There’s a lot of debate over the impact of social media, good or ill, on society.
Red curtain near brown wooden chairs in court room setting. Photo by Jackie Hope
But there are rarely any real measures launched to combat it and this might be in part due to how lucrative it is.
That’s all about to change, at least in the state of Texas in the USA.
A recent proposed law will ban social media accounts for users under 18 in a measure that is somewhat akin to the prohibition against purchasing tobacco that many states have in place.
Is social media as dangerous to the health of young Texans as tobacco? It would seem so, and there’s more than just anecdotal evidence to underpin this.
But back to this being a big industry: It remains to be seen whether or not this survives the Texas Senate. The state would not be unique in a ban of some form but would pioneer new avenues in terms of age. Currently, Florida bans social media accounts for users under 14, PetaPixel reports.
As we have documented on this blog multiple times, social media does not promote the best behavior or choices. Even so, it is a massive industry that has made many people, some younger creators included, very rich. Perhaps a ban is too extreme but a viable middle ground isn’t really forthcoming. Part of this might be a lack of imagination on all our parts, but a large part of it is probably just due to the inertia of how things are. We can’t imagine a world without it, but we also need a world where it is a little more under control than it is now. How to thread that line is a question for the future.
Any thoughts you might have on the influence of social media on society are welcome in the comments.
Check out some other photography news at this link.
Each month, we explain a recent cost estimate, contract, or purchase order in the form of a Pricing & Negotiating article. By redacting the names of the photographer and the client, we can share useful information that would otherwise be confidential. You can read more about our Pricing & Negotiating services on the Consulting Services page of our website.
Concept: 1 day of Food/Drink, Still Life/Product Photography Licensing: Perpetual Exclusive use of 10 images for two parties and Web Collateral use of 10 images for five years for a third party Photographer: Food/Drink and Still Life specialist Clients: Global Financial Services Brand and Restaurant Group
Summary
I recently helped an East Coast photographer create an estimate and negotiate a project for a prominent financial services company. The client was partnering with a well-known restaurant group on a cross-promotion. The client’s creative brief called for “carefully curated overhead and detail shots of plated food and drink, paired with the financial company’s branded items.”
The shoot was scheduled to take place on a single shoot day at the restaurant group’s test kitchen, conveniently located in the same city as the photographer. The original shot list included multiple food and drink setups, and the photographer planned to create two sets with different lighting styles, moving between them throughout the day. The client would provide the food, food styling, props, hair stylist, makeup, wardrobe, and wardrobe stylist.
The deliverables specified 10 final images. The client requested exclusive, perpetual, unlimited use of the images to promote their services across various platforms. The intended use included web ads, OOH placement in three East Coast cities, and large-scale wall ads in several airports. Additionally, the client wanted the company supplying the plates and glasses to be able to use the images on their social media for 5 years.
Fees
We allocated $23,500 for combined Creative/Licensing Fees. Based on the scope of work and the client’s intended use, we felt that a $2,500 Creative Fee and $21,000 for licensing the 10 images was appropriate, though likely at the higher end of the client’s expectations. We also offered the option to license additional images for $2,500 each, including up to two hours of retouching.
For the five-year web collateral license for the plate and glassware company, we budgeted $1,750 for the 10 images. We knew that charging $175 per image was pretty low, but the photographer wanted to extend this courtesy to the client. It was important for the photographer to impress the tableware company and work to build a good relationship for the future. Additionally, the photographer did not charge separately for their tech scout day and simply bundled it into their Creative Fee.
Crew
We included a first assistant at $650/day and a Digitech at $900/day. These rates were consistent with rates in this city and aligned with what the photographer had previously paid their crew.
Equipment
We allocated $2,200 for camera, lenses, lighting, and grip rentals. The photographer planned to use their own cameras, lenses, and lights while renting additional specialty modifiers, grip equipment, and a few surfaces they had in mind for the project. We also included $700 for the Digitech workstation and $320 for a couple of hard drives.
Misc
Although there are times when we bill separately for liability and worker’s comp insurance, in this instance, we chose to bundle that cost into the Creative/Licensing fees (though we kept the line item to show the client that coverage was being provided).
Post-Production
We budgeted $500 for the photographer to perform a first-round edit with basic color & contrast curves and $3,000 for retouching the 10 images, including up to 2 hours per image. The photographer would handle the retouching themselves.
Results
We heard back from the client the same day, saying that the estimate was accepted and they wanted to move forward. We scheduled a creative call for the following day. During the call, the client requested an updated estimate for 16 final images. While the shot list remained the same, they wanted a few additional images from some of the scenes. We knew the “hero” images hadn’t changed — they simply wanted more variations and angles from each scene to use as support imagery. We took this into account and submitted a revised estimate. The only adjustments we made were to the Fees and Post-Production sections, outlined below.
Fees
We allocated $32,000 for combined Creative/Licensing Fees, considering that these were not new scenes but additional support images around the hero shots. The increase of $8,500 for the six additional images felt fair to both me and the photographer. We also updated the five-year web collateral license for the plate and glassware company to include the six extra images at the previously established per-image rate.
Post-Production
We updated the retouching fees to $4,800 to cover the six additional images.
Update
The client reached out to let us know they still wanted to move forward, but the new total exceeded their project budget. They requested that we bring it closer to $35,000. They also wanted us to reduce the third-party plates and glassware company’s use to two years and limit it to five images. Since the adjustments would only involve the fees, I suggested to the client that we could reduce the costs if we could lower the use duration to three years and remove the exclusivity. The client didn’t confirm whether this was possible but asked to see an updated estimate. This third estimate included adjustments to the licensing description, Licensing Options, and Fees sections, while all other line items remained unchanged.
Fees
We allocated $23,500 for combined Creative/Licensing Fees, which would cover unlimited use of up to 16 images for three years, and removed the previous exclusivity provision. We updated the web collateral license for the plate and glassware company to $625 to cover two years and up to five images.
Results
The client accepted the estimate, and the project took place a few days later. The photographer called me that night, saying, “It was awesome, man. Everyone was great and appreciative.” After the shoot, the client expressed their gratitude, saying, “Thank you for an incredibly fun partnership on the shoot earlier this week. It was a pleasure to collaborate with you and the team as we begin to bring this experience to life!”
Shortly after, the client submitted an image order nearly three times larger than what was included in the original estimate. We reminded them that the additional fees would be $1,600 per image, as outlined in the estimate. In response, the client reduced their order to 16 images. Although this was a bit disappointing for the photographer, they were still very pleased with the outcome. The final retouched images turned out beautifully and the client launched their campaign in December 2024 ahead of holiday season travel.
Of all the prescriptive nonsense I hear about making photographs, the idea that “real photographers shoot on manual” has to be the most tiresome. As if burdening photographers with an even greater sense of obligation to the shoulds and the should-nots has ever led to greater creative freedom, less rigidity in our work, and more powerful photographs.
I’ve heard similar assertions about shooting in RAW (you must). And not cropping or using burst mode (you must not). And not using Photoshop to ___________. You can fill in the blank yourself because here, the so-called purists give us so many options from which to choose, but no matter what you put there, someone is going to put you on their naughty list without ever pausing to ask why you’re doing it differently.
Let’s set aside the notion that there is such a thing as a “real” photographer; you are a photographer if you make photographs. Full stop.
You might be a new photographer or an experienced photographer. You might be a lousy photographer or an inspired photographer. There are probably a million ways to categorize us, but real? As opposed to what? Imaginary? Fake? Is there a point to this kind of thinking? I need a drink.
Well, there is a point, and it’s that some people can only feel as though they are special by putting others down. They can only feel “in” by forcing others out. After all, if we’re all special, then no one is special (also nonsense, but that’s not what this is about. Focus, David!).
I’m not interested in what kind of photographer you are, though I’m interested in you as a photographer. I hope you’re fulfilled and love what you do, and that your photographs are getting stronger and feel more and more like your own.
I’m not overly concerned with how you make your photographs, so long as you’re happy doing it and it’s truly working for you. I shoot in something like full-manual mode with Auto-ISO and a liberal use of EV compensation, so I’m not sure whether or not I’m a real photographer and allowed to weigh in on whether you are or not. But I do know how to use my camera and make it do what I ask. If “real” photographers do anything, it is that.
Here’s my advice: shoot on Manual all the time. Or shoot in Aperture priority sometimes and Shutter priority sometimes. Hell, be reckless and push the dial to P now and then! Do what works for you.
What matters is that you have control of the camera while also being sensitive to the moment and still having the mental bandwidth to think about composition and what the light is doing. Do that.
If you need the camera to do some of the thinking for you while you tend to the decisions that make for stronger compositions, that’s a good choice. One day, that creative thinking will come a little easier, and you might long for a little more control over the camera’s decisions. Or you’ll figure out how you like to use the tools of your craft in your own way.
I like things simple: manual mode with auto-ISO and EV compensation to dial things in more precisely. This works for me for what I do right now.
And so long as I’m confessing my way out of the real photographer’s club:
I have no idea what my metering mode is and haven’t for over a decade—I just look at the histogram. I could look at my camera and find out, but that knowledge would enrich neither of us.
I don’t know what my focus mode is. It’s continuous and uses tracking—that’s what I know. It’s what I like, and I never change it (though I know how to do so if I had to). It works for what I photograph and how I like to use a camera.
I hate straps and have been told that not using one is reckless. A real photographer would at least use a wrist strap, right? I don’t like them, either. They slow me down. I’ll put one on if I have to—if I can find it.
I’ve been told the same about my indifference to UV filters and lens caps (though you can pry lens hoods from my cold, dead hands).
More often than not, when I bother to use one at all, my tripod is a little wonky.
I clean the front of my lens with my shirt, when (and if) I clean it.
Speaking of cleaning, my sensor often looks like someone spilled kitty litter into my camera while the lens was off, which is not the only reason I tend to shoot wide open, but it’s a reason. I get them cleaned once a year, and that’s enough for me.
My camera bag can be a mess; the dividers are all over the place, and they change all the time, if I even bother using them. Half the time, I just use a Buff, lens cloth, toque, or a pair of gloves to keep bodies and lenses from banging into each other. If my gear gets banged up, it’s because I’m using it for the purpose for which it is made.
I’d hate to have a real photographer weigh in on any of this. But if you’re going to judge me at all (I’d really rather you didn’t; don’t you have photographs you could be making?), then judge me on my photographs.
None of the sins I’ve mentioned gets in the way of creating the photographs I want to make. But fussing would. So would an unexpected lens cap. Or succumbing to the pressure to practice my craft in a way that just isn’t me.
So much of the advice I see aimed at photographers could be gathered up and bound into one volume called Adventures in Missing the Point. There are no real photographers (to the exclusion of others) any more than there is a single right way to do things that qualifies you to be one.
What matters is that you learn to make the kind of photographs you want to make, and to do so with greater creative flow and control. It matters that you be open to new ideas and techniques, but as creative options, not as obligations.
I’m not saying throw your lens caps away or don’t learn to shoot on manual if you think it might give you more control. And, yes, cleaning your lens with your shirt is generally considered less than ideal practice (don’t look at me like that; you do it, too). But I am saying it probably won’t get in the way of you doing the work your soul loves (which I am very much tempted to add is probably the only thing real photographers are universally concerned with).
Think in terms of possibilities, not prescriptions. We’re all trying to create something different, and there can’t possibly be only one path to do so.
For the Love of the Photograph (and those who make them), David
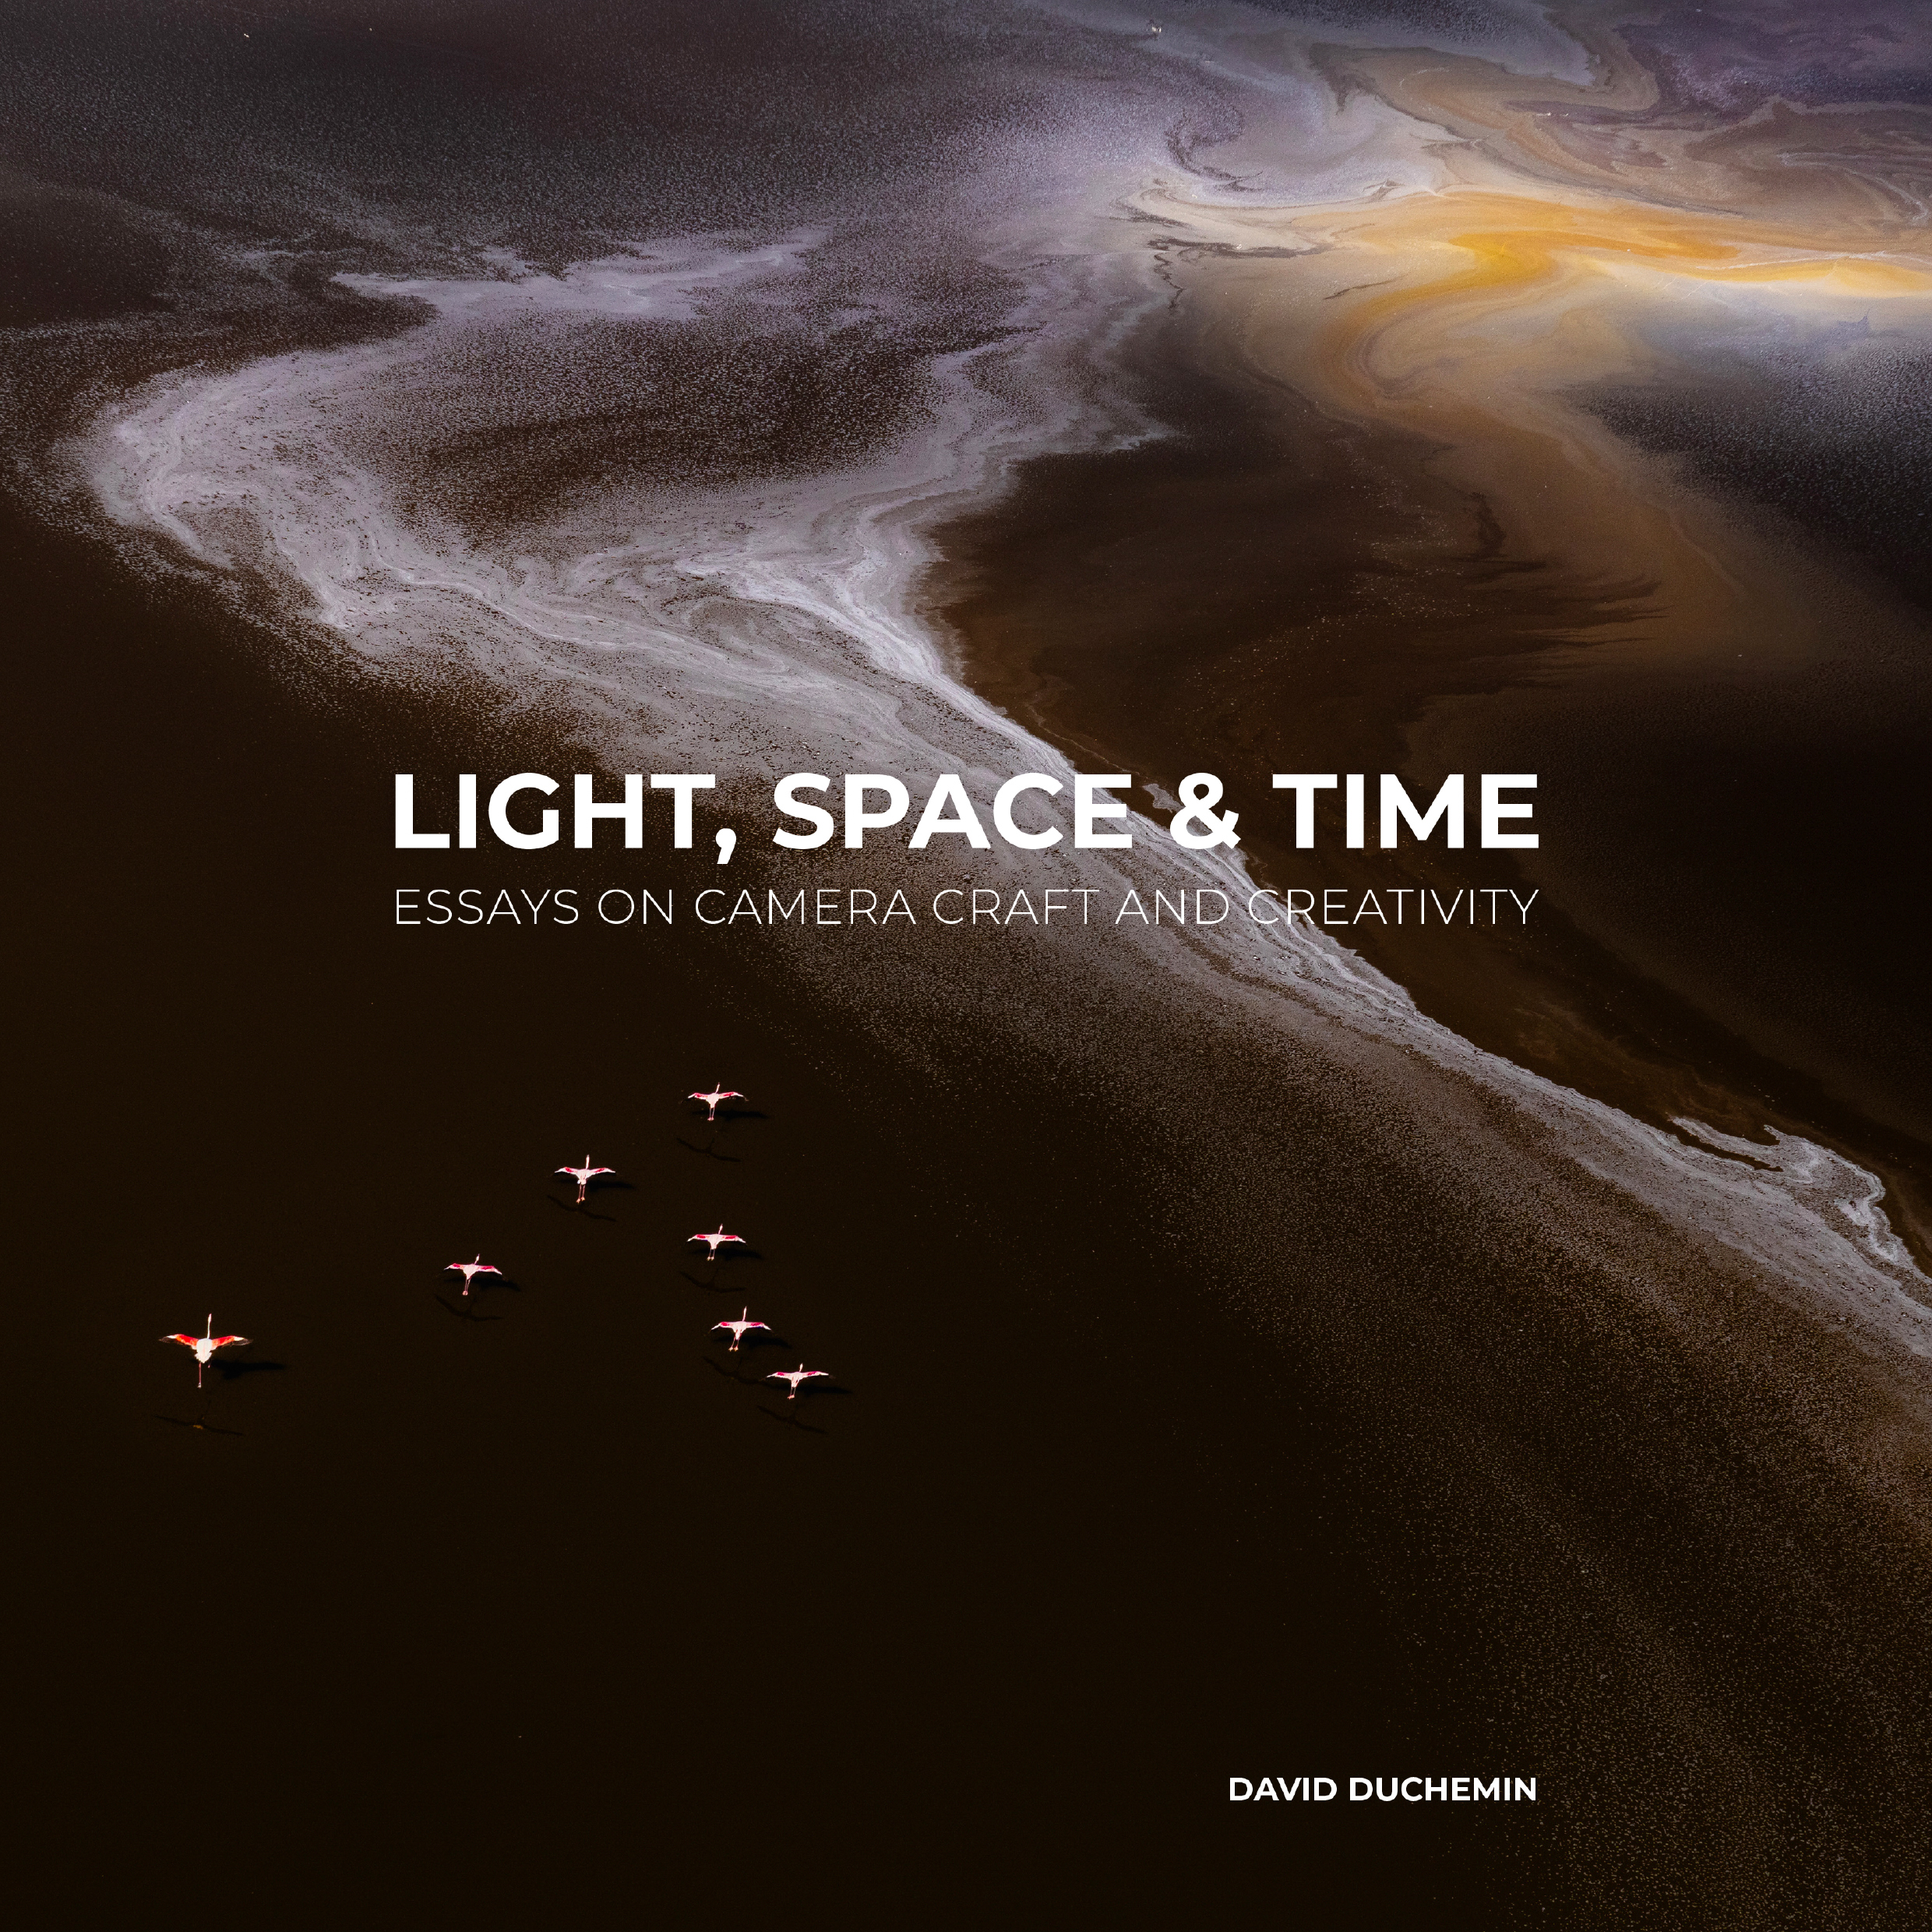
The biggest challenges for most photographers are not technical but creative.They are not so much what goes on in the camera but what goes on in the mind of the person wielding it. Light, Space & Time is a book about thinking and feeling your way through making photographs that are not only good, but truly your own. It would make an amazing gift for the photographer in your life, especially if that’s you. Find out more on Amazon.
This is the Big One, folks! Once-in-a-lifetime opportunity? Nah, we’re in DREAM JOB territory here! The lovely people at Lembeh Resort need a new manager for their Backscatter Authorized Photo Center.
Lembeh Strait needs no introduction, of course. As any macro photographer knows, this narrow strip of volcanic sand is home to some of the best muck diving on the planet and an endless parade of the ocean’s weirdest and most wonderful tiny creatures. (It’s a macro mecca to most, but you can also find spectacular corals, caves and wrecks here.)
Lembeh Resort takes the needs of visiting underwater photographers very seriously, with comprehensive photo/video facilities, and dive guides with exceptional spotting skills well-versed in what shooters want. It goes without saying, the Photo Center Manager plays an integral role, teaching courses, running workshops, helping solve camera equipment issues, and generally helping guests achieve their best images during their stay.
If you’re an accomplished shooter with proven teaching experience and you think you have what it takes to be the next Photo Center Manager at Lembeh Resort, check out the information below.
PRESS RELEASE
Join Our Team as the Photo Center Manager at Lembeh Resort
Are you passionate about underwater photography and videography, and eager to share your expertise? Lembeh Resort, a premier boutique dive destination in Indonesia, is seeking a dedicated Photo Center Manager to lead our esteemed facility.
Position Overview:
The Photo Center Manager will be instrumental in enhancing our guests’ photography experiences. Key responsibilities include:
Providing expert guidance, coaching, and troubleshooting to guests on underwater photography and videography techniques and equipment;
Managing office tasks and daily operations at the Photo Center, including equipment maintenance, sales, photo editing, organization of photo library, and inventory management;
Conducting photography and videography workshops and courses in our state-of-the-art classroom;
Collaborating with our team of marine biologists and dive professionals to ensure a seamless and enriching experience for our guests;
Interacting with guests to ensure they receive a welcoming, informative, and comprehensive service throughout their stay;
Helping to devise and implement Lembeh Resort marketing efforts; and
Creating topside and underwater content for the promotion of Lembeh Resort through social media and other channels.
Qualifications:
Proven experience in underwater photography and videography, with a robust portfolio.
Strong teaching and coaching abilities, with prior experience leading workshops or courses.
Excellent organizational and managerial skills.
A passion for marine life and conservation.
In addition to underwater photography and videography experience, topside knowledge would also be beneficial.
A willingness to learn and continuously develop your skills.
Possession of personal camera equipment (and professional familiarity with other makes and models), including lenses and underwater housing, is essential.
What We Offer:
A competitive salary, complemented by commissions.
Comprehensive living package, including accommodation, all meals, and a beverage allowance.
Visa and work permit from the Government of Indonesia, holiday entitlements, and assistance with relocation expenses.
Opportunities to collaborate with leading industry partners and personalities.
Regular opportunities to explore and document one of Indonesia’s premier dive locations—the Lembeh Strait—home to world-class muck diving sites and an incredible array of critters.
Application Process:
The position is available immediately, following a thorough selection process to ensure the right fit. Interested candidates are invited to submit:
A comprehensive CV.
A cover letter detailing your suitability for the role.
A link to your photography & videography portfolio.
Please send your application to: gm@lembehresort.com with a subject line “Photo Center Manager Application – [Your Name]”
About Lembeh Resort:
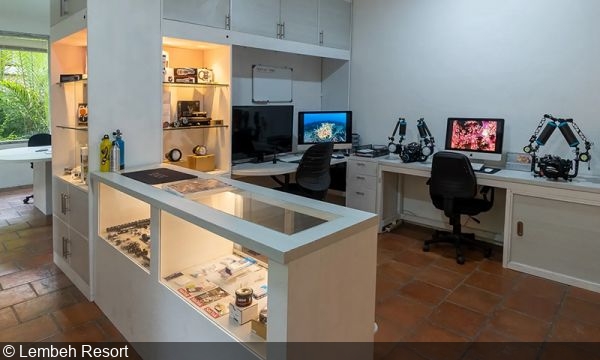
Nestled in the heart of the renowned Lembeh Strait, and celebrated globally for its unparalleled muck diving and vibrant reefs, Lembeh Resort offers guests exceptional service, luxury accommodation, and diverse diving experiences. Our Photo Center features extensive display areas, workbenches, an office space, and a classroom dedicated to photography and videography courses. Furthermore, we are the first Backscatter-authorized Photo Center in the region, underscoring our commitment to excellence and our position at the forefront of underwater imaging.
About North Sulawesi:
Living in North Sulawesi offers a unique blend of incredible diving, rich culture, and diverse activities. From morning dives in one of the most biodiverse regions of the world to afternoon treks through rainforests or volcano rims, the region provides endless opportunities for adventure. Manado’s modern airport offers convenient flights to destinations like Bali, Raja Ampat, Jakarta, Singapore, and more.
Shortlisted Applicants:
Shortlisted applicants will be contacted and asked to complete an application form, and participate in an online interview. Final candidates may be invited to visit Lembeh Resort as our guest (note: travel airfare at the candidate’s expense). Due to the time required for obtaining a work visa, the initial month will be considered a training period, with formal management duties commencing upon permit approval.
Join us at Lembeh Resort and immerse yourself in a role that blends passion with profession, in one of the world’s most captivating diving locales.
Throughout the years, landscapes have vastly presented themselves as splendid opportunities to be missed by me; yet, I indulge my eyes with a dollop of landscape imagery once in a while. For this week’s visual treat, Diane took the long-shot and asked for emotion in landscape!
And as you’ll notice right away while scrolling down, landscapes aren’t fixed to wide-angle crispy clean images. Using fixed telephoto lenses from 50mm and beyond triggers the photographic imagination into looking for unexpected angles and frames. Consider such tight compositions in the wild as ready-made abstract images to be grabbed as you roam.
Now, for the other way around; wide-angle views require extreme levels of control. From sturdy support —achieved via tripod, monopod or others to scouting, generous compositions demand meticulous planning before they occur. Do mind that if you feel inspired and who knows, even triggered to share some of your takes on emotion in landscapes with us.
Before diving in, remember this is part of a series on storytelling in a single frame; but is also part of an even larger effort to make this world a more literate place in terms of visual data and language.
Photo of the Week
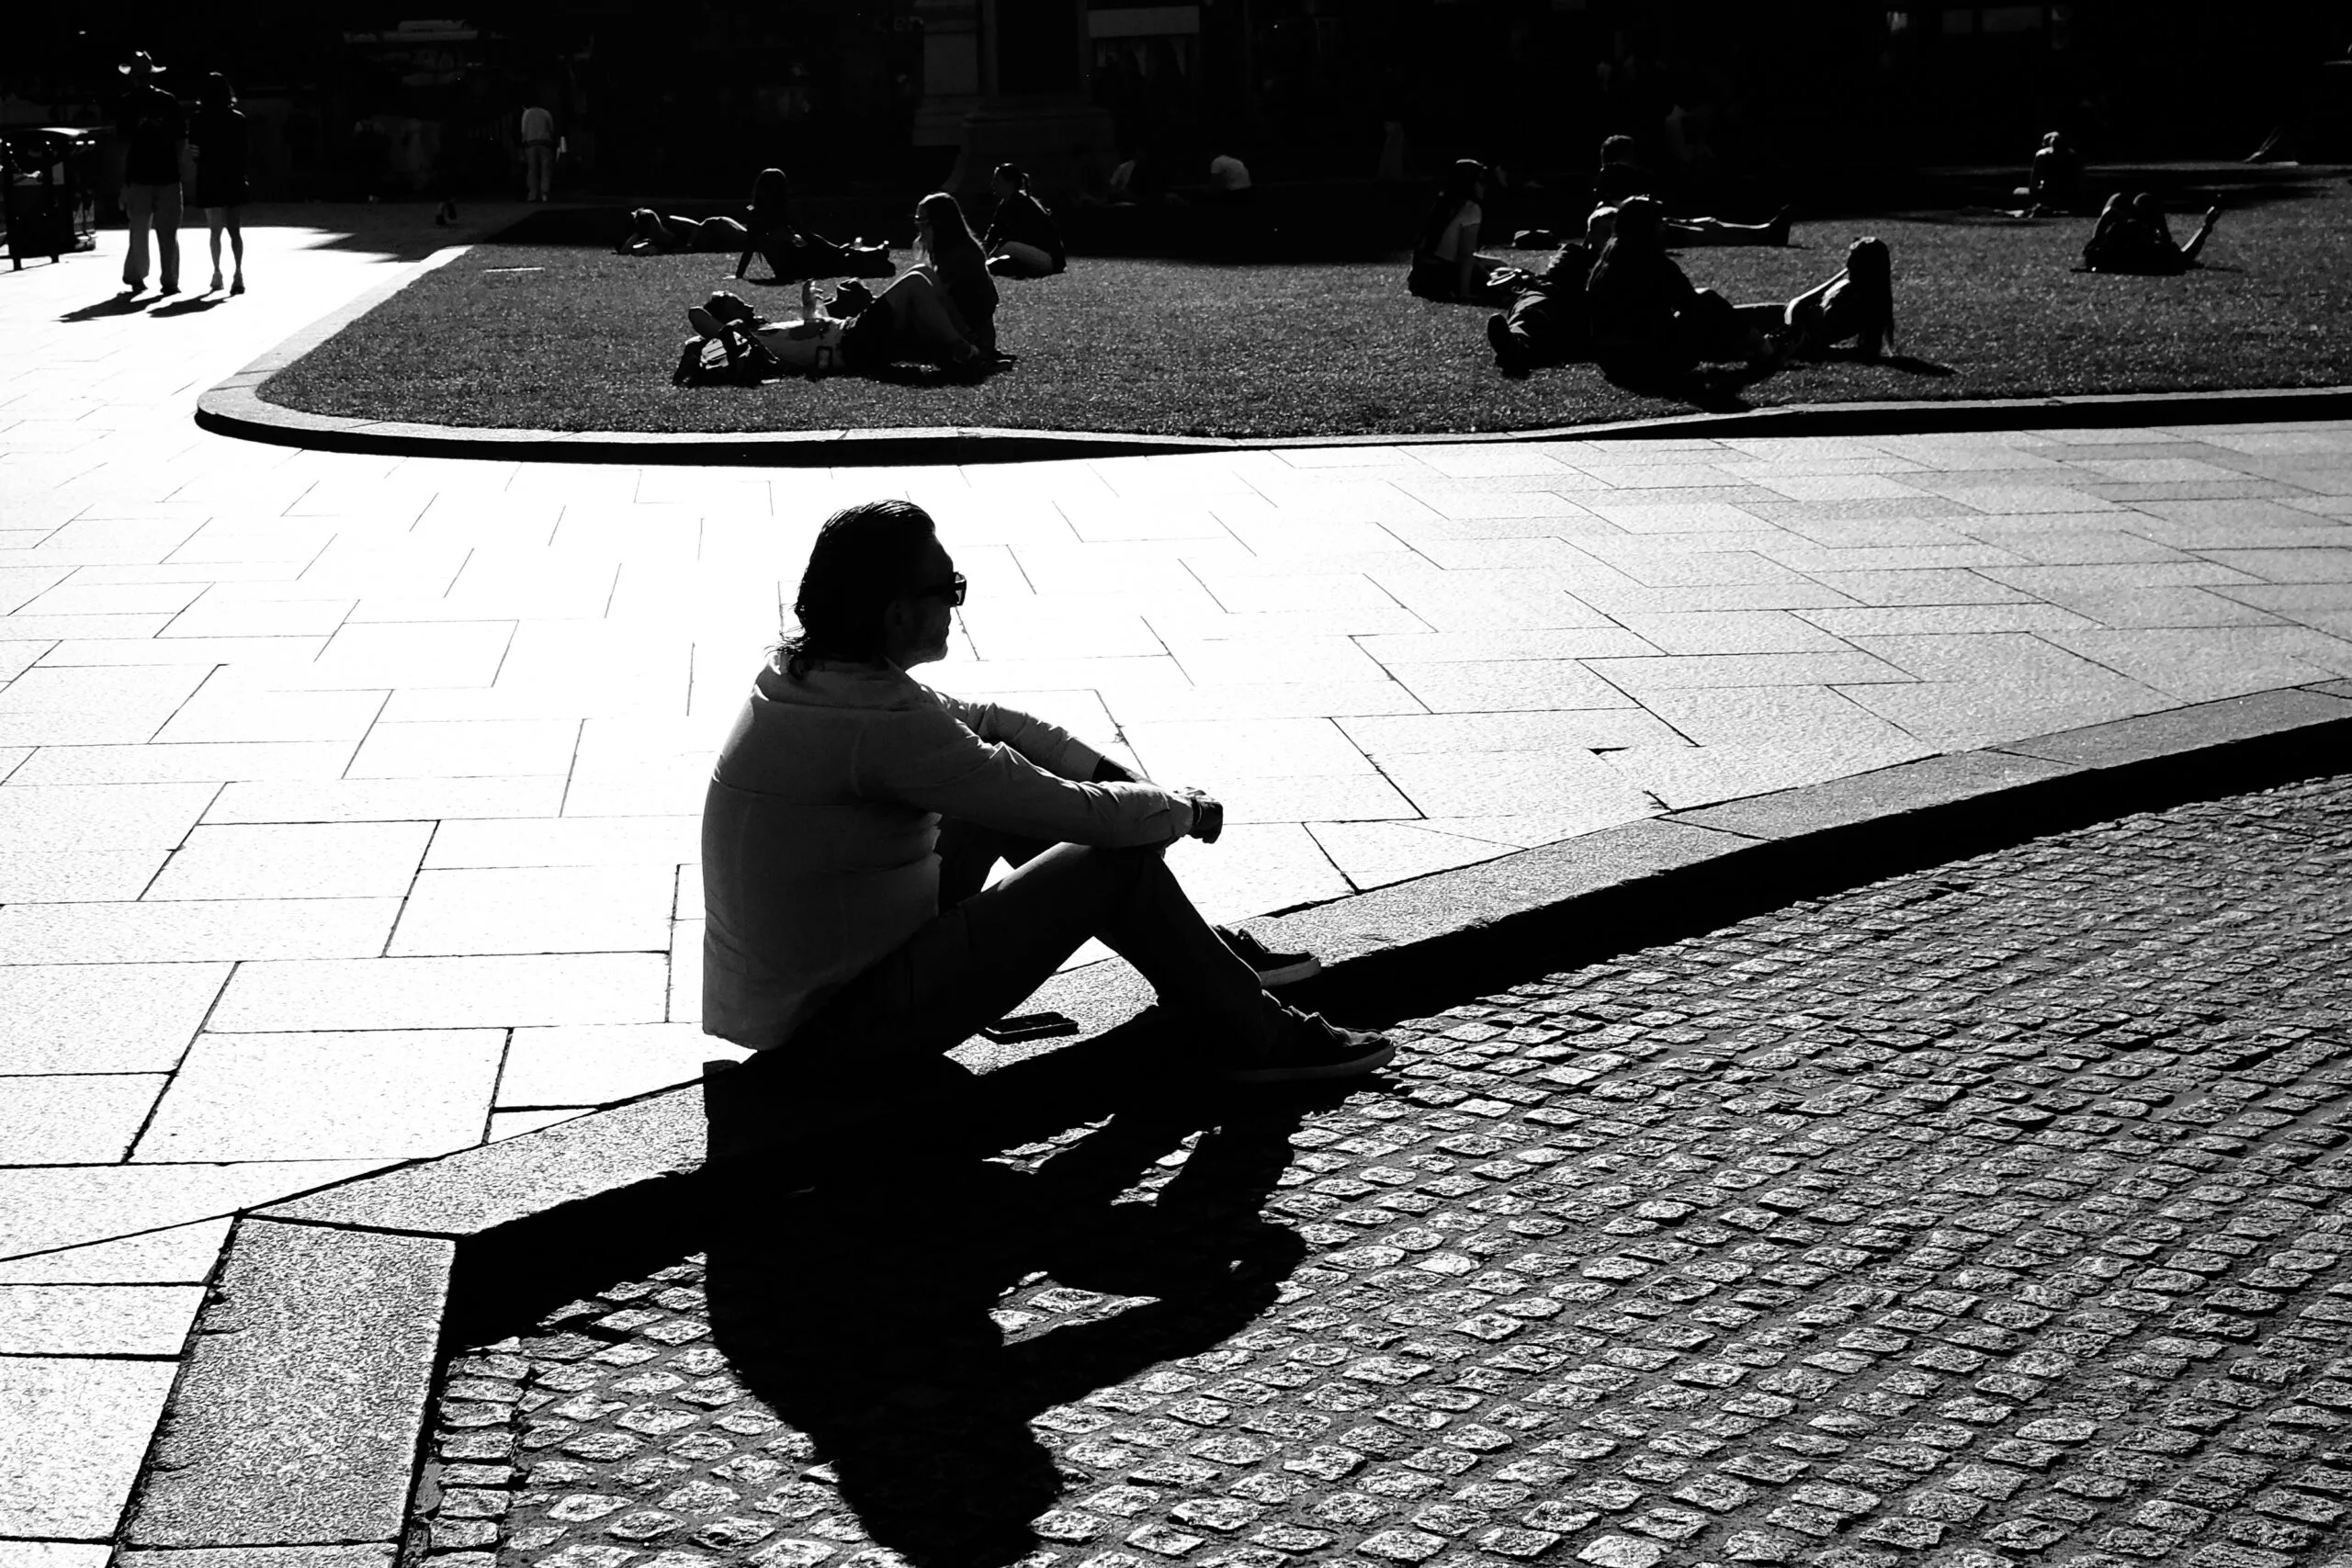
This beautiful shot was posted on the emotion in landscape challenge. True, it qualifies better as a street image rather than something related with landscape, but there’s a huge difference between “emotion in landscape” and “emotional landscapes”. Because one can find emotion within a given context, this visual piece works both-ways.
Congrats Patrick, thanks for sharing such a high quality photograph with us!
copyright – Patrick
Belfast city hall Lawns
Black and white are the colors of photography. To me, they symbolize the alternatives of hope and despair to which mankind is forever subjected – Robert Frank
Weekly Photography Challenge Digest
Thanks again to Diane and Dahlia for pushing our creative boundaries one step forward every week!
copyright – Wendy P
BLIZZARD
copyright – Robert Apple
Lost in the windswept sand dunes!
copyright – Wendy Pcopyright – Wendy P
Sadness
copyright – davidc
The road less traveled
copyright – Deidra White
Abandoned
copyright – Deidra White
Sunset at Saguaro National Park, Tucson, Arizona.
copyright – Michaelcopyright – Robert Applecopyright – Frogdaily
For contributing, check out the original challenge post!
A Highlight on the Latest Activity at our Community
Patrick went full minimal and captured one of the most innovative takes on street photography I’ve seen in a while!
copyright – Patrick
Stripped Back To The Essentials
And speaking of you mate, don’t forget checking out the mono edits started by the master himself:
copyright – Patrickcopyright – Patrick
Steve enjoys the quiet moments before the action, and took these right-on-spot storytelling frames!
And last but definitely not least, have you met David Clare? Swing by and say hi, thanks Dahlia for retaking this series focused on our talented community!
Don’t forget to check the photo contest winners for the Essence of Movement which will be published soon; and remember, this month’s photo contest is now open for entries. The theme revolves on “Storytelling in a Single Frame“. Submit your photos for a chance to win $250 and please don’t forget voting as well. Last but not least, keep an eye out for the Members Picks — the instructions are pretty straightforward:
Members reference what you might consider a five star photo. Give a call out to the photographer and share their photo even if it lies in the Shark Tank and feel free to give a Critique on why it trips your Trigger. Be sure to mention the photographer and the Thread you saw it in.
And if you want to make out the most of your Light Stalking user account, make sure to check the latest posts. Also, don’t forget to swim the Mobile Monday Challenge! Last but not least, Check out the current reading throwdown, it has some nice insights and recommendations!
We’d Love To Hear Your Thoughts
Our Feedback Forum is a fine place for all those people wanting to grow fast as photographers. Here, you’ll get your work reviewed by well-intended photographers, but you’ll also have the chance of commenting on the work of others. We believe in the power of feedback, and here are the latest shots shared in the pool:
The Shark Tank is a great place to learn and to discuss, but please read the instructions in order to get a better experience. Share your comments, opinions and doubts on any or all of the images above. We also will be delighted to see some of your own images. Remember all comments are given to the photographs; not the photographers. Also, don’t forget to participate in our upcoming challenge!
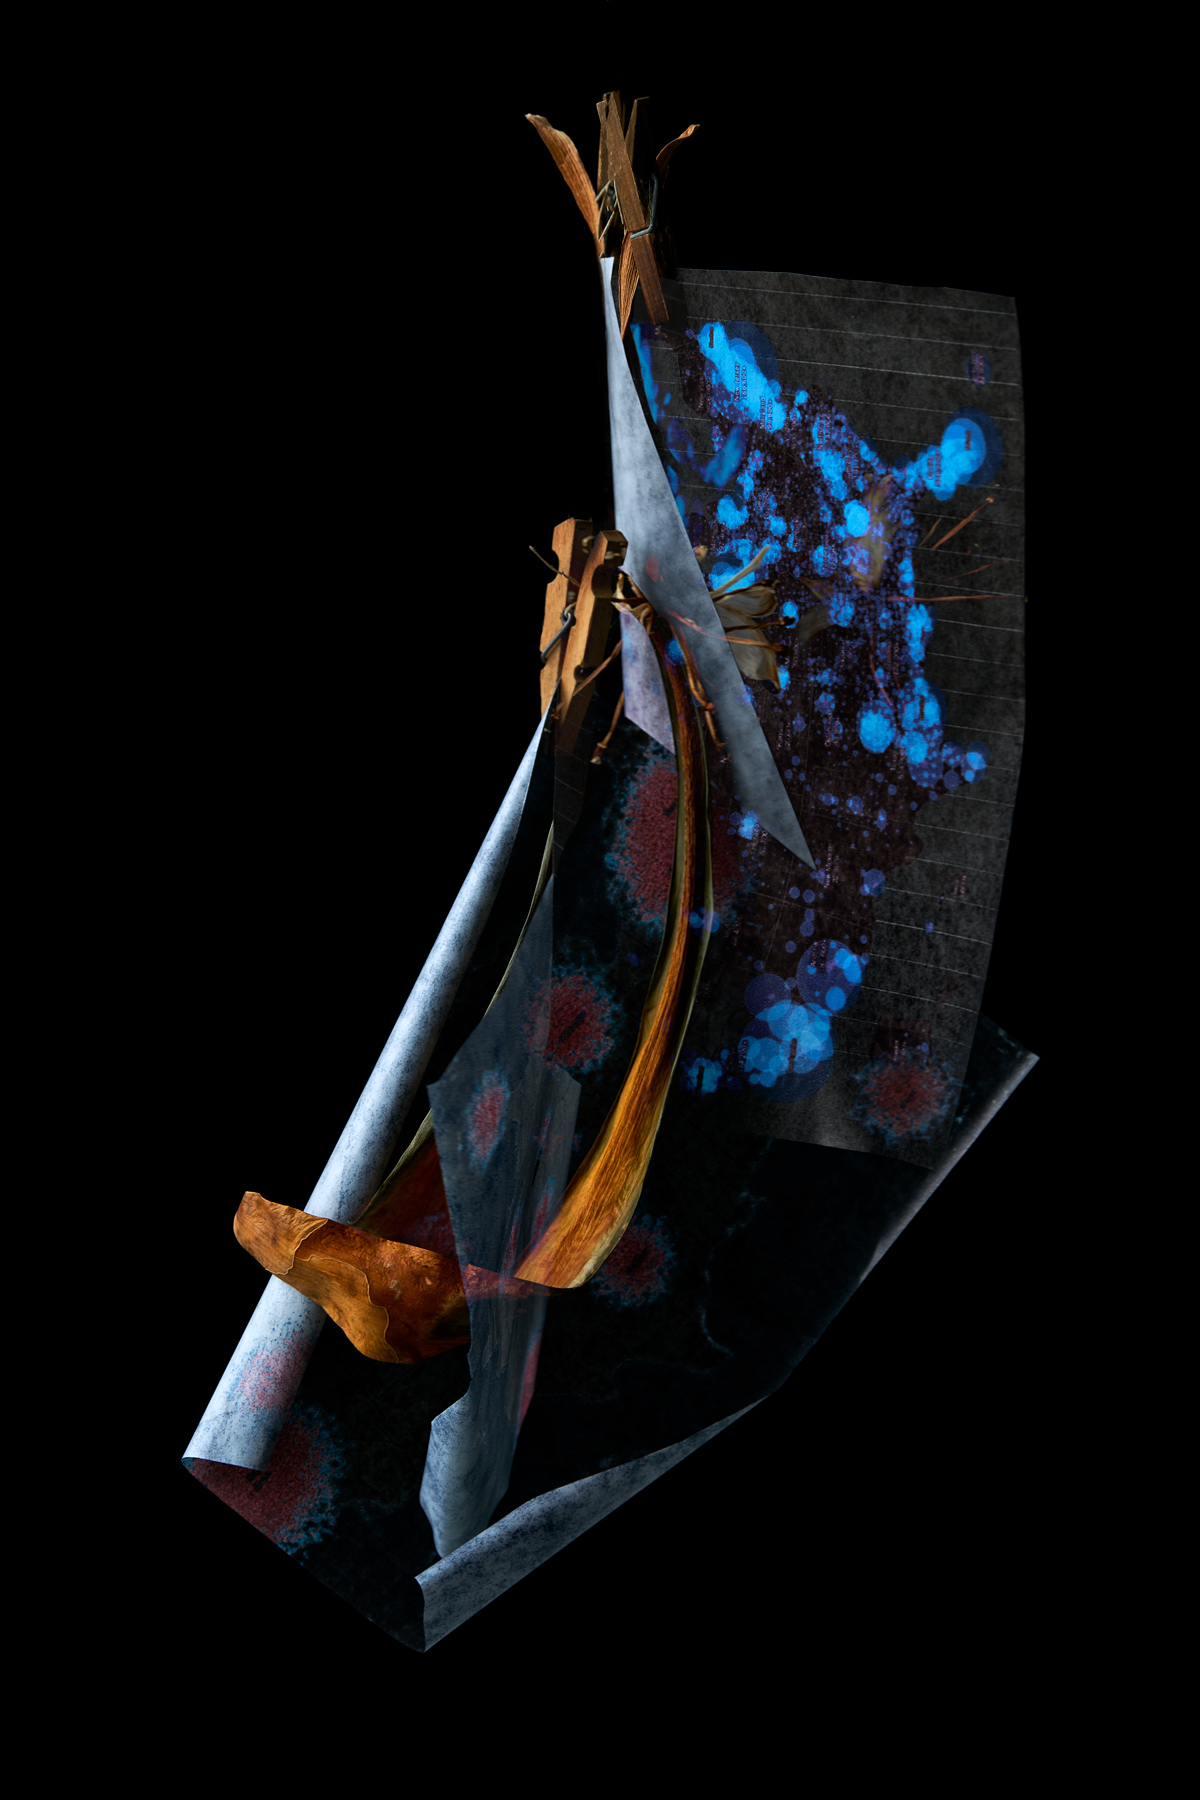
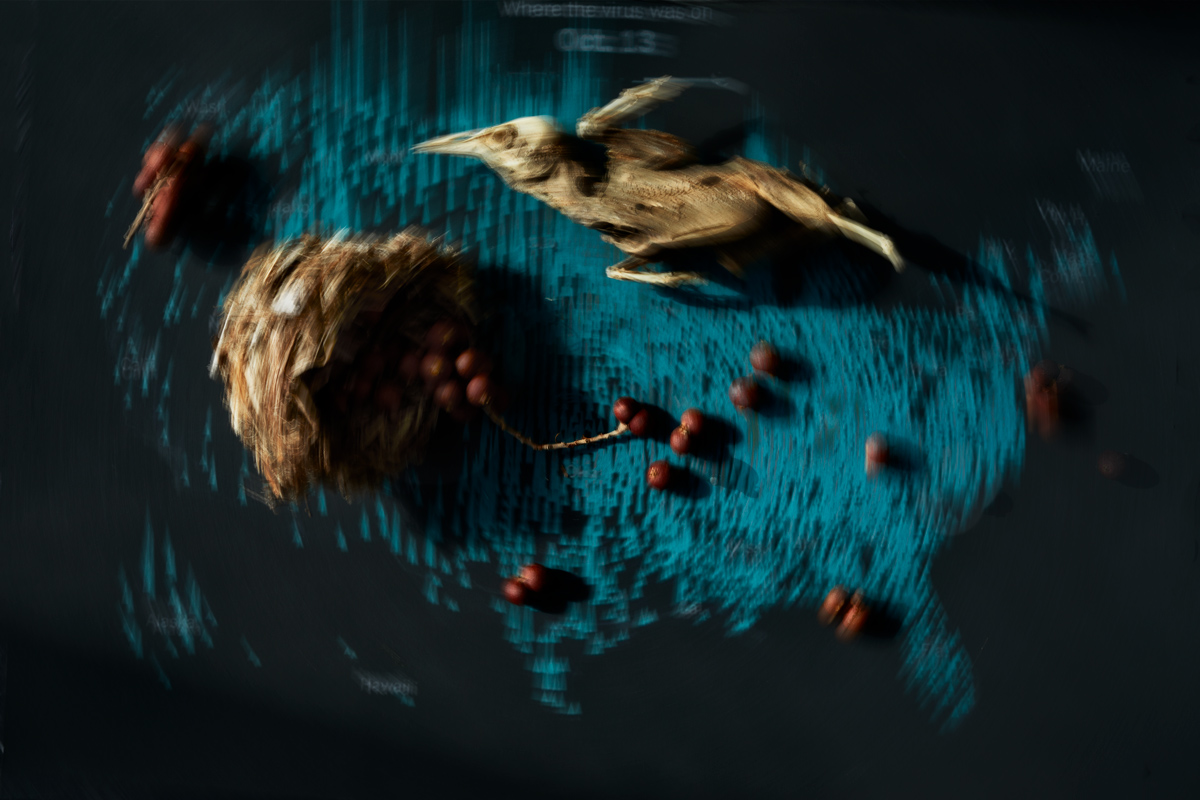
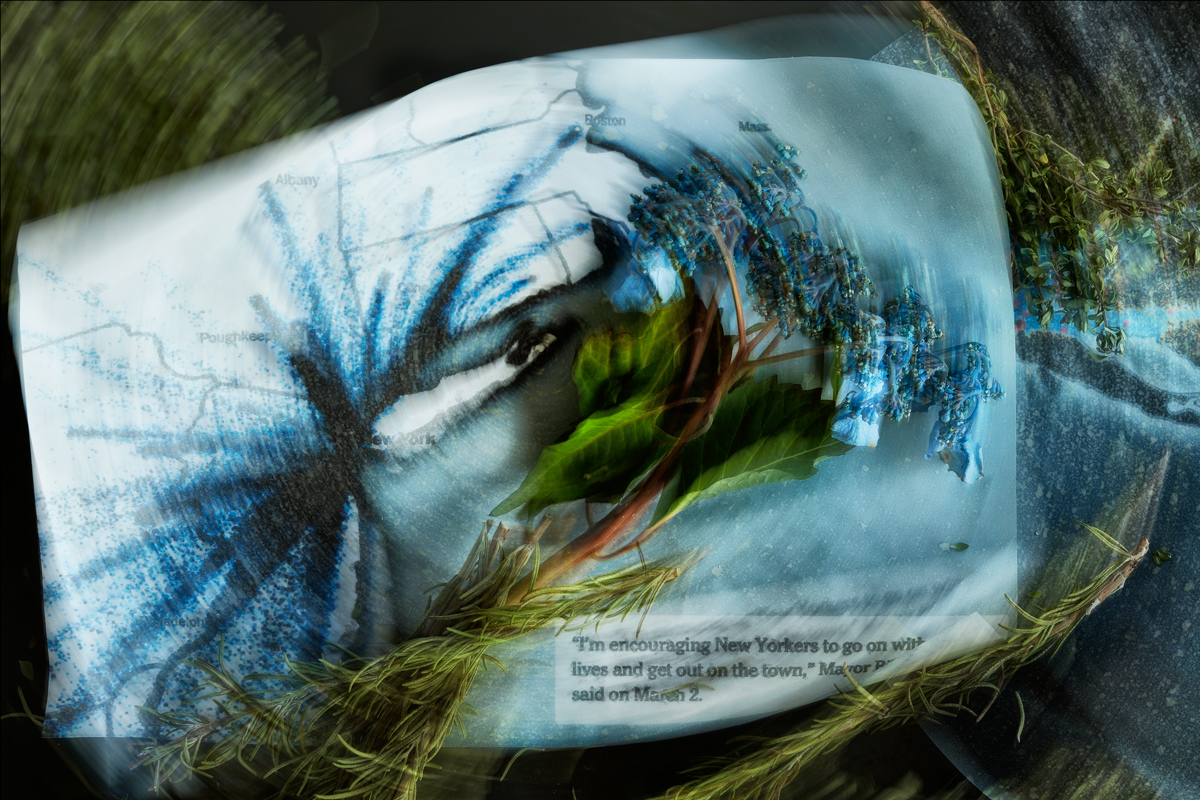
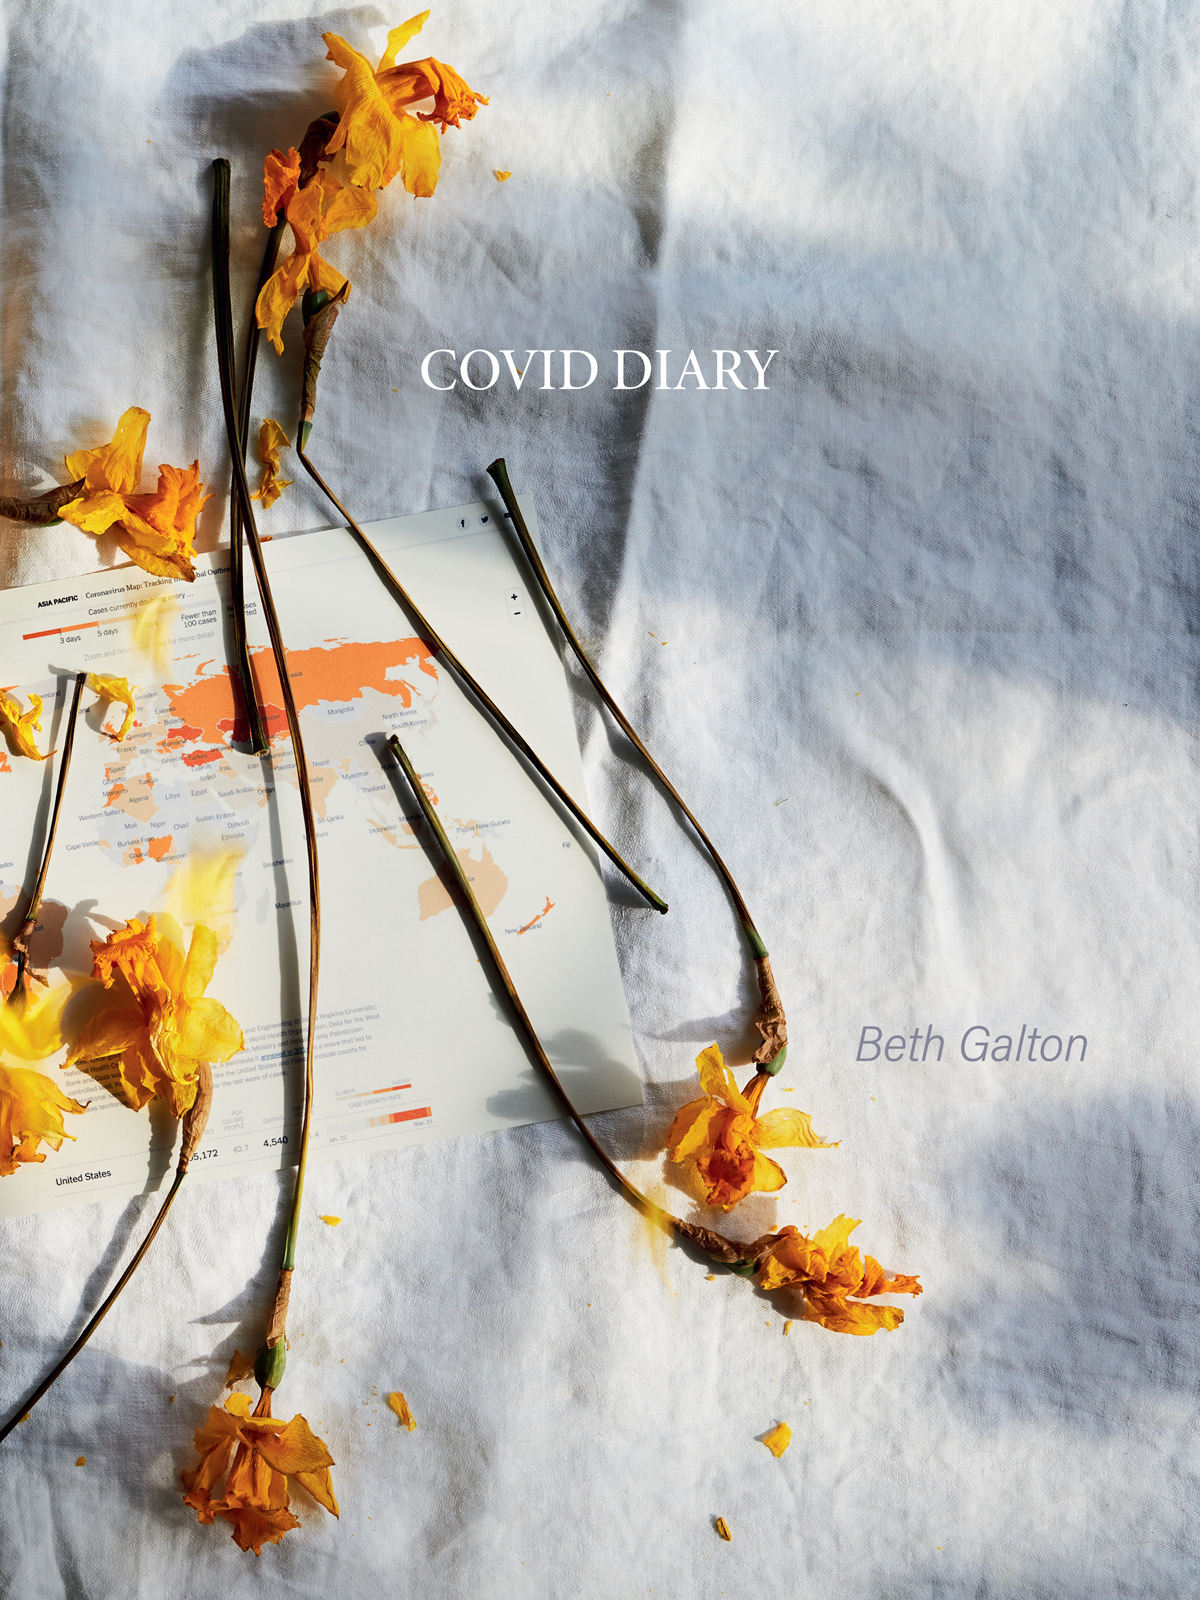
The Art of the Personal Project is a crucial element to let potential buyers see how you think creatively on your own. I am drawn to personal projects that have an interesting vision or that show something I have never seen before. In this thread, I’ll include a link to each personal project with the artist statement so you can see more of the project. Please note: This thread is not affiliated with any company; I’m just featuring projects that I find. Please DO NOT send me your work. I do not take submissions.
Like everyone, I struggled with the magnitude of the pandemic; how it insidiously spread and wreaked havoc everywhere it went. In March of 2020, as the virus swept around the globe, my world in NYC became my apartment. I knew that in order to keep safe I wouldn’t be able to access my studio, so I brought my camera home and constructed a small set next to a window.
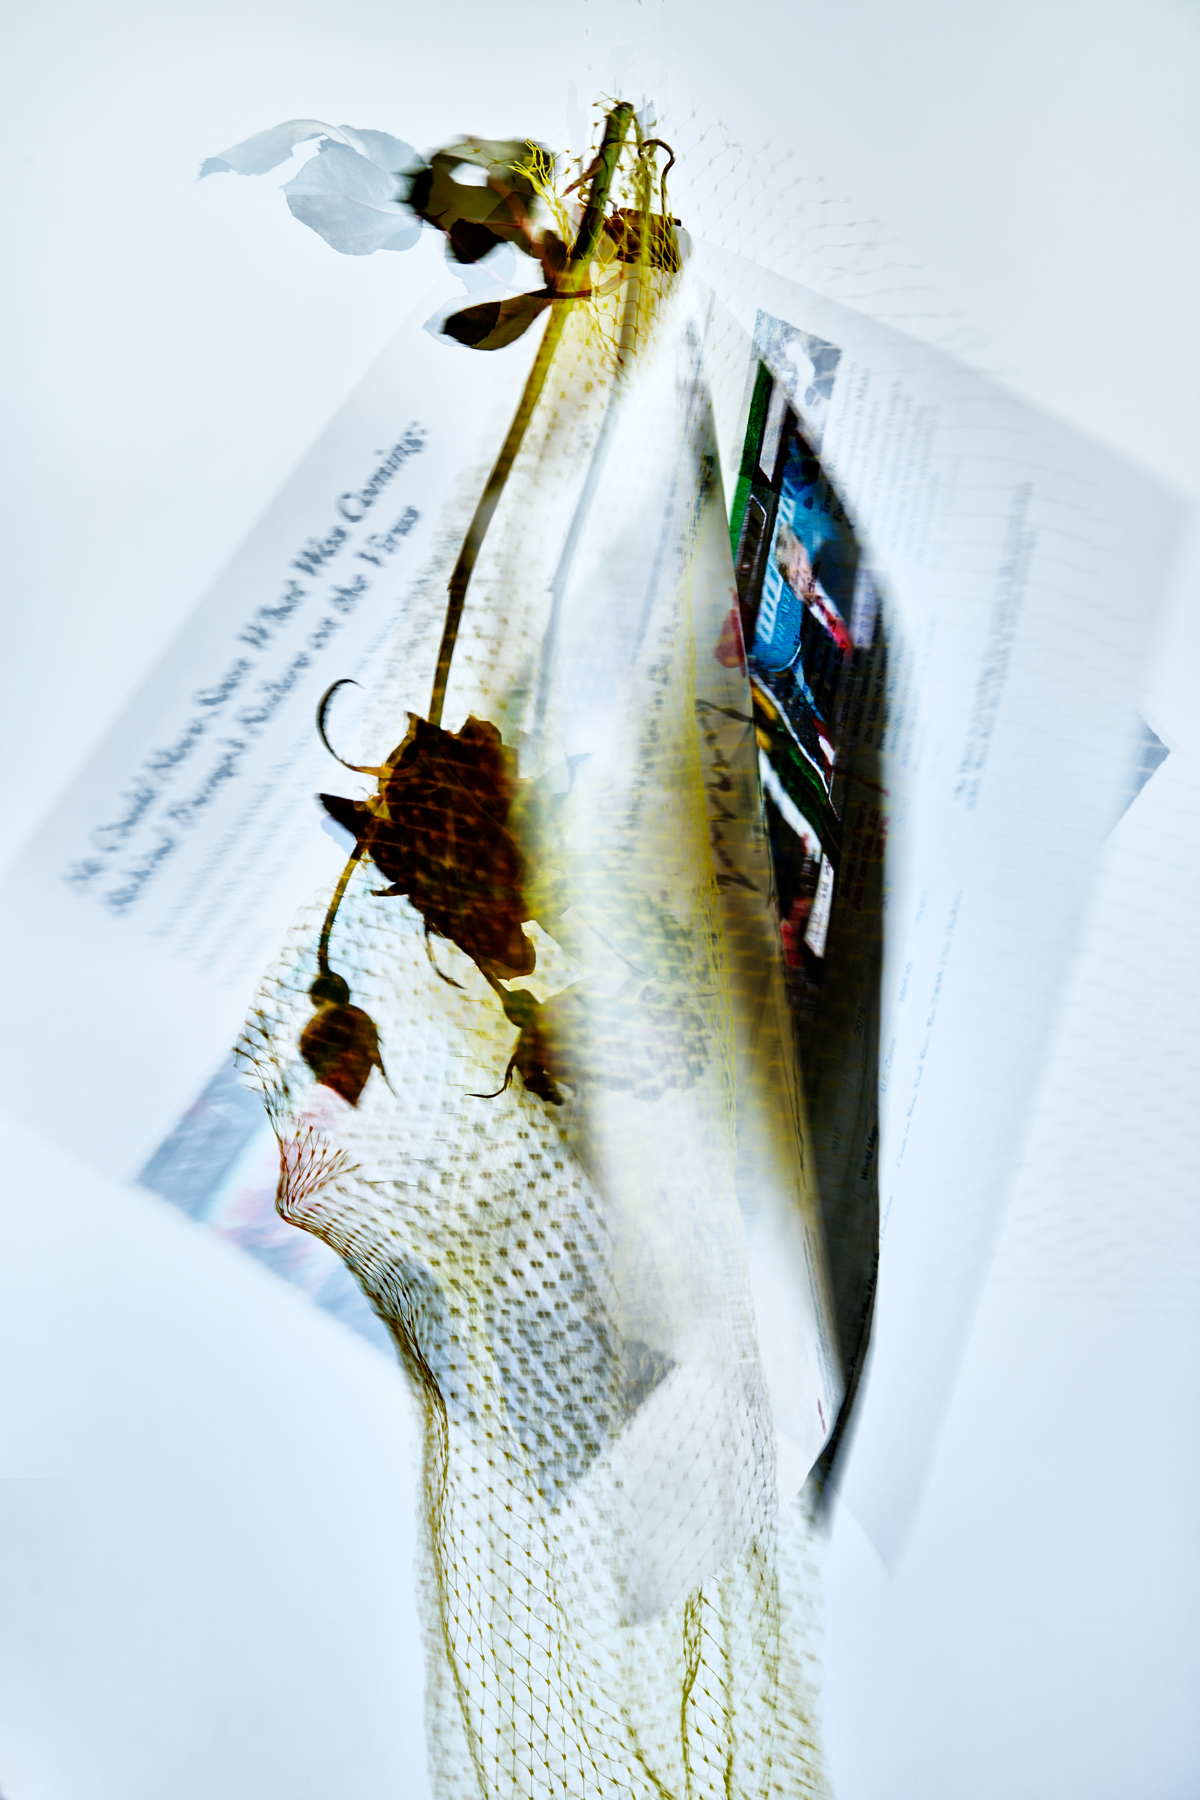
My days began with looking at the NY Times and Washington Post online, hoping to find a glimmer of positivity. What I found were the maps, charts, and headlines, tracking Covid-19’s spread. Obsessed, I screen grabbed and printed them out to see how the disease had multiplied and moved, soon realizing that each of these little visual changes affected millions of people. The graphics were highly analytical, devoid of the emotional toll of those affected. It felt necessary to use them in my photographs, to help me process this devastating experience.
Eventually, images of the vast number of people who had died began to appear in the news. Grids of people’s faces filled the screen; most having passed alone without family or friends beside them. As the virus moved through the US, many of our political leaders refused to acknowledge the dangers that it posed creating devastation and death. The incredible loss and the politics of this period were incorporated into these photographs.
This series began in March 2020 when NYC was the epicenter of the pandemic. It is a reflection of my emotions and thoughts through those dizzying 18 months. By photographing the recorded data,combined with botanicals, my intent is to speak to the humanity of those affected by this epidemic.Motion in the images was utilized to help convey the chaos and apprehensions we were all experiencing. Once assembled, I now see that these images have created a visual diary of this period, the politics of the time, and the way it has affected our everyday lives.
APE contributor Suzanne Sease currently works as a consultant for photographers and illustrators around the world. She has been involved in the photography and illustration advertising and in-house corporate industry for decades. After establishing the art-buying department at The Martin Agency, then working for Kaplan-Thaler, Capital One, Best Buy and numerous smaller agencies and companies, she decided to be a consultant in 1999. Follow her on Instagram
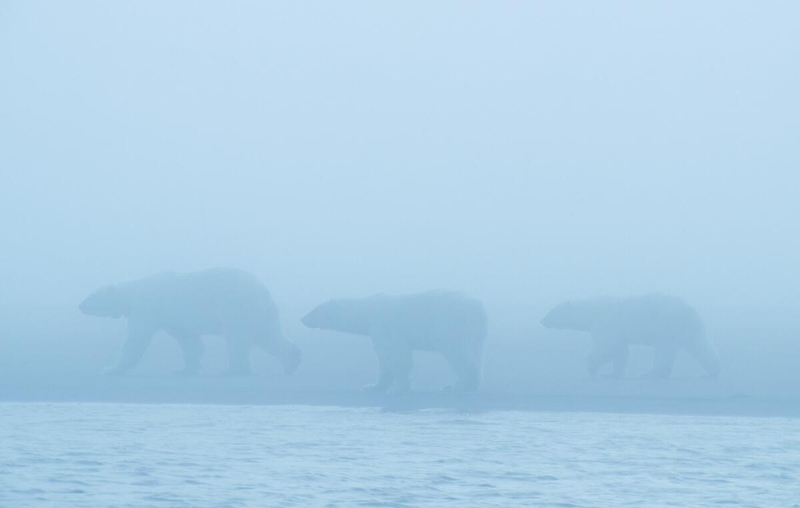
The winners of the second annual edition of The Nature Photography Contest have been revealed, with Christopher Paetkau crowned overall winner for a wonderful shot of a polar bear resting in a field of vibrant fireweed flowers. Alongside Paetkau’s “Photography of the Year,” Thomas Vijayan was named “Photographer of the Year” for demonstrating “his keen eye for composition, storytelling, and the delicate balance that governs the natural world” across various categories.
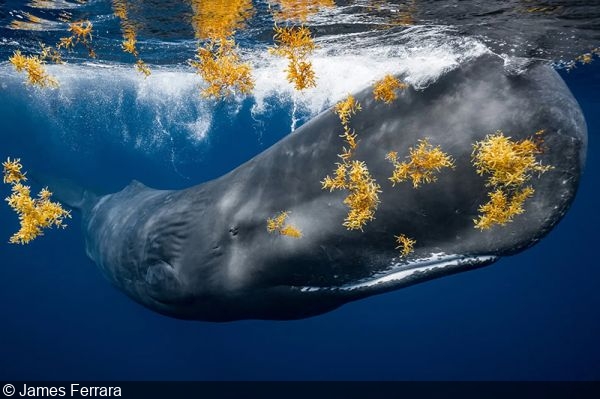
Among those different categories, of course, it was “Underwater” that we were most excited to see. DPGer James Ferrara’s perfectly framed shot of a sperm whale cruising through clumps of sargassum weed—featured in his DPG Photographer of the Week article—was the category winner among a wonderful selection of finalists by Simon Biddie, Ilaria Mariagiulia Rizzuto, Kwon Chan, Lorincz Ferenc, Wan Yong Chong, Remuna Beca, Andy Lambert, Jun He, and Theo Maynier.
Check out the “Underwater” category finalists below, and head over to the competition website to see the rest of the recognized images. The Nature Photography Contest 2025 is expected to launch in May.
Underwater Finalist: “A Sunrise Glide” by Simon Biddie
Underwater Finalist: “Bad Boy” by Ilaria Mariagiulia Rizzuto
Underwater Finalist: “Big Dreams” by Kwon Chan
Underwater Finalist: “Carp Love” by Lorincz Ferenc
Underwater Finalist: “Circle of Life” by Wan Yong Chong
Underwater Finalist: “Connection” by Remuna Beca
Underwater Finalist: “Jellyfish” by Andy Lambert
Underwater Finalist: “Pike Hunting” by Ferenc Lorincz
Underwater Finalist: “Place of Residence” by Jun He
Underwater Finalist: “Sous Ecorte” by Theo Maynier
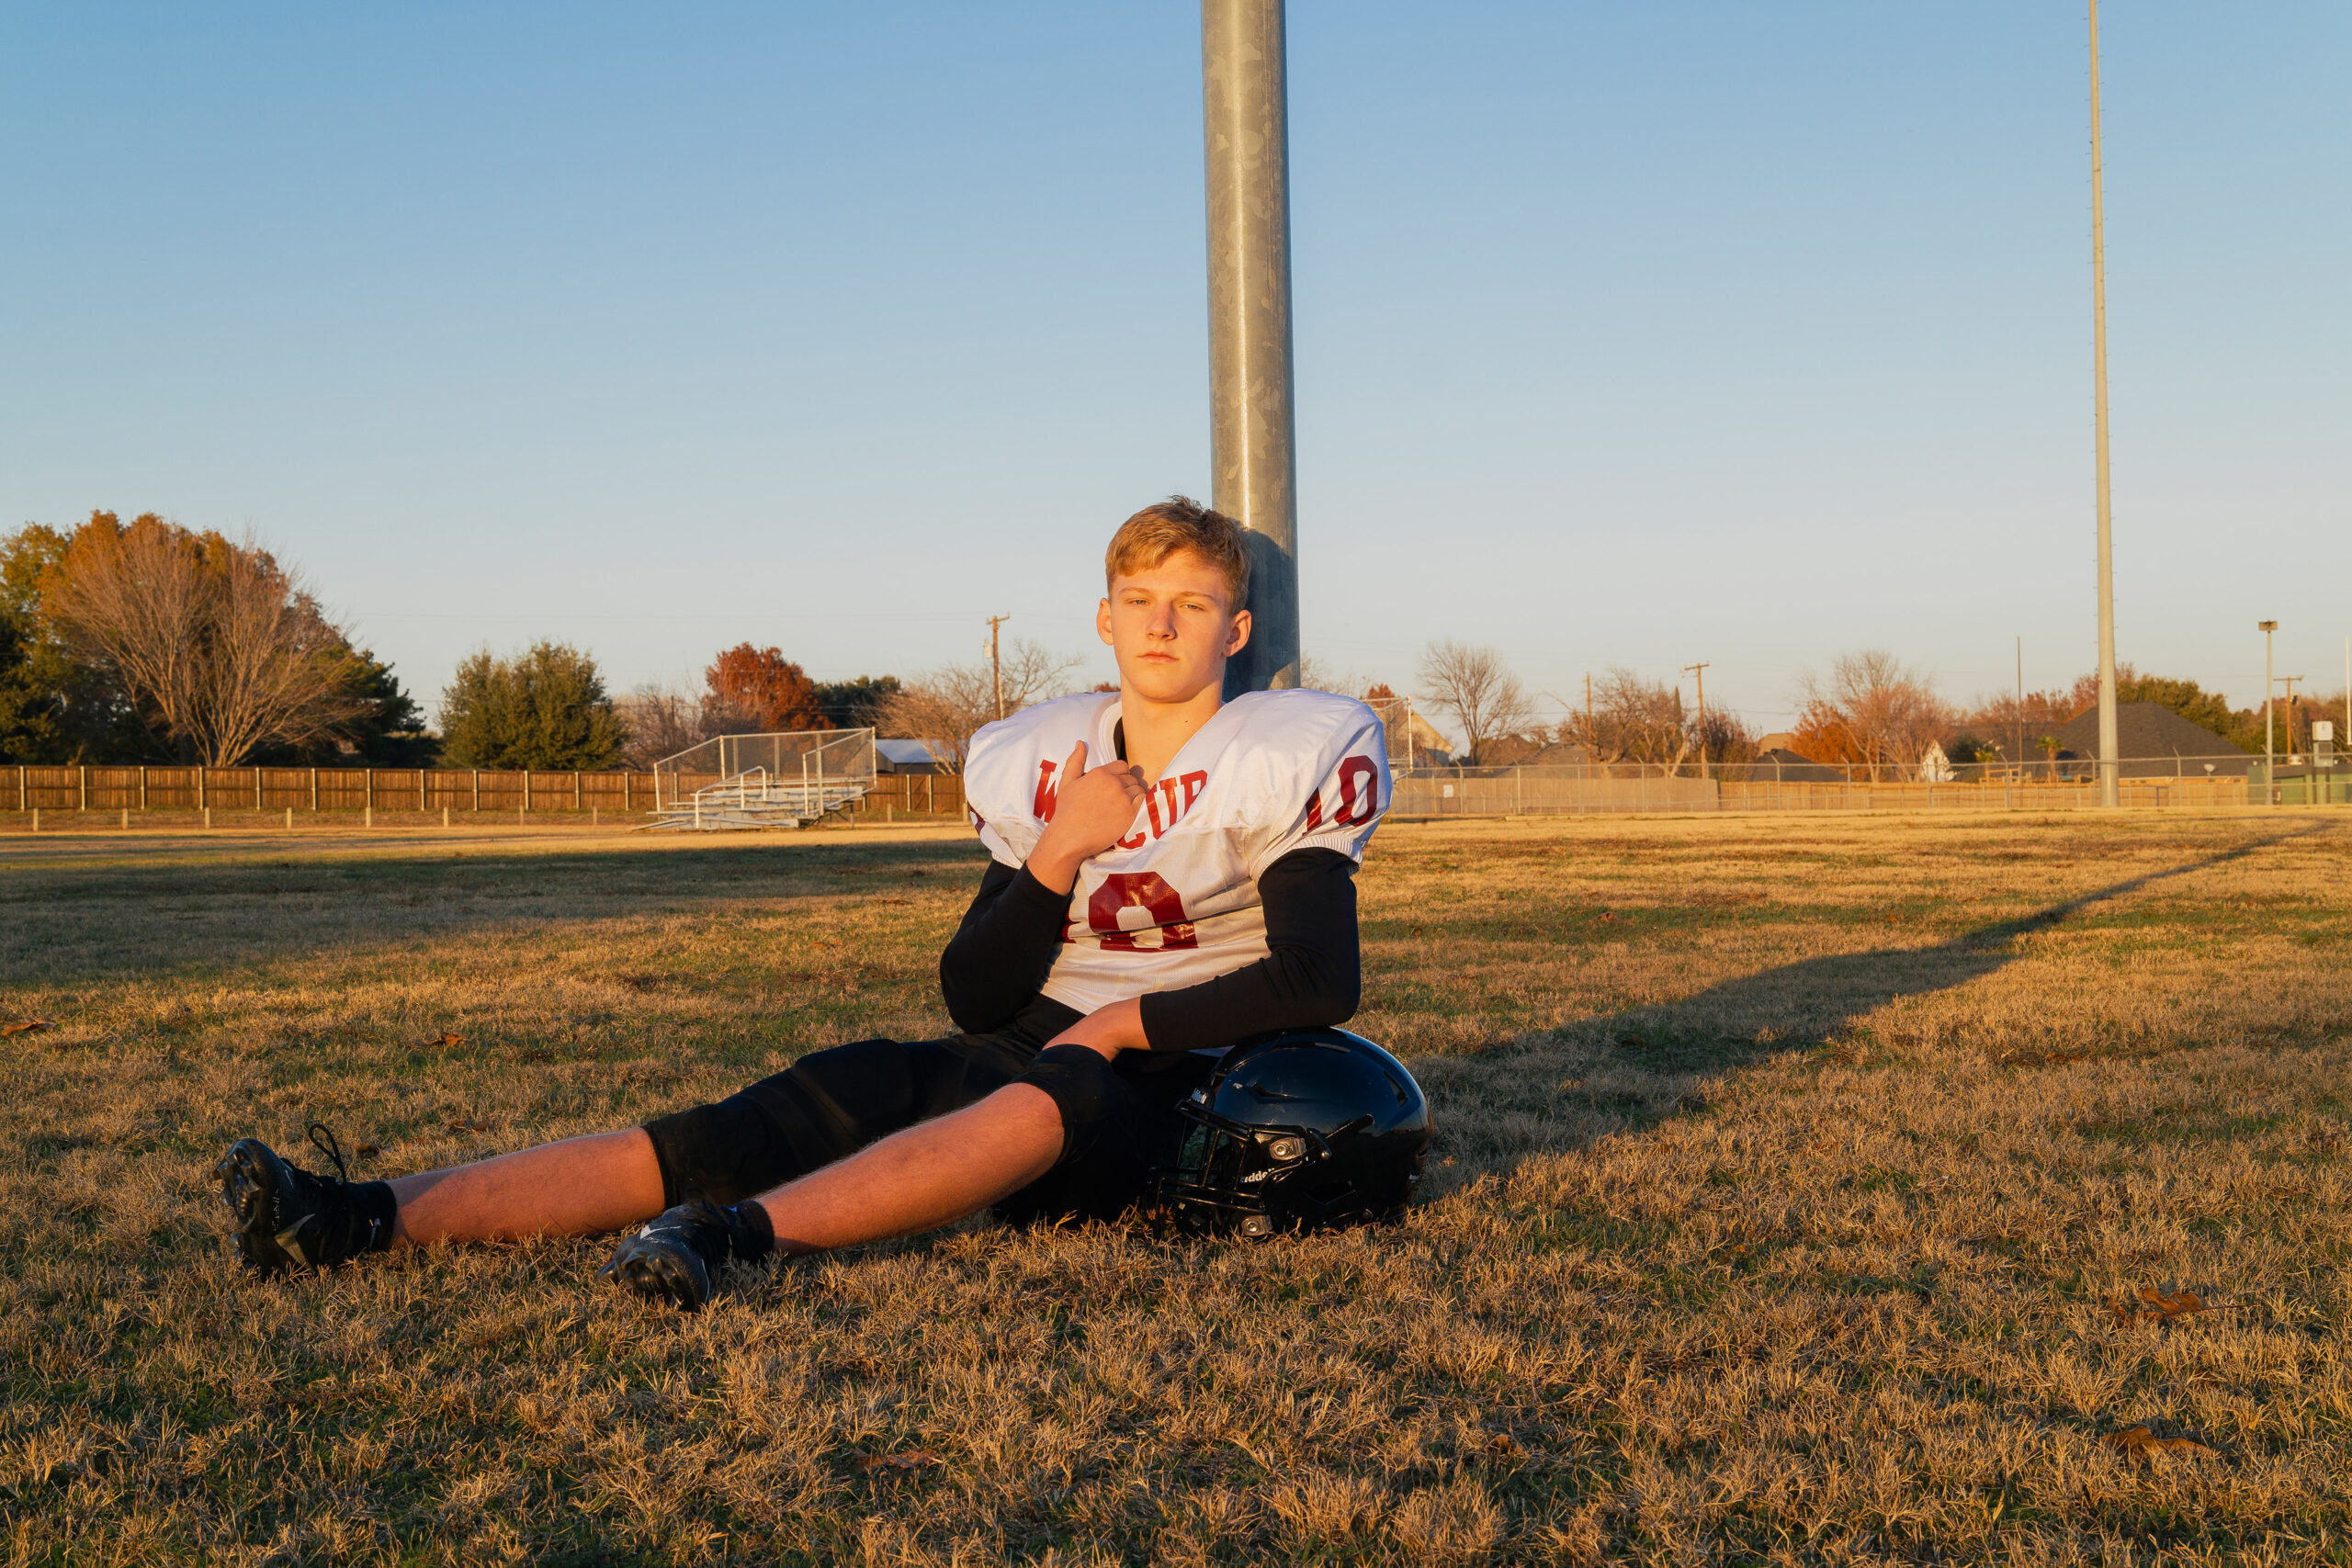
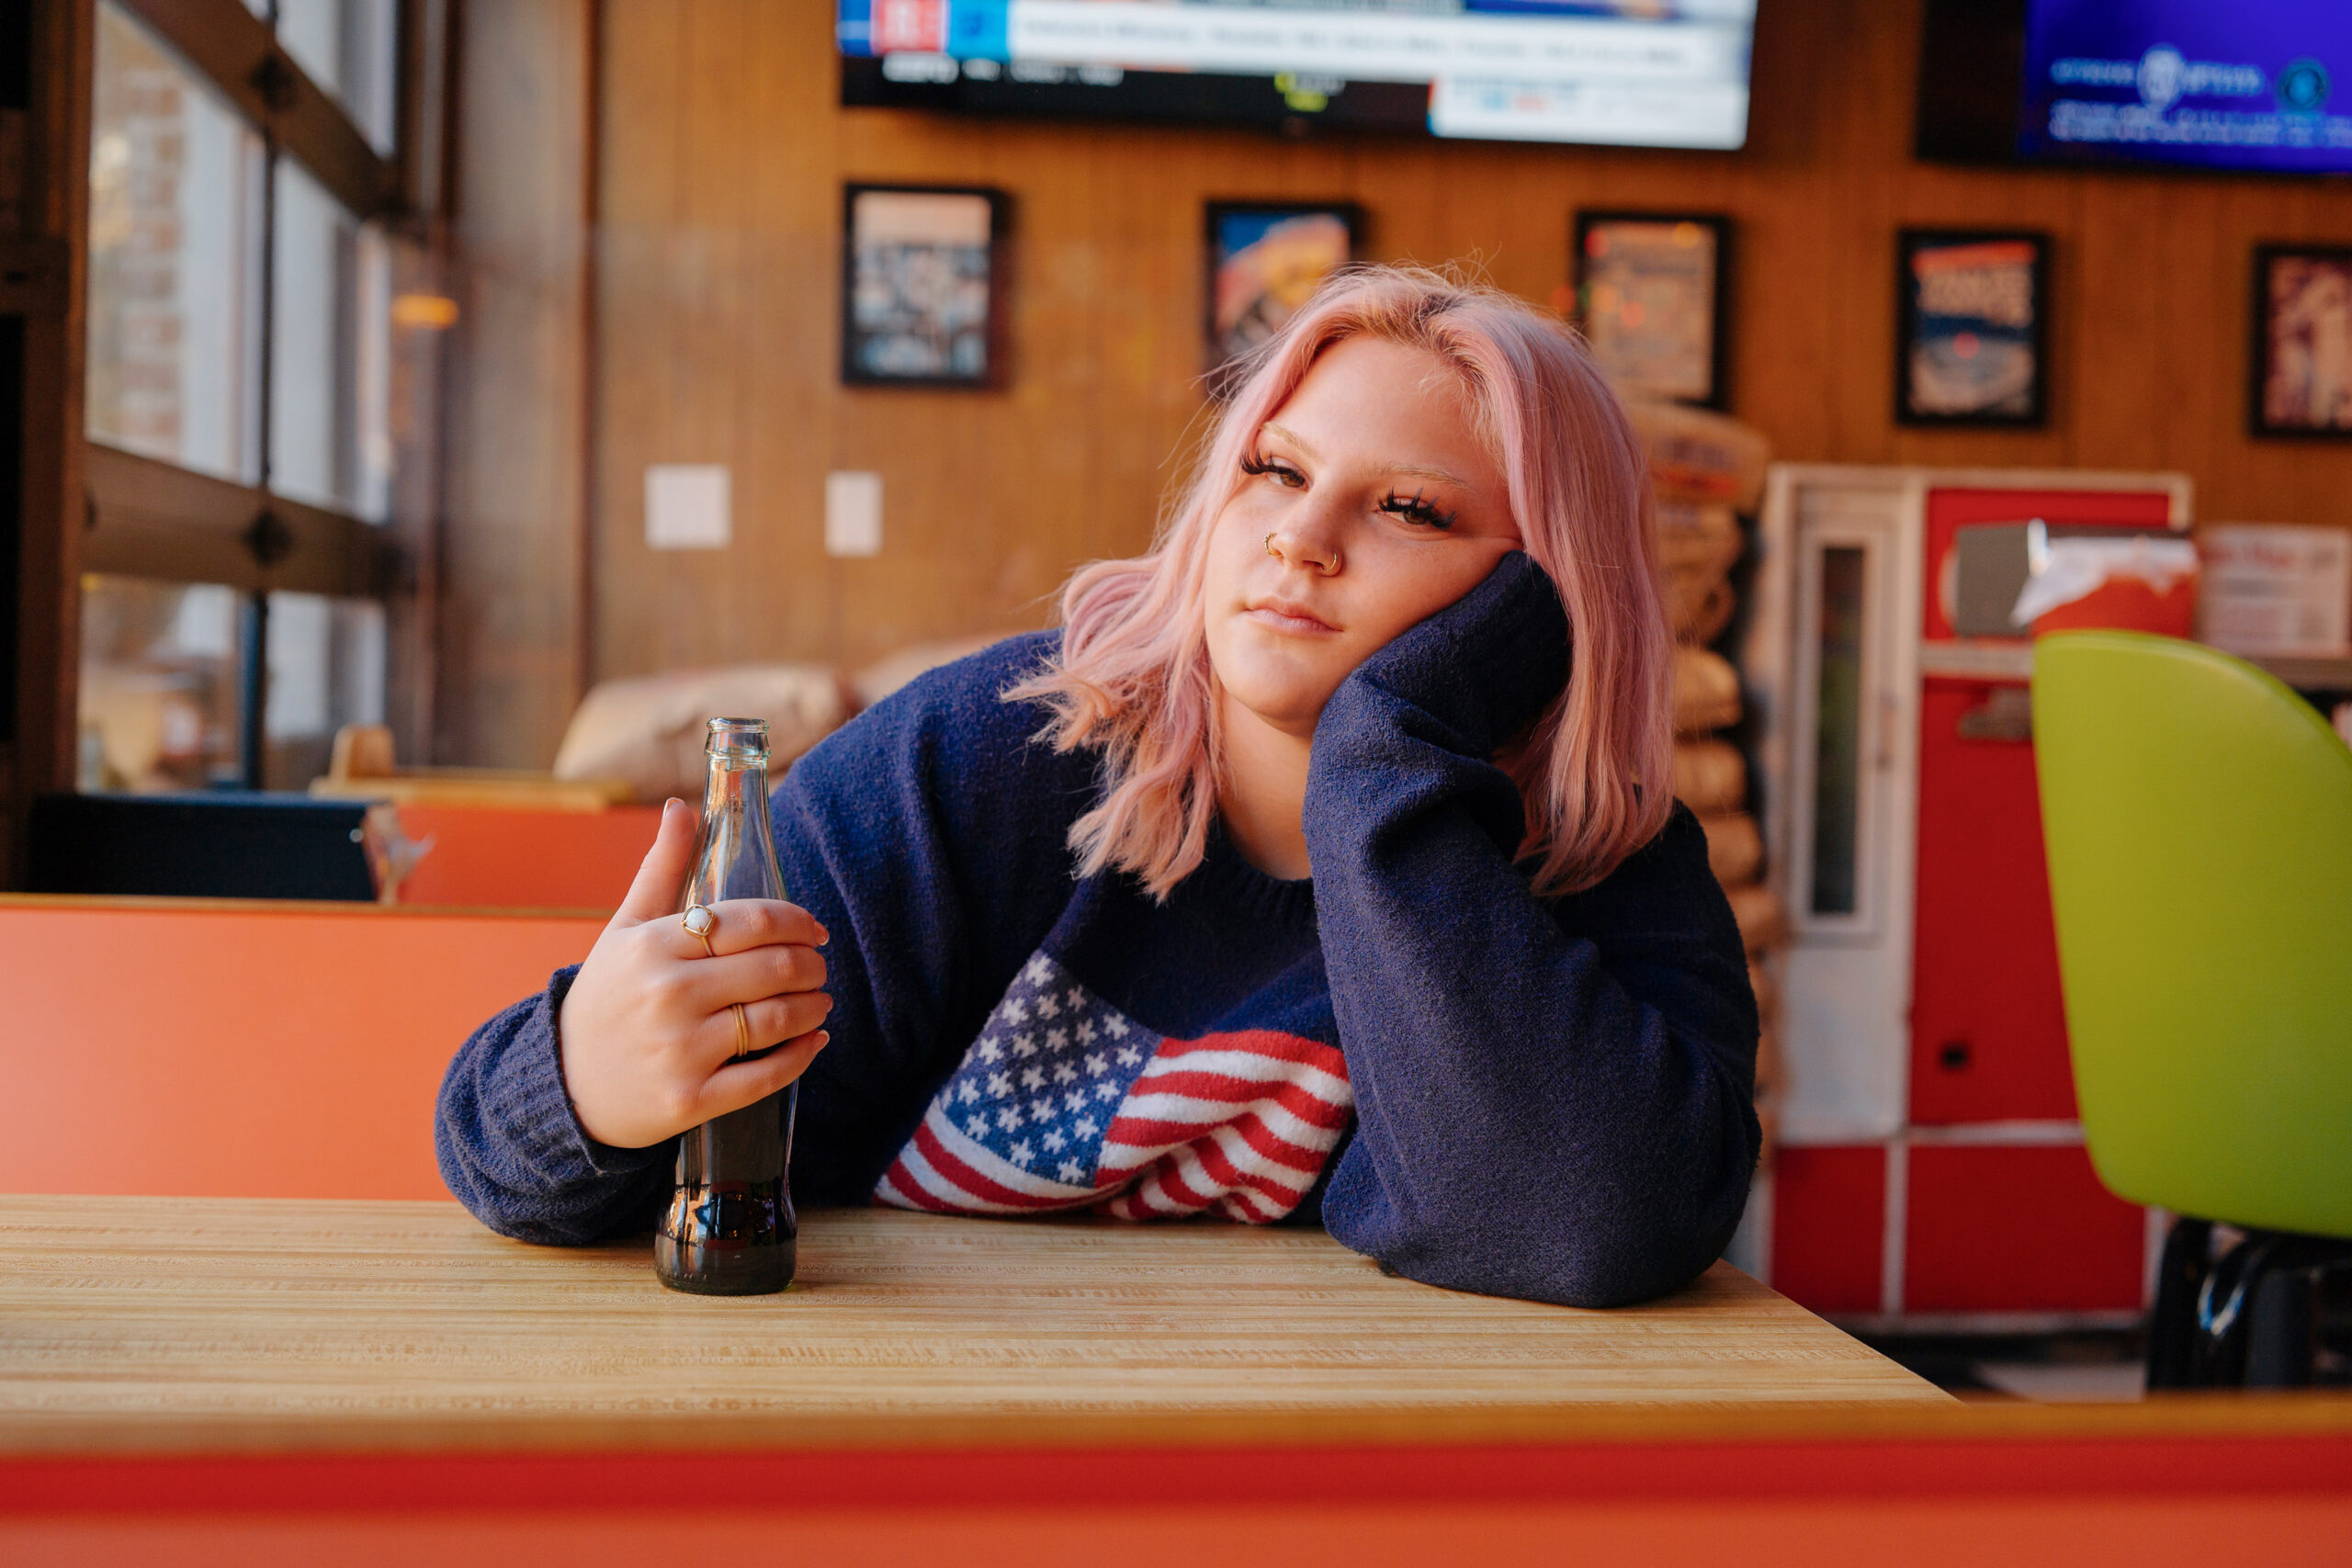
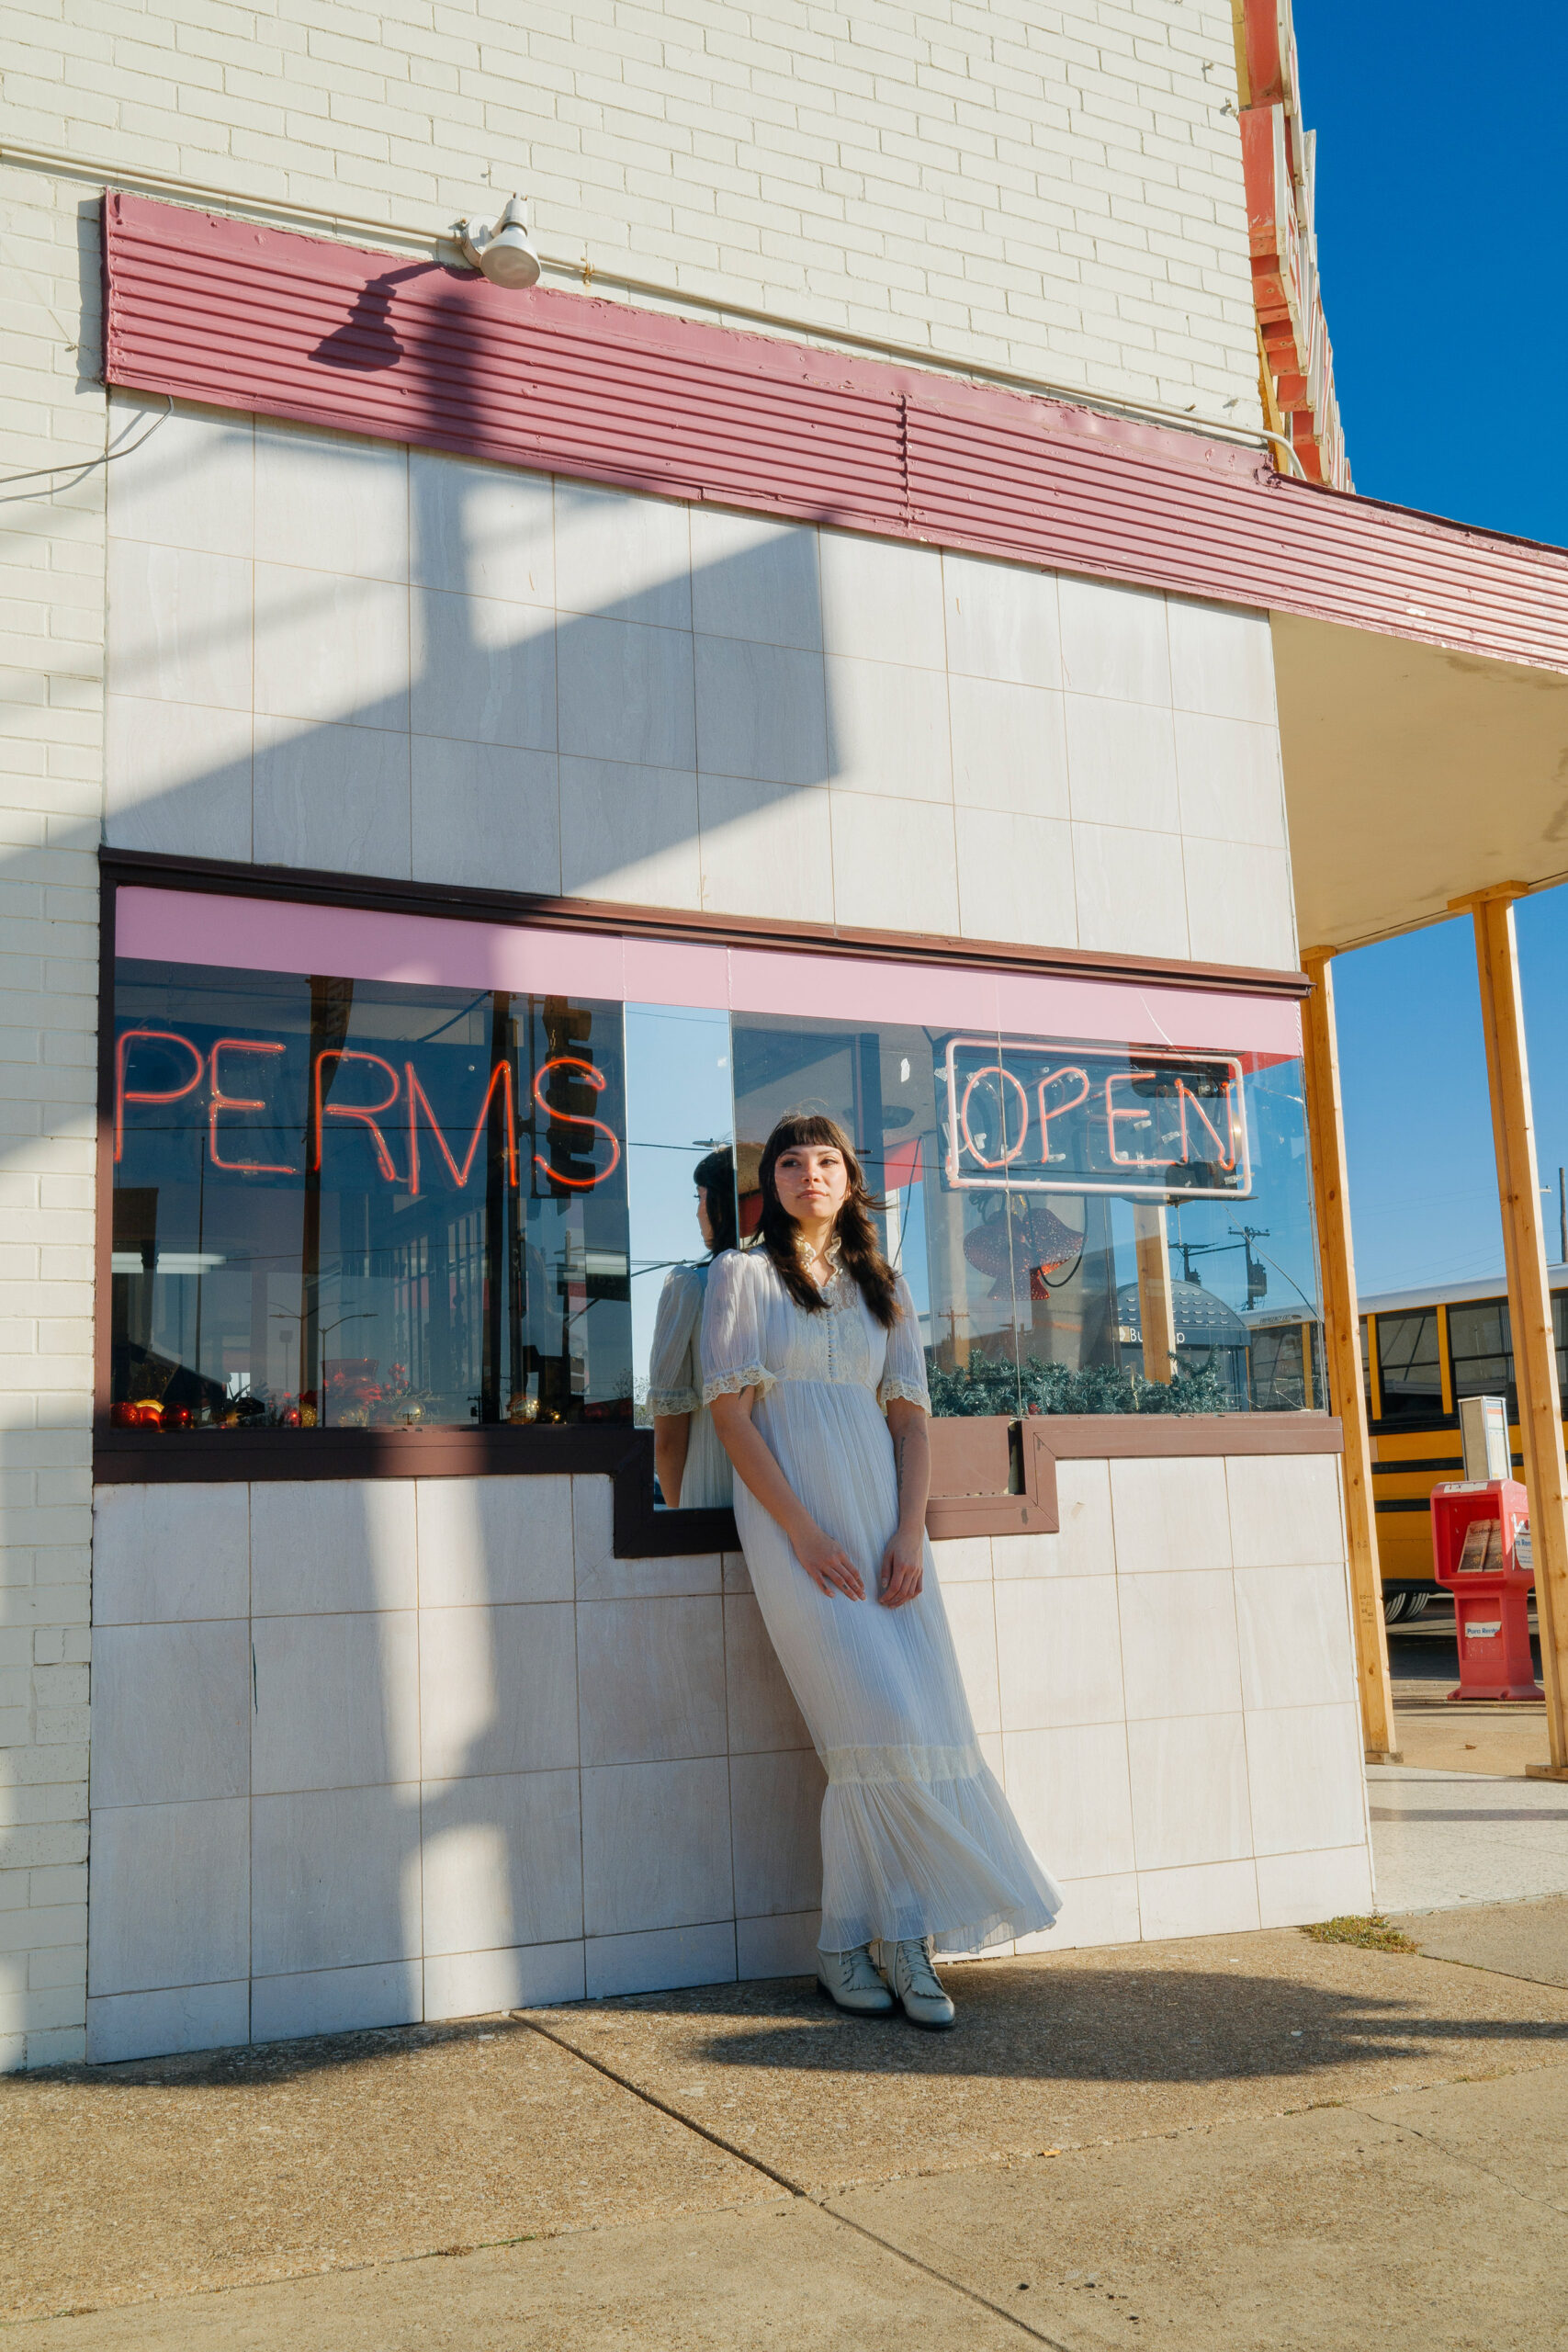
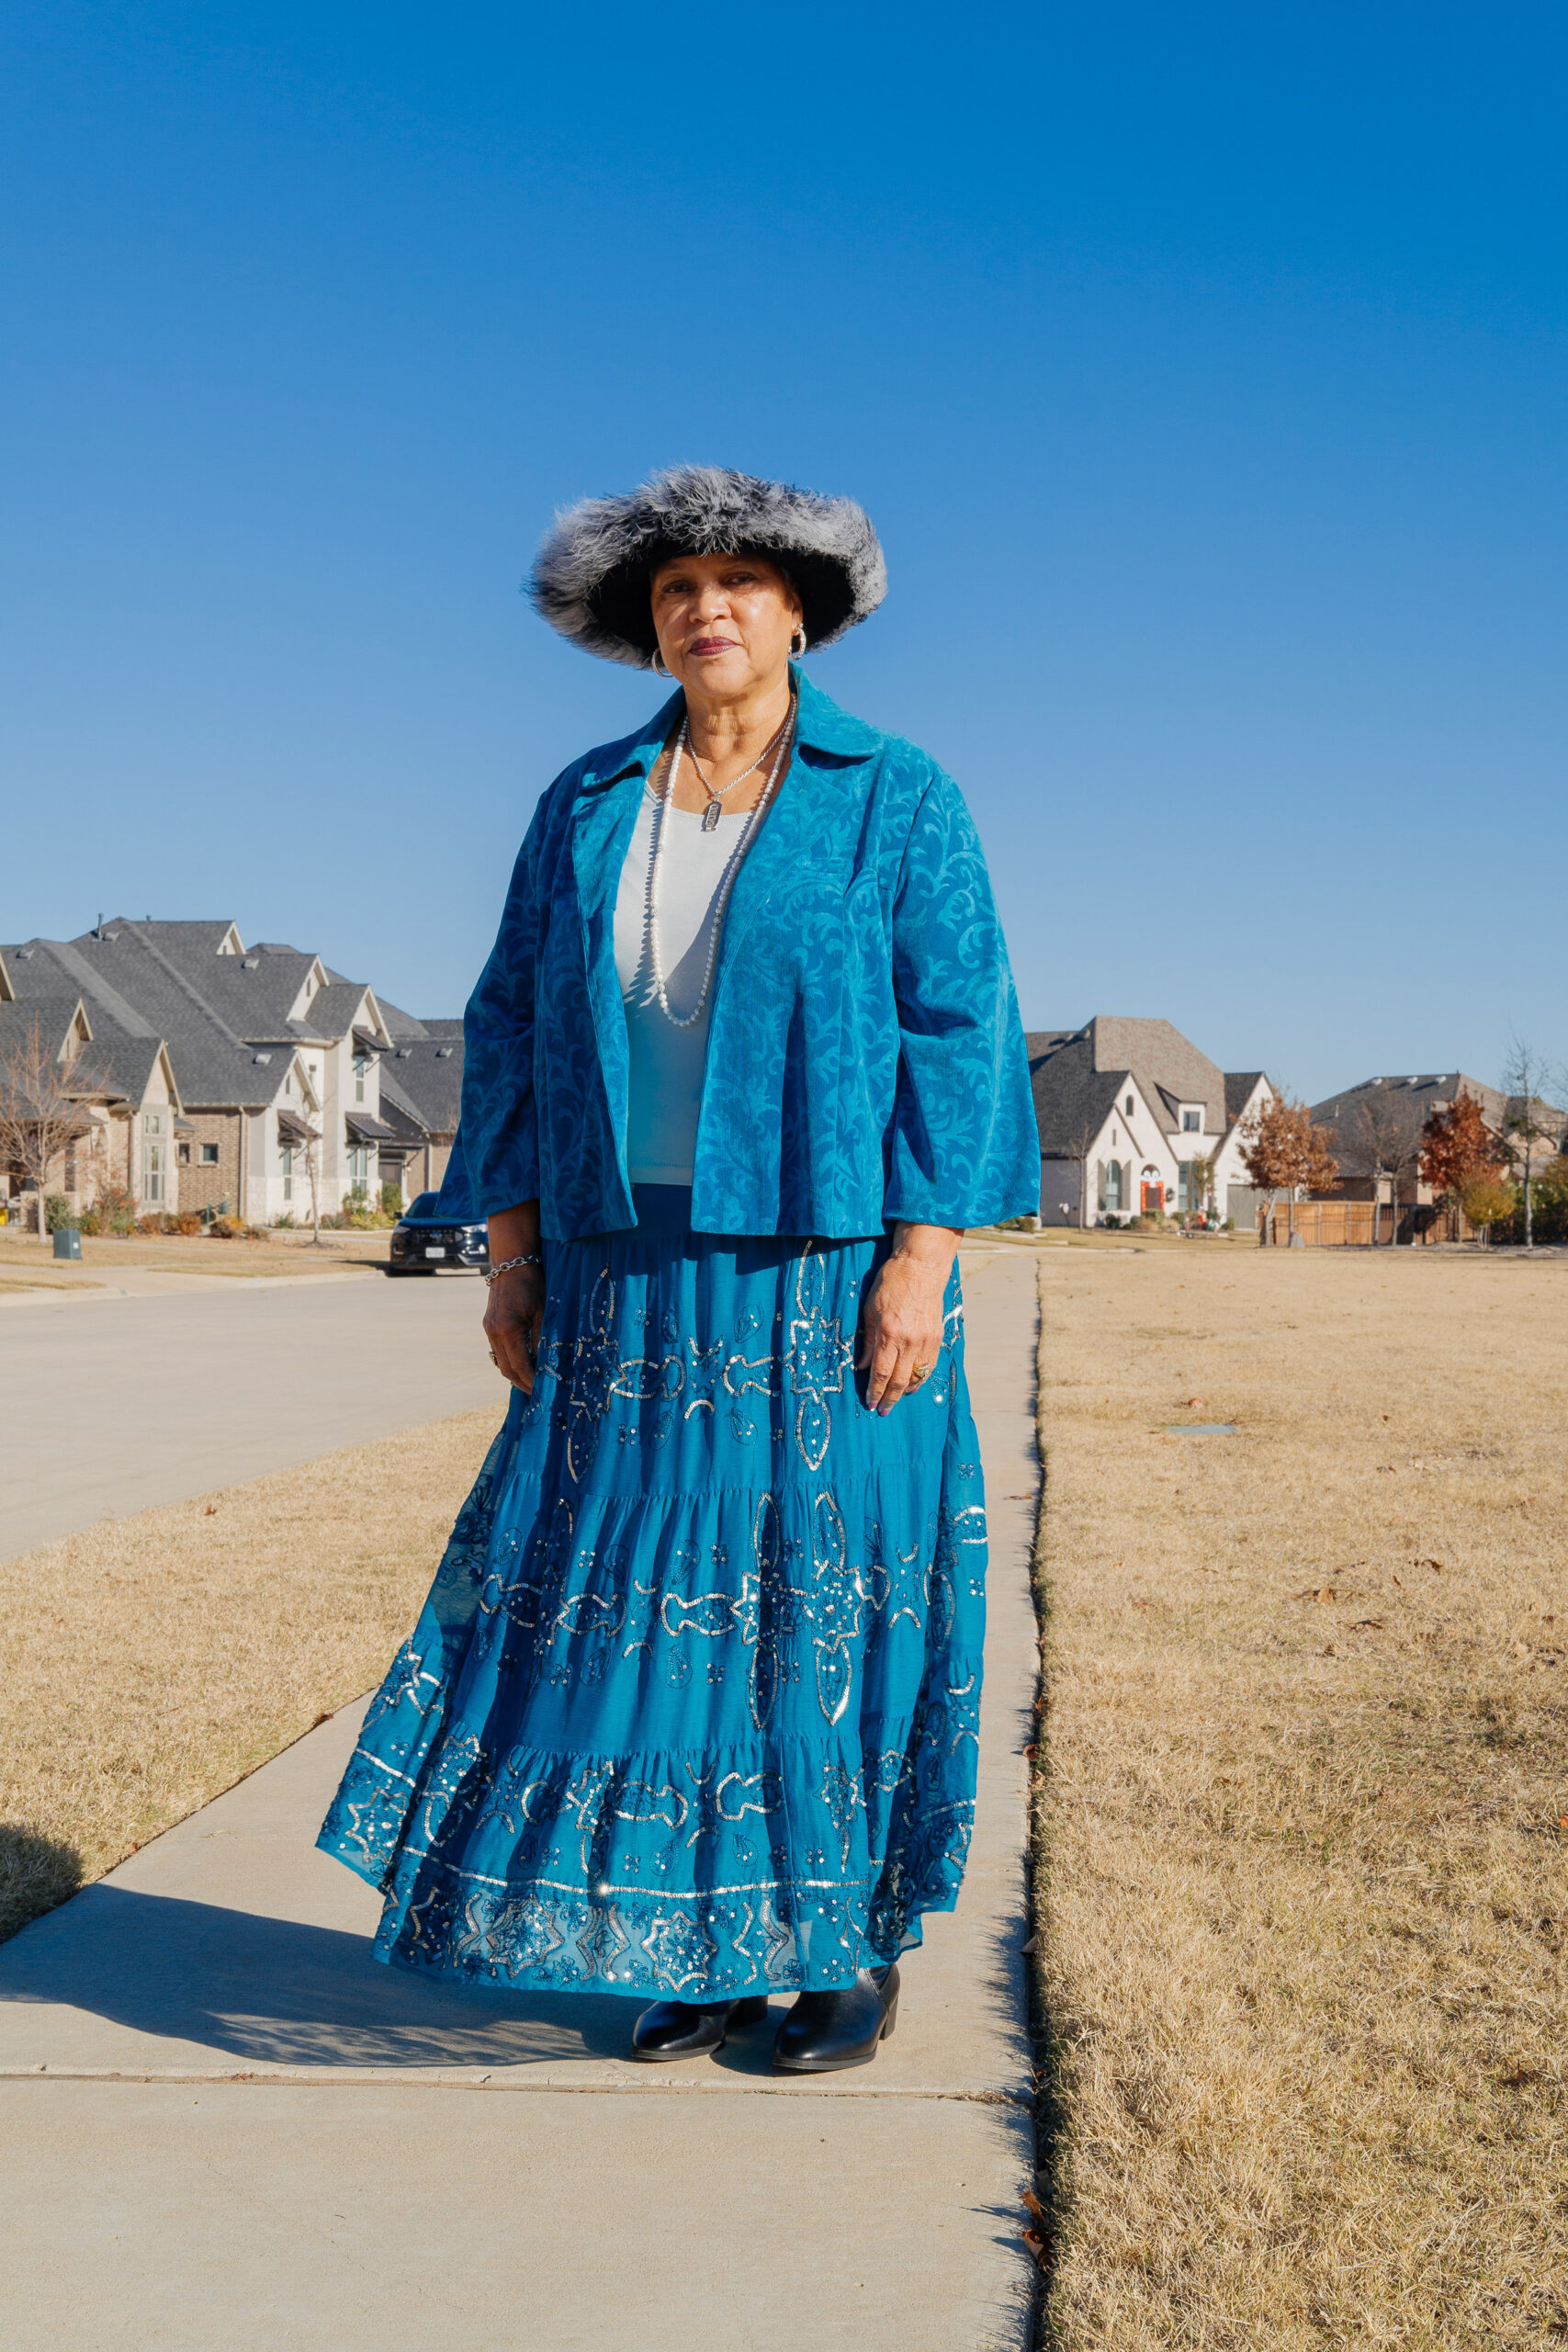
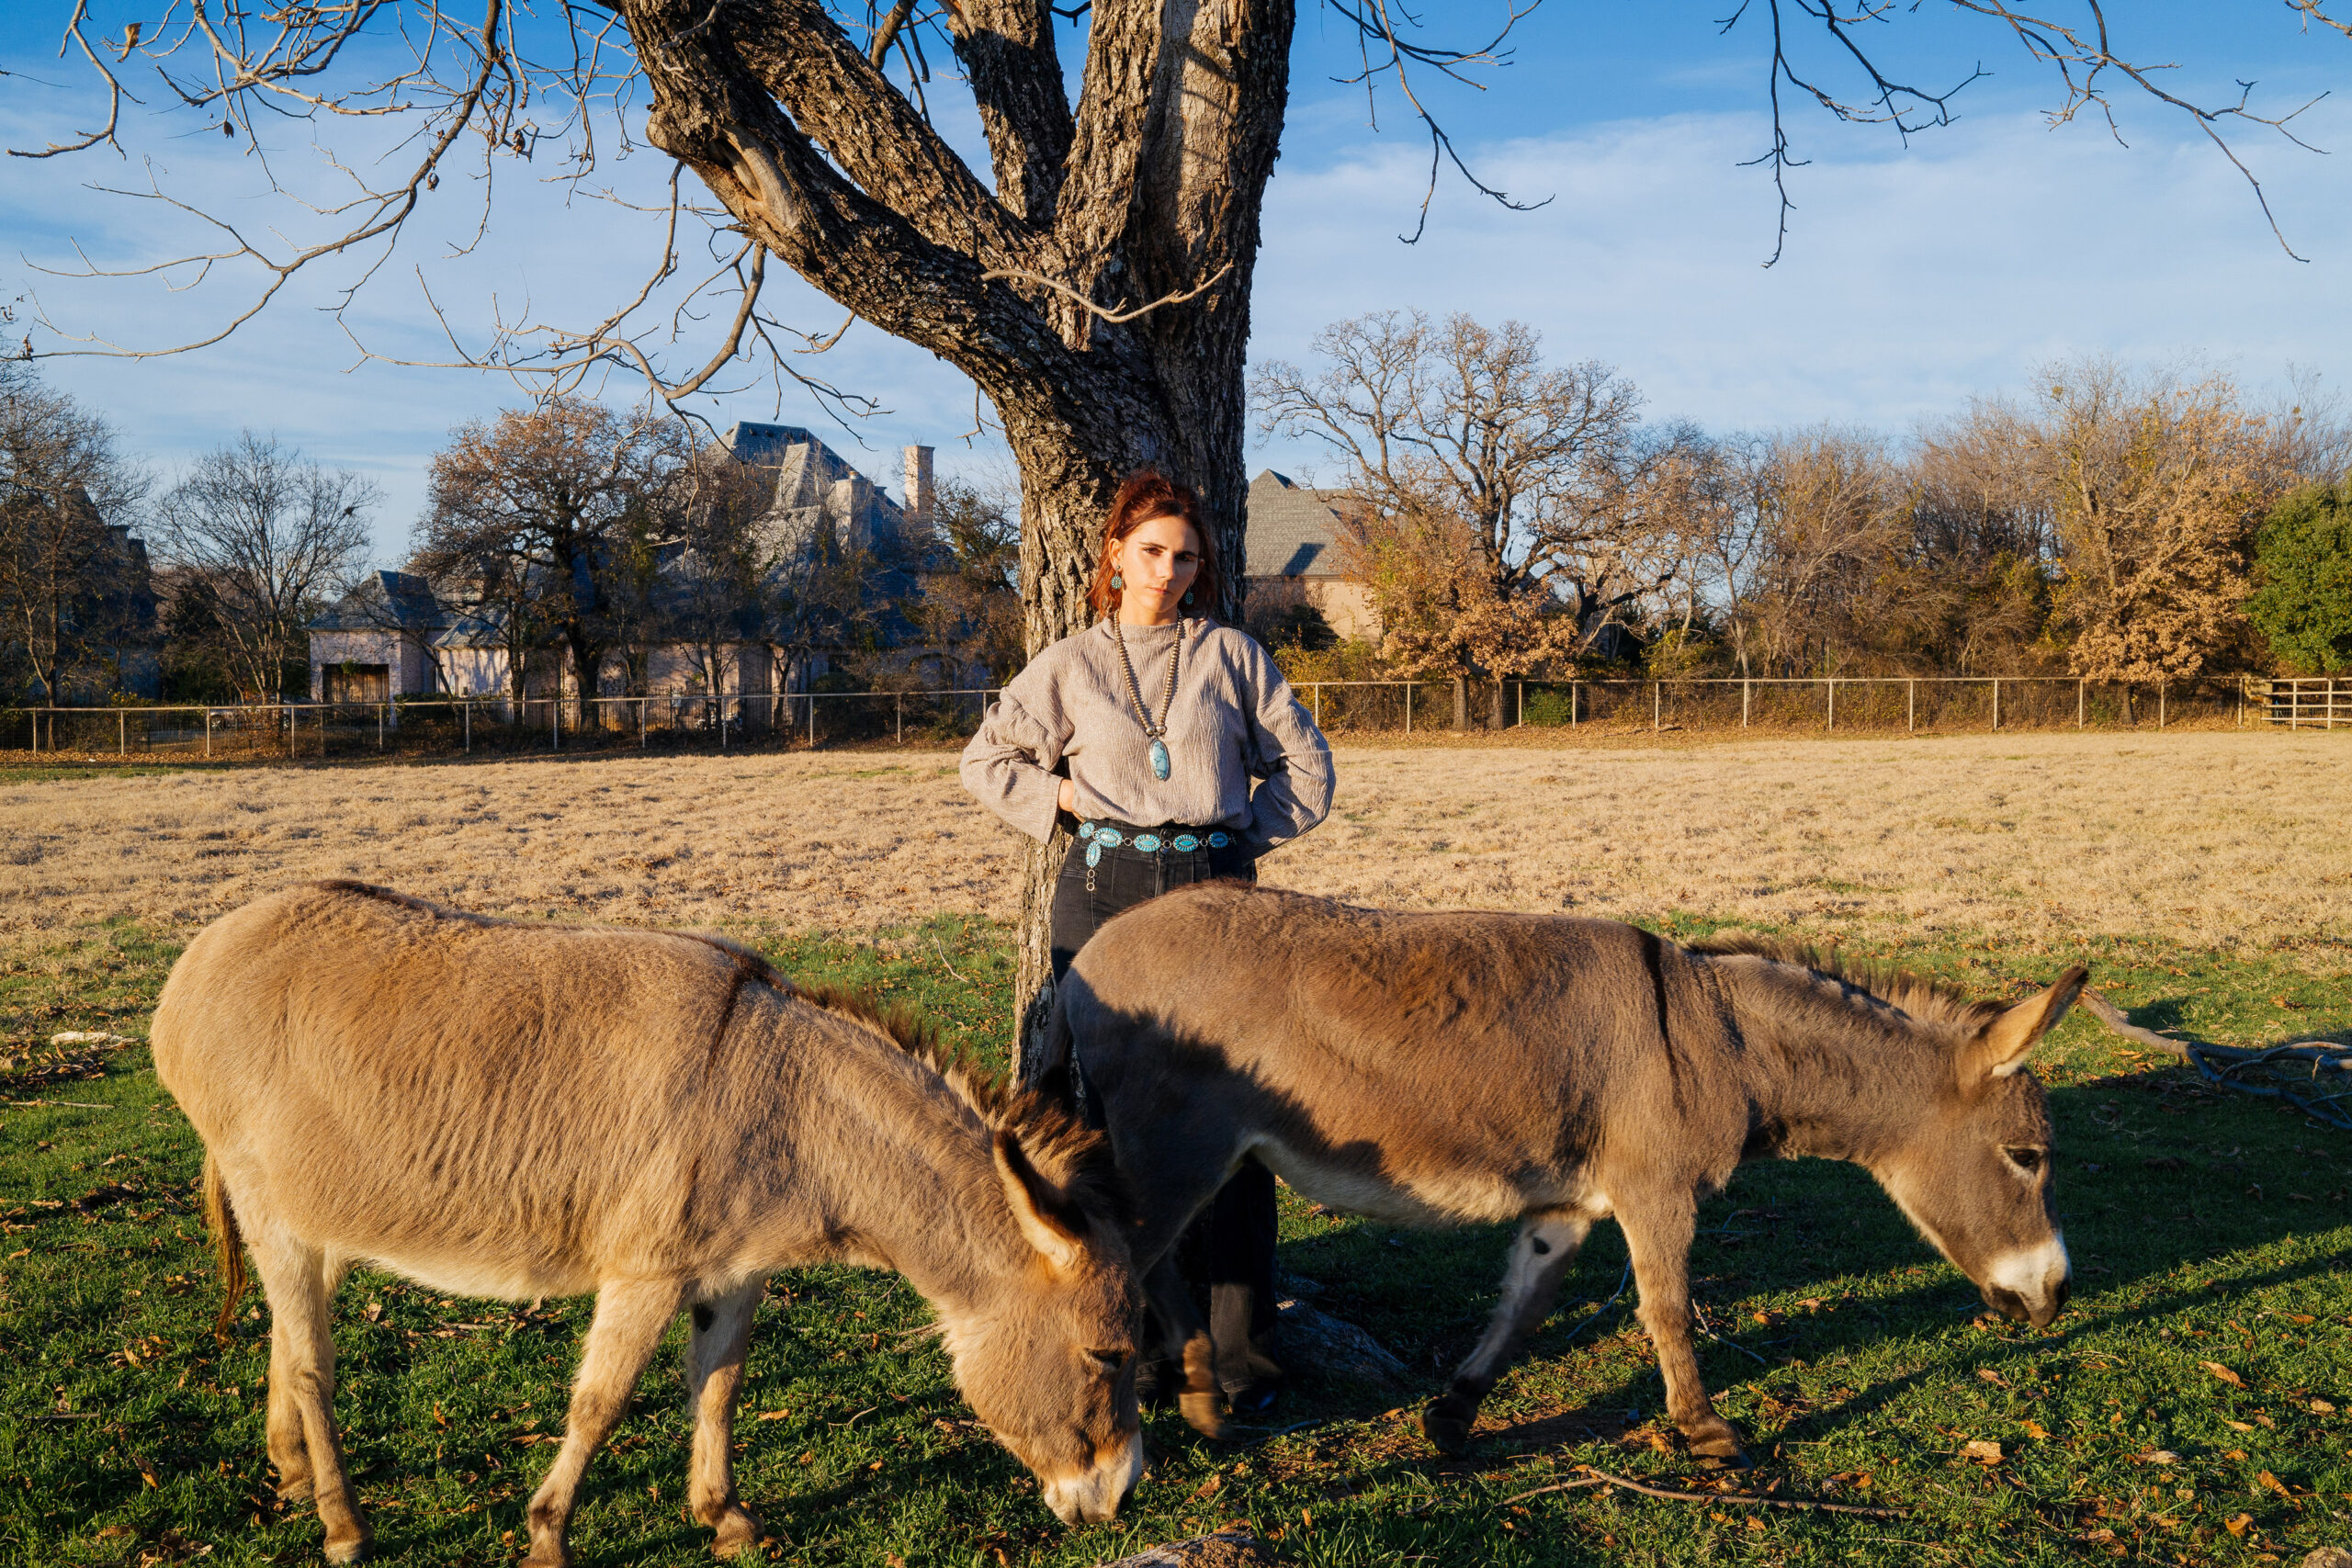
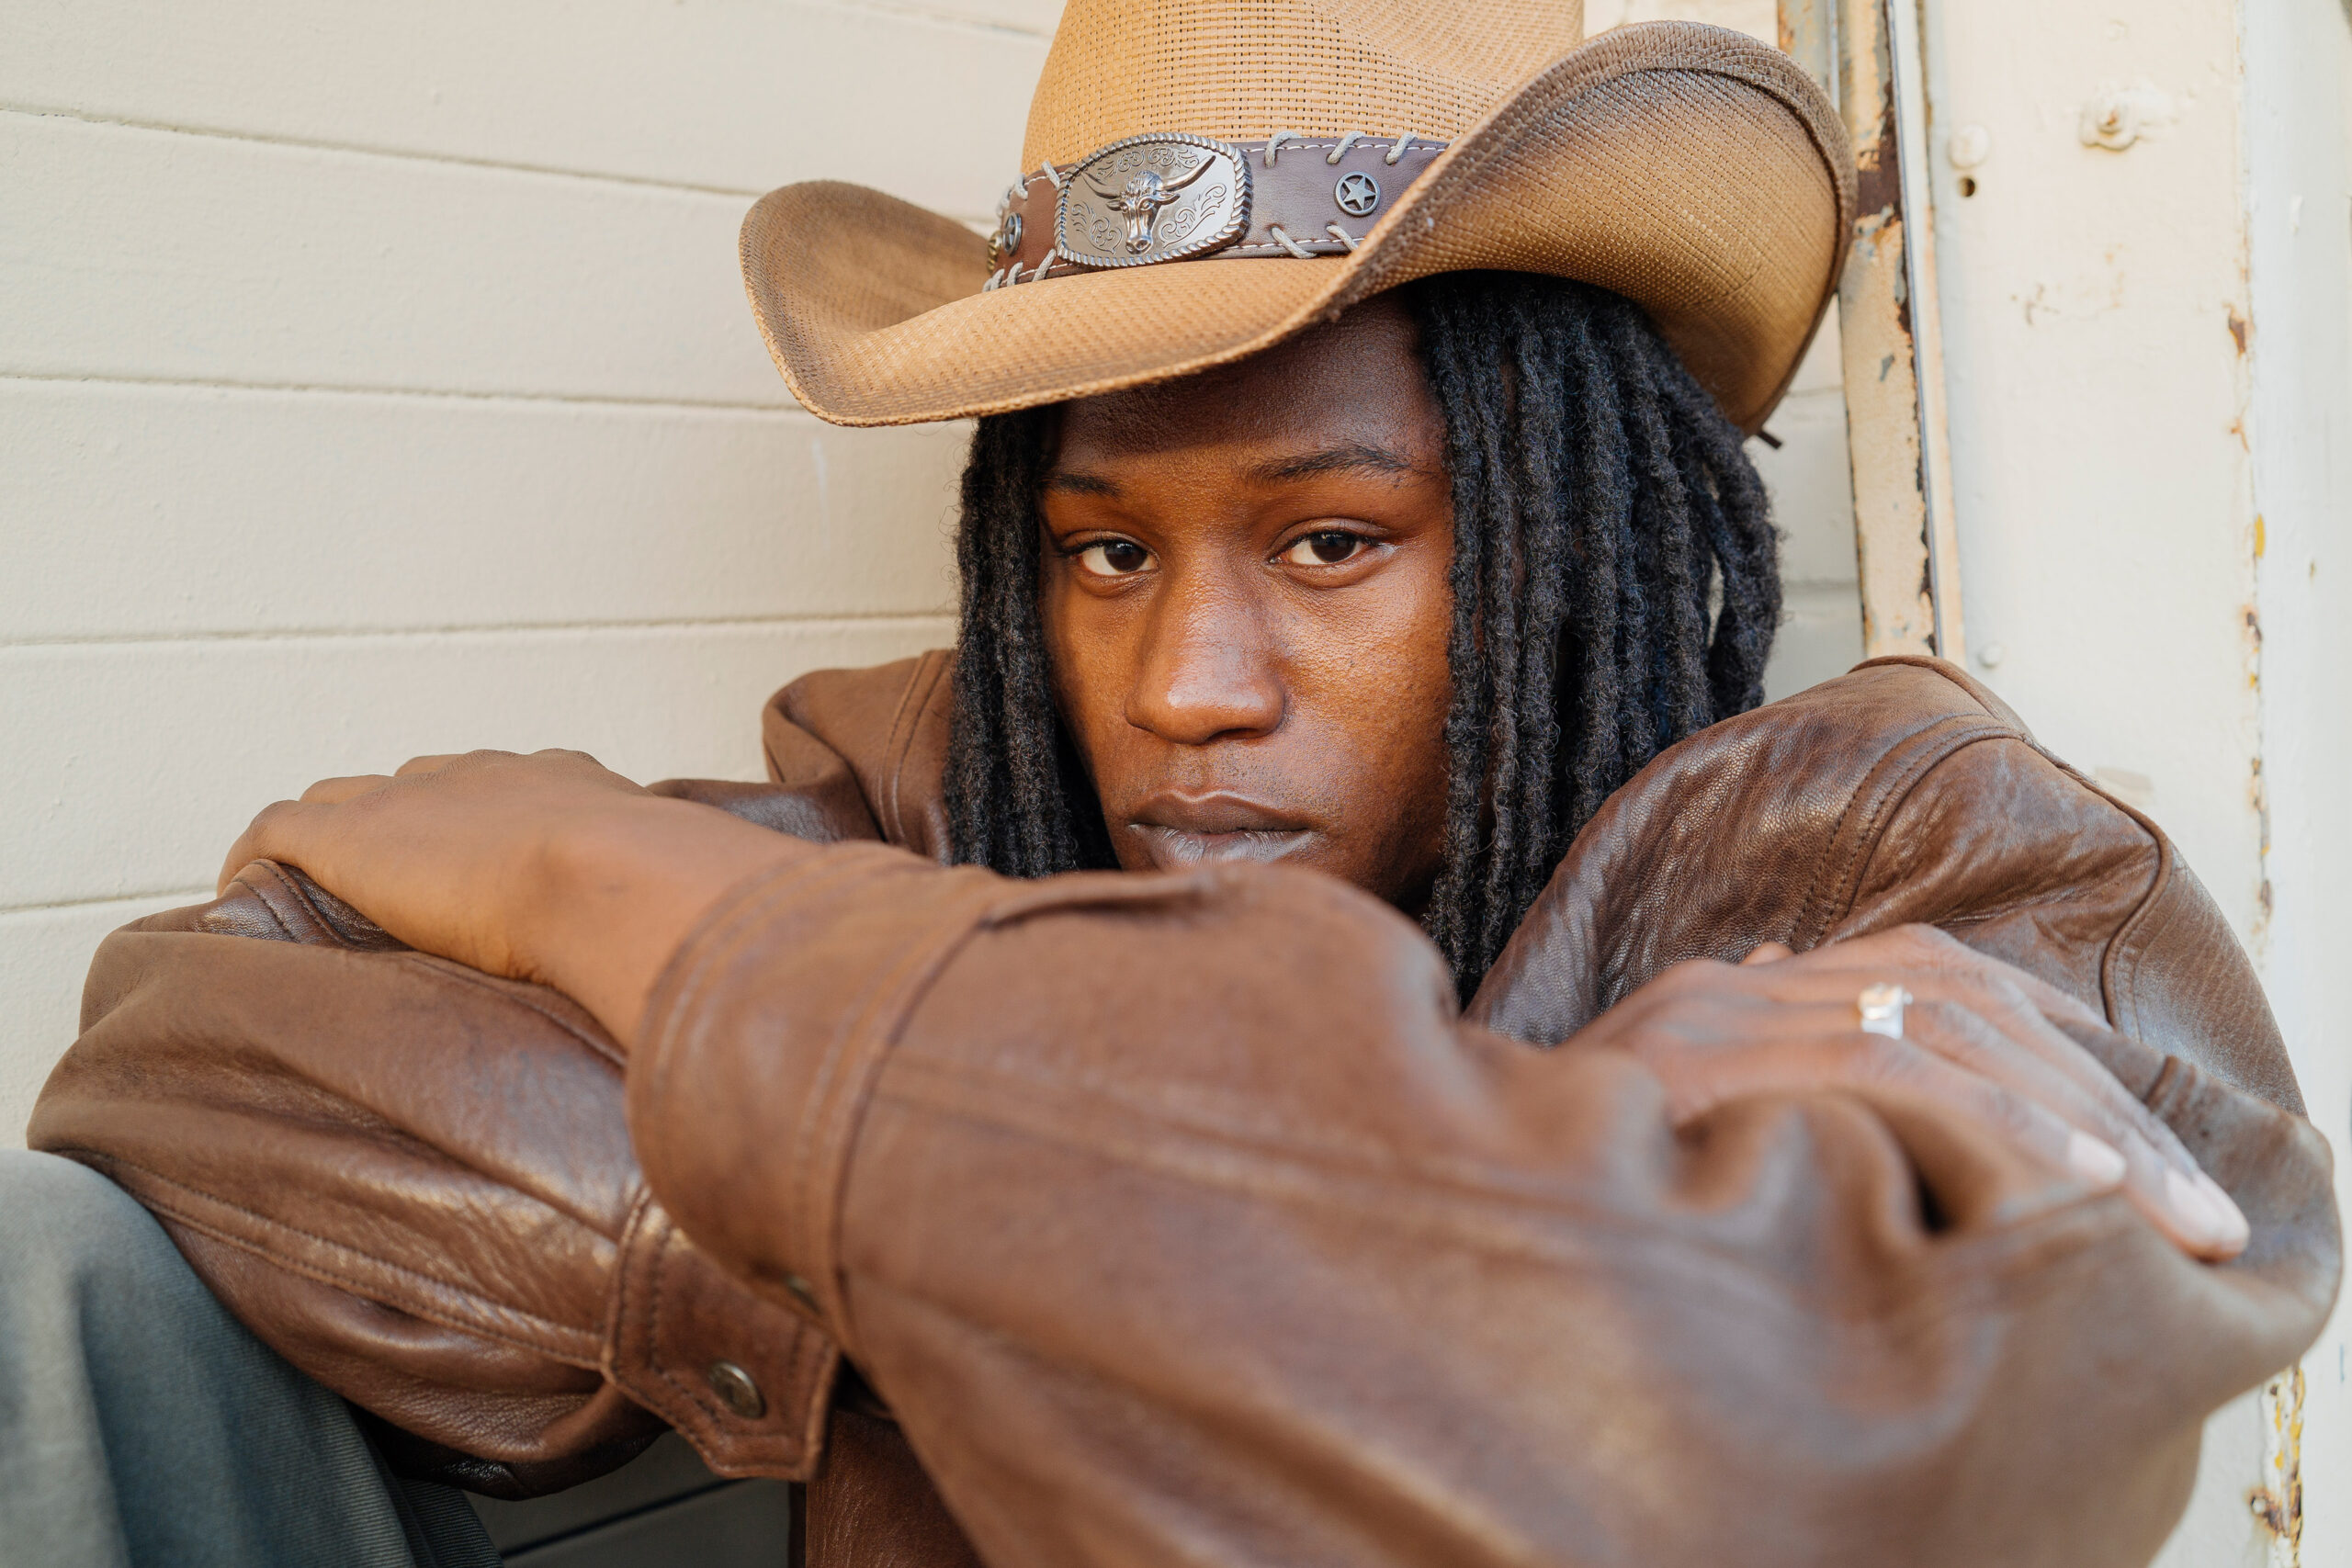
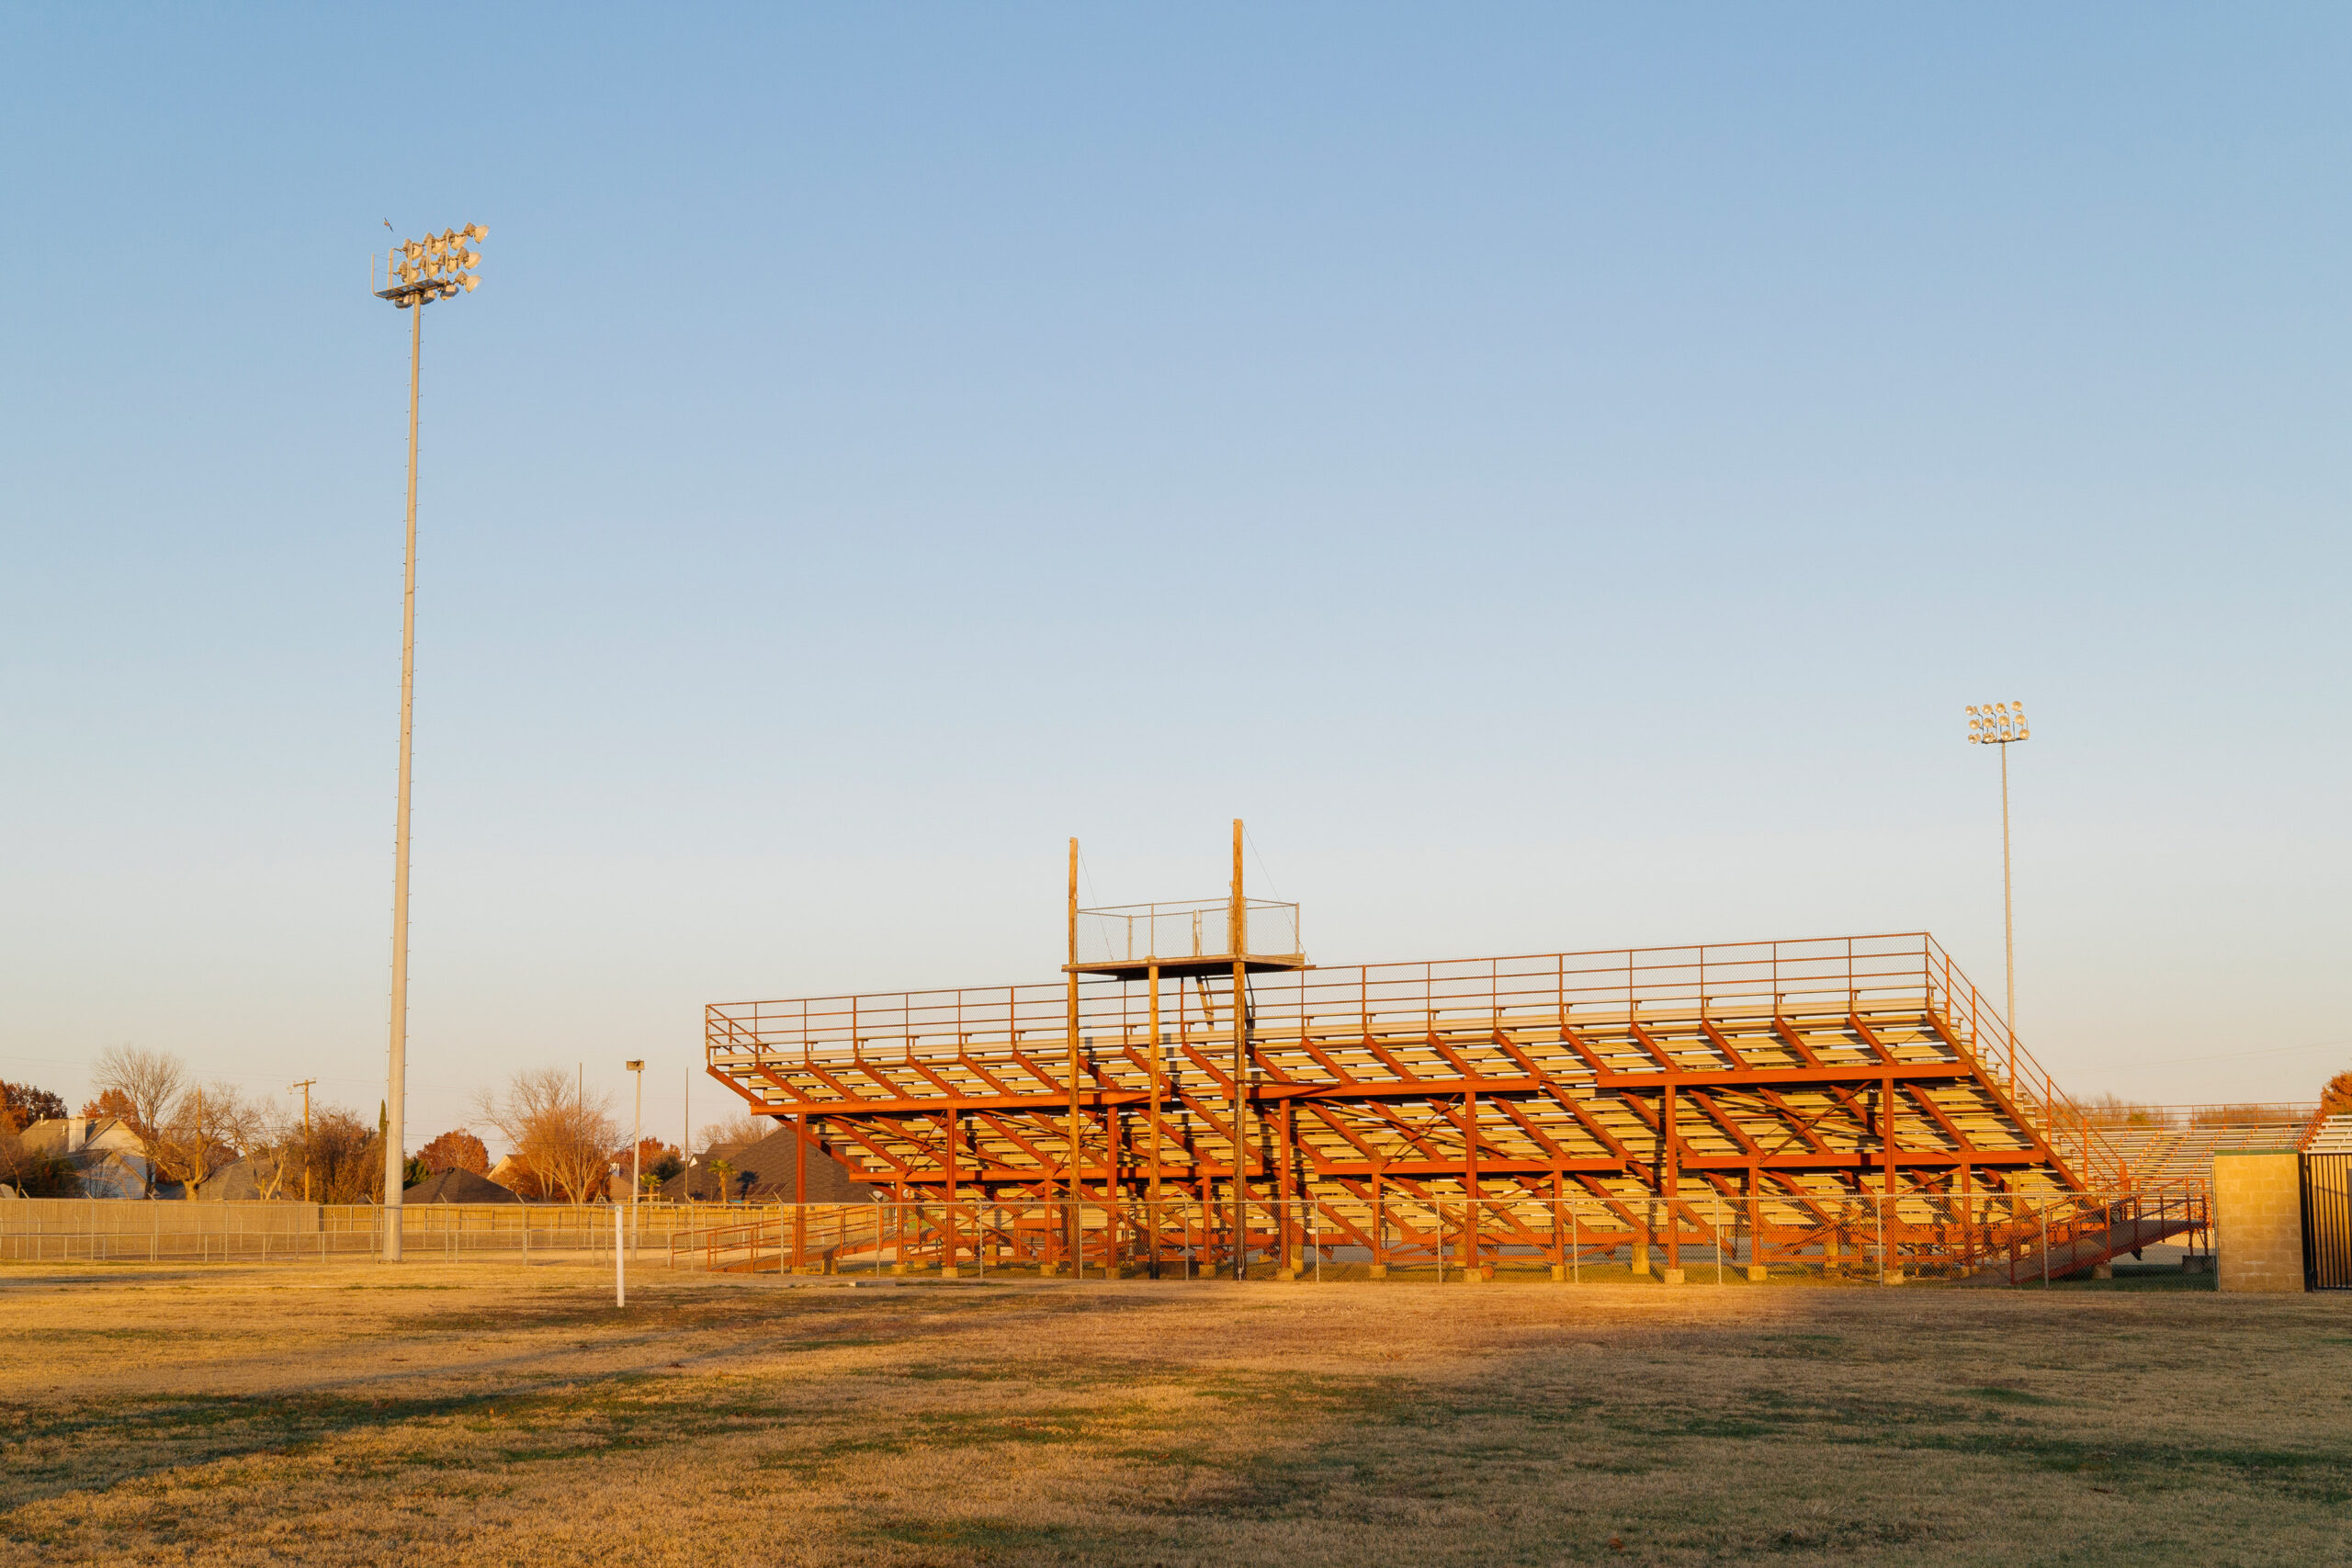
Through images defined by curiosity and empathy, Fumi offers intimate portrayals of the people she meets and the time she spends with them.
As a Japanese artist now living in America, Fumi brings a unique perspective. Her projects often span years as she immerses herself in the communities that capture her interest. Documented in books like Marching Wolves (2022) and Dora, Yerkwood, Walker County, Alabama (2023), these projects reflect her desire to capture her subjects on a deeper level.
The images presented here are part of this ongoing project of capturing everyday life in America. Taken in New York and Texas in December 2024, they showcase tender moments of intimacy and connection, all reflecting Fumi’s compassionate approach to photography.
“Since 2016, when there was the presidential election, I didn’t really have much of an idea about America, except for New York and big cities. But that election made me curious about the country, and I started paying more attention to what was happening in this place that had been my home for such a long time,” Fumi says.
“When I started my project in Alabama, I had a friend who lived across the street, and she was from this small town. She took me to where she grew up. Apart from through her, I didn’t have access to small places in the U.S. I’m not from here. I’m from Japan.”
“People in New York are familiar with photography, but people in small towns aren’t to the same extent,” Fumi notes. “They might have taken photos for school yearbooks or everyday events like that, but photography isn’t as much a part of daily life as it is in big cities. So, in the beginning, it took time for me to make them trust me. A lot of people said no because they thought I was going to charge money or sell their pictures online. I had to build a relationship from the start to be trusted to take their photos for the first time. There was a lot of work outside of photography, and it became my life’s work. It became more than photography to me,” she explains.
Fumi says that, for her, it is essential to feel authentically intrigued by what she photographs. You get the sense that she invests a lot of emotional energy into her projects.
“I’m always open, but I have to be inspired to start a personal project. If someone tells me what to do, then it becomes more like a job. For my personal projects, it has to be about my vision. So, I always put myself in situations that challenge me and allow me to experience things first, to see if there’s something I can start, a long-term project. Since I like projects that last for years, I need to make sure that what I commit to is something I can really dig deep into.”
In her photography, she strives to remove all barriers that might stand between her and the individuals she portrays. “When I photograph people, I don’t want there to be a boundary between the subject and myself. I don’t want to be seen as ‘the photographer’ who takes photos of ‘them.’ It’s more about real friends spending time together, and I want to capture them being themselves. A lot of times, they get nervous or feel like they have to give me something. It’s very important for me to build trust.”
Where does she find beauty as a photographer? “I think beauty comes from within. I’m interested in intriguing people and their life stories. I see myself as a storyteller, and I tell the stories of the people I photograph. That’s what I see as beauty.”
Fumi became a photographer by chance. After high school in Japan, she studied hotel management and tourism but knew she wanted to pursue creative work. During a trip to New York, her life took a new turn.
“I didn’t come to New York to become a photographer, but to find a creative field I could pursue,” Fumi says. She met a Japanese hairdresser who was looking for a roommate and moved in with him. As it happened, her roommate had old issues of Street, a Japanese magazine focused on street fashion and culture outside Japan. The issues were all about London.
Since she lived in New York, she thought that photos of the city’s street life would be a good fit for the magazine. She pitched her idea to Street’s editor, who took a chance on her. When she turned in the images she had taken of people in New York, the editor offered her a job as a regular contributing photographer.
Although photography was never Fumi’s plan, it is now an essential part of her life, having grown naturally from her love for the medium. Today, she works with clients such as The New York Times, New York Magazine, and Vogue, as well as brands like Louis Vuitton and Dior. But what first drew her to the medium remains the same: meeting and connecting with people.
Photographer, Filmmaker, and Conservationist: Florian Schulz
Heidi: We are a culture distracted by screen and cell service – is your photography and film work partially an act of resistance? Floiran: As a photographer and filmmaker, I often find myself at the intersection of creativity and technology. While social media platforms like Facebook and Instagram are undeniably powerful tools for sharing work and connecting with others, I have a complex relationship with them. On one hand, they provide valuable insights into the work of colleagues and friends, as well as access to news and thought-provoking statements. However, I also see them as significant sources of misinformation, where quantity often trumps quality, and the loudest voices can overshadow meaningful content.
In my personal life, my wife and I have made a conscious decision to limit screen time for our children. Our 9- and 13-year-olds do not have cell phones, and screens are not used for entertainment. (We do watch nature documentaries on the TV) This choice has allowed them to develop remarkable creativity and a keen awareness of the world around them. They observe how excessive screen time affects their peers, and it’s heartening to see them thrive without the constant distraction of digital media.
In this sense, my photography and filmmaking can be seen as acts of resistance against the prevailing culture of distraction. By focusing on creating meaningful, high-quality content that encourages reflection and engagement, I aim to counterbalance the fast-paced, often superficial nature of social media. My work is about capturing moments that inspire, provoke thought, and foster connection on a deeper level.
Moreover, the process of creating art without the constant influence of social media allows me to tap into my own creative potential more authentically. It enables me to explore themes and ideas that might not fit into the algorithm-driven narratives that dominate online platforms. This approach not only enriches my work but also contributes to a broader cultural dialogue that values substance over spectacle.
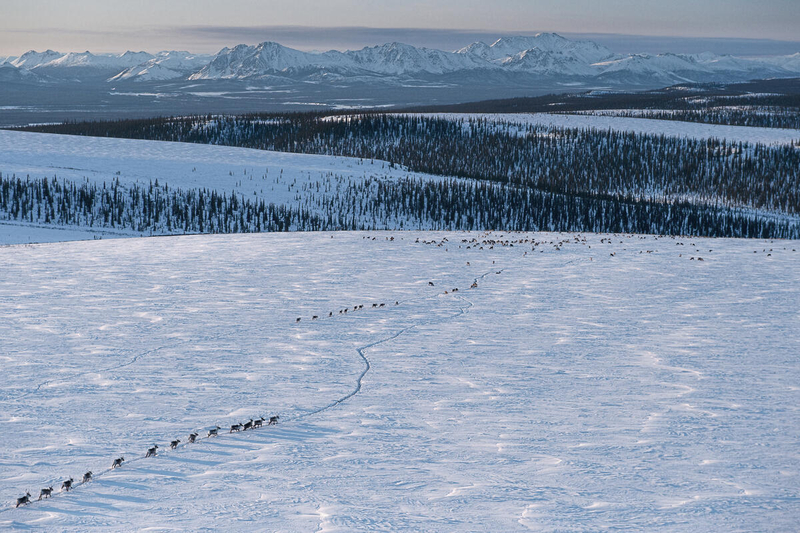
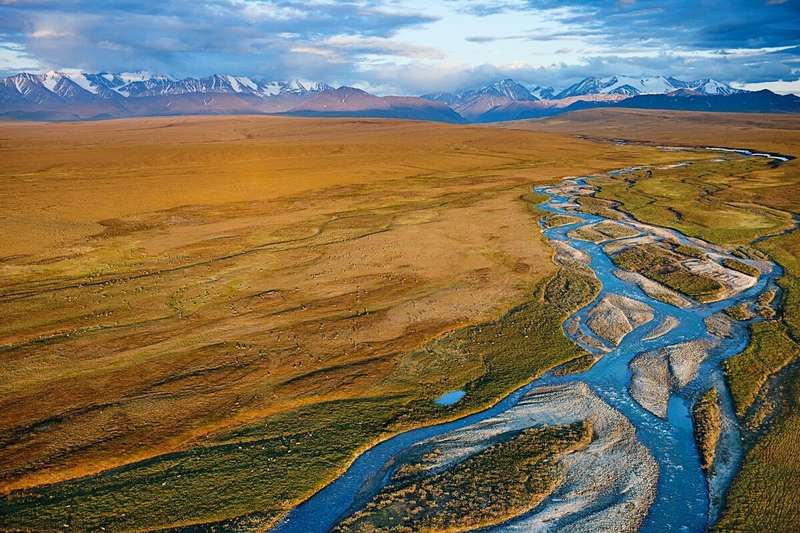
Ultimately, my goal is to inspire others to step back from the screens and engage with the world around them. By doing so, I hope to contribute to a shift in how we consume and interact with media, one that prioritizes depth, creativity, and genuine connection. Nature is wild and she works on her terms – how has this lack of control informed your creative work and life? Yes, nature is wild and unpredictable. That is exactly what I love about my work! This career that I have chosen is not such much of a simple job, work, a career, – it is rather the inevitable path I had to walk because of my passion for wild places, the adventure that comes with it and the desire to be in the presence of wild creatures. To do my work well, I need to be out in the wild for extended periods of times. This has always been my goal and accordingly I have chosen projects that allowed me to do this. What is beautiful about it is that one has to let go of control and especially when documenting wildlife I have to give in to a more organic approach. Sometimes when I am waiting for hours for an animal to appear or a certain behavior to show this work has a meditative element. I have to be here and now in the present. The sounds, sights, smells – the wind and weather conditions. All of it is important to take in or to capture in a series of photographs to document an ecosystem with its wildlife. I love the idea that moments and images have to “come to you”. The animals have to present themselves, that is when the good images get taken. After doing this for so many decades I also realize that it is not just the final image that counts for me – but the entire experience. As all of this takes a lot of time, we are just now at a particular crossroads. Even though I have always tried to have my family be a part of the adventure it was only possible at certain times. We are now embarking onto a new path where we are going to be exploring the wild as an entire family. We will start with some of the most exciting wild places across Alaska. From the fjords and forests of South East Alaska to the Arctic Tundra of the North or the bears coast along the Alaska peninsula.
Does all your work come with a call to action? If a photographer wanted to get started supporting a cause, what’s the best way to start? You are right that a lot of my work over the past decades has been mission driven and often included a call to action. The hope to help with the conservation of ecosystems comes across in the stories I tell through my images. As a conservation photographer, my goal is to inspire viewers to care about the natural world and its wildlife. Whether it’s documenting the majesty of wild places or highlighting the challenges faced by endangered species, my work aims to raise awareness and encourage action.
For photographers looking to support a cause, I would recommend starting by identifying what truly resonates with them. It might be a specific species, ecosystem, or environmental issue. Once you’ve found your passion, immerse yourself in learning about the topic. Collaborate with experts, such as scientists or conservationists, to gain a deeper understanding of the challenges and potential solutions.
Networking is also crucial. Join organizations like the International League of Conservation Photographers (ILCP), which I co-founded, to connect with like-minded photographers and learn from their experiences. Engage with conservation groups and consider partnering with them to amplify your message.
Lastly, use your platform to share your story. Whether through social media, exhibitions, or publications, make sure your work reaches the right audience. Remember, the power of photography lies not just in capturing stunning images but in inspiring change and motivating others to take action.
In my own journey, projects like “Freedom to Roam” or the effort to help with the permanent protection of the Arctic Refuge have shown me the impact that visual storytelling can have on conservation efforts. By sharing compelling narratives and images, photographers can play a vital role in shaping public awareness and influencing policy decisions.
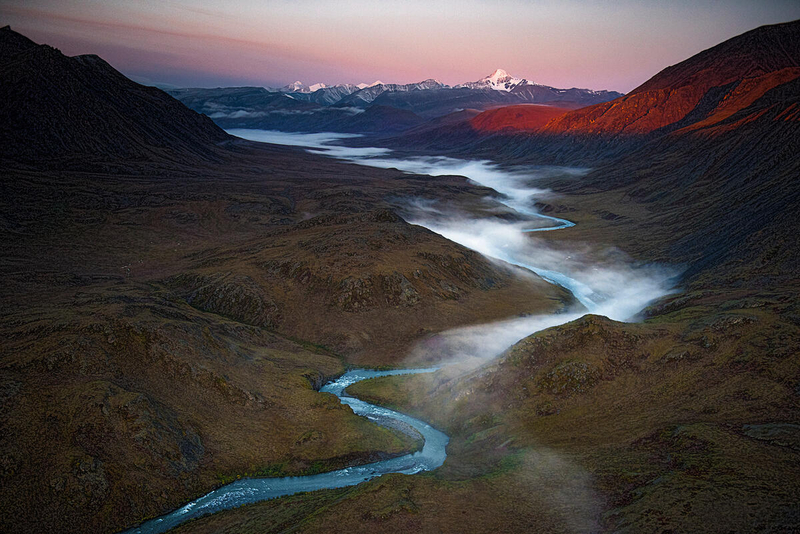
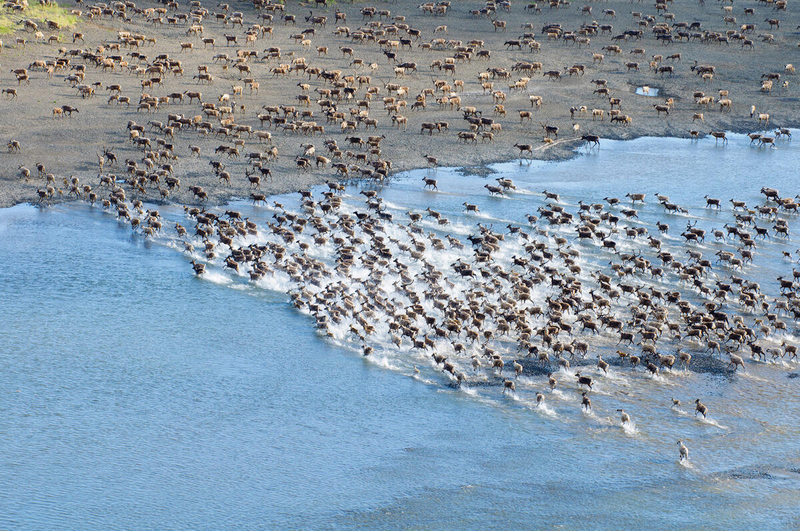
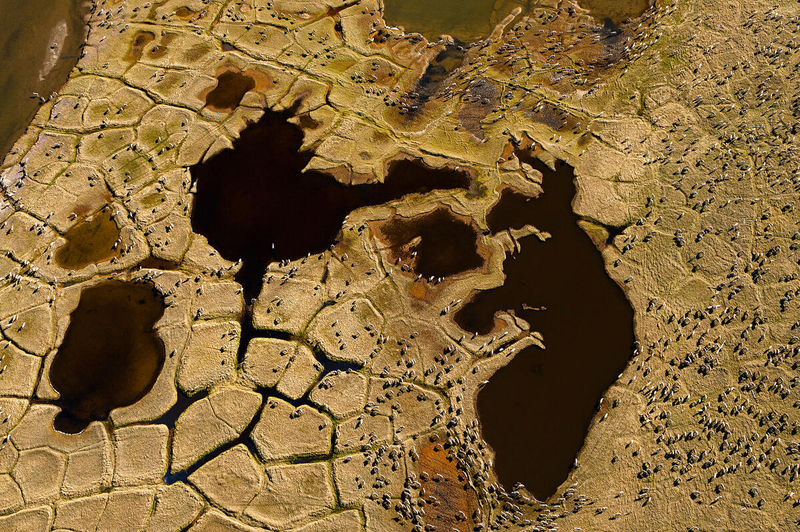
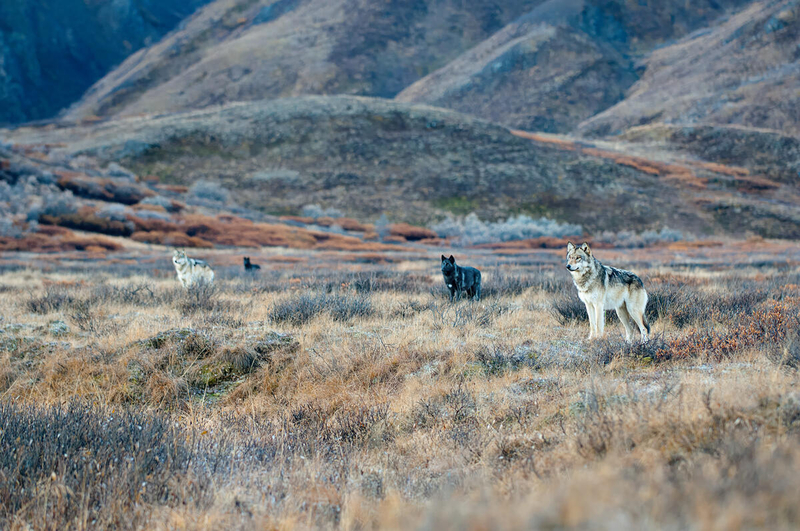
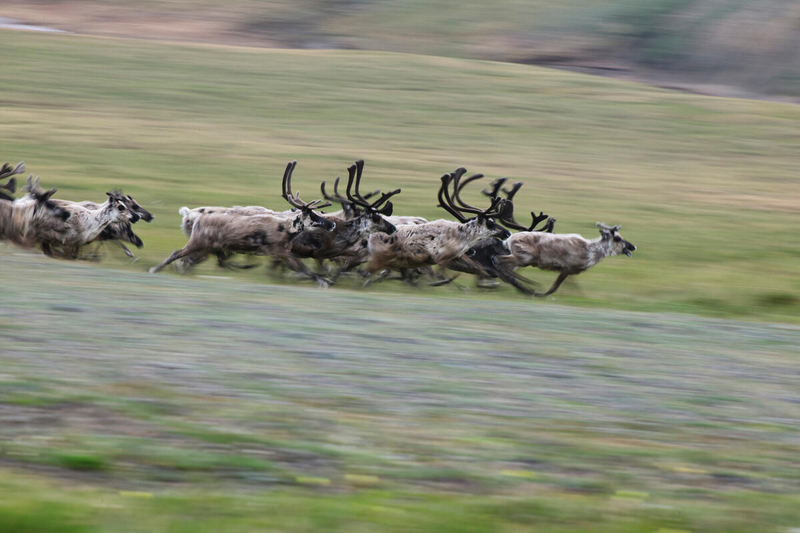
What cues do you recall when your first realized your photography/filmmaking gave agency to the biodiversity and landscape, presenting the Arctic as worth protecting rather than just a barren energy resource? I believe a big reason why conservation was such a big topic for myself from early on was me growing up in Germany. In Germany and across most European countries we had lost large interconnected wild ecosystems. While we have a 1000 year old castle around the corner from where I grow up, we had lost wild places. This feeling of loss, made me cherish the big wild places across North America. Whether it was the Greater Yellowstone Ecosystem where we would still find bears, bison, elk and wolves, or the wild coastlines or the Arctic where the ancient caribou herds would still roam. There was never a time where I could look at these great arctic landscapes as “barren wastelands”. The fight for the Arctic Refuge has been going on for many decades and I have been involved with the Refuge for the last 25 years. It has always been a collaborative effort to fight for the Arctic Refuge alongside the Gwich’in People and many conservation organizations. My images and film work have been a central part in a lot of these efforts and campaigns. From big live speaking tours, many magazine articles to massive signature campaigns, like during the #ProtectTheArctic campaign that inspire millions to take action. This campaign resulted in an unprecedented 6 million comments submitted to the U.S. Fish and Wildlife Service, effectively stopping seismic testing in the Arctic Refuge. Unfortunately, the battle the Arctic Refuge and other wild places is long lasting tug of war.
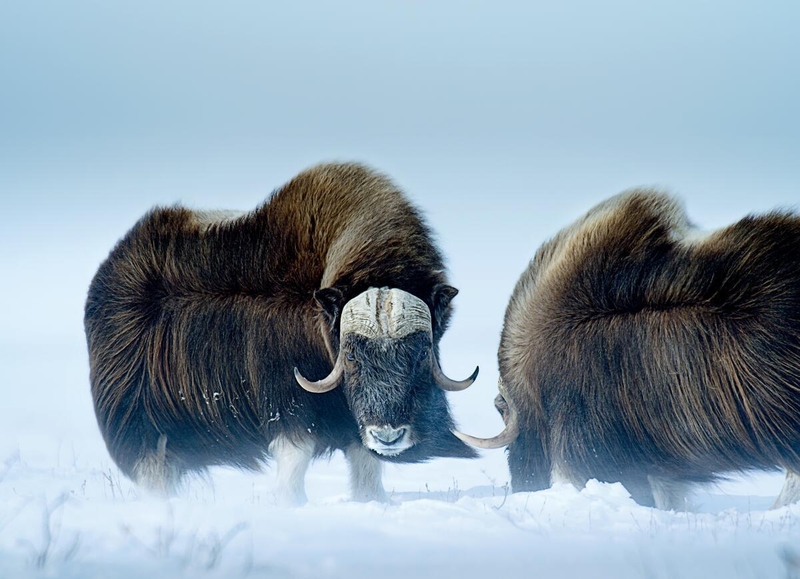
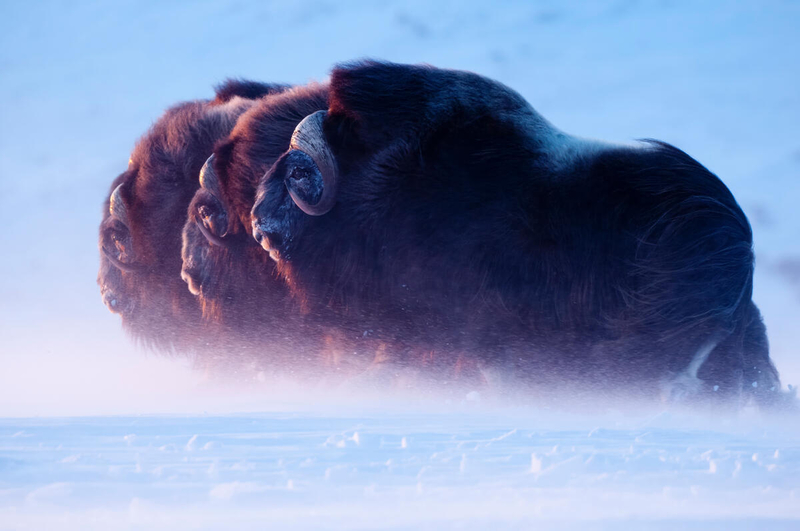
What can you share about this image from your coffee table book, To The Arctic? I near a group of muskox bulls and find myself wishing for a musk ox’s coat to protect me from the weather. Their long guard hair hangs from their bodies like beautiful overcoats. Underneath, their wool is eight times warmer than the highest-quality sheep wool. I feel the gripping cold, especially on my face, where the snow crystals lash my skin like grains of sand. But I am excited about this turn in the weather. It allows me to create photographs that show a true Arctic scene, with conditions these musk oxen have to withstand many times in the course of the year. The wind becomes so intense that the animals almost disappear behind a curtain of blowing snow, their long hair rippling around them like soft cloth. I try to get close enough to capture their image before the sun dips behind the ridgeline. Dropping to my knees, I frame the scene as the last rays cast pink light on the musk oxen’s fur. Then something magical happens. Three bulls take off from the group, heading directly toward the setting sun. For an instant they are in perfect formation. The blowing snow is so thick that it makes the three bulls seem to float magically above the ground. A photograph of a lifetime-and worth everything I had to endure to get it.
Patagonia celebrated your conservation work for ANWR in their Fall catalogs (2016 and 2024) both being election years, what feels different this second time around about impacts we can make as individuals and collectives? I’m honored to have been a part of Patagonia’s conservation efforts, including their campaigns highlighting the importance of protecting the Arctic National Wildlife Refuge (ANWR). The recent “Alaska Needs You” campaign underscores the urgency of our collective action. What is different today after the recent election: “ Alaska Needs You More Than Ever! “ However, it is not just about Alaska; many wild places are under threat due to a wholesale mentality of exploiting public lands and resources, which will ultimately rob future generations of their natural heritage.
The current landscape is complicated by attacks on democratic values, the environment, public lands, and marginalized communities. Misinformation is a significant obstacle, as it often misleads people into believing that exploiting public lands will benefit underprivileged Americans, when in reality, it primarily enriches corporations and billionaires.
However, I remain hopeful. There is a growing recognition of the need for collective action. By coming together as a community, we can fight against these challenges and protect our planet’s biodiversity. The power of collaboration, as seen in campaigns like “Alaska Needs You,” demonstrates that when individuals and organizations unite, we can inspire meaningful change and safeguard the future of our wild places.
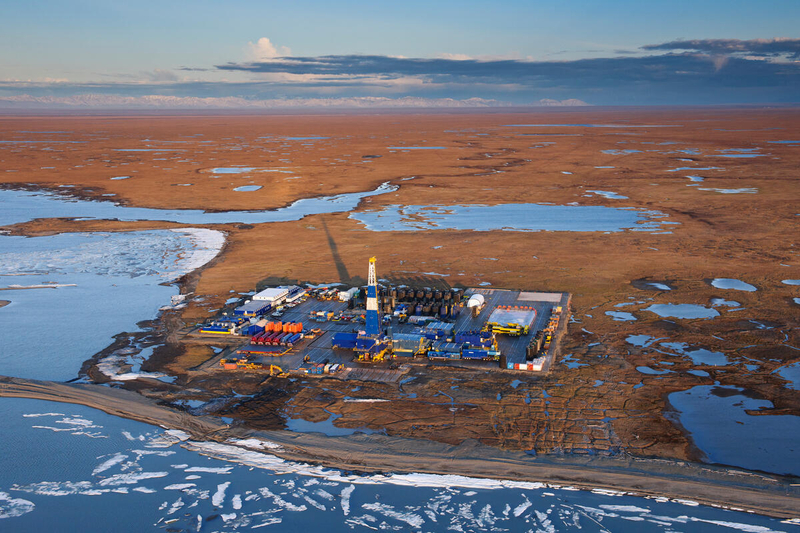
One of the oil drill pads at the edge of the Arctic Refuge just west of the Canning River delta. Oil companies have pushed for opening the Arctic Refuge to the east of the Canning River for oil development. Canning River Delta, Alaskan Arctic
You’ve called Alaska home for the past 15 years, a place where mining, drilling, and extraction remain real threats to land, biodiversity, how are you thinking about your work these days? Every day we are chipping away at the last open spaces and wild lands. The current administration is doing this at a massively accelerated pace. Unfortunately, it is the same old story that is repeating itself. The main difference is, that we have less and less wilderness around us and the speed of exploitation is ever faster. What I am planning to continue to do is fight the same old fight but with different stories and from different perspectives. I personally have to pace myself and also consider my children. If I will always bring up all the critical things I see it is hard for them to be joyful. All this consciousness weighs hard on myself and that gets passed on to them. I want to let my children go and see the beauty of this planet with their curious joyful eyes. So in the coming years, that might be part of the way I will tell stories for us to protect earth for future generations. What are you working on now? I am currently putting on the finishing touches on a presentation I will give at the Patagonia Soho Store in New York City on March 19th. At the same time we are in the middle of planning multiple expeditions across Alaska. This spring we are hoping to document bears coming out of their winter dens. We will also be working in areas across the vast coastal areas of Southeast Alaska and later in the summer across Arctic Alaska. My family will be part of many of the expeditions.
Panasonic may have only just announced the arrival of their flagship photo-centric full-frame mirrorless camera, the S1RII, but Nauticam has wasted no time engineering their matching housing, the NA-S1RII. Much smaller and lighter than its predecessor, the S1RII—arriving five years after its predecessor—boasts a new 44.3MP BSI CMOS image sensor and L² image processing engine, which combine to produce some impressive numbers: 10fps burst shooting with continuous AF using the manual shutter (and 40fps with the electronic shutter) plus 8K/30p 10-bit video recording with 14 stops of dynamic range.
The new NA-S1RII housing offers all of the features we’ve come to expect from Nauticam: a full complement of dials, levers and buttons ergonomically placed around integrated handles; an M24 bulkhead for attaching external monitors or recorders via HDMI 2.0; full compatibility with the company’s water-contact optics (such as the FCP and EMWL); and vacuum check and leak detection electronics as standard. Built-in fiber optic bulkheads mean it’s a breeze to add a Mini Flash Trigger for rapid-fire manual flash triggering.
Available now from retailers such as Backscatter, the NA-S1RII is priced at $5,184.
When purchasing underwater photography equipment like the products mentioned in this article, please support DPG by supporting our retail partner—Backscatter.com.
PRESS RELEASE
INTRODUCING NA-S1RII
The Panasonic S1RII
The Panasonic S1RII seems more of a redesign than an evolution, both in terms of capabilities as well as form factor. The new S1RII is built around a 44MP 8.1K sensor that allows for both high resolution stills capture as well as 8K video at up to 30p with low rolling shutter effect. The S1RII can also record ProRes RAW or 422 at selected resolutions and frame rates. Promising improved autofocus, more in-line with its peers, the S1RII features phase-detection and enhanced subject tracking.
In addition to an overall smaller footprint, the S1RII also has relocated ‘Movie” mode from the exposure mode dial to a dedicated switch below the drive mode dial. This frees up the exposure dial to have 5 custom mode positions which have discrete settings for stills and video mode.
In addition to the high-resolution video capture specs, the S1RII also features Panasonic’s dual-gain ISO. A new Dynamic Range Expansion mode can be enabled when shooting in V-Log to gain an additional stop of highlight information.The S1RII also adds a false-color overlay of pixel brightness to help both still and video shooters prevent clipping. Support for real-time LUTs and Open Gate Capture show the S1RII is really a full-featured hybrid camera.
The Nauticam NA-S1RII Underwater Housing
The Nauticam NA-S1RII is a professional aluminum underwater housing that delivers fast and intuitive access to all the essential controls of the Panasonic S1RII camera underwater. Pairing the NA-S1RII with Nauticam’s extensive line of Water Contact Optics and accessories further enhances the camera’s already impressive still and video capabilities.
Premium Professional Optics
As with the NA-S1R, the NA-S1RII is built around the N120 port system and allows for those moving from the NA-S1R to carry over their port and lens configurations unchanged. This large port opening also allows for a wide range of lenses to be used as well as extensive integration with Nauticam’s Water Contact Optics that offer the best possible underwater image quality.
Mission Control
The NA-S1RII allows for efficient camera control underwater with most essential functions placed within easy reach of the ergonomic handles. The S1RII moves the video/still mode selection to a dedicated switch which is now easily accessed with a lever located atop the NA-S1RII allowing for rapid switching underwater.
Thumb levers near the left and right side handles actuate the image review and AF-ON buttons while levers for Af-mode and switching between the EVF and LCD are also within easy reach.
HDMI Output
The NA-S1RII is equipped with the large M24 bulkhead that allows for the use of Nauticam’s HDMI system to attached optional external monitors or recorders. The 8 1/4″-20 holes atop the housing provide a solid base for mounting these or other larger accessories.
Flash Triggering
For rapid-fire manual flash triggering, the NA-S1RII is compatible with the Mini Flash Trigger (26305) which uses small LED units to trigger external flashes via Nauticam Universal Fiber Optic Cables (26216).
Vacuum Check and Leak Detection System
The Nauticam vacuum check and leak detection electronics are shipped with the NA-S1RII as standard equipment. Combined with an optional accessory vacuum valve (PN 25625) this monitoring system provides constant updates on the water tight and safe-to-dive status of the housing. A simple color coded LED lighting system lets the user know that the vacuum is solid, or that the housing is losing vacuum. Leak detection is built into the same circuit, so if there is water intrusion, an audible and visual indication will occur.
The Nauticam system is temperature compensated, eliminating false alarms caused by a change in outside temperature, or from a camera heating up on an action packed dive.
What’s in the box
NA-S1RII Housing
90137 Spare main housing o-ring
2x Plugs for Optical fiber cable mount
2x Handles with mounting balls
Panasonic CR-2032 Battery (for moisture alarm)
Set of Allen Keys
Padded housing bag and shoulder strap
Recommended Accessories
Vacuum Valve
25625 M16 Vacuum Valve II (Pushbutton Release)
Viewfinder
32212 Nauticam Full Frame Straight Viewfinder (40°/0.8:1)
32214 Nauticam Full Frame Angle Viewfinder (40°/0.8:1)
87213 Reverse Angled Viewfinder for EMWL (40°/0.8:1)
87214 Reverse Straight Viewfinder for EMWL (40°/0.8:1)
*32212/32214, 87213/87214 are preferred
Hand Strap
28130 Hand Strap for 28113
Optical Trigger
26305 mini Flash trigger Fujifilm/Canon/Panasonic
Housing Mount
25221 M10 strobe mounting ball for housing
25224 M10 strobe mounting ball for housing (with hole for using with lanyard)
17959 Housing Mounting ball with 1/4” screws
17960 Universal Quadra-Pod Plate for Nauticam Housings
25218 mounting ball set for tripod
Surface USB-PD Power Bank
26325 USB-C Bulkhead with USB-C Connector *Can be installed on either M24 or M16.
26326 M24-M16 Adaptor for use with 26325
*for use with M24 only
HDMI Output
1) Required accessories for HDMI 2.0 Cable System
25086 M24 adaptor for HDMI 2.0 cable (incl. tightening tool)
25099 M24A2R200-M28A1R170 HDMI 2.0 Cable (for NA-a1 to use with Ninja V housing)
Compatible HDMI 2.0 Monitor Options
17922 Nauticam Atomos Ninja V Housing for Atomos Ninja V 5” 4kp60 4:2:2 10-bit recorder/monitor/player (excl. HDMI 2.0 cable)
17922S Nauticam Atomos Ninja V-S Housing for Atomos Ninja V 5” 4kp60 4:2:2 10-bit recorder/monitor/player (excl. HDMI 2.0 cable) with Atomos AtomX SDI Module
17926 Nauticam NA-Ultra5 Housing for SmallHD Ultra 5 Camera Monitor
2) Required accessories for HDMI 1.4 Cable System (can be installed on either the M24 or the M16 accessory port)
25033 Standard HDMI bulkhead with M16 thread (included in 17927)
26326 M24-M16 Adaptor for use with 26325
25075 HDMI (D-A) Cable in 190mm Length for NA-GH5/G9 (for internal connection from HDMI bulkhead to camera)
Compatible HDMI 1.4 Monitor Options
17927 NA-Shinobi II Housing for Atomos Shinobi II 5.2” HDMI Monitor
17922 Nauticam Atomos Ninja V Housing for Atomos Ninja V 5” 4kp60 4:2:2 10-bit recorder/monitor/player (excl. HDMI 2.0 cable)
25082 HDMI1.4 Cable for Ninja V Housing in 0.75m Length (for connection from Ninja V Housing to HDMI bulkhead) Required for use with 17922
Technical Specifications
Dimensions: 330mm(W) x 200mm (H) x 165mm (D)
Weight in air: 2.25kg
Buoyance in water: Positive 0.5kg (includes camera and battery)