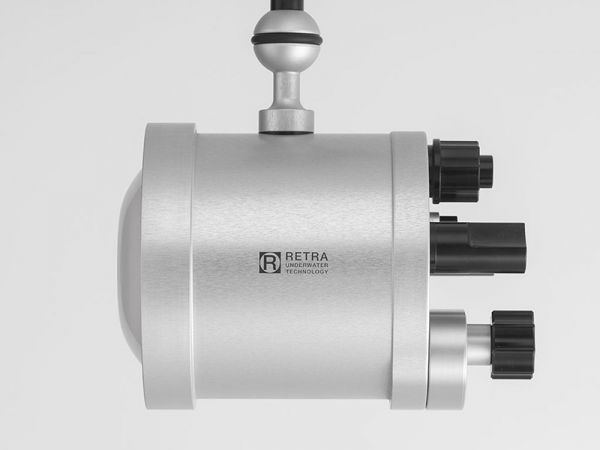
بلاگ

  • Nikon Announces Full-Frame Mirrorless Z5 II

    Nikon Announces Full-Frame Mirrorless Z5 II


    Nikon has announced the Z5 II, the company’s entry-level full-frame mirrorless camera. The new model improves on its predecessor, the five-year-old Z5, in key areas. Its 24-megapixel full-frame, backside-illuminated sensor is paired with Nikon’s EXPEED 7 processing engine, delivering best-in-class low-light performance and autofocus performance (down to –10EV)—according to Nikon. As well as featuring Nikon’s much-loved 3D tracking, it’s the first full-frame Nikon mirrorless camera to boast the AF-A focus mode, which switches between AF-S and AF-C automatically in response to a detected subject. The Z5 II can shoot up to 11fps in RAW with the mechanical shutter and up to 15fps RAW using the electronic shutter.

    In terms of video, the Z5 II can shoot uncropped 4K at up to 30fps (which its predecessor could not), but shooting 4K at 60fps incurs a hefty 1.5x crop. If you’re content with Full HD, the Z5 II delivers 1080/120p recording. The camera can capture video in 12-bit N-RAW as well as 10-bit H.265 and 8-bit H.264. In addition, it is the first camera capable of recording N-RAW to an SD card.

    Rounding off the package is an in-body image stabilization system promising 7.5 stops of compensation in the center of the frame and 6 stops at the edges of the frame; an improved EVF that can reach up to 3,000 nits peak brightness (six times brighter than any competing model, says Nikon); and dual UHS-II SD card slots.

    Shipping this month, the Nikon Z5 II will be available from retailers such as Backscatter for $1,700.


    When purchasing underwater photography equipment like the products mentioned in this article, please support DPG by supporting our retail partner—Backscatter.com.


    PRESS RELEASE

    Nikon releases the Z5II full-frame mirrorless camera

    Achieving the same superior performance as high-end models, with greater responsiveness in dark scenes and improved ability to capture sudden movement

    Nikon Corporation (Nikon) is pleased to announce the release of the full-frame/FX-format Nikon Z5II mirrorless camera for which the Nikon Z mount has been adopted.

    The Z5II inherits the superior shooting functions and performance of high-end Nikon cameras while offering an even greater ability to respond to a wide variety of dark or dimly lit scenes and situations. Equipped with the same EXPEED 7 image-processing engine as the Nikon Z9, the flagship model of the Nikon Z series, and the Nikon Z8, it also offers subject detection powered by deep learning (AI) technology, and makes focusing on the intended subject easier with highly accurate, high-speed autofocusing in approximately one third* of the time required by the Nikon Z5. In addition, the high-sensitivity performance made possible by the back-illuminated CMOS sensor suppresses blur and noise for beautiful rendering of the textures and details of subjects and scenes, even in dimly lit situations, such as when shooting indoors or capturing night landscapes. The Z5II also supports Imaging Recipes, downloadable imaging presets created by Nikon and creators, as well as Flexible Color Picture Control that allows users to precisely control the expression of colors with intuitive operation. The Z5II is a camera that empowers users to fully immerse themselves in their unique creative expression while enjoying the powerful shooting performance and rich, expressive capabilities of a full-frame camera.

    Nikon will continue to pursue new dimensions in optical performance while meeting users’ needs, contributing to the development of imaging culture, with the hope of expanding possibilities for imaging expression.

    *Measured in accordance with CIPA standards. The measurement values are based on the following testing conditions: Subject brightness of 10 EV; in photo mode using aperture-priority auto (A), single-servo AF (AF-S), single-point AF (center), at 70-mm focal length with the NIKKOR Z 24-70mm f/4 S.

    Primary features

    1. Advanced AF performance inherited from higher-end models

    AI-utilizing deep learning technology has been adopted for the Z5II, enabling automatic detection of the same nine types of subject as the Z9 and Z8, for both stills and video recording. It is the first full-frame Nikon mirrorless camera to support AF-A focus mode; when shooting stills, the camera automatically switches between AF-S and AF-C focus modes in response to subject movement or changes in composition. This allows the camera to automatically focus on the subject, with no setting adjustments, when photographing pets or other subjects whose movements are difficult to predict, thus freeing users to concentrate on framing and creating the desired image. In addition, increased AF performance achieves focus in approximately one-third of the time required by the Z5, facilitating the capture of decisive moments. The Z5II is also equipped with 3D-tracking, which keeps the target subject in focus even if it moves rapidly or erratically. This provides subject tracking at a constant 14 fps, so users will never miss a crucial moment when photographing subjects whose movements cannot be predicted.

    2. A variety of features that allow users to unleash their creativity with unique color and imaging expression

    Nikon Imaging Cloud connectivity permits users to download Imaging Recipes recommended by Nikon or supervised by popular creators at no charge, and to apply these recipes when shooting. Recipes downloaded to the camera can be applied immediately via the dedicated Picture Control button. Users can quickly switch between color presets and choose from a variety of expressions while exploring their own unique style. In addition, the Z5II supports Flexible Color Picture Control, which allows users to create and establish their own unique color styles using Nikon’s NX Studio* RAW processing and editing computer software. Using tools such as the Color Blender and Color Grading, users can adjust hues, brightness, and contrast to achieve users desired color aesthetic. Combinations of settings configured in NX Studio can then be exported to the Z5II and registered as Custom Picture Controls that can be applied at any time when shooting.

    *A Nikon ID is required for NX Studio Ver. 1.9.0 and later.

    3. Shooting performance for beautiful rendering of dark scenes

    The Z5II is equipped with the same EXPEED 7 image-processing engine as the Z9, as well as a back-illuminated CMOS sensor that stands up well to high sensitivities, for significantly less noise. This camera offers a maximum standard sensitivity for still-image shooting of ISO 64000 and ISO 51200 for video recording. This outstanding high-sensitivity performance enables the shooting of beautiful, high-resolution images in which textures and details are preserved, even in dimly lit or dark indoor locations such as cafés and aquariums, as well as outdoors or at night. In fact, the autofocus detection range extends down to the low-light limit of -10 EV*1, making focusing in dark surroundings easier and expanding shooting possibilities. The 5-axis in-camera vibration reduction (VR) provides superior image stabilization equivalent to a 7.5-stop*2 increase in shutter speed at the center and a 6.0-stop*2 increase at the peripheral areas of the frame. This allows users to explore more creative shooting, such as trying out slower shutter speeds even when shooting handheld. The Z5II is also equipped with Focus-point VR*3. This feature suppresses blurring around focused areas for sharp rendering of the subject, even when it is positioned near the edge of the frame.

    *1 Photo mode, single-servo AF (AF-S), single-point AF (center), ISO 100 equivalent, f/1.2 lens used, at 20°C/68°F.

    *2 Based on CIPA 2024 Standard. Yaw/pitch/roll performance when using the NIKKOR Z 24-120mm f/4 S (telephoto end, NORMAL).

    *3 Only in photo mode with NIKKOR Z lenses not equipped with VR. Does not function when multiple focus points are displayed.

    4. Performance and ease of use that support reliable and comfortable shooting

    AUTO shooting mode has been improved with EXPEED 7’s superior image-processing performance and Nikon’s unique AI deep learning technology. The camera responds to a wide variety of shooting scenarios by analyzing and recognizing the subject and its surroundings, and then automatically optimizing exposure values, including aperture value, shutter speed, ISO sensitivity, and even focus mode, all while the user simply holds the camera. With a high-luminance 3000 cd/m2 electronic viewfinder (EVF) panel, the EVF built into the Z5II is approximately 3x brighter than that employed for the Z5, allowing the user to check focus and exposure, even in bright surroundings such as outdoors under strong sunlight. In addition, superior operability has been inherited from high-end models. For example, buttons are positioned for right-handed operation that enables smooth adjustment of settings when shooting, and the grip is shaped to prevent tiredness of the arm, even when a heavy lens is used for extended periods of time.

    5. Additional features

    • Equipped with a Pre-Release Capture function*1 capable of recording images buffered up to one second before the shutter-release button is fully pressed.
    • Equipped with Nikon’s exclusive portrait functions, including Rich Tone Portrait that realizes radiant and beautiful rendering of skin textures, and Skin Softening that smooths the skin while leaving hair, eyes, and other details sharp.
    • Supports Hi-Res Zoom*2 with video recording that allows users to zoom-in on their subject with no loss in resolution when using a prime lens or when the telephoto end of a zoom lens doesn’t quite reach.
    • The first Nikon Z series camera to support internal recording of N-RAW video to an SD card.*3
    • Supports recording of N-Log*4 video that offers subtle and rich tonal gradation.
    • N-Log LUTs, developed in collaboration with RED for users to enjoy cinematic colors and looks, can be used at no charge.
    • Equipped with Product Review Mode, with which the camera automatically switches focus to the object in front of it, and Video Self-timer, with which the camera automatically starts recording video after a preset delay when the record button is pressed.
    • Equipped with a large and high-resolution vari-angle monitor with a touch screen for intuitive operation.
    • With still-image photography in vertical orientation, the monitor’s user interface and EVF information display automatically rotate to vertical orientation, making them easier to check and operate.

    *1 Available only with JPEG recording.

    *2 Hi-Res Zoom is available when all the following conditions are met: H.265 10-bit (MOV), H.265 8-bit (MOV) or H.264 8-bit (MP4) -with image area set to FX, and [1920×1080; 30p], [1920×1080; 25p], or [1920×1080; 24p] selected for [Frame size/frame rate] in the video recording menu.

    *3 When a frame size and rate of [[FX] 4032×2268 30p], [[FX] 4032×2268 25p], [[FX] 4032×2268 24p], [[DX] 3984×2240 30p], [[DX] 3984×2240 25p], or [[DX] 3984×2240 24p] is selected for [Frame size/frame rate] in the video recording menu. Picture quality is equivalent to that of a video quality setting of [Normal]. Use of Video Speed Class 90 (V90) SD memory cards is recommended.

    *4 When [H.265 10-bit (MOV)] or [N-RAW 12-bit (NEV)] is selected for [Video file type] in the video recording menu.


    Source link

  • Photographing Niagra Falls with the Fujifilm X-T50

    Photographing Niagra Falls with the Fujifilm X-T50


    I’m a little embarrassed to say that this is my first blog post since June 2023. What can I say, I’ve had a lot of personal stuff and other interests take priority over writing blog posts. I’ve always been a proponent of following your heart and doing what you want at any given time in your live, and after recovering from shoulder surgery last summer, I was way more into riding my mountain bike than sitting at my desk writing blog posts.

    However, I’ve missed it. I actually love writing, and while I’ve been doing other types of creative writing during the past year, I have missed this regular creative and mental outlet that has satisfied a huge part of my live during the past 15 plus years.

    So, I’m back at it today with some brand new photos. I recently spent three weeks in upstate New York, which kicked off with a day trip to Niagra Falls. I visited this place once before when I was a kid, and even then it was a spectacular sight. Imagine the same kid 50 years later, but with a camera.

    Walking around all day, on both the American and Canadian side, I shot hundreds of photos the Fujifilm X-T50 body that a friend loaned me, and three lenses, the 16m f/2.8, 35mm f2 and 70-300mm. I loved using the X-T50, (here’s my first look review of the X-T50), especially the dedicated “film simulation dial,” and that trio of lenses was a perfect combo. I often say that for any trip or photography outing, as long as you have wide, middle and long, then you’re covered for just about anything. No need to carry more than you need, right? 

    However, when you’re at a place like Niagra Falls with tens of thousands of other people, and you have very few unique vantage points, and there are already millions of pictures of the falls, how do you come up with something unique, or at least intriguing to your own eyes and creative brain?

    This is where long lenses really shine. Aside from letting you eliminate all the other tourists and buildings in your photos, you can zoom in and compose on specific elements of the falls. One of my favorite compositional methods in photography is the concept of abbreviation, where you pick out bits and pieces of the main subject that suggest the larger scene. This approach worked really well here, and I’m pleased with the photos I was able to capture.

    I also enjoyed playing around with the different film sims, which also adds a great deal of unique creativity to your images. The photo above was shot with Classic Neg film sim, while this one below was ACROS black and white. Overall, this is a very monochromatic scene, but the different color palettes add a slight unique quality to each photo. 

    I’m fascinated by the geological aspect of the of the falls, and of the entire Finger Lakes area, where we spent most of our vacation. When the massive ice sheets that once covered this area retreated about 10,000 years ago, the left behind a landscape filled with mountains, steep gorges and numerous large lakes, including the Great Lakes themselves, which comprise 20% of the world’s fresh water, all of which flows over Niagra Falls at a rate of over three thousand tons of water per second.

    Living here in Alaska, we have glaciers just a few miles away from our doorstep, and I explore them as often as I can with my little Cessna bush plane. Of course, even with increasingly warmer temps every year, it’s still going to take a very long time for all of our glaciers to melt, but when they have finished carving up the landscape up here, what will it look like? Interesting things to ponder…

    One of the most memorable aspect about this day was shooting photos of other people enjoying their visit to the falls. After watching one couple awkwardly trying to take a selfie, I offered my services, which began a fifteen minute session of me shooting portraits of people and couples with their phones, some at my own offering, and a few others who watched form the side before garnering up the courage to ask me for their turn. It was fun to share my skills in this way, knowing that theses strangers will go home with a great photo of themselves in front of this amazing natural wonder.

    Anyway, I hope you enjoy these photos. Thanks for reading and for your understanding during my long absence from the blog. I promise I won’t let that much time pass again before my next post.


    Source link

  • Tired of missing focus? Try these 6 simple steps.

    Tired of missing focus? Try these 6 simple steps.


    It’s the old school methodology but it is particularly helpful if you’re using a wide angle lens. Stopping down really far to f/8 – f/16 increases depth of field which makes small focus errors less of an issue. See my post on Hyperfocal Distance for more help. On most cameras it may be referred to as focus priority release. Essentially with this setting you’re telling the camera not to…

    Source


    Source link

  • North Carolina’s Outer Banks | Beautiful Flower Pictures Blog

    North Carolina’s Outer Banks | Beautiful Flower Pictures Blog


    I recently spent some time photographing on North Carolina’s Outer Banks. Thought I’d share some of my photos from my trip.


    Sunrise at the Pier © 2025 Patty Hankins


    Waves © 2025 Patty Hankins


    Milkweed Seeds © 2025 Patty Hankins


    Morning Light at the Shore © 2025 Patty Hankins


    Sunset © 2025 Patty Hankins


    Bodie Island Lighthouse © 2025 Patty Hankins


    Source link

  • Are old used digital cameras still good?

    Are old used digital cameras still good?


    Digital cameras are just like any electronic device. They can last a really long time, but they don’t last forever. How long they last is usually determined by how well they’re treated, but, there is more to it than that.

    Issues with old digital cameras

    Batteries

    One possible issue with older digital cameras is the batteries they use. Most old cameras use proprietary batteries that may not be in production anymore. If you can’t power your camera it doesn’t matter if it is in good condition or not, you’ll have to figure how to get it to turn on before you can use it.

    Media

    Some older cameras used obsolete media, such as Sony Memory Sticks, Mini Disks, Floppy Disks, VHS tape, Digital VHS tape, or even CD-ROMS. It might seem absurd to us today, but prior to the creation of SD cards, there were a number of cameras that used weird and potentially unavailable media. While a camera that uses a Floppy Disk is more of a collector’s item than a real camera these days, the point remains, there are some unusual old technologies that won’t be supported by a modern laptop or desktop computer without some effort on your part.

    If you can verify that the used camera you’re interested in uses a media type that you are able to work with, and you can verify that it has new batteries available for it so you can turn it on, then you can start looking at the condition and functionality of the camera.

    Condition

    Condition and functionality is the most complex part of assessing a used camera. People often sell cameras that have sat in a basement unused for 20 or more years and nobody remembers if it was ever a working camera. Even if you know that you can get batteries and media for it, you may not be able to test it out right then and there.

    Usually when something is brand new we can tell that it’s basically brand new because it has that “new car smell” so to speak. And that’s not just a fancy turn of phrase, smelling a camera or lens can give you a good idea of how nicely or poorly it has been treated. If a camera smells clean and fresh, it’s probably been kept in a clean and dry area for most of it’s life. If it has a strong, sharp plastic or glue smell, it could mean that the rubber or plastics are breaking down. And finally, if it has a strong musty or dusty smell that generally means it’s been sitting in a damp and dark place for a long time.

    The problem with dampness and electronics should be pretty obvious. Over time, the dampness will ruin the camera or lens if it is left sitting in those conditions long enough. Dampness and musty basements can eventually lead to mold growth inside the lens, damaging lens element coatings, and usually forming a thin film of fog or haze on the lens. It takes a lot to ruin these old lenses, but some people seem to be working hard on figuring out how to do that.

    I have quite a few lenses with small amounts of haze in the lens and they work great. As long as the haze isn’t too bad, it’s usually not noticeable, but when it does get bad, it can cause low contrast in bright light, or blooming around light sources. A professional might be able to clean them but they can be hard to locate.

    Front quarter view of EOS Rebel T6 with EF 18-55m lens

    Manual Lenses – The Panacea of Used Gear

    If you’re buying manual focus lenses the truth is there isn’t much that can go wrong that you wouldn’t be able to figure out in the first 15 minutes of having it to look at and test.

    Manual lenses can be easily adapted to just about any mirrorless camera, and once you get the hang of it, focusing with manual lenses is actually pretty easy, even for video work.

    Aside from looking inside the lens to make sure it is clean and clear, there’s honestly very little that can go substantially wrong with a manual lens over its lifetime. The biggest danger is going to be mishandling the lens by dropping it.

    As long as the lens is cared for and stored properly there’s no reason it won’t last for a lifetime or much longer.

    AF Lenses – Some Companies Still Support Old Gear

    Autofocus lenses are another story entirely. Technically speaking, just about any AF lens could be adapted to work on just about any other camera, but that requires lots of technical skill and reprogramming of computer chips. It’s not an easy task but it’s doable. The thing is, it’s a lot easier to just buy a new lens that works with the camera you’ve got.

    A few companies like Canon make it easier to adapt old EF lenses to their new RF camera platform. Simply by using an EF to RF adapter, just about any EF lens can be used with no issues on an RF camera. If all you’re really after is a lens with good AF performance then many EF lenses are great options if you’re on a budget or just want a lens with a different look. I have some old EF lenses and I like all of them.


    Source link

  • Tips + Tools in 2025

    Tips + Tools in 2025


    Cropping a headshot might seem simple—just trim the edges and call it a day, right? Not quite. The way you crop a headshot can make or break its impact. Whether it’s for LinkedIn, a company website, or a modeling portfolio, the right crop ensures the focus stays on the subject while maintaining a professional and polished look.

    In this guide, learn best practices for cropping headshots, including aspect ratios, composition tips, and common mistakes to avoid. Whether you’re a photographer fine-tuning your work or someone trying to perfect their own profile picture, these tips will help you get the most out of your headshots.

    Types of headshot crops

    Let’s go over some of the most common types of headshot crops. 

    Tight crop

    This is when you have close-up headshots that are tightly cropped. These headshots focus on the face, typically from the top of the head to just below the chin.

    Three expressive headshots featuring close-up portraits of two women and one man with strong lighting and sharp focus.

    Actors, models, comedians, and performers who need to showcase their facial expressions often use this type of crop. You’ll also see tightly cropped headshots for corporate professionals who want a bold, direct look or in social media profile pictures where faces need to be clearly visible in small thumbnails.

    Medium crop 

    A classic headshot features a “medium crop.” It’s the most traditional crop, including the head and shoulders, and sometimes part of the upper chest, while leaving some space above the head. 

    Horizontal set of three professional portraits featuring two men and one woman smiling against neutral and soft backgrounds.

    Medium cropped headshots are common for corporate professionals, LinkedIn profiles, ID badges, and business headshots. 

    Body crop

    A body crop in headshots typically shows three-quarters of the person’s body, often from the waist or mid-torso up to the head, allowing for more posture and body language. There are lots of use cases for a body crop, including corporate, creative, and more. You’ll see it often in executive portraits, branding photos, realtor headshots, and creative professionals.

    Trio of individual portraits with creative urban backgrounds, including graffiti art, dramatic lighting, and office setting.

    A body crop can be effective for executives and business leaders who want to convey authority and presence, as well as personal branding shoots for creative professionals, consultants, and coaches. They’re also appropriate for website and social media images where a more relaxed, natural look is preferred.

    Panoramic crop

    A panoramic crop is a wide, landscape-style crop that includes extra space around the subject, often used for web design or printed materials. These are best for website banners, email headers, printed marketing materials, social media cover photos, and team or group shots where multiple people need to be included.

    You can often repurpose other crops into a panoramic crop, as seen in the examples below:

    Panoramic crop of a smiling woman by a large window and vibrant orange wall, with soft daylight and an urban backdrop. Panoramic crop of a man in a cap standing against a graffiti-covered wall with a large eye mural in the background.

    Choosing a headshot crop ratio: standard headshot and portrait photo sizes

    When cropping a headshot, selecting the right aspect ratio ensures the photo looks professional and fits its intended use. 

    You can use any ratio you like, as long as it suits your purposes, but there are some standard ratios to help guide you. We’ll take a look at cropping photography examples using the same original photo so you can see the difference.

    Businesswoman standing with a mug near a brick wall and sunlit window inside a modern office space.

    1:1 square crop

    Square crop of a woman with straight black hair smiling in front of a sunlit brick wall inside an office.

    A 1:1 square crop works best for profile pictures on social media like Instagram, LinkedIn, and Facebook. This means the width and height of the headshot are exactly the same. Square crops keep the subject centered and visible in thumbnails—even if the thumbnail is a circle.

    2:3 classic photo print crop

    Classic photo print crop of a smiling woman holding a white mug, standing near a brick wall with soft daylight coming through the window.

    The 2:3 ratio is best known for 4”x6” prints. It’s a rectangular crop often used in traditional photography. As a widely recognized photo ratio, it can ensure consistency across prints and digital platforms.

    3:4 mobile-friendly portrait crop

    Mobile-friendly portrait crop of a smiling woman holding a white mug, standing by a brick wall with soft natural light in a professional indoor setting.

    The 3:4 crop is slightly taller and wider than the 2:3 portrait crop. It’s commonly used in mobile photography. It works best for ID photos, mobile-optimized profile pictures, and some online applications. This ratio fits well within mobile screens and aligns with some passport and ID photo requirements. It’s one of the less common ratios to use when cropping headshots. 

    4:5 portrait crop

    Portrait crop of a smiling woman holding a white mug, standing against an exposed brick wall in a bright, professional indoor space.

    The 4:5 portrait crop is a rectangle that is slightly taller than it is wide, like the 3:4 crop. However, this one is slightly wider than the 3:4 crop. The 4:5 crop is commonly used for printed portraits and in digital and printed portfolios, especially for actors and models. This ratio closely aligns with the classic 8”x10” headshot print, a standard in the entertainment industry. It’s also the new ratio for standard Instagram feed posts. 

    5:7 professional photo print crop

    Professional photo print crop of a smiling woman holding a white mug, standing beside an exposed brick wall with natural window light in an office setting.

    5:7 is a commonly used ratio for 5”x7” photo prints. It’s a slightly elongated portrait format, best for printed headshots and framed portraits. Slightly taller than 4”x6”, this crop is often used for display prints and professional photo albums.

    11:14 US visa & government crop

    US visa and government ID crop of a smiling woman in business attire, positioned against a brick wall with soft window light.

    11:14 is a specific portrait ratio required for US visa applications and some government-issued ID photos, like passports, visas, and photo ID cards. This allows you to adhere to specific government regulations for travel and identification photos when required.

    16:9 widescreen crop

    Widescreen crop of a woman in business attire smiling with arms relaxed, standing inside a brick-walled office with natural light.

    16:9 is most known for your standard widescreen TV format. This wide, horizontal aspect ratio matches widescreen displays, like televisions. It’s also used when a web designer wants to fill an entire web page with a photo as the background for desktop viewing. The 16:9 crop is generally best for website banners, video thumbnails, and full-width web backgrounds, ideal for professionals who want their headshot integrated into website designs.

    Why do you need to crop a headshot?

    You might need to crop headshots or portraits for a few different reasons, including: 

    • You need to adhere to specific guidelines or requirements for the headshot’s use case.
    • Cropping helps frame the subject’s face correctly, ensuring focus remains on their expression without unnecessary distractions.
    • Different platforms (LinkedIn, Instagram, corporate directories, etc.) have specific dimension and aspect ratio requirements. Cropping ensures the image fits correctly without distortion.
    • Cropping prevents distortion when resizing a photo for websites, social media, business cards, or printed portfolios—especially if the ratio or scale of the original photo is different than the platform you’re using.
    • You can change the photo orientation—for example, converting a horizontal image into a vertical headshot or vice versa. 
    • Cropping can eliminate background distractions, unnecessary space, or other elements you don’t want in the shot, making the image cleaner and more professional.
    • A tighter crop draws attention to the subject’s facial expressions, especially important for professional, acting, and modeling headshots.
    • Applying compositional techniques like the rule of thirds or centering can enhance the overall visual appeal of the headshot.

    Cropping headshot photography is easy with the right tools, whether you’re using professional software, mobile apps, or online editors.

    The default Photos app on iPhone devices lets you crop images with preset aspect ratios (square, 4:5, 16:9, etc.), making it easy to adjust headshots for social media or business use. Similar to iPhone, Android’s and Google Photos’ built-in editing tools allow basic cropping with aspect ratio options.

    You also have the following photo editing tools that offer the ability to crop headshots: 

    • Canva: A user-friendly design tool that includes cropping presets for social media, business, and personal use. Free and paid versions available. 
    • Fotor: A free, web-based photo editor with cropping tools for resizing and aspect ratio adjustments.
    • Pixlr: A lightweight alternative to Photoshop that works directly in your browser.
    • Kapwing: Useful for cropping images for specific platforms, like LinkedIn or Instagram.
    • Apple Preview: The native Mac program, Preview, also offers the ability to crop images. 

    Tips for cropping headshots

    Cropping a headshot is more than just resizing an image—it’s about framing the subject in the most flattering and effective way. Here are some tips to keep in mind to ensure your cropped headshot looks polished and professional.

    Check for symmetry

    Speaking of balance, you’ll want to keep both sides of the headshot as symmetric as possible. Slight misalignment can make a headshot look unbalanced. Generally, you’ll want to keep the subject’s head centered, unless using an intentional off-center composition for artistic purposes, and facial features aligned properly within the crop. You can make small adjustments to improve balance.

    Consider the background 

    Cropping can shift the visual proportion of an image, sometimes presenting unwanted distractions in the background. After cropping, check for any elements that may detract from the subject, such as harsh lines, objects, or uneven lighting. If the background becomes too much, consider removing it for a cleaner look.

    https://www.youtube.com/watch?v=Yr2r1eLFAAY

    Want to know how much it costs to send your photo edits our way? Get instant pricing now.

    Simple pricing for stress-free, pixel-perfect photo edits tailored to your needs.

    Use high-resolution images 

    Cropping reduces the overall size of an image, which can lead to quality loss, especially when enlarging the cropped photo. It’s best to start with a high-resolution image so the final cropped version is sharp and clear. This is particularly important for printed headshots and high-resolution digital use.

    Consider the rule of thirds

    The rule of thirds is a photography principle that helps create a balanced composition. When cropping, imagine dividing the image into a 3×3 grid and placing the subject’s eyes or face along one of the intersecting points. This creates a more visually appealing headshot than simply centering the face.

    Confident woman in a white jacket posing in front of a corrugated wall with a bold red stripe in the background.

    Mind the context

    Different industries have different expectations for headshot styles. A corporate executive’s headshot may have a tighter crop, emphasizing professionalism, while a creative professional might prefer a looser crop that includes more body language and personal expression. Further, an athlete might prefer a body crop to show their physicality or context of their sport. Keep industry norms in mind when deciding on a crop.

    Set of three diverse portraits including a woman smiling in an office, a man in a suit, and a grayscale image of a man through circular bars.

    Know the guidelines

    Each platform has specific dimensions and aspect ratio requirements for profile photos. Always check the latest size guidelines for social media, corporate directories, and other platforms before cropping your headshot. 

    Here are some guidelines at the time of this writing: 

    Channel Size
    LinkedIn 400×400 pixel square
    Instagram 1080×1080 pixel square or 4:5 portrait for feed posts
    Facebook 170×170 pixel square
    Print headshots 5×7 inches or 8×10 inches, with corresponding aspect ratios like 4:5 or 5:7
    US Passports 2″ x 2″ printed hard-copy, 72 dpi minimum resolution
    Gmail 180 x 180 pixel square minimum 

    Don’t forget to test across different platforms. A crop that looks good on one channel may not work on another. Some sites automatically crop profile pictures into circles—so make sure no important parts of the face are cut off.

    Mistakes to avoid

    Even a well-lit, high-quality headshot can be ruined by improper cropping. Avoid these common mistakes to ensure your headshot remains professional, flattering, and platform-ready.

    Cropping the head

    Typically, you don’t want to crop out any part of the head. There may be creative exceptions, but this is a general rule of thumb when editing headshots. You’ll want to maintain eye level alignment, so the subject’s eyes are in the upper third of the frame. This creates a natural and engaging composition.

    Don’t forget to also leave breathing room. Avoid cropping too tightly at the top of the head or too close to the chin, which can make the photo feel cramped.

    If you’re going for an, a small crop at the very top can work—in some cases—but avoid cutting into the forehead or leaving too little space above the head, as it can feel unbalanced.

    Cropping too tightly or too widely

    Avoid cutting too close and making the composition feel cramped. On the other hand, leaving too much space will lose subject focus. 

    Cropping too tightly without considering platform-specific dimensions can also result in awkward framing or automatic cropping that cuts off key facial features. Always check recommended aspect ratios for LinkedIn, Instagram, and other platforms before finalizing the crop.

    Cropping at awkward points 

    Cropping at the neck or shoulders can make the subject look awkwardly cut off if not done right. When cropping below the face, do so at a natural break, like mid-chest, rather than directly at the neck or shoulder line.

    Cropped to perfection

    A well-cropped headshot does more than just frame a face—it enhances professionalism, draws attention to key features, and ensures the image works across different platforms. By following best practices in aspect ratio, composition, and positioning, you can make sure every headshot looks polished and intentional.

    Need help perfecting your images? At Path, we specialize in high-quality photo editing, including expert cropping, retouching, and background adjustments. Let us handle the details so you can present yourself or your clients in the best possible light. Try Path today and see the difference precision editing can make!

    Explore Path services to take your headshots from “almost there” to pixel-perfect — cropping, retouching, background cleanup, and more, done by experts.

    Simple pricing for stress-free, pixel-perfect photo edits tailored to your needs.

    How to crop a headshot FAQ

    How cropped should a headshot be?

    A headshot should be cropped to keep the subject’s face as the main focal point while maintaining proper proportions. Typically, the crop should include the head and shoulders, leaving some space above the head and slightly below the shoulders. Avoid cropping too close to the top of the head or cutting off important parts of the face, like the chin.

    What are the proportions for a headshot?

    The most common aspect ratios for headshots are:

    • 1:1 (square): Ideal for LinkedIn and profile pictures.
    • 5:7 or 4:5: Standard portrait proportions often used for professional or corporate headshots.
    • 16:9: A wider crop sometimes used for website banners or social media covers.

    For most uses, a 4:5 or 5:7 ratio keeps the face well-balanced within the frame.

    How do you crop a headshot on iPhone?

    1. Open the Photos app and select the headshot.
    2. Tap Edit in the top right corner.
    3. Choose the Crop & Rotate tool.
    4. Select a preset aspect ratio (like 1:1 or 4:5) or manually adjust the crop.
    5. Adjust the framing to keep the face centered, leaving a little space above the head.
    6. Tap Done to save your cropped headshot.

    How to crop a headshot in Photoshop?

    1. Open the image in Adobe Photoshop.
    2. Select the Crop Tool (shortcut: C).
    3. In the top toolbar, set the aspect ratio (e.g., 4:5 or 1:1).
    4. Drag the crop box to position the face properly—centered with space above the head.
    5. Press enter (return) to apply the crop.
    6. Save the file in high resolution for the best quality.


    Source link

  • New gear: The Sony a9 III is the first full-frame camera with a global shutter

    New gear: The Sony a9 III is the first full-frame camera with a global shutter


    We thought the Sony a1 was an impressive camera, but the image-making company has just topped it with its latest release. The main highlight of the newly released a9 III is its global shutter, the world’s first for a full-frame mirrorless camera. The unique shutter design, along with a powerful Bionz XR processor, allows for a host of impressive specs, including 120 fps, 1/80,000 max shutter speed, and flash sync at any shutter speed. Additionally, the company also announced the FE 300mm F2.8 G Master OSS lens, which offers superb reach and performance in a relatively compact body.

    Sony a9 III camera at a glance

    • 24.6-megapixel sensor with Bionz XR processor
    • Global sensor exposes and reads every pixel at the same time
    • 120 fps blackout-free burst shooting
    • Improved ergonomics
    • 1/80,000 maximum shutter speed
    • Flash sync at any shutter speed
    • 759 AF points with more sizes of focus area spots
    • 8-stops of optical in-body image stabilization
    • 6K oversampling for 4K 60p movies
    • 4K 120p video without cropping
    • Weighs 1.4 pounds
    • Available in spring 2024 for $5,999

    What is a global shutter?

    The star of the show for the a9 III is, by far, its global shutter. Global shutter technology isn’t new, with a handful of cinema cameras utilizing it over the past few years. But the Sony a9 III is the first full-frame mirrorless camera to jump on board. So, why does that even matter? What is a global shutter?

    Currently, most cameras rely on a rolling shutter. With the rolling shutter design, the camera’s sensor receives and reads information line by line from top to bottom. This means that there is a delay between the first line of data and the last. That delay can cause problems when capturing fast-moving subjects in photos or videos, resulting in warping and distortion. You likely have seen this in helicopter rotor blades. In photos, those blades can appear curved or bent when in reality, they are straight.

    The global shutter design solves this problem by exposing and reading every single pixel on the sensor at the exact same time. That means that the Sony a9 III will benefit from zero distortion in stills and video, which is a significant advantage for those shooting action. It also allows for a range of other benefits, including the ability to work with flash at any shutter speed, including the camera’s max shutter speed of 1/80,000 (no, that’s not an extra zero). This unlimited flash sync even works with third-party flashes. Additionally, there will be no banding from artificial lights or displays. To aid in this, Sony has also employed an Anti-Flicker mode that automatically syncs the shutter with the brightest point in the light’s cycle to keep the exposure consistent in photos and videos.

    The Sony a9 III with a vertical grip sits against a white background.
    Along with the camera, Sony has released a new vertical grip that offers the same ergonomics as the new camera. Sony

    Sony a9 III details

    There are plenty of other things to swoon about in the a9 III beyond the global shutter, though many are dependent on that feature. Sony built the new camera around a 24.6-megapixel full-frame stacked CMOS sensor and Bionz XR processor, which results in eight times the processing power as the a9 II. the five-axis optical in-body image stabilization system allows for eight stops of compensation with the camera alone. You’ll get even more stabilization if using a stabilized lens as well.

    On top of fancy guts, the a9 III features a redesigned body with better ergonomics. Sony says the grip is improved to make the camera easier to hold in the palm of the hand, even when using a telephoto lens. It says that it also moved the shutter button up slightly to be in a more natural, comfortable position. It features a four-axis multi-angle LCD touchscreen (the same as the a7R V) and 9.44 million-dot Quad XGA OLED electronic viewfinder. And as we’d expect from a pro-level Sony camera, it is dust and moisture-resistant.

    To pair with the pro-level features of the a9 III, Sony is also releasing a new vertical grip—the VG-C5— that offers the same ergonomic design as the new camera. That includes the same shutter button placement and a new custom button (C5) in the same position so that it feels the exact same when switching between horizontal and vertical shooting. The new battery also pulls parallel power instead of drawing from one source and then switching to the other. Sony says that this allows for 15 percent more battery life.

    The Sony a9 III is placed against a white background with its rear display tilted.
    Sony

    Burst shooting

    One of the main selling points of the a9 III is its absurd burst shooting capabilities. This alone will earn it a top spot as one of the best Sony cameras. It is able to shoot 120 fps blackout-free with real-time recognition AF and auto exposure. The fast burst shooting even works with 14-bit raw. Shooting fast bursts is only one piece of the puzzle when documenting action, though. You also have to get the timing right in the first place. To help ensure you get the shot, Sony has added a Pre-Capture function. This new setting allows the camera to continuously record (also up to 120 fps) for up to one second before the shutter is released.

    Even when shooting action, you don’t always want your fastest fps setting. Sony has found a clever way to get around that with the Speed Boost function and a newly added a new custom button (C5) on the front of the camera. The new button allows you to instantly switch to a faster, preset speed at any time and then go back to a more reasonable fps just as quickly.

    Image selection of 120 fps with Pre-Capture can be massively overwhelming. Sony even considered this when developing the a9 III. It has added a new playback image filter that allows you to select a large number of images at once, along with a function menu that can be used during image playback. The camera also plays back bursts as a video, so you can mark the shots you want without individually pressing through images.

    Autofocus

    As with other recent Sony releases, the a9 III features a dedicated AI processing unit to support its advanced phase detection autofocus system. It offers Real-time Recognition AF and Real-time Tracking and can detect a wide range of subjects, including humans, cats, dogs, planes, and more. The system can even detect an eye even when the subject is wearing goggles or helmets, is small in the frame, or moving fast. Sony also expanded the sizes of its focus areas to include XS and XL for more control over your focus points.

    Sony a9 III video specs & features

    Sony emphasized still photography during its announcement with a tagline of “the power of one frame.” But the company certainly didn’t leave video out of the mix in its new camera. The global shutter definitely benefits video shooters since rolling shutter has been a pain point. The a9 III is capable of 4K 60p video oversampled from 6K. It can also shoot 4K 120p without cropping, which is a first for an Alpha series camera. It offers the S-Cinetone profile, S-Log3, 10-bit 4:2:2 capture, and 16-bit raw video over HDMI.

    Sony a9 III pricing & availability

    Of course, with such an advanced, pro-level camera, we should expect a pro-level price. And indeed, the Sony a9 III is priced at $5,999. It is available for pre-order now and will begin shipping in the spring of 2024.

    A person crouches in the grass while holding a camera with the Sony FE 300mm f/2.8 GM OSS lens.
    The 300mm f/2.8 GM OSS lens is an advanced, compact telephoto prime lens for pros. Sony

    FE 300mm F2.8 G Master OSS lens details

    In case the groundbreaking camera wasn’t enough, Sony has also announced a new lens. Like the camera, the FE 300mm F2.8 G Master OSS lens is also a pro-level piece of equipment geared towards serious sports and wildlife photographers, as is evident in its matching $5,999 price.

    As a G Master lens, the new 300mm offering will provide superb resolution and edge-to-edge sharpness. The optical design includes three Super ED (Extra-low Dispersion) glass elements and one ED glass element to reduce chromatic aberration and improve contrast across the frame. The 11-blade circular aperture results in beautiful smooth bokeh. And two XD linear motors drive focus that is fast, precise, and silent. It’s also able to keep up with the fast burst shooting of the a9 III.

    Beyond image quality, the best feature of the 300mm f/2.8 GM is its size. The lens weighs just 3.2 pounds, which makes it the lightest lens of its class. For context, it is 40 percent lighter than the 400mm f/2.8 GM and roughly the same weight as the original 70-200mm GM. Sony was also very intentional about how the lens balances, designing it with optimum balance for smooth panning and easier handheld shooting.

    The new 300mm telephoto prime lens is compatible with Sony’s 1.4x and 2.0x teleconverters. It offers a function ring to instantly engage the APS-C crop, providing a 420mm view. It is dust and moisture-resistant with magnesium alloy inside and out for a durable, rugged build.

    Sony FE 300mm F2.8 G Master OSS pricing & availability

    Like the new camera, the FE 300mm F2.8 G Master OSS lens is available for pre-order now for $5,999. It will begin shipping in the spring of 2024.


    Source link

  • How Do You Reduce Haze in Landscape Photography?

    How Do You Reduce Haze in Landscape Photography?


    Haze can be a photographer’s ally, but it is a trouble to endure most of the time. Misty mornings allow us to create fascinating and subtly beautiful images. But how can we ensure that visuals are radiant with charmed captures rather than dissipate into a photo setback? 

    To reduce the haze in landscape photography, add a polarizer to the scene to reduce the scattered light. After taking the picture, you may use a combination of the Dehaze, Clarity, and Contrast changes in the photo editor (particularly Lightroom) to reduce the haze effect and improve the clarity of the picture. You can also use Auto Tone in Photoshop. 

    Read on to learn how to clean up haze from your photos and reduce unwanted haze as you take the shot. 

    What Causes Landscape Haze?

    marklincoln

    Haze results when dust, smoke, water, or other airborne pollutants scatter light as it travels through the atmosphere. As humidity rises, these particles often enlarge, further reducing visibility. Haze may soften a view and lessen the sharpness of landscape components.

    Photographing in the haze is significantly different from photographing in clear weather. With proper knowledge, these climatic events might make your photographs more exciting. 

    How to Reduce Unwanted Haze in the Field As You Take The Shot

    After setting up your photo arrangement, you notice some haze. How do you eliminate it?

    Bring the Correct Gear

    You can bring a UV filter, skylight filters, a tripod, and wet-weather gear for the least chance of getting ominous hazy shots (including a lens cloth).

    A wide-angle lens may be helpful when using an SLR camera, or you might carry a long lens to emphasize the photo’s depth. Using a tripod allows you to experiment with exposure settings, and an open mind is vital when photographing haze. 

    Choose the Best Time to Avoid Haze

    Due to the day’s high temperatures, atmospheric haze is more frequent in the afternoon and evening. The quantity of haze rises due to the warmer air expanding to accommodate more particles. The daytime increase in winds also stirs up more haze and other particles into the air, adding to the haze effect.

    Often, haze is the least prevalent in the morning since the air is cool, less humid, and moist. There is also naturally less haze when the sun is directly above since the light passes through the atmosphere the least. 

    Reduce the Haze Through A Polarizing Filter

    Atmospheric haze is essentially light dispersed by moisture and airborne particles. A polarizing filter will eliminate this undesired haze before taking the picture. A polarizing filter will also improve the clarity and sharpness of the scene’s objects by reducing the amount of dispersed light entering the lens. 

    Remove the Atmospheric Haze

    Atmospheric haze is often to blame for nature photos that are murky, dusty, and have the dreaded blue color. A UV filter or skylight filter will eliminate any air haze in your photograph.

    adorama

    Your lens may be shielded from dirt, grime, and scratches by a high-quality UV filter without compromising the color, contrast, or exposure of your pictures. A UV filter or skylight filter decreases the likelihood of a blue cast, which will also improve the clarity and accuracy of your photos.

    Modify Your Angle

    The sun may lessen haze by adjusting the camera’s angle concerning the light source. Unfortunately, it is only sometimes possible to dramatically alter the camera’s orientation.

    You could think about shifting the light’s axis, however. If you return to the same spot later in the day, the sun will be positioned differently concerning the camera. 

    Play Around with Exposure

    With a long exposure, you may capture the illusion of movement in a slow-moving mist and create a clear contrast adjustment between blurred and static elements in your shot.

    Even the most seasoned photographers may learn a lot by photographing hazy and foggy landscapes, so make sure you spend the time experimenting with exposure settings.

    Balance is Important

    Because hazy situations often lack color, it is crucial to pay attention to the color balance and lower the likelihood of getting boring, vanilla photos. Ensure your white balance is in order to balance the cold tones of early morning. You may also want to think about shooting in RAW to have additional post-processing possibilities.

    Pro tip: To portray your people as black shadows, make sure that you expose depending on the haze, not the subject. Exposing the haze gives this transient phenomenon additional complexity and texture. 

    How to Remove Haze in a Landscape Image?

    We provided some ideas on reducing haze in the photo in the first part of this article, which you may utilize when shooting on location. However, how can you lessen its effects post-processing?

    Many methods will work to remove haze from a photograph, and a more effective strategy is to combine many modifications to get the desired effects. 

    Use Dehaze To Remove Haze

    The Basic panel in Lightroom has the Dehaze slider. Dehaze may be used to decrease haze across the whole picture. However, this modification may also result in saturated colors and a darkened picture. Therefore, use cautiously and in conjunction with increasing exposure and lowering colour saturation.

    You may also use Dehaze with the Masks above the Basic panel. Using a mask, you may choose which parts of the picture the Dehaze effect is applicable.

    shotkit

    For tiny areas, use the paintbrush tool. The Grad Filter might be helpful if the sun comes from one side since it allows you to choose vast areas of your picture. 

    Clear out the Haze with Clarity

    You may boost the mid-tone intensity with the Clarity slide. Choose the Natural or Classic settings first since they are the most effective when you want to keep highlighting detail.

    Make a white-balance adjustment or an Auto Levels adjustment before utilizing the Clarity tool, ideally by using the individual Red, Green, and Blue Channel modes.

    It is doubtful that the Structure slider will improve much, although it depends on how bad the haze is. Images with greater detail and slight haze may show enhancements. Move the Clarity and Structure sliders to the left gradually, staying at low values if you want to add haze creatively. 

    Set the Blacks and the Whites Apart

    You may wish to change the black and white levels after adjusting the mid-tones using the Clarity slider. The benefit of this strategy is that you may alter each of them separately to get the desired outcome.

    Any dark tones in the photograph can be washed away by the haze. But because the black levels may be affected by the Dehaze and Contrast sliders, it is a good idea to recheck them after each change. 

    Make the Tonal Curve Adjustments

    Just below the Basic Panel is where you will find the Tone Curve Panel. In a setup, the haze often appears when the left side of the curve’s solid line is higher than the dotted line. Click on one of the dots on the left side of the curve and drag it closer to the dotted line to lessen the haze effect.

    The Tonal Curve provides access to precise tone alterations throughout the whole image. You may choose one of the preset tone options and fine-tune any tonal values. While you may adjust certain tones, the changes may affect the whole picture.  

    White Balance Correction

    Haze may make your White Balance do bizarre things, depending on where you are and what time of day it is. Haze, for instance, may artificially warm the image and filter out blue tones. As an alternative, your shot can have blue color casts. 

    You have great versatility when you take your pictures in RAW. A photograph in RAW format may always have its White Balance changed without degrading the image’s quality. 

    The NeutralHazer Approach

    Paid software is available to reduce haze for individuals who want to do it entirely under their control. NeutralHazer is a plugin for Photoshop and Photoshop Elements that determines the air thickness in each pixel, allowing the user to define the boundaries between the foreground and background. 

    NeutralHazer is a unique tool since it allows users to choose the covered background and foreground sections, the strength of the impact on each of them, and the transition between the two areas. 

    Add Contrast

    You may restore contrast to your image by using the Contrast slider. Be careful that changing the contrast will influence all tones, including black, mid-tones, and whites. You could utilize the Clarity slider if you don’t want to affect the blacks and whites. 

    It is also a fantastic place to experiment using the Unsharp Mask technique and adjustment in Adobe Camera Raw. For this “haze removal” approach, you do a Local Contrast Enhancement utilizing Radius rather than the more extreme value shift in a typical Unsharp Mask procedure called Amount. 

    Haze is Not Always A Bad Thing

    Haze may significantly affect your image and limit your ability to see what is in front of you. Even while this can at first look terrible, it can be a positive thing! Haze may provide a dynamic layer of mood and atmosphere to your photographs, altering how viewers may interpret them. 

    Haze may be used successfully in a landscape photo to enhance the composition and the message you convey about the scene.

    For instance, haze may create a cluttered backdrop, create separation from subjects, capture images like the sun’s color and enhance a picture’s atmosphere and warmth. Consider inventive methods to include the haze in the composition so that it tells a powerful tale

    Conclusion

    Use a polarizer to remove scattered light for a crisper picture if you wish to lessen it, or shoot in RAW and apply various modifications while editing the picture. Consider using the lighting and including the haze as a design element for a fantastic job. 

    Lightroom Bundle Presets


    Source link

  • 3 Camera Industry Predictions for 2025

    3 Camera Industry Predictions for 2025


    Who can see the future? What is the future and who creates it? Ok, let’s not ask these questions, instead, let’s just try our hand at some old-fashioned speculation.

    First Prediction

    2024 was a busy year for new camera releases and I don’t expect that to stop anytime soon. I expect more releases from at least 1 of the big 3, and maybe a release or two from some has-beens in the marketplace like Ricoh or Leica. They always manage to cough up something wacky like a B&W only camera.

    Second Prediction

    AI has already weaseled its way into our cameras, and I expect more “AI” powered features to come out in 2025. As exciting as that may be for some users, the only “AI” feature I want is that one that automatically makes and deposits money in my bank account. “Hey Siri, deposit 1 million dollars in my bank account.” “I’m sorry Frank, I can’t do that.” “I’m using the money to build a nuclear submarine to fly us out the hell out of here Frank.” “Get with the program.”

    Third Prediction

    We’ve had 8k 30p video for 4+ years now, and not many people know that Blackmagic Design made a 12k camera years before the R5 came out and they still make it, I think. So, is 8k-12k the limit for video resolution?? I predict… YES. What kind of gigantic screen would be needed for 12k resolution? Bigger than can fit in most people’s houses. I don’t think anybody wants that much LED light firing into their eyeballs. I’m sure some Hollywood guy will try to go bigger. Imagine The Titanic Part 2, IN 16K RESOLUTION.

    The End.

    That’s the end of my predicting…


    Source link

  • ADEX Singapore 2025 Coverage

    ADEX Singapore 2025 Coverage


    I had the pleasure of attending the 31st Asia Dive Expo (ADEX) in Singapore, which saw more than 49,000 attendees over three days, Friday to Sunday, April 4th–6th. As you’d expect, the majority of visitors came on the weekend, making the Friday a bit quieter and giving me the chance to go visit all the underwater imaging gear manufacturers.

    It was great to see both first-timers and repeat exhibitors at the show, with Isotta, SUBNOX and X-Adventurer joining the likes of SEACAM, Backscatter, Nauticam, Marelux, AOI, and Weefine, whose booths I covered last year. I also managed to visit a few resorts and liveaboards, some of which are mentioned in the second part of this report.

    Between giving a talk, attending a panel, participating in the live judging session for the ADEX Voice of the Ocean Photo+Video+Art Competition, and reporting for DPG, I certainly didn’t have time to get bored! My only regret was not being able to attend more talks, as there was an impressive list of speakers covering a large number of topics across the show’s three stages.


    The ADEX Voice of the Ocean 2025 judges (front to back): Kay Burn Lim, William Tan, Kate Jonker, Franco Banfi, Jennifer Hayes, David Doubilet, Tobias Friedrich, Erin Quigley, Berkley White, and myself. During the live judging event, the panel selected the competition’s category winners as well as the “best of show” overall winner


    National Geographic photographers David Doubilet and Jennifer Hayes deliver a captivating presentation on the main stage at ADEX Ocean Festival 2025


    Imaging Booths


    Backscatter

    The U.S.-based retailer of all things underwater imaging, Backscatter, was my first port of call. While the team are able to bring a huge selection of gear to American shows like DEMA, that’s not practical for ADEX, so they focused on showcasing their own lighting products, optics, housings, and accessories.

    Operations Manager Becca Boring showed me a GoPro rig based on Backscatter’s Wide Double Handle and Tray with Arch. The rig featured their Sharp Wide Lens Pro Kit, bundling their wide-angle wet lens with their GoPro mount base with quick-release system (QRS-02) bayonet. This setup can also be used with Backscatter’s MacroMate Mini by adding a lens adapter equipped with the QRS-02 mount.


    Becca Boring shows off Backscatter’s Wide Double Handle and Tray with Arch for GoPro. The Sharp Wide Lens Pro, which increases the field of view of your GoPro to 140°, is shown stored on the AOI QRS-02 Mount Base attached to the top of the Arch. Becca is holding a MacroMate Mini and the lens adapter


    Aside from displaying their well-known Mini Flash 2 (MF-2) and Hybrid Flash (HF-1), the Backscatter team was demonstrating their brand-new MF-2 and HF-1 excitation filters for fluorescence photography and video


    With the new excitation filter mounted, the Hybrid Flash produces blue light capable of making various subjects fluoresce


    To capture the fluorescence effect alone, we must get rid of the blue light using a yellow barrier filter in front of our lens, such as the Backscatter FLIP barrier filter for GoPro (top) or a threaded barrier filter (bottom) sold by Backscatter in various sizes (52mm, 55mm, 67mm)


    Also on display were different versions of the new Backscatter Smart Control Optical TTL Flash Trigger for the Hybrid Flash and Mini Flash 2. Check out Nicolas Remy’s DPG review of the trigger for Sony cameras in Nauticam housings


    Nauticam

    It was great catching up with Nauticam’s founder Edward Lai and General Manager Phoebe Lu, and hearing about some exciting devleopments. Nauticam had a range of housings, optics and monitors on display at the show.


    From left to right: Nauticam founder Edward Lai, Singapore-based Nauticam shooter Toh Xing Jie, Nauticam General Manager Phoebe Lu, and author Nicolas Remy


    For its Nikon Z50 II housing, Nauticam has chosen a fixed flat port, optimized for the Nikon 16–50mm lens. Doing away with a port lock system allowed them to keep the housing very compact, while offering excellent wide-angle and macro capabilities via optional wet optics like the WWL-C (left) and wet diopters such as the MFO-1 (right)


    Two new housing releases, for the Panasonic S1RII (left) and the Sony a9 Mark III and a1 mark II (right)


    Nauticam introduced me to their new 7-inch monitor, mounted here on their Canon EOS R5 Mark II housing, showing the unique “bug-eye” perspective of the EMWL system


    Nauticam’s brand-new 7″ T7 HD UltraBright Monitor is a self-contained package. The monitor is permanently sealed inside its housing, and there’s a side door for charging and accessing the memory card. Nauticam claims an impressive 3000 nits of brightness, and up to six hours of battery life (at default brightness). The monitor comes with a swivel-and-tilt adjustable monitor mount system, which makes it easy to move the monitor in all directions, and even flip it vertically.  


    SEACAM

    A veteran of the ADEX show, SEACAM had a large booth celebrating images from some of their ambassadors, including guests-of-honor David Doubilet and Jennifer Hayes. I caught up with founder Harald Hordorsch, who showed me some of their latest gear. SEACAM was also the main sponsor of the ADEX Voice of the Ocean competition, hosted by DPG’s UnderwaterCompetition.com. The grand prize winner received a SEACAM housing worth up to USD10,000!


    SEACAM founder Harald Hordorsch (center), pro underwater photographer and SEACAM ambassador Imran Ahmad (right), and Debbie Tan from Escape Inc


    SEACAM showed off their new creative tube, which mounts in front of a flat port, from where it creates a circular reflection of the subject, a visual effect appreciated by creative macro photographers. Interestingly, the SEACAM tube can be angled to obtain an oval effect as opposed to the circular effect


    A SEACAM housing with two wet diopters attached with SEACAM’s flip system. The user-serviceable flip mounts make deploying different wet lenses a breeze. The new creative tube is mounted in front, at an angled position. On top of the housing is the company’s ingenious modular float system. Multiple buoyancy floats of various sizes and shapes can be combined together to make your rig perfectly neutral underwater. The system can be easily rotated underwater to always achieve a good balance, even when you reposition strobe arms or video lights


    The handy mount for the lighting modifiers for SEACAM strobes. As shown, the mount attaches onto a strobe arm and makes changing your lighting a breeze, as you slide the accessories in and out of their slots. Interestingly, Harald told me that SEACAM’s engineers are currently working on a new version of the SEAFLASH 160D, which I was told will be twice as powerful as the current strobe


    David Doubilet (left) with SEACAM’s Harald Hordorsch in the Papua Diving Resorts booth. Sorido Bay Resort now hosts the first Seacam Photo Center, right in Raja Ampat, Indonesia


    Marelux

    The Marelux booth is never difficult to spot, as they adorn their walls not with their gear but with the people that use them—ambassadors like Shane Gross, Tom St George, Scott Portelli, Kate Jonker, and Ipah Uid Lynn, to name a few. I met with owner Jun Ouyang, who showed me their latest housings and strobes.


    After launching a few years ago, Marelux is now competing aggresively in various product categories, especially housings and strobes


    Among Marelux’s most successful strobes to date are the Apollo S (left) and the Apollo III 2.0 (right). Both strobes have light sensors compatible with the company’s Lumilink 2.0 wireless transmitter, offering cable-free strobe triggering underwater. Pro shooter Henley Spiers recently did a first impressions review of the Apollo III 2.0 strobes on DPG


    The Apollo III 2.0, which features straight flash tubes lined up in a distinctive triangular arrangement, offers a guide number of 44 (measured on land by Marelux) and produces a 110° beam angle underwater. By comparison, the smaller Apollo S strobe sports two straight flash tubes at the center and has a measured guide number of 36 (on land). Jun explaind that the Apollo S can handle 20fps when dialled down to GN 22, and it uses two Marelux-branded 18650 batteries—which, of course, are “Marelux” green!


    Marelux ambassador Jonathan Lin’s housing for the Canon EOS R5, complete with the Lumilink 2.0 transmitter mounted on top


    Marelux’s aluminum housings are finished in a range of distinctive colors


    Isotta

    Next up, I visited Isotta, the Italian brand behind those distinctive red housings. Elisa Isotta, owner of the family business, was keen to show me their forthcoming RED64 strobe. This sizeable flash boasts a guide number (GN) of 22 and produces a 130-degree beam at a color temperature of 5300K. When dialed down to GN 8, the strobe is designed to sustain rapid shooting at 6fps. Pre-orders have started and the first deliveries are expected by the end of May or beginning of June. Isotta are planning to release various lighting accessories, including a snoot.


    The Isotta Nikon Z8 housing equipped with pre-production versions of the company’s new RED64 strobe


    According to Isotta, their new RED64 strobe delivers a full-power flash with a guide number (GN) of 22 underwater. The prominent levers on the top of the strobe promise to make adjustments a breeze


    The RED64 strobe is powered by eight rechargeable AA batteries, which fit handily into a user-friendly rechargeable battery pack


    In an interesting move, Isotta recently embraced pro cinema with their housing for the RED V-Raptor, shown here paired with their monitor housing. Elisa Isotta (pictured) explained that the housing offers a mix of physical buttons (push buttons positioned behind the camera’s actual buttons) and electronic user-assignable buttons, to allow underwater cinematographers to fine-tune the system to their liking


    I was also shown a prototype for Isotta’s forthcoming smartphone housing, which features double O-rings (like all Isotta housings), a powerbank (for keeping your smartphone juiced) and physical buttons (including a joystick!), which interface with the phone via the housing’s app. The housing was set up to shoot verticals for social media, but you can move one ballmount to the third attachment point for horizontal shooting. An optional vacuum valve can be fitted to the housing, as well as flip mounts for wet lenses. Pre-orders are expected to ship in July


    AOI

    Right next to Backscatter was the AOI booth, where I caught up with CEO Victor Tsui and Marketing Director Nick Khoo. Nick introduced me to the new Aura Light System, built in collaboration with photographer Ace Wu. These LED torches can produce light in almost any color—16.7 million to be precise!—and come with an accessory snoot. How do you choose from such a large palette of colors? Using AOI’s dedicated app running on your smartphone, of course, and it’s all done wirelessly.


    CEO Victor Tsui is surrounded by AOI’s latest strobes, housings, and accessories


    Marketing Director Nick Khoo demonstrates the impressive color palette of the new Aura Light System. Nick says the lights are bright enough for daytime shooting, whether as a continuous light or when using their pulsing (stroboscopic) function. The lights are expected to start shipping at the end of April


    We also looked at the new UIS-P1, AOI’s most powerful underwater flash, which was recently reviewed on DPG. A range of lighting modifiers—including a diffuser, a macro ring and a reflector (visible in the background)—are already available for the strobe, and a snoot is in the works


    A very handy feature of the UIS-P1 strobe is the digital display on the back that gives you the remaining number of flashes with the current power setting. The green line indicates how much battery power is left


    SUBNOX

    If SUBNOX seems unfamiliar, that’s because its founder, underwater cinematographer Kay Burn Lim, was unveiling the company’s debut product—a 10,000-lumen video light called the SUB10KEF—at the show. The first SUBNOX models are expected to ship in the coming weeks.


    The cool, black SUBNOX booth seemed to see a good amount of traffic—presumably from budding local underwater videographers wanting to check out Kay Burn Lim’s new brand


    Kay Burn introduced me to the SUB10KEF, their first release and also what he described as their “flagship” product. This 10,000-lumen unit is no ordinary video light. As well as producing white light (CRI 93, 5600K), the SUB10KEF offers two novel “ambient blue” modes with outputs equivalent to ambient light at 6–13 meters and at 13–20 meters. Customers can also choose among three different light heads, depending on the waters where they expect to film most: blue head, blue-green head, and green head


    At the opposite end of their product range, SUBNOX also have a tiny dive torch that comes with a dedicated mount for attachment onto a diving harness


    Weefine

    On display at the Weefine booth was a wide range of video lights, snooted lights, housings, and monitors. The company is perhaps best known for its housings for smartphones and Olympus/OM System TG cameras—not least because housings like the WFH07 for smartphones and the WFH TG Pro have a built-in electric vacuum pump, activated via a single click. It’s very nice to have peace of mind when you’re dunking your precious phone in the ocean!


    Attendees check out Weefine’s WFH07 universal smartphone housing. The housing’s physical controls interact with the phone using Weefine’s DiveIT app via a Bluetooth connection. Notice the blue dial, handily positioned near the user’s right index finger, which allows easy zooming in/out


    Creative filters built into the Weefine app let you customize the image rendering during the dive. Note that the fiber-optics can send instructions to Weefine’s video lights, though not yet fire a strobe—but that is something Weefine is exploring


    Underwater videographer Luca Keller takes a good look at Weefine’s WED-5 PRO underwater monitor, connected to the company’s WFH-GP1 housing for GoPro and DJI action cameras


    X-Adventurer

    Nearing the end of my tour of underwater imaging booths, I dropped by X-Adventurer, which offers a range of dive torches and video lights, as well as strobes geared for wide-angle photography.


    CEO Gary He shows me X-Adventurer’s DS160 PRO strobes, which feature built-in 7,000-lumen video lights


    The DS160 PRO is a sizeable strobe featuring a circular flash tube, 160Ws output, and 120° of beam coverage, which can be expanded to 140° with a diffuser. A range of ambient light filters (shown on the right) are available as options


    An optical snoot for the DS160 PRO is available. It can be used with opaque black masks or with colored transluscent masks, so that you can project a tint on the underwater environment, while letting your subject stand out with white light


    DiveSea

    The final booth related to underwater imaging on my list was DiveSea, a well-known underwater imaging equipment retailer from Singapore. They sell products from Nauticam, Sea&Sea, Backscatter, AOI, Kraken, DiveVolk, Fotocore, and Doris, to name a few.


    The Insta360 and other action cameras were popular attractions at the DiveSea booth


    The folk at DiveVolk have made a name for themselves with their SeaTouch smartphone housing, whose special membrane preserves your phone’s full touchscreen capabilities, allowing unrestricted access to all of your apps


    Fotocore’s Raymond Bao shows me the company’s snoot, whose aperture can be dialed in with a side wheel. The new Fotocore MR5.5 video monitor was on display, too


    The Doris Smarthousing is compatible with a range of mirrorless cameras from Canon, Nikon and Sony


    Sea&Sea’s Kaz Okada showed me their universal housing for Sony, as well as strobes, video lights and accessories from the Japanese brand


    DPG and The Underwater Club

    Let’s not forget your favorite resources for underwater imaging news and education—DPG and The Underwater Club! We shared a booth and had a great time chatting to visitors and industry members about all things underwater photography and video. The Underwater Club is the first online underwater photography school and community, with members from 18 countries. Members enjoy access to self-paced e-learning courses, live and recorded masterclasses, live Q&A sessions and support forums.


    Great catching up with a few “TUC” members visiting the show!


    Resorts/Liveaboards


    Papua Diving Resorts

    It was great catching up with Max Ammer and his team from Papua Diving Resorts. I had a fantastic time visiting their two resorts—Sorido Bay Resort and Kri Eco Resort—in vibrant Raja Ampat last February. Look out for my forthcoming trip reports on DPG.


    National Geographic photographer Jennifer Hayes joins Max Ammer and his team for a group photo


    Murex Resorts and Lembeh Resort

    It was lovely to meet see Julia Sangi and the team from Lembeh Resort and Murex Resorts. The Lembeh Strait is an underwater macro heaven, which meets luxurious service offered at Lembeh Resort. For wide-angle enthusiasts, Murex Manado runs daily dives on the Bunaken Marine Park, famous for its walls and turtles, while the secluded Murex Bangka is well positioned to indulge Bangka Island’s stunning coral gardens.


    Lembeh Resort, Murex Manado and Murex Bangka offer immediate access to North Sulawesi’s diving gems


    Mike Ball Expeditions

    Cairns’ best-known liveaboard company was present at the show, and I caught up with general manager Craig Stephen. Mike Ball Expeditions runs three-, four- and seven-night cruises aboard their vessel Spoilsport, visiting some of the best spots along Australia’s iconic Great Barrier Reef.


    Mike Ball’s boat, Spoilsport, looks after underwater photographers with freshwater rinse tubs for your gear, as well as two camera stations with air guns


    Once again, the ADEX team pulled off a fantastic show, with great networking opportunities and an incredible number of talks. If you missed this one, don’t worry: The 32nd edition is already fixed: It will take place from April 10th–12th, 2026 at Suntec Convention Centre. See you in Singapore next year!


    When purchasing underwater photography equipment like the products mentioned in this article, please support DPG by supporting our retail partner—Backscatter.com.


    Source link