برچسب: How

  • How to Choose the Right Photo Editing Services

    How to Choose the Right Photo Editing Services


    When you need photo edits and see a long list of editing services and techniques, it’s easy to feel a bit overwhelmed. With so many options plus multiple ways to combine them, where do you even start?

    It makes perfect sense to go with what feels familiar, like basic retouching or background removal. But we’ve learned from working with thousands of photographers and business owners that your photos often benefit from multiple services working together. Combining services gets you better results with less hassle, since you can handle everything in one order instead of juggling separate projects. Let’s show you how to pick the right edits for your photos.

    How to identify what your photos actually need

    Before you start combining services, let’s figure out what you’re actually working with—it’ll save you time and help you get better results.

    Photo diagnosis checklist

    Take a look at your images and ask yourself if you spot any of these:

    • Background issues: Is the background distracting, the wrong color, or inconsistent across your batch? Does it look messy or unprofessional?
    • Subject problems: Are there imperfections, poor lighting, or color issues with your main subject? For apparel, does it need to show fit and drape without a model?
    • Technical fixes: Is anything crooked? Are shadows missing or looking unnatural? Any dust, dirt, or glare issues?
    • Brand requirements: Do you need multiple product colors? Specific formats? Transparent backgrounds for marketing materials?

    Common photo problems and their solutions

    Here are some scenarios we see all the time:

    • “My product looks flat and boring” → clipping path + shadows
    • “The background is messy and distracting” → background removal + retouching
    • “I need to show this product in 5 different colors” → clipping path + color change
    • “The model’s hair isn’t looking right” → image masking + retouching
    • “My apparel needs to show shape without the mannequin” → ghost mannequin + retouching + symmetry

    Most photo challenges need two to three services working together, not just one by itself.

    How Path services work better together

    Here’s why thinking in combinations instead of individual services makes more sense:

    • Save admin time: Upload everything you need edited in a single order and get it all back together, ready to use. No juggling multiple orders or trying to keep track of which image versions are where.
    • Speed up your workflow: Everything gets delivered together in the formats you need. Your designer handles all the edits for each image, so there’s consistency across the entire batch.
    • Keep all photos consistent: When the same designer handles all your edits, you get cohesive results. Colors match, shadows look natural together, and the overall style stays consistent.
    • Keep costs down: We offer discounts when you bundle multiple editing services together.

    You can combine pretty much any of our services together—two, three, four, or more. What matters is understanding which combinations work best for your specific type of photography.

    Service combinations by photography type

    Every photography project has different needs, and you might even use the same image for different purposes. Here are some proven editing combinations that work well for different situations:

    Sports photographers

    When you’re dealing with high-volume shoots and tight deadlines, you need services that work fast and handle the most common issues in sports photography.

    Your typical service combo:

    • Image masking for complex backgrounds, hair, equipment details, etc.
    • Background removal for clean, professional shots and official team photos, etc.
    • Photo retouching for spot removal, color correction, skin touch-ups, etc.

    There may be time-critical events such as championship coverage where you need polished images fast, or you might need to update and create consistent team roster headshots across an entire squad, just like this photographer does. You can choose different services depending on what each batch of images needs, whether that’s processing 200+ action shots or creating headshots with a uniform, professional look.

    We offer turnarounds from 6 hours, so you can deliver images to your clients, magazines, or publications fast.

    Product and ecommerce brands and photographers

    For ecommerce, consistency is everything. Your product photos need to look professional, meet marketplace (like Amazon) standards, and convert browsers into buyers.

    A standard combo:

    • Clipping path for clean cutouts that meet marketplace requirements or create a clean website look.
    • Shadow services add depth and dimension so products don’t look flat.
    • Color change shows all available product colors without reshooting every single variant.

    Advanced ecommerce stack (add these for even more polished results):

    New ecommerce brands often start with the foundation combo (clipping path + shadows + color change) and add ghost mannequin as their apparel inventory grows. Established retailers may go with the full stack approach for complete consistency across their entire product catalog.

    Portrait and headshot photographers

    Professional portraits and headshots need to look polished but still natural. The goal is enhancing what’s already there, not creating something fake.

    Typical professional edits for portraits and headshots include:

    • Background removal/clipping path gives you versatile backgrounds for different marketing uses.
    • Photo retouching helps with natural beauty enhancement, color correction, and flyaway hair fixes.

    Corporate headshot scenarios may include:

    • Basic combo of background removal + basic retouching.
    • Premium package, adding advanced retouching and multiple background options for different brand uses.

    Advanced portrait combination (for high-end clients or special projects) may include:

    • Image masking for complex hair or clothing details.
    • Color change for different outfit variations or brand color matching.
    • Multiple background options so clients can use the same headshot across different marketing materials.

    Wedding and event portrait combinations may include:

    • Image masking for intricate dress details and flowing fabric.
    • Retouching for flawless, natural skin and perfect lighting.
    • Background removal for ceremony photos that need to work in albums and marketing.

    How to choose your perfect edit combination

    Use this simple framework to figure out which services make sense for any project:

    1. What’s your end goal? Are these photos for marketplace listings, marketing materials, portfolio work, or client galleries?
    2. What’s your biggest time constraint? Do you have a tight deadline, a high volume of images, or particularly complex edits?
    3. What’s your budget priority? Are you focused on cost per image, or is premium quality and time savings more important?

    Consider your photo use case

    Sometimes the same photo needs different sets of edits depending on how you plan to use it. For example, a product photo might need:

    • For marketplace listing: clipping path + white background + basic retouching.
    • For social media: same photo but with different background + enhanced colors + shadows.
    • For print: higher resolution + color matching + vector conversion.

    How to mix and match your edits

    Use this simple approach to figuring out which services work best for your projects:

    • Start simple: Pick two to three core services that address your biggest pain points.
    • Test combinations: Try different combos on smaller image batches to see what works best for your workflow.
    • Scale up when it makes sense: Add more services as you see results and understand how they improve your final images.

    When to add each editing service

    Not sure which services you actually need? Here’s a quick reference for what each one does best.

    Clipping path: When you need hand-drawn, crisp clean cutouts that you can use on any background.

    Background removal: When you want clean white (or any color) backgrounds for product photos.

    Image masking: For intricate shots with hair, fur, or complex borders that need precise, natural-looking cutouts.

    Shadow: When products look flat or unrealistic—shadows add depth and dimension, and they actually help generate more sales.

    Ghost mannequin: For apparel that needs to show natural fit and drape without models or mannequins, essential for consistent ecommerce catalogs.

    Color change: When you have multiple color options and need to show true-to-life colors without reshooting every single shade.

    Photo retouching: When imperfections distract from your subject—this corrects flaws and makes every element shine.

    Multi-clipping path: When you need to select multiple areas within images for separate editing (like changing just the shirt color but not the pants).

    Vector conversion: When you need scalable graphics and logos that maintain quality at any size.

    Symmetry: When product alignment matters for brand consistency and that premium, professional look that converts better.

    Flowchart titled “What does your photo need?” showing how to choose photo editing services like clipping path, image masking, shadow, ghost mannequin, and retouching based on background issues, subject problems, technical fixes, and business needs.

    How to place your Path order

    Ready to try combining services? Here’s exactly how to do it and how it works:

    Getting started

    1. Sign up for your Path account
    2. Top up Path credits (optional but recommended—you get bonus credits when you top up)

    The ordering process

    1. Click “new order” to start your project
    2. Select all the services you need for this batch—you can choose as many as you want
    3. Upload your images using drag and drop
    4. Get instant quote and you’ll see your total cost immediately
    5. Set preferences like:
      a) File format for your edited images
      b) Additional comments or instructions
      c) Upload any supporting files if needed
    6. Select turnaround time (longer turnaround means cheaper pricing, or choose rush for time-sensitive projects)
    7. Review and approve your quote
    8. Choose payment method and submit your order

    If you need 1,000+ images edited a month, we offer bulk pricing with better rates and priority support.

    Ordering edits with Path couldn’t be any easier

    Now that you know which combinations work for your type of photography, placing an order is straightforward. Try Path free with 2 free edits and see how much better your photos look with the right services working together.

    Let us look after your image edits, so you can get back to the fun stuff. Try Path free.


    Source link

  • How to Take Incredible Photographs of Flowers

    How to Take Incredible Photographs of Flowers


    This is a guest post from Izabela Korwel. Check out Iza’s amazing macro photography on her blog, follow her on Twitter, Facebook and also on Google +!

    Flowers are the easy subjects to come by and to photograph, even close to home. You can go to local park or find a flower bed downtown or at the mall. You can visit a botanical garden, there is one in every major city. You can ask the neighbors if you can photograph in their garden. You can also just go the flower shop and buy potted or cut flowers, and set them up in your living room.

    The easiest way, as I discovered this year, is to plant small flower garden in front of your house. Even for the sole purpose of having a photographic subject handy, they do not require that much work, especially if you choose the local wild flowers. The diversity in types and colors will help keeping you interested and returning often to add to the collection of images. Each day, the flowers will looks different, some will be already dying, and some will just start to bloom. There are new and different photos to be taken each and every day.

    Don’t Forget to Check The Weather!

    Weather is going to be your worst enemy. Sun and wind are two ingredients you need to be aware of at any moment.

    They say that macro photography of flowers (and other plants) is the one type of photography allowed in the midday harsh light. Don’t believe it. It will at times create as much contrast between your highlights and shadows as for any other subject. Unless of course your flower subjects are in the shade or under a scrim. Pay attention to the light, and either photograph during “golden hour” or at times when the sun in on opposite side of the house. It will create far more beautiful images.

    It is going to be quite difficult to avoid the wind. Even a small breeze can shake high stem flowers enough to result in blurry images. Especially if you photograph in the shade, with stepped down aperture (large f/ stops) for increased depth of field, the shutter speeds will be slow and the slightest movement of the flower will be magnified in your photograph. There is not much you can about it. Check the wether and pick the day of the week and the time of the day with the calmest conditions. Pick the side of house for your garden opposite to prevailing wind direction in your area. But also, you can just incorporate the movement into your photographs for fresh, creative look.

    What Gear Do You Need for Flower Photography?

    Photography of flowers is oftentimes at borderline of close-up and macro work.

    If you have a point and shoot camera, many have excellent macro mode, which will allow you to get close. Turn it on.

    On a dSLR, you will get the best results from dedicated macro lens. They come in few focal lengths, which vary by manufacturer. I found the Nikkor 85 mm works well for me and my shooting style. In fact, all images in this post but one were take with this lens. You can rent and try different lenses from one of several reputable online services (like BorrowLenses.com, LensRentals.com, LensProToGo.com) or check in local camera store before investing your money in one. Also consider that many all-in-one zoom lenses, like the Nikkor 18-200 mm or Sigma 18-300 mm I use, will allow you to focus from just few inches away. Other options include extension tubes and macro filters. This last option is the least recommended, but the least expensive at the same time.

    Use These Settings for Best Results

    The camera settings you choose will have strong effect on the final image. Play with them, if your camera allows it.

    The ISO is best left alone on the highest setting you are comfortable on your camera. The higher the ISO, the shorter your shutter speed will be, but the more noise you will get. On most dSLRs, 400 or 800 is the best choice.

    The other parameter you probably don’t need to worry much is the white balance. First, most dSLRs are quite good on the Automatic mode. Secondly, if you shoot RAW, you will have the most flexibility to change it afterwards. Third, the flower images are usually fine art not documentary, and as such are subject to artistic freedom. You might even try changing the white balance to warmer or colder for some artistic reason.

    The Aperture priority or Manual mode will give you the most control over remaining settings. But stay away from really wide open apertures like f/1.8, or even f/5.6. Many beginners enjoy the shallow depth of field, especially shortly after upgrading from point-and-shoot which typically have unlimited depth of field. When you are close to the subject, the depth of field is too narrow and just not enough for any part of the flower to be in sufficient focus. You will quickly realize that anything starting from f/11 or even f/14 gives enough depth of field to avoid the feeling of out-of-focus, blurry image. Many times it is best to go as high as lens allows, up to f/22 or f/32 depending on the lens. Be also careful in how you position the camera in relation to the flower. The more parallel the sensor and the part of flower you want in sharp focus are, the easier it will be to achieve crispy look.

    At the same time, the stepped down aperture might cause your background to come in focus and make the image too cluttered. To avoid it and have more control over the aesthetic of your background, replace it with your own. Take several different out of focus photographs- of cloudy sky, trees in several shades of green etc. If it is not single, solid color, it will look more natural. Print them as 11×14, and glue them onto foam core for more sturdiness and use as on-demand background. The more color choices, the more flexibility.

    Getting Better Flower Photos With Precision

    The last two pieces of advice in this post are going to have the most impact on your flower photography. These are also the two things too many of beginning photographers ignore, thinking they will be just fine without them. The results are mediocre instead of excellent.

    First, put the camera on tripod. Really. It does not need to be fancy setup with ball head and removable center column, although it helps. What it has to be, however, is sturdy enough to keep the weight of the your camera. I am using Manfrotto 055XPROB with 488RC2 ball head. I went through several cheap, plastic tripods before giving up and finally investing into it. Avoid my mistake.

    Secondly, use manual focus. Even with stepped down aperture, the depth of field will still be narrow. With the stabilized tripod, now you can make the decision if the middle of the flower or the petals are where you want viewers to look first.

    I hope those few basic tips will get you interested in finding some flowers now and photographing them. Be creative. Have fun. And if you feel there is anything important I forgot, please ask a question or add your tips in the comments section.


    Source link

  • How to Take Symmetrical Apparel Photos for Ecommerce


    Crooked collars, uneven sleeves, lopsided hems—these small details can make even high-quality products look unprofessional. For apparel product shots, getting perfect symmetry is one of those skills that separates amateur shots from photos that serve as sales tools.

    Clothing doesn’t cooperate like rigid products do. But there are plenty of proven tips and tricks to help with the three stages—prep, shooting, and post-production—so you can consistently create balanced, professional photos that convert.

    Why symmetry matters in apparel product photography

    Put simply, symmetry is pleasing to the eye. It represents order that our brain likes. Like a bookshelf with perfectly aligned spines or evenly stacked towels. But if you look at a building that has every window perfectly aligned except one, you’d notice it immediately.

    The same applies to your product photography. If your apparel shots are crooked, unbalanced, or asymmetrical, shoppers notice—and not in a good way. Symmetry triggers trust, which in turn can help boost your sales

    When buyers see balanced, well-aligned product images—like The Wildlife Trusts online storefront—they perceive higher quality and professionalism. It’s a subconscious signal that you care about details, which translates to caring about your products.

    Product grid from The Wildlife Trusts online store featuring illustrated T-shirts, tote bags, caps, and a water bottle, emphasizing nature-themed merchandise.

    Pre-shoot preparation: setting up for symmetry 

    The right prep can save you hours of editing later and help you achieve that balanced, professional look from the start.

    Choosing the right garments and prep

    • Select quality samples: Choose garments in excellent condition without permanent wrinkles, stretched fabric, or damaged seams that can’t be easily fixed.
    • Steam thoroughly: Remove all wrinkles and creases before shooting. Pay extra attention to sleeves, collars, and hems where asymmetry is most noticeable.
    • Know your fabrics: Delicate materials like silk need gentle handling and may require clips to maintain shape (without over stretching). Heavier fabrics like denim hold their form better but need proper steaming.
    • Arrange details evenly: Position buttons, zippers, and accessories symmetrically before shooting.
    • Check seam alignment: Ensure shoulder seams, side seams, and collar edges are properly positioned and won’t create uneven lines.

    Mannequin and display preparation

    • Choose proper sizing: Select mannequins (or models) that fit your garments without stretching or bunching the fabric. You can turn images into ghost mannequins later.
    • Align mannequin straight: Position mannequins facing directly forward. Shoot straight-on or at a slight up/down angle.
    • Support flat lays: Use foam core boards or batting inside garments to add structure and eliminate wrinkles for flat lay shots.
    • Add dimension: Stuff sleeves and body sections with batting to create natural-looking volume and shape.
    • Pin invisible points: Secure fabric from behind using straight pins to keep symmetrical draping.

    Some pieces won’t work symmetrical and that’s fine. Still apply all other prep and shooting tips to get high quality photos. For example, this cape on Project Cece’s online shop is asymmetrical and calls for balanced composition rather than forced symmetry.

    Product page for a red JULAHAS cotton cape on Project Cece, showing eco-labels and ordering options, emphasizing sustainable fashion marketing.

    During the shoot: capturing balanced apparel images

    Photographing and arranging products isn’t quick work—even teams with professional stylists might max out at 10 items per shoot day, though dedicated studios with specialized workflows can typically process more.

    Camera settings for optimal symmetry

    • Choose longer focal lengths: Use 50mm, 85mm or longer to minimize distortion that can make clothing look uneven or warped. If you’ve got limited space, zoom lenses can come in handy.
    • Set consistent aperture: Shoot around f/8-f/11 to keep the entire garment in sharp focus from front to back.
    • Position camera center: Keep your camera dead-center and level. For top-down shots, ensure the camera is truly overhead to avoid skewing.
    • Use a sturdy tripod: Essential for consistent framing, sharp images, and avoiding camera shake.
    • Set up even lighting: Use two lights (ideally), positioned on either side to eliminate uneven shadows. Adjust angles based on fabric thickness.
    • Enable camera gridlines: Use your camera’s grid overlay to align garments perfectly within the frame. You can also shoot tethered and connect to a monitor to catch any issues in real-time.
    • Frame precisely: Frame your shots exactly as needed from the start. If you plan on removing background or doing other edits like drop shadow, you can always adjust canvas size during editing. Just make sure to fully capture your product so you have plenty to work with in editing.

    Styling techniques for balance

    Different garments will benefit from different arm positions—some look better with hands close to the body, others with arms slightly bent away. Whatever you choose, make sure both sides match for symmetrical posing.

    Before and after image of a plaid dress showing improved styling with symmetrical arm positioning and cleaner garment presentation, alongside tips for balance and garment posing in product photography.

    • Use clips, pins, and even tape behind the garment to create perfect draping while keeping them invisible from camera view.
    • Review each shot immediately to catch issues before moving to the next setup. What looks balanced to your eye may appear crooked in the photo.
    • Make small adjustments between shots rather than major repositioning. 
    Dig deeper into why symmetry sells. Read “Symmetry in Product Photography: Why It Matters” to uncover the psychology and strategy behind balanced apparel images.

    Before and after image of a leather jacket showing ghost mannequin effect and symmetry correction in post-production, with tips on natural garment editing for eCommerce apparel photography.

    Post-production: fine-tuning your symmetry  

    Even with perfect shooting, most apparel photos need symmetry adjustments. Good clothing editing fixes natural flaws without making products look artificial and matches both sides, not copy-pastes half a garment.

    Before and after photo of a green puffer jacket showing improved symmetry and background removal, with editing tips on cropping and alignment using Photoshop grid overlays for precise garment presentation.

    Basic symmetry edits anyone can do

    • Crop and straighten: Use your editing app’s grid overlays to align garments perfectly within the frame and correct any camera tilt. In Adobe Photoshop, you can select several grids when cropping, such as Rule of Thirds or Triangle (both great for quickly centering your shots) or Grids (for more precision).

    Photoshop interface showing a leopard print top on a mannequin with the crop tool active and the Rule of Thirds grid overlay dropdown menu expanded for precise image composition.

    Cropped view of a leopard print knotted T-shirt on a mannequin inside Photoshop, with symmetrical framing adjustments applied using grid alignment tools.

    Professional symmetry editing techniques

    Four-stage photo editing process of a linen top including original, background removal, wrinkle removal, and symmetry correction, demonstrating garment photo enhancement.

    Professional symmetry editing involves complex, precise adjustments that require advanced skills:

    • Sleeve alignment: Matching sleeve length, cuff positioning, and draping between left and right sides
    • Side-edge corrections: Ensuring garment edges create perfect parallel lines and consistent silhouettes
    • Curve refinement: Smoothing necklines, armholes, and hemlines for balanced curves
    • Detail alignment: Positioning pockets, buttons, zippers, and decorative elements to mirror exactly

    These edits involve reshaping fabric digitally while keeping realistic texture and natural draping. Our mirror image symmetry service handles these complex fixes so you can focus on shooting and growing your business instead of spending hours on detailed post-production. 

    When to DIY vs. when to outsource

    Not every symmetry issue can be fixed with editing. Major fabric distortions or non-mirrored patterns need to be corrected during shooting—no amount of post-production can create symmetry that wasn’t captured originally.

    Some garments, like the patterned shirt from Omnes, look balanced in shape but have naturally asymmetric designs. For these pieces, focus on getting the overall structure right during shooting, then handle simple fixes like ghost mannequin effects, lighting adjustments, and wrinkle removal.

    OMNES product listing featuring a model wearing a pink floral shirt and pants set, with isolated product image of the top on white background.

    Basic edits like cropping and straightening work fine as DIY projects. But complex symmetry corrections can take hours per image. For busy photographers and ecommerce brands, professional editing usually costs less than your time while delivering better results. 

    And with marketplaces like Amazon requiring high-quality images, professional symmetry editing gives you that polished result that DIY edits can’t always achieve.

    Symmetry checklist 

    Check all these before approving your images and you’re good to go:

    • No obvious wrinkles (natural fabric draping is fine)
    • Sleeves and hems are aligned and match in length
    • Collar and necklines are centered and balanced
    • Buttons, zippers, and pockets are positioned symmetrically
    • Fabric drapes evenly on both sides
    • Lighting is balanced with no uneven shadows

    Consistently balanced shots for every product

    Not only does symmetrical apparel photography help your products look appealing, it also meets the high standards that customers expect in ecommerce. Whether you edit in-house or outsource the tricky stuff, what matters is finding the approach that works for your workflow and quality needs.

    Need help getting perfect symmetry? Path’s editors handle complex apparel fixes, saving you time while delivering professional results for any marketplace.

    The post How to Take Symmetrical Apparel Photos for Ecommerce appeared first on Path Edits.


    Source link

  • How to use crop modes on your full frame digital camera.


    The reality of the world is that images are almost always cropped from what they were in camera no matter how we share them. This is largely due to the constraints of mobile phones where wide aspect ratio images can be hard to view on phones when the phone is held in portrait mode.

    The weird thing is that every website or app is a little bit different. Some sites force your images into their own highly restricted crop such as Instagram, and some sites like Flickr don’t care what crop is used. The main concern for using either of those services is how people are most likely to view your images which as far as I know is still a mobile device.

    To help photographers deal with this, did you knot that most (if not all) full frame 35mm digital cameras have built in “crop modes” which apply a digital crop to your image in camera?

    For example, my camera will shoot in 4 different crop modes (also called aspect ratios). It will shoot in a 4:3 aspect ratio which is the old TV standard for HD television. It will shoot in 1:1 format which is a square format used as we all know on Instagram. It will shoot in 16:9 which is the modern standard for television screens, computer monitors, and many TV shows. Take a look at the comparisons below to get more of an idea of how these different formats relate to each other.

    When using these alternate aspect ratios the RAW image remains unaffected. After opening the RAW files in Lightroom a crop will be automatically applied to the image but you can just remove the crop and voila, you’re back to having a full frame image again. If shooting JPG the final image is cropped and the 35mm full frame image can’t be recovered.

    Since the RAW file retains the 35mm full frame image a different aspect ratio can be used as a bit of a cheat to help avoid framing mistakes. Say you’re the type who tends to shoot with a tilt or off to the right all the time, or maybe you tend to shoot with the subject low or high and cut off people’s feet. If you’re one of those types then using one of these alternate aspect ratios can force you to frame your images better.

    For instance, if you want to make sure you always have room on the sides of your images, you can use the 4:3 crop to force yourself to frame a little wider on your subject. This might be especially useful if you’re shooting fast action such as sports and you want to make sure that there is room in the image to get a nice frame around your subject for publication.

    For instance, if I was shooting baseball or basketball where there is usually a focus on what a single player is doing, I might choose to shoot in RAW with the 1:1 crop active. This would force me to put the player close to the center of the frame at all times.

    Think of it as a way of making a repetive job a little easier on yourself and you might start to see the benefits of using different crop ratios when you’re taking pictures.

    It would be really cool if the camera allowed me to create a couple custom crop ratios for all the different websites out there as well, but, I haven’t heard of a camera that can do that yet.

    The R5 can also shoot with a full APS-C crop. Below is a comparison of the full frame area vs the APS-C area.

    If you’re far away from the subject, say a bird or other kind of wildlife, then shooting with an APS-C crop not only saves some file size but it can help the photographer get better framing for their final images. It also allows the R5 to work a little more seamlessly with other APS-C cameras if other people happen to be using those.

    Despite all this, many if not most photographers will immediately ask why anyone would throw out all those pixels that they paid so much money for in a full frame camera. Well, they honestly have a good point and it’s why I rarely to never use APS-C crop on my camera. For one, while the APS-C crop does offer some logic, it’s really better to use a longer focal length to achieve precise framing. On the R5 a full APS-C crop is still 17.2 megapixels which isn’t too far off from actual crop sensor cameras that are often around 24 megapixels. But it is a far cry from the 45 megapixels of the R5’s full frame sensor. Bottom line: going to APS-C on the R5 throws out more than half the resolution and that would be true with any FF camera that offers the ability to shoot in crop mode.


    Source link

  • How Long Do You Keep Client’s Files? Horror Story!

    How Long Do You Keep Client’s Files? Horror Story!


    It’s a tale as old as time, but when you enter into work in the photography space without a contract, problems like this are bound to arise.

    An unfortunate Redditor recently revealed on the site that a client they had done a shoot for eight months previously came back asking for the download link.

    a close up of a computer screen with a menu

    Unfortunately, and somewhat predictably, this was about a week after they had already deleted the client’s photographs.

    And this was one of those situations in which, as you guessed, there was no contract.

    Now, we are not in any way naive enough to believe that a lot of photographers aren’t working on good faith in this industry—but what happens when situations like this arise?

    For one, it potentially leaves you open to legal repercussions—a knife that cuts both ways.

    Of course, as anyone will tell you, the first thing in a legal situation that lawyers will ask for is the contract. And if there is no contract, you are about to enter a quagmire.

    But this particular situation also raises the question: how long is reasonable to keep a client’s old work? For that, you might need to use common sense—or, preferably, as you guessed it, have a contract in place.

    So how long do you keep clients’ work?

    Is eight months a reasonable amount of time?

    And do you have a standard contract that you use that covers this scenario?

    Let us know in the comments.


    Source link

  • How to Fix Blurry Sports Photos

    How to Fix Blurry Sports Photos


    Taking crisp action shots of sports figures can be challenging, and sometimes an otherwise perfect shot is just a little out of focus. 

    In this tutorial, you’ll learn how to fix blurry sports photos—including methods you can use to sharpen and fix out-of-focus sports photography, as well as tips to ensure your next sports photos are crisp and clear.

    How to fix a completely blurry sports photo

    A completely blurry sports photo is when nothing in the frame is in focus. This often happens in action shots. If this happens to you, there are several filters you can use in Photoshop to sharpen the entire image.

    Using the Unsharp Mask Tool

    Photoshop has a filter specifically designed to sharpen images, known as the Unsharp Mask tool. A blurry image can never truly be “sharpened,” but Unsharp Mask attempts to detect the edges of your photo by looking for side-by-side pixels that are different in color. Then, the tool allows you to adjust the contrast of those pixels and create the illusion of a sharpened image.

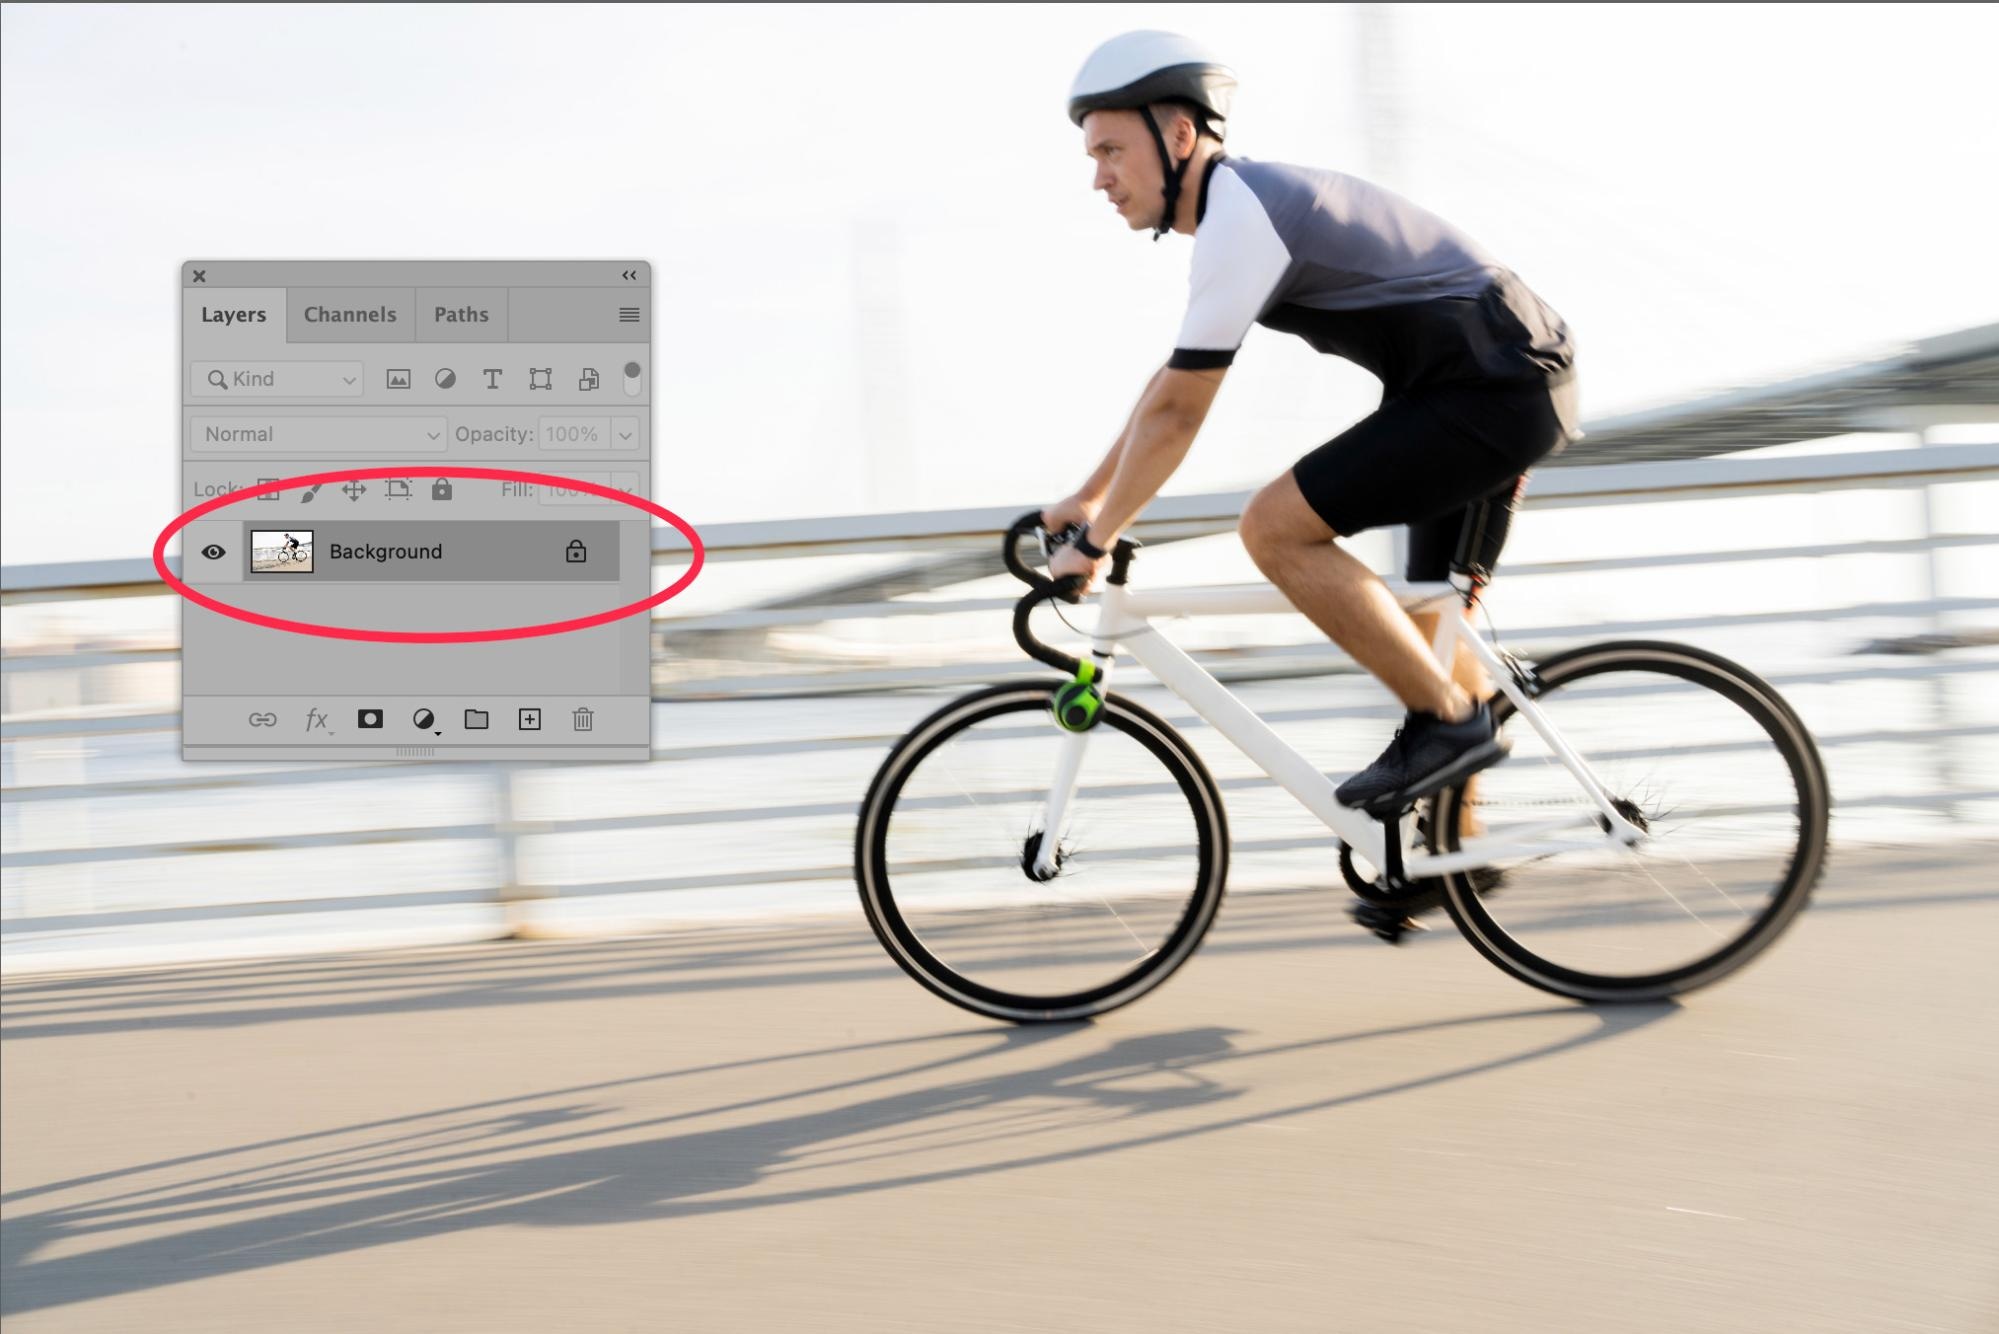
    To use this tool, open your blurry sports photo in Photoshop. Make sure you have the layer containing the image you want to sharpen selected (in a JPEG, this would be the Background layer).

    Photoshop 2025 showing the locked background layer selected in the Layers panel, displaying a motion-blurred cyclist on a bridge.

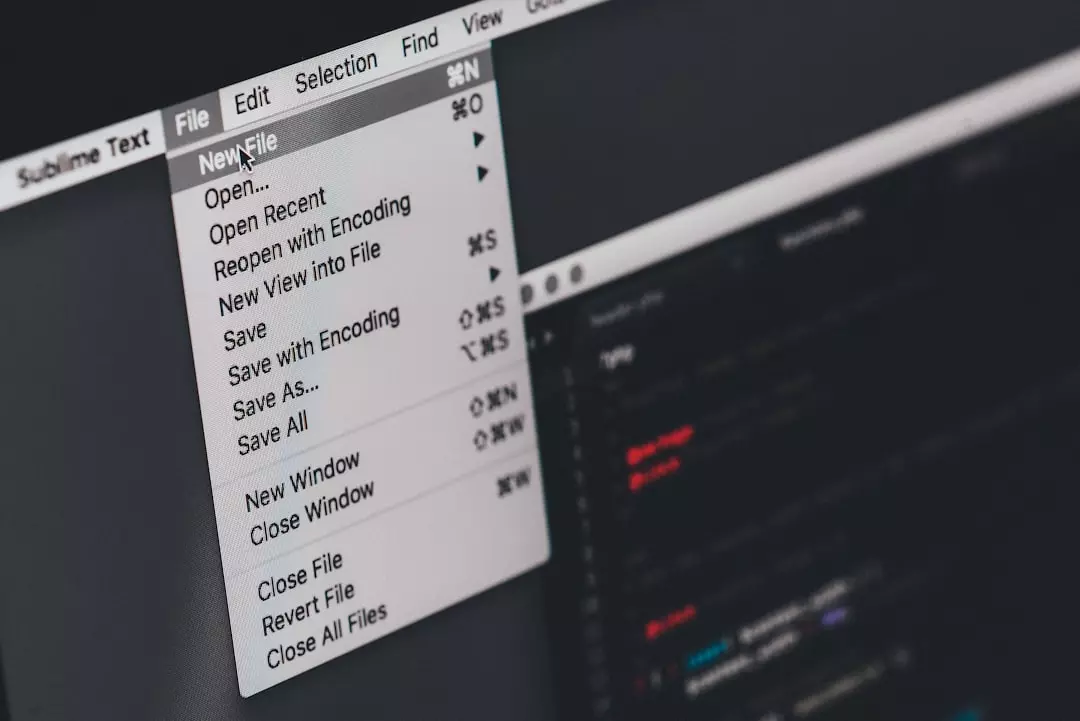
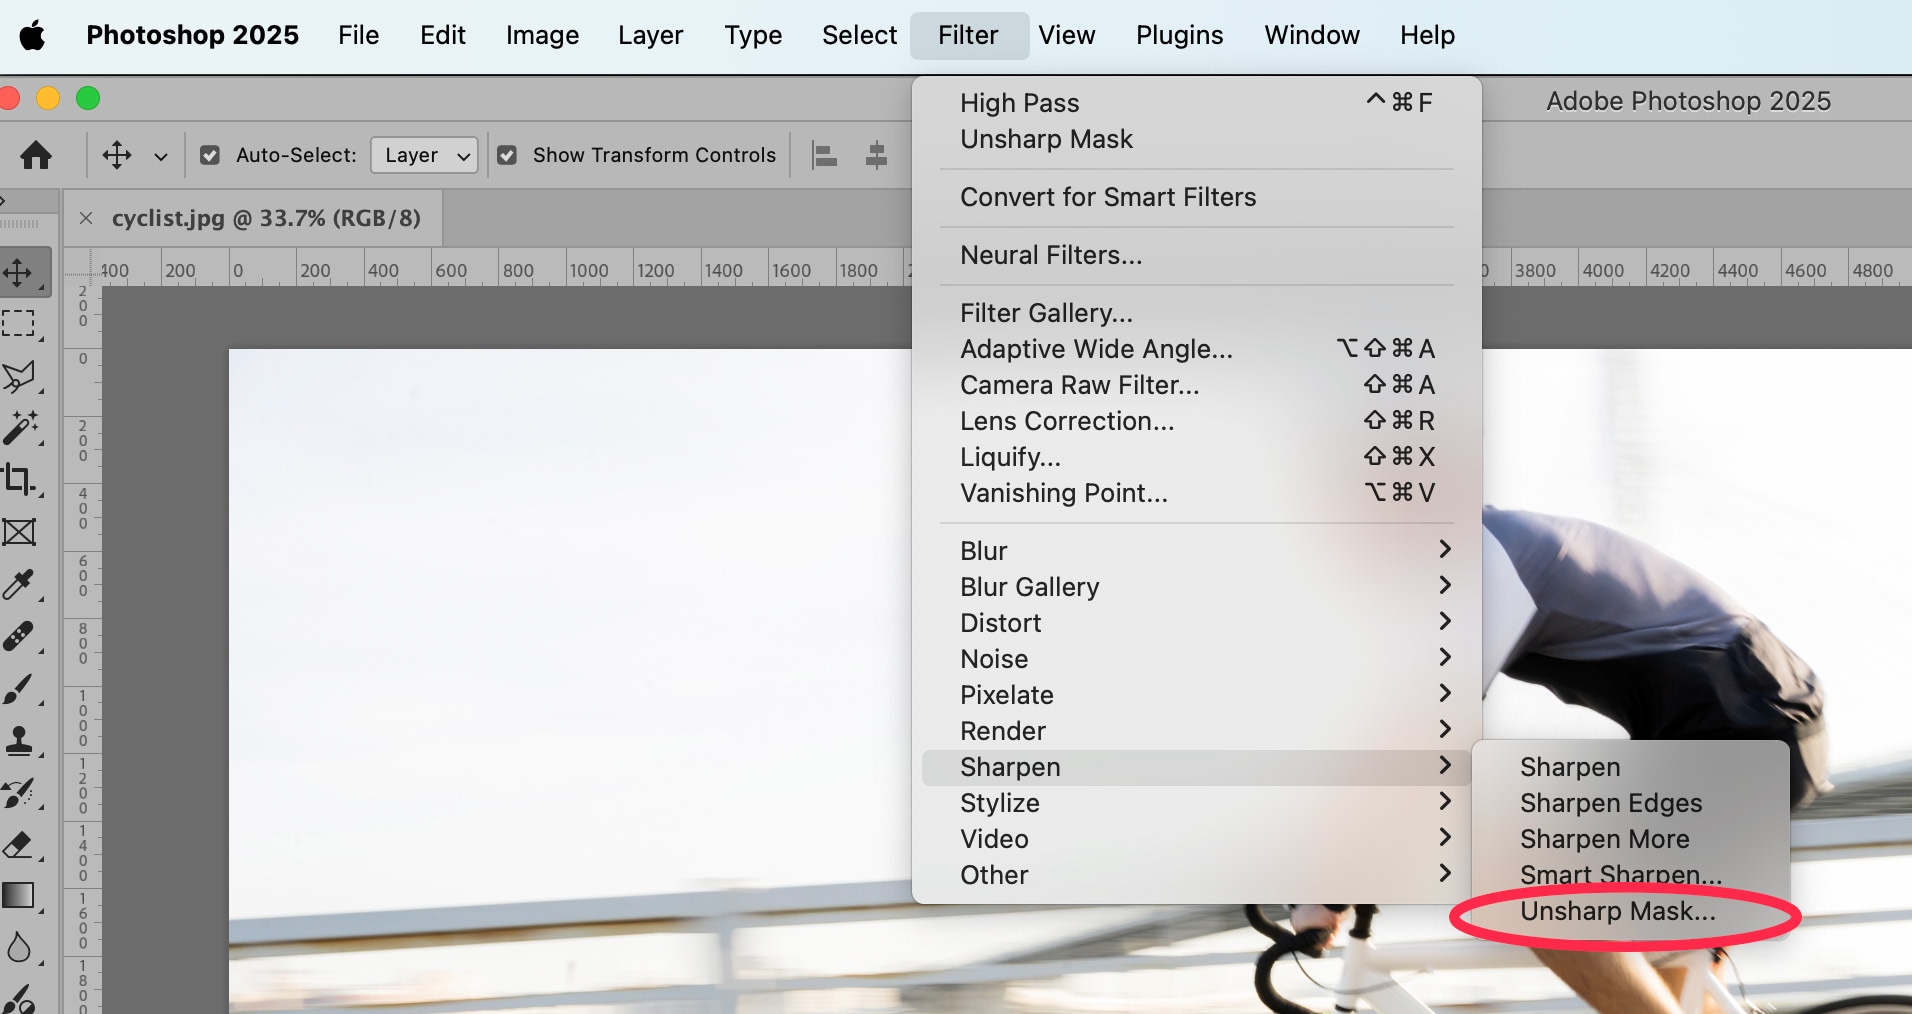
    Next, choose Filter > Sharpen > Unsharp Mask… from the dropdown menu at the top of the application window.

    Photoshop 2025 Filter menu with the Unsharp Mask option highlighted, used for image sharpening and edge refinement.

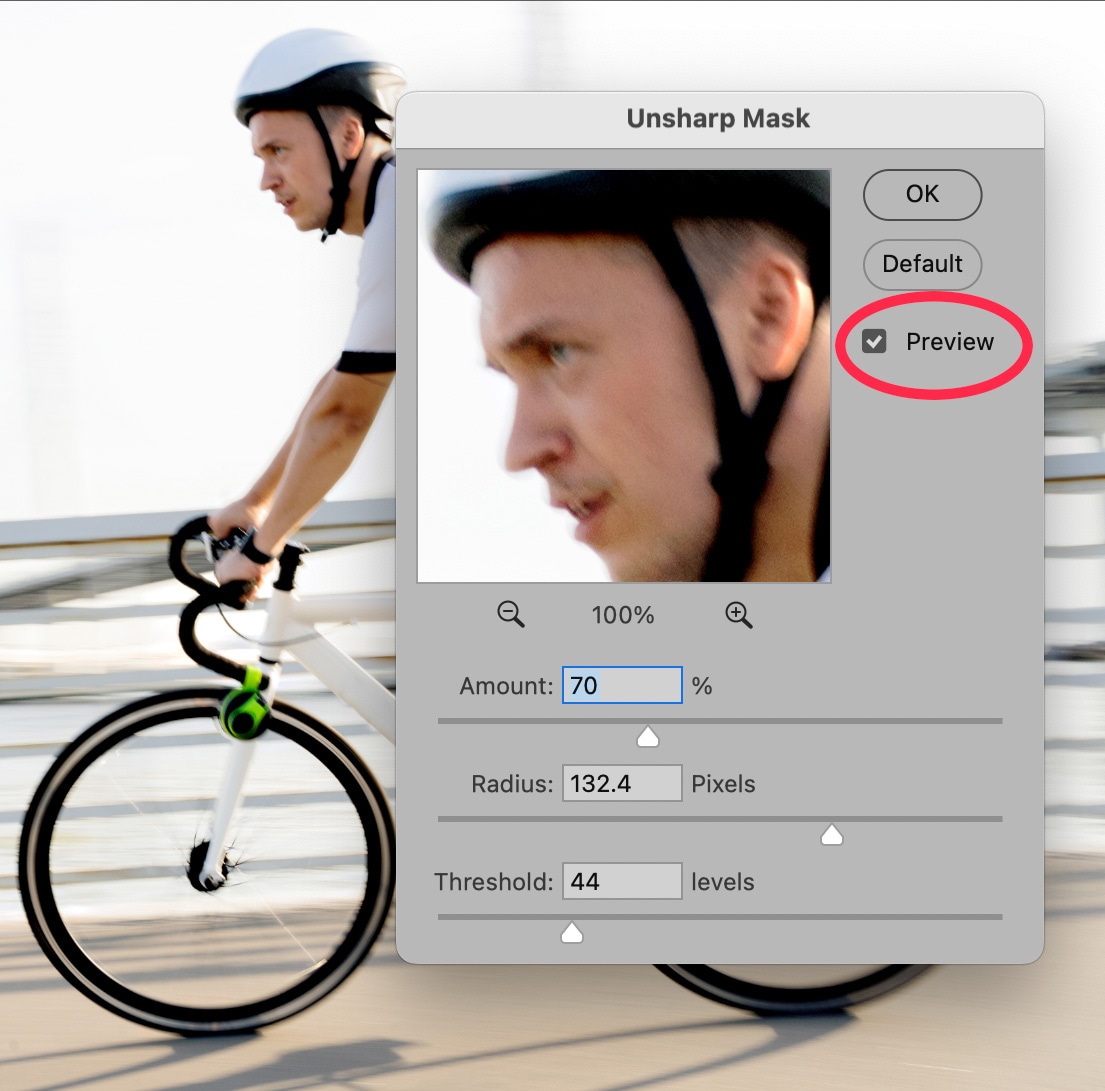
    A dialog box with Unsharp Mask settings will appear. Within this window you can adjust the Unsharp Mask settings. These settings allow you to finely tune how much contrast Photoshop will apply to the pixels within your image. 

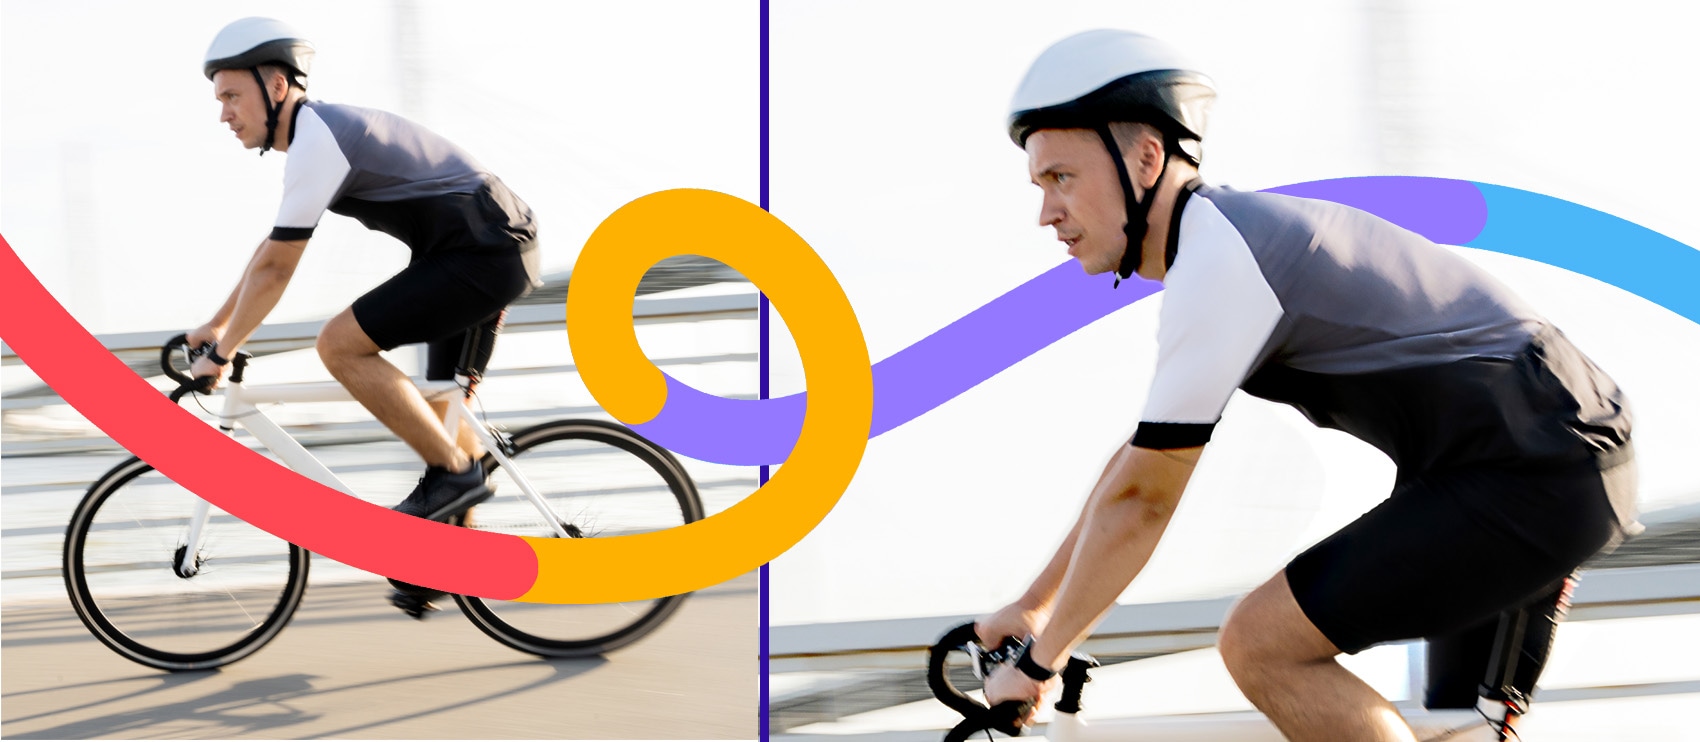
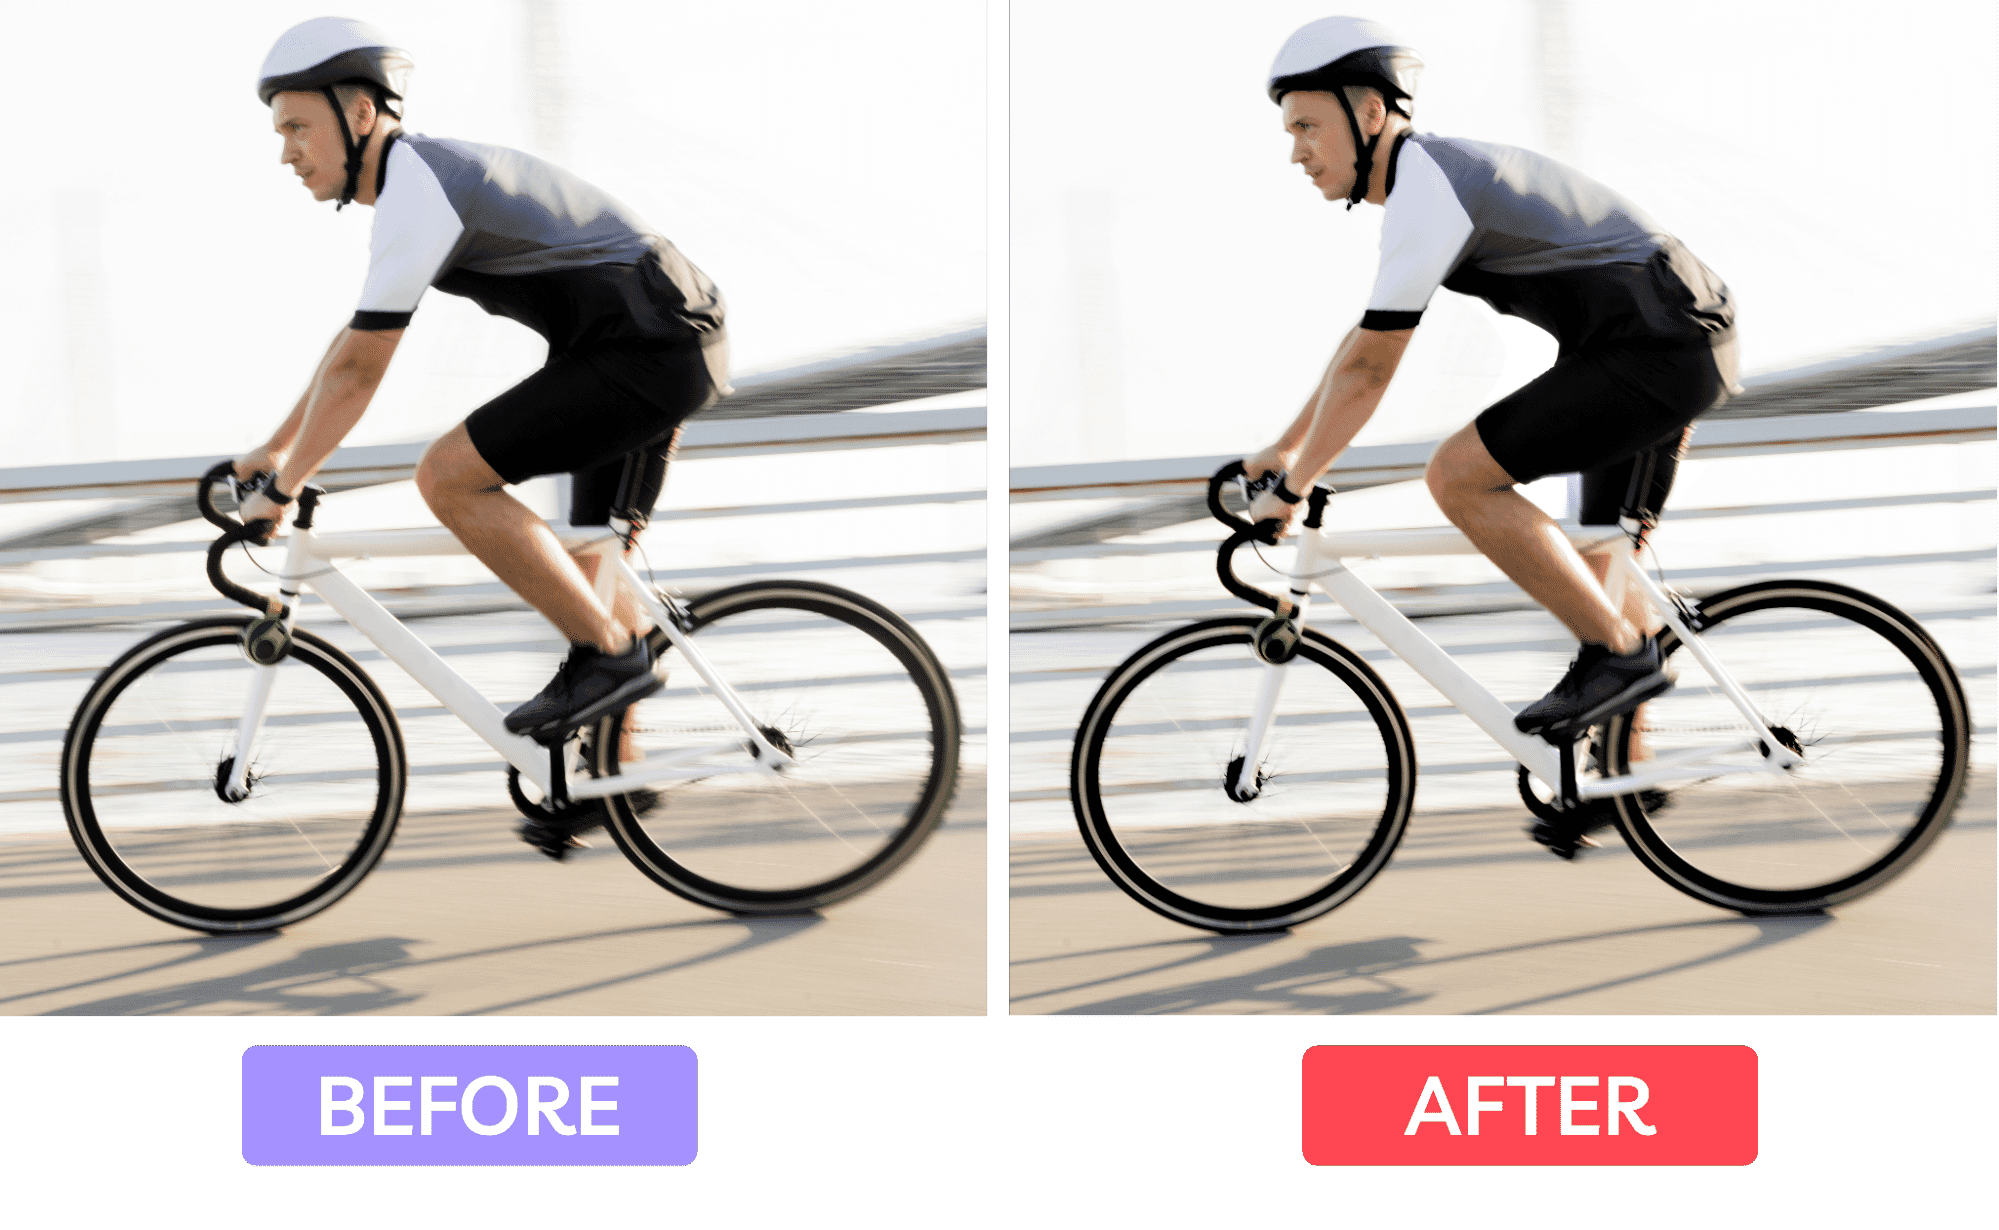
    You’ll see a portion of your image displayed within the dialog box. You can use your cursor to drag until a critical portion of your sports photo appears in that image window. In the example below, we’ve positioned the cyclist’s face in the window.

    Next, you’ll see three sliders: 

    1. Amount: The Amount setting adjusts the increase in contrast between pixels. 
    2. Radius: Radius adjusts the number of pixels along an edge that will be affected by the contrast increase. 
    3. Threshold. Threshold tells Photoshop just how different those pixels must be from each other before they’re considered an “edge.”

    Make sure Preview is checked so you can see how the image will change when you make adjustments within this dialog box.

    Unsharp Mask filter window in Photoshop 2025 previewing sharpening adjustments on a cyclist’s face with fine-tuned radius and threshold settings.

    Each image you adjust will have different settings for these three sliders, because no two images are identical. Play with the sliders until you figure out which combination of settings works best for your image without creating an overly contrasted result.

    Once you’re happy with the final image, click OK.

    Side-by-side comparison of a cyclist image before and after photo retouching, showing improved sharpness and contrast after editing.

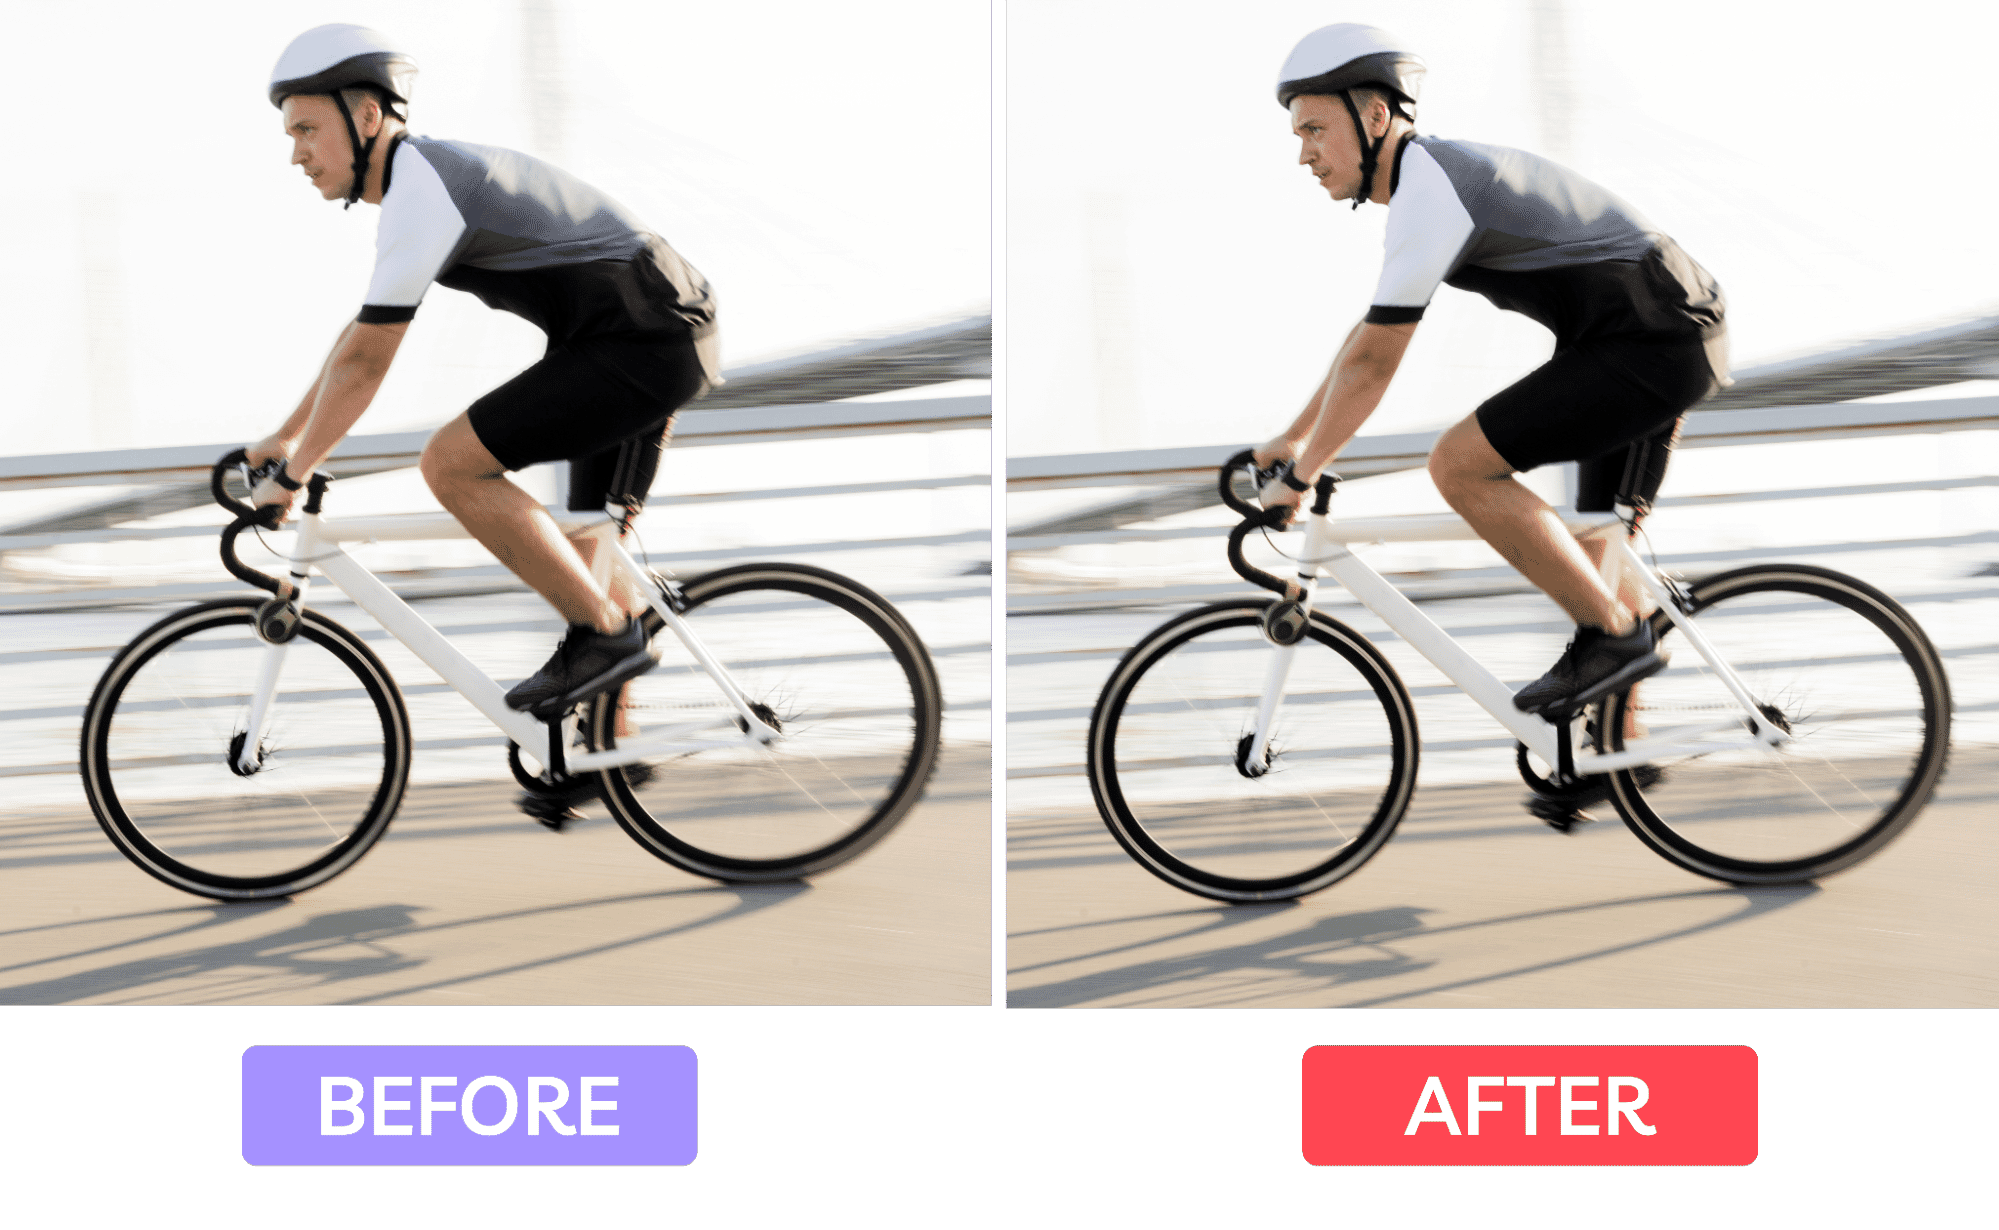
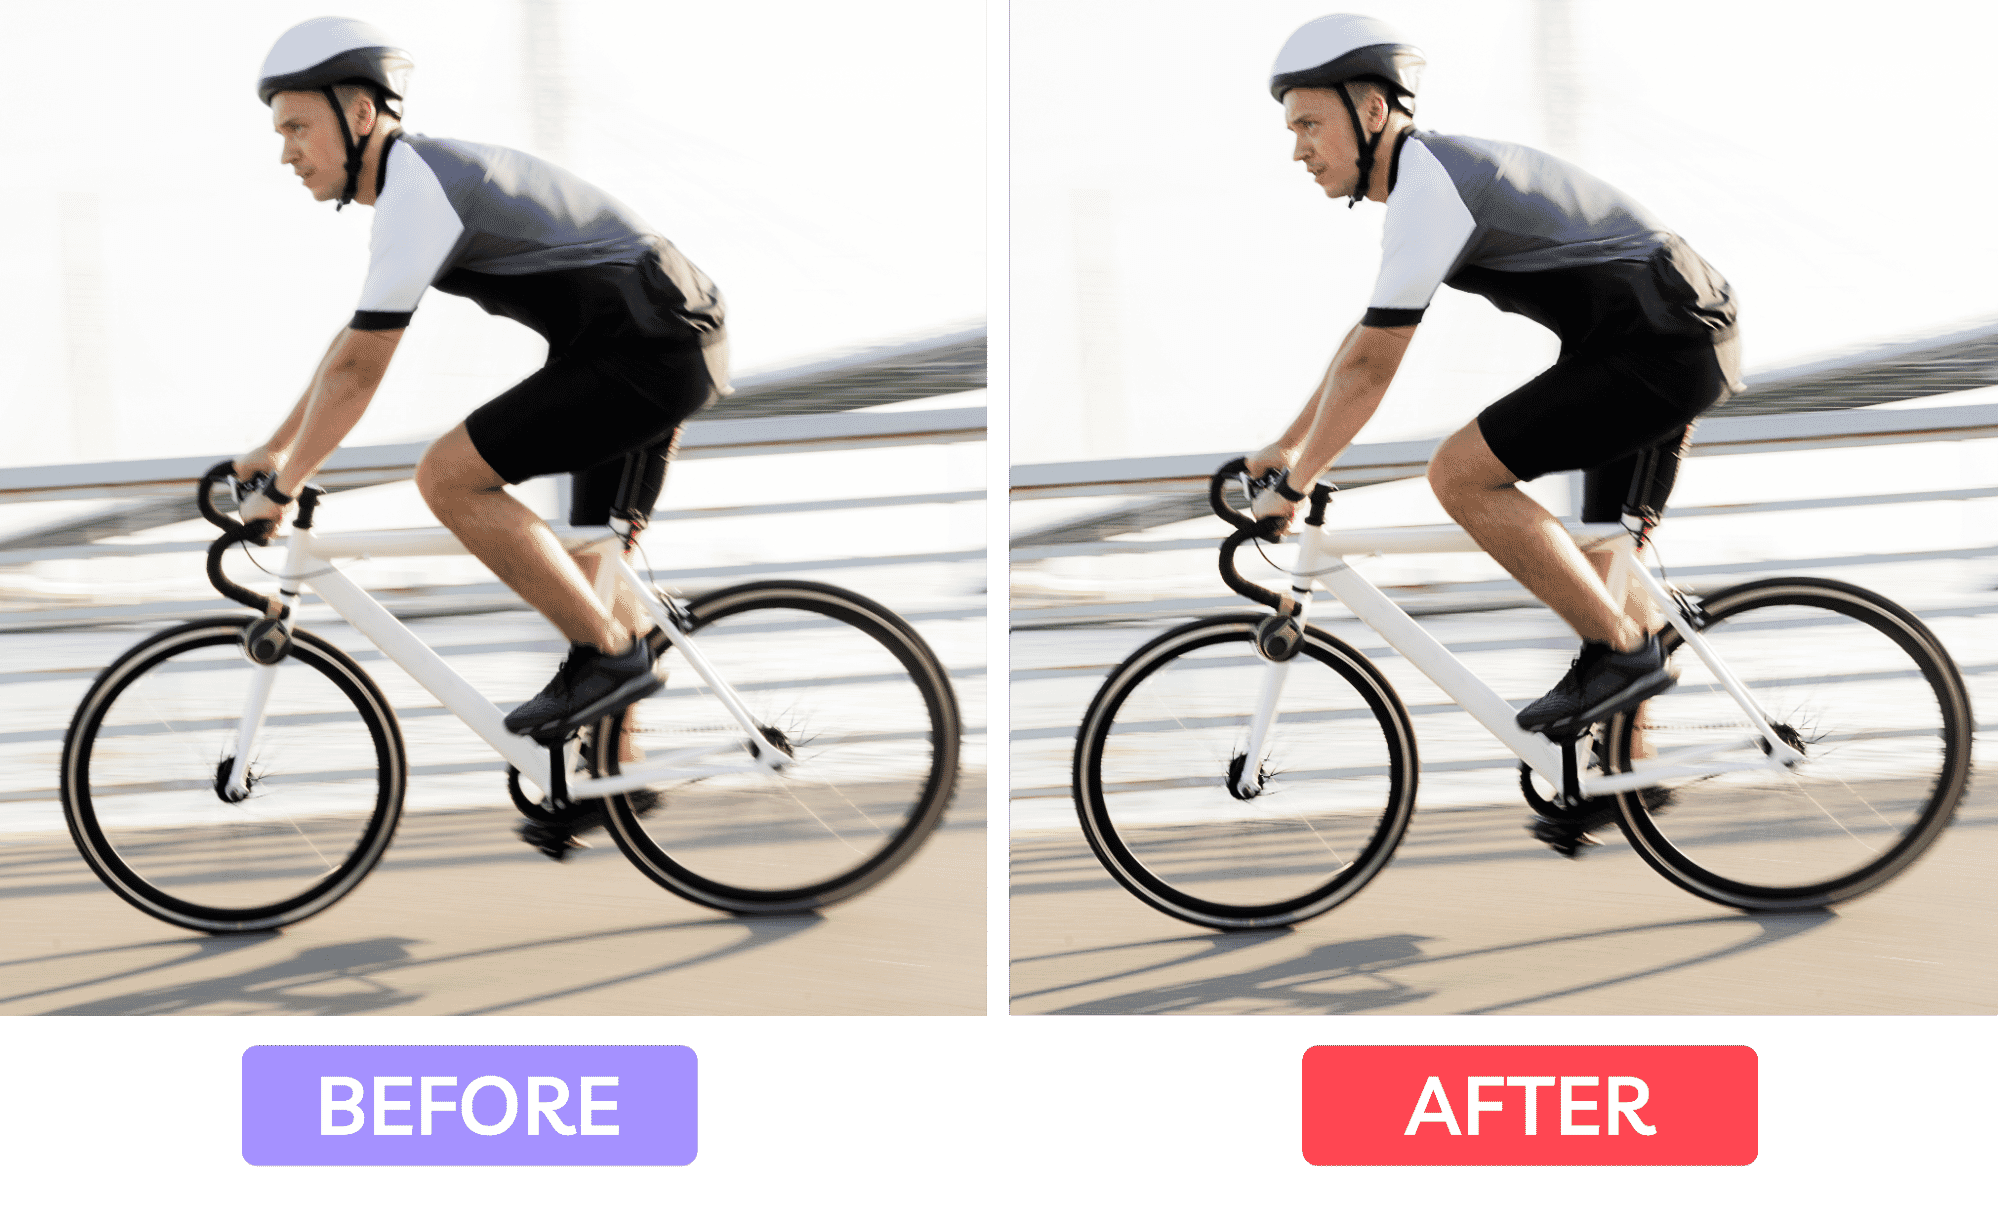
    So, it’s not perfect, but it is an improvement

    Sharpen blurry sports images using High Pass Filter

    Another Photoshop tool for sharpening blurry images is the High Pass Filter. In fact, you can use High Pass Filter and Unsharp Mask together to create an even sharper image.

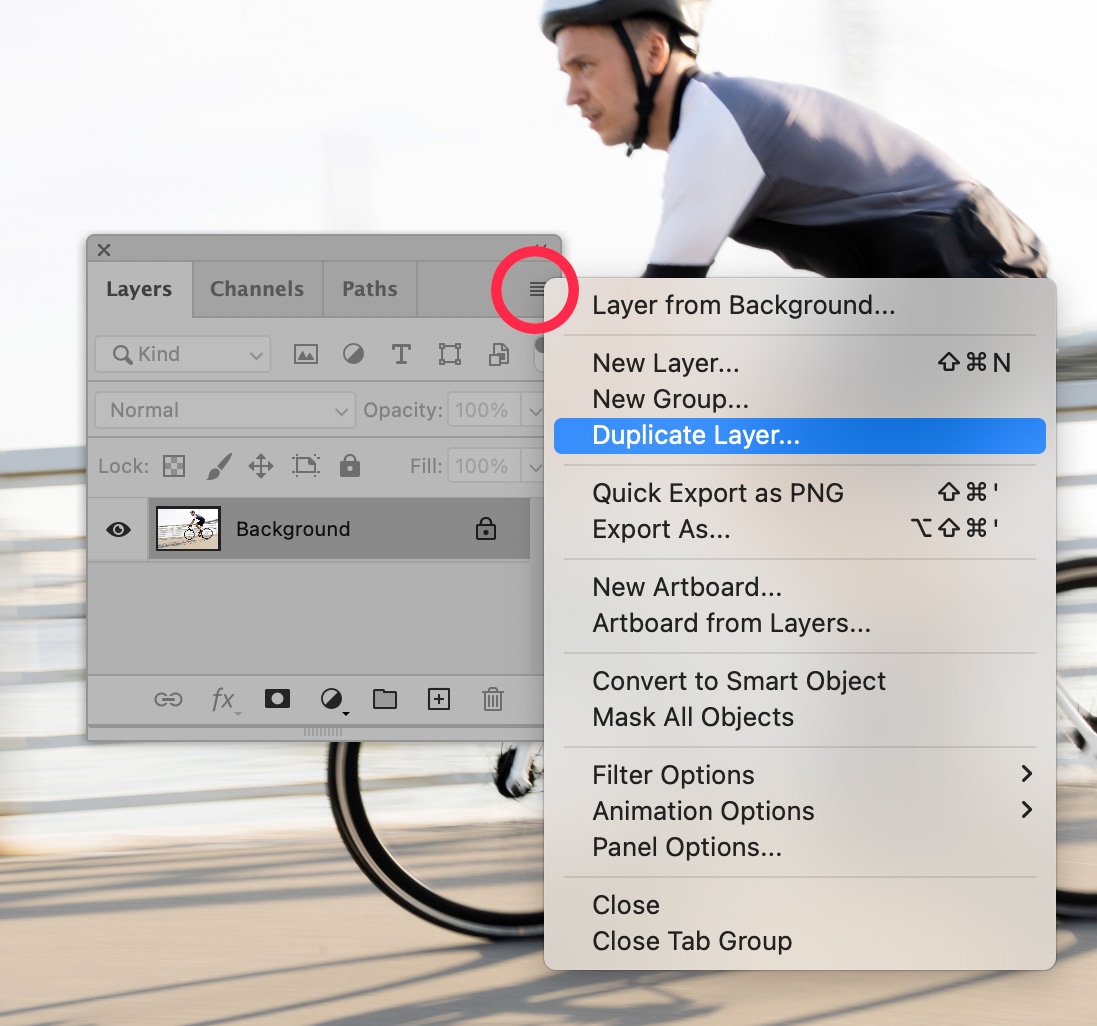
    To use the High Pass Filter, first duplicate the layer that contains the image you want to sharpen (most likely your Background layer). You can do this by clicking on the Layers panel menu (four little horizontal lines in the upper right corner of the panel) and choosing Duplicate Layer….

    Photoshop Layers panel with Duplicate Layer option selected, preparing a new layer for non-destructive image editing on a cycling photo.

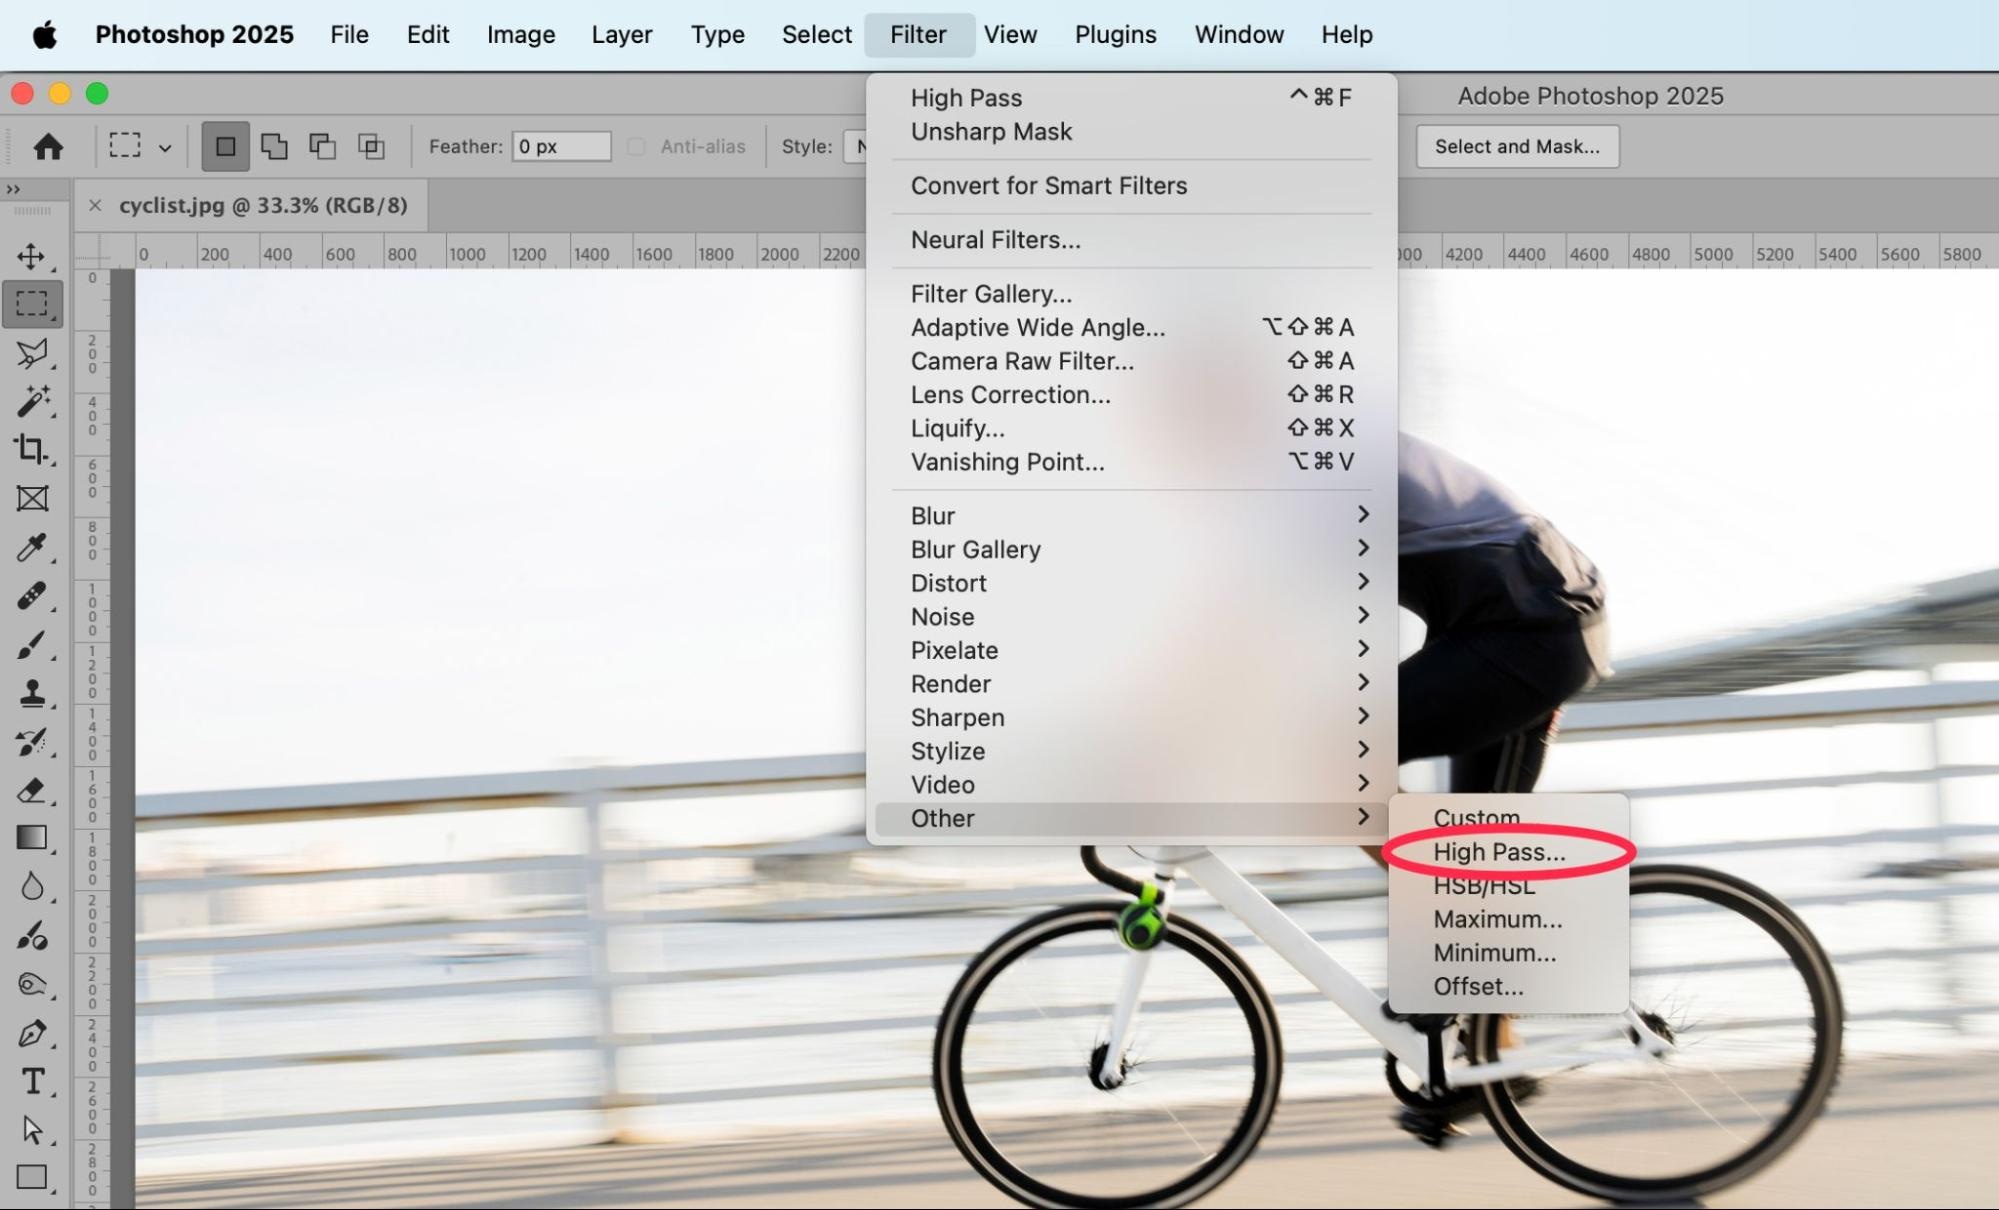
    With the new layer selected, choose Filter > Other > High Pass… from the dropdown menu at the top of the application window.

    Photoshop 2025 interface with the Filter menu open, highlighting the High Pass filter option used for edge sharpening and image enhancement.

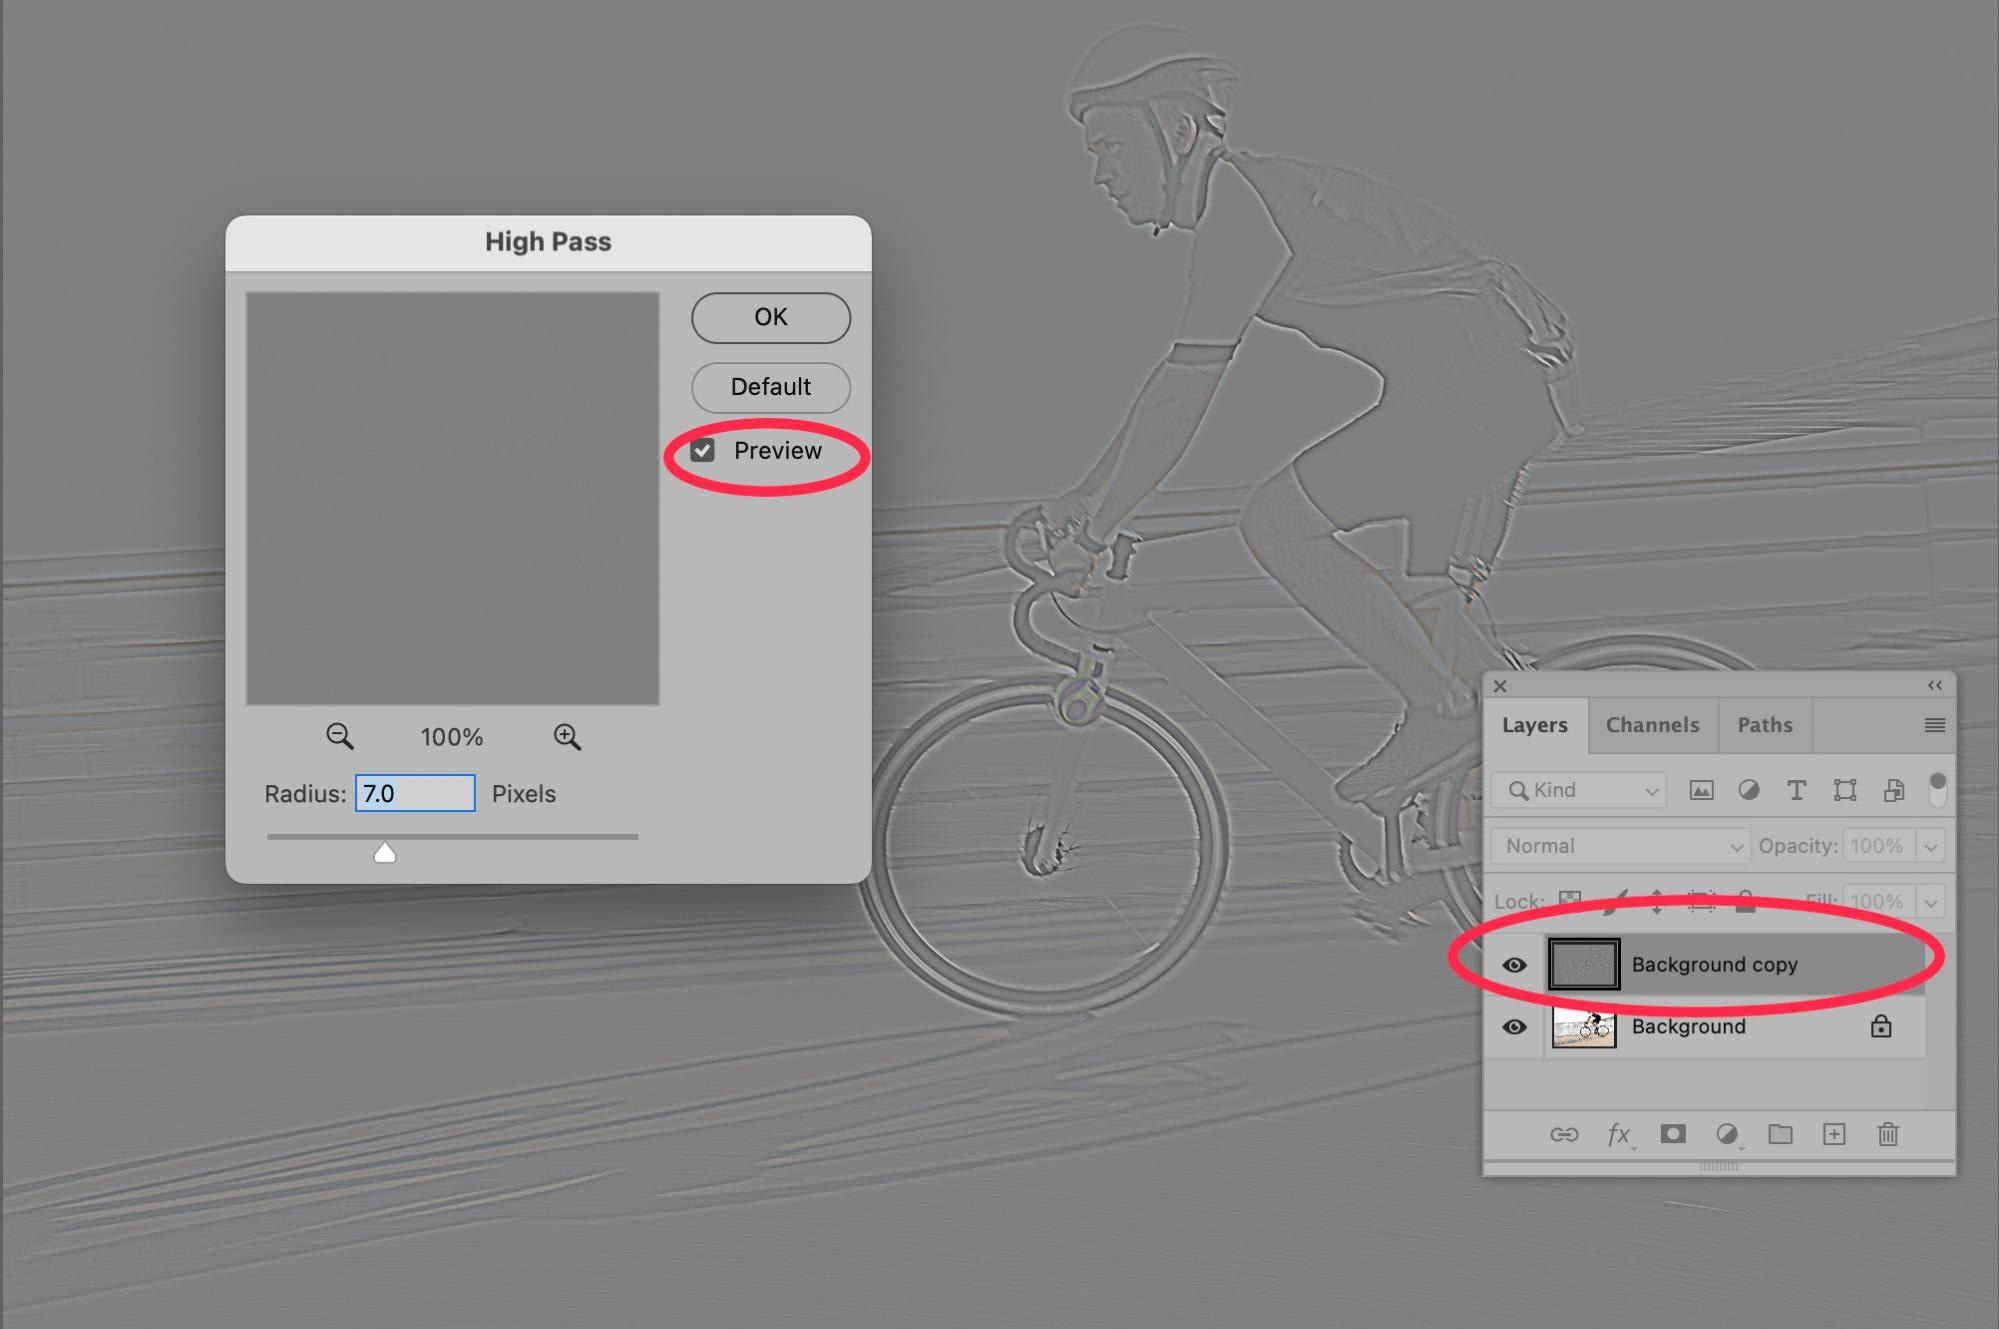
    Your image will go completely gray. You’ll only see the outlines of your edges in the image. 

    In the High Pass dialog box that appears on the screen, move the Radius slider to the left to reduce detail or to the right to increase the details of the edges. Make sure “Preview” is checked so you can see the effects of moving the slider. In general, keep the radius at 7.0 Pixels or less so your end result will look natural.

    Photoshop High Pass filter preview with layer mask applied to cyclist photo, used for edge sharpening in a non-destructive workflow.

    Click OK.

    Next, go back to your Layers Panel. Change the Blending Mode of the top layer to “Overlay.” (By default, the Blending Mode will be set to Normal.)

    Photoshop Layers panel displaying the Overlay blending mode applied to a duplicated background layer for contrast enhancement.

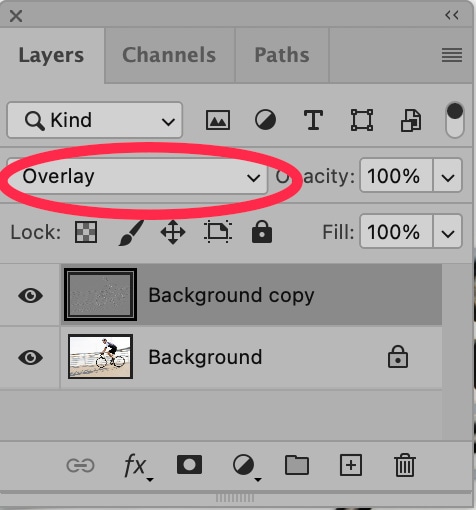
    Your image will now appear sharper.

    Side-by-side comparison of a motion-blurred cyclist image before and after Photoshop sharpening, highlighting improved focus and clarity.

    For an even sharper image, you could apply Unsharp Mask, and then a High Pass Filter on top of that. 

    You capture the action, we’ll look after the edits. Sports photo editing services start at 25¢ per image.

    How to fix a specific area of a blurry sports photo

    Sometimes, you want to capture motion blur and keep the visual effect, but you also want your subject’s face, or some other portion of the photo to be crisp. There are multiple ways to do this, including using selections, using layer masks, and using Photoshop’s Sharpen Tool.

    How to use a selection and layer mask

    Go back to the image you just sharpened using a High Pass Filter. Now, you’re going to remove the sharpened effects from every part of the image except the cyclist’s face—and then add additional effects to that area to create even more crispness.

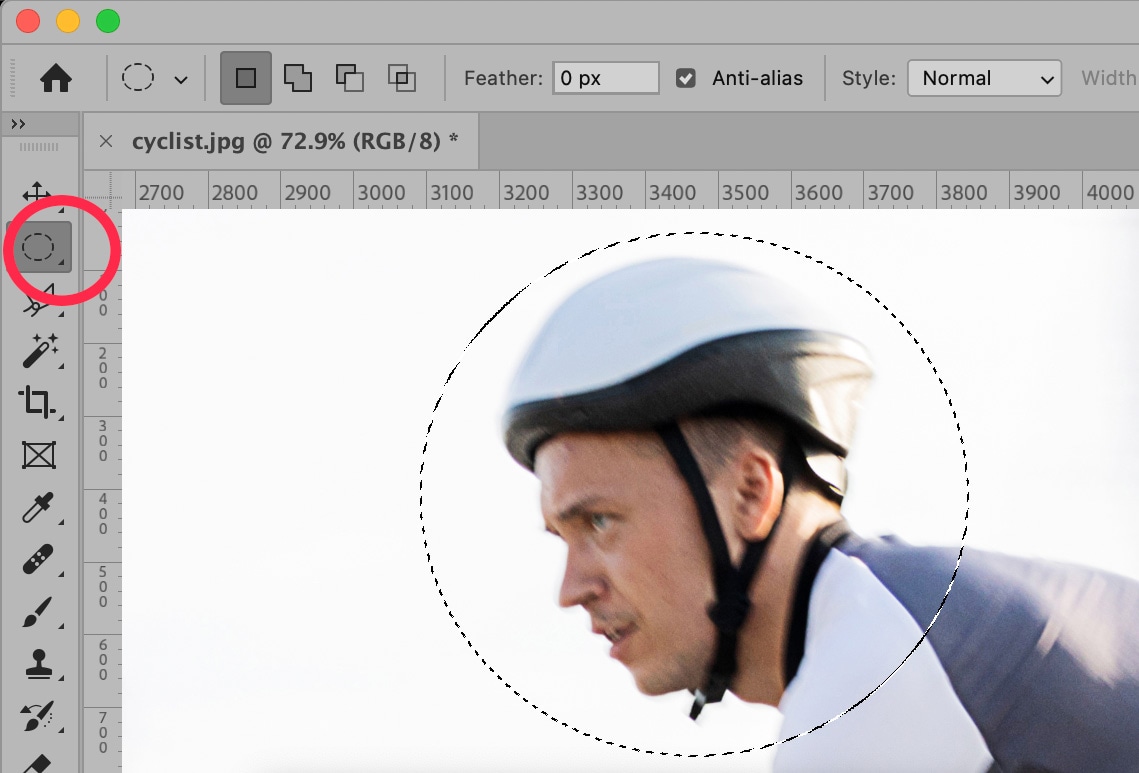
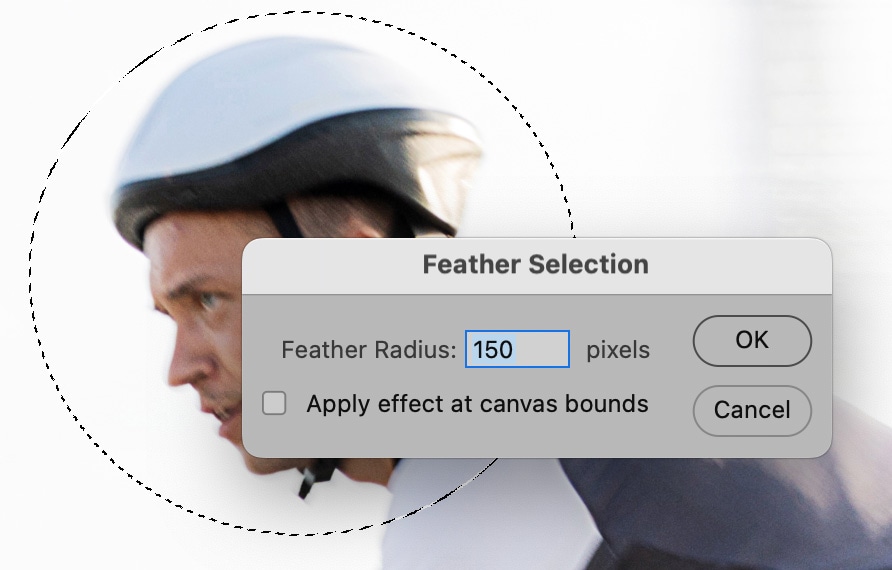
    Using the Marquee Tool in Photoshop’s Toolbar, draw an ellipse or a rectangle around the area of the photograph you want to remain crisp.

    Photoshop 2025 showing the Elliptical Marquee Tool in use to select a circular area around a cyclist’s head for localized editing.

    Next, choose Select > Modify > Feather… from the dropdown menu at the top of the application window.

    Photoshop 2025 Select menu showing the path to the Feather option under Modify, used for softening selection edges during image editing.

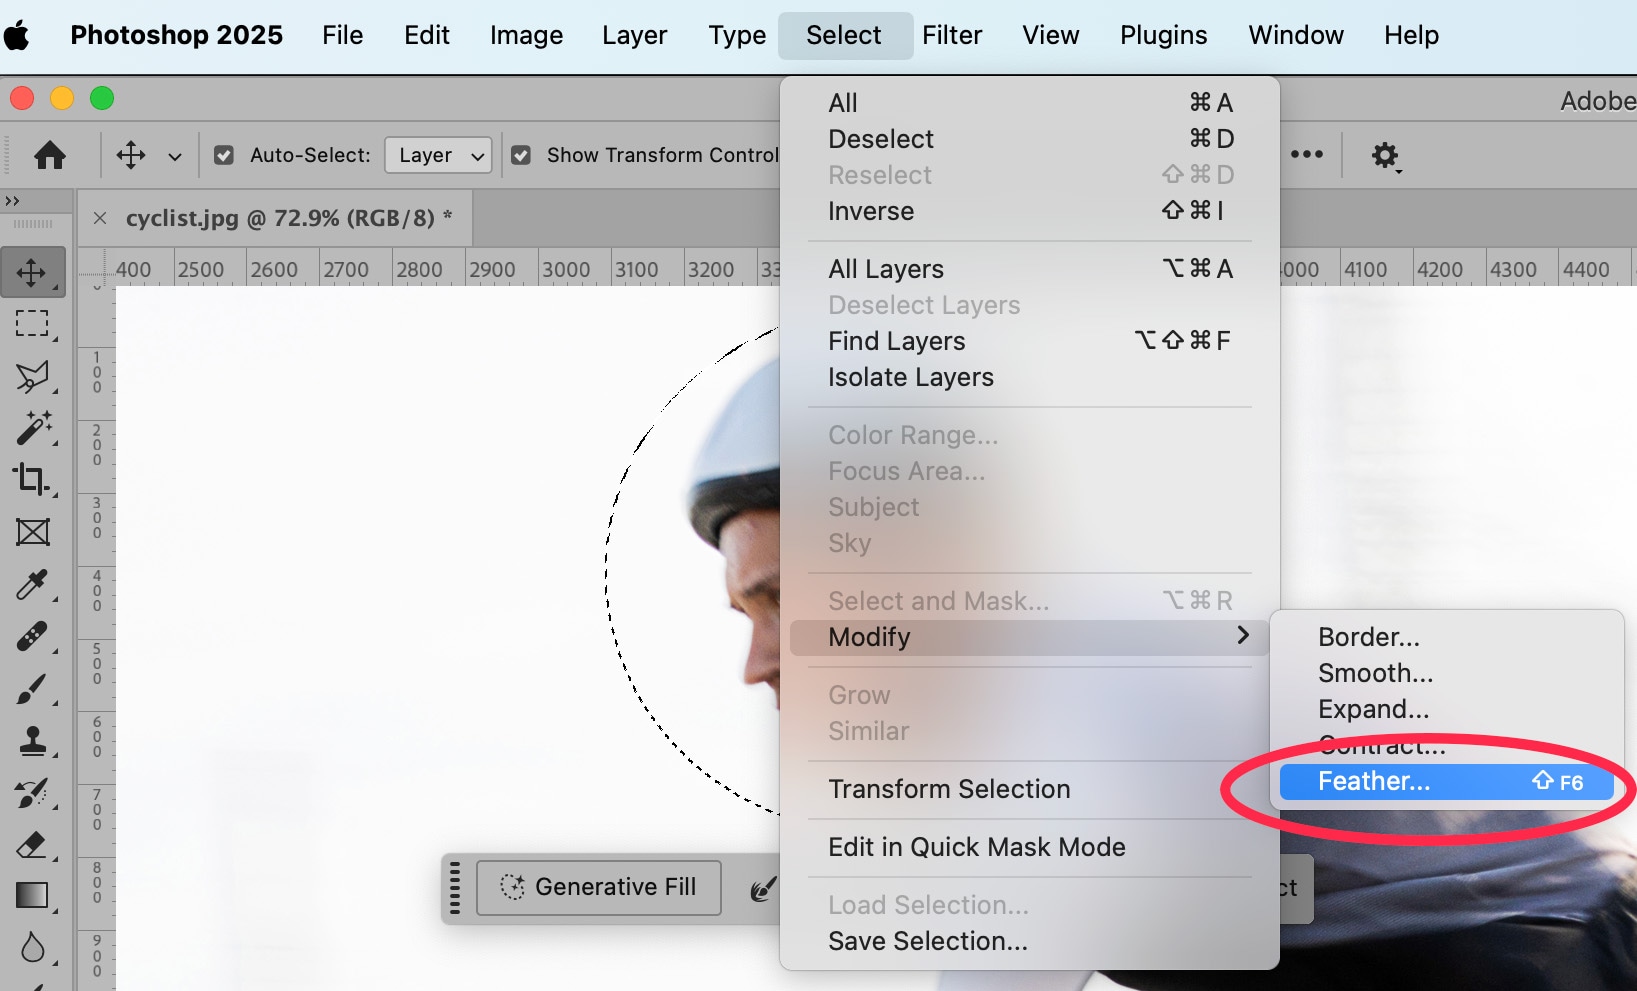
    In the dialog box that appears, type in a value between 100 and 250. This will give you the smoothest feather of your selection.

    Photoshop feather selection dialog box over a cyclist image, demonstrating how to soften selection edges with a high feather radius.

    Now, go back into your Layers panel and choose the layer that contains your High Pass Filter. Click on the Mask icon at the bottom of the Panel. This icon looks like a black rectangle with a lighter circle inside of it.

    Photoshop 2025 Layers panel showing a duplicated background layer with a layer mask applied and set to Overlay blend mode for localized adjustments.

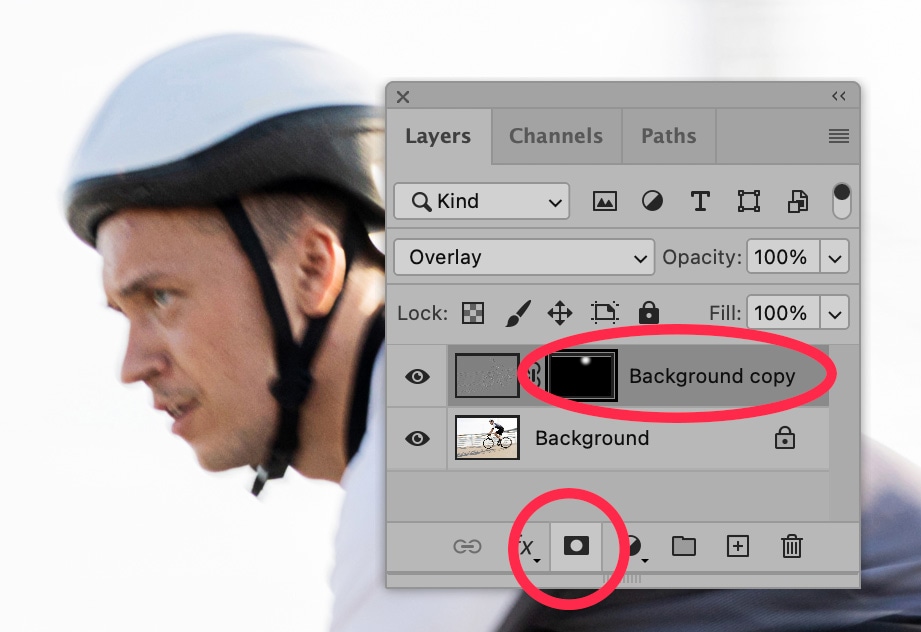
    Once you click on that icon, you’ll see a mask appear in your layer. It will look all black, except for the area of your selection, which will appear white.

    You’ve now made it so the High Pass Filter will only appear on the area where you originally created your selection, or in the case of this example, on this cyclist’s face.

    How to use the Sharpen Tool

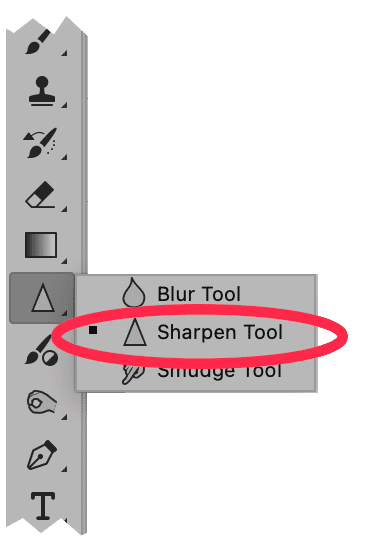
    You can sharpen the cyclist’s face even more by using Photoshop’s Sharpen Tool.

    Select the Sharpen Tool from the Toolbar to the left of the application window. The Sharpen Tool may be sitting behind the Blur Tool or the Smudge Tool.

    Photoshop toolbar showing the Sharpen Tool selected from the Blur Tool group, used for enhancing image clarity and detail.

    In your Layers panel, select your original laye—the layer that does not contain the High Pass Filter. Then, with your Sharpen Tool selected, “paint” over the areas of your image that you want to be a bit crisper. In the below example, we went over the cyclist’s eyes and mouth with the tool.

    Photoshop 2025 interface showing the Sharpen Tool in use on a cyclist’s face, with the background layer selected and tool settings highlighted for precision image enhancement.

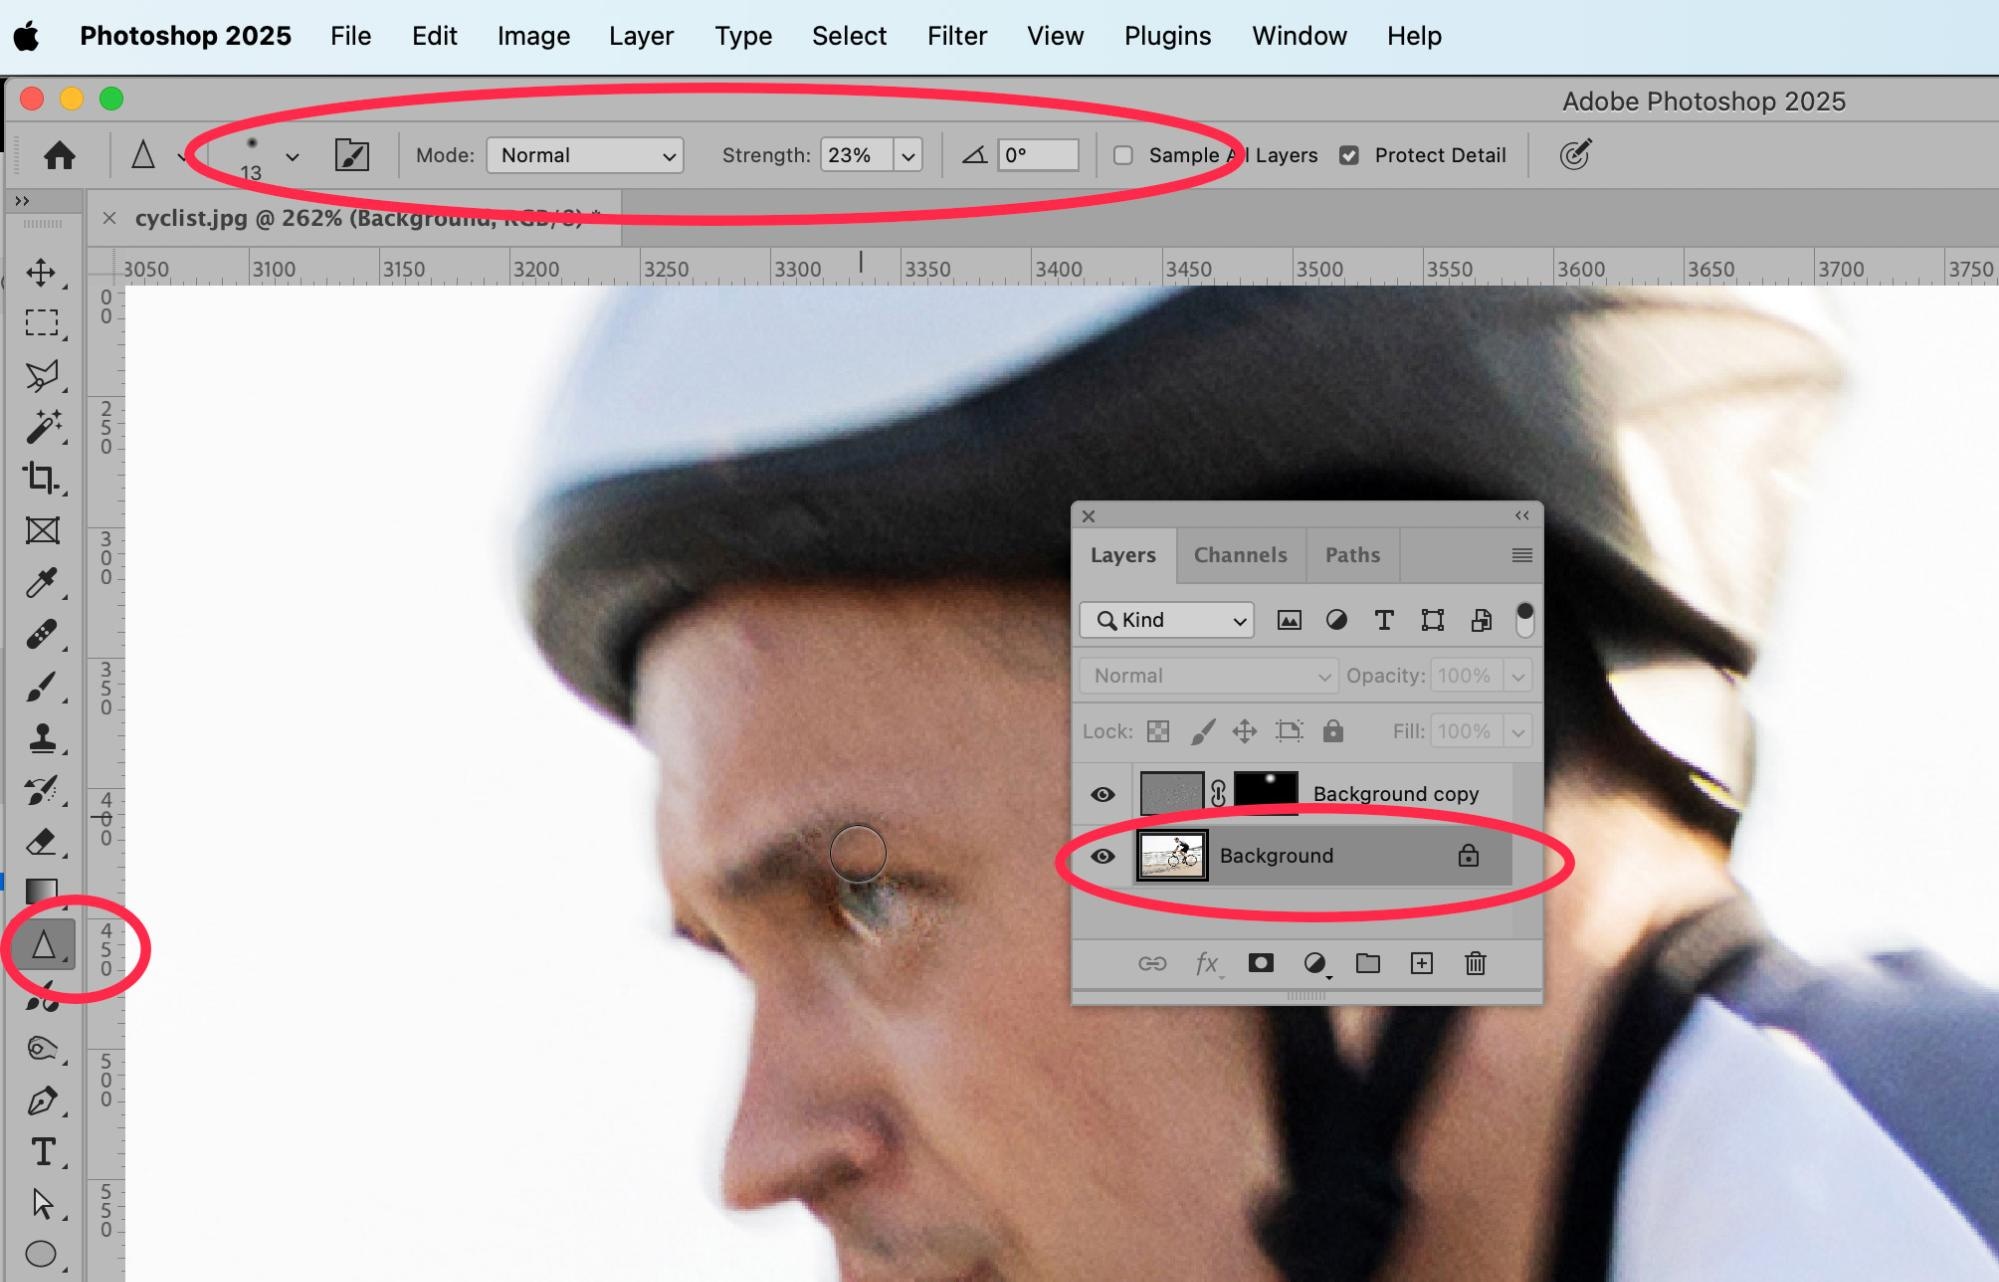
    Like all tools in Photoshop, you have the option to adjust the strength and size of the Sharpen Tool in the Options Bar.

    Before and after comparison of cyclist photo sharpening, demonstrating enhanced image clarity and edge definition using Photoshop tools.

    How to remove a blurry background from a sports photo

    Sometimes a photographer will want a clear subject and a blurry background in a sports photo. However, there are times where a crisp background makes more sense. In these instances, it works best to remove the background altogether and replace it with a new image.

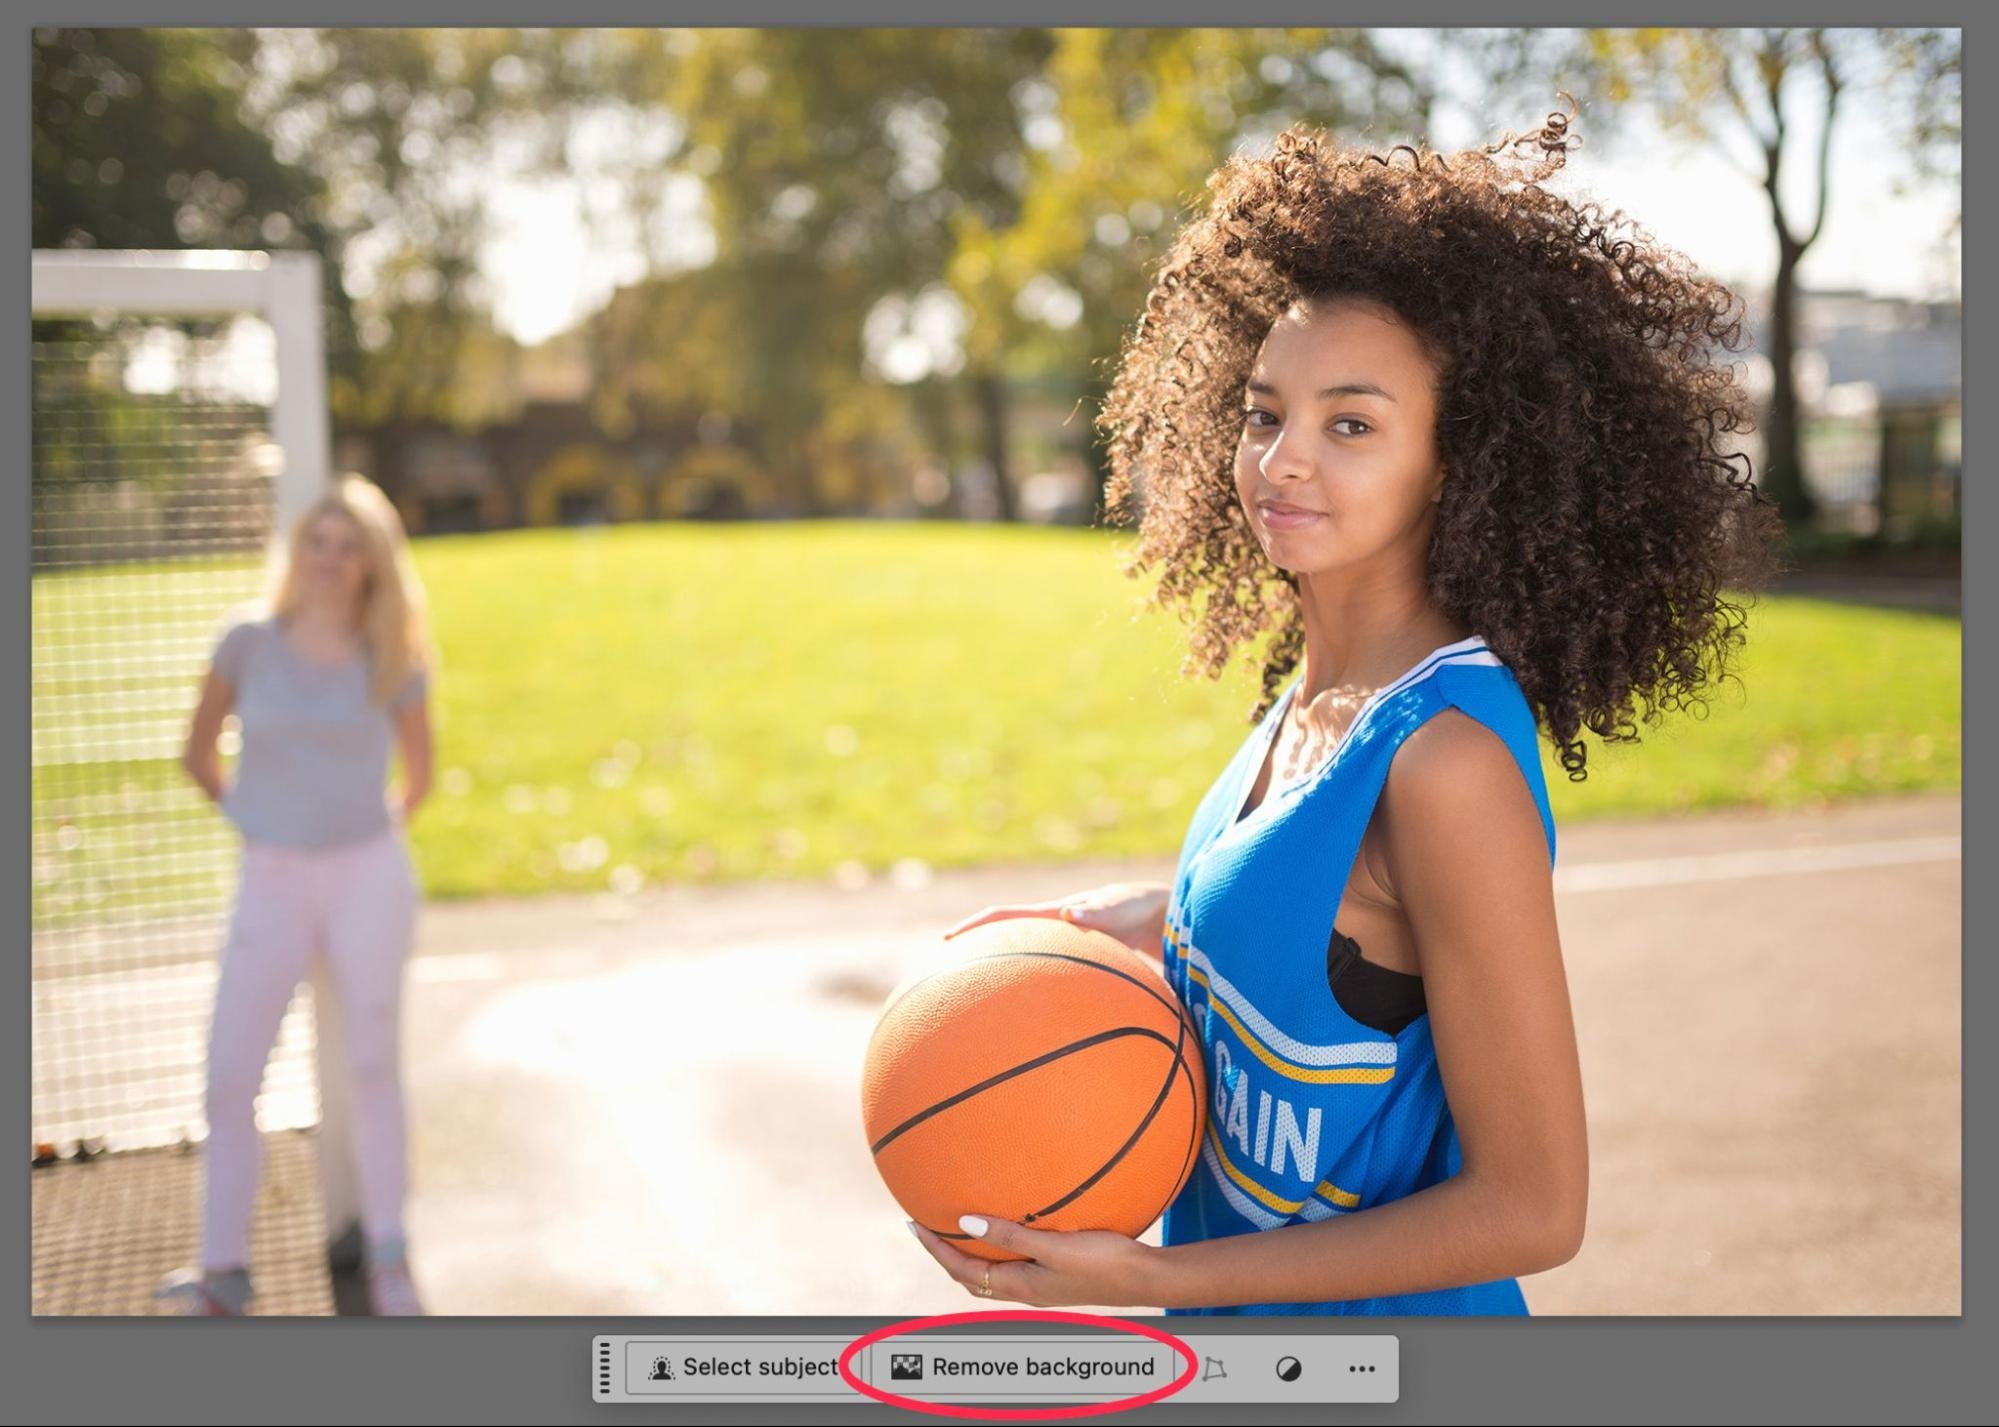
    For the following examples, let’s use this image of a young woman holding a basketball.

    Photoshop 2025 interface showing the Remove Background button active beneath a basketball player image during automated background removal.

    Use AI to remove a background in Photoshop

    The easiest way to remove a background is to use the “Remove Background” tool, which is part of Photoshop’s new AI tools. However, while fast, this tool isn’t always the best option, as you’ll see in a minute.

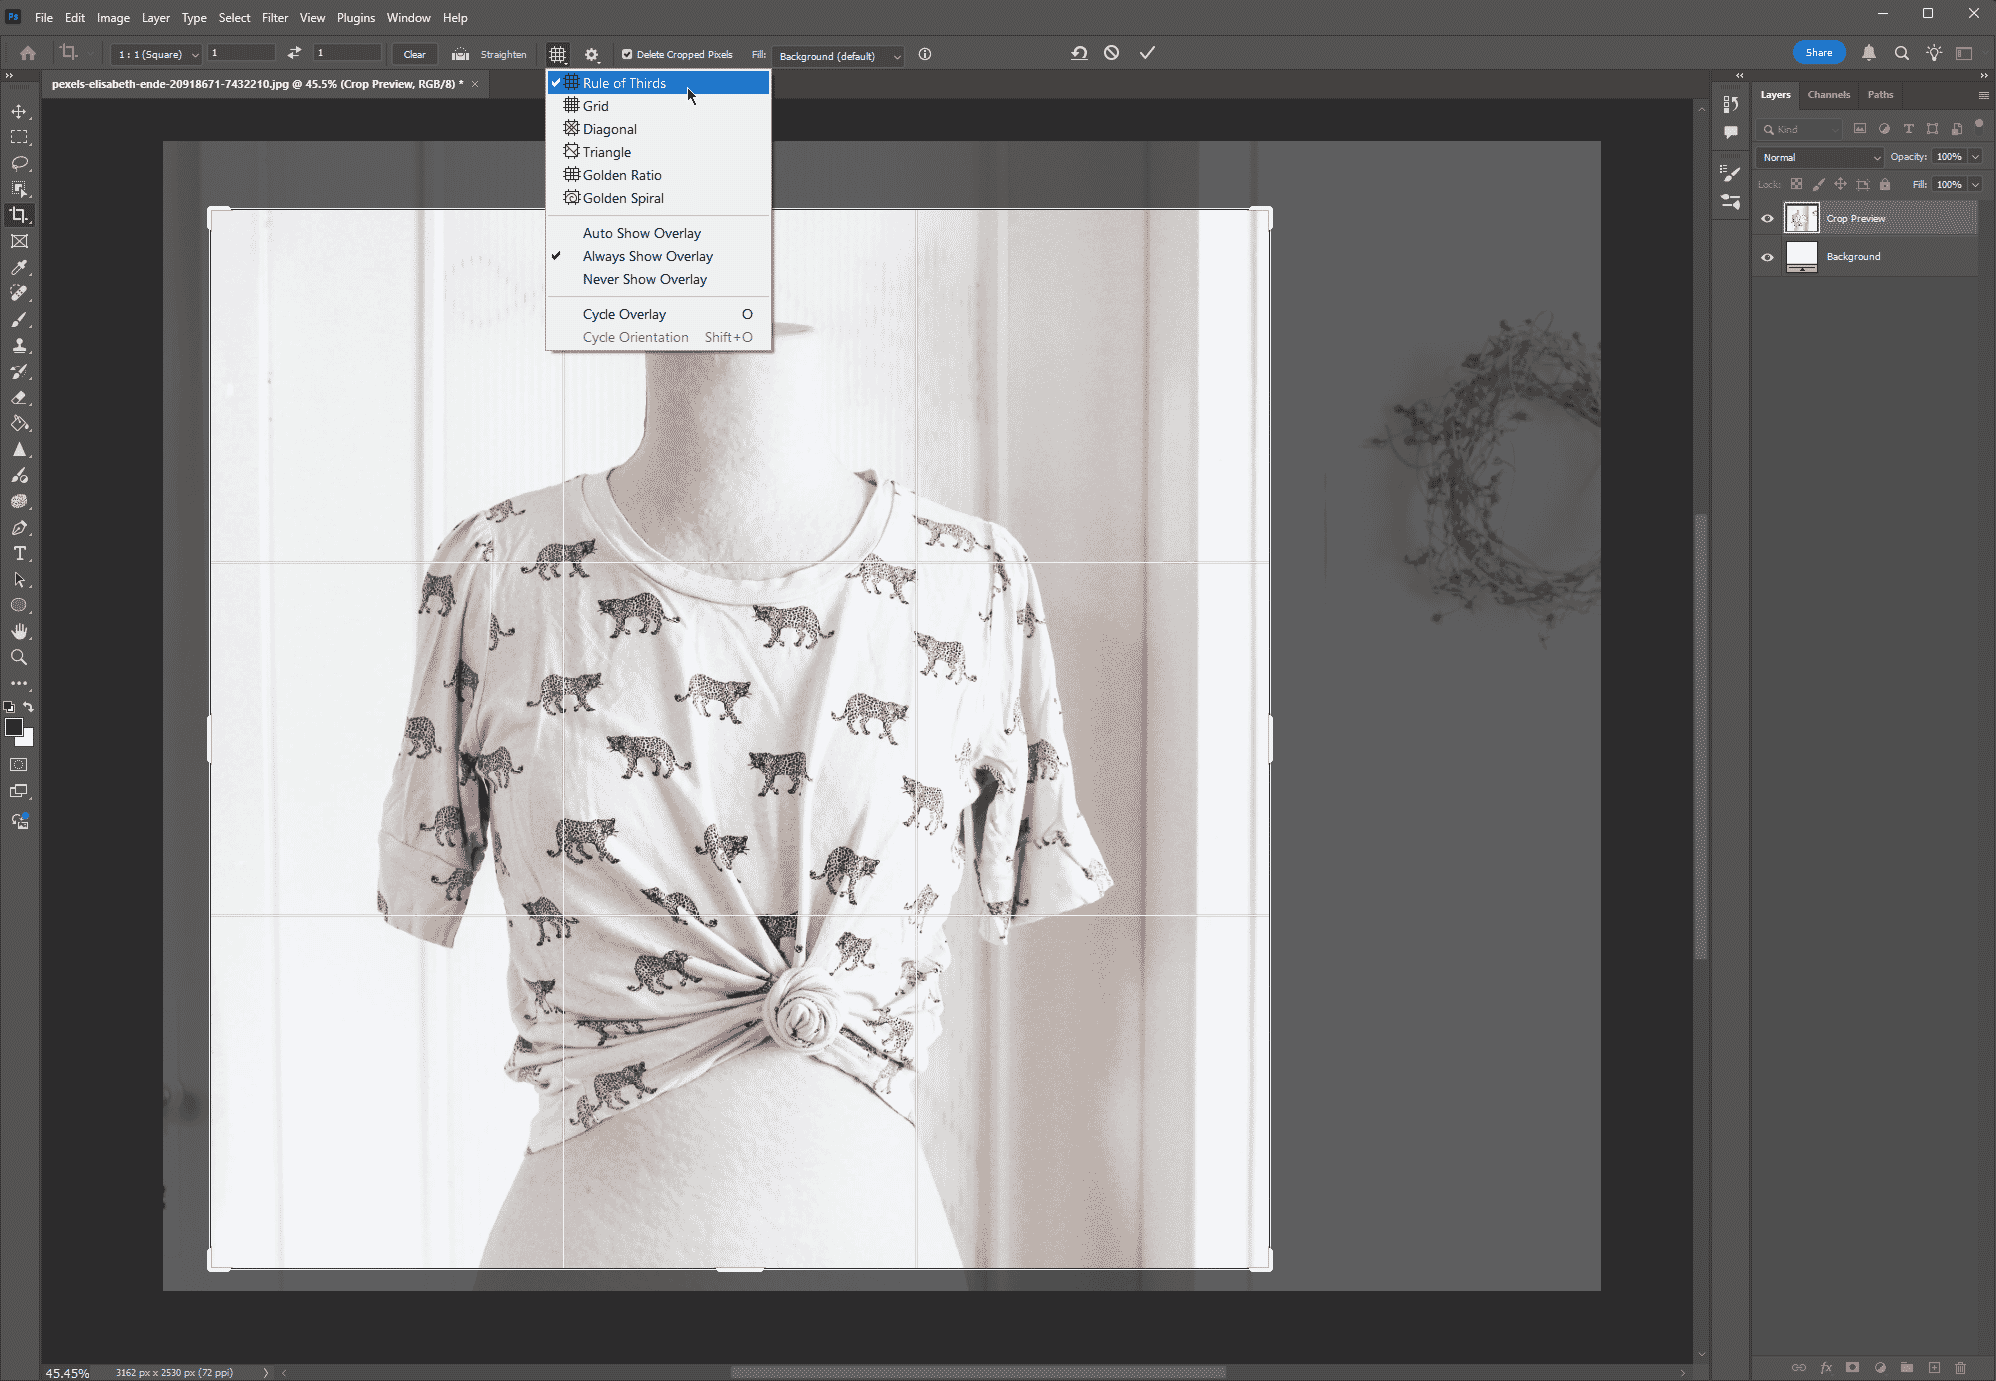
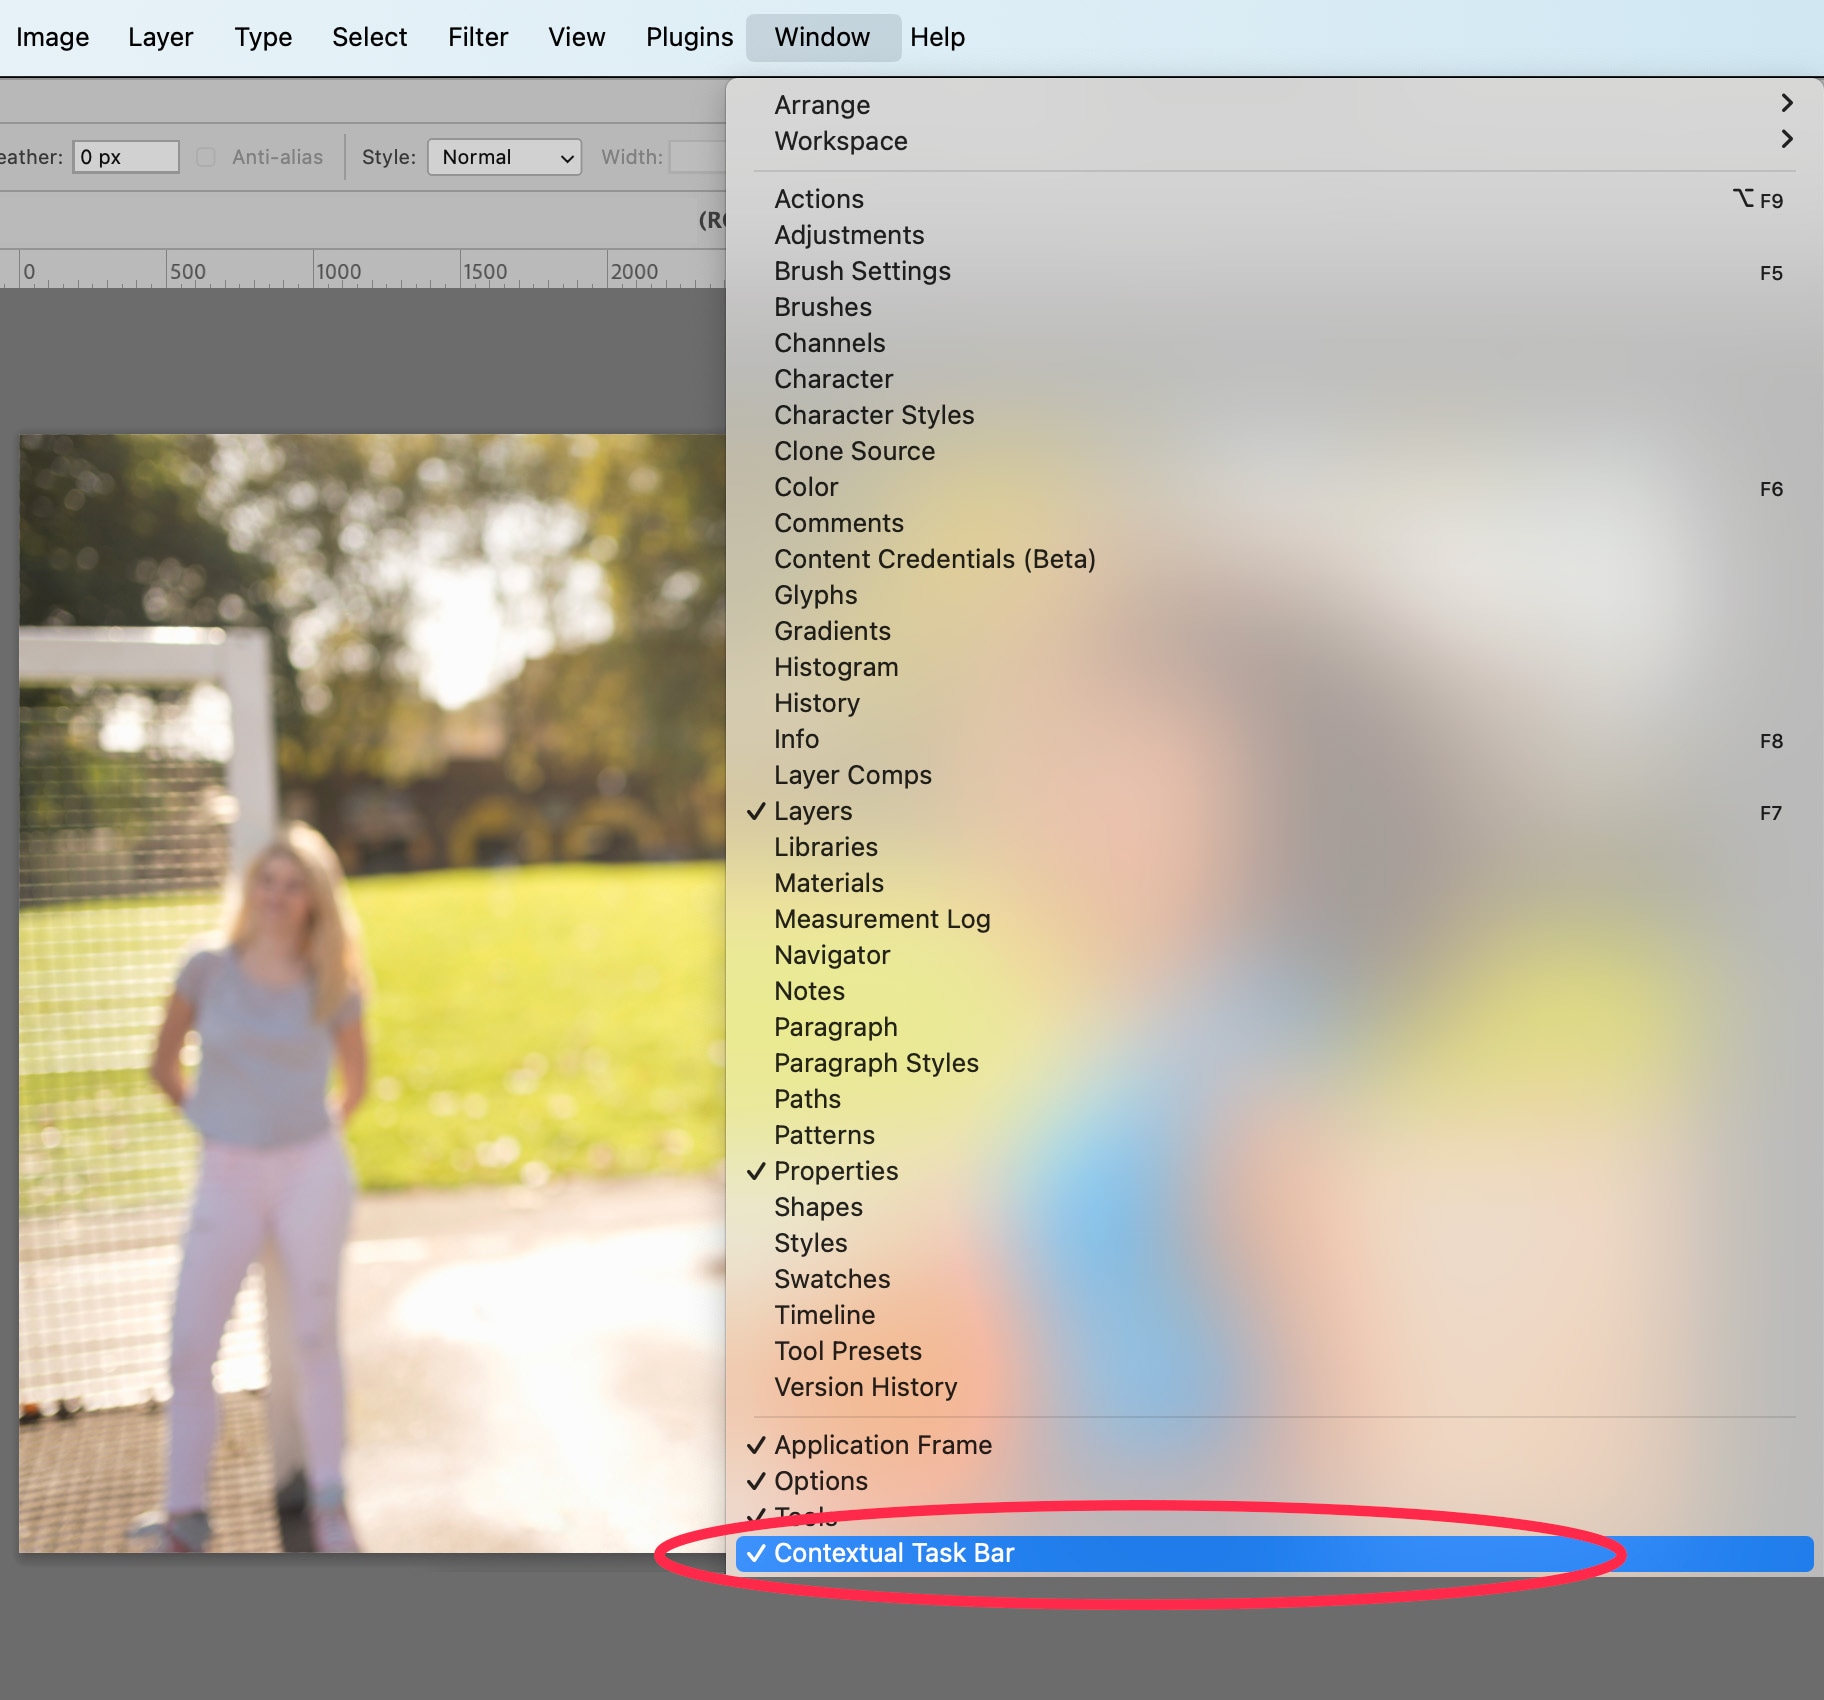
    To use the tool, make sure the Contextual Task Bar is visible. By default, it is—however, if you don’t see it, make sure Contextual Task Bar is checked under the Window dropdown menu.

    Photoshop 2025 interface showing active contextual task bar and layer panel during sports image editing workflow.

    With the Contextual Task Bar visible beneath your image, you’ll see the option to Remove Background. Click on that option.

    Photoshop 2025 interface showing the Remove Background button active beneath a basketball player image during automated background removal.

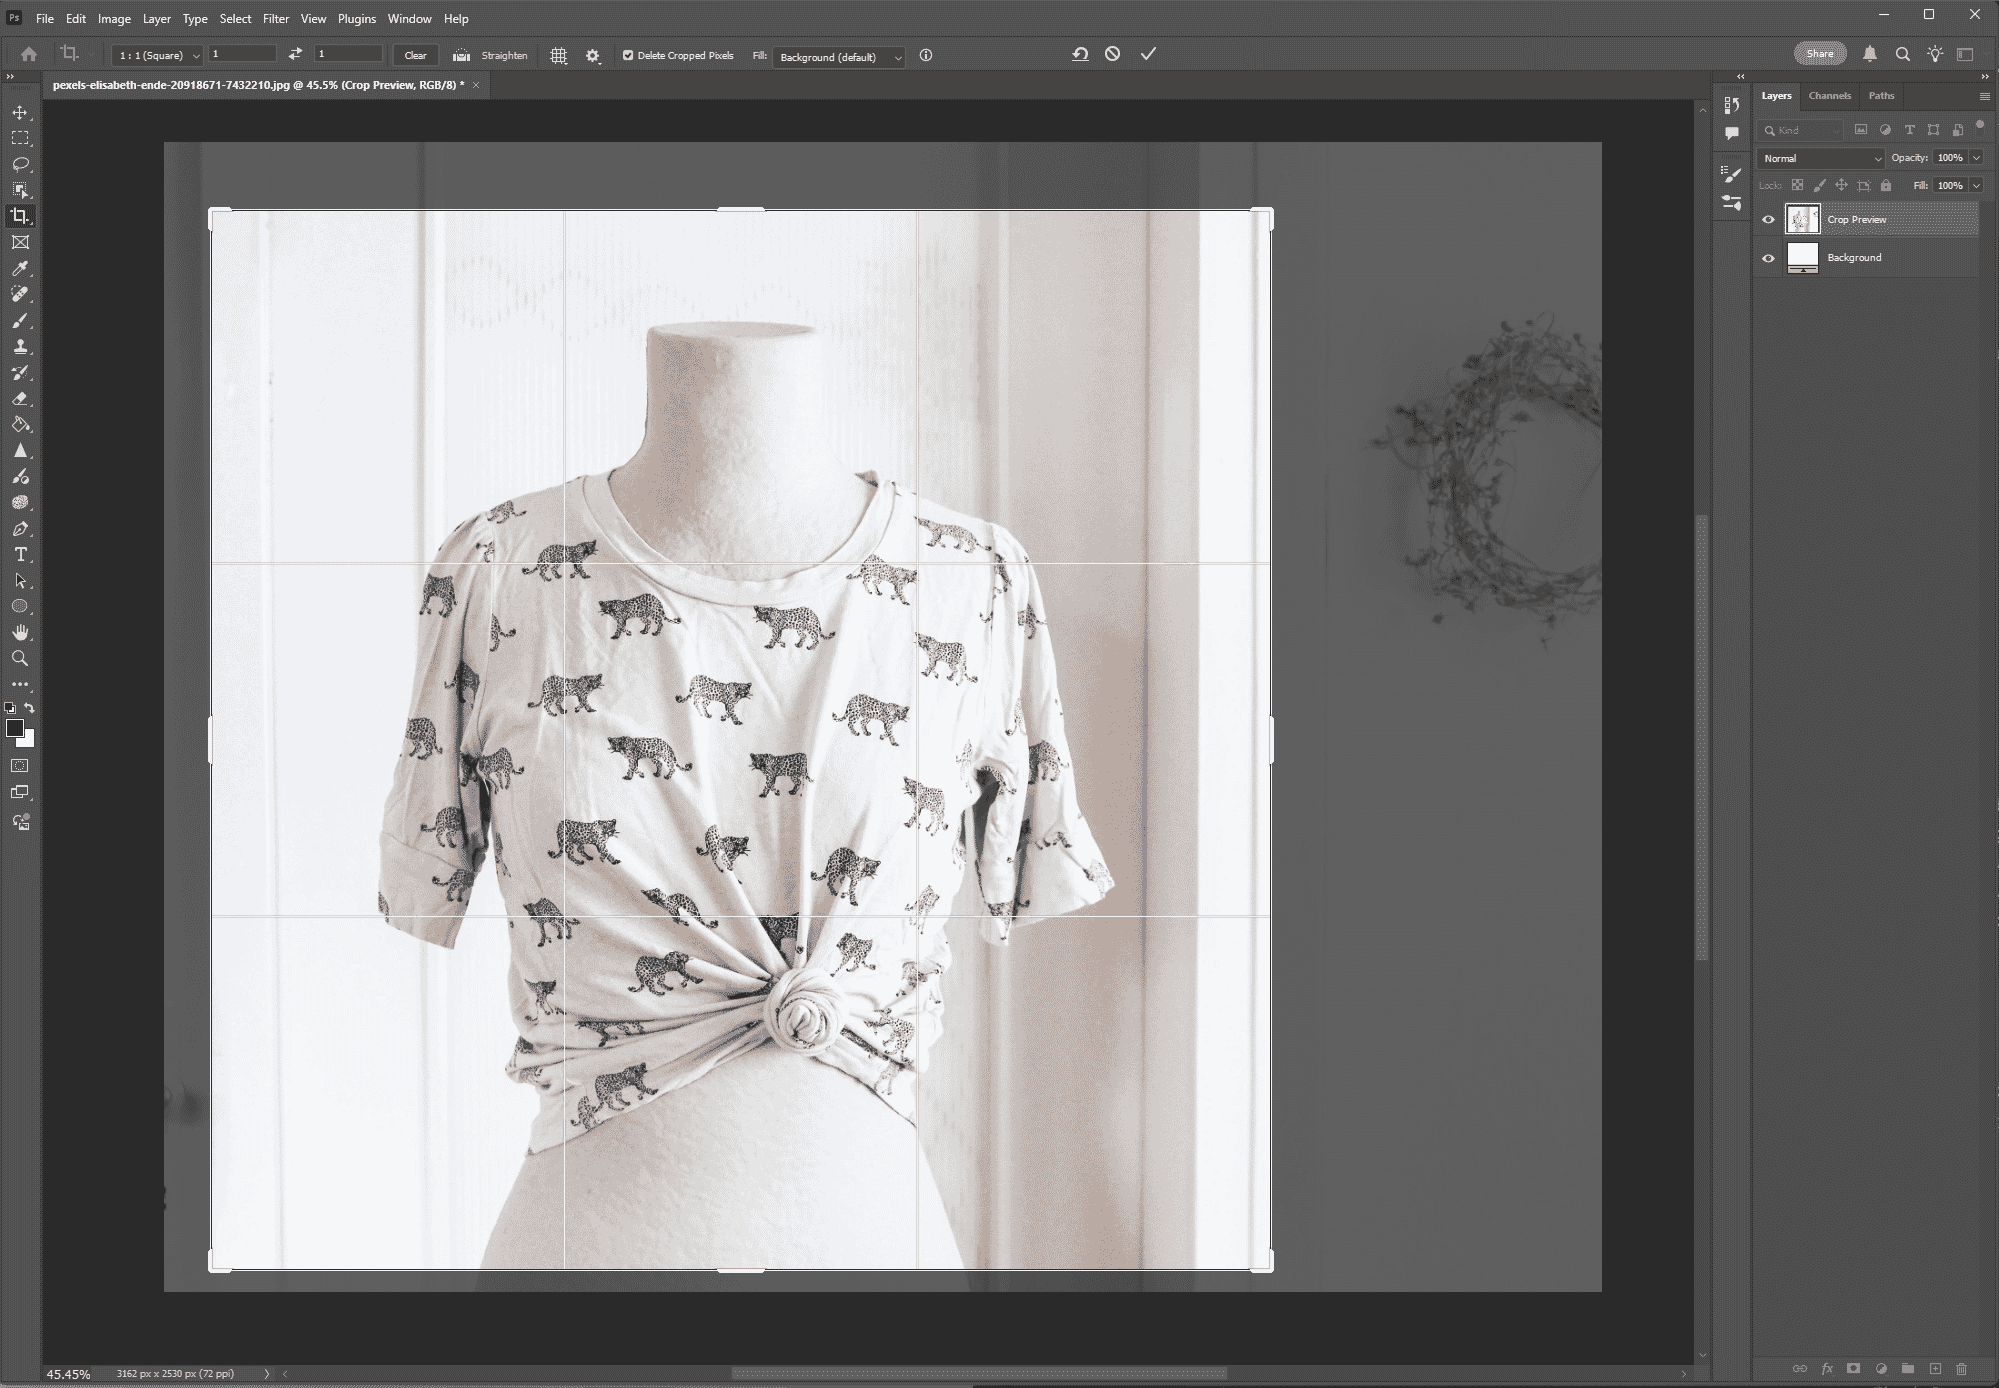
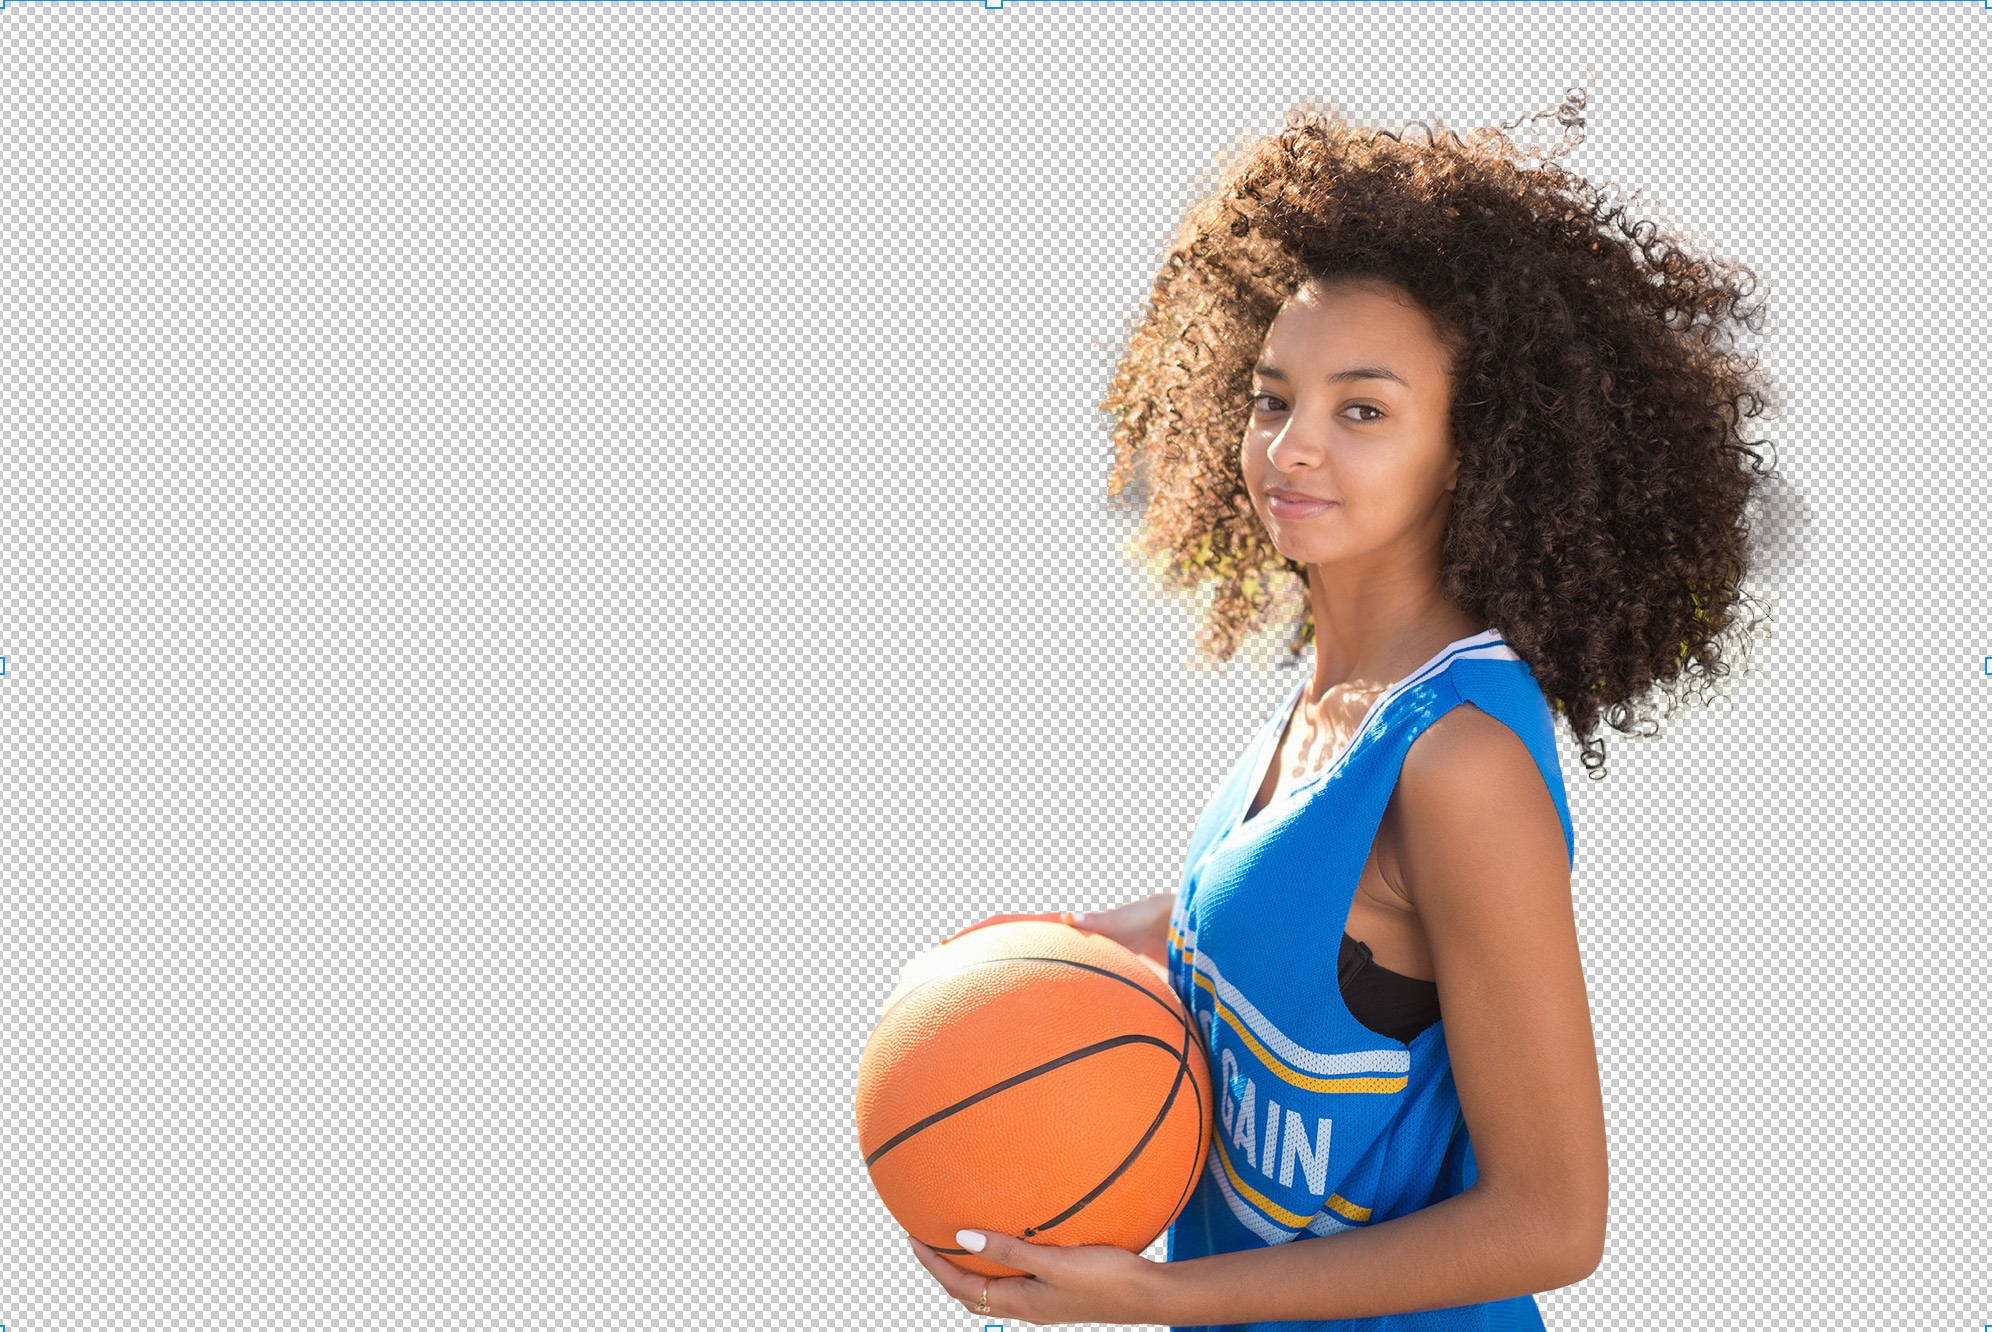
    The result will be…okay. But not perfect. To really remove the background from an image, you’ll need to add a human touch.

    Young female basketball player isolated on a transparent background after precise clipping path and background removal.

    [cta text=”Save a ton of time with pro background removal from 39¢ per image” button=”Learn more” link=”https://pathedits.com/pages/background-removal”]

    Remove background using Select and Mask

    Another option to quickly remove the background of your image is to use the Select and Mask feature in Photoshop. To do this, go to Select > Select and Mask… from the dropdown menu at the top of the application window.

    Photoshop 2025 Select menu with 'Select and Mask' highlighted, preparing to refine selections for precise cutouts of a sports portrait.

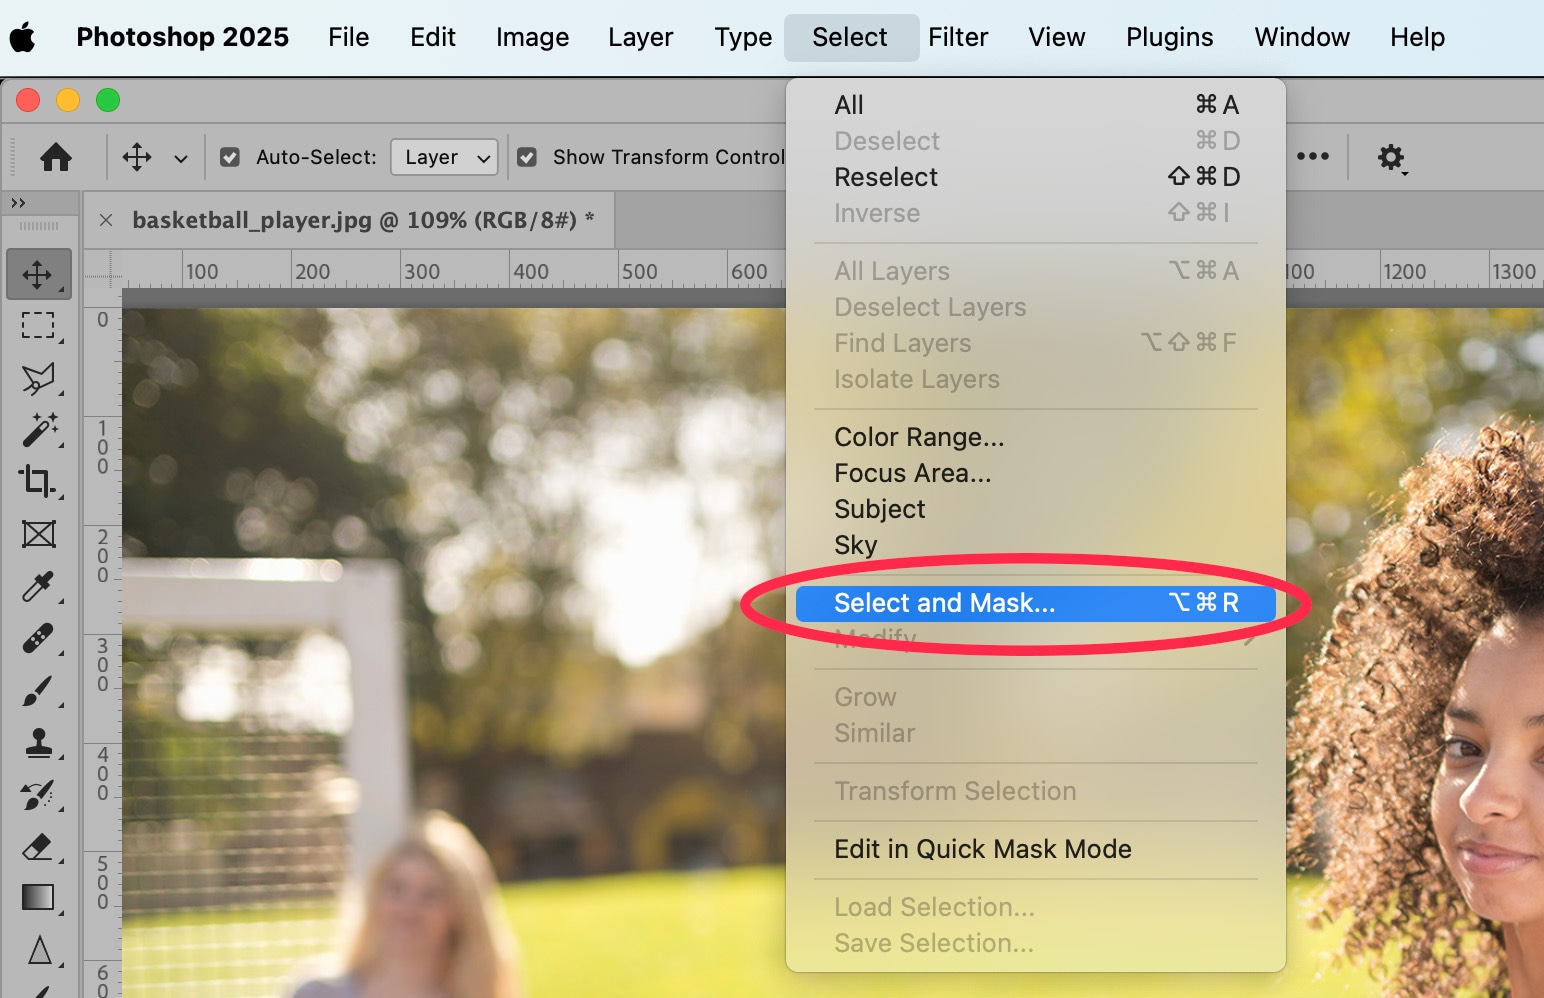
    A new window will appear. In this window, choose Select Subject. You can refine the subject by using the “Refine Hair” button and the tools on the left-hand side of the window, including the Magic Wand Tool.

    Once you have your subject selected to your satisfaction, scroll to the bottom of the Properties tab at the right-hand side of the window. Change “Output to” to “Layer Mask.”

    Photoshop interface showing 'Select Subject' and 'Layer Mask' options in use for isolating and masking a basketball player on a transparent background.

    Click OK.

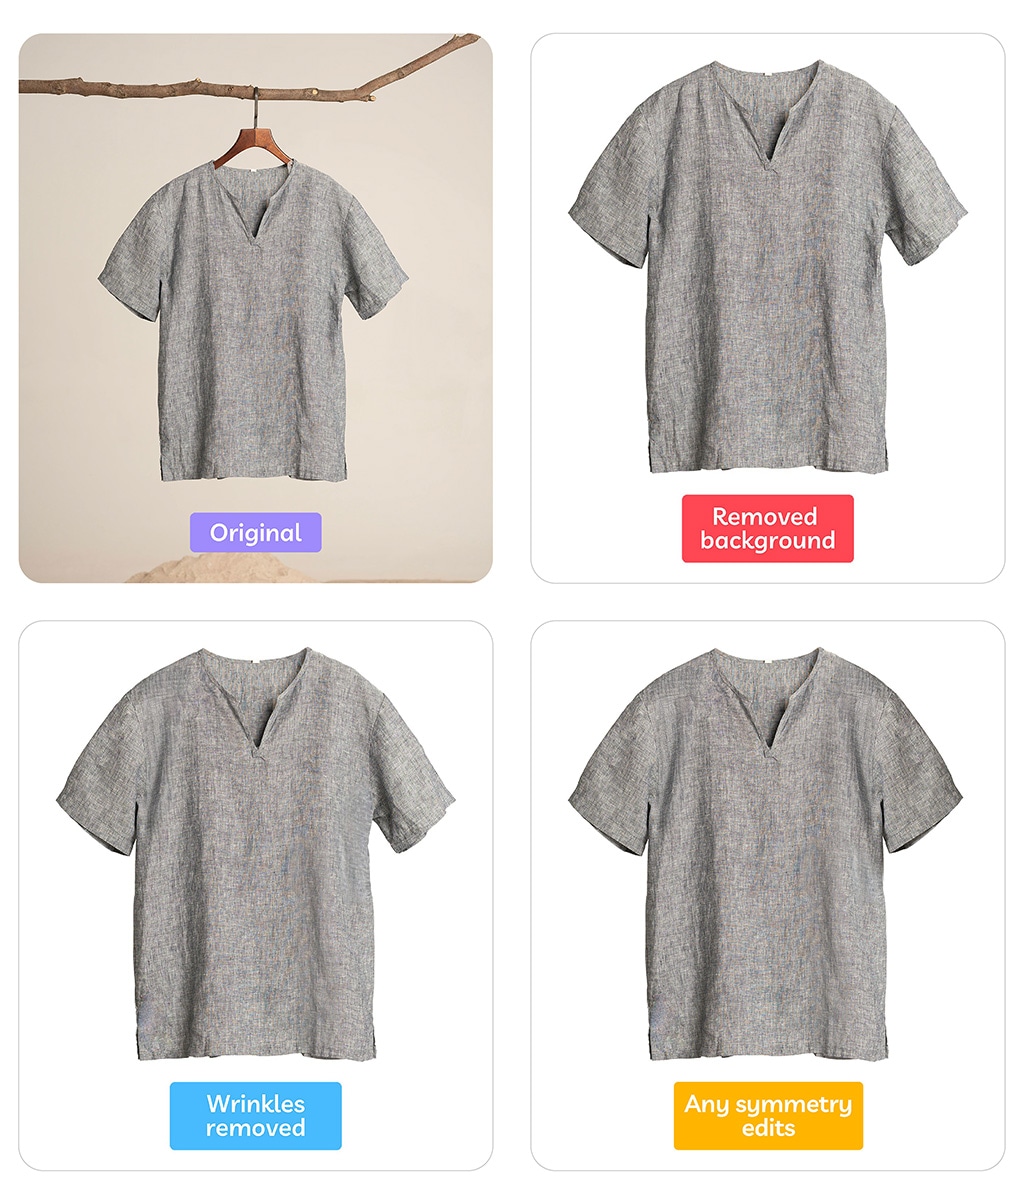
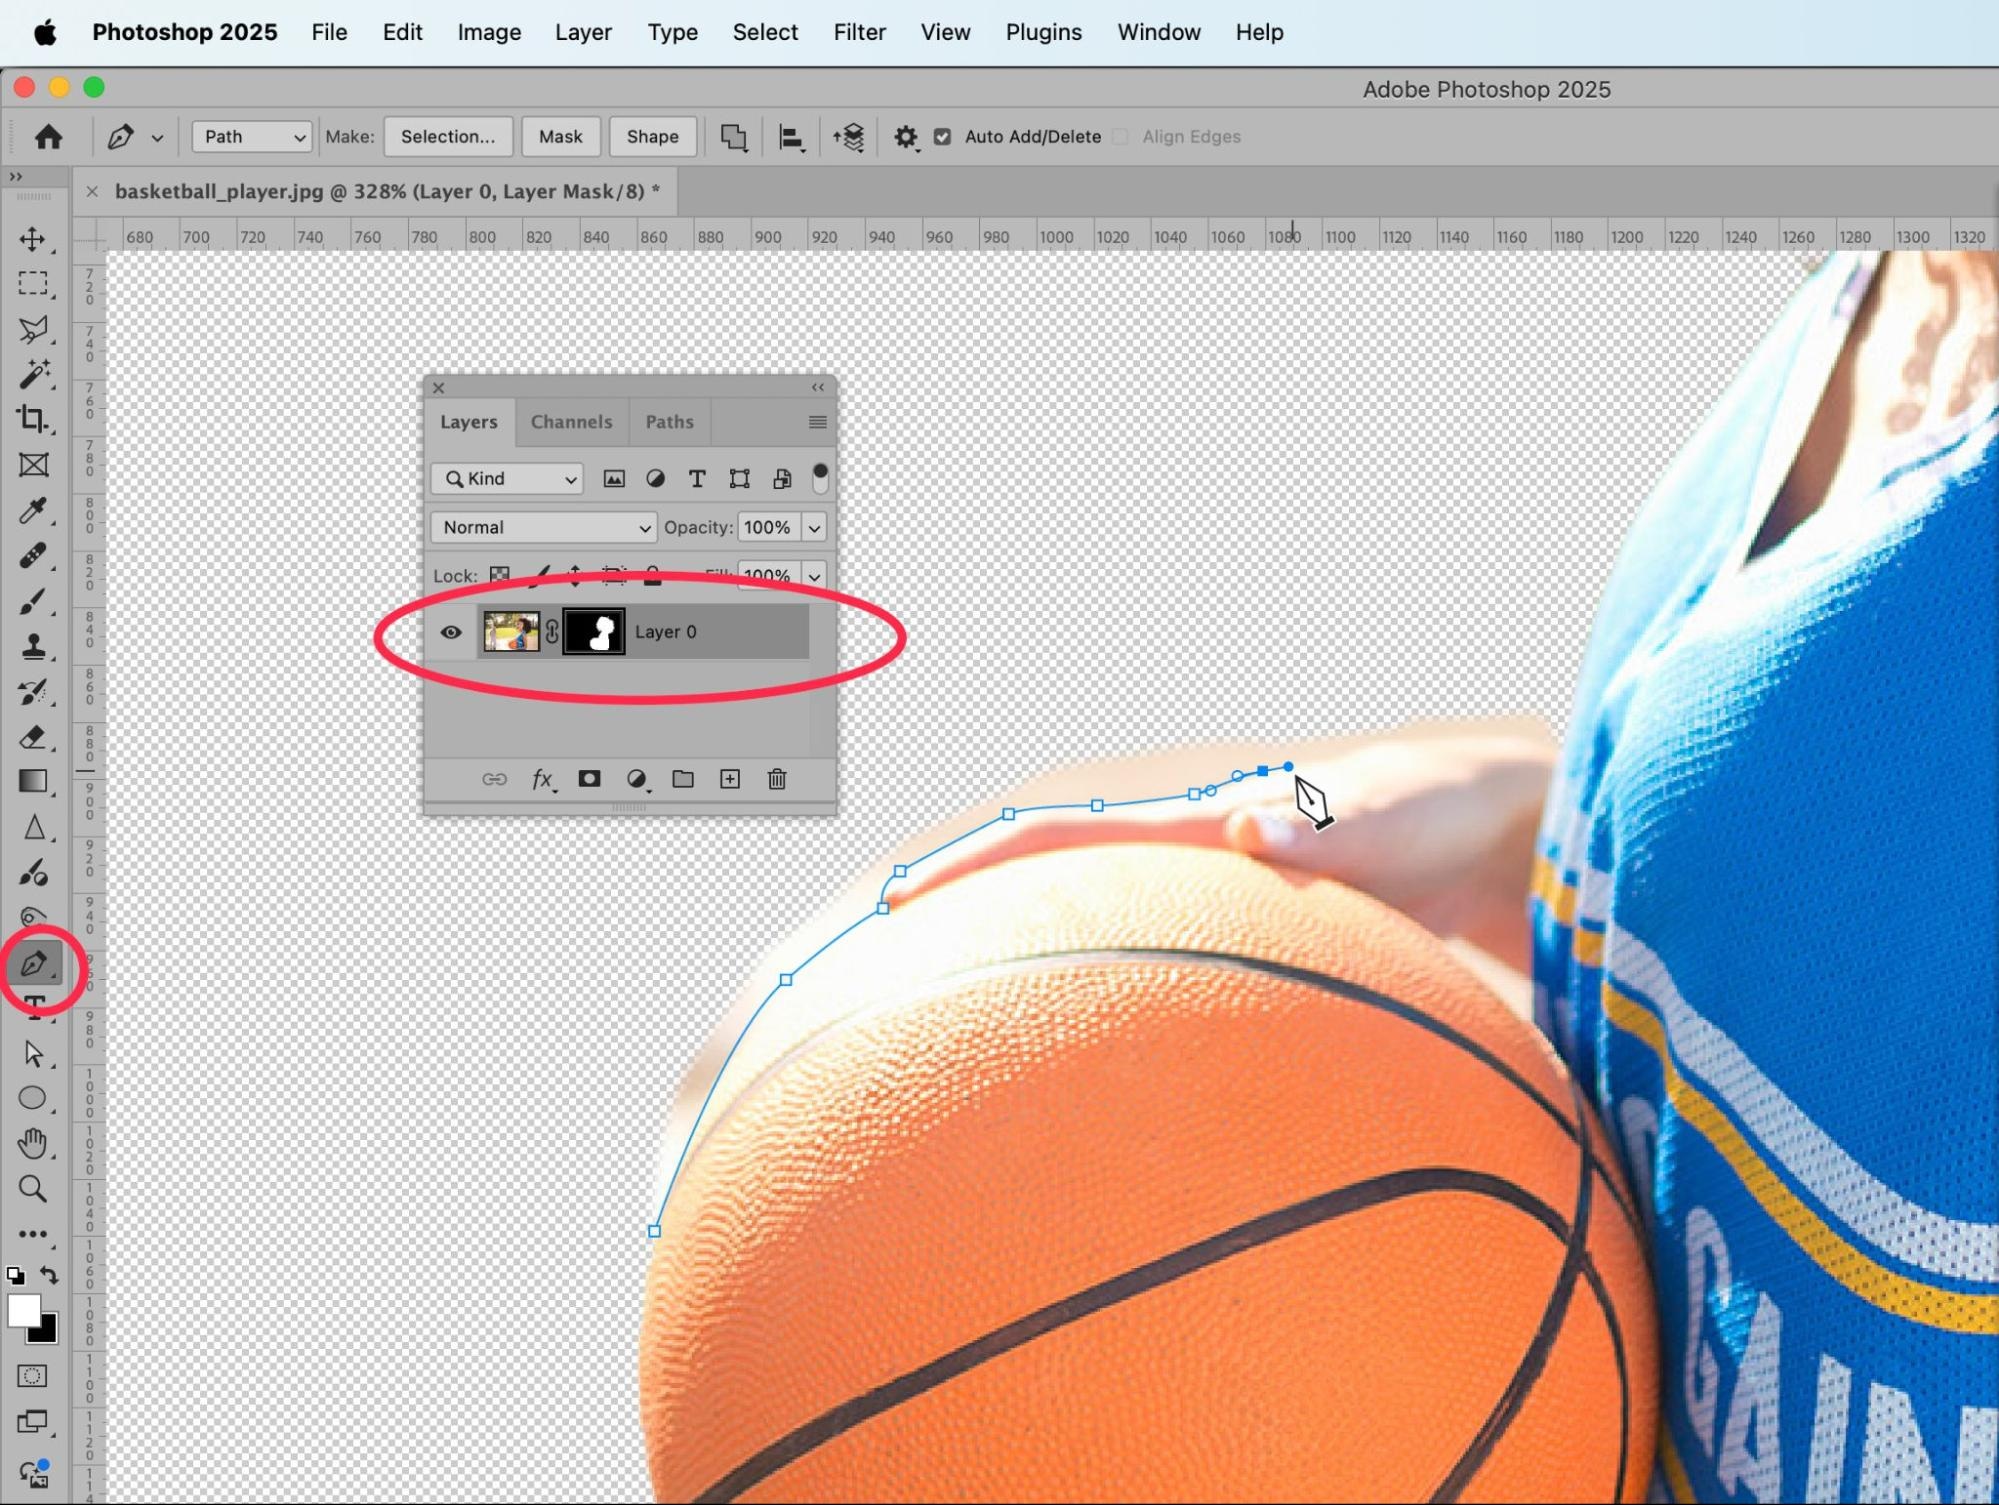
    Back in your regular image window, you can now refine the subject more. For instance, Select and Mask didn’t do a very nice job of selecting the model’s hair, and parts of her left hand are cut off. You can fix this manually using Photoshop’s Pen Tool and Background Eraser Tool.

    Refine selection using the Pen Tool

    You can use the Pen Tool to refine crisp edges of your subject. 

    First make sure you have the mask portion of your layer selected. Then select the Pen Tool from the Toolbar at the left-hand side of the application window and draw along the edge of your subject. Create a selection from your path, then delete or add portions of your image back in to achieve the desired edge to your subject. 

    Photoshop 2025 interface showing the Pen Tool and active layer mask while creating a clipping path around a basketball in a background removal workflow.

    Use the Background Eraser Tool

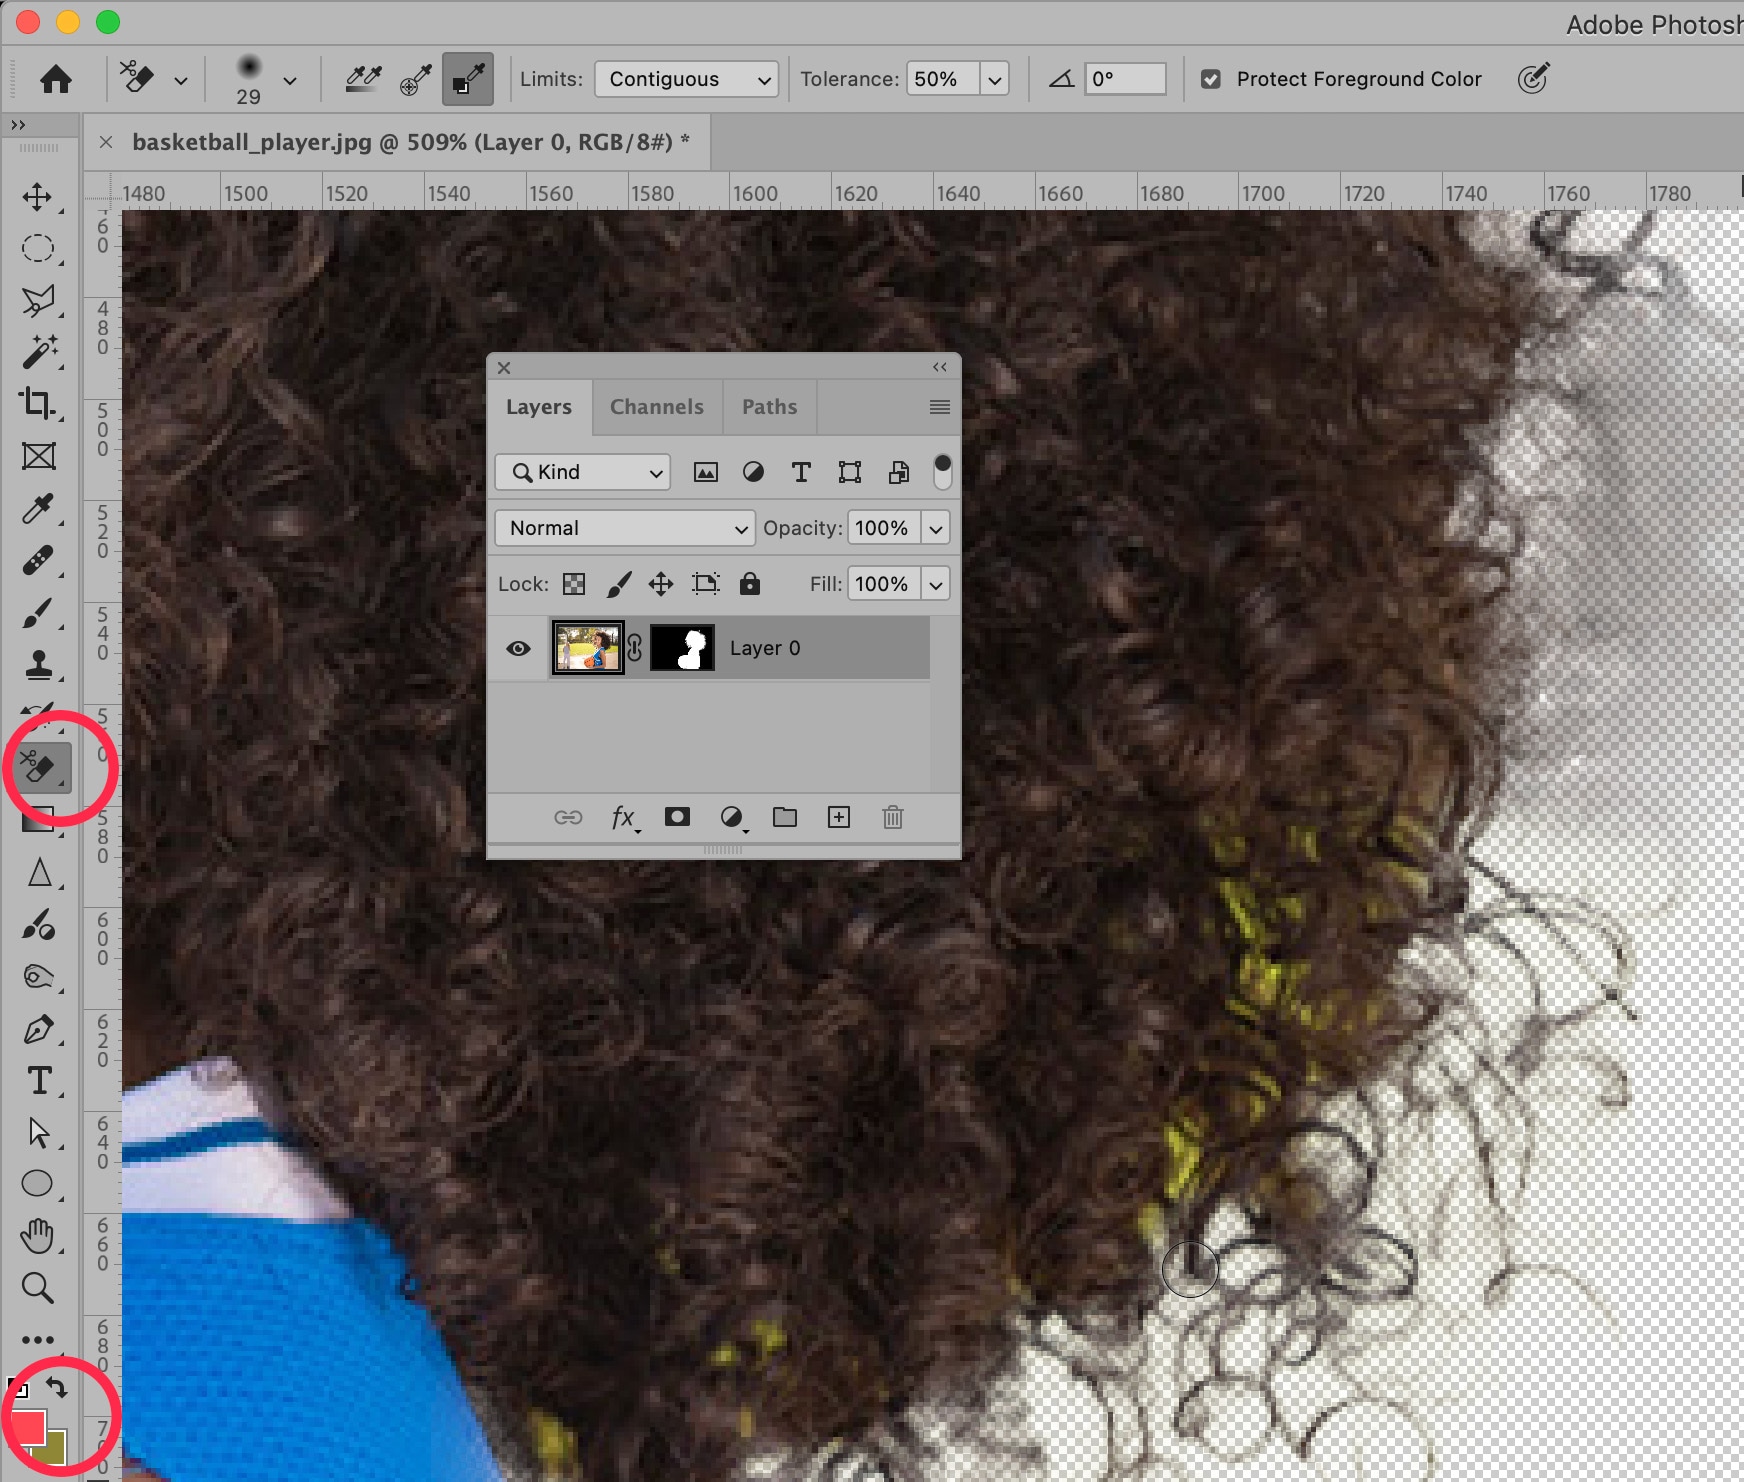
    Next, you can use the Background Eraser Tool to refine the hair of our subject. You can get to the Background Eraser Tool by clicking and holding down the Eraser Tool in the Toolbar.

    It’s best to work in stages around the edge of the subject’s hair, so choose one side of the head to start on. Then, set your background color to the color of the background behind that portion of hair. Use the Background Eraser Tool to refine the edge of the hair and continue to change the background color as needed as you work around the entire head.

    Photoshop 2025 close-up view of masking curly hair using the Brush Tool and selection refinement tools on a transparent background.

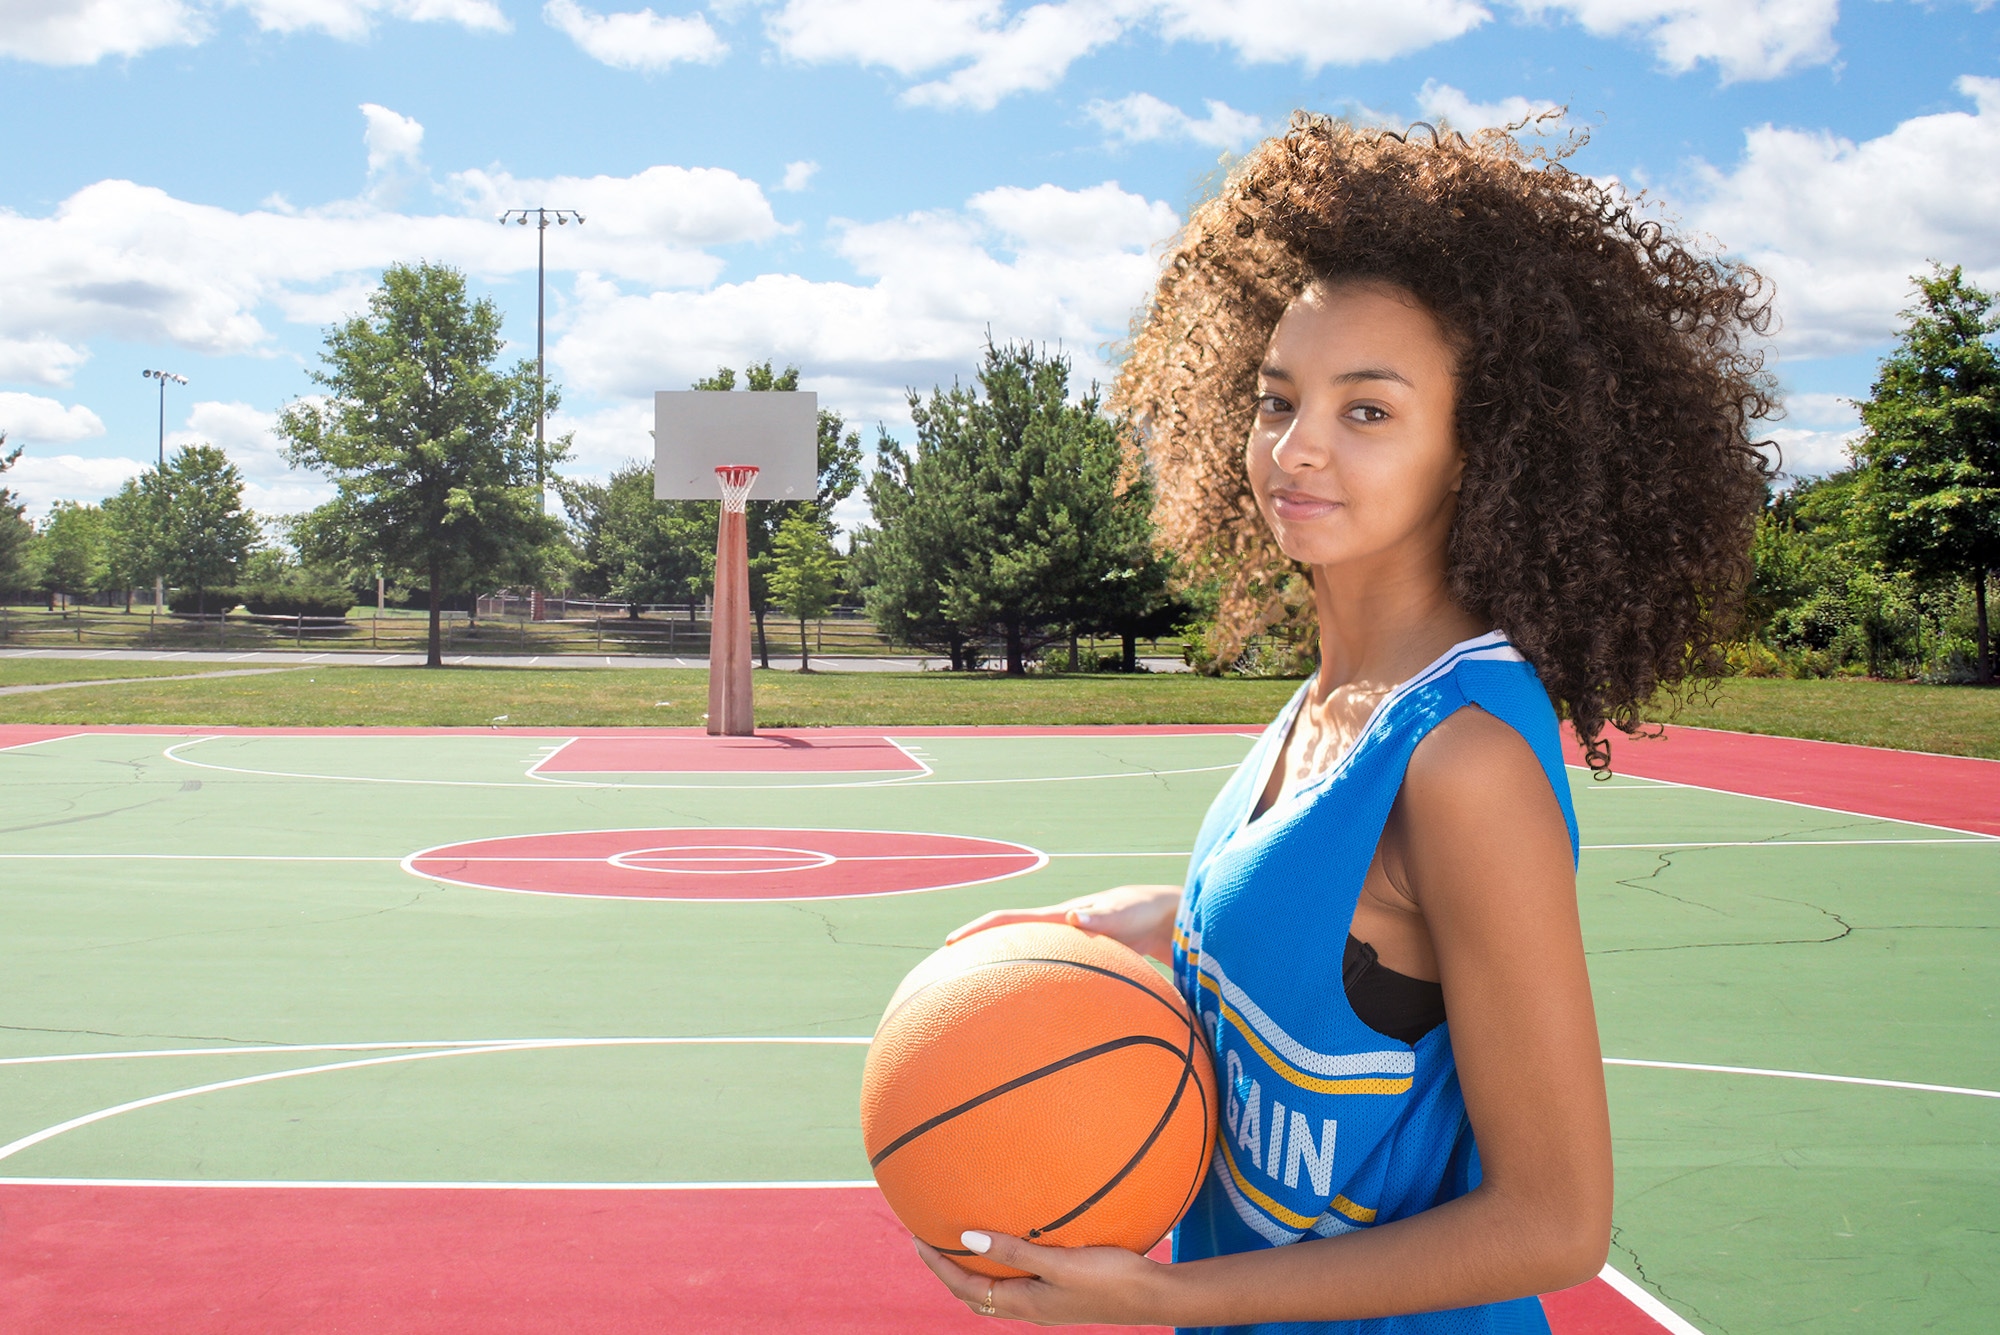
    Once you’ve sufficiently removed the background from your subject, you can insert a new, crisp background into your image.

    Retouched image of a female basketball player placed on a new outdoor court background after background removal and replacement.

    How to avoid taking blurry sports photos

    While Photoshop offers many options to reduce motion blur, the best way to get a crisp photo is adjusting your camera and equipment settings for the scene you’re shooting. Take plenty of test shots before the event to get your setup close to perfect, based on subject speed and lighting conditions. Shooting in RAW instead of JPEG gives you more flexibility to rescue blurry or underexposed photos later. Even if you don’t have the time to spend on fixing photos, you can outsource photo editing to Path using your captured RAW images. 

    Below are some simple but effective shooting tips to make sure your next sports photos are perfectly in focus.

    Fast shutter speed

    When you’re trying to capture a moving subject, you will need to use a fast shutter speed if you want the subject to appear clear, or “frozen.” How fast a shutter speed you need (and can use) depends on how fast the subject is moving, how much light you have to work with, and how wide or narrow the aperture of your lens is.

    For subjects that are moving at high speed, such as running athletes, cyclists, or racing cars, you will need a shutter speed at least 1/1000 sec, and probably closer to 1/4000 sec. Different cameras offer different shutter speed options, and some new mirrorless options offer shutter speeds up to 1/64,000 sec.

    If you want to create a blurry background with your subject still sharp, use the panning method. Reduce the shutter speed to create a blur and move the camera in the same direction as your subject when they move past you. It takes plenty of experimentation to get your settings and hand movement right, so don’t worry if you don’t get it on the first try.

    High-speed group cycling race with motion blur emphasizing dynamic movement and competition intensity on city streets.

    Adjust light 

    When you reduce your shutter speed (meaning you make it faster, such as going from 1/250 sec to 1/1000 sec), you reduce the amount of light that hits the sensor through the shutter. Therefore, in order to have a bright image, you need to compensate for the high shutter speed by raising the ISO, widening the aperture, or both. 

    Taking photos with plenty of light is important to ensure that the photo comes out at the correct exposure, at the zoom level you need, without the increased film grain that can occur from high ISO values in low-light. Taking photos outdoors during the day will provide a lot of light, as will using a flash. Before you use a flash at an indoor sporting event, however, check the event’s rules for flash photography. Many sporting events don’t allow flash photography from professional photographers, unless they’re the official contracted photographer.

    Reduce camera shake

    Camera shake happens because even when you try to stand perfectly still, your hands naturally make tiny movements that can blur images. Using your camera’s neck strap pulled tight against your neck can add a bit of extra stability when shooting handheld. 

    When you zoom in to your subject, you increase your focal length, and you need to increase your shutter speed to compensate, or else you risk your image blurring from shaking. For a still subject, your shutter speed needs to be at least the inverse of your focal length, so if you zoom in to 400mm, you will need to set your shutter speed to at least 1/400 sec to avoid camera shake. And then you will need to increase your shutter speed from there, depending on how fast your subject is moving and the available lighting conditions.

    Most sports action shots are taken with hand-held cameras or with monopods. You’ll often see sports photographers with large lenses use monopods to support the weight of their kit, which still allows them to quickly move the camera around.

    Many modern cameras and some lenses also have powerful shake reduction capabilities. Look for terms like ‘In-Body Image Stabilization’ (IBIS) in camera bodies or ‘Optical Stabilization’ (OS/IS/VR) in lenses. This technology can help you shoot at slower shutter speeds while still getting sharp images.

    Let us fix your sports photos

    While not every blurry photo can be saved, with the right tools and techniques, you can rescue many of them—and capture crisp, clear shots moving forward. 

    Shooting, organizing, and editing sports photos takes a lot of time and work. Wouldn’t it be great if you could outsource the most tedious, repetitive aspects? With Path, you can! Send us all your background removal, retouching, and image masking needs—so you can get back to the creative work that really matters. 

    Ready to send your photo edits our way? Get started now—and get your edits back in as little as 6 hours.

    Simple pricing for stress-free, pixel-perfect photo edits tailored to your needs

    How to fix blurry sports photos FAQs

    How do you make sports pictures not blurry?

    To make sports photography less blurry, use a fast shutter speed—ideally 1/1000s or faster—to freeze motion. Set your camera to continuous autofocus (AI-Servo or AF-C mode) and track your subject. Good lighting, a higher ISO if needed, and steady panning techniques also help capture sharper images.

    Why are my pictures blurry in sports mode?

    Sports mode usually tries to select faster shutter speeds, but it can still struggle in low light or if the autofocus isn’t keeping up with the action. Your pictures might also be blurry if the camera is focusing on the wrong spot, or if there’s not enough contrast for the autofocus to lock onto the subject properly.

    How do I get my sports pictures sharp?

    Use a fast shutter speed, continuous autofocus, and a wide aperture (like f/2.8 or f/4) to let in more light. Track the subject carefully, and if possible, pre-focus on an area where you expect the action to happen. Shooting in burst mode can also increase your chances of getting a tack-sharp frame.

    How do you take clear sports pictures?

    Clear sports images start with the right camera settings: fast shutter speed, continuous autofocus, and an appropriate ISO. Also, practice good technique—like following your subject smoothly with the camera and anticipating the action. Using higher-quality lenses with image stabilization can make a big difference too.


    Source link

  • How The DJI Pocket 3 Fits Into My Workflow

    How The DJI Pocket 3 Fits Into My Workflow


    Hybrid Photography

    I am a hybrid photographer, a photographer that shoots both stills and video. My main camera is the Sony a7RV and it is perfectly suited to my needs. It shoots 61mp stills and up to 8k video in 10 bit 422 colour.

    I also have an iPhone 15 Pro. Its video capabilities are excellent, being able to capture 10bit 422 in Prores if using an external SSD. I also have a couple of drones, and a DJI Osmo Action, the original version. I find uses for all these cameras, so why on Earth would I want to add the DJI Pocket 3 to my camera bag? Let me explain.

    A Gap In Capability

    I shoot a lot of videos with the Sony a7RV. Much of this is shot either from a gimbal or from a locked off a tripod with a video head. Both of these are slow and cumbersome to set up and make shooting stills more difficult. Often when I am shooting video, I suddenly see a stills photo that I want to take.

    To do this I need to either remove the Sony from the gimbal or maneuver the tripod and camera to the right location. It’s slow and there is often a good chance that I will miss the shot.

    Man shooting video low level using a gimbal
    A large camera and gimbal can become very heavy. By Jose P Ortiz on Unsplash

    My workflow at the moment sees me dedicated myself to shooting either video or stills but not both at any given location. There are many times when I am out on a stills shoot, roaming a location when I yearn to shoot some video. However on a stills shoot I will not take the gimbal with me. That leaves me with the option of handheld video. Whilst Sony’s IBIS is pretty good, I still feel that handheld video is not a great option for stock agencies. It will be rejected more often than not.

    I also carry the DJI Osmo Action with me, but there are a lot of limitations. It is electronically stabilized, which often looks awful, has a small sensor and is now quite dated. It is primarily used as my vlogging camera.

    The Other Gap In Capability

    Since the beginning of the year, I have set myself a target to monetise my YouTube channel. The channel is focused on all things photography, stills, video, drones, editorials and more. There was an issue though.

    I like to create my videos on location. Me and my camera in a pretty location talking about the photography subject of the day.

    However, given my main camera will often be the subject of the video and the iphone was limited ergonomically, my choices were limited. Often, my script notes are on the phone making it tricky to use and shoot from simultaneously. The Osmo Action is very limited unless used as a fixed static camera. It’s not great for getting b-roll either of the location or the gear. Drones are great at tracking subjects and moving around but you really need a second person to operate them safely. So I needed something else.

    Video still of person talking to camera on busy Bangkok street
    Talking to camera in a hot and humid Bangkok

    Looking At The Options

    What I was looking for was a compact, mechanically stabilized video camera with output quality good enough for stock agencies. It had to be lightweight, easy to set up and decent in low light. I narrowed the choice down to two options. My iPhone on a DJI/Zhiyn gimbal or the DJI Pocket 3.

    I have used my iPhone with a gimbal for stock video on many occasions. The quality is decent in good light but drops off very quickly as the light fades. There is another drawback though. The iPhone is a portable computer on the go. I use it to navigate, check emails, post to social media and pay for things. None of these are easily done when it is attached to a gimbal.

    Video still of of Singapore skyline shot on a DJI Pocket 3
    Still from a DJI Pocket 3 Timelapse. By Jason Row Photography

    I had followed the progress of DJI’s Pocket cameras from the release of the original. The DJI pocket cameras are effectively a small camera attached to a handle through a gimbal. They are small, mechanically stabilized and, at a push, can fit into your pocket.

    They were interesting, but did not fit my needs. It seemed to be primarily aimed at vloggers shooting to camera pieces outside and for average quality b-roll footage for those vlogs. The Pocket 2 improved capabilities a little, but was still not really useful as a stock video camera.

    Then about six months ago and to much hype, DJI released the Pocket 3. This stood out for a very good reason, the 1” sensor.Now in large camera terms a 1” sensor is not huge but compared to previous Pockets and to smartphones it was huge.

    However there was another stand out feature. It also shot Log in 10 Bit colour. This is a big deal for videographers as it gives a lot more leeway when grading the footage in post. This was a pro level feature.

    A DJI Pocket 3 Camera shooting a timelapse in Bangkok
    The DJI Pocket 3 shooting a timelapes at Wat Arun in Bangkok. By Jason Row Photography

    Was The Hype Realistic?

    I rarely buy tech gear at first release. YouTube is full of creators that pump out “super psyched” videos on the launch day of pretty much anything that runs off batteries. The hype on the DJI Pocket 3 was immense, YouTubers extolling the many virtues and finding little wrong with the camera.

    Six months later, you start to get videos with titles like “The Downsides Of The Pocket 3” It is these videos that I like to watch in combination with 6 months’ reviews from established and well regarded filmmakers and photographers.

    What I learnt from these videos was that much, but not all of the hype was real. The DJI Pocket 3 was a very capable camera, producing a superb video image that belies its size. It was a tool with some excellent features. There were issues, downsides of course, but none that I could see that would affect my use of the camera. So I bought one.

    A DJI Pocket 3 still capture of the Grand Palace in Bangkok
    Still image from DJI Pocket 3 video of the Grand Palace Bangkok. By Jason Row Photography

    How Is It Working Out

    So far, very good. I have had the Pocket 3 for a few months and have shot quite a bit of footage with it as well as a studio based, to camera YT video. The video quality is excellent and the range of features very good. I can shoot 4K up to 120fps, timelapses, ultra slow motion. It will track subjects, detect my face, both very useful for outdoor vlogging. It’s compact, has good battery life, connects easily to my Rode Wireless Go II mic system and provides me with an excellent range of gimbal moves.

    It’s early days but so far it is living up to the hype.

    https://www.youtube.com/watch?v=vYrJ9aFMeQk

    Why the DJI Pocket 3 was my best camera on a recent trip


    Source link

  • Pro Tips on How to Take Beautiful Antelope Canyon Pictures

    Pro Tips on How to Take Beautiful Antelope Canyon Pictures


    “Wow” is an understatement when describing the beauty of Antelope Canyon. Its beautiful and glowing red canyon walls, sleek curves, scalloped rock faces as well as striking light beams can leave you speechless.

    Fortunately, you don’t have to be a professional photographer just to get great Antelope Canyon pictures. With your camera, you can actually take great photos of the area.

    Keep reading this article for tips on how and where to position your camera to get spectacular shots.

    [table id=29 /]

    Antelope Canyon: Interesting Facts

    Antelope Canyon

    Antelope Slot Canyon is located in Page, Arizona.

    It is made up of the Upper and Lower Antelope Canyons. Both canyons are part of the Navajo land in Northern Arizona. The Navajo people are responsible for the care and preservation of the Antelope Canyon. 

    The formation was created millions of years ago. These canyons were created due to water and wind erosion caused by flash floods in Arizona. Both slot canyons are open for tourists. Oftentimes, when people say Antelope Canyon, they normally refer to the Upper Antelope Canyon.

    The Upper Antelope Canyon is more popular than the Lower Antelope Canyon. However, tours for the Lower Antelope Canyon are relatively cheaper. With a Navajo guide, you may visit both slot canyons in one day.

    The road leading to the canyons is gated by the Navajo Nation. The Navajo Nation protects its people as well as the canyons. That is why only guided tours with authorized tour guides are allowed entry into the canyon.

    As majestic as it is, this natural beauty can cause danger during monsoon season. Rainwater can quickly fill up the canyon which can cause flash flooding due to the canyon’s narrowness. In 1997 a flash flood cost the lives of some tourists. 

    Because of the 1997 incident, visiting the canyon is only through guided tours. Aside from the issues of safety,  only authorized guide tours are permitted entry into the canyon to prevent vandalism and preserve this natural landmark.

    If you are planning to visit the canyons, make sure to check the weather conditions on your planned dates. You want to enjoy your trip and bring home great memories and not get stranded on the ledge because of the rain.

    The Lower Antelope Canyon

    Lower Antelope Canyon

    The Lower Antelope Canyon is also called “The Corkscrew” and has a Navajo name “Hazdistazi”. The Navajo name for the Lower Antelope Canyon translates to “spiral rock arches”.

    If you like narrow passageways and ladders, you may find the Lower Antelope Canyon to your liking. The canyons here are shallower and lighter in shade than the Upper Antelope Canyon because of their upright V shape.

    The Lower Antelope Canyon is located near the Upper Antelope Canyon. Unfortunately, in 2018 tour operators no longer offer general tours and even photography tours.

    The Famous Upper Antelope Canyon

    Upper Antelope Canyon

    The Upper Antelope Canyon is also called “The Crack” and has a Navajo name “Tsé bighánílíní”. The Navajo name for the Upper Canyon translates to “ the place where water runs through cracks”.

    It is characterized by high and dark canyon walls, light beams shining down, and falling sand. The Upper Antelope Canyon is somehow shaped like an inverted V. It is narrow at the top while it is wide and passable at the bottom.

    Because of its high canyon walls, light beams are easily created when the sun shines at certain angles. The narrow top also makes the canyons look darker and the surrounding atmosphere cooler.

    How to Visit Antelope Canyon?

    The Antelope Canyon is only open for scheduled tours. You may inquire about tour packages, exclusive deals, and even discount codes from tour companies. It is highly encouraged that you make reservations for tour slots at least three months in advance. 

    The whole tour usually lasts for 1.5 hours which is inclusive of the travel time and touring the canyon. So many people who want to visit this place. It is not surprising for many want to witness this majestic site up close and personal.

    Road to Antelope Canyon

    Most tourists flock to Antelope Canyon during summertime. Midday is the most crowded time. Tourists prefer to visit during this time so they can get more great stock photos. If you want to avoid the crowd and take your time taking pictures, you can visit earlier or later in the afternoon.

    Tips for Capturing Gorgeous Antelope Canyon Pictures

    Both slot canyons are photogenic. However, you can capture more stunning photographs at the Upper Antelope canyon. It is during midday that you can get gorgeous photos of light beams as well as falling sand.

    Don’t forget to look up

    Tourists Looking Up

    When you are on tour with so many tourists, taking great pictures can be challenging. One important piece of advice to get great shots is to look up. The canyons look lovely from that perspective. Also, if you are lucky, you can get gorgeous images of light beams shining down.

    Tripods and selfie sticks are prohibited

    Only handheld photography is permitted. Unfortunately, handheld photography in the Upper Canyon can be challenging especially after midday because the canyon walls look noticeably darker.

    Taking Selfie

    As an avid photographer, you will surely be in awe at the lighting conditions in the canyons. At the Upper Antelope Canyon, for instance, you can capture various gorgeous pictures of the sandstone walls changing color throughout the day depending on the sun’s angle.

    You may also find yourself wandering about, looking for the perfect shot because there are several compositions you can make. If you hire a Navajo guide, they can bring you into the canyon at the right time for you to capture amazing light beams.

    Light beams don’t last long

    Antelope Canyon Light Beam

    You have to bring in your A-game and capture as many pictures as you can. If you still have time after you take all the necessary shots, you can stare at the majestic view in front of you and absorb it all.  Not everyone gets to witness such beauty of nature.

    The Antelope Canyon is a great surprise and unique experience if you are an enthusiastic landscape photographer. You take a lot of abstract photographs and the art compositions are limitless. Not everyone will have the same composition. Each photo is unique.

    If you get to take shots of a particular spot in the canyon with your preferred lighting condition, the result is magical. You will notice that the contrasts and transitions between cold and hot tones are spectacular.

    Depending on the time of day you are inside the canyon, you can capture varying contrasts of purple, red, and orange. If you have an active imagination, you may spot some human or animal formation to capture on a frame.

    What Is So Special About Antelope Canyon?

    Antelope Canyon is special because of its wave-like canyon walls. These walls change color throughout the day depending on lighting conditions. The sunbeams and falling sand also add to the spectacle of the place. These make Antelope Canyon the most photographed slot canyon in the southwest USA.

    If you’re thinking of visiting the area, it is from the end of March until the first weeks of October that you can enjoy Antelope Canyon the most. It is from 11:00 am until 1:30 pm that you can witness the ultimate beauty of the Antelope Canyon, especially the Upper Antelope Canyon.

    On average, it can take you 1 to 1.5 hours to walk through Antelope Canyon both Upper and Lower Antelope canyons. You get to traverse a distance of approximately 1,800 meters (1.10 miles) round trip. Walking is easier in the Upper canyon than in the Lower canyon.

    Final Thoughts

    Beautiful Canyon

    Antelope Canyon is one breathtaking and jaw-dropping natural destination. It offers tourists a different kind of experience. This American Southwest is truly amazing. A true gem of the world. 

    The lines, tones, as well as color separation, are a spectacle to behold. These are perfect elements for an abstract photograph. It is a perfect place for abstract photographers to create their masterpieces and draw design inspiration from.

    If you seek thrill and fun, it is best to visit the Lower Antelope Canyon. On the other hand, if you want to take great stock photos, then the Upper Antelope Canyon is your best bet. 

    Whatever your reasons are for visiting the Antelope Canyon, one common thing stands out from all tourists – the appreciation and gratitude for Mother Nature’s creation. Bring your most trustworthy camera and create priceless memories in Antelope Canyon, Arizona.

    Lightroom Bundle Presets


    Source link

  • How to fly with film

    How to fly with film


    In this section of our three-part series about traveling with film, we’ll talk about the mode of travel most fraught with peril for film photographers: Flying. Back in the pre-digital days, flying with film was a no-brainer; you could pack your camera gear and buy all the film you needed at your destination (and perhaps get it developed there as well). Today, film is harder to find and airport security is tighter (and potentially more harmful to film), so airborne analog photographers have to do a bit more planning.

    (Note that the information in this article is specific to air travel in the United States. Other countries may—and likely will—have different regulations and procedures.)

    The primary problem facing film fans who fly

    Related: How to travel with film by land and sea

    Here’s the big problem for airborne film photographers: The scanners and X-ray machines used for luggage inspection produce light energy to which film is sensitive. These machines can potentially “fog” your film, causing dark spots or waves on the negatives (or light spots on slides) as if the film had been exposed to light. So the challenge when flying is to minimize or avoid situations that could potentially damage your film.

    Note that only undeveloped film is subject to damage. Developed negatives, slides, and prints are no longer light sensitive and cannot be damaged by airport security equipment. 

    Can you avoid X-rays altogether?

    Depending on your destination, it may be possible to avoid bringing film through the airport altogether. If you’re traveling to a big city, you might be able to buy your film locally. If you’re staying at a high-end hotel with a concierge, they may even be able to buy film for you (but beware of hefty prices and fees). You may also be able to mail-order film and have it sent directly to your lodgings; check with the property first to see if they can receive packages (and bring a couple of rolls in case your shipment is lost or delayed). Likewise, if you use mail-order film processing, consider sending the film off for development from your destination before you leave for home.

    Never put film in a ‘checked’ bag

    Do not put unexposed or undeveloped film in checked baggage, ever. The scanners used for checked baggage are more powerful than those used in carry-on luggage and will very likely fog your film. Film and loaded cameras should always be taken in carry-on luggage.

    A camera, passport and film.
    Always carry your film onboard with you. To avoid a potentially destructive zap from the X-ray or CT scanner, stow (preferably) unopened film in a clear plastic bag and ask for a “hand inspection” at security. Dan Bracaglia

    Related: Going back to film? Here’s what’s changed

    A related side note: When booking your airline tickets, beware of “Basic Economy” tickets, which do not always allow carry-on baggage beyond a small personal item. Buyers of these tickets often board last, when carry-on storage is full, and will sometimes be forced to check their baggage (for a hefty fee), where it could be subject to harmful scanning at stopovers. If you are traveling with film, make sure your air ticket allows you to bring carry-on luggage, and pack your film (and cameras) in a bag small enough to join you in the cabin.

    Film in carry-on baggage: Ask for a ‘hand inspection’

    The Transportation Security Administration (TSA) says that the X-ray machines it uses for carry-on baggage are safe for photographic film up to ISO 800*. We’ve had slower film scanned with no ill effects, but we also understand that the effects are cumulative and that multiple scans may cause fogging. (We asked TSA if we could run some test scans at our local airport; they politely denied our request, citing security concerns.)

    Fortunately, there is one good way to ensure your film will not be damaged: Ask for your film to be “hand inspected,” regardless of its speed.

    *Note that at some airports, TSA is introducing more powerful CT scanners for carry-on luggage, which can damage even slower-speed film.

    The PopPhoto guide to hand inspections

    First: We recommend being patient and polite with TSA agents. Remember that their first responsibility is security, not customer service—and also that they’re subject to a lot of vented frustrations from harried passengers. There’s no need to show fealty; simple politeness and civility will get you a long way.

    Film photography is popular enough that most TSA agents should be familiar with hand-scanning requests, but it does slow their workflow. When traveling with film, we always allow an extra ten to fifteen minutes to get through security (a margin we rarely need).

    We recommend carrying your film in a clear plastic zip-lock-style bag, with which TSA is familiar. Leave your rolls in their plastic canisters and/or sealed packaging whenever possible. We try to keep our cameras unloaded so they can pass through the X-ray machine, but loaded cameras can also be hand-scanned. Anything you’d like hand-inspected should be kept where it’s easily accessible; a backpack is preferable to a suitcase that must be unzipped.

    Before we put our luggage on the belt, we remove our film and loaded cameras, catch the eye of the nearest TSA agent, and say, “I have some film (and cameras) I’d like to have hand-inspected, please.” If asked if the film is under ISO 800 we either say no or (to avoid fibbing) tell them it’s going to be pushed and shot at a higher speed. (They may not know what this means but will generally accept it.) 

    Someone loading a film camera
    It’s best to hold off loading your cameras with film until you’ve reached your destination. Getty Images

    After walking through the scanners we try to stand somewhere conspicuous without blocking the flow of passengers. Film is usually checked by the same agents inspecting bags that have been pulled for secondary inspection, so there may be a wait. The inspection usually consists of swabbing the individual rolls, then putting the swab in a machine that checks for explosive residue. We’ve occasionally had requests to open boxes and always say yes (so long as they don’t pull your film out of the canister or unspool your 120 rolls, it’ll be fine). Once the machine gives the agent the green light, you’ll likely be sent on your way. 

    Going home: Have all film hand inspected

    Once your film has been shot, it’s still sensitive to light and can still be damaged by scanners, so be sure to have all of your film, shot or not, inspected by hand. We must reiterate: Do not put undeveloped film in checked bags

    If you’ve had your film developed while on vacation, there’s nothing to worry about—as we mentioned earlier, developed film, negatives, prints and slides are not light-sensitive. You can safely put them through the scanners or in your checked baggage.

    What about lead-lined film bags?

    Several manufacturers offer lead-lined film bags that claim to protect the film from X-rays. (We do not know if these bags protect against CT scanners.) We haven’t tried one in recent years, but if the bags do block X-rays, they will likely show up as a large dark blob on the security scan, which is likely to trigger a secondary inspection. We find it easier to simply request a hand inspection and avoid the inconvenience of having TSA unpack our bags.

    Advice for other countries

    While we’ve never had a request for hand-scanning denied in the US, we have been refused in Europe, and we don’t know if this was down to security procedures or a language barrier. For this reason, if you do travel with analog cameras overseas, consider bringing a slower-speed film, which is most likely to survive scanning with no ill effects. That said, we understand that some European countries are also introducing CT scanners for hand luggage, which is much more likely to fog film. 

    Ultimately, it’s best to check the official website for the security agency of the country to which you are traveling. If they don’t have a clear-cut policy covering film, you might want to consider traveling with a digital camera or making provisions to mail your film home before you leave.


    Source link

  • How to Position Your Subject for the Best Shot – Path

    How to Position Your Subject for the Best Shot – Path


    Getting the hang of using a camera and photo editing is one thing, but directing subjects? Now, that’s hard! Even pro photographers can struggle with an awkward or camera-shy person in front of their lens. 

    How can you guide your subjects so your portrait shoots are consistent in quality, there are fewer retakes, and the result looks great? It’s a mix of technical shooting and composition skills, with plenty of soft skills, like getting your subjects to relax and smile.

    Want your next portrait shoot to be a success? Check out some practical tips for how to pose any subject—from corporate execs to creative professionals and family groups.  

    Prepare for a successful portrait shoot

    The secret to great portrait poses actually starts before your subject arrives. Here’s what experienced photographers do to prepare:

    Set clear expectations

    Help your clients arrive confident and prepared by sending them key information ahead of time:

    • Share simple wardrobe guidelines: solid colors work best, avoid busy patterns
    • Explain the location and background setup: indoor/outdoor, how many outfits to bring
    • Give grooming tips: classic styling usually photographs best—and a fresh shave won’t hurt!
    • Outline the session timeline: how long it will take, how many looks you’ll capture
    • Send examples of poses you’ll try: helps them visualize the result

    To speed this up, you can create a standard pre-shoot guide you can quickly customize for each client. Use apps like Canva or Adobe Express and export the guide as a PDF or create a shareable link.

    Build trust and rapport

    Most people aren’t naturally comfortable in front of a camera. Posing for headshots can be stressful even for the most successful business people, so your first job is to make them feel at ease. Try these quick tips:

    • Start with a quick chat about what to expect and what you’ll shoot first
    • Demonstrate poses yourself—it’s easier than explaining and helps break the ice
    • Pay attention to what works for each person—a pose that looks great on one subject might feel awkward for another, so stay flexible
    • The same goes for instructions in general—some people need more guidance than others 
    • Keep the conversation natural while you work, but keep your directions simple
    • Give positive feedback when you capture great shots, and if something’s not working, smoothly guide them into a different pose instead of pointing out problems

    Main posing frameworks for any portrait shoot

    Let’s break down some of the best poses for professional headshots and relaxed portraits that consistently deliver great results and let your subjects shine. 

    Standing poses 

    Standing poses are a great choice for both corporate headshots and casual portraits. They offer plenty of ways to help subjects feel comfortable—from leaning against the wall to interacting with the surroundings. Standing shots also work anywhere—in a studio, office, or outdoors—and you can repurpose them to crop in for tighter headshots or waist-up portraits. 

    Here’s how to pose for standing shots: 

    • Turn feet about 45 degrees from the camera—this creates a naturally slimming angle
    • Have subjects shift weight to one leg—usually the front one—to avoid looking stiff
    • Ask them to lean forward slightly from the hips, with just an inch or two being enough
    • Change arm positions between shots—relaxed at sides, hands in pockets, or arms crossed
    • Remember “if it bends, bend it slightly” for natural-looking poses
    • Keep shoulders relaxed and dropped because tension shows in photos
    • Ask the subject to change the direction of their gaze slowly from one side to the other to get a wide range of angles

    two photos of women, side by side, with gray hair

    For corporate shots:

    • Keep poses clean and professional
    • Arms relaxed at sides or one hand in pocket
    • Subtle lean forward to engage with the camera
    • Maintain a straight posture while avoiding stiffness
    • For tight headshots, still keep the body slightly angled, like on Treeconomy’s team page 

    treeconomy about us page with team individual headshots

    For personal branding:

    • Allow more dynamic movement
    • Try casual leans against walls or furniture
    • Experiment with crossed arms or hands on hips
    • Include interaction with the environment (desk, tools of trade, products), like Liz, owner of Wild Pines, an arts and crafts store

    Wild Pines about page with a photo and text about the founder

    • Allow space for naturally big smiles and laughter, too—it’ll create warm and welcoming portraits, like on Sojo’s company page

    Sojo about us page with the founder photo at a design table and some text about the brand

    Flattering seated poses

    Seated portraits can create a variety of engaging shots. Just because your subject is sitting doesn’t mean options are limited—it’s all about working with posture and leg positioning to create natural, dynamic results.

    Key principles for seated portraits include:

    • Guide subjects to sit at the edge of their chair or sofa instead of slumping back
    • Avoid letting subjects sink into soft furniture (like in the example below of Noura Sakkijha, CEO of Mejuri)
    • Keep the core engaged for good posture 
    • Point toes in the same direction to elongate legs

    Mejuri meet the founder page with text and portriat

    Professional settings:

    • Position at a desk with a slight forward lean
    • Hands clasped or resting naturally—play around with a variety of hand positions to find a flattering pose for your subject
    • Encourage subjects to engage with what’s on their desk, such as their laptop or notebook
    • Cross ankles rather than legs for a polished look
    • Keep shoulders level and relaxed
    • Walk around the subject to capture different angles—from camera-facing to slightly angled to full-on side profile

    man sitting at a desk looking away from the camera with an open laptop in front of him

    Casual settings:

    • Allow more relaxed postures while maintaining good form
    • Create asymmetry by shifting weight to one hip
    • Use arms for support when sitting on floors
    • Avoid both legs pointing directly at the camera—instead, either extend one leg towards the camera or angle them both slightly away from the camera

    portrait on off-white background of  a woman sitting down casually, she has a prosthetic leg

    Creating dynamic duo shots:

    • Use seating to create interesting height variations
    • Try one person seated while the other stands
    • For co-founder shots, have one person sit in a chair while the other perches or leans on the armrest, like in the example below of ettitude’s co-founders
    • Vary the height of chairs or use different seating positions to add visual interest
    • Keep subjects at different heights but maintain connection through body language or eye contact

    Ettitude from the founders page on their webiste

    Relaxed group portraits

    Whether you’re photographing a corporate team or a family, group photos present unique challenges. 

    Basic principles for group shots:

    • Create depth by avoiding straight lines of people—unless you’re shooting a sports team photo that traditionally requires one or two straight lines of players
    • Stagger heights naturally using stairs, chairs, or standing/sitting combinations
    • Keep heads at different levels but close enough to feel connected
    • Position taller people towards the back or center
    • Arrange people in a slight arc to ensure everyone’s visible, like in Ora’s team photo below with the two people on both sides slightly turned inward
    • For large team shots, shooting from an elevated position, such as another floor, can help include everyone, but you could also use a drone
    • Shoot more photos than you think you’ll need—there’ll always be someone blinking so it’s best to have more images to pick from

    Ora about page showing the founders and their story

    For professional teams:

    • Keep poses consistent but not identical
    • Use the rule of thirds to arrange larger groups
    • Break bigger teams into smaller clusters
    • Maintain equal spacing between subjects
    • Ensure everyone’s shoulders are angled slightly rather than square to the camera—or, if facing the camera directly, ask the subject to shift weight from one leg to the other 

    two group shots, side by side, the group shot on the left has three older women standing and the group shot on the right has five diverse adults standing

    For family portrait poses:

    • Create natural connections through gentle touching (hand on shoulder, arms linked)
    • Position children in front or held by parents
    • Use props or furniture to create natural groupings
    • Let small kids move around and play between shots to stay engaged
    • Capture both formal and candid interactions—experiment with both seated and standing poses
    • Switch between some or all subjects looking at the camera to fully candid shots

    family portrait of two adults and two children in a casual home setting

    Common posing challenges and tips to solve them

    Even experienced photographers run into tricky posing situations. Maybe you’ve got a group with significant height differences, someone nervous about being photographed, or the shoot ran late so now you’re rushing to cover all your bases. So, what are some common challenges you might run into?

    Height differences

    If you have subjects with drastically different heights, it can make for an awkward portrait. Position taller people slightly behind or sitting. Seated poses work the best to tackle this, but that doesn’t mean you should avoid standing poses altogether. You can use elements like stairs or slopes to minimize extreme height gaps. 

    portrait photo of a group of students and their teacher in front of a blackboard

    You can also create diagonal arrangements instead of straight lines. Avoid placing the tallest and shortest people next to each other—unless they’re standing behind each other.

    Confidence issues

    If your subjects are camera-shy, start with simple poses to build trust. Give specific compliments about what’s working well, and show them the preview shots when you capture something great. 

    It’s a good idea to have a few go-to safety poses that work for most people. Some might also feel more relaxed if there’s music playing in the background, especially if you’re shooting in a studio.

    Your own confidence and body language as the photographer make a difference too—stay positive or even a little goofy if appropriate. Make sure to edit your portraits and headshots to show your subjects in the most flattering way while keeping their appearance natural

    Photographing glasses and reflections

    If shooting something reflective in the frame, slightly tilt the head down to avoid glare. You can also ask subjects to push their glasses slightly up their nose. Position lights at angles that don’t create reflections. If the reflection doesn’t cover the subject’s eye in full, you can always fix it with retouching.

    Rushing through poses

    Prepare a shot list ready but be flexible—you can have the shot list on your phone or even photograph it so you can flick through your camera during the shoot without stopping the session.

    Start with your most reliable poses first. Give clear, concise directions, and keep subjects engaged by showing progress.

    Are you ready to direct your next portrait shoot?

    Working with people can be unpredictable because everyone’s unique—but that’s exactly what makes portrait photography so rewarding. The trick is to adapt your approach for each subject while keeping your photo quality consistent. With these posing guidelines, you’ll be better equipped to direct any portrait session confidently, from corporate headshots to family gatherings.

    And if you need help getting those portraits polished and ready to share, our team of expert editors at Path can handle the retouching while you focus on capturing more great shots.

    Polish up your portraits with pro retouching from 79¢ per image

    Portrait poses FAQs

    How do you pose for a professional headshot?

    Start by turning your body 45 degrees from the camera, then face back toward it. If you’re standing, shift your weight to your front leg, keep your shoulders relaxed, and lean forward slightly from the hips. Small adjustments make a big difference—change arm positions between shots and keep movements subtle. Allow yourself to smile and laugh, too!

    How do you look professional in a headshot?

    • Maintain good posture without looking stiff
    • Keep shoulders back but relaxed
    • Sit at the edge of your chair for seated shots
    • Cross ankles instead of legs
    • Let hands rest naturally

    What are the best poses for group photos?

    Avoid straight lines of people. Instead, create depth by staggering heights using stairs or chairs, and arrange people in a slight arc. For professional teams, keep poses consistent but not identical. With families, encourage natural connections through gentle touching like hands on shoulders.

    What are common mistakes to avoid when posing subjects?

    Common portrait mistakes include forcing unnatural smiles, rushing through poses without direction, and not adapting poses to fit different subjects. Stay engaged with your subject throughout by having a conversation and provide positive feedback. If something doesn’t work, simply switch to the next pose.

    How to pose different body types?

    Work with your subject’s natural body language instead of forcing uncomfortable poses. The 45-degree angle works well for most people, as does shifting weight to one leg. For seated poses:

    • Focus on good posture
    • Create asymmetry through slight head tilts
    • Adjust your camera position rather than making subjects twist
    • Make sure subjects feel confident in their pose
    • Don’t let the subject sink back into a soft chair or sofa

    How do you pose someone who is camera shy?

    Start with simple poses and build trust gradually. Show them preview shots when you capture something great, keep the conversation going, and guide them into different poses smoothly. Playing background music can help relax in studio settings.


    Source link