برچسب: and

  • Photojournalism and coaching fosters resilience and empathy – A Photo Editor

    [ad_1]

    PHILADELPHIA – JUNE 14, 2025: An American flag extends across the steps of the Philadelphia Museum of Art as an estimated 80,000 participants joined the “No Kings” protest.

    Participants in Philadelphia join the national “No Kings” protest on the same day as a military parade in Washington, coinciding with the Army’s 250th anniversary and President Donald J. Trump’s birthday.

    Heidi: You studied journalism and political science at Temple University and transformed into a lecture adjunct. How did that academic foundation shape your approach to documentary and protest photography?

    Kriston: I think my choice to study both journalism and political science was more a function of who I am and what I want to see in the world, so in a sense, the same thing that drives my approach to photography is what led me to my academics. The two are intertwined, but a core part of who I am is that I like to understand people and I love to learn how things work. I do believe having that formal background allows me to think more deeply about the issues I cover and try, as much as possible, to see what’s unfolding without inserting my own emotions. Of course, as a visual journalist, I’m also trying to capture the feeling behind that, so I can build a connection with the audience. But it also lets me have much more nuanced conversations, which can help people feel at ease or even open doors that may otherwise remain closed.

    As noted in Diversify Photo’s “Solutions Photography” talks, trauma-informed long-form story creation is central. How do you ethically build trust with protest participants—especially in emotionally-charged environments?
    When you’re working in a crowd of people, whether it’s dozens or tens of thousands, I think the first, and hopefully easiest part, is to just be a genuine human being. I take the time to talk to people, I’ll answer questions about what I’m working on, or even make a portrait of someone just because they asked. You’re not there to participate in a protest, but that doesn’t mean you can’t have humanity. I think this is even more important when you’re working with people whose viewpoints may differ from your own. It’s the little things that I think go a long way, even non-verbal communication like a smile or a nod, that help people feel at ease. Authenticity is key.


    How do you maintain that journalistic neutrality when covering emotionally charged social justice issues, where public sentiment often runs high?

    I think there’s a misconception about what neutrality means and how we handle it as journalists. I mean, nearly everyone wants to believe that they’re neutral, that they’re completely unbiased, that they’re thinking with their head and not their heart. If that were true, politics would probably be a lot more boring and social media would be a much kinder space!

    But the fact is that we’re not robots. The important part of being a journalist isn’t that you exist without personal opinions or feelings, but that you don’t let those get in the way of your coverage. We all come with our own life experiences that shape who we are and how we see the world, but when you’re doing the work, it’s important to discern how those may affect your perceptions. I think good journalists learn to allow themselves to feel, without letting it override their reporting.

    There are a thousand tiny moments where decisions are made as a photographer – the stories we pitch, where you choose to point our camera, what we leave out of the frame, what makes our final edit. Things like gender, ethnicity, orientation, religion, economic background – all of these qualities shape our world view, giving us unique knowledge and insight. But it’s important to acknowledge these, especially in cases where they may lead to privilege, so we can minimize blind spots.


    In high-pressure work, how do you stay flexible—able to fully feel intense moments and then bounce back—and what small habit helps you reset?

    Something you and I talked about is this idea of “emotional elasticity” – being flexible with your experiences, your life, your emotions. When talking to my colleagues and friends who work in the industry, a lot of people are feeling the toll of working in a field that’s often driven by high pressure moments, while capturing intense emotions that you’re deeply embedded in. It can be a lot to manage, but it’s important to stay healthy through that. Whether you’re seeing a therapist or journaling on your own, talking it through with someone else or just doing mental check-ins with yourself. For me, I try not to center my entire being around the work, but have outside interests. I rock climb, I coach and overall practice cultivating a positive mindset. I think trying to push things down without recognizing your own experience is a good way to burn out. That’s where the ability to remain flexible and resilient becomes important, so that you can experience everything in the moment, but still come back to who you are.

    How do you, as a coach, foster resilience and empathy in your athletes—helping them face failure, handle negative thoughts during long runs, and grow not just as runners, but as people?
    I coach high school track and cross country, predominantly working with distance athletes. This is something I do simply because I enjoy being there for them, but it’s a lot less about the athletics than I think most people think. When you have to run a distance event, there can be a lot of time in your head for negativity to creep in and take over. What we try to teach is resiliency, the ability to overcome, how to come back after failure. It’s not about never having those negative thoughts, but how you deal with those emotions. These are the lessons we’re really working on and sport kind of just comes out of it. I hope the thing they’ve learned after graduating isn’t how to be a better runner, but how to be a better version of themselves.

    There really is a tremendous amount of pressure on young people today. I think we’re suffering as a society from a lack of empathy and willingness to actually listen to one another. This has us pushing further and further in opposite directions, looking for confirmation more than critical understanding. Combine that with the internet and social media that allows us to see what we want – this has us in a very challenging position right now. Bringing it back around, I hope that my work helps us build a more resilient society, that helps us grow closer together, to see the tough things and understand more about what the other is feeling.

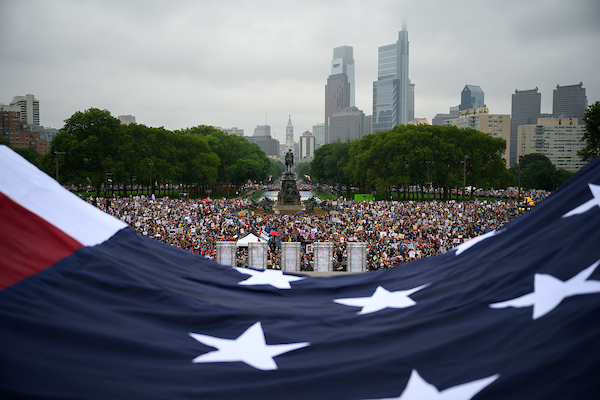
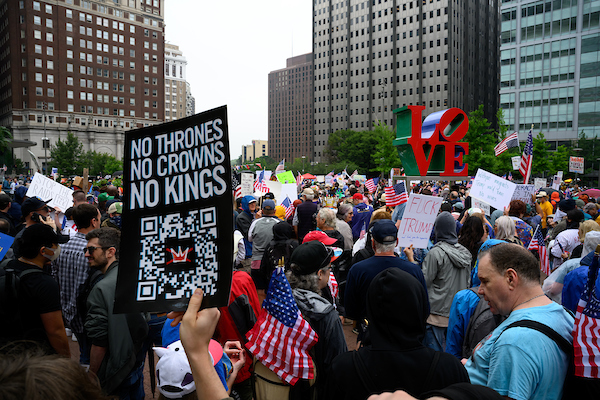
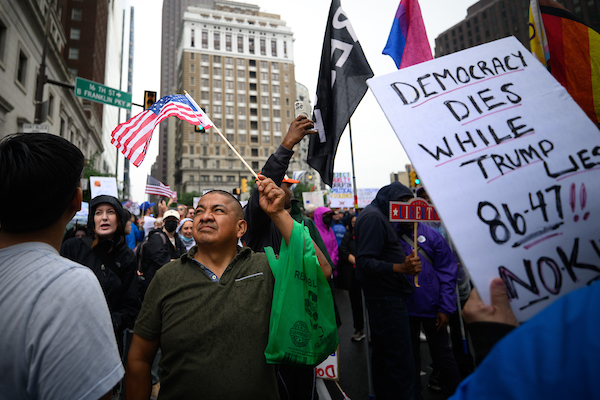
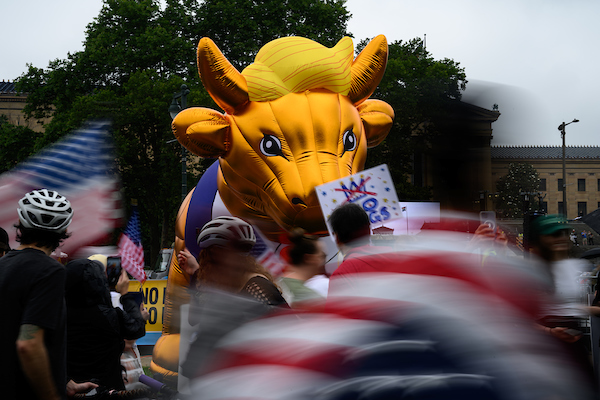
    You were embedded in the flagship Philadelphia action, among an estimated 80,000 protesters on June 14. How did you ensure your images reflected both the collective voice and the individual stories within such a massive crowd?
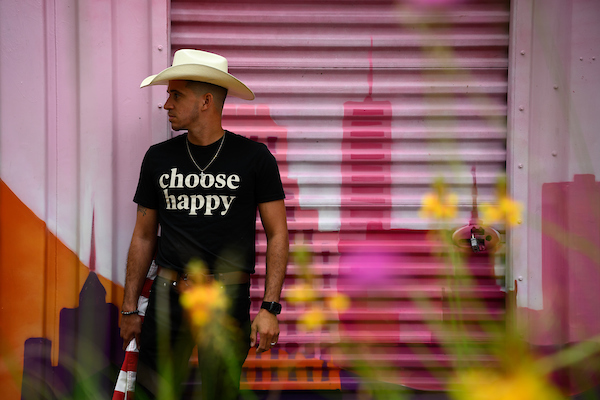
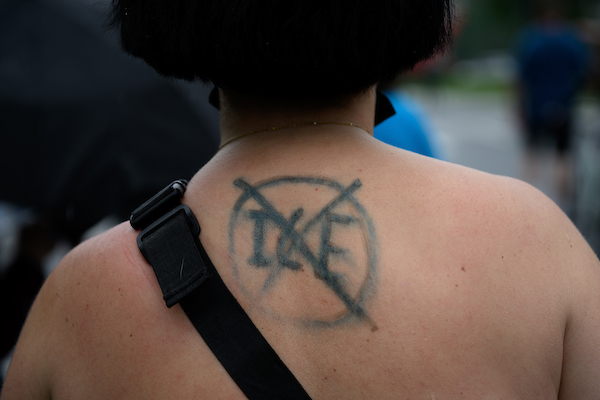
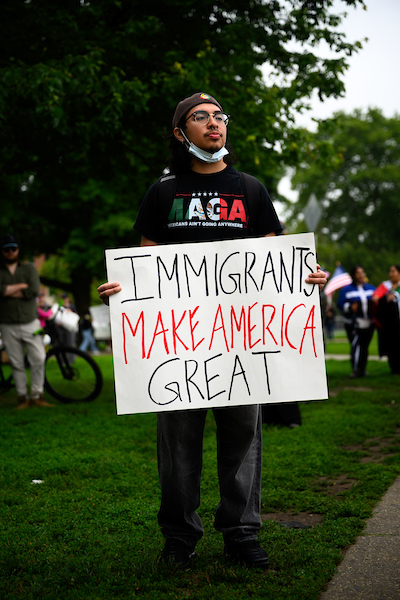
    Scale is always impressive and often provides a sense of how important or urgent an issue may be. It’s the big picture. However, it’s also crucial to take viewers into the ground level and create images that capture emotion (something I seem to be talking about a lot). I’m constantly looking through a crowd and trying to find a variety of emotions and moments that tell us how people are feeling. There’s always something that stands out to me. And in addition to that, I’m always trying to find something that may subvert expectations. I’m not always successful, but It’s definitely something I’m keeping an eye out for.

    Crowd density and police presence bring unique risks. How do you assess and manage personal risk while on assignment—especially in fast-moving situations?
    I want to preface my answer by saying I’m not a HEFAT (Hostile Environment First Aid Training) instructor and anyone looking to learn more about how to stay safe in potentially hostile environments should definitely look into taking a course. That said, there are a lot of steps you can take to keep yourself safe, but the first thing to know is your level of risk tolerance. You have to be honest with yourself about how much you can handle, depending on your training and experience, and to not exceed that. Then you have to have a risk assessment. Who might be working against you, what threats do they pose and how do you mitigate that. In regard to physical safety, having eye protection, head protection and respiratory protection are all things you should have on hand.

    What are two key things to consider for anyone covering fast moving situations?
    I think the two most important things are 1. Good communication and 2. Having a field buddy.

    To the first part, always talk to your editors about your plan, then remain in communication with them throughout the day. And if you’re going into something alone, make sure you have someone at home to keep updated. This could be a partner, friend or family member. Before the protest, I reached out to several other freelance colleagues that were going to be covering the protest and got us all in a chat with one another. While we were all working for different publications, I wanted us to all be able to rely on one another on the ground. This was all in addition to remaining in contact with my editors and security team.

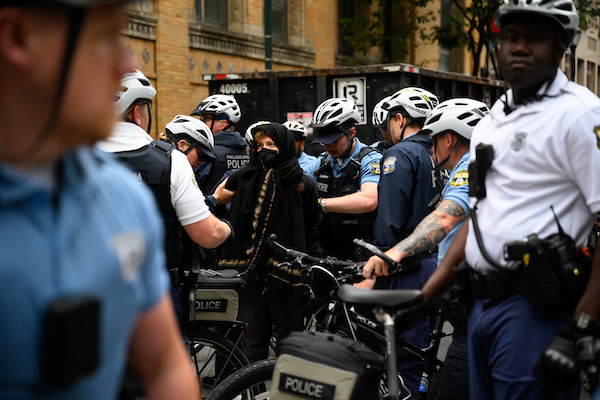
    To the second part, having someone in the field with you that you can rely on really does increase your safety level. During the protest, my colleagues and I checked in with one another throughout the day and later in the evening, many of us traveled together, so no one was alone. Things can get more unpredictable when it starts getting dark. A group of protestors separate from the “No Kings” event gathered outside the Federal Detention Center and marched through the city, leading to some conflict with law enforcement. Having someone that can see the things you miss, especially in situations like these, could be the difference between going home and taking a trip to the hospital.

    There’s a lot more that can be said about this, like maintaining situational awareness, deescalation (whether it’s with protestors, law enforcement or just someone on the street), when to blend in and when to stand out, but I would highly recommend taking a course for those interested in pursuing more of this type of work.

    At the end of the day, the number one thing to remember is to use good judgement and avoid risks beyond what you’re prepared for, because you’re more important than a photo.

    ###


    [ad_2]

    Source link

  • The Art Of Urban Black And White Photography

    The Art Of Urban Black And White Photography

    [ad_1]

    Do you, like me, find black and white images incredibly evocative? They seem to draw us in more than colour, have more sense of life and of story. There are a few genres of photography that are not suited to monochrome, but one that most definitely is, is the urban landscape.

    There is so much in urban areas that lends itself to black and white. Amble areas of light and shade, textures, form and most importantly geometry and symmetry.

    Today we are going to explore how to elevate your urban images into artistic black and whites.

    Low angle black and white shot of buildings and people in La Defence, Paris
    Low angle urban black and white. By Jason Row Photography

    You Need To See In Black and White

    The simple fact is, that not every urban shot you take will be suited to black and white. To shoot great black and white shots you need to see in black and white. Now, that might seem quite an odd statement, especially given the billions of colours our eyes are capable of recording, but hear me out.

    Identifying a black and white urban image is not literally about seeing in black and white. It’s about identifying the elements that go into making a great black and white photo.

    Some of the most important are the interplay of light and shade and the use of lines of contrast. Light and shade are, perhaps, more important in black and white than in colour. The depth of the blacks define how we react to an image emotionally, the harder the black the more gritty and harsh the image can feel.

    Lines of contrast lead our eye around the image. This contrast need not be pure black or white, but well defined graduations of tone that give depth to an image.

    One tip, if you struggle with “seeing” black and white in your urban landscapes is to shoot in a black and white mode. On many cameras, this will turn the viewfinder/LCD monochrome as well, making it easier for you to see if the shot works. Make sure you are shooting RAW and JPEG though as the RAW file will give us so much more latitude when editing.

    Long exposure twilight shot of the parliament building in Budapest, Hungary
    What works in colour…… By Jason Row Photography
    Long exposure black and white twilight shot of the parliament building in Budapest, Hungary
    Often also works in black and white. By Jason Row Photography

    Colour Is Important

    Briefly, it is important to know that colour is vital to our black and white shots. Assuming we have shot RAW (see above), we can increase or decrease the luminance of any of the primary colours. For example when editing a blue sky, we can decrease the blue luminance to make that sky much darker.

    The urban environment is full of colour, from the faded to the bold. When we are shooting we can identify those blocks of colours that we either wish to enhance or reduce in significance.

    For example a bright yellow sign with bold lettering might make an interesting subject to our urban shot. By decreasing the luminance of the blue channel (opposite to yellow) we can brighten up that sign and separate it from the rest of the image. The same can be true of faded colours, we can enhance or reduce their intensity according to how relevant we wish them to be in the image.

    Black and white architectural style shot of Lloyds Building in London
    The urban environment is about shapes, forms and shadows. By Jason Row Photography

    Composition In The Urban Environment

    Once you have found the ability to “see” in black and white, you will see monochrome opportunities around every corner. There are several elements in the urban environment that we can identify for black and white shots. The first are the shapes, forms and textures of the manmade. Another is the human element, the stories of the people in that built environment – these also cross genres with street photography. Another important black and white element can be the way nature interacts with the urban.

    In man made we are looking for the way the light interacts with structures. How light casts shadows and creates depth and form to our shots. We are looking for symmetry and geometry. A symmetrical image of a building can look great but add in a person to one side and you add tension to the shot. In black and white, this can look amazing.

    Textures are everywhere in urban areas, from the rust of the manmade to the bark of a tree. Low directional light makes these textures pop whilst shallow depth of field hints at the location. Graffiti and urban decay are also fantastic black and white subjects in cities and towns

    The way the natural works with the manmade is another great area to focus on with your black and white urban images. The lone tree in front of a modern structure. A line of park benches in an urban park. There is so much to look for and shoot.

    Black and white image of an old Lada car in the courtyard of a Soviet apartment block in Chisinau, Moldova
    Urban black and white can also be documentary. By Jason Row Photography

    In The Edit – Processing Black and White

    Taking a good black and white is half the job. Editing it is the other half. These days it’s not difficult to edit great black and white urban shots. Tools like Lightroom Classic have a plethora of functions to help us get good black and white images.

    There are some things that you can do to add punch though. Convert the image using a colour profile, this will give you a good starting point. Use the black and white sliders to adjust the amount of overall contrast you are looking for. Pushing to the ends of the histogram (or even beyond) will give maximum contrast whilst pulling the blacks and whites inside the histogram will reduce the contrast.

    The clarity and texture sliders are great tools for managing mid tone contrasts, and are especially useful in punching out textures. Use masking tools to isolate areas of textures and enhance them.

    As mentioned earlier the use of RGB sliders can allow us to manipulate individual colour channels within our black and white urban images giving us huge control over the way they look.

    Editing the urban environment in black and white is an immensely satisfying thing to do, be it a few hours or few years after you took the original image.

    Reflections of the Lloyds building in London in black and white
    Geometry and reflections. By Jason Row Photography

    As we mentioned at the top, the urban environment is, perhaps, the best place you will find to elevate your black and white photos to more artistic images.

    It’s hard not to find great black and white shots in towns and cities but it will take some practice to both start seeing in black and white and finding compositions to enhance your monochrome shots. But, as they say, practice makes perfect, and with the cameras and editing tools we have to hand today, practice is also immensely satisfying

    Further Reading


    [ad_2]

    Source link

  • Leica Is Launching Its Own Black And White Film: Leica MONOPAN 50

    Leica Is Launching Its Own Black And White Film: Leica MONOPAN 50

    [ad_1]

    Analog photography is something that has been appreciated more in the recent years with many photographers looking to shoot film. Not many companies manufacture film cameras but there are a lot of trusted sites that sell used cameras. One of the companies that still sells analog cameras is Leica and they are launching their own black and white film, the Leica MONOPAN 50.

    Image via Leica

    Leica mentions,

    With its distinctive look, our Leica MONOPAN 50 black-and-white film recalls the early days of 35 mm photography. It takes us back to 1925, when we presented the revolutionary Leica I to the world.

    The Leica MONOPAN 50 film allows 36 high resolution shots, since it has ultra fine grain and super panchromatic sensitivity. The resulting images are amazingly sharp with great tonal range. The film can be processed in all developers available to develop black and white film.

    As the name suggests, the iso sensitivity for the Monopan 50 film is at 50 which means it can be used to capture images in bright light conditions using a wide aperture value. It can be a perfect film to use with the fast M-lenses of Leica’s analog cameras.

    Here is a summary of the film specifications:

    • Type of film – Black and White
    • Number of frames – 36
    • Iso sensitivity – 50
    • Resolution – 280 line pairs/mm
    • Sensitivity – super panchromatic 780nm
    • Price is about $12
    • Can be developed in all developers for black and white film

    The specifications for the Monopan 50, match the ones for Adox HR-50. Leica has also mentioned that the enhanced spectral sensitivity of the Leica MONOPAN 50 film makes it a great choice for infra-red photography. The film can also be used along with Leica’s yellow, orange and green color filters, to capture high depth, contrast, tonal values and character in black and white images.

    More details about the Leica Monopan 50 film can be found here and the film will be available from August 21, 2025.

    We have more news for you to read if you are interested at this link here.


    [ad_2]

    Source link

  • Ikelite Releases OM System TG-7 Housing and Ecko Strobe Kits

    Ikelite Releases OM System TG-7 Housing and Ecko Strobe Kits

    [ad_1]

    Underwater Housing, OM System Tough TG-7 Camera and Ecko Strobes Wide Angle Kit


    Following the launch of its Ecko DS and Ecko Fiber strobes, Ikelite has launched two new kits bundling the fiber-optically triggered model. The kits combine the OM System Tough TG-7 camera, housing, one or two strobes, and various accessories.

    The “Wide Angle Kit” (see above) comprises the camera, housing with dome port, Olympus FCON-T02 fisheye lens, tray with dual handles, two Ecko Fiber strobes, strobe arms, and fiber-optic cords—everything you need to shoot a large variety of subjects, from macro to wide angle. The six-inch dome even makes it possible to shoot splits.

    The “Deluxe Kit” (see below) consists of the camera, housing, tray with single handle, Ecko Fiber strobe, strobe arm, and fiber-optic cord. With this housing, Ikelite gives you the option of adding the FCON-T02 lens and dome port later—and, of course, a second strobe if desired.

    Available from Ikelite, the “Wide Angle Kit” currently retails for $2,825, while the “Deluxe Kit” costs $1,645—the former giving you a $160 discount, the latter saving you almost $90. Similar—but more expensive—kits bundling Ikelite’s DS51 II strobe are no longer available, as the DS51 II has been discontinued. The DS160 II and DS162 have also been discontinued—replaced by the new DS165 and RC165.

    Underwater Housing, OM System Tough TG-7 Camera and Ecko Strobe Deluxe Kit


    When purchasing underwater photography equipment like the products mentioned in this article, please support DPG by supporting our retail partner—Backscatter.com.


    [ad_2]

    Source link

  • Ikelite Unveils Ecko DS and Ecko Fiber Strobes

    [ad_1]


    Entry-level strobe offers 50Ws of power, a 140-degree beam when using diffusers, and comes in both fiber-optic and electrical versions

    [ad_2]

    Source link

  • Ikelite Unveils DS165 and RC165 Strobes

    Ikelite Unveils DS165 and RC165 Strobes

    [ad_1]


    Left: DS165. Right: RC165


    Ikelite has announced two new additions to its strobe lineup—the DS165 and RC165. And as you probably already noticed, only one of them, the DS165, is triggered the conventional way for Ikelite strobes—electrically. The other, the RC165, is a surprising—but many will say, welcome—departure into the world of fiber-optic triggering. While the U.S. company has offered fiber-optic triggering solutions in the past, these have been in the form of receivers that convert the electrical bulkhead to a fiber-optic connection. This is the first time Ikelite is offering a strobe with fiber-optic connectivity built in.

    In Ikelite’s blog post on the RC165, the company says “this next generation of 165-series strobes is an improved upon and refined version of our famous DS160 II.” The power of the RC165 isn’t explicitly stated, but as an upgrade from the the DS160 II, the new strobe presumably offers the same 160Ws maximum power. Other specs are stated: Ikelite says the RC165 offers a “significantly wider 120º angle of coverage” (without the need for a diffuser), comparing favorably with the 110-degree beam angle with diffuser of the DS160 II. At 5000K, the RC165’s stated color temperature is also a little different to the 4800K color temperature of the DS160 II. Otherwise, the controls on the new strobe are identical to those on the DS160 II: Expect manual control across 10 stops in 1/2-stop increments.


    Left: DS165. Right: RC165


    As you’d expect, given Ikelite’s long history as TTL pioneers, it’s the strobe’s TTL capabilities that the company is giving the most emphasis. The RC165 supports TTL operation with compatible OM System, Olympus, and Panasonic cameras when firing the built-in flash in “RC” mode, and with compatible Canon cameras when using Ikelite’s TT5 Canon TTL Transmitter. The TT5 supports switching between TTL and manual strobe exposure using the camera’s flash menu, as well as rear/second curtain sync. Ikelite has promised TTL transmitters for Sony and Nikon systems are coming soon.

    Current compatible Ikelite housings for OM System and Olympus cameras include those for the OM System TG-7, Olympus TG-3/TG-4/TG-5/TG-6 and the Olympus OM-D E-M10 Mark III. Various non-Ikelite housings are also compatible, such as Olympus or Nauticam housings for the Olympus OM-D E-M1 Mark II with FL-LM3 flash; Nauticam housings for the Olympus OM-D E-M10 Mark I to Mark IV; and Olympus, Nauticam, Isotta or Recsea housings for the Olympus TG-5, TG-6 or OM System TG-7.

    In its blog post, Ikelite is careful not to overstate the benefits of fiber-optic connections, writing, “Fiber optic cords are not more reliable than electrical cords, but they may be more convenient.” And for anyone who isn’t bothered by the added O-ring maintenance associated with electrical triggering, the company has you covered with the DS165, which has all the same specs as the RC165, except the fiber-optic port is replaced with Ikelite’s conventional electrical bulkhead. Is the “165-series” the first of many to be offered in both fiber-optic and electrical versions? Is Ikelite slowly but surely going fiber-only? Only time will tell!

    Shipping now from retailers such as Backscatter, the RC165 and DS165 are both priced at $995.


    Left: DS165. Right: RC165


    RC165


    DS165


    [ad_2]

    Source link

  • And Another – Stuck in Customs

    [ad_1]

    Discover more from Stuck in Customs

    Subscribe now to keep reading and get access to the full archive.


    Continue reading


    [ad_2]

    Source link

  • Simplicity, Street and a Contest! The Light Stalking Weekly Community Wrap Up!

    Simplicity, Street and a Contest! The Light Stalking Weekly Community Wrap Up!

    [ad_1]

    Welcome to the Light Stalking weekly wrap-up of our wonderful little community.

    We had another great week on the site this week with some very interesting photographs being submitted for our weekly challenge – Colour in Simplicity.

    Here are a few of our favourites.

    Pat Garrett:

    Frogdaily:

    Patrick:

    Tersha:

    Pat Garrett

    Robert Apple


    Member Highlight

    Over the last several months, Patrick has been producing some extraordinary black-and-white street photography that we thought was well overdue for a bit of a spotlight. Patrick has managed to develop a style all of his own, and, miraculously to us, he manages to produce it on a very regular basis with his posts and his Instagram being updated daily as far as we can see.

    Anybody who has been in different photography knows how difficult this is. But here are some of the wonderful images he’s produced lately:


    Join the Photography Contest to Win Some Cash!

    Don’t forget to jump into our monthly contest for the chance to win some cash. This month, it is Minimalism and Simplicity, which is always a popular type of theme when it comes to photography.

    Join the contest here.


    [ad_2]

    Source link

  • And Another from Piopiotahi – Stuck in Customs

    [ad_1]

    Daily Photo – And Another from Piopiotahi

    More from Milford Sound…

    And Another from Piopiotahi

    Photo Information

    • Date Taken2025-04-28 17:29:20
    • CameraILCE-7CR
    • Camera MakeSony
    • Exposure Time1/60
    • Aperture4.5
    • ISO200
    • Focal Length24.0 mm
    • FlashOff, Did not fire
    • Exposure ProgramManual
    • Exposure Bias


    [ad_2]

    Source link

  • Capturing the Stars and Everything Below with the Sigma BF Camera

    Capturing the Stars and Everything Below with the Sigma BF Camera

    [ad_1]

    What does it take to get out of your comfort zone? Over the last 10 years or so, I’ve very rarely shot anything outside of astrophotography. I’ve always had an appreciation for other styles, but very little desire to explore shooting them myself. While I always try to improve my work, my comfort level with astro allows me to fully enjoy being out under the stars and focus on creating.

    Hearing about some of the details around the new Sigma BF definitely had me intrigued. While it’s hard to deny the design of the camera stands out, it was really the simplified approach that grabbed me. I visited the pop-up in NYC during March 2025 to get my first look at the camera, and then returned two weeks later so I could have the chance to shoot with one.

    Getting used to the minimal button system on the back of the camera didn’t take much time at all. Using the dial to make quick adjustments and my personal love for the aperture ring on the 20mm F2 DG | Contemporary lens made taking some of my first street photography images feel a lot more fun than like more of a challenge.


    The Sigma BF as a walkaround camera

    Street photography in particular is a genre I’ve had a special appreciation for when viewing someone’s work. It looks easy, but like so many things, only when it’s done well. I was a bit unsure about what to photograph, or if what I was photographing was any good, but I was having fun. And, at least personally, I was really enjoying the images I was capturing, too.

    I didn’t wait long before heading back out with the BF. This time, I made my way to Princeton, NJ, again with the all-metal 20mm F2 DG | Contemporary, hoping to take some black and white architectural images. The built-in monochrome color mode helped me do just that, although other color modes were just a flick of the wheel away. Just walking around with a wrist strap and this new minimalist camera, I found myself looking at everything to try and find the perfect frame. These new (for me) genres of photography felt fresh and exciting.

    I worked my way all the way around buildings, up close and from a distance, watching the back of the camera to find that perfect angle or just waiting until something felt right. That’s such a special feeling when that happens while you’re out photographing. It means you’re completely present in the moment and paying full attention to finding that perfect composition.

    I found myself occasionally using the screen to use the tap to focus feature and other times just getting into that zone of snapping away as everything moved through the frame. Admittedly, autofocus is not a feature I’m often concerned with for astrophotography, but it felt extremely fast and accurate on both of my outings.

    Exploring a genre outside of my comfort zone and not having to worry about things like autofocus performance or getting lost in menus, really allowed me to find that zone of being present and immerse myself in shooting.


    Trying the Sigma BF for astrophotography

    After a few days out in busy streets, I really felt like it was time to head out under the stars. With clear skies in the forecast for the entire night, I arrived a few hours before the Milky Way would be rising. I took a handful of test images as I wandered to find the compositions I would be shooting once the core of the Milky Way was sufficiently visible above the horizon.

    One of the first things I noticed was how easy dialing in that very precise infinity focus on the stars was with the LCD screen. Even more importantly, one of the things I didn’t notice were the buttons on the back of the camera. It wasn’t until well after I was shooting the Milky Way that I had even thought about them. After two outings during the day, I think easily navigating a new camera in complete darkness speaks to how thoughtfully it was designed.

    I ended up shooting far longer than I anticipated using a number of different techniques ranging from stacking to separate foreground exposures. While admiring an image of the back of the camera is one thing, the real test for those high ISO captures is viewing on a much larger screen…

    Working my way through the images and seeing how far I could push the files was probably the biggest surprise of my experience with the BF. It wasn’t that I didn’t have high expectations, it was a matter of those expectations being surpassed. Pushing astrophotography images while editing, bringing back detail in the shadows and trying to pull out detail in the sky, can often result in a very noisy final image. Shooting at these higher ISOs can also mean that your image lacks a bit of sharpness or just doesn’t have much depth to the color you captured, especially in the foreground. Not only was I able to push the files to bring out an incredible amount of detail through the image, they all felt very sharp and full of rich color.


    The Sigma BF for wildlife?

    After my night under the stars, I had one more test for the Sigma BF. Wildlife. This was also a test for myself, as aside from a few fox photos about a decade ago, this was not something I had ever given a try. I found myself near Myrtle Beach, South Carolina with the BF and the Sigma 500mm F5.6 DG DN OS | Sports. I wandered Huntington State Beach Park with the hopes of photographing alligators. As I kept my eyes on the water, I saw a variety of different birds that I figured, “why not?” and did my best to take some photos along the way. Again, while this was a new genre of photography for me, I think the simplicity of the BF allowed me to just enjoy being in nature. The autofocus was quick to lock in, and while I didn’t attempt any in-flight shots, I was pretty happy with the results!

    For better or worse, the only gators I saw were just peeking out of the swampy waters. Which at first, felt like a bit of a bummer, but I didn’t end the day feeling like I had checked something off a list. If anything, it felt like I was starting a new list.

    Maybe after a decade of shooting only astrophotography, a few days with the Sigma BF had inspired me to look at things a bit differently again. I’ve been out shooting more styles of photography in the span of a month than I ever have before. I think sometimes, whether it’s intentional or not, a bit of a reset can be a really helpful process to go through. Just taking a second to look at things differently and use that opportunity to step out of our routine.

    I’ve always felt, as a photographer, the best gear is whatever helps me focus on creating first. While the world after a photo is taken demands our constant attention with excessive beeps and notifications, it feels refreshing to have those moments where I’ve connected completely to creating art. I think the BF is a camera that does just that, by encouraging you to look at things different and without distractions.

    [ad_2]

    Source link