We’re happy to announce the winner of July’s competition, “Textures and Layers.”
For those who don’t know, the Light Stalking Monthly Photography Competition carries a $100 People’s Choice Award and a $100 Overall Winner Award. The People’s Choice Winner is selected by a vote of the community, whereas our guest judge selects the overall winner.
The “Textures and Layers” Photo Contest
Textures and layers are a powerful combination in photography and they are difficult to photograph well. Combining textures and layers in an image needs careful observation, wise choice of subject, elements and the right lighting to get the best resulting image.
Textures are interesting and photographing just the textures close-up may not always end in compelling photographs. Layers on the other hand can be a powerful tool to enhance depth and visual interest in an image. Combined, both work together and help achieve great results in a photograph.
When capturing textures, the photographer needs to take into account the camera settings as well, in order to capture the details well. Narrow aperture values for crisp texture details and low iso values to capture neat noise free images.
The contest theme for July was “Textures and Layers’ and the photos from the participating members included interesting submissions covering various genre in photography like macro, portraits, abstracts, nature, landscape, still life and even street photos. The submitted photos portrayed unique interpretations of the theme with images shot under great lighting and also some submissions making use of light and shadow to enhance the layers and depth in the image.
When choosing the winning photos, we wanted to make sure that the decision process was based on a good interpretation of the theme, followed by other factors like light, composition, story, details, creative vision, etc. The results are entirely subjective and there are no losers in any competition as we all know.
Here are July’s winners:
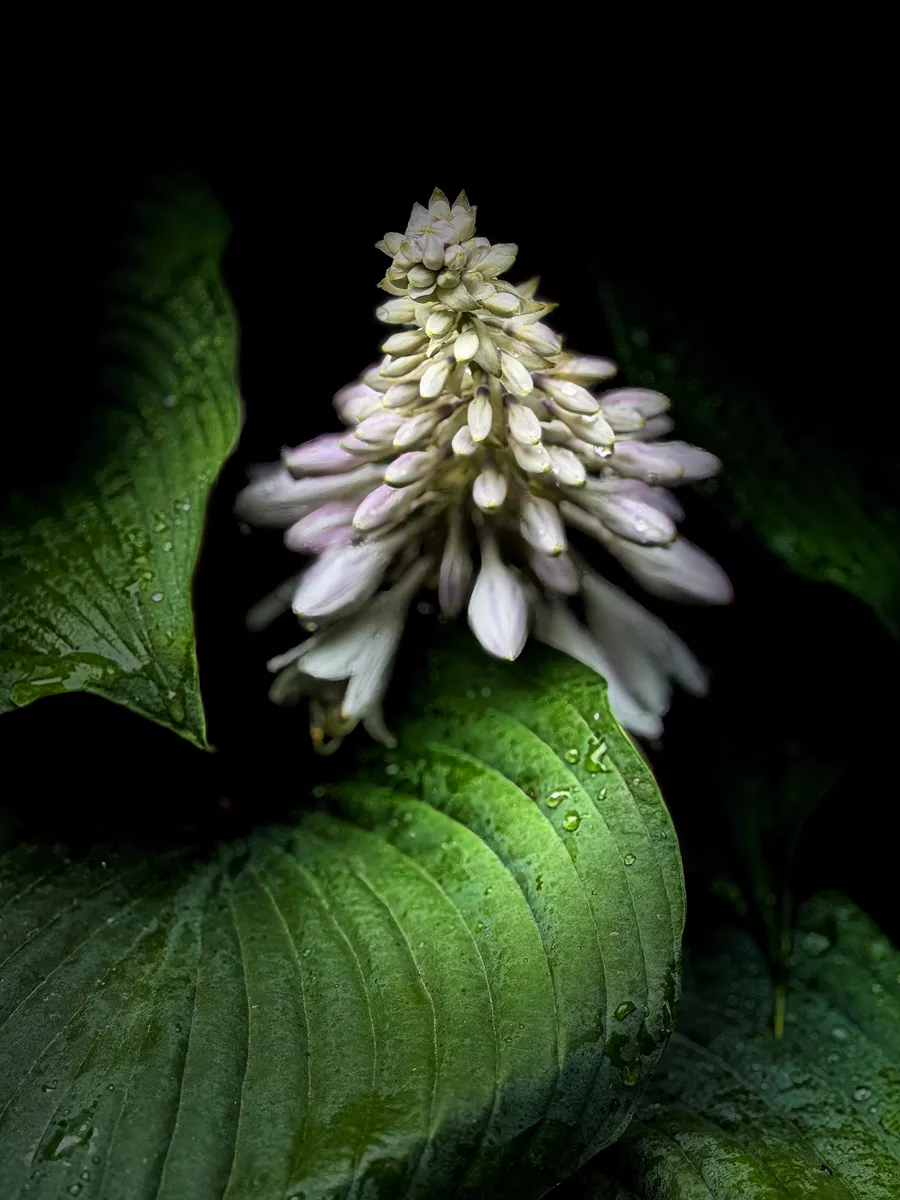
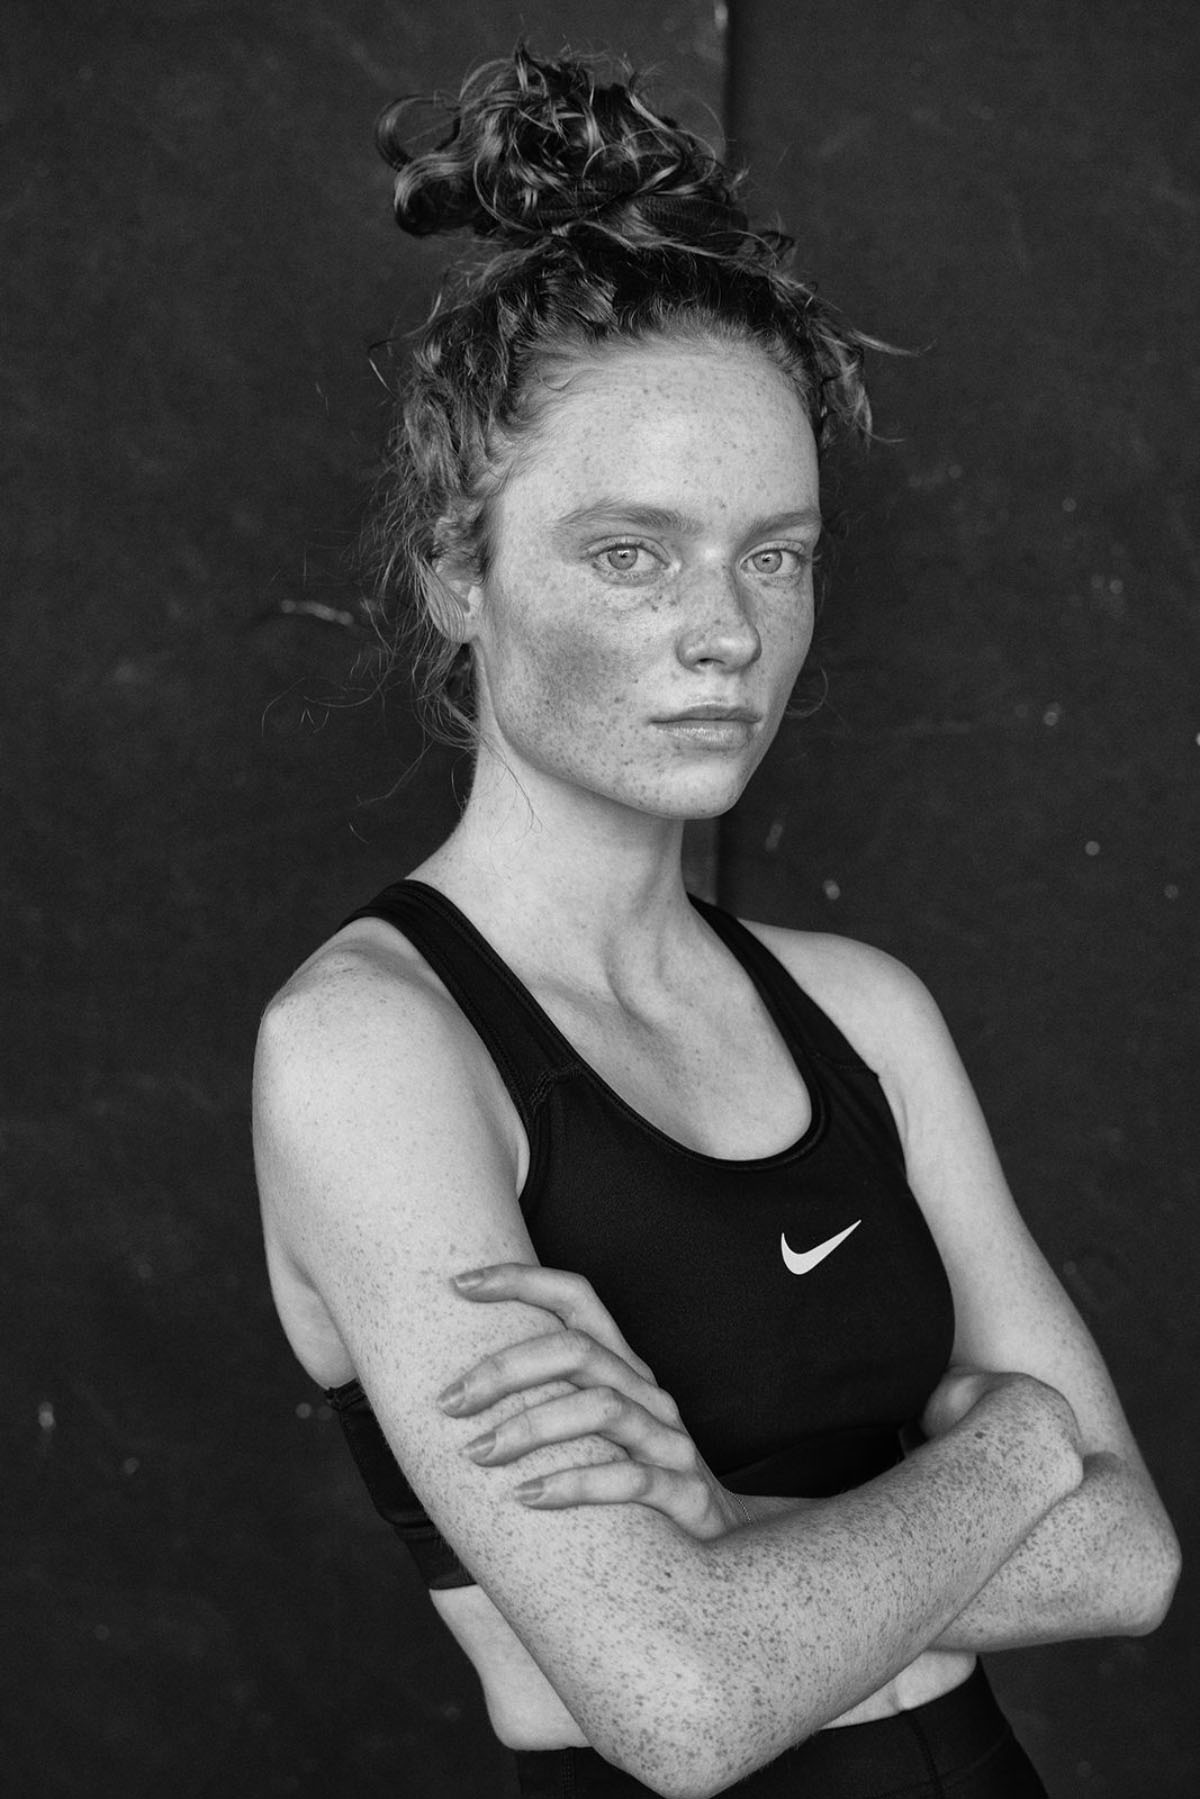
First Place: “Wet, Layered, and Blooming” by Pat Garrett
Wet, Layered, and Blooming – Copyright Pat Garrett
Pat submitted this image of a Hosta along with its flower and this image really stood out in terms of composition, light and is a great example for the contest theme. The textures, colours on the leaves and flowers complement each other while the light used is great to highlight the elements, reveal the layers and in the process add depth to the image.
Pat’s choice of perspective and angle has made use of the lines in the leaves leading to the flower, making them natural leading lines to draw the viewer’s attention to the flower. Also the leaves act as a natural frame for the flower.
The light and shadows in the image are used cleverly to reveal depth by choosing the right choice of lighting and the water on the leaves add a fresh mood to the photo. Congratulations on the win Pat and for capturing this interesting and unique shot.
Second Place: “Organic Textures and Layers” by Frogdaily
Organic Textures and Layers (Water and oil in a plate on top layer with kale on bottom layer reflecting the texture to the bubbles and plate.) – Copyright Frogdaily
This organic textures and layers photo by Frogdaily is interesting taking into account how it was executed and photographed. The monochrome colours in the photo make it even more visually appealing without much distraction in terms of colours.
The water and oil droplets on a glass plate with kale at the bottom is a very interesting concept making every element in the frame almost organic too. The textures created by kale and the tiny droplets are really beautiful and the light is just right with details in all parts of the image.
Congratulations Frogdaily on this cleverly executed shot.
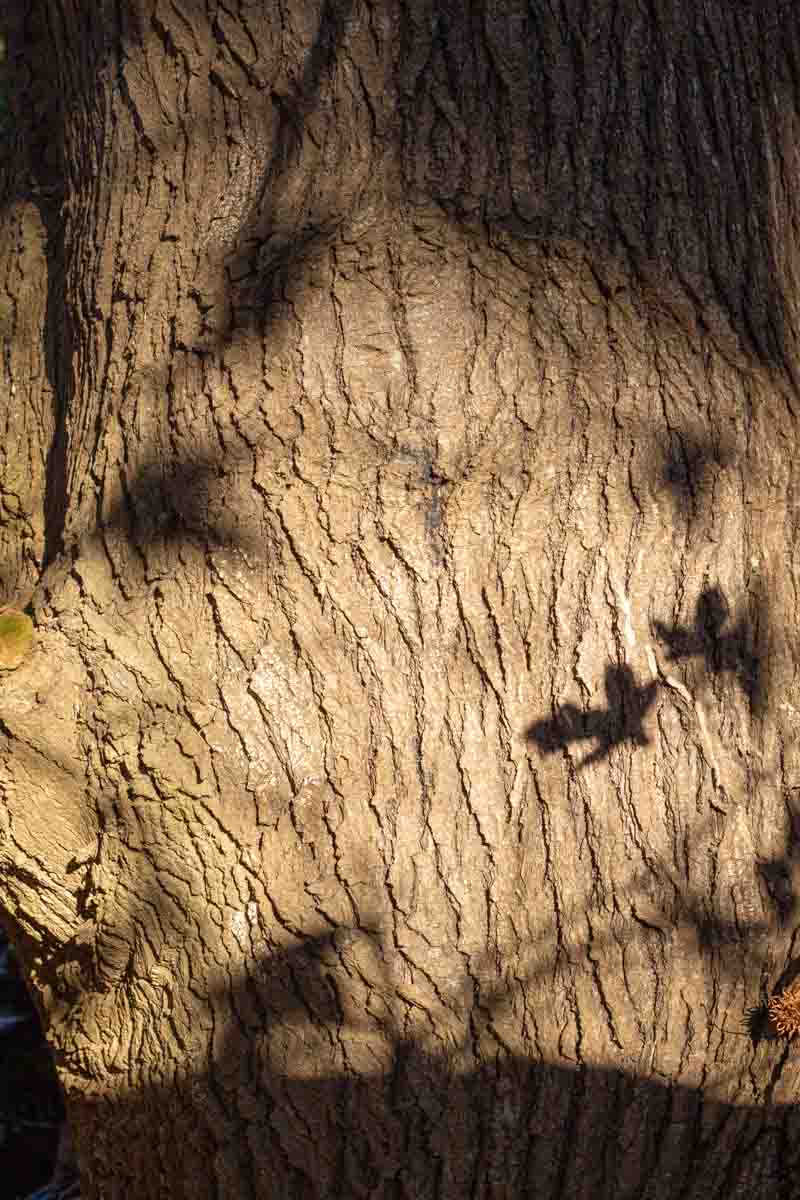
Third Place: “Liquidambar bark” by Beverley Kirkby
Liquidambar bark – Copyright Beverley Kirkby
This textural image by Beverly really stood out in terms of the textures, colours and the amazing light and shadows — the star shaped leaves really add so much visual interest to the image. The Liquidambar bark would not have looked very interesting if it was photographed without the shadow of its leaves.
Besides the above, Beverley has made use of the right light when photographing the bark – it is neither too harsh nor too soft but the right amount to reveal the bark details, add some depth and provide those interesting shadows with enough contrast.
Congratulations Beverley on capturing this beautiful photo.
People’s Choice Award Winner
Our monthly photo contests also come with a People’s Choice Award. The winner of this part of the contest receives $100 worth of store credit on Light Stalking which they can spend as they please on our blueprints, drills, courses or Presets.
Start with a List… – Copyright Pat Garrett
The most popular photo for July, voted by the contestants was “Start with a List…” by Pat Garrett, which has won the people’s choice award. The many textures and layers formed by reflections on glass makes the photo more interesting and at the same time a very engaging one, making the viewer quite curious.
Pat has managed to avoid any light reflecting off the glass, which may have otherwise created bright spots and ruined the image. The subject is beautifully illuminated with soft light and Pat has captured the right amount but still very sharp details in the photo. Congratulations Pat on the win.
We are about two weeks into this month’s photo contest and still have a couple of weeks left to submit photos to our August’s monthly contest. This month, our theme is “The Art Of Reflection.”
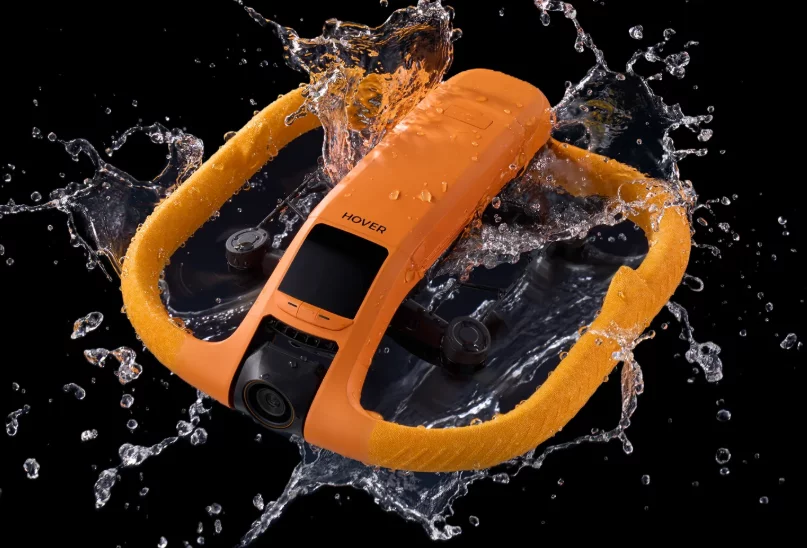
Zero Zero Robotics has introduced a new drone in their HOVERAir brand, the HOVERAir Aqua which is a water-borne, self-flying drone. This drone can take off and land in water, and is built specifically for that purpose with more than 15 waterproofing adaptations. Looks like this is a drone with features that many drone users have been waiting for.
Image via HOVERAir
HOVERAir is a company that already has released a few self-flying drones with its flagship model being the HOVERAir X1. The HOVERAir Aqua weighs less than 249g making it an ultra lightweight device that may not require a registration in some countries.
The drone’s camera comes with a 1/1.3 inch CMOS sensor and can capture 4K videos at 100fps. The camera has a custom lens for use with water and can be controlled using a compact controller.
The wind resistance of the drone is up to 33 knots (approximately 61 kmph) and has a top speed of 55 kmph, making it a great choice to capture adventurous sports in both land and water. This drone will be a great equipment for anyone involved in outdoor adventures.
The drone comes in an orange colour design so it would be easier to spot it in water even when there are waves on the surface. The drone is also designed to stay afloat on water after landing or before takeoff.
More details about the drone will be available at the official launch, but you can read some interesting information here and sign up using your email address to receive updates.
We have more news for you to read if you are interested at this link here.
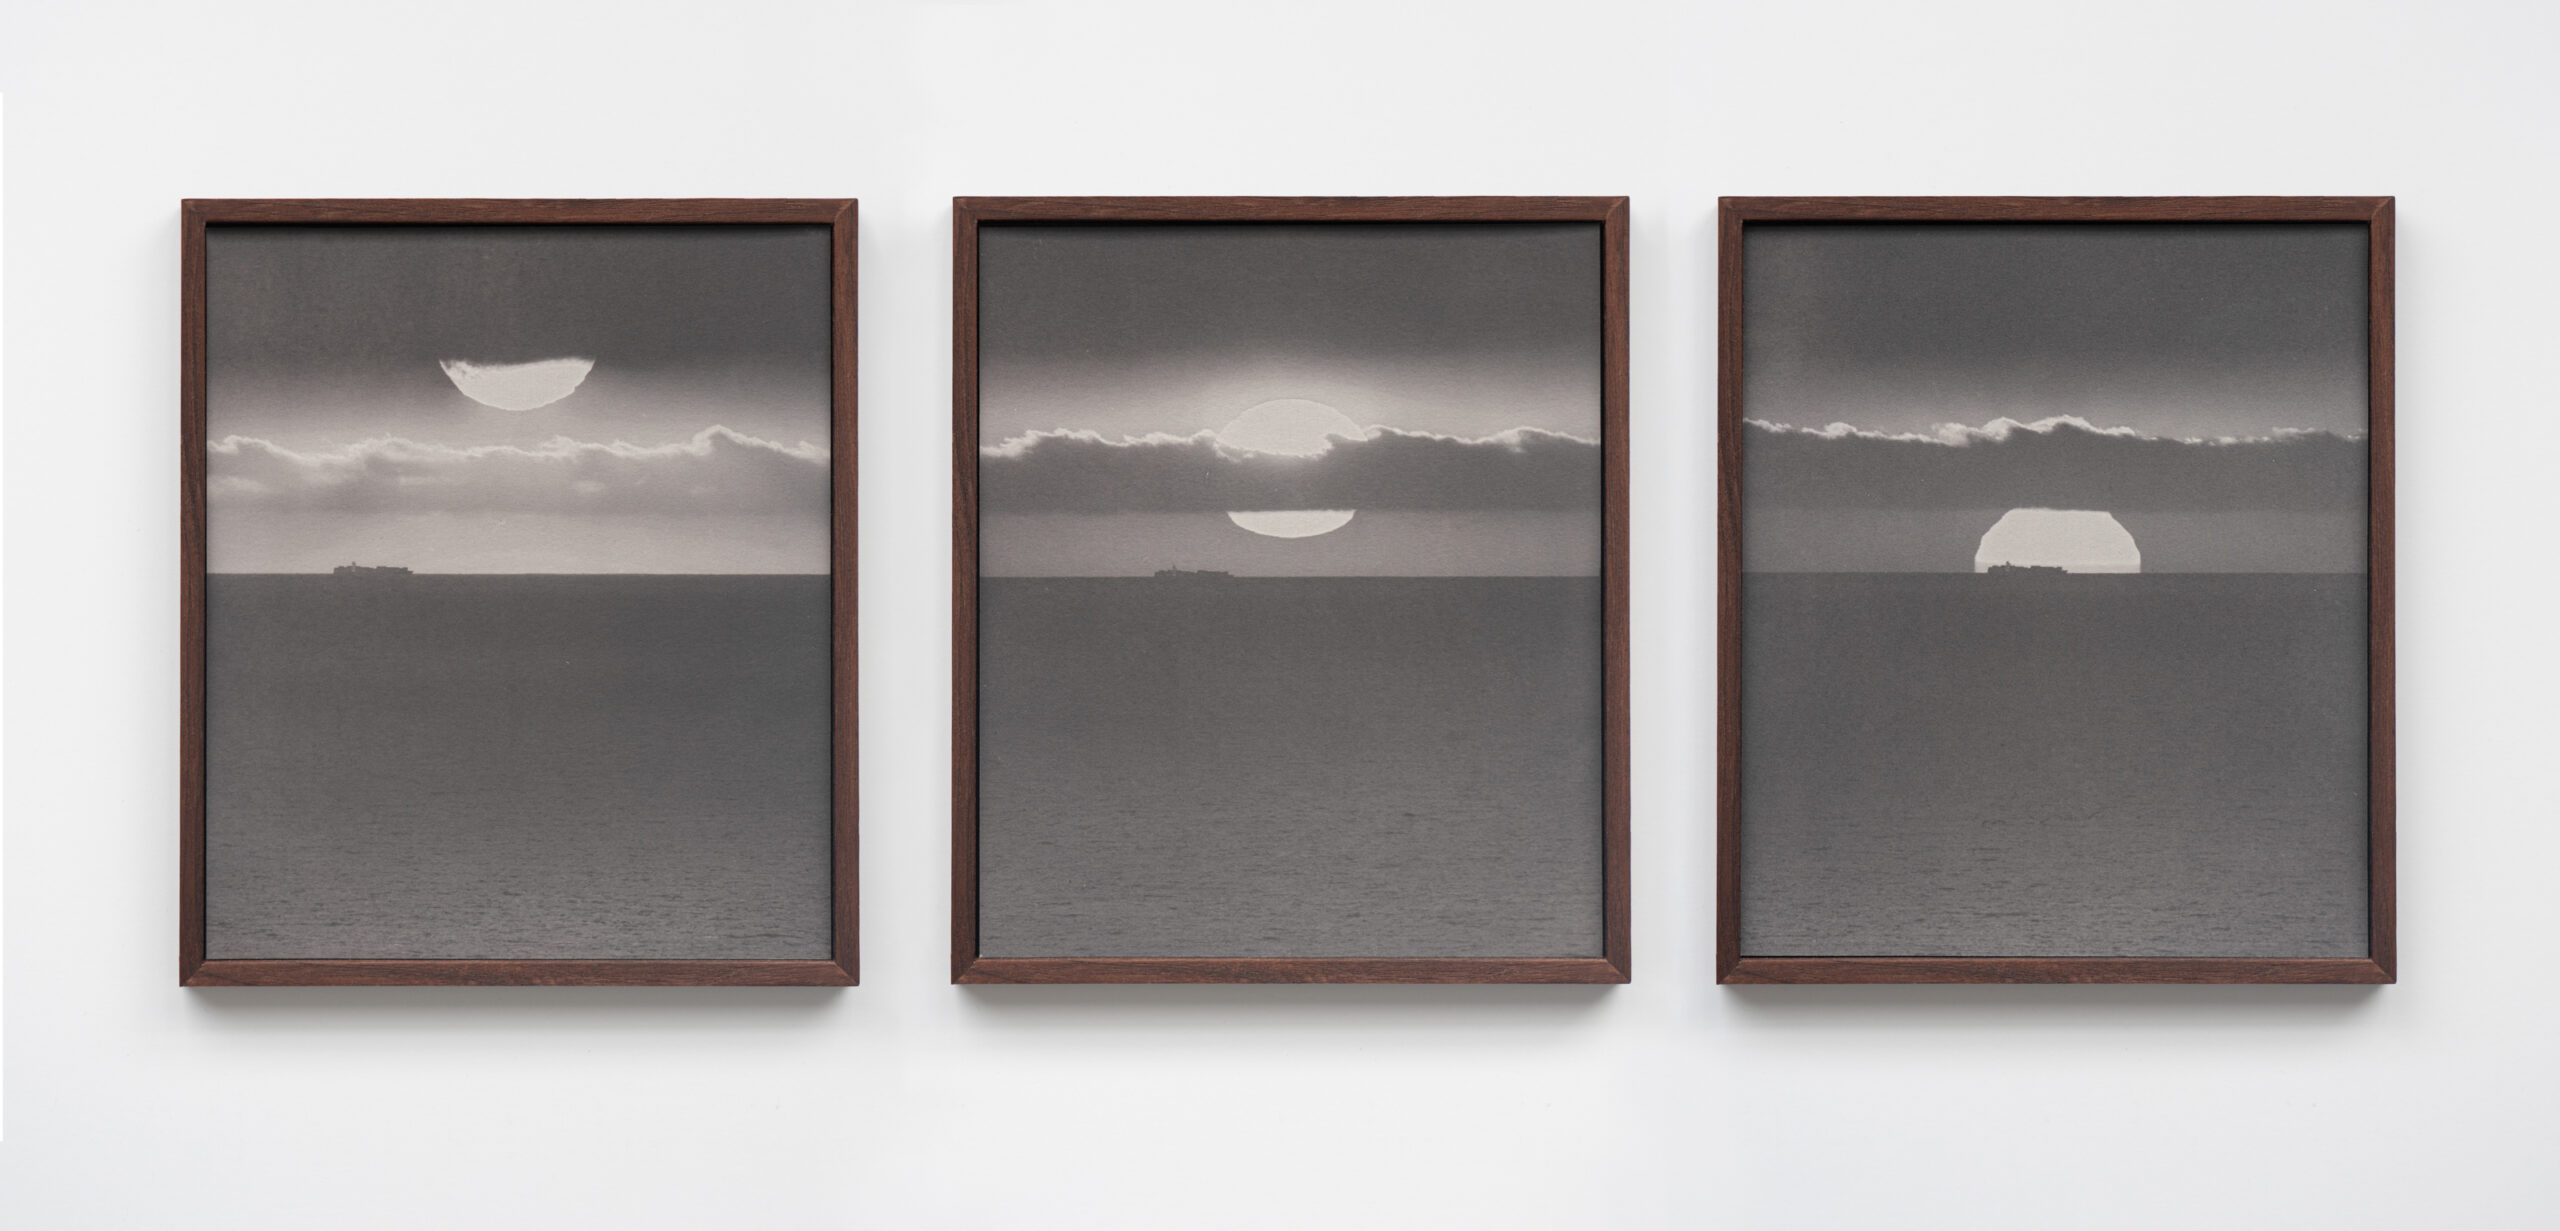
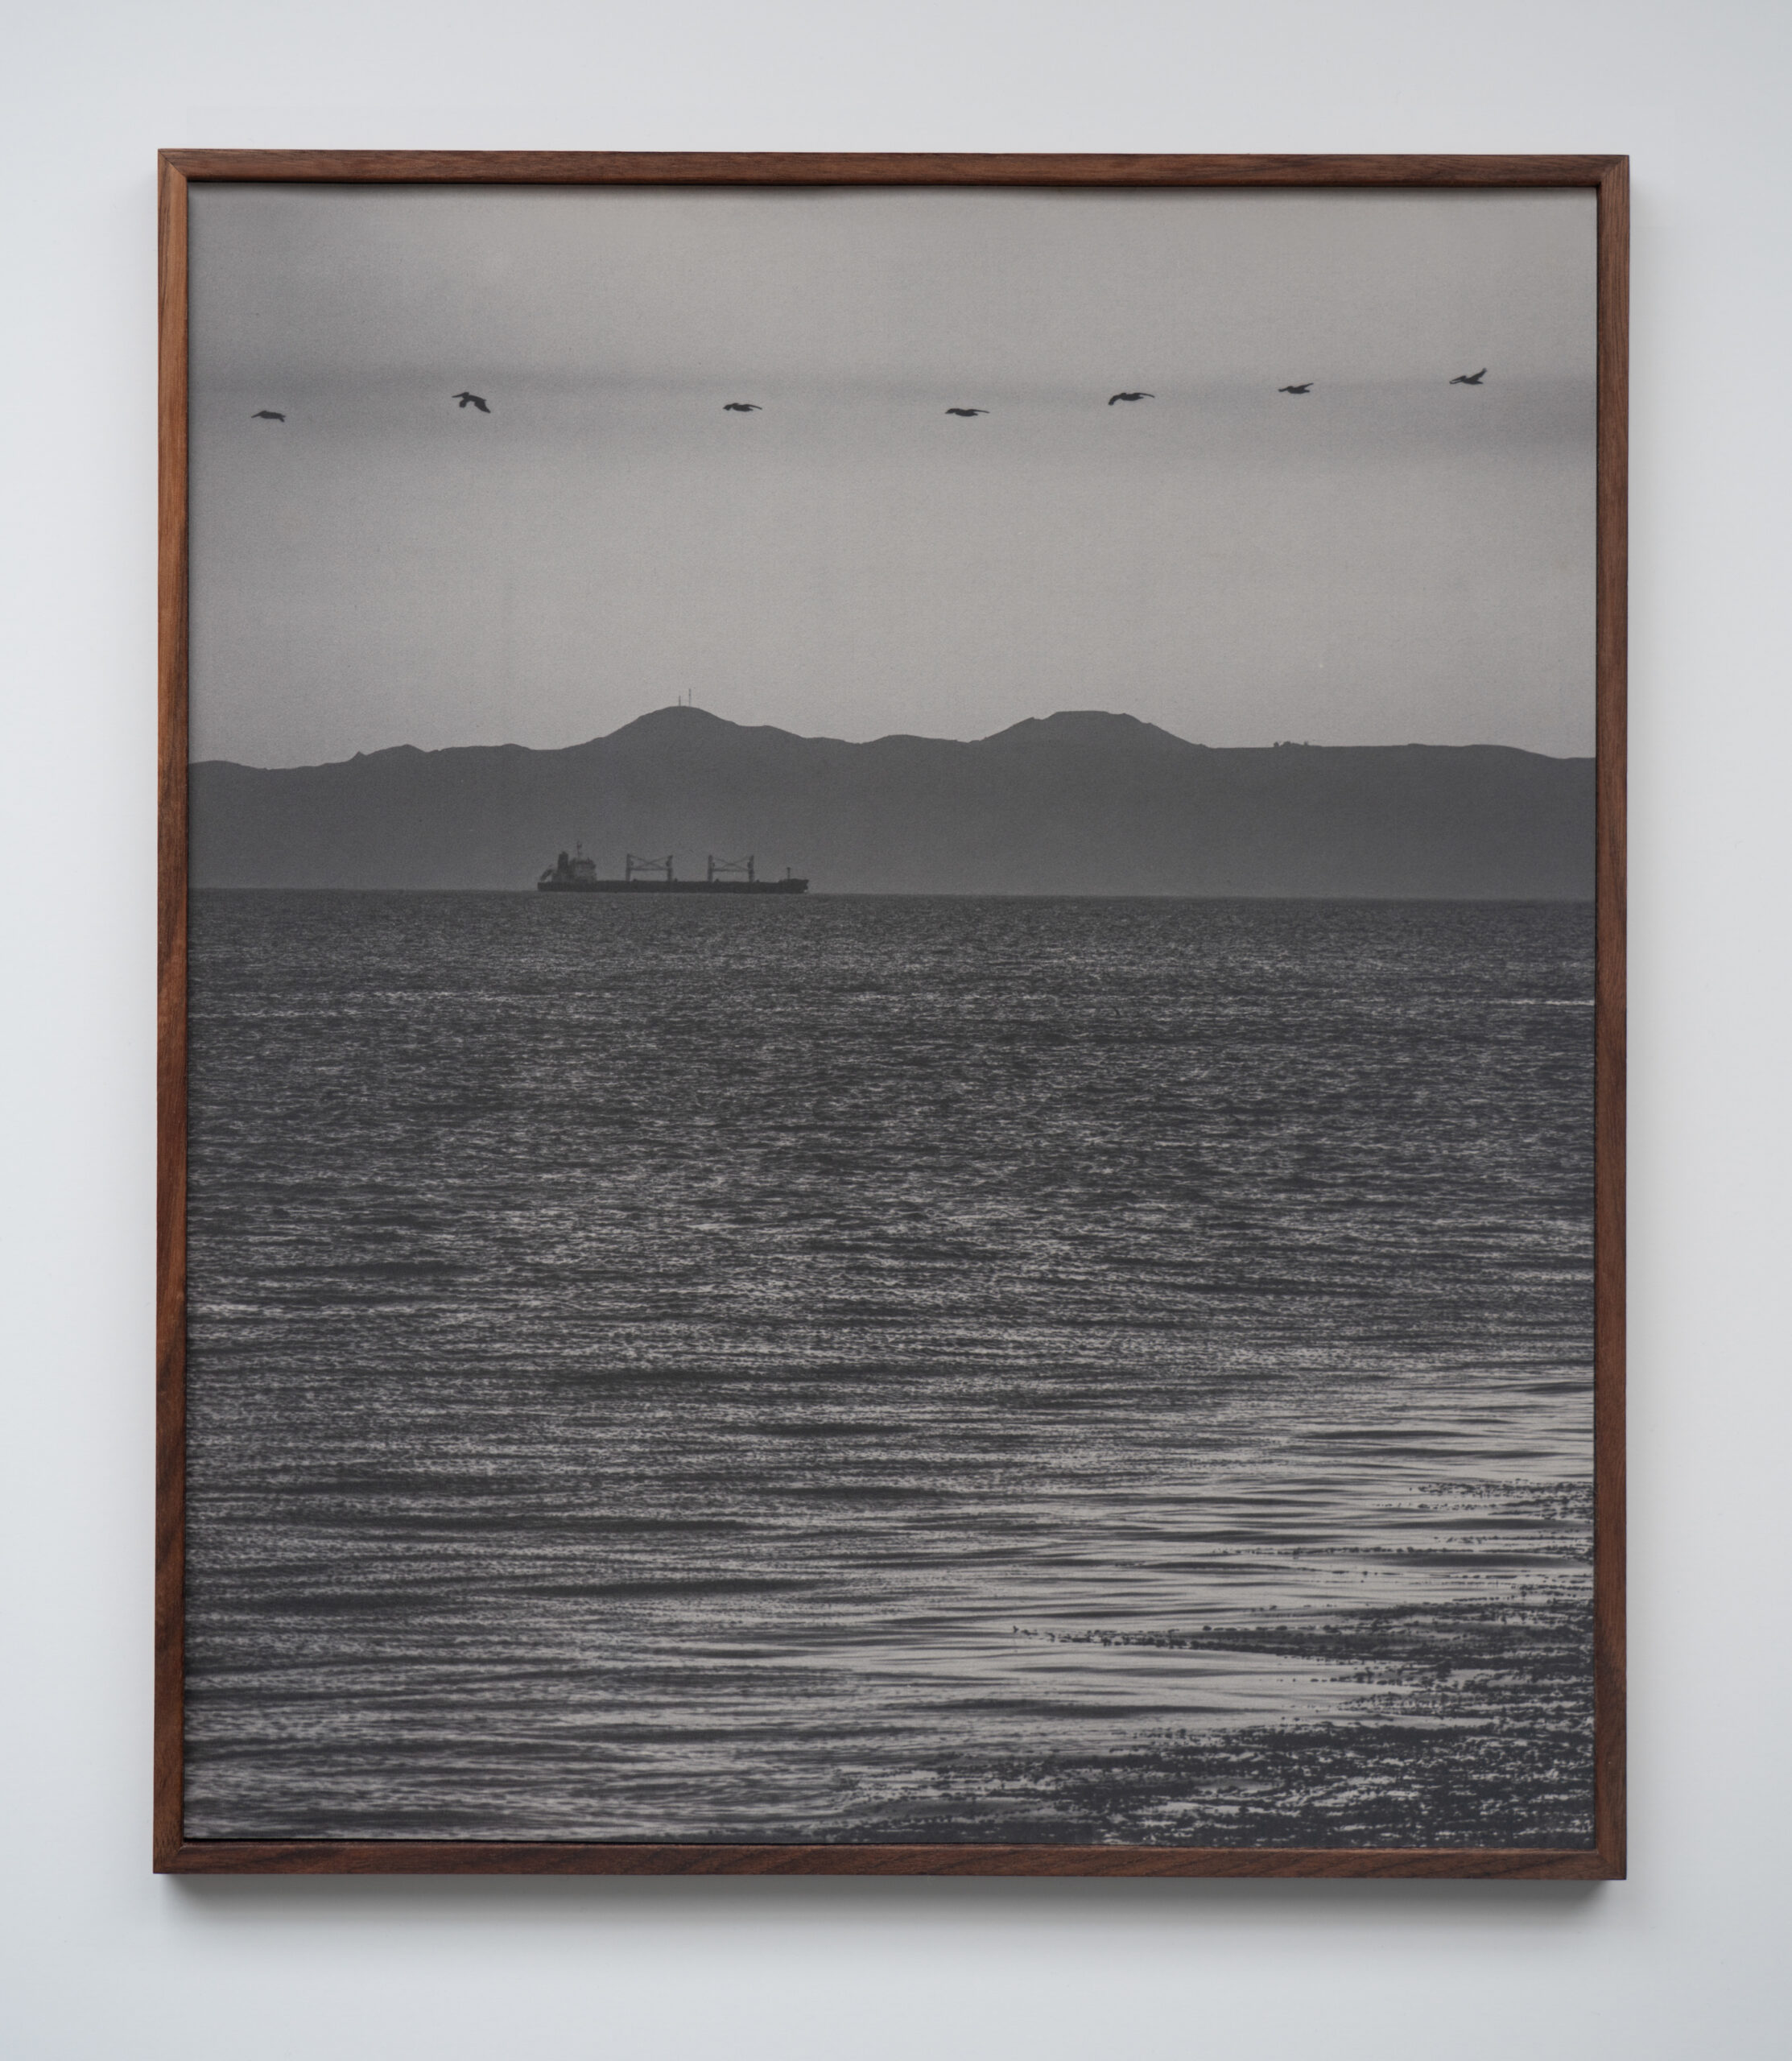
We had the pleasure of chatting with Kaya & Blank about their latest project, Intermodal. Their salted prints don’t dramatize—they speak with crisp, architectural clarity. Paired with the nighttime footage of shipping ports, their work turns industrial sprawl into a sensory, mesmerizing experience.
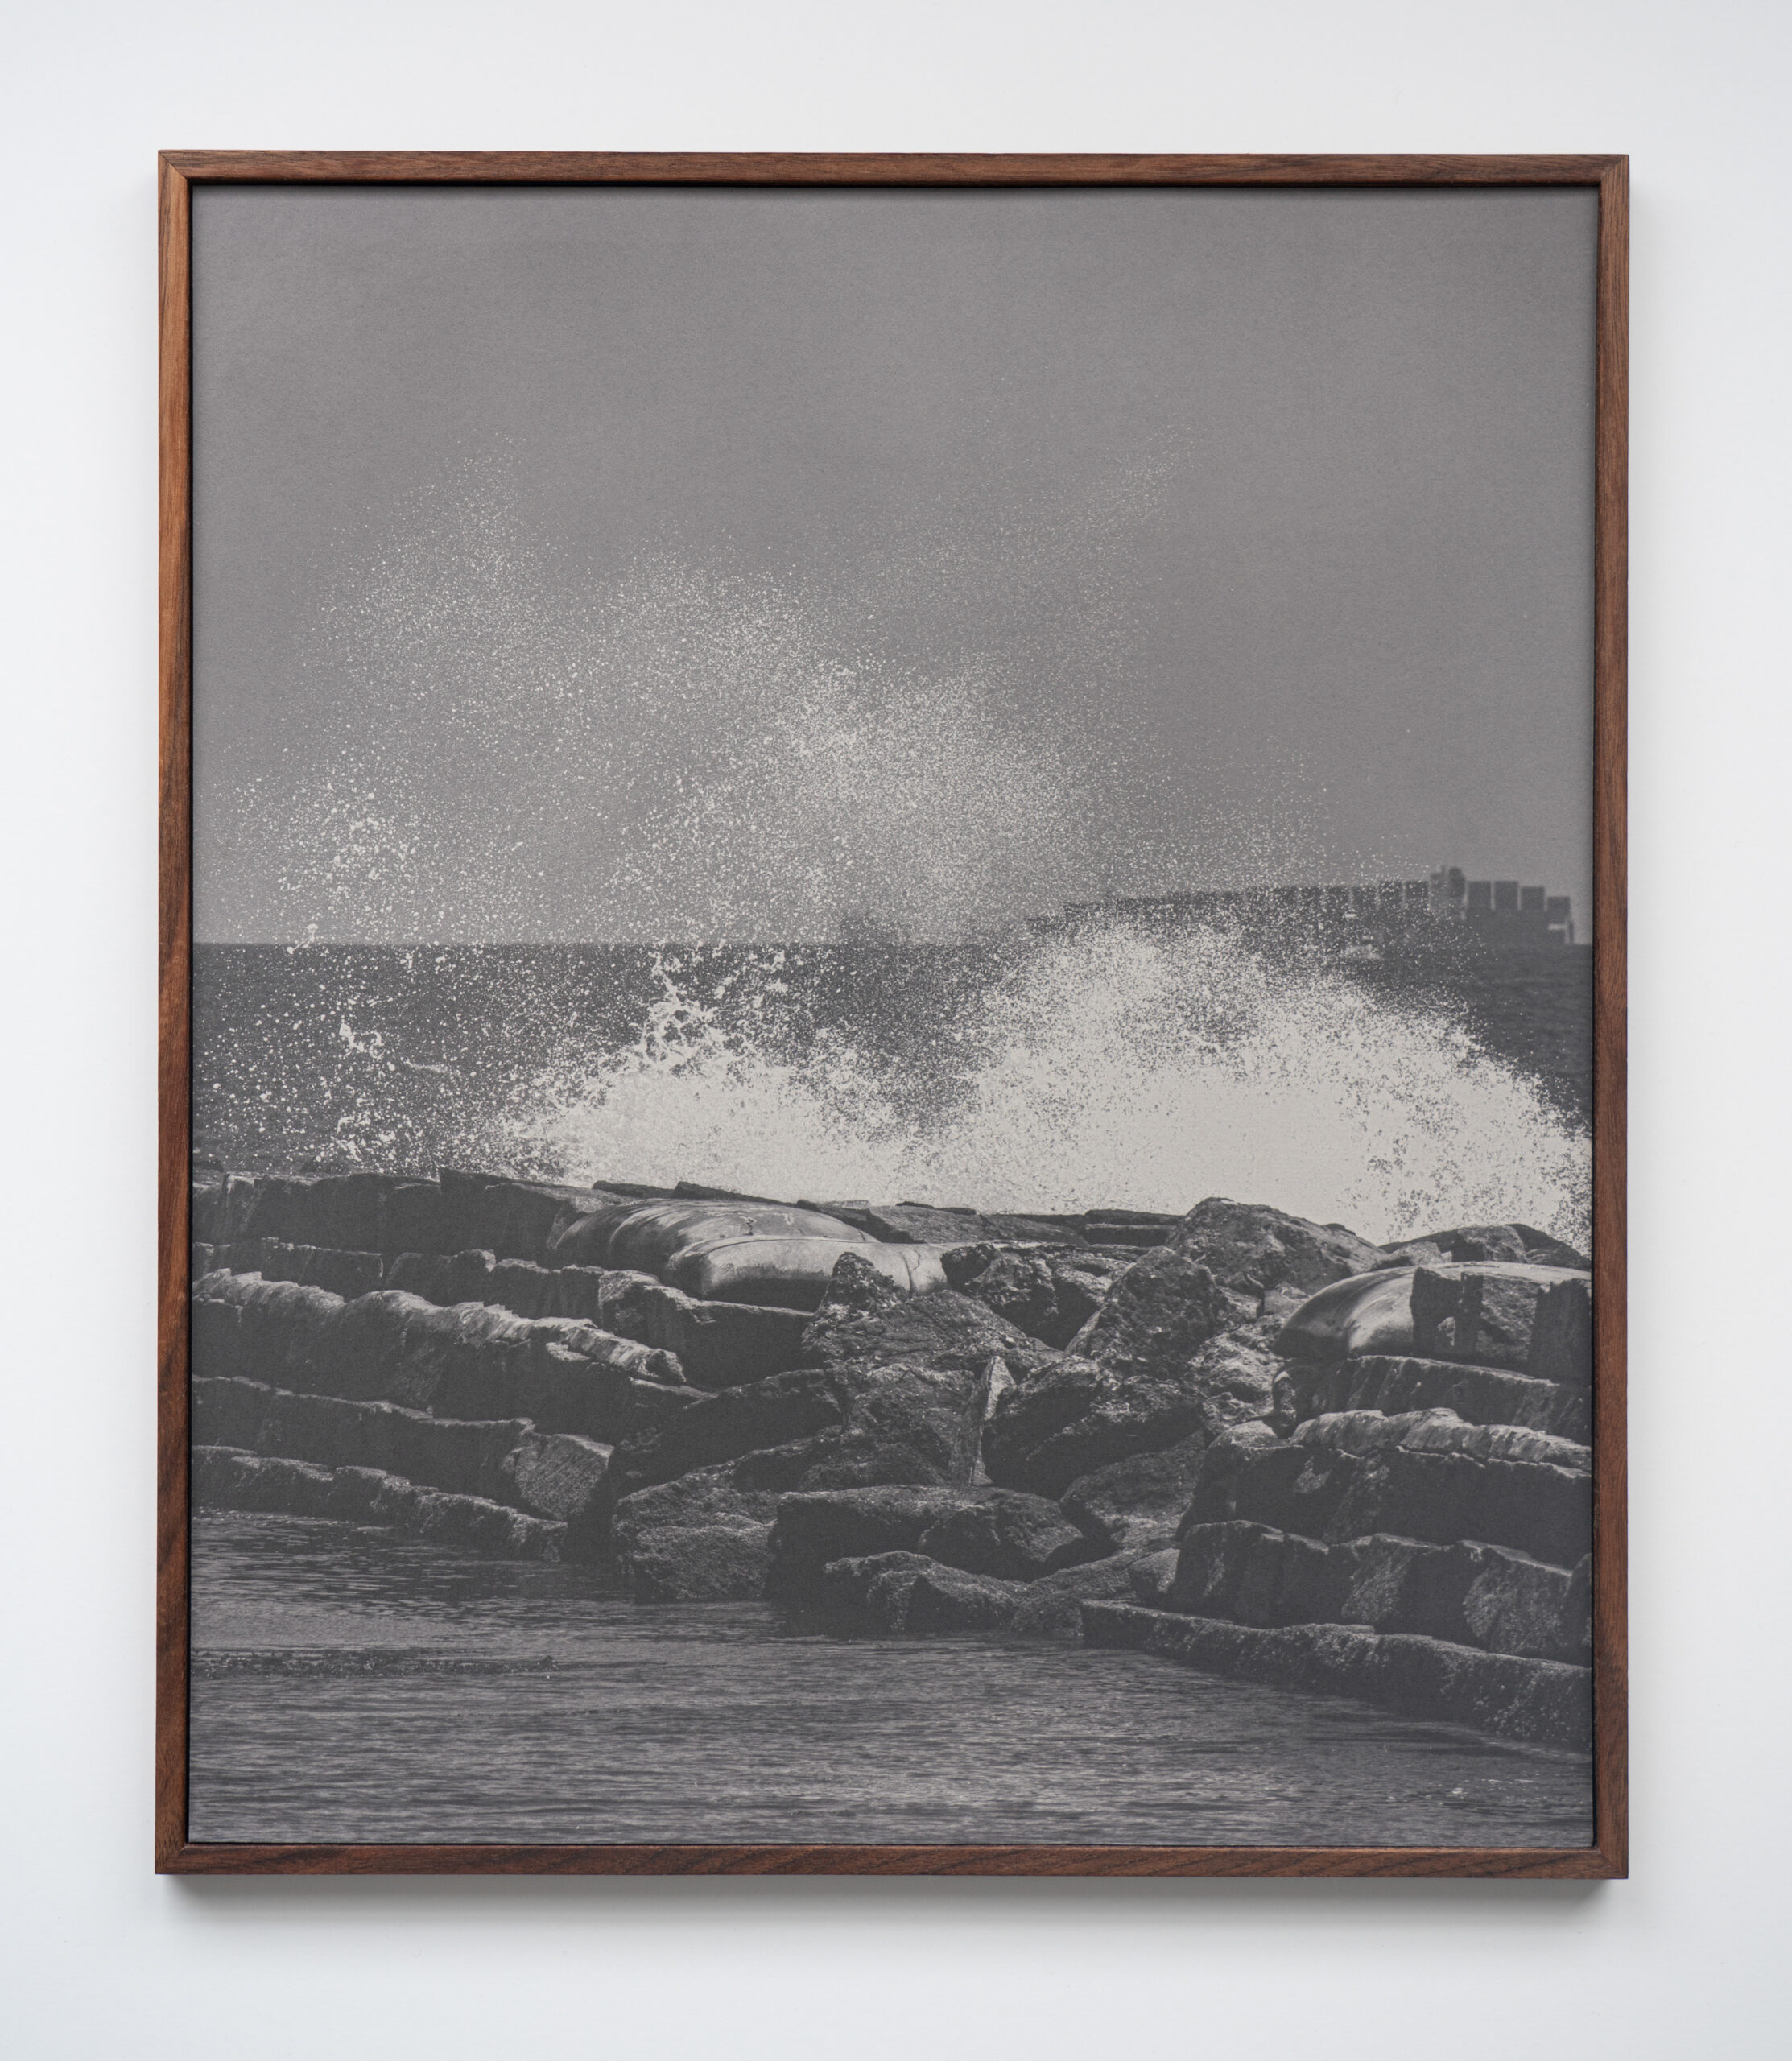
Heidi: Intermodal captures monumental operations in a minimalist way. As photographers, how do you decide when to let scale speak for itself versus when to intervene with framing? Kaya and Blank: We tend to approach these sites with a sense of stillness rather than trying to dramatize them. The scale of the ports is already overwhelming, with endless cranes, container stacks, and ships, so often our role is simply to frame the scene in a way that allows the scale to register without distraction. At the same time, we think carefully about vantage points, how much of the surrounding environment is visible, and how the image is layered. Sometimes bringing in an extreme close-up, like the corner of a container and the dust it expels when being stacked, or a tight shot of the cable systems that, when looked at closely, resemble waves, can shift the way a viewer reads the space. When we first started filming for Intermodal, we were not able to film much that made us feel truly excited. After several nights of filming and reviewing the footage, it felt like something was missing. We eventually decided to invest in an extreme telephoto lens, and that completely changed the perspective. The way the lens compresses distant layers became the perfect visual equivalent of what ports do to the world; they collapse space. And once we found that look, the video component of Intermodal really began to take shape. We do not usually think in terms of narrative when we edit, but we do work toward a sense of flow. The video is shaped with certain key points, like a beginning and an end, and the end point often defines how the structure unfolds. We think in chapters rather than isolated scenes, allowing each segment to develop its own tone and rhythm while still being part of a larger whole. The connections between these chapters are built visually, through echoes of motion, color, or atmosphere, rather than through plot, inviting viewers to navigate and assemble their own experience of the work.
The Port of Los Angeles can feel like a fortress, especially at night. Were you surprised by how much access you were able to get? Yes, absolutely. The first time we filmed in the ports was actually for our previous project, Crude Aesthetics. There are several oil derricks inside the port area, and that is what first brought us in. While it is true that most of the port is inaccessible, there are public parks, waterfront walkways, and fishing piers tucked inside the industrial zones. Over the two years we worked on Intermodal, we returned to some of these spots again and again, usually in the middle of the night, to capture the operations. Over the course of two years, we only ran into access issues once, which is remarkable given the scale and security of these sites.
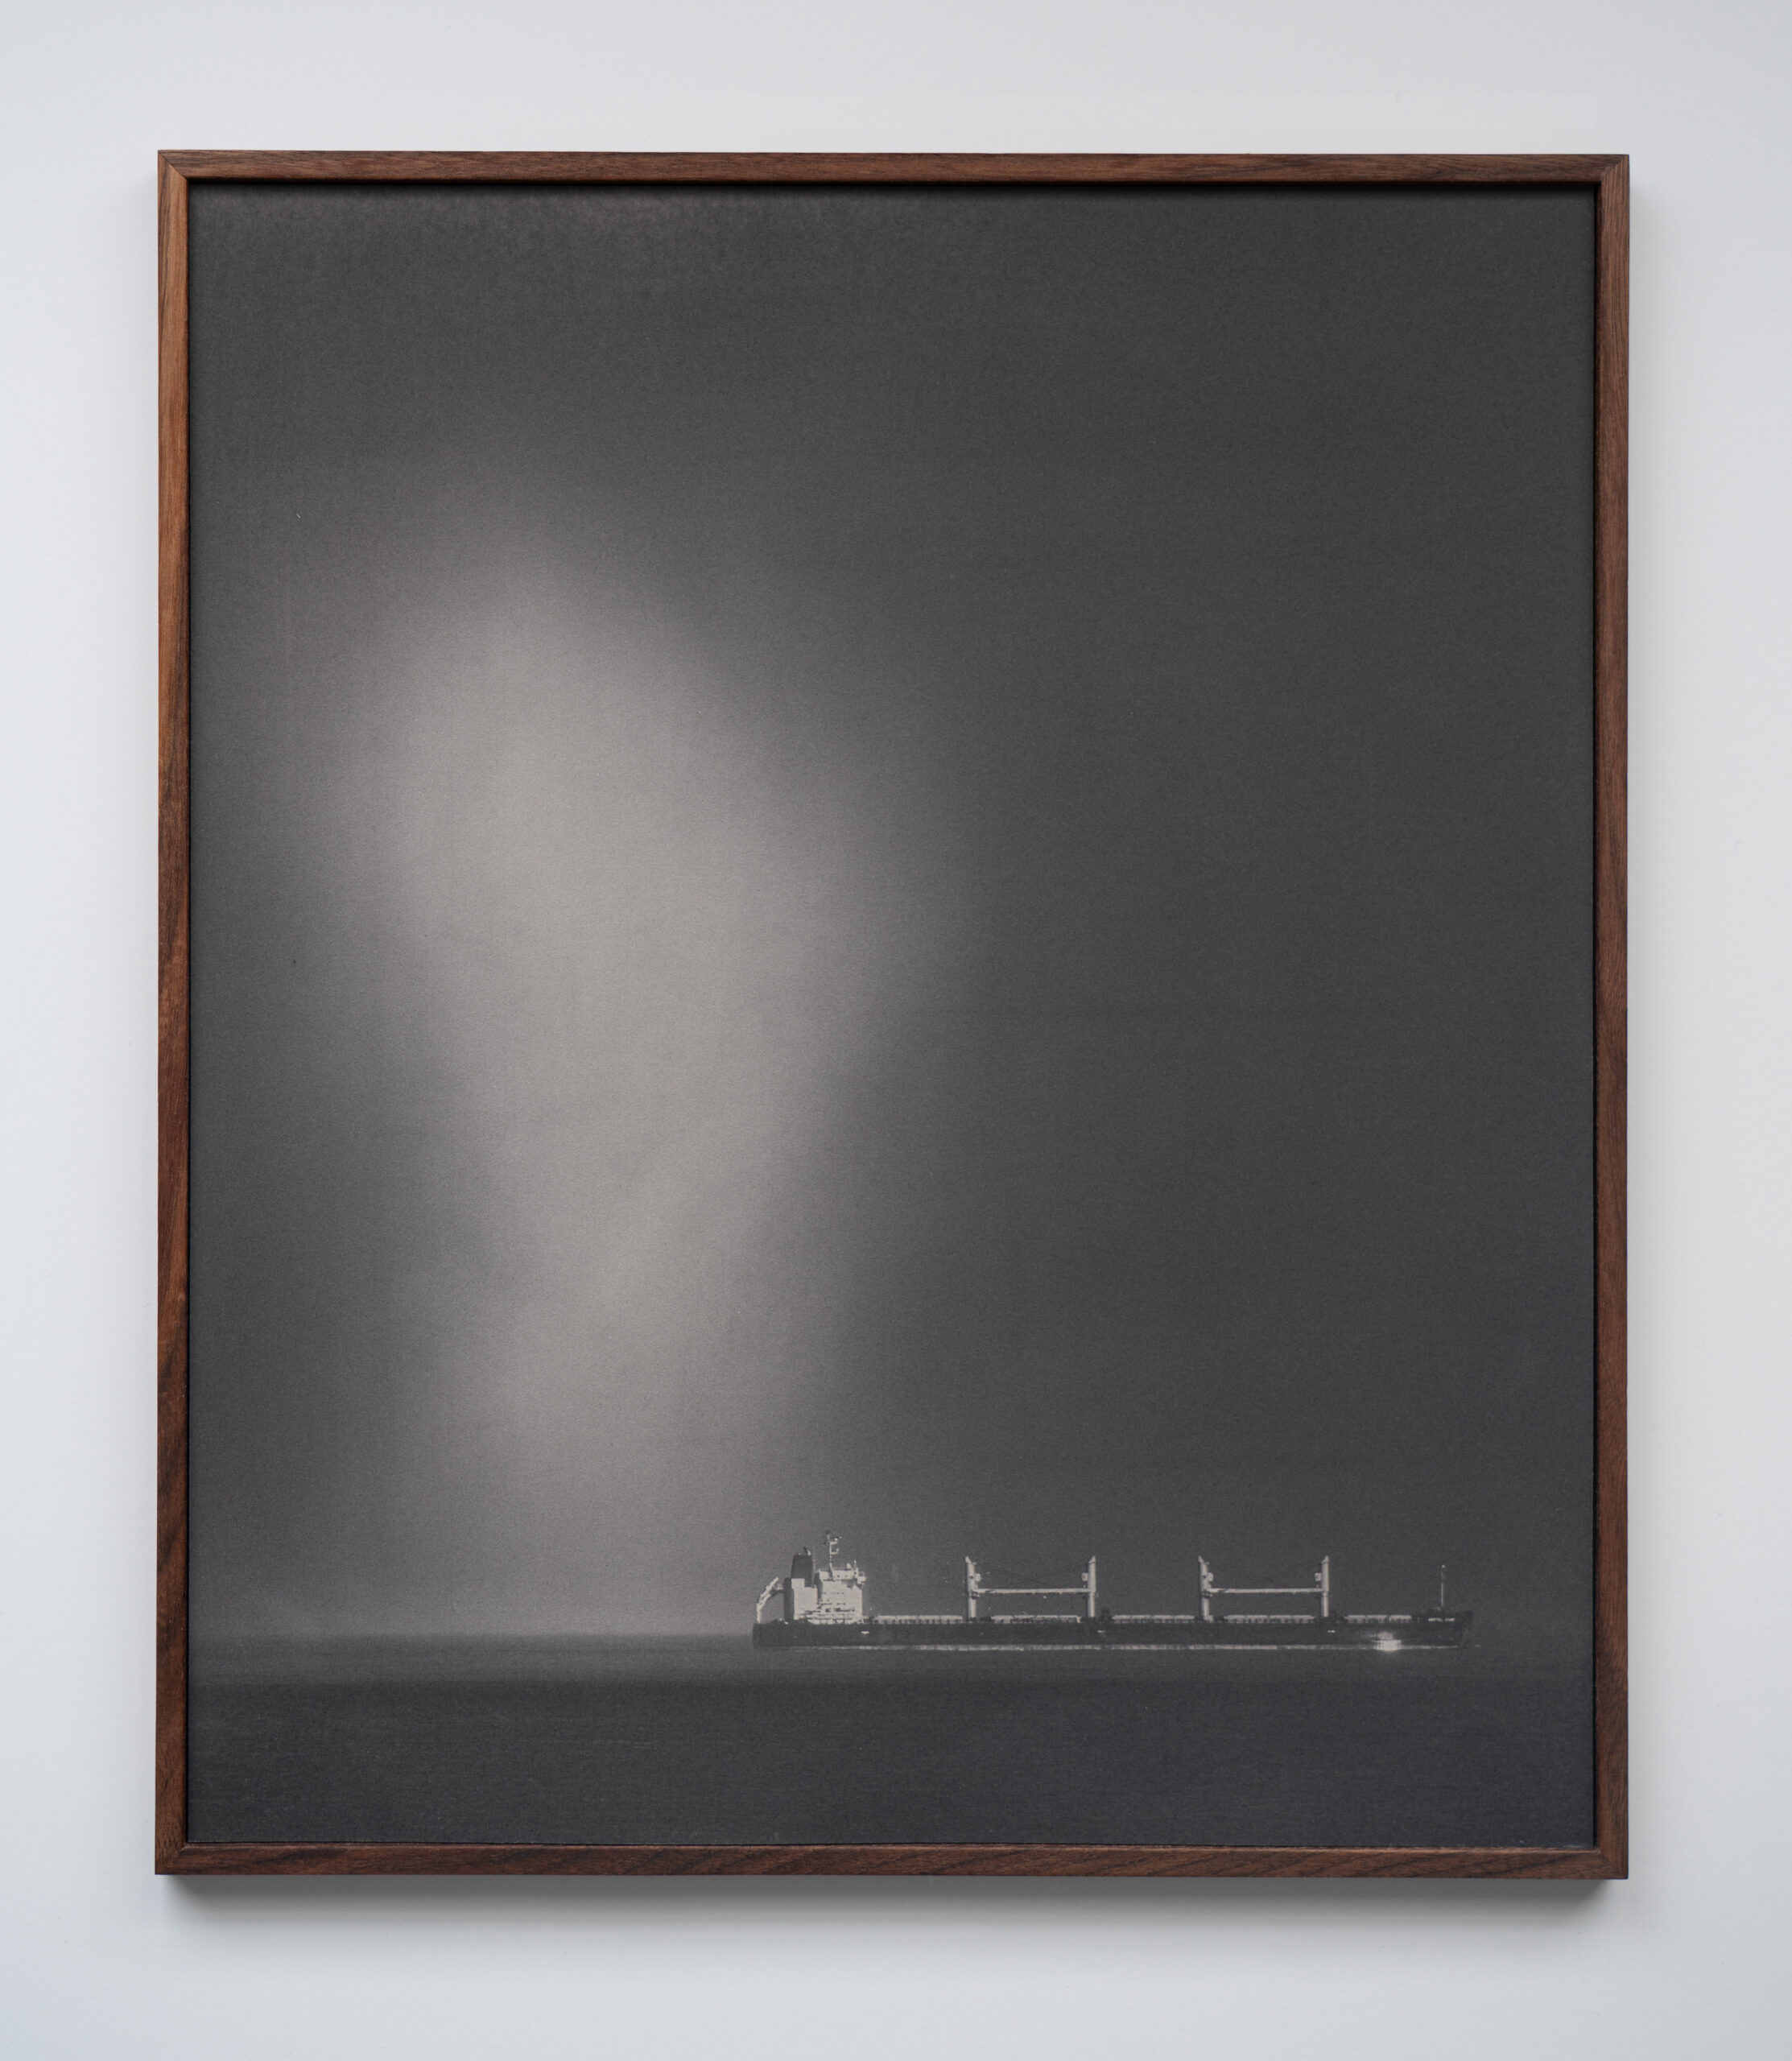
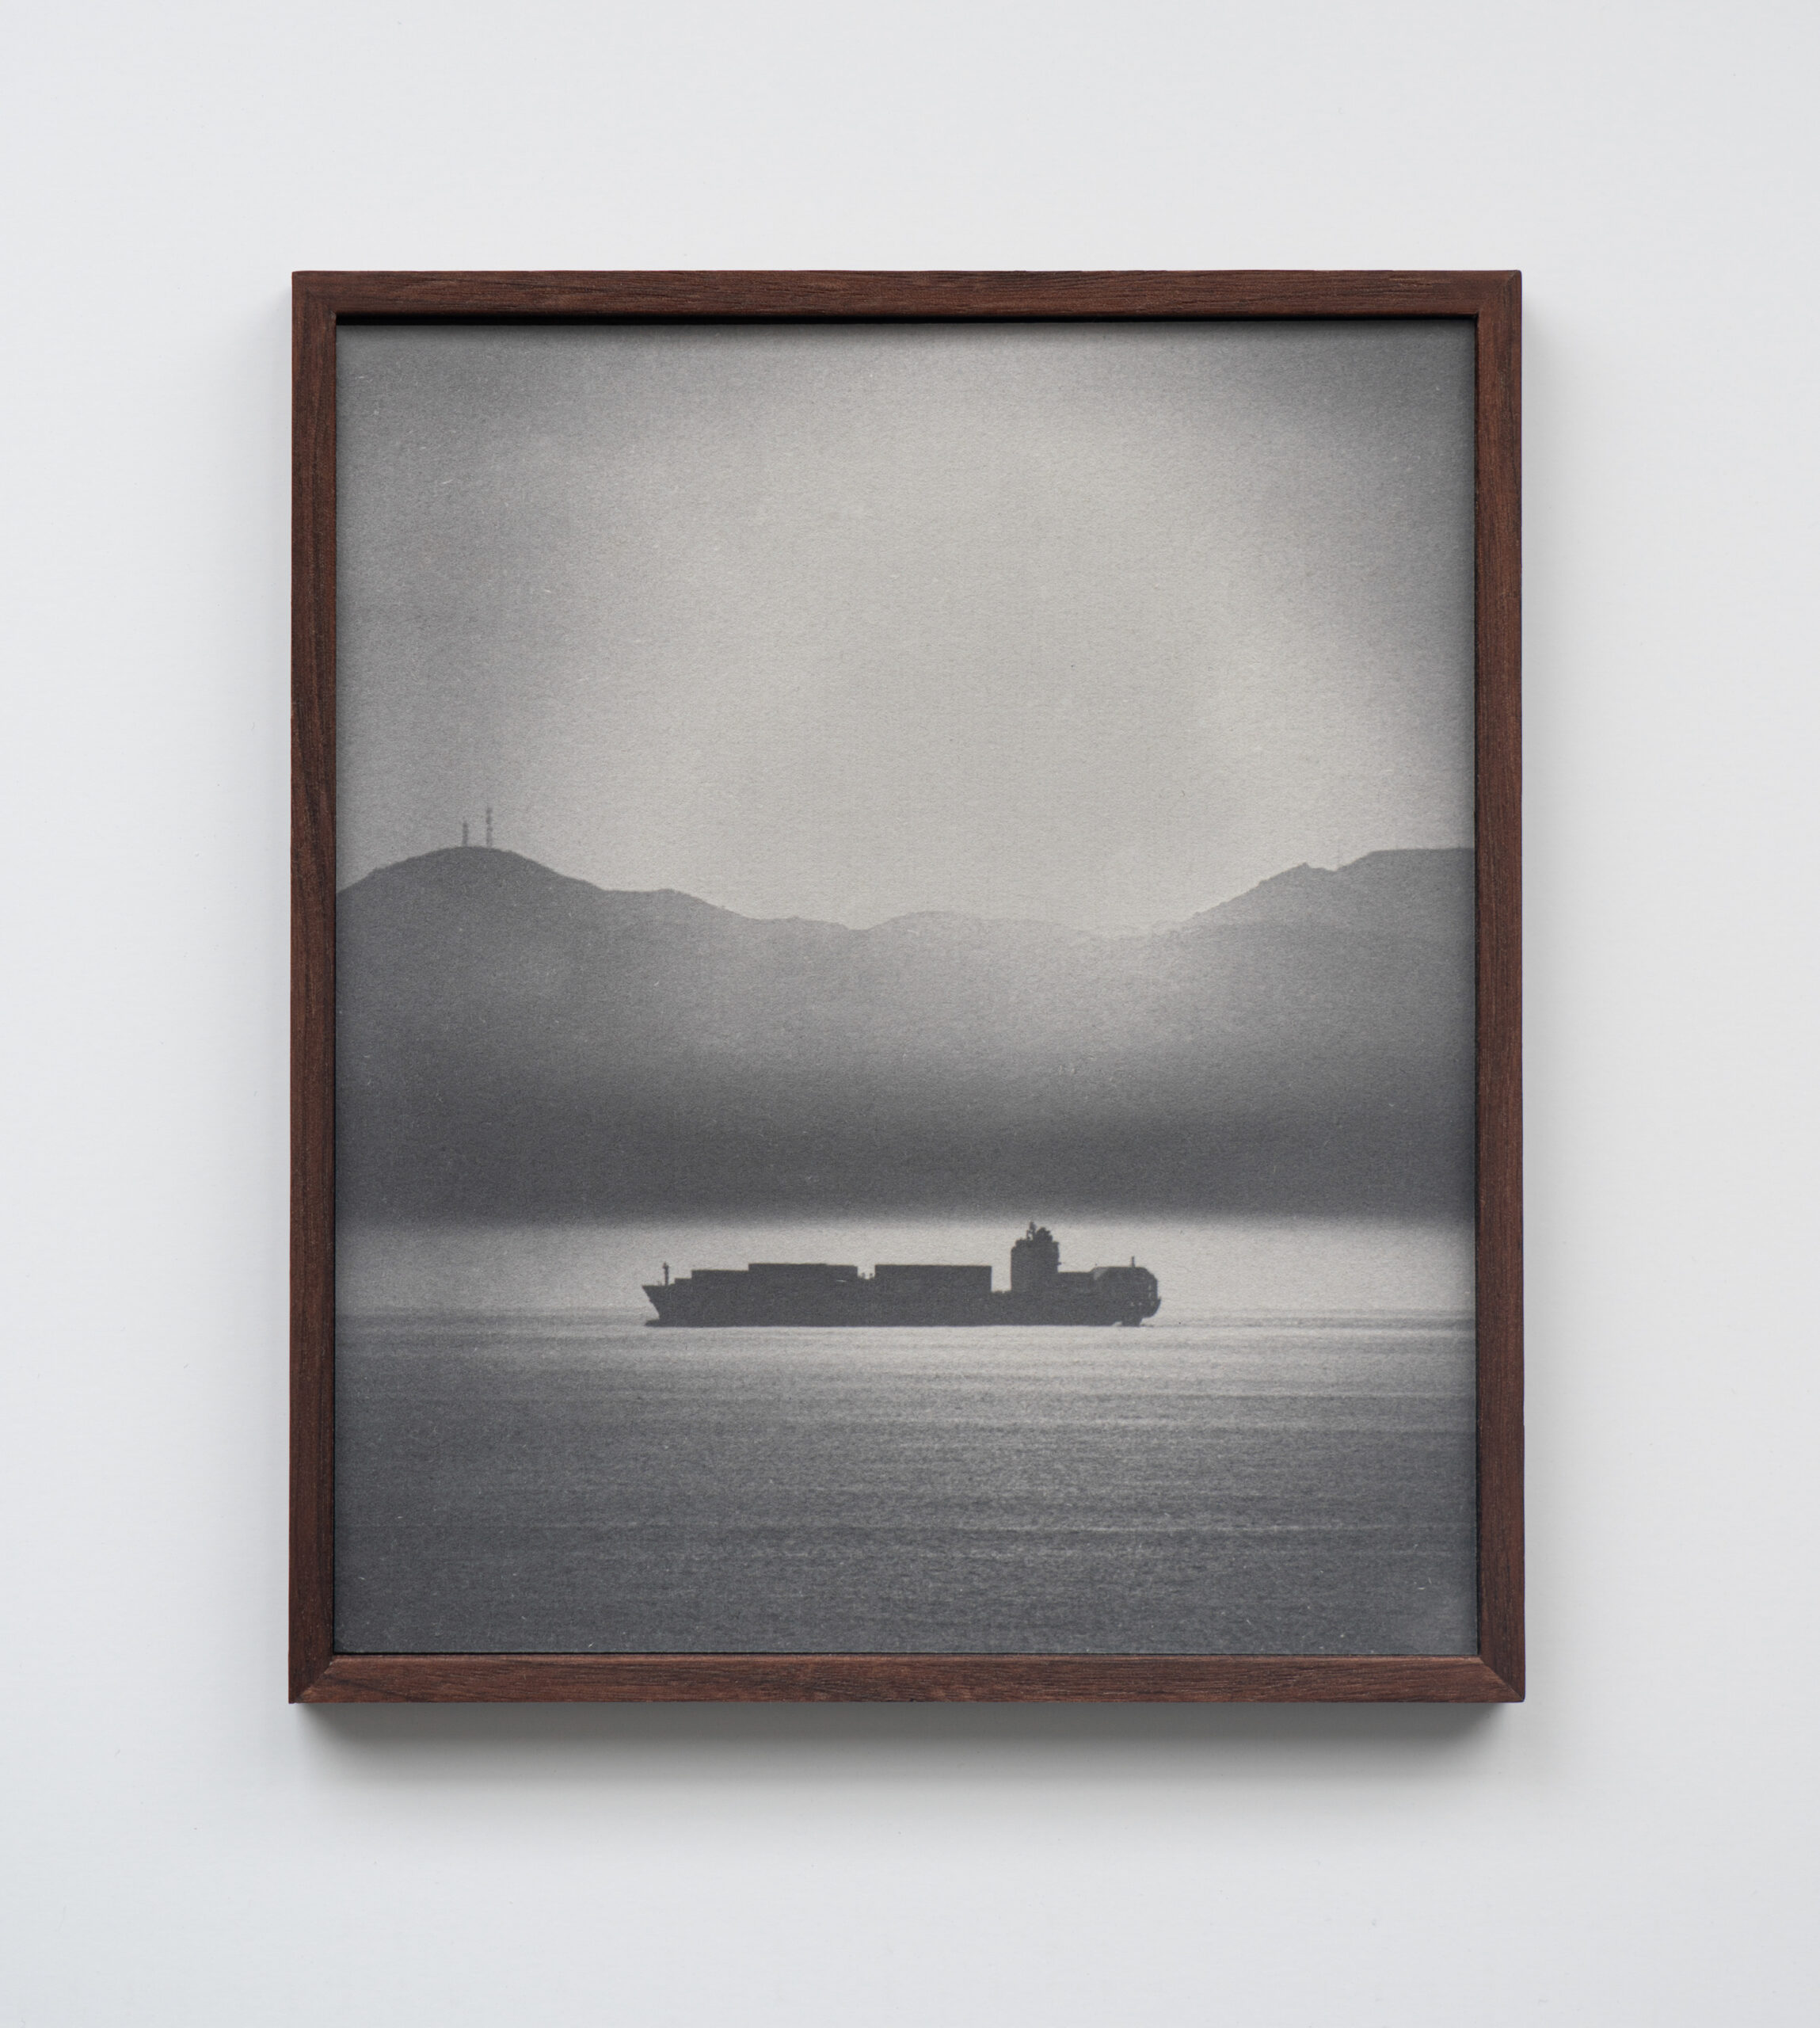
Photography has always been about light transforming matter. Your processes range from bitumen to salt and UV light. How does your process push against the digital era? Our interest in these processes come from making the materiality of the image part of the work. Historical processes like heliography (bitumen) and salted paper printing remind you that a photograph is not just an image, it is a physical object shaped by chemistry, light, and time. Each print can have unpredictable qualities, shaped by the environment and the materials at hand. Filming digitally and creating photographic objects require two completely different modes of engagement. All of our video work is filmed at night, while the photographs for the salted paper prints are taken during the day. In a way, that separation echoes the relationship between digital and analogue, they are as different as night and day, yet part of the same cycle, and together they form a more complete picture of the subject. 19th-century salt prints were about light, time, and trace minerals. Your salt prints were created using water collected from the Port of Los Angeles. How did the chemical or environmental qualities of that water influence texture and unpredictability of the prints? The port water definitely had an influence. It carries sediment, minerals, and pollutants that interact with the chemicals in subtle ways, sometimes creating speckling, sometimes altering the tonality. It is not something you can fully control, which is part of the appeal. When we first started working with salt prints, we tried dipping the paper directly into the port water. That much salt built up in the fibers created results we did not enjoy, the images lost too much contrast and sharpness. It became a back-and-forth question, how much of the site do we let into the process, and how much control do we want to keep? We eventually settled on brushing the port water onto the paper in the studio. That gave us a balance we liked, the physical presence of the place still embedded in the print while making it light sensitive, but with a lot more clarity and contrast. How did using your still photography embed movement into a transient subject? The installation is divided between the video, which shows the intermodal operations of containers being loaded and unloaded up close, and the salted paper prints, which return the focus to the land, or rather, the seascape. The video places you in the midst of a giant machinery, surrounded almost entirely by containers, cranes, and movement. The salted paper prints reverse that perspective. The ships become distant silhouettes on the horizon, and attention shifts to the environment in which they operate. We aim to balance formal qualities in our installations. Working with both moving image and still photographs allows us to focus on different aspects in each. While the video exists only as light projected onto a surface, the prints have a tangible presence in space, their textured fibers, weight, and scale create a physical encounter that the immaterial image cannot. This difference in materiality shifts the viewer’s experience from an enveloping, ephemeral flow of movement to a slower, tactile engagement. The salted paper prints share the same aspect ratio as shipping containers, and some are divided into stacked segments that echo the appearance of how containers are organized on ships and in the ports.
The ports are powerful symbols of global commerce, efficiency, and environmental cost. How do you balance creating visually compelling images with raising critical questions about our complicity in these systems? We do not think those two aims are separate. The beauty of the port at night, the lights, the scale, the choreography of movement, is part of its seduction. At the same time, we are aware that all of this efficiency is tied to systems of extraction, exploitation, and environmental damage. We try to present the images in a way that allows both responses to exist at once, the fascination and the unease. Art can be a space for ambiguity, and that is something we value, especially with complex topics like global trade and our own roles in a consumer society. We do not want to offer one-dimensional answers, instead, we would rather make work that leaves room for viewers to sit with conflicting impressions. That complexity feels more honest to the way these systems are experienced in real life. The endless movement of cargo can be both awe-inspiring and anxiety-inducing. What was your hope for viewers to feel when engaging with your work? We do not expect everyone to feel the same way, but we hope viewers take the time to really look. The work is not meant to deliver an instant message; it is more about creating space for sustained attention. For some, the scale and complexity might inspire awe. For others, the relentlessness of the activity might spark discomfort or questions about what drives it. After the opening, someone told us that the video felt very visceral, and that for the first time they might have experienced something close to megalophobia, the fear of large objects. That reaction stayed with us, because it is exactly the kind of physical, emotional response we hope the installation can create. If the work can hold that duality, fascination and unease, then it is doing what we intended.
Photo editing is more accessible—and essential—than ever. Whether you’re a business owner, ecommerce seller, or busy creative, knowing what photo editing is (and isn’t) can help you elevate your visuals and reach your goals faster.
In the following guide to photo editing, you’ll learn:
What photo editing means (and why it matters)
Different types of photo editing, from simple to complex
And if you’re ready to level up your own photo edits, check out our free tutorials and professional editing services.
What is photo editing?
Photo editing is the act of image enhancement and manipulation. This process is usually done with a digital photo editing software. Photo editing can involve basic tweaks like when you crop and resize images or adjust saturation. It also includes advanced techniques like swapping faces or photo retouching to get rid of distracting elements or unwanted objects.
Some image editing techniques are done manually, while others are conducted through automated photo editing tools and software. Most edits to digital photography involve some one or a few photo editing programs. Some edits are even done offline on actual photographs, posters, or other printed collateral without any image editing software.
Other terms for photo editing include:
Image editing
Post-processing
Image/photo manipulation
Photoshopping
Image/photo enhancement
Let us look after your image edits, so you can get back to the fun stuff. Try Path free.
The importance of photo editing
Editing helps you fine tune and get the best image possible, as close to what you imagined when you took the photo (or better perhaps). Niche photographers can hone and emphasize their personal style. And for businesses, editing helps cement branding and optimize for business goals.
Photo editing is particularly important for ecommerce companies. Image quality directly affects people’s opinion of the product and sales numbers. If you have ugly photos, it’s going to be tough to convince a shopper to purchase your product.
Types of photo editing
There are many ways to edit a photo—some simple and others more complicated.
Many people can figure out simple photo editing techniques on their own—though this does require time and patience. More complex adjustments may require using dedicated programs with specific photo editing features or hiring a trained professional editor.
Simple photo editing techniques include:
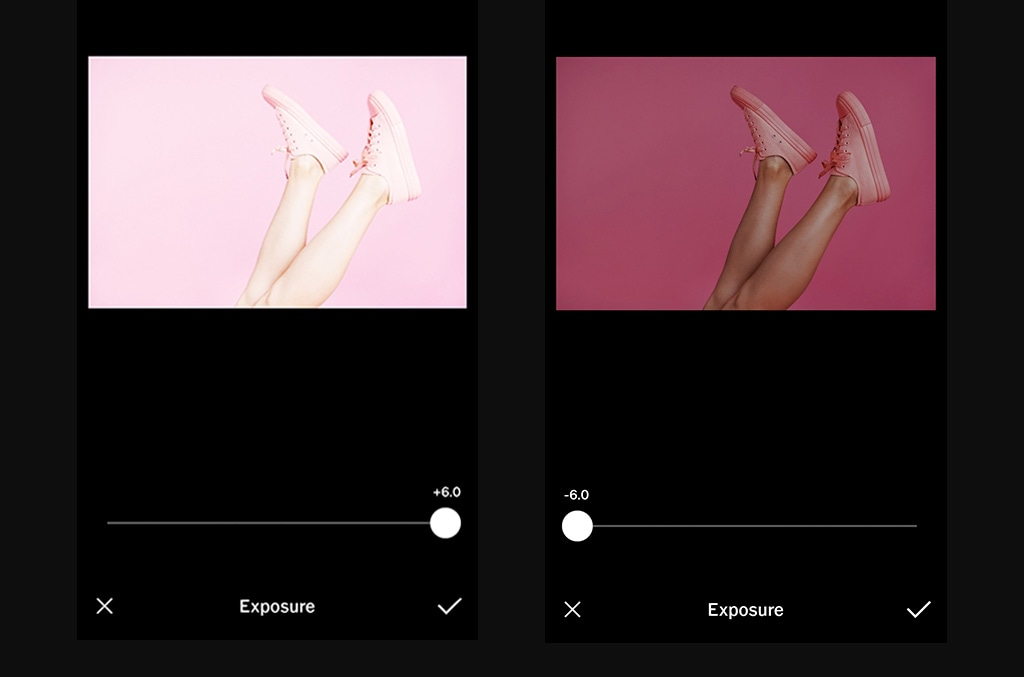
Straighten: adjust the horizon of the photo
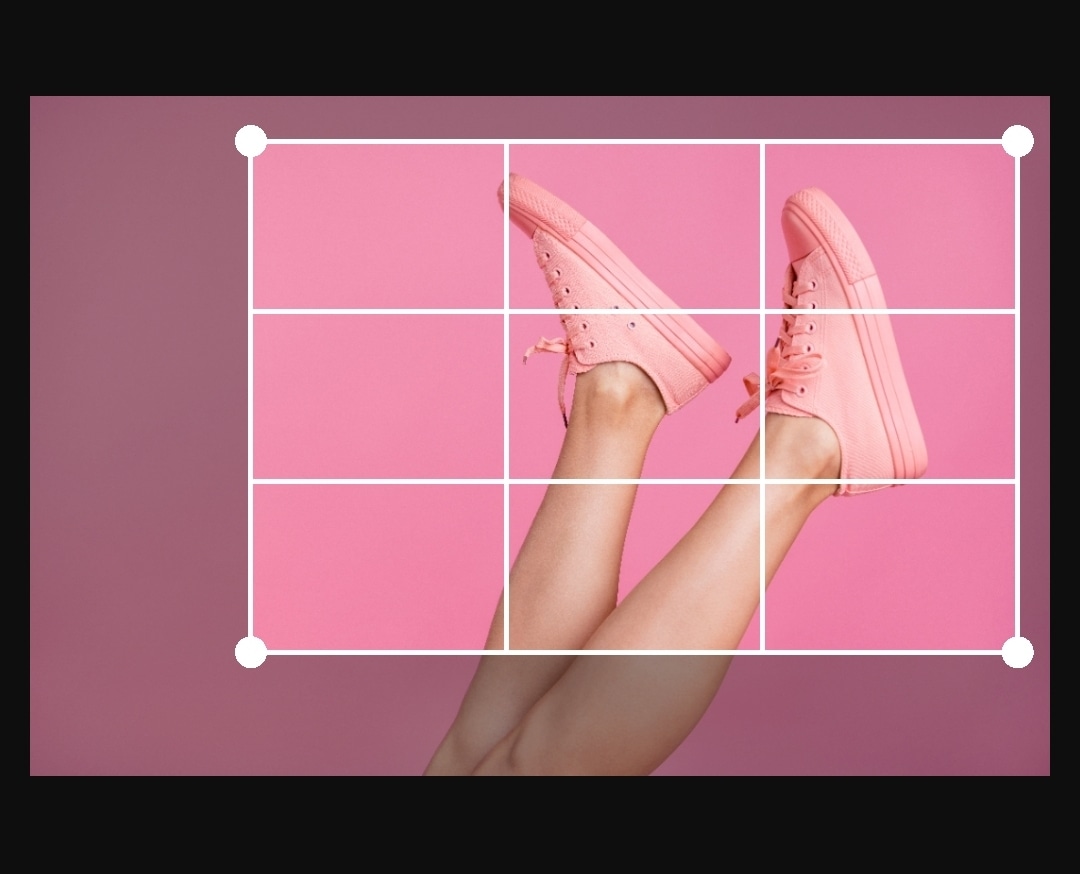
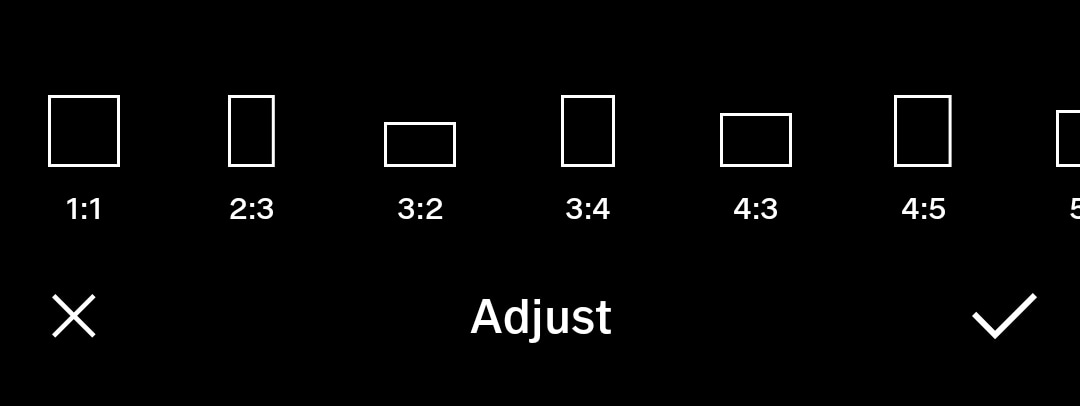
Crop: image cropping involves trimming out a portion (usually peripheral) of the image to help draw attention to the subject or otherwise improve the composition
Sharpen: enhance the definition of the edges in an image (won’t make a blurry image in-focus)
Noisereduction: smoothing the picture out, typically accomplished by reducing the pixel size
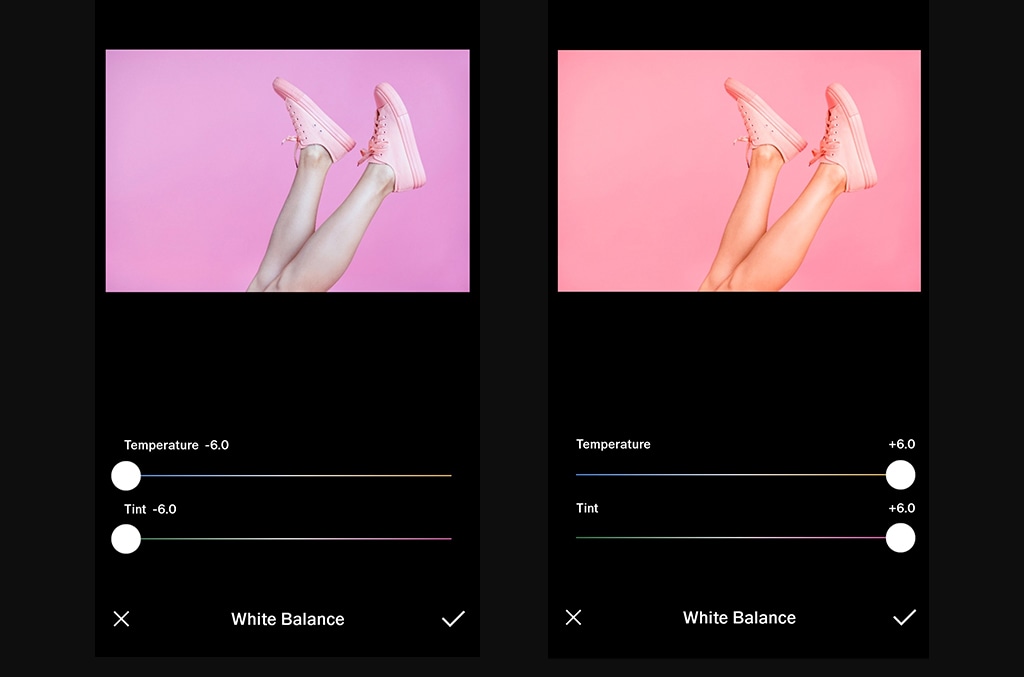
Whitebalance: the color of the light in the image
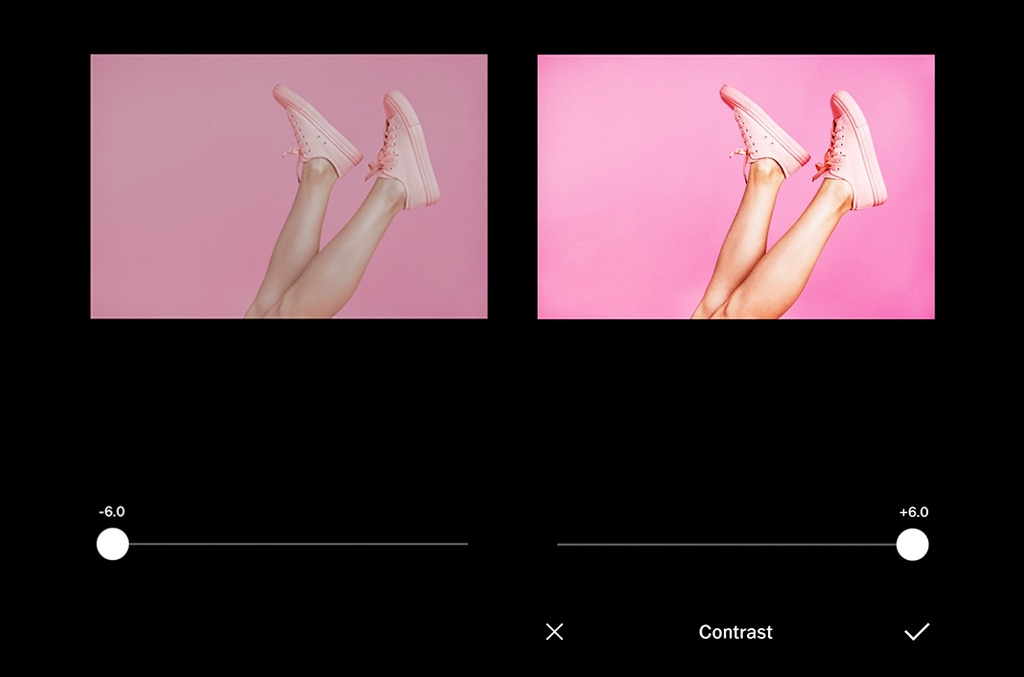
Contrast: higher contrast makes an image more punchy, while lower contrast makes it flatter in color
Exposure: the brightness of the photo
Lens correction: lessens the effect(s) of the camera lens
Coloradjustments: change the color of an item or element in the photo
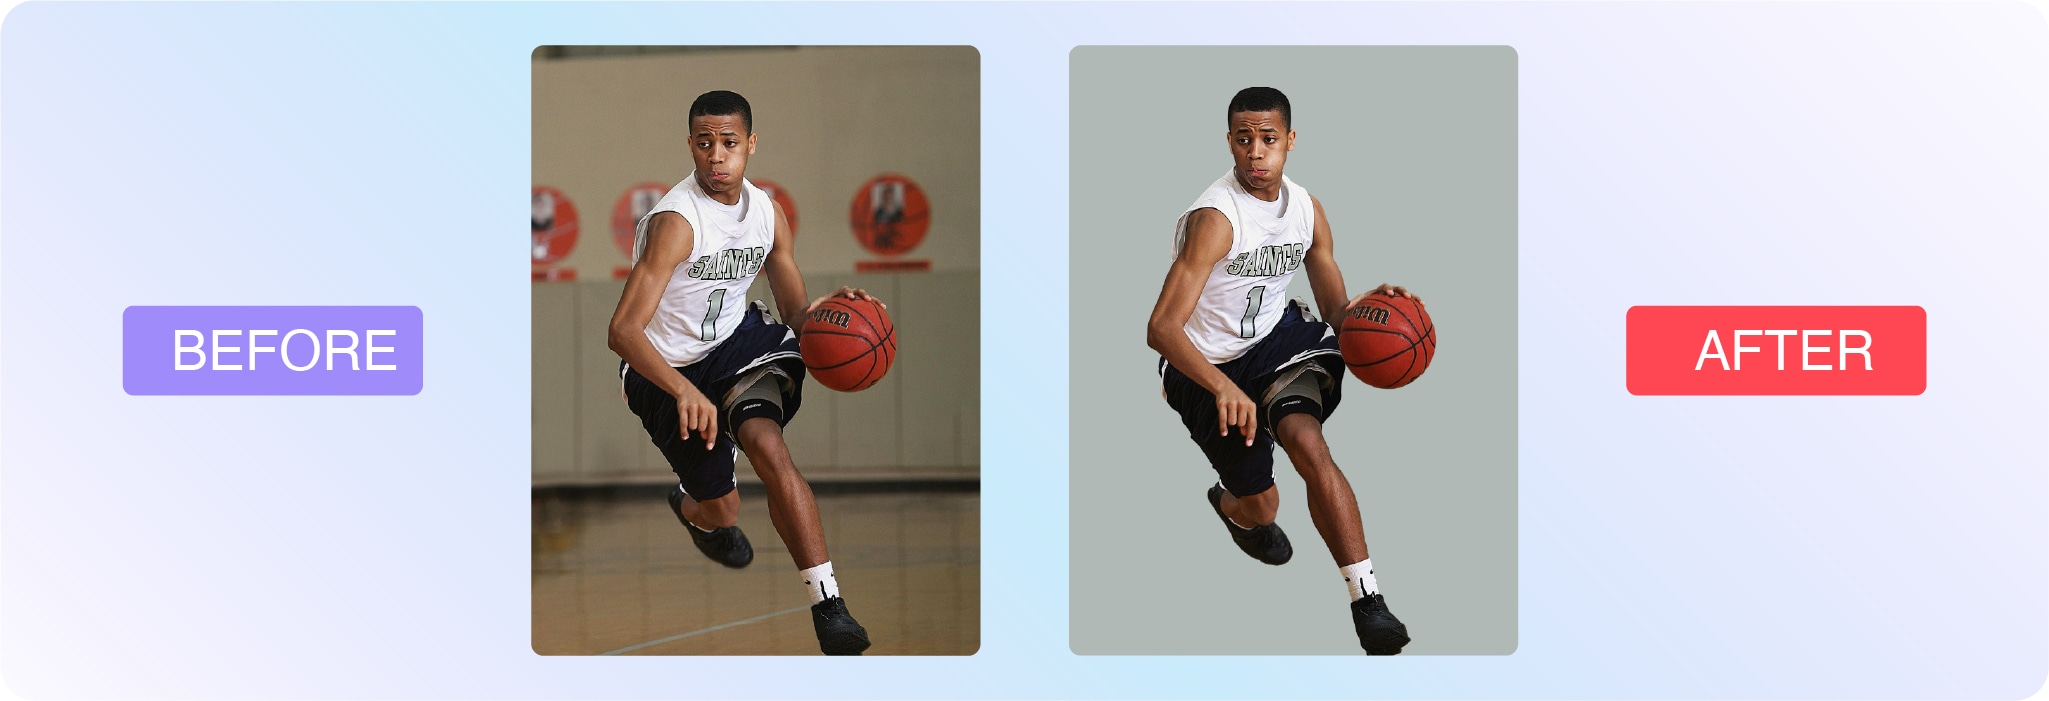
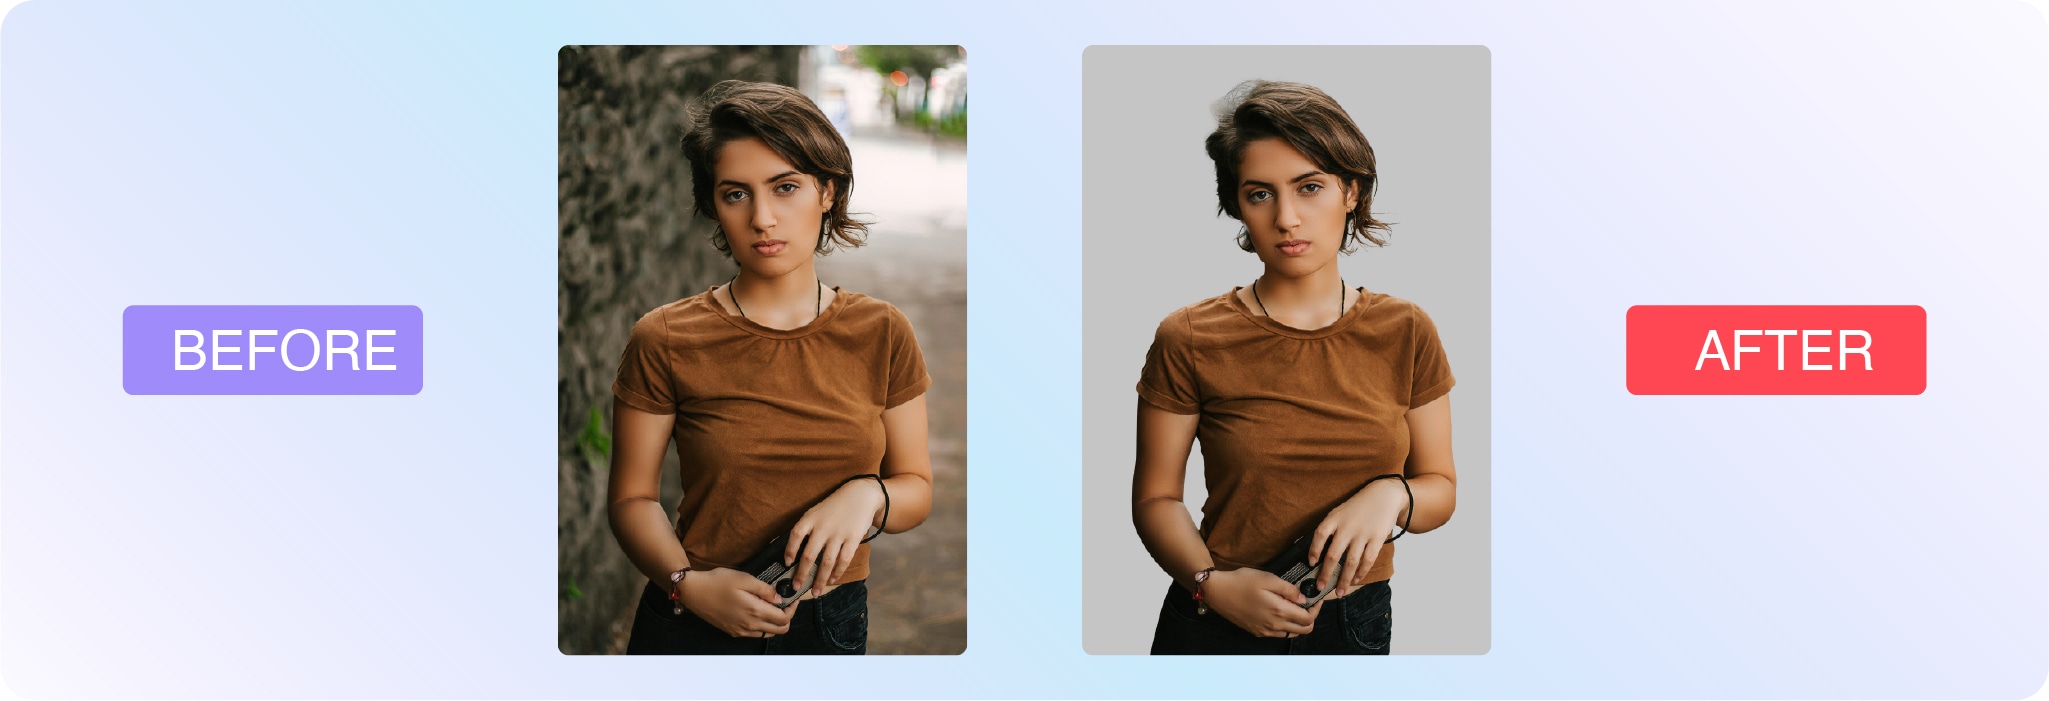
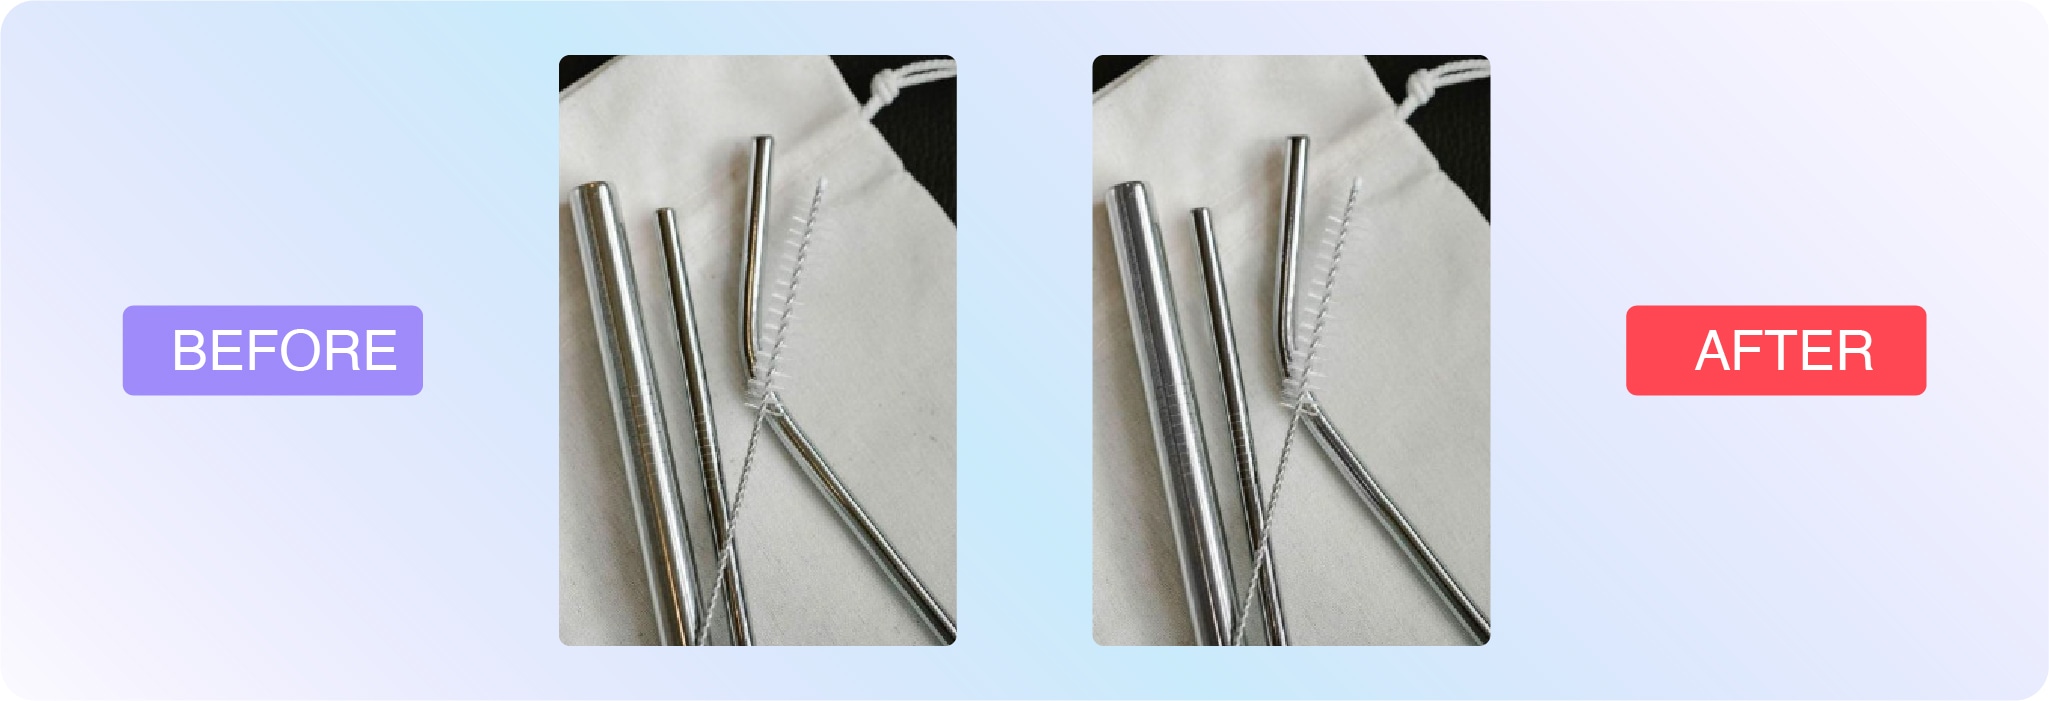
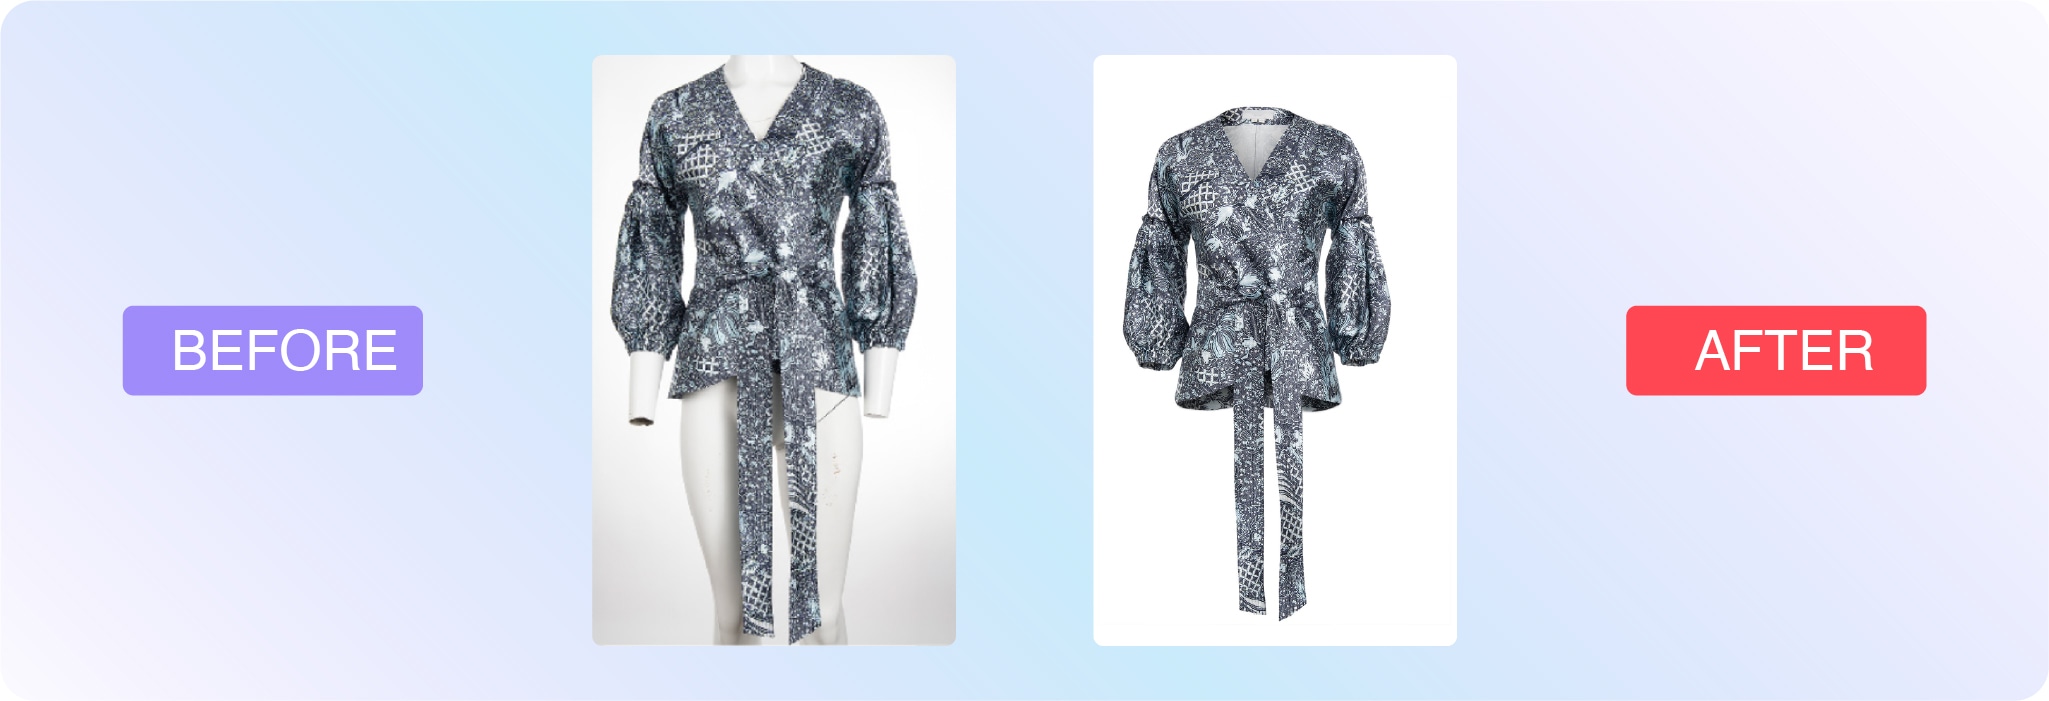
Background removal: delete the background from the image, isolating the subject (this is often used for white background product photography)
More complex techniques include:
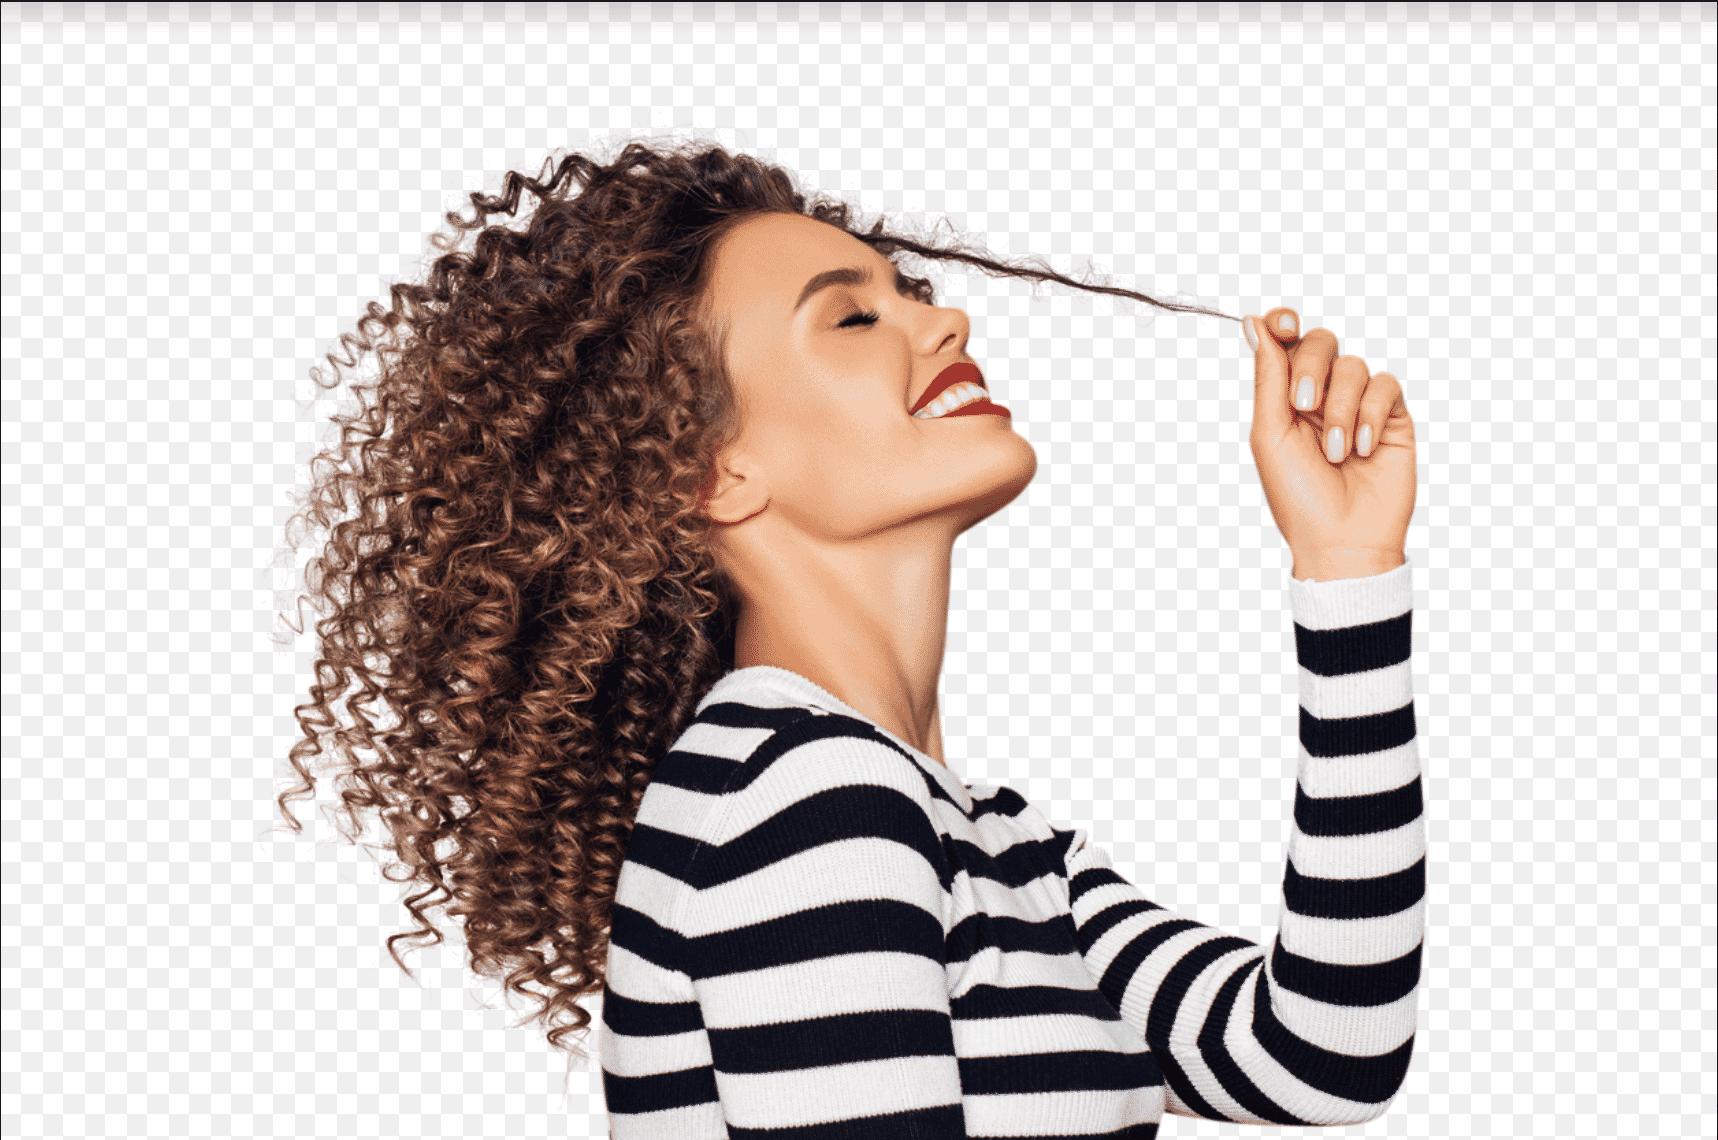
Clipping paths: vector path that differentiates the part of the image that’s visible and the part that’s transparent (extracts a subject or element from an image)
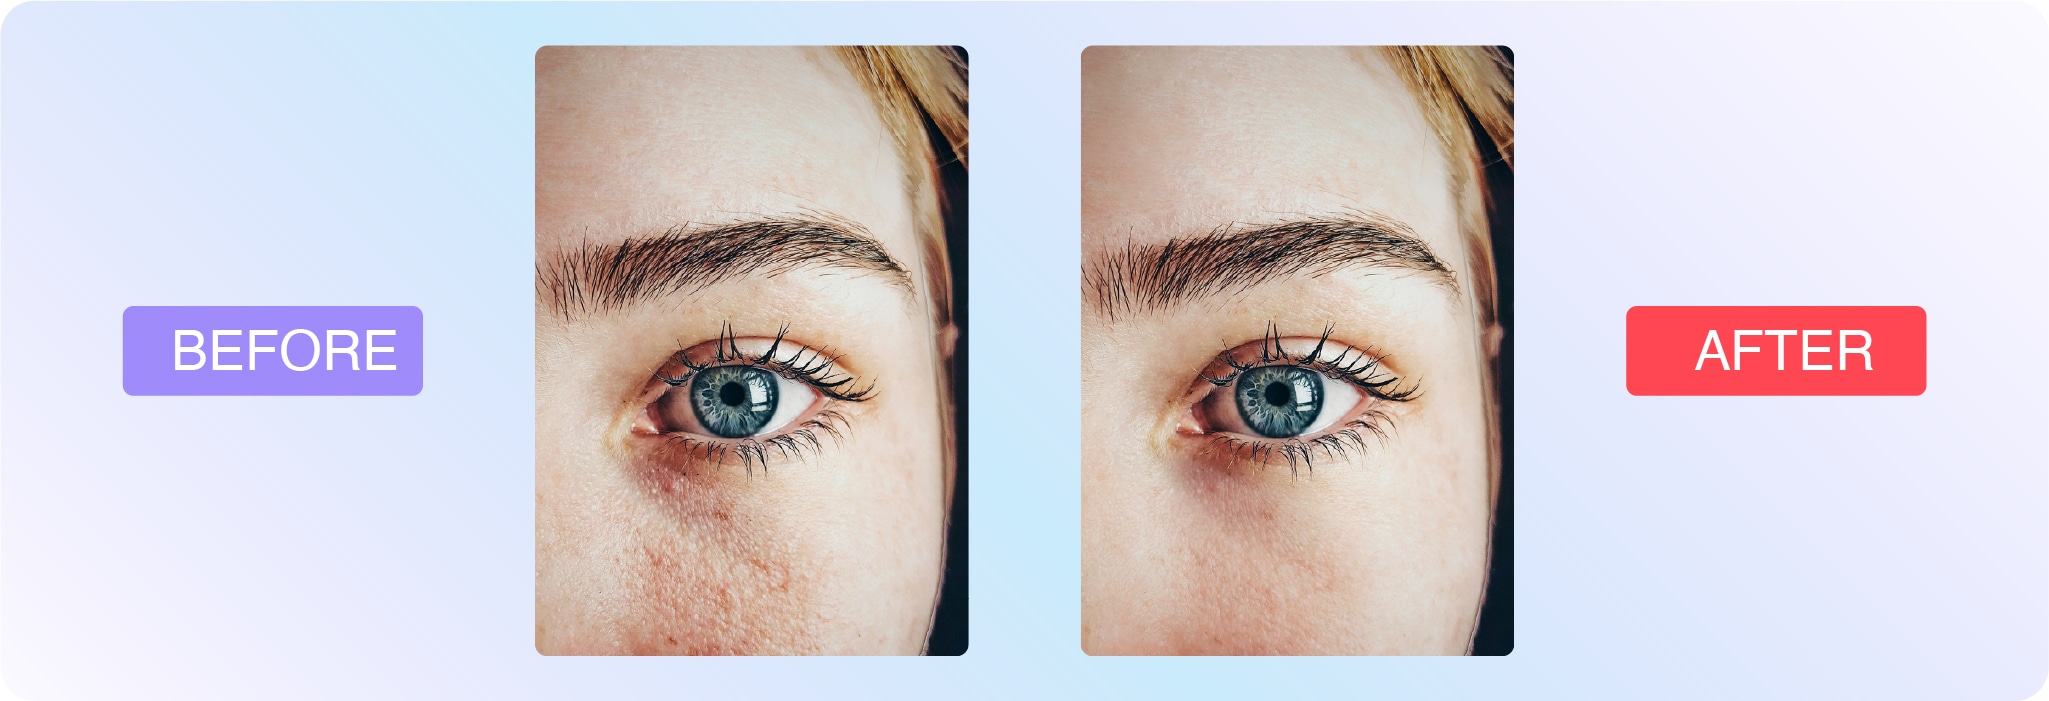
Portrait corrections: complexion touch-ups and enhancements
Two methods of digital photo editing are pixel editing and parametric image editing. Let’s look at their definitions:
What is pixel editing?
Pixel editing, or pixel-level editing, is when you alter an image at the pixel level. Because you’re altering the pixels themselves, this also permanently changes the image file. That’s why pixel editing is considered a destructive form of photo editing because it’s not as easy to undo the changes and restore the original file.
Pixel editing allows you to make extremely detailed edits and accomplish certain functions that parametric image editing can’t (like CMYK color modes, for example).
What is parametric image editing?
Parametric image editing (PIE) doesn’t change the pixels of the image. Instead, these edits are recorded as a set of steps to follow to accomplish the final look. Thus, it’s a non-destructive mode of photo editing. However, PIE doesn’t always allow for all types of edits.
Many in the industry recommend starting with PIE, and then using pixel editing to refine the final details.
Examples of photo editing
There are so many ways to edit photos, and everyone has a unique approach. You might see examples of photo editing on social media or YouTube.
Here are some examples of photo edits the team at Path have done for businesses from all around the world:
Background removal
Save a ton of time with pro background removal from 39¢ per image
Photo retouching
Polish up your product shots with pro retouching from 79¢ per image
Ghost mannequin
Let us look after your ghost mannequins, starting at just 99¢ per image
Editing different types of photos
Technique
Skill level
Use case
Cropping
Beginner
Ecommerce, social media, marketing, headshots
Background removal
Intermediate
Amazon product listings, white background product photos
Retouching
Advanced
Portraits, headshots, fashion, jewelry
Product and ecommerce photography
Product images will almost always require or benefit from post-processing. Aim for consistency, especially if you’re working on multiple products for the same company or are providing several types of photos of the same product.
Visuals help market brands and sell products, but you should also think about where the image will be used. Is it for an advertisement, ecommerce page, social media, or a print catalog? A white background shot will call for much different edits than an image for a Facebook ad. Likely, you’ll be able to get more creative with advertising imagery.
Here are some of the most common types of edits for product photography:
Brightness and exposure: If you didn’t nail the lighting, you can make substantial adjustments post-shoot.
Background removal: This is a common edit for product photos, especially if you’re listing the item on Amazon, which has a white background requirement. Regardless, white background maintains consistency.
Color correction: It’s important that product photos portray the item as accurately as possible so it’s a smart idea to color correct all of your product images. As many as 64% of returns happen because the product didn’t match customer expectations based on product images and descriptions.
Color change: For products that come in several colors, it’s important to showcase the variety. Instead of photographing the product in every color, photo editors can make the changes post shoot.
Sports photography
Sports images are often captured in fast-paced, unpredictable environments—making photo editing essential for polishing the final result. Whether you’re working with action shots from the field or editorial images of athletes, editing helps enhance sharpness, fix lighting, and direct attention to the key moment.
Cropping: Reframe the shot to highlight peak action or key players. A tighter crop can add intensity and drama.
Sharpening: Motion blur is common in sports. Sharpening can help make images feel more crisp and in focus.
Colorcorrection: Natural lighting varies across stadiums and gyms. Post-shoot edits bring consistency and accuracy.
Backgroundcleanup: Remove distractions from the crowd or surroundings that pull attention away from the subject.
Spotretouching: Clean up sweat, mud, or jersey wrinkles to create stronger, cleaner visuals for media or brand use.
If you’re editing for a team, school, or sponsor, keep branding consistency in mind—many sports photographers rely on editing templates to maintain uniformity across hundreds or thousands of images.
Headshot and portrait photography
Headshots and portraits are often the first impression someone gets of a person—whether it’s for a professional bio, dating profile, modeling portfolio, or graduation announcement. Editing can enhance natural features while preserving authenticity.
Here are common edits for portraits and headshots:
Skinretouching: Reduce blemishes, smooth skin, and even out tone without losing texture.
Whiteningteethandeyes: Brighten smiles and make eyes pop subtly and naturally.
Colorcorrection: Adjust tones to match a flattering, realistic look or a specific brand aesthetic.
Flyawayremoval: Clean up stray hairs or lint that distract from the subject.
Backgroundediting: Simplify or replace backgrounds to match the intended context—e.g., corporate headshot vs. lifestyle portrait.
The key with headshot and portrait editing is to enhance, not transform. The goal is to present someone in their best light while keeping the photo true to who they are.
Learn how to edit your photos
If you’re ready to learn how to edit your own photos, check out this handy collection of Photoshop tutorials. Here are a few to get started with:
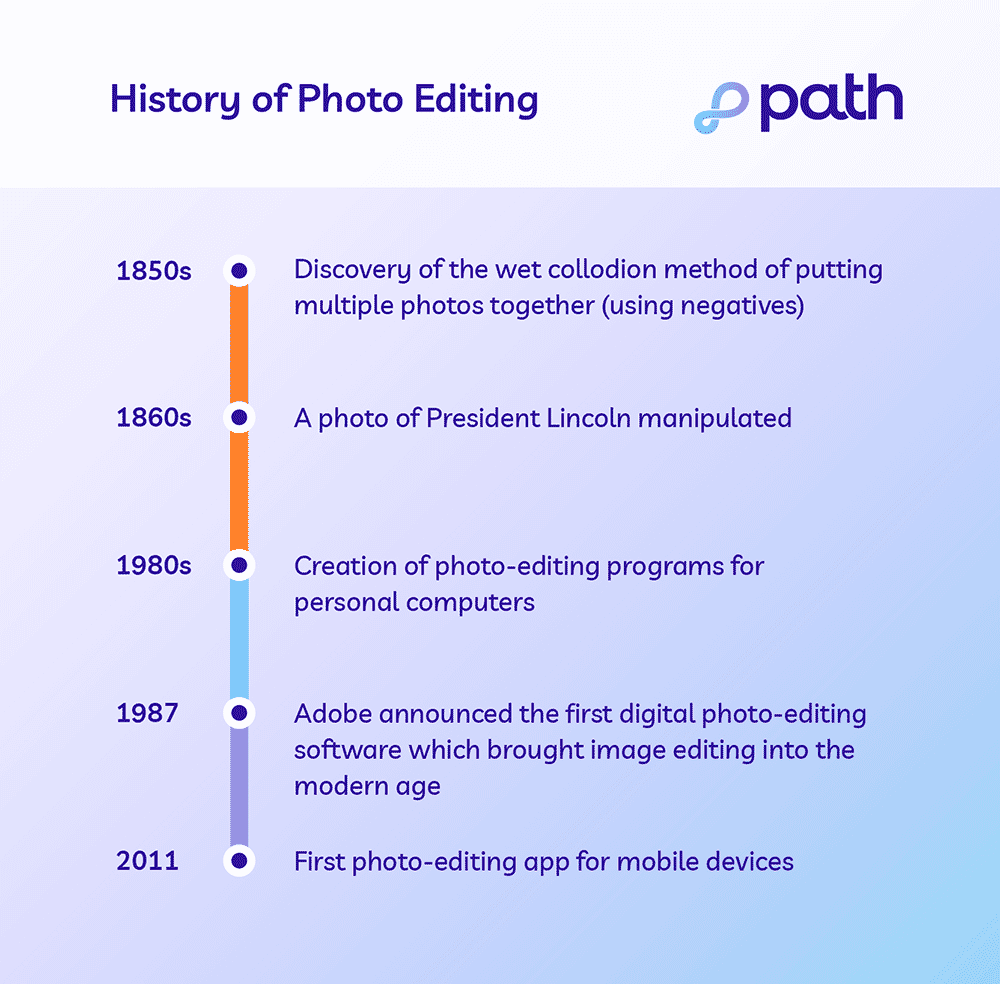
Photo editing history
What is a professional photo editor?
A person who edits images can either be self-employed, contracted by an outsourced company or agency, or someone who works in-house. There are many possible job titles for a photo editor, including digital photo editor, graphic designer or art director, among others.
Typically, photo editors specialize in specific industries, much like photographers. For example, real estate, editorial, and product photography all come with their own set of trends and intricacies. Editors that focus on ecommerce images know how to make products pop.
Our virtual photo editing studio is made of more than 300 trained professional photo editors who specialize in the following:
Ecommerce
Product
Sports
Headshot
Portrait photography
Let us look after your image edits, so you can get back to the fun stuff. Try Path free.
Tackle your photo editing projects with Path
Learning new photo editing techniques can be an enjoyable way to break up your day and add to your industry knowledge, but editing photos can be time-consuming, especially if photography is your specialty. If you need fast, affordable, high-quality photo-editing services, the professionals at Path are here to help.
What is photo editing? FAQs
Can I edit a photo for free?
Yes, you can edit a photo for free. You can use free photo editing tools and do it yourself. You can also use free AI photo editing tools, but these edits require careful quality checks. Or, send your first two photos to Path to get them edited for free.
How can I edit a picture image?
Open your photo editing tool of choice
Upload or open the photo you want to edit
Make your desired edits
Save your work
What is the best app to use for photo editing?
Adobe Photoshop
Adobe Lightroom
GIMP
Pixlr
Snapseed
VSCO
How do I edit my photos like a pro?
Edit photos like a pro by learning basic and advanced Photoshop techniques, outsourcing the tedious edits, and optimizing for the right use and context.
What is the meaning of photo editing?
The meaning of photo editing is the process of manipulating and enhancing a photo. Photo editing can involve basic tweaks like cropping, resizing, and applying artistic filters. It also includes advanced manipulations like retouching and removing unwanted elements and distractions.
What are the 5 basics of photo editing?
Cropping
Resizing
Applying simple clipping paths
Changing colors
Adjusting exposure
What is the purpose of a photo editor?
A photo editor can save you time and stress because they have the skills necessary to accomplish tedious, time-consuming, or complicated editing tasks for you.
Let us look after your image edits, so you can get back to the fun stuff. Try Path free.
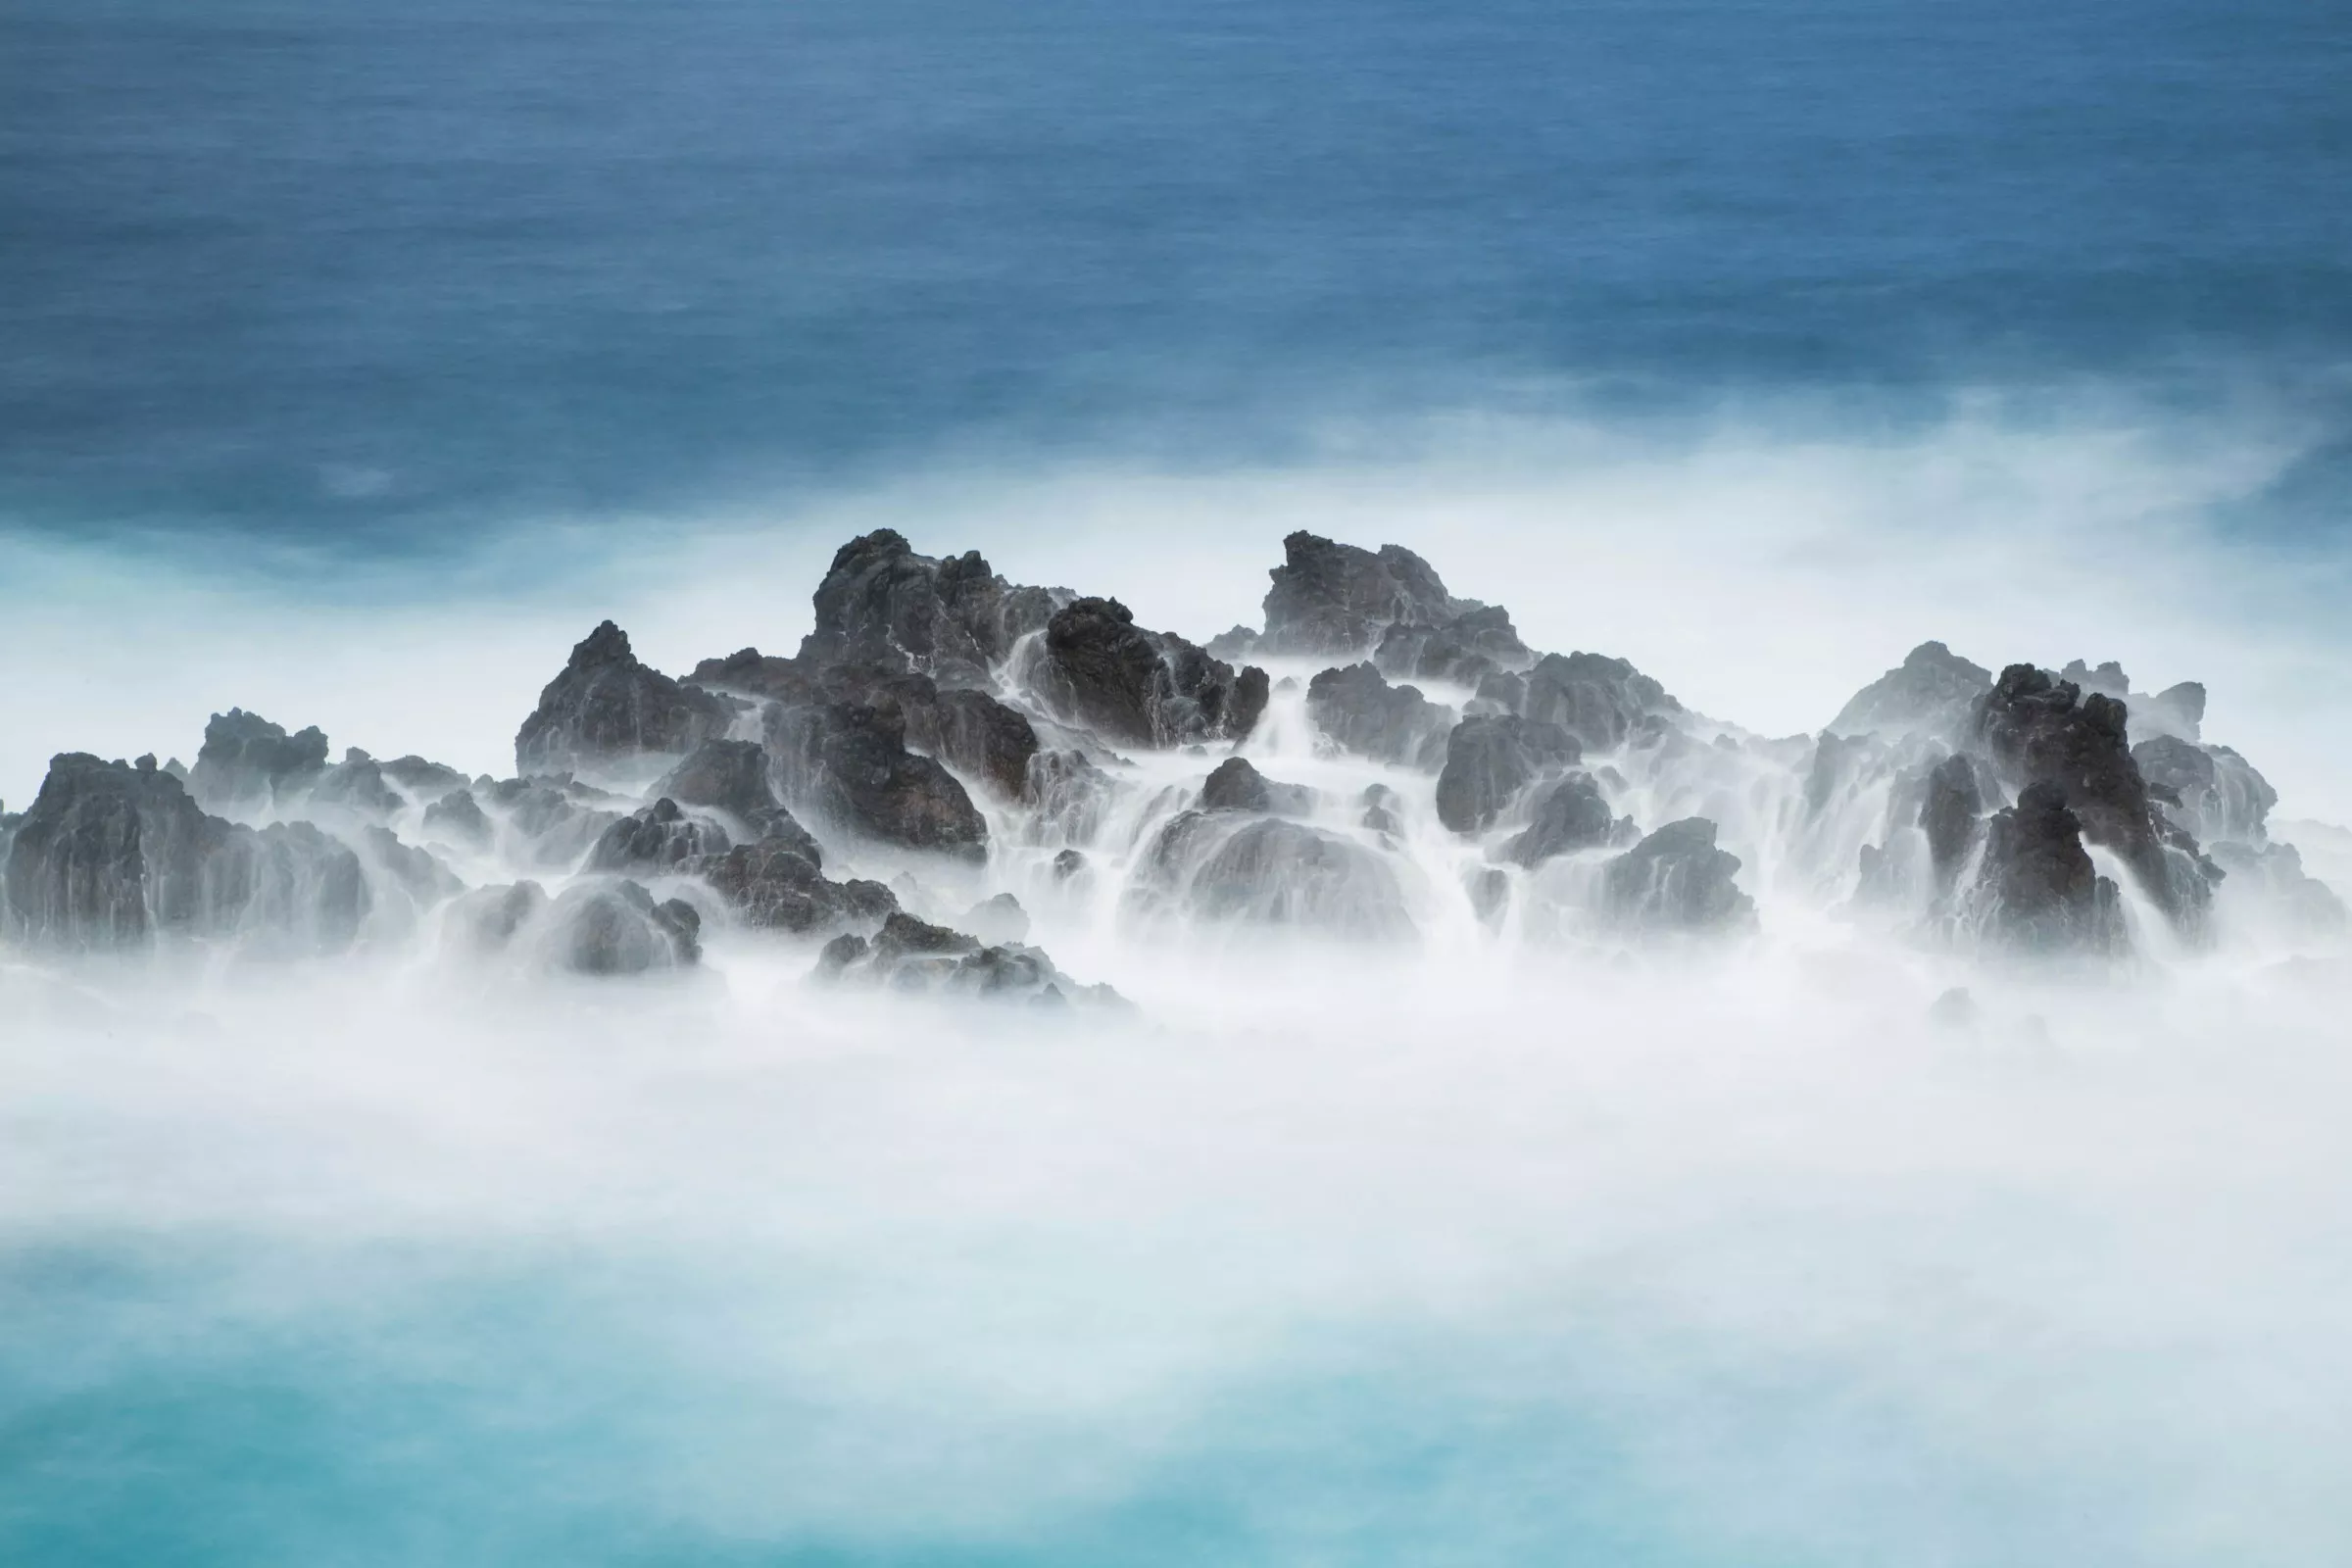
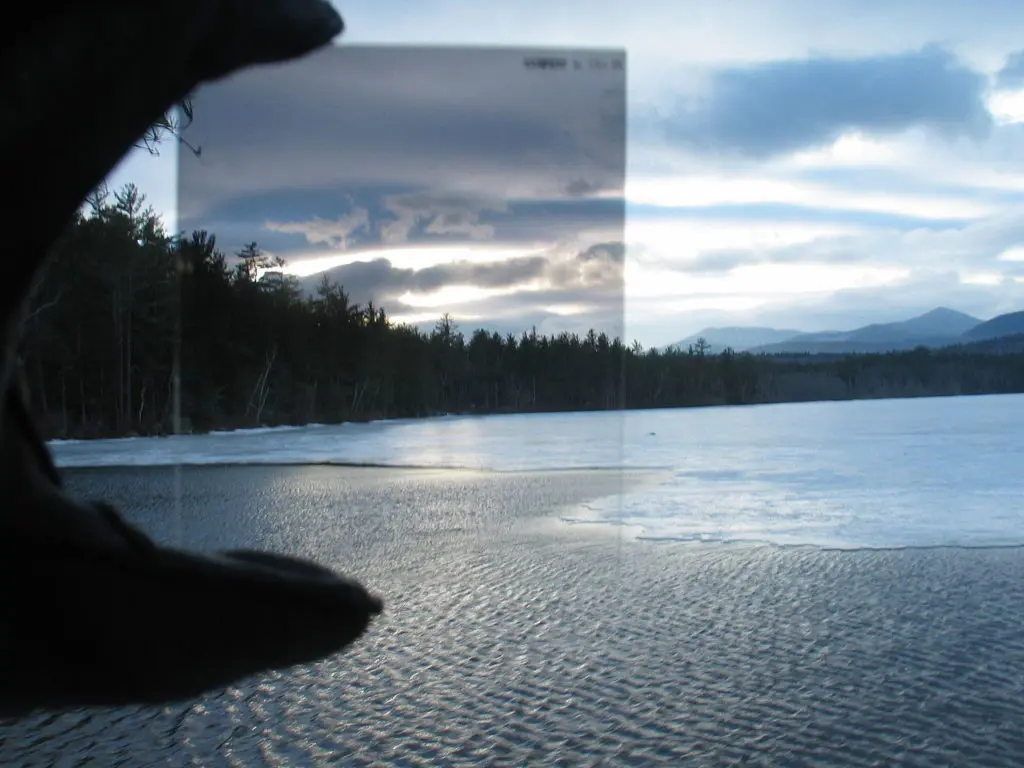
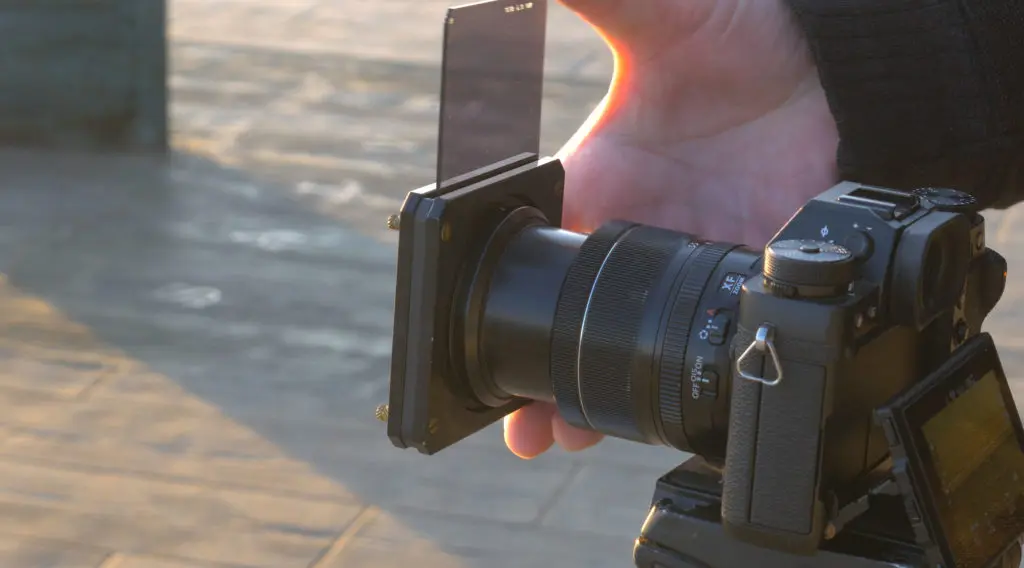
Long exposure photography is a genre where you intentionally increase the exposure time to blur certain parts of the image but there is also night sky photography or other night photography where long exposure can be made to capture as much light as possible. When you capture long exposure images depending on the time of the day and amount of light, you may need to increase the exposure times and sometimes use an ND or Grad-ND filter to lengthen the exposure times.
Photo by Lopez Robin
Besides using ND filters, you will also need accessories like a stable tripod and a remote release to avoid camera shakes. Long exposure photography can be applied to many genre of photography besides the landscape photography where this technique is more commonly used. In this article, we have put together a bunch of tutorials for you to get an understanding of long exposure photography and improve your skills.
Photo by Gerald Berliner
When capturing long exposure images, a few factors need to be kept in mind. The light in the location and how it is illuminating the subject, the time of day and what the end results would be, stabilising the camera, using the right settings based on the light and other elements, etc. Besides, you will need to use required accessories to get the best results. Check out these four easy to follow tips that will help make your long exposure photos successful.
Photo by Nathan61
If you are looking for a few more quick tips on capturing long exposure images, the above article has a few tips on the factors and settings you need to consider for good long exposure shots. There is also a useful chart that will help you to calculate your applied settings for normal light situations into the language of long-exposure photography.
Image by BenFrantzDale
Capturing long exposure during the day time can be quite tricky because the light can be bright in most situations and you will need to cut down light based on how long you need the exposure time to be. This is where ND filters come in handy and they come in various strengths. Check out the above article to learn how to use an ND filter for day time long exposure photography.
Here are some more handy tutorials:
Photo by Jason Row
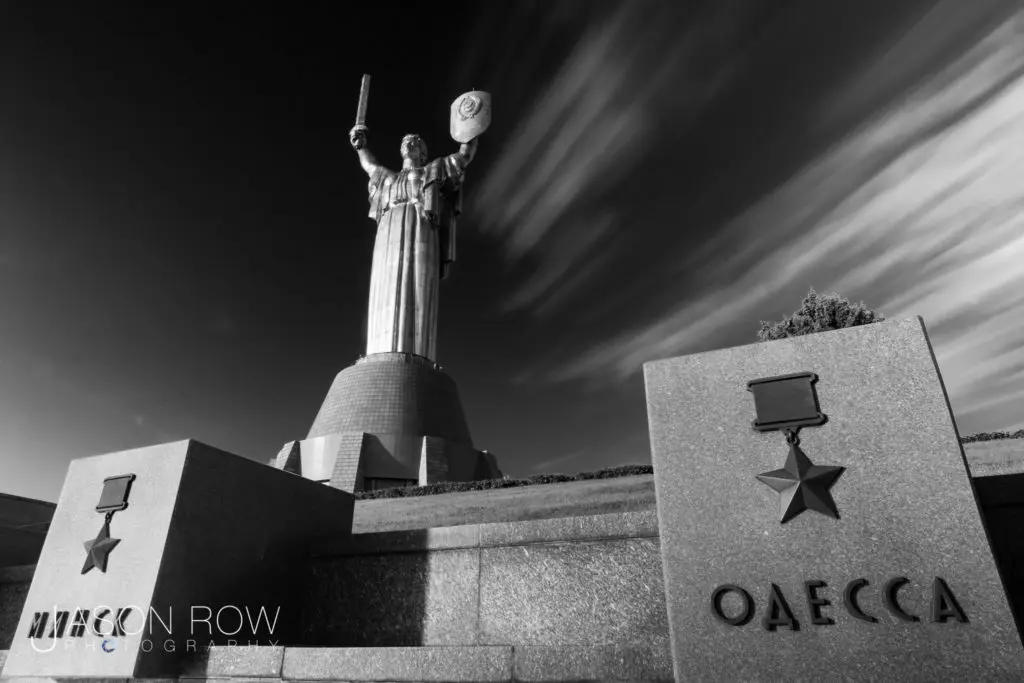
Architectural elements can be great subjects in a long exposure photograph. If shot under the right light conditions and other elements in the frame like clouds or light trails architectural structures can lead to very interesting photographs. The above article is a quick guide on long exposure architectural photography.
Photo by H Matthew Howarth
Just like how you capture long exposure photographs during the day time, you can capture stunning long exposures at night too. Remember that you will definitely need a tripod and a shutter release to capture sharp images without any blur due to camera shake.
Photo via Pixabay
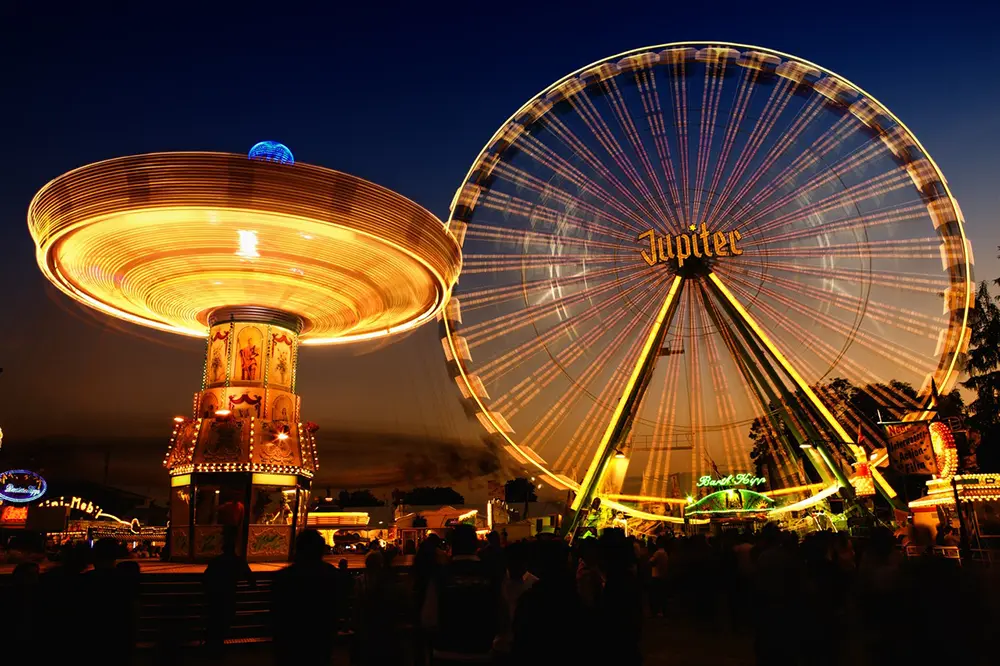
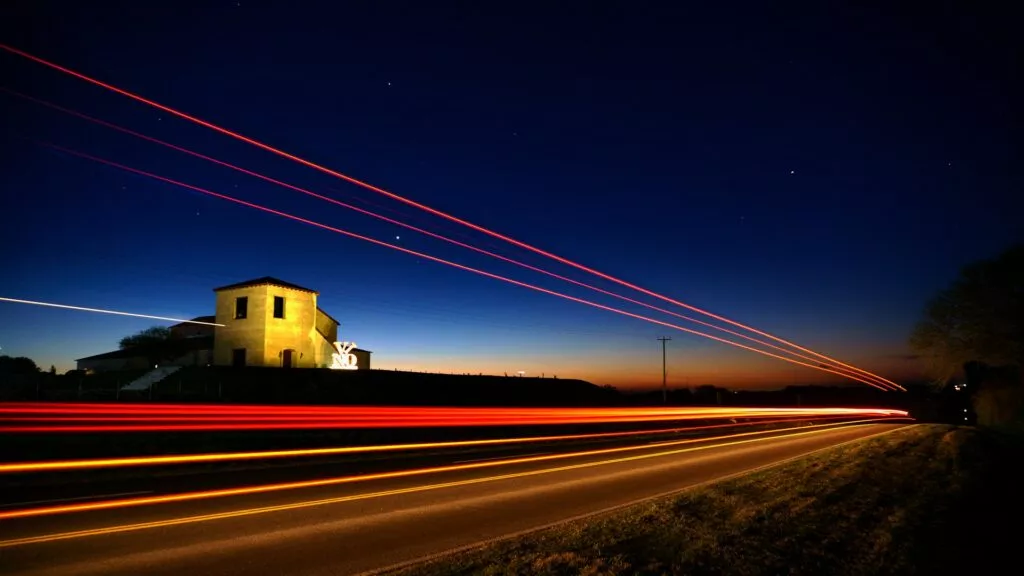
Night time photography can be interesting if you add a dynamic element to the frame. If you can safely photograph the light trails from traffic or from other interesting subjects like a carousel or a Ferris wheel, these can add visual interest and a story telling factor to the image. Here are some quick tips in the article above.
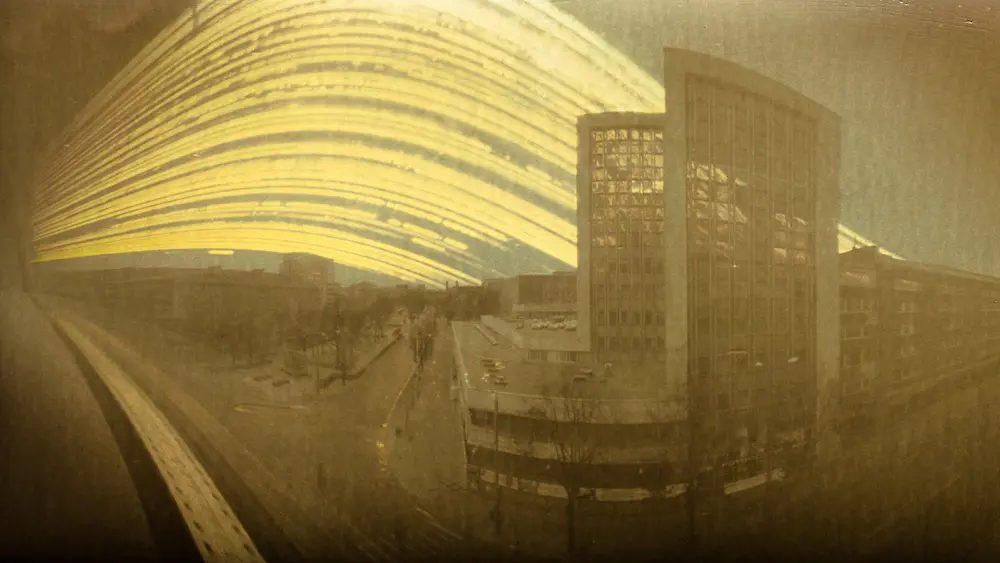
Long exposure photography is so fascinating that it does not stop with capturing just light trails, moving water or clouds, star trails and so on, but can also be extended to capture sun trails. Here is an article that shares the work of photographer Kristian Saks and the process of how he captures these images.
Photo by Federico Alegría
Now if you are a street photographer, you are surely missing out on some creative photography if you do not capture long exposure street photos. Yes, long exposure is a great way to add a dynamic element to street photos and will help you to capture intriguing photos. The above article will help you with some tips to capture long exposure street photos.
Photo by Jason Row
There are times when we capture long exposure images that we think are technically perfect but the results may be very disappointing. The most common mistakes are camera shakes, colour shifts, noise, diffraction, internal reflection, etc. The article above will help you understand why these mistakes can happen and how you can rectify them.
Photo by Diego Vitali
Some situations will help some photographers capture long exposure images by just handholding their camera if they have a somewhat steady hand. But when you become quite serious about this craft and look to capture perfect and sharp photos, you will need to invest in some very essential gear. Here is what you need to capture the best long exposure shots both during the day and at night.
Working Through a Seismic Industry Shift : Balancing visibility and vulnerability in a constantly changing landscape.
Lately, I’’ve been hearing from more and more photographers who feel stuck, like the ground beneath them is moving and the usual paths forward no longer apply. I’m sure you’ve noticed, our industry is changing. While big budget ad campaigns and large-ish editorial shoots still exist, they’ve become more elusive: fewer in number, harder to secure, and more tightly budgeted. At the same time, the industry’s public-facing rhythm hasn’t changed much. Photographers continue to share behind-the-scenes social media posts, announce new commissions, and keep their websites fresh. This isn’t dishonest; it’s a form of forward momentum. But it can also mask a deeper truth many are feeling. The structure itself is undergoing a seismic shift, slow in some ways, sudden in others.
This disconnect is not a sign of delusion, but of survival. Many photographers are quietly anxious, burned out, or disillusioned, not because they lack talent or drive, but because the industry they built careers around no longer behaves predictably or sustainably. This disconnect can breed a particular kind of paralysis: the knowing that things are wrong, paired with the fear of stepping outside the illusion. It’s easier, and often more professionally acceptable, to play along with the facade than to confront the reality head-on.
It can be disorienting. On one hand, we’re encouraged to keep up appearances, to maintain visibility, to show we’re still working. On the other, many creatives quietly admit to uncertainty about where the next job will come from or how to adapt to the growing presence of AI and the shrinking demand for traditional production. This isn’t failure. It’s a rational response to change. Acknowledging the gap between how things look and how they feel is not a weakness. It’s the beginning of recalibration.
This recalibration doesn’t have to mean abandoning the craft. In fact, continuing to share your work, especially the honest, messy, beautifully human parts, can be a quiet act of resistance. Whether you’re shooting a big budget campaign for an agency or brand, or working on a personal project, your images and stories still matter. They remind others that the work is not only possible but still worth pursuing, even as the industry continues to shift. By recognizing the change, staying visible, and adapting to an evolving process, photographers can help shape what comes next.
Chris began his career as a photographer in Los Angeles, eventually moving through the worlds of film, television, and advertising before returning to photography in a new role as an agent and producer. Along the way, he worked with legendary filmmakers like Robert Altman, top production companies in Los Angeles and London, and global agencies including Wunderman, Publicis, and Deutsch. With 30-plus years of international experience, he has a panoramic view of the creative industry, one that’s occasionally dysfunctional but always worth sharing. That breadth of perspective informs everything he does, from creative strategy to mentoring emerging talent.
In 2012, Chris founded PhotoPolitic in Stockholm as a response to the shifting landscape of commercial photography and production. Now operating between Amsterdam and Los Angeles, the invite-only platform connects elite photographers, directors, and digital artists with leading advertising and editorial clients worldwide. Carefully curated and fiercely independent, PhotoPolitic represents talent recognized for both aesthetic excellence and real-world impact.
Today, the PhotoPolitic network includes some of the most respected names in advertising, editorial, architecture, interiors, documentary, reportage, and fine art photography. At its core, PhotoPolitic exists to champion creative integrity in an industry that often compromises it, working only with professionals whose reputations are built on craft, ethics, and results.
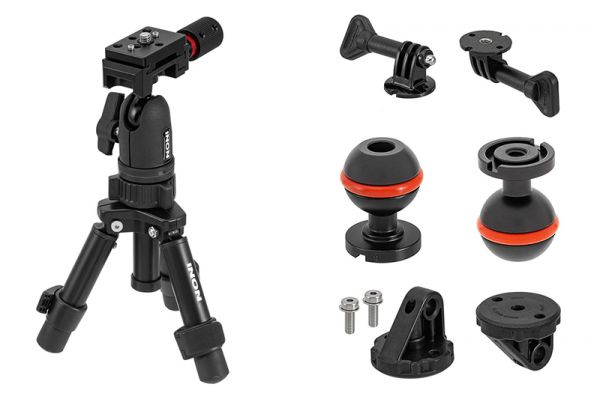
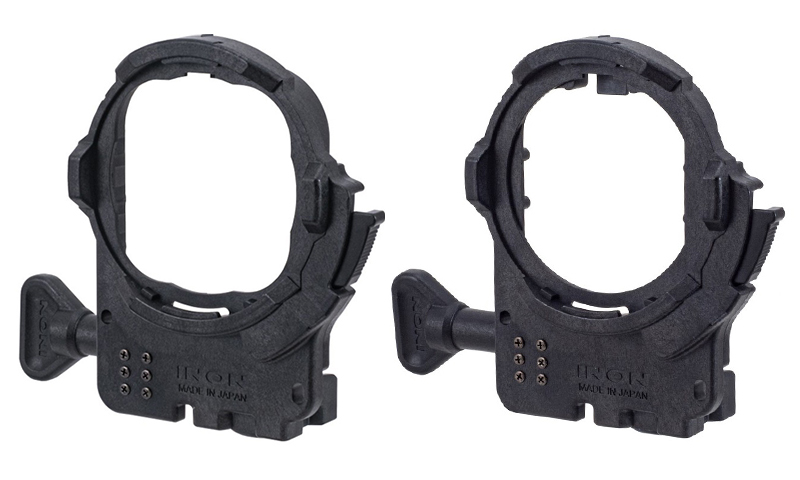
Back in 2018, Inon announced a tripod system designed to provide a stable platform for underwater photo and video work. However, that modular system offered a highly flexible solution that may seem overly complex for casual shooters. Now, Inon has introduced a simpler, more compact, and more affordable option—the Compact Tripod (UWTP-C1)—which pairs with the new Quick Shoe Ballhead (UWTP-QB1).
Alongside, the Japanese company has released various accessories that could be used with the tripod: the GP 1/4-20UNC Adapter ll (for GoPro), the Ball 1/4-20UNC Adapter, and the Direct Base YS ll.
All the new offerings are available now. Consult your Inon dealer for pricing.
When purchasing underwater photography equipment like the products mentioned in this article, please support DPG by supporting our retail partner—Backscatter.com.
PRESS RELEASE
INON INC. is pleased to announce the release of the Compact Tripod UWTP-C1, a compact, lightweight, and affordable tripod and the Quick Shoe Ballhead UWTP-QB1, rigid and reliable ball head, on August 5, 2025.
Compact Tripod UWTP-C1
Released date: August 5, 2025
JAN/EAN: 4570018121104
Quick Shoe Ballhead UWTP-QB1
Released date: August 5, 2025
JAN/EAN: 4570018121128
The company is also releasing a range of optional parts for various applications.
GP 1/4-20UNC Adapter ll
Released date: August 5, 2025
JAN/EAN: 4570018121142
Ball 1/4-20UNC Adapter
Released date: August 5, 2025
JAN/EAN: 4570018121159
Direct Base YS ll
Released date: August 5, 2025
JAN/EAN: 4570018121166
*The original version of the Direct Base YS is not compatible with the Compact Tripod UWTP-C1 and the Quick Shoe Ballhead UWTP-QB1.
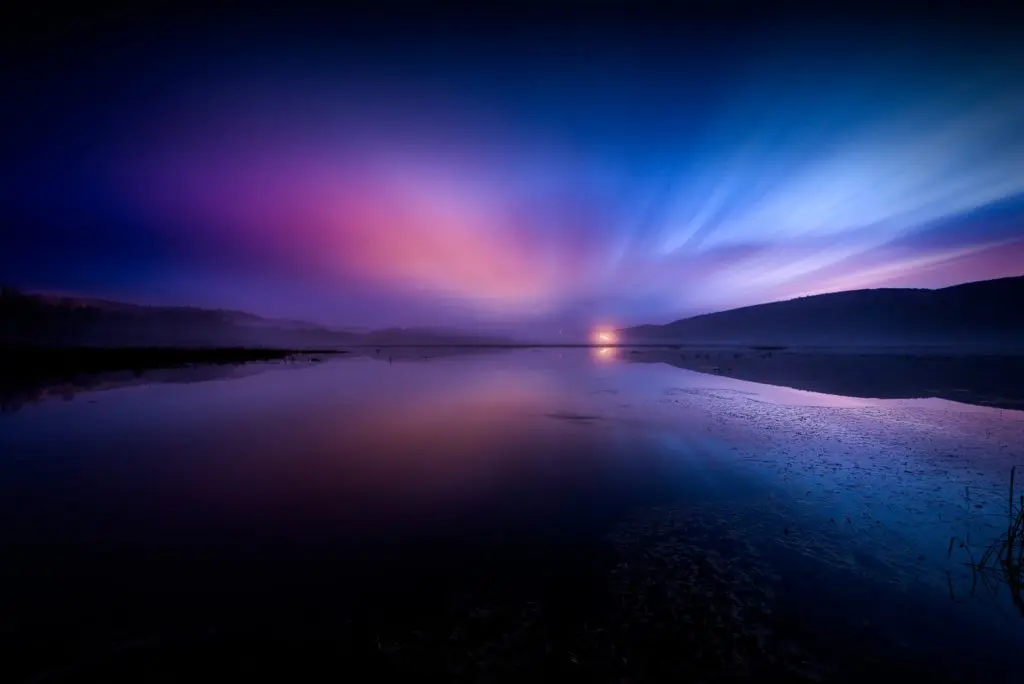
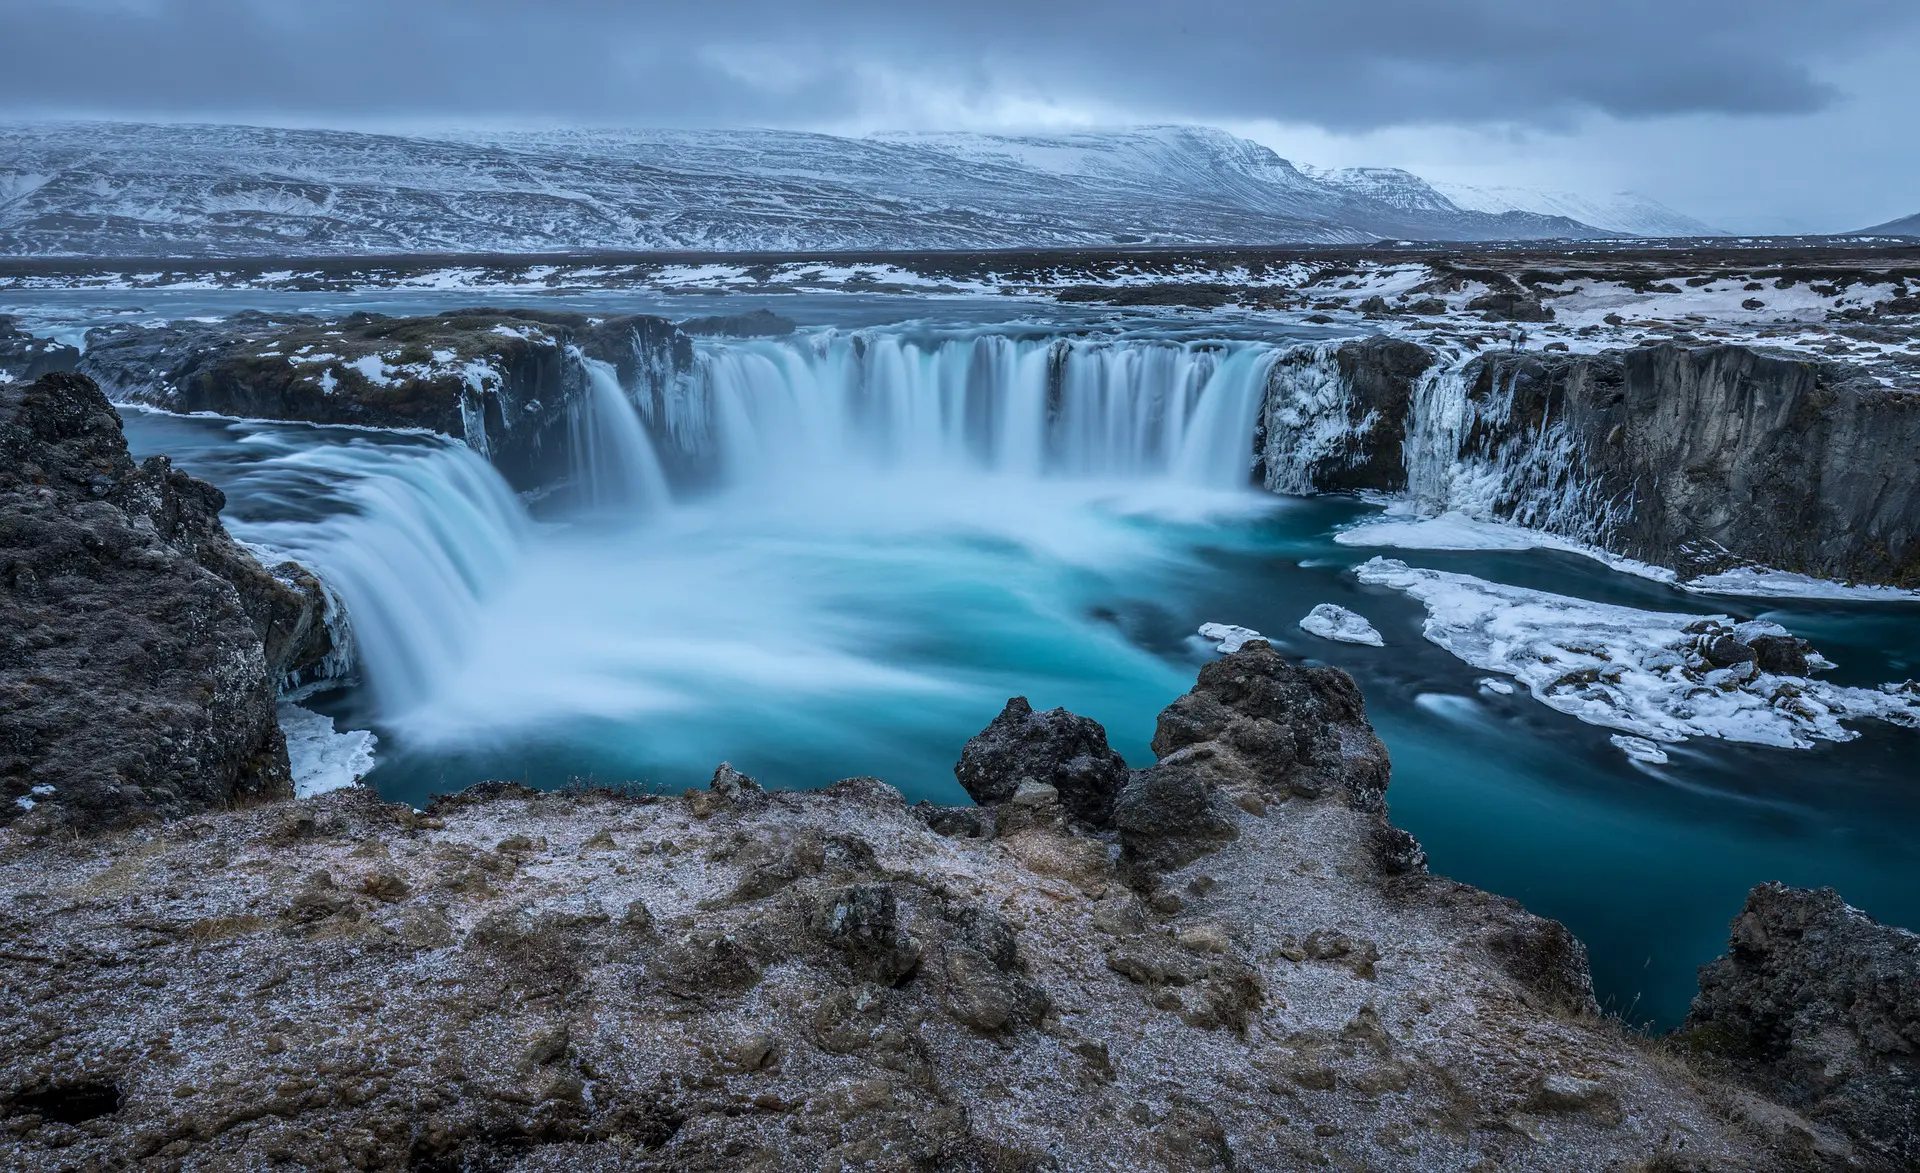
Depending on where you live, you may be experiencing the Summer or monsoons in the Northern Hemisphere and the Southern Hemisphere maybe experiencing Winter weathers slowly transitioning into Spring. This is a time when people spend most of their time outdoors and photographers have a number of opportunities to photograph water features in nature, especially in the Northern Hemisphere.
Photo by Adrian Mag
Water features look magical when captured using long exposure techniques during certain times of the day under the right light conditions. In this article we have put together a collection of 25 long exposure photos of water features in nature, that may inspire you to go out and capture some yourself.
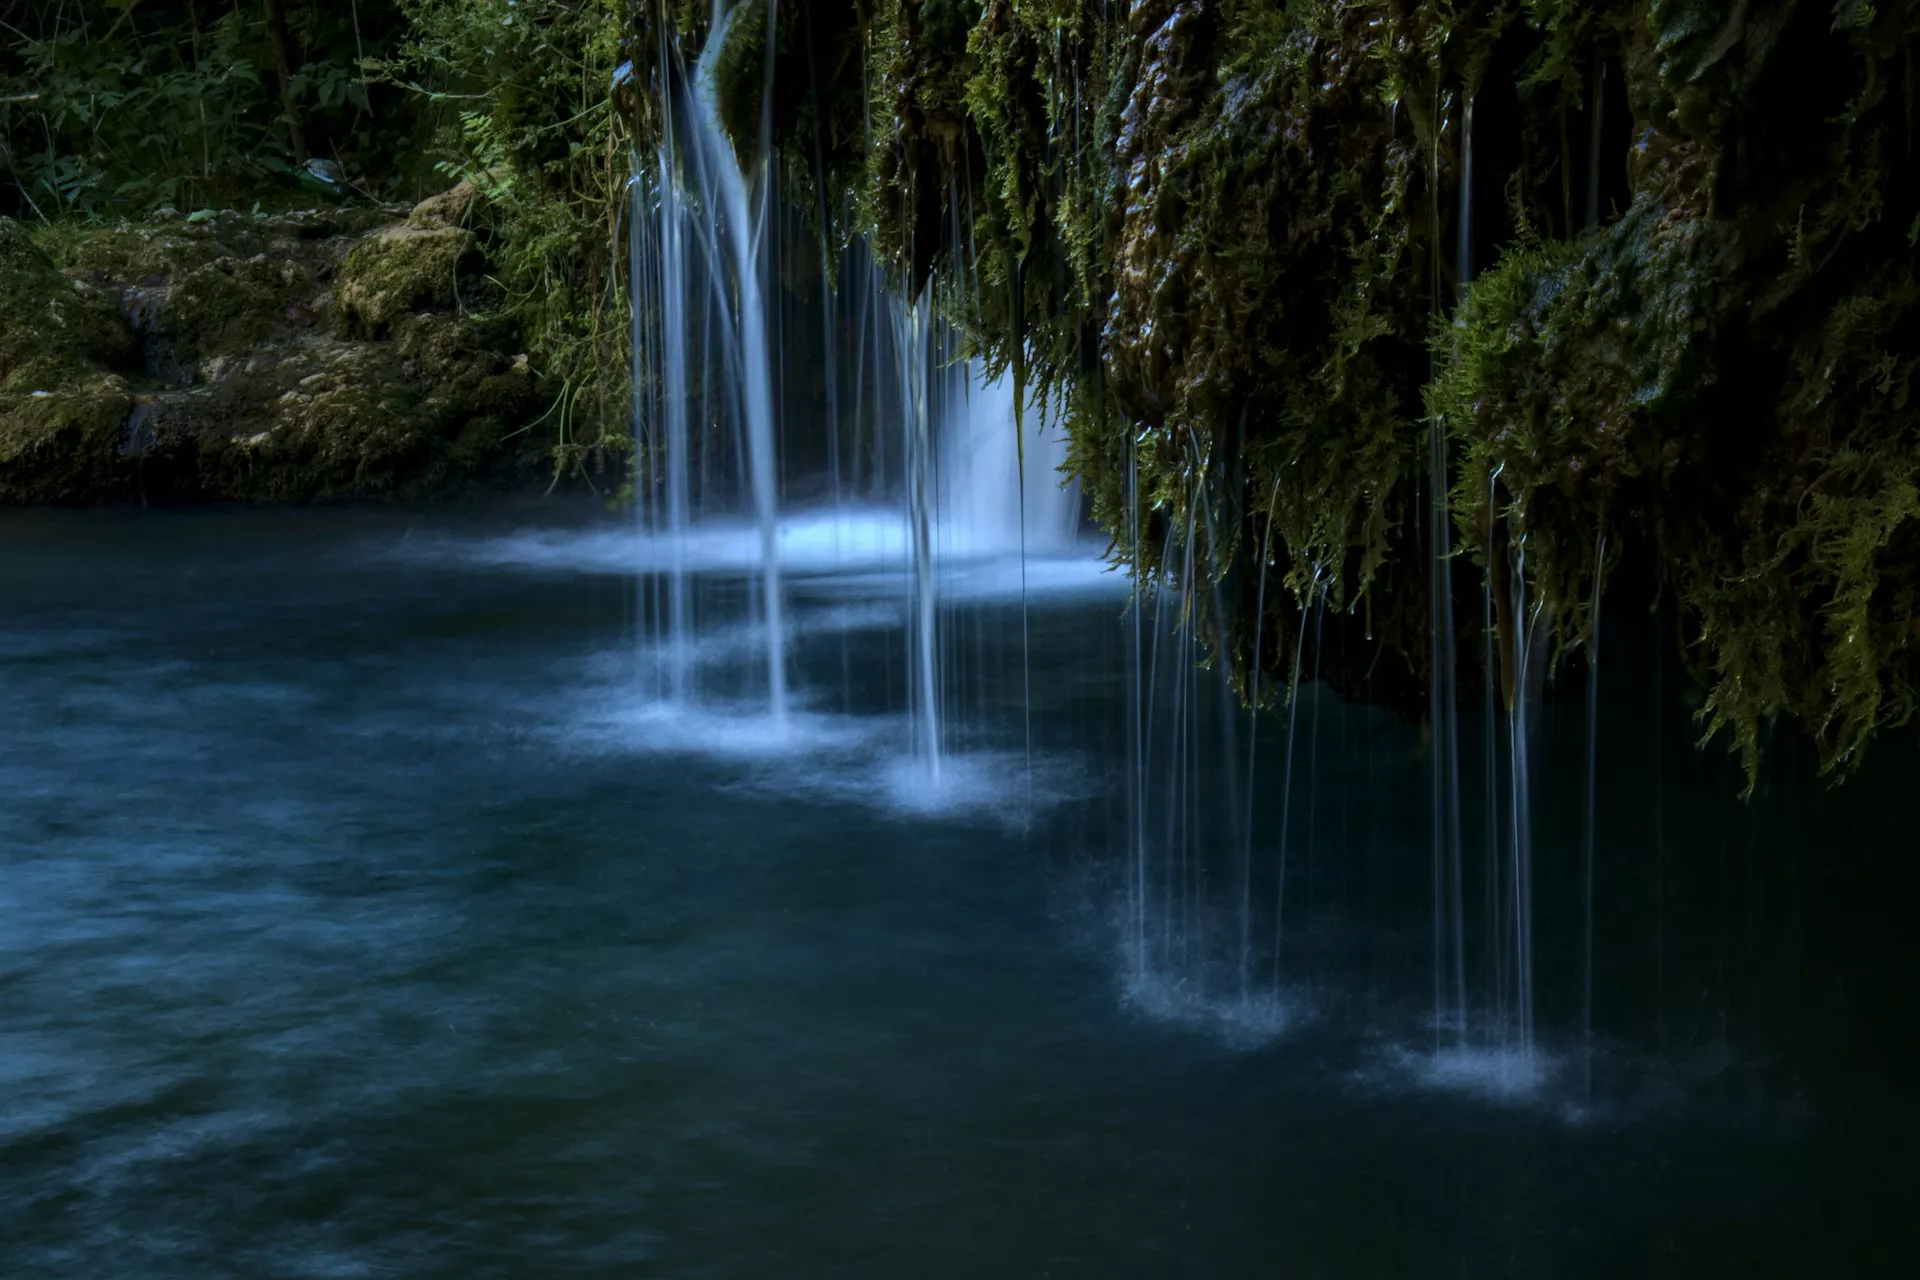
Natural water features are found all around us if we move slightly from the most urbanised areas. Streams, rivers, lakes, waterfalls, beaches, oceans, are all great subjects to photograph using the long exposure technique. This technique renders a great mood, atmosphere and some dynamism to an otherwise static image.
Long exposure photography can surprise you with stunning results and if you are looking for a creative surprise in your photography, we recommend you to check out this eBook “The Complete Guide To Long Exposure Photography” by Photzy.
Photo by Landon Arnold
Photo by Intricate Explorer
Photo by James Feaver
Photo by Thomas Le
Photo by David Becker
Photo by Riccardo Cervia
Photo by Fulvio Cassani
Photo by Bruno do Val
Long exposure is not difficult if you get the basics right and an understanding of light and the gear required. You do not need to spend weeks or months practicing the long exposure craft in photography, but just refer to this eBook “The Complete Guide To Long Exposure Photography” by Photzy. This guide comes with 119 easy to follow pages that provide precise training for long exposure photography. It also comes with detailed descriptions and visual references to ensure you get a complete understanding of the craft.
Photo by Richard R
Photo by Hans Isaacson
Photo by Jms
Photo by Anthony Cantin
Photo by William Warby
Photo by Samuele Bertoli
Photo by Tapio Haaja
Photo by Soumya Banerjee
When capturing long exposure images, you also need to make sure that you capture sharp photos under the right conditions using the right gear and setup. Whether you are a beginner or an amateur looking to brush up your knowledge or someone looking to learn more about capturing creative long exposure shots, we recommend you to check out this eBook “The Complete Guide To Long Exposure Photography” by Photzy.
The Art of the Personal Project is a crucial element to let potential buyers see how you think creatively on your own. I am drawn to personal projects that have an interesting vision or that show something I have never seen before. In this thread, I’ll include a link to each personal project with the artist statement so you can see more of the project. Please note: This thread is not affiliated with any company; I’m just featuring projects that I find. Please DO NOT send me your work. I do not take submissions.
Reflection of Beauty is a project I started about 15 years ago. It began as a series called Five Minutes With, which was essentially five minutes with a model in front of the camera. They came to the studio wearing whatever they wanted, with no professional makeup. It was a chance for them to be photographed as they were — to express their own perception of how they wanted to be seen, rather than how a stylist, makeup artist, lighting team, or Photoshop might shape their image.
It was a raw, honest portrait session centered around one question: “What does beauty mean to you?”
At first, the answers were simple — “To me, beauty is a great red lipstick.”, for example. But over the years, those answers have evolved into much more complex reflections, mirroring the growing complexity of that very question:
What does beauty mean to you? What does beauty mean to all of us?
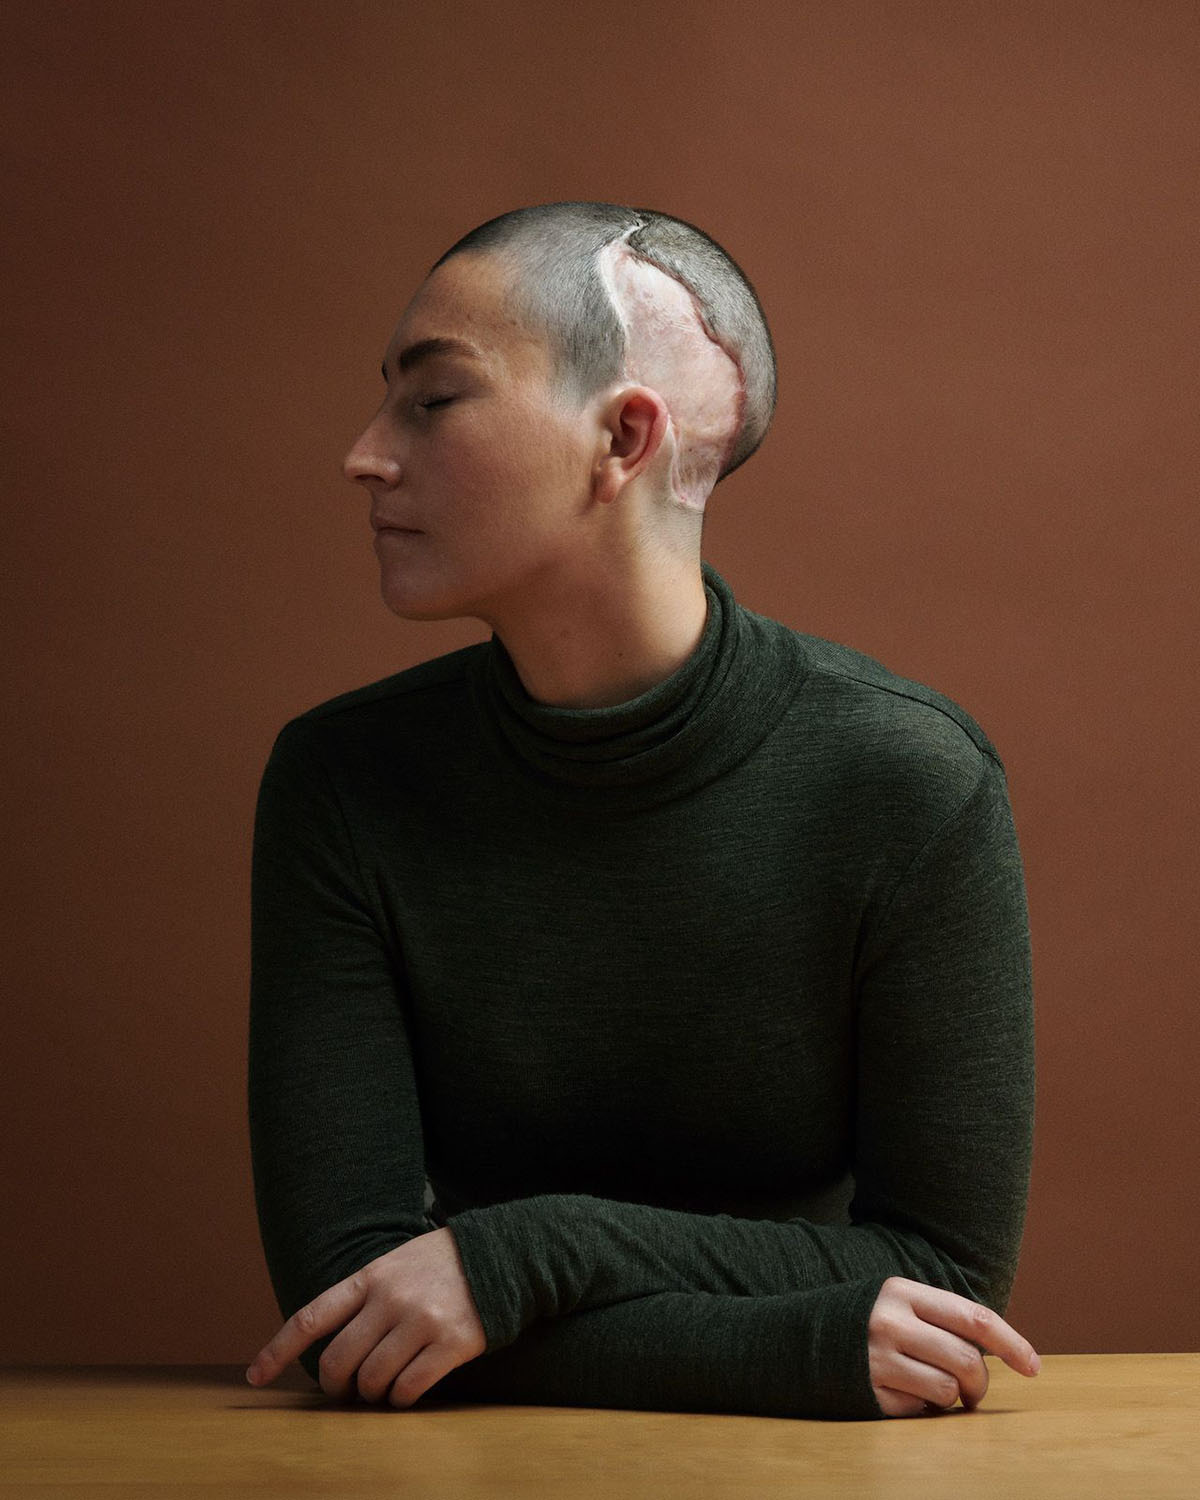
My portrait of Katie (pictured at top) was taken after she underwent brain surgery to replace part of her skull. She explores how that experience has shaped her feelings about herself, her perception of beauty, and how others perceive her.
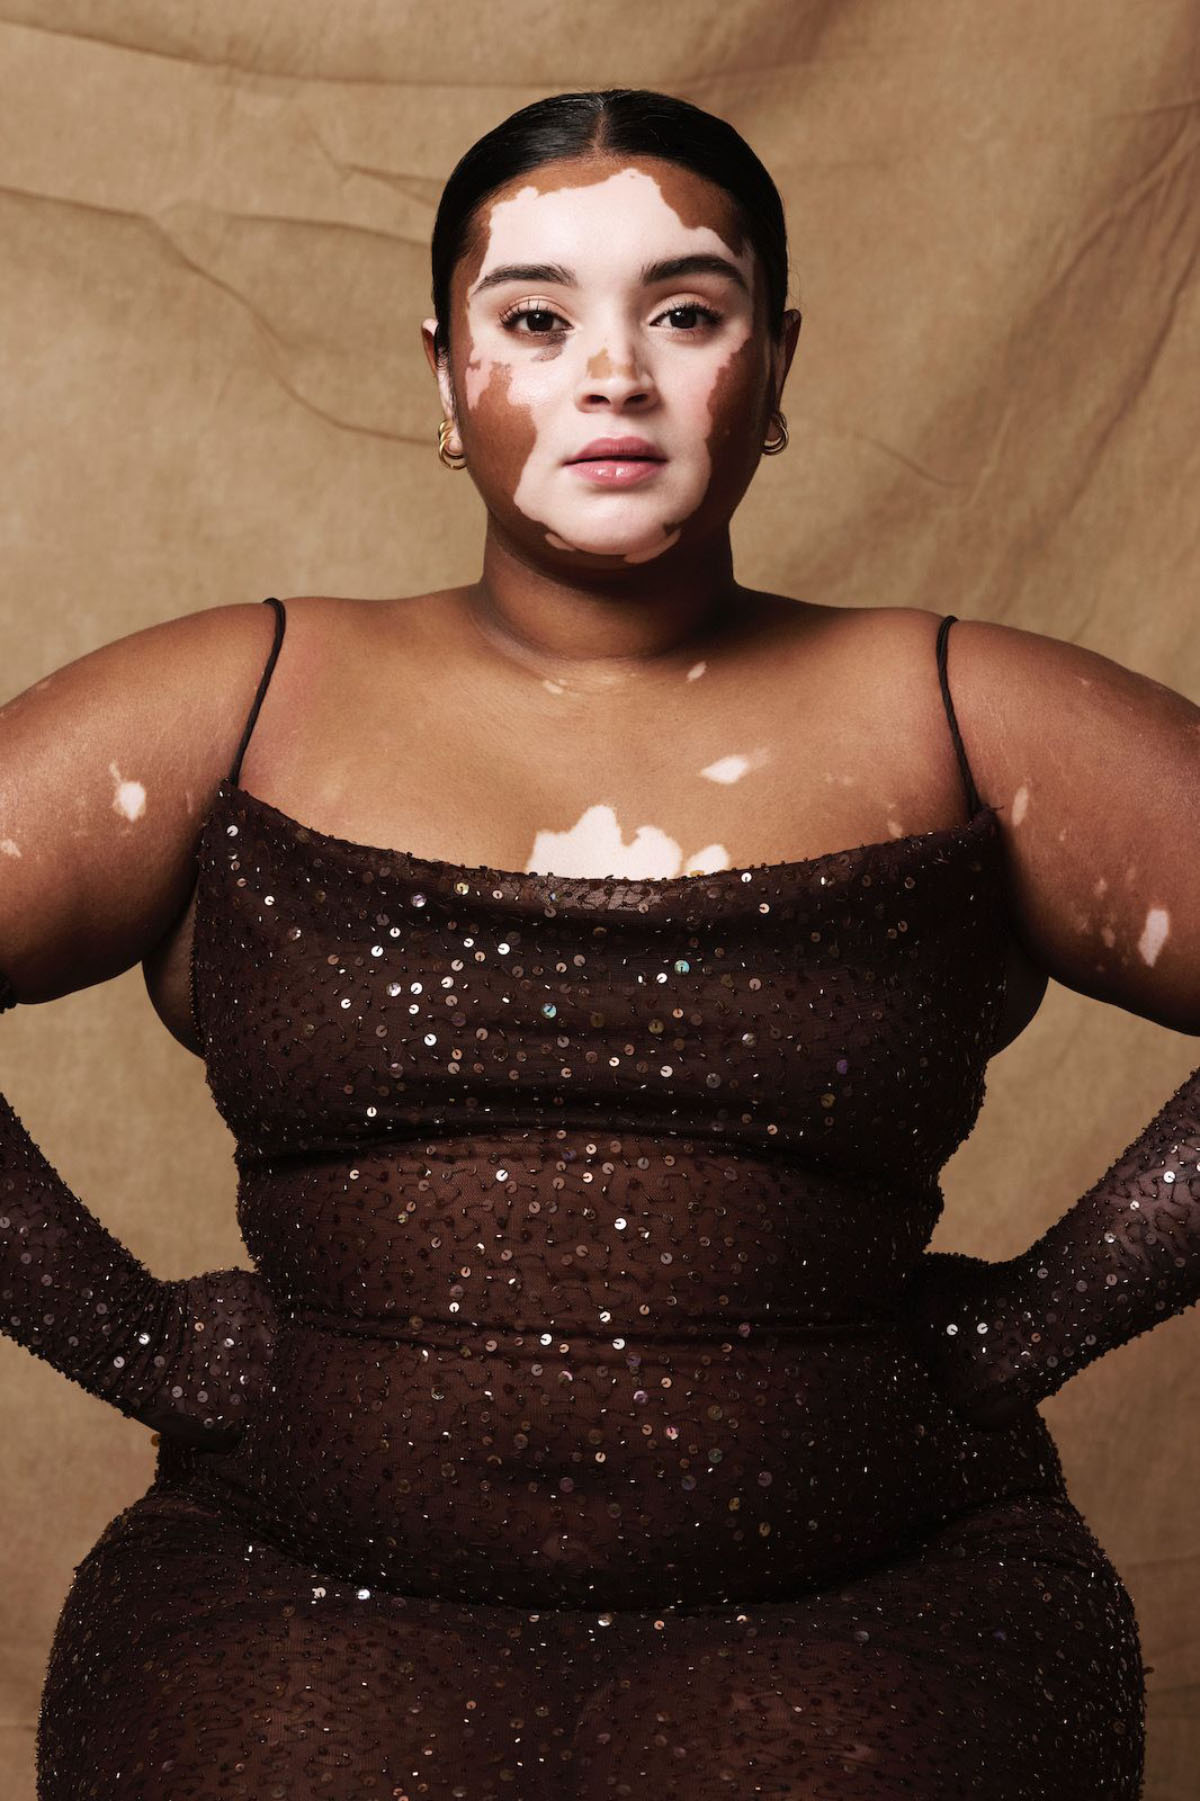
Onella Muralidharan is a model and fashion influencer in Melbourne, Australia. – “The patterns of my Vitiligo are a reflection of how connected I am to the natural world and the inspiration for my definition of beauty.”
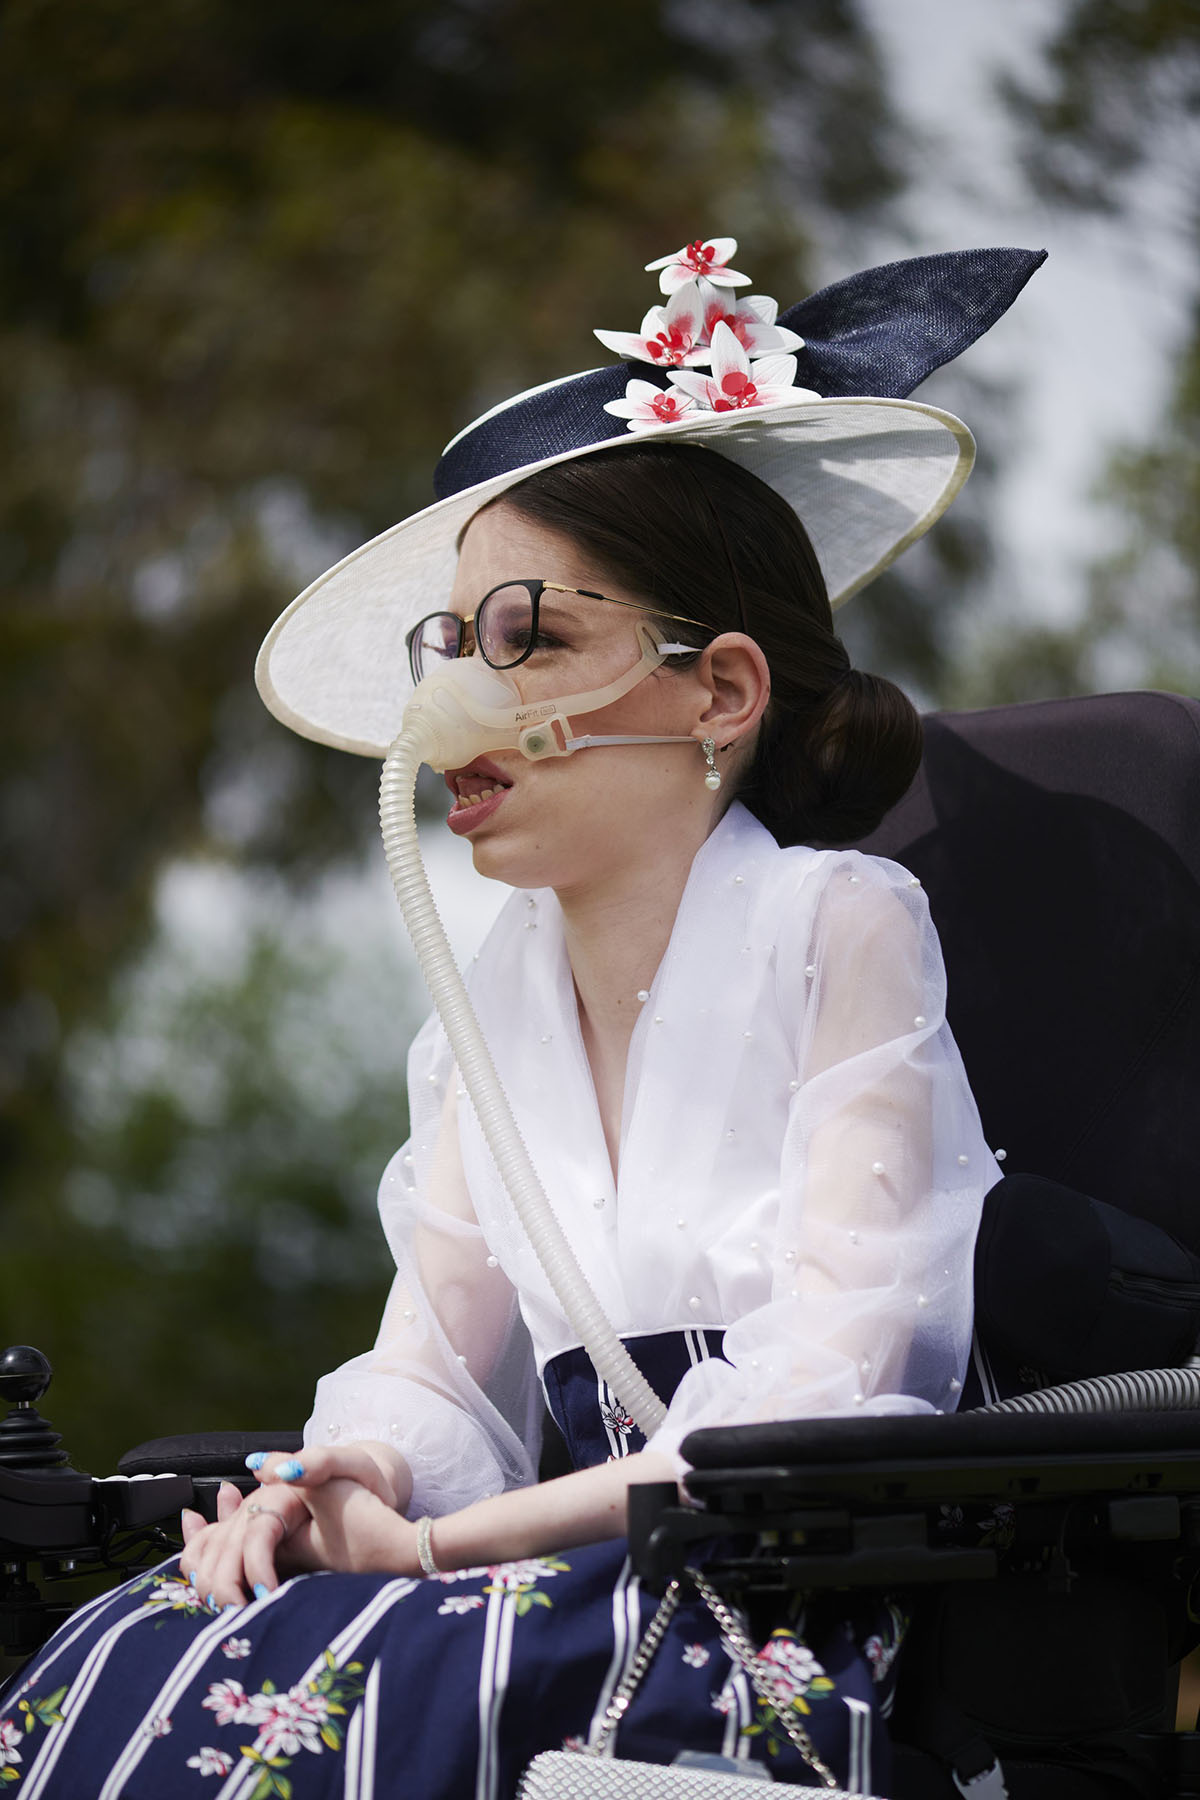
Amy Evans (pictured above in wheelchair) is passionate about fashion, beauty, and horse racing. For her, there has always been a conversation around disability identity: whether one sees themselves as a person with a disability (person-first language) or a disabled person (identity-first language). However, she says, “For me, identity encompasses more than just what people see. My identity is my passion. My identity is Amy!”
Leaning on my greatest strength as a photographer shooting for fitness and beauty portraiture and my internal need to connect with other women on what our perspective of beauty is.
Reflection of Beauty has become something far greater. It’s an exploration of life — how we see ourselves, and how the world sees us.
Suzanne Sease is a creative consultant and former ad-agency senior art buyer. She works with both emerging and established photographers and illustrators to create cohesive, persuasive presentations that clients can’t resist.
Suzanne offers something rare: an insider’s perspective on how client’s source creative talent. Her deep understanding of the industry is underscored by her impressive resume: 11 years as senior art buyer at The Martin Agency, seven years as an art producer for Capital One, and stints with the art-buying department at Kaplan-Thaler and the creative department at Best Buy, where she applied her expertise to reviewing bids to see which were most likely to come in on budget. Over the years, Suzanne has worked with a wildly diverse range of clients, including Seiko, Wrangler, Bank One, AFLAC, and Clairol Herbal Essence. Now, as a consultant, she is equipped to problem-solve for her clients from an unusually dynamic point of view.
As a longtime member of the photo community, Suzanne is also dedicated to giving back. Through her Art of the Personal Project column on the popular website aphotoeditor.com, she highlights notable personal projects by well-known and up-and-coming photographers. The column offers these artists excellent exposure while reflecting Suzanne’s passion for powerful imagery.
If you want to use your action camera with Inon’s latest wet lenses—the UFL-GR140 ZD/UFL-GR140 Pro ZD and UFL-G140 ZD semi-fisheye lenses, and the UCL-G55 ZD, UCL-G100 ZD and UCL-G165II ZD close-up lenses—you’ll need their latest ZD Front Mask, which attaches to your action cam’s waterproof case.
There’s already an ZD Front Mask for GoPro HERO9–13. Now, Inon has introduced ZD Front Masks for the Insta360 Ace Pro 2 and DJI Osmo Action 5 Pro. If you prefer a pistol grip, Inon will soon be releasing the 4D Light Grip, which can be used with the ZD Front Masks for GoPro, Insta360, and DJI action cameras.
The new ZD Front Masks are available now, while the 4D Light Grip is arriving in September. Consult your Inon dealer for pricing.
When purchasing underwater photography equipment like the products mentioned in this article, please support DPG by supporting our retail partner—Backscatter.com.
PRESS RELEASE
INON INC. releases two new ZD Front Mask on August 5, 2025: the ZD Front Mask for Ace Pro 2, designed to fit the official Dive Case for Insta360 Ace Pro 2, and the ZD Front Mask for Osmo Action 5 Pro, made specifically for the official Osmo Action 60m Waterproof Case.
Attaching the INON ZD Front Mask allows the use of the underwater semi-fisheye conversion lens UFL-GR140 ZD (*1) which can deliver wide and quality view with its large-aperture optics across more wide-angle FOV settings on Ace Pro 2 and Osmo Action 5 Pro, as well as the compact UFL-G140 ZD.*
Also, the wide variety of INON close-up lenses (UCL-G165ll ZD, UCL-G100 ZD, UCL-G55 ZD) (*2) now allows Ace Pro 2 and Osmo Action 5 Pro users to enjoy macro imaging that wouldn’t be possible with the camera alone.
INON also releases the 4D Light Grip in late September, which can be mounted onto the housings of various action cameras. This highly versatile grip allows users to attach both an action camera and a light at the same time.
(*1) Lens hoods included with UFL-GR140 ZD shipped before Augst 5, 2025 may be visible in footage. Please use the updated “Lens Hood II (for UFL-GR140)” which is available for separate purchase.
(*2) UCL-G100 and UCL-G55 shipped on or after August 5, 2025 will come with newly designed Focus Stick that helps prevent interference when used with Ace Pro 2 and Osmo Action 5 Pro. For existing UCL-G100/UCL-G55 users, updated Focus Stick II is available for purchase to replace the original Focus Stick.