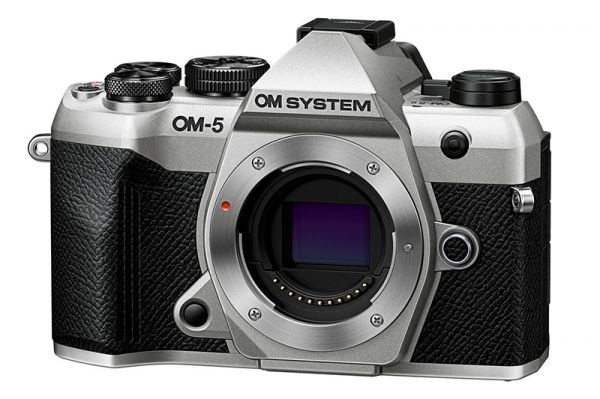
Fujifilm announced the launch of its new rangefinder style mirrorless camera in the X-E series, the Fujifilm-X-E5, that has a classic look and comes with an updated elegant design. One of the most interesting design features is the customizable “Film Simulation” (FS) dial that features an indicator window.
Image via Fujifilm
The Fujifilm-X-E5 allows you to navigate between Fujifilm’s own presets via the FS dial and also allows the user to save their own three customizable film simulation settings. Fujifilm has used the term “recipes” for the film simulation settings, much like the presets that users develop and save in some mobile photo apps as recipes.
The X-E5 has a compact design and comes with a 40.2MP APS-C sensor. It features a five-axis in-body image stabilization, AI powered autofocus and many other interesting features for aadvanced image capture.
Here are some of the most important features of the Fujifilm X-E5:
40.2MP APS-C, X-Trans CMOS 5 HR sensor
X-Processor 5 imaging engine
Five-axis sensor-shift IBIS
3″ touchscreen LCD with three-axis tilting
Single SD/SDHC/SDXC card slot
Captures videos up to 6.2K
Lower base ISO of 125, improving low light performance
Latest AF Algorithm, subject detection AF
Teleconverter with digital zoom settings of 1.4 and 2.0x
Continuous shooting for uncompressed Raw images – up to 20 fps
Long exposure up to 1 hour in bulb mode
20 unique Film Simulation modes
Maximum frame rate of 29.97 fps in 6.2K, 59.94 fps in 4K, and 240 fps in Full HD
Weight approximately 445 g
Built-in Wi-Fi 5 and Bluetooth 4.2
USB-C power input for charging
More details about the Fujifilm X-E5 can be found here. Along with the announcement of the X-E5, Fujifilm has also announced the FUJIFILM XF 23mm f/2.8 R WR Lens that comes with a 11 blades round aperture, manual focus ring, autofocus motor and is a great lens for low light shooting. Both these products are available to pre-order and are estimated to ship by end of August, 2025.
We have more news for you to read if you are interested at this link here.
PHILADELPHIA – JUNE 14, 2025: An American flag extends across the steps of the Philadelphia Museum of Art as an estimated 80,000 participants joined the “No Kings” protest.
Participants in Philadelphia join the national “No Kings” protest on the same day as a military parade in Washington, coinciding with the Army’s 250th anniversary and President Donald J. Trump’s birthday.
Heidi: You studied journalism and political science at Temple University and transformed into a lecture adjunct. How did that academic foundation shape your approach to documentary and protest photography?
Kriston: I think my choice to study both journalism and political science was more a function of who I am and what I want to see in the world, so in a sense, the same thing that drives my approach to photography is what led me to my academics. The two are intertwined, but a core part of who I am is that I like to understand people and I love to learn how things work. I do believe having that formal background allows me to think more deeply about the issues I cover and try, as much as possible, to see what’s unfolding without inserting my own emotions. Of course, as a visual journalist, I’m also trying to capture the feeling behind that, so I can build a connection with the audience. But it also lets me have much more nuanced conversations, which can help people feel at ease or even open doors that may otherwise remain closed.
As noted in Diversify Photo’s “Solutions Photography” talks, trauma-informed long-form story creation is central. How do you ethically build trust with protest participants—especially in emotionally-charged environments? When you’re working in a crowd of people, whether it’s dozens or tens of thousands, I think the first, and hopefully easiest part, is to just be a genuine human being. I take the time to talk to people, I’ll answer questions about what I’m working on, or even make a portrait of someone just because they asked. You’re not there to participate in a protest, but that doesn’t mean you can’t have humanity. I think this is even more important when you’re working with people whose viewpoints may differ from your own. It’s the little things that I think go a long way, even non-verbal communication like a smile or a nod, that help people feel at ease. Authenticity is key.
How do you maintain that journalistic neutrality when covering emotionally charged social justice issues, where public sentiment often runs high? I think there’s a misconception about what neutrality means and how we handle it as journalists. I mean, nearly everyone wants to believe that they’re neutral, that they’re completely unbiased, that they’re thinking with their head and not their heart. If that were true, politics would probably be a lot more boring and social media would be a much kinder space!
But the fact is that we’re not robots. The important part of being a journalist isn’t that you exist without personal opinions or feelings, but that you don’t let those get in the way of your coverage. We all come with our own life experiences that shape who we are and how we see the world, but when you’re doing the work, it’s important to discern how those may affect your perceptions. I think good journalists learn to allow themselves to feel, without letting it override their reporting.
There are a thousand tiny moments where decisions are made as a photographer – the stories we pitch, where you choose to point our camera, what we leave out of the frame, what makes our final edit. Things like gender, ethnicity, orientation, religion, economic background – all of these qualities shape our world view, giving us unique knowledge and insight. But it’s important to acknowledge these, especially in cases where they may lead to privilege, so we can minimize blind spots.
In high-pressure work, how do you stay flexible—able to fully feel intense moments and then bounce back—and what small habit helps you reset? Something you and I talked about is this idea of “emotional elasticity” – being flexible with your experiences, your life, your emotions. When talking to my colleagues and friends who work in the industry, a lot of people are feeling the toll of working in a field that’s often driven by high pressure moments, while capturing intense emotions that you’re deeply embedded in. It can be a lot to manage, but it’s important to stay healthy through that. Whether you’re seeing a therapist or journaling on your own, talking it through with someone else or just doing mental check-ins with yourself. For me, I try not to center my entire being around the work, but have outside interests. I rock climb, I coach and overall practice cultivating a positive mindset. I think trying to push things down without recognizing your own experience is a good way to burn out. That’s where the ability to remain flexible and resilient becomes important, so that you can experience everything in the moment, but still come back to who you are.
How do you, as a coach, foster resilience and empathy in your athletes—helping them face failure, handle negative thoughts during long runs, and grow not just as runners, but as people? I coach high school track and cross country, predominantly working with distance athletes. This is something I do simply because I enjoy being there for them, but it’s a lot less about the athletics than I think most people think. When you have to run a distance event, there can be a lot of time in your head for negativity to creep in and take over. What we try to teach is resiliency, the ability to overcome, how to come back after failure. It’s not about never having those negative thoughts, but how you deal with those emotions. These are the lessons we’re really working on and sport kind of just comes out of it. I hope the thing they’ve learned after graduating isn’t how to be a better runner, but how to be a better version of themselves.
There really is a tremendous amount of pressure on young people today. I think we’re suffering as a society from a lack of empathy and willingness to actually listen to one another. This has us pushing further and further in opposite directions, looking for confirmation more than critical understanding. Combine that with the internet and social media that allows us to see what we want – this has us in a very challenging position right now. Bringing it back around, I hope that my work helps us build a more resilient society, that helps us grow closer together, to see the tough things and understand more about what the other is feeling.
You were embedded in the flagship Philadelphia action, among an estimated 80,000 protesters on June 14. How did you ensure your images reflected both the collective voice and the individual stories within such a massive crowd? Scale is always impressive and often provides a sense of how important or urgent an issue may be. It’s the big picture. However, it’s also crucial to take viewers into the ground level and create images that capture emotion (something I seem to be talking about a lot). I’m constantly looking through a crowd and trying to find a variety of emotions and moments that tell us how people are feeling. There’s always something that stands out to me. And in addition to that, I’m always trying to find something that may subvert expectations. I’m not always successful, but It’s definitely something I’m keeping an eye out for.
Crowd density and police presence bring unique risks. How do you assess and manage personal risk while on assignment—especially in fast-moving situations? I want to preface my answer by saying I’m not a HEFAT (Hostile Environment First Aid Training) instructor and anyone looking to learn more about how to stay safe in potentially hostile environments should definitely look into taking a course. That said, there are a lot of steps you can take to keep yourself safe, but the first thing to know is your level of risk tolerance. You have to be honest with yourself about how much you can handle, depending on your training and experience, and to not exceed that. Then you have to have a risk assessment. Who might be working against you, what threats do they pose and how do you mitigate that. In regard to physical safety, having eye protection, head protection and respiratory protection are all things you should have on hand.
What are two key things to consider for anyone covering fast moving situations? I think the two most important things are 1. Good communication and 2. Having a field buddy.
To the first part, always talk to your editors about your plan, then remain in communication with them throughout the day. And if you’re going into something alone, make sure you have someone at home to keep updated. This could be a partner, friend or family member. Before the protest, I reached out to several other freelance colleagues that were going to be covering the protest and got us all in a chat with one another. While we were all working for different publications, I wanted us to all be able to rely on one another on the ground. This was all in addition to remaining in contact with my editors and security team.
To the second part, having someone in the field with you that you can rely on really does increase your safety level. During the protest, my colleagues and I checked in with one another throughout the day and later in the evening, many of us traveled together, so no one was alone. Things can get more unpredictable when it starts getting dark. A group of protestors separate from the “No Kings” event gathered outside the Federal Detention Center and marched through the city, leading to some conflict with law enforcement. Having someone that can see the things you miss, especially in situations like these, could be the difference between going home and taking a trip to the hospital.
There’s a lot more that can be said about this, like maintaining situational awareness, deescalation (whether it’s with protestors, law enforcement or just someone on the street), when to blend in and when to stand out, but I would highly recommend taking a course for those interested in pursuing more of this type of work.
At the end of the day, the number one thing to remember is to use good judgement and avoid risks beyond what you’re prepared for, because you’re more important than a photo.
I gotta tell you, I have no idea how any of us ever managed to learn this craft well enough to make the photographs we do. There’s just so much to learn! Exposure alone can be tricky at first, but these days, there are so many different modes and buttons and dials. With time, it becomes intuitive-feeling, but it’s a lot.
And even then, we can master the camera without ever really mastering the skills needed to make a compelling photograph.
Last week, I was going through the many resources I’ve created for you over the years, and I came across one that you might not have seen: The Composition Checklist.I’d like you to have a copy of that, together with a video I made with three suggestions on how to make the most of the checklist.
When I first introduced these two resources, I made the mistake of advertising them on Facebook. Totally free resources—no catch, no strings attached—and they still drew out the haters and the critics! 😂 One of them berated me for the idea that composition could be reduced to a checklist, which, of course, it can’t (and I didn’t at all mean to imply that it could be). But there are ideas that are helpful to remember when you’re framing a photograph, and I thought an easy-to-reference guide might be useful to you.
Composition is important; it’s the visual language photographers use to make their photographs compelling. And for some reason, it’s some of the last stuff we are taught (if we’re taught at all).
A quick story. Years ago, before Covid wrecked everything, I did a series of workshops in places like Italy. We’d put some time aside in the middle of the day to look at images and discuss them. The assignment was (I thought) simple: look at the image and describe one decision the photographer made to make the image and what that decision contributed. You could talk about balance and how it was achieved. You could talk about how the vertical framing reinforced the vertical elements in the image. Perhaps you might talk about how the main subject was well isolated using depth of field or a longer lens. Or you could talk about what didn’t work. Maybe important elements were getting cut off by the edges of the frame. Maybe the chosen moment wasn’t strong enough to create a dynamic composition. I mean, the sky was the limit. Yet, the reply I most often got was just a blank stare and a mumbled, uncomfortable version of, “Well, I like it…”
“That’s all? That’s all you can say about this photograph? That you like it??” I felt like I was taking crazy pills. I wanted to have a lively conversation about composition, and it always ended up feeling like an interrogation.
It taught me an important lesson. I was asking photographers to think in ways they hadn’t yet been taught. I had ambushed them and expected them to have the same vocabulary that I did. Many of them knew cabalistic things about cameras that I still don’t understand, but when it came to photographs, they struggled. Ideas like balance and tension, or using contrast or juxtaposition (I talked about this in this recent post/article). Ideas like repeated elements or thinking about the energy of the photograph were all a bit foggy.
So let me ask you: how’s your composition? Do you think about the way the elements in the frame relate to each other and what they accomplish in the image? Is it time to check in with some of those ideas?
Anyways, The Composition Checklist is a simple thing, but combined with the accompanying 10-minute video, I’m hoping it can give you a bit of a nudge and maybe help you ask some important questions as you shoot.
Don’t be that photographer who knows more about camera design than visual design. And once you’ve checked out these two free resources, if you want to chat about composition or ask questions, I would love to have that conversation in the comments here on my blog.
A couple of years ago, a trio of incredible—and incredibly heart-wrenching—photos took first place in the environmental category, “No Time to Waste,” of the UN World Oceans Day Photo Competition, hosted by DPG. Those images of an entangled humpback remain, in my view, among the most arresting underwater photos demonstrating the terrible cost of humanity’s impact on the oceans. I hoped that one day I’d be able to meet the photographer, Álvaro Herrero, aka Mekan, and congratulate him on those striking pictures—and on contributing so powerfully to the conversation about marine protection.
As it turned out, when I finally had the pleasure of meeting Mekan at ADEX earlier this year, I was congratulating him on another amazing achievement: being crowned Underwater Photographer of the Year 2025—this time with a heart-warming shot of a healthy humpback mom and her calf. Mekan isn’t just a lovely guy, modest about his accomplishments; he’s also incredibly passionate and ready to share with anyone who shares his passion. No wonder, then, that this talented Spaniard is the perfect person to be joining Nicolas Remy in the next Underwater Club Masterclass event to talk about “Making a Career in Underwater Photography.”
This promises to be another unmissable two-hour webinar. As well as chatting about some of his most spectacular underwater images, Mekan will be sharing how he has managed to turn his passion into a full-time job. In particular, he’ll be discussing the income streams that make that possible, including leading trips, teaching photo courses, selling prints, and doing photo shoots for clients. Appropriately, Mekan will also cover how to make the most of wins in photo competitions and using social media to support your work. As usual, during the live Q&A portion, participants will get the chance to ask questions. It’s sure to be an extremely inspiring session.
As always, TUC members join for free, while non-members will need to purchase tickets to the event at AU$49 (approx. US$35). Note that this is also the price of monthly membership, so this is the perfect opportunity to join the club and take advantage of all of the membership benefits.
Do you, like me, find black and white images incredibly evocative? They seem to draw us in more than colour, have more sense of life and of story. There are a few genres of photography that are not suited to monochrome, but one that most definitely is, is the urban landscape.
There is so much in urban areas that lends itself to black and white. Amble areas of light and shade, textures, form and most importantly geometry and symmetry.
Today we are going to explore how to elevate your urban images into artistic black and whites.
The simple fact is, that not every urban shot you take will be suited to black and white. To shoot great black and white shots you need to see in black and white. Now, that might seem quite an odd statement, especially given the billions of colours our eyes are capable of recording, but hear me out.
Identifying a black and white urban image is not literally about seeing in black and white. It’s about identifying the elements that go into making a great black and white photo.
Some of the most important are the interplay of light and shade and the use of lines of contrast. Light and shade are, perhaps, more important in black and white than in colour. The depth of the blacks define how we react to an image emotionally, the harder the black the more gritty and harsh the image can feel.
Lines of contrast lead our eye around the image. This contrast need not be pure black or white, but well defined graduations of tone that give depth to an image.
One tip, if you struggle with “seeing” black and white in your urban landscapes is to shoot in a black and white mode. On many cameras, this will turn the viewfinder/LCD monochrome as well, making it easier for you to see if the shot works. Make sure you are shooting RAW and JPEG though as the RAW file will give us so much more latitude when editing.
Briefly, it is important to know that colour is vital to our black and white shots. Assuming we have shot RAW (see above), we can increase or decrease the luminance of any of the primary colours. For example when editing a blue sky, we can decrease the blue luminance to make that sky much darker.
The urban environment is full of colour, from the faded to the bold. When we are shooting we can identify those blocks of colours that we either wish to enhance or reduce in significance.
For example a bright yellow sign with bold lettering might make an interesting subject to our urban shot. By decreasing the luminance of the blue channel (opposite to yellow) we can brighten up that sign and separate it from the rest of the image. The same can be true of faded colours, we can enhance or reduce their intensity according to how relevant we wish them to be in the image.
Once you have found the ability to “see” in black and white, you will see monochrome opportunities around every corner. There are several elements in the urban environment that we can identify for black and white shots. The first are the shapes, forms and textures of the manmade. Another is the human element, the stories of the people in that built environment – these also cross genres with street photography. Another important black and white element can be the way nature interacts with the urban.
In man made we are looking for the way the light interacts with structures. How light casts shadows and creates depth and form to our shots. We are looking for symmetry and geometry. A symmetrical image of a building can look great but add in a person to one side and you add tension to the shot. In black and white, this can look amazing.
Textures are everywhere in urban areas, from the rust of the manmade to the bark of a tree. Low directional light makes these textures pop whilst shallow depth of field hints at the location. Graffiti and urban decay are also fantastic black and white subjects in cities and towns
The way the natural works with the manmade is another great area to focus on with your black and white urban images. The lone tree in front of a modern structure. A line of park benches in an urban park. There is so much to look for and shoot.
Taking a good black and white is half the job. Editing it is the other half. These days it’s not difficult to edit great black and white urban shots. Tools like Lightroom Classic have a plethora of functions to help us get good black and white images.
There are some things that you can do to add punch though. Convert the image using a colour profile, this will give you a good starting point. Use the black and white sliders to adjust the amount of overall contrast you are looking for. Pushing to the ends of the histogram (or even beyond) will give maximum contrast whilst pulling the blacks and whites inside the histogram will reduce the contrast.
The clarity and texture sliders are great tools for managing mid tone contrasts, and are especially useful in punching out textures. Use masking tools to isolate areas of textures and enhance them.
As mentioned earlier the use of RGB sliders can allow us to manipulate individual colour channels within our black and white urban images giving us huge control over the way they look.
Editing the urban environment in black and white is an immensely satisfying thing to do, be it a few hours or few years after you took the original image.
As we mentioned at the top, the urban environment is, perhaps, the best place you will find to elevate your black and white photos to more artistic images.
It’s hard not to find great black and white shots in towns and cities but it will take some practice to both start seeing in black and white and finding compositions to enhance your monochrome shots. But, as they say, practice makes perfect, and with the cameras and editing tools we have to hand today, practice is also immensely satisfying
Sigma 14-24mm F2.8 DG DN | Art Sony A7R IV 14mm, F2.8, 13s, ISO 6400
Sigma presents a gallery of images by professional photographer Darren White. This gallery is comprised entirely of photos shot with the 14-24mm F2.8 DG DN | Art lens, released in 2019 for full-frame format mirrorless cameras.
The Sigma 14-24mm F2.8 DG DN | Art lens mounted on a full-frame mirrorless Sony camera body.
With the Sigma 14-24mm Art lens, you get edge-to-edge sharpness, minimal distortion (even at 14mm), and color rendering that will make your edits feel almost unnecessary. I own and use both the Sony E-mount and older Nikon F versions, and love them equally the same!
Weather sealed, rock solid build and surprisingly compact for what it offers, it’s the lens that says, “Go ahead, dust, rain & cold. Bring it on!” As a professional landscape photographer I shoot in all extreme conditions, and this lens will hold up in any of them.
Darren White, Professional Photographer
Sigma 14-24mm F2.8 DG DN | Art Sony A7R IV 14mm, F2.8, 10s, ISO 3200Sigma 14-24mm F2.8 DG DN | Art Sony A7R IV 14mm, F5, ISO 64Sigma 14-24mm F2.8 DG DN | Art Sony A7R IV 16mm, F18, 1/6s, ISO 50Sigma 14-24mm F2.8 DG DN | Art Sony A7R IV 23mm, F16, 1/10s, ISO 50Sigma 14-24mm F2.8 DG DN | Art Sony A7R IV 15mm, F6.3, 30s, ISO 1600Sigma 14-24mm F2.8 DG DN | Art Sony A7R IV 14mm, F10, 1/30s, ISO 64
Sigma 14-24mm F2.8 DG DN | Art Sigma fp L 14mm, F13, 1/125s, ISO 100Sigma 14-24mm F2.8 DG DN | Art Nikon Z8 14mm, F4, 30s, ISO 400
Sigma 14-24mm F2.8 DG DN | Art Sony A7C II 24mm, F10, 1/100s, ISO 64
Sigma 14-24mm F2.8 DG DN | Art Sony A7R IV 14mm, F7.1, 1/50s, ISO 100Sigma 14-24mm F2.8 DG DN | Art Sony A7R IV 14mm, F2.8, 15s, ISO 10000
Sigma 14-24mm F2.8 DG DN | Art Sigma fp L 14mm, F7.1, 125s, ISO 32Sigma 14-24mm F2.8 DG DN | Art Sony A7R IV 17mm, F16, 1/400s, ISO 64Sigma 14-24mm F2.8 DG DN | Art Sony A7R IV 16mm, F11, 1/6s, ISO 64Sigma 14-24mm F2.8 DG DN | Art Sony A7R IV 16mm, F9, 1/160s, ISO 100
Get your lens direct from Sigma:
About
Born and raised on the Oregon Coast where his love for beautiful landscapes began. In 1999 Darren moved to Portland Oregon and soon fell in love with the mountains and Columbia River Gorge areas. In July of 2013 Darren made a huge move to Littleton, Colorado where he has quickly fell in love with the majestic mountains Colorado has to offer and the outdoor life Colorado is known for.
Darren has been published in various magazines like Popular Photography, Columbia Gorge Magazine and had a mention in National Geographic Traveler. His prints have been sold worldwide and used for all kinds of media from Websites to Trade Show Backdrops.
Darren enjoys a variety of outdoors activities which include but are not limited to, hiking, biking, running, night photography, trail running, climbing steep hills and simply just being amazed at what nature can produce!
Equipment used
EXPLORE MORE
Photographer Etsuko Aimu captures images of her children with the Sigma 17-40mm F1.8 DC | Art lens mounted on a Canon EOS R7 mirrorless camera. This APS-C format combination produces beautiful photos for memories that last a lifetime, and beyond.
With the Sigma 17-40mm F1.8 DC | Art lens at his side, photographer and cinematographer Naoki Miyashita visits a Kyoto pottery workshop to find out just how well this modern evolution of a beloved APS-C zoom lens performs.
We all may have seen a rainbow at some point and it may have been in strange places even like a waterfall, due to sea spray or even when watering plants in the garden. The most common occurrence of rainbows is when sunlight hits raindrops or water particles when the air is moist after a rain, but even moonlight can cause rainbows.
A rainbow is actually an optical illusion and seeing a rainbow depends on where you are standing with respect to the sun and at what angle the sunlight is falling on the waterdrops. The same applies for any form of rainbow seen elsewhere.
Now capturing just rainbows can seem quite boring, for example, just a colourful arc in the sky. It is always important to compose the shots to make the final photo look interesting and meaningful. Here are 29 striking rainbow photos that have been shot well.
If you would like to master composition in any genre of photography and create brilliant photographs, then you should check out this eBook “Understanding Composition” by Photzy. This guide is packed with illustrations for visual learning, case studies, and assignments that will help to verify your knowledge.
Photo by Zoltan Tasi
Photo by Austin Schmid
Photo by NOAA
Photo by Karson
Photo by Chris Barbalis
Photo by greg_nunes
Photo by Cosmic Timetraveler
Photo by David Brooke Martin
Photo by Todd Cravens
Photo by Jared Erondu
We all know that composition is the secret to incredible photography and if you want to learn how to determine the flow of a scene so that setting up a perfect shot is effortless, then you should check out “Understanding Composition” by Photzy. This complete hands-on guide with easy to understand case studies covering the “What” and “Why” of photography composition, can make learning a breeze.
Photo by Sorasak
Photo by Dario Mueller
Photo by Zdeněk Macháček
Photo by Lucie Dawson
Photo by Jorge Fernández Salas
Photo by DIEU
Photo by Jesse Gardner
Photo by Dylan Gialanella
Photo by Marcus Woodbridge
Photo by Zoltan Tasi
If you want to learn to spot great composition in a scene quickly, so you don’t miss out on those brilliant shots again, then you should check out “Understanding Composition” by Photzy. You will no longer feel overwhelmed by not being able to get the shots you really want. The 120 pages eBook comes with step-by-step information that contains 25 key lessons, 77 example images, 23 assignments and 1 printable composition checklist, all helpful to get a perfect shot.
AOI has released a new addition to its Q1-series of Ultra Compact Strobes, which includes the UCS-Q1 and UCS-Q1 RC. The UCS-Q1i was unveiled at the recent Malaysia International Dive Exhibition (MIDE) in Kuala Lumpur. According to the press release (see below), the new fiber-optically triggered strobe “combines the best features from the UCS-Q1 and UIS-P1”—though the UCS-Q1i features a straight flash tube as opposed to the circular flash tube of the UIS-P1.
Depth-rated to 60 meters (200 feet), the UCS-Q1i boasts a guide number (GN) of 22, a color temperature of 5600K, and an 85° beam angle with diffusor attached. AOI claims a recycle time of just 0.85s after a full power dump and 1,500 flashes at full power. The strobe features the same built-in 700-lumen continuous light found on the UCS-Q1 and UCS-Q1 RC, and also runs on a pair of 18650 Li-ion rechargeable batteries (3,100mAh).
Like the UIS-P1, the new strobe features InTeLi mode, which is designed to ensure that TTL exposure is “accurate and consistent” across different camera systems. The mode encompasses support for Sony TTL and i-Macro, OM System/Olympus RC TTL and i-Macro, and TTL HSS and M-HSS. In manual mode, output can be adjusted in six increments, from full power to 1/64 power.
Priced at $500, the AOI Q1i strobe is available now—in black or white finish—from retailers such as Backscatter.
When purchasing underwater photography equipment like the products mentioned in this article, please support DPG by supporting our retail partner—Backscatter.com.
PRESS RELEASE
AOl Ltd Unveils the UCS-Q1i at the Malaysia International Dive Exhibition 2025
Kuala Lumpur, Malaysia – June 13, 2025 – AOI Ltd is proud to announce the official launch of the UCS-Q1i, its latest groundbreaking underwater strobe, at the Malaysia International Dive Exhibition (MIDE) 2025, held in Kuala Lumpur from June 13 to 15, 2025. As one of the premier events for the diving industry, MIDE provides the perfect stage to showcase the UCS-Q1i. a powerful and compact strobe that redefines underwater lighting technology Building on the success of the UCS-Q1 and UCS-Q1RC, AOI Ltd continues to elevate underwater imaging innovation. The award-winning UCS-Q1 has been embraced by beginners for its advanced features, often found in more premium models. The UCS-Q1RC introduced TTL integration for OM System cameras, creating a seamless experience in both performance and design. AOI Ltd further solidified its reputation for pioneering technology with the UIS-P1, which introduced AOl In TeLi™ Mode, a next-generation system optimized specifically for underwater photography.
Now, with the debut of the UCS-Q1i, AOI Ltd combines the best features from the UCS-Q1 and UIS-P1. The UCS-Q1i inherits AOl In TeLi™ Mode, ensuring accurate and consistent TTL exposure across multiple camera systems, surpassing traditional S-TTL or TTL capabilities. This advanced mode intelligently adapts to camera settings, delivering enhanced precision in exposure control.
Additionally, AOl In TeLi™ Mode includes i-Macro Mode, refining macro flash photography by optimizing light output for close-up shooting. Underwater photographers can capture fine details with stunning clarity, ensuring beautifully lit macro shots. With support for Sony TTL and i-Macro, OM System RC TTL and i-Macro, and TTL HSS and M-HSS Mode, AOl InTeLi™ Mode sets a new benchmark in underwater strobe technology.
Most importantly, the UCS-Q11 remains the brightest strobe in its segment with an impressive Guide Number 22 (GN22) at ISO100, delivering powerful illumination underwater. Like the UIS-P1, the UCS-Q1i supports High Speed Shutter (HSS) compatibility with Sony cameras, allowing photographers to freeze fast-moving underwater scenes with precision and clarity.
“MIDE 2025 is the perfect platform to introduce the UCS-Q1i to the world,” said Victor Tsui, Managing Director of AOI Ltd. “With AOl InTeLiT Mode, we’re bringing a smarter, more refined approach to TTL exposure and macro photography, ensuring underwater photographers get consistent, high-quality results every time.”
Visitors at MIDE 2025 will have the first opportunity to see the UCS-Q1i in action, explore its features, and engage with AOl Ltd’s experts. The launch event promises exciting demonstrations and insights into how this cutting-edge strobe can transform underwater photography experiences.
For more details about the UCS-Q1i and AOI Ltd’s latest innovations, visit www.aoi-uw.com or contact info@aoi-uw.com
Welcome to another weekly wrap-up of all of the happenings on the Light Stalking forums and community.
This week has been another wonderful week in the world of creating beautiful photographs. Our community is all about positivity, encouraging people of all levels to reach the next step in their photographic journey. It’s a great bunch of people, and collegiality is basically how the whole group comes together. If you’re not already part of it, consider joining today.
Don’t forget to join in our current weekly challenge on the forums. This week, the theme is shadows of simplicity.
Some of the amazing shots from the community this week:
Photo by Wendy P
Photo by Rob Eyers
Photo by Robert Apple
Photo by Pat Garrett
Photo by Patrick
Photo by Frog Daily
Also don’t forget to join in our monthly challenge for the chance to win $100 prize. This month, the theme is “minimalism and simplicity.” You can enter it here.
Alongside the launch of its latest strobe—the UCS-Q1i—AOI has announced a set of protective silicone sleeves designed for strobes in the Q1 series, including the UCS-Q1i, UCS-Q1RC, and UCS-Q1. Engineered to offer a snug, secure fit, these durable silicone sleeves provide protection against scratches, abrasions, and minor impacts, extending the life of the strobe while allowing users to add a personal splash of color to their underwater setup.
Sold in pairs, the sleeves are available in six vibrant colours: neon pink, orange, yellow, lime green, aqua blue, and graphite gray. The sleeves are designed for easy installation and removal, making them a versatile and stylish addition to any Q1-series strobe.
Available now, the protective silicone sleeves will retail for USD25.
When purchasing underwater photography equipment like the products mentioned in this article, please support DPG by supporting our retail partner—Backscatter.com.