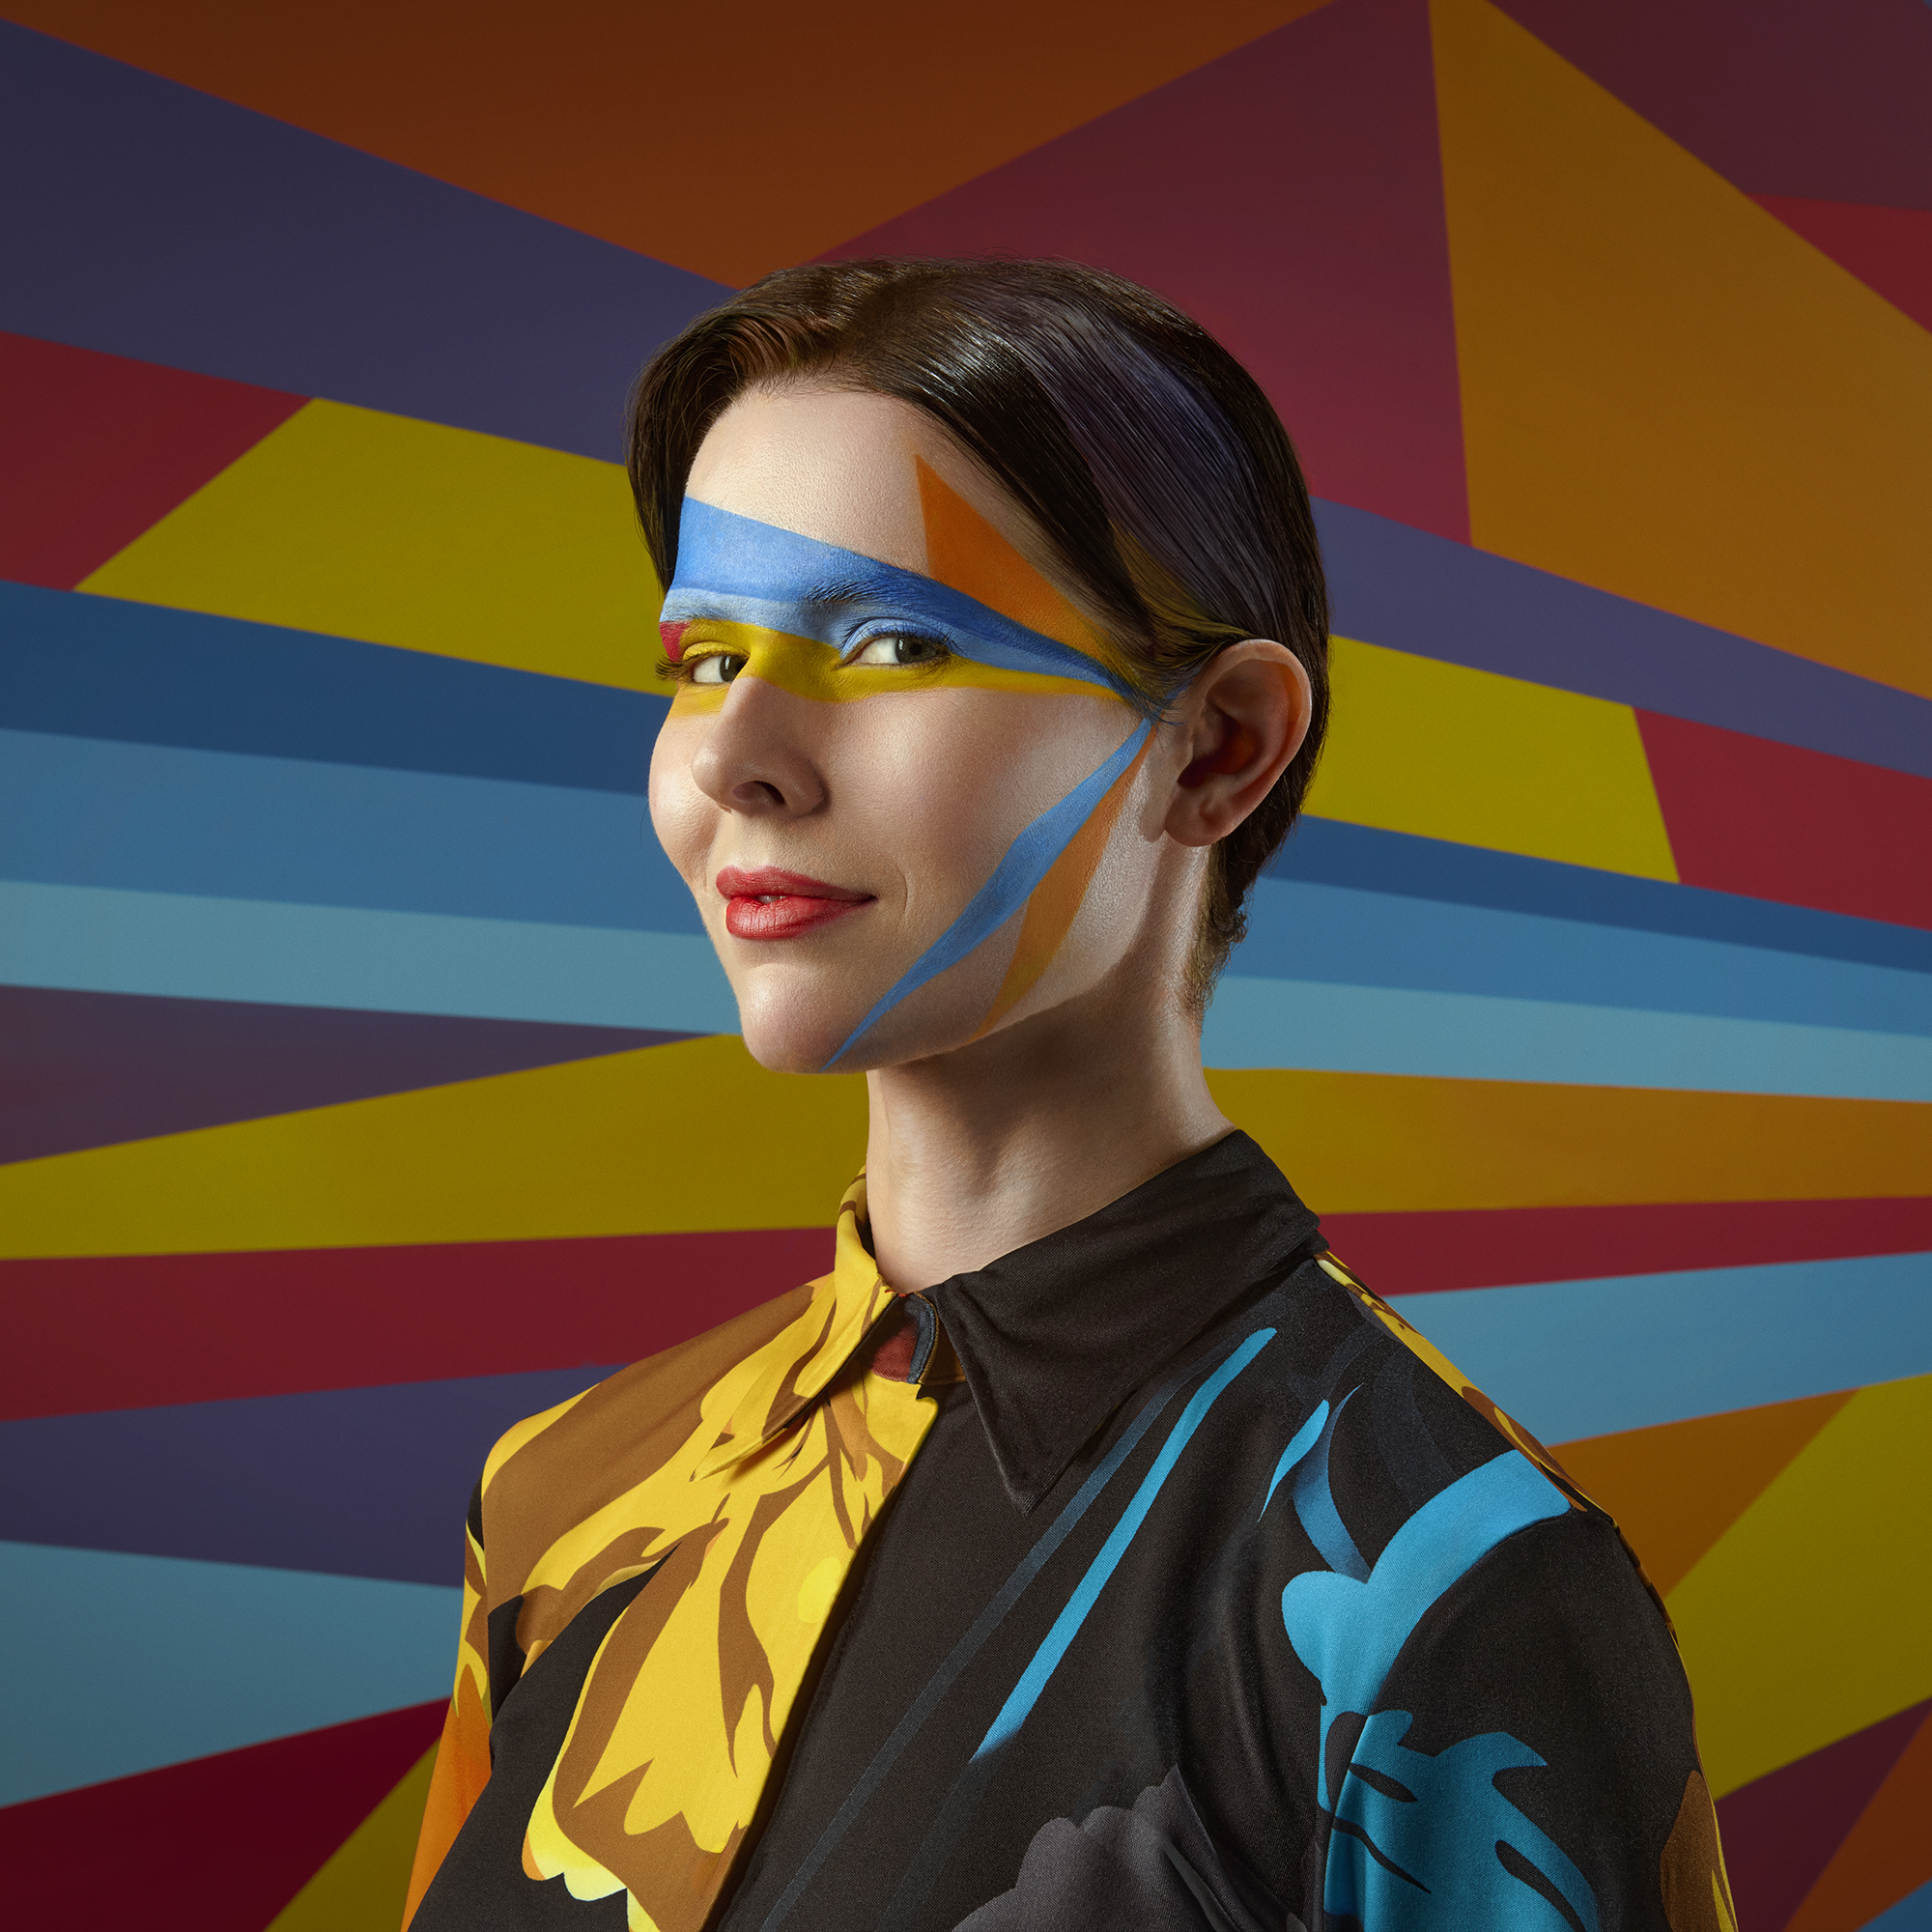
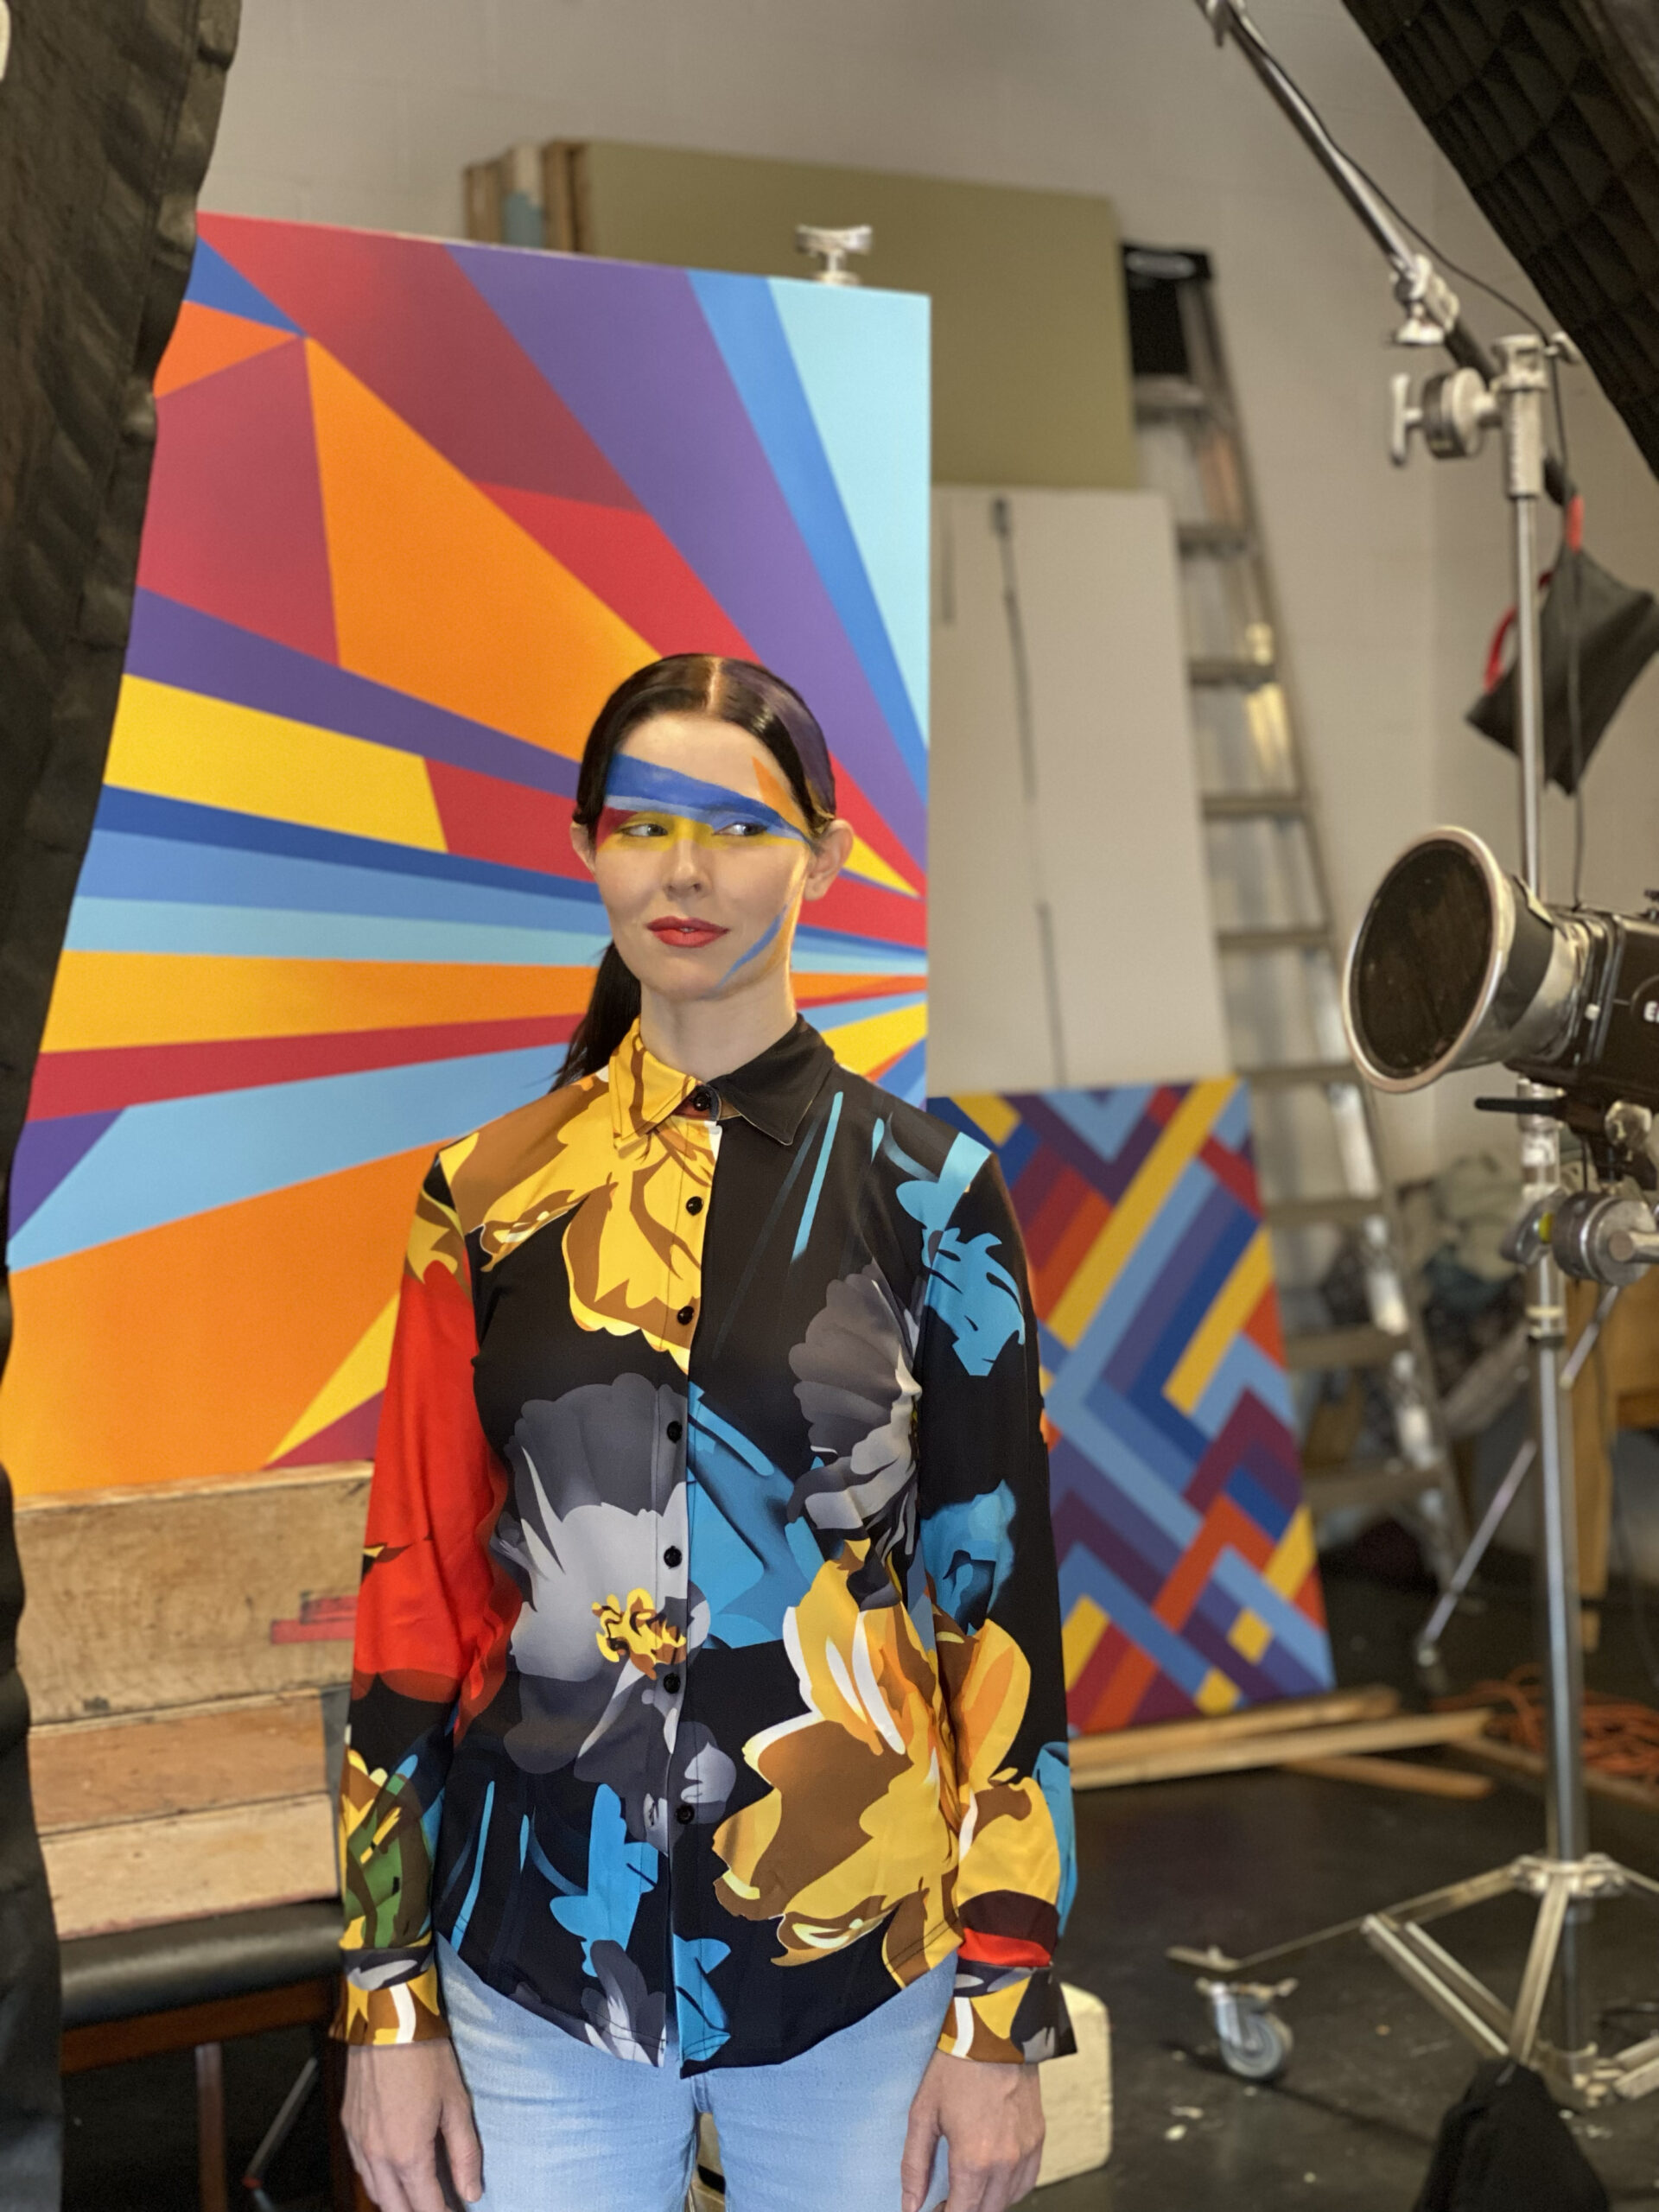
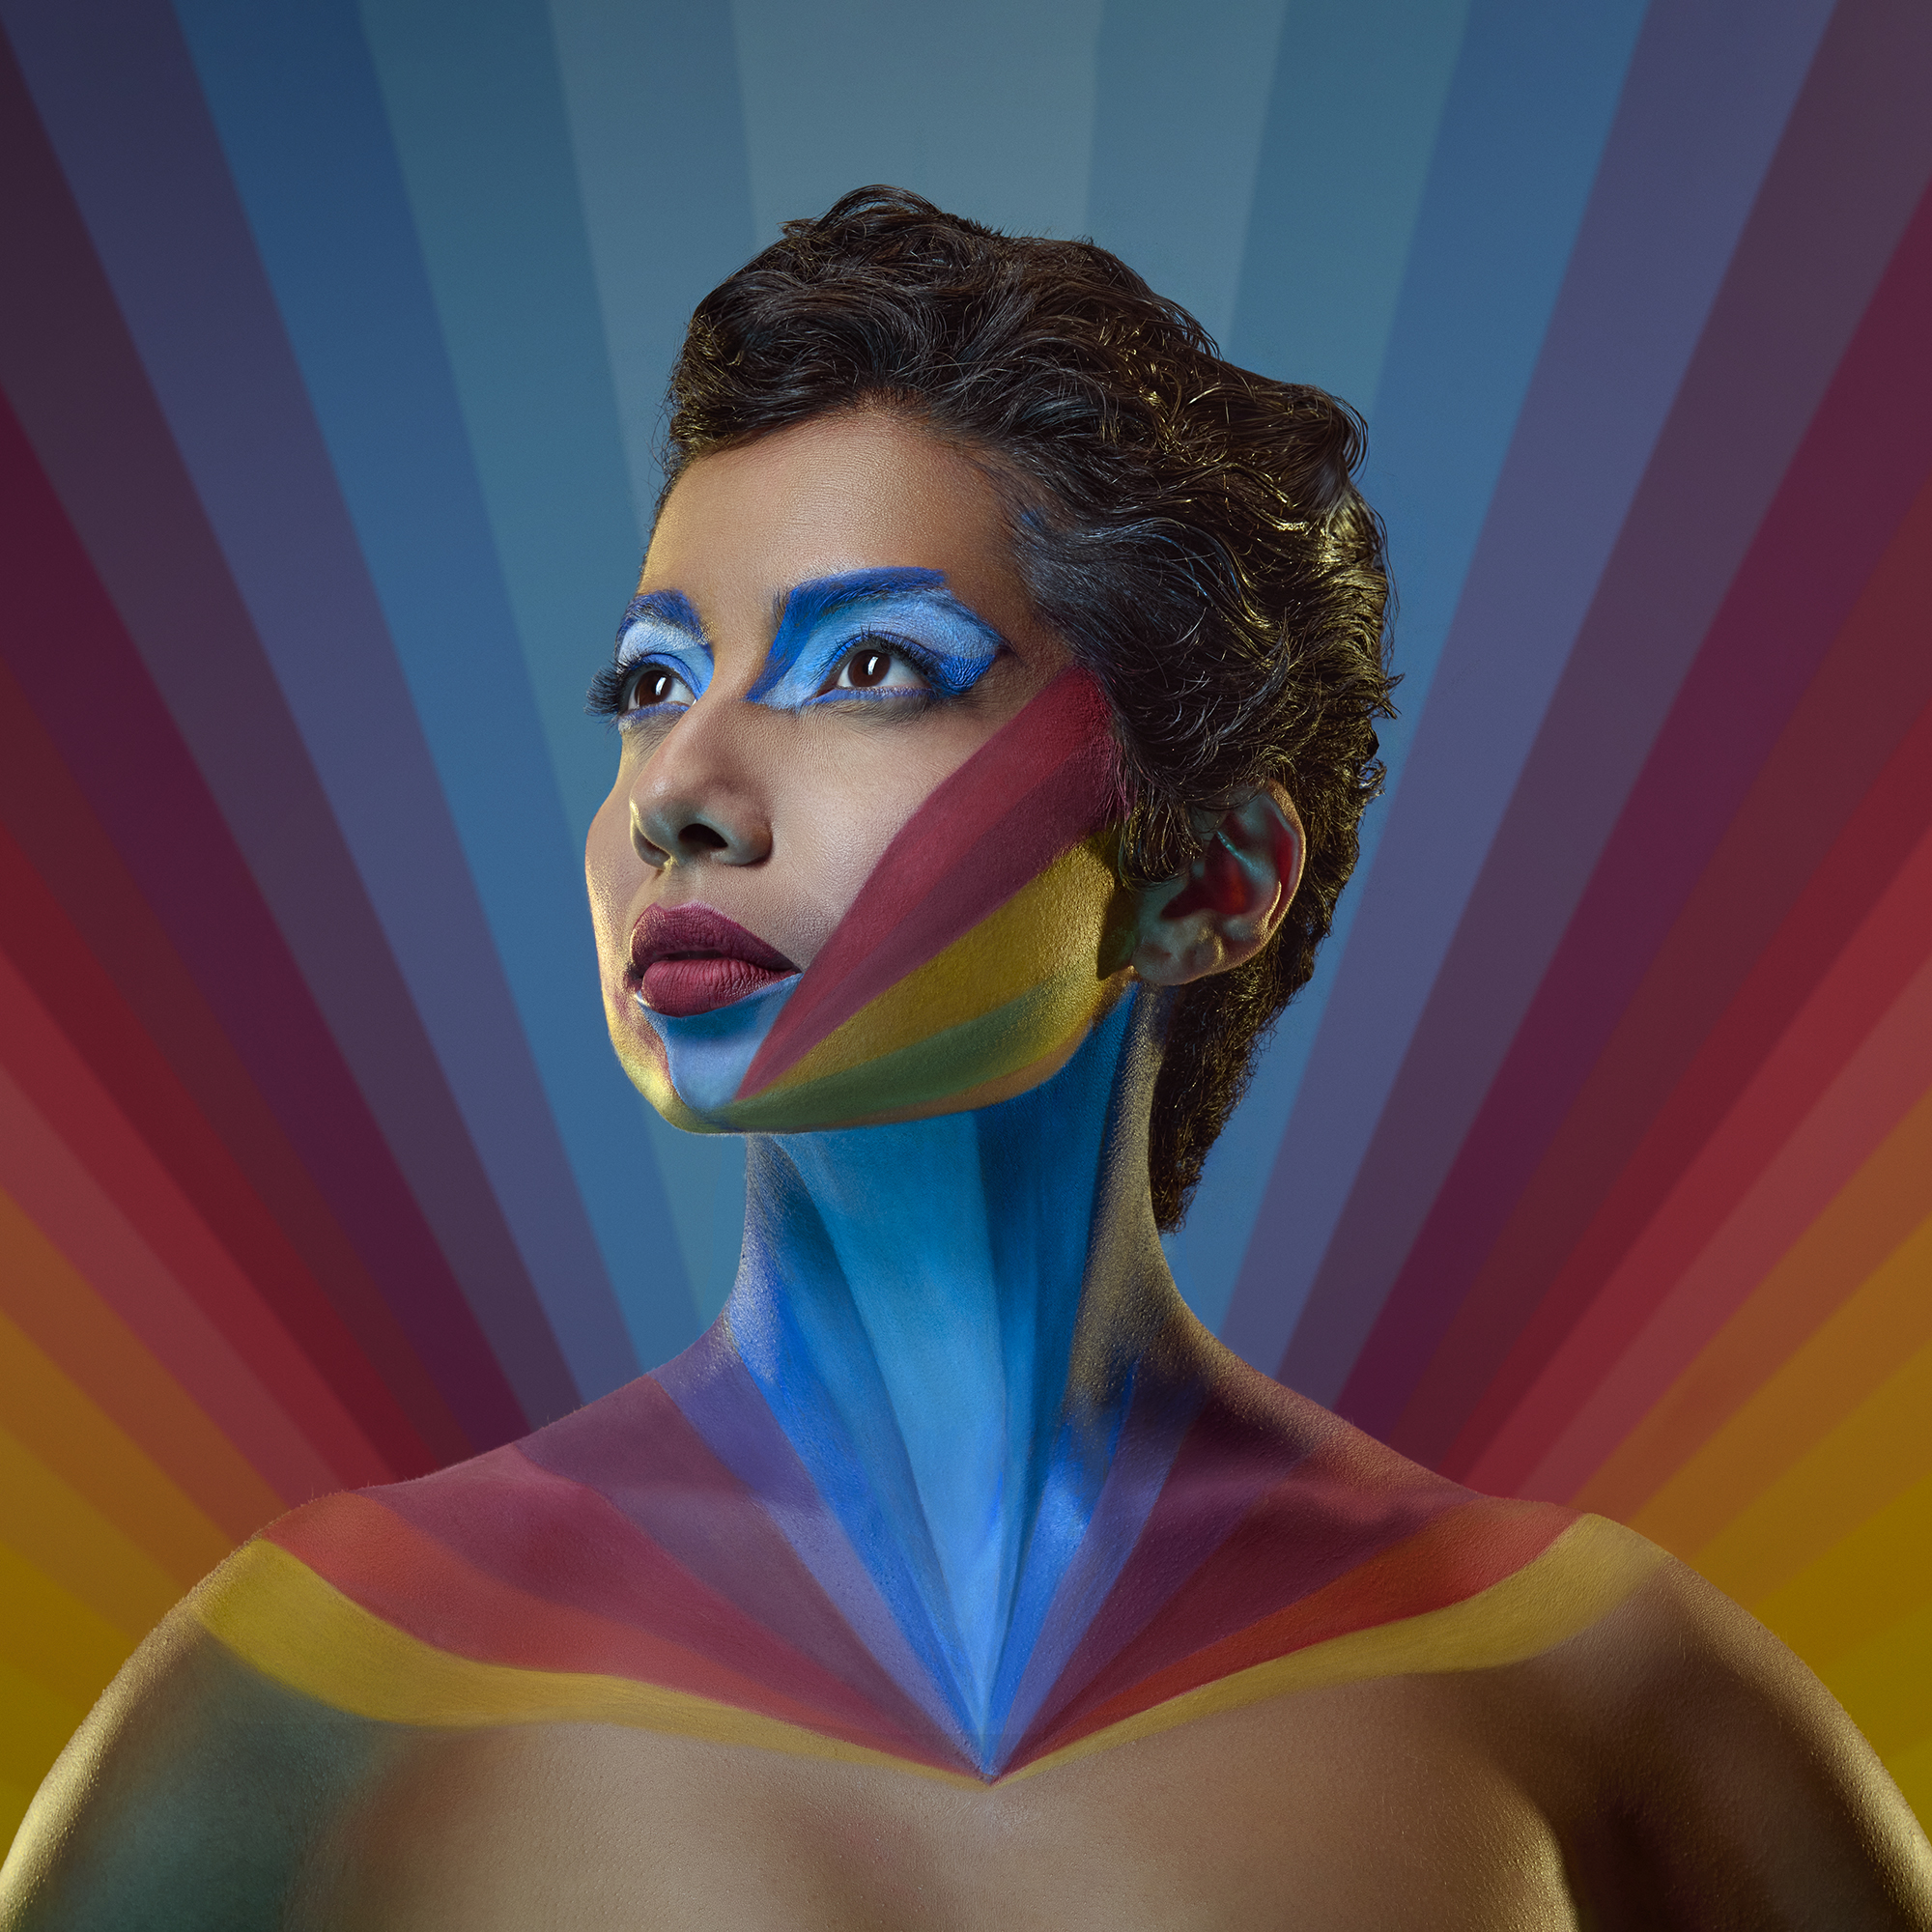
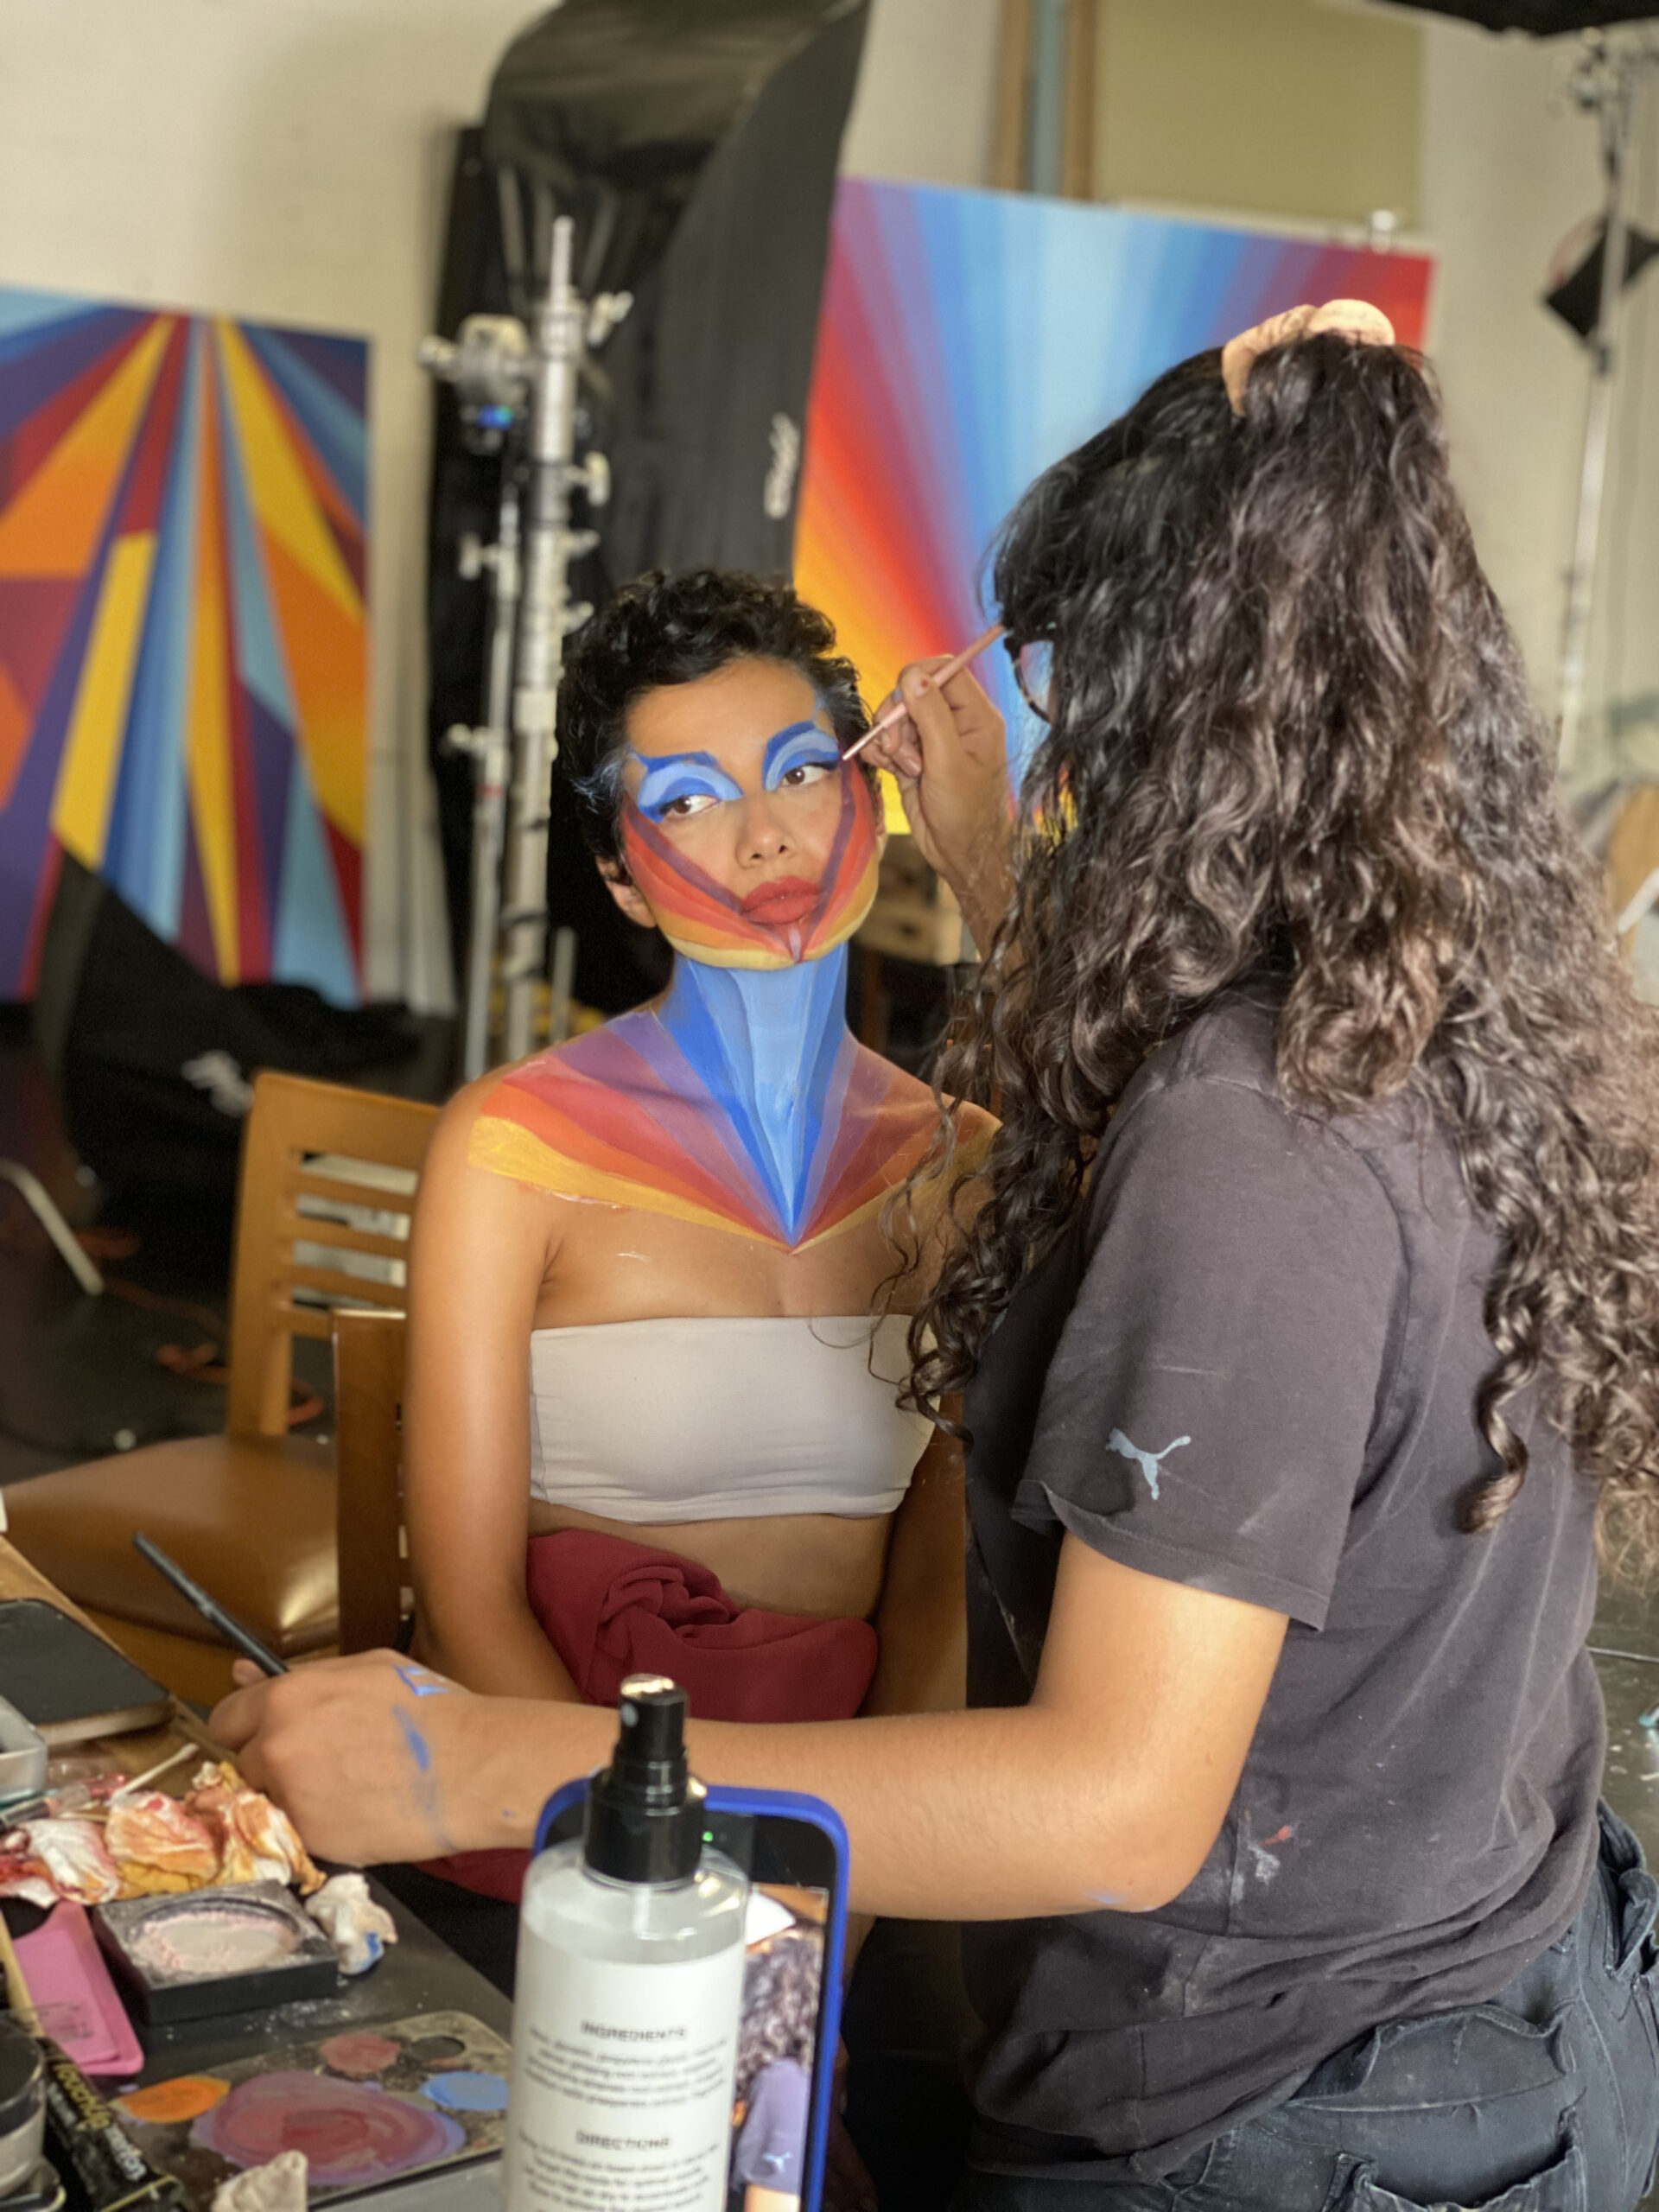
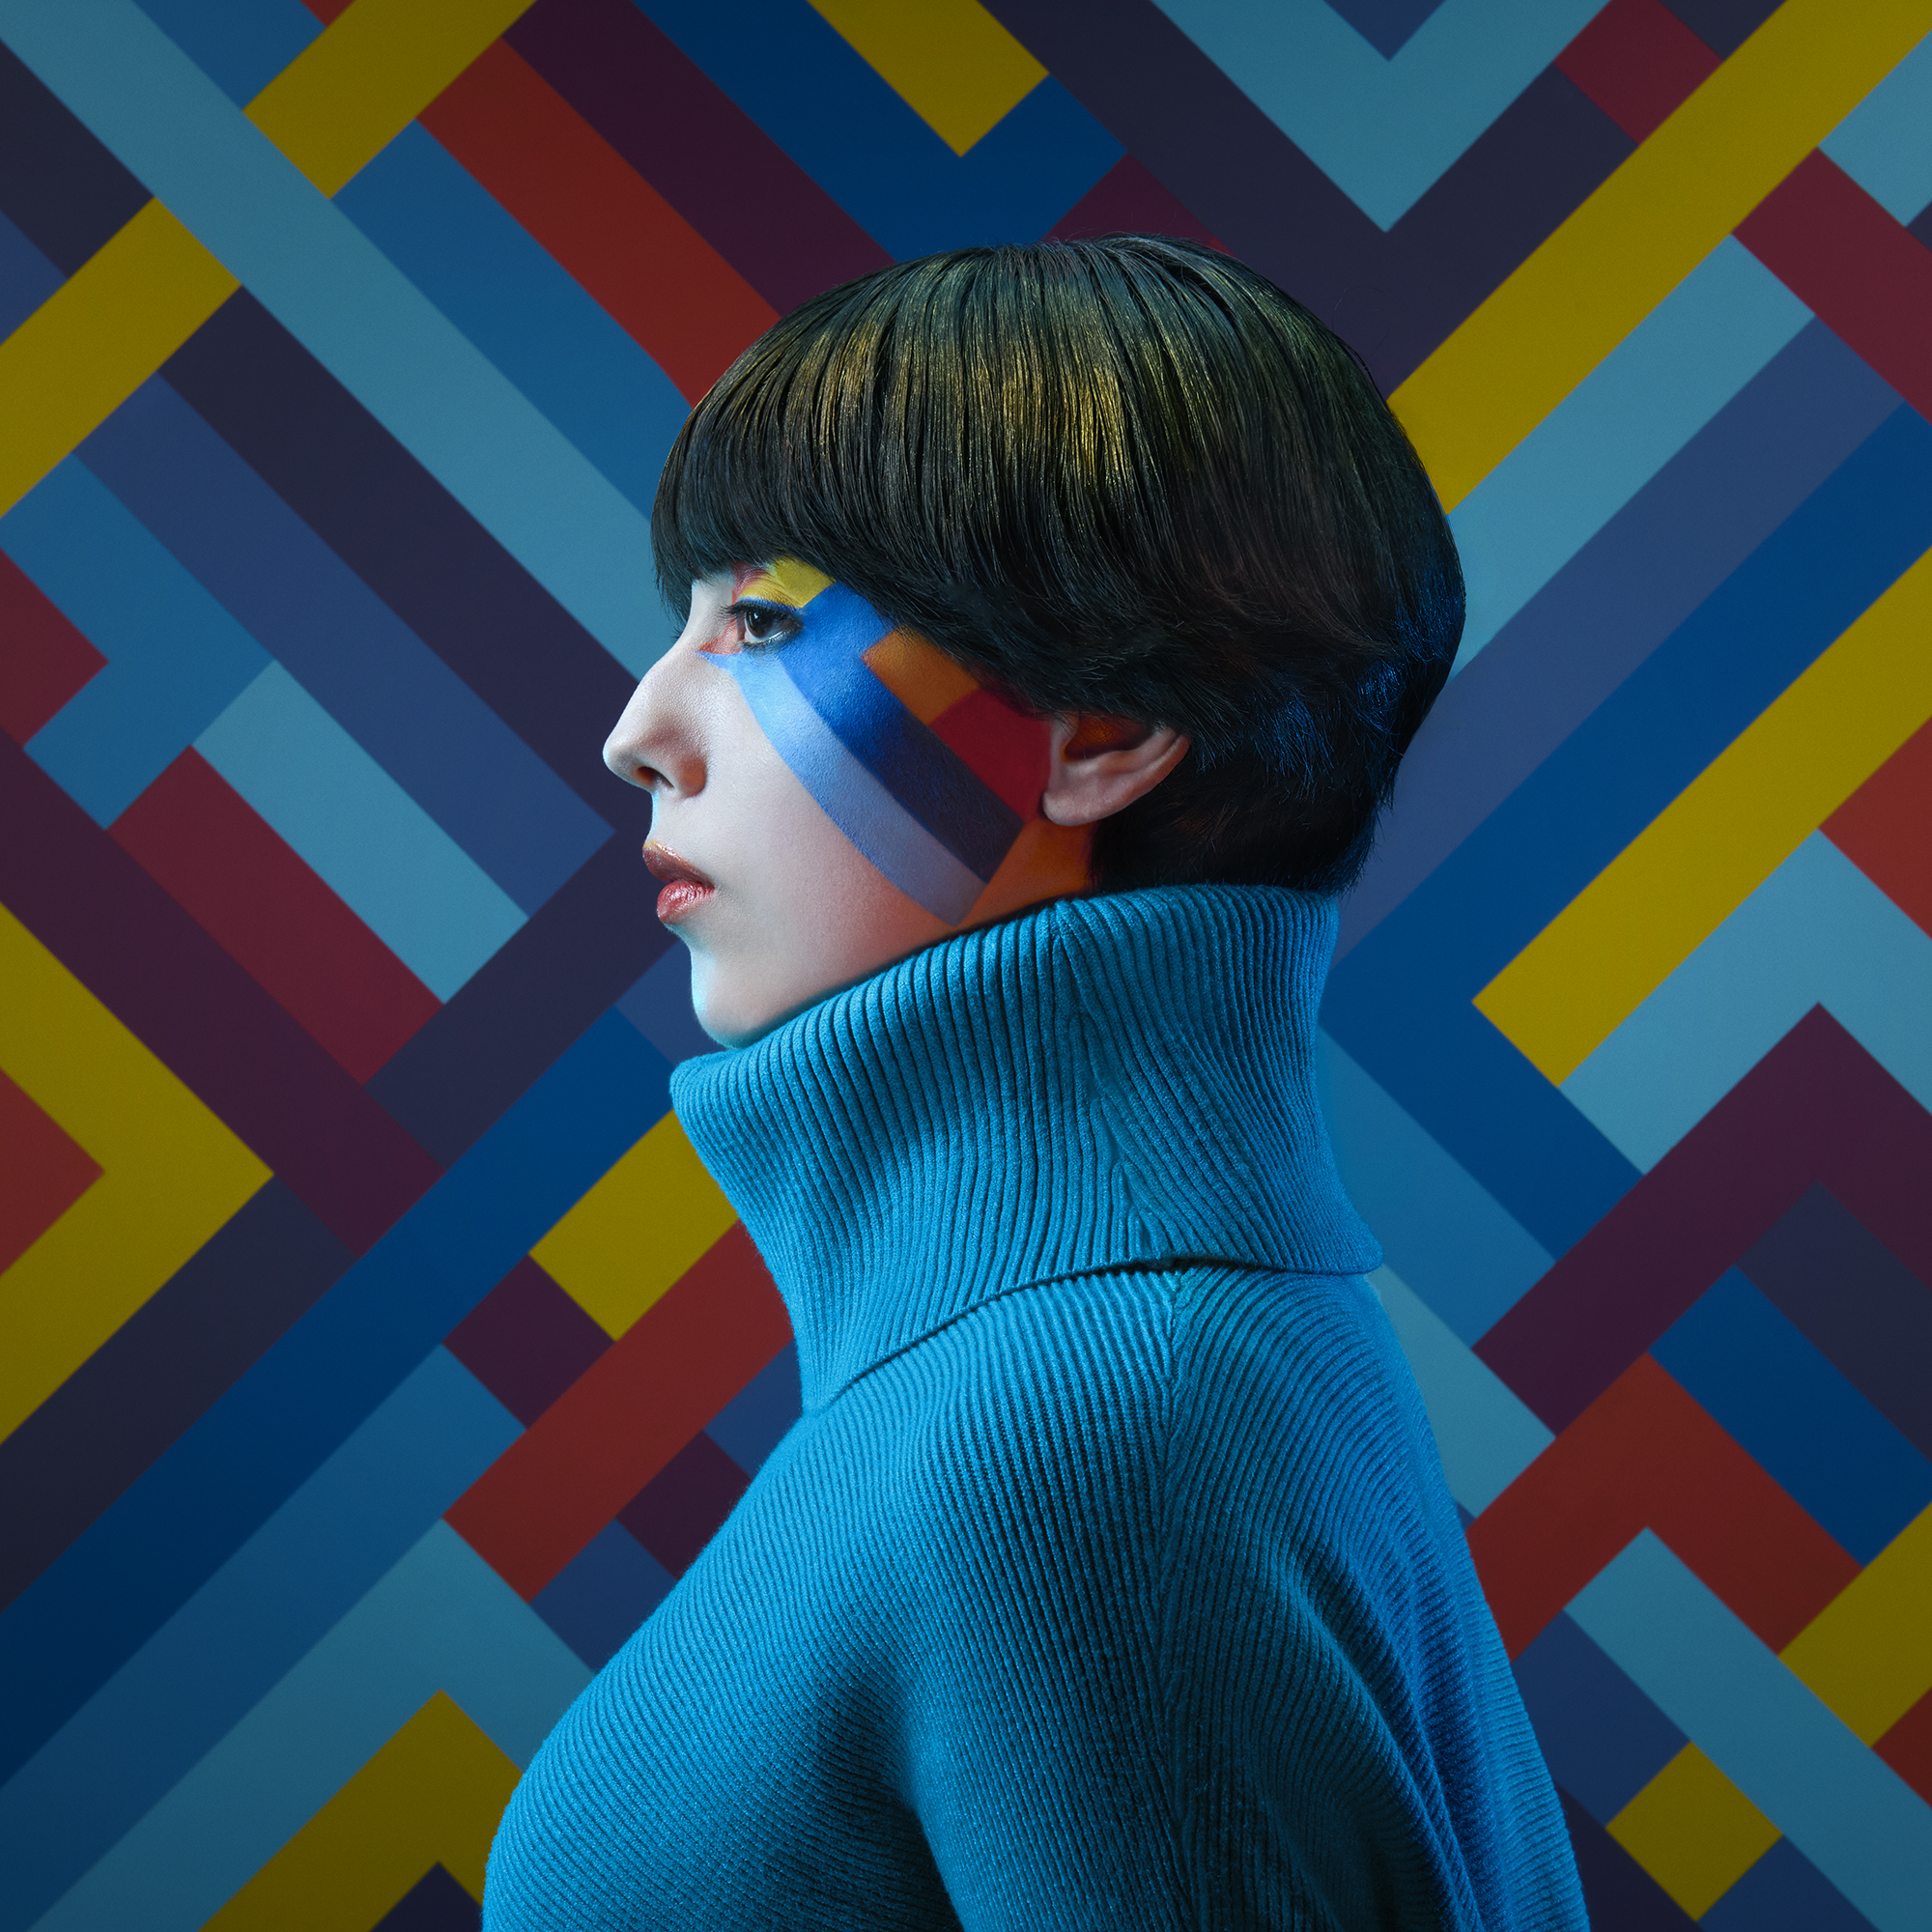
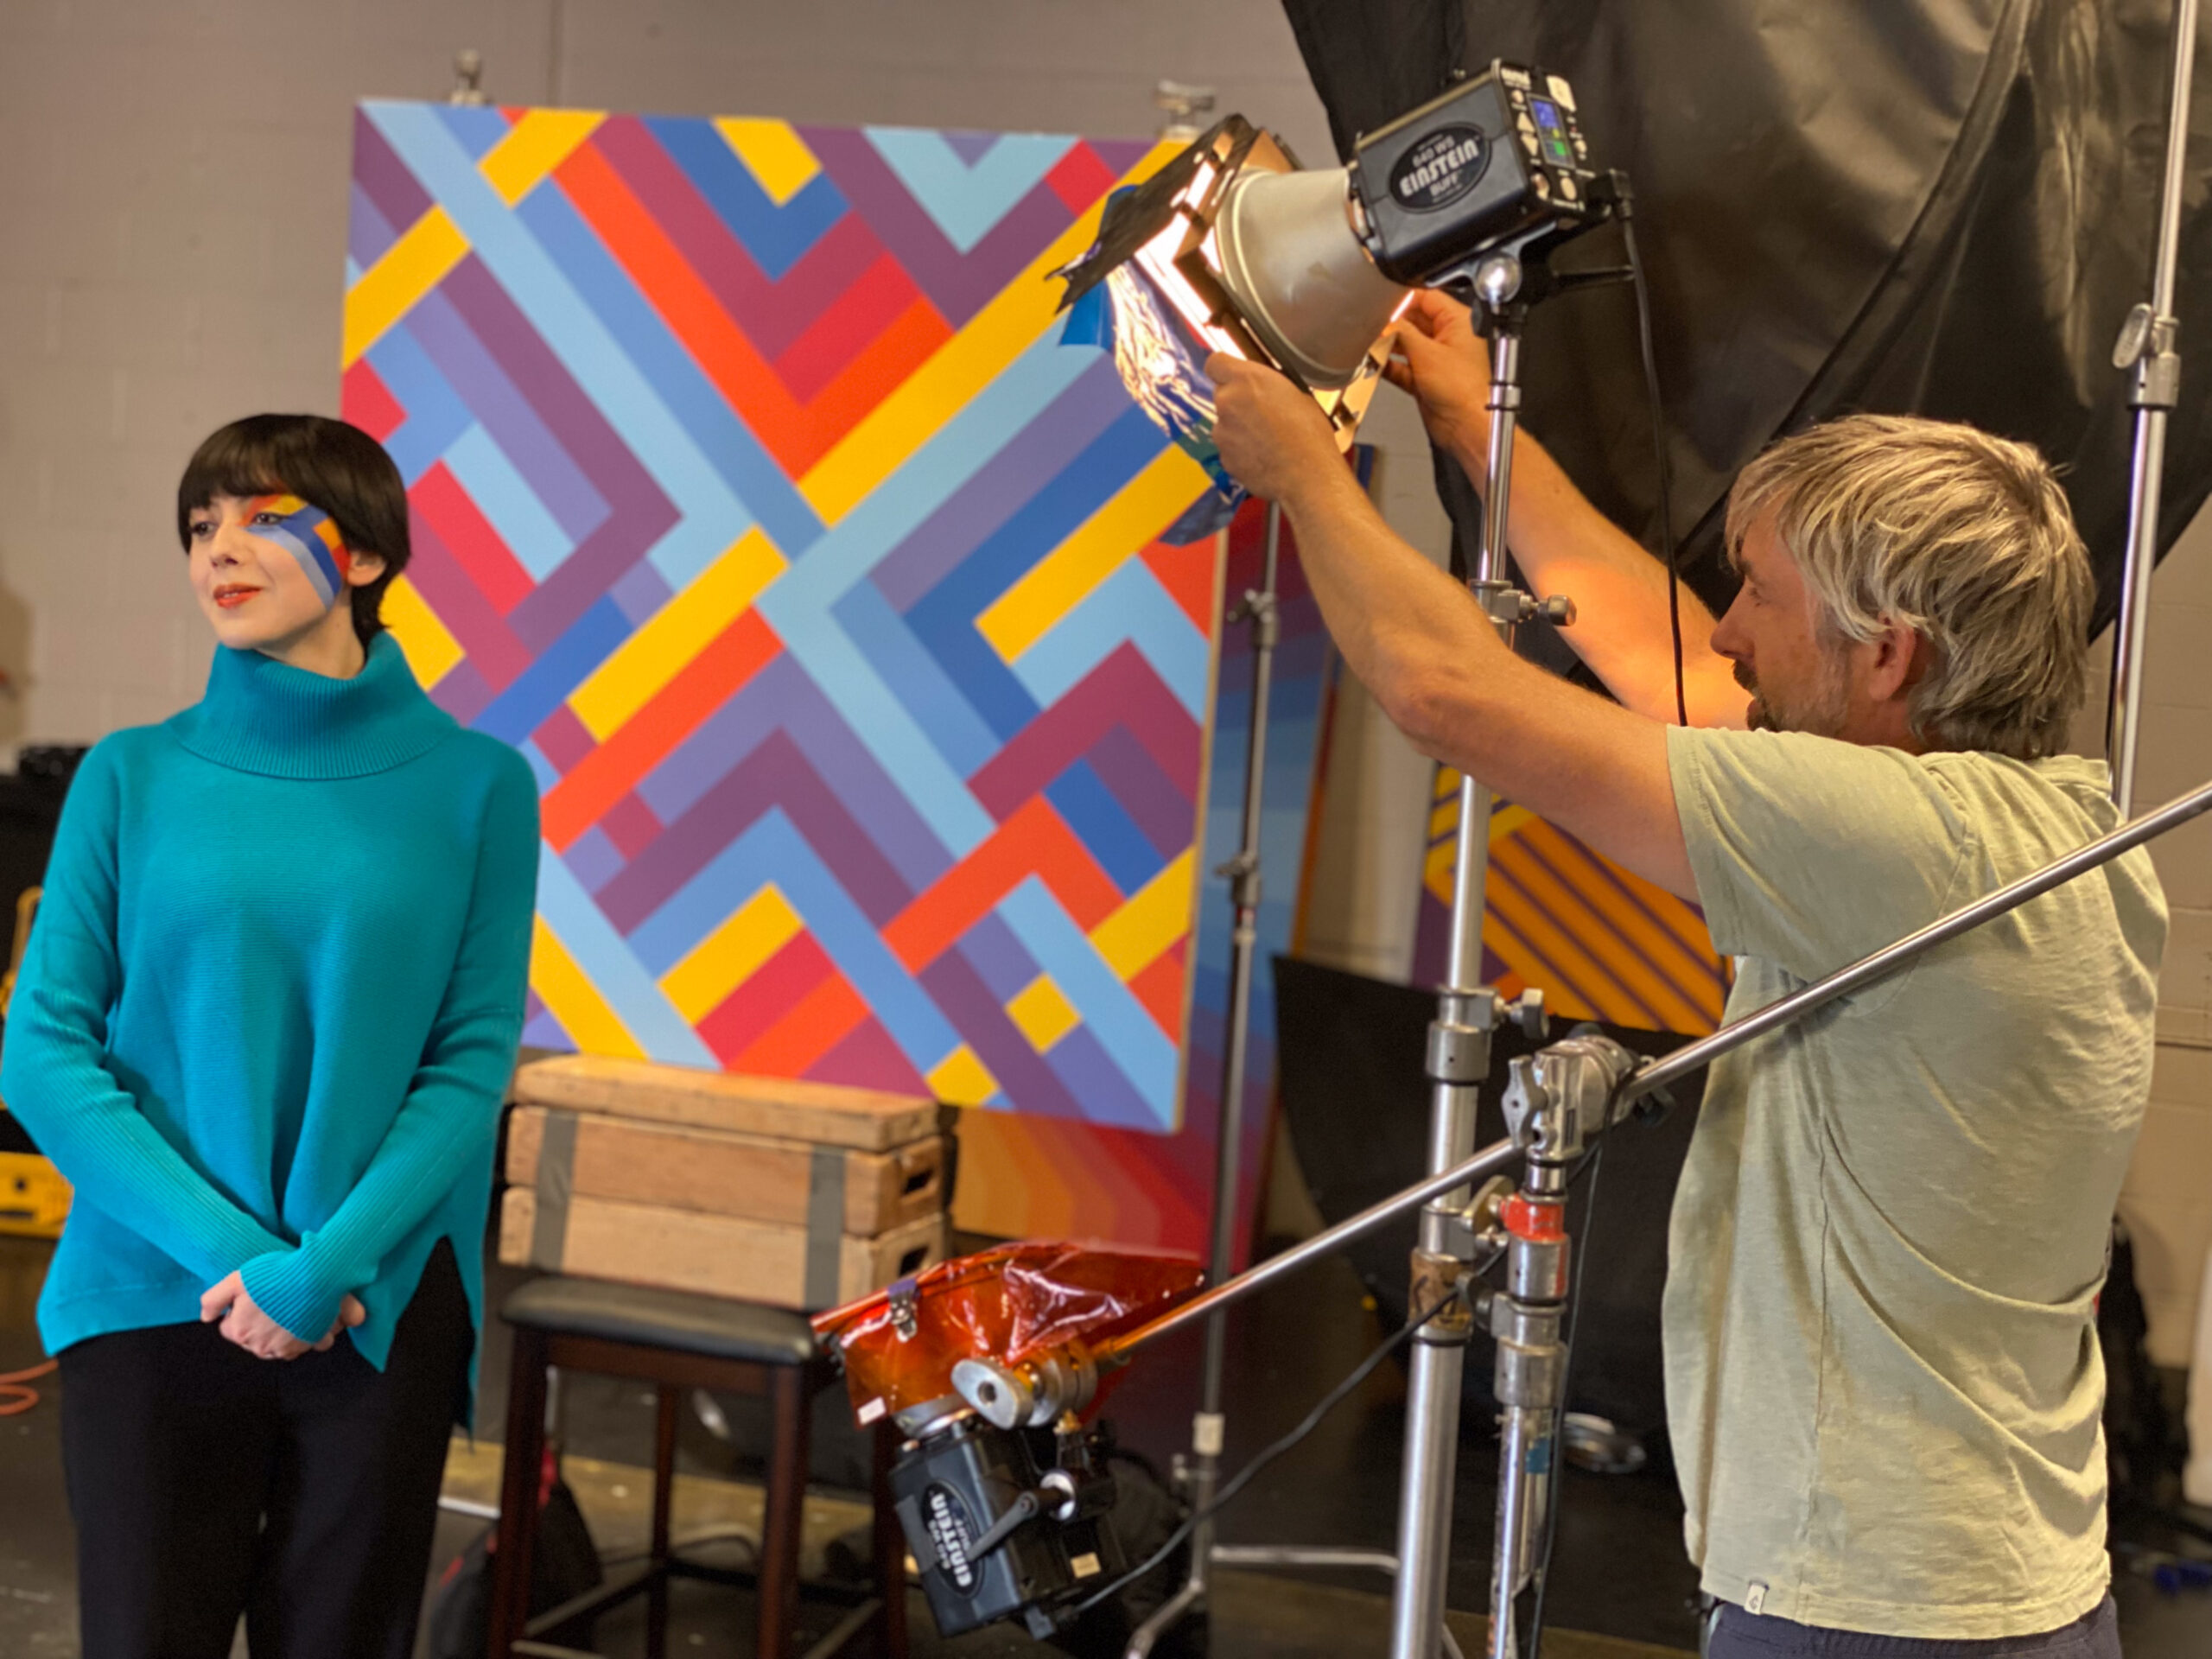
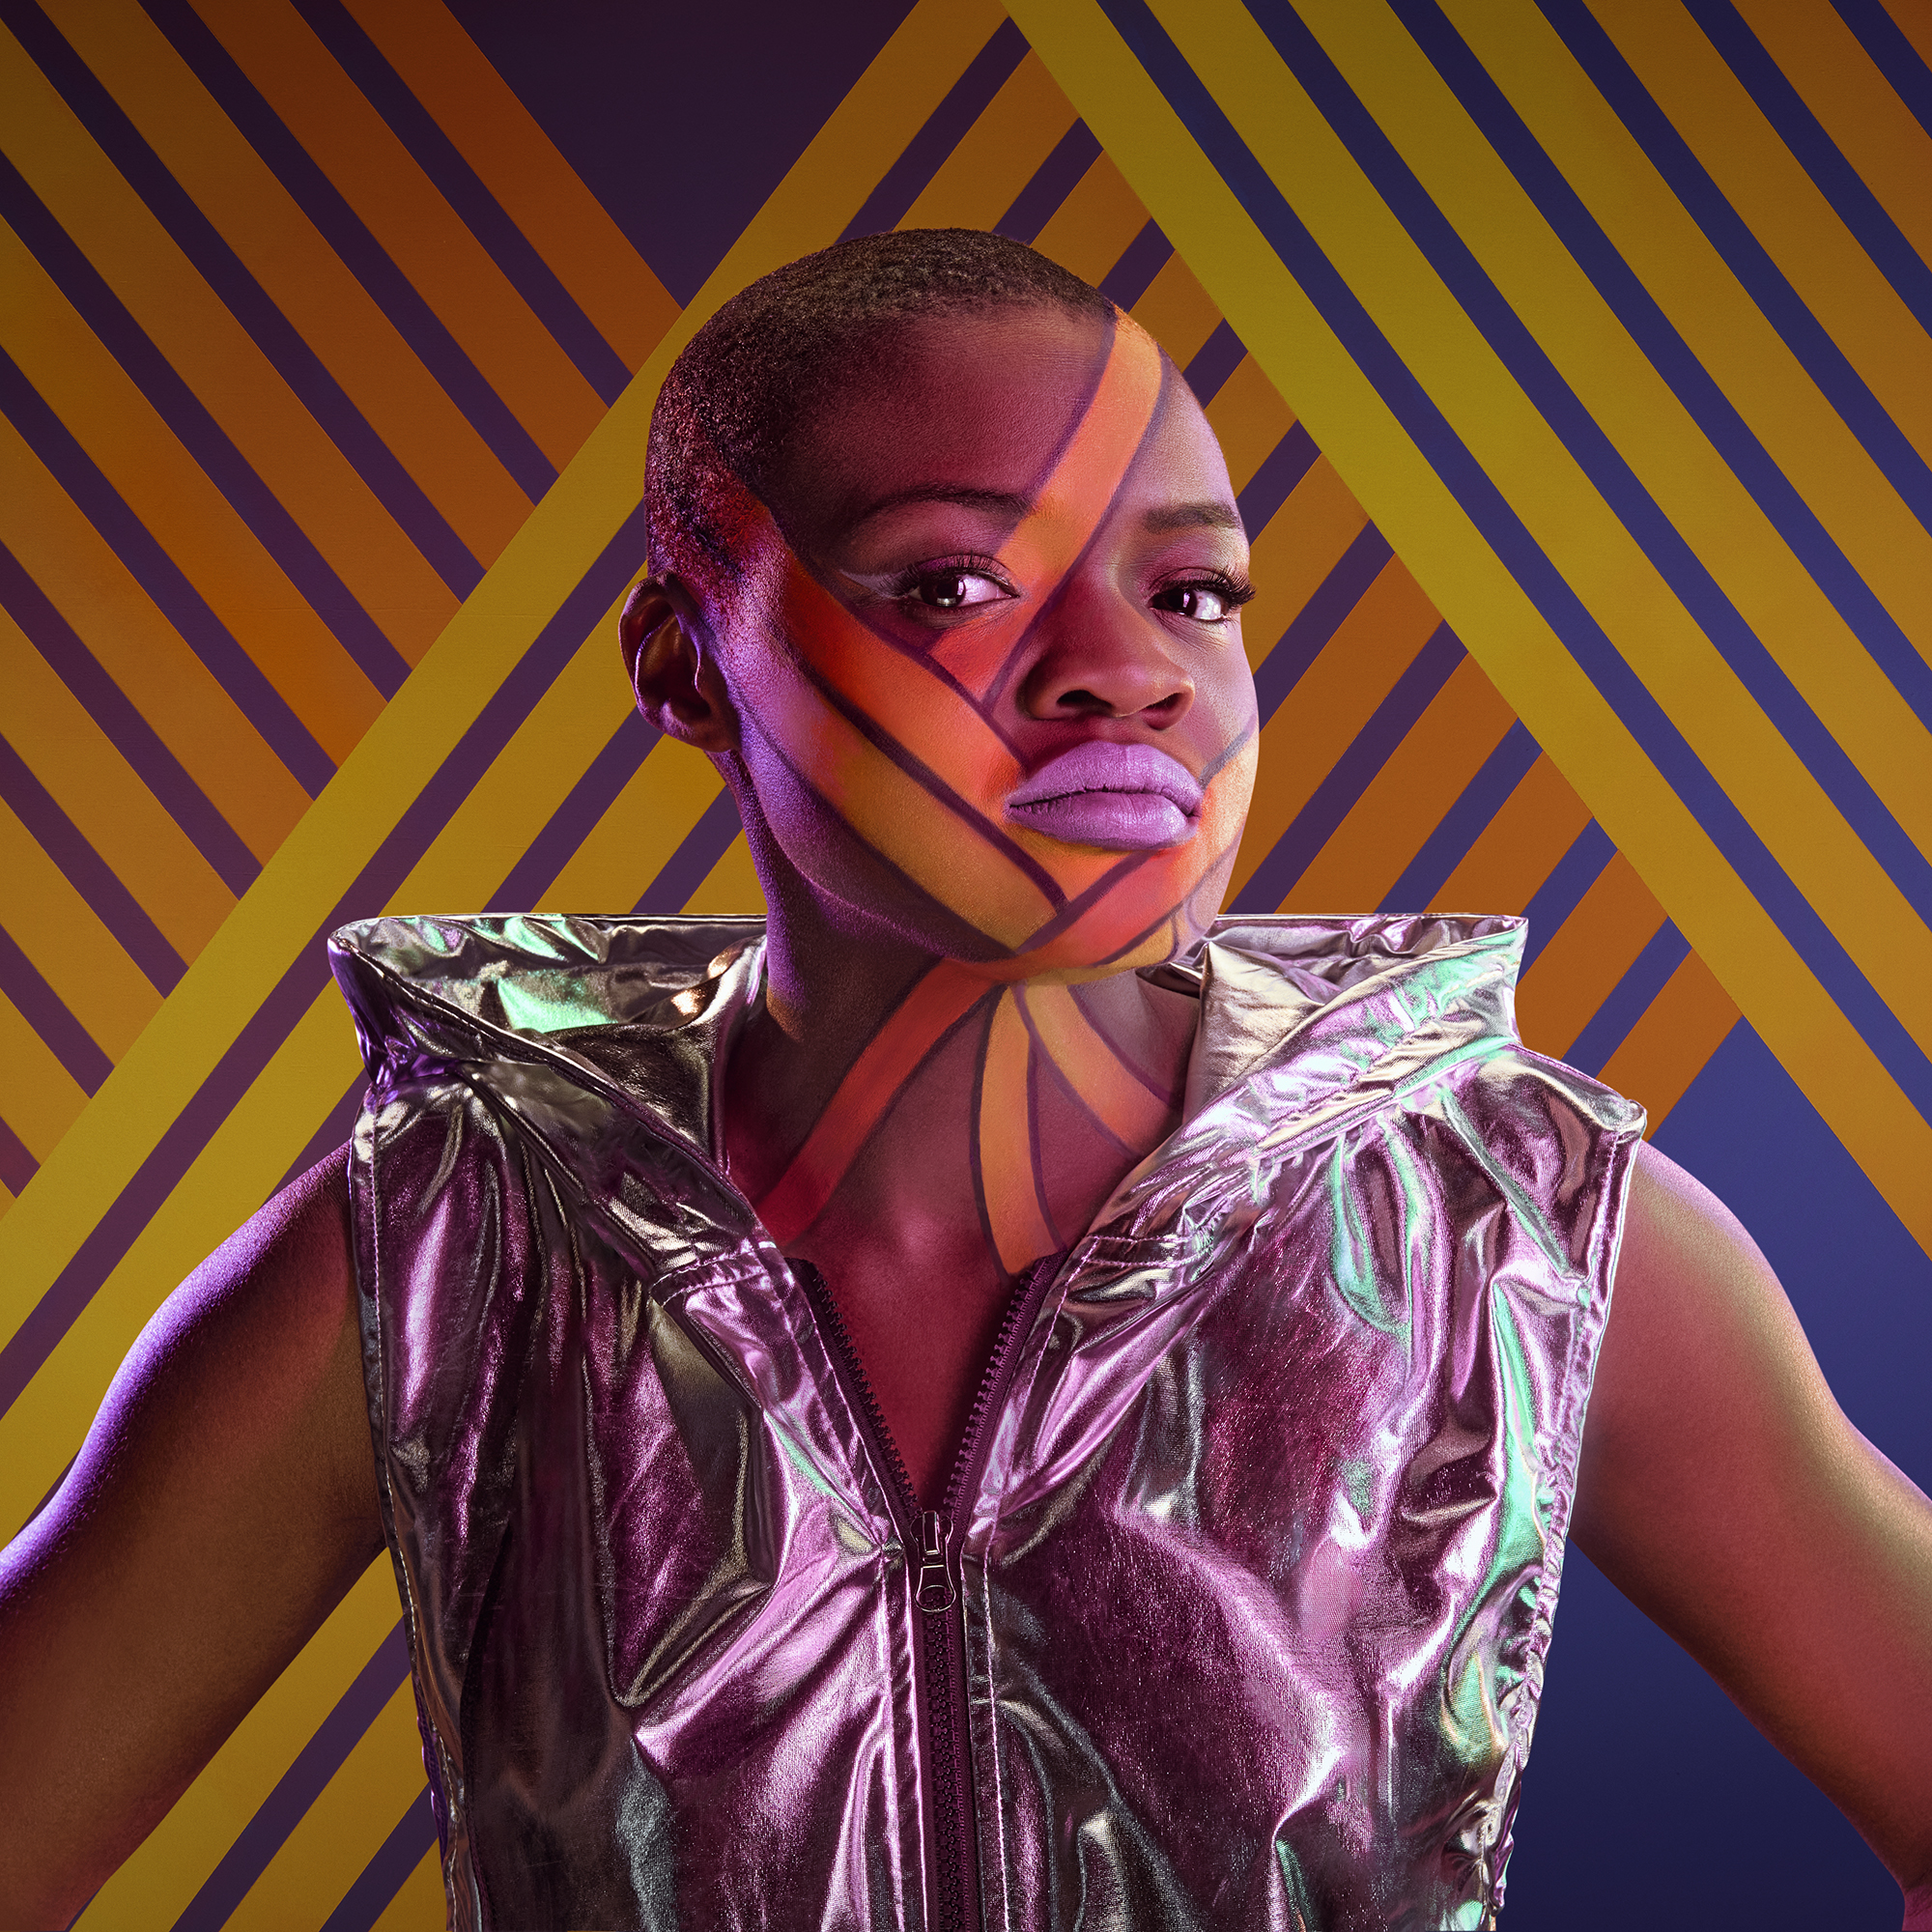
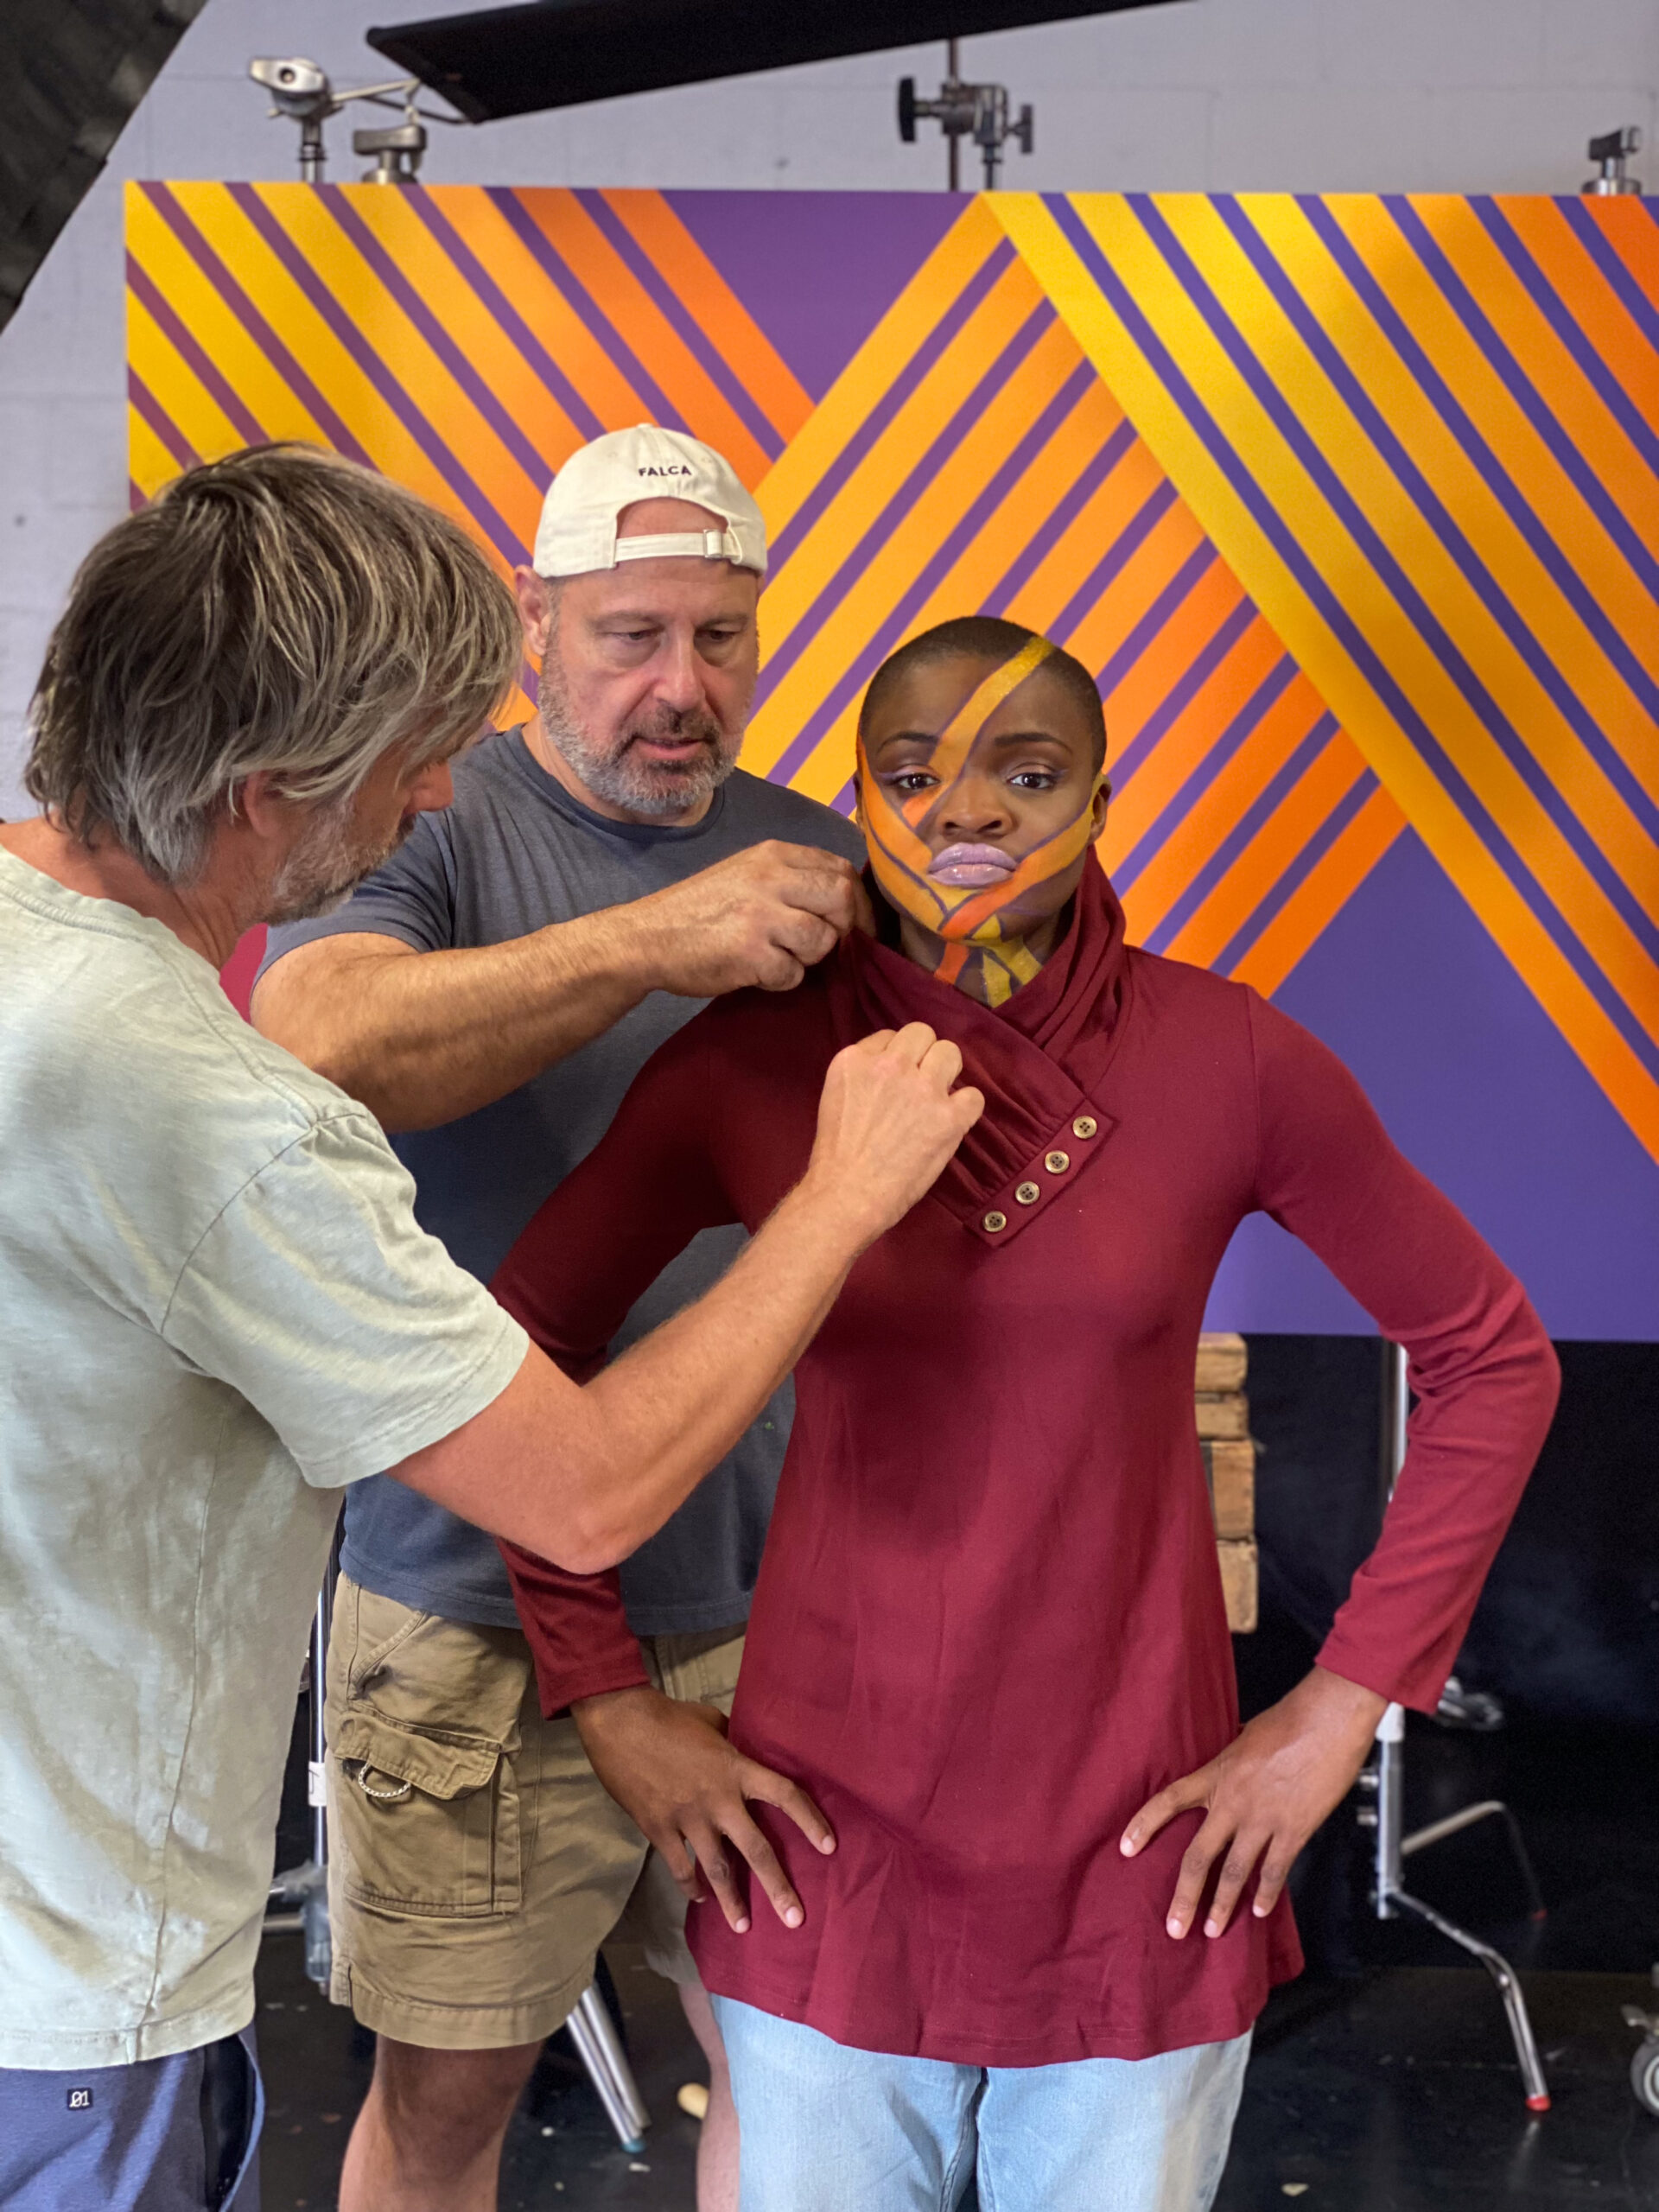
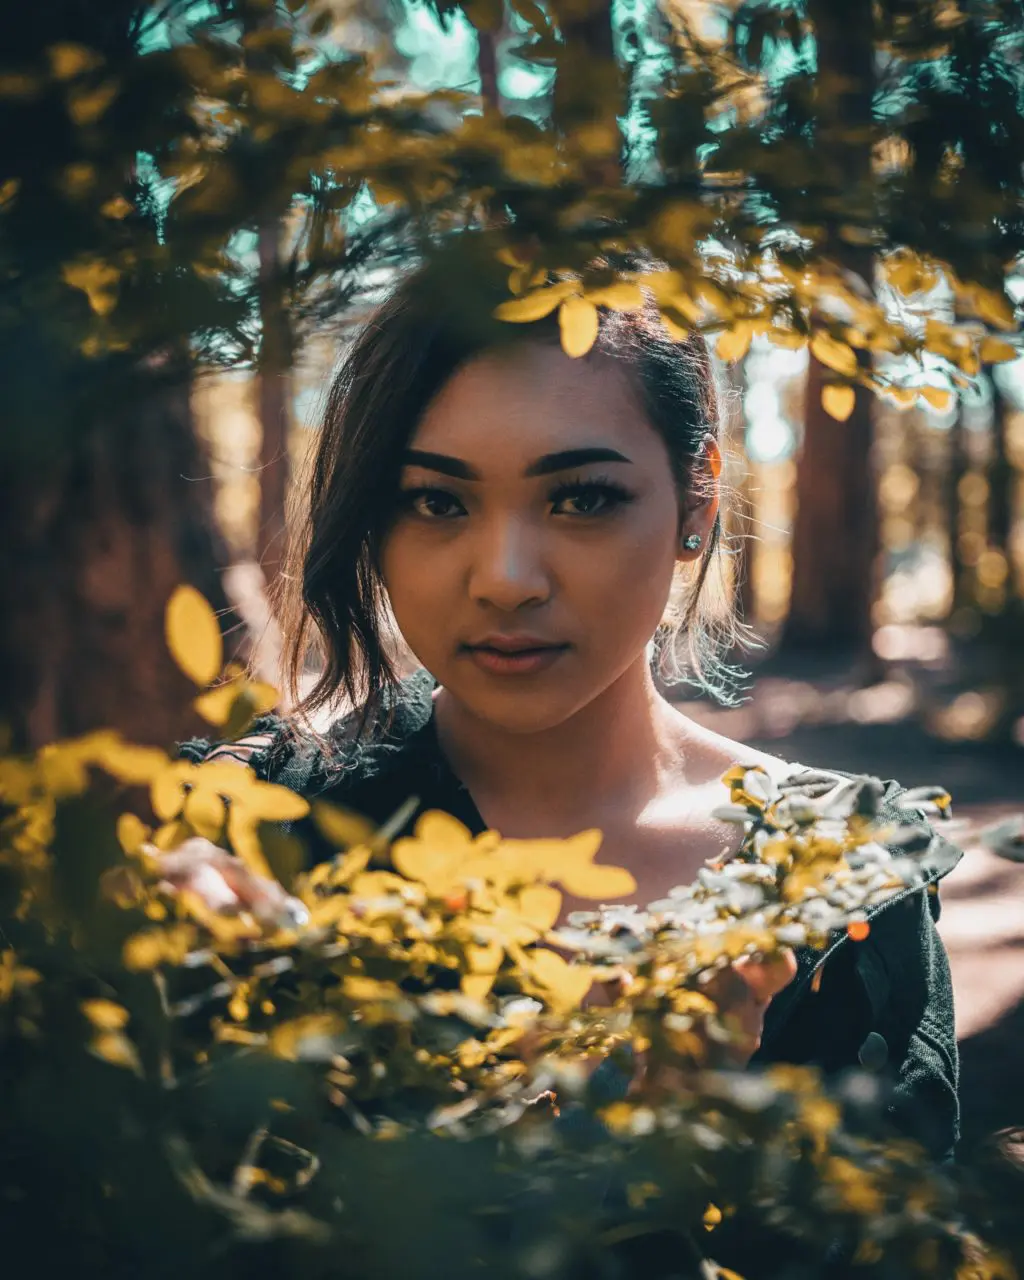
The Art of the Personal Project is a crucial element to let potential buyers see how you think creatively on your own. I am drawn to personal projects that have an interesting vision or that show something I have never seen before. In this thread, I’ll include a link to each personal project with the artist statement so you can see more of the project. Please note: This thread is not affiliated with any company; I’m just featuring projects that I find. Please DO NOT send me your work. I do not take submissions.
This project was born when we admired a friend’s paintings — and the idea snowballed from there.
How could we weave a real person into those painted worlds? What should the talent look like? Would wardrobe echo the canvas, or stand apart? Should the makeup reflect the brushstrokes? How should the light fall? Would pristine, flawless retouching make it feel alive, or just like another cheap AI image? Were we making a statement, or simply creating something beautiful?
To answer our questions, we did what we always do. We followed our process.
Suzanne Sease is a creative consultant and former ad-agency senior art buyer. She works with both emerging and established photographers and illustrators to create cohesive, persuasive presentations that clients can’t resist.
Suzanne offers something rare: an insider’s perspective on how client’s source creative talent. Her deep understanding of the industry is underscored by her impressive resume: 11 years as senior art buyer at The Martin Agency, seven years as an art producer for Capital One, and stints with the art-buying department at Kaplan-Thaler and the creative department at Best Buy, where she applied her expertise to reviewing bids to see which were most likely to come in on budget. Over the years, Suzanne has worked with a wildly diverse range of clients, including Seiko, Wrangler, Bank One, AFLAC, and Clairol Herbal Essence. Now, as a consultant, she is equipped to problem-solve for her clients from an unusually dynamic point of view.
As a longtime member of the photo community, Suzanne is also dedicated to giving back. Through her Art of the Personal Project column on the popular website aphotoeditor.com, she highlights notable personal projects by well-known and up-and-coming photographers. The column offers these artists excellent exposure while reflecting Suzanne’s passion for powerful imagery.
One of the most interesting subjects to photograph on this planet is the humans and it is because of the varied characters and personalities that each human possesses. Portrait is a unique genre and similar to all other genre in photography, one needs to give importance to composition when creating a portrait. It is through effective compositional guidelines that the photographer can create a visual impact and connect to the viewer through their photography.
A portrait needs to convey the character and mood of the person and composing a portrait can be a bit tougher than you might think. There are several things like lighting, right subject, best camera settings and locations you need to get right to create successful and compelling portraits.
In order to create engaging portraits and not snapshots, you need to have the skills and technical knowledge in making portraits. One of the most important factors among these are composition techniques and here are six composition techniques that can be used to improve your portraits.
Placing the eyes on the upper third
Filling the frame
Framing your subject using frame within a frame
Using leading lines
Leaving space for your subject to look at
Using different perspectives or angles
1. Place The Eyes In The Upper Third:
You may all have heard about the basic rule that most photographers start with – the rule of thirds. In order to create a visual impact in your portraits, when shooting in portrait orientation, it is best to have the eyes of the subject on the upper third of the frame.
Štefan Štefančík
If you are shooting in landscape orientation, then going by the rule of thirds, it is good to have the dominant eye of the subject on or near one of the vertical lines of the rule of thirds grid.
Bollie6734
Note:
An exception to the above technique can be when you are shooting full body shots where you can be positioning your subject on the right or left third of the image.
2. Fill the Frame:
When making a portrait, you are capturing the character and features of the person. So do not hesitate to get close and fill the frame with your subject’s face. Do not limit yourself to just the headshots, but try filling the frame when you do head and shoulders shots, medium shots or three-quarter shots.
Filling the frame with the subject’s face also helps emphasize textures and other details like lines, wrinkles, etc. in the portrait. You can also look into the subject through a closer view of their eyes in the photograph.
Luxstorm
3. Frame Your Subject With Frames Within The Frame:
When making portraits, you do not have to eliminate or blur the background, instead use the elements like doors, windows, lines, etc. to frame the subject to keep the viewer’s attention on your subject.
Clem Onojeghuo
You can also use elements like windows, doors, arches or any other natural or man-made structures in the foreground to frame your subject to create visually interesting images.
Corey Saldana
Samarth Singhai
4. Use Lines To Lead The Viewer To Your Subject:
Lines are another interesting feature when it comes to composition for any genre of photography. They can be so powerful and be used to lead the viewer into the frame to your subject. Use lines and frame your subject in such a way that the lines lead the viewer’s eyes to the subject or their eyes.
5. Leave Space In Front Of The Subject:
This is a very important technique that needs to be taken care of. If you are making a portrait where the subject is looking in one direction or their body is facing a particular direction, then, always leave space in the direction your subject is looking into (in front of them) or their body is facing, just like how you would leave space in the direction of movement of your subject. Do not frame in a way that the subject is positioned, facing a direction where they exit the frame immediately.
Mustafa Omar
6. Use A Different Angle Or Perspective:
Do not stop with just straight up shots at eye level, but change angles to show your subject from a totally different perspective. You can get higher or lower or move to the left or right of your subject to get the right composition and personality of your subject. It also helps avoid certain distracting elements behind or around your subject and can lead to powerful portraits sometimes.
TunaOlger
These are some of the many composition techniques required to create stunning portraits, but with the techniques mentioned here, you can create beautiful well-composed portraits. Once you master these techniques, do not hesitate to break these techniques in a creative way.
Last month, we wrote about Antigravity, the first 360 drone incubated by Insta360 and a group of third parties. They have now unveiled their first product, Antigravity A1, which will be the first drone in the world that boasts an 8K 360 degrees capture, combined with an immersive flying experience.
Image via Antigravity
Antigravity A1 comes with a dual lens camera so the footage can be captured in 360 degrees. One of the lenses is mounted on top and another at the bottom of the drone and this helps with capturing the entire 360 degree view.
The vision goggles that comes with the drone gives the drone pilot an immersive experience. It comes with FreeMotion technology and head tracking that allows the pilot to explore the surroundings from aerial view even if the drone is flying in a different direction. The rendering process uses advanced image stitching technology to make the drone invisible when viewing using the goggles and in the final footage, making the scenes look realistic.
The dual camera allows capture of everything in view allowing the user the flexibility to reframe the footage when post-processing. This also enables new editing possibilities like tiny planet, dynamic camera moves, horizontal flips, etc.
The grip controller allows drone pilots to use hand movements to control the drone and this paired with the goggles helps the user explore the surrounding in 360 degrees real-time. The drone also has safety features like return-to-home and a payload detection system to prevent misuse and unauthorised modifications.
Antigravity weighs only 249g making it light, compact and meeting the drone regulatory requirements in most countries. This drone is perfect for everyone right from families to creators.
The drone is scheduled to launch globally in January, 2026. Antigravity is also accepting applications for its Antigravity co-creation project where selected participants will be invited to test, explore and share their ideas.
You can check more details about this product here and here. We have more news for you to read if you are interested at this link here.
Marelux has unveiled its underwater housing for the Sony Alpha 1 II, announced in November 2024. The second-gen pro-level full-frame mirrorless camera combines a 50.1MP stacked image sensor with the BIONZ XR image processor, delivering 20fps continuous shooting (lossless compressed or uncompressed RAW) as well as 8K/30p and 4K/120p video recording. The Alpha 1 II features a deeper grip than its predecessor, so we’ve been seeing a steady stream of new housings, the latest being the Marelux MX-A1 II.
Designed to make the most of the Alpha 1 II’s capabilities, Marelux’s anodized aluminum alloy housing features an ergonomic design with controls arranged around the built-in handles. A quick-release baseplate allows the camera to be easily inserted with precision and removed again. Dual locking levers ensure the housing is safely closed, while ports and extension rings are secured in place using another locking lever. The housing ships with a vacuum detection and moisture alarm system.
Various innovative accessories are compatible with the new housing. These include the Flashfuel FF2100, which combines a flash trigger and a power bank (for charging the camera as well as powering the flash trigger); and the Remote Shutter Module, which allows you to control the shutter remotely using the Marelux Artemis 4500 RMT video light.
The MX-A1 II housing has an MSRP of $3,498 and can be ordered directly from the Marelux website.
PRODUCT INFORMATION
MX-A1 II Housing for Sony Alpha 1 II Mirrorless Digital Camera
INTRODUCTION
Marelux housing has the industry leading design that’s not only more compact than other brands but also more simplified in mechanical structure to make it easy to assemble. With 125mm port diameter, the biggest in the market, users can easily install and uninstall cameras with large lens through the housing.
Marelux housing is built using uniquely anodized aluminum alloy which provides superb scratch resistance, sea water erosion durability as well as the attractive options of various surface colors. The housings maintain a perfect balance between sturdy body and lightweight. It has the best-in-class ergonomics with all the camera controls readily available at your fingertips including AF-ON and Q Menu.
Marelux housing can be connected to other innovative products made by Marelux, such as 180-degree Smart Viewfinder etc., making diving and underwater photography easier, safer and more enjoyable.
FEATURES
Flashfuel FF2100 (Manual Flash Trigger + 2100mAh Power Bank Combo)
Patented Design: Tailored for underwater photography and high-speed shooting, combining flash triggering and camera power supply in a single compact device.
Ultra-durable Trigger Performance: Powered by a single CR123A 3V lithium battery, it can handle up to 300,000 flash triggers before replacement.
Robust USB-C Power Output: Integrates a 2100mAh rechargeable battery, offering up to 30W output (5–20V), capable of powering your camera directly.
Remote Shutter Module
With an invention patent, the Remote Shutter Module is designed to enhance underwater photography by providing remote control capabilities to remotely control the camera shutter release via Marelux’s Artemis 4500 RMT Light (42703). It features an effective receiving distance of 10 meters and an optical signal receiving angle of 140 degrees, allowing for flexible positioning and reliable performance.
Dual Locking System
Requires little effort to lock it in place, while making it almost impossible to be unlocked by accident, and it will take only a second to open if needed for a battery change.
Manual Flash Trigger
The flash trigger can translate the electric signal from the camera into light signal, with an extremely long battery life of 10,000 triggers on only two CR2032 batteries.
Built-in Lock
Extension ring and port can be safely locked in place with the built-in locking system on the housing with one simple click.
Sturdy Baseplate
A 50kg force is applied to secure the camera with the design of the quick release baseplate, while being extremely convenient to operate.
For some, it’s a simple way to interact with friends and show their images off. For others, it’s a valuable marketing tool. Whether you are just beginning in photography or a seasoned pro, social media is a valuable and useful place for photographers.
Not only is it a place to display and show off your work, but its many different specialist groups can be great places to learn, interact, and solve issues with your gear or photography. However, some social media platforms are much better places to be than others as photographers. There is also the danger that we might use social media as a way of validating our skills.
Today we are going to take a look at some of the top social media platforms for photographers in 2025. We will look at how they can help our photographic journeys rather than as a marketing tool.
We are going to kick off with the granddaddy of photographic social media platforms, Instagram.
Is Instagram Still The Place For Photographers?
The short answer is no, the long answer is, it’s complicated. Instagram has evolved from a platform where all images were displayed at a fixed resolution and image ratio, to a multimedia platform where short form video is king.
As a photographer wishing to show off purely their photography work, Instagram is a busted flush. It’s very hard to build a following and engagement, simply by posting images these days.
There is the argument that Instagram reels are a good place for learning photography, but personally I see a lot of engagement bait and very generic photography “lesson” reels. Instagram’s algorithm seems to favour uniformity and conformity these days so many of the reels are the same advice wrapped up in slightly different ways. Often that advice is also quite poor.
Instagram, the grand daddy, but is it still relevant? By Souvik Banerjee
As a marketing tool, if you have time and/or a team, posting behind the scenes reels as well as images, can build a following and get you noticed; however, unless you are a fairly successful professional, it’s probably not worth investing a huge amount of time in Insta
The Platform Formerly Known As Twitter
Twitter used to be a decent place for showing off your images if you had a decent enough following. These days X, is still a reasonable place so long as you stay within the photography genre. Step outside, just for a moment, and the algorithm will ambush you.
The photography community in X is still pretty friendly. Lots of sharing of images, people willing to give advice, and even the potential to sell a print or two. I have built a decent, engaged following on X by doing a daily showcase. I invite people to post images to my daily theme, then retweet them. I also do an honest critique post once a month, where followers can have an image critiqued by me or other followers. It has proved popular and people enjoy getting real, constructive feedback on their photos.
As a marketing tool, X is pretty limited. Like many platforms these days, external links get heavily demoted, however you can get some engagement by posting a photo to the first comment and a link to the second.
Avoid the politics, and X can be ok. By Daddy Mohlala
What You Should Know About BlueSky And Threads
I have put these two together as they are both new kids on the block, relatively speaking, and both competitors to X. Bluesky is very similar to the Twitter of old, with very good reason; it was created by Jack Dorsey, the original creator of Twitter.
As a photographer’s platform, it falls into the showing category more than the learning. However, the photography community is well-engaged and very friendly. The odd thing I find about Bluesky is that images get lots of likes but very few comments.
The reverse seems true of Threads, which, for photographers, behaves in a similar way. It is again a displaying platform rather than learning, but there does seem to be more commentary, often very useful, compared to Bluesky. The main issue for the photography community on Threads seems to be the infestation of rage bait subjects (this is common across all subjects on Threads). A lot of photographers seem to post “controversial” takes in order to boost engagement. The irony of this approach is that these posts get lots of engagement but don’t pick up many followers.
On both Bluesky and Threads, I have built over 1.2K followers, simply by posting good images, at least once per day. However, I don’t find them particularly useful as photographers’ platforms.
The new kids on the block. Threads and Bluesky
Facebook
This might surprise you, but I think Facebook is probably the best social media platform for photographers in 2025. There are two main reasons for this. The first is that you can create and post as a page, a completely separate entity from your personal timeline. The second is the sheer number of highly specialised photography groups. If you can think of a sub-genre, there will be multiple groups in it.
Creating your own Facebook page is a great way to build a following that is there just for your photography. Many groups allow you to join and post as a page , and if people like your work, you can invite them to join your page.
You don’t need to be a business or professional to have a page. Anyone can create their own photography page and tailor it to their own genre.
Facebook, despite the endless adverts, is actually quite good. By Will Francis
Photography groups on FB can be incredibly helpful, both to new photographers and advanced enthusiasts alike. Whilst the biggest groups can get toxic, the smaller, very specific groups are full of great photographers who are happy to give advice. Local groups are a great way to show off your local photography and build a local following.
Don’t Sleep on YouTube
Whilst there is always an ongoing debate as to whether YouTube is a social media platform, there is absolutely no doubt that it’s a fantastic learning resource for photographers. Whether you are looking to buy some new gear, learn a new photographic genre, or up your editing game, there will be multiple videos available.
As on any social media platform, there can be bad advice, but the bigger photography channels got there by creating engaging and factually useful videos, and in general will be giving out very good advice.
There is a caveat, and that is gear reviews. There are a number of larger channels that predominantly do photography gear reviews. They are often given new equipment before release and put out videos on the day of release. Whilst these videos can be useful in understanding the capabilities of a new piece of photography gear, they can be shills for the manufacturer.
In my opinion, the best gear reviews come from the smaller channels where they have bought it to fit into their own photographic workflows. They are much more likely to give impartial opinions.
For experienced photographers, YouTube can also be a great place to showcase and impart your own knowledge to others. Creating your own photography videos is a good way to give back to the photographic community and gives you an extra creative outlet.
There are a number of other social media platforms. Vero, Glass, and Foto are specifically tailored to the photographer, but none of them really have the pull and power of the bigger platforms. They are good for showing work to your peers but not to a wider demographic.
TikTok and Snapchat both have short-form video photographic tutorials, but like Instagram reels, they tend to be very generic and often misleading.
An often underrated platform for photography is Reddit. There are a number of Reddit photography communities, and they are well-moderated and very useful. One of the great things about Reddit is that it often shows up high on Google searches for specific photography topics, making it a useful go-to for advice.
Social media is not to everyone’s taste. However, as both a learning resource and a place to meet and engage with like-minded photographers, it is invaluable. In my opinion, despite potential toxicity and endless adverts, Facebook is the best place to be for new and enthusiast photographers. The fact that you can create a page dedicated to your own photography is a great way of building up a dedicated following of people who enjoy your work.
I am not the photographer I once was—and neither are you. Change is inevitable (and desirable), and as you look at your work, I hope you see that change reflected in the photographs you have made. As the months and years roll by, the camera becomes a little more familiar, a little less intimidating. At some point, it just feels like a part of you: your fingers moving to buttons without conscious thought, your hands moving the whole rig left and right to frame compositions you aren’t aware you’ve envisioned. Slowly, ever so slowly, you become the photographer you are. Some of that is intentional, and some of it feels like it just…happens. And some of it is hard-earned, a matter of trial and error and (finally!) figuring out that one technical problem that’s been dogging you for years. The pictures become better when you experience this kind of growth.
Some of that growth forward is personal rather than technical, an evolution that is tied to the way you think and feel and see the world. It’s often this progress that is the most noticeable. A moment of courage to try something different, like the way (for example) so many people experiment with intentional camera movement, and it becomes their new thing. A moment of curiosity when you think, “I just want to try something,” and that something is so fascinating to you that it becomes one of those threads that unravels the sweater the more you pull it, only in reverse, because in this metaphor, the sweater becomes more complete, not less. Over time, this kind of growth leads to images that are not just good, but truly your own.
One could argue (here I go!) that the first kind of growth is a movement forward in craft, and that the second represents an onward journey in vision. The former satisfies the technician in us, the latter satisfies the artist. Both are necessary, perhaps not in the same measure, but I’ve found that they feed each other, even require each other. Learning some new technique, even just playing with some new piece of gear, gives me glimpses of creative possibilities I had never considered, and the technician nudges the artist forward. The artist, ever curious and disinclined to sit still, tries to do something, imagines something they don’t know quite how to do, and the technician is called in to figure it out, to find new ways or new tools. And the artist moves into new territory, makes something different than they’ve ever made or even imagined before.
The technician pushes the artist in us forward; the artist pulls the technician into places they’ve never been needed before. Iron sharpens iron, as they say.
I have long felt that this tension is one of the keys to growth. Most of us naturally fall more to one side than the other (artist or technician), but that’s not a liability; it’s an opportunity. It’s the way forward for the photographer who wants to evolve and keep up with the human being they are becoming. That tension is a gap—a space into which we can move—and it’s key to our evolution.
The question of growth or evolution is often phrased in the negative: how do I get unstuck? How do I escape my rut? Sometimes (often?) it just feels like boredom, a deep sense of dissatisfaction or ennui, but the need to escape from it remains. Everything hinges on opening the gap, or finding where it already exists, and exploring it. The tools of that exploration are curiosity, challenge, and change.
Learn New Things
Curiosity is the exploration of a knowledge gap. You realize you don’t know something, and a fissure opens. You can either shrug it off, accept a posture of “don’t know, don’t care,” or you can give yourself over to curiosity and peek inside. Sometimes that peek reveals something new that doesn’t particularly draw you in; other times, your eyes blink a little in the darkness, and what you see is a cave of wonders that invites you deeper. To accept that invitation, you move forward. Perhaps it’s the moment you look through the macro lens and see an entirely new world of colour and shape. Maybe it’s a first experience with a subject that so intrigues you that it pulls you down one of those rabbit holes from which you never really emerge.
Want to evolve as a photographer and get out of your rut? Nurture your curiosity, ask questions, follow the gaps in your knowledge, and you will open yourself to new directions in your work.
Do Hard Things
Challenge, often seen as an obstacle to our best work, is instead the way forward into it. I’ve said it so often it’s beginning to sound like a mantra: your creativity needs something to push against. It needs a problem to solve. Challenge leads to flow, but it also sets the stage for the kinds of microfailures that lead to learning, and learning pulls us forward. Learning is the engine of evolution and growth. If you want to continue growing as an artist, you must continually find new challenges, even create new challenges for yourself.
When people ask me how they get out of their rut, what they’re telling me is they’re bored.
Boredom comes when we lack challenge. Like curiosity, which is willfully stepping into a knowledge gap, taking up challenge is stepping into a gap created by what we can and can’t do (yet) or what we believe we can or can’t do. Bite off more than you think you can chew and see where it leads.
Do Different Things (In Different Ways)
Change is hard. But no growth happens without it. When you evolve into a new person doing new things in new ways, you must leave the old things behind. Scary. Hard. But that’s the cost. If the idea of pursuing your curiosity or creating challenge for yourself is a little too abstract, this one is concrete: do something differently. Change what you do. Change how you do it. Photograph new things. Photograph in new ways.
The rusting hull of an abandoned ship off Vancouver Island’s west coast drew my eye in a way I can’t explain. I was there to photograph wildlife and could have, instead spent hours exploring this wreck. Does it signal a change in direction for me, away from wildlife, probably not, but it made me aware of something inside that is drawn by the texture and colour, an itch that my current work doesn’t scratch. I’m more drawn to the first two images. I like the abstraction, the un-identifiable-ness of them. I like that there’s no scale, no real frame of reference. But this one has its own magic. It’s different from what I normally photograph and in order to grow forward you need to explore the detours that interest you. They might not lead anywhere, but you have to follow them to find out.
Most of us resist change, choosing to avoid it rather than chase it down. But it’s the price demanded by life if we’re to grow. We don’t love to be in a rut, but it’s so much more comfortable than change. Change is unpredictable. It’s the devil you don’t know. It’s scary. Change threatens the labels we apply to ourselves, and by which others recognize us. Change can alter the story we tell about ourselves: I was a travel/humanitarian photographer, now I seem to be a wildlife photographer. It’s difficult to know what to do with that, but unless we’re willing to explore it, we’ll never move forward into it.
All of this can be said about our passage through life. You don’t grow into the new without letting go of the old. For some, the struggle is to accept that; for others, the struggle is to accelerate it. If you’re among the latter and you long to move forward in your art, consider being more proactive about nurturing your curiosity, accepting and even chasing challenge, and re-evaluating your relationship with change.
Learn new things, do hard things, and do different things (differently), and you’ll move forward. Life, and your art, will also be so much more interesting. 😉
For the Love of the Photograph, David
The biggest challenges for most photographers are not technical but creative.They are not so much what goes on in the camera but what goes on in the mind of the person wielding it. Light, Space & Time is a book about thinking and feeling your way through making photographs that are not only good, but truly your own. It would make an amazing gift for the photographer in your life, especially if that’s you. Find out more on Amazon.
At the end of 2024, I had a brief but cathartic flirtation with film photography again. There was a very personal reason for this, when my father passed away, he left an old Minolta X300. This was the same camera model that I had used in my early days of photography.
Photo by Tetzemann
I wanted to celebrate his memory by running some film through the camera. It became quite the emotional journey and indeed, I wrote about the experience here on Light Stalking.
However, beyond the emotional journey, I want to share with you what I learnt from a technical and creative viewpoint, in my brief flirtation with film.
I should preface this by saying that I had shot film before, in fact if you have followed my articles here, you will know that much of my early photographic career was film based. However, it has been at least 20 years since I had shot a roll of film, and so this is more about what I had forgotten than new things that I learned.
Every Shot Has A Value
This is something that has always been the case when shooting film. Every single image you make is going to cost you. There is the purchase price of the film, the cost of development and the price of printing to factor in.
That was not an inconsiderable sum in the pre-digital days, but these days, it is a highly significant amount. To get from film to contact sheet you are looking at around $30 per roll of 36. Quite a bit more if you decide to get prints made.
However, this is not necessarily a negative. It teaches you that every single exposure you make has a value. That in turn slows you down. It makes you think both creatively and technically every time you press the shutter. It’s a sobering counter to the digital concept of spray and pray.
Exposure Is Important
Modern digital cameras are incredible. Even if somehow you manage to get the exposure completely wrong, you can pull it back into something decent. This is not so with shooting film.
Most film has a much lower latitude to exposure mistakes than digital. There are one or two black and white films that get close, but in general if you make a significant exposure mistake on film, there is little to no chance of pulling it back either as a print or as a scan.
When I shot Ilford HP4 on my father’s camera, I bracketed, much like I do on digital. However, the images that were 1 or more stops over or under exposed were significantly degraded compared to a digital equivalent.
That also leads to a big increase in something else we don’t worry too much about in digital – grain aka noise.
The upshot of this is that you become keenly aware of how important exposure is to getting the optimum image. This is made even more important by the lack of exposure tools available to you. Speaking of which…
Trusting Your Eyes and Instincts.
The Minolta X300 is a very basic film camera. It has manual and aperture priority exposure modes, and that’s about it. The viewfinder has a +/- scale for exposure and split/Fresnel screen for focusing. Yes, that means manual focusing.
That viewfinder is also really quite dark compared to any modern DSLR or mirrorless. This all combines to make taking photos with the X300 quite challenging.
For focusing, I find the split screen the easiest to use. However, you have to center the camera on your focal point, focus then recompose the shot. There is none of this guiding a focus point using a joystick or d-pad.
Like with exposure however, it slows you down, makes you think clearly about where exactly your subject/focus should be.
There is a complete lack of aids on older film cameras. No histograms, no live views, no focus peaking, none of the tools we are used to. That means you need to visualise in your head exactly how you want the image to look and then use your own experience with that camera and film type to make the vision a reality. Experience is the keyword here, as it trains you to understand so many elements of photography that we often take for granted.
Want to shoot something inside, handheld? You cannot just bump up the ISO and get on with it. You will need to swap out the film for one of a higher ISO.
That’s not necessarily the end of the story. If you are going inside to shoot, you will probably be shooting under artificial light. It’s not as simple as putting a higher ISO film in. You need a film that’s colour balance is tuned to interior lights, in general tungsten film. Without it, your images are going to have a deep orange cast.
It is perfectly possible to remove films mid-roll, however, you will lose a few frames of that film (every frame costs) and you need to be meticulous with labelling. If you remove a film with 20 exposures shot, you need to label that film well. Then when you come to use the film again you need to shoot with the lens cap on and wind on at least 24 frames, before you can start shooting again. Again it’s a game of patience and planning.
Shooting with film brought back a lot of memories, some good, some bad. There is no doubt that we have lost some important skillsets in the move to digital. The most significant is perhaps building up an instinct that when you press the shutter button, you have got it right. In a digital world, that instinct is much diminished because we can review the image before and after we take it.
More importantly, perhaps, is that shooting film teaches you to slow down and think about every shot that you take. You become keenly aware that every image has value.
Would I like to go back to film permanently? That’s a resounding no. The convenience and image quality of digital far outweigh the educational aspect of film. However, as an occasional cathartic exercise in creativity it’s nice to know that I can still take my father’s camera for a run out.
There are about 24 hours or so left on the latest Peak Design Kickstarter. That cool new “pro” tripod. (I assume it’s ok for hobby users too and won’t fall over in shock should one try to use it.)
Anyway, here’s the link for you to check out if you see a new tripod in your future. Given they’ve crossed $4m in pledges so far it’s fair to say people think it looks pretty decent.
Photographers are not perfect all the time – even the most experienced or professional photographers are prone to making mistakes at times. Making mistakes in photography is not a huge problem, as long as the photographer learns from the mistake and rectifies the errors in the future. Besides, not all mistakes are serious, as some mistakes can also lead to creative results or learning new techniques in photography.
There are a lot of different genre in photography and each one has its own guidelines and settings. For example, sports photography will need a different setting compared to landscape photography and long exposure photography will need a different setting compared to street or portrait photography. The same applies to editing too.
Depending on the desired results or individual photographers’ interests, different workflows are followed by photographers. In this article, we have put together a bunch of resources that we hope will help you to avoid some common mistakes in photography.
Most of the time, beginners in photography are confused with many problems like getting the settings right, making use of the right light, compositional guidelines, over-shooting, too much post processing and so on. Many photographers start with point and shoot in auto mode, and with the advancement in camera technology, most of the time an image may turn out good but what is important is to have a creative vision and work on achieving that result. Check out this article to learn some of the most common photography mistakes beginners make in photography.
Photo by Jason Row
Composition is very important in photography in order to capture effective and compelling images that have a lot of visual interest. Without just pointing the camera at a scene and shooting, taking time to scout the location and capturing images from different perspectives and angles, or watching out for interesting backgrounds, using meaningful elements, etc., will all contribute to great compositions in an otherwise simple image. This article talks about some typical composition mistakes that can ruin the effectiveness of your image.
Photo by Pietro de Grande
Portrait photography is a slightly difficult and challenging genre and is one that requires a few important factors to be taken care of, for the best results. Since we are dealing with closeup details of the subjects mostly and also want to capture their personality well, it requires a lot of practice and patience to master portrait photography. Here in this article, there is a list of 7 common mistakes in portrait photography and how to avoid them.
Photo by Jessica Felicio
Many think that mistakes are made by only beginners or amateur photographers because they are still learning, but photographers are always learning and professional photographers also make mistakes, including the very successful or famous photographers. Some photographers just ignore their mistakes or do not realise that they are making a mistake. This article talks about some common mistakes that professional photographers need to avoid.
Photo by NEOM
From time to time, most photographers shoot long exposure photographs while some shoot them quite often. Long exposure photography is not about just putting the camera on a tripod and setting a longer exposure time to capture the image. There are a lot of things to be taken care of like exposure times, accessories to lengthen exposure, colour shifts, noise, internal reflections, etc. Check out this article to avoid some long exposure photography mistakes.
Photo by Jason Row
If you have been into black and white photography for a while, you know that it is not just converting an image to black and white by bringing down the saturation slider all the way down to the negative side, or just applying a black and white preset. Black and white images need tonality in order for them to shine and it is always recommended that you learn to see in black and white, shoot in colour and then convert to black and white. Check if you are making any of these mistakes in black and white photography and see what you can do to avoid them.
Some photographers shoot raw always, while some shoot jpeg and others a combination of raw and jpeg. Eery photographer may have a reason as to why they are shooting in a certain format, but most images require at least some post processing to give the image a pop and the right contrast, colours and exposure.
When post-processing your images, it is important to not go overboard and make the images look unnatural, with too much saturation, clarity sharpening, etc. Check this article to see if you make any of these post production mistakes!
Photo by Tron Le
Lightroom is one of the most versatile programs that can be used for post processing, and is more popular among professional photographers who require batch processing often. Its features are very useful when it comes to creating and sharing catalogs, and also the many panels that help make post production easier, but as with all programs, overusing any of the sliders can result in bad final images. Check this article to see if you make any of these mistakes when working in Lightroom.
Photo by Jason Row
Are you someone who shoots film? There are mistakes film photographers make too and these mistakes can cost a lot. When shooting film, the photographer mostly needs to take care of a lot more things that what a digital photographer would. This article discusses three common film photography mistakes and how to avoid them.
Photo by Brian Huynh
Lastly, we would also like to touch on a very important subject that photographers need to take care of – maintaining the gear. Depending on what you shoot, especially in the outdoors, the camera, lens and other accessories are exposed to the elements and other harsh conditions. It is important that we take of our gear and do regular maintenance in order to avoid expensive repairs or replacements. Check out this article on some mistakes to avoid.
The Art of the Personal Project is a crucial element to let potential buyers see how you think creatively on your own. I am drawn to personal projects that have an interesting vision or that show something I have never seen before. In this thread, I’ll include a link to each personal project with the artist statement so you can see more of the project. Please note: This thread is not affiliated with any company; I’m just featuring projects that I find. Please DO NOT send me your work. I do not take submissions.
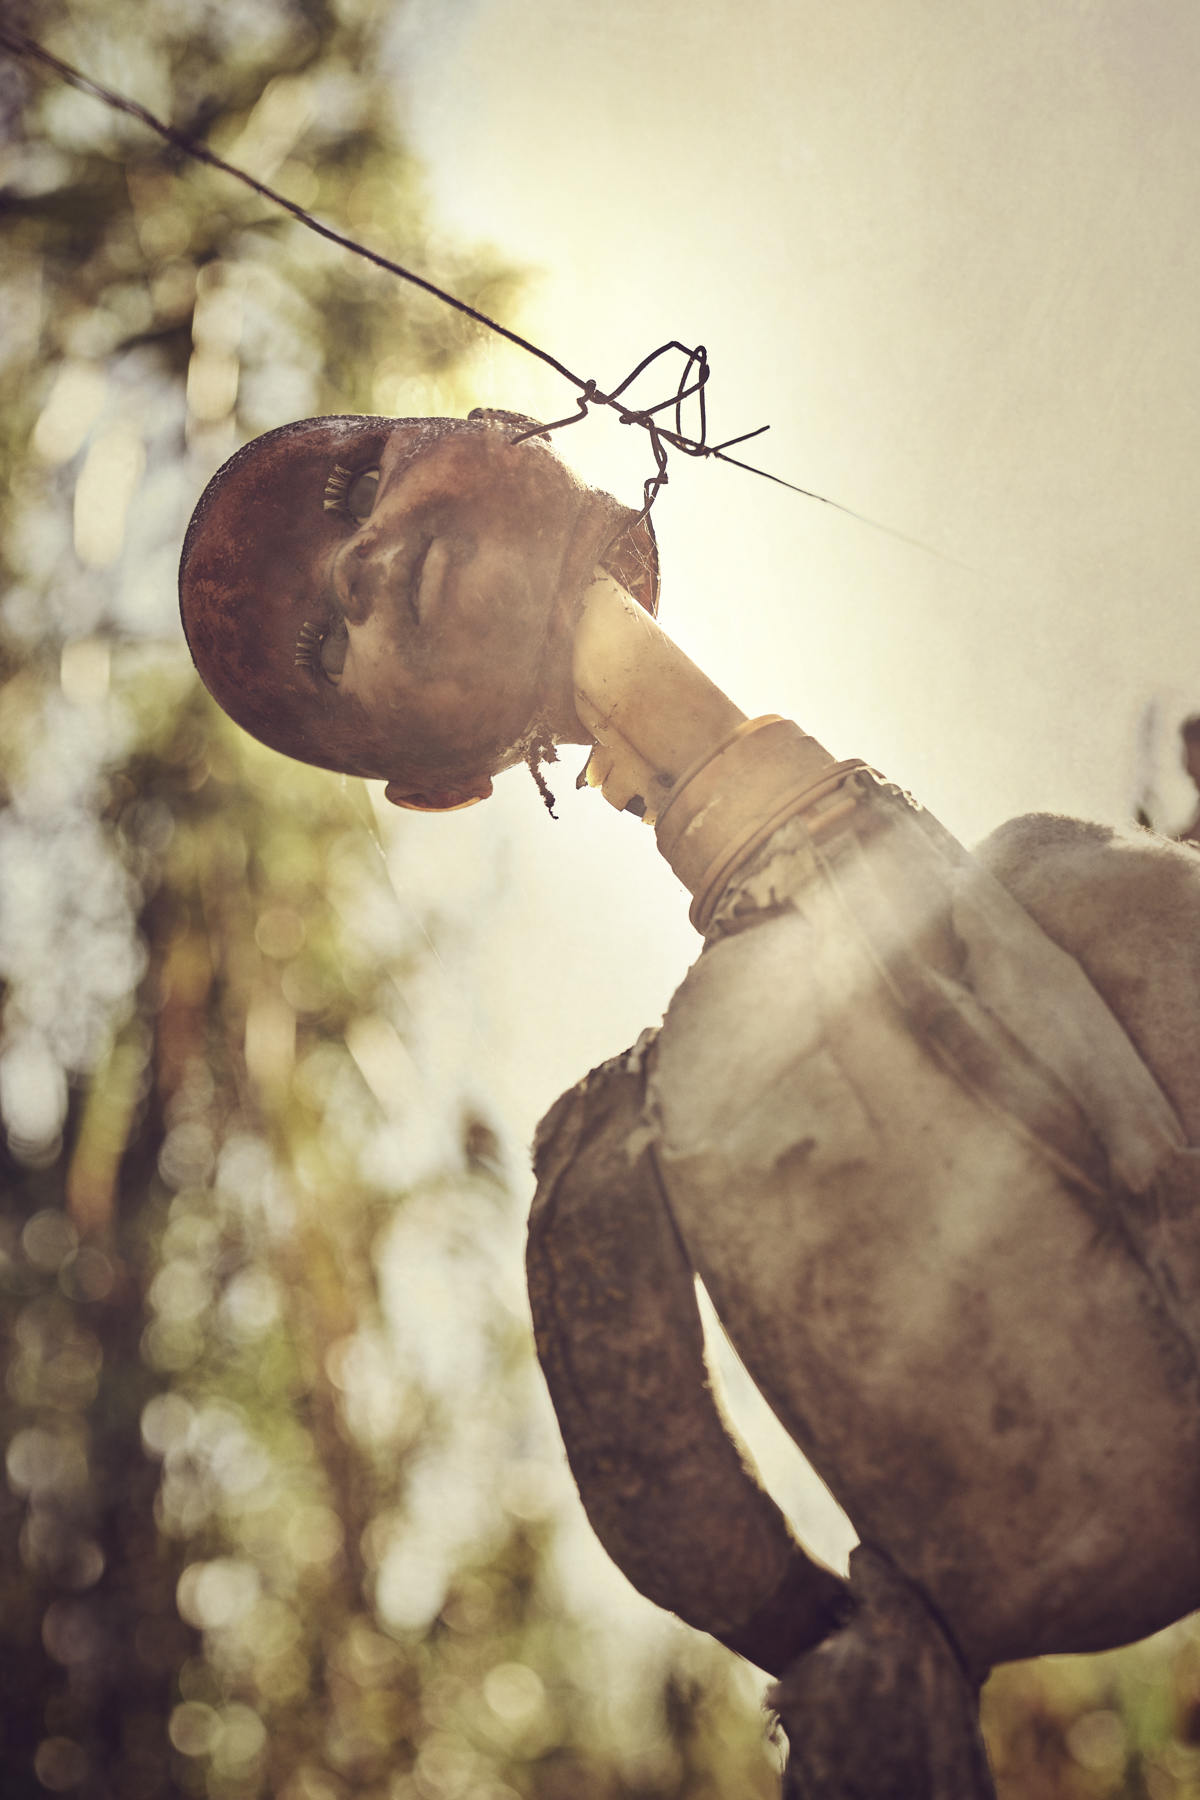
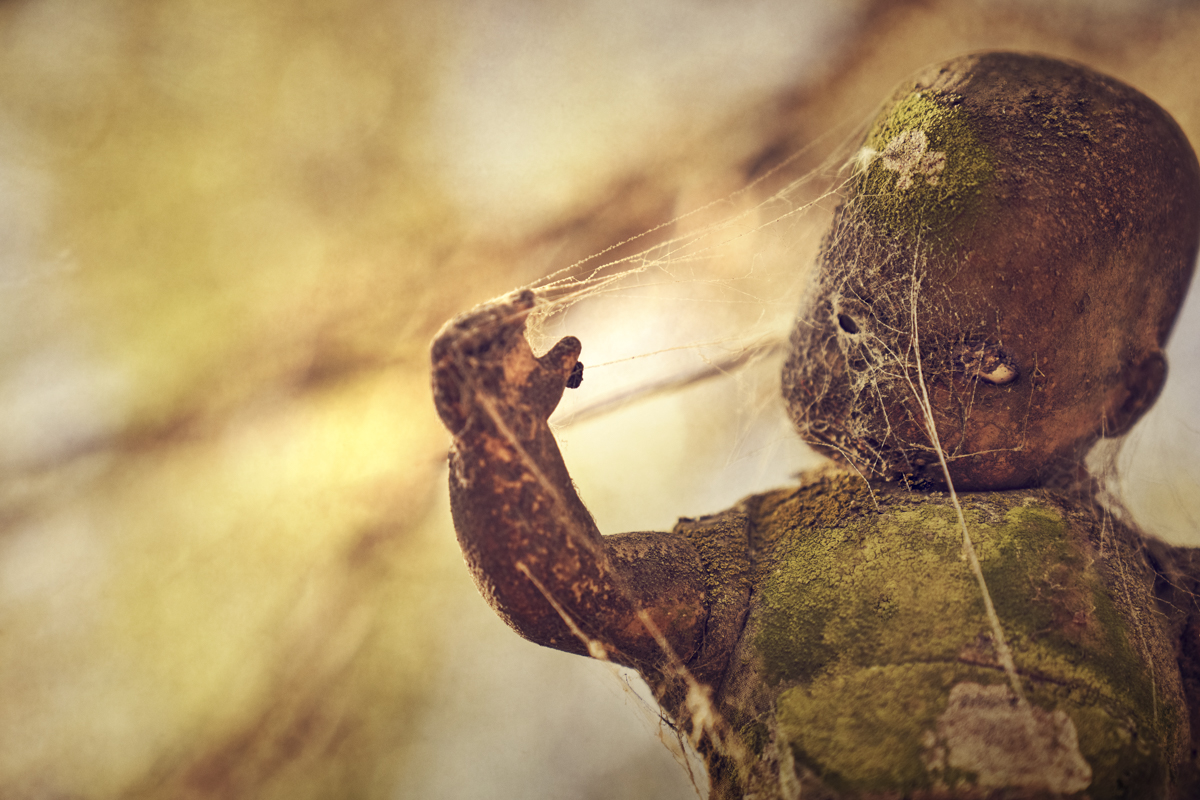
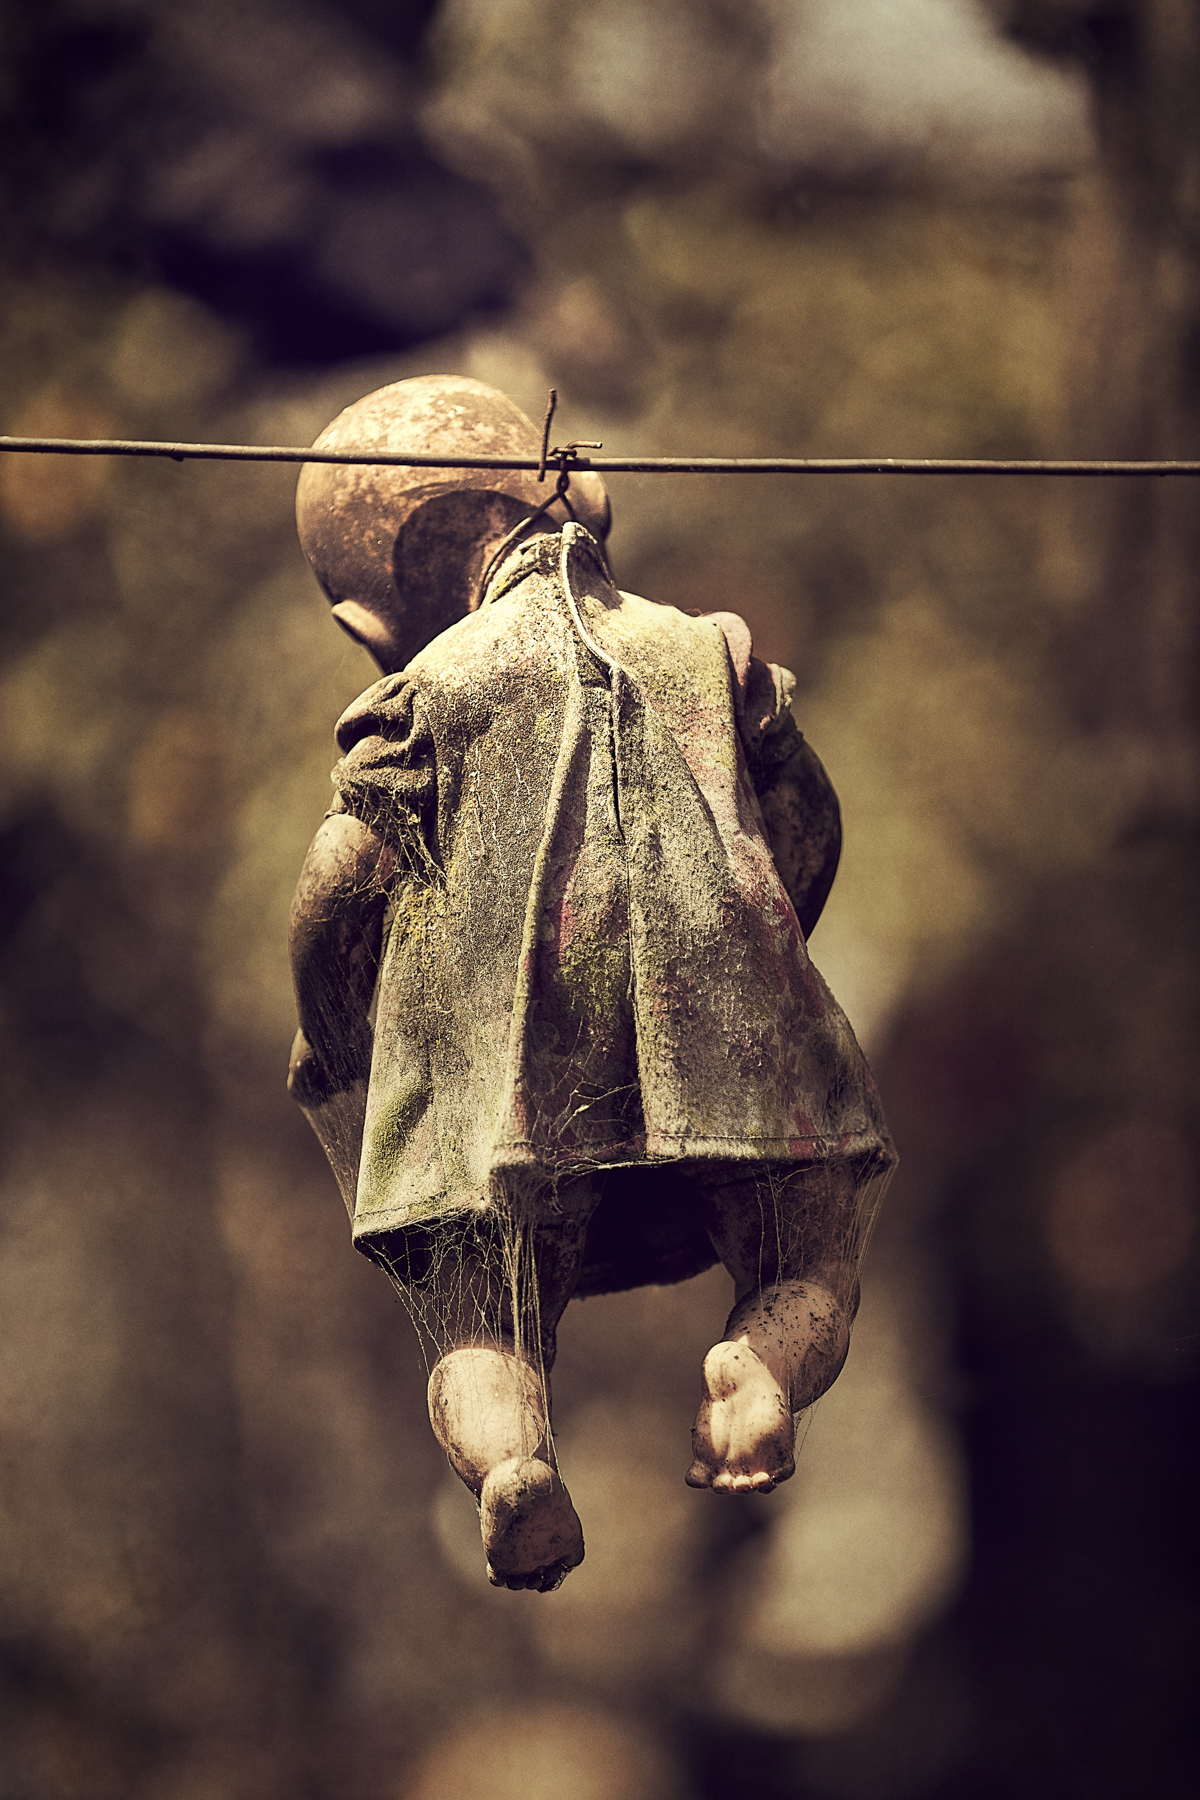
I have always loved a good story, with great characters and the opening sentence “Legend has it…”
These are stories to tell around the campfire, to pass along and keep alive – but some stories, I’ve just got to see for myself. The Island of the Dolls is such a tale.
Legend has it, a little girl drowned entangled among the lilies of the Xochimilco canal. Her body was found on the banks of one of the islands by Don Julian Santana Barrera.
Julian was the caretaker of the island and, shortly thereafter, he found a doll floating nearby and, assuming it belonged to the deceased girl, hung it from a tree as a sign of respect – to support the spirit of the girl. After this, he began to hear whispers, footsteps, and anguished wails in the darkness even though his hut – hidden deep inside the woods of Xochimilco – was miles away from civilization.
Driven by fear, he spent the next fifty years hanging more and more dolls, some missing body parts, all over the island in an attempt to appease what he believed to be the drowned girl’s spirit.
After 50 years of collecting dolls and hanging them on the island, Julian was found dead in 2001, reportedly found in the exact spot where he found the girl’s body fifty years before.
Suzanne Sease is a creative consultant and former ad-agency senior art buyer. She works with both emerging and established photographers and illustrators to create cohesive, persuasive presentations that clients can’t resist.
Suzanne offers something rare: an insider’s perspective on how client’s source creative talent. Her deep understanding of the industry is underscored by her impressive resume: 11 years as senior art buyer at The Martin Agency, seven years as an art producer for Capital One, and stints with the art-buying department at Kaplan-Thaler and the creative department at Best Buy, where she applied her expertise to reviewing bids to see which were most likely to come in on budget. Over the years, Suzanne has worked with a wildly diverse range of clients, including Seiko, Wrangler, Bank One, AFLAC, and Clairol Herbal Essence. Now, as a consultant, she is equipped to problem-solve for her clients from an unusually dynamic point of view.
As a longtime member of the photo community, Suzanne is also dedicated to giving back. Through her Art of the Personal Project column on the popular website aphotoeditor.com, she highlights notable personal projects by well-known and up-and-coming photographers. The column offers these artists excellent exposure while reflecting Suzanne’s passion for powerful imagery.