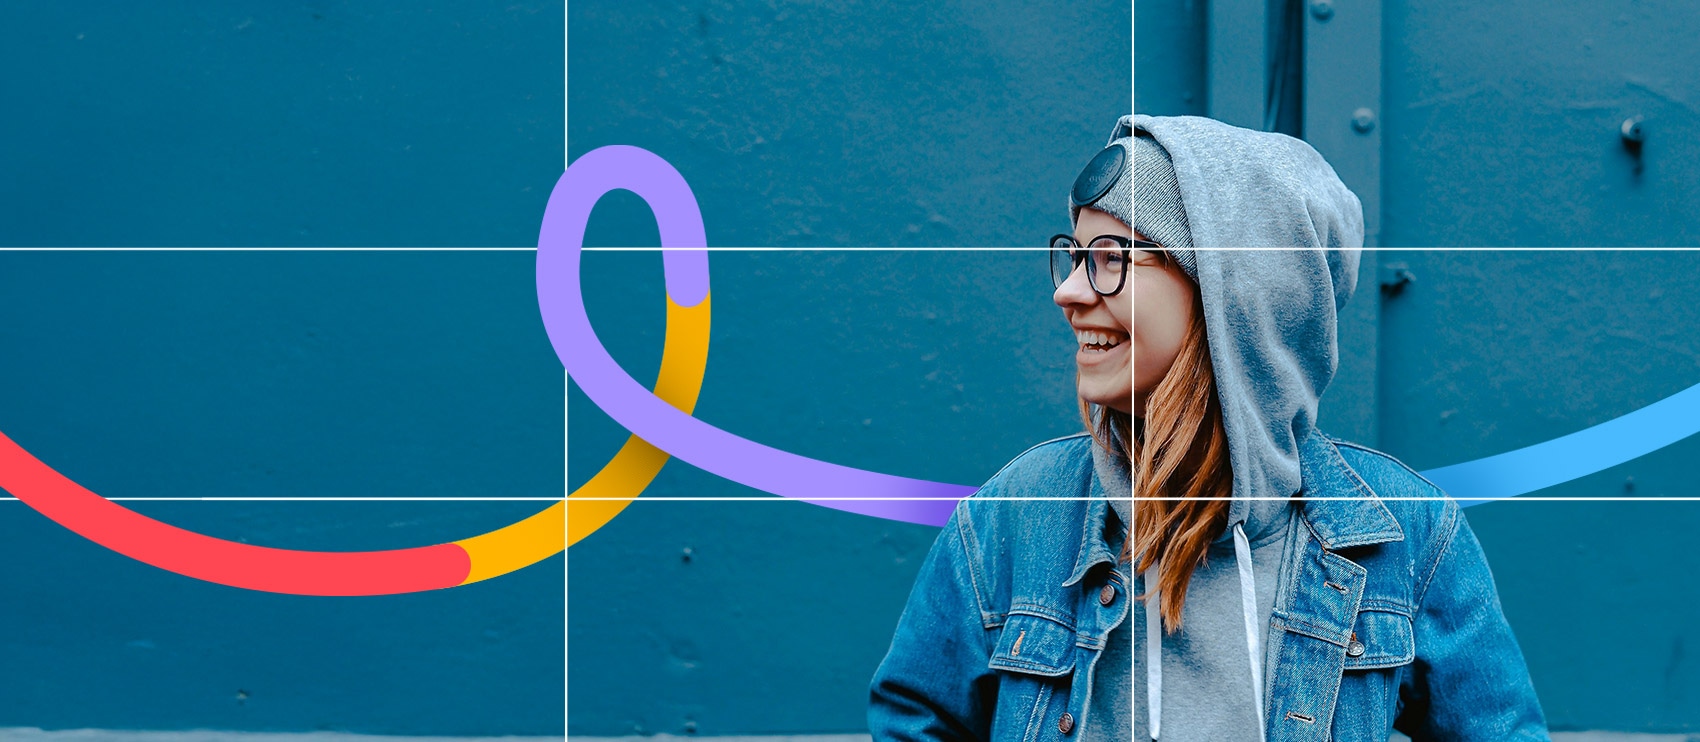
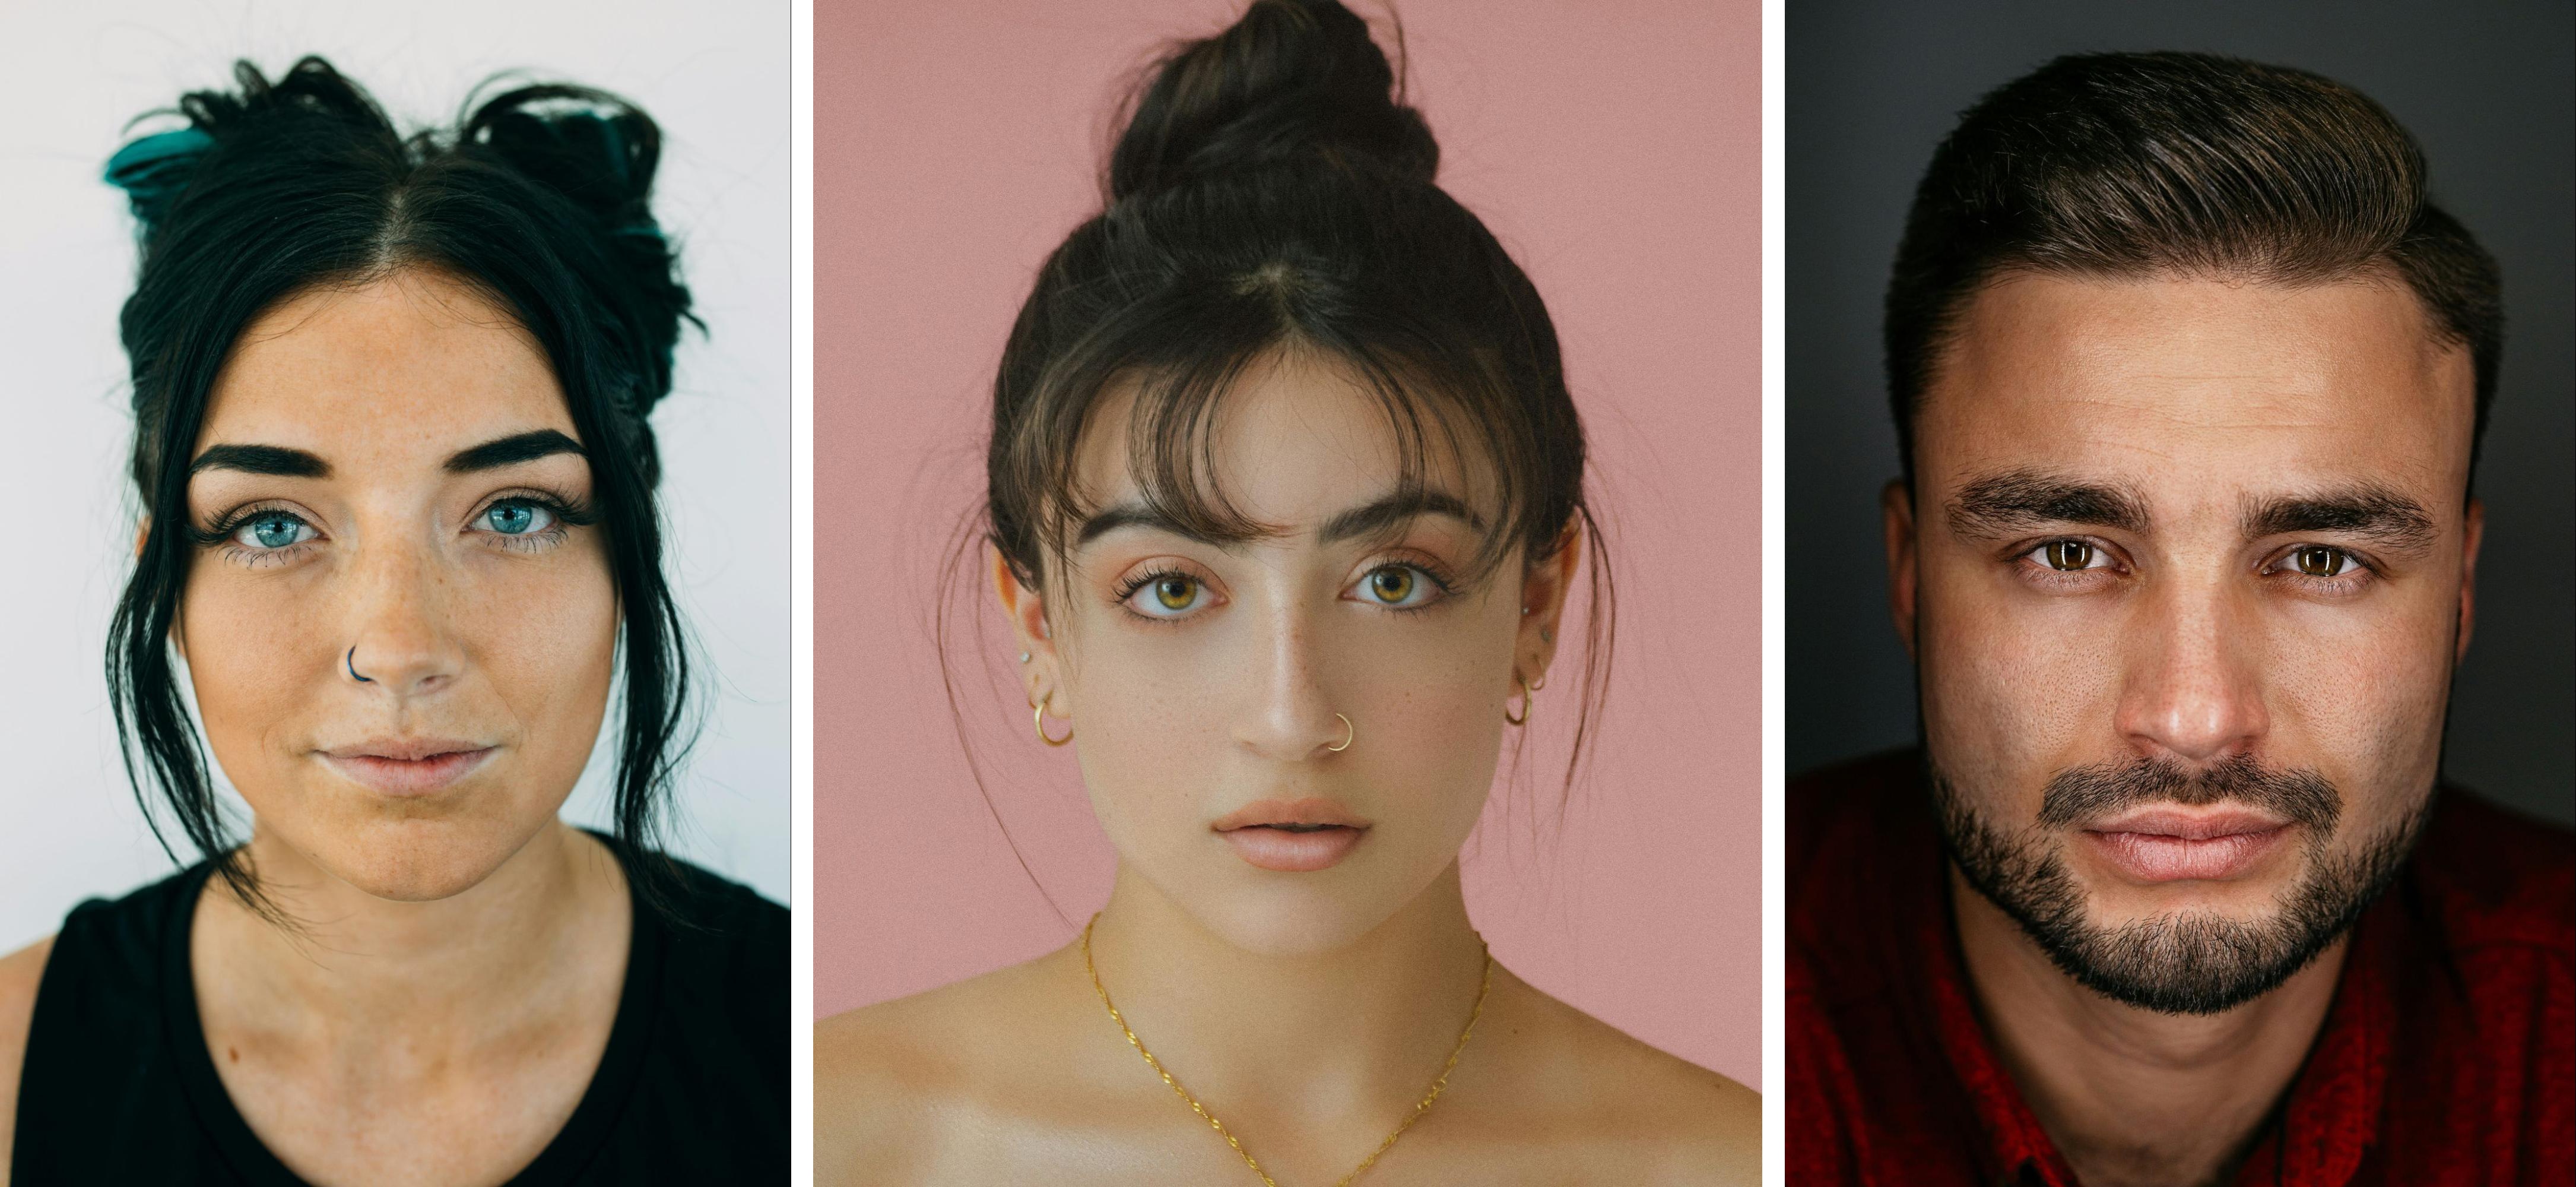
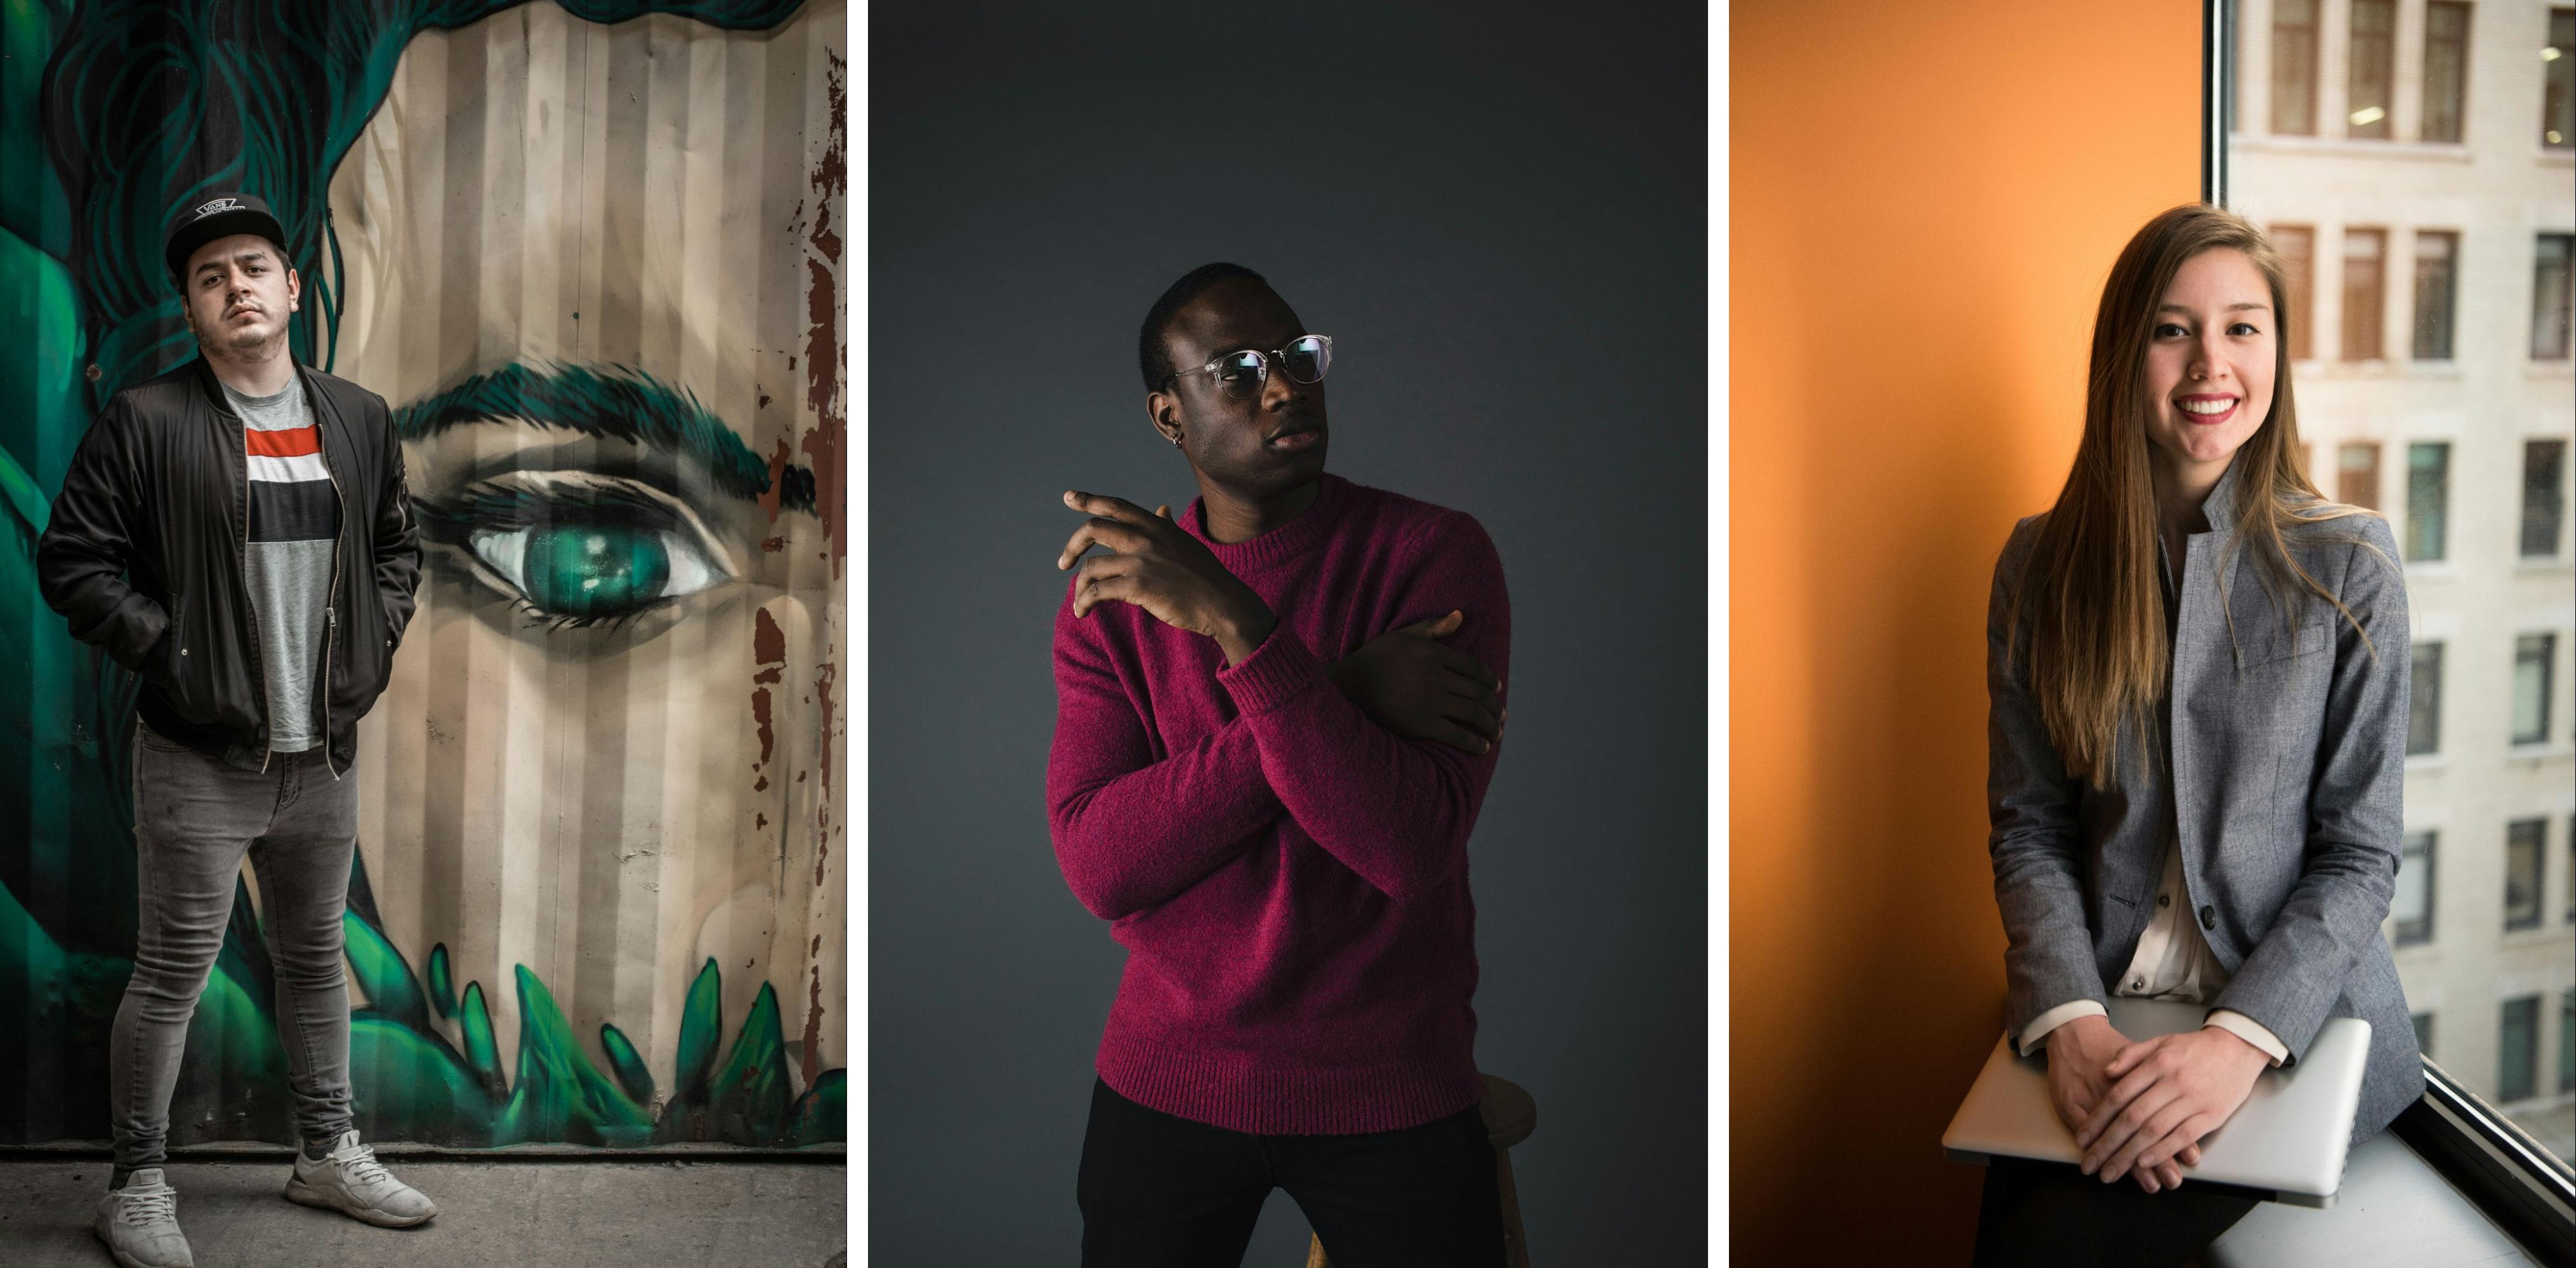
Portrait photography is a genre in photography where the photographer captures the subject’s personality and story. In order to capture effective portraits, the photographer needs to make use of the right light, background, props, attire and poses, as long as they are not candids where instant moments need to be captured.
Portraits can be captured in any environment under any light situations and it depends on the story and mood you are trying to capture in the image. Here are a number of resources that cover everything you need to know about capturing authentic portraits, from lighting to different styles and types of portraits.
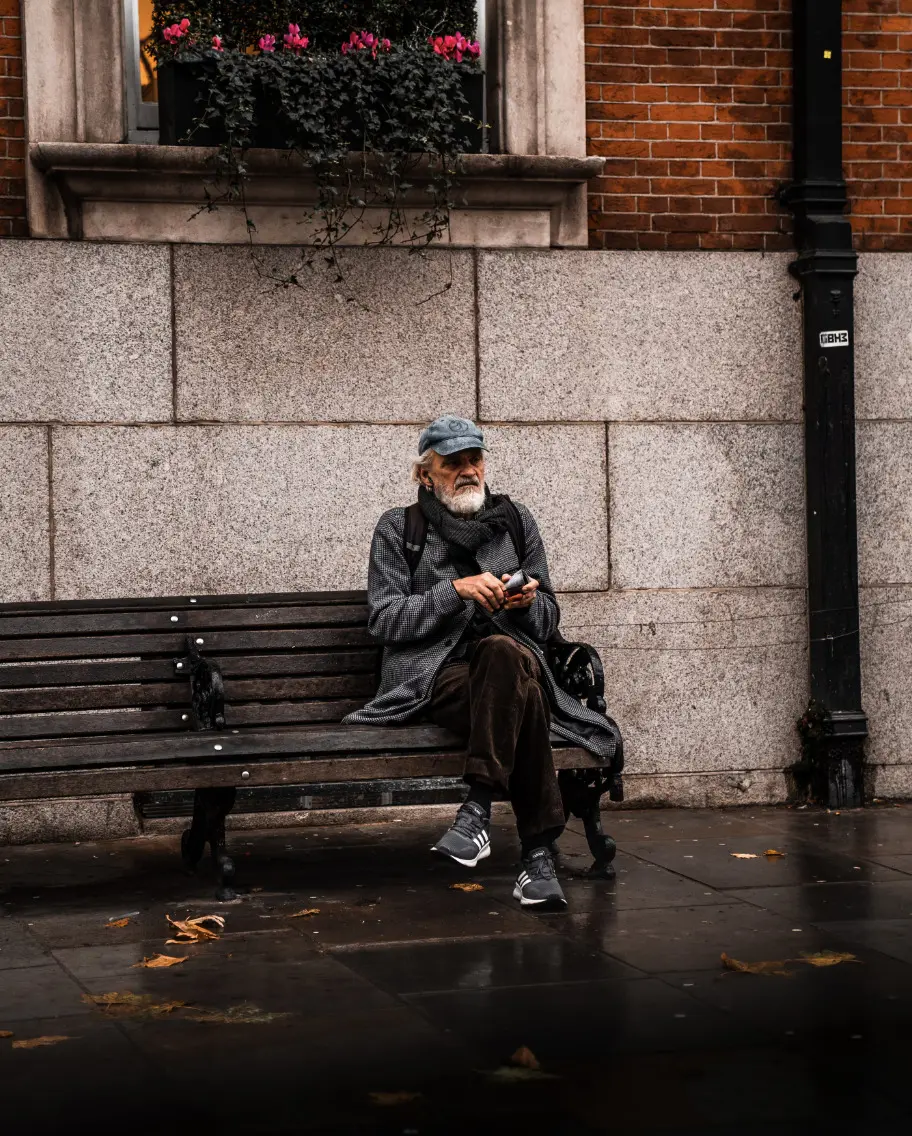
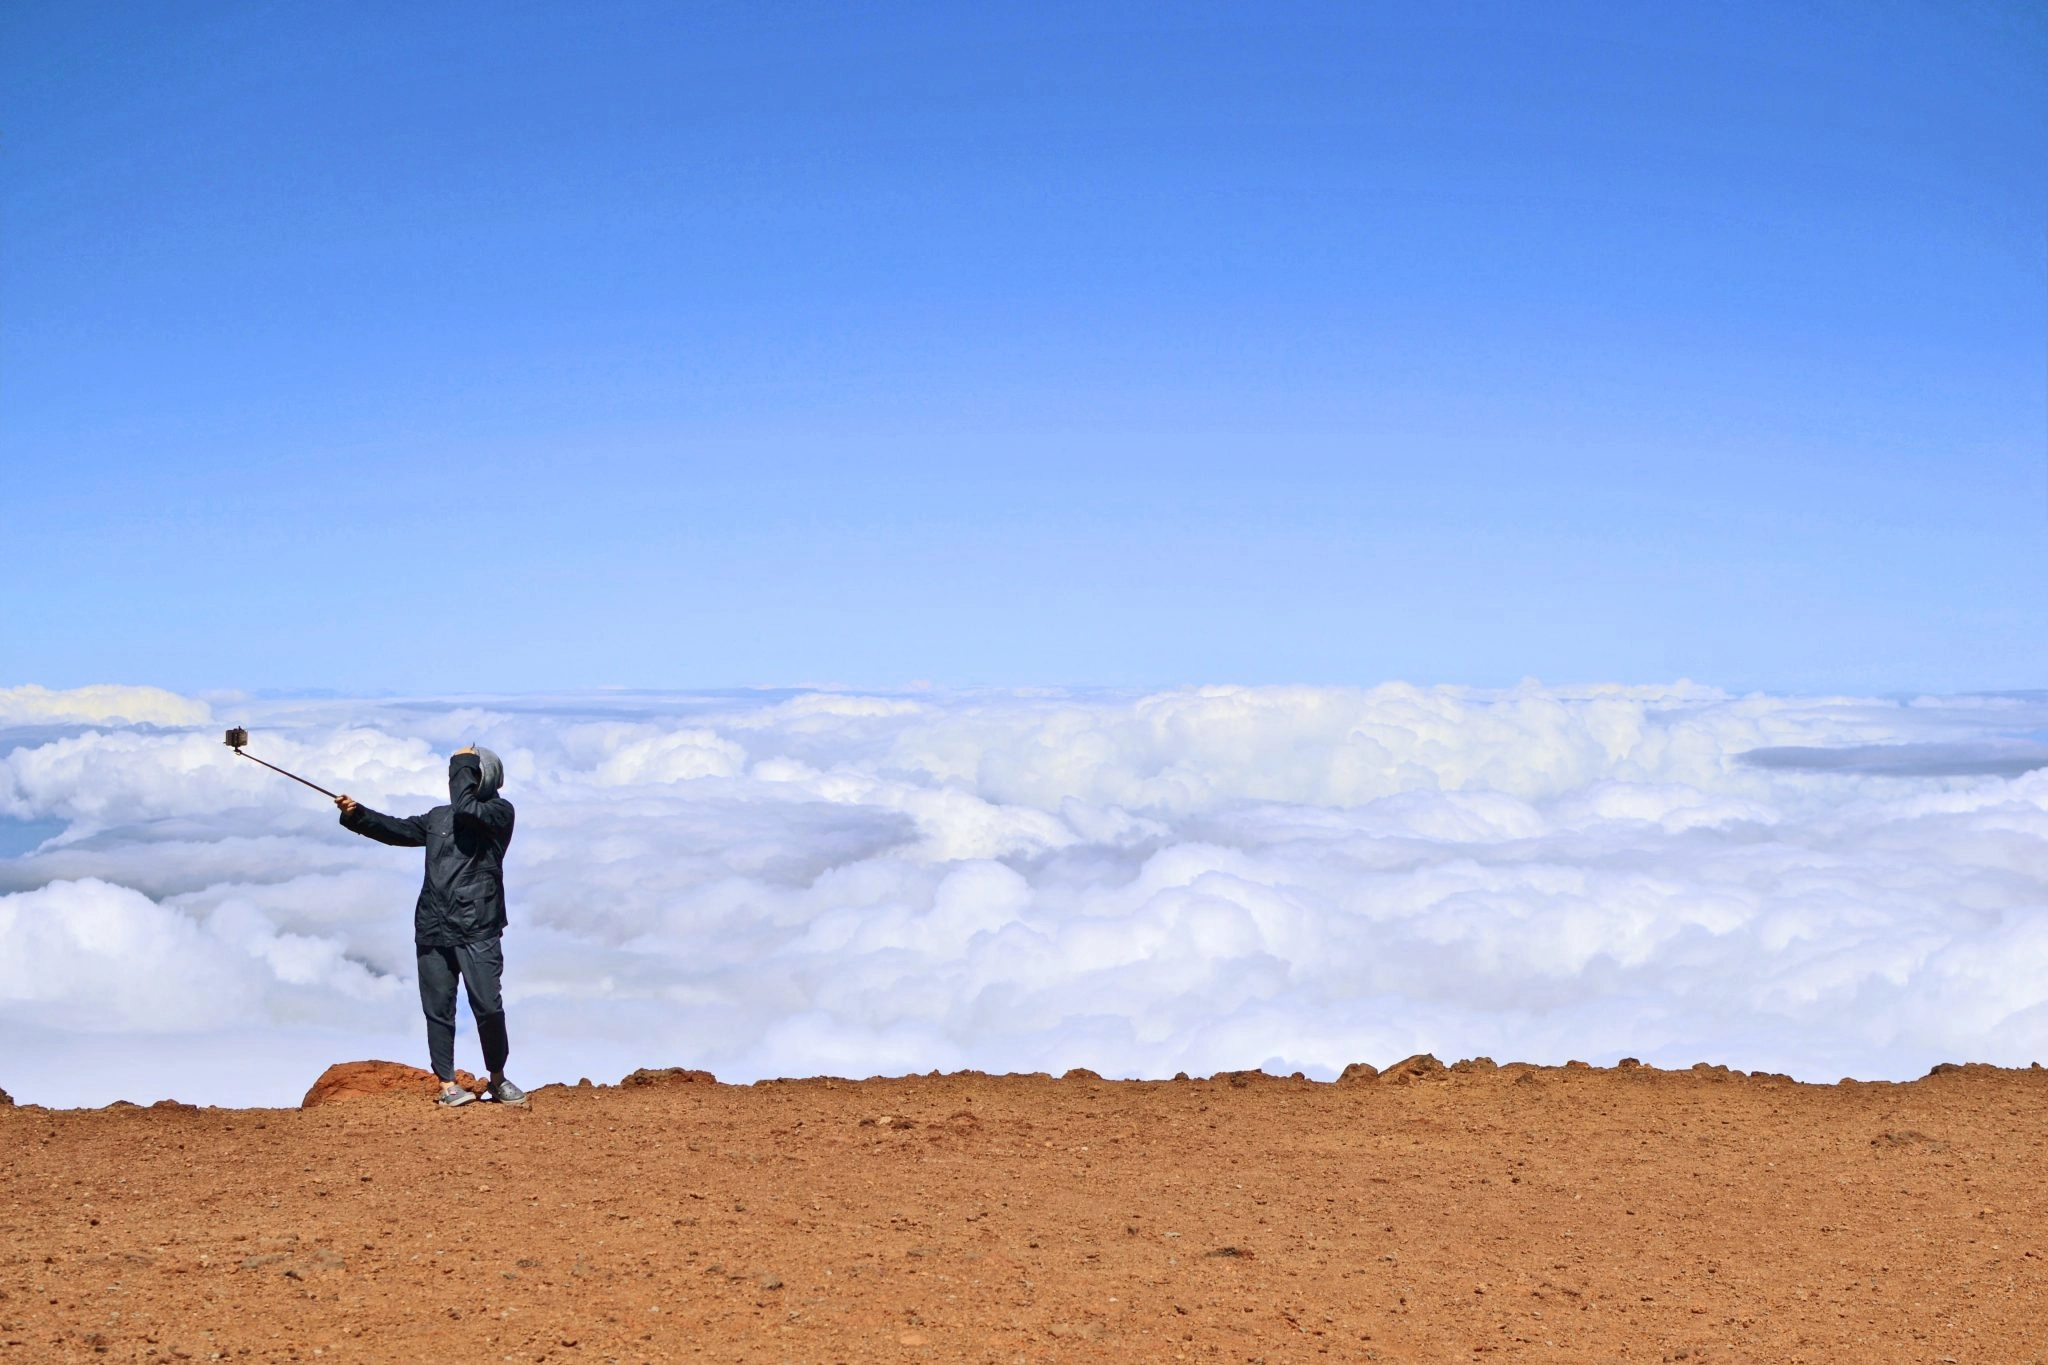
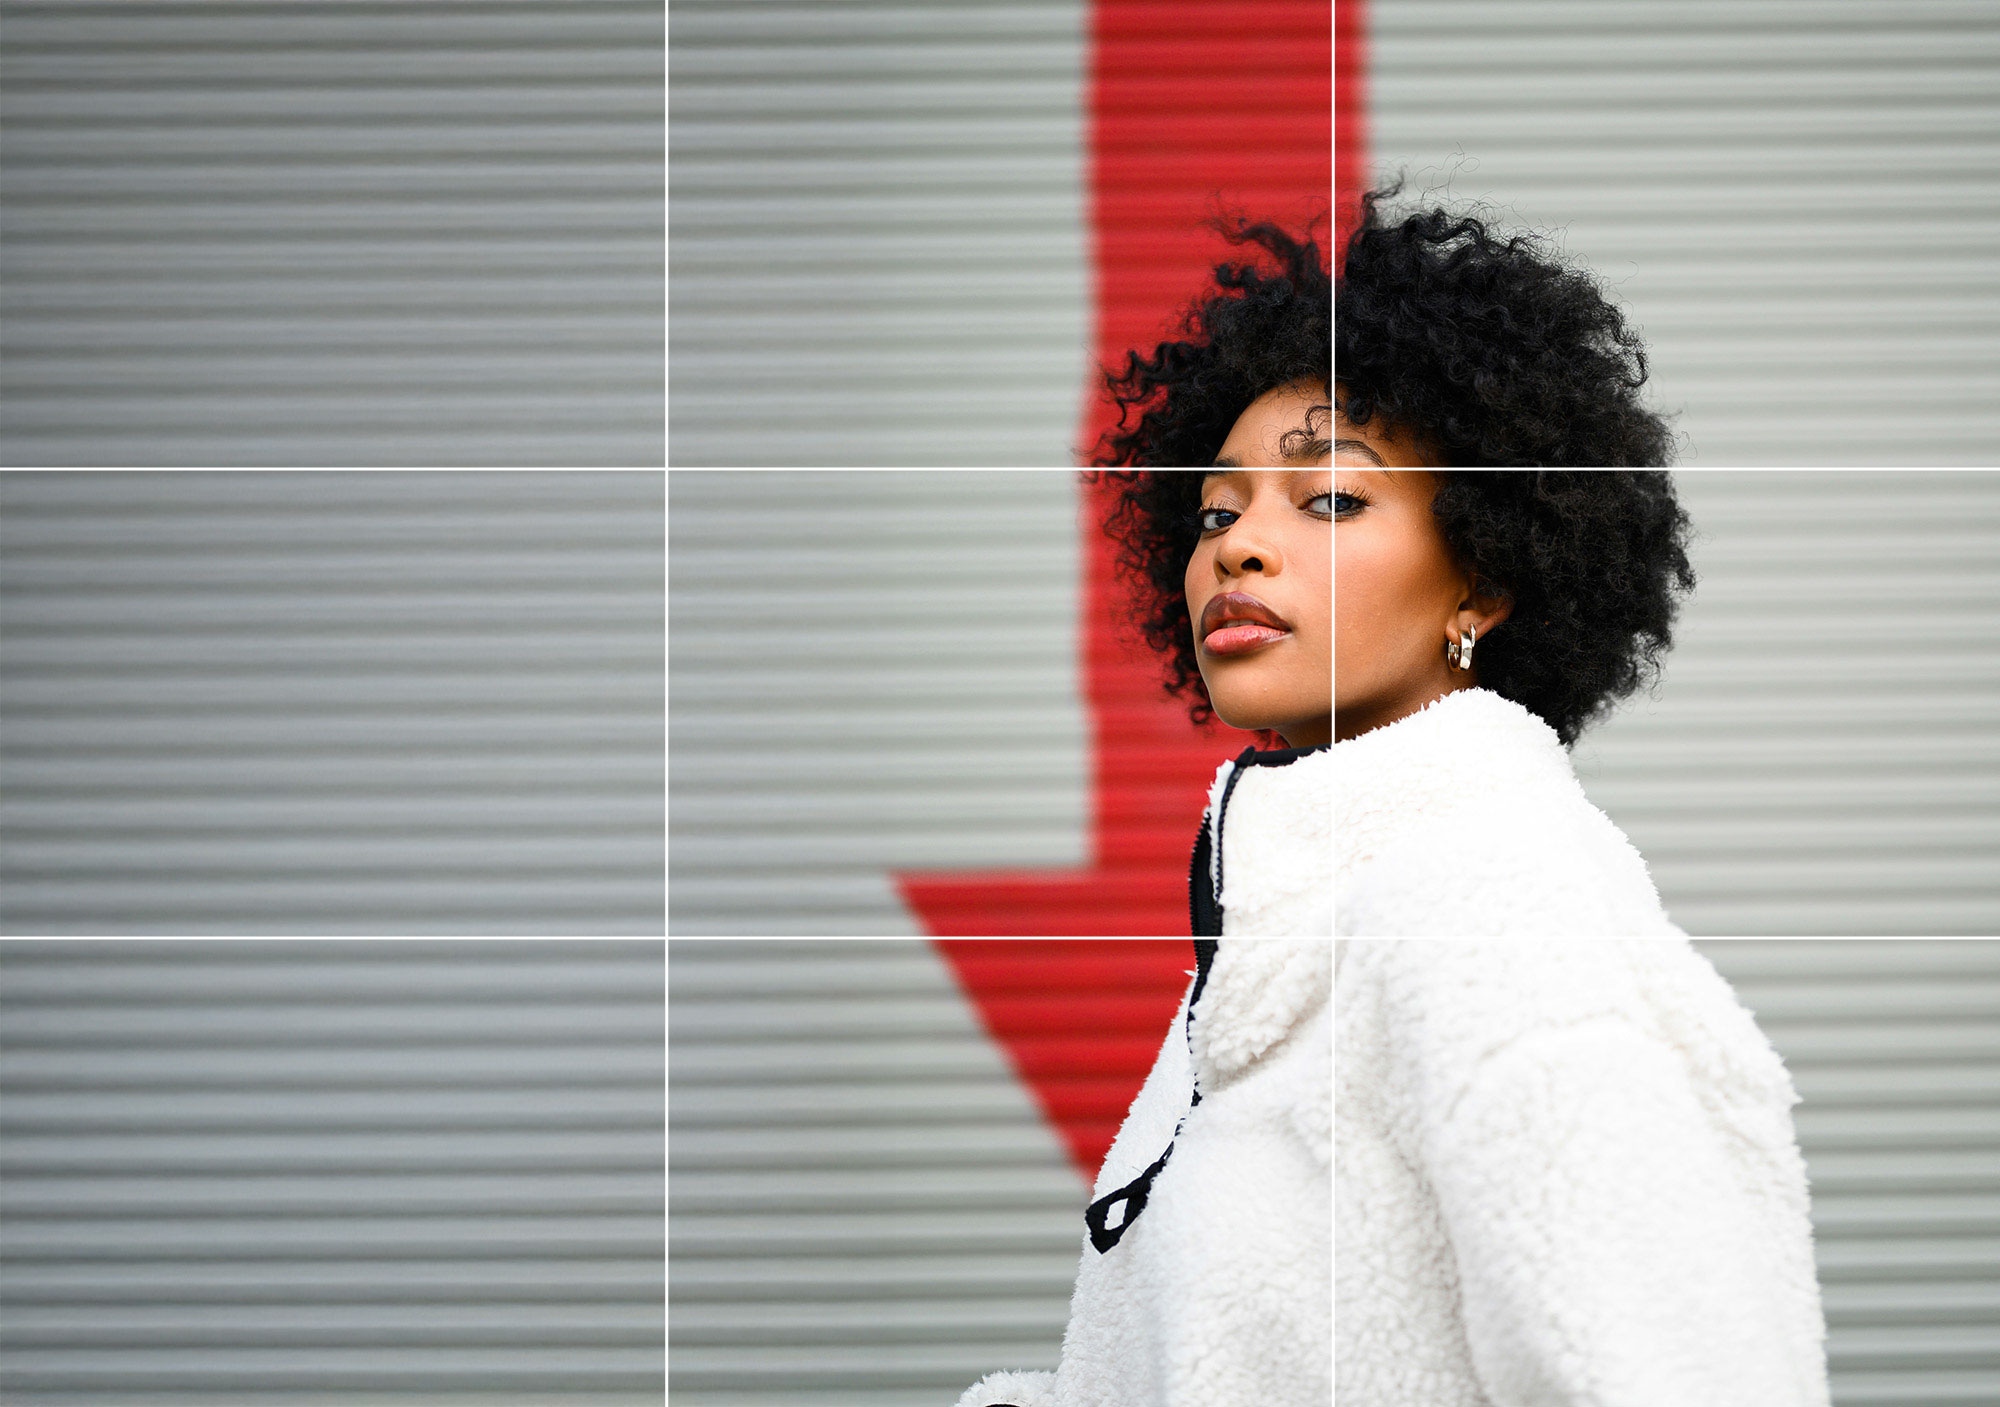
Photo by Amir Geshani
Portrait photography may seem like a boring genre for some people who have not actually shot portraits or gotten deep into that genre. When it comes to portraits, there are a number of types of portraits that you can actually shoot and in many creative ways. It’s not just a couple of types like professional, candid, wedding, event, etc. This article talks about 23 different types of portraits you can try today.
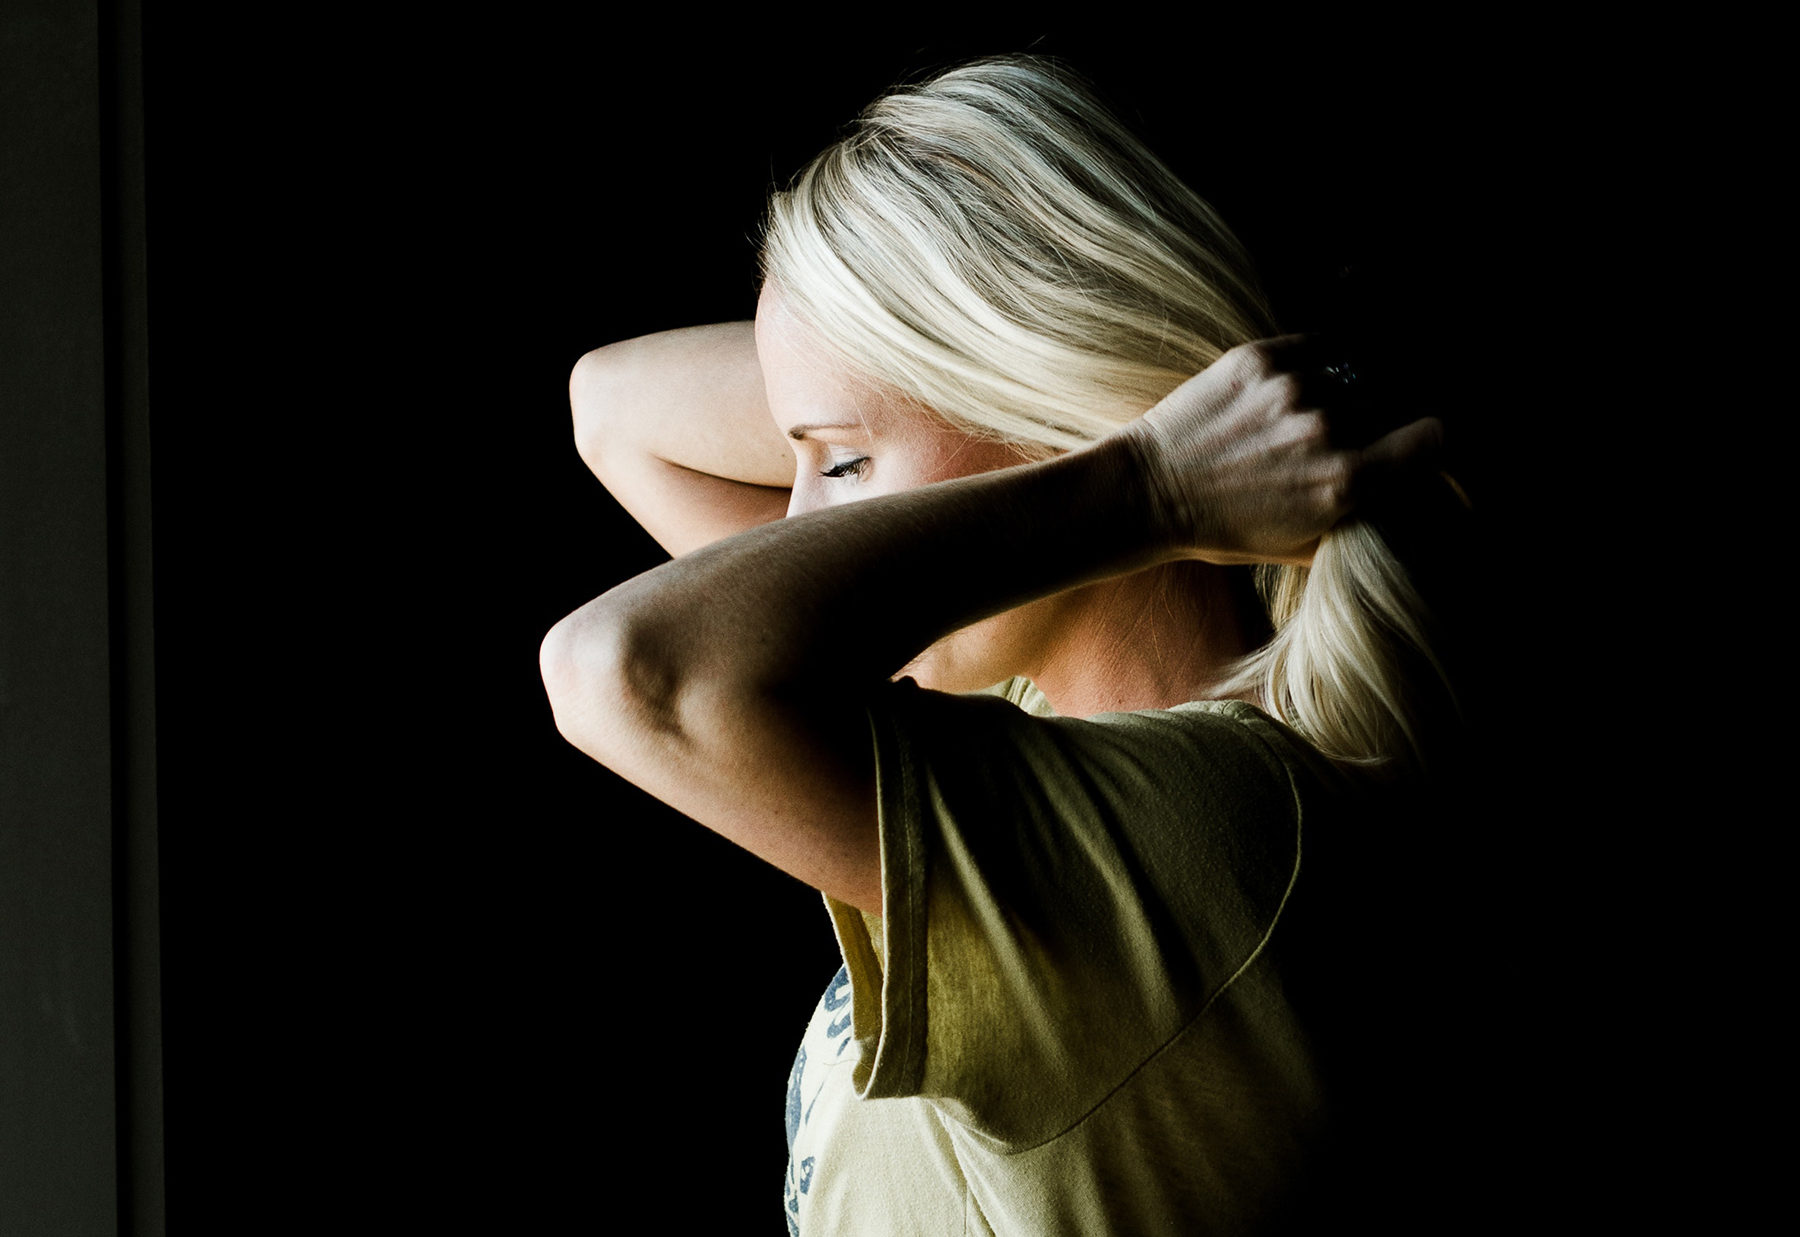
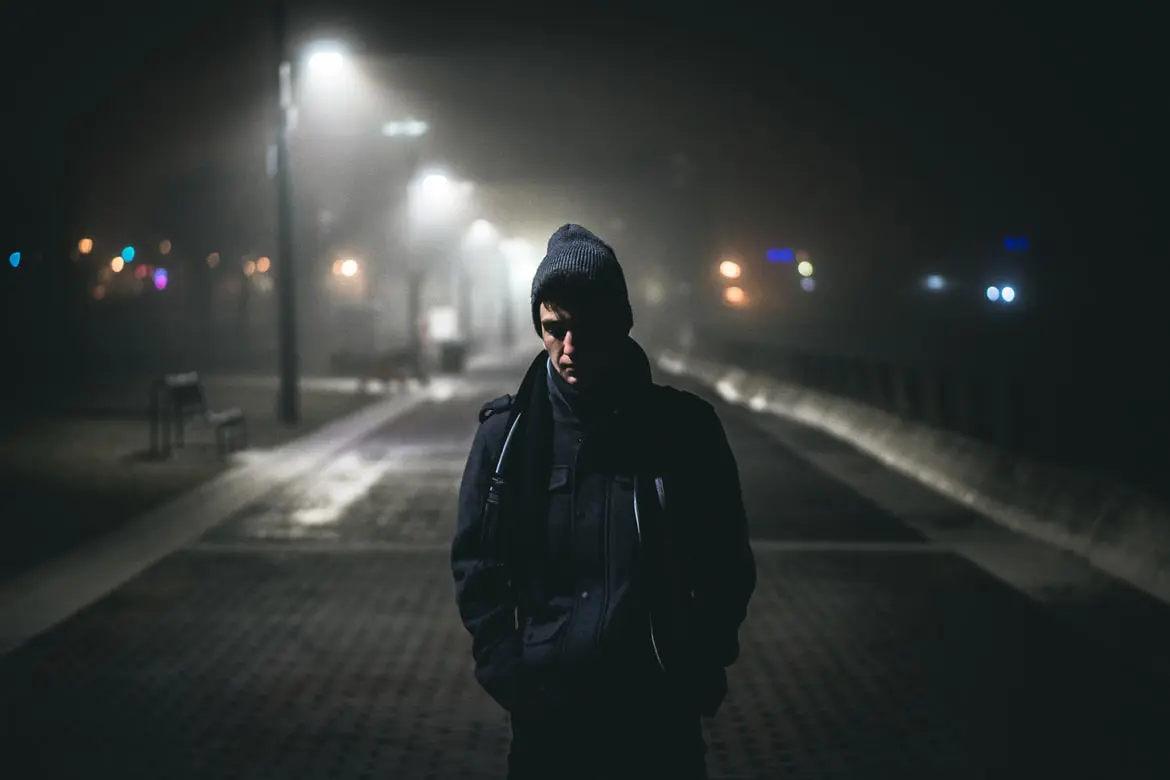
Photo by Jason D. Little
Most photographers rely on natural light for their photography and this also applies to a lot of portrait photographers. Natural light is beautiful and if you have a good understanding of light, you can manipulate natural light to your advantage to capture stunning portraits. This article provides tips that will be useful for natural light portrait photographers.
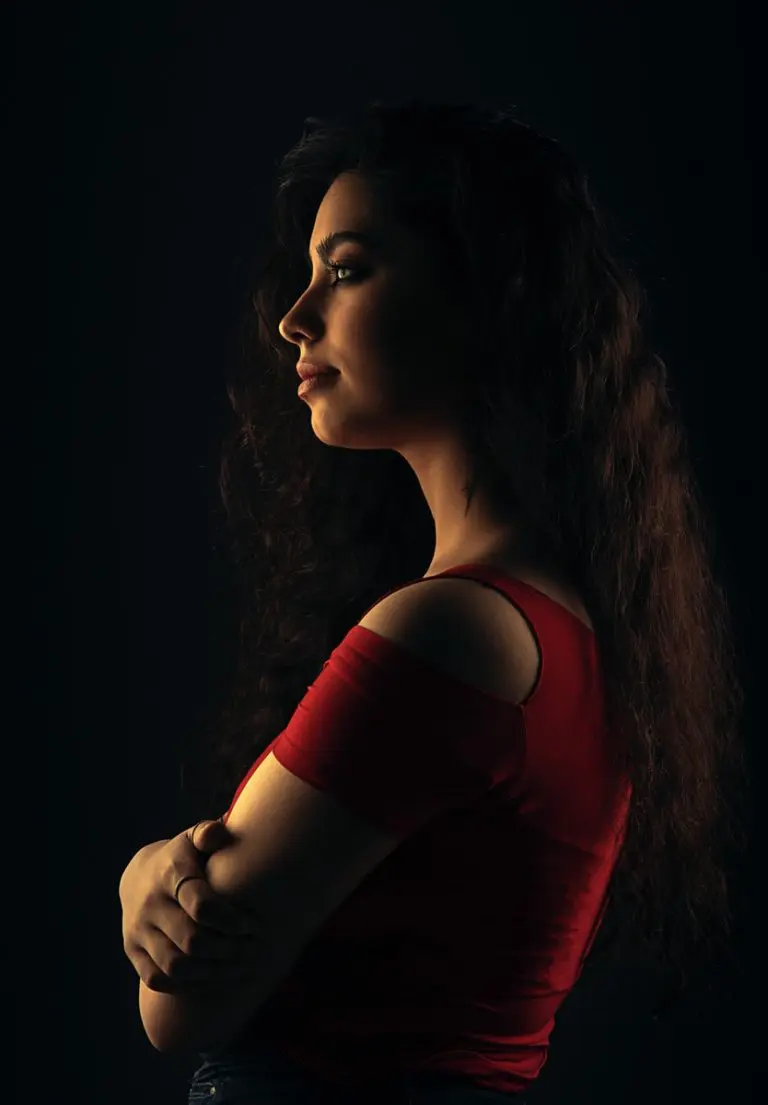
Photo by Leonardo Toshiro Okubo
Professional photographers mostly tend to shoot portraits in studios because they can have full control over the lighting, background and other elements that contribute to the process. It also saves the photographer from scouting for locations which in itself can sometimes be a tedious task. Shooting portraits in a studio also requires taking care of a lot of things and this article provides a ton of tips for shooting studio portraits.
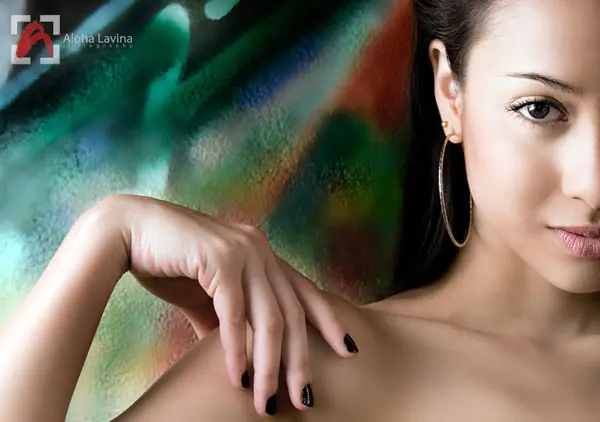
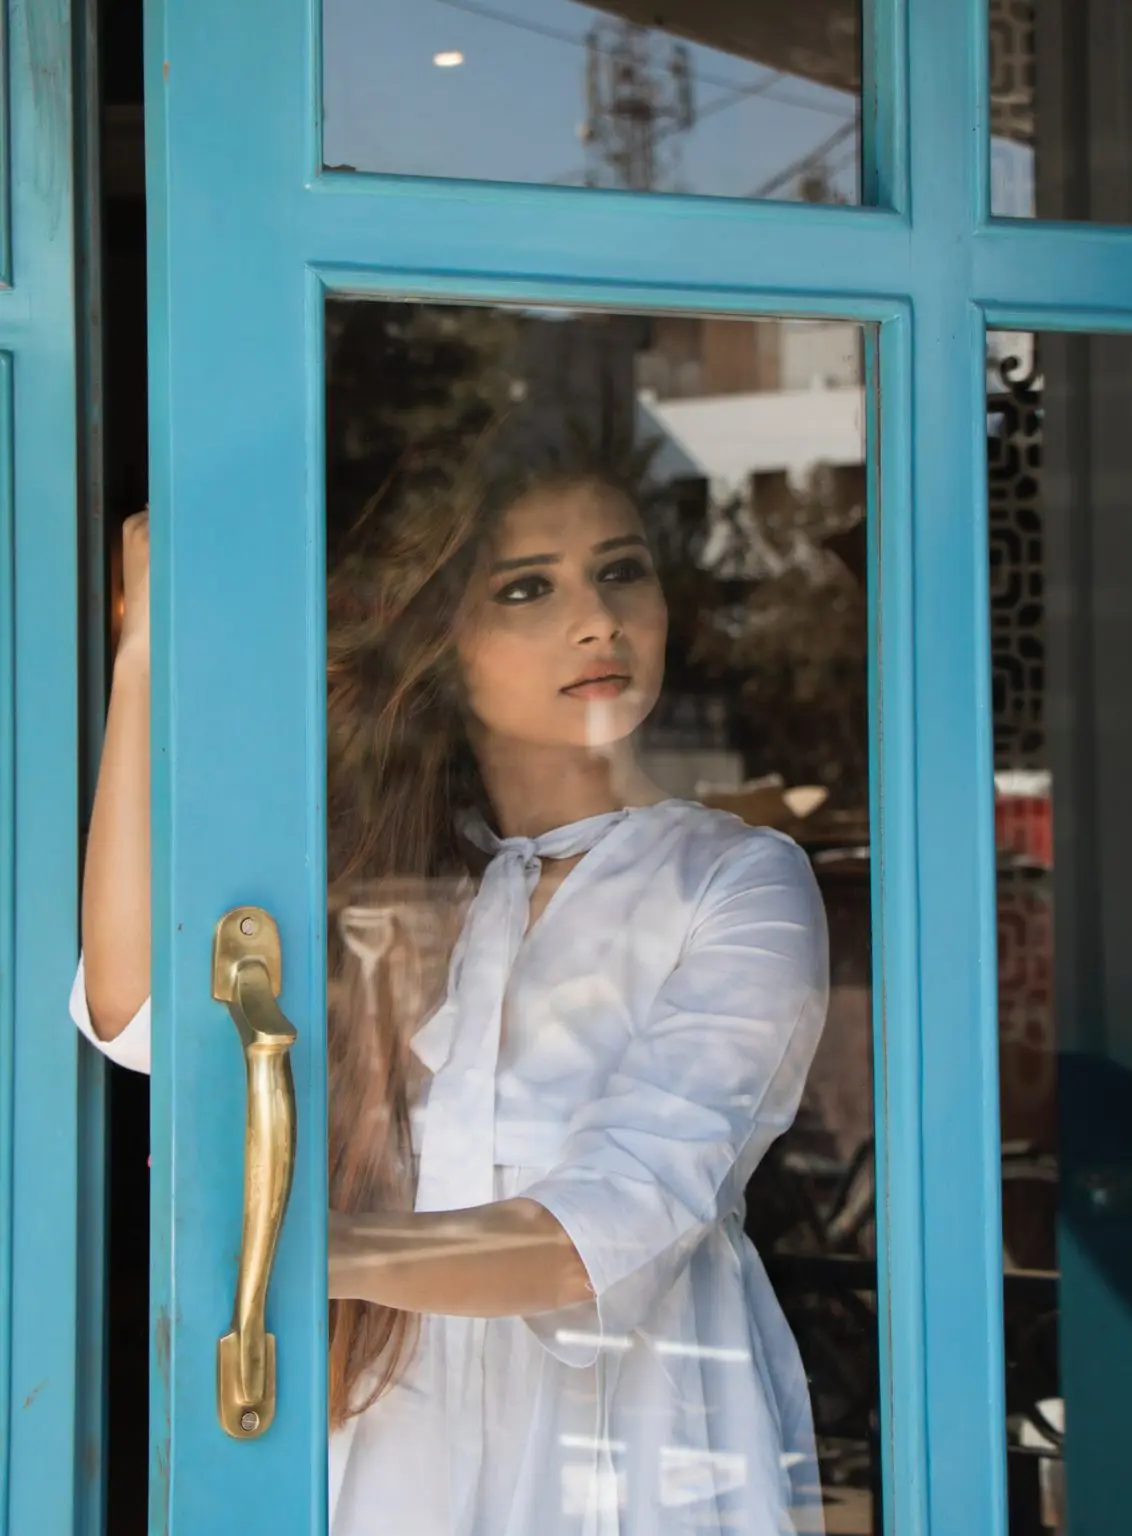
Photo by Aloha Lavina
When we talk about natural light, we immediately think of grand landscapes, outdoor architecture, wildlife, outdoor, sports, nature photography, etc. Portraits can also be shot under natural light and they look really stunning if the light is used wisely. If there are times where your subject may require light to fill in shadows etc., you can use reflectors to fill in light. This article talks about the art of capturing natural portraits using reflectors.
Photo by Warren Wong
Portraits can be shot either indoors or outdoors depending on the time of day, purpose of the shoot, the results that you are looking to achieve, the weather and so many other factors. When capturing portraits outdoors, care needs to be taken when choosing the location and the type of light (golden hour, overcast, midday, night, etc.). This article discusses some secrets to capture perfect outdoor portraits.
Photo by vahid kanani
Portraits that have a black background can look very professional and lend a certain mood to the overall image. In order to get a black background in portraits, you can either choose a black background and use the light settings effectively to keep the background dark. Or, you can make use of the contrast between the light and dark and make the background dark, no matter what the colour. This article discusses how you can capture a portrait with a black background.
Photo by Tanja Heffner
In photography, shooting with available light is a skill as it requires a good understanding of light and some creative thought on how available light can be used for the best images possible. The same applies when capturing portraits – they do not always require additional or artificial lights and can be shot beautifully with available light if well planned. This article discusses how to use available light for good portrait photos
Photo by Cottonbro
There are times, especially indoors or outdoors when the sun is behind the subject and you need some light to bounce off something onto your subject for better illumination of your subjects in portraits. This is where bounce light comes in handy to fill in areas that are dark or need better illumination. Light can be bounced off walls, ceilings, reflectors, etc., and this article talks about some simple ways to bounce light to capture better portraits.
Photo by Timothy Dykes
There are times when the available light is just not enough to capture sharp details and the right colours in your portraits. If you shoot portraits often, then it is good to have a speedlight to improve the quality of your photos. With a single speedlight, there is a lot that you can achieve. This article talks about using speedlights to capture some of the best portraits.
Photo by Samarth Singhai
Having a camera, a good lens, location, subject and maybe a speedlight cannot help with capturing the best portraits all the time. In order for your portraits to be powerful and effective, you need to make use of compelling compositional guidelines that can take your portraits to the next level. Effectively placing the eyes and taking care of other factors when composing a portrait is important and this article talks about some fundamental composition techniques for portraits.
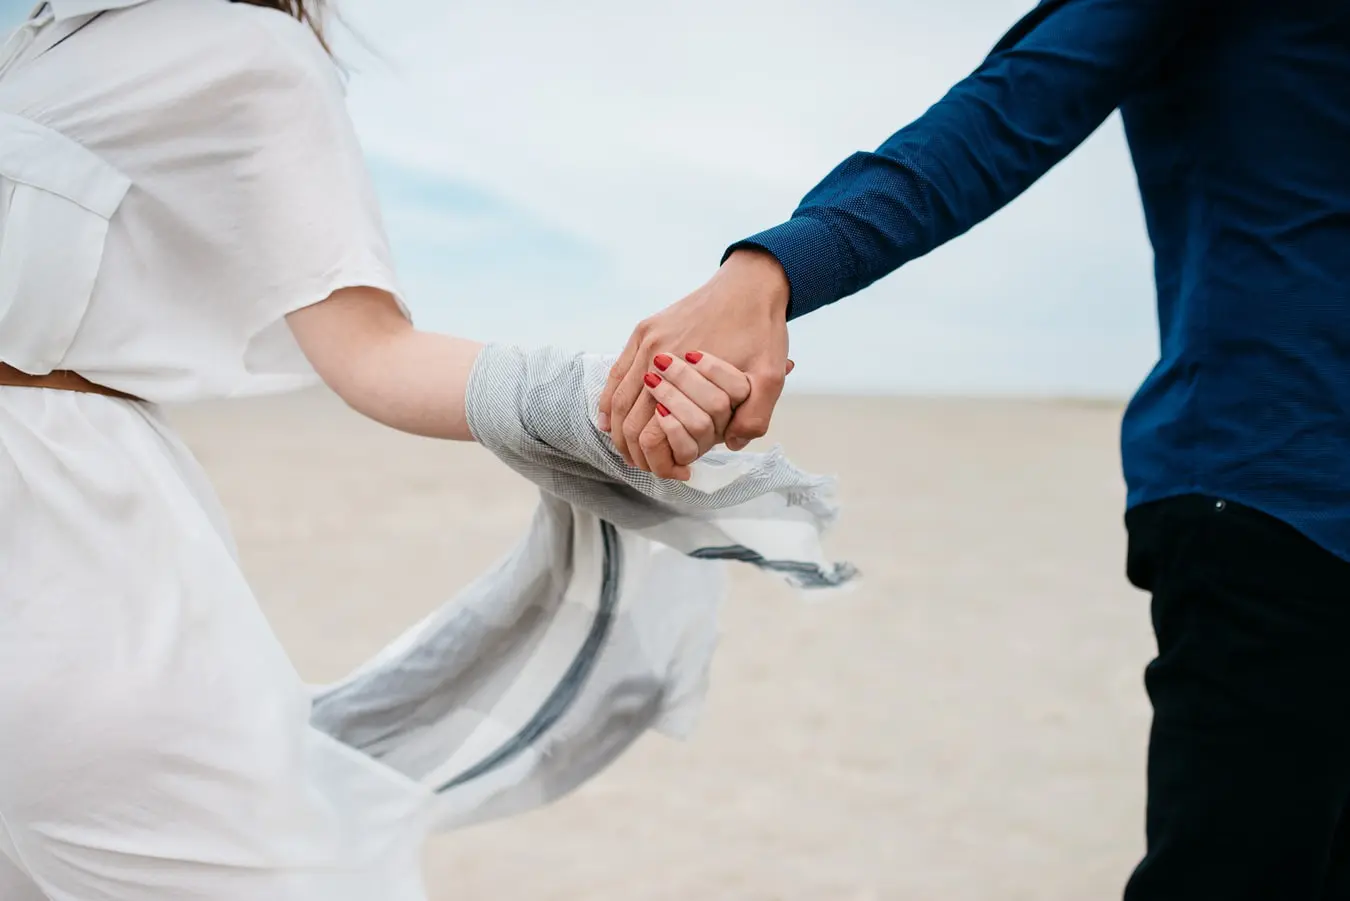
Photo by Pablo Heimplatz
Couple portraits are something that are most sought after in the field of portrait photography. Capturing couples in their candid moments can portray the bond or connection that they have with each other, but it is also good for experienced photographers to know some classic methods for posing in order to get the best results. This article talks about poses for impressive couple portraits.
Photo by Kinga Cichewicz
If you are someone who loves to capture portraits but are nervous to be in front of other photographers, or to capture photos of other people, you can capture your own portraits, which is self portrait. When capturing self portraits, you are working with yourself and you are both the subject and the photographer. You have the freedom to capture your personal moments without worrying about the fact that you have to pose in front of someone else. This article discusses how you can capture storytelling self portraits.
Photo by Taya Iv
Portrait photography does not have to be done with posed subjects, looing into the camera in a perfect location. There are times when you may have limited resources and space, but portraits can always be captured using the available light, simple props lying around the house and sometimes some DIY filters or hacks. This article talks about 10 ways in which you can elevate your portrait photography.
Photo by Brad Starkey
If you are a street photographer, you can also capture stunning and powerful street portraits. Streets are full of moments, stories and colours and it is a great place to capture candid moments of people going about their daily lives. The right location, good use of light and some observational skills along with some patience will yield great street portraits. This article discusses tips on capturing stunning street portraits.
The night sky is stunning and the objects in the night sky are one of the most beautiful subjects that can be photographed mostly from your backyard. One of the most interesting and the brightest subjects in the night sky is the moon. Knowing the moon phases and a good understanding of controlling exposure in your camera can help you capture beautiful images of the moon.
In order to capture details on the moon’s surface, it is good to use a narrow aperture between f/8 and f/11. You will need a tripod, focus manually and use a shutter speed based on the focal length you are using to avoid motion blur. A remote trigger will also greatly help with capturing sharp images.
Grab your Milky Way Photography Blueprint for free righthere.
Here are some resources for effective moon photography tips and techniques.
Image by nousnou Iwasaki
When starting out with moon photography, most of us imagine those closeup shots of the moon that fill the frame, with a lot of details of the moon’s surface visible. When actually capturing the images, they may turn out to be a white blob or spot in the frame. This can be quite frustrating, but without giving up, check out this detailed guide on how to photograph the moon.
Image by Sebastian Voortman
If you are looking for some quick tips to refer to when photographing the moon, then this article quickly goes through a checklist that will help you to capture a quick shot of the moon. Always remember to make minor adjustments based on light, sky conditions and the gear that you use.
Image by Dahlia
Did you know that the moon is not just white but has some interesting colours? This is due to the mineral deposits on its surface. If you have not seen the colours yourself, the next time you photograph the moon, switch to live view and zoom in on the surface of the moon. You will be able to see the colours on its surface without the help of any accessories – just make sure the sky is very clear. Now you can capture the moon and post process to bring out its colours. This article will take you through all the steps required to capture and edit a mineral moon.
Image by Dahlia – shot on iPhone 7 Plus
A lot of photographers these days start their photography journey with their smartphones and some continue to do so for a while. While a smartphone can be a great tool for most genre of photography, it can be quite tricky when it comes to capturing photos of night sky objects. With some patience and understanding of camera settings you can capture decent images of the moon. There are also telephoto lens attachments sold for smartphones that can be used to capture closeup photos of the moon. This article discusses all the essentials required to capture a photograph of the moon using an iPhone or an Android.
Image by Ganapathy Kumar
The rising or setting Moon glows in a bright orangish colour very similar to the rising or setting Sun. This is due to the fact that the light from the rising Moon needs to pass through the thick atmosphere, before you can see it. Most of the shorter wavelengths of light in the blue end of the spectrum are scattered while the longer wavelengths towards the red end are visible. During this time the moon can look a bit fuzzy without great details but with some care, stunning photos of the rising Moon can be captured. This article discusses 3 tips to capture a perfect moonrise.
Image by Ganapathy Kumar
Moonscapes may have a confusing meaning like a Lunar landscape or a devastated landscape, but here in this article, we are talking about a landscape or a cityscape photo, with the moon in the sky. The moon is such a beautiful subject that it can add meaning, story and mood to an otherwise boring landscape or cityscape. In this article, we have provided all the details you need to capture a stunning moonscape.
Image by Temudjin
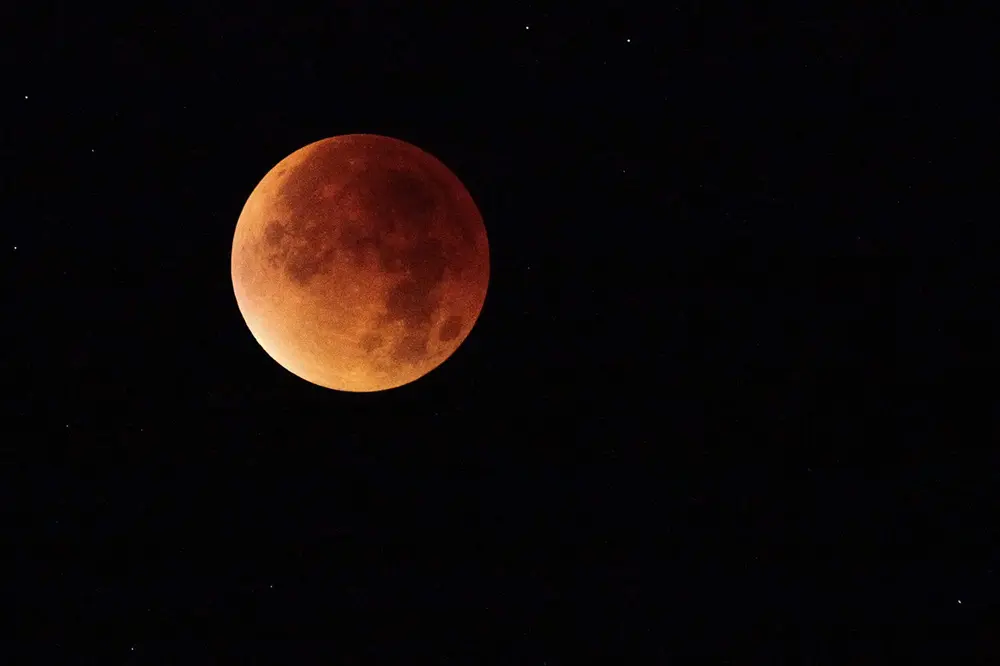
You may have heard of the term blood moon. During a total Lunar eclipse, the moon turns to a beautiful blood red because of the red light getting refracted and falling on the moon. A Lunar eclipse is quite a common occurrence compared to a Solar eclipse, but a total Lunar eclipse can also be a rare one, depending on where you live. So, if you wish to capture a photo of the eclipsed moon in the future, it is quite easy and this article will go through all the steps required to capture the blood moon.
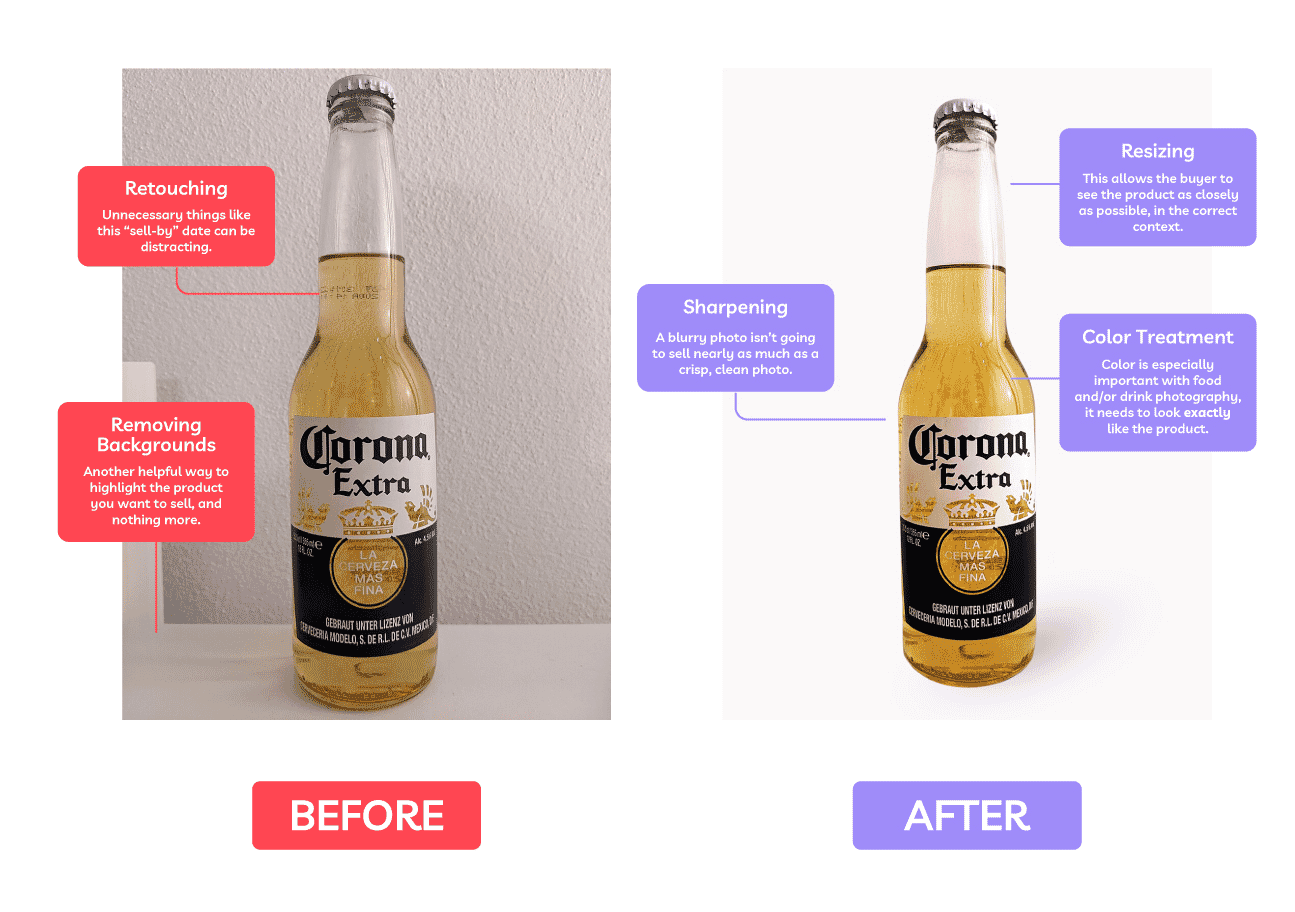
Photo editing is more accessible—and essential—than ever. Whether you’re a business owner, ecommerce seller, or busy creative, knowing what photo editing is (and isn’t) can help you elevate your visuals and reach your goals faster.
In the following guide to photo editing, you’ll learn:
What photo editing means (and why it matters)
Different types of photo editing, from simple to complex
And if you’re ready to level up your own photo edits, check out our free tutorials and professional editing services.
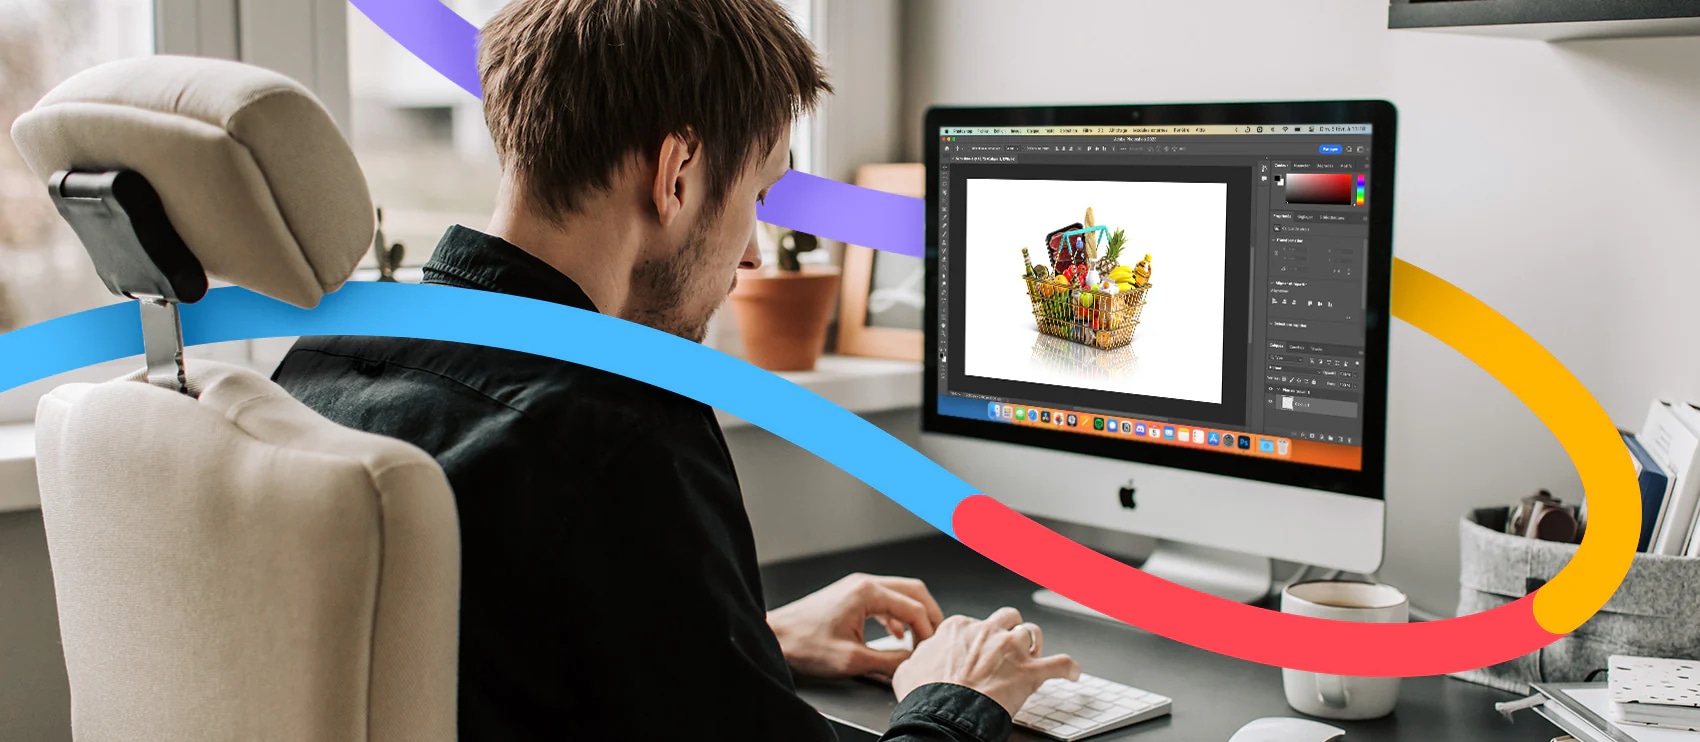
What is photo editing?
Photo editing is the act of image enhancement and manipulation. This process is usually done with a digital photo editing software. Photo editing can involve basic tweaks like when you crop and resize images or adjust saturation. It also includes advanced techniques like swapping faces or photo retouching to get rid of distracting elements or unwanted objects.
Some image editing techniques are done manually, while others are conducted through automated photo editing tools and software. Most edits to digital photography involve some one or a few photo editing programs. Some edits are even done offline on actual photographs, posters, or other printed collateral without any image editing software.
Other terms for photo editing include:
Image editing
Post-processing
Image/photo manipulation
Photoshopping
Image/photo enhancement
Let us look after your image edits, so you can get back to the fun stuff. Try Path free.
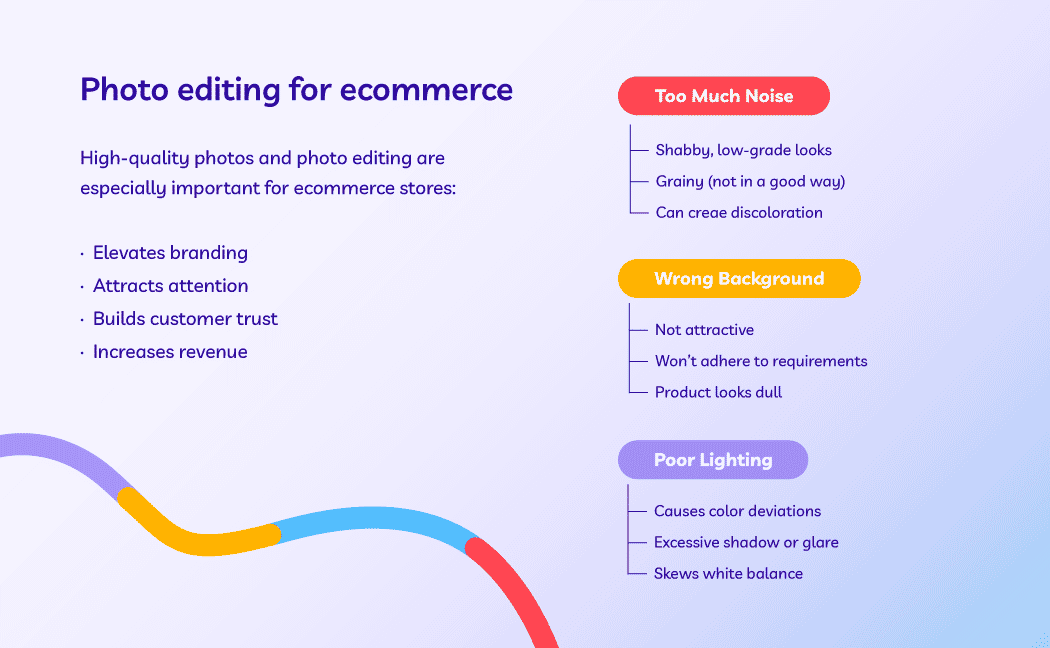
The importance of photo editing
Editing helps you fine tune and get the best image possible, as close to what you imagined when you took the photo (or better perhaps). Niche photographers can hone and emphasize their personal style. And for businesses, editing helps cement branding and optimize for business goals.
Photo editing is particularly important for ecommerce companies. Image quality directly affects people’s opinion of the product and sales numbers. If you have ugly photos, it’s going to be tough to convince a shopper to purchase your product.
Types of photo editing
There are many ways to edit a photo—some simple and others more complicated.
Many people can figure out simple photo editing techniques on their own—though this does require time and patience. More complex adjustments may require using dedicated programs with specific photo editing features or hiring a trained professional editor.
Simple photo editing techniques include:
Straighten: adjust the horizon of the photo
Crop: image cropping involves trimming out a portion (usually peripheral) of the image to help draw attention to the subject or otherwise improve the composition
Sharpen: enhance the definition of the edges in an image (won’t make a blurry image in-focus)
Noisereduction: smoothing the picture out, typically accomplished by reducing the pixel size
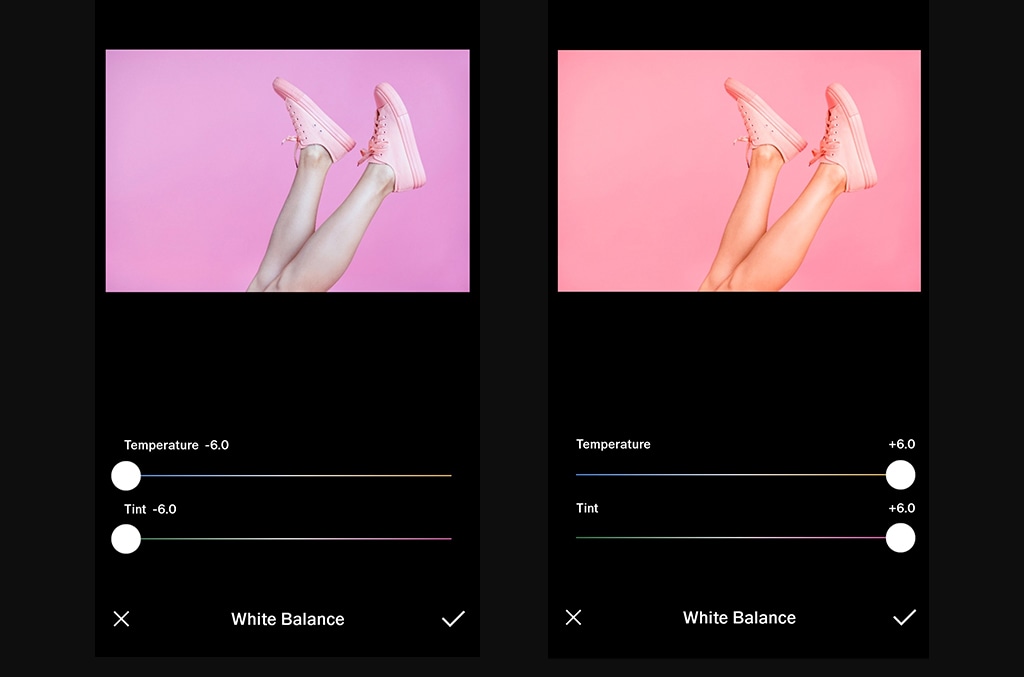
Whitebalance: the color of the light in the image
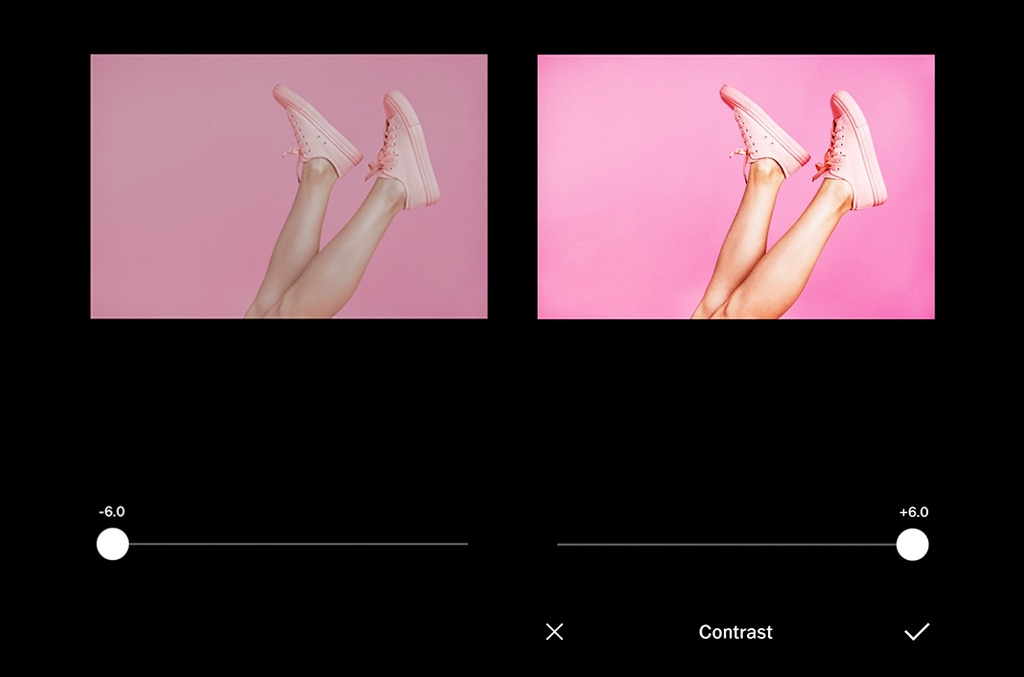
Contrast: higher contrast makes an image more punchy, while lower contrast makes it flatter in color
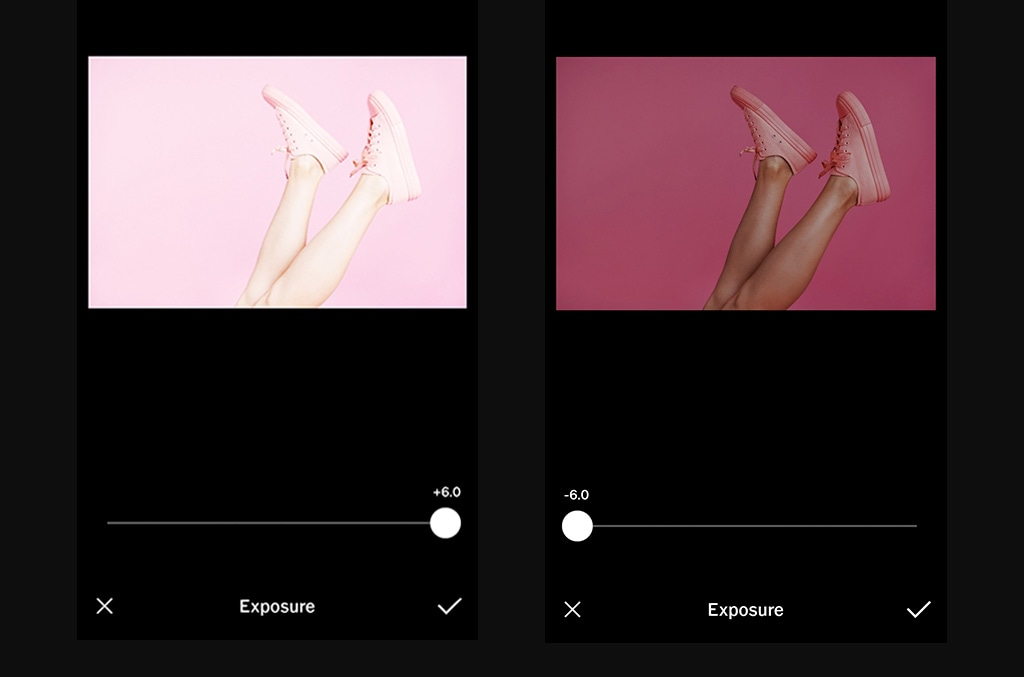
Exposure: the brightness of the photo
Lens correction: lessens the effect(s) of the camera lens
Coloradjustments: change the color of an item or element in the photo
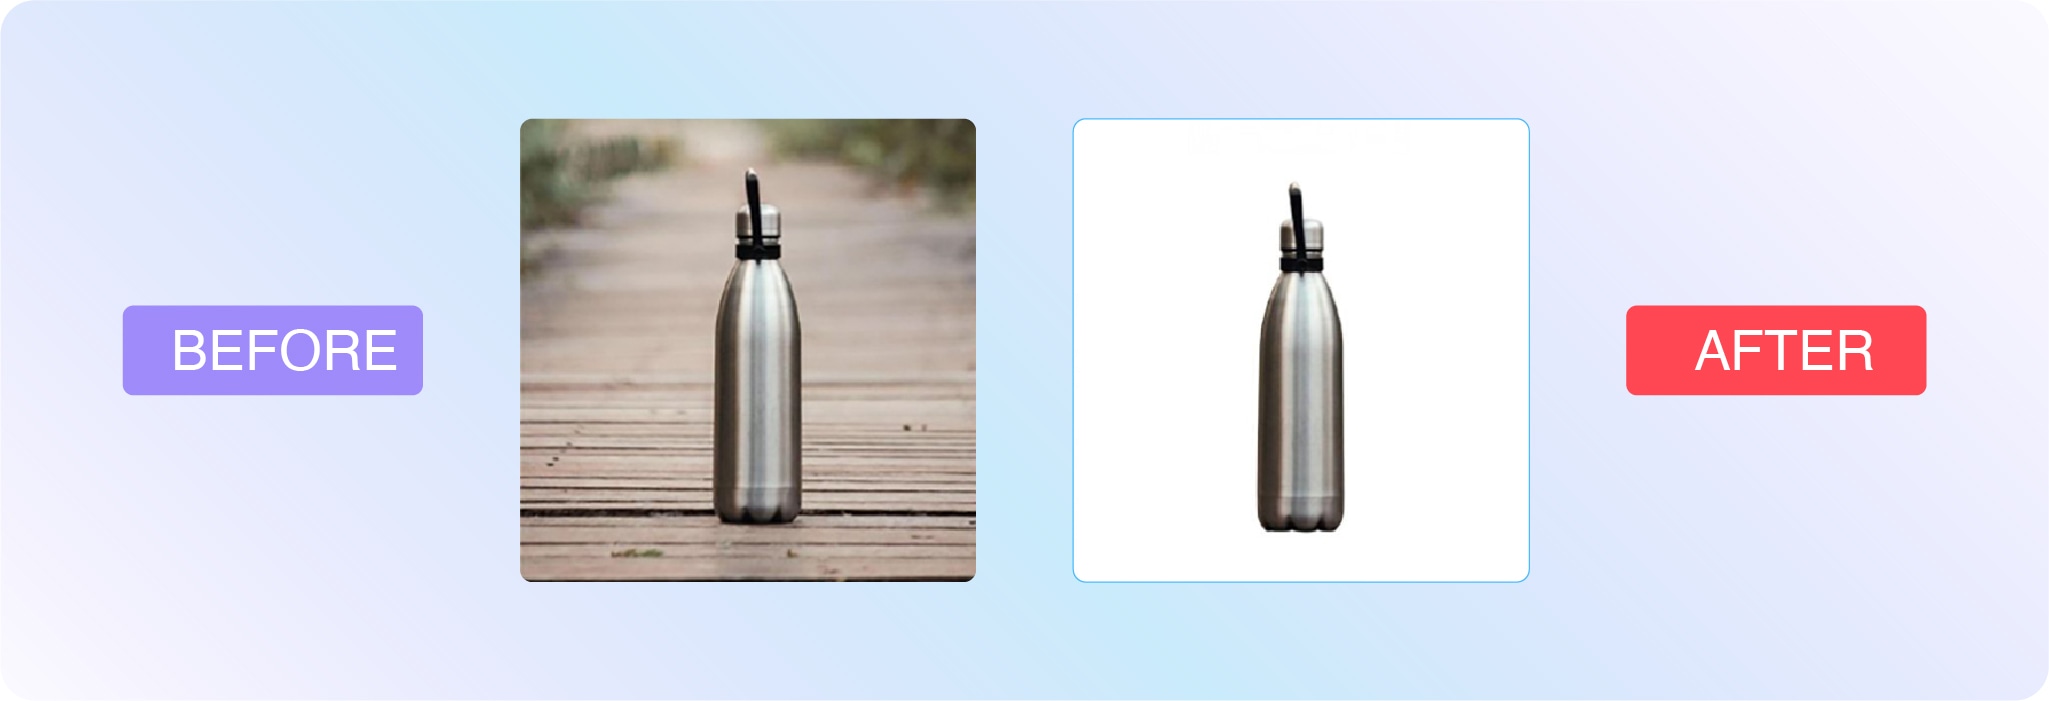
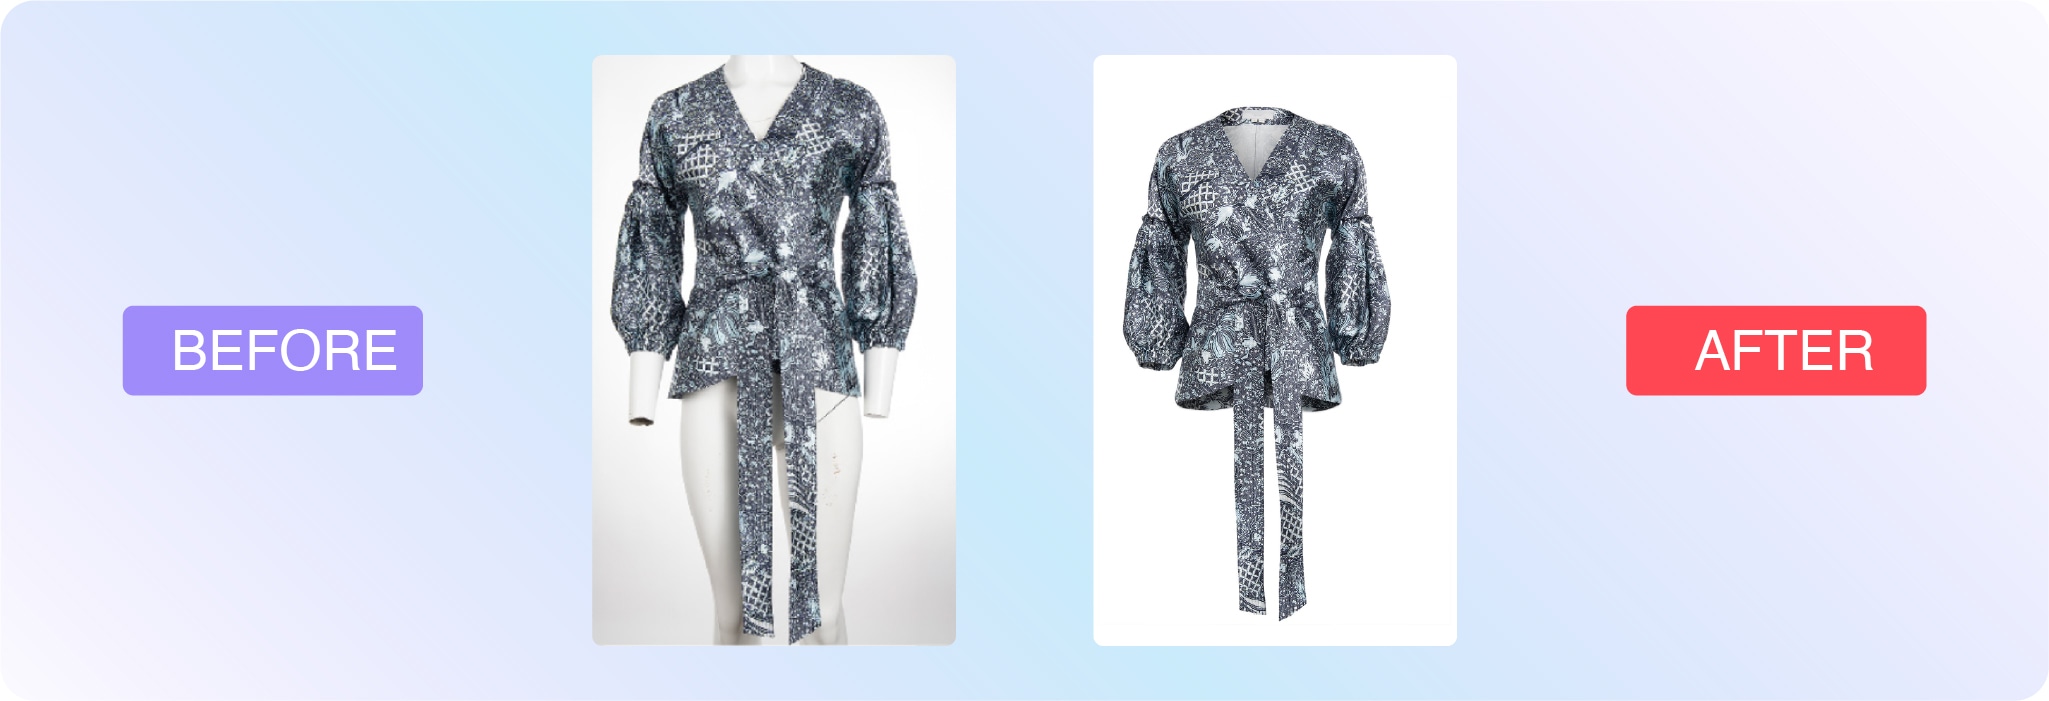
Background removal: delete the background from the image, isolating the subject (this is often used for white background product photography)
More complex techniques include:
Clipping paths: vector path that differentiates the part of the image that’s visible and the part that’s transparent (extracts a subject or element from an image)
Portrait corrections: complexion touch-ups and enhancements
Two methods of digital photo editing are pixel editing and parametric image editing. Let’s look at their definitions:
What is pixel editing?
Pixel editing, or pixel-level editing, is when you alter an image at the pixel level. Because you’re altering the pixels themselves, this also permanently changes the image file. That’s why pixel editing is considered a destructive form of photo editing because it’s not as easy to undo the changes and restore the original file.
Pixel editing allows you to make extremely detailed edits and accomplish certain functions that parametric image editing can’t (like CMYK color modes, for example).
What is parametric image editing?
Parametric image editing (PIE) doesn’t change the pixels of the image. Instead, these edits are recorded as a set of steps to follow to accomplish the final look. Thus, it’s a non-destructive mode of photo editing. However, PIE doesn’t always allow for all types of edits.
Many in the industry recommend starting with PIE, and then using pixel editing to refine the final details.
Examples of photo editing
There are so many ways to edit photos, and everyone has a unique approach. You might see examples of photo editing on social media or YouTube.
Here are some examples of photo edits the team at Path have done for businesses from all around the world:
Background removal
Save a ton of time with pro background removal from 39¢ per image
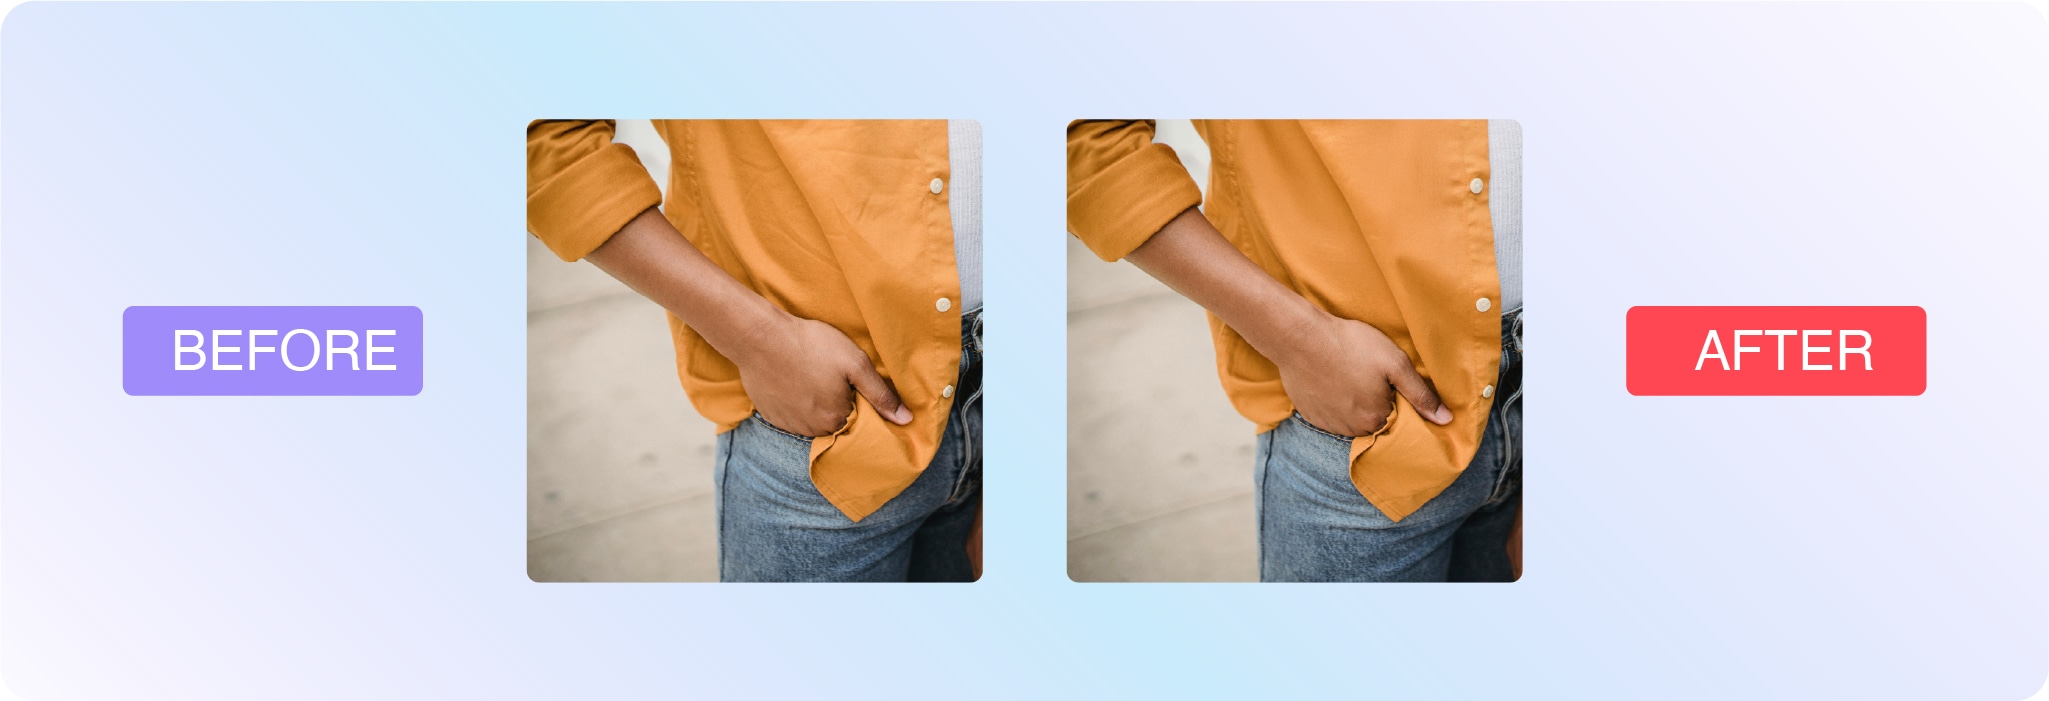
Photo retouching
Polish up your product shots with pro retouching from 79¢ per image
Ghost mannequin
Let us look after your ghost mannequins, starting at just 99¢ per image
Editing different types of photos
Technique
Skill level
Use case
Cropping
Beginner
Ecommerce, social media, marketing, headshots
Background removal
Intermediate
Amazon product listings, white background product photos
Retouching
Advanced
Portraits, headshots, fashion, jewelry
Product and ecommerce photography
Product images will almost always require or benefit from post-processing. Aim for consistency, especially if you’re working on multiple products for the same company or are providing several types of photos of the same product.
Visuals help market brands and sell products, but you should also think about where the image will be used. Is it for an advertisement, ecommerce page, social media, or a print catalog? A white background shot will call for much different edits than an image for a Facebook ad. Likely, you’ll be able to get more creative with advertising imagery.
Here are some of the most common types of edits for product photography:
Brightness and exposure: If you didn’t nail the lighting, you can make substantial adjustments post-shoot.
Background removal: This is a common edit for product photos, especially if you’re listing the item on Amazon, which has a white background requirement. Regardless, white background maintains consistency.
Color correction: It’s important that product photos portray the item as accurately as possible so it’s a smart idea to color correct all of your product images. As many as 64% of returns happen because the product didn’t match customer expectations based on product images and descriptions.
Color change: For products that come in several colors, it’s important to showcase the variety. Instead of photographing the product in every color, photo editors can make the changes post shoot.
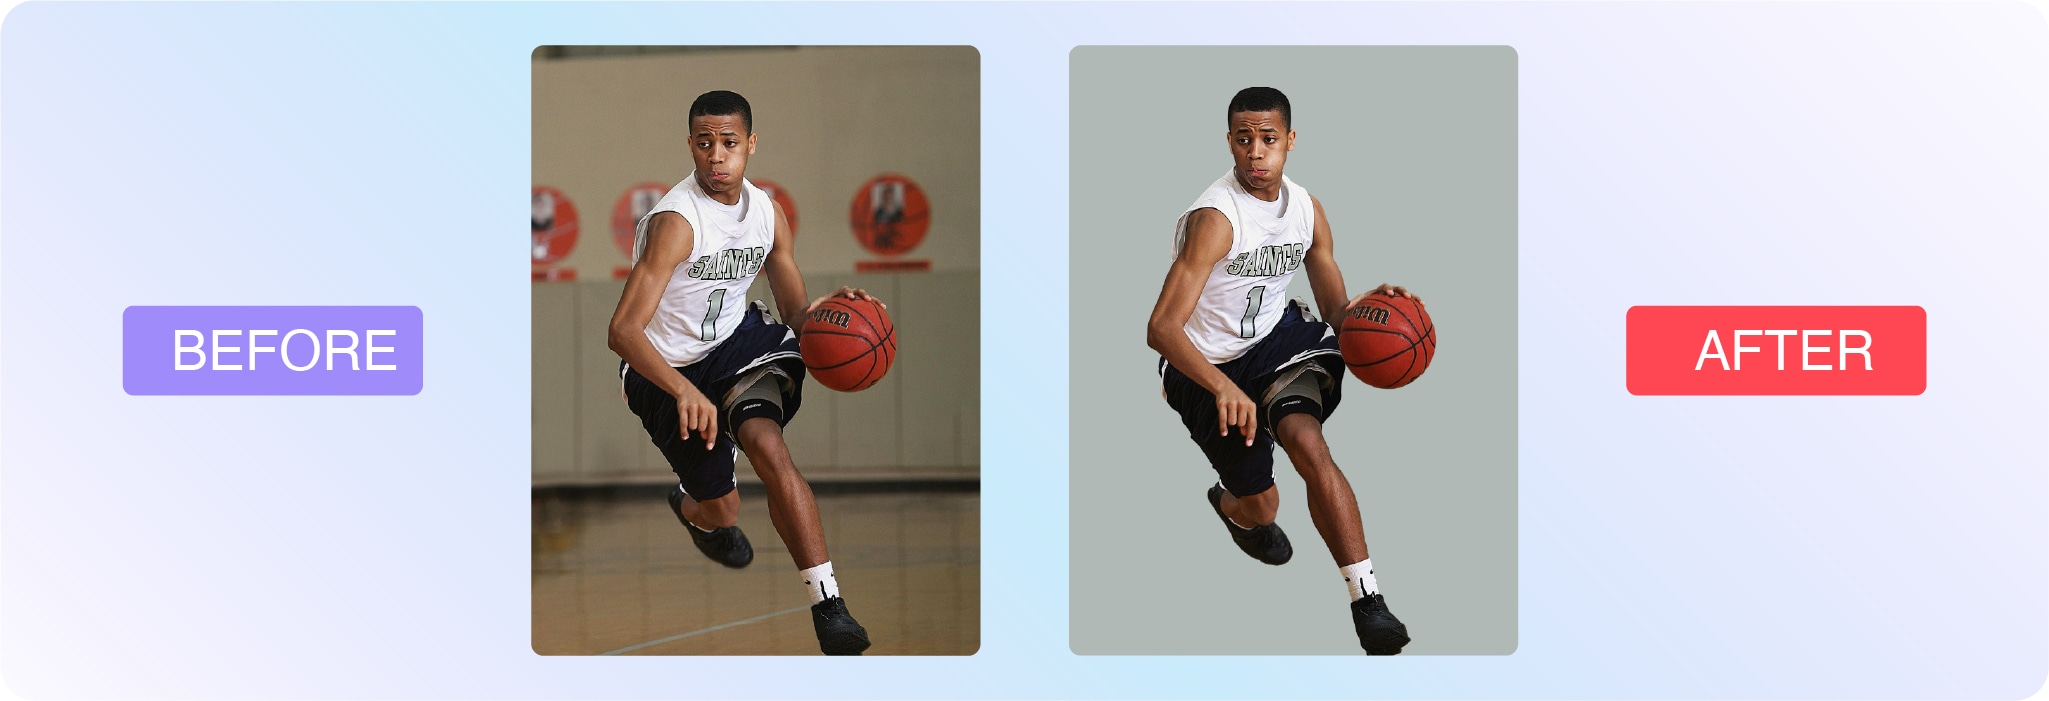
Sports photography
Sports images are often captured in fast-paced, unpredictable environments—making photo editing essential for polishing the final result. Whether you’re working with action shots from the field or editorial images of athletes, editing helps enhance sharpness, fix lighting, and direct attention to the key moment.
Cropping: Reframe the shot to highlight peak action or key players. A tighter crop can add intensity and drama.
Sharpening: Motion blur is common in sports. Sharpening can help make images feel more crisp and in focus.
Colorcorrection: Natural lighting varies across stadiums and gyms. Post-shoot edits bring consistency and accuracy.
Backgroundcleanup: Remove distractions from the crowd or surroundings that pull attention away from the subject.
Spotretouching: Clean up sweat, mud, or jersey wrinkles to create stronger, cleaner visuals for media or brand use.
If you’re editing for a team, school, or sponsor, keep branding consistency in mind—many sports photographers rely on editing templates to maintain uniformity across hundreds or thousands of images.
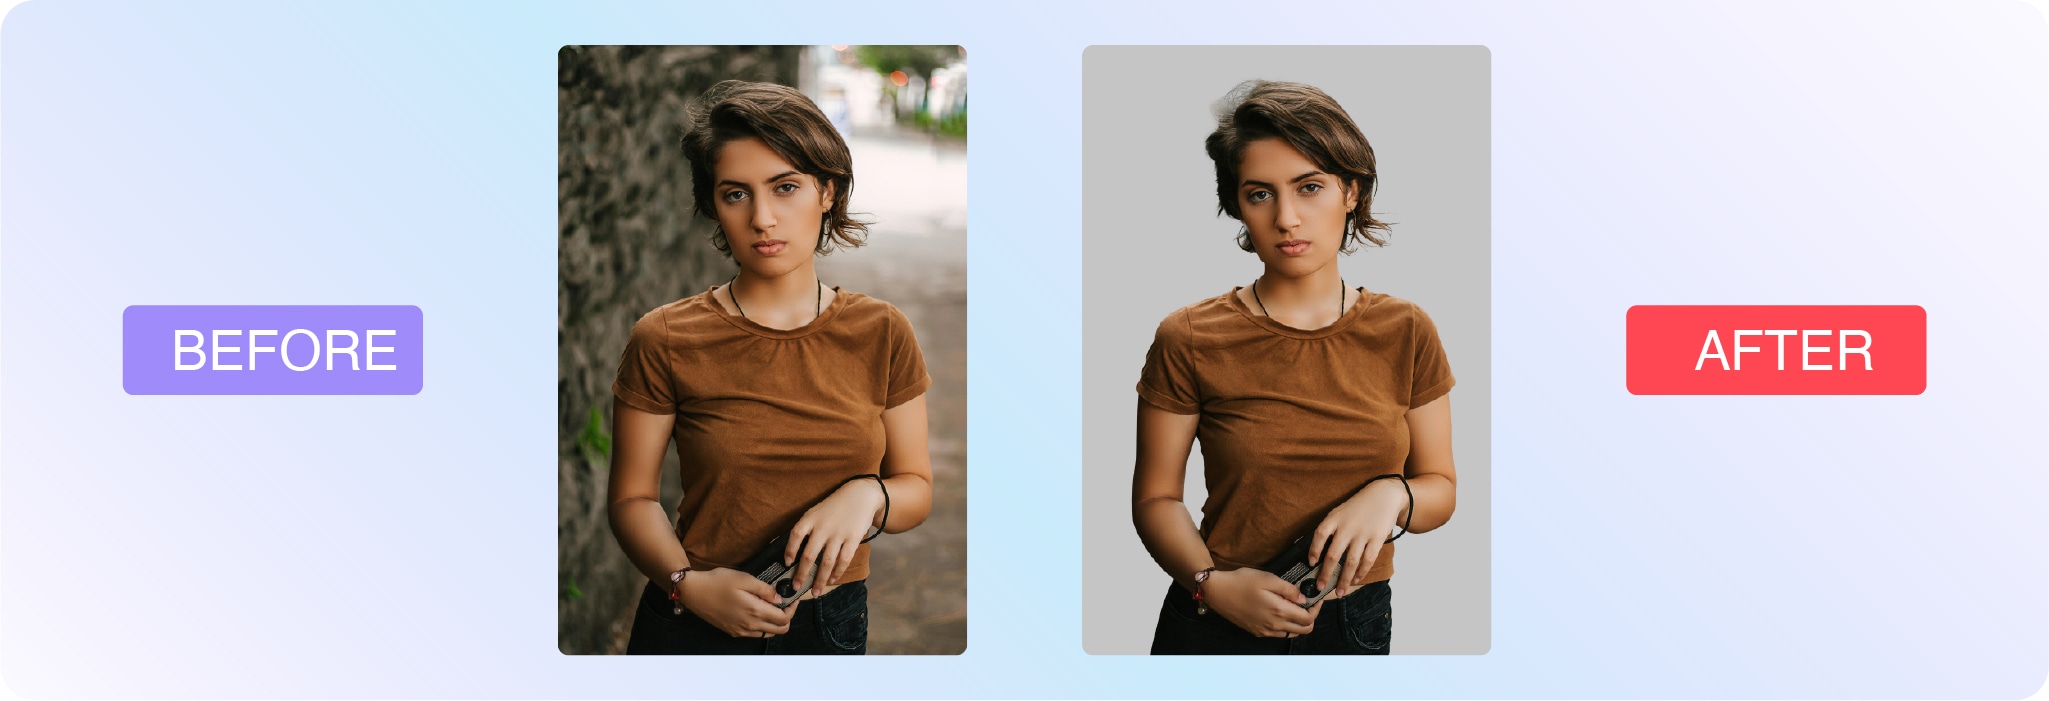
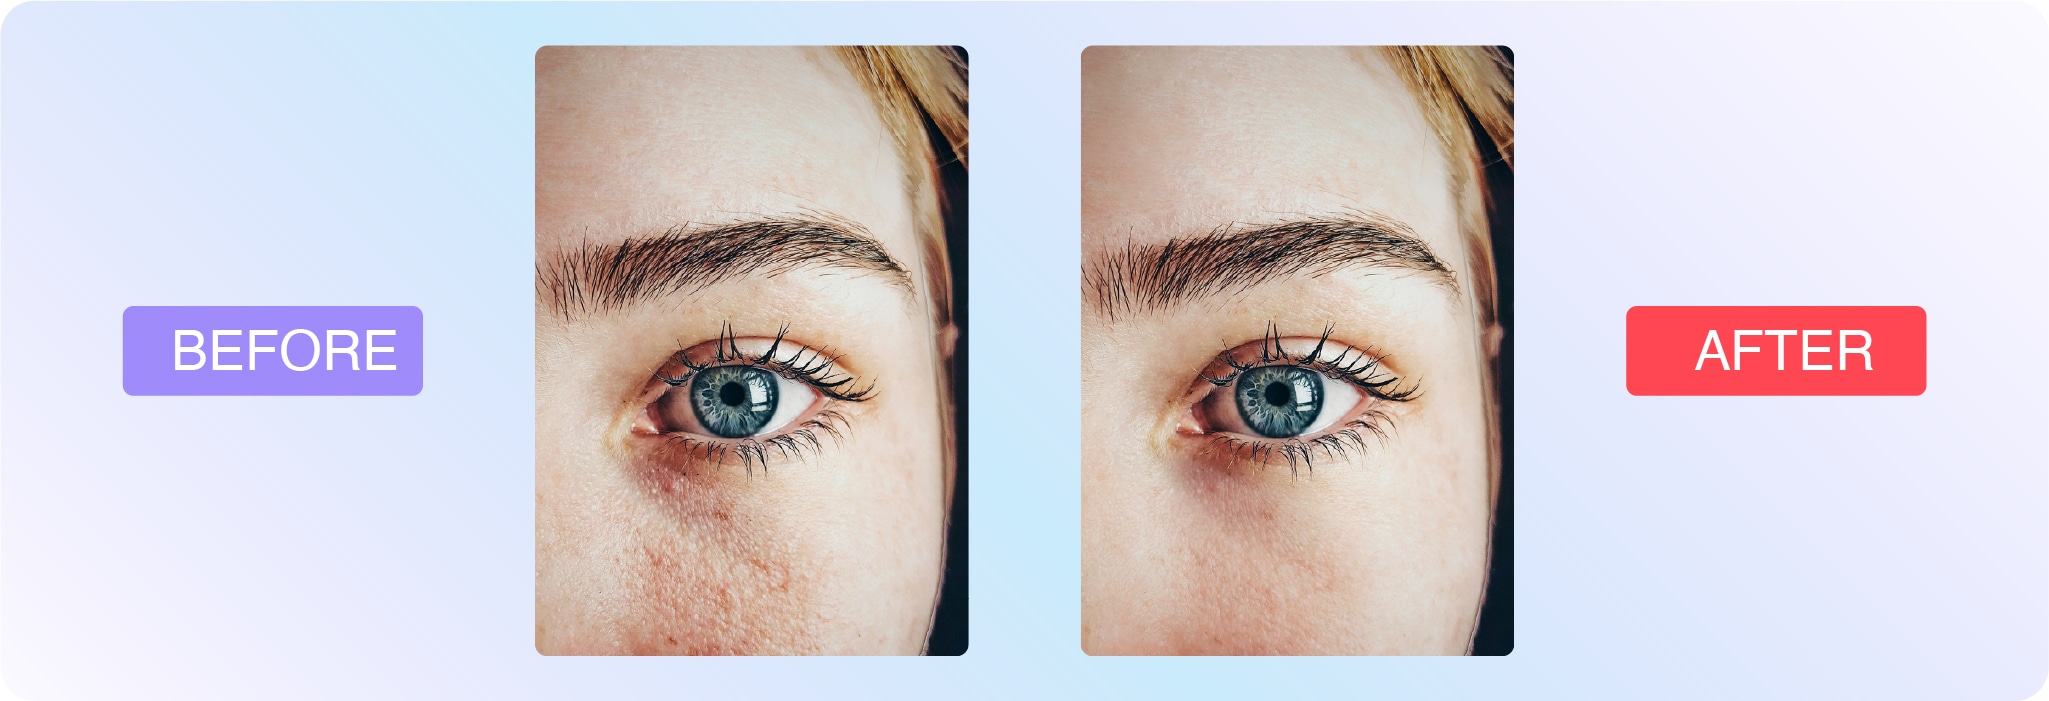
Headshot and portrait photography
Headshots and portraits are often the first impression someone gets of a person—whether it’s for a professional bio, dating profile, modeling portfolio, or graduation announcement. Editing can enhance natural features while preserving authenticity.
Here are common edits for portraits and headshots:
Skinretouching: Reduce blemishes, smooth skin, and even out tone without losing texture.
Whiteningteethandeyes: Brighten smiles and make eyes pop subtly and naturally.
Colorcorrection: Adjust tones to match a flattering, realistic look or a specific brand aesthetic.
Flyawayremoval: Clean up stray hairs or lint that distract from the subject.
Backgroundediting: Simplify or replace backgrounds to match the intended context—e.g., corporate headshot vs. lifestyle portrait.
The key with headshot and portrait editing is to enhance, not transform. The goal is to present someone in their best light while keeping the photo true to who they are.
Learn how to edit your photos
If you’re ready to learn how to edit your own photos, check out this handy collection of Photoshop tutorials. Here are a few to get started with:
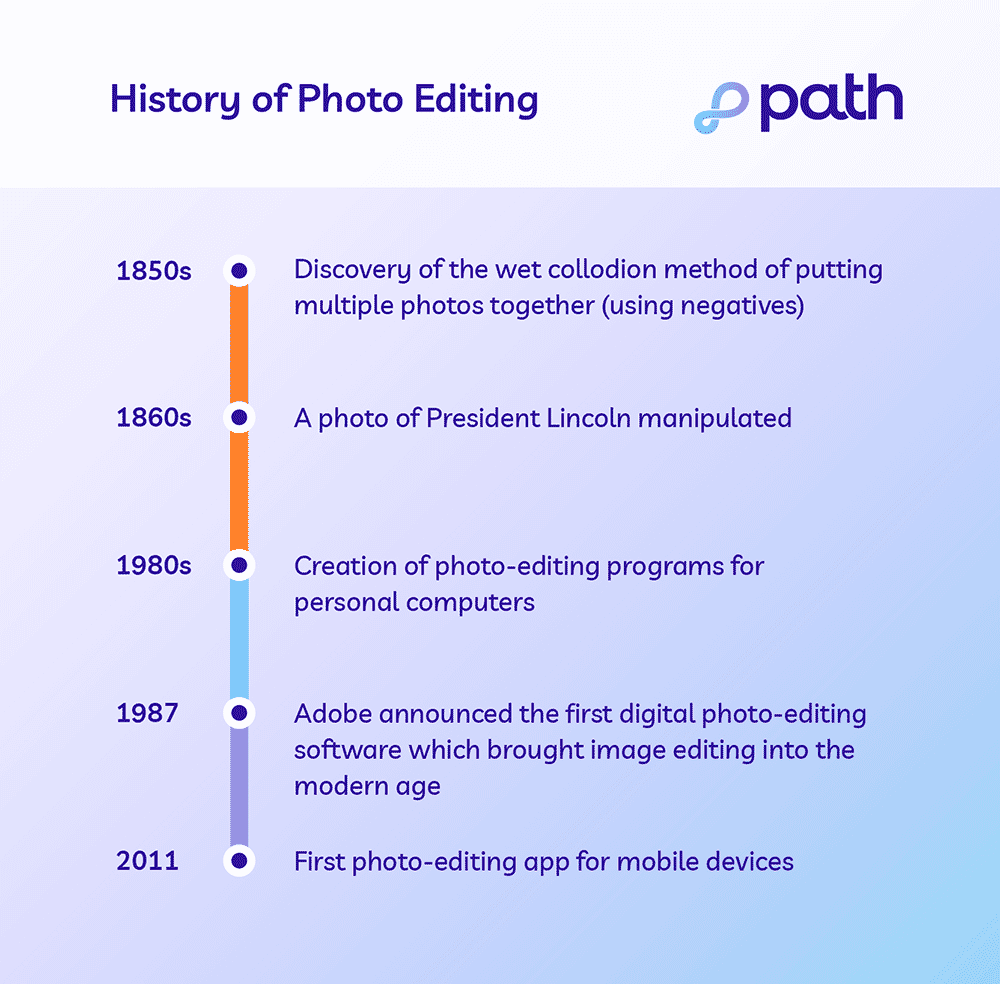
Photo editing history
What is a professional photo editor?
A person who edits images can either be self-employed, contracted by an outsourced company or agency, or someone who works in-house. There are many possible job titles for a photo editor, including digital photo editor, graphic designer or art director, among others.
Typically, photo editors specialize in specific industries, much like photographers. For example, real estate, editorial, and product photography all come with their own set of trends and intricacies. Editors that focus on ecommerce images know how to make products pop.
Our virtual photo editing studio is made of more than 300 trained professional photo editors who specialize in the following:
Ecommerce
Product
Sports
Headshot
Portrait photography
Let us look after your image edits, so you can get back to the fun stuff. Try Path free.
Tackle your photo editing projects with Path
Learning new photo editing techniques can be an enjoyable way to break up your day and add to your industry knowledge, but editing photos can be time-consuming, especially if photography is your specialty. If you need fast, affordable, high-quality photo-editing services, the professionals at Path are here to help.
What is photo editing? FAQs
Can I edit a photo for free?
Yes, you can edit a photo for free. You can use free photo editing tools and do it yourself. You can also use free AI photo editing tools, but these edits require careful quality checks. Or, send your first two photos to Path to get them edited for free.
How can I edit a picture image?
Open your photo editing tool of choice
Upload or open the photo you want to edit
Make your desired edits
Save your work
What is the best app to use for photo editing?
Adobe Photoshop
Adobe Lightroom
GIMP
Pixlr
Snapseed
VSCO
How do I edit my photos like a pro?
Edit photos like a pro by learning basic and advanced Photoshop techniques, outsourcing the tedious edits, and optimizing for the right use and context.
What is the meaning of photo editing?
The meaning of photo editing is the process of manipulating and enhancing a photo. Photo editing can involve basic tweaks like cropping, resizing, and applying artistic filters. It also includes advanced manipulations like retouching and removing unwanted elements and distractions.
What are the 5 basics of photo editing?
Cropping
Resizing
Applying simple clipping paths
Changing colors
Adjusting exposure
What is the purpose of a photo editor?
A photo editor can save you time and stress because they have the skills necessary to accomplish tedious, time-consuming, or complicated editing tasks for you.
Let us look after your image edits, so you can get back to the fun stuff. Try Path free.
For some, poring over Lightroom for hours on end to create the perfect edit, is the only way to go. For others, the mere thought of sitting down at a computer and fashioning raws into something more usable is at best an inspiration for procrastination and at worst something to avoid all together.
Lightroom, particularly if you do not use it much, can be a daunting and overwhelming program. But it doesn’t have to be that way. If you adhere to the 1/99% rule you will soon find yourself getting great shots with minimal effort. The 1/99% rule suggests that you use 1% of the features, 99% of the time. That is something that is perfectly possible with Lightroom. Today we are going to tell you how.
Preselection
One of the biggest mistakes you can make, and one that will definitely put you off editing, is to simply sit with Lightroom and edit each and every photo. This is a time consuming and fruitless pursuit.
It’s much better to use Lightroom’s simple but powerful rating system to find the best images to edit. In the Library module, open the first image of the shoot. You can create your own system but for simplicity, if the image is not worth editing, do not give it a rating. If it’s a maybe, assign it a 3 star rating. If it’s a must edit, give it 5 stars. You can easily assign the star rating using the number keys on your keyboard. Then hit the right arrow to advance to the next image and rate that. In no time at all you will have a selection of 5 star images to edit. Use the filters at the top of the Library module to filter 5 star images only.
Knowing which images you want to edit is half the battle.
Make Use Of Presets
If you really do struggle with editing, then presets are the way to go. Whilst there are a number of photographers that sell presets, there is also a very good selection provided by Adobe.
To apply a preset open the image in the “Develop” Module. On the left side of the screen you will see a plethora of different types. You don’t actually have to click on a preset to see what it will look like on your image. Instead simply roll your cursor over each of them. When you find one that you like, click it and the preset will be applied.
If there is a particular preset that you find yourself gravitating to often, you can choose to apply it on import. To do this, in the import window, to the right click on “Develop Settings.” You will see all the presets that you have installed in a drop down list. Simply select the one you like and all images will have that preset applied as they are imported.
Don’t worry if you are not happy, you can clear any preset by right clicking on it in the “Library” module and selecting “Develop Settings” – “Reset.” This will return the image to its out of camera look. You can do this to multiple images by holding “CMD/CTR” and left clicking all the images you wish to reset. Then with the mouse over one of the selected images, use the same procedure.
Carefully chosen presets can save large amounts of time
If you prefer not to use a preset, Lightroom allows you to make automatic corrections. These can be very useful for very quick edits.
In the “Develop” Module under the “Basic” tools there are two “Auto” options. The first, at the very top is called “Auto.” When you click this, Lightroom will work out what it thinks the image needs based on the histogram. It will apply exposure, contrast and saturation as well as lifting shadows and dropping highlights. It’s not a perfect tool, but for quick edits, it does a decent job.
The other very useful tool is the “White Balance dropper” tool. It is found at the top left of the White Balance section.
To use this tool simply click on it and move the dropper to a section of the image that you know to be a neutral grey. Lightroom will then correct the white balance to make sure that grey area becomes neutral.
Make use of Lightroom’s auto tools
Use The Basic Editing Sliders
If you want to have a little more control over your images, then confining yourself to the basic correction tools is a good way to go. These are Exposure, Contrast, Highlights, Shadows, Blacks and Whites.
For a very simple, fast edit, first move the Exposure slider, to get the bulk of the Histogram to the middle. Then simply move the Black slider until the edge of the histogram hits the left side. Do the same with the White slider until the histogram hits the right side. This will give you optimum contrast and exposure. If you want to edit a touch more, use the Highlight and Shadow tool to get the look you want.
If you like that look you can then apply it easily to the other 5 star images in your shoot. To do this, simply right click on the edited image, select “Settings” – “Copy Setting” then from the window click ‘Check All.”
Now you can scroll through your 5 star images and apply that setting to each one. To do that, bulk select the images in the “Library” Module, right click on one of them and select “Develop Settings” – “Paste Settings.” You might need to go back and tweak one or two, but overall this should give you a fast and consistent edit.
Repetition is a good way to get efficient in Lightroom, so developing your own short workflow will help you breeze through the editing process. It doesn’t have to be complicated, just import, rate, quick edit and export the ones you want to show.
By repeating the same workflow you will soon find yourself being able to edit images in minutes rather than hours.
Editing can be an off putter to some photographers. It can be time consuming and frustrating. However using some or all of the tips above, you will soon find editing in Lightroom doesn’t have to be a chore. The end benefit will be a definite upturn in the quality of your images. That has to be a win-win.
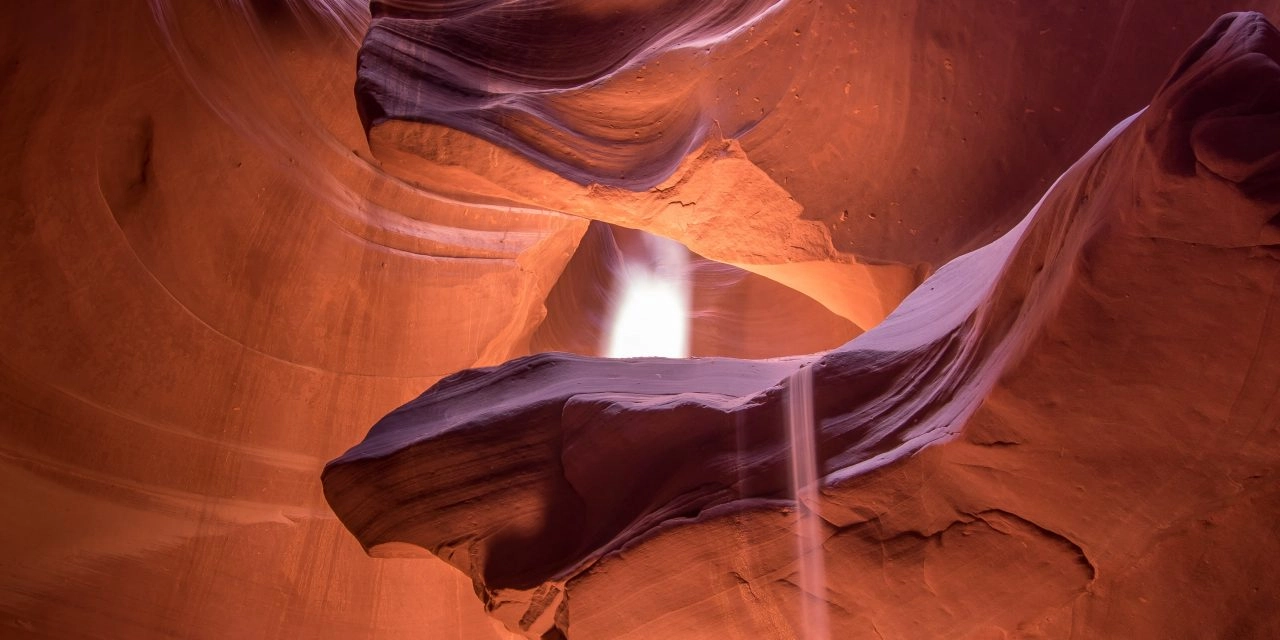
“Wow” is an understatement when describing the beauty of Antelope Canyon. Its beautiful and glowing red canyon walls, sleek curves, scalloped rock faces as well as striking light beams can leave you speechless.
Fortunately, you don’t have to be a professional photographer just to get great Antelope Canyon pictures. With your camera, you can actually take great photos of the area.
Keep reading this article for tips on how and where to position your camera to get spectacular shots.
[table id=29 /]
Antelope Canyon: Interesting Facts
Antelope Canyon
Antelope Slot Canyon is located in Page, Arizona.
It is made up of the Upper and Lower Antelope Canyons. Both canyons are part of the Navajo land in Northern Arizona. The Navajo people are responsible for the care and preservation of the Antelope Canyon.
The formation was created millions of years ago. These canyons were created due to water and wind erosion caused by flash floods in Arizona. Both slot canyons are open for tourists. Oftentimes, when people say Antelope Canyon, they normally refer to the Upper Antelope Canyon.
The Upper Antelope Canyon is more popular than the Lower Antelope Canyon. However, tours for the Lower Antelope Canyon are relatively cheaper. With a Navajo guide, you may visit both slot canyons in one day.
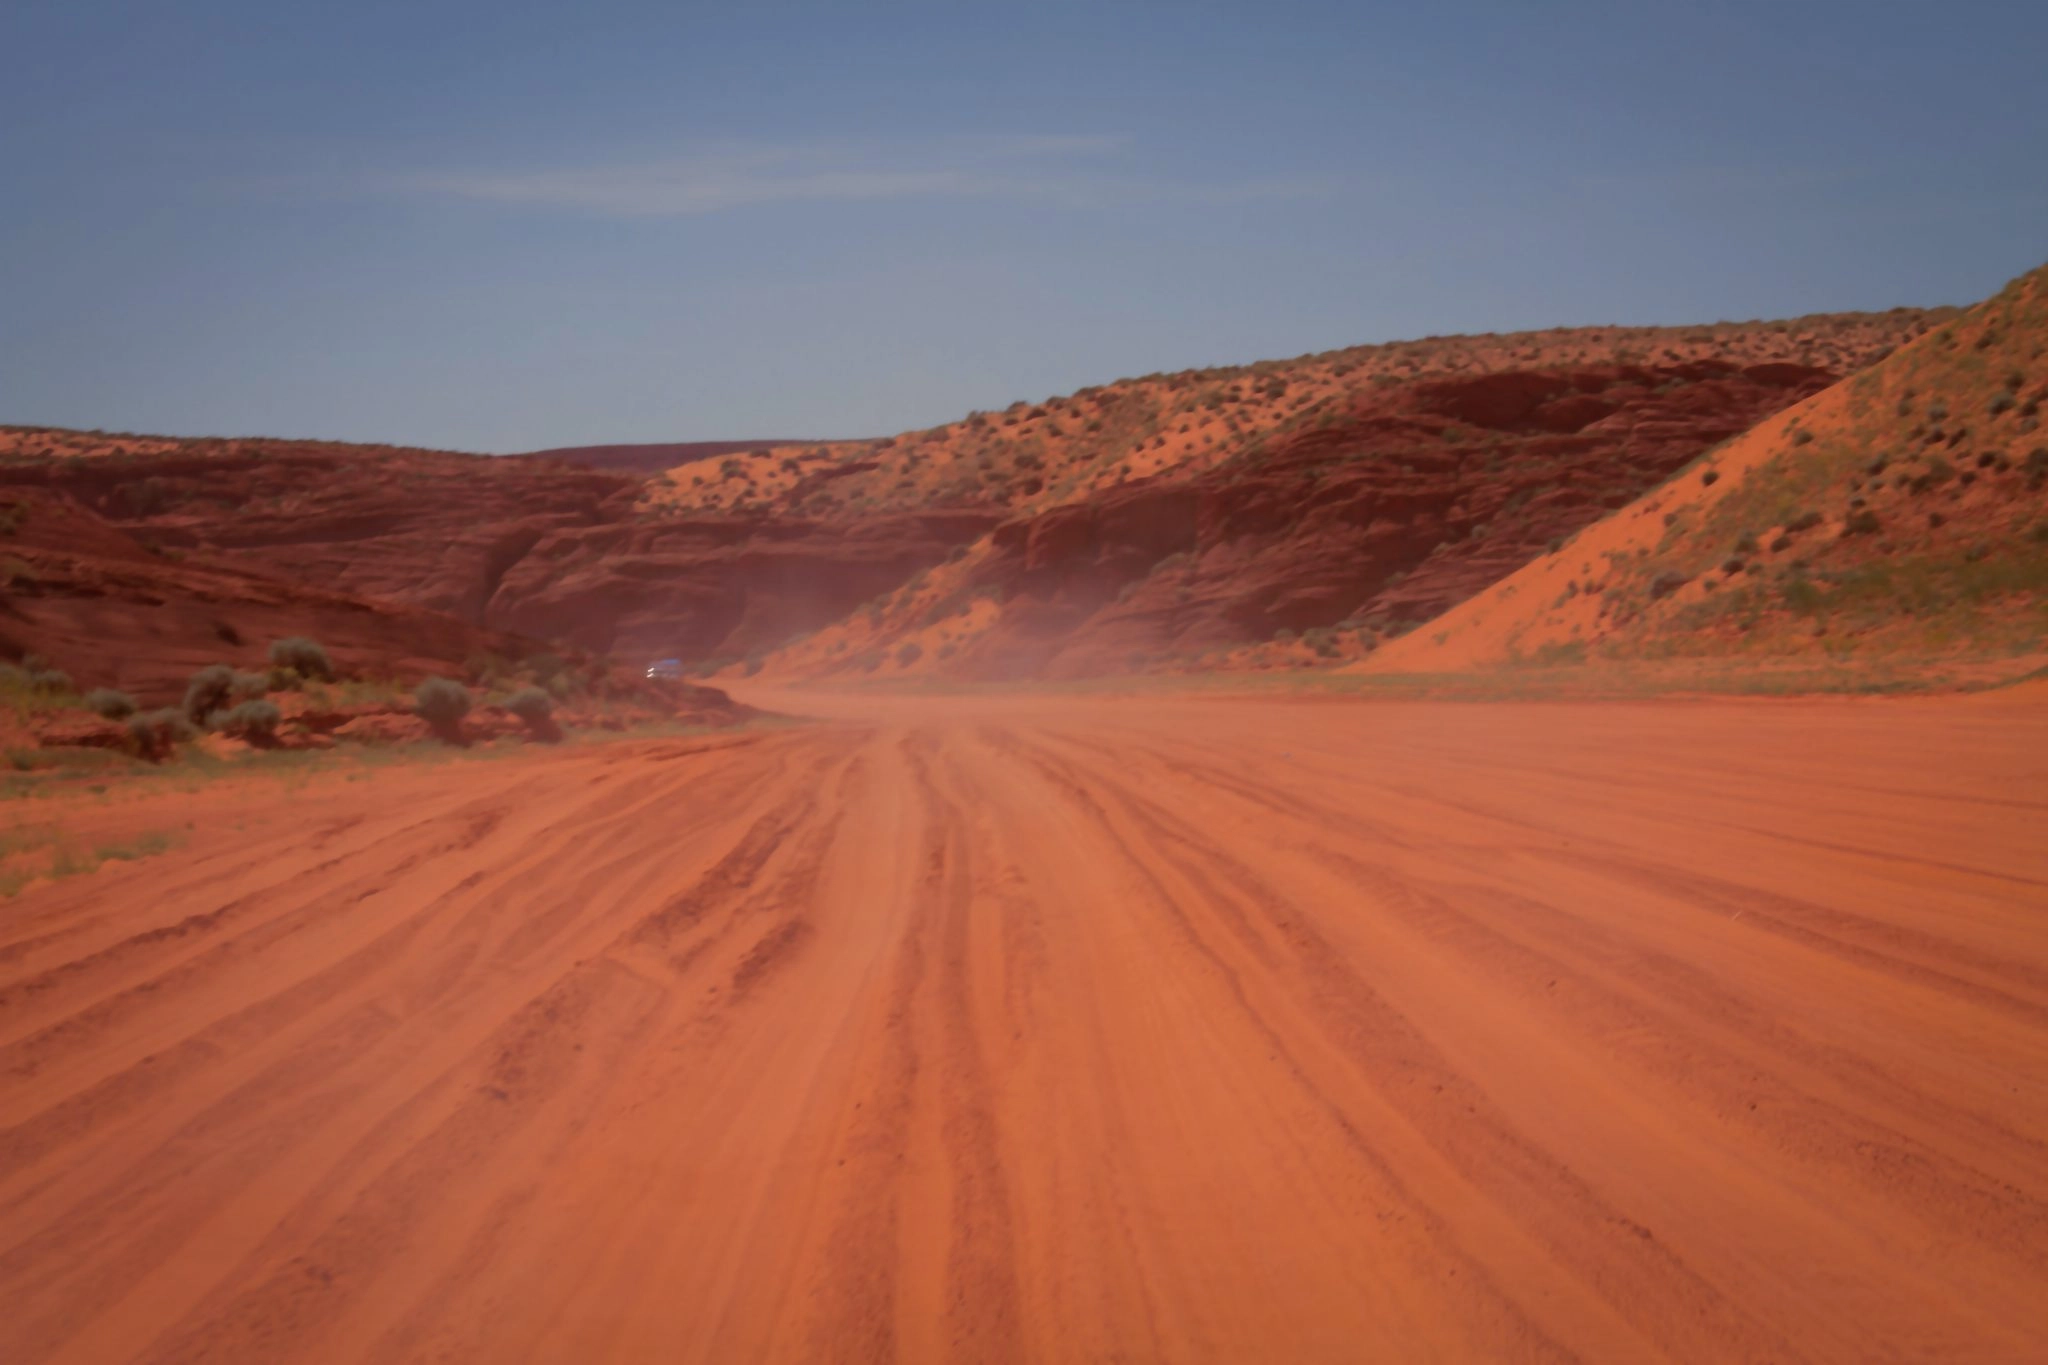
The road leading to the canyons is gated by the Navajo Nation. The Navajo Nation protects its people as well as the canyons. That is why only guided tours with authorized tour guides are allowed entry into the canyon.
As majestic as it is, this natural beauty can cause danger during monsoon season. Rainwater can quickly fill up the canyon which can cause flash flooding due to the canyon’s narrowness. In 1997 a flash flood cost the lives of some tourists.
Because of the 1997 incident, visiting the canyon is only through guided tours. Aside from the issues of safety, only authorized guide tours are permitted entry into the canyon to prevent vandalism and preserve this natural landmark.
If you are planning to visit the canyons, make sure to check the weather conditions on your planned dates. You want to enjoy your trip and bring home great memories and not get stranded on the ledge because of the rain.
The Lower Antelope Canyon
Lower Antelope Canyon
The Lower Antelope Canyon is also called “The Corkscrew” and has a Navajo name “Hazdistazi”. The Navajo name for the Lower Antelope Canyon translates to “spiral rock arches”.
If you like narrow passageways and ladders, you may find the Lower Antelope Canyon to your liking. The canyons here are shallower and lighter in shade than the Upper Antelope Canyon because of their upright V shape.
The Lower Antelope Canyon is located near the Upper Antelope Canyon. Unfortunately, in 2018 tour operators no longer offer general tours and even photography tours.
The Famous Upper Antelope Canyon
Upper Antelope Canyon
The Upper Antelope Canyon is also called “The Crack” and has a Navajo name “Tsé bighánílíní”. The Navajo name for the Upper Canyon translates to “ the place where water runs through cracks”.
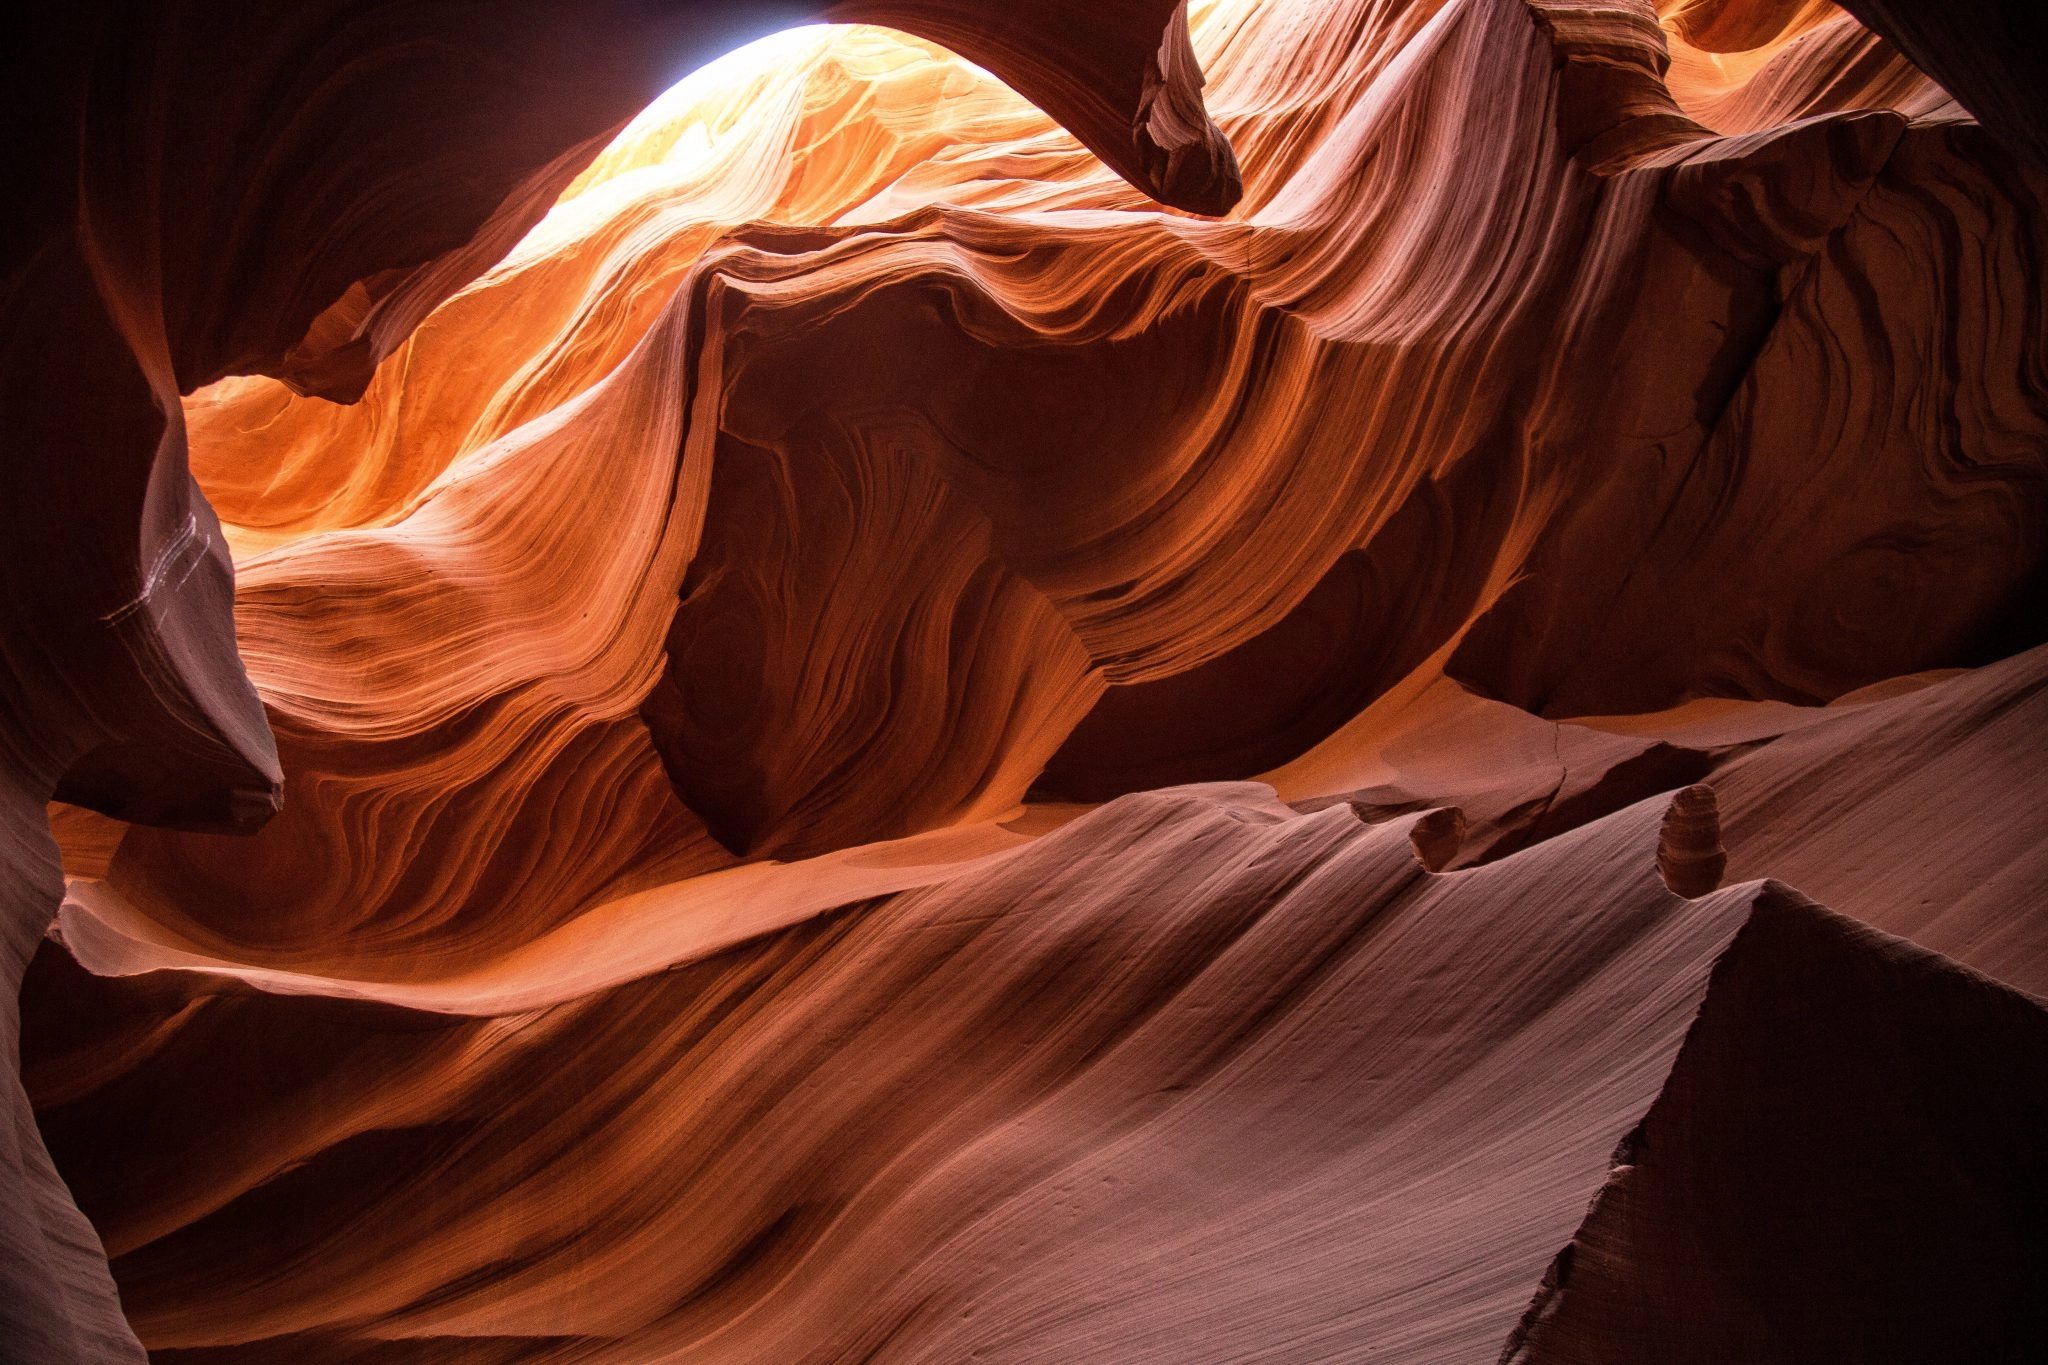
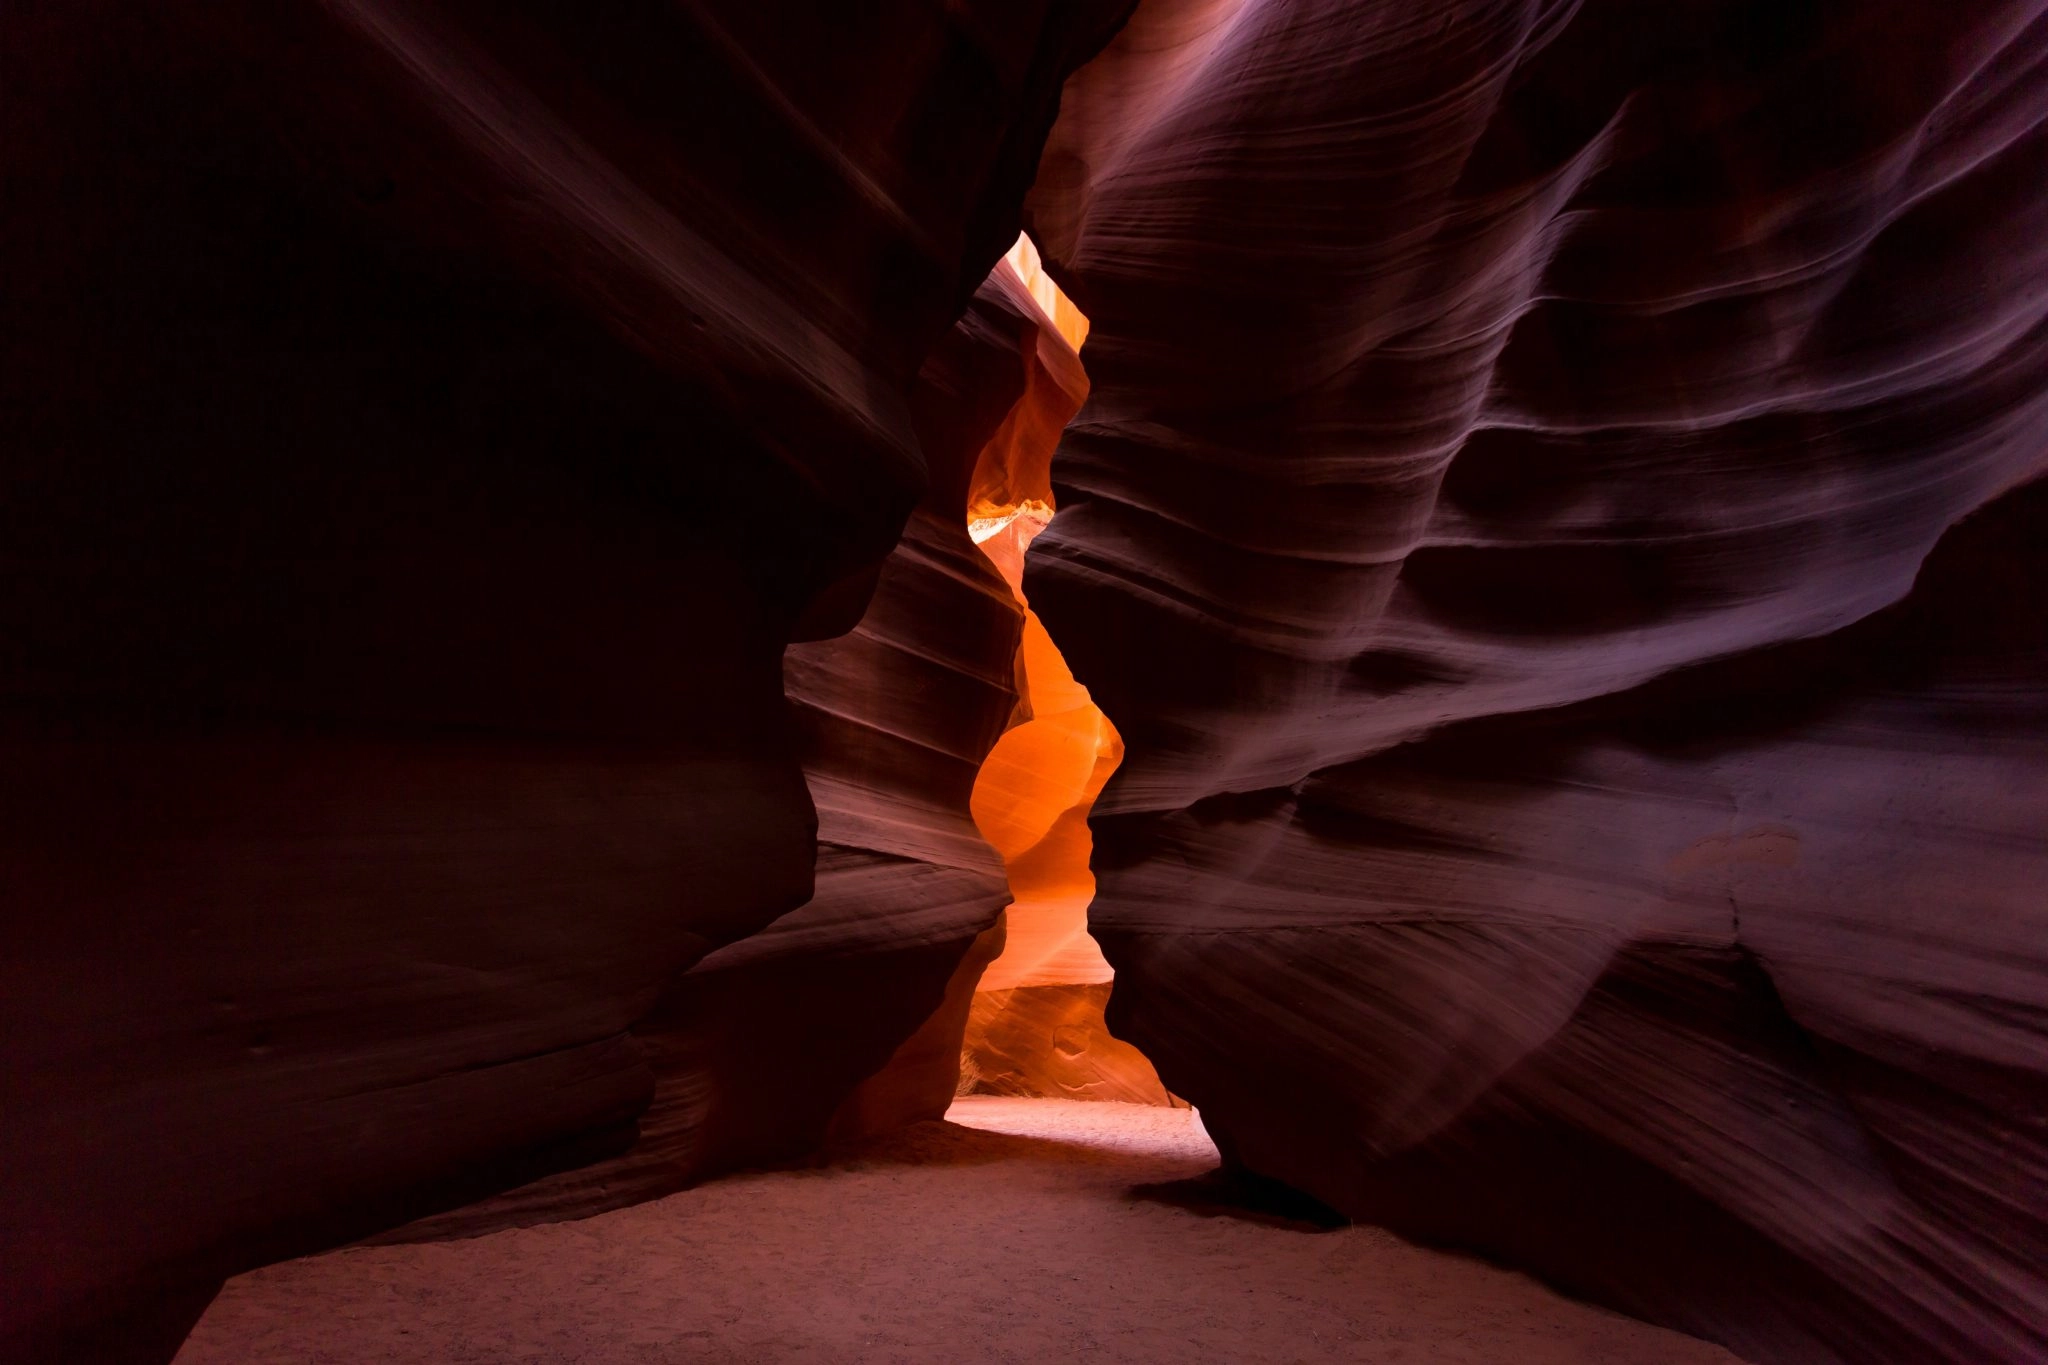
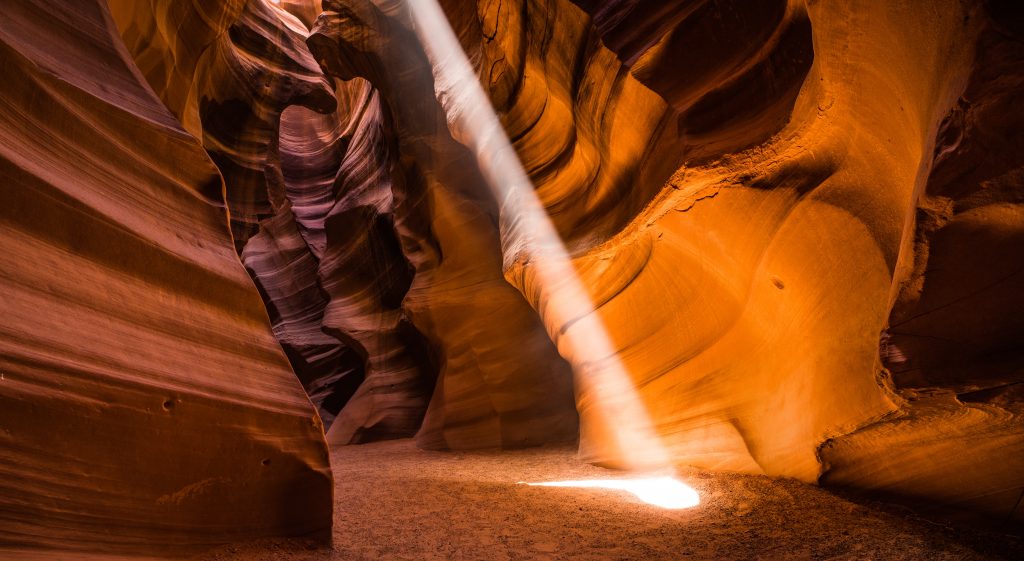
It is characterized by high and dark canyon walls, light beams shining down, and falling sand. The Upper Antelope Canyon is somehow shaped like an inverted V. It is narrow at the top while it is wide and passable at the bottom.
Because of its high canyon walls, light beams are easily created when the sun shines at certain angles. The narrow top also makes the canyons look darker and the surrounding atmosphere cooler.
How to Visit Antelope Canyon?
The Antelope Canyon is only open for scheduled tours. You may inquire about tour packages, exclusive deals, and even discount codes from tour companies. It is highly encouraged that you make reservations for tour slots at least three months in advance.
The whole tour usually lasts for 1.5 hours which is inclusive of the travel time and touring the canyon. So many people who want to visit this place. It is not surprising for many want to witness this majestic site up close and personal.
Road to Antelope Canyon
Most tourists flock to Antelope Canyon during summertime. Midday is the most crowded time. Tourists prefer to visit during this time so they can get more great stock photos. If you want to avoid the crowd and take your time taking pictures, you can visit earlier or later in the afternoon.
Tips for Capturing Gorgeous Antelope Canyon Pictures
Both slot canyons are photogenic. However, you can capture more stunning photographs at the Upper Antelope canyon. It is during midday that you can get gorgeous photos of light beams as well as falling sand.
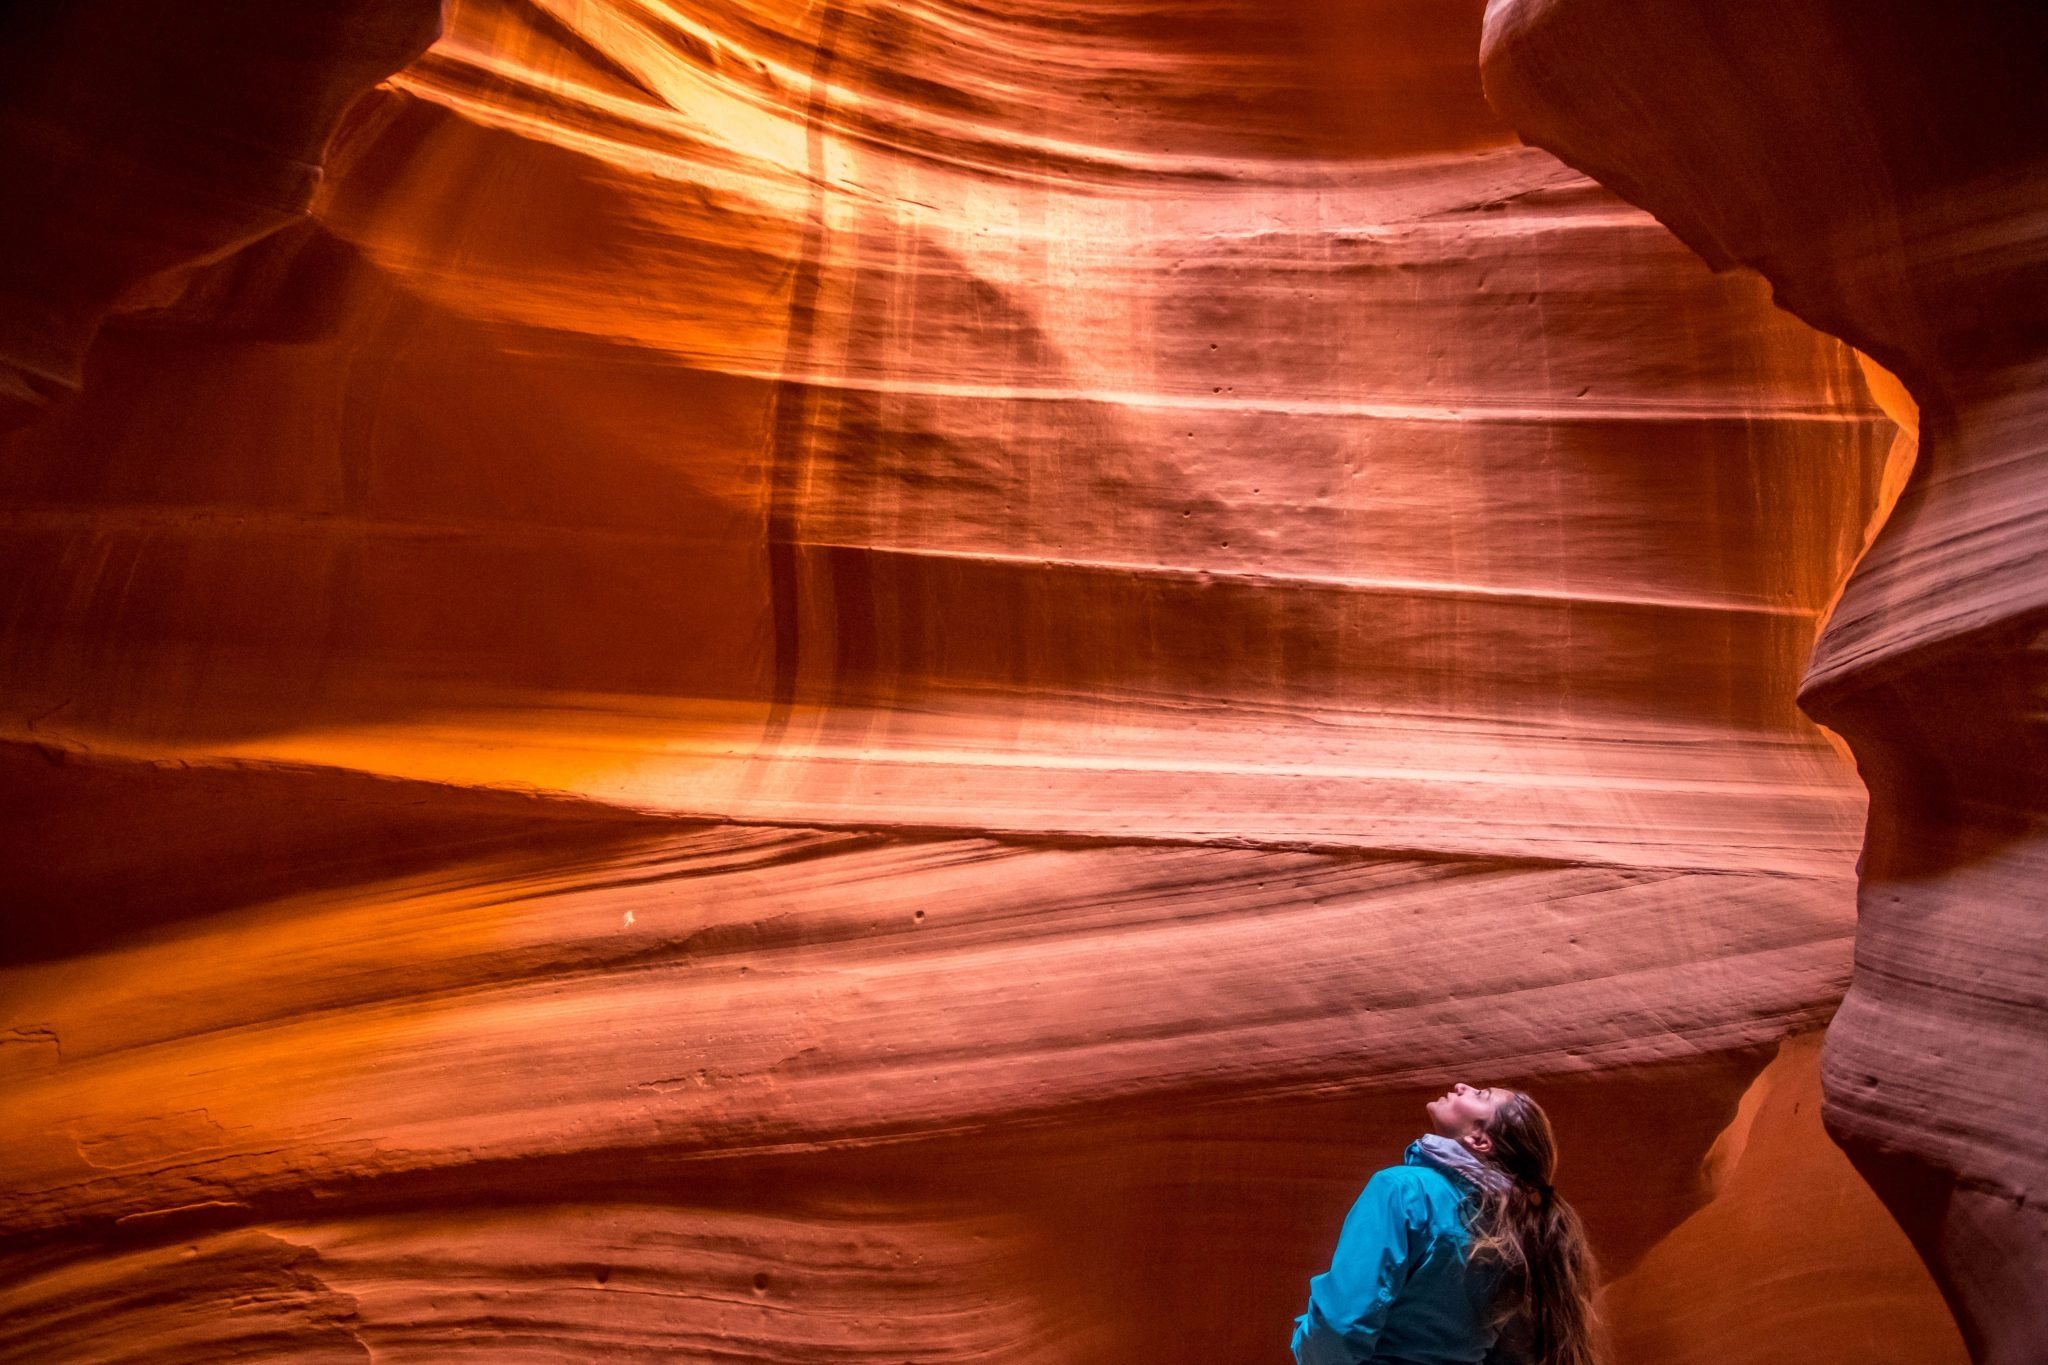
Don’t forget to look up
Tourists Looking Up
When you are on tour with so many tourists, taking great pictures can be challenging. One important piece of advice to get great shots is to look up. The canyons look lovely from that perspective. Also, if you are lucky, you can get gorgeous images of light beams shining down.
Tripods and selfie sticks are prohibited
Only handheld photography is permitted. Unfortunately, handheld photography in the Upper Canyon can be challenging especially after midday because the canyon walls look noticeably darker.
Taking Selfie
As an avid photographer, you will surely be in awe at the lighting conditions in the canyons. At the Upper Antelope Canyon, for instance, you can capture various gorgeous pictures of the sandstone walls changing color throughout the day depending on the sun’s angle.
You may also find yourself wandering about, looking for the perfect shot because there are several compositions you can make. If you hire a Navajo guide, they can bring you into the canyon at the right time for you to capture amazing light beams.
Light beams don’t last long
Antelope Canyon Light Beam
You have to bring in your A-game and capture as many pictures as you can. If you still have time after you take all the necessary shots, you can stare at the majestic view in front of you and absorb it all. Not everyone gets to witness such beauty of nature.
The Antelope Canyon is a great surprise and unique experience if you are an enthusiastic landscape photographer. You take a lot of abstract photographs and the art compositions are limitless. Not everyone will have the same composition. Each photo is unique.
If you get to take shots of a particular spot in the canyon with your preferred lighting condition, the result is magical. You will notice that the contrasts and transitions between cold and hot tones are spectacular.
Depending on the time of day you are inside the canyon, you can capture varying contrasts of purple, red, and orange. If you have an active imagination, you may spot some human or animal formation to capture on a frame.
What Is So Special About Antelope Canyon?
Antelope Canyon is special because of its wave-like canyon walls. These walls change color throughout the day depending on lighting conditions. The sunbeams and falling sand also add to the spectacle of the place. These make Antelope Canyon the most photographed slot canyon in the southwest USA.
If you’re thinking of visiting the area, it is from the end of March until the first weeks of October that you can enjoy Antelope Canyon the most. It is from 11:00 am until 1:30 pm that you can witness the ultimate beauty of the Antelope Canyon, especially the Upper Antelope Canyon.
On average, it can take you 1 to 1.5 hours to walk through Antelope Canyon both Upper and Lower Antelope canyons. You get to traverse a distance of approximately 1,800 meters (1.10 miles) round trip. Walking is easier in the Upper canyon than in the Lower canyon.
Final Thoughts
Beautiful Canyon
Antelope Canyon is one breathtaking and jaw-dropping natural destination. It offers tourists a different kind of experience. This American Southwest is truly amazing. A true gem of the world.
The lines, tones, as well as color separation, are a spectacle to behold. These are perfect elements for an abstract photograph. It is a perfect place for abstract photographers to create their masterpieces and draw design inspiration from.
If you seek thrill and fun, it is best to visit the Lower Antelope Canyon. On the other hand, if you want to take great stock photos, then the Upper Antelope Canyon is your best bet.
Whatever your reasons are for visiting the Antelope Canyon, one common thing stands out from all tourists – the appreciation and gratitude for Mother Nature’s creation. Bring your most trustworthy camera and create priceless memories in Antelope Canyon, Arizona.
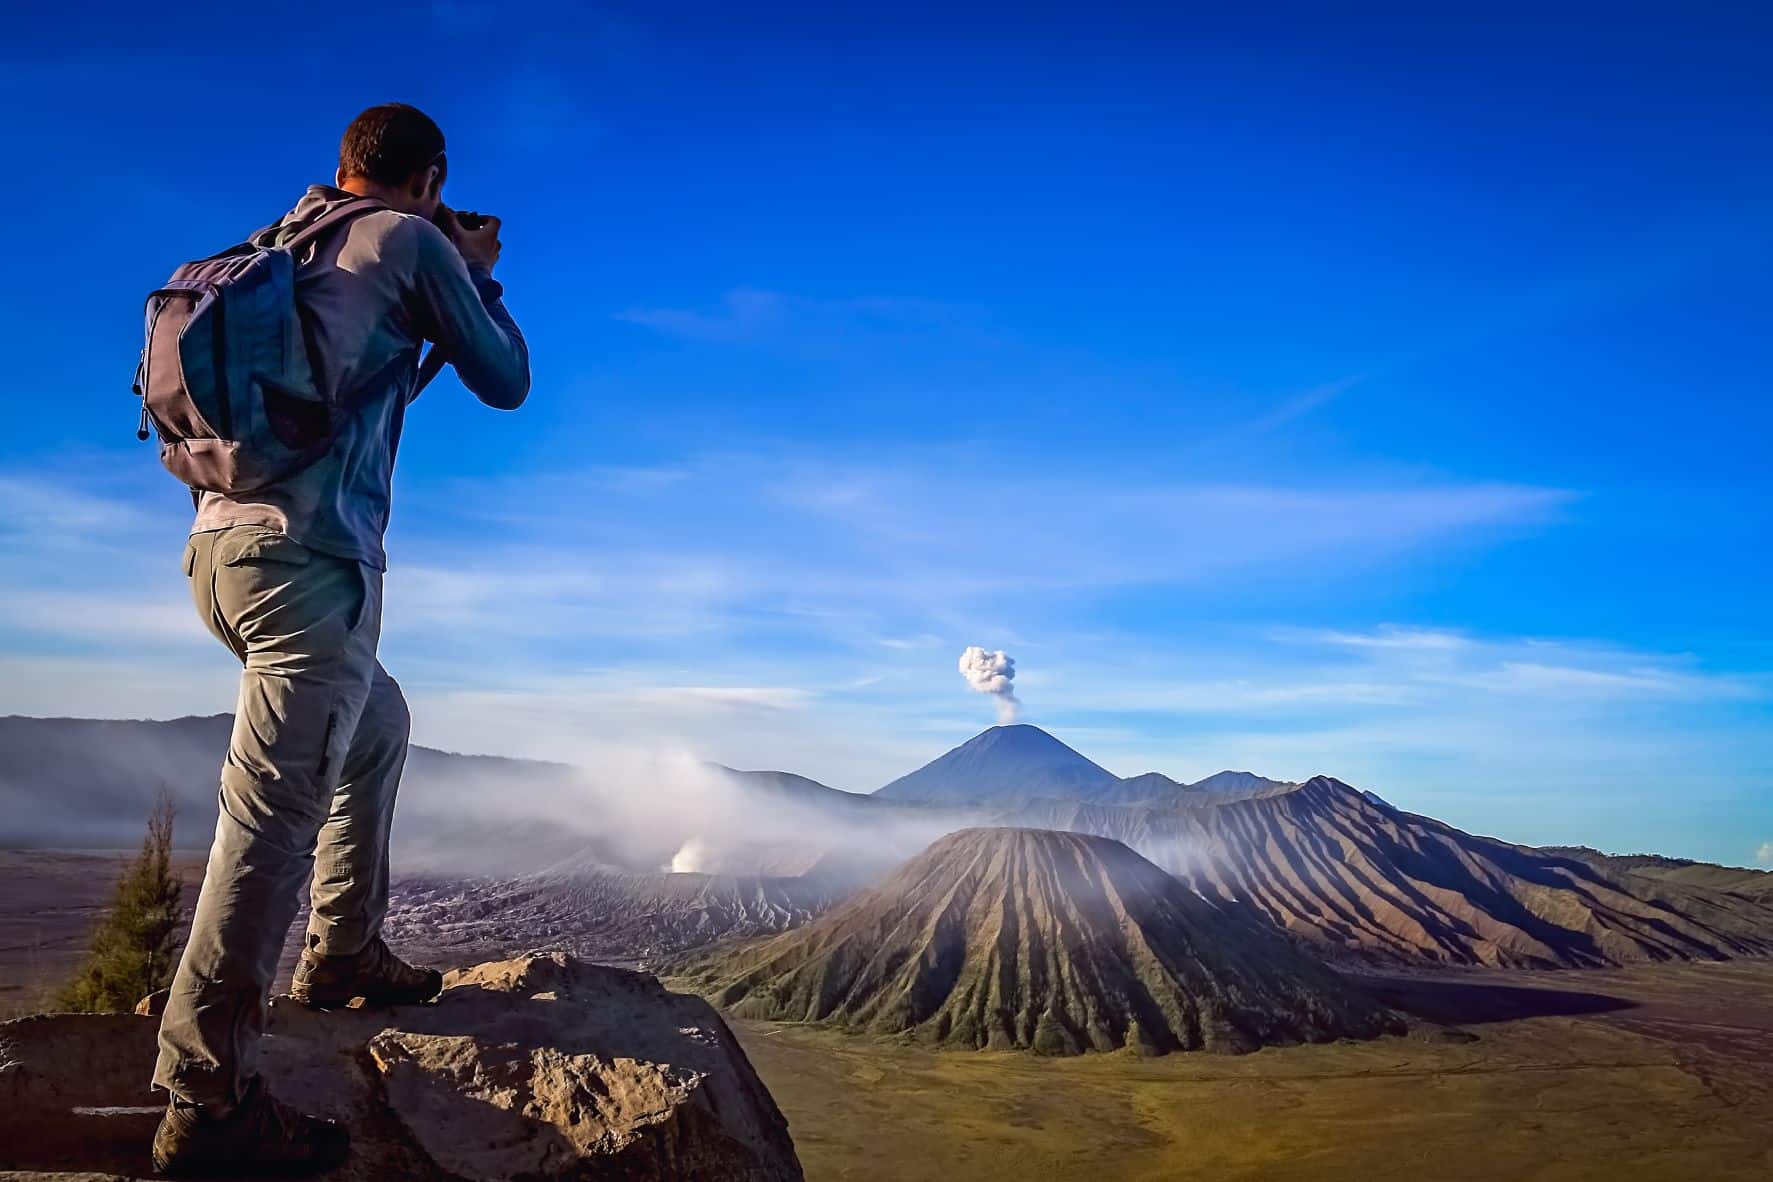
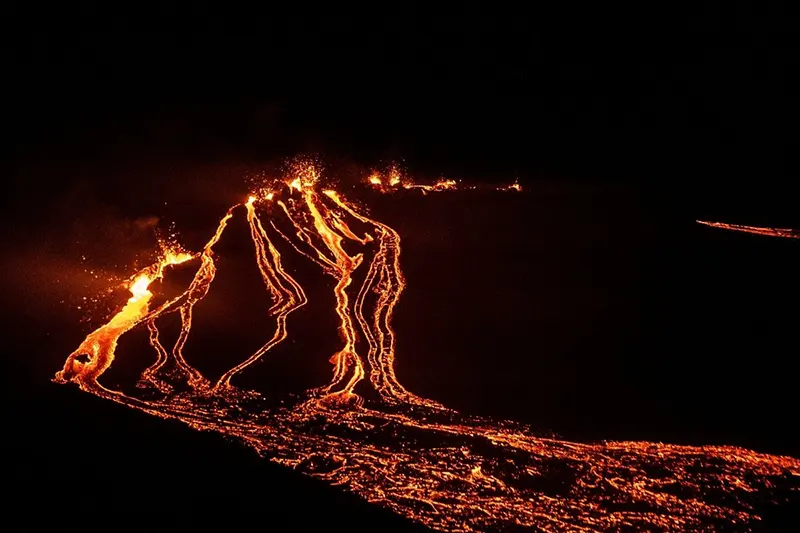
Volcano photography is an enriching hobby. Even though a lot of work goes into the process of capturing the best volcano pictures, the experience makes everything worth it. Yes, it’s risky but it’s an experience like no other.
To photograph a volcano, you’ll need a quick shutter speed to freeze any motion. Set your speed to 1/1000th, then change your ISO and aperture as necessary. Shooting volcanoes from the air, ground, or sea captures dramatically different outcomes and a better view of the lava source.
Read on to learn the best tips on photographing volcanoes and how to do it safely.
[table id=34 /]
Best Ways to Locate Vantage Points
guidetoiceland
If you want to make the process a lot faster, you can ask a local to take you to the best vantage points. When photographing volcanoes, it’s not enough to see the areas in photographs or hear stories from other people. You’ll need to visit them and see them for yourself. Just don’t forget to take the appropriate lens for each possible viewpoint.
When you go to an erupting volcano, take some time to observe the explosion from a safe distance. Determine the eruption’s strength and the direction in which the hot lava is moving for your safety. As we all know, it’s not safe to get near an erupting volcano.
Photographing Tips During the Day
You can catch the most powerful volcanic eruptions and ash clouds by shooting photos of volcanic explosions throughout the day. Shooting lava is an option as well. Your most probable lens will be a 24-105mm lens. A long lens is ideal if you are far away.
You may either try to freeze the motion in daylight photography or create some motion blur.
Freeze the motion: You will need quick shutter speeds to freeze falling lava bombs, or pyroclastic flows captured on camera. Set your speed to 1/1000th, then change your ISO and aperture as necessary. The ISO is probably at or over 1000. You should typically use an aperture of f/8 while taking landscape photography. You may need to use a bigger aperture as it grows darker.
Motion blur: Slower shutter speeds, which may blur motion, are at the other extreme of the shutter speed continuum. Shutter speeds of 1/20th are required to capture the appearance of action. Use this with ash clouds if you can. Shutter speeds of one second or longer are perfect for recording lava movement. Use an ISO of 100 and a narrower aperture to obtain slower shutter speeds. Add a graded neutral density filter if necessary.
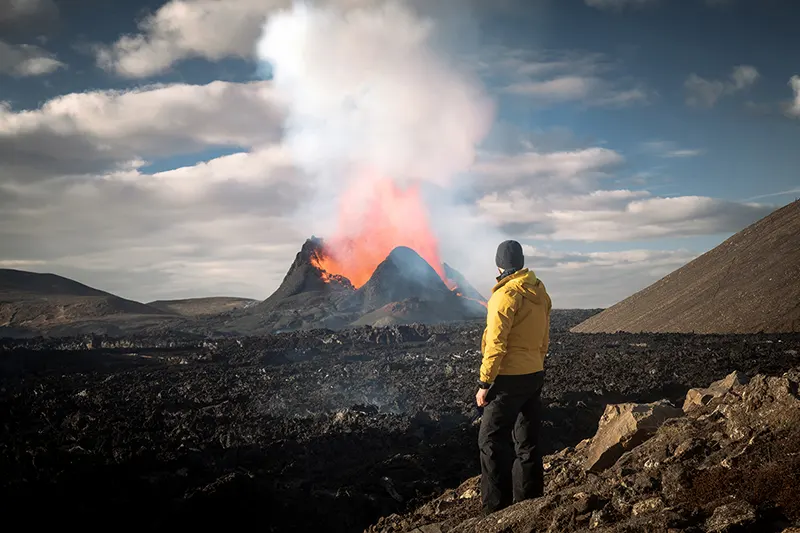
Photographing Tips At Night
news18
Nighttime is one of the loveliest periods to try taking photos of lava. You will be able to detect the glowing lava much better.
The ideal time to take photos is during the late blue hour. You have a higher chance of detecting the volcano’s foreground features. The lava will seem brighter in the picture the later you go into the blue hour. The rocks will become shadows against the lava once wholly dark.
For this reason, you need to try to take pictures while the moon is full. Bring a powerful flashlight so you can illuminate molten rock during the exposure. Look to expose for up to 10 seconds if you want to get the lava streaks.
ND filters are also valuable for blue-hour situations. You may shoot the volcano with prolonged exposure and six- to eight-stop neutral density filters.
Use the same general procedures as when shooting a typical landscape. When feasible, bracket your shots and shoot in RAW. Exercise delicate processing to guarantee that the image you capture is as accurate as possible. Make sure your lava has a red and orange gradient and lessen the brightness.
Protecting Yourself and Your Gear
You will need gear to protect yourself and your photography equipment before anything else.
Safety Gear
Volcanoes pose a wide range of hazards, particularly if you want to approach a volcano or lava flow up close. Most photographers covering volcanoes have a few specific things in their gear.
Helmet: Falling rock is one of the main risks around volcanoes (or lava bombs).
Heat-resistant clothes: Wear heat-resistant clothes since it might be dangerous to approach the lava.
Gas masks: The area surrounding volcanoes may contain deadly gases.
Note: None of these items will shield you from pyroclastic flows.
Photography Gear
The following are the camera gear you need for taking volcano pictures.
Camera body: A must-have is a sturdy camera body and weather and dust-sealed.
Lens: You must carry a wide-angle lens while taking landscape photos, especially for dormant volcanoes. Mid and long focal lengths are preferable for an active volcano.
Tripod: Make sure the tripod is robust and heat-resistant.
UV filter: A UV filter protects from different debris present in an extreme environment.
Camera blowers or towels for cleaning
Hiking Gear
Some volcanoes are located in very rugged terrain. That suggests you also need the following on top of the appropriate safety gear.
Hiking boots
Walking poles
Water and rations
Tent or sleeping gear
First aid kit
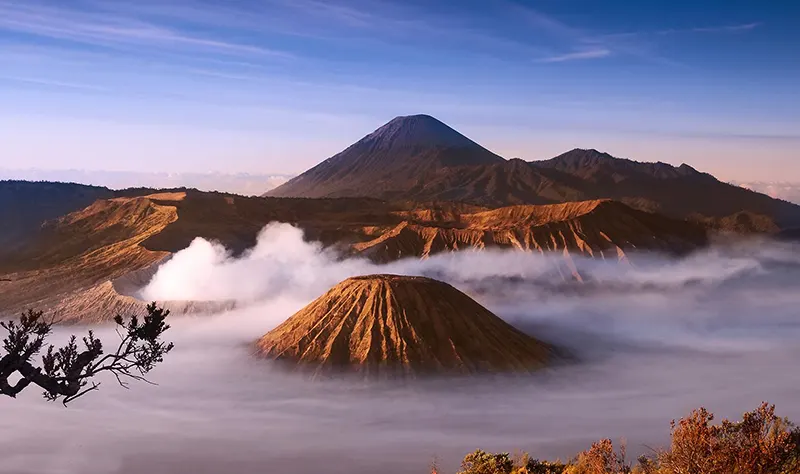
Dormant Volcanoes Photography
greatvaluevacations
Even when they are not erupting, volcanoes are breathtakingly gorgeous. They are excellent photographic subjects because of their rough geology and features like crater rims. For times when the lava isn’t flowing, here are some other photographic locations:
Trekking up the volcano: It’s advantageous to climb a volcano when it’s dormant. Deep ravines and leaking gas will still provide challenges. Though even when it is not an active volcano, there are safety risks.
Acid lakes: Acid lakes form when escaping sulfur gas combines with a crater lake. These lakes are highly picturesque and have an odd, otherworldly sense.
Geysers: Geysers are nature’s fountains and make excellent picture subjects.
Sulfur mines: Sulfur mines also make for a compelling photo.
Photographing From The Ground
Photographing from the ground is challenging and poses some particular difficulties. First, it takes a lot of frames and a little luck to get all parts to line up at once.
Don’t forget to get wide and detailed shots when shooting from the ground. Photograph between 14mm and 500mm, and be sure to have all your lenses on hand and keep an eye out for various compositions.
Examine several shutter speeds to determine which effect you like. A 1-second exposure often produces the most remarkable results.
When the blue hour is winding down, there is a perfect balance of light for 15 to 30 minutes. Because it moves quickly, you must be sure that you have chosen the best composition for the excursion at that point.
It’s feasible for your tripod and camera equipment to melt while taking close-up photos with a wide-angle lens. Surprisingly far, lava flows transmit heat.
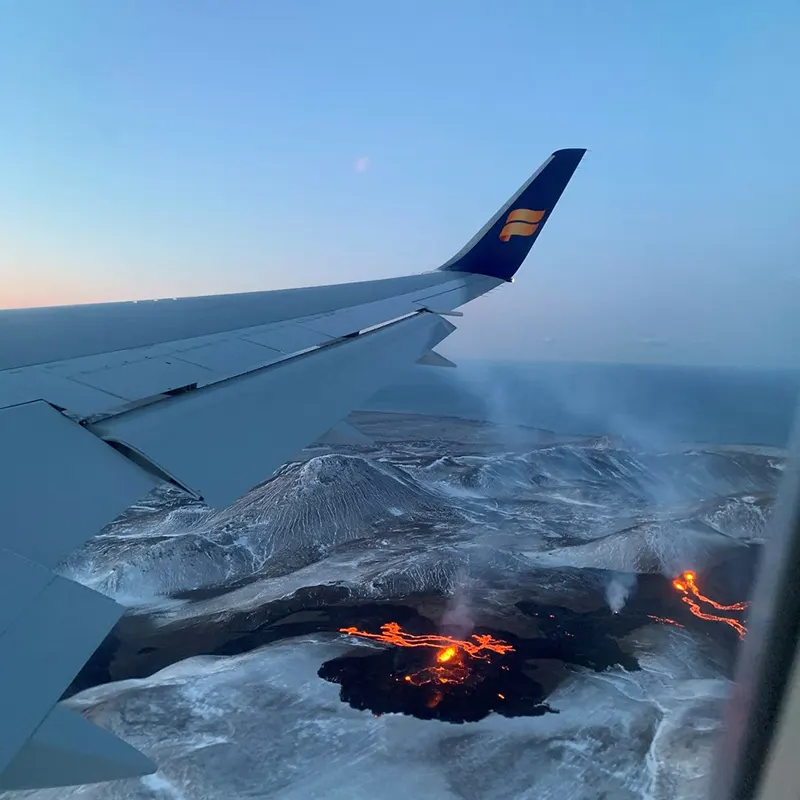
Photographing From The Air
Since many volcanoes are unreachable by land, it is better to have a broad notion of capturing the volcano and setting up your camera correctly in advance.
When the shutter speed is less than 1/500th of a second, vibrating aircraft like piston-engined helicopters tend to produce blurry images. If possible, set shutter speeds to 1/750th or even 1/1000th of a second; however, you may get away with 1/500th if your lenses have image stabilization.
@Icelandair
A fast (f/2.8) lens is advantageous in this situation since you can often shoot wide open and still have everything in focus because the explosive eruptions are far away.
ISO is the only setting you have to work with to get the proper exposure with a wide-open aperture and 1/750th of a second – this is where your camera’s “auto ISO” feature comes in useful.
The last factor is ensuring that the camera chooses the appropriate exposure for you. Use “highlight-weighted metering” if your DSLR has it. Volcanic photography in dark regions is easy to work in a frame with better exposure.
For helicopter safety, do not switch lenses while the plane is in the air. In light of this, keep two camera bodies: one with a 24-70mm lens and the other with a 70-200mm or 80-400mm lens. Keep the camera’s strap connected, and wear them around your neck the whole trip.
Photographing From The Sea
You should certainly see the lava from a boat to get a close-up view while it is entering the water. It is a fantastic view position that makes for a very immersive experience.
A 70-200mm lens (full frame) is ideal for capturing the hot lava trickling into the water in fine detail. A shutter speed of at least 1/250 second was necessary to freeze the motion due to the rocking boat and splashing waves.
Where Are the Best Volcanoes to Capture?
Most of the world’s volcanoes are in tectonically active regions, such as in the country of New Zealand, the Philippines, Japan, Kamchatka, Alaska, and the western coasts of North and South America.
Indonesia, Italy, Iceland, Hawaii, and other places in Africa also have incredibly beautiful volcanoes.
Before going, look at the volcanic eruption history and ask locals about the actual eruption. Consider hiring a guide to accompany you as well.
Find out whether the volcano generates potentially harmful pyroclastic flows. If so, find out which way they often travel.
Conclusion
Taking images of volcanoes is a ton of fun, and the results will blow you away! If you are interested in volcano photography, ensure you have the right gear and a good guide who knows the area well to get some great images.
It’s been one month since I introduced a challenge to all of you who follow me on my blog. The #DiscoverWithMikko challenge was to capture something nearby (no more than 20 km’s away) where you live. It was also to encourage you to try to capture something unique. The month flew by, and I can say that it was a tough challenge for me as well. Not many participated in this challenge, but I saw some beautiful entries on Instagram, which I’ll share in my stories @mikkolagerstedt.
I went out to photograph 15 times in the past month, whether to a nearby field or around the nearby lake. I didn’t take photographs each time because I couldn’t find anything to capture, but that’s how it goes at times. What this challenge reminded me of is that I really enjoy having options. In the future, I want to get a macro lens to capture those details and different perspectives.
There weren’t many great opportunities with the weather, but I eventually captured something I enjoyed. It wouldn’t be a challenge if it weren’t challenging, right?
Each of the challenge photographs I captured was edited with my EPIC Preset Collection. See the descriptions for more information of each edit and camera settings.
1. Keep an open mind and Find new places nearby
Finding something new from nearby places can sometimes be challenging. However, it was easier than I thought. I have driven, biked, and walked around a lot of the area where I live. But I still found a few spots I had never seen before. Keeping an open mind while searching for something to capture is essential. If you want to improve your craft, this approach will move you forward more than anything else.
The first capture was on a beautiful night about 11 kilometers from where I live. The night was amazing and misty. The light pollution wasn’t so evident because of the fog. I ventured to this field and saw this beautiful small bridge. I ran to the bridge while my camera was taking long exposure photographs. I stood there for a few minutes to ensure one of the 20-second exposures was sharp.
Cropping a headshot might seem simple—just trim the edges and call it a day, right? Not quite. The way you crop a headshot can make or break its impact. Whether it’s for LinkedIn, a company website, or a modeling portfolio, the right crop ensures the focus stays on the subject while maintaining a professional and polished look.
In this guide, learn best practices for cropping headshots, including aspect ratios, composition tips, and common mistakes to avoid. Whether you’re a photographer fine-tuning your work or someone trying to perfect their own profile picture, these tips will help you get the most out of your headshots.
Types of headshot crops
Let’s go over some of the most common types of headshot crops.
Tight crop
This is when you have close-up headshots that are tightly cropped. These headshots focus on the face, typically from the top of the head to just below the chin.
Actors, models, comedians, and performers who need to showcase their facial expressions often use this type of crop. You’ll also see tightly cropped headshots for corporate professionals who want a bold, direct look or in social media profile pictures where faces need to be clearly visible in small thumbnails.
Medium crop
A classic headshot features a “medium crop.” It’s the most traditional crop, including the head and shoulders, and sometimes part of the upper chest, while leaving some space above the head.
Medium cropped headshots are common for corporate professionals, LinkedIn profiles, ID badges, and business headshots.
Body crop
A body crop in headshots typically shows three-quarters of the person’s body, often from the waist or mid-torso up to the head, allowing for more posture and body language. There are lots of use cases for a body crop, including corporate, creative, and more. You’ll see it often in executive portraits, branding photos, realtor headshots, and creative professionals.
A body crop can be effective for executives and business leaders who want to convey authority and presence, as well as personal branding shoots for creative professionals, consultants, and coaches. They’re also appropriate for website and social media images where a more relaxed, natural look is preferred.
Panoramic crop
A panoramic crop is a wide, landscape-style crop that includes extra space around the subject, often used for web design or printed materials. These are best for website banners, email headers, printed marketing materials, social media cover photos, and team or group shots where multiple people need to be included.
You can often repurpose other crops into a panoramic crop, as seen in the examples below:
Choosing a headshot crop ratio: standard headshot and portrait photo sizes
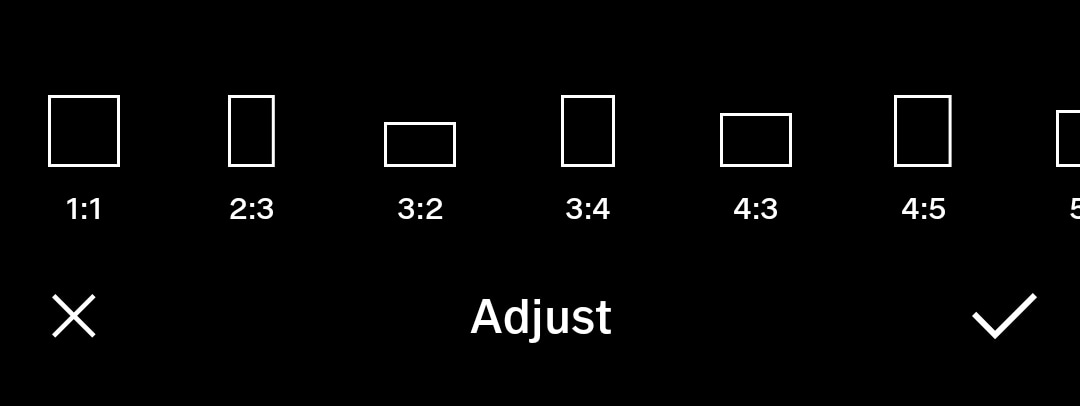
When cropping a headshot, selecting the right aspect ratio ensures the photo looks professional and fits its intended use.
You can use any ratio you like, as long as it suits your purposes, but there are some standard ratios to help guide you. We’ll take a look at cropping photography examples using the same original photo so you can see the difference.
1:1 square crop
A 1:1 square crop works best for profile pictures on social media like Instagram, LinkedIn, and Facebook. This means the width and height of the headshot are exactly the same. Square crops keep the subject centered and visible in thumbnails—even if the thumbnail is a circle.
2:3 classic photo print crop
The 2:3 ratio is best known for 4”x6” prints. It’s a rectangular crop often used in traditional photography. As a widely recognized photo ratio, it can ensure consistency across prints and digital platforms.
3:4 mobile-friendly portrait crop
The 3:4 crop is slightly taller and wider than the 2:3 portrait crop. It’s commonly used in mobile photography. It works best for ID photos, mobile-optimized profile pictures, and some online applications. This ratio fits well within mobile screens and aligns with some passport and ID photo requirements. It’s one of the less common ratios to use when cropping headshots.
4:5 portrait crop
The 4:5 portrait crop is a rectangle that is slightly taller than it is wide, like the 3:4 crop. However, this one is slightly wider than the 3:4 crop. The 4:5 crop is commonly used for printed portraits and in digital and printed portfolios, especially for actors and models. This ratio closely aligns with the classic 8”x10” headshot print, a standard in the entertainment industry. It’s also the new ratio for standard Instagram feed posts.
5:7 professional photo print crop
5:7 is a commonly used ratio for 5”x7” photo prints. It’s a slightly elongated portrait format, best for printed headshots and framed portraits. Slightly taller than 4”x6”, this crop is often used for display prints and professional photo albums.
11:14 US visa & government crop
11:14 is a specific portrait ratio required for US visa applications and some government-issued ID photos, like passports, visas, and photo ID cards. This allows you to adhere to specific government regulations for travel and identification photos when required.
16:9 widescreen crop
16:9 is most known for your standard widescreen TV format. This wide, horizontal aspect ratio matches widescreen displays, like televisions. It’s also used when a web designer wants to fill an entire web page with a photo as the background for desktop viewing. The 16:9 crop is generally best for website banners, video thumbnails, and full-width web backgrounds, ideal for professionals who want their headshot integrated into website designs.
Why do you need to crop a headshot?
You might need to crop headshots or portraits for a few different reasons, including:
You need to adhere to specific guidelines or requirements for the headshot’s use case.
Cropping helps frame the subject’s face correctly, ensuring focus remains on their expression without unnecessary distractions.
Cropping prevents distortion when resizing a photo for websites, social media, business cards, or printed portfolios—especially if the ratio or scale of the original photo is different than the platform you’re using.
You can change the photo orientation—for example, converting a horizontal image into a vertical headshot or vice versa.
A tighter crop draws attention to the subject’s facial expressions, especially important for professional, acting, and modeling headshots.
Applying compositional techniques like the rule of thirds or centering can enhance the overall visual appeal of the headshot.
Cropping headshot photography is easy with the right tools, whether you’re using professional software, mobile apps, or online editors.
The default Photos app on iPhone devices lets you crop images with preset aspect ratios (square, 4:5, 16:9, etc.), making it easy to adjust headshots for social media or business use. Similar to iPhone, Android’s and Google Photos’ built-in editing tools allow basic cropping with aspect ratio options.
You also have the following photo editing tools that offer the ability to crop headshots:
Canva: A user-friendly design tool that includes cropping presets for social media, business, and personal use. Free and paid versions available.
Fotor: A free, web-based photo editor with cropping tools for resizing and aspect ratio adjustments.
Pixlr: A lightweight alternative to Photoshop that works directly in your browser.
Kapwing: Useful for cropping images for specific platforms, like LinkedIn or Instagram.
Apple Preview: The native Mac program, Preview, also offers the ability to crop images.
Tips for cropping headshots
Cropping a headshot is more than just resizing an image—it’s about framing the subject in the most flattering and effective way. Here are some tips to keep in mind to ensure your cropped headshot looks polished and professional.
Check for symmetry
Speaking of balance, you’ll want to keep both sides of the headshot as symmetric as possible. Slight misalignment can make a headshot look unbalanced. Generally, you’ll want to keep the subject’s head centered, unless using an intentional off-center composition for artistic purposes, and facial features aligned properly within the crop. You can make small adjustments to improve balance.
Consider the background
Cropping can shift the visual proportion of an image, sometimes presenting unwanted distractions in the background. After cropping, check for any elements that may detract from the subject, such as harsh lines, objects, or uneven lighting. If the background becomes too much, consider removing it for a cleaner look.
Want to know how much it costs to send your photo edits our way? Get instant pricing now.
Use high-resolution images
Cropping reduces the overall size of an image, which can lead to quality loss, especially when enlarging the cropped photo. It’s best to start with a high-resolution image so the final cropped version is sharp and clear. This is particularly important for printed headshots and high-resolution digital use.
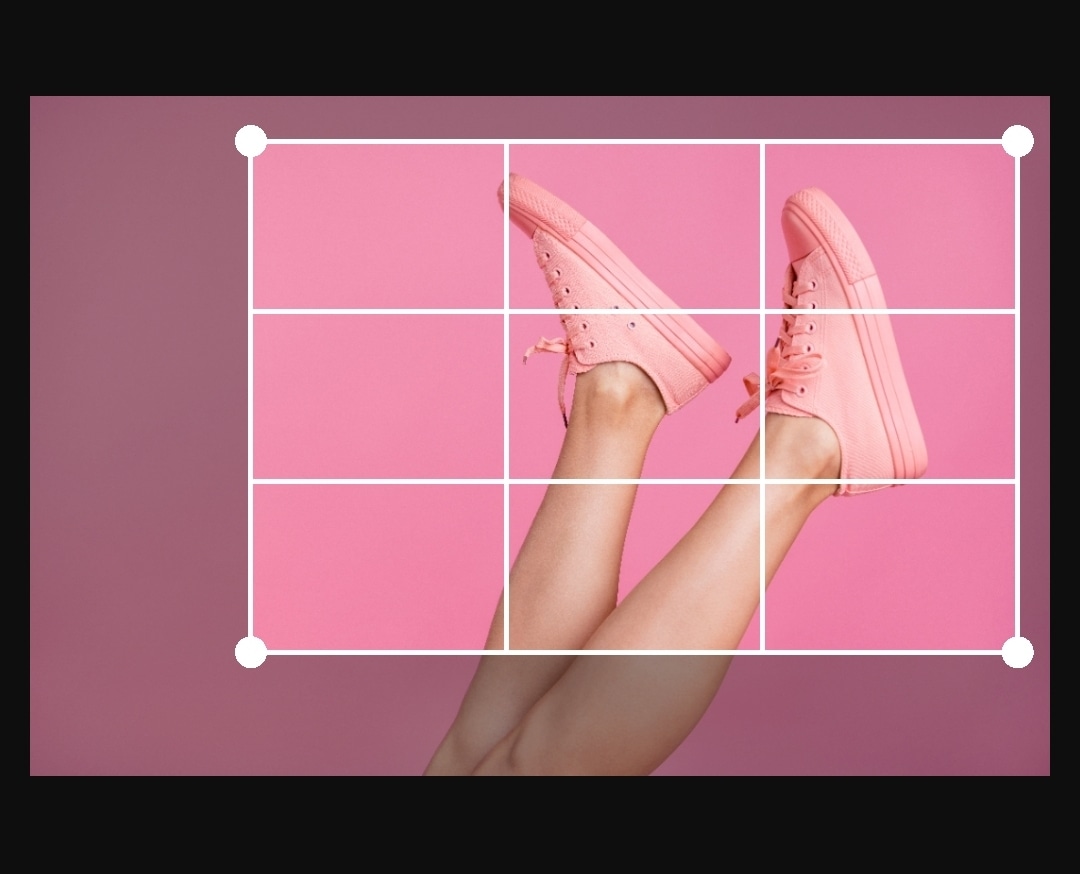
Consider the rule of thirds
The rule of thirds is a photography principle that helps create a balanced composition. When cropping, imagine dividing the image into a 3×3 grid and placing the subject’s eyes or face along one of the intersecting points. This creates a more visually appealing headshot than simply centering the face.
Mind the context
Different industries have different expectations for headshot styles. A corporate executive’s headshot may have a tighter crop, emphasizing professionalism, while a creative professional might prefer a looser crop that includes more body language and personal expression. Further, an athlete might prefer a body crop to show their physicality or context of their sport. Keep industry norms in mind when deciding on a crop.
Know the guidelines
Each platform has specific dimensions and aspect ratio requirements for profile photos. Always check the latest size guidelines for social media, corporate directories, and other platforms before cropping your headshot.
Here are some guidelines at the time of this writing:
Channel
Size
LinkedIn
400×400 pixel square
Instagram
1080×1080 pixel square or 4:5 portrait for feed posts
Facebook
170×170 pixel square
Print headshots
5×7 inches or 8×10 inches, with corresponding aspect ratios like 4:5 or 5:7
US Passports
2″ x 2″ printed hard-copy, 72 dpi minimum resolution
Gmail
180 x 180 pixel square minimum
Don’t forget to test across different platforms. A crop that looks good on one channel may not work on another. Some sites automatically crop profile pictures into circles—so make sure no important parts of the face are cut off.
Mistakes to avoid
Even a well-lit, high-quality headshot can be ruined by improper cropping. Avoid these common mistakes to ensure your headshot remains professional, flattering, and platform-ready.
Cropping the head
Typically, you don’t want to crop out any part of the head. There may be creative exceptions, but this is a general rule of thumb when editing headshots. You’ll want to maintain eye level alignment, so the subject’s eyes are in the upper third of the frame. This creates a natural and engaging composition.
Don’t forget to also leave breathing room. Avoid cropping too tightly at the top of the head or too close to the chin, which can make the photo feel cramped.
If you’re going for an, a small crop at the very top can work—in some cases—but avoid cutting into the forehead or leaving too little space above the head, as it can feel unbalanced.
Cropping too tightly or too widely
Avoid cutting too close and making the composition feel cramped. On the other hand, leaving too much space will lose subject focus.
Cropping too tightly without considering platform-specific dimensions can also result in awkward framing or automatic cropping that cuts off key facial features. Always check recommended aspect ratios for LinkedIn, Instagram, and other platforms before finalizing the crop.
Cropping at awkward points
Cropping at the neck or shoulders can make the subject look awkwardly cut off if not done right. When cropping below the face, do so at a natural break, like mid-chest, rather than directly at the neck or shoulder line.
Cropped to perfection
A well-cropped headshot does more than just frame a face—it enhances professionalism, draws attention to key features, and ensures the image works across different platforms. By following best practices in aspect ratio, composition, and positioning, you can make sure every headshot looks polished and intentional.
Need help perfecting your images? At Path, we specialize in high-quality photo editing, including expert cropping, retouching, and background adjustments. Let us handle the details so you can present yourself or your clients in the best possible light. Try Path today and see the difference precision editing can make!
Explore Path services to take your headshots from “almost there” to pixel-perfect — cropping, retouching, background cleanup, and more, done by experts.
How to crop a headshot FAQ
How cropped should a headshot be?
A headshot should be cropped to keep the subject’s face as the main focal point while maintaining proper proportions. Typically, the crop should include the head and shoulders, leaving some space above the head and slightly below the shoulders. Avoid cropping too close to the top of the head or cutting off important parts of the face, like the chin.
What are the proportions for a headshot?
The most common aspect ratios for headshots are:
1:1 (square): Ideal for LinkedIn and profile pictures.
5:7 or 4:5: Standard portrait proportions often used for professional or corporate headshots.
16:9: A wider crop sometimes used for website banners or social media covers.
For most uses, a 4:5 or 5:7 ratio keeps the face well-balanced within the frame.
How do you crop a headshot on iPhone?
Open the Photos app and select the headshot.
Tap Edit in the top right corner.
Choose the Crop&Rotate tool.
Select a preset aspect ratio (like 1:1 or 4:5) or manually adjust the crop.
Adjust the framing to keep the face centered, leaving a little space above the head.
Tap Done to save your cropped headshot.
How to crop a headshot in Photoshop?
Open the image in Adobe Photoshop.
Select the CropTool (shortcut: C).
In the top toolbar, set the aspect ratio (e.g., 4:5 or 1:1).
Drag the crop box to position the face properly—centered with space above the head.
Press enter (return) to apply the crop.
Save the file in high resolution for the best quality.
The weather can be unpredictable, even in the most temperate of climates. Rainy days can make for a great photo shoot opportunity, but if you’re unprepared and don’t have the right gear, it could also mean some costly repairs for your camera.
Protect your camera from bad weather by investing in high-quality rain protection gear, covers, rain sleeves, waterproof backpacks, and UV filters.
Whether you’re shooting in the rain, snow, or extreme heat, there are steps you can take to ensure that your camera stays safe and functional:
Quick Navigation
16 Tips for Weatherproofing Your Camera
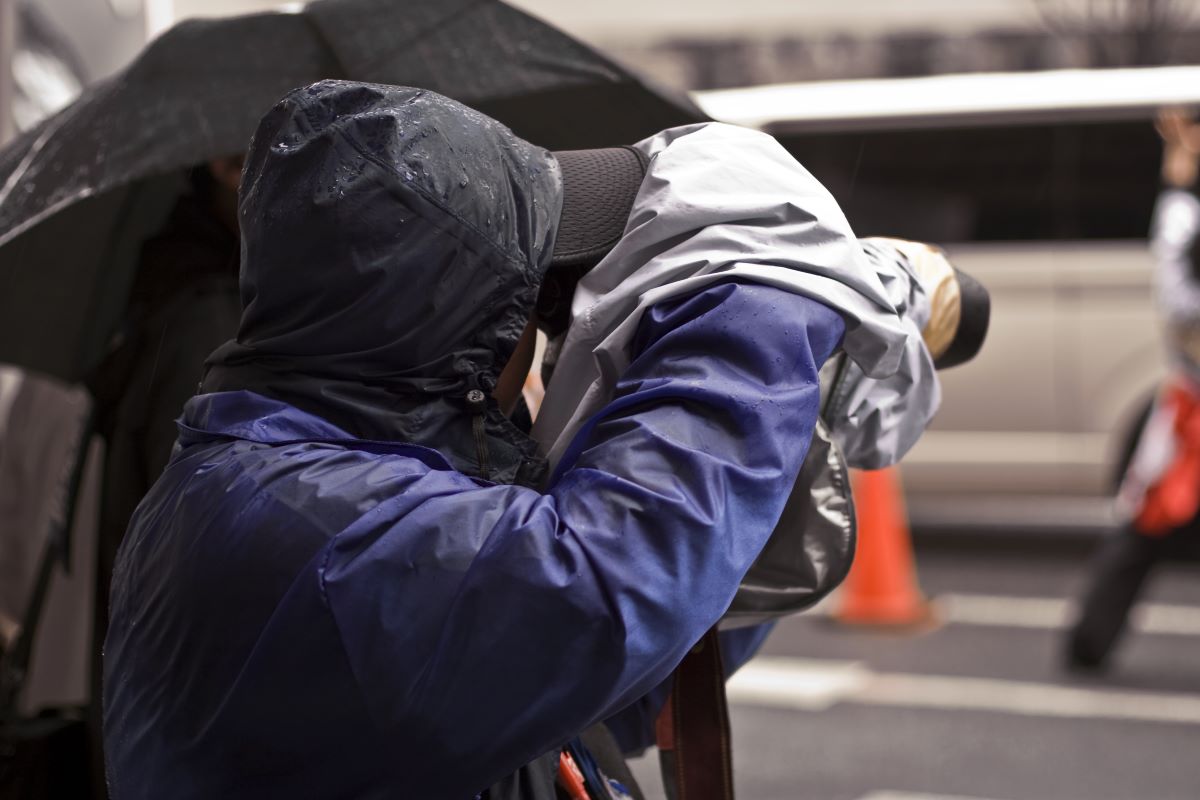
1. Invest in a Camera Rain Cover
A camera rain cover is the first line of defense against rainy conditions, and it’s a must-have for any serious outdoor photographer.
upaa
It is a simple and effective way to protect your camera from the elements. It fits over your camera and lens, creating a barrier between the camera and the rain.
A good rain cover will protect your camera from rain, snow and sand—and can also be used to shield it from the sun’s UV rays. Rain covers attach to your camera using hook-and-loop fasteners (a type of adhesive), allowing you to easily remove or reposition the cover as needed.
2. Use a UV Filter
For those who don’t know, UV filters are basically clear pieces of glass that fit in front of your camera lens to protect it from scratches and damage. So why would you want one?
Well, they’ll help keep dust out of your camera and prevent moisture from getting inside. Aside from that, they help reduce the amount of UV light that enters the lens, which can cause lens flare and other problems. A UV filter also provides an extra layer of protection for your lens.
They’re also easy to clean when they do get dirty while you’re working outside with your camera! These filters come in all shapes and sizes – we recommend purchasing one with just a bit wider diameter than the front element on your lens so that it can easily slide into place without having to worry about vignetting (light falloff).
3. Change your Lens Cap for a Tulip Hood
To protect your camera from the elements, you can use a tulip hood. A tulip hood is an alternative to using a lens cap that will save you time and money. The benefits of using a tulip hood are:
It’s easy to attach and remove from your camera.
There is no need to remove it every time you want to take pictures.
It protects both sides of the lens at once—the front and back sides of the lens are equally protected by this cover!
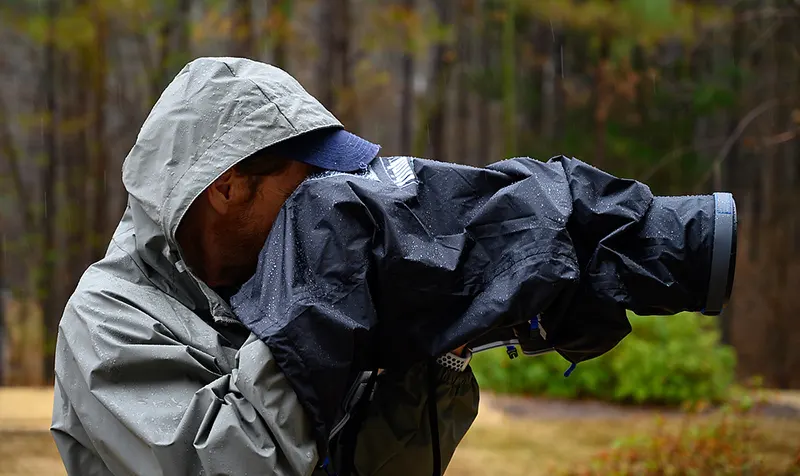
4. Use a Rain Sleeve on your Camera
You can also use a rain sleeve as an additional protection for your camera gear. A rain sleeve is a protective cover for your camera that helps keep it dry and protected from the elements, including dirt, dust and water.
Rainsleeves come in several sizes: some are designed for specific models like DSLRs or mirrorless cameras; others are universal and will fit any size device.
If you’ve got multiple lenses that need protection but don’t want to buy multiple covers, consider buying an ultralight backpack instead of individual bags—many backpacks have built-in lens cases that can be opened with one hand while shooting!
A good quality rain sleeve will have an adjustable strap to attach it securely around your DSLR or mirrorless camera body. It should also be made from high-quality material with waterproof zippers so that it doesn’t let any water in when you open the case up after using it in inclement weather conditions like heavy rain, light rain or snowfall.
If you don’t want to buy one of these sleeves for every time you go out shooting photos outdoors during bad weather conditions then consider investing in a lightweight plastic bag instead (or even just zip lock bags).
This way you can keep them as spares when photographing outdoors so that if something does happen with your gear while taking photos outside during rainy days then there’s always an extra layer protecting their expensive equipment!
5. Keep your Camera Away from Direct Water Contact
photofocus
The last thing you want is for your camera to get wet, so make sure you take precautions before heading out on your next adventure. If there’s even a chance of rain, keep your camera gear safe in a waterproof camera housing, bag or case for better protection. You must always be ready with weather-sealed cameras.
And if it’s too late and the weather has already turned against you, try taking the battery out and bringing just that part inside.
If a storm happens while you’re out in nature, quickly seek shelter under some trees or rocks until it passes—but don’t risk getting lost by trying to find shelter outside! If all else fails, consider changing plans altogether and rescheduling them for another time when it won’t be raining as hard (or at all).
6. Carry Dry Bags with you
Keep your camera inside a dry, protective bag. Dry bags are waterproof and can protect your camera from the elements.
A camera bag with a weather-resistant exterior can help protect your camera gear safe from the rain and other elements. It’s also a good idea to store your camera in a dry place when it’s not in use for better protection.
They come in all shapes and sizes, so you can choose one that fits your needs. Make sure the zippers are strong enough to keep all the water out and make sure there’s a way for air to escape if it does get inside (don’t buy a dry bag with just a single valve).
You can also use them to keep any other electronics you’re carrying dry. You can typically fit your photo gear, waterproof camera housing, a phone, wallet, passport, etc. in one of these small bags and just throw it into your bag or backpack.
7. Shoot in RAW format
Shooting in RAW format is one of the best ways to protect your camera from bad weather. Unlike JPEG files, which are compressed and have their colors reduced, RAW files are not processed by your camera settings until you open them on your computer.
This means that they contain all of the information captured by the camera’s sensor—uncompressed, high-resolution images with more detail than JPEGs can ever hope for.
8. Buy a Waterproof Backpack to Protect your Gear
You may want to invest in a good waterproof backpack to keep your camera dry. Even if you are confident that your camera and lenses can stand up against wet conditions and the elements, it’s always better to get added protection and to be safe than sorry.
dpreview
Look for one that has been designed specifically with photographers in mind. It should feature an internal memory card slot, multiple accessory pockets and dividers for organizing equipment. It also needs to have padded straps to comfortably keep your camera inside during long hikes or treks through the city streets.
The additional cost is worth it to protect your cameras and gear and keep them safe from the rain, cold, and other extreme conditions.
9. Keep an Extra Camera Battery Handy
The weather is not going to care if you are shooting a wedding or just trying to get that perfect shot of the sunset. You need to be prepared, as your camera’s battery life will be affected by all sorts of things, including temperature and humidity.
As with human batteries (iPhones), the amount of charge left in your camera’s battery will decrease over time. If you use your camera often, then you should consider replacing the original battery with an extra one.
10. Protect your Camera from Heat and Humidity
If you store your camera for long periods of time, make sure it is dry and cool. Do not leave your camera in a car or on any surface that might get hot from sunlight or indoor heating.
For extra protection, keep the lens cap on when not in use to prevent dust accumulation on the surface of the lens. If you’re going to be putting your cameras away for a while, consider storing it in a temperature-controlled environment (such as an air-conditioned room) or climate-controlled storage facility.
11. Carry a Microfiber Cloth
A microfiber cloth can be used to wipe away any excess moisture or dirt that gets on your camera. It’s a good idea to keep one in your camera bag at all times.
12. Avoid Changing Lenses in Bad Weather
If you need to change lenses, try to do it in a covered area to protect your camera from the elements. If you must change lenses in the rain, turn your camera off and cover the body and lens with a rain cover or umbrella to minimize the amount of moisture that gets inside.
13. Use a Lens Hood
A lens hood is a piece of plastic or metal that attaches to the front of your lens. It helps to shield the lens from heavy rain, snow, and other elements. It also helps to reduce lens flare and improve image quality.
14. Avoid Shooting in Extreme Heat
If you’re shooting in very hot conditions, try to keep your camera in a cool, shaded area as much as possible. Avoid leaving it in a hot car or direct sunlight for extended periods of time, as this can cause damage to the camera and its batteries.
15. Use a Dry Box or Silica Gel Packets
drycabinets
If you’re traveling to a humid location, consider using a dry box or silica gel packets to protect your camera and lenses from moisture. A dry box is a small, airtight container that absorbs moisture, while silica gel packets absorb moisture and help to keep your gear dry.
16. Use a Tripod in Windy Conditions
If you’re shooting in windy conditions, a tripod can help to keep your camera steady and prevent it from being blown over. It’s also a good idea to use a cable release or self-timer to minimize camera shake
Takeaway
The takeaway from this article is that you need to be aware of the weather conditions and keep your camera safe when you are outdoors. You should also take precautions before heading outside.
If it looks like it will rain or snow, keep your camera weather sealed, stay indoors, and wait for the storm to pass. Be sure to wipe off any moisture on your camera if it gets wet in the rain or snow, and make sure you keep it dry when indoors so that moisture doesn’t build up inside of it and damage its internal parts.
The most important thing is to not let yourself get frustrated or discouraged when things don’t go as planned. Remember that there will always be beautiful days for photography.
It’s impossible to keep the bad weather completely out of the picture. Tips, we shared can help you protect your camera from bad weather, and ensure that it stays in good working order, and takes better photos for years to come. Happy shooting!