It takes a while to learn to use your camera like a photographer for whom the camera feels natural in the hands, to move your fingers across the buttons almost unthinkingly, with intent and purpose. It takes even longer to think like a photographer for whom thoughts about composition and the look and feel of the image come in a way that feels intuitive.
Photographers seem more excited to lean into the former than into the latter, which is unfortunate if you believe that your thoughts as a photographer must be thunk before you decide what to do with your hands.
Our photographs are a result of how we think about the world, the scenes in front of us, and how our perceptions of those scenes can be translated into a picture by our creative use of the camera.
If you and I were photographing together and you asked me, “What are you looking for?” your actual question would be, “What are you thinking?” It’s not how I use my eyes that you’d be inquiring about, but what I think about what those eyes are seeing. And when I’m alone, sitting in the presence of some wild thing and failing to make the beauty translate to the picture, I usually ask myself the same kind of question: “How should I be thinking about this?”
When the process is challenging, it’s not my eyes that aren’t working; it’s my mind. As a starting point, it sometimes helps to think about specific things and look for them. One of those things is contrast.
The contrasts or differences in the scene are often something we can build a photograph around. That could be a contrast of tones or of colours. It might be a contrast of shape, texture, or line. A contrast between the sizes of elements, perhaps, or the magical contrast of light.
It might be a contrast of ideas, what we usually call juxtaposition. Organic and inorganic in one frame. Hard and soft. Old and new. Ancient and modern. Predator and prey.
And it could also be contrasts that will only really come to life when I amplify them with the camera. A contrast of moving subjects against stationary backgrounds made clearer with a slow shutter speed. A contrast of focused elements against those I allow to blur with a wide aperture. Even the contrast between highlight and shadow might look one way to my eye, but magnified in effect by my exposure choices.
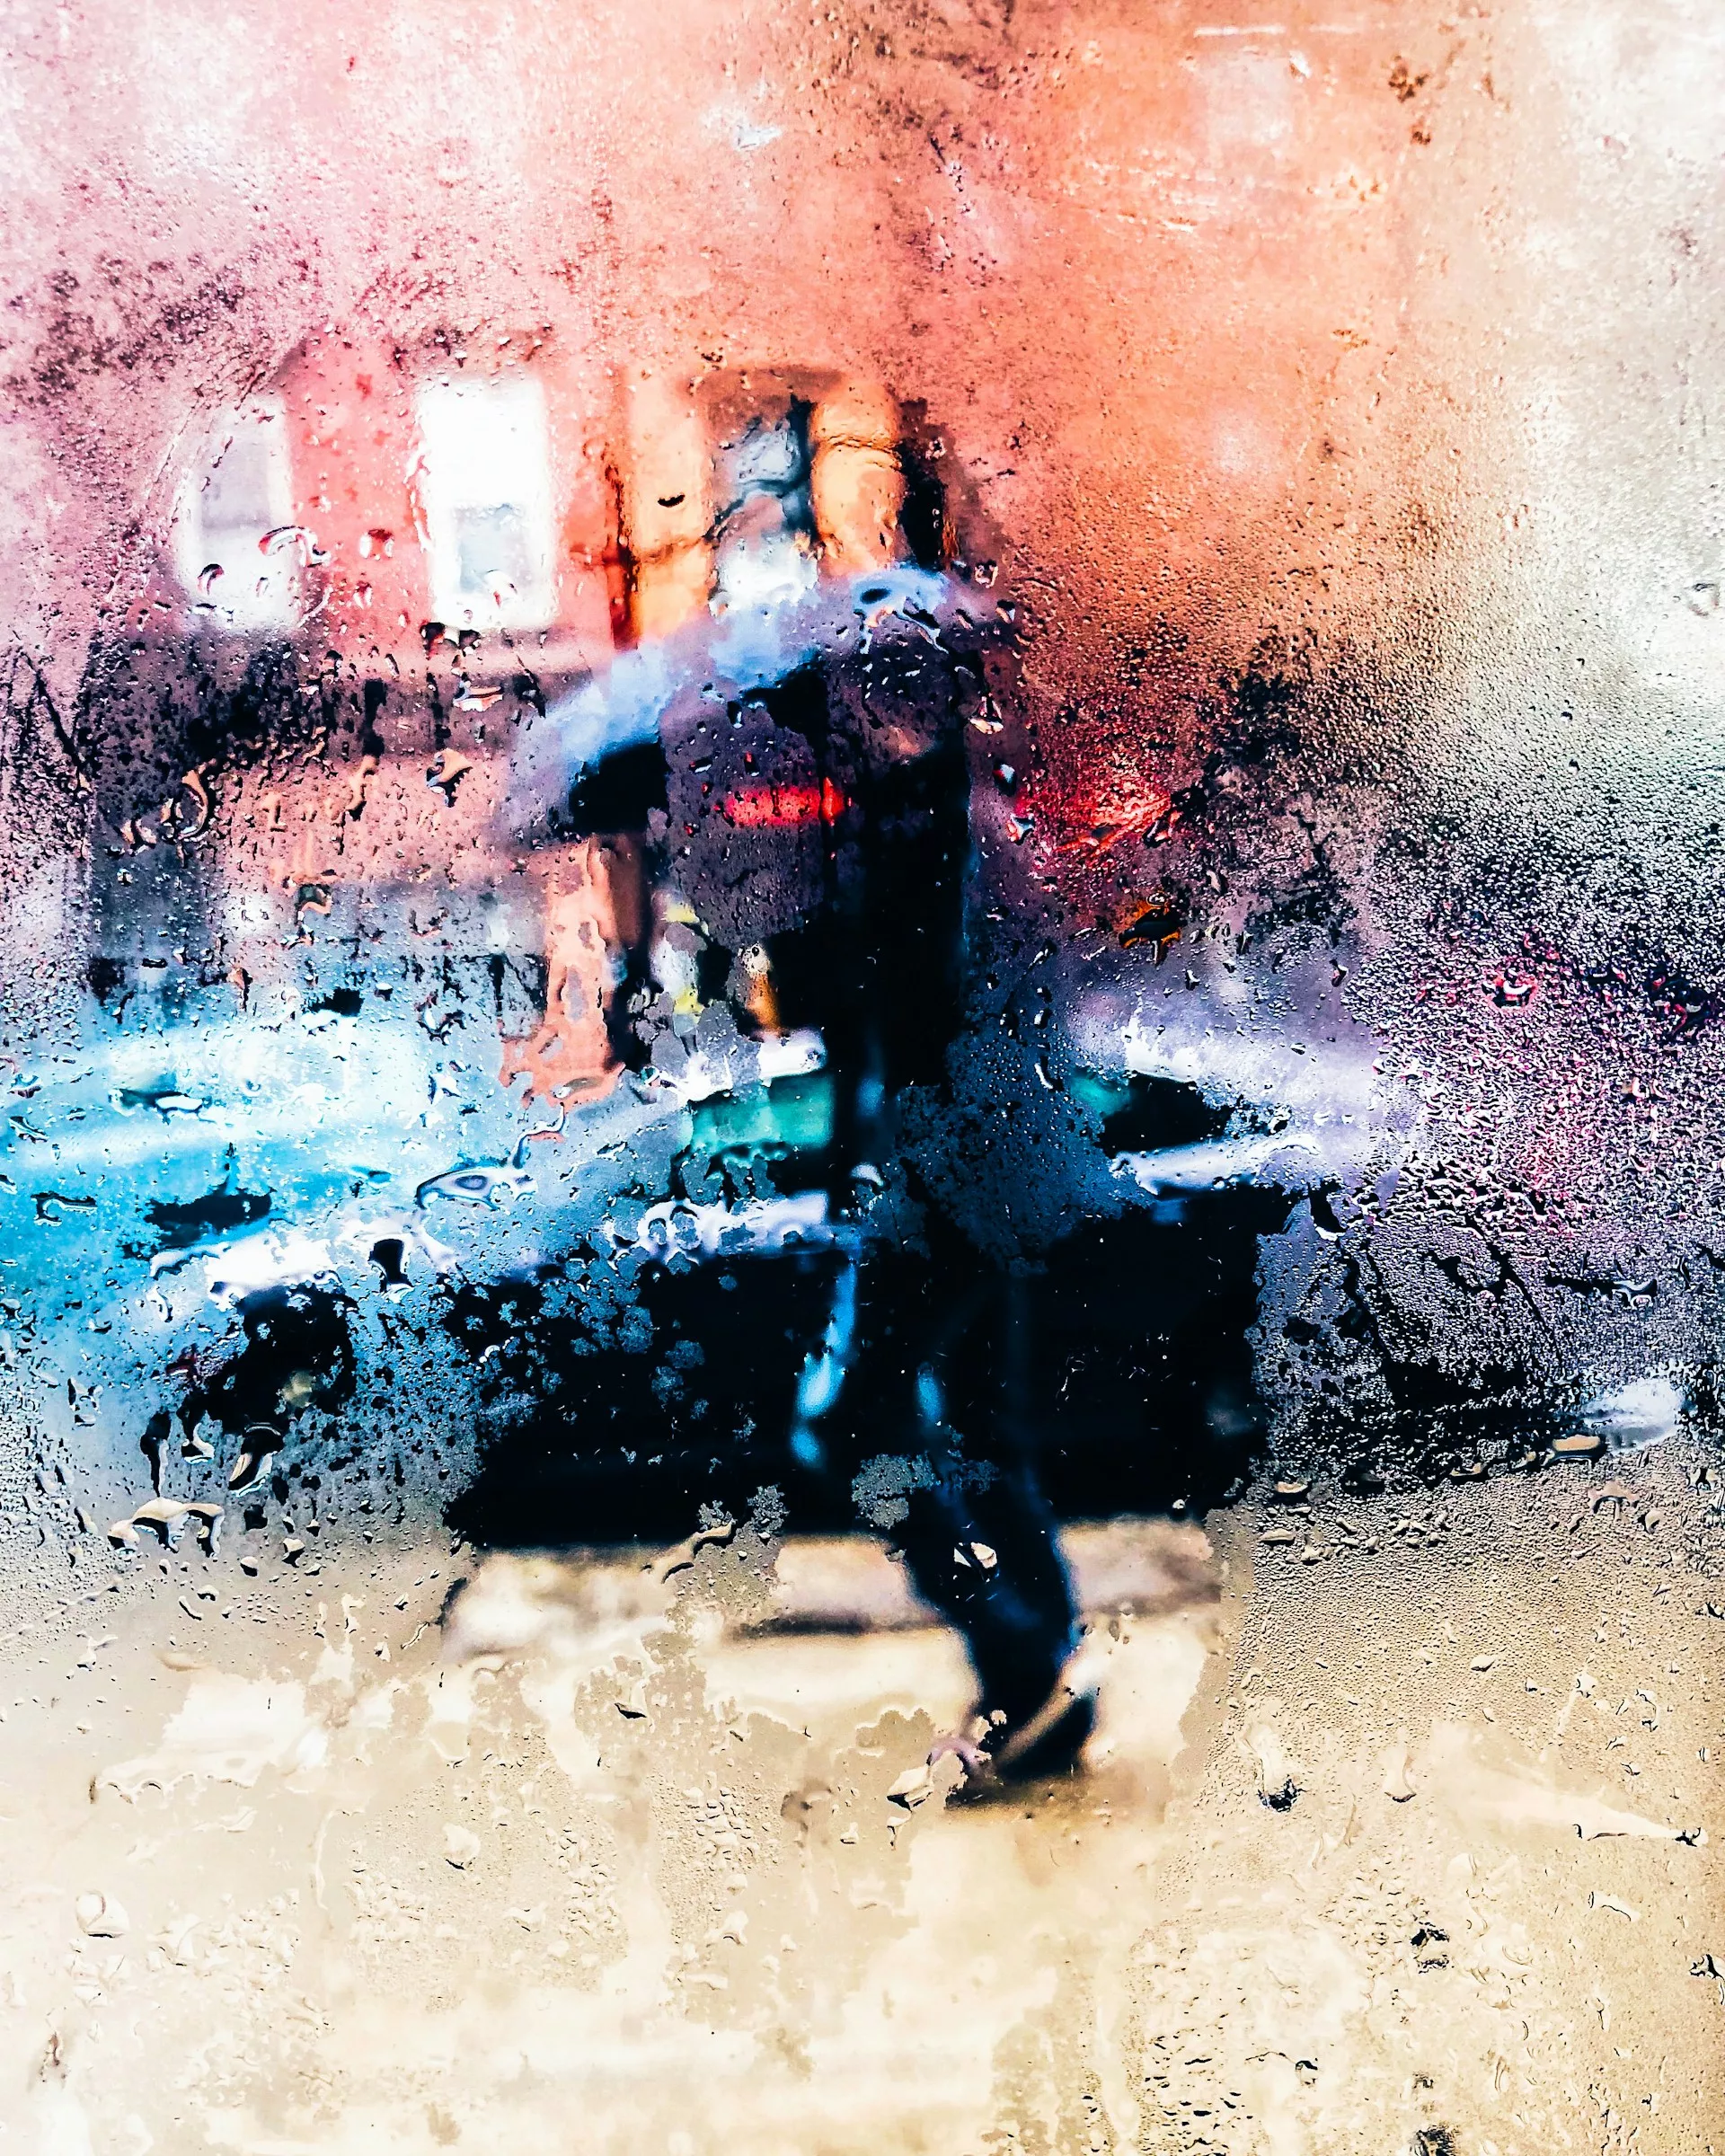
In the images above, which contrasts do you identify? Can you find the colour contrast? The contrast in size? The contrast of ancient and modern? What contrast do you see in the image of the vultures?
It is not necessarily true that the stronger the contrast, the stronger the photograph, but I think it’s certainly the case that more interesting contrasts captivate us. I don’t know why, but I know that we’re drawn to the differences. And I know this:
The fewer interesting contrasts I see in an image, the fewer mood and story hooks there are on which to hang my emotions and my imagination.
Not all contrast is helpful. We’ve all looked at a scene where the light is hot and contrasty, but not in a good way. Some colours contrast in an unappealing way. And there might be other contrasts in a scene that pull the eye, but not how you’d hoped. And maybe that’s what I’m getting at: contrast naturally pulls the eye. You can use that intentionally or pretend it’s not there, but it won’t pull the eye any less without you making some decisions. Maybe that’s where wider apertures and shallower depth of field help. Maybe a longer lens to exclude those unwanted contrasting elements. Perhaps this is when you convert the image with clashing colours into black and white.
Before you mash that shutter button or spin the dials, it’s worth asking which contrasts you see in the scene and if there’s a way—either with the camera or in post-processing—to draw my attention to them. It might just be that all you need to do is notice them and follow whichever instincts take over from there, but I know that learning to see is about learning to notice, and we notice things we think about.
I am amused by the contrast of the “have and have not” in the image on the left (click it to see it larger on my blog). Without that contrast, the image wouldn’t have the interest it does or the appeal to my humour. The image on the right is a contrast of size and age, but also of action: attentive vs. asleep. That’s where the story is.
So think about contrasts. Maybe look at some of your photographs today and seek out the differences. Contrast isn’t everything, but it’s one element I see in the best images. And when you’re sitting down doing post-production, asking where the interesting contrast is and how you might want to amplify it is a worthy question.
Without differences between elements, we have nothing to look at, no hook on which to hang our interest. The more interesting those differences, the more intentionally you work with them, the stronger your photographs have a chance of becoming. The more you think about this, the more you’ll see it.
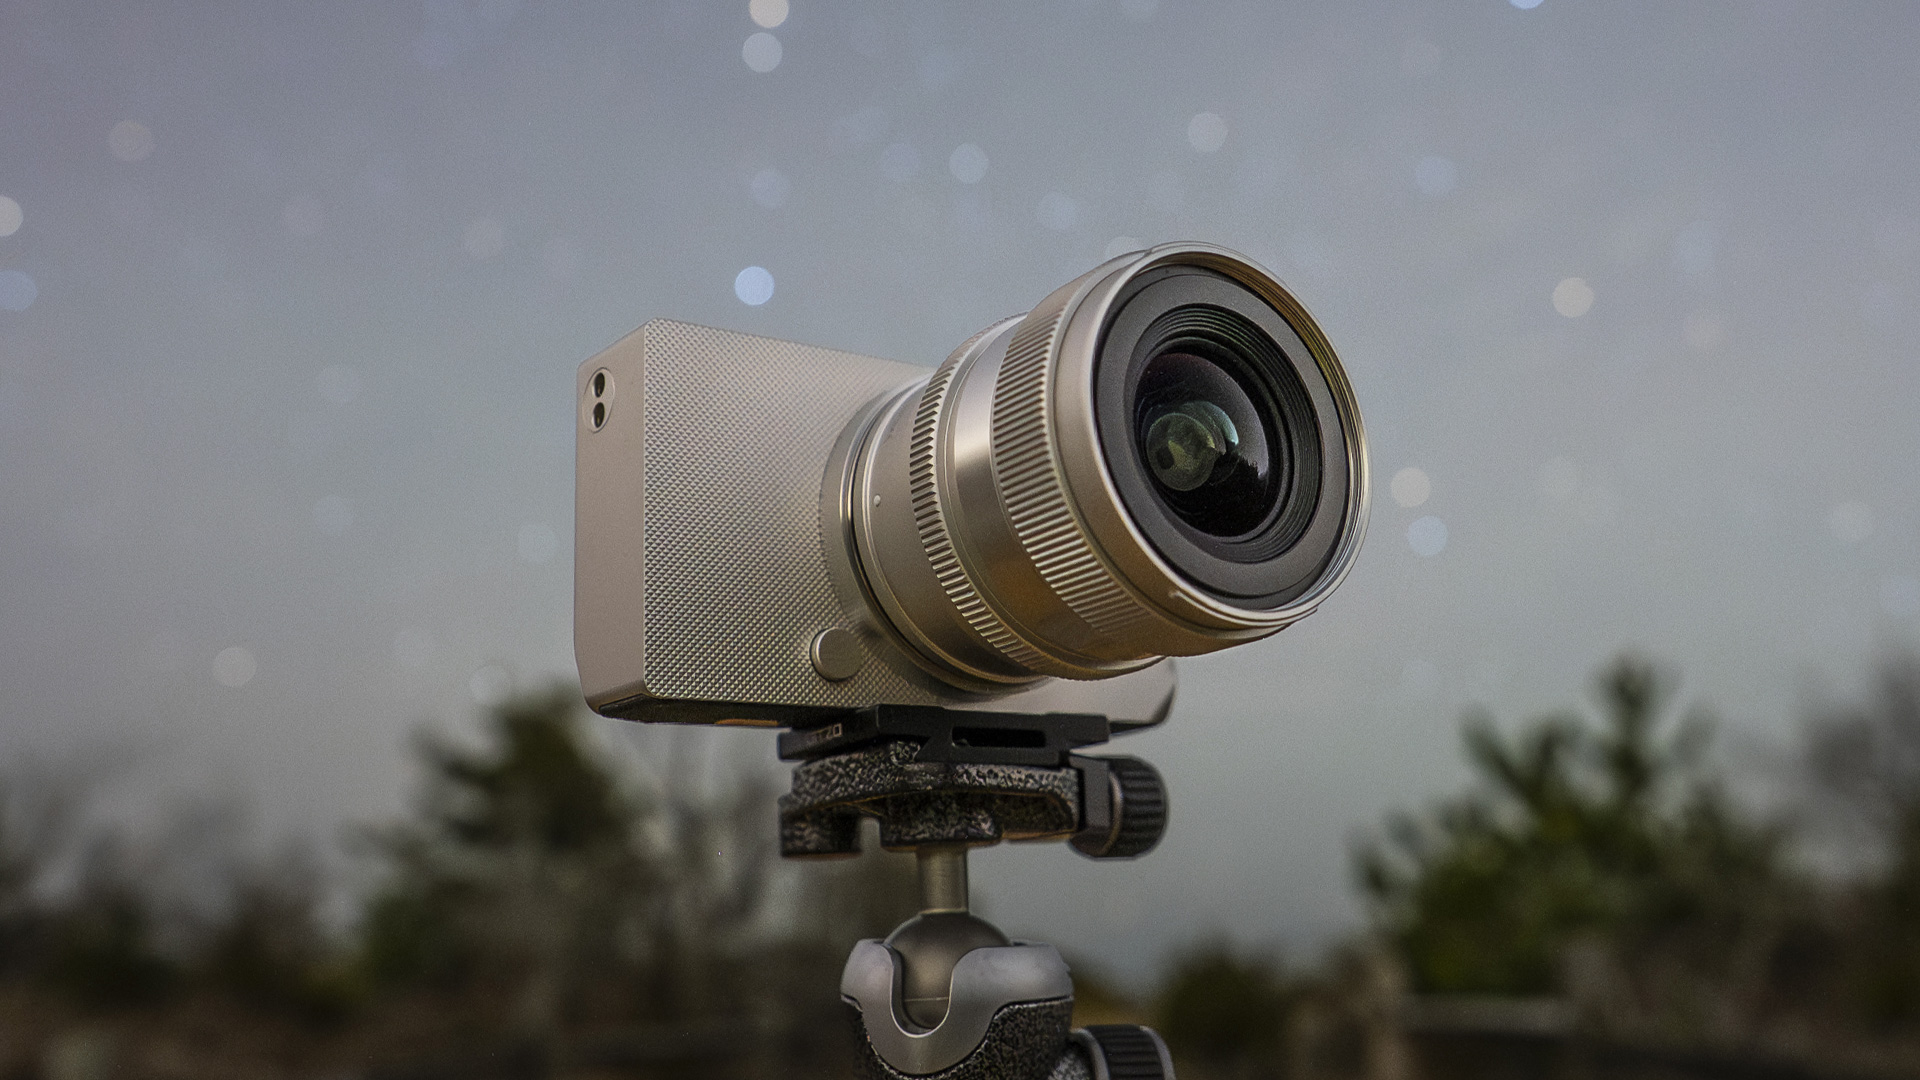
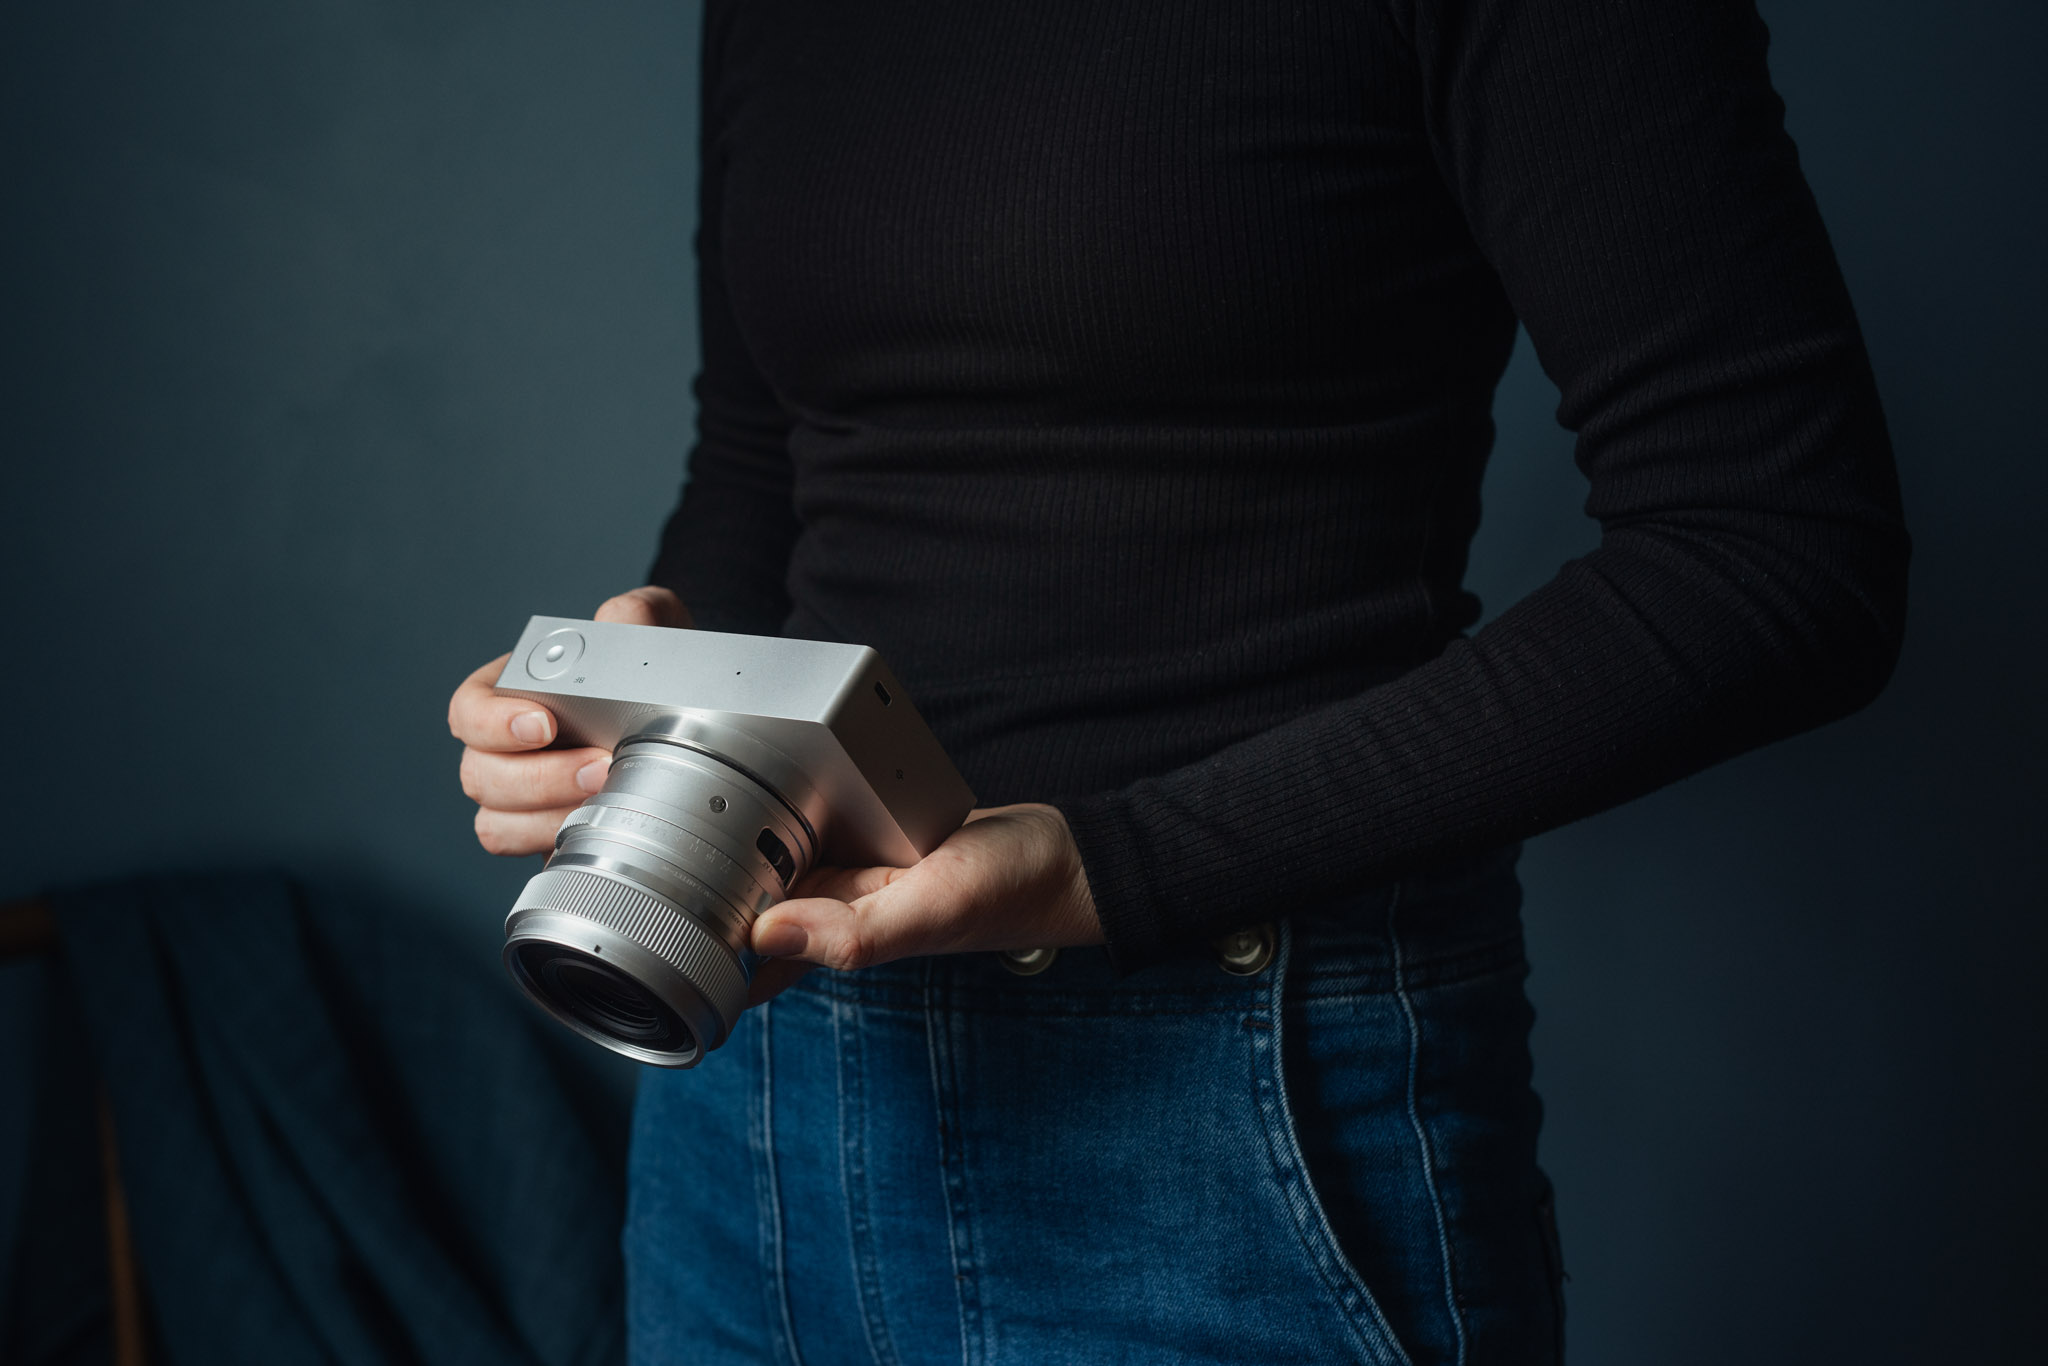
The Sigma BF looks stunning at night. But how are the images?
What does it take to get out of your comfort zone? Over the last 10 years or so, I’ve very rarely shot anything outside of astrophotography. I’ve always had an appreciation for other styles, but very little desire to explore shooting them myself. While I always try to improve my work, my comfort level with astro allows me to fully enjoy being out under the stars and focus on creating.
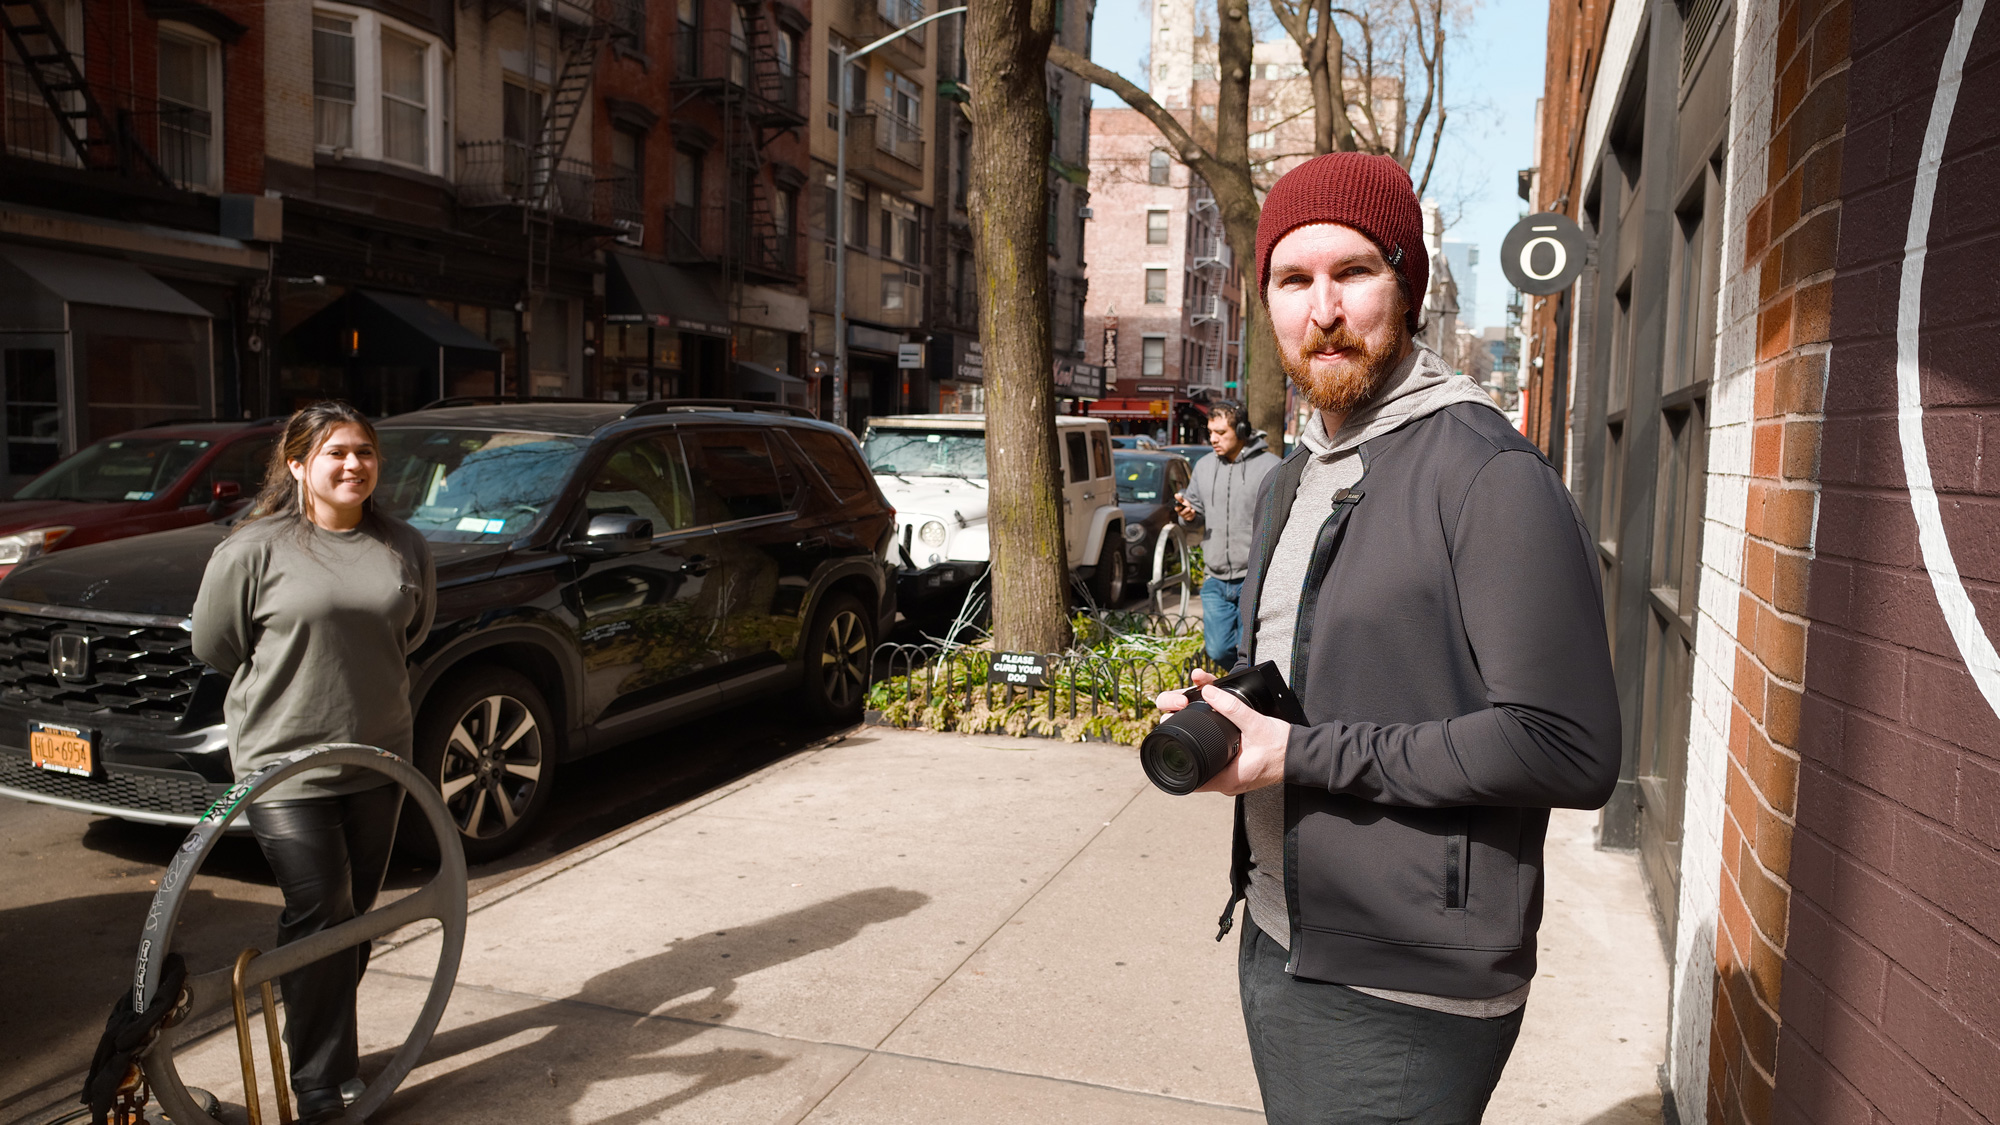
Hearing about some of the details around the new Sigma BF definitely had me intrigued. While it’s hard to deny the design of the camera stands out, it was really the simplified approach that grabbed me. I visited the pop-up in NYC during March 2025 to get my first look at the camera, and then returned two weeks later so I could have the chance to shoot with one.
With the Sigma America crew and my BF camera, ready to hit the streets.
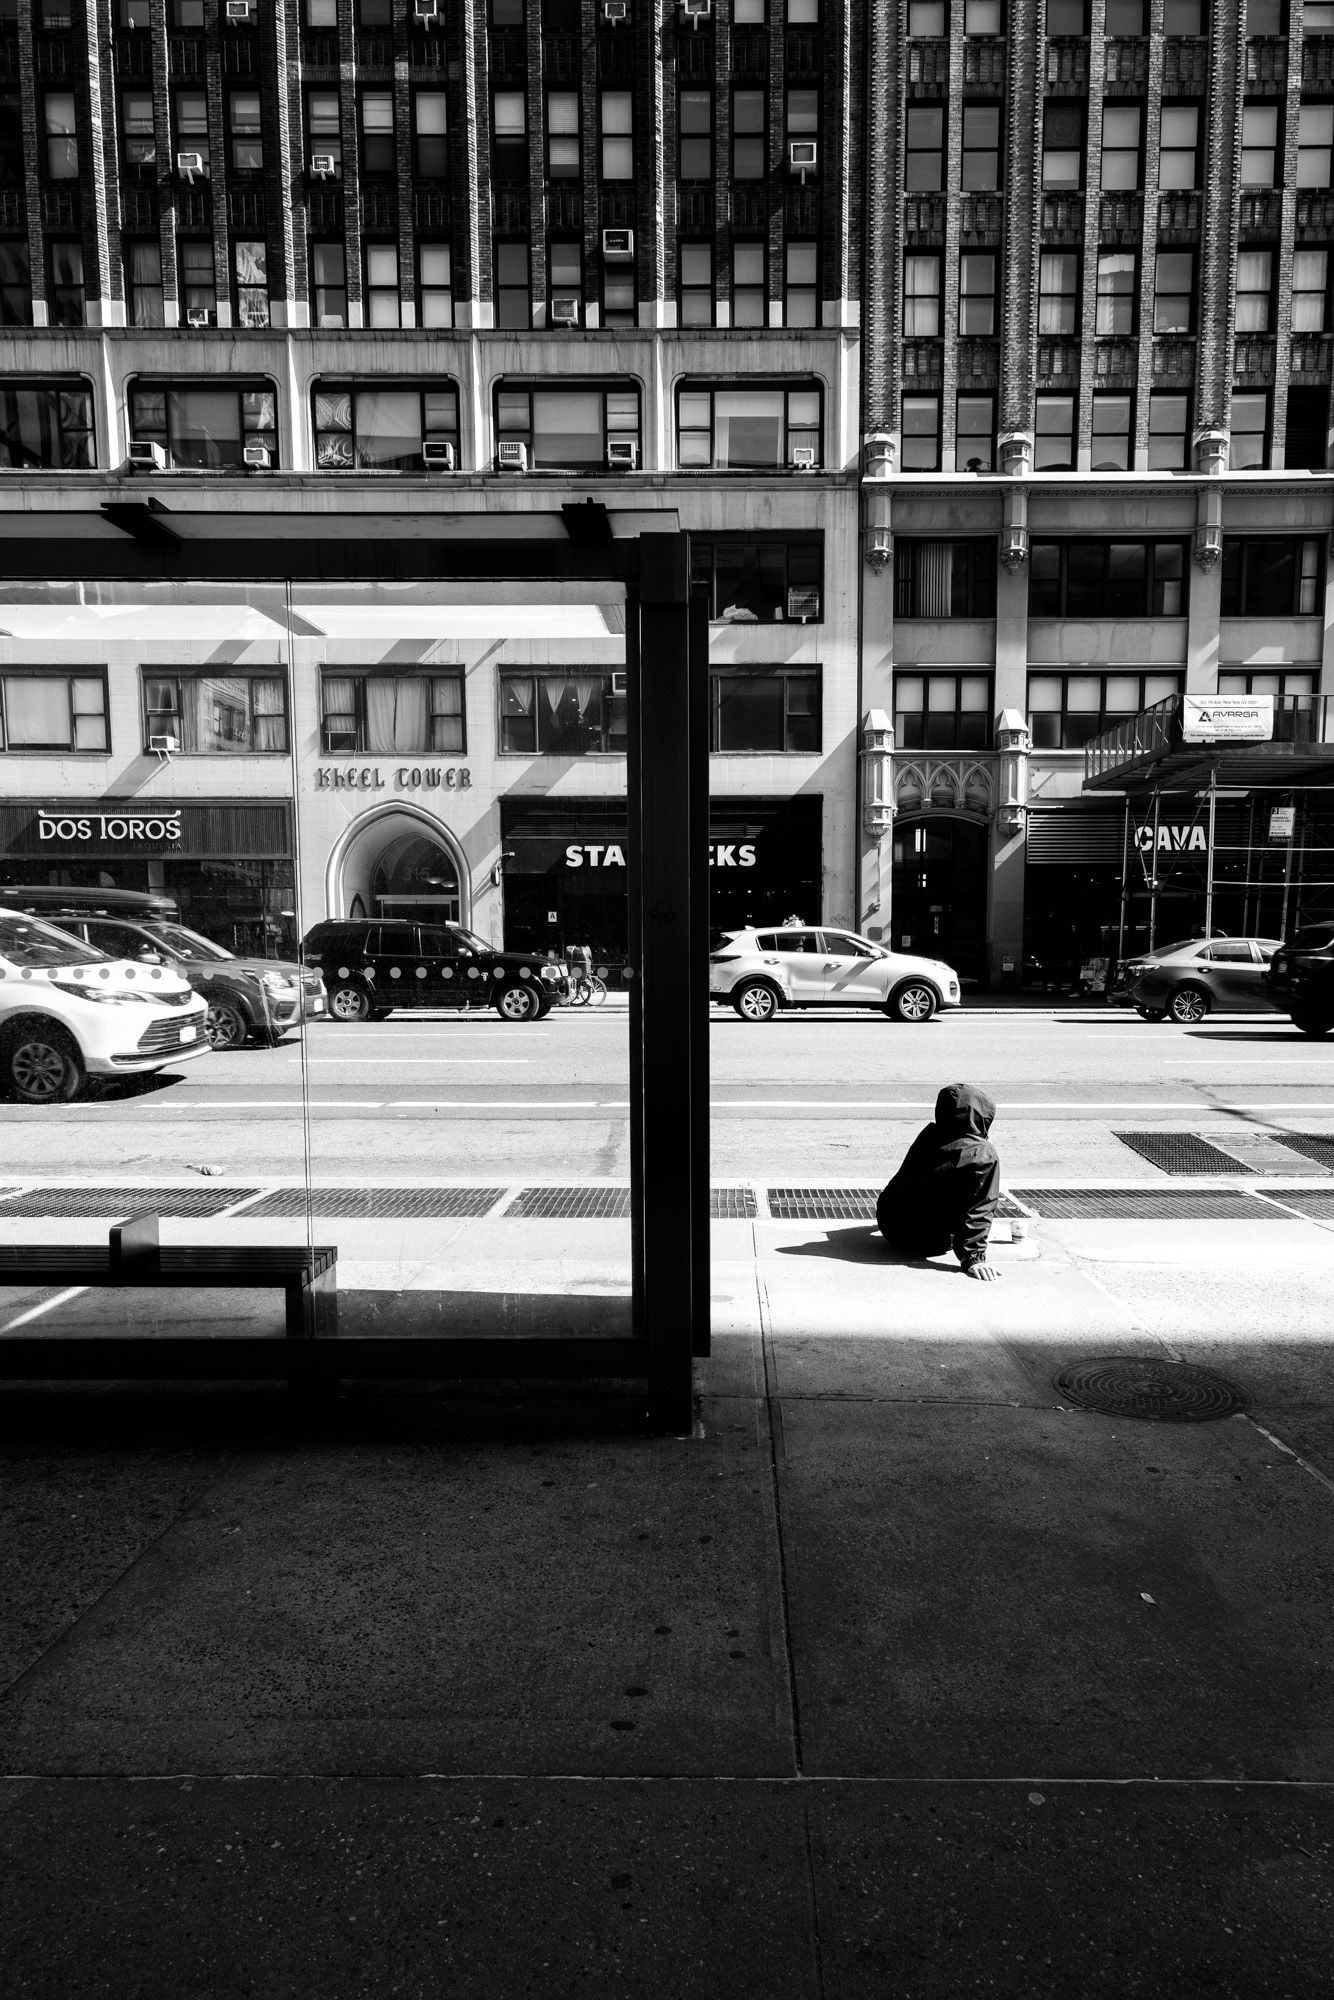
Getting used to the minimal button system on the back of the camera didn’t take much time at all. Using the dial to make quick adjustments and my personal love for the aperture ring on the 20mm F2 DG | Contemporary lens made taking some of my first street photography images feel a lot more fun than like more of a challenge.
The Sigma BF as a walkaround camera
Street photography in particular is a genre I’ve had a special appreciation for when viewing someone’s work. It looks easy, but like so many things, only when it’s done well. I was a bit unsure about what to photograph, or if what I was photographing was any good, but I was having fun. And, at least personally, I was really enjoying the images I was capturing, too.
SIGMA BF CAMERA 20mm F2 DG | CONTEMPORARY F8, 1/1000s, ISO 400
SIGMA BF CAMERA 20mm F2 DG | CONTEMPORARY F8, 1/250s, ISO 400SIGMA BF CAMERA 20mm F2 DG | CONTEMPORARY F8, 1/500s, ISO 400
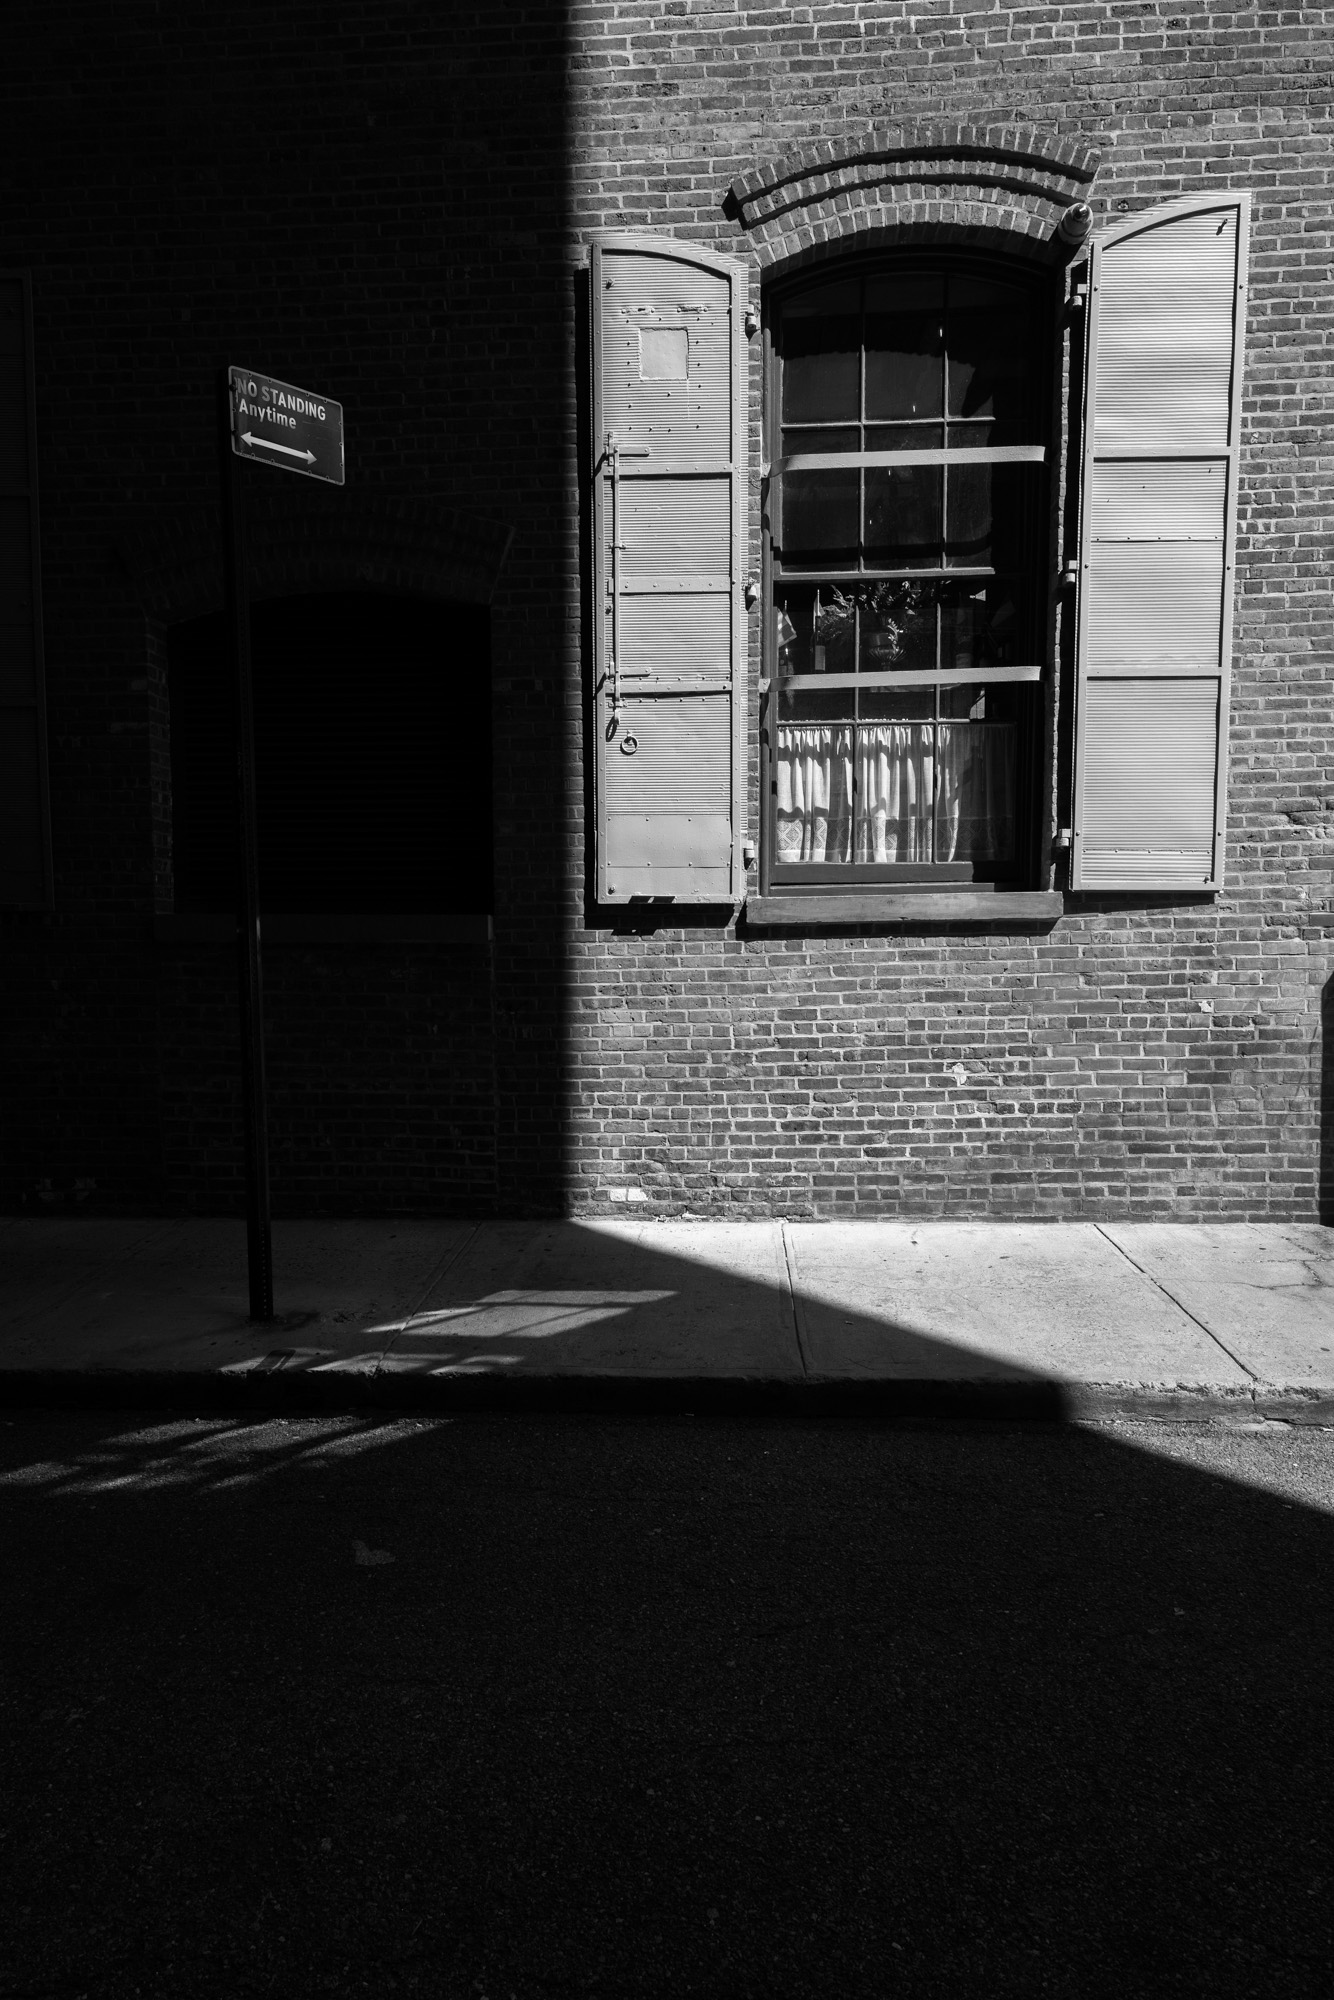
I didn’t wait long before heading back out with the BF. This time, I made my way to Princeton, NJ, again with the all-metal 20mm F2 DG | Contemporary, hoping to take some black and white architectural images. The built-in monochrome color mode helped me do just that, although other color modes were just a flick of the wheel away. Just walking around with a wrist strap and this new minimalist camera, I found myself looking at everything to try and find the perfect frame. These new (for me) genres of photography felt fresh and exciting.
SIGMA BF CAMERA 20mm F2 DG | CONTEMPORARY F9, 1/80s, ISO 100SIGMA BF CAMERA 20mm F2 DG | CONTEMPORARY F9, 1/400s, ISO 100
I worked my way all the way around buildings, up close and from a distance, watching the back of the camera to find that perfect angle or just waiting until something felt right. That’s such a special feeling when that happens while you’re out photographing. It means you’re completely present in the moment and paying full attention to finding that perfect composition.
SIGMA BF CAMERA 20mm F2 DG | CONTEMPORARY F8, 1/125s, ISO 100SIGMA BF CAMERA 20mm F2 DG | CONTEMPORARY F9, 1/30s, ISO 100
I found myself occasionally using the screen to use the tap to focus feature and other times just getting into that zone of snapping away as everything moved through the frame. Admittedly, autofocus is not a feature I’m often concerned with for astrophotography, but it felt extremely fast and accurate on both of my outings.
Exploring a genre outside of my comfort zone and not having to worry about things like autofocus performance or getting lost in menus, really allowed me to find that zone of being present and immerse myself in shooting.
Trying the Sigma BF for astrophotography
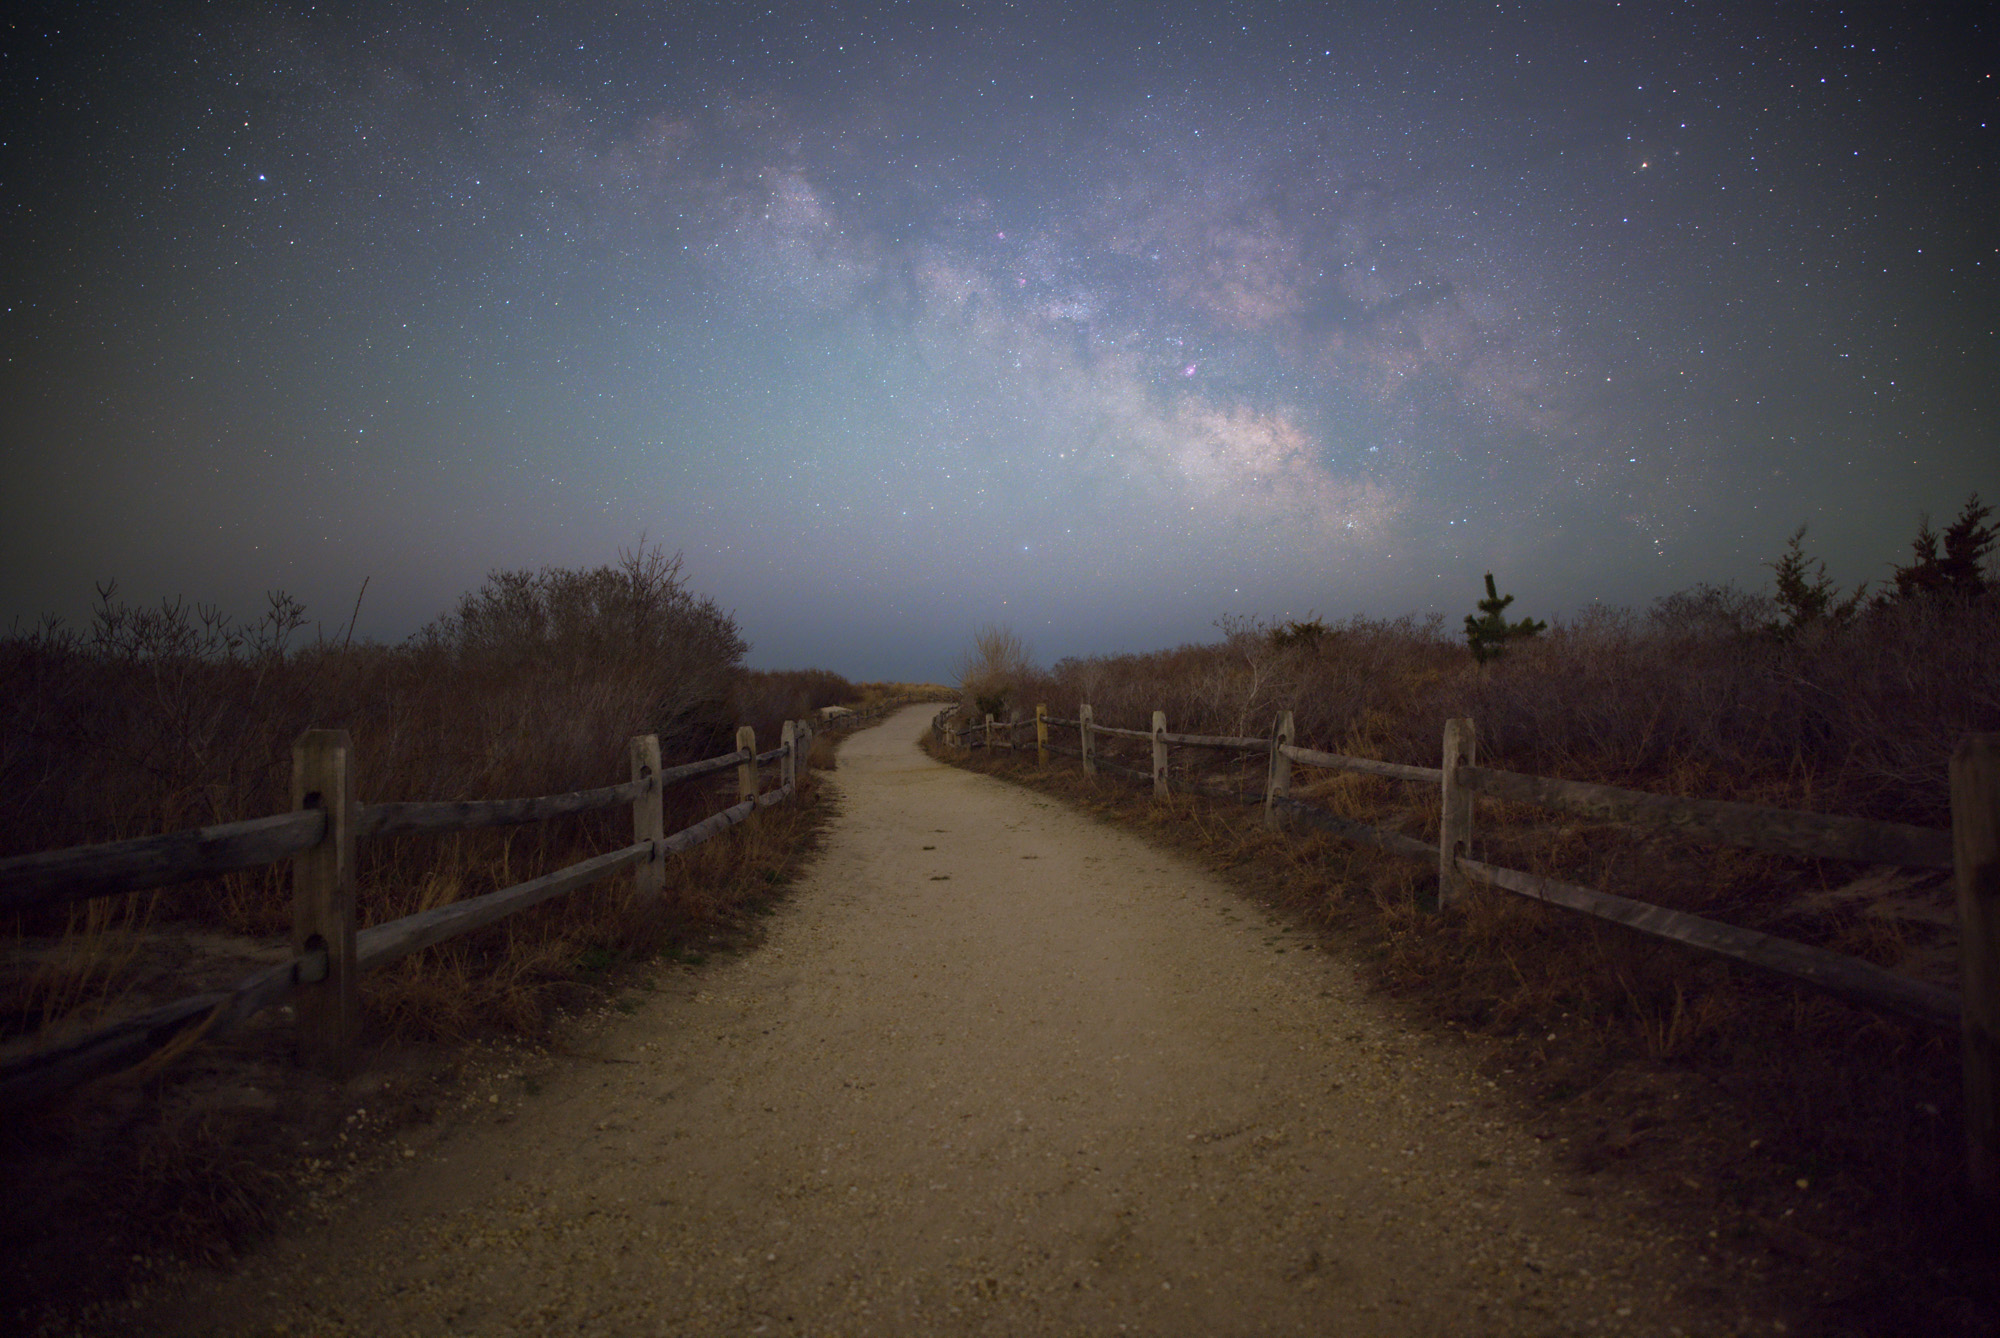
After a few days out in busy streets, I really felt like it was time to head out under the stars. With clear skies in the forecast for the entire night, I arrived a few hours before the Milky Way would be rising. I took a handful of test images as I wandered to find the compositions I would be shooting once the core of the Milky Way was sufficiently visible above the horizon.
One of the first things I noticed was how easy dialing in that very precise infinity focus on the stars was with the LCD screen. Even more importantly, one of the things I didn’t notice were the buttons on the back of the camera. It wasn’t until well after I was shooting the Milky Way that I had even thought about them. After two outings during the day, I think easily navigating a new camera in complete darkness speaks to how thoughtfully it was designed.
The Sigma BF only has a few physical controls and very simple menus that quickly become second nature.
I ended up shooting far longer than I anticipated using a number of different techniques ranging from stacking to separate foreground exposures. While admiring an image of the back of the camera is one thing, the real test for those high ISO captures is viewing on a much larger screen…
NOISE TEST IMAGE – SIGMA BF 20mm, F2, 13s, ISO 3200 (NO NOISE REDUCTION)
Working my way through the images and seeing how far I could push the files was probably the biggest surprise of my experience with the BF. It wasn’t that I didn’t have high expectations, it was a matter of those expectations being surpassed. Pushing astrophotography images while editing, bringing back detail in the shadows and trying to pull out detail in the sky, can often result in a very noisy final image. Shooting at these higher ISOs can also mean that your image lacks a bit of sharpness or just doesn’t have much depth to the color you captured, especially in the foreground. Not only was I able to push the files to bring out an incredible amount of detail through the image, they all felt very sharp and full of rich color.
SIGMA BF CAMERA 20mm F2 DG | CONTEMPORARY F2, 156s, ISO 1600SIGMA BF CAMERA 20mm F2 DG | CONTEMPORARY F2, 156s, ISO 1600
The Sigma BF for wildlife?
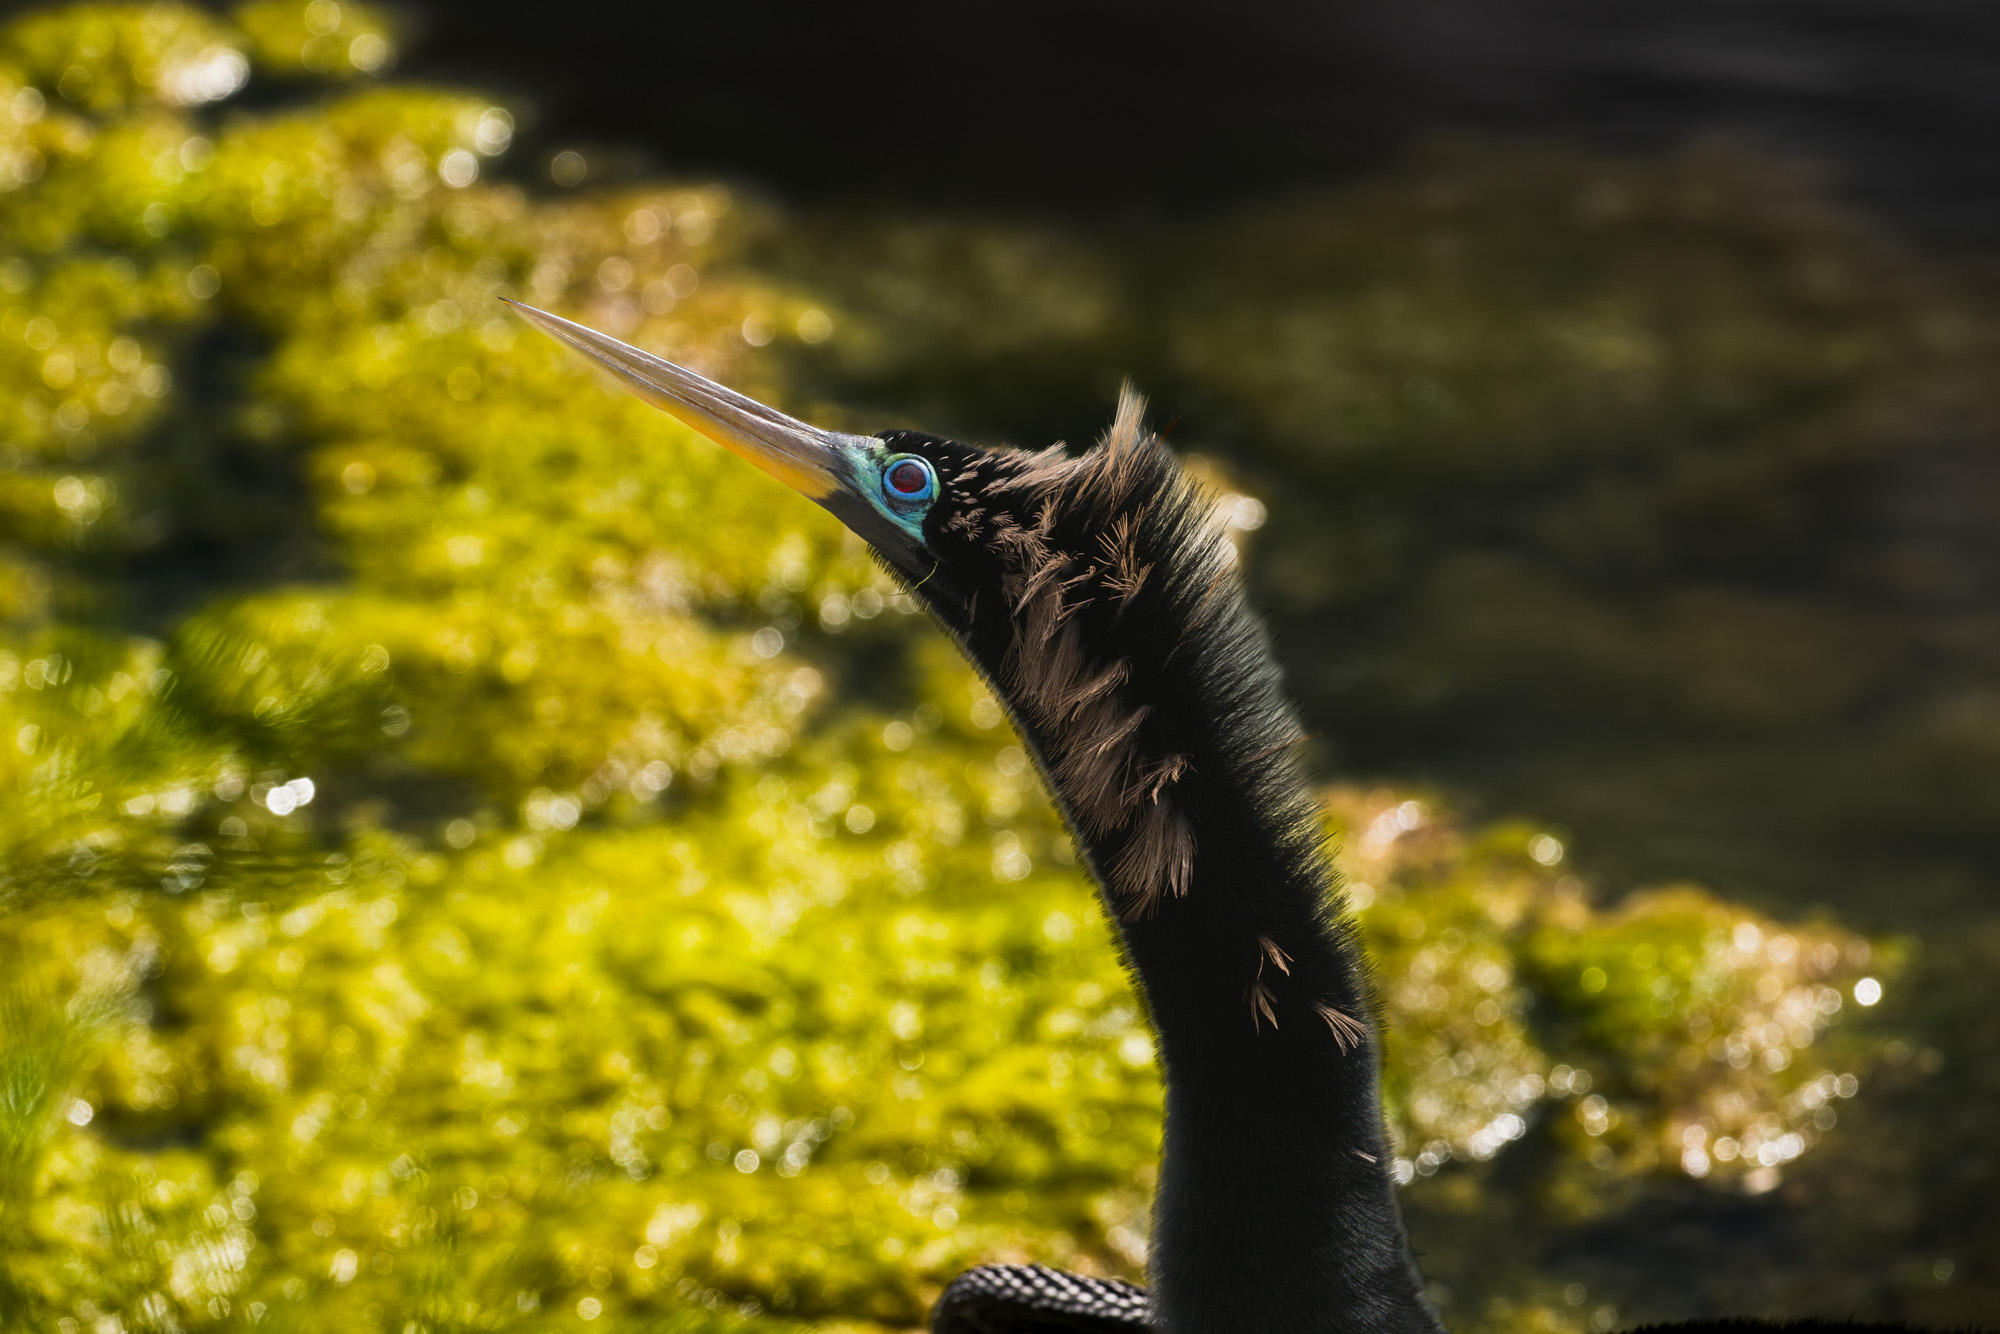
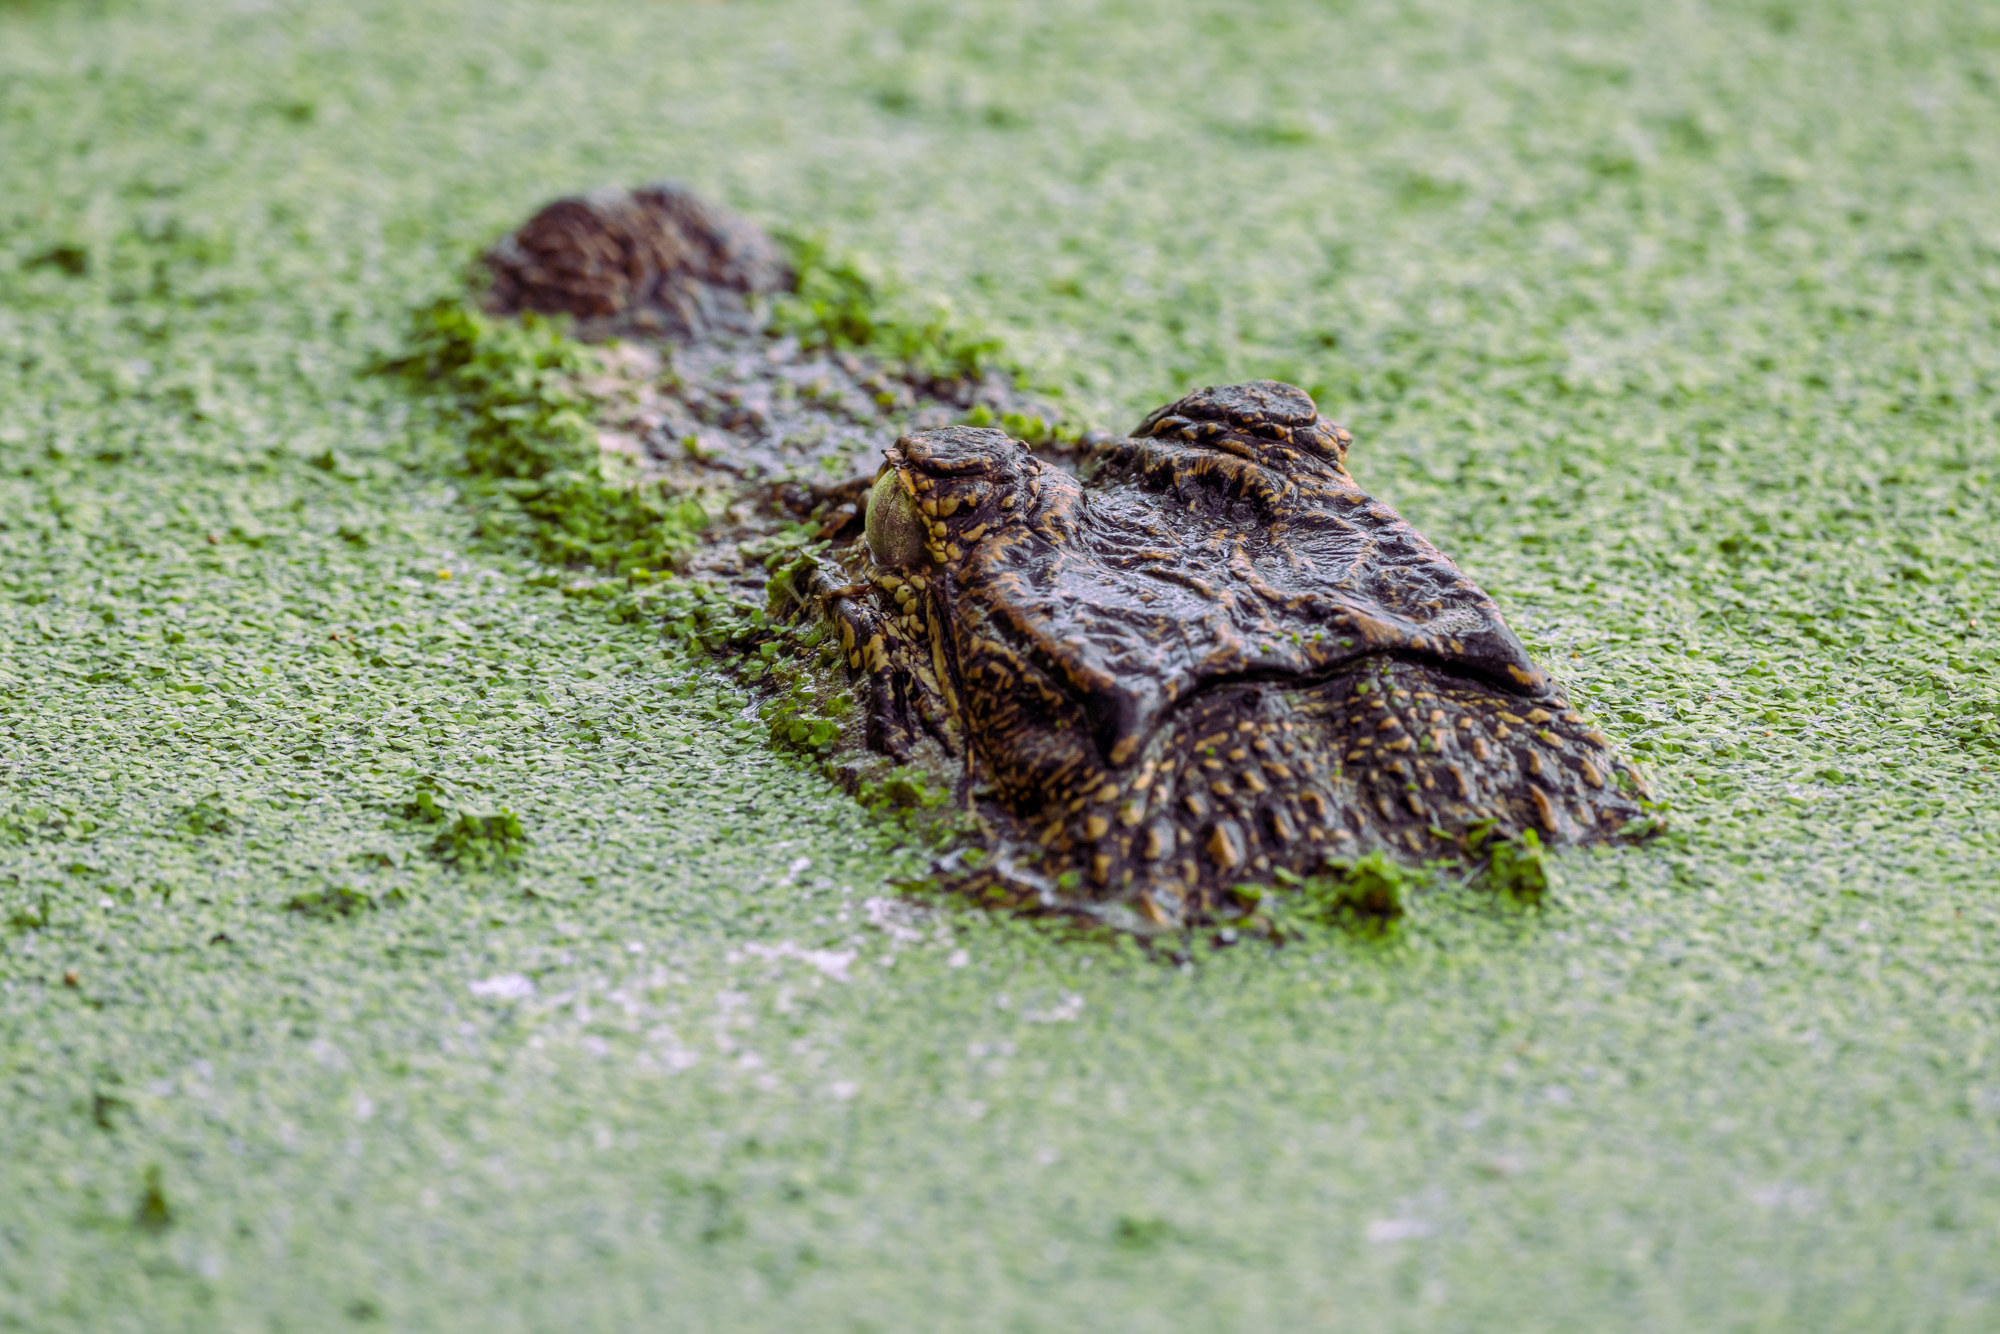
After my night under the stars, I had one more test for the Sigma BF. Wildlife. This was also a test for myself, as aside from a few fox photos about a decade ago, this was not something I had ever given a try. I found myself near Myrtle Beach, South Carolina with the BF and the Sigma 500mm F5.6 DG DN OS | Sports. I wandered Huntington State Beach Park with the hopes of photographing alligators. As I kept my eyes on the water, I saw a variety of different birds that I figured, “why not?” and did my best to take some photos along the way. Again, while this was a new genre of photography for me, I think the simplicity of the BF allowed me to just enjoy being in nature. The autofocus was quick to lock in, and while I didn’t attempt any in-flight shots, I was pretty happy with the results!
SIGMA BF CAMERA 500mm F5.6 DG DN OS | Sports F8, 1/320s, ISO 800SIGMA BF CAMERA 500mm F5.6 DG DN OS | Sports F13, 1/400s, ISO 400SIGMA BF CAMERA 500mm F5.6 DG DN OS | Sports F13, 1/250s, ISO 400
For better or worse, the only gators I saw were just peeking out of the swampy waters. Which at first, felt like a bit of a bummer, but I didn’t end the day feeling like I had checked something off a list. If anything, it felt like I was starting a new list.
SIGMA BF CAMERA 500mm F5.6 DG DN OS | Sports F8, 1/320s, ISO 800
SIGMA BF CAMERA 500mm F5.6 DG DN OS | Sports F13, 1/125s, ISO 800SIGMA BF CAMERA 500mm F5.6 DG DN OS | Sports F8, 1/500s, ISO 800
Maybe after a decade of shooting only astrophotography, a few days with the Sigma BF had inspired me to look at things a bit differently again. I’ve been out shooting more styles of photography in the span of a month than I ever have before. I think sometimes, whether it’s intentional or not, a bit of a reset can be a really helpful process to go through. Just taking a second to look at things differently and use that opportunity to step out of our routine.
I’ve always felt, as a photographer, the best gear is whatever helps me focus on creating first. While the world after a photo is taken demands our constant attention with excessive beeps and notifications, it feels refreshing to have those moments where I’ve connected completely to creating art. I think the BF is a camera that does just that, by encouraging you to look at things different and without distractions.
It is almost rainy season in most of the tropical and sub-tropical countries and it is one of those seasons that brings in respite from the summer heat, especially in the tropics. Some photographers worry about shooting in the rain, because they are concerned about their gears’ safety and also getting wet in the rain.
Rain photography is magical and sometimes dramatic, and can be very rewarding of you take a few precautions when shooting in the rain. There are a lot of subjects and scenes that can be beautifully shot during the rain if one embraces the elements, understands light and focuses on the details.
If you would love to understand the secrets of recognizing the right light, control it and manipulate it according to the situation you are shooting, we highly recommend you to check out the eBook “Understanding Light” by Photzy. This guide will uncover the secrets behind controlling the available light and will leave others wondering how you did it.
Here are 18 photographs of the rainy season that can help you with some inspiration to shoot in the rain.
Photo by Gil Ribeiro
Photo by Jusdevoyage
Photo by Todd Diemer
Photo by Jack Finnigan
Photo by Makoto Tsuka
Photo by Matteo Catanese
There are many ways in which rain can be photographed. You can capture the stormy sky, reflections, puddles, even stay indoors and capture the falling rain. During this time, the light can be quite tricky but shooting from the right angle and perspective while also using the right camera settings can help you to capture better photos. We recommend you to check out this eBook “Understanding Light” by Photzy that has 155 pages of fast and easy learning, packed with illustrations, case studies and assignments to verify your knowledge.
Photo by Urban Vintage
Photo by Imthiyas Iqbal
Photo by Hannah Domsic
Photo by Jack Finnigan
Photo by Luca Bravo
Photo by Michael Podger
When out to photograph the rain, besides the grand scene in front of you, it is also good to focus on the details for some macro photography, patterns and textures. Also look for actions in the outdoors, like vehicles speeding, children splashing in the puddles, or dramatic skies. The colours can be rich, so if you work with the light, you are sure to come home with some great photographs. Check out “Understanding Light” by Photzy if you need to learn more about using light to your advantage in tricky situations.
For those who haven’t been following the major rift in the world of photojournalism a quick summary of what is going on: A film called “The Stringer” directed by Bao Nguyen (previously directed The Greatest Night In Pop) and produced/starring Gary Knight (VII Agency co-founder and ED) premiered at The Sundance Film Festival on January 25 claiming and attempting to prove that 53 years ago Nguyễn Thành Nghệ actually took “The Terror of War” (AKA Napalm Girl) image and not Nick Ut. AP photo editor Carl Robinson claims his boss, Horst Fass, told him to switch the credit from Nguyễn, a stringer, to Nick, an AP photographer. The filmmakers find Nguyễn, and he says, yes, he took the picture.
Prior to the film’s premiere, the AP released a preliminary report disputing the claims of the film. At the premiere, the AP watched the film and followed up (May 16) with a 100-page report saying that there’s not enough evidence to remove Nick Ut’s credit.
Then, on May 16, World Press Photo released a statement saying they investigated (David disputes the characterization that they investigated and rather they simply got a private screening of the film and agreed with the conclusion) and are suspending Nick Ut’s credit on his 1973 Photo of the Year award.
This sparked outrage on social media with posts from what appears to me to be the VII camp (Ashley Gilbertson, Ed Kashi, Sara Terry) and the Nick Ut camp (David Burnett, Pete Souza, David Kennerly).
And the real zinger in the whole dust-up is that David Burnett was there! He’s an eyewitness to the events at Trang Bang, where the famous image was made.
Ok, one final note: besides the premiere at Sundance and private screenings, the film cannot be watched until a distributor is lined up. I’m aware of a screening in DC next month, but most people, including David and myself, have not seen the film.
I talked with David over the phone, and here’s a condensed and edited version of our conversation.
Screenshot from AP Report: Investigating claims around ‘The Terror of War’ photographScreenshot from AP Report: Investigating claims around ‘The Terror of War’ photographScreenshot from AP Report: Investigating claims around ‘The Terror of War’ photographScreenshot from AP Report: Investigating claims around ‘The Terror of War’ photograph
Rob Haggart: I want to start by asking if it’s really difficult for you to go back and rehash all this stuff.
David Burnett: No, I mean, I have these moments from not just Vietnam, but the jobs that I worked my whole life, French elections, Ethiopia, Chile, and it’s not really something that causes me great pain. There are so many of these things that I’ve lived through that the memories of them and what I was doing in them as a photographer is very, very clear in my head. And Trang Bang is really no different than almost anything else.
The first time I was under fire and had the crap scared out of me, it’s one of those things where you don’t just think, will I ever get over it? Because you don’t, they become part of what your life is about.
The running joke about Trang Bang and me was that, well, I missed the shot because I was changing film in my old screw mount knob wind Leica which is kind of a slow, kludgy film camera. It was not an easy camera to operate.
And yet, Cartier-Bresson shot with them for something like 20 years before the M2 and the M3 came along and made some pretty great pictures, so I mean, I think part of why I even bothered shooting with that camera instead of getting another M2 for 200 bucks, was kind of a historical thing with the old Contax and Leicas, you felt a little more attached to some kind history if you’re shooting with this kludgy old camera and um you know, and I was trying to reload it and anybody had ever owned one of the cameras knows that if you take a 35-millimeter film where you have the little cut-down tongue that you really need to cut an extra inch or inch and a half away from that one side that’s cut so that when you drop the film in the camera, it will seat itself perfectly.
I never bothered doing that, so I was always stumbling, trying to get the camera reloaded. So I was reloading it when the plane came in to drop the napalm. I was holding the open camera in my left hand and shooting with a 105 in the other hand. When the napalm hit right next to the pagoda, there was this Gigundo fucking fireball, Nick has that picture, and I kind of have it a few seconds later. But it was the in the days when you didn’t shoot with three motor drives, you know, you weren’t going out there to shoot 25 rolls of film. I think I shot maybe three or four rolls that day, and it was a fairly long period of time we were there because we were kind of hanging out waiting to see what was going on.
You could hear firing and shooting coming from the village. Then the planes came in, and there was that fireball, and then like three minutes later, the kids started running out of the field and onto the road toward us, and that is the moment, more than anything in my mind, where Nick was the one guy who was in a position to shoot the picture, and nobody else was. There was this line of journalists, and we were all within a few feet of each other lined up across the road. As soon as we could tell that, there were people on the road racing out toward us, and the kids were running as fast as they could run. Nick and this guy Alex Shimkin, who was killed a few weeks later up north, took off running towards them, and no one else did.
RH: When did you first hear a film was being made about this event and that there were questions about the author of the famous image?
I was sitting at a Walgreens parking lot in Florida 3 years ago going in to go get some stuff, and Gary Knight called me and said tell me everything you know about Trang Bang, so I spent a couple hours on the phone and told him everything I know and then said you know there’s this guy and he’s kind of a horses ass, ex AP guy and he says that Nick didn’t shoot the picture and I kind of think he’s full of crap as does everyone else but along the way you’re gonna run into Carl Robinson.
Carl had this real chip on his shoulder about AP, and he was never afraid to let people know how he felt like he’d been screwed over by the AP.
RH: So you’re telling me this rumor has been around for a while?
Yep, a long time. It’s not new. The last time I saw Horst Faas was in 2008. There was a gathering for a memorial wall at the news museum in Washington, and if you lived near the East Coast and worked as a journalist in Vietnam, you pretty much were there that day. Somebody at that point could have said, hey, Horst, let me talk to you about this thing that Carl’s been telling everybody that you told him to put Nick’s name on the image, and it was really some stringer’s film.
And no one ever, no one ever asked Horst.
No one ever just asked him point blank.
I guess Carl makes a pretty reasonable case for trying to talk about how the guilt of 50 years and being able to unburden his guilt when he finally met this guy. But you know, every crackpot theory that ever was has at least a 2% chance that it happened.
Could Horst have said it? I suppose he could have. But it would have been very out of line with what always happened.
If you talk to Neal Ulevich, who was in the AP bureau as a staff photographer for, I don’t know, six or seven years in Asia and was in the bureau the whole time, he will tell you about the sacrosanct policy of never allowing anyone’s film to have any name on it other than the actual photographer that shot it.
He said, “All the time I was in Asia, never once did I see anybody do anything like that.”
It just didn’t happen.
I was in that group of people who were looking at the first print of Napalm Girl when it came out of the darkroom, and I did what every photographer in the history of photography would have done, which is I look at this picture and I try and think to myself without having seen my own film, hm, I wonder if I have anything better. I’m thinking, yeah, that’s pretty good. That’s probably better than anything I have.
There were 3 or 4 of us looking at this little 5 x 7 print that was still wet, and Horst, without making a big deal out of it, just turned to Nick and said, “You do good work today, Nick Ut.”
I still have the memo I wrote when I went back to my office at the Time-Life Bureau. I said there was this accidental bombing in this village called Trang Bang, and I said, Nick from AP got a pretty good picture, and they tell me they’re shipping the negative to New York on what’ll be the same flight that my negatives are gonna be on, so you’ll be able to get an original print made in the lab rather than rely on a wire service photo.
So that’s what they ended up doing. It was in the front section of the magazine called the Beat of Life; there were always 3 or 4 of these big picture spreads.
Usually one picture, sometimes two or even three, and they ran one of mine of the grandma with the burned baby and Nick’s picture side by side, and when you look in the photo credits, it says page four and five, David Burnett, AP. I mean, it was the wire services in the 70s. They weren’t going to put a photographer’s name on it. It’s kind of funny that way.
RH: What are the chances, if you’re Nick, that you don’t know beforehand you made that picture?
There’s no way that either of those guys would not know they took that picture. It was such an enpassant moment, and I’m sure there was just one frame that was the one.
For sure, there are times when you’re surprised by something you’ve done when you move from wherever you shot it, and now, you know, we’ve kind of shut out the middle man, and you go right to the computer and see if what’s on there is anything like what you remember, but in the film days I would find it really hard to not know that you had something.
I can’t imagine that the camera wasn’t up at the eye; it’s not like a chest-high Hail Mary, although technically, it was never great, but maybe at the same time, some of the imperfections add to the raw reality of that moment.
RH: That leads me to this talking point I see from the film’s defenders saying that this is not a critique of Nick, but that would mean that Nick didn’t know he took the photo. But you think there’s no way he didn’t know he took the photo, so the film is saying he’s been lying for 53 years about this.
He’s a 21-year-old kid with a camera, and I think incapable of that. Yes, it was a good picture, but there were a lot of good pictures out there.
And, you know, some people have said, oh, but Horst knew right away that that was gonna be a great picture, and he wanted AP to have the copyright on it instead of a stringer. But the thing is, you’ve got all these little sub-arguments if you accept a certain premise, and you can walk yourself right off a cliff of trying to figure out what it is you believe or don’t believe.
Gary called me back at one point, and he said, you know, I think there’s really something to Carl’s statement here, but you know, once you get the first bit of the Kool-Aid, you just gotta drink the whole pitcher, and I just don’t see it.
I mean, like I said, it’s possible.
Everything’s possible, you know?
I mean, you know, once you start to believe part of it, you kind of end up believing the whole thing, or you believe none of it.
To me, it looks like Gary’s trying to make himself into a big documentary producer, and this is his launch pad.
Gary said you ought to be in the film, and I just said, Gary, I don’t wanna do a goddam Mike Wallace interview where I have no control over how you cut it or anything else. I’ve watched 60 minutes too many times where Mike managed to hammer somebody, and I had no confidence that it would be a fair representation.
Fox Butterfield was the reporter I was with that day working for The New York Times, and he got a call from Gary’s wife, a producer on the film, he started to tell her his version of what took place, and she told him everything you’ve said is wrong. That’s not a really good way to coax people into a discussion. She said he would have to sign a non-disclosure agreement, and he said, what the hell for? I’m the one telling you stuff; you haven’t told me anything.
Gary said to me last time I talked to him like six weeks ago, he said, well, you know, we’ve done all this forensic stuff, and we’ve proven that he couldn’t be down there to take the picture.
And I said to him, in my mind, because I remember the way he ran out on the road ahead of everybody else when the kids were coming down the road, he’s the only one who could have taken that picture because it was in the very first moments that the kids were coming down toward where the journalists were lined up, and it was after that everybody else started wandering around, but that was another five or ten or 15 minutes later.
And I just don’t see how anybody else was out there in front, and to me, that picture was taken out in front. It wasn’t taken right next to the press people.
It was out there away, maybe, I don’t know, 20 yards, 40 yards. 50 yards.
RH: How do you think the filmmakers should have handled this? What should they have done with the information they got from Carl?
You don’t ever want to get to a place where people are afraid to posit things, but I don’t know what the answer is, but you know, unlike a lot of people who don’t shut up about it, I’m not sure I have an answer to what the most perplexing question is.
And I never said I was right behind him when he shot that.
I saw him, I was changing my film, and it was a minute or two minutes later, and in those moments, that could be a long time. I offer it strictly as a witness to what happened that day and nothing more.
I find one of the most curious things of all, aware of the fact that Nguyễn probably had to leave Saigon with almost nothing, that he left everything behind, andI totally get that.
But apparently, he never sold another picture to anybody, and in the last 50 years, no one has even seen one picture that he’s taken.
Other than the most famous picture of the Vietnam War.
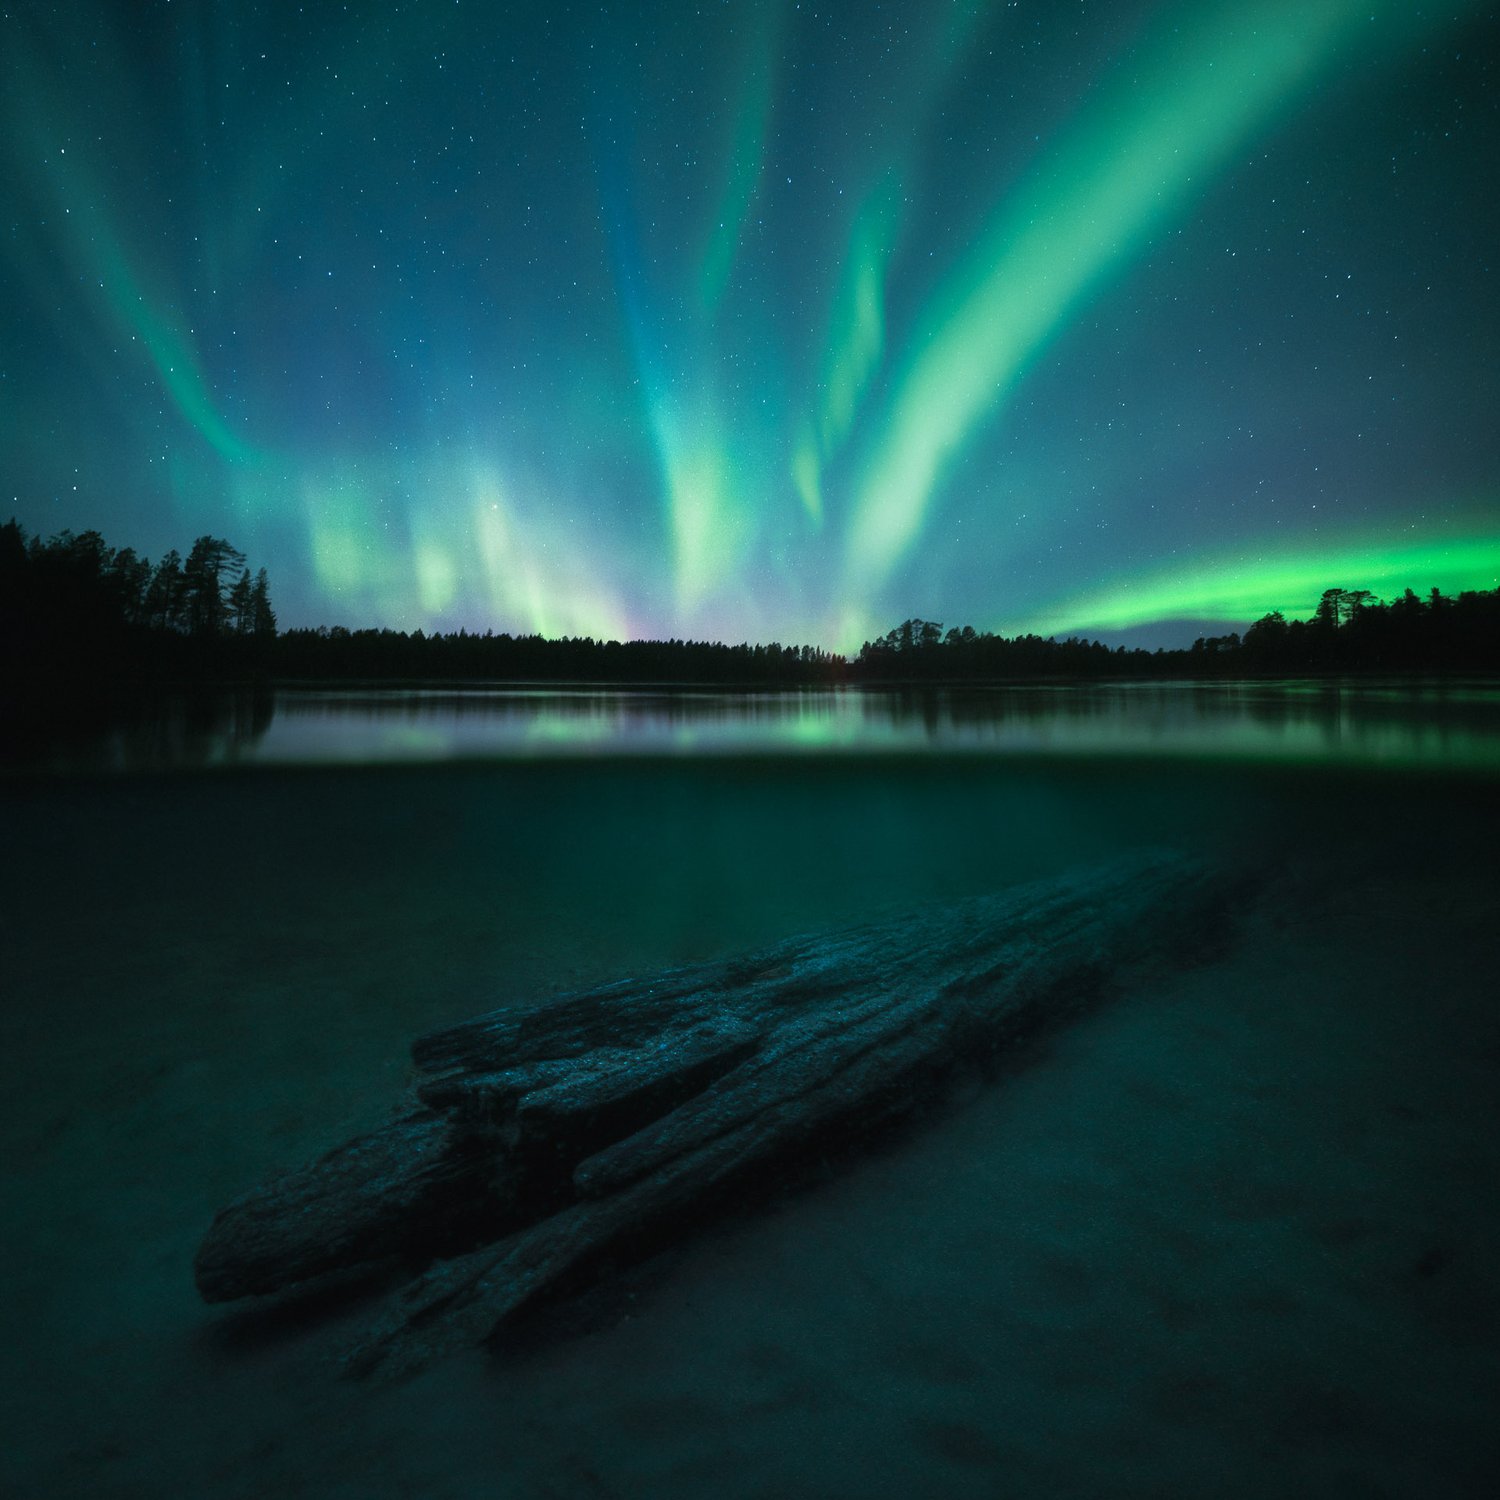
As a creative, I try to push myself to develop new ideas and visions. I had this strong pull to do something different, to push the boundaries of what I could capture with my camera and convey the ever-changing beauty of our planet.
I wanted to push myself out of my comfort zone and express the emotions of transformation. I wanted to connect this piece to my roots, guiding the visuals with Finnish literature, Kalevala, the theme of the mythic transformation of nature, light, and darkness. This was the start of the birth of my new photography piece, Underneath The Surface.
I packed my gear and headed to the stunning landscapes of northern Finland, unsure how I would bring this dream to life. It sure wasn’t easy. The project turned into this intense journey of battling sleeplessness and the brutal cold of Finnish Lapland. Imagine spending hours in freezing water, trying, failing, and then trying again the next day.
But then, there was this moment. After all those attempts, I finally got the shot I was after. Sitting there in the icy water, watching the Northern Lights, I felt this overwhelming sense of connection and change. Time stood still, and I was there, soaking in every second.
It’s funny how we often scratch the surface of things, isn’t it? But we must keep pushing and trying, no matter how often we stumble. And that’s what makes us succeed.
This piece blends the natural world and the mystical stories from the Kalevala. It invites you to step into a scene where these two worlds collide, showing the ever-changing nature of our planet alongside those age-old stories. Through this process, I learned so much about myself and how pushing your limits can lead to some amazing discoveries. Below, you can find a behind-the-scenes video and a chapter on how this photograph was captured.
I had the pleasure of serving on the 2025 Communication Arts Photography Competition jury—a fantastic opportunity to step outside my usual discipline and review photography alongside my esteemed peers. One standout moment was discovering Sacha Stej Sacha, an Auckland-based photographer represented by Image Driven Content.Her accolades include being named one of the top 200 advertising photographers globally by Lürzer’s Archive and being recognized as one of the 23 World’s Best Sport Photographers by The Agents Club in 2023. I recently had the pleasure of catching up with Sacha to discuss her award-winning image.
Your photography is known for its cinematic and powerful portrayal of women—what are the key elements you look for when capturing intensity and resilience in your subjects? When I’m gearing up to capture my subjects, there are a few key elements I always keep in mind. First and foremost, getting to know my subjects is essential. I want to know what shapes who they are. Before the shoot and even during it, I dive into conversations that reveal what makes them tick.
Once I have a sense of them, I try matching their emotional tone; if they’re fiery and passionate, I want that to jump off the frame. I aim to include a piece of who they are in every shot, whether it’s a glimmer in their eye or the way they hold themselves. I strive to create an image they can recognize, one that resonates with their energy. It’s all about connection, and that’s what I love most about photography: being able to freeze a slice of someone’s narrative, a moment of resilience and intensity, in time.
In your “Girls in Sports” campaign for 2 Degrees, you highlighted both strength and vulnerability in your subject. Can you talk about how the casting went and what direction you gave? This campaign was shot alongside a TVC, and the fantastic Director Taylor Ferguson did the casting. When I met these young women I could see that they radiated talent and spirit. For this brief, I wanted to capture that passion and grit. They don’t just play the game—they own it. I love the dichotomy between their sweet appearances and the fierce determination they display on the field – there is nothing more badass than seeing these girls in their element. Take the rugby girl, for instance. I asked her to sprint full speed towards the camera, like she was dodging the opposing team. In that moment, she transformed into a powerhouse charging at me like a freight train, the fire in her belly blazing as she zoomed closer. It was exactly the energy we were after.
How do you balance storytelling with advocacy in your visual work, particularly around gender representation? Women in sports face a harsh reality—they often get overshadowed, and it’s disheartening to see that women’s sports internationally don’t get the same spotlight as men’s. That’s why campaigns like this are so crucial; encouraging fans—especially from a young age—to rally behind these amazing athletes.
In my visual work, I find that storytelling and advocacy naturally go hand in hand—probably without me even realizing it. As a woman photographer, I’m drawn to capturing fierce, strong women because I know just how powerful we can be. In a society that often tries to box us in or undermine our strength, it’s crucial to keep that fire alive. That passion burns even brighter as a mother to a spirited young daughter. I want her to see women as capable and unafraid, sensitive and kind, just like the women I photograph.
How do you ensure your images challenge traditional portrayals, particularly of femininity and athleticism, while still maintaining authenticity and emotional depth? I’m usually guided by how I want the image to feel, especially when it comes to capturing femininity and athleticism. My images become a deep dive into an energy that connects the viewer to the subject. I want to create an atmosphere where the audience feels confronted, pulled into the frame, and unable to look away.
I find authenticity through genuine human connections, digging beyond the surface, whether I’m photographing a seasoned athlete or someone new to the sport. There’s something superhuman about athletes; they possess more than just physical strength; they embody resilience and discipline. There’s a profound sacrifice that comes with striving for excellence, and that narrative fascinates me. Each image I capture is a testament to that journey—an exploration of what it truly means to balance vulnerability and power.
Can you talk about the role visual media plays in shifting public perception and promoting equity, especially in underrepresented communities and activist movements? Photography holds a unique power in shaping public perception and promoting equity. As a visual person myself, I’ve always felt that a single image can convey emotions and stories far more effectively than words ever could. It’s the raw authenticity of a photograph that can resonate with someone’s heart, breaking down barriers and connecting us all on a fundamental level.
Through the lens of a camera, we can reveal the complexities of human nature and amplify voices that often go unheard. In this visual storytelling landscape, images become tools for change, not just documenting reality but actively reshaping how we view each other. Ultimately, photography fosters a shared humanity that can inspire action and fight against injustice. They remind us that, at our core, we are all just humans with similar desires for love, acceptance, and dignity.
You might recall a story we did on Leica sometime ago about how prices were going to be impacted by the tariffs levied in the United States.
Black and silver nikon dslr camera. Photo by Tusik Only
That was an accessory that was already pricey which ballooned into something completely out of the reach of most people.
Now, Nikon is joining other companies and predicting increased prices within the next month in the USA in response to tariffs. This comes on the heels of a rising trend in the industry towards more and more expensive products anyway that are making things that much more difficult for the average photographer when it comes to sourcing and maintaining gear.
And it looks like things are only going to get more expensive from here unless something changes. Heck, even Apple is reportedly on the tariff block so smartphone photography might not even be a viable entry point for people wedded to Apple products.
But really none of this is anything new. If anything, it’s an accelerated trend we’ve covered here for years. As low-end products increasingly get phased out and the margins from high-end products bolster company bottom lines, it is only natural that the latter continues its march towards dominance while the former, even without tariffs, continues to face challenges.
So how much of a price increase are we looking at in total? PetaPixel reports that a similar phenomenon happened with Sony products, raising prices anywhere from 10% to 35% depending on what you’re looking at in terms of product. In other words, it’s either going to be mild or very noticeable.
Any thoughts on the rising cost of being a photographer are welcome in the comments.
We have some other news you can read at this link.
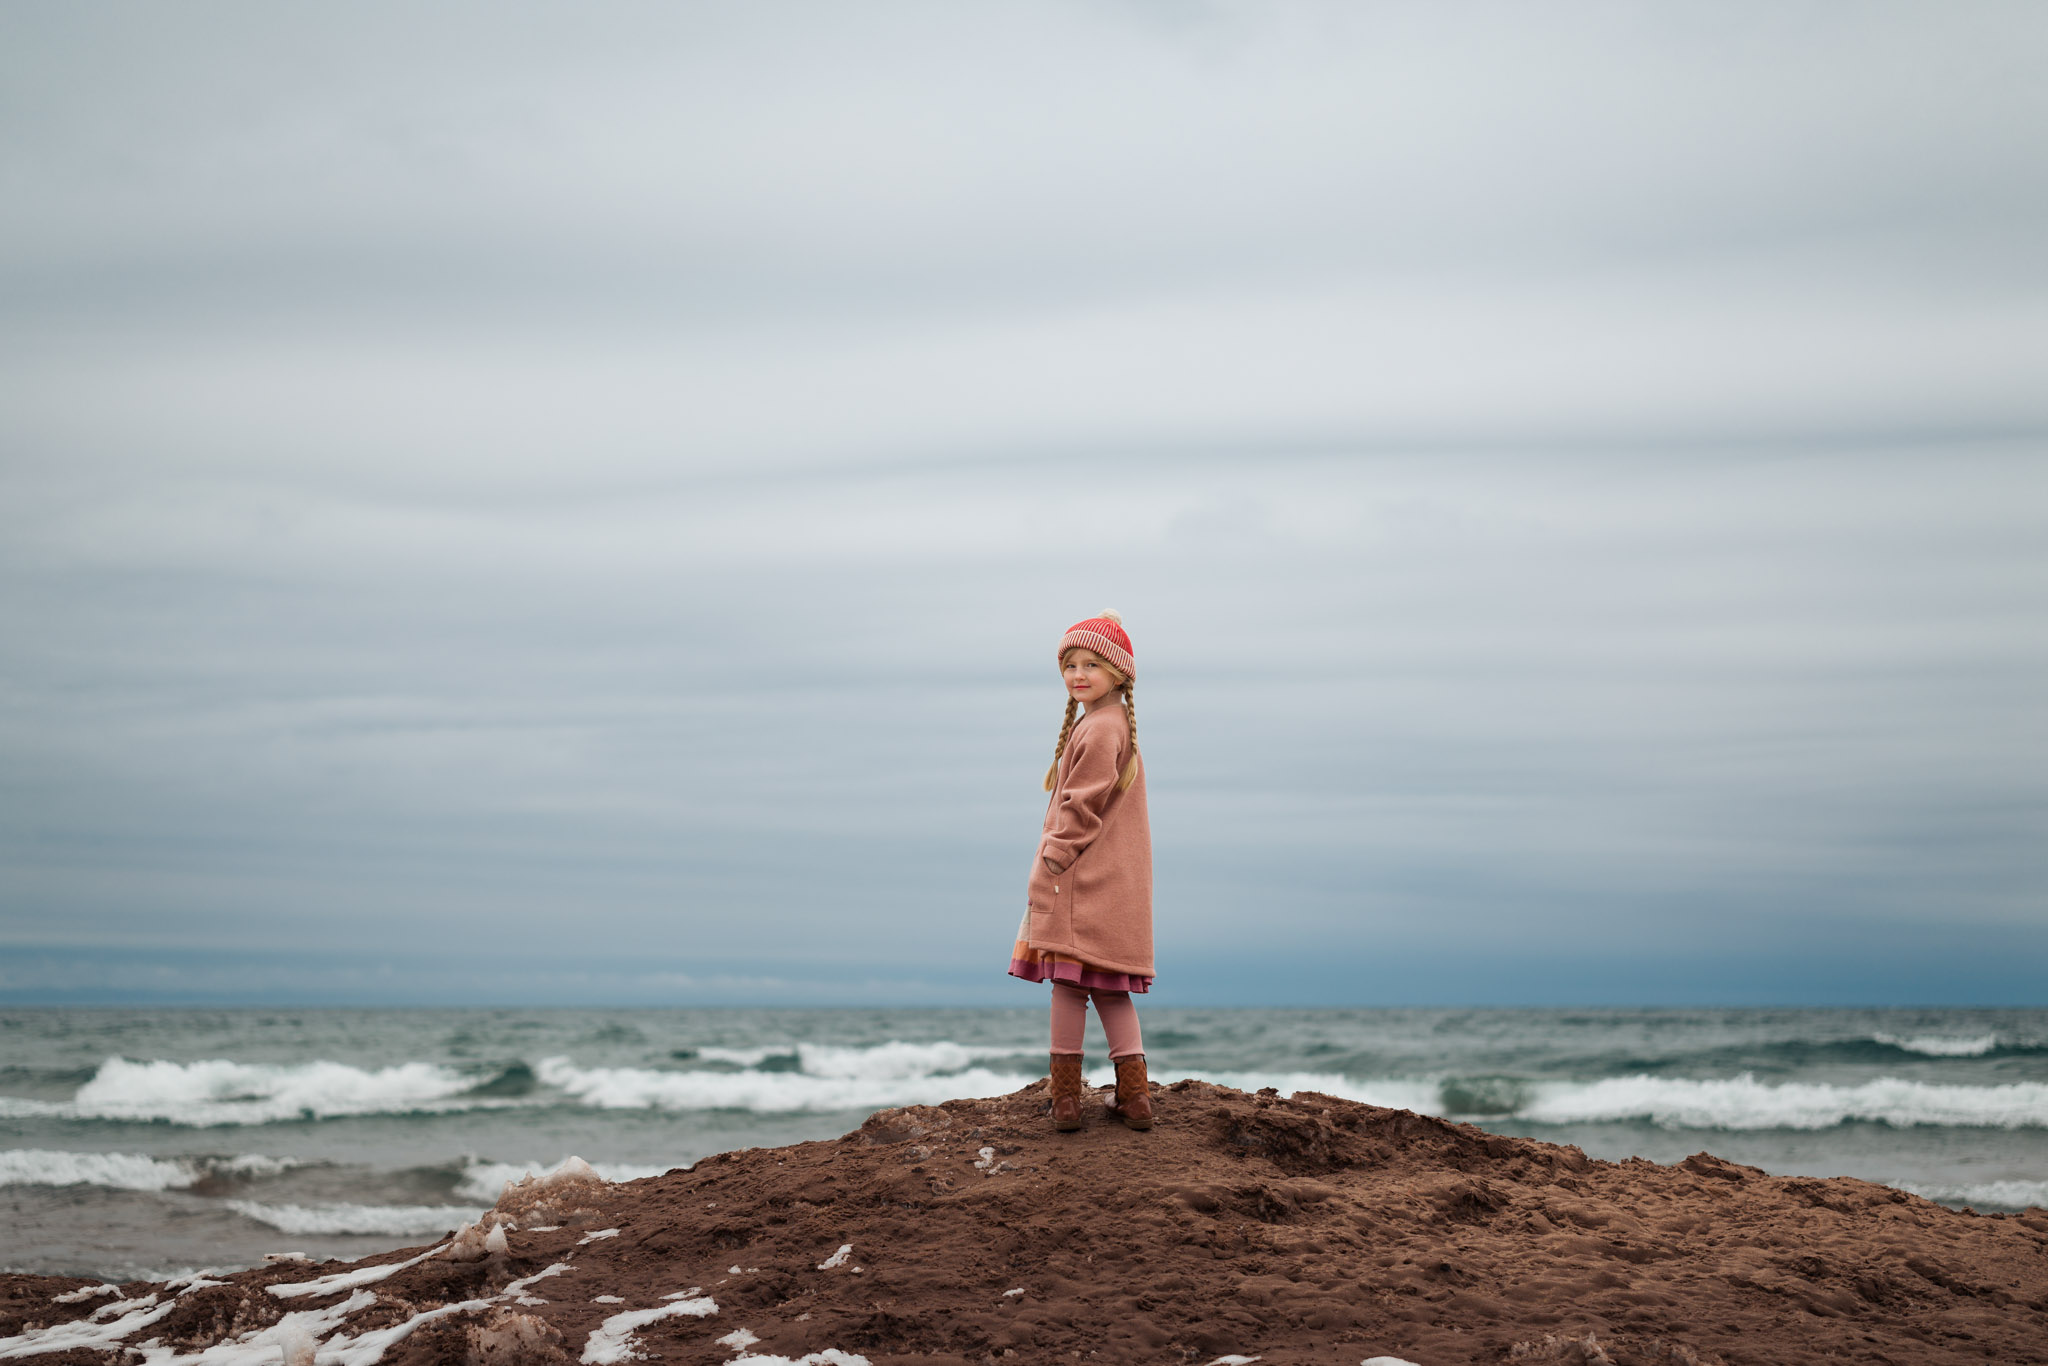
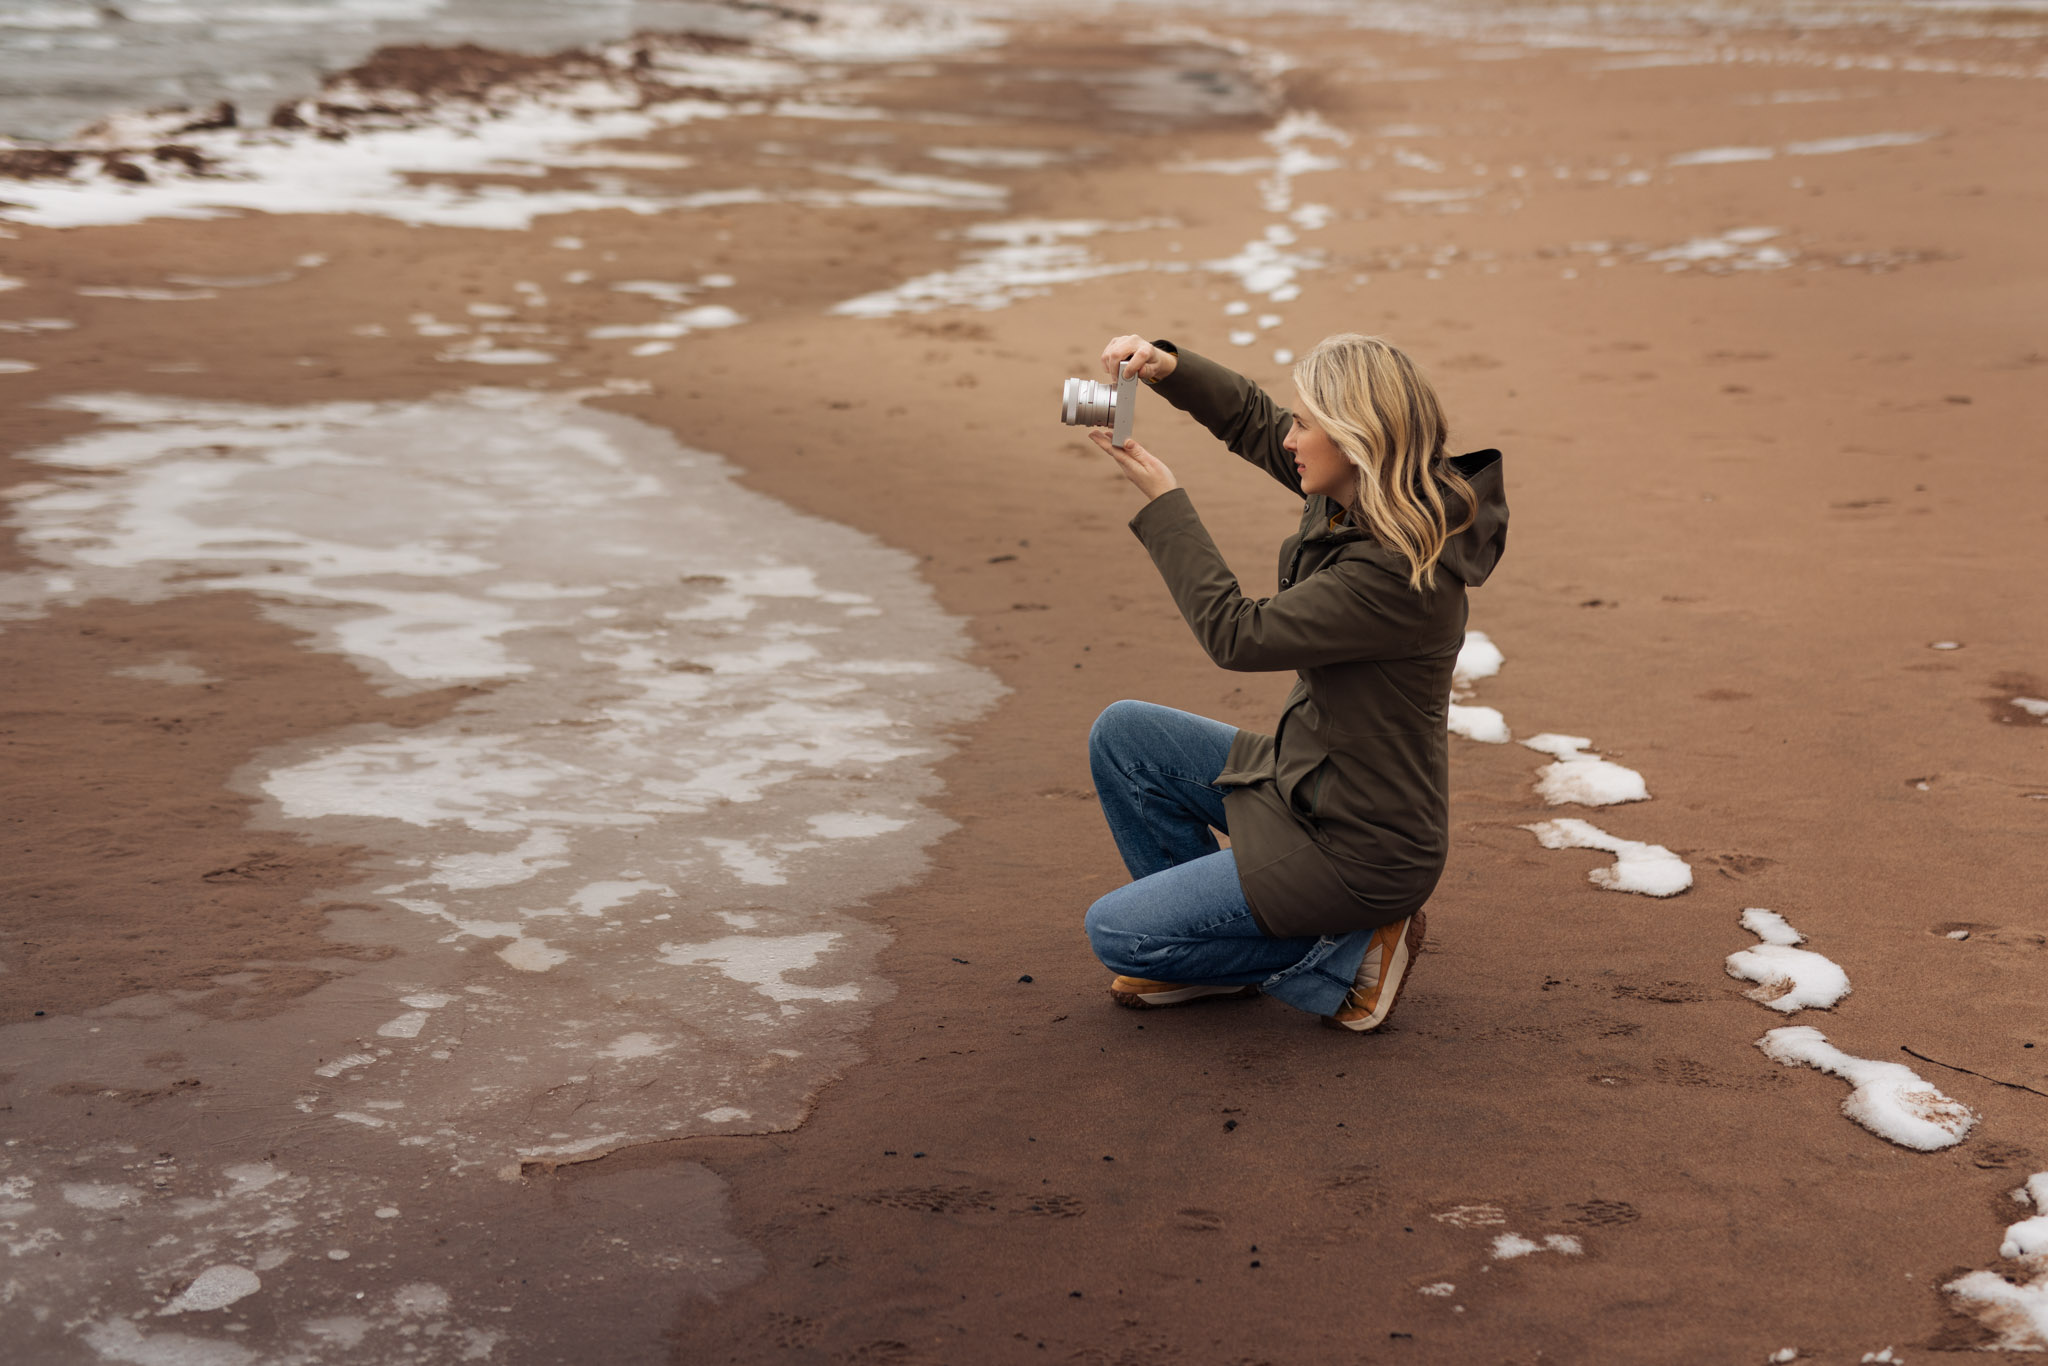
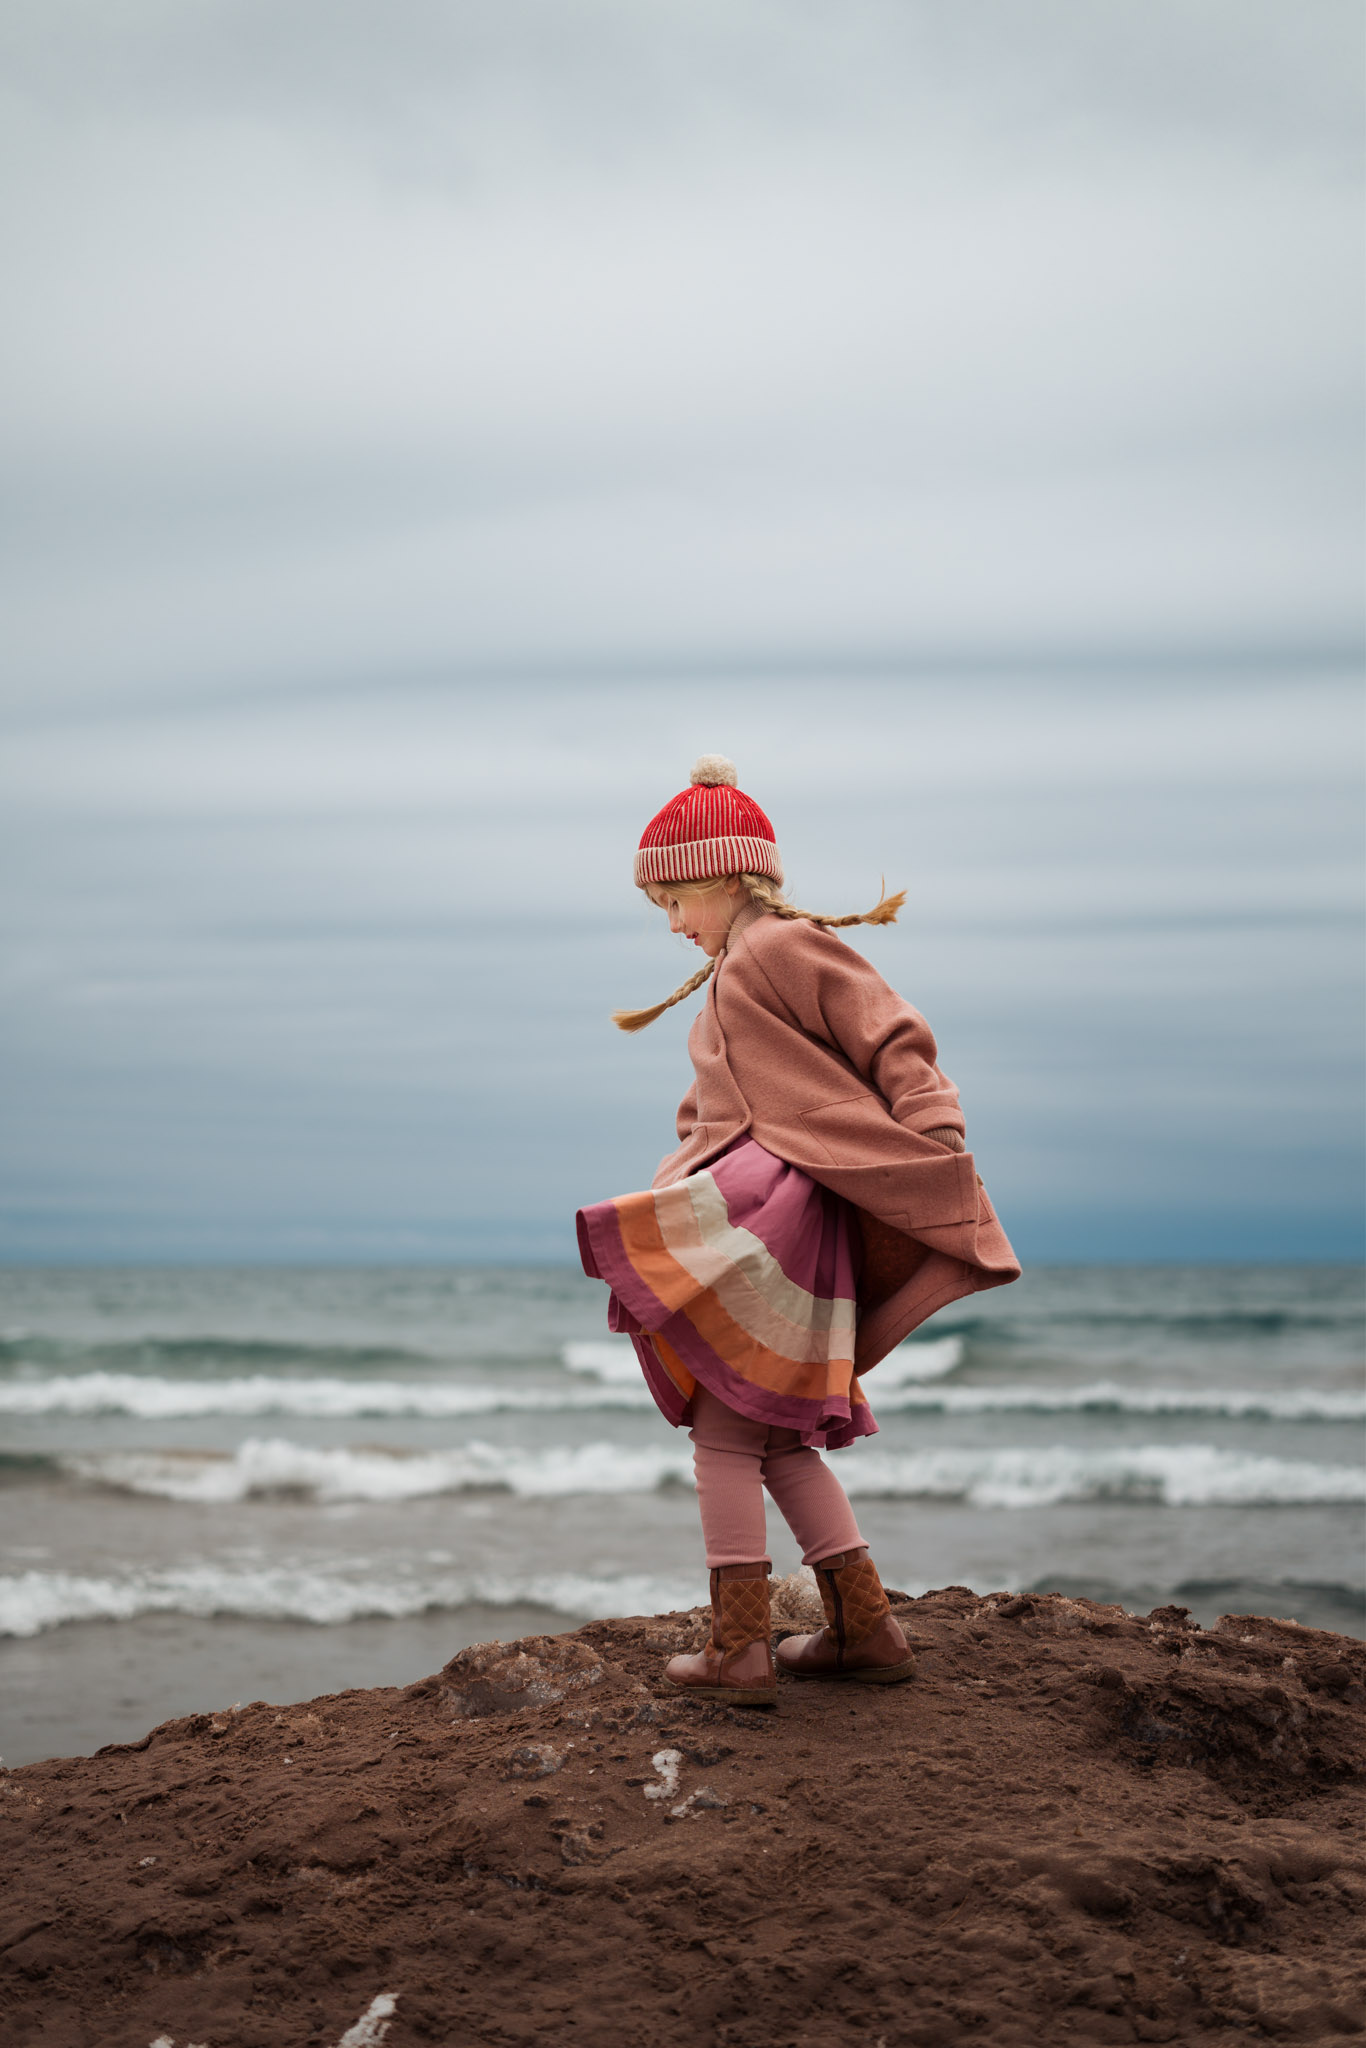
Photographer Meg Loeks with the silver Sigma BF camera and 50mm F2 lens.
What’s not to love about the new BF camera by Sigma? With a strikingly sleek aesthetic, a solid aluminum build, and a minimalist design, it’s as durable as it is intuitive.
When I’m out with my children, I need a camera that feels like an extension of myself. I want it to feel like second nature, effortlessly there for every moment. The BF camera is just that and more. From playful afternoons at the arcade with my son to breezy moments at the beach with my daughter, this beautiful, stylish camera lets me stay present and focus on what matters most.
SIGMA BF CAMERA 50mm F2 DG | CONTEMPORARY F2, 1/200s, ISO 400SIGMA BF CAMERA 50mm F2 DG | CONTEMPORARY F2, 1/2500s, ISO 100
If I had to pick just two words to describe the BF camera it would be sophisticated and effortless. The sleek, modern design is visually appealing. With looks this good, it could double as modern home decor. This camera’s minimalist design ensures it remains effortlessly user-friendly. A camera doesn’t have to be complicated, and Sigma ensures that with a simple yet stylish aesthetic.
The Sigma BF is as durable as it is intuitive.
Compact and lightweight, the body is suited for life on the go, making it an ideal everyday companion. Though lightweight, the camera boasts a sturdy construction and solid build which is especially favorable for a photographer like me who’s often out chasing adventures with my kids in tow.
I’ve always found that composing through the LCD screen gives me a clearer sense of my frame.
One of my favorite features is that there are no memory card slots. The seamless, internal storage design once again makes everything feel effortless. With no cards to manage, it truly keeps things simple and worry-free.
And as someone who rarely ever uses a viewfinder, I also appreciate its omission allowing for a more compact, sleek camera design and modern LCD screen. As a photographer specifically specializing in children’s portraiture, I’ve always found that composing through the LCD screen gives me a clearer sense of my frame. Not to mention, helping me capture key moments without missing a beat.
SIGMA BF CAMERA 50mm F2 DG | CONTEMPORARY F2, 1/2500s, ISO 100SIGMA BF CAMERA 50mm F2 DG | CONTEMPORARY F2, 1/200s, ISO 250
The camera’s continuous capture rate is swift at 8 frames per second. I occasionally found it too quick, in fact, and switched to single capture for more precise control. When my children were on the move, continuous capture was indispensable for freezing those fast-paced, fleeting moments. The autofocus accuracy in low-light conditions, particularly when my son was darting around the arcade, was nothing short of impressive.
The Sigma BF also camera features automatic face and eye detection for both people and pets, enabling seamless subject tracking. What’s more, the function is active by default, further streamlining the friendly user experience.
SIGMA BF CAMERA 50mm F2 DG | CONTEMPORARY F2, 1/200s, ISO 400SIGMA BF CAMERA 50mm F2 DG | CONTEMPORARY F2, 1/200s, ISO 250
For more precise control, I could switch to single point focus whether in single or continuous autofocus modes. While the autofocusing features of this camera are more curated, they’re ideal and efficient for anyone on the go, allowing for more time to stay immersed in the moment rather than fumbling with countless focus settings.
SIGMA BF CAMERA 50mm F2 DG | CONTEMPORARY F2.5, 1/160s, ISO 125
Another feature I genuinely love is the touch screen focusing. It’s something I’ve frequently used in the past, so I was pleased to see it thoughtfully included in this camera’s design.
The BF feels like the perfect travel companion, equally at home when you’re doing everything or nothing at all.
Last but certainly not least, the image quality is outstanding. Given the Sigma BF camera’s minimalist design, I was thrilled by how sharp and detailed the photos turned out. Even in low light conditions, the clarity and definition held up beautifully. I was also really drawn to the camera’s film-like color rendering. It brings a nostalgic, cinematic feel to images that’s intentional and beautiful.
SIGMA BF CAMERA 50mm F2 DG | CONTEMPORARY F2, 1/2500s, ISO 100SIGMA BF CAMERA 50mm F2 DG | CONTEMPORARY F2, 1/200s, ISO 640
SIGMA BF CAMERA 50mm F2 DG | CONTEMPORARY F2, 1/200s, ISO 320
Sigma unveiled nine updated prime lenses that color-match the sleek BF camera to maintain a cohesive look. My go-to portrait lens is the 50mm F2 DG | Contemporary, and I was consistently impressed by its focusing performance in a range of challenging lighting conditions, from low light to backlight, while my children were constantly on the go. The bokeh was smooth and round, adding to the overall sense of magic I was able to capture. From icy mornings in our yard to playful adventures at the arcade, the bokeh quality enhances the overall mood and atmosphere of my images.
SIGMA BF CAMERA 50mm F2 DG | CONTEMPORARY F2, 1/2500s, ISO 100SIGMA BF CAMERA 50mm F2 DG | CONTEMPORARY F2, 1/200s, ISO 640
Though its minimal design is far from ordinary, this camera is perfectly suited for everyday moments. Its thoughtful design and sleek aesthetic make it ideal for those who value both form and function. It feels like the perfect travel companion, equally at home when you’re doing everything or nothing at all. There’s beauty in keeping things simple, and Sigma makes that possible with the BF camera, letting you stay immersed in the moment rather than gadgets and settings.
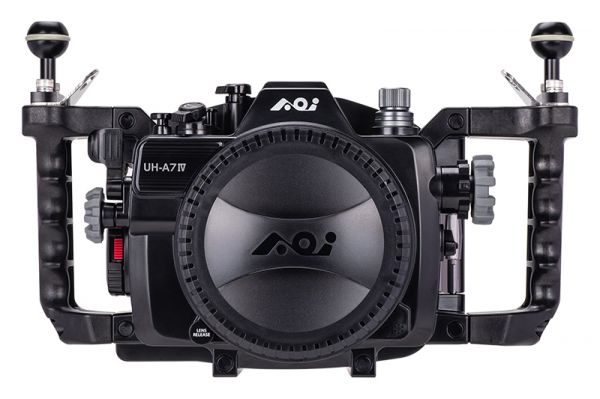
AOI has announced its new housing for the Sony a7 Mark IV—the latest version of the Japanese company’s entry-level full-frame mirrorless camera. The Mark IV is built around a 33MP BSI-CMOS sensor and the Bionz XR processing engine, offering 10fps continuous shooting with AF/AE tracking and 4K/30p 10-bit 4:2:2 video with no crop. The UH-A7IV housing represents exciting new territory for AOI, which has previously only supported Micro Four Thirds cameras from Olympus and OM System, and makes sense given the newly released UIS-P1 strobe offering compatibility with Sony TTL.
The new housing is clearly designed to offer a compelling alternative to sophisticated but pricey aluminum housings or polycarbonate housings with only basic functionality. Controls are ergonomically positioned around integrated handles, there’s a built-in vacuum check and moisture detection system, and the non-proprietary AX port system means that ports and extensions for a variety of lenses are readily available. The housing features two fiber-optic ports and ships with an LED flash trigger supporting manual mode and Sony TTL (TTL, HSS TTL) with AOI’s UIS-P1 strobe as well as Backscatter’s Hybrid Flash.
A unique feature that sets the housing apart is the “Smart Multi Control Device,” which allows the user to switch between manual and TTL flash modes and features a miniature display that offers useful at-a-glance information about the flash modes and from the water depth monitor and the Vacuum Analyzation and Wet Detection System (VWS). The device uses a built-in rechargeable lithium polymer battery that takes 90 minutes to charge and allows for 18 hours of continuous operation.
Available now from retailers such as Backscatter, the AOI UH-A7IV is priced at $1,400.
When purchasing underwater photography equipment like the products mentioned in this article, please support DPG by supporting our retail partner—Backscatter.com.
PRESS RELEASE
New AOI UH-A7IV, Harnessing the Alpha Advantage Filling the Gap
For many users, the biggest hurdle in underwater photography is the extravagant cost of underwater housings for high-performance cameras, often priced at two to three times the cost of the cameras themselves. On the other hand, affordable housings available in the market frequently lack the reliability and features that inspire confidence. This leaves users with difficult choices: delay their plans, compromise on their ideal setups, or settle for less-than-optimal systems.
AOI has successfully carved a niche by offering high-performance underwater housings that combine user-friendly design, full functionality, and affordability for OM System cameras. Now, AOI aims to bring the same excitement and value to Sony camera users.
The Sony A7IV, though a few years old, remains a smart choice for many photographers. Known for its versatility, the camera boasts a high-resolution sensor, fast and reliable autofocus, and excellent dynamic range—all at a reasonable price in the full frame mirrorless segment. These qualities made it one of the most popular full-frame mirrorless cameras on the market, and it continues to hold its own against newer competitors.
Introducing the NEW AOI UH-A7IV Underwater Housing
The new AOI UH-A7IV underwater housing bridges the gap in the market for Sony A7IV users who find current options either too expensive, too basic, or both.
Accessing the Alpha Advantage
Camera manufacturers invest heavily in innovation, crafting modern cameras to meet diverse user needs. AOI’s design philosophy complements this vision by ensuring that its underwater housings are more than just waterproof enclosures—they are extensions of the cameras themselves.
The 3C’s of AOI’s design philosophy—Creative, Compatible, and Consumer-Centric—shine in the UH-A7IV.
Creative
Rechargeable Smart Multi Control Device with Mini Display: Clear instructions and status updates for various operations, including flash modes (manual and TTL), depth mode, VWS mode, alerts, control device battery status and depth indicator. To improve reliability and connectivity between the camera’s hot shoe and the housing’s Control Device, AOI has upgraded a cable-less connector.
Sony TTL and HSS Compatibility: Seamless integration with the AOI UIS-P1 strobe and Backscatter’s Hybrid Flash.
Improved VWS: The Vacuum Analyzation and Wet Detection System now incorporates an over-ride mechanism, to ensure proper vacuum sealing is conducted to prevent errors.
Built-in Ergonomic Handles: Easy access to buttons and effortless handling.
Compatibility
Non-Proprietary Port System: By utilizing a popular port system, a wide range of ports and extensions for different lenses are readily available.
Standardized Mounts: Compatible with aftermarket and AOI accessories including plug type ports for fiber optic connectivity.
Service-Friendly Design: Uniform buttons and O-rings simplify maintenance.
Consumer-Centric
Full Camera Functionality: Provides access to all key camera features.
Affordable Pricing: Lowers the barrier to entry for underwater photography for a full frame mirrorless camera.
User-Focused Engineering: Lightweight, travel-friendly, and easy to maintain.
Crafting an underwater housing is both an art and a science. AOI’s UH-A7IV embodies this harmony, balancing the capabilities of the Sony A7IV with the practical needs of photographers. The result is one of the most complete and user-friendly housings AOI has ever produced.