برچسب: Photo

  • Kaya and Blank do not want to offer one-dimensional answers – A Photo Editor

    [ad_1]

    We had the pleasure of chatting with Kaya & Blank about their latest project, Intermodal. Their salted prints don’t dramatize—they speak with crisp, architectural clarity. Paired with the nighttime footage of shipping ports, their work turns industrial sprawl into a sensory, mesmerizing experience.

    Heidi: Intermodal captures monumental operations in a minimalist way. As photographers, how do you decide when to let scale speak for itself versus when to intervene with framing?
    Kaya and Blank: We tend to approach these sites with a sense of stillness rather than trying to dramatize them. The scale of the ports is already overwhelming, with endless cranes, container stacks, and ships, so often our role is simply to frame the scene in a way that allows the scale to register without distraction. At the same time, we think carefully about vantage points, how much of the surrounding environment is visible, and how the image is layered. Sometimes bringing in an extreme close-up, like the corner of a container and the dust it expels when being stacked, or a tight shot of the cable systems that, when looked at closely, resemble waves, can shift the way a viewer reads the space.
    When we first started filming for Intermodal, we were not able to film much that made us feel truly excited. After several nights of filming and reviewing the footage, it felt like something was missing. We eventually decided to invest in an extreme telephoto lens, and that completely changed the perspective. The way the lens compresses distant layers became the perfect visual equivalent of what ports do to the world; they collapse space. And once we found that look, the video component of Intermodal really began to take shape.
    We do not usually think in terms of narrative when we edit, but we do work toward a sense of flow. The video is shaped with certain key points, like a beginning and an end, and the end point often defines how the structure unfolds. We think in chapters rather than isolated scenes, allowing each segment to develop its own tone and rhythm while still being part of a larger whole. The connections between these chapters are built visually, through echoes of motion, color, or atmosphere, rather than through plot, inviting viewers to navigate and assemble their own experience of the work.

    The Port of Los Angeles can feel like a fortress, especially at night. Were you surprised by how much access you were able to get?

    Yes, absolutely. The first time we filmed in the ports was actually for our previous project, Crude Aesthetics. There are several oil derricks inside the port area, and that is what first brought us in. While it is true that most of the port is inaccessible, there are public parks, waterfront walkways, and fishing piers tucked inside the industrial zones. Over the two years we worked on Intermodal, we returned to some of these spots again and again, usually in the middle of the night, to capture the operations. Over the course of two years, we only ran into access issues once, which is remarkable given the scale and security of these sites.

    Photography has always been about light transforming matter. Your processes range from bitumen to salt and UV light. How does your process push against the digital era?

    Our interest in these processes come from making the materiality of the image part of the work. Historical processes like heliography (bitumen) and salted paper printing remind you that a photograph is not just an image, it is a physical object shaped by chemistry, light, and time. Each print can have unpredictable qualities, shaped by the environment and the materials at hand.
    Filming digitally and creating photographic objects require two completely different modes of engagement. All of our video work is filmed at night, while the photographs for the salted paper prints are taken during the day. In a way, that separation echoes the relationship between digital and analogue, they are as different as night and day, yet part of the same cycle, and together they form a more complete picture of the subject.

    19th-century salt prints were about light, time, and trace minerals. Your salt prints were created using water collected from the Port of Los Angeles. How did the chemical or environmental qualities of that water influence texture and unpredictability of the prints?

    The port water definitely had an influence. It carries sediment, minerals, and pollutants that interact with the chemicals in subtle ways, sometimes creating speckling, sometimes altering the tonality. It is not something you can fully control, which is part of the appeal.
    When we first started working with salt prints, we tried dipping the paper directly into the port water. That much salt built up in the fibers created results we did not enjoy, the images lost too much contrast and sharpness. It became a back-and-forth question, how much of the site do we let into the process, and how much control do we want to keep? We eventually settled on brushing the port water onto the paper in the studio. That gave us a balance we liked, the physical presence of the place still embedded in the print while making it light sensitive, but with a lot more clarity and contrast.

    How did using your still photography embed movement into a transient subject?

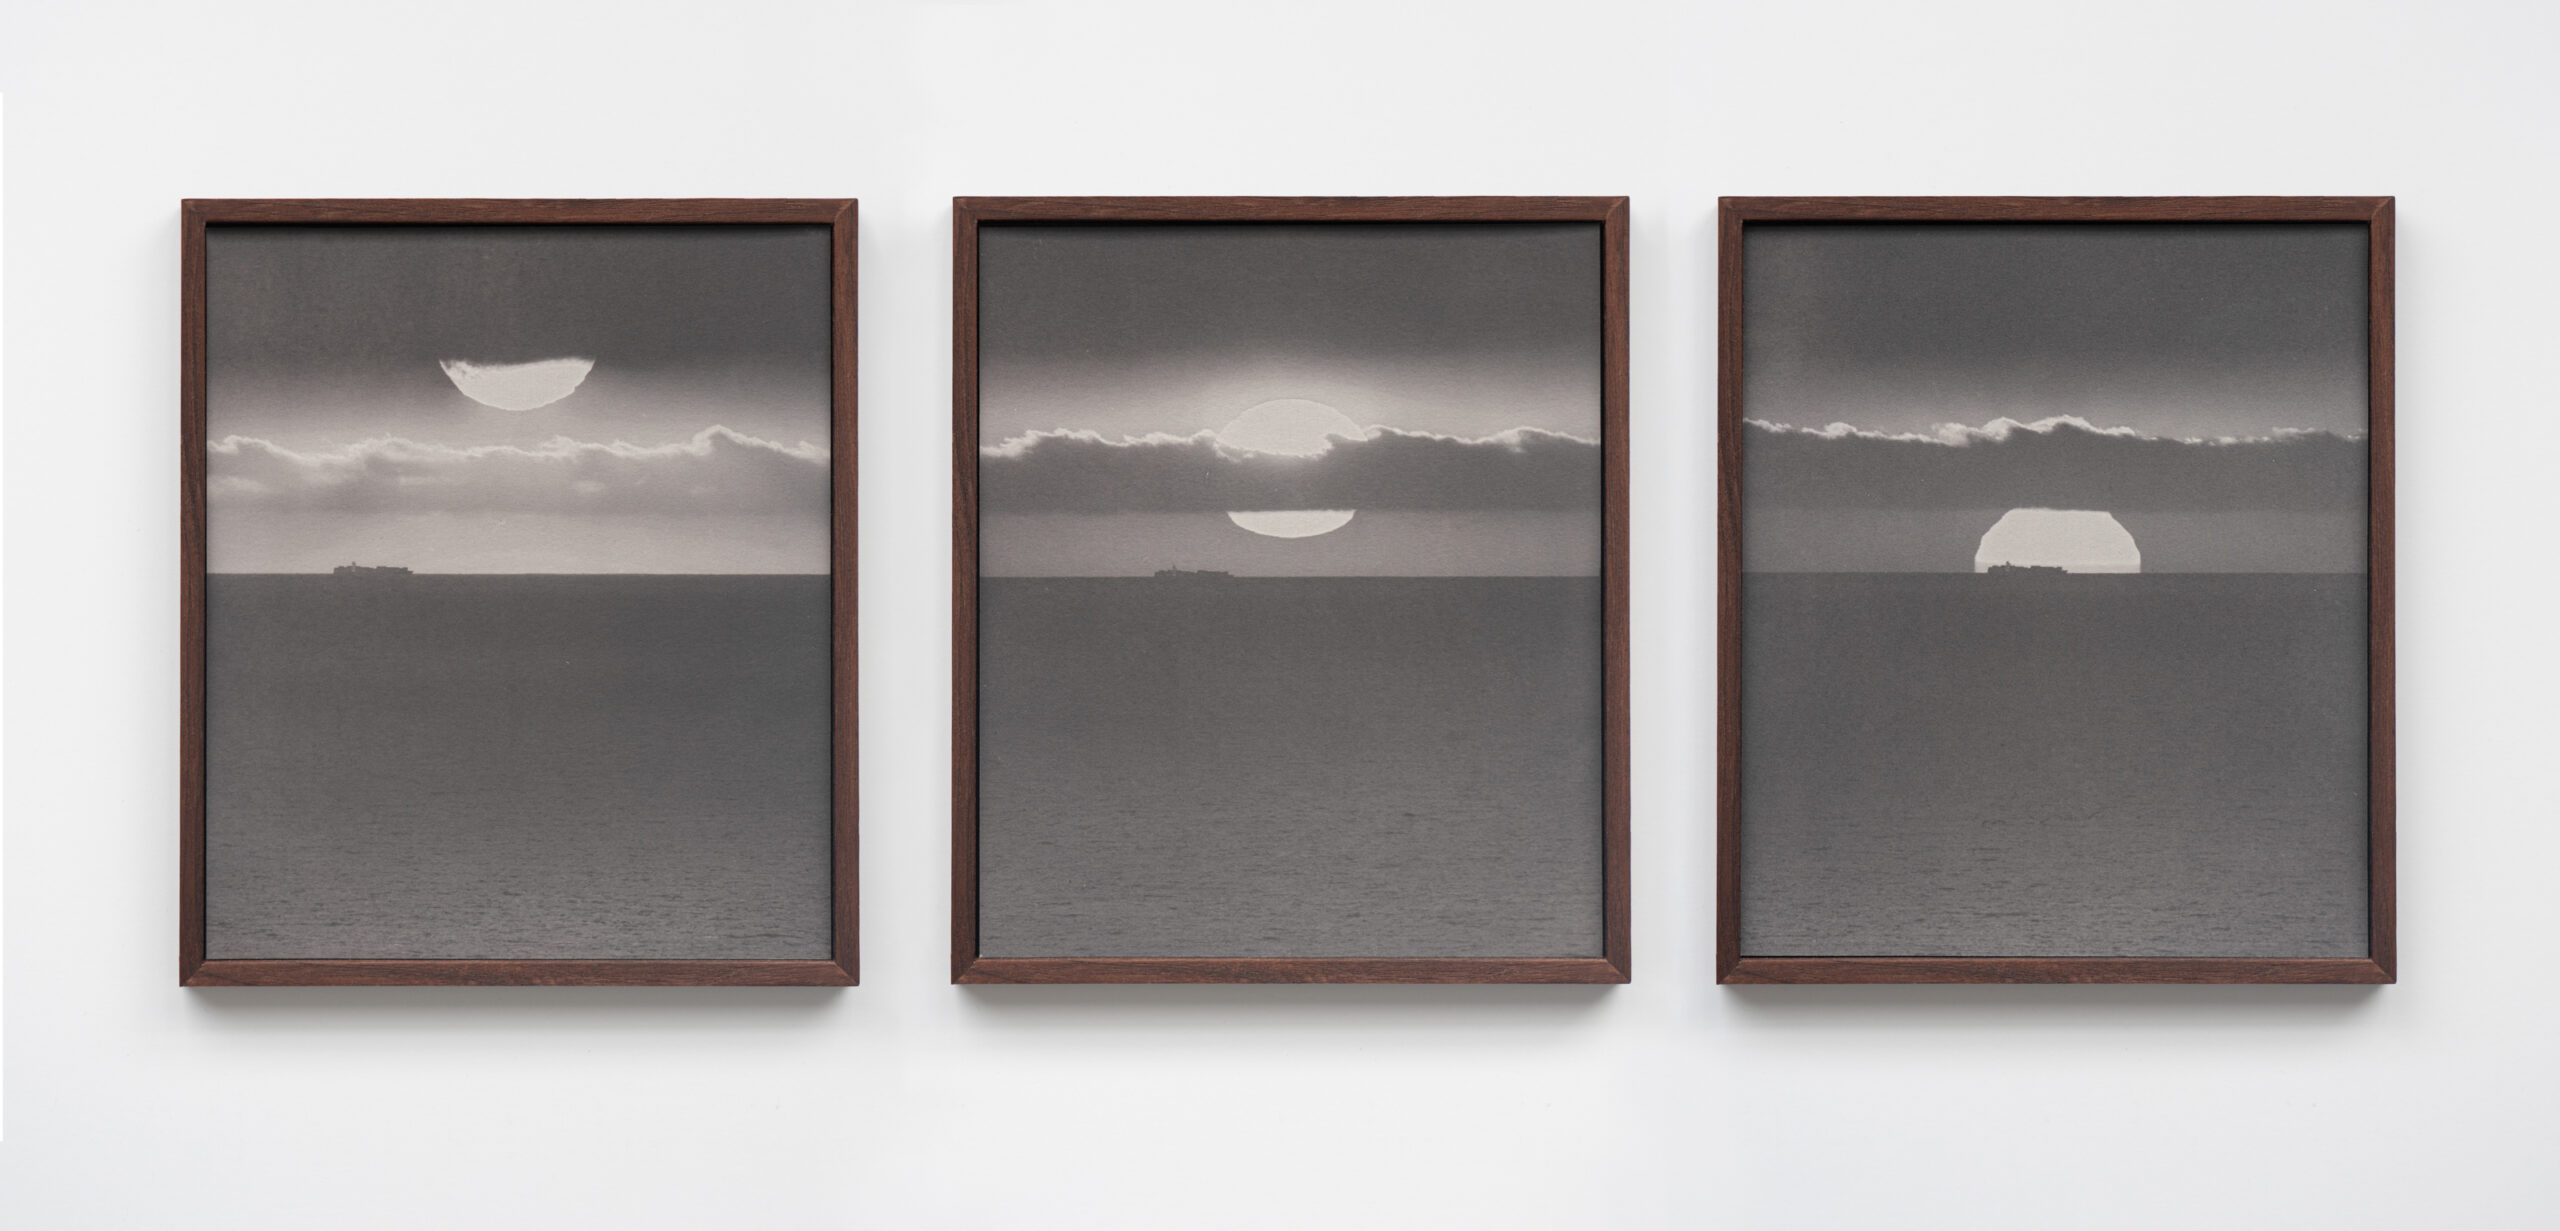
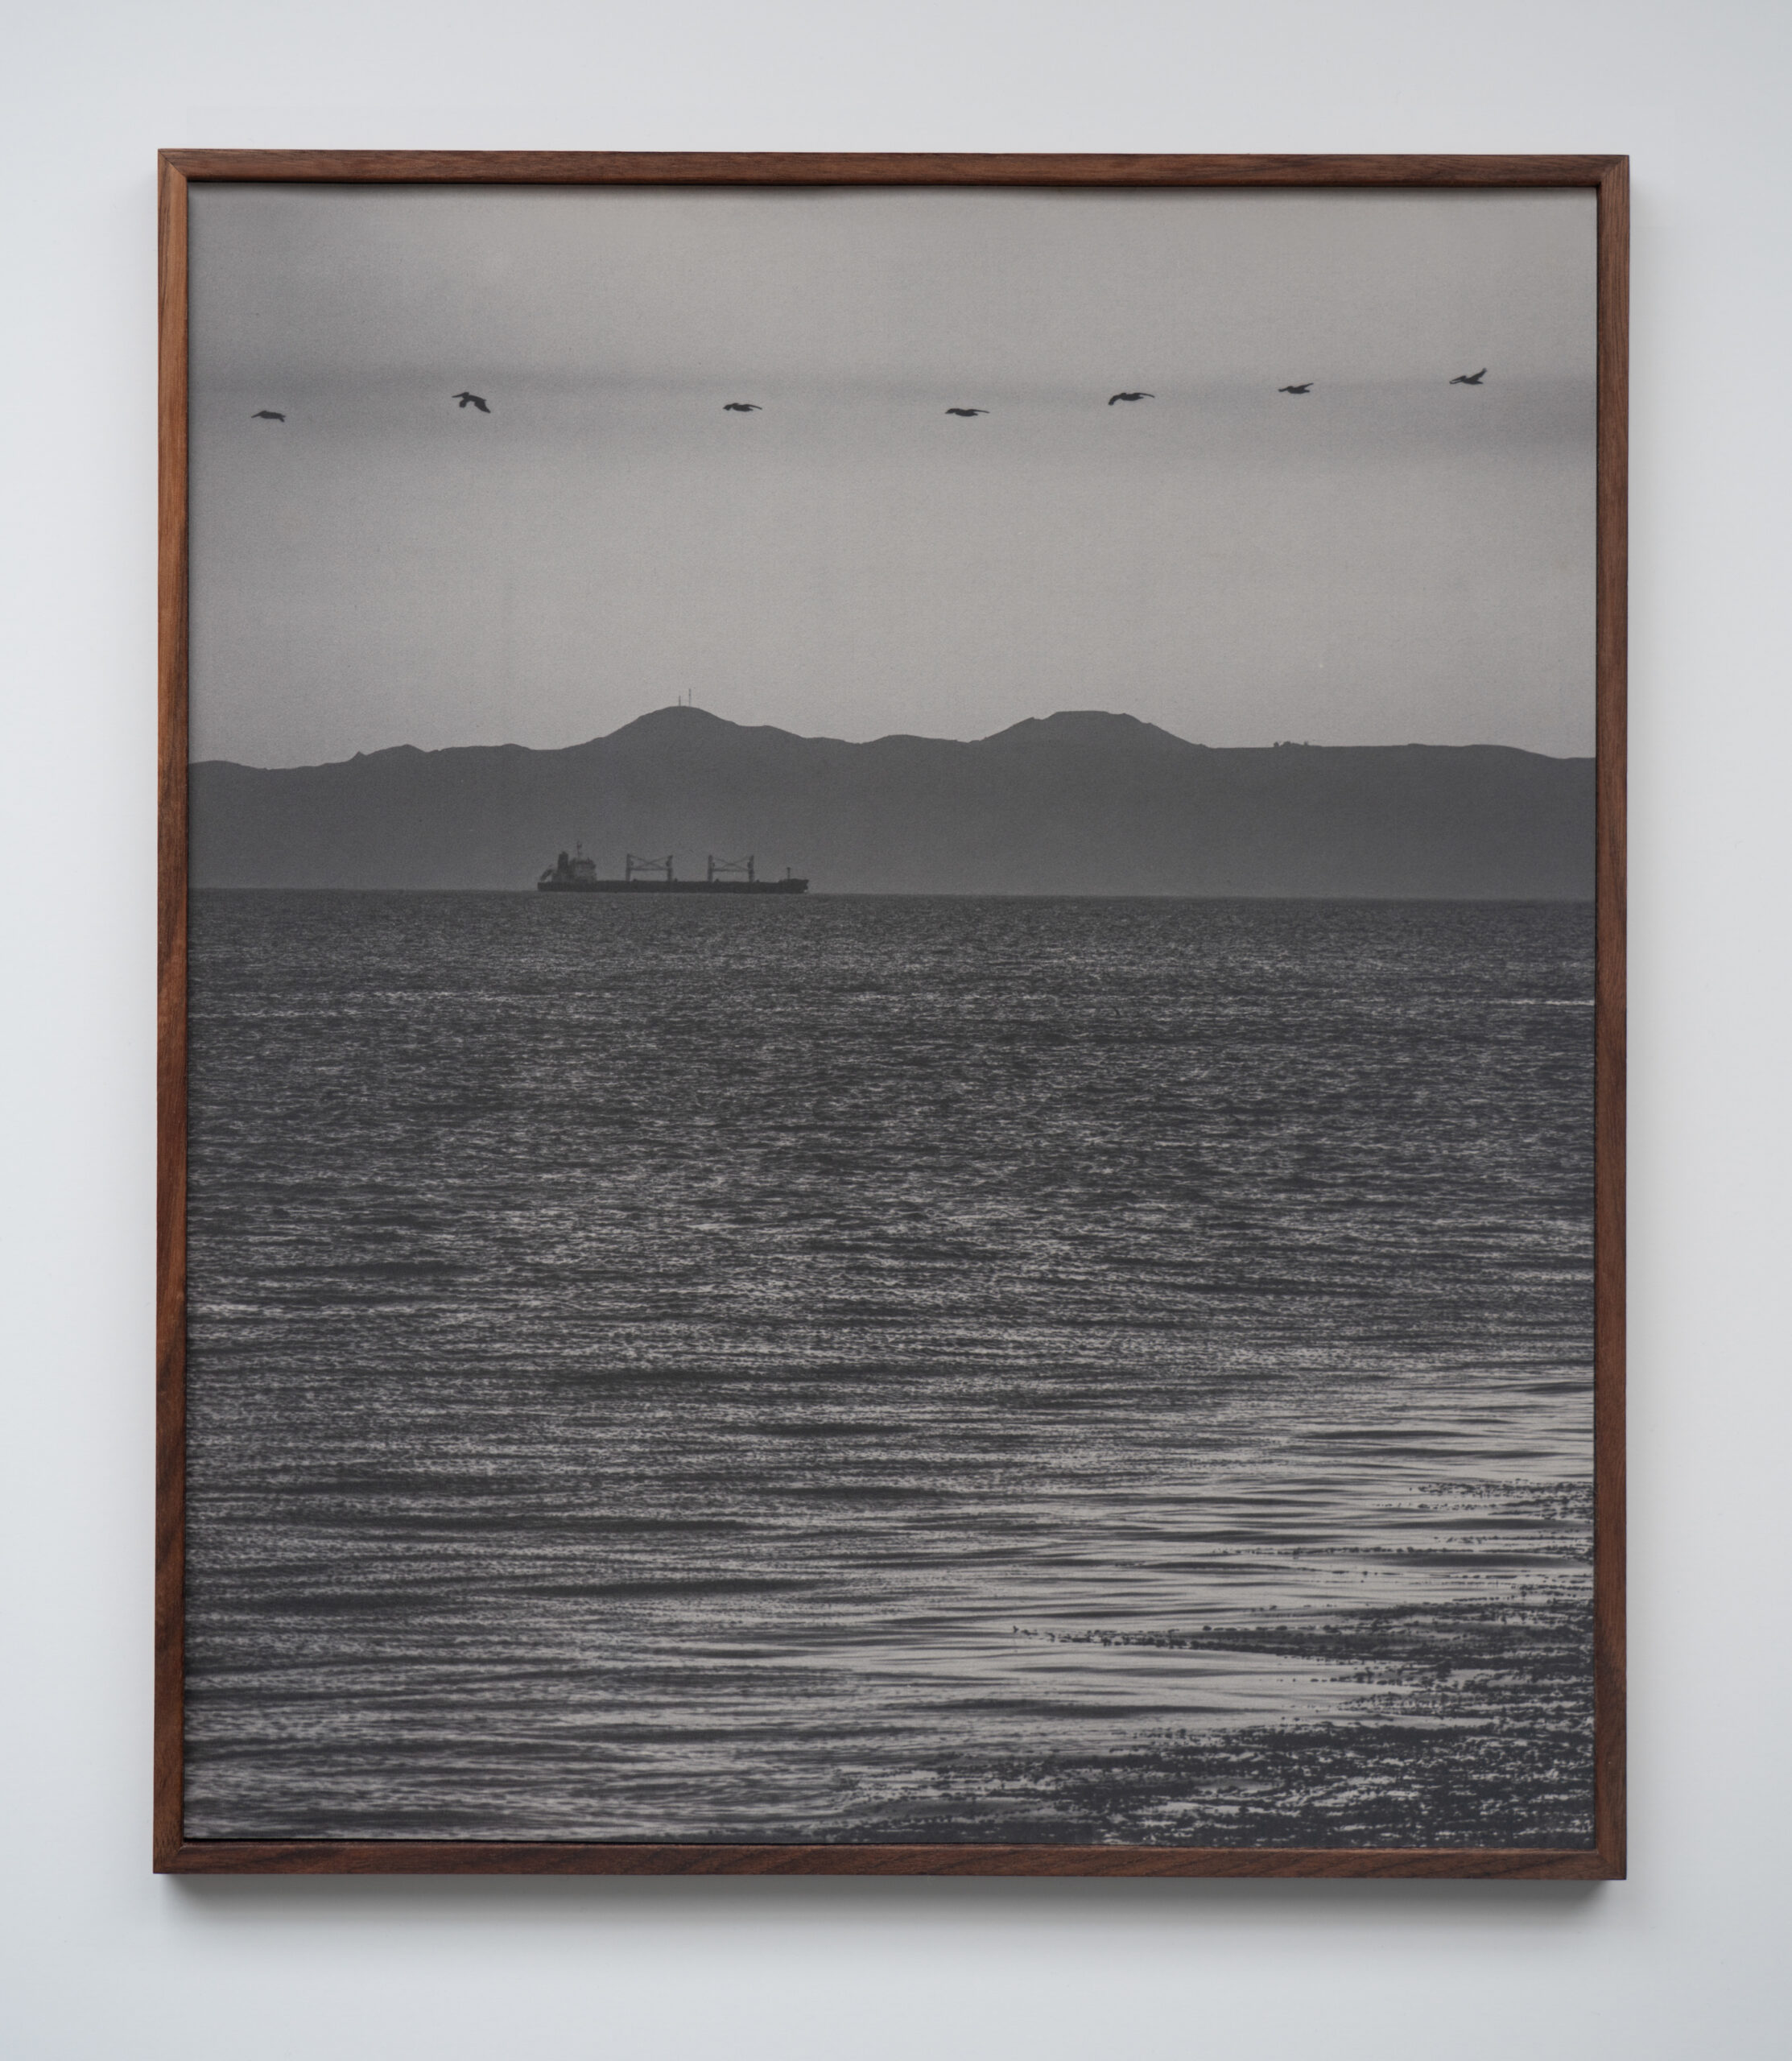
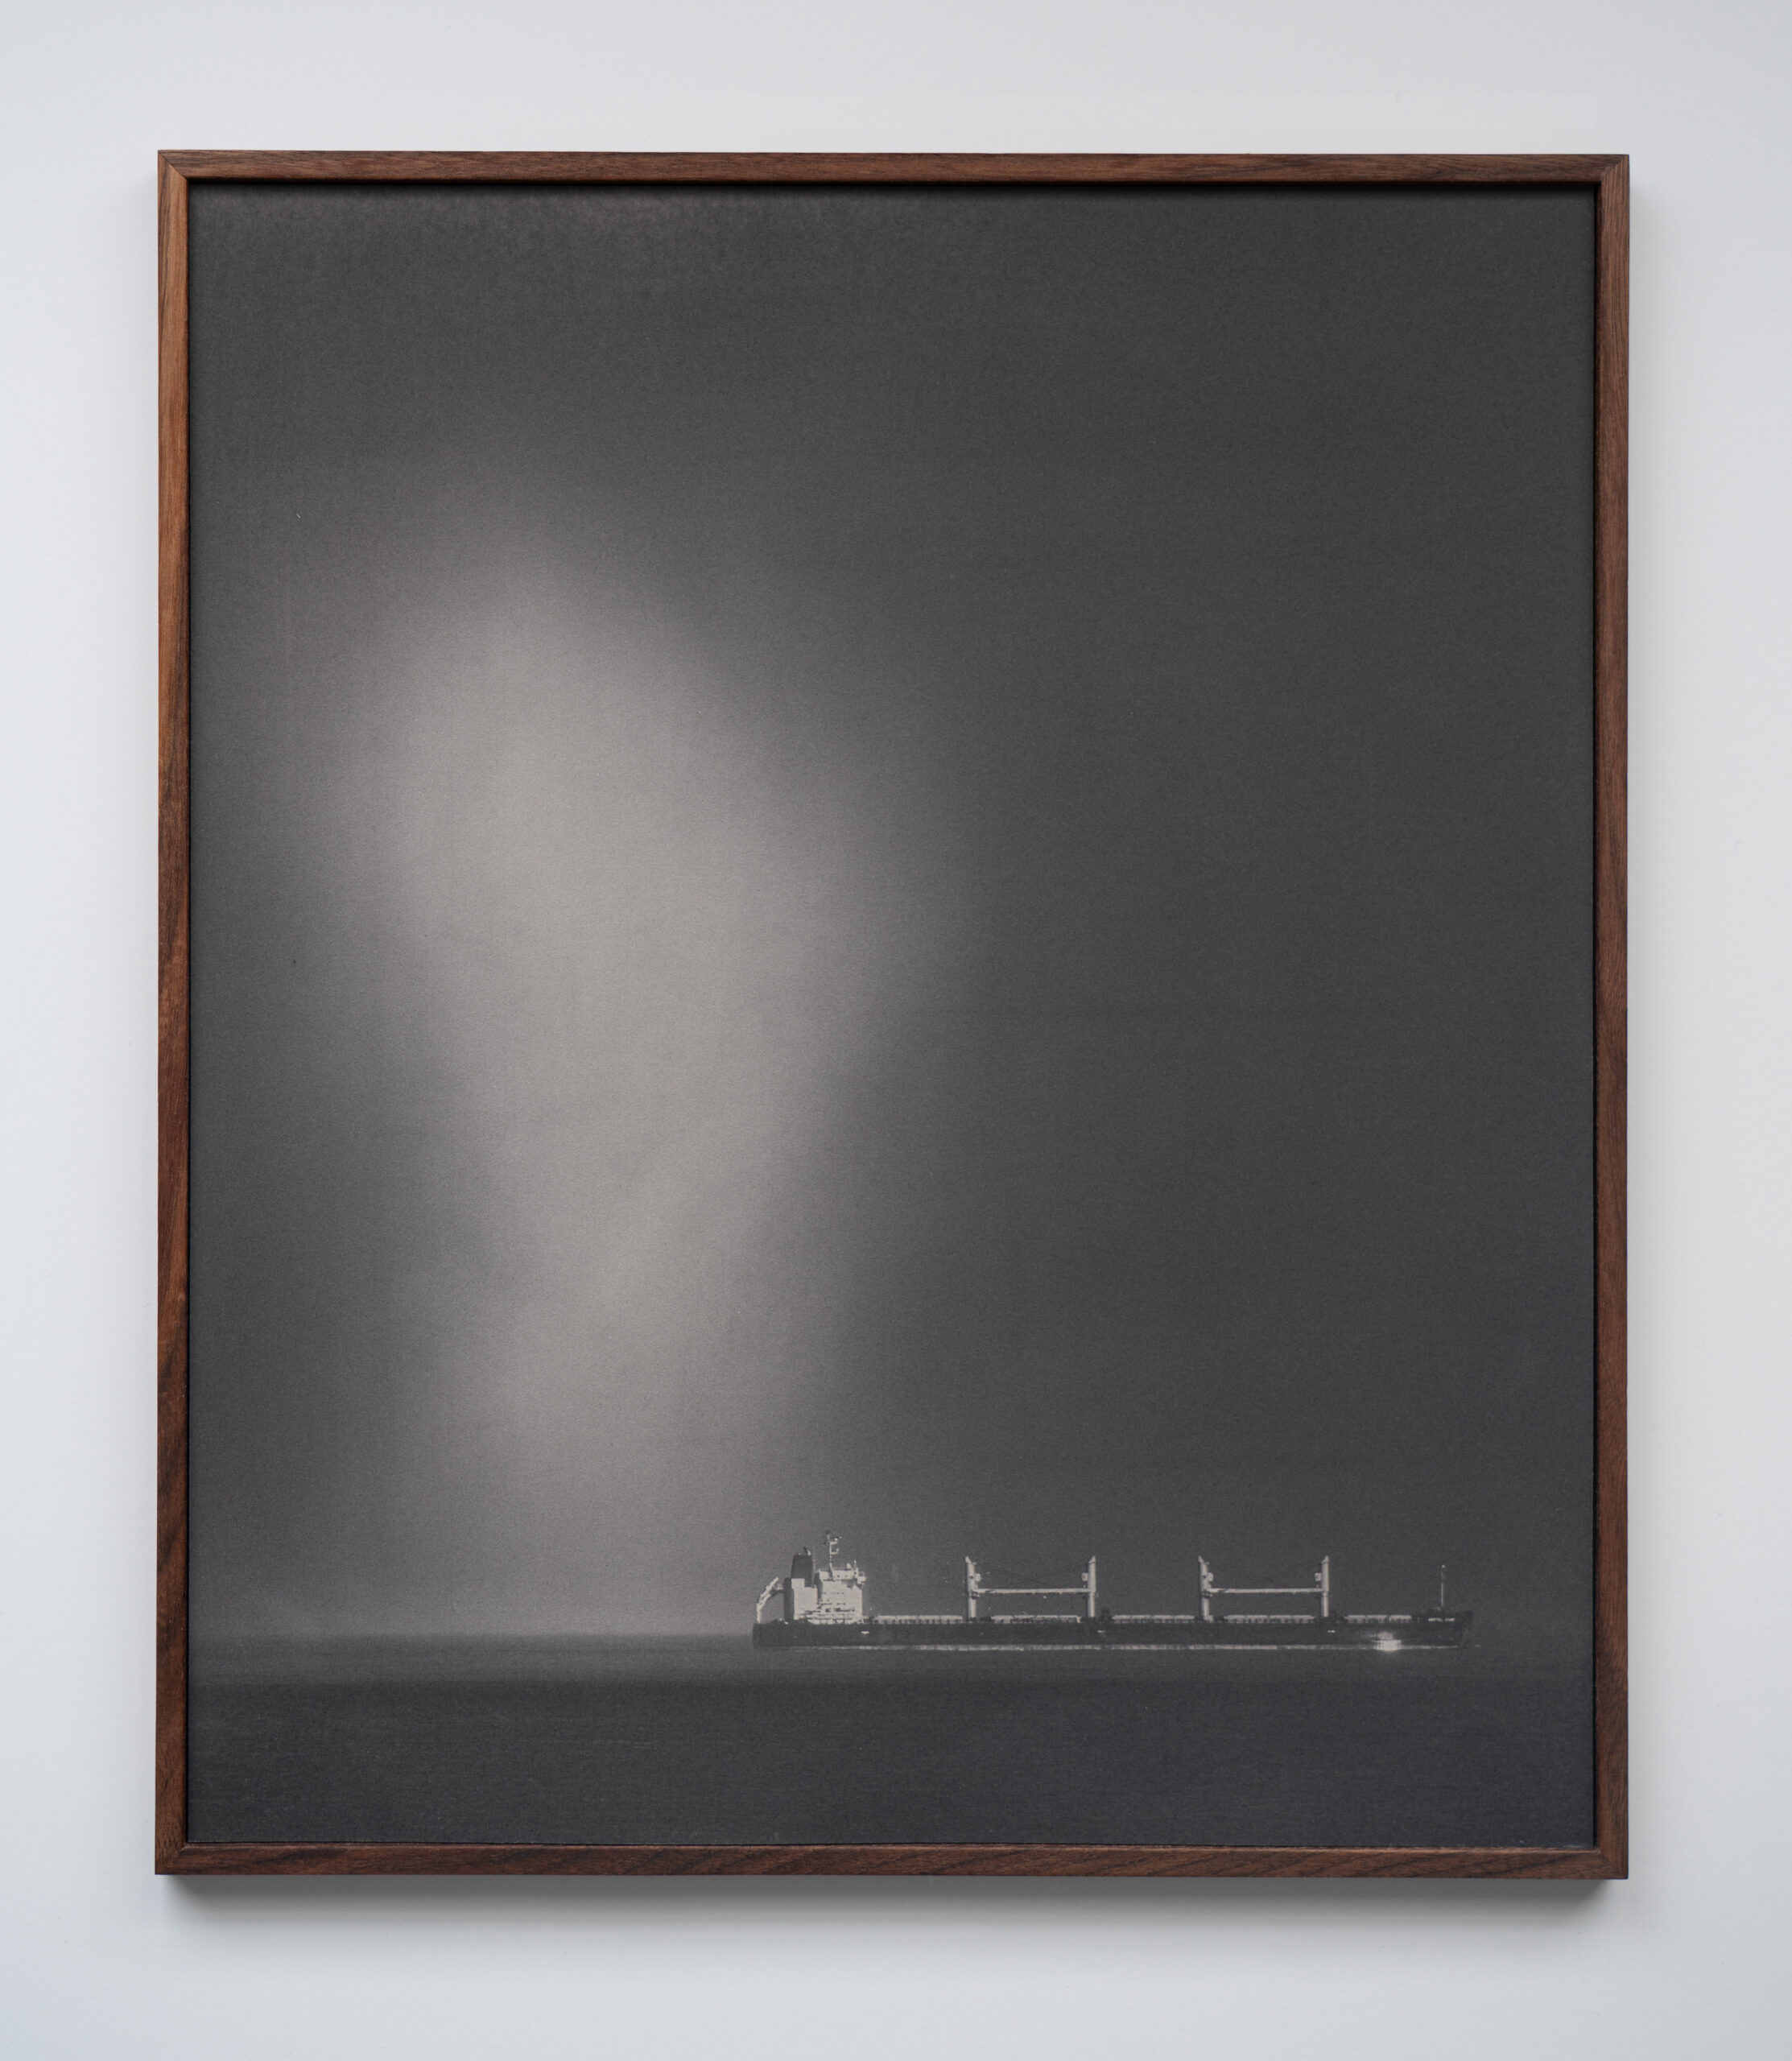
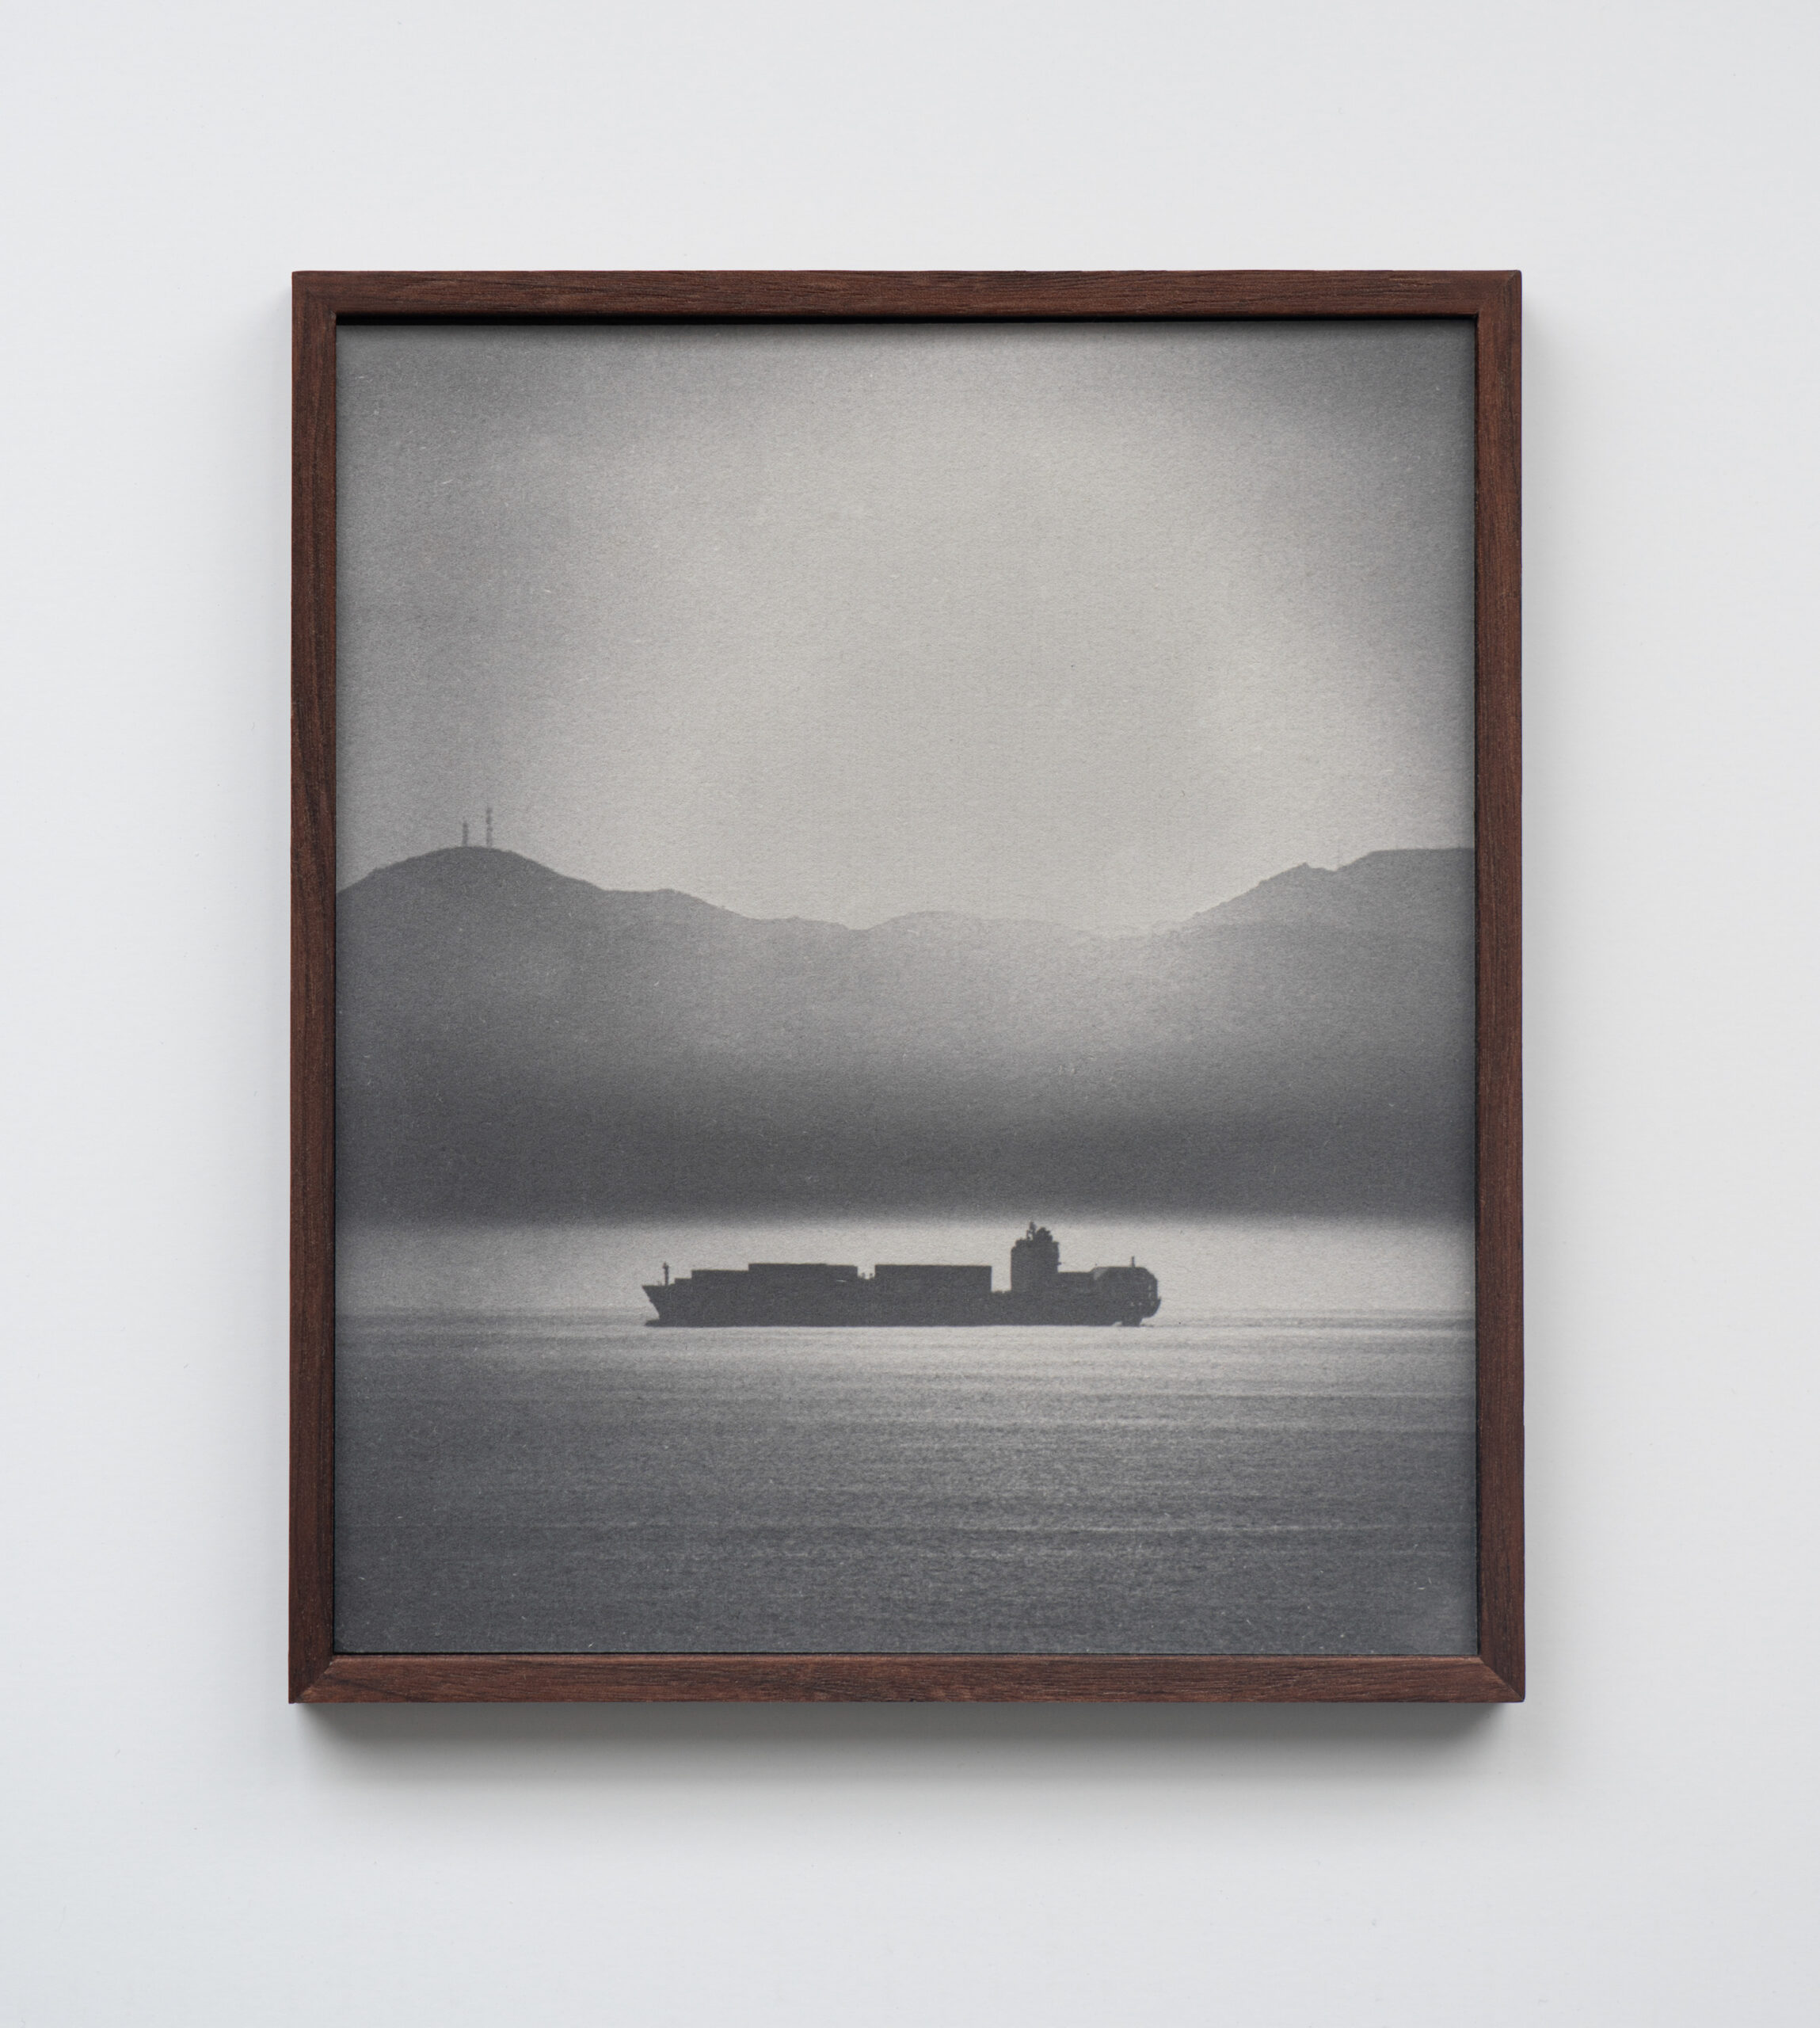
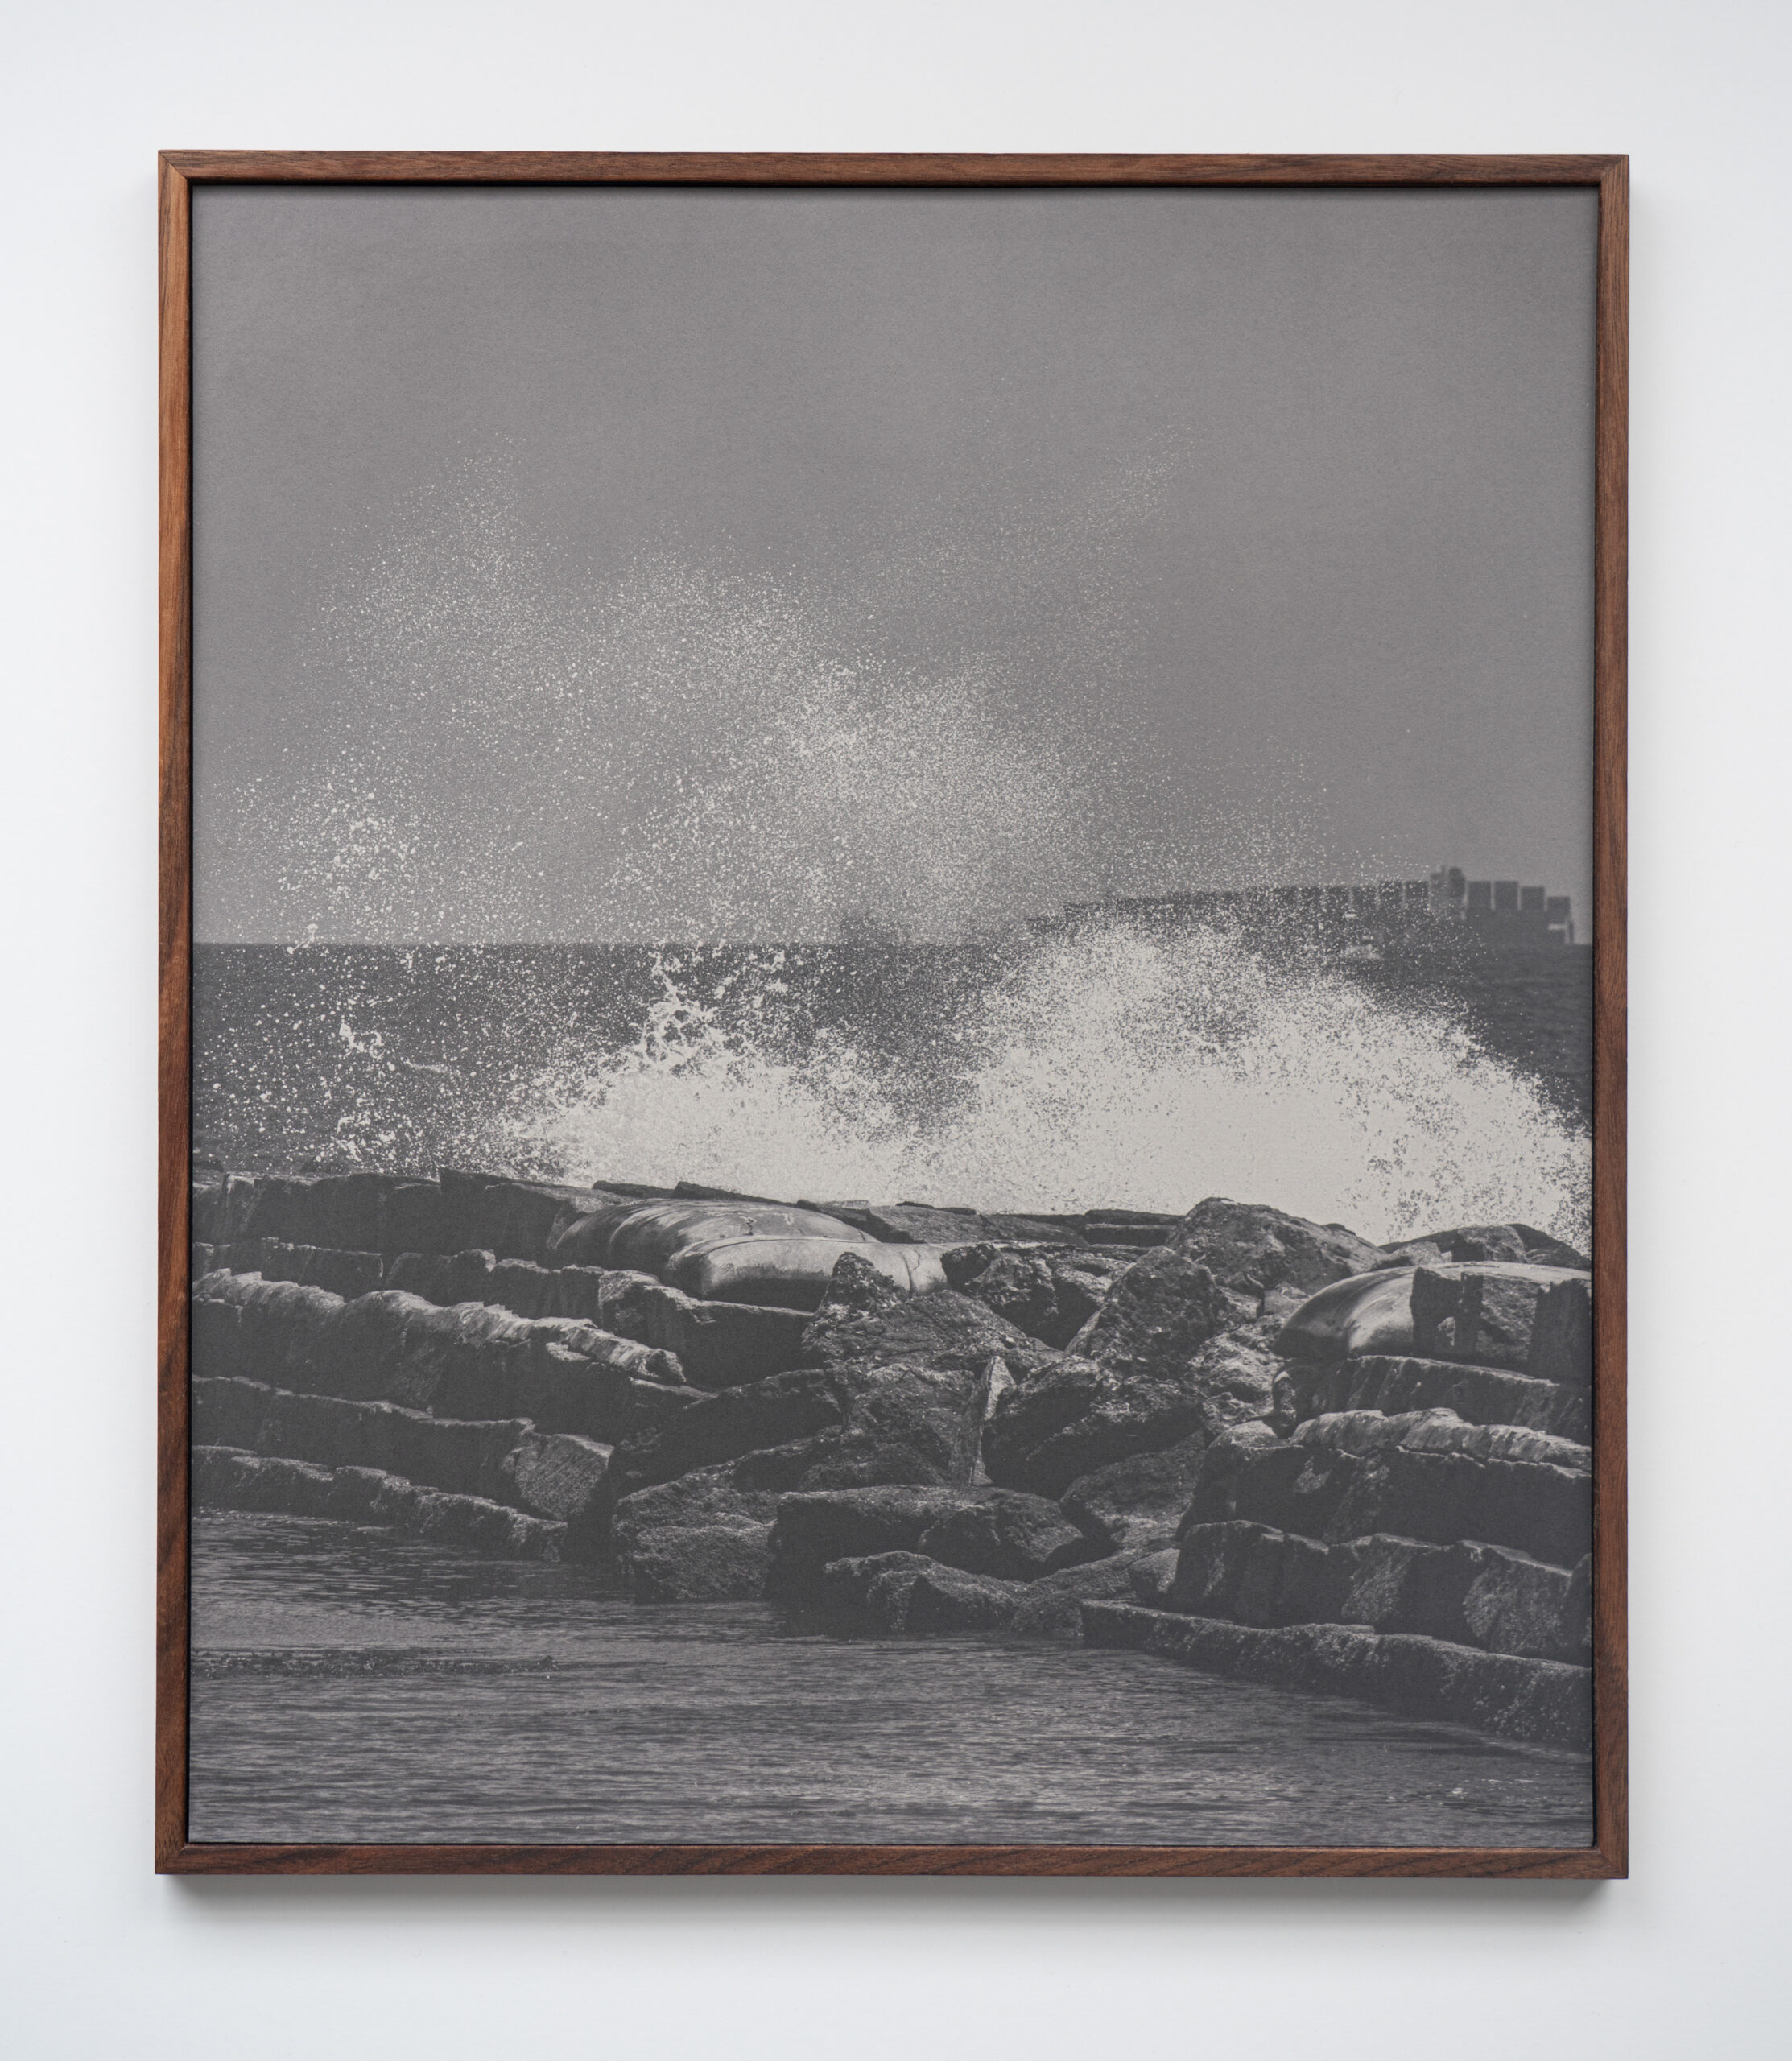
    The installation is divided between the video, which shows the intermodal operations of containers being loaded and unloaded up close, and the salted paper prints, which return the focus to the land, or rather, the seascape. The video places you in the midst of a giant machinery, surrounded almost entirely by containers, cranes, and movement. The salted paper prints reverse that perspective. The ships become distant silhouettes on the horizon, and attention shifts to the environment in which they operate.
    We aim to balance formal qualities in our installations. Working with both moving image and still photographs allows us to focus on different aspects in each. While the video exists only as light projected onto a surface, the prints have a tangible presence in space, their textured fibers, weight, and scale create a physical encounter that the immaterial image cannot. This difference in materiality shifts the viewer’s experience from an enveloping, ephemeral flow of movement to a slower, tactile engagement. The salted paper prints share the same aspect ratio as shipping containers, and some are divided into stacked segments that echo the appearance of how containers are organized on ships and in the ports.

    The ports are powerful symbols of global commerce, efficiency, and environmental cost. How do you balance creating visually compelling images with raising critical questions about our complicity in these systems?
    We do not think those two aims are separate. The beauty of the port at night, the lights, the scale, the choreography of movement, is part of its seduction. At the same time, we are aware that all of this efficiency is tied to systems of extraction, exploitation, and environmental damage. We try to present the images in a way that allows both responses to exist at once, the fascination and the unease.
    Art can be a space for ambiguity, and that is something we value, especially with complex topics like global trade and our own roles in a consumer society. We do not want to offer one-dimensional answers, instead, we would rather make work that leaves room for viewers to sit with conflicting impressions. That complexity feels more honest to the way these systems are experienced in real life.

    The endless movement of cargo can be both awe-inspiring and anxiety-inducing. What was your hope for viewers to feel when engaging with your work?

    We do not expect everyone to feel the same way, but we hope viewers take the time to really look. The work is not meant to deliver an instant message; it is more about creating space for sustained attention. For some, the scale and complexity might inspire awe. For others, the relentlessness of the activity might spark discomfort or questions about what drives it.
    After the opening, someone told us that the video felt very visceral, and that for the first time they might have experienced something close to megalophobia, the fear of large objects. That reaction stayed with us, because it is exactly the kind of physical, emotional response we hope the installation can create. If the work can hold that duality, fascination and unease, then it is doing what we intended.


    [ad_2]

    Source link

  • What Is Photo Editing: Definition + Tips (2025)

    What Is Photo Editing: Definition + Tips (2025)

    [ad_1]

    Photo editing is more accessible—and essential—than ever. Whether you’re a business owner, ecommerce seller, or busy creative, knowing what photo editing is (and isn’t) can help you elevate your visuals and reach your goals faster. 

    In the following guide to photo editing, you’ll learn: 

    • What photo editing means (and why it matters)
    • Different types of photo editing, from simple to complex
    • Real-world examples of edits for portrait, sports, and product photography

    And if you’re ready to level up your own photo edits, check out our free tutorials and professional editing services.

    What is photo editing?

    Photo editing is the act of image enhancement and manipulation. This process is usually done with a digital photo editing software. Photo editing can involve basic tweaks like when you crop and resize images or adjust saturation. It also includes advanced techniques like swapping faces or photo retouching to get rid of distracting elements or unwanted objects.

    Some image editing techniques are done manually, while others are conducted through automated photo editing tools and software. Most edits to digital photography involve some one or a few photo editing programs. Some edits are even done offline on actual photographs, posters, or other printed collateral without any image editing software.

    Other terms for photo editing include:

    • Image editing
    • Post-processing
    • Image/photo manipulation
    • Photoshopping
    • Image/photo enhancement

    Let us look after your image edits, so you can get back to the fun stuff. Try Path free.

    The importance of photo editing

    Editing helps you fine tune and get the best image possible, as close to what you imagined when you took the photo (or better perhaps). Niche photographers can hone and emphasize their personal style. And for businesses, editing helps cement branding and optimize for business goals.

    Photo editing is particularly important for ecommerce companies. Image quality directly affects people’s opinion of the product and sales numbers. If you have ugly photos, it’s going to be tough to convince a shopper to purchase your product. 

    Types of photo editing

    There are many ways to edit a photo—some simple and others more complicated.

    Many people can figure out simple photo editing techniques on their own—though this does require time and patience. More complex adjustments may require using dedicated programs with specific photo editing features or hiring a trained professional editor.

    Simple photo editing techniques include:

    • Straighten: adjust the horizon of the photo

    Side-by-side comparison of cropped and straightened pink shoes against a pink background.

    • Crop: image cropping involves trimming out a portion (usually peripheral) of the image to help draw attention to the subject or otherwise improve the composition

    Pink sneakers on pink background with cropping grid overlay for adjustment.

    • Resize: adjust the dimensions of the image

    Crop ratio selection menu showing various aspect ratios with adjust option.

    • Sharpen: enhance the definition of the edges in an image (won’t make a blurry image in-focus)
    • Noise reduction: smoothing the picture out, typically accomplished by reducing the pixel size
    • White balance: the color of the light in the image

    Comparison of white balance adjustment for pink shoes, showing cooler and warmer temperature and tint settings.

    • Contrast: higher contrast makes an image more punchy, while lower contrast makes it flatter in color

    Side-by-side contrast adjustment of pink shoes on pink background, showing low and high contrast levels.

    • Exposure: the brightness of the photo

    Side-by-side exposure adjustment of pink shoes on pink background, showing low and high exposure levels.

    • Lens correction: lessens the effect(s) of the camera lens
    • Color adjustments: change the color of an item or element in the photo
    • Background removal: delete the background from the image, isolating the subject (this is often used for white background product photography)

    Smiling woman with curly hair in a striped top, isolated on a transparent background.

    More complex techniques include:

    • Clipping paths: vector path that differentiates the part of the image that’s visible and the part that’s transparent (extracts a subject or element from an image)
    • Portrait corrections: complexion touch-ups and enhancements
    • Drop and reflection shadow: create and adjust shadows
    • Special effects: this can mean an array of things, from animation to adding weather conditions like fog or snow
    • Adjusting text and visuals: add overlays or manipulate what’s already there
    • Photo stitching: when you seamlessly put two images together to make it look as though they were shot that way
    • Photo masking and Layers: the process of hiding and revealing specified portions of an image
    • Mirror effect: when you create a perfectly symmetrical photo, often used for apparel product shots

    Get pro image editing from just 25¢ per image

    Pixel editing and parametric image editing

    Two methods of digital photo editing are pixel editing and parametric image editing. Let’s look at their definitions:

    Close-up of a pixelated image in Adobe Photoshop, showing toolbar and grid view.

    What is pixel editing?

    Pixel editing, or pixel-level editing, is when you alter an image at the pixel level. Because you’re altering the pixels themselves, this also permanently changes the image file. That’s why pixel editing is considered a destructive form of photo editing because it’s not as easy to undo the changes and restore the original file.

    Pixel editing allows you to make extremely detailed edits and accomplish certain functions that parametric image editing can’t (like CMYK color modes, for example).

    What is parametric image editing?

    Parametric image editing (PIE) doesn’t change the pixels of the image. Instead, these edits are recorded as a set of steps to follow to accomplish the final look. Thus, it’s a non-destructive mode of photo editing. However, PIE doesn’t always allow for all types of edits.

    Many in the industry recommend starting with PIE, and then using pixel editing to refine the final details.

    Examples of photo editing

    There are so many ways to edit photos, and everyone has a unique approach. You might see examples of photo editing on social media or YouTube.

    Here are some examples of photo edits the team at Path have done for businesses from all around the world: 

    Background removal

    Before-and-after product photo editing with background removal for a bottle. Before and after sports action photo editing with background removal of a basketball player dribbling. Before and after portrait editing with background removal of a woman wearing a brown t-shirt.

    Save a ton of time with pro background removal from 39¢ per image

    Photo retouching

    Set of metal straws with cleaning brush on a cloth pouch, labeled before and after.

    Polish up your product shots with pro retouching from 79¢ per image

    Before and after close-up of an eye with photo retouching to smooth facial skin and enhance clarity. Before and after photo retouching showing wrinkle removal from a blue sports shirt worn by a man on a tennis court. Before and after photo retouching showing wrinkle removal from a mustard shirt worn with denim jeans.

    Ghost mannequin

    Patterned blouse displayed on a mannequin, with background removed in the

    Let us look after your ghost mannequins, starting at just 99¢ per image

    Editing different types of photos

    Technique Skill level Use case
    Cropping Beginner Ecommerce, social media, marketing, headshots
    Background removal Intermediate Amazon product listings, white background product photos
    Retouching Advanced Portraits, headshots, fashion, jewelry

    Product and ecommerce photography

    Product images will almost always require or benefit from post-processing. Aim for consistency, especially if you’re working on multiple products for the same company or are providing several types of photos of the same product.

    Infographic on photo editing for ecommerce, covering benefits like branding and customer trust, plus issues like noise, background, and lighting.

    Visuals help market brands and sell products, but you should also think about where the image will be used. Is it for an advertisement, ecommerce page, social media, or a print catalog? A white background shot will call for much different edits than an image for a Facebook ad. Likely, you’ll be able to get more creative with advertising imagery.

    Here are some of the most common types of edits for product photography:

    Before-and-after product photo of a bottle with editing notes on retouching, background removal, sharpening, resizing, and color treatment.

    Image source

    • Brightness and exposure: If you didn’t nail the lighting, you can make substantial adjustments post-shoot.
    • Background removal: This is a common edit for product photos, especially if you’re listing the item on Amazon, which has a white background requirement. Regardless, white background maintains consistency.
    • Color correction: It’s important that product photos portray the item as accurately as possible so it’s a smart idea to color correct all of your product images. As many as 64% of returns happen because the product didn’t match customer expectations based on product images and descriptions.
    • Color change: For products that come in several colors, it’s important to showcase the variety. Instead of photographing the product in every color, photo editors can make the changes post shoot.

    Three striped socks in red, purple, and yellow colors displayed on a gradient blue background.

    Sports photography

    Sports images are often captured in fast-paced, unpredictable environments—making photo editing essential for polishing the final result. Whether you’re working with action shots from the field or editorial images of athletes, editing helps enhance sharpness, fix lighting, and direct attention to the key moment.

    Common edits for sports photography include:

    • Cropping: Reframe the shot to highlight peak action or key players. A tighter crop can add intensity and drama.
    • Sharpening: Motion blur is common in sports. Sharpening can help make images feel more crisp and in focus.
    • Color correction: Natural lighting varies across stadiums and gyms. Post-shoot edits bring consistency and accuracy.
    • Background cleanup: Remove distractions from the crowd or surroundings that pull attention away from the subject.
    • Spot retouching: Clean up sweat, mud, or jersey wrinkles to create stronger, cleaner visuals for media or brand use.

    If you’re editing for a team, school, or sponsor, keep branding consistency in mind—many sports photographers rely on editing templates to maintain uniformity across hundreds or thousands of images.

    Headshot and portrait photography

    Headshots and portraits are often the first impression someone gets of a person—whether it’s for a professional bio, dating profile, modeling portfolio, or graduation announcement. Editing can enhance natural features while preserving authenticity.

    Here are common edits for portraits and headshots:

    • Skin retouching: Reduce blemishes, smooth skin, and even out tone without losing texture.
    • Whitening teeth and eyes: Brighten smiles and make eyes pop subtly and naturally.
    • Color correction: Adjust tones to match a flattering, realistic look or a specific brand aesthetic.
    • Flyaway removal: Clean up stray hairs or lint that distract from the subject.
    • Background editing: Simplify or replace backgrounds to match the intended context—e.g., corporate headshot vs. lifestyle portrait.

    The key with headshot and portrait editing is to enhance, not transform. The goal is to present someone in their best light while keeping the photo true to who they are.

    Learn how to edit your photos

    If you’re ready to learn how to edit your own photos, check out this handy collection of Photoshop tutorials. Here are a few to get started with:

    Photo editing history

    Timeline depicting key photo-editing milestones from the 1850s to 2011 on a gradient background.

    What is a professional photo editor?

    A person who edits images can either be self-employed, contracted by an outsourced company or agency, or someone who works in-house. There are many possible job titles for a photo editor, including digital photo editor, graphic designer or art director, among others.

    Typically, photo editors specialize in specific industries, much like photographers. For example, real estate, editorial, and product photography all come with their own set of trends and intricacies. Editors that focus on ecommerce images know how to make products pop.

    Our virtual photo editing studio is made of more than 300 trained professional photo editors who specialize in the following: 

    • Ecommerce
    • Product
    • Sports
    • Headshot
    • Portrait photography

    Let us look after your image edits, so you can get back to the fun stuff. Try Path free.

    Tackle your photo editing projects with Path

    Learning new photo editing techniques can be an enjoyable way to break up your day and add to your industry knowledge, but editing photos can be time-consuming, especially if photography is your specialty. If you need fast, affordable, high-quality photo-editing services, the professionals at Path are here to help.

    What is photo editing? FAQs

    Can I edit a photo for free?

    Yes, you can edit a photo for free. You can use free photo editing tools and do it yourself. You can also use free AI photo editing tools, but these edits require careful quality checks. Or, send your first two photos to Path to get them edited for free.

    How can I edit a picture image?

    • Open your photo editing tool of choice
    • Upload or open the photo you want to edit
    • Make your desired edits
    • Save your work

    What is the best app to use for photo editing?

    • Adobe Photoshop
    • Adobe Lightroom
    • GIMP
    • Pixlr
    • Snapseed
    • VSCO

    How do I edit my photos like a pro?

    Edit photos like a pro by learning basic and advanced Photoshop techniques, outsourcing the tedious edits, and optimizing for the right use and context.

    What is the meaning of photo editing?

    The meaning of photo editing is the process of manipulating and enhancing a photo. Photo editing can involve basic tweaks like cropping, resizing, and applying artistic filters. It also includes advanced manipulations like retouching and removing unwanted elements and distractions.

    What are the 5 basics of photo editing?

    • Cropping
    • Resizing
    • Applying simple clipping paths
    • Changing colors
    • Adjusting exposure

    What is the purpose of a photo editor?

    A photo editor can save you time and stress because they have the skills necessary to accomplish tedious, time-consuming, or complicated editing tasks for you.

    Let us look after your image edits, so you can get back to the fun stuff. Try Path free.

    Simple pricing for stress-free, pixel-perfect photo edits tailored to your needs.

    [ad_2]

    Source link

  • Working through a Seismic Industry Shift – A Photo Editor

    [ad_1]

     Working Through a Seismic Industry Shift : Balancing visibility and vulnerability in a constantly changing landscape.

    Lately, I’ve been hearing from more and more photographers who feel stuck, like the ground beneath them is moving and the usual paths forward no longer apply. I’m sure you’ve noticed, our industry is changing. While big budget ad campaigns and large-ish editorial shoots still exist, theyve become more elusive: fewer in number, harder to secure, and more tightly budgeted. At the same time, the industrys public-facing rhythm hasnt changed much. Photographers continue to share behind-the-scenes social media posts, announce new commissions, and keep their websites fresh. This isnt dishonest; its a form of forward momentum. But it can also mask a deeper truth many are feeling. The structure itself is undergoing a seismic shift, slow in some ways, sudden in others.

    This disconnect is not a sign of delusion, but of survival. Many photographers are quietly anxious, burned out, or disillusioned, not because they lack talent or drive, but because the industry they built careers around no longer behaves predictably or sustainably. This disconnect can breed a particular kind of paralysis: the knowing that things are wrong, paired with the fear of stepping outside the illusion. Its easier, and often more professionally acceptable, to play along with the facade than to confront the reality head-on.

    It can be disorienting. On one hand, were encouraged to keep up appearances, to maintain visibility, to show were still working. On the other, many creatives quietly admit to uncertainty about where the next job will come from or how to adapt to the growing presence of AI and the shrinking demand for traditional production. This isnt failure. Its a rational response to change. Acknowledging the gap between how things look and how they feel is not a weakness. Its the beginning of recalibration.

    This recalibration doesnt have to mean abandoning the craft. In fact, continuing to share your work, especially the honest, messy, beautifully human parts, can be a quiet act of resistance. Whether you’re shooting a big budget campaign for an agency or brand, or working on a personal project, your images and stories still matter. They remind others that the work is not only possible but still worth pursuing, even as the industry continues to shift. By recognizing the change, staying visible, and adapting to an evolving process, photographers can help shape what comes next.

    Instagram 

    About Christopher Armstrong

    Chris began his career as a photographer in Los Angeles, eventually moving through the worlds of film, television, and advertising before returning to photography in a new role as an agent and producer. Along the way, he worked with legendary filmmakers like Robert Altman, top production companies in Los Angeles and London, and global agencies including Wunderman, Publicis, and Deutsch. With 30-plus years of international experience, he has a panoramic view of the creative industry, one that’s occasionally dysfunctional but always worth sharing. That breadth of perspective informs everything he does, from creative strategy to mentoring emerging talent.

    In 2012, Chris founded PhotoPolitic in Stockholm as a response to the shifting landscape of commercial photography and production. Now operating between Amsterdam and Los Angeles, the invite-only platform connects elite photographers, directors, and digital artists with leading advertising and editorial clients worldwide. Carefully curated and fiercely independent, PhotoPolitic represents talent recognized for both aesthetic excellence and real-world impact.

    Today, the PhotoPolitic network includes some of the most respected names in advertising, editorial, architecture, interiors, documentary, reportage, and fine art photography. At its core, PhotoPolitic exists to champion creative integrity in an industry that often compromises it, working only with professionals whose reputations are built on craft, ethics, and results.


    [ad_2]

    Source link

  • Stef King – A Photo Editor

    [ad_1]

    The Art of the Personal Project is a crucial element to let potential buyers see how you think creatively on your own.  I am drawn to personal projects that have an interesting vision or that show something I have never seen before.  In this thread, I’ll include a link to each personal project with the artist statement so you can see more of the project. Please note: This thread is not affiliated with any company; I’m just featuring projects that I find.  Please DO NOT send me your work.  I do not take submissions.


    Today’s featured artist:  Stef King

    Reflection of Beauty is a project I started about 15 years ago. It began as a series called Five Minutes With, which was essentially five minutes with a model in front of the camera. They came to the studio wearing whatever they wanted, with no professional makeup. It was a chance for them to be photographed as they were — to express their own perception of how they wanted to be seen, rather than how a stylist, makeup artist, lighting team, or Photoshop might shape their image.

    It was a raw, honest portrait session centered around one question: “What does beauty mean to you?”

    At first, the answers were simple — “To me, beauty is a great red lipstick.”, for example. But over the years, those answers have evolved into much more complex reflections, mirroring the growing complexity of that very question:

    What does beauty mean to you? What does beauty mean to all of us?

    My portrait of Katie (pictured at top) was taken after she underwent brain surgery to replace part of her skull. She explores how that experience has shaped her feelings about herself, her perception of beauty, and how others perceive her.

    Onella Muralidharan is a model and fashion influencer in Melbourne, Australia. – “The patterns of my Vitiligo are a reflection of how connected I am to the natural world and the inspiration for my definition of beauty.”

    Amy Evans (pictured above in wheelchair) is passionate about fashion, beauty, and horse racing. For her, there has always been a conversation around disability identity: whether one sees themselves as a person with a disability (person-first language) or a disabled person (identity-first language). However, she says, “For me, identity encompasses more than just what people see. My identity is my passion. My identity is Amy!”

    Leaning on my greatest strength as a photographer shooting for fitness and beauty portraiture and my internal need to connect with other women on what our perspective of beauty is.

    Reflection of Beauty has become something far greater. It’s an exploration of life — how we see ourselves, and how the world sees us.

    To see more of this project, click here

    Instagram

    Suzanne Sease is a creative consultant and former ad-agency senior art buyer. She works with both emerging and established photographers and illustrators to create cohesive, persuasive presentations that clients can’t resist.

    Suzanne offers something rare: an insider’s perspective on how client’s source creative talent. Her deep understanding of the industry is underscored by her impressive resume: 11 years as senior art buyer at The Martin Agency, seven years as an art producer for Capital One, and stints with the art-buying department at Kaplan-Thaler and the creative department at Best Buy, where she applied her expertise to reviewing bids to see which were most likely to come in on budget. Over the years, Suzanne has worked with a wildly diverse range of clients, including Seiko, Wrangler, Bank One, AFLAC, and Clairol Herbal Essence. Now, as a consultant, she is equipped to problem-solve for her clients from an unusually dynamic point of view.

    As a longtime member of the photo community, Suzanne is also dedicated to giving back. Through her Art of the Personal Project column on the popular website aphotoeditor.com, she highlights notable personal projects by well-known and up-and-coming photographers. The column offers these artists excellent exposure while reflecting Suzanne’s passion for powerful imagery.

    Instagram


    [ad_2]

    Source link

  • Estimate Review Of An Employee Lifestyle Library For Global Beauty Brand – A Photo Editor

    [ad_1]

    By Andrew Souders, Wonderful Machine

    In addition to helping photographers build price quotes from scratch, Wonderful Machine offers an Estimate Review service on existing quotes that photographers have created themselves. It’s often helpful to have an extra set of eyes and credible insight to polish up your price quote before sending it off to a client.

    Just as with our other Pricing & Negotiating case studies, we redact the names of the photographer and client, which allows us to share valuable and educational information that would otherwise be confidential.

    Concept: Two-day employee portraiture and lifestyle library shoot for social, internal, and recruitment materials
    Licensing: Perpetual worldwide Web Advertising, Publicity, and Collateral use of up to 100 images
    Photographer: West Coast-based lifestyle and portrait photographer
    Client: International beauty and personal care brand

    A West Coast-based photographer was recently approached by a global beauty brand to capture candid and environmental portraits and lifestyle images of employees over two shoot days. The 100 final images would be used across a broad range of platforms — including career websites, social media, digital ads, internal presentations, publicity, and print collateral like career fair flyers.

    While the scope of the project resembled other projects this photographer had worked on in the past with other clients, this project was for a more high-profile client with greater licensing needs and a bigger budget. The photographer asked us to help refine their estimate and determine appropriate creative and licensing fees commensurate with the project’s scale and client expectations.

    Scope & Usage

    The project called for two shoot days. The first would take place at a local retail location before business hours as a shortened half-day, while the second was planned as a full day at the brand’s nearby corporate offices. The client would handle casting, scheduling, styling, and shot list development.

    While the requested usage rights were broad, they were primarily planned for web collateral, internal communications, and printed materials for recruitment efforts such as career fair flyers, with the exception of some digital advertising, which we expected to remain relatively limited and would not include any POS, OOH, or Broadcast use. Given the compressed timeline for shoot days and the volume of final deliverables, there was a clear need to structure the shoot efficiently. At the same time, it was important to balance the project’s production needs with an appropriate creative and licensing fee that reflected both the scope and intended use.

    To help add context to what we reviewed and advised on, I’ll include the photographer’s original estimate format and agreement language below:

    Photographer’s Draft Estimate

    The expense total came to $12,040 and was modeled after past projects for similar clients with similar deliverables, but those projects had more limited usage and smaller client budgets. Recognizing that the licensing in this case was broader and likely held more long-term library value for the client, the photographer also consulted with me for guidance on how to properly structure the creative and licensing fee portion of the estimate alongside the rest of the production costs.

    After reviewing the intended usage and factoring in the compressed timeline for capturing such a high volume of deliverables, we recommended introducing a creative and licensing fee in the range of $20,000 to $30,000. This range felt like a fair balance that accounted for the breadth and duration of usage for a library of images, while still reflecting the relatively straightforward nature of the shoot from a creative standpoint.

    Revisions and Recommendations

    After a detailed review of the scope of the project and the licensing terms, I worked with the photographer to revise the estimate. We incorporated a $22,000 creative and licensing fee that reflected the value of the deliverables and requested usage. We also recommended increasing the retouching budget to $5,000 to account for additional retouching and polishing work that might be required for final selects, such as potential logo removal from employee outfits. The fee for preparing a gallery for client review was adjusted to $1,000 to better represent the time and labor involved for this number of images. We also added scouting fees for both shoot locations – $750 for the photographer and $650 for their assistant.

    The rest of the production expenses, including crew and equipment rentals, remained consistent with the photographer’s original approach, although we reorganized how it was presented to provide more clarity. While we discussed the possibility of bringing on a second assistant to help maintain an efficient pace on set, the photographer chose to keep the crew lean to remain flexible in potentially tight environments.

    We see this a lot, where a photographer has experience working on smaller projects for smaller clients. When a big client comes along with a big project, they’re often not sure what to charge. Once we took the expanded licensing and long-term library use into account, there was a clear opportunity to revise the fee structure to better match the value being delivered. These revisions brought the total estimate to $38,440.

    Below is a revised version of the estimate that reflects my recommendations.

    Treatment

    We also encouraged the photographer to submit a treatment to accompany their estimate. Though not specifically requested by the client, it helped communicate the photographer’s interest, approach, aesthetic, and overall sophistication. The document featured example images, described lighting and post processing, and showed that the photographer understood the brand.

    Outcome

    The photographer submitted the estimate and treatment, and shortly afterward, was awarded the project. Reflecting on the process, the photographer shared that our collaboration helped them feel more confident in how they framed the value of their work, especially for high-profile clients

    While the core production approach remained largely unchanged, the creative/licensing fee, retouching budget, and presentation were strategically refined to better reflect the project’s scope and value.

    This project is a strong example of how a modest investment in estimate refinement can help land a significantly higher fee for the photographer and set a new benchmark for pricing future projects.

    Follow our Consultants @wonderful_at_work.


    [ad_2]

    Source link

  • How to Choose the Right Photo Editing Services

    How to Choose the Right Photo Editing Services

    [ad_1]

    When you need photo edits and see a long list of editing services and techniques, it’s easy to feel a bit overwhelmed. With so many options plus multiple ways to combine them, where do you even start?

    It makes perfect sense to go with what feels familiar, like basic retouching or background removal. But we’ve learned from working with thousands of photographers and business owners that your photos often benefit from multiple services working together. Combining services gets you better results with less hassle, since you can handle everything in one order instead of juggling separate projects. Let’s show you how to pick the right edits for your photos.

    How to identify what your photos actually need

    Before you start combining services, let’s figure out what you’re actually working with—it’ll save you time and help you get better results.

    Photo diagnosis checklist

    Take a look at your images and ask yourself if you spot any of these:

    • Background issues: Is the background distracting, the wrong color, or inconsistent across your batch? Does it look messy or unprofessional?
    • Subject problems: Are there imperfections, poor lighting, or color issues with your main subject? For apparel, does it need to show fit and drape without a model?
    • Technical fixes: Is anything crooked? Are shadows missing or looking unnatural? Any dust, dirt, or glare issues?
    • Brand requirements: Do you need multiple product colors? Specific formats? Transparent backgrounds for marketing materials?

    Common photo problems and their solutions

    Here are some scenarios we see all the time:

    • “My product looks flat and boring” → clipping path + shadows
    • “The background is messy and distracting” → background removal + retouching
    • “I need to show this product in 5 different colors” → clipping path + color change
    • “The model’s hair isn’t looking right” → image masking + retouching
    • “My apparel needs to show shape without the mannequin” → ghost mannequin + retouching + symmetry

    Most photo challenges need two to three services working together, not just one by itself.

    How Path services work better together

    Here’s why thinking in combinations instead of individual services makes more sense:

    • Save admin time: Upload everything you need edited in a single order and get it all back together, ready to use. No juggling multiple orders or trying to keep track of which image versions are where.
    • Speed up your workflow: Everything gets delivered together in the formats you need. Your designer handles all the edits for each image, so there’s consistency across the entire batch.
    • Keep all photos consistent: When the same designer handles all your edits, you get cohesive results. Colors match, shadows look natural together, and the overall style stays consistent.
    • Keep costs down: We offer discounts when you bundle multiple editing services together.

    You can combine pretty much any of our services together—two, three, four, or more. What matters is understanding which combinations work best for your specific type of photography.

    Service combinations by photography type

    Every photography project has different needs, and you might even use the same image for different purposes. Here are some proven editing combinations that work well for different situations:

    Sports photographers

    When you’re dealing with high-volume shoots and tight deadlines, you need services that work fast and handle the most common issues in sports photography.

    Your typical service combo:

    • Image masking for complex backgrounds, hair, equipment details, etc.
    • Background removal for clean, professional shots and official team photos, etc.
    • Photo retouching for spot removal, color correction, skin touch-ups, etc.

    There may be time-critical events such as championship coverage where you need polished images fast, or you might need to update and create consistent team roster headshots across an entire squad, just like this photographer does. You can choose different services depending on what each batch of images needs, whether that’s processing 200+ action shots or creating headshots with a uniform, professional look.

    We offer turnarounds from 6 hours, so you can deliver images to your clients, magazines, or publications fast.

    Product and ecommerce brands and photographers

    For ecommerce, consistency is everything. Your product photos need to look professional, meet marketplace (like Amazon) standards, and convert browsers into buyers.

    A standard combo:

    • Clipping path for clean cutouts that meet marketplace requirements or create a clean website look.
    • Shadow services add depth and dimension so products don’t look flat.
    • Color change shows all available product colors without reshooting every single variant.

    Advanced ecommerce stack (add these for even more polished results):

    New ecommerce brands often start with the foundation combo (clipping path + shadows + color change) and add ghost mannequin as their apparel inventory grows. Established retailers may go with the full stack approach for complete consistency across their entire product catalog.

    Portrait and headshot photographers

    Professional portraits and headshots need to look polished but still natural. The goal is enhancing what’s already there, not creating something fake.

    Typical professional edits for portraits and headshots include:

    • Background removal/clipping path gives you versatile backgrounds for different marketing uses.
    • Photo retouching helps with natural beauty enhancement, color correction, and flyaway hair fixes.

    Corporate headshot scenarios may include:

    • Basic combo of background removal + basic retouching.
    • Premium package, adding advanced retouching and multiple background options for different brand uses.

    Advanced portrait combination (for high-end clients or special projects) may include:

    • Image masking for complex hair or clothing details.
    • Color change for different outfit variations or brand color matching.
    • Multiple background options so clients can use the same headshot across different marketing materials.

    Wedding and event portrait combinations may include:

    • Image masking for intricate dress details and flowing fabric.
    • Retouching for flawless, natural skin and perfect lighting.
    • Background removal for ceremony photos that need to work in albums and marketing.

    How to choose your perfect edit combination

    Use this simple framework to figure out which services make sense for any project:

    1. What’s your end goal? Are these photos for marketplace listings, marketing materials, portfolio work, or client galleries?
    2. What’s your biggest time constraint? Do you have a tight deadline, a high volume of images, or particularly complex edits?
    3. What’s your budget priority? Are you focused on cost per image, or is premium quality and time savings more important?

    Consider your photo use case

    Sometimes the same photo needs different sets of edits depending on how you plan to use it. For example, a product photo might need:

    • For marketplace listing: clipping path + white background + basic retouching.
    • For social media: same photo but with different background + enhanced colors + shadows.
    • For print: higher resolution + color matching + vector conversion.

    How to mix and match your edits

    Use this simple approach to figuring out which services work best for your projects:

    • Start simple: Pick two to three core services that address your biggest pain points.
    • Test combinations: Try different combos on smaller image batches to see what works best for your workflow.
    • Scale up when it makes sense: Add more services as you see results and understand how they improve your final images.

    When to add each editing service

    Not sure which services you actually need? Here’s a quick reference for what each one does best.

    Clipping path: When you need hand-drawn, crisp clean cutouts that you can use on any background.

    Background removal: When you want clean white (or any color) backgrounds for product photos.

    Image masking: For intricate shots with hair, fur, or complex borders that need precise, natural-looking cutouts.

    Shadow: When products look flat or unrealistic—shadows add depth and dimension, and they actually help generate more sales.

    Ghost mannequin: For apparel that needs to show natural fit and drape without models or mannequins, essential for consistent ecommerce catalogs.

    Color change: When you have multiple color options and need to show true-to-life colors without reshooting every single shade.

    Photo retouching: When imperfections distract from your subject—this corrects flaws and makes every element shine.

    Multi-clipping path: When you need to select multiple areas within images for separate editing (like changing just the shirt color but not the pants).

    Vector conversion: When you need scalable graphics and logos that maintain quality at any size.

    Symmetry: When product alignment matters for brand consistency and that premium, professional look that converts better.

    Flowchart titled “What does your photo need?” showing how to choose photo editing services like clipping path, image masking, shadow, ghost mannequin, and retouching based on background issues, subject problems, technical fixes, and business needs.

    How to place your Path order

    Ready to try combining services? Here’s exactly how to do it and how it works:

    Getting started

    1. Sign up for your Path account
    2. Top up Path credits (optional but recommended—you get bonus credits when you top up)

    The ordering process

    1. Click “new order” to start your project
    2. Select all the services you need for this batch—you can choose as many as you want
    3. Upload your images using drag and drop
    4. Get instant quote and you’ll see your total cost immediately
    5. Set preferences like:
      a) File format for your edited images
      b) Additional comments or instructions
      c) Upload any supporting files if needed
    6. Select turnaround time (longer turnaround means cheaper pricing, or choose rush for time-sensitive projects)
    7. Review and approve your quote
    8. Choose payment method and submit your order

    If you need 1,000+ images edited a month, we offer bulk pricing with better rates and priority support.

    Ordering edits with Path couldn’t be any easier

    Now that you know which combinations work for your type of photography, placing an order is straightforward. Try Path free with 2 free edits and see how much better your photos look with the right services working together.

    Let us look after your image edits, so you can get back to the fun stuff. Try Path free.

    [ad_2]

    Source link

  • Announcing the Sixth Think Pink Photo Competition

    Announcing the Sixth Think Pink Photo Competition

    [ad_1]


    DPG is very proud to announce the opening of the Sixth Think Pink Photo Competition, organized by nonprofit organization Dive into the Pink, and hosted by DPG, with proceeds used to support the fight against breast cancer. This year, the judging panel is made up of pro underwater shooters Shane Gross, Richard Barnden, and Tanya Houppermans.

    We’re once again talking all things PINK! We want to see your most eye-popping images featuring the color pink, from the hue of your foreground subject to the pink polyps in the background reef, from an intense fuchsia to a delicate rosé. Photos may be entered into two categories, Macro and Wide Angle, and may have been taken anywhere, anytime. (For inspiration, see the winners of the First, Second, Third, Fourth, Fifth Think Pink Photo Competition.)

    This year’s awesome prize sponsors include Crystal Blue Resort, Anilao, Philippines, Lissenung Island Resort, Kavieng, Papua New Guinea, Backscatter Underwater Photo & Video, Marelux, Kraken Sports, and Ultralight Camera Solutions.

    ​Entry is via donation to Dive into the Pink ($15 per single entry, $35 for three entries, $50 for five entries). The deadline for submission is August 31st, 11:59pm EST.


    Please read the full Rules and Guidelines (on DiveIntoThePink.org) before entering.


    Thank you for supporting Dive into the Pink! 100% of the proceeds from this effort will be used to support the fight against breast cancer.


    About Dive into the Pink

    Dive into the Pink, Inc. was started in 2015 by Allison Vitsky, a breast cancer survivor, veteran scuba diver, and underwater photographer, who wanted to raise money to fight cancer in an unconventional way—by going scuba diving with friends.

    Most of its funds are split between the Young Survival Coalition (YSC) and the Guise Laboratory at M.D. Anderson Cancer Center. The YSC is an international organization dedicated to the critical issues of young women with breast cancer—specifically, Dive into the Pink supports and promotes the YSC’s incredible patient support network. The Guise Laboratory is part of the Department of Endocrinology at Indiana University; funds are earmarked for a project examining whether characteristics of the bone marrow microenvironment can alter or promote the spread of breast and other cancers to the bones.

    Dive into the Pink is a salary-free, low-administrative cost 501c3 organization.


    [ad_2]

    Source link

  • Luke Copping – A Photo Editor

    [ad_1]

    The Art of the Personal Project is a crucial element to let potential buyers see how you think creatively on your own.  I am drawn to personal projects that have an interesting vision or that show something I have never seen before.  In this thread, I’ll include a link to each personal project with the artist statement so you can see more of the project. Please note: This thread is not affiliated with any company; I’m just featuring projects that I find.  Please DO NOT send me your work.  I do not take submissions.

    Today’s featured artist:  Luke Copping

    Chef Redbeard is a personal project that came out of the recent creative connection between me and Jeremy VanAntwerp (AKA Chef Red Beard), a chef with a background in both fine dining and deeply rooted comfort food. Jeremy runs a private dining experience where small groups of guests are served directly in his kitchen studio. It’s an intimate setting—no separation between the cooking and the people he’s feeding. The meals are multi-course, seasonal, and often tailored especially for his guests’ unique tastes and needs. It’s less about spectacle, more about connection.

    What drew me to document Jeremy’s process wasn’t just the food—it was the atmosphere around it. The space is calm, focused, and quiet. There’s no rush, no chaos. Just the steady rhythm of someone who’s deeply at home in their work. This project captures that mindset. It’s about the collaboration between Jeremy and his customers, the repetition of the kitchen, and the intensity that builds as the event night approaches.

    The series uses both still photography and motion to show the experience from different angles. I wasn’t interested in stylized food shots or polished plating. I wanted to photograph what happens: crisp edges as they come out of the pan, the way honey drips from a biscuit and ingredients being handled with purpose.

    This project isn’t about trends or restaurants. It’s about one chef, his space, and how he has decided to step away from the traditional restaurant model and explore something more intentional and personal.

    To see more of this project, click here

    Instagram

    Suzanne Sease is a creative consultant and former ad-agency senior art buyer. She works with both emerging and established photographers and illustrators to create cohesive, persuasive presentations that clients can’t resist.

    Suzanne offers something rare: an insider’s perspective on how client’s source creative talent. Her deep understanding of the industry is underscored by her impressive resume: 11 years as senior art buyer at The Martin Agency, seven years as an art producer for Capital One, and stints with the art-buying department at Kaplan-Thaler and the creative department at Best Buy, where she applied her expertise to reviewing bids to see which were most likely to come in on budget. Over the years, Suzanne has worked with a wildly diverse range of clients, including Seiko, Wrangler, Bank One, AFLAC, and Clairol Herbal Essence. Now, as a consultant, she is equipped to problem-solve for her clients from an unusually dynamic point of view.

    As a longtime member of the photo community, Suzanne is also dedicated to giving back. Through her Art of the Personal Project column on the popular website aphotoeditor.com, she highlights notable personal projects by well-known and up-and-coming photographers. The column offers these artists excellent exposure while reflecting Suzanne’s passion for powerful imagery.

    Instagram


    [ad_2]

    Source link

  • Alex Turner resists literal interpretation – A Photo Editor

    [ad_1]

    We caught up with photographic artist Alex Turner, whose work lives where vision meets sensation and ecology meets memory. In his acclaimed Blind Forest series now showing at Marshall Gallery, Turner uses thermal imaging to reveal the hidden life of trees—turning them into living witnesses, storytellers, and  ethereal portraits of our changing world.

    Your images often make the invisible visible. What drew you to thermal imaging as your primary tool in Blind Forest?
    Alex: What drew me to thermal imaging was its ability to reveal what’s normally invisible not just heat, but a different way of seeing vitality, presence, and change. In Blind Forest, I wanted to portray trees not as passive background elements, but as active, responsive organisms—beings that store energy, regulate their environments, and bear witness to time in a way few other living things can. Thermal imaging allowed me to visualize those hidden dynamics: the conservation, transmission, and loss of heat within and around each tree. But it wasn’t just about ecology—it was also about cultural memory. Many of the trees I photographed hold long histories, both ecological and human. Some were cultivated by Indigenous communities for food and medicine; others stand on sites of forced labor, displacement, or violence. Trees have absorbed these layered histories, and the thermal camera offered a way to suggest that embeddedness. Heat becomes a kind of residue, a trace of what a tree has lived through or is currently enduring. In that sense, thermal imaging became a way to look at trees not only as biological subjects, but as cultural witnesses.
    I was also interested in repurposing a technology typically used for surveillance, hunting, or fire detection—tools often associated with control or extractive thinking—and turning it toward something more reverent and speculative. The resulting images resist literal interpretation; they ask the viewer to slow down, to sit with ambiguity, and to consider the forest as a place where both natural systems and human histories are in constant flux.

    What are the ethical considerations behind obscuring or withholding your image locations?
    Withholding specific locations is both an ethical and conceptual choice. On one level, it’s about protection. Many of the trees I photograph are old, vulnerable, or located in ecologically sensitive areas. Publicizing exact coordinates can unintentionally invite harm—through increased foot traffic, extraction, or even vandalism. In an age of geotagging and digital overexposure, some places need anonymity to survive. But there’s also a deeper philosophical and cultural reason. Many of these trees hold significance not just ecologically, but culturally—especially to Indigenous communities who have long-standing relationships with these species as sources of medicine, food, and spiritual meaning.

    Withholding location becomes a gesture of respect, recognizing that these trees are not simply photographic subjects or aesthetic objects, but beings embedded in cultural systems of value and care that precede and exceed my presence as an artist.

    More broadly, I’m less interested in offering a precise where than I am in encouraging a deeper look at the land, how we relate to nonhuman life, how we carry stories of place. By withholding coordinates, I invite the viewer to encounter the tree not as a destination or trophy, but as a living presence. This choice also pushes back against the extractive tendencies of both landscape photography and colonial mapping practices. Naming a place, claiming it, and presenting it as “known” can flatten its complexity. In Blind Forest, I want to keep some things partially obscured—not to mystify, but to honor the idea that not everything is ours to name, frame, or expose.

    What role does fieldwork play in your practice—how do you locate and build relationships with your subjects?
    I spend a lot of time hiking, researching, asking questions, and building relationships. With Blind Forest, that meant working closely with arborists, forest ecologists, historians, and Indigenous knowledge-keepers to locate trees that carry not just ecological significance, but cultural and historical weight as well.
    Sometimes a tree is introduced to me through a historian or ecologist; other times I come across one by accident, and then spend weeks or months trying to understand its context—how it fits into a broader ecosystem, who has cared for it, what it has witnessed. I try to return to sites multiple times, sometimes across seasons, to watch how the tree responds to heat, drought, wind, or fire. That temporal intimacy feels crucial.

    It’s not just about finding “beautiful” trees—it’s about seeking out complexity, endurance, and entanglement. And it requires a certain kind of humility. These aren’t blank canvases or passive subjects; they’re living beings embedded in systems that far exceed my own timeline. Fieldwork, for me, is about cultivating a practice of attention—being present, doing the research, and recognizing when to step back.

    How does your work address climate and ecological loss without relying on traditional documentary tropes?
    I’m interested in climate and ecological issues, but I try to approach them through a slower, more reflective lens—one that resists the spectacle and elegiac tendencies often found in traditional environmental documentary work. Rather than show devastation directly—burned forests, parched landscapes, suffering wildlife—I focus on subtler forms of presence and absence. The thermal images in Blind Forest don’t depict disaster as bluntly; they reveal systems under stress, energy in transition, and histories held quietly in living organisms. It’s a way of inviting viewers to feel their way into these questions, rather than confront them with fixed narratives. I think traditional documentary often relies on visibility to create impact—showing what’s been lost, what’s on fire, what’s at risk. And while that has real value, I’m drawn to a more speculative, even poetic approach. One that makes room for ambiguity, wonder, and grief to coexist. Thermal imaging helps with that—it doesn’t render the landscape in familiar terms, but through a register of energy that is less about appearances and more about relationships: between organism and environment, between past and present, between perception and reality.

    If you could pass on one technical or philosophical principle to photographers working with landscape today, what would it be?
    If I could pass on one principle, it would be to slow down—both technically and conceptually. Landscape photography has long been associated with grandeur, clarity, and conquest—the wide view, the decisive moment, the untouched wilderness. But in reality, landscapes are layered, politicized, lived-in, and constantly changing. They deserve more than just aesthetic appreciation; they deserve attention, patience, and humility. Slowing down might mean spending more time with a place before photographing it. It might mean learning its ecological and cultural histories, or questioning your own presence within it. Technically, it could mean working with processes that stretch time—like stitching, long exposures, or analog materials—not for nostalgia’s sake, but to make space for complexity. Philosophically, it’s about resisting the impulse to extract a single, striking image and instead engaging with the landscape as a collaborator, not a subject. There’s so much urgency in the world right now, especially around climate and ecological loss— but I think slowness can be a form of resistance. It lets us listen more carefully, look more closely, and imagine more responsibly.


    Can you walk us through that moment in the clonal Aspen grove—when you realized the coyote was there? What were you feeling, and how did that experience shape the resulting image?
    I was camping alone in the middle of the aspen grove when, late at night, I heard something rustling nearby. It was pitch black—I couldn’t see a thing. I reached for my thermal scope and spotted a coyote, no more than twenty feet away, perfectly still, staring directly at me. It sent a chill through me. There was something unsettling in that moment of mutual recognition, but also a profound sense of asymmetry. The coyote, with its excellent night vision, could see me plainly. I could only return its gaze through the mediation of a camera.

    That moment shifted something in me. I became acutely aware of how dependent I was on technology to perceive what was otherwise invisible to me. The thermal scope didn’t just reveal the coyote—it revealed the limits of my own perception. And in that same instant, the forest around us—specifically, the clonal aspen colony I was there to photograph—took on a different kind of presence. The coyote wasn’t a singular visitor; it was part of a continuous ecosystem, one in which I was the outsider, looking in.

    What made you decide to keep the coyote out of focus, and instead focus on the tree behind it? Was that choice aesthetic, conceptual, or instinctive in the moment?
    In my previous project Blind River, I used remote sensing technologies triggered by movement to capture subjects as they passed through the landscapes of the U.S.–Mexico border. That process—especially the AI recognition software attempting to isolate figures from their surroundings—raised compelling questions about how we determine what is distinct from a landscape, and why. Who or what is considered a visitor? A trespasser? A part of the scene or apart from it? With Blind Forest, I wanted to invert that logic and shift the focus entirely toward the landscape —specifically, the trees—as enigmatic, sentient, and sometimes charismatic subjects. It was a move toward a more ecocentric perspective. Everything else—humans, wildlife—would become secondary. Deliberately placing the coyote out of focus was shaped directly by my experience with the animal. It became a way of acknowledging that this place wasn’t about the drama of my human- wildlife encounter. It was about the quiet, persistent presence of the forest itself—an ancient, interconnected organism. The coyote became part of the story, but not the center of it.

    There’s a lot of talk in photography about capturing the ‘decisive moment.’ But your process seems to stretch that moment across time and space. How do you think stitching affects the way we experience time and presence in an image like this one?
    I think it’s important to explain the stitching process, because it speaks directly to some of the deeper conceptual undercurrents of the work. At first glance, it may seem like you’re looking at a singular moment in time. But each image is actually composed of over a hundred smaller frames, stitched together over the course of up to an hour. That temporal stretch is embedded in the final image, even if it’s not immediately visible.

    I’ve always struggled with the idea that photography is primarily a medium for capturing a single, decisive moment. That notion implies a kind of narrative closure—that the moment photographed contains the essence or climax of a situation. But in reality, most events and environments are far more layered and unfolding. Freezing a single frame can flatten that complexity, and at worst, it can project the illusion of objectivity—a supposedly ‘truthful’ instant that’s actually shaped by countless subjective decisions: where you stand, when you click the shutter, what you include or exclude. In Blind River and again in Blind Forest, I’m interested in challenging that sense of fixed truth and instead suggesting that narrative—and presence—is continuous. With Blind Forest, the subject matter itself encourages this shift. Trees appear still, even static, to the human eye. But they are constantly exchanging energy with their surroundings.

    Thermodynamics upends our assumptions about their stillness. Heat moves, radiates, dissipates—those rates of change make time visible in subtle, surprising ways. The thermal camera doesn’t just record temperature—it reveals time embedded in matter: a burned scar, a cooling trunk, a stressed limb. The forest becomes not a frozen scene, but a living system in flux. And through the stitching process, I’m trying to honor that slowness and complexity—to hold space for presence that isn’t defined by the instant, but by duration, accumulation, and transformation.


    [ad_2]

    Source link

  • 20 Best Overlay Photo Effects in Photoshop for Creatives

    20 Best Overlay Photo Effects in Photoshop for Creatives

    [ad_1]

    * { box-sizing: border-box; } body {margin: 0;}*{box-sizing:border-box;}body{margin-top:0px;margin-right:0px;margin-bottom:0px;margin-left:0px;}

    [ad_2]

    Source link