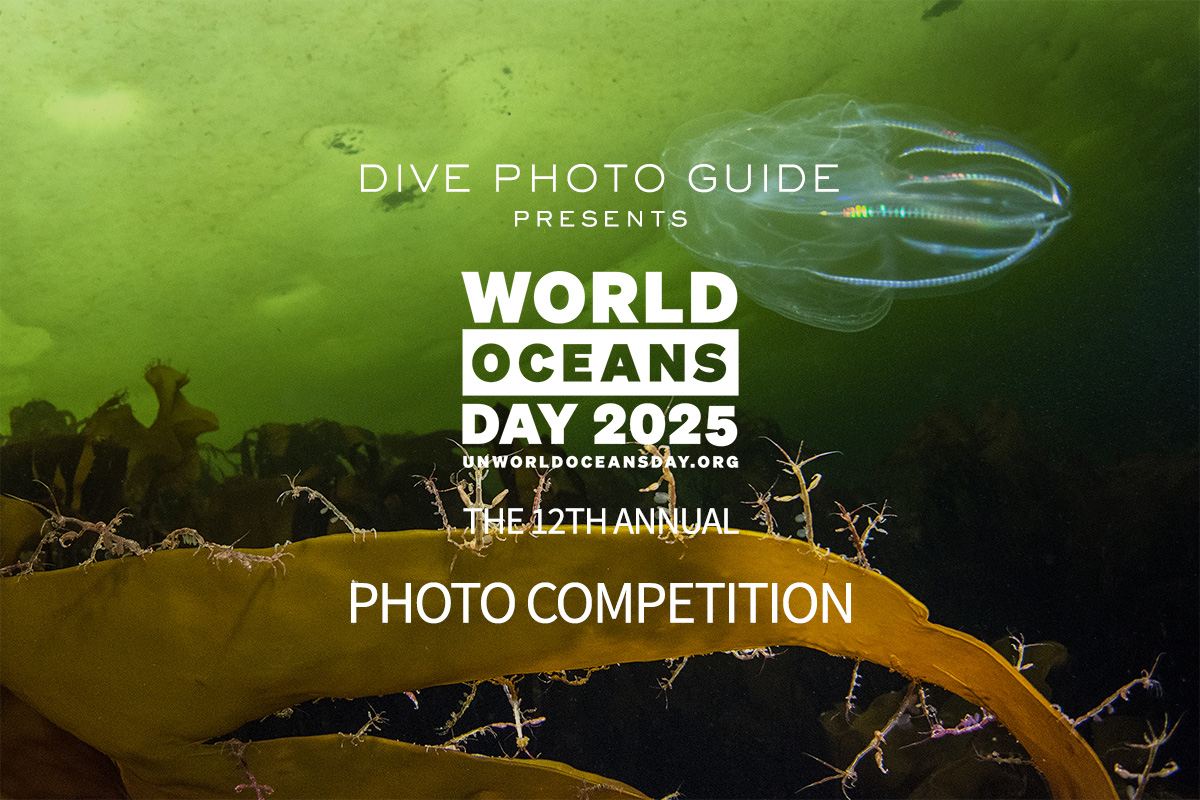
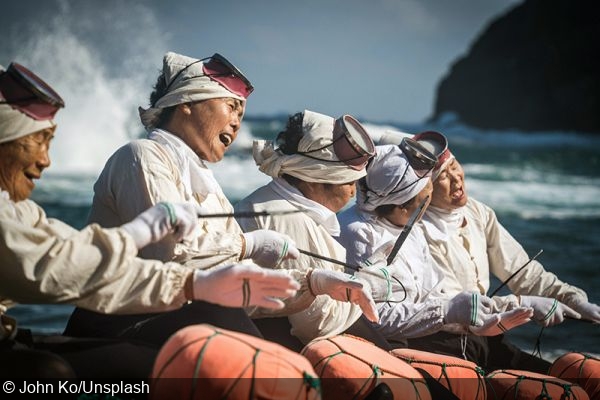
DPG is pleased to announce the opening of the 12th annual Photo Competition for UN World Oceans Day, surrounding the 2025 theme, “Wonder: Sustaining What Sustains Us.” Complementing the UN’s World Oceans Day celebration preceding the UN Ocean Conference in Nice, France, this year’s competition draws on the power of the arts to expand our perspectives and appreciation for our blue planet, and ignite a wave of action towards necessary change.
The 2025 Photo Competition for UN World Oceans Day is a free and open-to-the-public competition coordinated in collaboration between the United Nations Division for Ocean Affairs and the Law of the Sea, DPG, Oceanic Global, the Intergovernmental Oceanographic Commission of UNESCO, and Nausicaá. The 12th annual competition presents a unique opportunity for photographers to showcase the immense breadth and depth of the ocean’s beauty as well as to shed light on the lesser-known promise and potential brimming beneath its waves. The following four categories are now open for submissions:
Wonder: Sustaining What Sustains Us
Big and Small Underwater Faces
Underwater Seascapes
Above Water Seascapes
Winners will be announced on UN World Oceans Day, June 8th—this year celebrated in Nice—hosted by the Division for Ocean Affairs and the Law of the Sea, in partnership with Oceanic Global, and published on DPG shortly afterwards.
Since its inception, the annual competition has been curated by underwater photographer Ellen Cuylaerts and judged by a jury of renowned photographers. This year is no exception, with the 2025 jury comprising underwater photographer Ipah Uid Lynn (Malaysia), underwater photographer William Tan (Singapore), wildlife photographer Vanessa Mignon (France), and underwater photographer Marcello Di Francesco (Italy). For further details about submissions, including category descriptions, contest rules, judges, and more, click below.
All entries must be submitted by April 6th, 2025 at 11:59pm Eastern Standard Time (EST).
About United Nations World Oceans Day
Since its inception in 2008, United Nations World Oceans Day (UN WOD) has celebrated the ocean and its importance to the planet and our lives, while raising awareness about the many threats it faces. As the challenges to the ocean continue to grow, so does the need to understand and mobilize globally. In celebration of the 2024 theme, “Awaken New Depths,” the United Nations is joining forces with decision makers, scientists, private sector executives, civil society representatives, indigenous communities, celebrities and youth activists and more, to put the ocean first. The annual UN World Oceans Day celebration is hosted by the Division for Ocean Affairs and the Law of the Sea, and has been made possible by the generous contribution of Oceanic Global since 2019. For more information visit www.UNWorldOceansDay.org.
Ask anyone what social media platform is built around imagery and the majority of replies will be Instagram. Instagram has been around a long time in social media terms, having arrived on the scene in 2010.
However, there are many different social platforms available to photographers these days, some more productive than others. Some are based around video sharing, some around news and events and a minority around sharing images.
The new kid on the block in terms of image sharing is Foto.It has been developed by photographers for photographers. Its scope is not that of social interaction but purely to display and react to good photography.
It is a relatively niche entry into a crowded market, another social media app that could be huge or may wither and die. Today we are going to take a look at the Foto App, what it is and how it stacks up against alternatives.
The Rise And Fall Of Instagram
Any new photography-based social media platform is obviously going to be judged against Instagram. In the case of Foto, that might be a little unfair as it does not intend to be a competitor to Meta’s giant.
However, it’s important to look at Instagram’s place in the photographic world in relation to where Foto might go.
Although perhaps not intended as a social media app for enthusiasts and professional photographers, in its early days, Instagram became just that. The primary driver of this was its simplicity. The upload format was pretty uniform, with images all being displayed in a square format at a resolution that was perfect for mobile phones of the day.
Instagram is no longer the app it used to be for photographers.
People could search for specific genres and topics using hashtags, allowing users to easily find and interact with the content they liked. As such it grew popular not only with the general public sharing snaps, but also more serious photographers who could gain large and engaged followings. This in turn allowed professionals to use it as a powerful marketing tool and build their businesses off of the back of Instagram.
That all changed fairly quickly. Instagram became much more algorithm driven, feeding more and more non-photographic content to users. Influencer learnt how to game the algorithm, meaning more reels and toes dipped into infinity pools rose to the top rather than solid, quality photography.
In the last few years, Instagram has become increasingly difficult as a place for photographers to grow their brand and market their work. Other platforms have taken up some of the slack, but none of them were built around imaging as a primary driver. So how does Foto fit in?
Foto Is Not Trying To Be Instagram
Foto is a platform that is designed from the outset to focus on photography. Its USP is as a platform to share photography to anyone who wishes to see it. The developers state that it’s not just about photographers but anyone who wants to share their photos.
The app has been in beta for quite a while and recently had their full public launch – February 2025. Whilst still basic, the developers have published a roadmap of interesting additions to the app. These include portfolios, scheduling, print fulfillment and cloud storage.
One of the main claims of Foto is that it will never be an advert based model. However, there is currently a subscription service which gives you access to some of the higher level features and I would imagine that a number of the items listed on the roadmap will be included as fee based.
As with any social media platform there has to be a core number of users to make the platform viable. It will be interesting to see how many users move or add Foto to their social media portfolio and indeed how many take up a subscription service. Clearly, without advertising, Foto will need a substantial core to sign up. For that they will need to make the app compelling to its users.
I have been a user of the Foto app since its beta. As of yet, I have not signed up for the paid Ambassador subscription, but what are my thoughts so far on using the app?
Foto is an app purely to share photography
Foto App In Action.
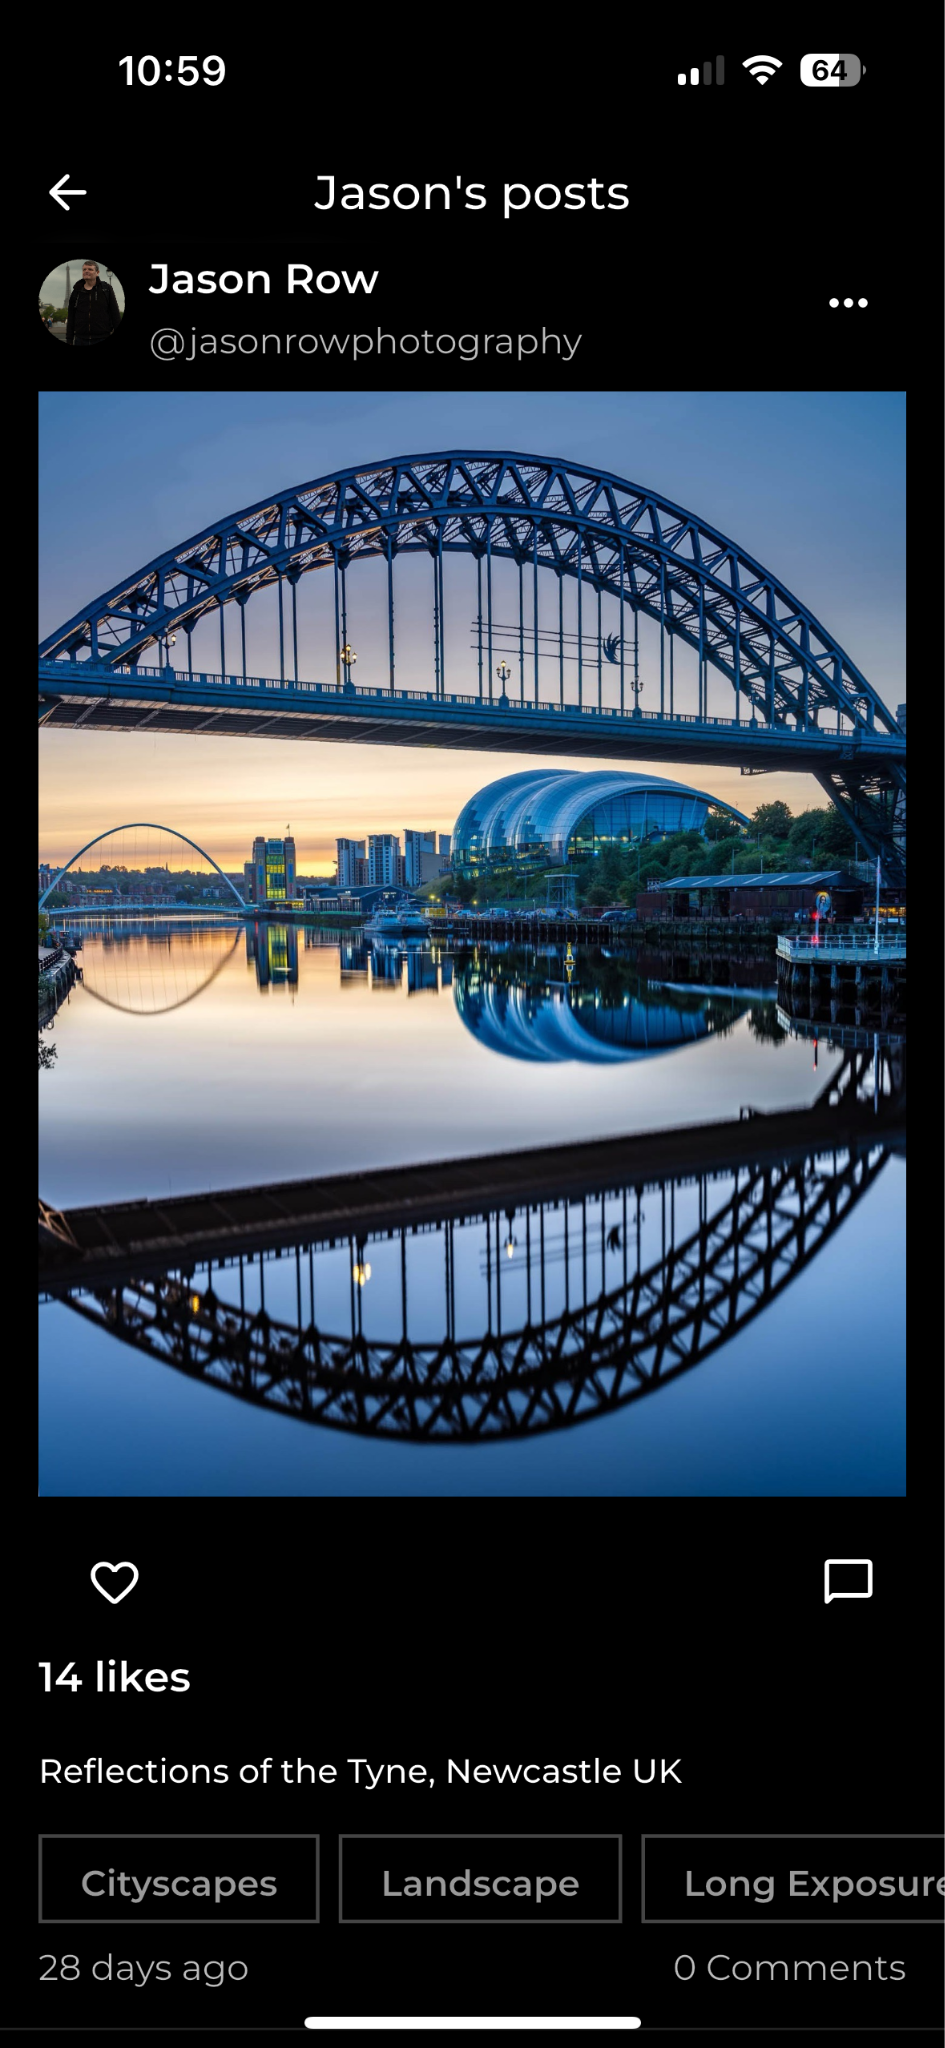
At the moment, the Foto app is available on both Apple IOS and Android, in the roadmap, they are also planning a desktop version in the near future. Once you sign up and log in, you will find a very clean and well-designed interface. Simplicity is certainly its strength, with photographs placed as the obvious centerpiece.
The app runs a chronological-based timeline from the Home button at the bottom, with a single row of large, clear images from contributors that you follow. To the right of the Home button is the search user function. Without searching, this displays a timeline of images only without the user name. If you tap on a photo, it will open with the user profile at the top.
Creating new posts is simple and you are restricted to three tags
Whilst you cannot search for specific text, you can search for tagged images. When you upload an image to the Foto app, you can apply up to three predefined, photography-based tags. These might be for example, Architecture, Landscape, and Long Exposure. This allows app users to filter the search section with specific genres of images. You can add up to three tags to your search.
The images are displayed well with a brief description and the three tags
The third of the five icons at the bottom is the upload button. This is, again, simple to use. When you upload, you can give your photo a description and add up to three tags. And that’s it, no faffing around trying to find suitable hashtags and labouring over a description that will trigger the algorithm.
The fourth icon is notifications, which will tell you if an image has been liked, commented and if someone has followed you. The last icon is your profile page and settings.
As a viewer, the app is as simple as a contributor. The only interactions you can make are to like and comment on a photo and to follow the photographer.
Whilst its simplicity makes it a really nice app to use both as a photographer and as a viewer, I wonder if the lack of deeper interaction will hamper its growth. That may well be something that is addressed in the future. For the moment, the Foto app feels very much like a modern version of early Flickr, a place to share and enjoy photos, but without any great interaction.
Will Fotos Succeed?
Personally, I hope so. I think with the decline of Instagram as a photography platform and the more generalised nature of other social media, there is certainly room for another image-based app. However, it will succeed or fail on its user base. In my opinion, users will need not only to get likes and comments on their images but some form of greater interaction. That may well be on the future roadmap, but for now, I am enjoying the Foto app without devoting a huge amount of my time to it.
The intrepid diver covered more than 27,000 miles to accomplish the task, which took place in late November of last year. New additions to his logbook include stops in Thailand, Malta, Egypt, Malta, and Argentina. The record-setting plunge took place in the frigid waters of Antarctica.
“When I finished my final dive, I called my sisters first to share the good news,” Scott told Essence.com. “I could feel the pride and excitement in their voices—it made the achievement feel even more real.”
Scott’s journey into the record books is a long time in the works. After dropping out of New York City’s foster care system as an adolescent, he joined the Marines and served in Afghanistan. Following his service, Scott earned a culinary degree and spent a year backpacking in Asia.
Finally, in 2014 he took the giant stride into diving in the Bahamas and never looked back. Scott eventually worked his way up to Master Scuba Diver Trainer (MSDT) and even authored a book on his adventures, Trent’s Adventures: Deep Sea Discovery, hoping to inspire young ocean explorers of all backgrounds.
“Breaking a Guinness World Record isn’t just about making history; it’s about showing that we belong in these spaces,” Scott shared on Instagram. “Black explorers, Black divers, Black adventurers—we’ve always been here, and we will continue to push boundaries.”
Learn more about Barrington Scott’s recent (and lifelong) diving journey in this wonderful profile featured in Essence.
Concept: Portraiture and Still Life Images for Cosmetics Brand Licensing: Unlimited use of all images captured for one year Photographer: Beauty and Still Life specialist Client: Cosmetics brand
Summary
I recently worked with a photographer to help them develop an estimate for a campaign promoting a cosmetic brand’s new product. The brand wanted still life images as well as images of the product in use by professional talent in a studio setting. The creative brief called for a mix of minimal setups against a white background, along with a few scenarios that involved prop styling and set design.
Fees
The client initially presented a shot list that included eight main shots. One of the shots was identified as a key visual while the others were considered supplemental. Although they requested unlimited use of all images, they were willing to limit the duration to one year.
I felt the key visual was worth $5,000, images 2-3 were worth $2,500 each, and the others worth $1,000, totaling $15,000. I had wanted to include an additional few thousand dollars as a creative fee. We understood, however, that we might be pushing the limits on the fee as it was. Ultimately, my goal was to keep the bottom line in check and stay under $50k total.
The agency, surprisingly, asked us to include a licensing option specifically for 110% of the one-year rate to include a pre-negotiated rate for a second year. In most cases, when pre-negotiating a duration extension, I’m accustomed to a request for a reduced rate compared to the original fee. I clarified this request on a call with the agency art producer. Sure enough, they explained that they’d be willing to pay 110% for an additional year, so I included that cost for the licensing and for the talent.
In addition, the client requested we present a firm bid, rather than an estimate. I noted this at the top of the document. In this scenario, the photographer keeps any unused funds if the cost of the production is less than anticipated. This also means, however, that they would need to cover any overages if expenses were higher than anticipated. Overall, we were very confident in these fees/expenses based on the working relationships with the specific crew members, styling team, casting director, talent agents, and locations we anticipated working with.
Crew
Although the production was rather straightforward, we included a strong team to help quickly execute the vision. To that end, we added a producer, first assistant, second assistant, digital tech, and production assistant, all at rates appropriate for the specific market.
Styling
The creative brief definitively called for a prop stylist to create a few background elements and manage the products. The photographer already had a local stylist they wanted to work with. We included rates we received from them, which included their prep, shoot and wrap time. There was a need for very minor wardrobe styling, and this prop stylist was able to take on both roles. Separately, we detailed the anticipated prop and wardrobe costs, along with their kit fees and miscellaneous expenses potentially incurred in the process of acquiring all of the necessary items. We included a hair/makeup stylist and, as there were a few shots that involved close-ups of the talent’s hands holding the products, we also included a manicurist.
Casting and Talent
I included a rate received from a casting agent to help us find one subject based on the talent specs provided by the agency. The agency planned to pay the talent directly, but I discussed an appropriate talent fee with the agency producer. I noted this in the line item without having that line item impact our bottom line since the billings would go through the agency.
Locations
We included $2,500, which would allow us to afford a generously sized studio in this particular market.
Equipment
We included appropriate rates for the rentals the photographer would need in order to execute the creative vision. In addition, we also included fees for the digitech’s workstation as well as production supplies to make everyone comfortable on set.
Meals
I based this on $80 per person for 19 people, which included breakfast and lunch.
Misc.
I added $500 to cover any unforeseen expenses. We also noted a fee for insurance, which the agency specifically asked that we include. I often calculate insurance fees based on 1-2% of the bottom line.
Post-production
We just included a fee for the photographer to perform an initial edit of the photos and help make selects because the agency would handle retouching. As a separate fee, we included a line for hard drives, delivery, and archiving.
Results
The photographer won the project. Shortly after, however, the shoot was postponed, and then quickly brought back to life with an increased scope that included two talent. This increased the shot list in addition to production expenses. As a result, we increased the creative/licensing fees by 50%, added a producer pre-production day to handle the changes, increased wardrobe, added another manicurist, added a hair/makeup stylist assistant, and increased casting and talent. We also were asked to include some extra equipment to help facilitate remote viewing by a few clients who would be unable to attend the shoot in person. Here is the final estimate, which was approved:
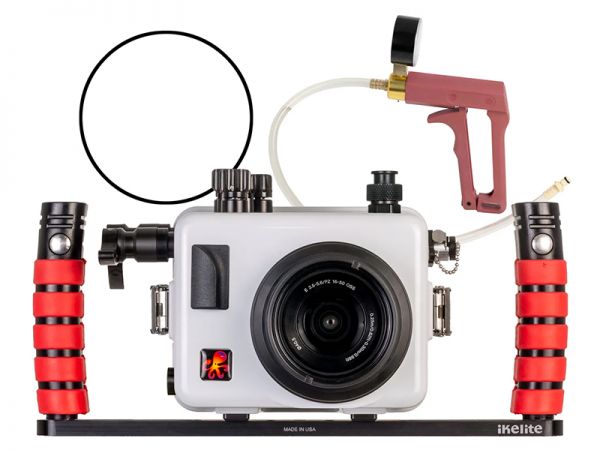
Ikelite Announces “Deluxe Version” Fixed Port Housings for Sony a6700 with Power Zoom 16–50mm Lens
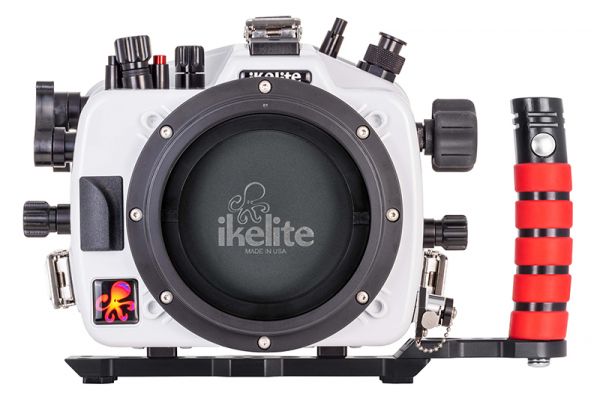
Ikelite has released two “deluxe versions” of its housing for the Sony a6700 featuring a fixed flat port with standard 67mm threads. The housings, which specifically accommodate the camera with the Sony E PZ 16–50mm f/3.5–5.6 OSS lens attached, are designed for use with macro and wide-angle wet lenses with 67mm threads—in much the same way as you would shoot with a compact camera underwater. To make it easier to attach heavier wide-angle lenses, Ikelite recommends using a compatible 67mm-to-bayonet adapter.
The two housing configurations are as follows: The 200FP/T housing bundles the Sony a6700 housing with the Dual Tray with Dual Handles, Trigger Extensions, Vacuum System, a spare O-ring, and TTL circuitry. The built-in TTL electronics mean that you just need to add a single sync cord or a dual sync cord and one or two compatible Ikelite DS strobes, respectively.
By contrast, the 200FP/F housing bundles the Sony a6700 housing with the Dual Tray with Dual Handles, Trigger Extensions, Vacuum System, a spare O-ring, and a built-in Fiber Optic Transmitter. The transmitter attaches to the camera’s hotshoe and translates its flash signals to LED pulses that can be read by compatible strobes by manufacturers such as Inon, Sea&Sea, Retra, Weefine, Kraken, AOI, and Backscatter. Strobes can only be used in manual mode.
Available now from retailers such as Backscatter, the 200FP/T housing is priced at $1,690, while the 200FP/F housing costs $1,715.
When purchasing underwater photography equipment like the products mentioned in this article, please support DPG by supporting our retail partner—Backscatter.com.
Ikelite has announced its housing for the Nikon Z5 II. The second-generation entry-level full-frame mirrorless camera is a significant step up from its predecessor. The 24MP backside-illuminated sensor is paired with Nikon’s latest EXPEED 7 processing engine, promising excellent low-light performance and doubling the burst shooting speed with the manual shutter—11fps with full AF/AE compared to the 4.5fps of the Z5. In addition, unlike its predecessor, the Z5 II can shoot 4K/30p video with no crop.
With its housing, Ikelite aims to get the most out of the new camera. As well as the company’s signature ABS-PC body with transparent back, Dry Lock (DL) port system, and oversized control levers for shutter release and autofocus, the housing can accommodate Ikelite’s USB Charging and Data Transfer Bulkhead, meaning you never have to take the camera out of the housing. Needless to say, if you want to be able to switch between TTL and manual strobe exposure on the fly, you have the option of adding the DL1 DS Link TTL Converter—and a couple of DS strobes.
Available from retailers such as Backscatter, Ikelite’s Nikon Z5 II housing is priced at $1,895.
When purchasing underwater photography equipment like the products mentioned in this article, please support DPG by supporting our retail partner—Backscatter.com.
PRODUCT INFORMATION
SKU: 71075
200DL Underwater Housing for Nikon Z5 II Mirrorless Digital Cameras
A full featured and durable waterproof housing for Nikon Z5 II mirrorless digital cameras. Suitable for scuba, snorkel, surf, pool, and any application in or around the water.
Controls: Controls are provided for everything except Joystick up/down/left/right, Fn1, Fn2, Diopter adjustment dial, or DOF button
Strobe Connector: Ikelite Bulkhead with Manual Hotshoe
Port Mount: DL (Dry Lock)
Accessory Port: M16 Thread
Depth Rating: 200 feet (60 meters)
Weight: 4.7 lb
Dimensions: 8.75 x 6.875 x 6.5″ (220 x 175 x 165 mm)
Rear O-Ring: 0132.59
Front O-Ring: 0132.45
Pre-Dive Checks
There is no greater assurance than being able to see your camera and o-ring seal through the back of the housing. Our signature open-groove design suspends the rear o-ring in a natural position that is easier to maintain and more reliable than forcing the o-ring into a channel. Once the housing is closed you can see the o-ring form a solid, waterproof seal.
We recommend using a pump with gauge to pull a vacuum on the housing and check for leaks prior to entering the water.
Construction
Our specially formulated ABS-PC blend housing is highly durable yet significantly lighter than aluminum. The light color keeps your camera cooler when shooting in warm, sunny environments.
Lens Support
Ikelite lens ports are the lightest on the market, yet robust and capable of standing up to rough surf.
We support a wide variety of lenses. Most popular zoom lenses and select focus rings can be engaged using simple gearing that puts adjustment right at your fingertips. Zoom and focus gears differ depending on which lens you are using.
Lens ports and zoom gears sold separately. Refer to the appropriate port chart for compatibility information.
Wi-Fi Transfer
Use the camera’s built-in Wi-Fi feature to download photos to another device without removing the camera from the housing. The Wi-Fi feature is only usable above water within close proximity to the connected device.
Compatibility
Unless otherwise noted, this housing does not accommodate the use of add-on grips, battery grips, eyepieces, LCD covers, or other accessories.
Differences in lens and control placement prevent other camera models from being used in or adapted to this housing. We are not aware of any other models which may be used in or adapted to this housing.
In the Box
Housing
Rear O-ring # 0132.59 (installed)
Front O-ring # 0132.45 (installed)
Zoom Gear Retainer # 75900 (installed)
Port Hole Cover # 0200.92 (installed)
Waterproof Bulkhead Cap # 9104.7 (installed)
Base with Left-Hand Quick Release Handle # 4077.67 (installed)
Scientists Find New Evidence That South Korea’s Female Freedivers Evolved for a Life Underwater
By Ian Bongso-Seldrup, May 8, 2025 @ 10:00 AM (EST) Source: CNN
Haenyeo sing traditional songs before heading out to sea to harvest abalone, sea urchins, seaweed, and other seafood from the waters around Jeju Island, South Korea
Scientists studying the DNA of the famous female freedivers of Jeju Island—the haenyeo—have discovered there are unique genetic differences that the women have evolved to cope with the physiological stress of freediving. Published in the scientific journal Cell Reports on May 2, 2025, the research was led by Melissa Ann Ilardo, a geneticist and assistant professor in biomedical informatics at the University of Utah.
Ilardo and her colleagues recruited 30 haenyeo divers, 30 non-diving women from Jeju Island, and 31 women from the South Korean mainland for the study. The participants’ average age was 65. As well as sequencing their genomes from blood samples, the researchers compared their heart rates, blood pressure and spleen sizes. In order to simulate dives, participants held their breath while submerging their faces in cold water, stimulating the mammalian dive reflex. As a result, the heart rate slows, blood pressure increases and the spleen contracts.
The analysis showed that the participants from Jeju—divers as well as non-divers—were more than four times more likely than the participants from the mainland to have a genetic variant associated with lower blood pressure. “Your blood pressure increases as you dive,” explains Ilardo. “Their [Jeju residents’] blood pressure increases less.” The scientists suggest that the genetic trait may have evolved to keep unborn babies safe—since the haenyeo dive throughout pregnancy, when high blood pressure can be dangerous.
Previous research has linked cold and pain tolerance to another genetic variation, and this study revealed that the participants from Jeju were more likely to have this genetic variant. However, the researchers weren’t able to say with certainty whether the variant may be important for the haenyeo’s ability to dive throughout the year, since the participants’ ability to withstand low temperatures was not measured in the study.
Genetics wasn’t the only factor to explain the haenyeo’s impressive diving capabilities. During the tests, the researchers also found a dramatic difference between the heart rates of the divers versus the non-divers. A reduced heart rate would help the haenyeo conserve oxygen during their dives. “Actually, their heart rate dropped about 50% more over the course of the dive than the control (participants),” says Ilardo. “We know that it’s because of training, because it’s something that we only saw in the haenyeo.”
While much more work needs to be done, the research could potentially lead to the development of new drugs for lowering blood pressure.
Each month, we explain a recent cost estimate, contract, or purchase order in the form of a Pricing & Negotiating article. By redacting the names of the photographer and the client, we can share useful information that would otherwise be confidential. You can read more about our Building Estimates service on the Consulting Services page of our website.
Concept: Executive Headshots and Environmental Portraits Licensing: Perpetual Publicity and Collateral use of 7 images Photographer: Portrait and Lifestyle Specialist Client: National Grocery Store Chain
Summary
I recently collaborated with a photographer to develop an estimate for a corporate portraiture photoshoot for a US-based grocery retailer. The project’s goal was to capture the authenticity, approachability, and leadership of the company’s Chairman/CEO and President/Vice-CEO.
We planned for the shoot to take place in a single day at a store location in the Southwestern US. The client would plan to coordinate the schedule to minimize disruption to store operations and, at the same time, allow the photographer to accomplish everything they needed to.
Deliverables included 4 high-resolution headshots and 3 environmental portraits, all licensed for perpetual publicity and collateral use. They intended for these visuals to enhance the company’s marketing materials, reinforce its brand ethos, and connect with its customer base on a more personal level.
Fees
The client’s brief outlined a need for Publicity and Collateral use for the imagery, which informed the pricing structure. We determined that perpetual usage rights were appropriate for this particular project.
Perpetual usage relates to the duration the client can use the images. Perpetual usage means the client can use the images indefinitely. But, the usage is still confined to the agreed-upon media (in this case, publicity and collateral).
Unlimited usage, on the other hand, implies no restrictions on the type of media placement, often making it broader usage for things like paid advertising.
Why Perpetual Usage?
Leadership portraits don’t stay relevant forever. Executives update their photos every few years, so setting a time limit on usage would likely expire after the images are already outdated.
It simplifies things for both the client and the photographer. No need to track expiration dates or negotiate renewals for images that won’t be used long-term anyway.
It encourages repeat business. Even with perpetual rights, occasional leadership changes (just in the age and look of the person, or who’s in the actual role itself) mean new photos will be needed. Making the process easy builds goodwill and increases the chance they’ll return to the same photographer.
The intended use is long-term but not commercial. Since these images are for PR and internal branding (not paid advertising), perpetual licensing makes sense — it’s a one-time cost for the client, with not much downside for the photographer.
The creative and licensing fee was set at $3,500, a rate reflecting the project’s somewhat smaller scope balanced with the longevity of the usage rights. We also included a tech/scout day, priced at $500, to allow the photographer to familiarize themselves with the location and refine logistical details.
Crew
We included a first assistant at $500/day, with an added 25% payroll fee, bringing the total to $625 for the shoot day. Given the shoot needs, the inclusion of the photographer’s trusted first assistant to handle equipment setup, lighting adjustments, and management of digital workflows was of great importance.
Styling
We allocated $875 for a men’s groomer/hair and makeup stylist to be present on shoot day. This role would also include light wardrobe adjustments, providing the professional polish necessary for high-quality headshots and portraits.
Equipment
We allocated a conservative budget of $250 to cover any supplemental equipment needs. The photographer owned most of the required equipment, but additional backdrops were necessary to achieve the desired aesthetic for the headshots.
Misc.
To cover incidental costs such as meals, parking, and mileage, we included a budget of $200. We noted these expenses were to be billed at cost to provide flexibility while maintaining transparency.
Post-Production
We budgeted $300 for the initial edit and client review, hosted on a web gallery. We allocated an additional $700 for retouching seven selected images, priced at $100 per image to include up to one hour of retouching work each. This process ensured each image met the client’s expectations and upheld the brand’s standards.
Results
The photographer was awarded the project, and the shoot was scheduled to take place within the following weeks!
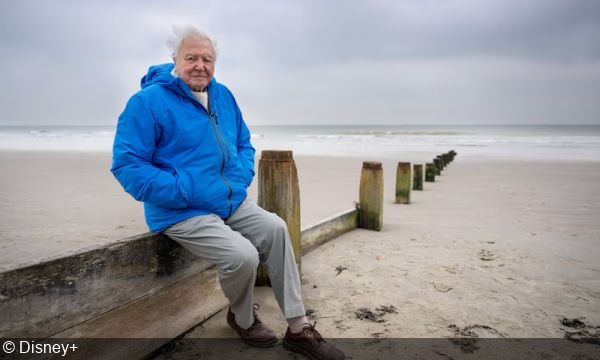
May 8th is David Attenborough’s 99th birthday, and in his new documentary, Ocean, he’s marking the occasion with a veritable call to arms. “If we save the sea, we save our world,” says Sir David.
Over the last seven decades, the beloved English presenter has made many films focused on our marine world, but this latest one is something different. Of course, there’s awe-inspiring cinematography aplenty, as you’d expect, but this time, the camera shows us the full extent of the tragedy occurring on the high seas today: The colorful reefs teeming with fish abruptly give way to vast deserts of broken, gray, lifeless coral—the aftermath of dragging huge nets along the ocean floor, killing everything in their path.
“When I first saw the sea as a young boy, it was thought of as a vast wilderness to be tamed and mastered for the benefit of humanity,” says Attenborough in Ocean. “But now, as I approach the end of my life, we know the opposite is true.” Elsewhere, he admits: “After living for nearly 100 years on this planet, I now understand the most important place on Earth is not on land, but at sea.”
While Sir David may have been criticized in the past for not doing enough to sound the alarm regarding the destruction of the natural world, in this documentary he doesn’t mince his words as he explains all the shocking ways we are harming our seas—with a particular emphasis on the blanket destruction caused by bottom trawling. Not only is he enraged that this practice is legal, but he’s also incensed by the fact that it is actively encouraged by governments through subsidies. “Three billion people rely on our ocean for food,” he points out in Ocean. “But ships sent by a few wealthy nations are starving coastal communities of the food source they have relied on for millennia. This is modern colonialism at sea.”
Ultimately, though, Sir David is still hopeful. What he calls the “most remarkable discovery of all”—that the ocean can “recover faster than we had ever imagined”—has kept him from despair. He remembers a time, as a young man, when large-scale commercial whaling had all but wiped out our ocean’s largest inhabitants, but how—against all odds—a global powers bowed to public pressure and worked together to save the whales by enacting a moratorium on commercial whaling. In Ocean, he shows us places where conservation measures have been effective and marine life is thriving, and he’s optimistic about the global commitment to protect 30 percent of the world’s ocean by 2030, established at the 2022 UN Ocean Conference.
At 99, Attenborough’s mellifluous voice is still strong: “It is my great hope that we all come to see the ocean, not as a dark and distant place with little relevance to our lives on land, but as the lifeblood of our home,” he says.
Ocean is in cinemas from May 8th, and will stream on Disney+ on June 8th—UN World Oceans Day.
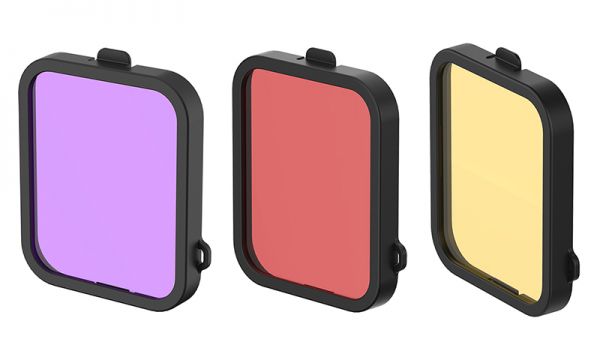
SeaLife Shipping Red, Magenta and Yellow Filters for SportDiver Smartphone Housings
Alongside the release of the SportDiver S, SeaLife has announced a trio of color filters that can be used with all models of the underwater smartphone housing, including the original model and the “Ultra” model as well as the new “S” model. The original red filter—which ships with the SportDiver Ultra but not with the SportDiver S—is joined by a new magenta color-correcting filter for green water applications and a yellow barrier filter for fluorescence imaging. Each filter comes with a lanyard.
Priced at $20 each, the red, magenta and yellow are available from Backscatter and other good retailers.
When purchasing underwater photography equipment like the products mentioned in this article, please support DPG by supporting our retail partner—Backscatter.com.
PRESS RELEASE
SeaLife Offers Color-Correcting Filters for Popular SportDiver Smartphone Housings
MOORESTOWN, NJ – SeaLife, the maker of the SportDiver Underwater Smartphone Housings for iPhone and Android smartphones, has added color correcting filters to their accessory assortment including the original Red color filter for most diving applications; a new Magenta color-correcting filter for green water; and a Yellow filter is available for Fluorescence and UV Imaging, and certain blue water applications.
The filters are designed to restore and correct for color-loss underwater, especially in the red color spectrum. They’re made of an optical acrylic that uses proprietary color pigments. The filters are most effective at depths of 10ft/3m to 60ft/18m and are easily attachable and removeable to the SportDiver optical lens frame while underwater. The filters fit all SeaLife SportDiver models, including the original SportDiver, SportDiver Ultra and the new SportDiver S.
The color filters may be used with or without external underwater lights, depending on the shooting distance and water conditions. The filter also serves as a protective cover for the SportDiver’s optical glass port.
A lanyard is included for attaching the filter to the housing to prevent loss.
Item
Description
US Retail
SL40007
SportDiver Red Color Filter – for most Blue water applications
$20
SL40003
SportDiver Magenta Color Filter – for Green water
$20
SL40005
SportDiver Yellow Color Filter – for UV, Fluoro Lights, Blue water