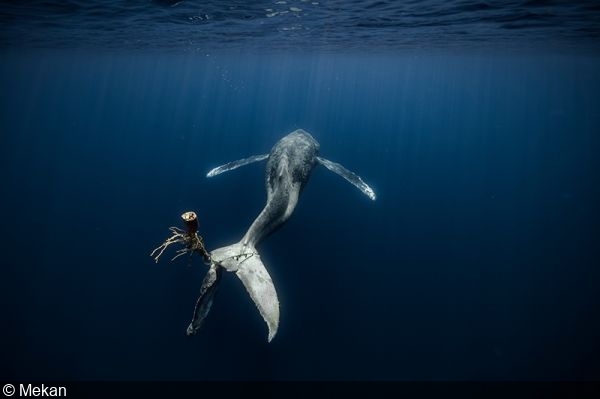
A couple of years ago, a trio of incredible—and incredibly heart-wrenching—photos took first place in the environmental category, “No Time to Waste,” of the UN World Oceans Day Photo Competition, hosted by DPG. Those images of an entangled humpback remain, in my view, among the most arresting underwater photos demonstrating the terrible cost of humanity’s impact on the oceans. I hoped that one day I’d be able to meet the photographer, Álvaro Herrero, aka Mekan, and congratulate him on those striking pictures—and on contributing so powerfully to the conversation about marine protection.
As it turned out, when I finally had the pleasure of meeting Mekan at ADEX earlier this year, I was congratulating him on another amazing achievement: being crowned Underwater Photographer of the Year 2025—this time with a heart-warming shot of a healthy humpback mom and her calf. Mekan isn’t just a lovely guy, modest about his accomplishments; he’s also incredibly passionate and ready to share with anyone who shares his passion. No wonder, then, that this talented Spaniard is the perfect person to be joining Nicolas Remy in the next Underwater Club Masterclass event to talk about “Making a Career in Underwater Photography.”
This promises to be another unmissable two-hour webinar. As well as chatting about some of his most spectacular underwater images, Mekan will be sharing how he has managed to turn his passion into a full-time job. In particular, he’ll be discussing the income streams that make that possible, including leading trips, teaching photo courses, selling prints, and doing photo shoots for clients. Appropriately, Mekan will also cover how to make the most of wins in photo competitions and using social media to support your work. As usual, during the live Q&A portion, participants will get the chance to ask questions. It’s sure to be an extremely inspiring session.
As always, TUC members join for free, while non-members will need to purchase tickets to the event at AU$49 (approx. US$35). Note that this is also the price of monthly membership, so this is the perfect opportunity to join the club and take advantage of all of the membership benefits.
Do you, like me, find black and white images incredibly evocative? They seem to draw us in more than colour, have more sense of life and of story. There are a few genres of photography that are not suited to monochrome, but one that most definitely is, is the urban landscape.
There is so much in urban areas that lends itself to black and white. Amble areas of light and shade, textures, form and most importantly geometry and symmetry.
Today we are going to explore how to elevate your urban images into artistic black and whites.
The simple fact is, that not every urban shot you take will be suited to black and white. To shoot great black and white shots you need to see in black and white. Now, that might seem quite an odd statement, especially given the billions of colours our eyes are capable of recording, but hear me out.
Identifying a black and white urban image is not literally about seeing in black and white. It’s about identifying the elements that go into making a great black and white photo.
Some of the most important are the interplay of light and shade and the use of lines of contrast. Light and shade are, perhaps, more important in black and white than in colour. The depth of the blacks define how we react to an image emotionally, the harder the black the more gritty and harsh the image can feel.
Lines of contrast lead our eye around the image. This contrast need not be pure black or white, but well defined graduations of tone that give depth to an image.
One tip, if you struggle with “seeing” black and white in your urban landscapes is to shoot in a black and white mode. On many cameras, this will turn the viewfinder/LCD monochrome as well, making it easier for you to see if the shot works. Make sure you are shooting RAW and JPEG though as the RAW file will give us so much more latitude when editing.
Briefly, it is important to know that colour is vital to our black and white shots. Assuming we have shot RAW (see above), we can increase or decrease the luminance of any of the primary colours. For example when editing a blue sky, we can decrease the blue luminance to make that sky much darker.
The urban environment is full of colour, from the faded to the bold. When we are shooting we can identify those blocks of colours that we either wish to enhance or reduce in significance.
For example a bright yellow sign with bold lettering might make an interesting subject to our urban shot. By decreasing the luminance of the blue channel (opposite to yellow) we can brighten up that sign and separate it from the rest of the image. The same can be true of faded colours, we can enhance or reduce their intensity according to how relevant we wish them to be in the image.
Once you have found the ability to “see” in black and white, you will see monochrome opportunities around every corner. There are several elements in the urban environment that we can identify for black and white shots. The first are the shapes, forms and textures of the manmade. Another is the human element, the stories of the people in that built environment – these also cross genres with street photography. Another important black and white element can be the way nature interacts with the urban.
In man made we are looking for the way the light interacts with structures. How light casts shadows and creates depth and form to our shots. We are looking for symmetry and geometry. A symmetrical image of a building can look great but add in a person to one side and you add tension to the shot. In black and white, this can look amazing.
Textures are everywhere in urban areas, from the rust of the manmade to the bark of a tree. Low directional light makes these textures pop whilst shallow depth of field hints at the location. Graffiti and urban decay are also fantastic black and white subjects in cities and towns
The way the natural works with the manmade is another great area to focus on with your black and white urban images. The lone tree in front of a modern structure. A line of park benches in an urban park. There is so much to look for and shoot.
Taking a good black and white is half the job. Editing it is the other half. These days it’s not difficult to edit great black and white urban shots. Tools like Lightroom Classic have a plethora of functions to help us get good black and white images.
There are some things that you can do to add punch though. Convert the image using a colour profile, this will give you a good starting point. Use the black and white sliders to adjust the amount of overall contrast you are looking for. Pushing to the ends of the histogram (or even beyond) will give maximum contrast whilst pulling the blacks and whites inside the histogram will reduce the contrast.
The clarity and texture sliders are great tools for managing mid tone contrasts, and are especially useful in punching out textures. Use masking tools to isolate areas of textures and enhance them.
As mentioned earlier the use of RGB sliders can allow us to manipulate individual colour channels within our black and white urban images giving us huge control over the way they look.
Editing the urban environment in black and white is an immensely satisfying thing to do, be it a few hours or few years after you took the original image.
As we mentioned at the top, the urban environment is, perhaps, the best place you will find to elevate your black and white photos to more artistic images.
It’s hard not to find great black and white shots in towns and cities but it will take some practice to both start seeing in black and white and finding compositions to enhance your monochrome shots. But, as they say, practice makes perfect, and with the cameras and editing tools we have to hand today, practice is also immensely satisfying
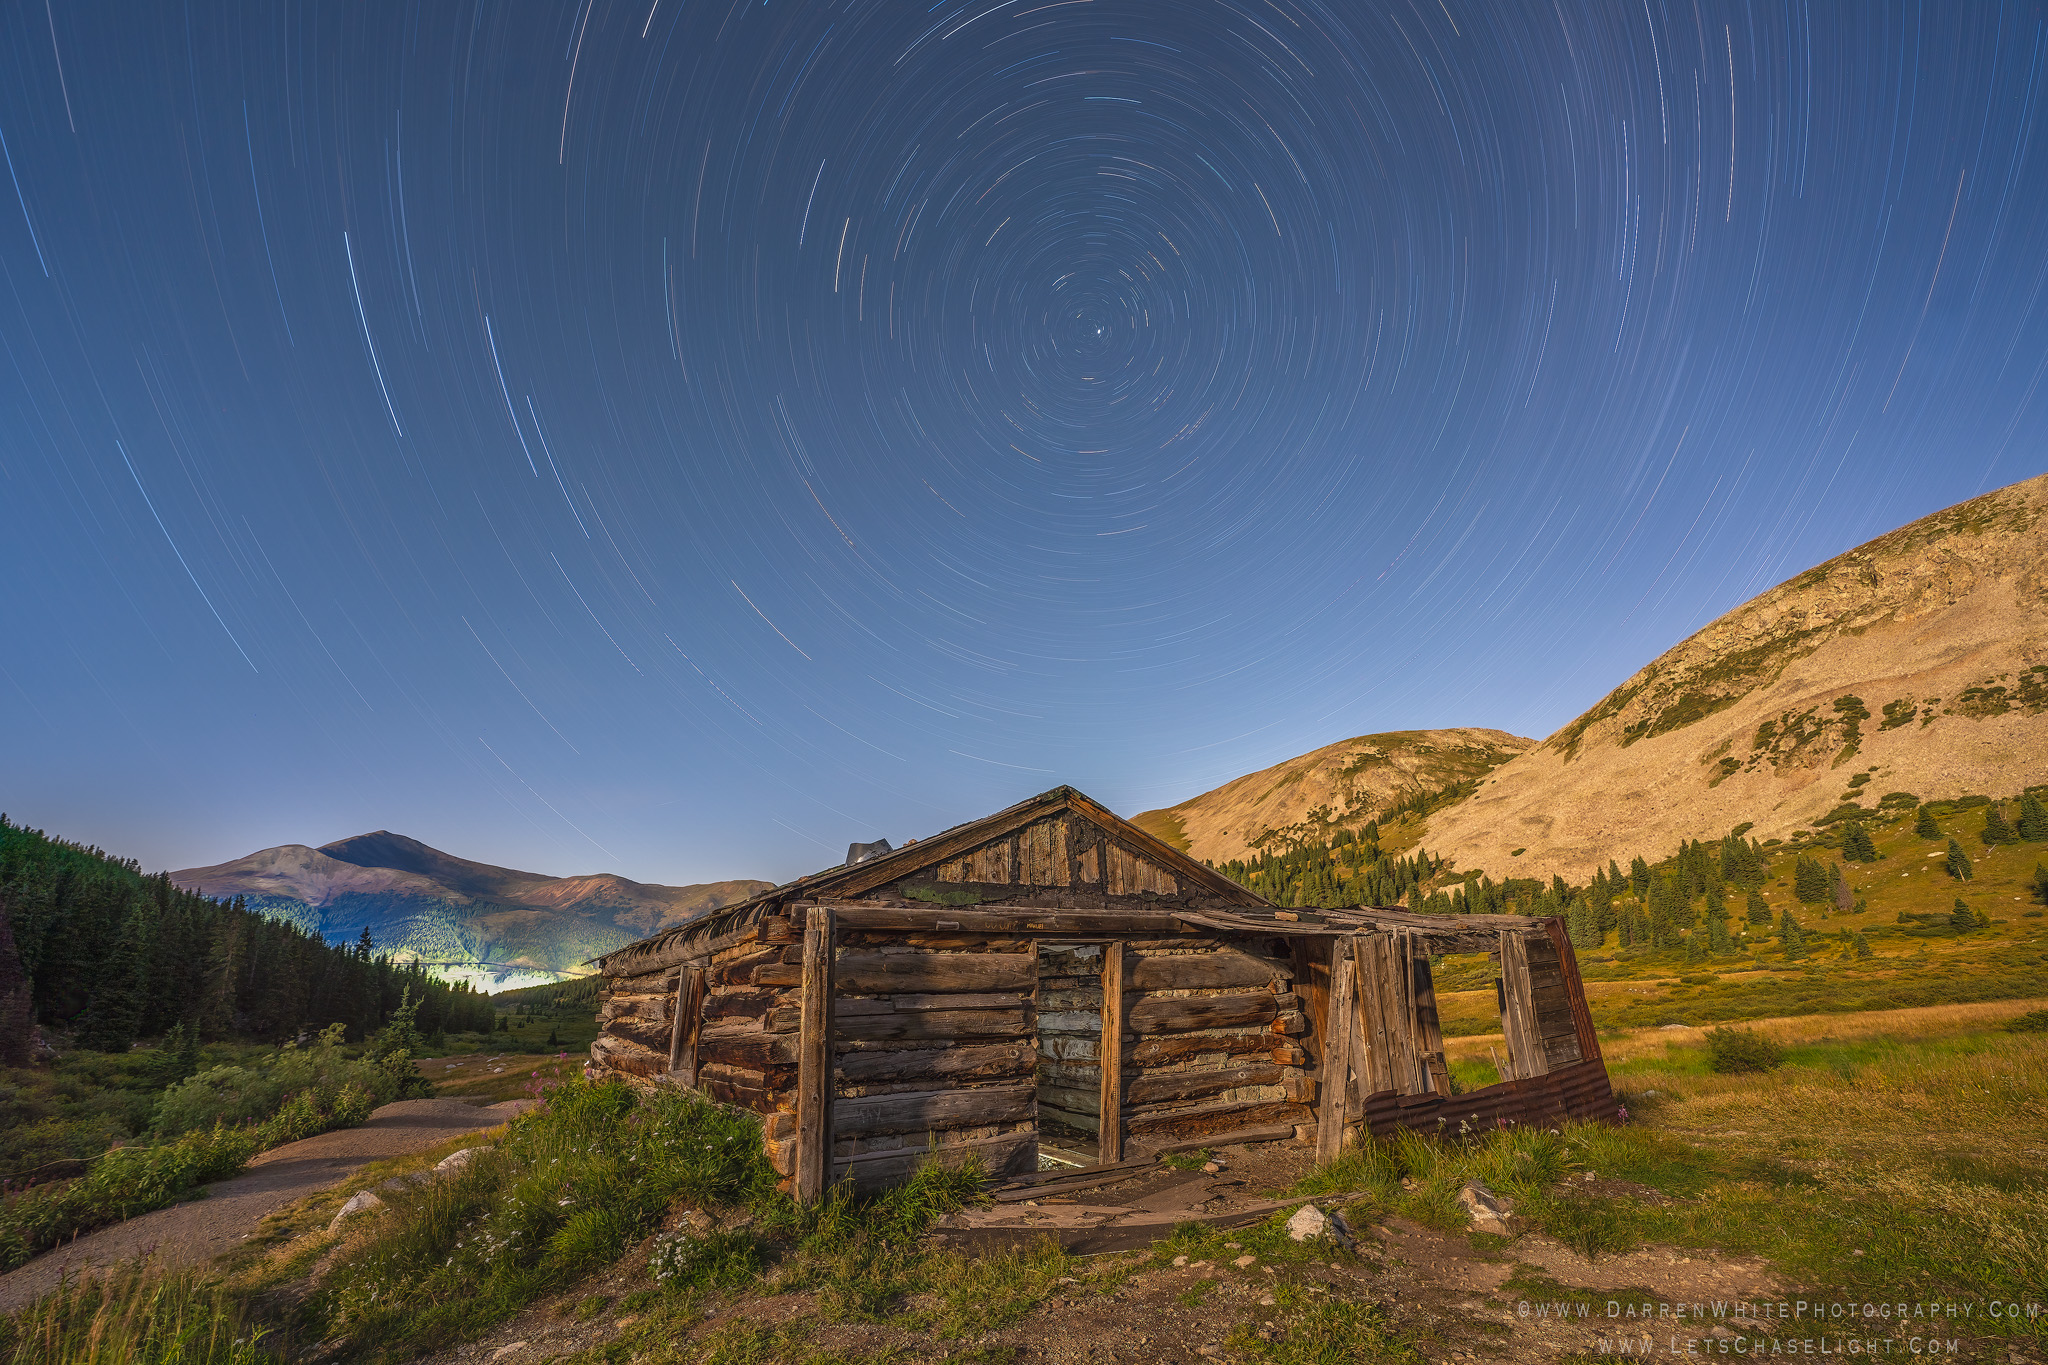
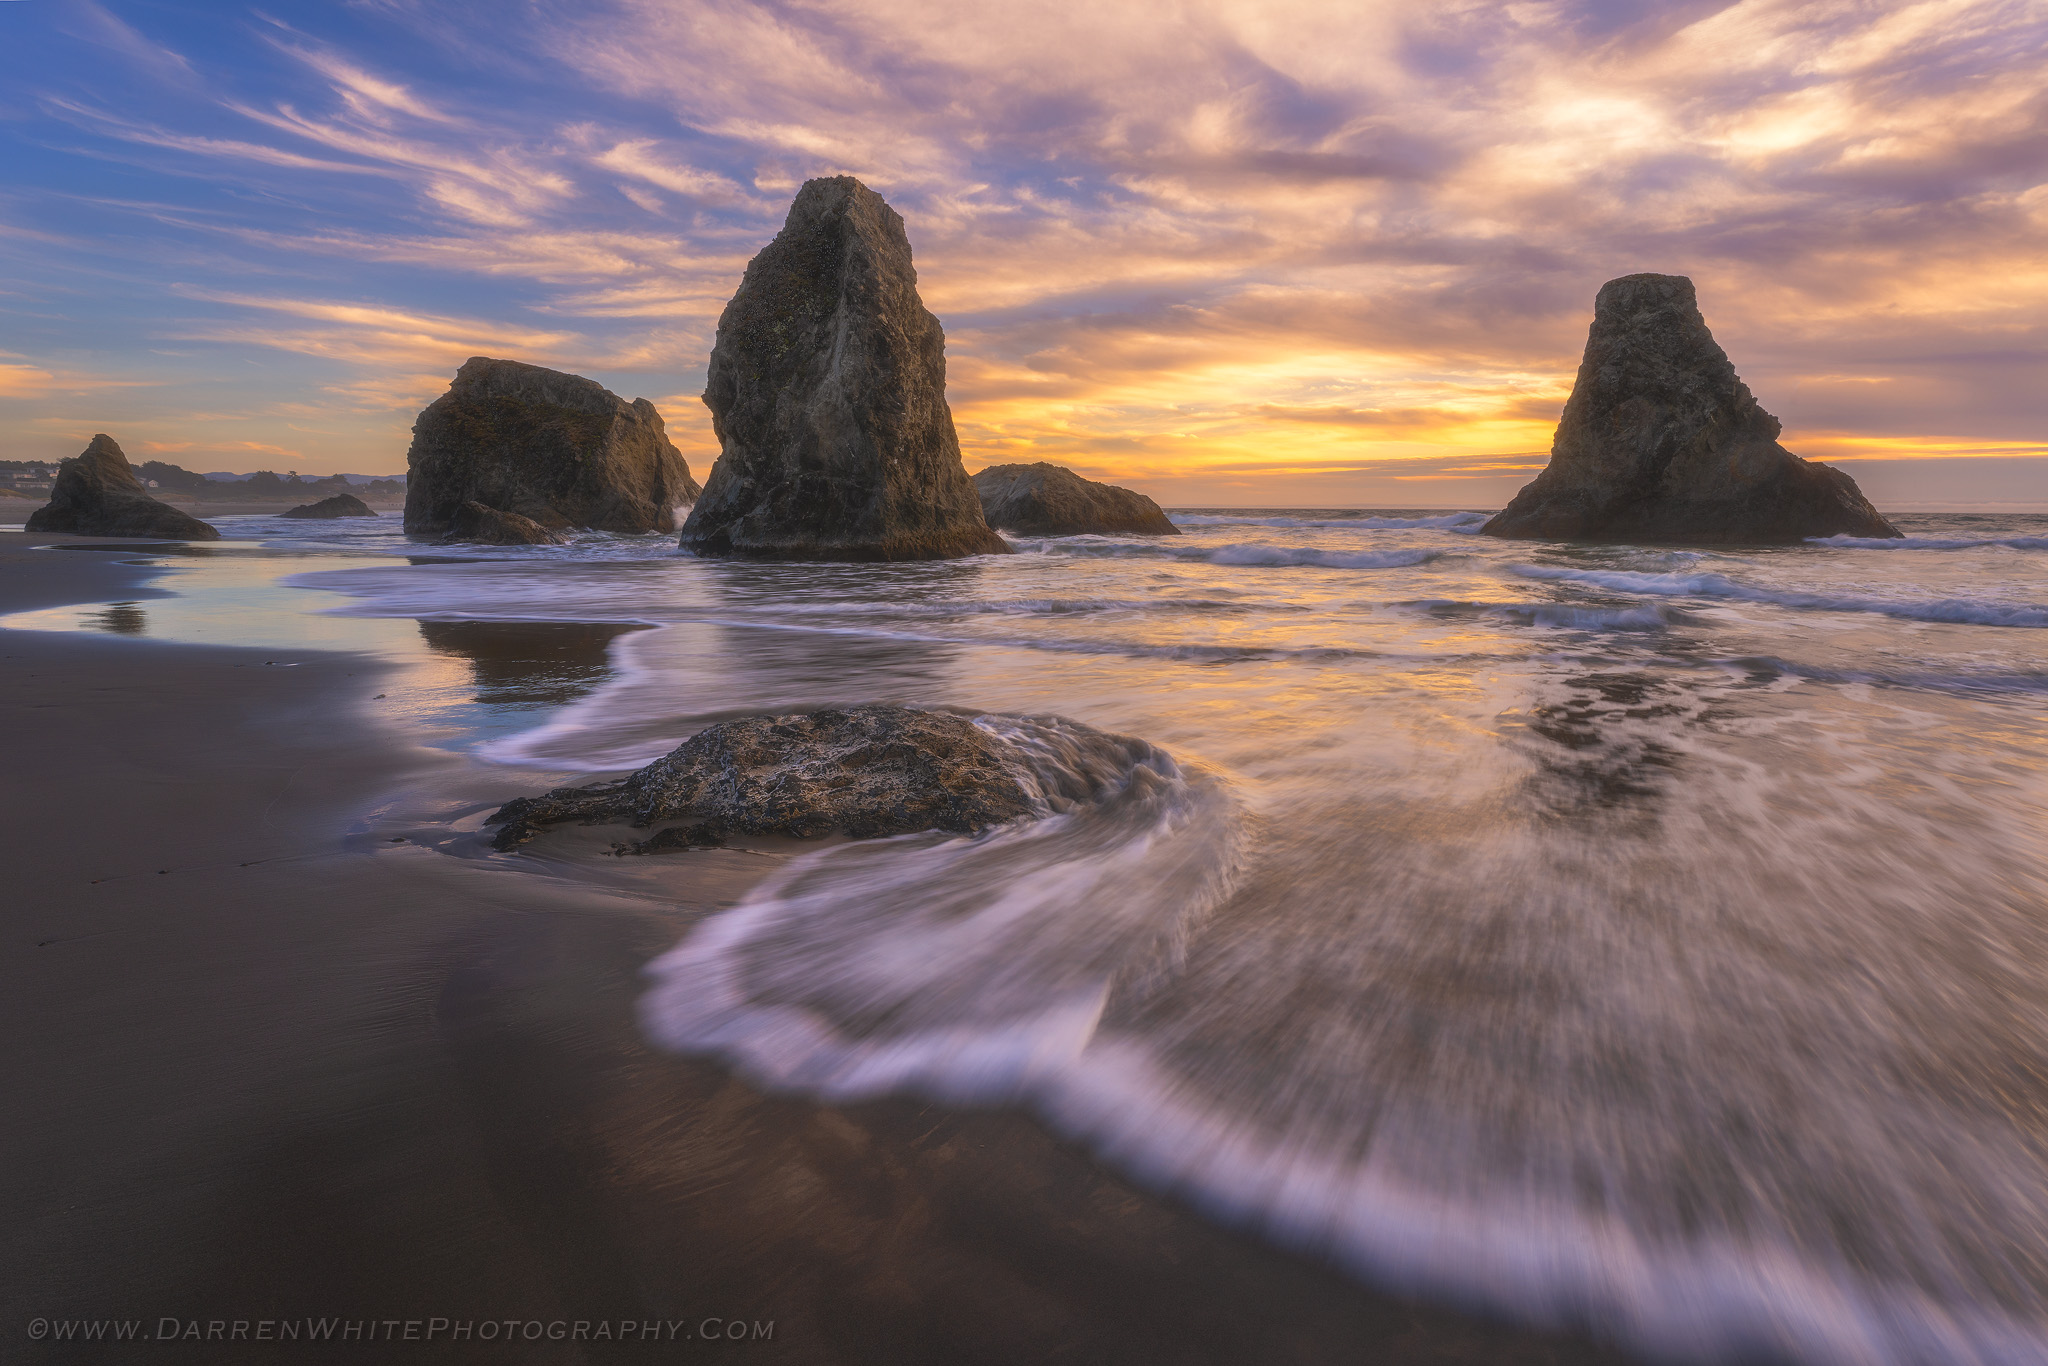
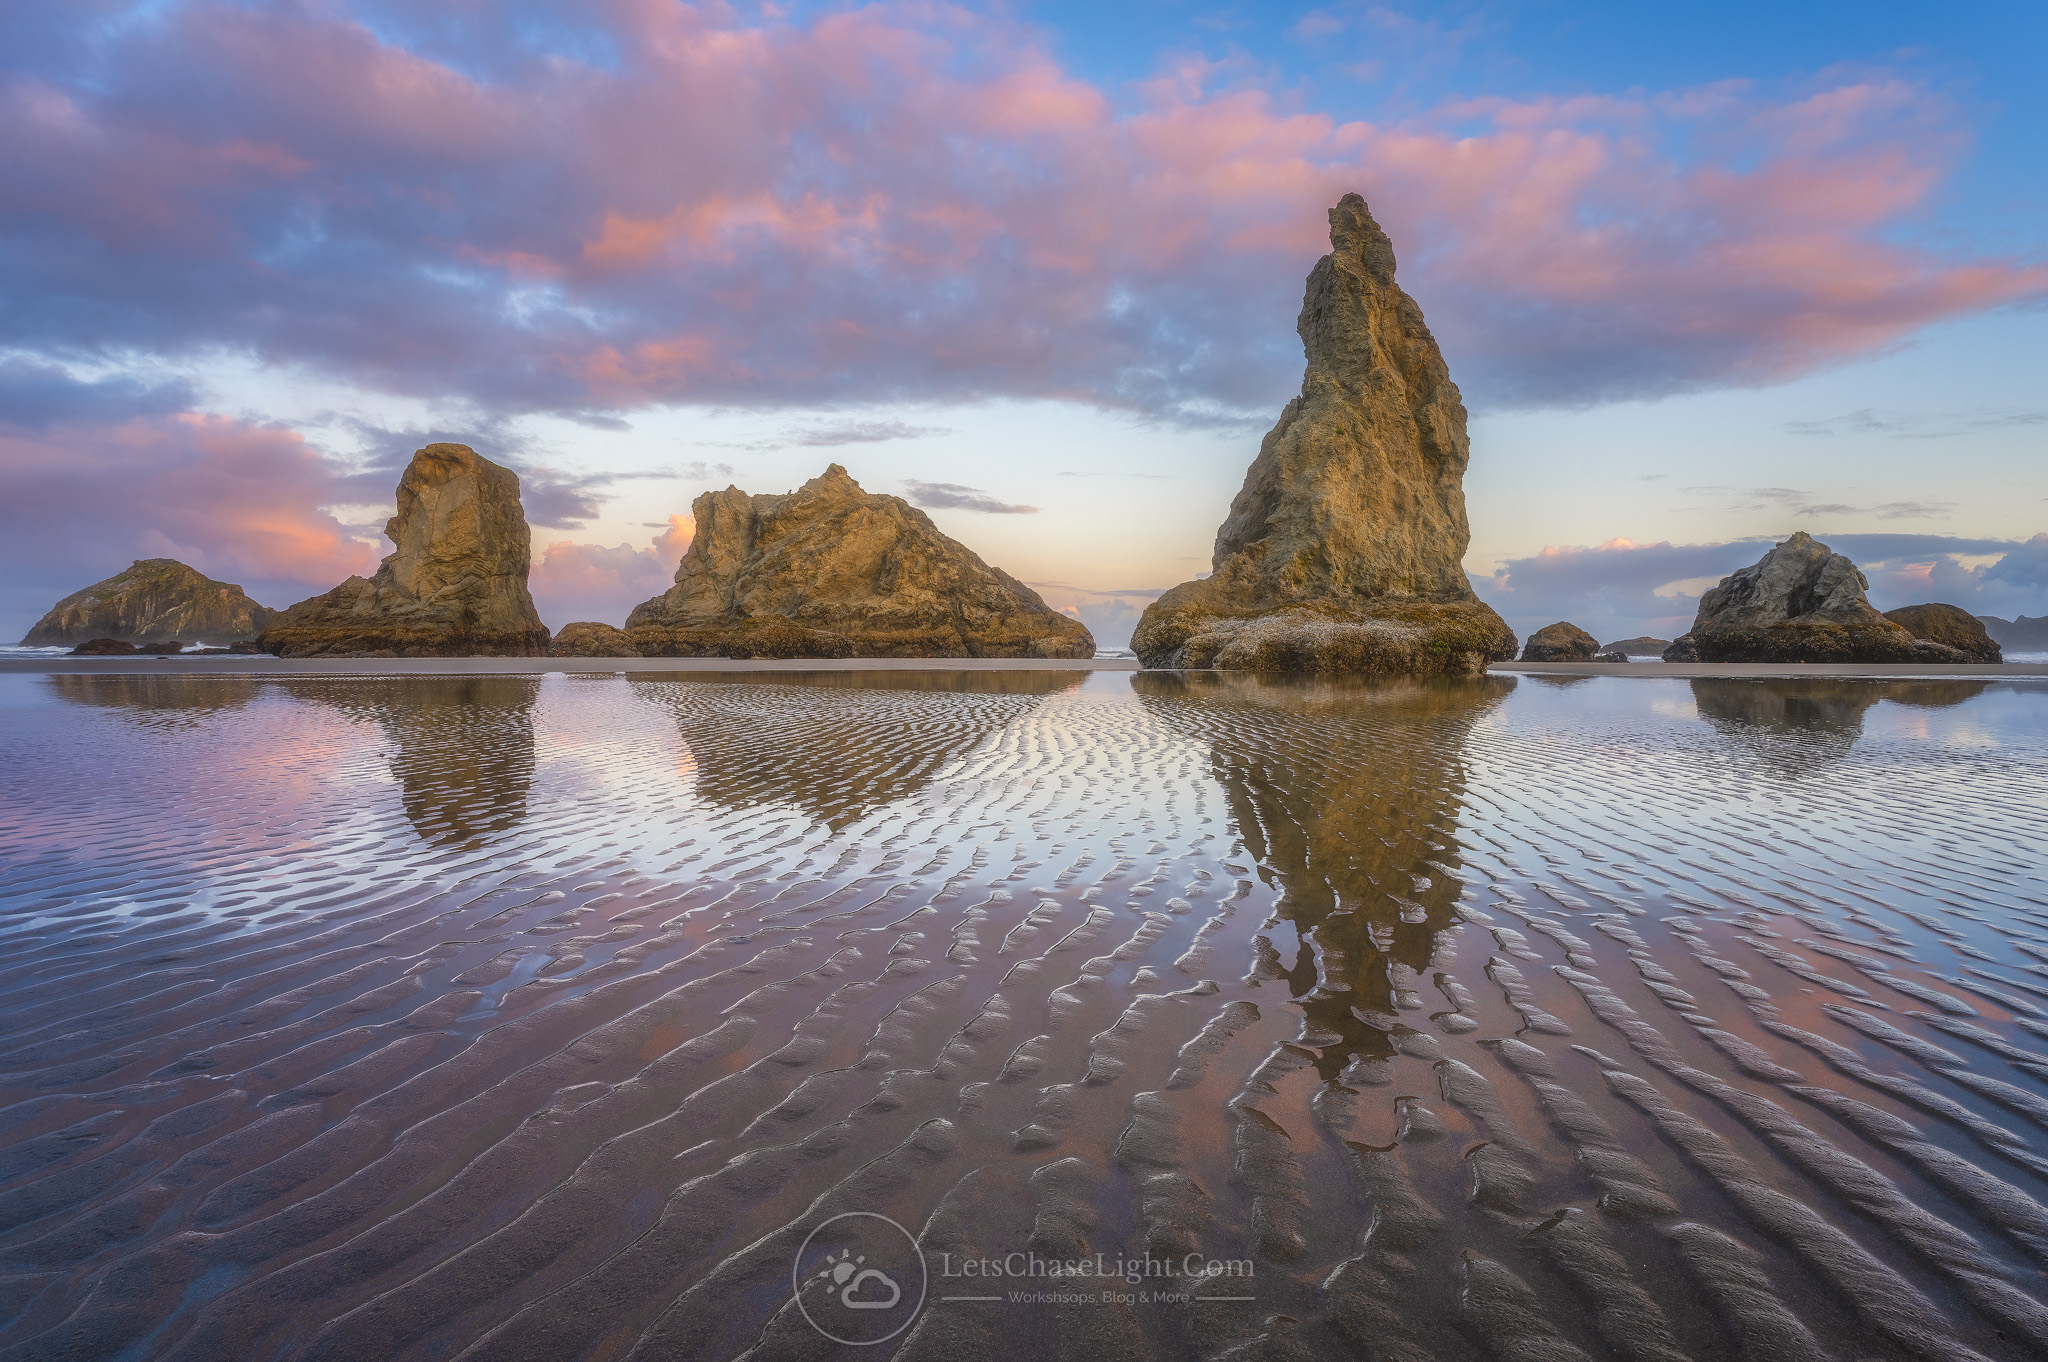
Sigma 14-24mm F2.8 DG DN | Art Sony A7R IV 14mm, F2.8, 13s, ISO 6400
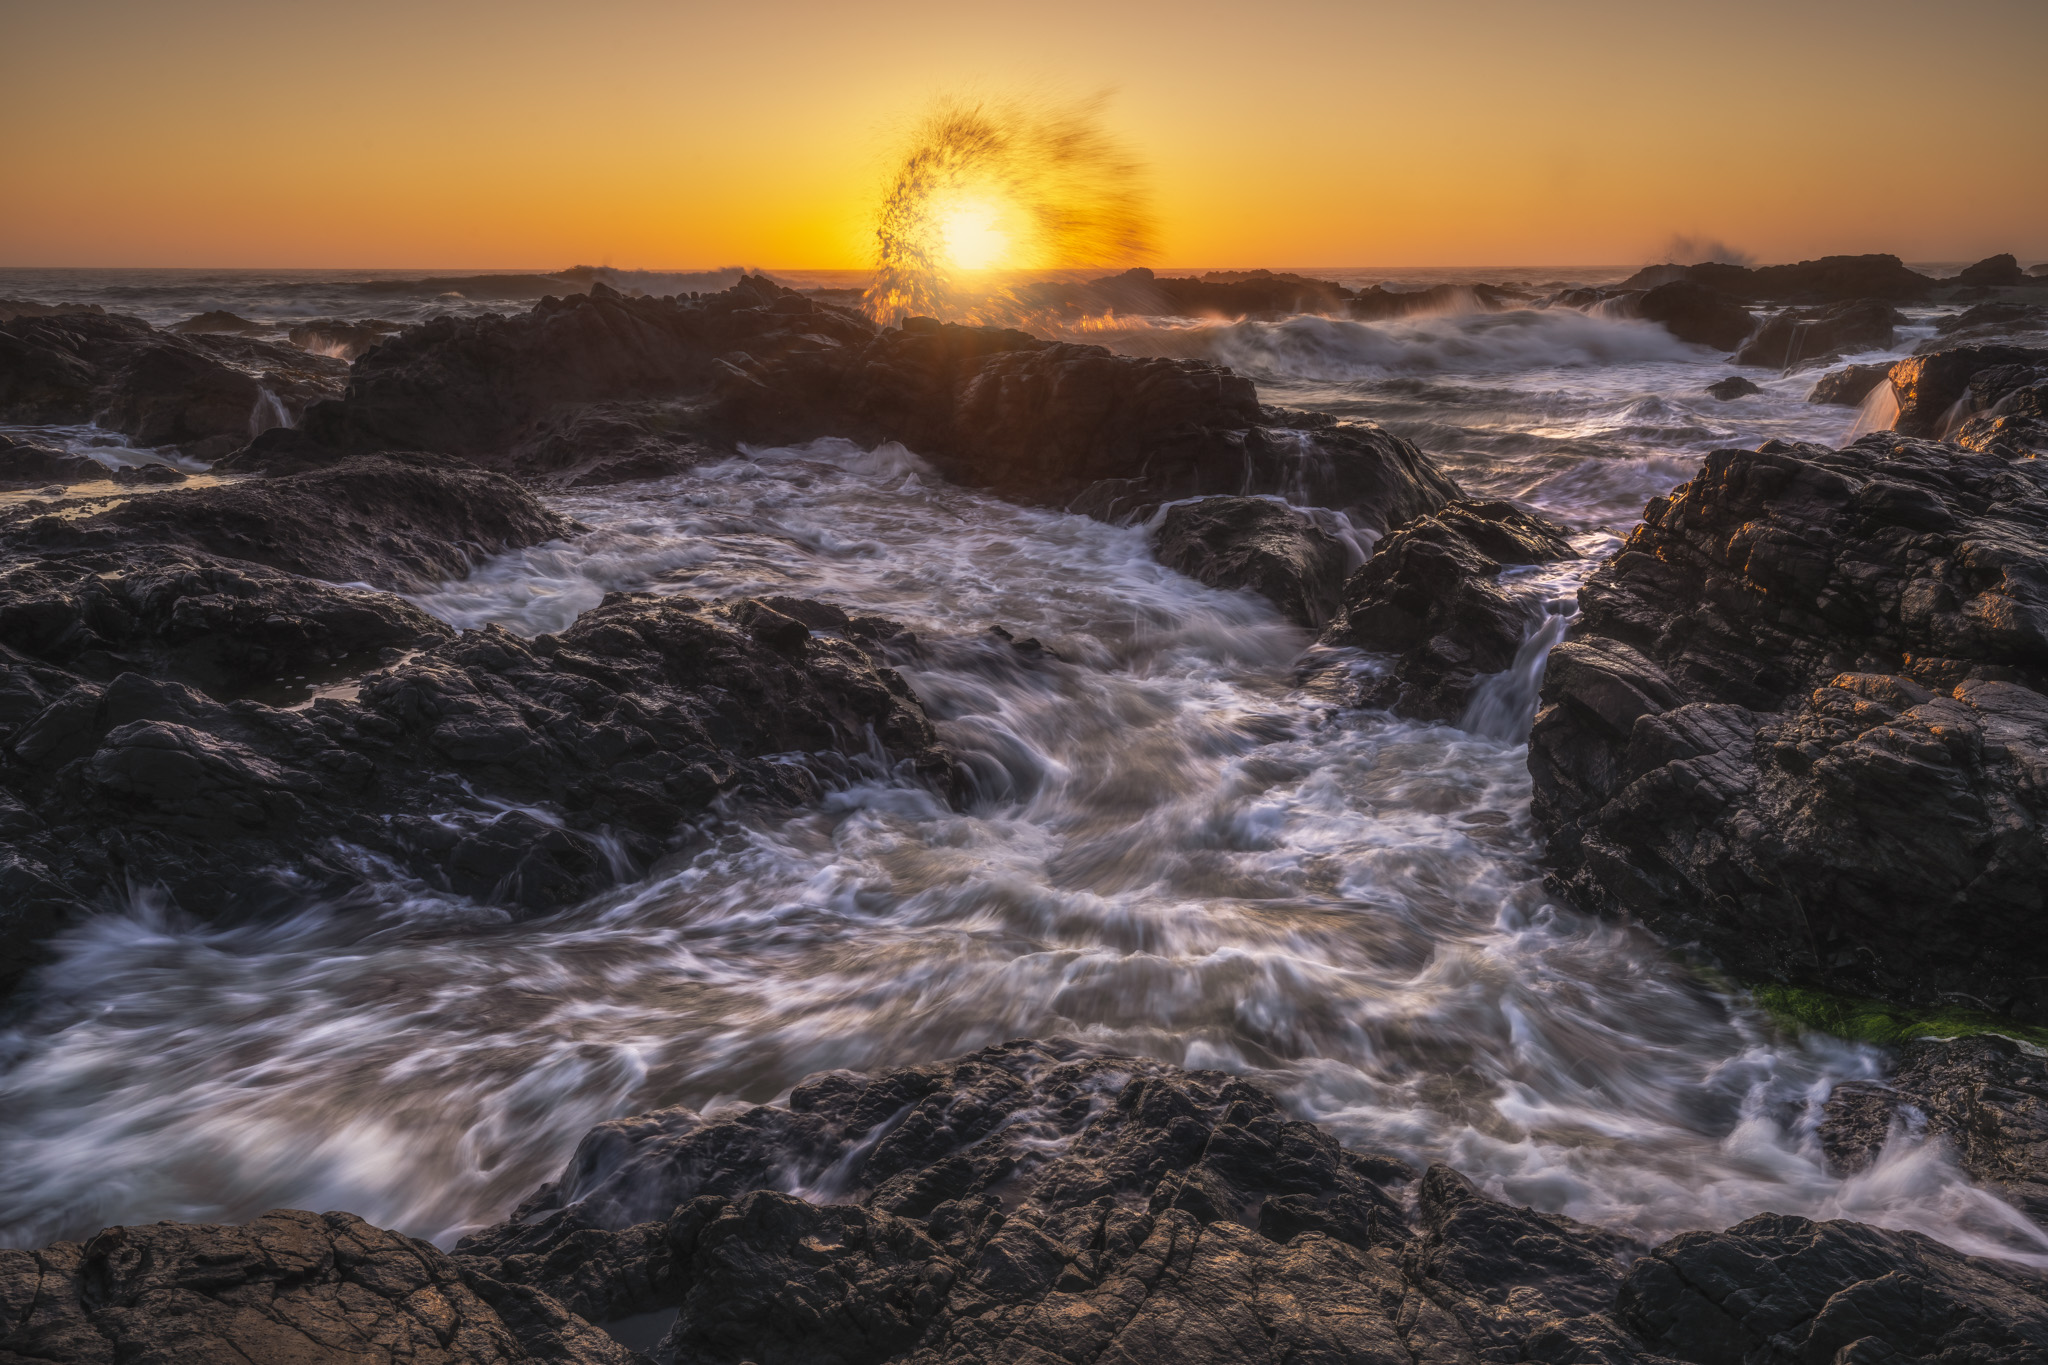
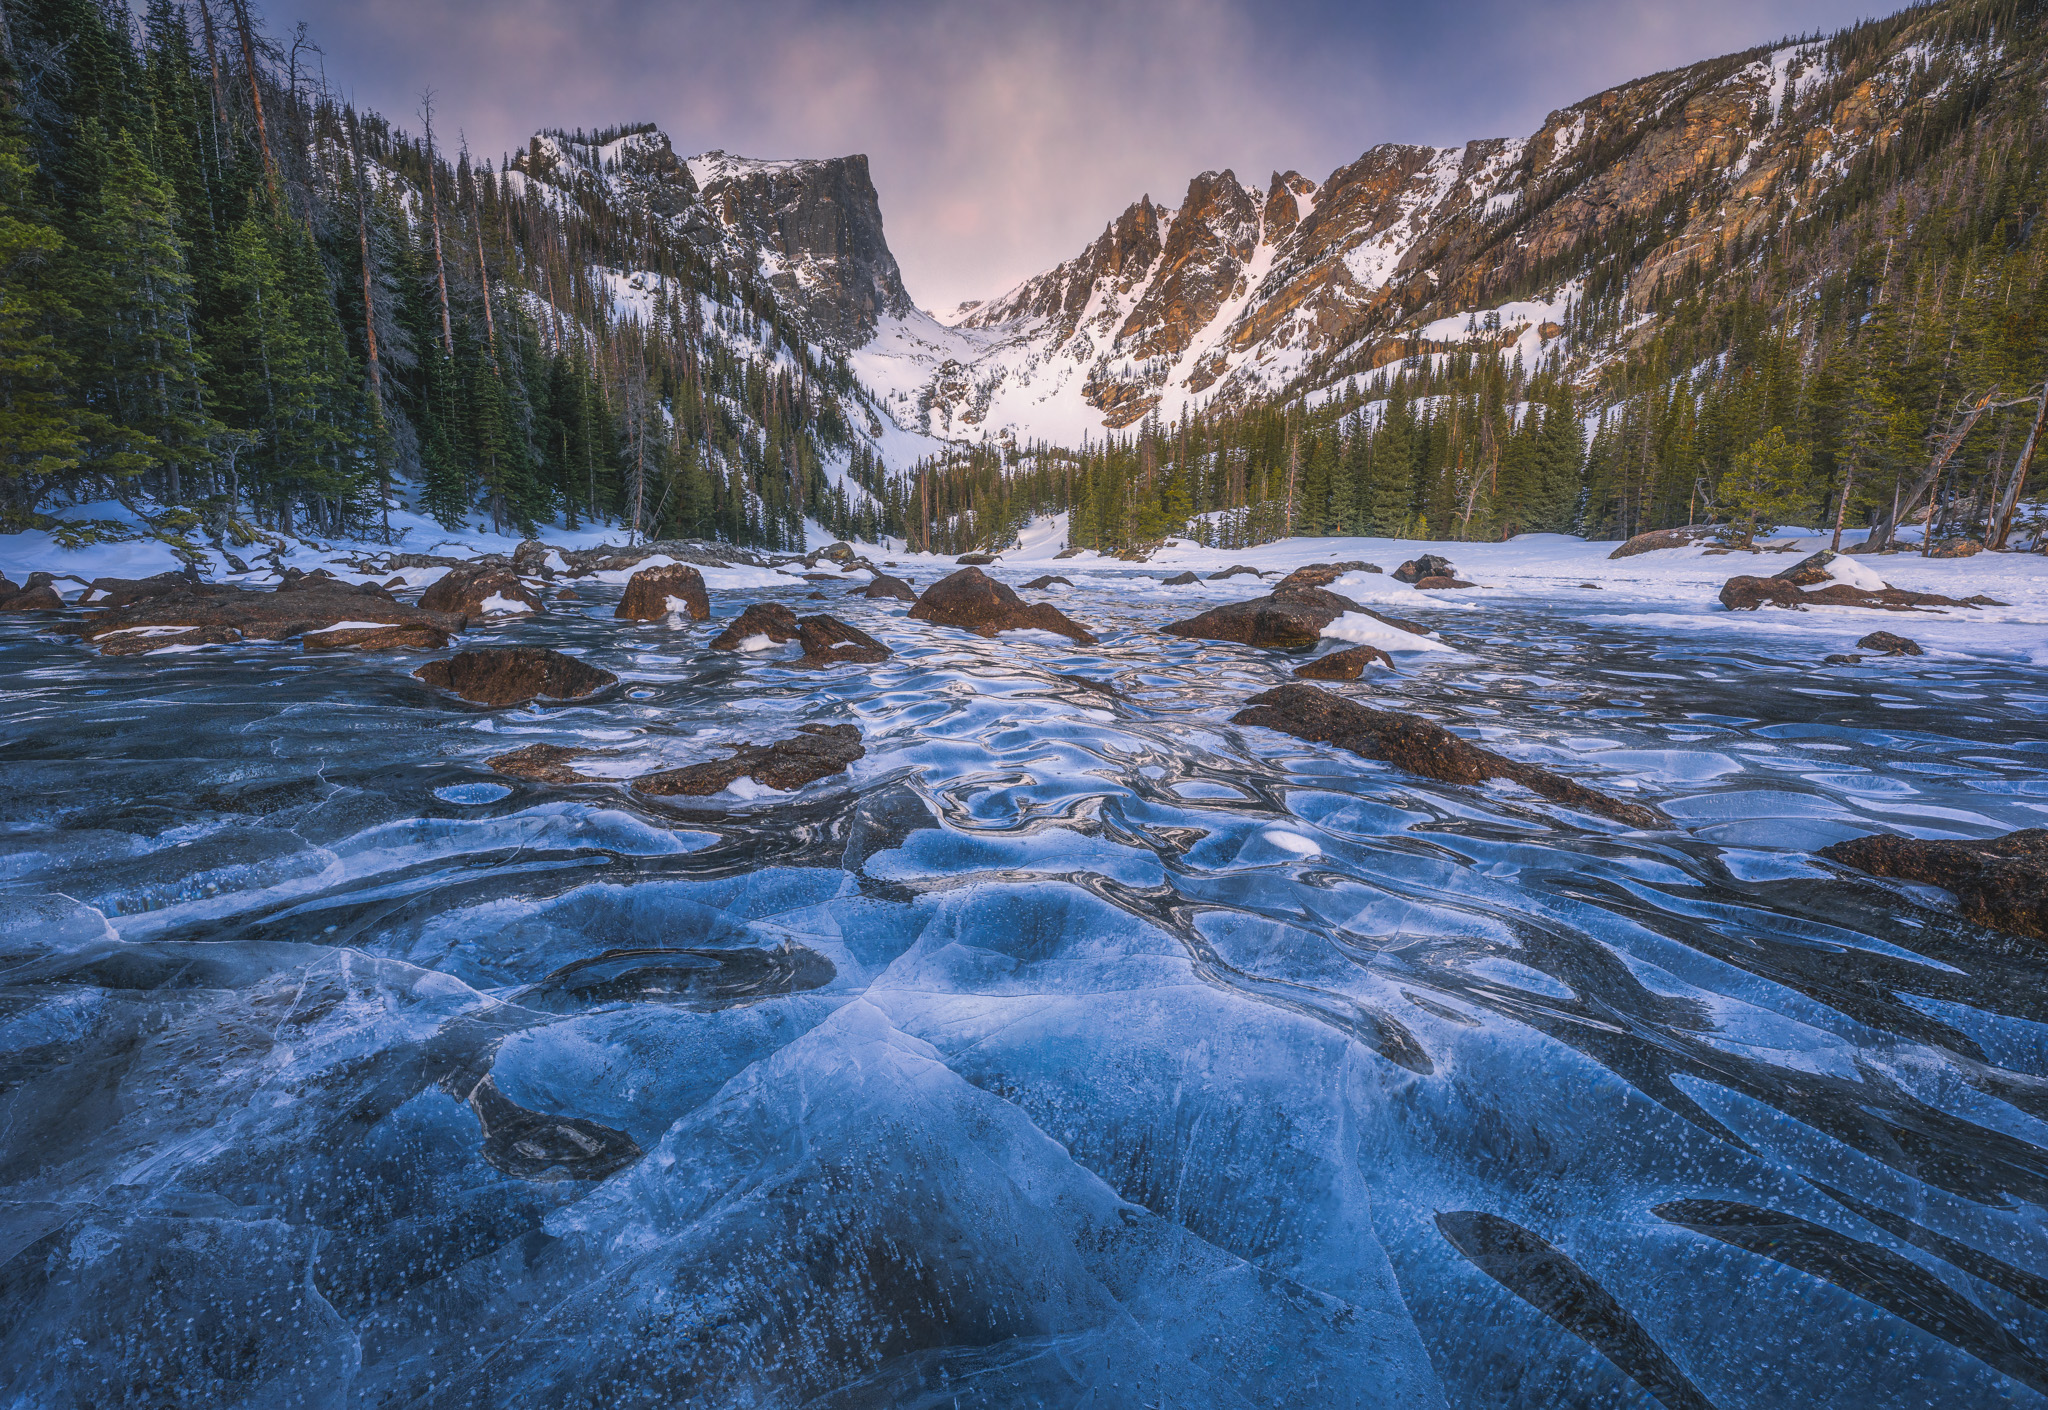
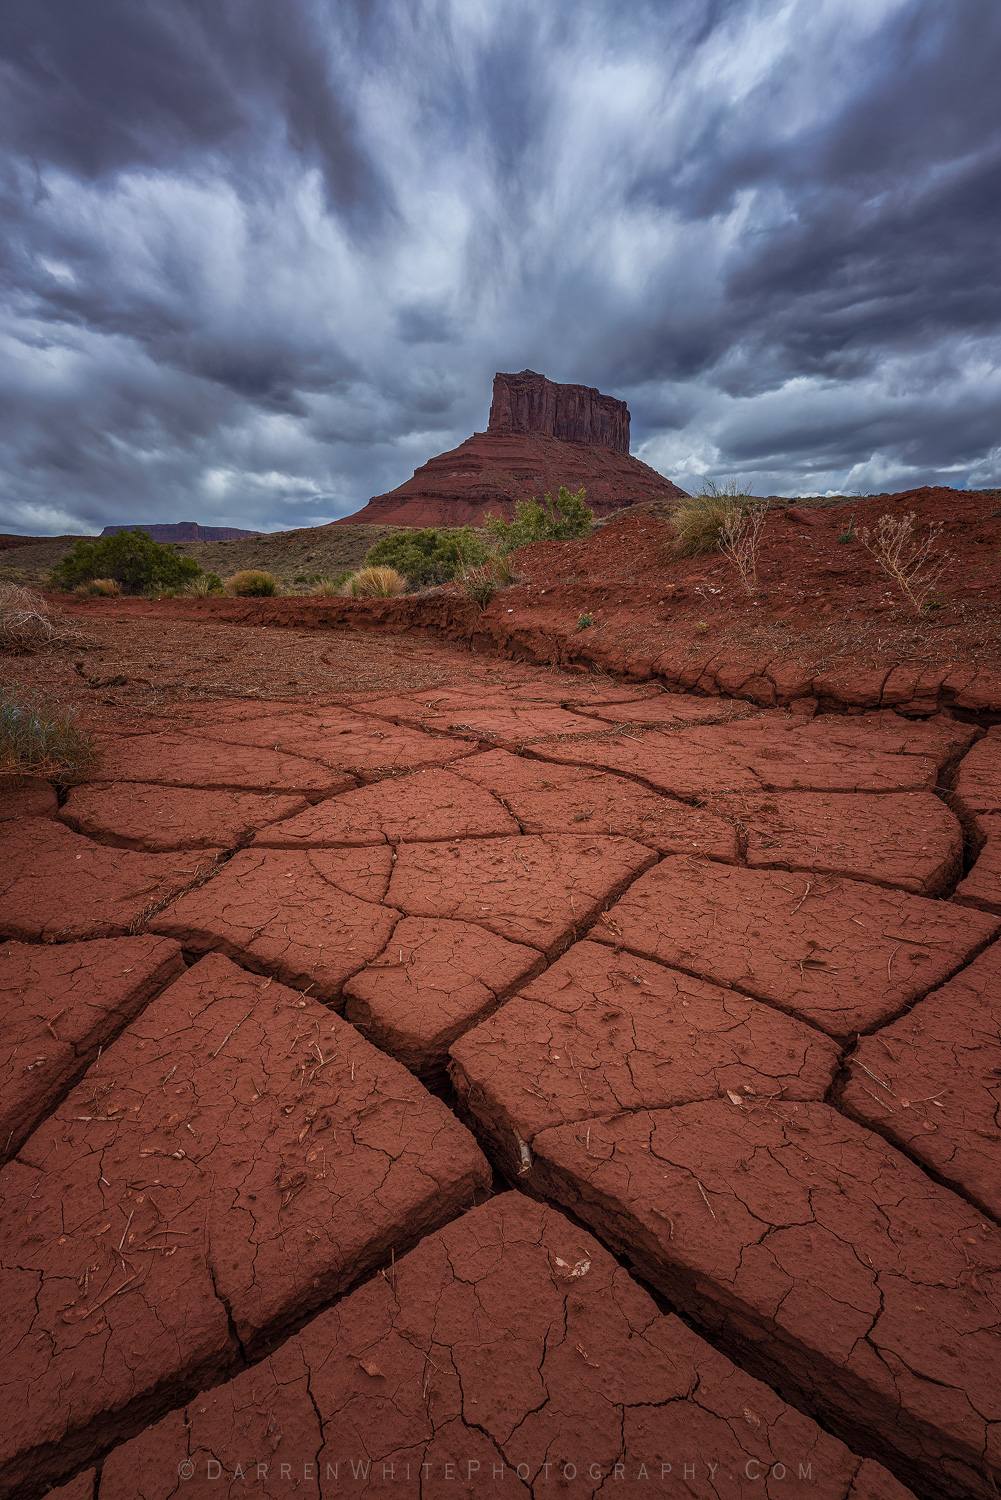
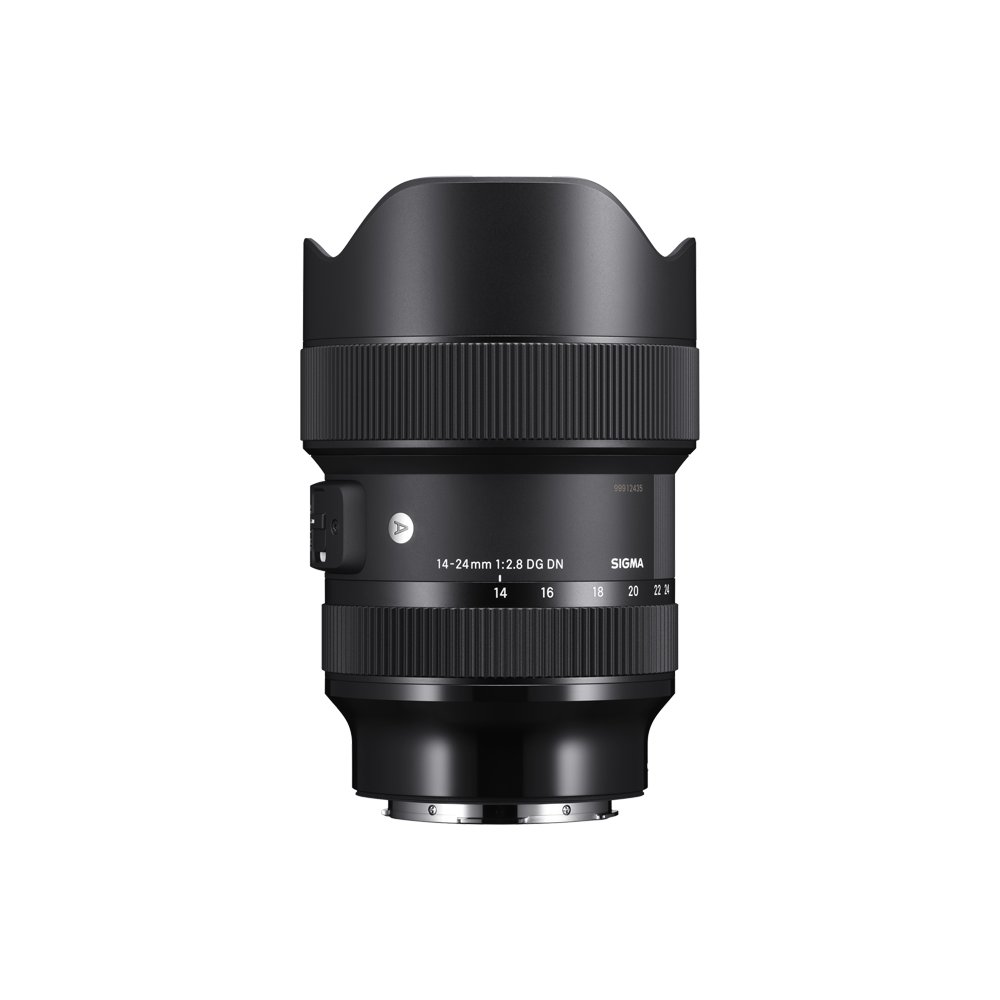
Sigma presents a gallery of images by professional photographer Darren White. This gallery is comprised entirely of photos shot with the 14-24mm F2.8 DG DN | Art lens, released in 2019 for full-frame format mirrorless cameras.
The Sigma 14-24mm F2.8 DG DN | Art lens mounted on a full-frame mirrorless Sony camera body.
With the Sigma 14-24mm Art lens, you get edge-to-edge sharpness, minimal distortion (even at 14mm), and color rendering that will make your edits feel almost unnecessary. I own and use both the Sony E-mount and older Nikon F versions, and love them equally the same!
Weather sealed, rock solid build and surprisingly compact for what it offers, it’s the lens that says, “Go ahead, dust, rain & cold. Bring it on!” As a professional landscape photographer I shoot in all extreme conditions, and this lens will hold up in any of them.
Darren White, Professional Photographer
Sigma 14-24mm F2.8 DG DN | Art Sony A7R IV 14mm, F2.8, 10s, ISO 3200Sigma 14-24mm F2.8 DG DN | Art Sony A7R IV 14mm, F5, ISO 64Sigma 14-24mm F2.8 DG DN | Art Sony A7R IV 16mm, F18, 1/6s, ISO 50Sigma 14-24mm F2.8 DG DN | Art Sony A7R IV 23mm, F16, 1/10s, ISO 50Sigma 14-24mm F2.8 DG DN | Art Sony A7R IV 15mm, F6.3, 30s, ISO 1600Sigma 14-24mm F2.8 DG DN | Art Sony A7R IV 14mm, F10, 1/30s, ISO 64
Sigma 14-24mm F2.8 DG DN | Art Sigma fp L 14mm, F13, 1/125s, ISO 100Sigma 14-24mm F2.8 DG DN | Art Nikon Z8 14mm, F4, 30s, ISO 400
Sigma 14-24mm F2.8 DG DN | Art Sony A7C II 24mm, F10, 1/100s, ISO 64
Sigma 14-24mm F2.8 DG DN | Art Sony A7R IV 14mm, F7.1, 1/50s, ISO 100Sigma 14-24mm F2.8 DG DN | Art Sony A7R IV 14mm, F2.8, 15s, ISO 10000
Sigma 14-24mm F2.8 DG DN | Art Sigma fp L 14mm, F7.1, 125s, ISO 32Sigma 14-24mm F2.8 DG DN | Art Sony A7R IV 17mm, F16, 1/400s, ISO 64Sigma 14-24mm F2.8 DG DN | Art Sony A7R IV 16mm, F11, 1/6s, ISO 64Sigma 14-24mm F2.8 DG DN | Art Sony A7R IV 16mm, F9, 1/160s, ISO 100
Get your lens direct from Sigma:
About
Born and raised on the Oregon Coast where his love for beautiful landscapes began. In 1999 Darren moved to Portland Oregon and soon fell in love with the mountains and Columbia River Gorge areas. In July of 2013 Darren made a huge move to Littleton, Colorado where he has quickly fell in love with the majestic mountains Colorado has to offer and the outdoor life Colorado is known for.
Darren has been published in various magazines like Popular Photography, Columbia Gorge Magazine and had a mention in National Geographic Traveler. His prints have been sold worldwide and used for all kinds of media from Websites to Trade Show Backdrops.
Darren enjoys a variety of outdoors activities which include but are not limited to, hiking, biking, running, night photography, trail running, climbing steep hills and simply just being amazed at what nature can produce!
Equipment used
EXPLORE MORE
Photographer Etsuko Aimu captures images of her children with the Sigma 17-40mm F1.8 DC | Art lens mounted on a Canon EOS R7 mirrorless camera. This APS-C format combination produces beautiful photos for memories that last a lifetime, and beyond.
With the Sigma 17-40mm F1.8 DC | Art lens at his side, photographer and cinematographer Naoki Miyashita visits a Kyoto pottery workshop to find out just how well this modern evolution of a beloved APS-C zoom lens performs.
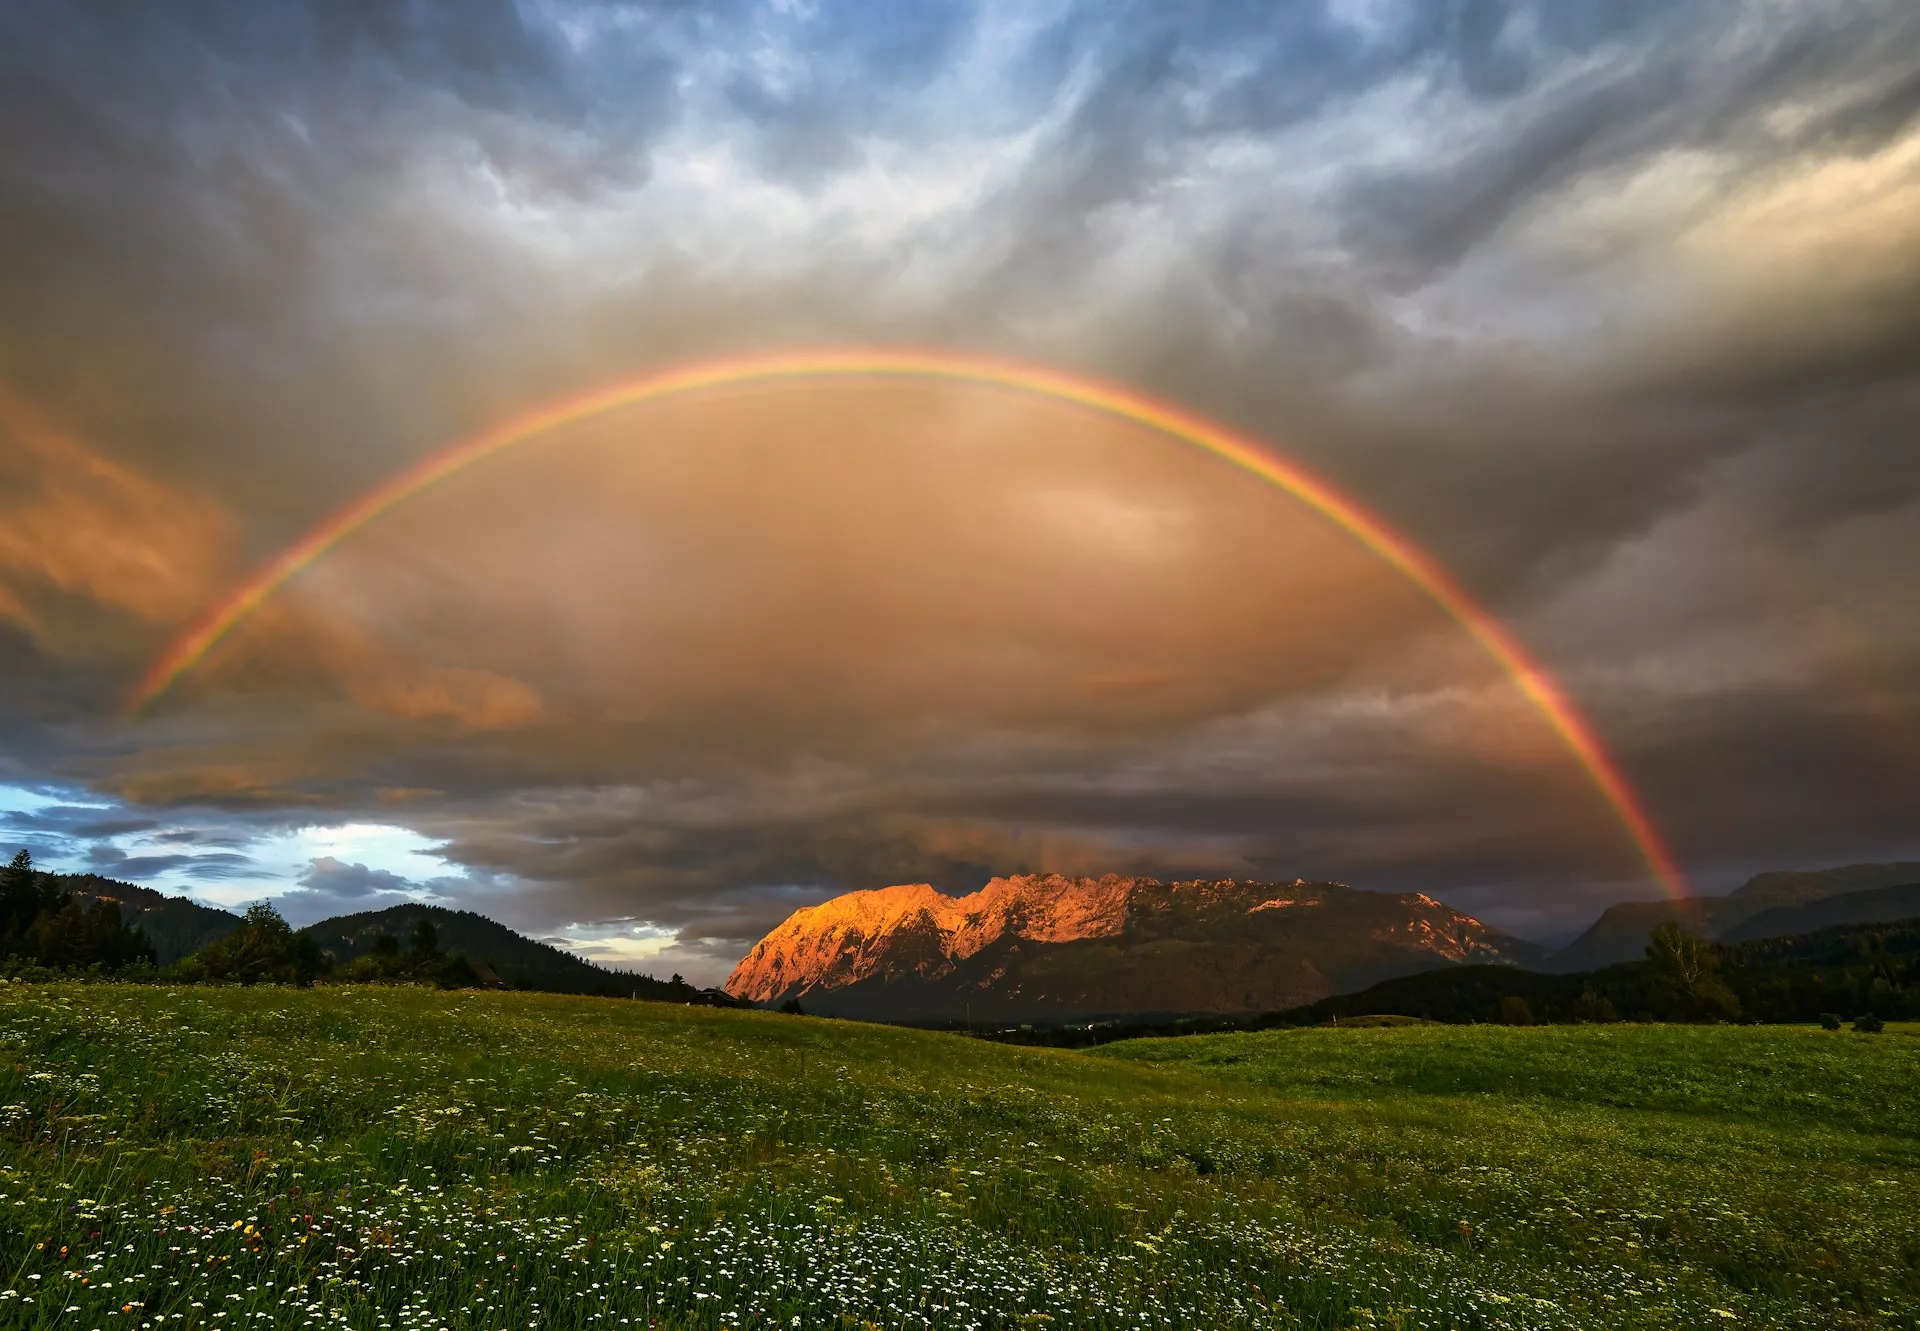
We all may have seen a rainbow at some point and it may have been in strange places even like a waterfall, due to sea spray or even when watering plants in the garden. The most common occurrence of rainbows is when sunlight hits raindrops or water particles when the air is moist after a rain, but even moonlight can cause rainbows.
A rainbow is actually an optical illusion and seeing a rainbow depends on where you are standing with respect to the sun and at what angle the sunlight is falling on the waterdrops. The same applies for any form of rainbow seen elsewhere.
Now capturing just rainbows can seem quite boring, for example, just a colourful arc in the sky. It is always important to compose the shots to make the final photo look interesting and meaningful. Here are 29 striking rainbow photos that have been shot well.
If you would like to master composition in any genre of photography and create brilliant photographs, then you should check out this eBook “Understanding Composition” by Photzy. This guide is packed with illustrations for visual learning, case studies, and assignments that will help to verify your knowledge.
Photo by Zoltan Tasi
Photo by Austin Schmid
Photo by NOAA
Photo by Karson
Photo by Chris Barbalis
Photo by greg_nunes
Photo by Cosmic Timetraveler
Photo by David Brooke Martin
Photo by Todd Cravens
Photo by Jared Erondu
We all know that composition is the secret to incredible photography and if you want to learn how to determine the flow of a scene so that setting up a perfect shot is effortless, then you should check out “Understanding Composition” by Photzy. This complete hands-on guide with easy to understand case studies covering the “What” and “Why” of photography composition, can make learning a breeze.
Photo by Sorasak
Photo by Dario Mueller
Photo by Zdeněk Macháček
Photo by Lucie Dawson
Photo by Jorge Fernández Salas
Photo by DIEU
Photo by Jesse Gardner
Photo by Dylan Gialanella
Photo by Marcus Woodbridge
Photo by Zoltan Tasi
If you want to learn to spot great composition in a scene quickly, so you don’t miss out on those brilliant shots again, then you should check out “Understanding Composition” by Photzy. You will no longer feel overwhelmed by not being able to get the shots you really want. The 120 pages eBook comes with step-by-step information that contains 25 key lessons, 77 example images, 23 assignments and 1 printable composition checklist, all helpful to get a perfect shot.
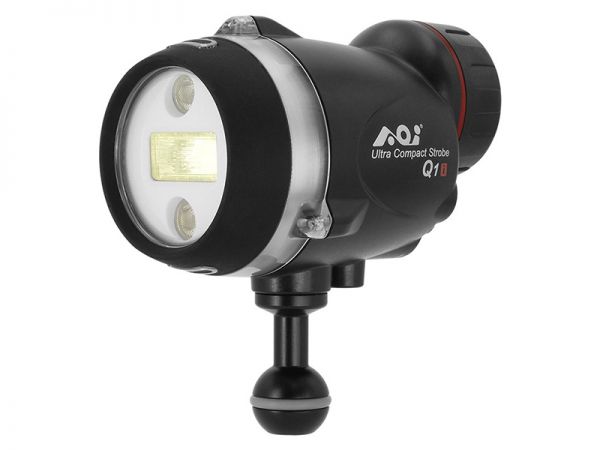
AOI has released a new addition to its Q1-series of Ultra Compact Strobes, which includes the UCS-Q1 and UCS-Q1 RC. The UCS-Q1i was unveiled at the recent Malaysia International Dive Exhibition (MIDE) in Kuala Lumpur. According to the press release (see below), the new fiber-optically triggered strobe “combines the best features from the UCS-Q1 and UIS-P1”—though the UCS-Q1i features a straight flash tube as opposed to the circular flash tube of the UIS-P1.
Depth-rated to 60 meters (200 feet), the UCS-Q1i boasts a guide number (GN) of 22, a color temperature of 5600K, and an 85° beam angle with diffusor attached. AOI claims a recycle time of just 0.85s after a full power dump and 1,500 flashes at full power. The strobe features the same built-in 700-lumen continuous light found on the UCS-Q1 and UCS-Q1 RC, and also runs on a pair of 18650 Li-ion rechargeable batteries (3,100mAh).
Like the UIS-P1, the new strobe features InTeLi mode, which is designed to ensure that TTL exposure is “accurate and consistent” across different camera systems. The mode encompasses support for Sony TTL and i-Macro, OM System/Olympus RC TTL and i-Macro, and TTL HSS and M-HSS. In manual mode, output can be adjusted in six increments, from full power to 1/64 power.
Priced at $500, the AOI Q1i strobe is available now—in black or white finish—from retailers such as Backscatter.
When purchasing underwater photography equipment like the products mentioned in this article, please support DPG by supporting our retail partner—Backscatter.com.
PRESS RELEASE
AOl Ltd Unveils the UCS-Q1i at the Malaysia International Dive Exhibition 2025
Kuala Lumpur, Malaysia – June 13, 2025 – AOI Ltd is proud to announce the official launch of the UCS-Q1i, its latest groundbreaking underwater strobe, at the Malaysia International Dive Exhibition (MIDE) 2025, held in Kuala Lumpur from June 13 to 15, 2025. As one of the premier events for the diving industry, MIDE provides the perfect stage to showcase the UCS-Q1i. a powerful and compact strobe that redefines underwater lighting technology Building on the success of the UCS-Q1 and UCS-Q1RC, AOI Ltd continues to elevate underwater imaging innovation. The award-winning UCS-Q1 has been embraced by beginners for its advanced features, often found in more premium models. The UCS-Q1RC introduced TTL integration for OM System cameras, creating a seamless experience in both performance and design. AOI Ltd further solidified its reputation for pioneering technology with the UIS-P1, which introduced AOl In TeLi™ Mode, a next-generation system optimized specifically for underwater photography.
Now, with the debut of the UCS-Q1i, AOI Ltd combines the best features from the UCS-Q1 and UIS-P1. The UCS-Q1i inherits AOl In TeLi™ Mode, ensuring accurate and consistent TTL exposure across multiple camera systems, surpassing traditional S-TTL or TTL capabilities. This advanced mode intelligently adapts to camera settings, delivering enhanced precision in exposure control.
Additionally, AOl In TeLi™ Mode includes i-Macro Mode, refining macro flash photography by optimizing light output for close-up shooting. Underwater photographers can capture fine details with stunning clarity, ensuring beautifully lit macro shots. With support for Sony TTL and i-Macro, OM System RC TTL and i-Macro, and TTL HSS and M-HSS Mode, AOl InTeLi™ Mode sets a new benchmark in underwater strobe technology.
Most importantly, the UCS-Q11 remains the brightest strobe in its segment with an impressive Guide Number 22 (GN22) at ISO100, delivering powerful illumination underwater. Like the UIS-P1, the UCS-Q1i supports High Speed Shutter (HSS) compatibility with Sony cameras, allowing photographers to freeze fast-moving underwater scenes with precision and clarity.
“MIDE 2025 is the perfect platform to introduce the UCS-Q1i to the world,” said Victor Tsui, Managing Director of AOI Ltd. “With AOl InTeLiT Mode, we’re bringing a smarter, more refined approach to TTL exposure and macro photography, ensuring underwater photographers get consistent, high-quality results every time.”
Visitors at MIDE 2025 will have the first opportunity to see the UCS-Q1i in action, explore its features, and engage with AOl Ltd’s experts. The launch event promises exciting demonstrations and insights into how this cutting-edge strobe can transform underwater photography experiences.
For more details about the UCS-Q1i and AOI Ltd’s latest innovations, visit www.aoi-uw.com or contact info@aoi-uw.com
Welcome to another weekly wrap-up of all of the happenings on the Light Stalking forums and community.
This week has been another wonderful week in the world of creating beautiful photographs. Our community is all about positivity, encouraging people of all levels to reach the next step in their photographic journey. It’s a great bunch of people, and collegiality is basically how the whole group comes together. If you’re not already part of it, consider joining today.
Don’t forget to join in our current weekly challenge on the forums. This week, the theme is shadows of simplicity.
Some of the amazing shots from the community this week:
Photo by Wendy P
Photo by Rob Eyers
Photo by Robert Apple
Photo by Pat Garrett
Photo by Patrick
Photo by Frog Daily
Also don’t forget to join in our monthly challenge for the chance to win $100 prize. This month, the theme is “minimalism and simplicity.” You can enter it here.
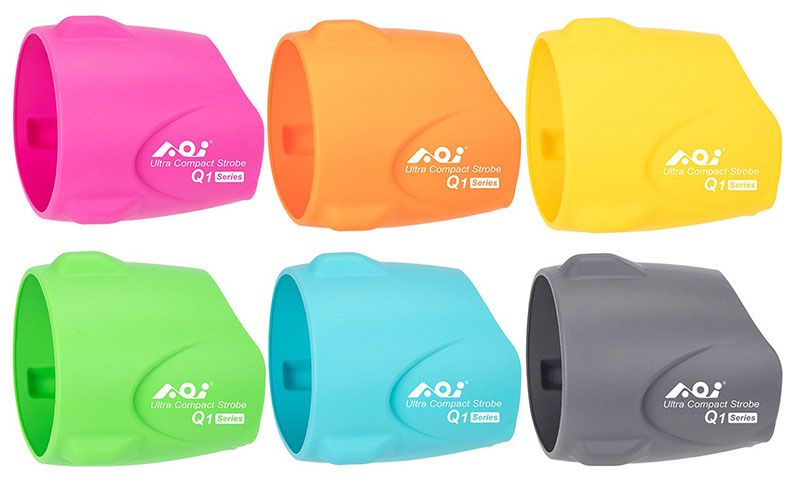
Alongside the launch of its latest strobe—the UCS-Q1i—AOI has announced a set of protective silicone sleeves designed for strobes in the Q1 series, including the UCS-Q1i, UCS-Q1RC, and UCS-Q1. Engineered to offer a snug, secure fit, these durable silicone sleeves provide protection against scratches, abrasions, and minor impacts, extending the life of the strobe while allowing users to add a personal splash of color to their underwater setup.
Sold in pairs, the sleeves are available in six vibrant colours: neon pink, orange, yellow, lime green, aqua blue, and graphite gray. The sleeves are designed for easy installation and removal, making them a versatile and stylish addition to any Q1-series strobe.
Available now, the protective silicone sleeves will retail for USD25.
When purchasing underwater photography equipment like the products mentioned in this article, please support DPG by supporting our retail partner—Backscatter.com.
Trees – we find them almost everywhere around us, even in the most urban spaces where they are grown to add some life to the lifeless concrete jungles. While trees may be a common subject found easily, and one that is used to frame other subjects or as a supporting element in photography, it is quite difficult to effectively photograph them on their own, especially their grandeur or their importance in a particular space.
Photo by Mel
When photographing trees, importance needs to be given to the gear, especially lenses used, location, angles and perspective, composition, weather, atmospheric conditions and the right light. Although trees are difficult to photograph, the process of slowing down, waiting for the right light and capturing a compelling shot can be very rewarding. Try using interesting compositions like framing, juxtaposition, reflections, centered composition, patterns, etc.
Here are 21 photographs of trees that make use of interesting compositions.
If you are already familiar with basic compositional guidelines like the rule of thirds or the leading lines and wish to take your compositional skills to the next level, we recommend you to check out this eBook “Advanced Composition” by Photzy, that will help you turn your photographs into works of art.
Photo by Henrik Hansen
Photo by iuliu illes
Photo by Adrián Valverde
Photo by Jessica Furtney
Photo by Oli Gibbs
Photo by Ian Wagg
Photo by Jeremy Bishop
If you wish to move beyond the rule of thirds and other simple compositional guidelines to advanced techniques that use curves, repetitions, light and shadows, focal points, etc., then we recommend you to check out this eBook “Advanced Composition” by Photzy which is a 239 pages practical guide, that is packed with training, assignments, lessons and plenty of quizzes to test your knowledge.
Photo by Chad Stembridge
Photo by Intricate Explorer
Photo by Redd Francisco
Photo by Maksim Shutov
Photo by Meg MacDonald
Photo by Mahrshi Bisani
Photo by Daniel Peters
Using basic compositional guidelines all the time can make your photographs look similar and sometimes boring. There are plenty of ways to compose an image other than the basic ways and this eBook “Advanced Composition” by Photzy will show you 47+ ways you can move beyond the basic rule of thirds.
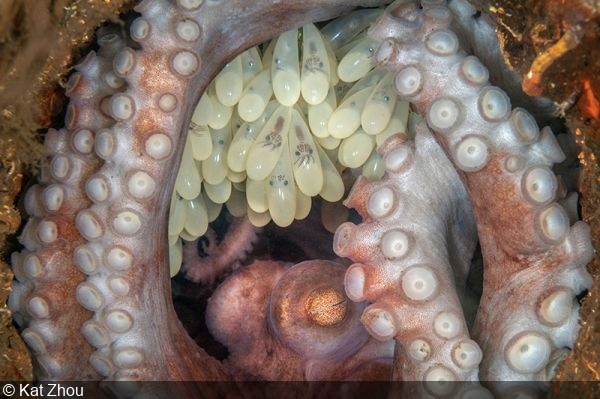
Aquatic Life, Winner: “Octopus Mother” by Kat Zhou
The California Academy of Sciences has unveiled the winners of its BigPicture photography competition, which celebrates stunning images from the natural world. Now in its 12th year, the competition is judged by a panel of nature and conservation photography experts, which is chaired by wildlife photographer Suzi Eszterhas. The Grand Prize Winner is “Lemur’s Tough Life” by Donglin Zhou, a Chinese wildlife photographer known for her nature documentaries.
Meanwhile, in the “Aquatic Life” category, it was DPG Photographer of the Week Kat Zhou who clinched the top award with her mind-blowing shot of a Caribbean reef octopus guarding her eggs at Florida’s Blue Heron Bridge (which also featured in her POTW portfolio). Various DPGers were also finalists in the “Aquatic Life” category as well as other categories, including “Art of Nature” and “Landscapes, Waterscapes, and Flora.”
Big congratulations to all the winners and runners-up in this year’s contest. Don’t forget that the 2nd Underwater Awards Australasia imaging competition is accepting submissions—so make sure you get your entries in soon and claim your share of the spectacular $70,000 prize pool!
Landscapes, Waterscapes, and Flora, Finalist: “Acacia” by Talia Greis
Art of Nature, Finalist: “Ghost of the Reef” by Simon Biddie
Aquatic Life, Finalist: “Yin Yang” by Melanie Müller
Aquatic Life, Finalist: “Dystopian Seas” by Angel Fitor
Aquatic Life, Finalist: “Theatre of War” by Talia Greis
Aquatic Life, Finalist: “Into the World of Dreams” by Hitomi Tsuchiya
Aquatic Life, Finalist: “Mudskipping” by Georgina Steytler