بلاگ

  • Follow These Tutorials To Capture Night Sky Objects With The Camera You Have

    Follow These Tutorials To Capture Night Sky Objects With The Camera You Have

    [ad_1]

    Night sky is an addictive subject to photograph and if you look closer, there are many night sky objects that you can photograph, other than the moon and the Milky Way. On very clear nights, you will be able to see a lot of nebulae, star clusters, cloud complexes and even a galaxy without the aid of a telescope.

    Right now it is the Milky Way season in the Northern Hemisphere, but for those who live in the Southern Hemisphere, there are many objects in the Winter sky that are worth photographing. If you are new to astrophotography, start by photographing the moon and then move on to photograph the Milky Way, before working towards photographing deep space objects.


    Grab your Milky Way Photography Blueprint for free right here.


    In this article here, we have put together a collection of tutorials that are highly detailed and provide you with every information you need to photograph the sky at night. Don’t forget to check out the “Further Reading” section.

    Let us start with the Moon which is the natural satellite to our planet Earth and it is one of the closest and brightest subjects in the night sky, that you can easily photograph. If you observe the moon over a few weeks, you will get an understanding of the phases of the moon, its rising and setting time, etc. You just need to do a little bit of planning to get the best shot.

    Graphic by Light Stalking

    If you are wondering what if you do not have a camera yet, but only a smartphone that you use to capture photos right now? Smartphone technology has advanced quite a lot in the recent years and they can be used to capture beautiful images of the moon and some brighter objects in the night sky. Especially if you are a a beginner in astrophotography, with some practice and knowledge, you can capture interesting photos of the moon with your smartphone.

    Photo by Dahlia Ambrose using Samsung Galaxy S22 – 20x digital zoom. ISO 25, 69mm, -0.2 ev, f/2.4, 1/583s. Cropped to fill the frame.

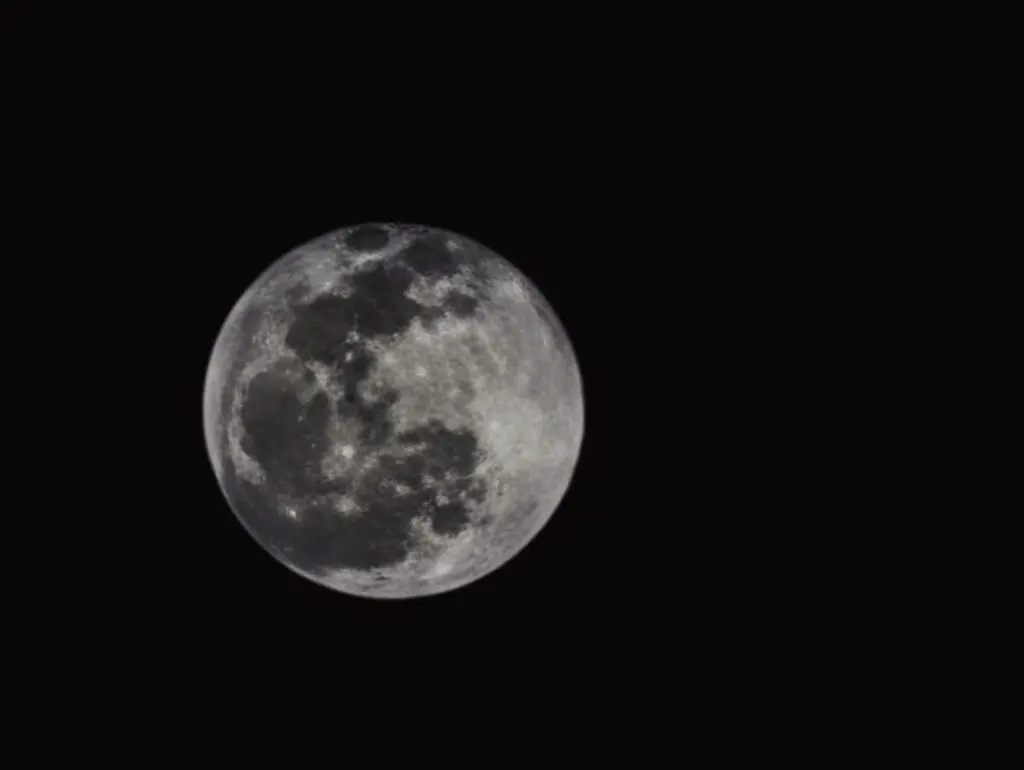
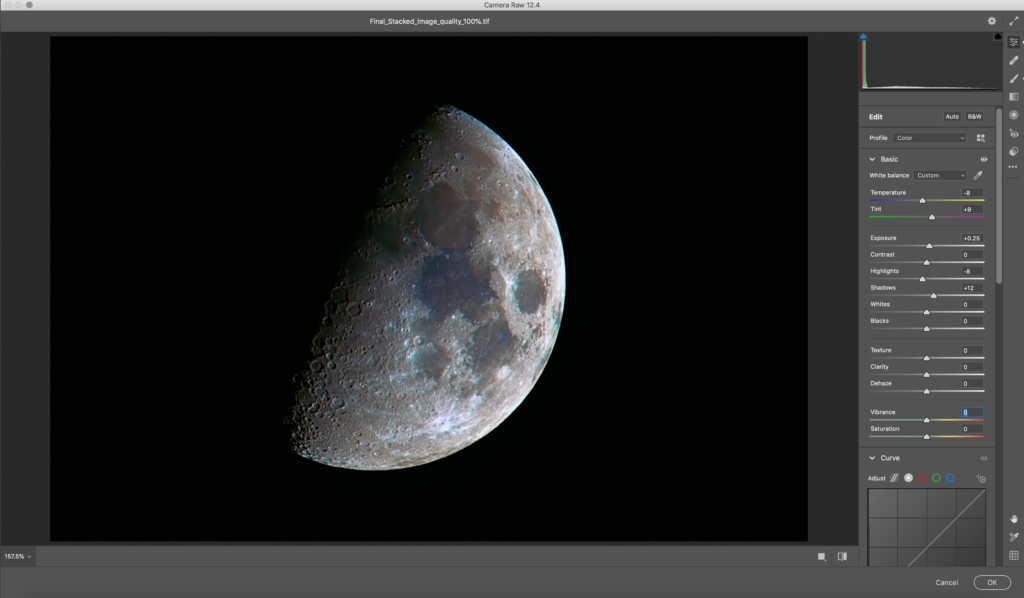
    And, did you know that the moon is not just white, but has some colours due to the mineral deposits on its surface? If you zoom in on live view with a long lens, on a very clear night, you will be able to observe these colours faintly. You can photograph the moon and bring in those beautiful colours and this article will help you achieve that. It is interesting and can be done during any phase of the moon, but remember that you will have to take a series of shots to get the best results in terms of colours and details.

    Photo by Dahlia Ambrose

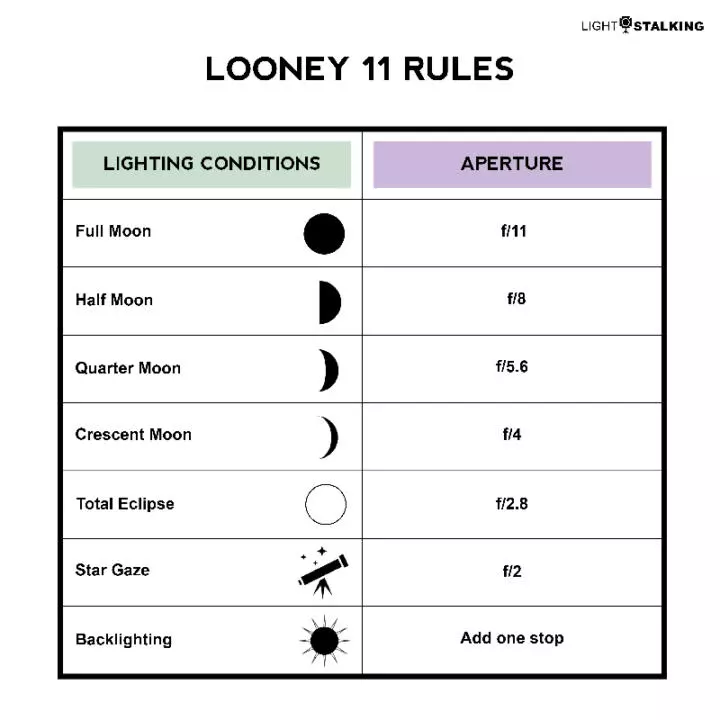
    We have heard of rules for correctly setting exposure for certain subjects in photography, rules that do not need to be followed as such, but rules that can help you get started initially and then can be refined further according to the situation. One such rule to capture the moon is the Looney 11 rule which can be a start to estimate exposure times. We will summarise the rule here:

    • Set aperture to f/11 and shutter speed to the reciprocal value of ISO.

    Check out the article to learn more about this rule.

    Graphic by Light Stalking

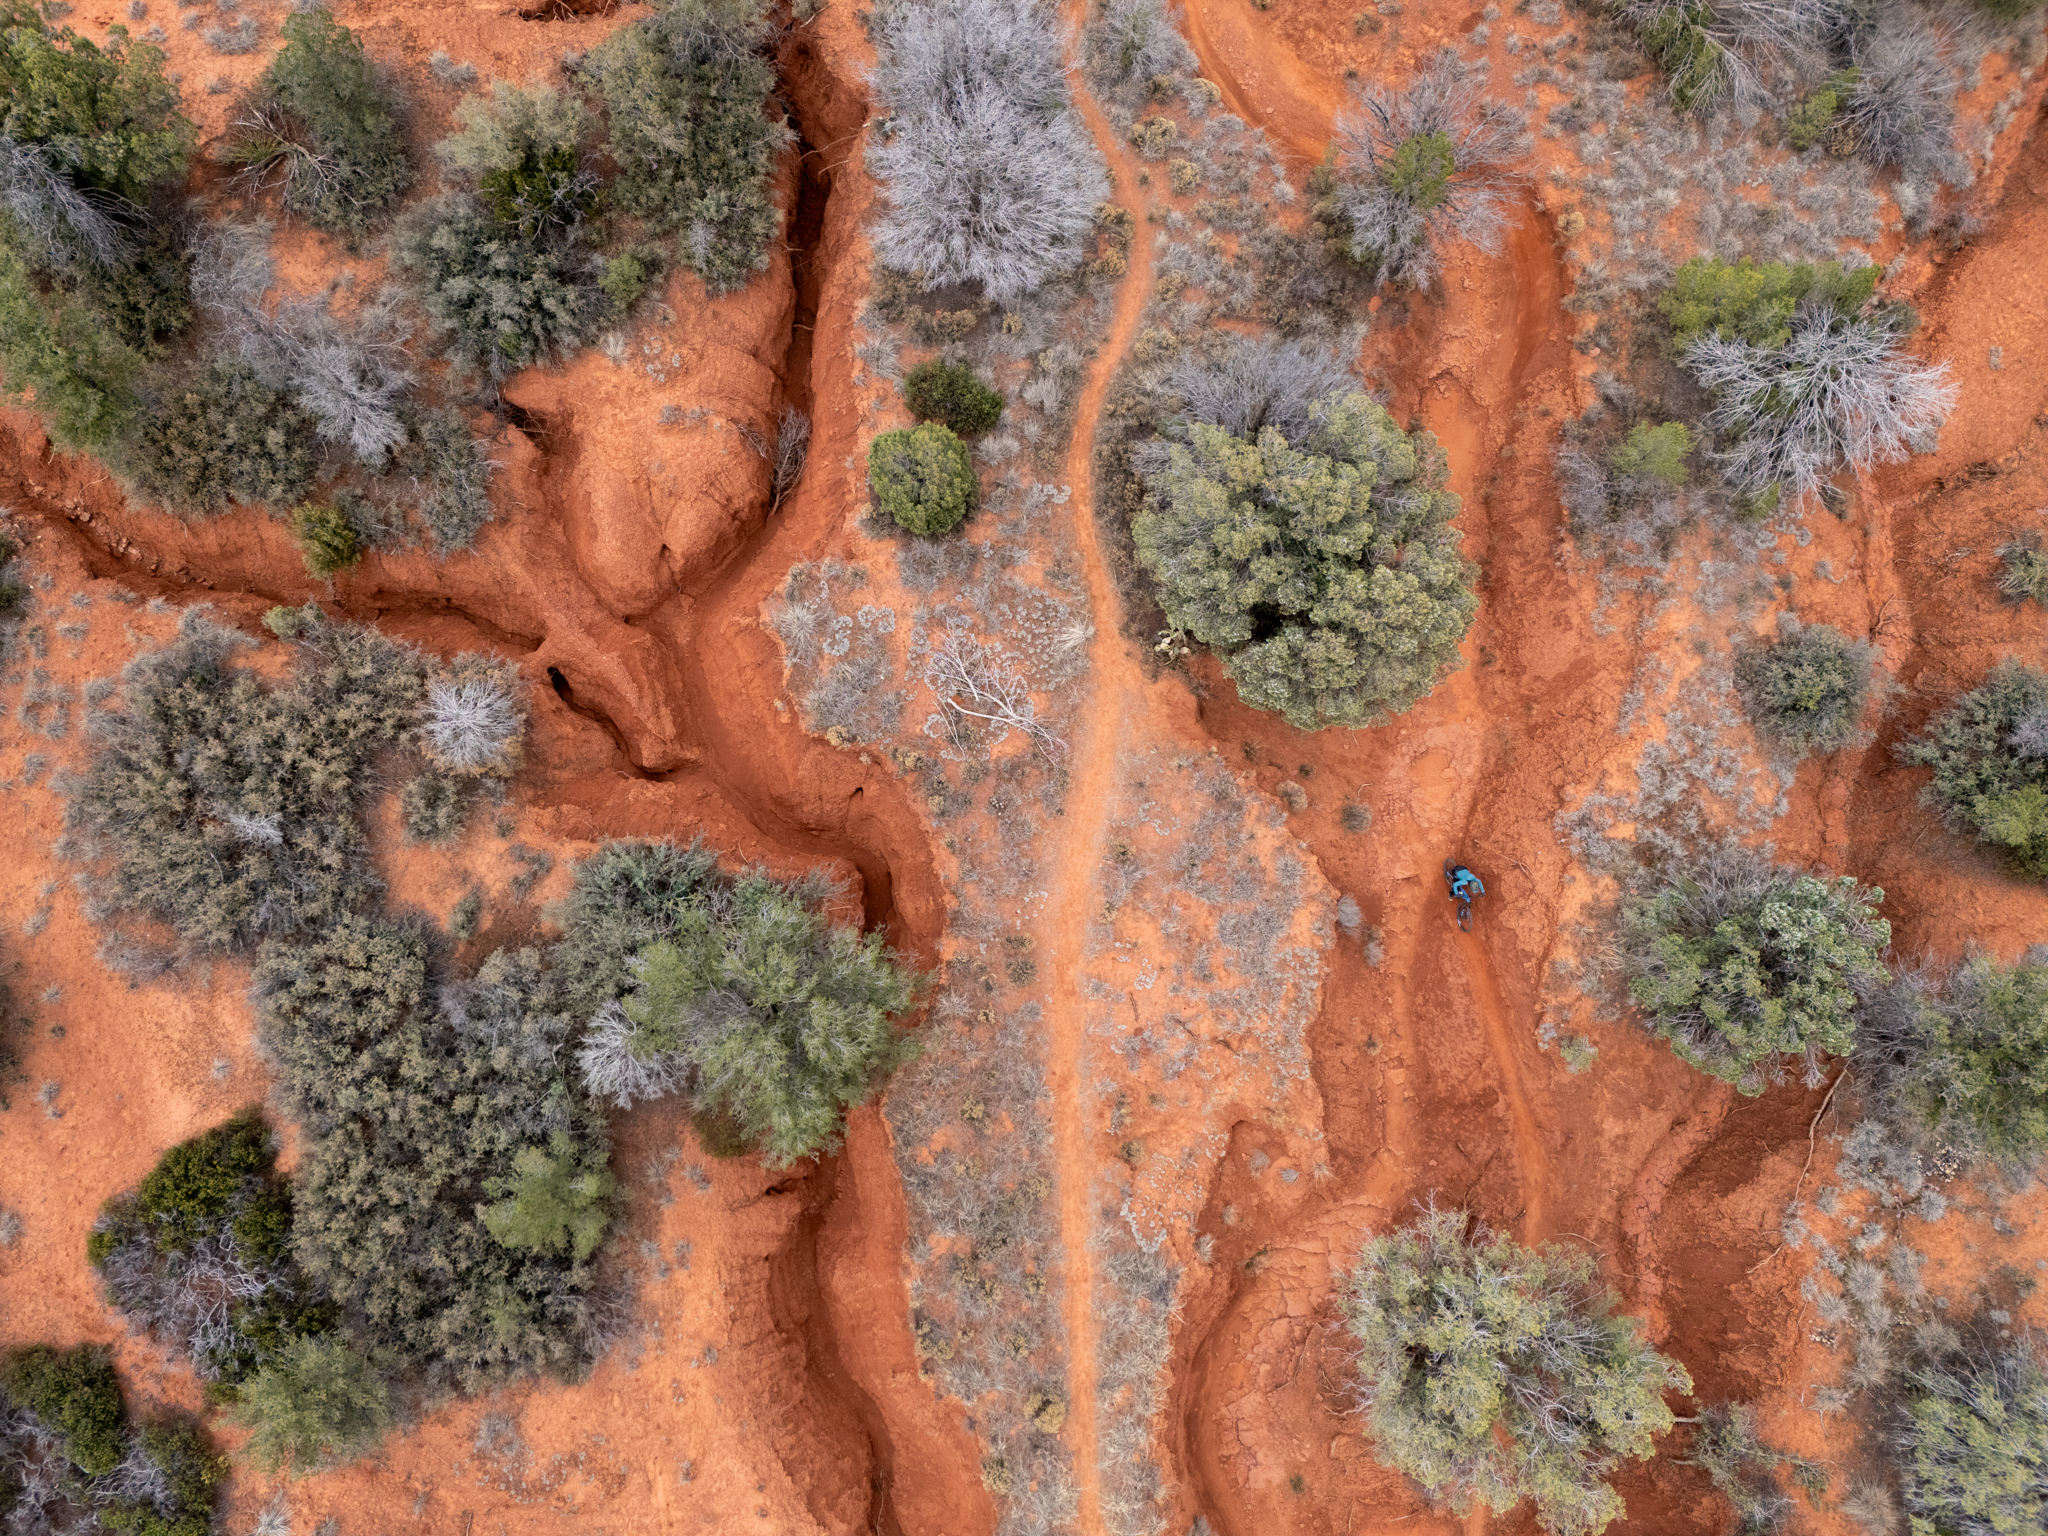
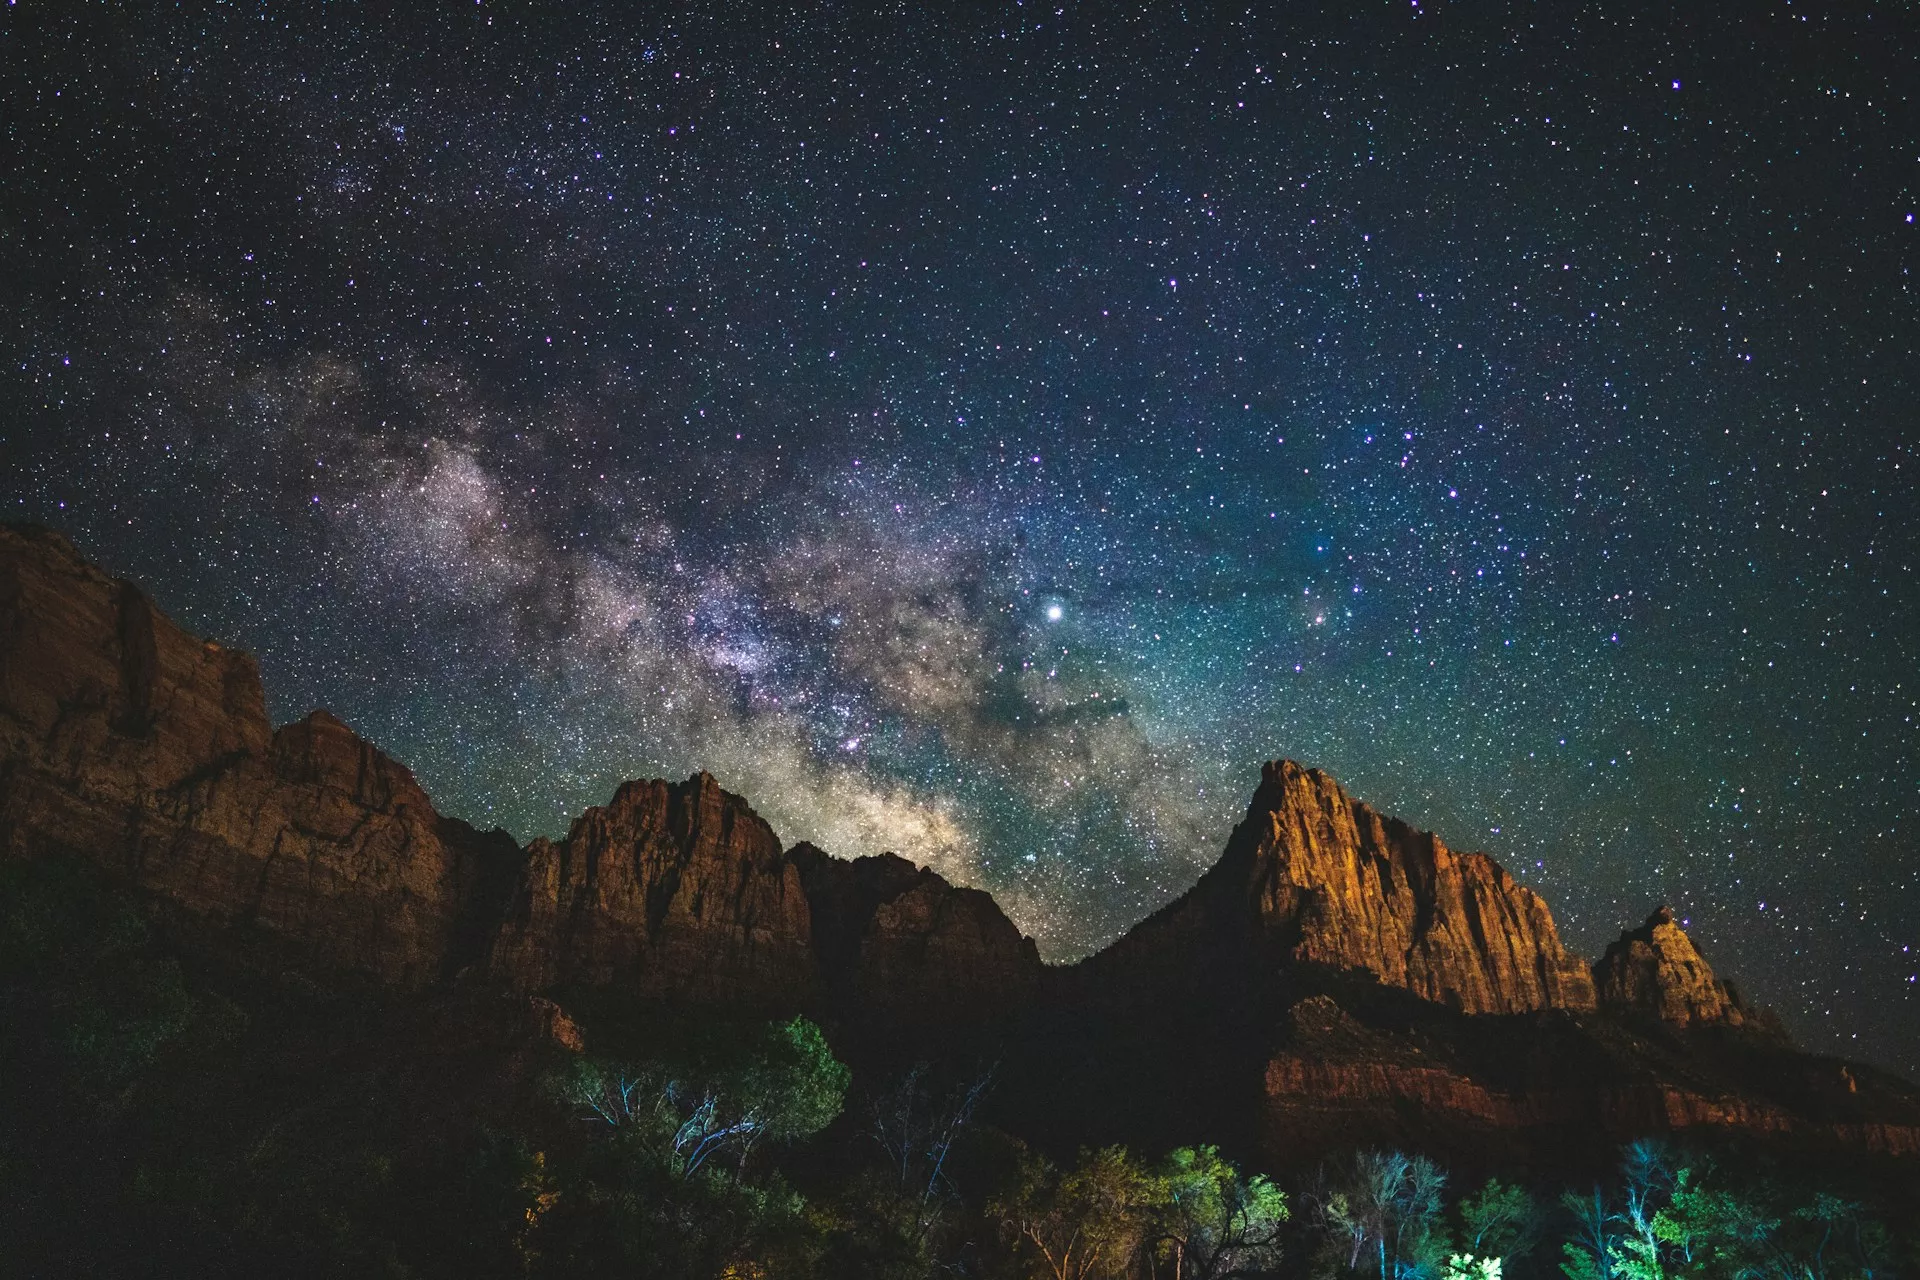
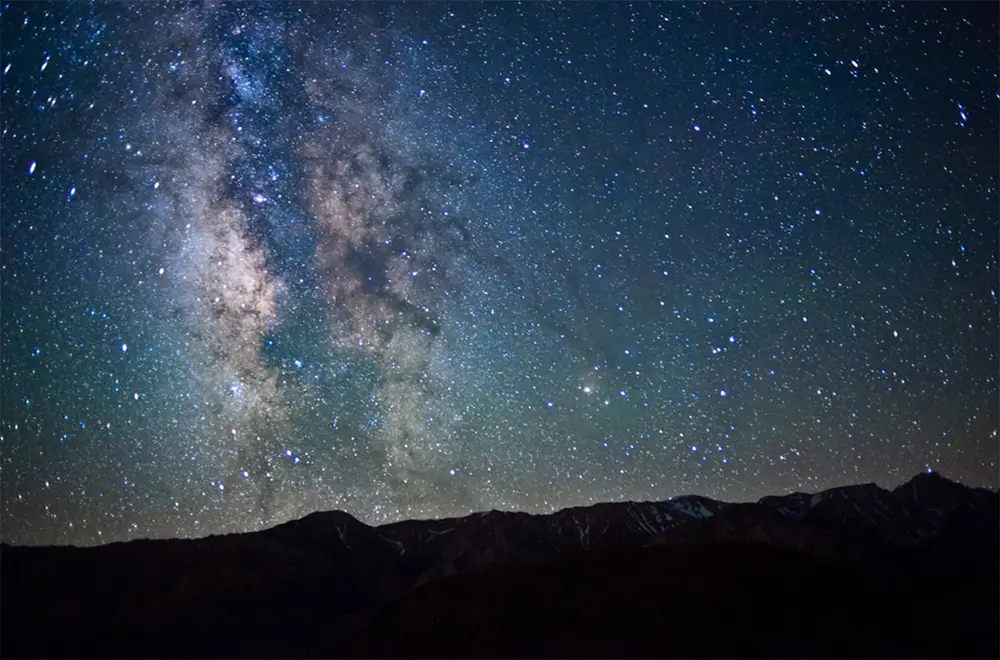
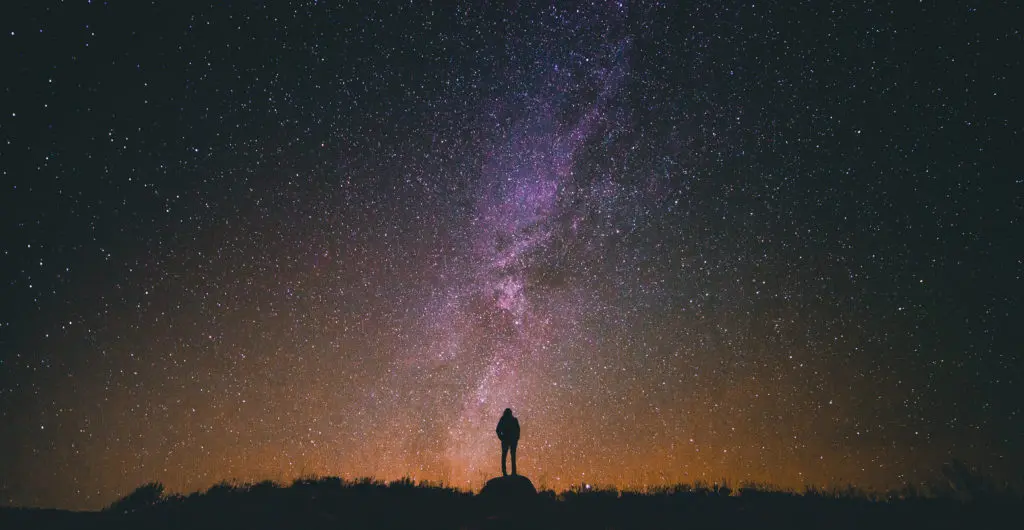
    We live in the Milky Way galaxy and it is one of the easiest subjects to photograph, after the moon. Depending on the time of the year, you will be able to photograph only specific areas of the Milky Way galaxy. The core is the most stunning region and it is above the horizon at night, a few months every year. So keep an eye on the weather forecast and find the darkest location possible and photograph the Milky Way with the camera you have in hand.

    Photo by John Lemieux

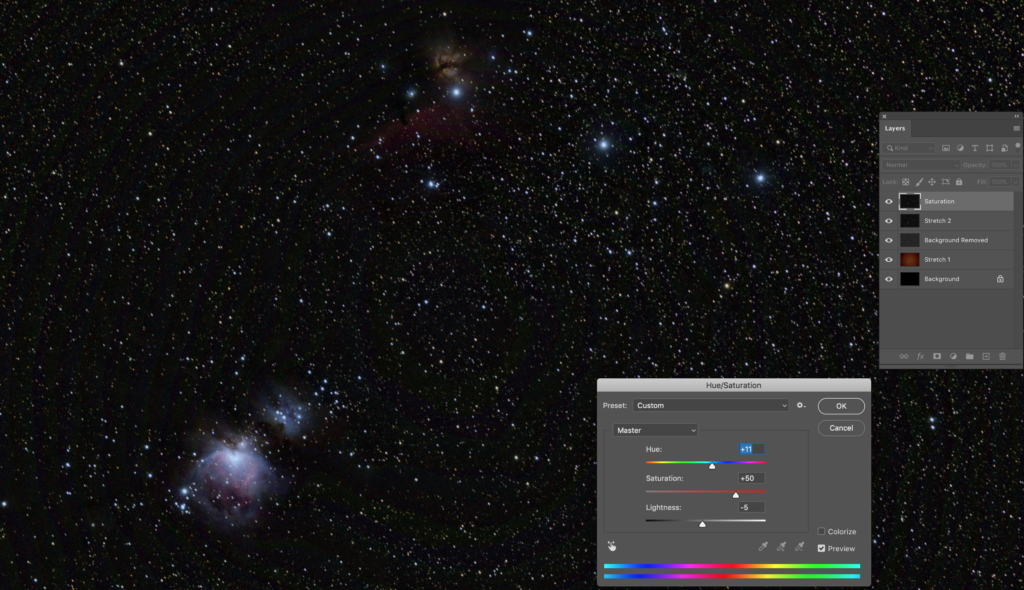
    If you want to go a bit further after some experience and photograph a nebula, the Orion Nebula is one of the easiest to capture and one that is most commonly photographed too. You can use the camera that you have in hand and a moderate focal length lens to capture the frames and then with some detailed post processing, you will have a beautiful image. You will need to capture a series of shots including calibration frames and everything is explained in detail in this article.

    Photo by Dahlia Ambrose

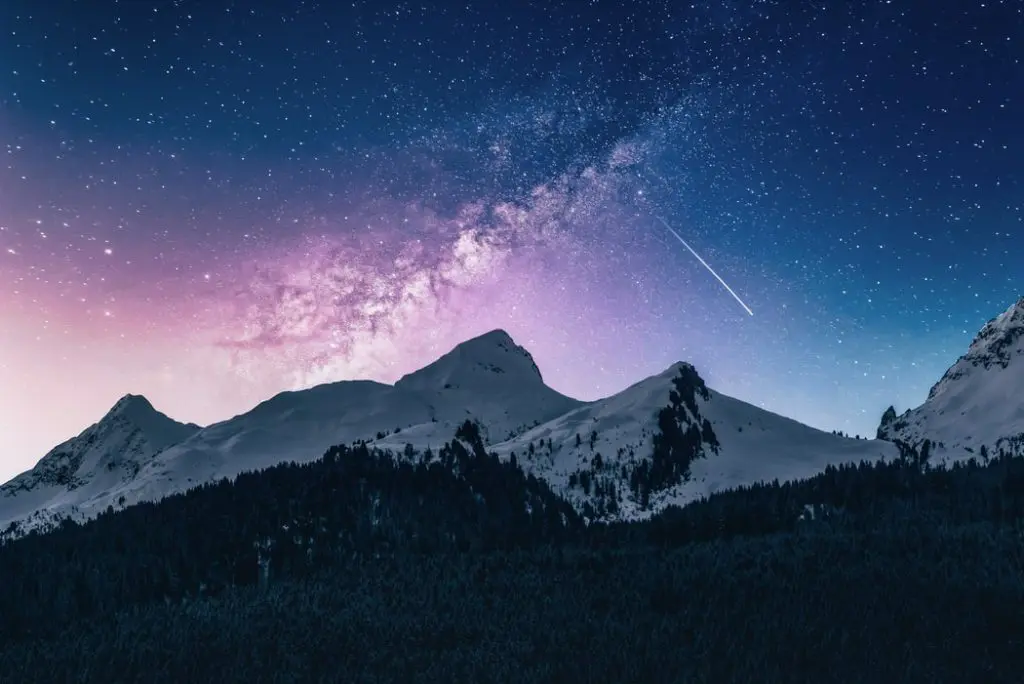
    Now, similar to the rule we mentioned above to set exposure for moon photography, if you are a beginner and not sure where to start in terms of settings for your night sky photography like stars, nebulae, etc., start with the 500 rule. It is not very accurate, but is a great start to get an image of the stars, galaxies and the Milky Way. Here is the rule summarised below:

    • Set your camera to ISO 3200 or 6400, your Aperture to f/2.8 (or as wide as possible) and your shutter speed to 500 divided by the focal length of your camera, taking into account the crop factor of your camera.

    There is also a 600 rule where you replace the 500 above with 600 and see if it works better than the above setting.

    Snapwire at Pexels

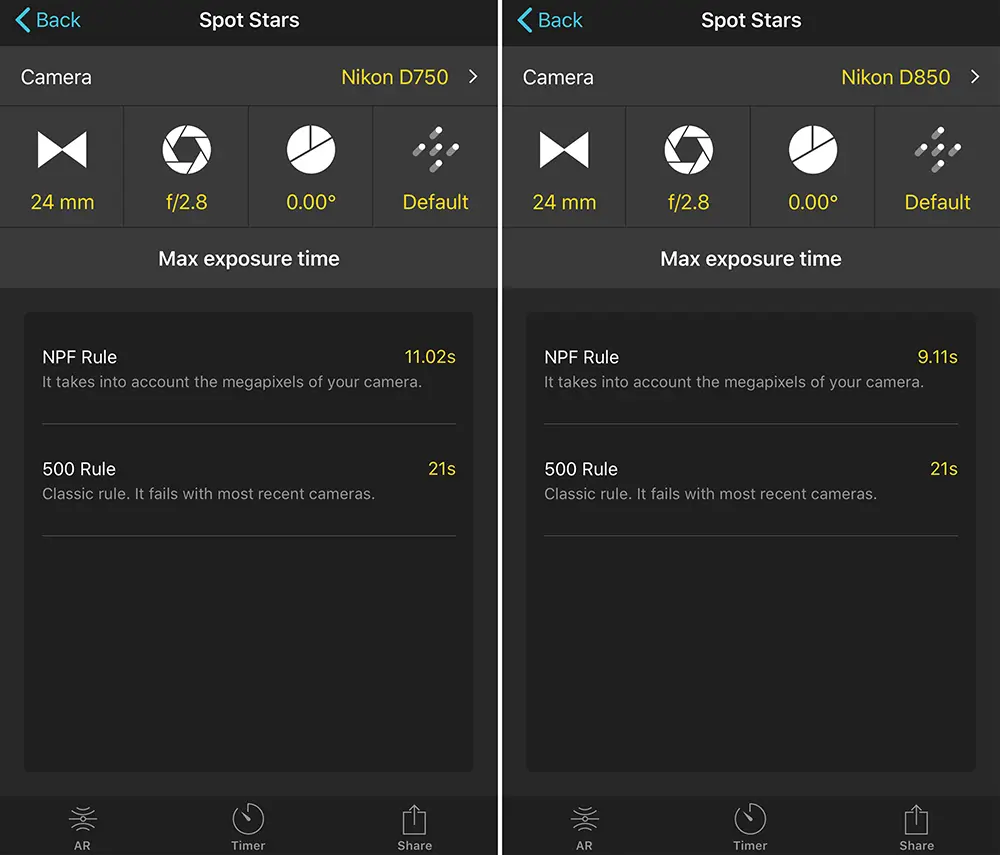
    With more advanced cameras and sensors, sometimes the 500 or 600 rule may not get you the best results, especially if you want to have a large print. Sometimes there may be some trailing in the stars instead of point sharp stars. To avoid this situation, the photographer needs to calculate exposure based on the type of camera and lens combination.

    A formula was devised by Frédéric Michaud for the Société Astronòmique du Havre called the NPF rule which is quite complex, where

    • N stands for aperture, the letter N is used to represent aperture in optics.
    • P for photosites or pixel density or pixel pitch (distance between two pixels)
    • F for focal length

    If you have an app called PhotoPills, you can easily calculate exposure times using the NPF rule on that app.

    Screenshot from PhotoPills App showing different exposure times for two different full frame cameras

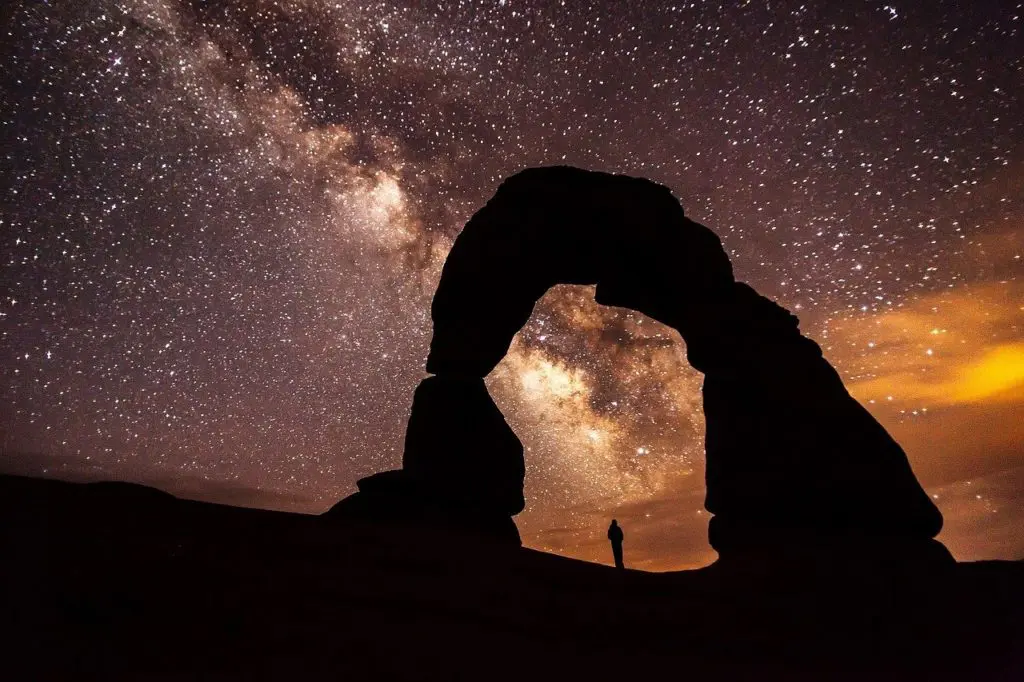
    Star photography is easy, but in order to get the best results like sharp and noise free images, there are a few things that you will need to keep in mind. It also requires you to choose the right location, weather conditions, keep an eye on the moon phases and use the right tools and accessories to get the best shot. Last but not the least, patience and practice is key to perfect star images.

    Photo by Skeeze

    Cameras come with noise reduction features called high iso noise reduction and long exposure noise reduction. Many photographers seem to be confused if they need to leave these settings on for astrophotography, in order to get the best results. Depending on what you are shooting, these features can cause some delay in sequences, can cause heat, and also remove faint star details. Read to find if you should leave these settings on or off for astrophotography and why.

    Image by Benjamin Voros

    When capturing night sky or dep space object, you are working with very little light and longer exposure times. Factors like heat due to long exposure and high iso can induce thermal and/or digital noise in these photographs that can leave unwanted effects/artifacts in the images that also greatly reduce the sharpness and quality of the image. Here are some ways in which noise can be reduced in your night sky images.

    This is how noise looks in photographs – this is for illustration purposes only. Image by MartinThoma

    Further Reading


    [ad_2]

    Source link

  • June 2025 Photo Contest Winners: Minimalism and Simplicity

    June 2025 Photo Contest Winners: Minimalism and Simplicity

    [ad_1]

    We’re happy to announce the winner of June’s competition “June 2025 Photo Contest Winners: Minimalism and Simplicity.”

    For those who don’t know, the Light Stalking Monthly Photography Competition carries a $100 People’s Choice Award and a $100 Overall Winner Award. The People’s Choice Winner is selected by a vote of the community, whereas our guest judge selects the overall winner.

    The “Minimalism and Simplicity” Photo Contest

    Minimalism in photography is about reducing the number of elements, minimising or even eliminating patterns and textures to capture a simple image with a strong composition that is visually appealing and can keep the viewer engaged. As you gain experience in photography composition, looking at a scene will give you ideas on whether it will work for minimal photographs, but sometimes you can also just focus on a part of a grand scene and capture minimal photographs.

    Less is more in minimalist photography and the concept for this type of composition is simplicity. Just eliminate unnecessary elements and focus on a single element or subject in the frame and it will be a great start to minimalism and simplicity in photography. Using negative space can be a powerful compositional tool in this case and converting images to black and white can emphasise minimalism further and add a timeless and classic touch to the photos.

    The contest theme for June was, “Minimalism and Simplicity” and participants submitted their interpretations of this theme through interesting and visually striking photographs. Landscapes, wildlife, portraits, nature, still life, macros of flowers, bugs, objects, and many other subjects were captured and submitted for June’s contest.

    When choosing the winning photos, we wanted to make sure that the decision process was based on a good interpretation of the theme, followed by other factors like light, composition, story, details, creative vision and thought, etc. The results are entirely subjective and there are no losers in any competition as we all know. 

    Here are June’s winners:

    First Place: “Family” by Elin Laxdal

     Common loon – Copyright Elin Laxdal

    Elin submitted a beautiful photo of a common loon with her babies, titled “Family.” The composition in this photo is minimal with the focus on just the bird and the chicks. The photo also portrays a sweet story – the bond between the parent and the babies.

    Elin also used the reflection of the loon in water to her advantage, as a leading line which is a powerful compositional tool. Also, her choice to convert the image to black and white has eliminated anything distracting in terms of colours, that may have taken away some attention from the subject. The image is perfectly exposed with details in both the dark and bright areas and the eye of the bird is also perfectly in focus.

    Congratulations on the win Elin, this is a brilliant shot that portraits minimalism and simplicity in photography.

    Second Place: “Mantid” by Tersha

    Mantid – Copyright Tersha

    Tersha’s take on the photo of a mantid is very clever and the way the photo is composed is unique. Not many photographers would think about cropping off an insect’s head in the image, but Tersha’s choice to keep the abdomen and just a pair of legs in the frame arouses curiosity, while also being visually interesting.

    The image is even more simplified with a monochrome theme which is green. The textures in the background are soft and minimal and hence not distracting. The legs of the mantid serve as leading line and also as a frame to bring focus on the mantid’s abdomen. The abdomen itself is interesting, with patterns that are of visual interest. The soft side lighting technique has added depth to make the image even more interesting.

    Congratulations on this creatively framed and captured image Tersha.

    Third Place: “Serenity Floats” by Pat Garrett

    Serenity Floats – Copyright Pat Garrett

    Pat shared this very minimal photo of a leaf floating on water, titled “Serenity Floats.” The scene indeed looks very serene with the waters looking calm and the leaf floating still on the surface. The golden hour has beautifully backlit the leaf, revealing some of its textures and emphasizing the warm colours. Also the reflection of the golden sky in the water adds visual interest and a perfectly warm atmosphere for this serene shot.

    Pat has chosen to eliminate any other distraction in the scene in terms of colours, objects and other elements. The serene atmosphere itself is a minimal concept in the frame, and the colours, light are soft allowing the viewer to focus on the subject. Pat has also exposed the image perfectly to capture details on all parts of the leaf including the underside.

    Congratulations on this beautifully captured image Pat.

    People’s Choice Award Winner

    Our monthly photo contests also come with a People’s Choice Award. The winner of this part of the contest receives $100 worth of store credit on Lightstalking which they can spend as they please on our blueprints, drills, courses or Presets.

    Mechanized Symmetry – Copyright Frogdaily

    The most popular photo for June, voted by the contestants was “Mechanized Symmetry” by Frogdaily, which has won the people’s choice award. Frogdaily has made use of simple subjects and composition to capture this beautiful photo.

    The light illuminating the subject, the beautiful reflection and the soft bokeh, make this image visually appealing. This image is also an example of how still life can also be captured with minimal elements and a simple composition. Congratulations Frogdaily on the win.

    We are about two weeks into this month’s photo contest and still have a few days left to submit photos to our July’s monthly contest. It has already seen some interesting submissions. This month, our theme is “Textures and Layers.”

    If you would like to join and enter some images into our monthly contest then take a look at your options here.


    [ad_2]

    Source link

  • Brian Maranan Pineda – A Photo Editor

    [ad_1]

    The Art of the Personal Project is a crucial element to let potential buyers see how you think creatively on your own.  I am drawn to personal projects that have an interesting vision or that show something I have never seen before.  In this thread, I’ll include a link to each personal project with the artist statement so you can see more of the project. Please note: This thread is not affiliated with any company; I’m just featuring projects that I find.  Please DO NOT send me your work.  I do not take submissions.

    Today’s featured artist: Brian Maranan Pineda

    My “Oaxaca, Mexico” personal series is a vibrant, intimate look at the heart of this incredible region. I wandered through bustling markets, lively streets, and peaceful neighborhoods, drawn to the colors, textures, and the spirit of Oaxaca. What struck me most were the people—their warmth, openness, and deep connection to their tradition. Through candid portraits and vivid scenes, I wanted to capture not just what Oaxaca looks like, but how it feels: full of energy, history, and life.

    This project is my personal tribute to a place that left a lasting mark on me. From moments of celebration to quiet daily rituals, I hoped to capture the everyday beauty that makes Oaxaca so unique. Each image is a small story of life there, reflecting the character and rich cultural roots of its people. I hope these photographs invite others to share in the wonder and appreciation I felt while visiting this remarkable part of Mexico.

    To see more of this project, click here

    Instagram

    Suzanne Sease is a creative consultant and former ad-agency senior art buyer. She works with both emerging and established photographers and illustrators to create cohesive, persuasive presentations that clients can’t resist.

    Suzanne offers something rare: an insider’s perspective on how client’s source creative talent. Her deep understanding of the industry is underscored by her impressive resume: 11 years as senior art buyer at The Martin Agency, seven years as an art producer for Capital One, and stints with the art-buying department at Kaplan-Thaler and the creative department at Best Buy, where she applied her expertise to reviewing bids to see which were most likely to come in on budget. Over the years, Suzanne has worked with a wildly diverse range of clients, including Seiko, Wrangler, Bank One, AFLAC, and Clairol Herbal Essence. Now, as a consultant, she is equipped to problem-solve for her clients from an unusually dynamic point of view.

    As a longtime member of the photo community, Suzanne is also dedicated to giving back. Through her Art of the Personal Project column on the popular website aphotoeditor.com, she highlights notable personal projects by well-known and up-and-coming photographers. The column offers these artists excellent exposure while reflecting Suzanne’s passion for powerful imagery.

    Instagram


    [ad_2]

    Source link

  • The Many Falls – Stuck in Customs

    [ad_1]

    Daily Photo – The Many Falls

    One thing (of many good things) that New Zealand does is create and well maintain walking tracks. They’re all over the place on the South Island and even from the middle of a town or city you’re often only a few minutes from the beginning of a trail that will take you into a beautiful, serene environment where you’ll barely see another human. The paths often cross little streams and regularly pass by lovely waterfalls like this one. Great for popping your shoes off and cooling down some tired feet on the way back.

    Photo Information

    • Date Taken2025-03-23 12:50:22
    • CameraILCE-7CR
    • Camera MakeSony
    • Exposure Time1/25
    • Aperture16
    • ISO320
    • Focal Length24.0 mm
    • FlashOff, Did not fire
    • Exposure ProgramManual
    • Exposure Bias


    [ad_2]

    Source link

  • Sony RX1R III Premium Compact Camera Unveiled After Almost Decade Wait

    Sony RX1R III Premium Compact Camera Unveiled After Almost Decade Wait

    [ad_1]


    Good things come to those who wait. Certainly, that’s the reaction Sony is hoping for with the launch of the RX1R III premium full-frame compact—very nearly 10 years after the RX1R II was announced. One thing is for sure: A lot has changed in terms of camera technology in the intervening period.

    For starters, while the RX1R II combined a 42.4-megapixel sensor with the BIONZ X image processor, the RX1R III boasts a 61MP sensor and the latest BIONZ XR chip as well as Sony’s newest AI-processing unit for locking onto and tracking subjects. There are also now 693 phase-detection AF points covering around 78% of the image capture area, up from 399 points in the RX1R II. Unsurprisingly, video also gets a significant boost: The new camera can shoot 4K/30p 10-bit 4:2:2 and 1080/120p 8-bit 4:2:0 video, while its predecessor maxed out at 1080/60p.

    Other things that have changed include: the rear 3-inch LCD, which is now a touchscreen and offers improved resolution (2.36M dot vs 1.23M); the battery, a NP-FW50 unit that increases the CIPA rating from 220 shots to 300; and the EVF, which is rear mounted rather than pop up (though still 2.36M-dot resolution). It’s worth noting a couple of minor negatives: the screen no longer tilts and the viewfinder has a smaller magnification—0.7x vs 0.74x. What has not changed is the camera’s fixed lens—it’s the same Zeiss Sonnar T* 35mm f/2 that was built into the original RX1 from 2012. For underwater use, of course, that’s going to need high-quality wet lenses in front of it to capture the vast majority of subjects.

    Available in July, the Sony RX1R III will retail for an eye-watering $5,100—a price tag, most will agree, justifies its “premium” designation.


    When purchasing underwater photography equipment like the products mentioned in this article, please support DPG by supporting our retail partner—Backscatter.com.


    PRESS RELEASE

    Sony Electronics Introduces The RX1R III: The Flagship Full-Frame Premium Compact Camera With A Fixed Lens

    SAN DIEGO, July 15, 2025 – Sony Electronics Inc. announces the RX1R III, the eagerly anticipated third generation of its RX1R series, featuring a 61-megapixel1 35 mm full-frame Exmor R™ CMOS image sensor, the latest BIONZ XR™ image processing engine, and a ZEISS® Sonnar T* 35 mm F2 lens.

    “The RX1R III combines Sony’s design savvy with the latest innovations in imaging technology to produce a new flagship in our RX1R camera series that offers uncompromising full-frame quality in a premium compact camera body,” said Yang Cheng, Vice President of Imaging Solutions, Sony Electronics Inc. “The RX1R series has resonated greatly among discerning photographers, and we’re proud to now deliver the next generation of this popular camera model.”


    A Focus On High-Quality Photography

    The combination of the 61-megapixel1 full-frame Exmor R™ back-illuminated CMOS image sensor and the BIONZ XR™ image processing engine delivers high resolution and sensitivity, with low noise and a wide dynamic range. The sensor surface features AR (Anti-Reflection) coating and omits the optical low-pass filter to achieve superior image quality.

    The integrated lens offers excellent image quality. By optimizing the position of the lens and the imaging surface one by one at the micron level, RX1R III achieves high optical performance in a compact form factor.

    Dedicated To Creative Freedom

    To ensure you always get your shot accurately and without effort, RX1R III is equipped with the latest AI-processing unit, a valued feature of top-of-the-line professional Sony Alpha™ cameras. The AI-processing unit can accurately recognize the shape and movement of subjects, human bodies, heads, and the position of eyes, tracking subjects even when their faces are not visible, and is available for both still images and videos2. Up to 693 densely arranged3 phase-detection AF (Auto-Focus) points cover approximately 78% (for still image shooting) of the image capture’s area.

    While the camera has a fixed lens, users can tap into the versatility of three prime lenses thanks to the Step Crop Shooting4 function, which allows users to switch between focal lengths equivalent to 35 mm, 50 mm, and 70 mm5 via assigned buttons or dials. When shooting in RAW format, users can reselect the focal length during post-production. The lens’s macro ring enables instant switching to macro mode, allowing users to get as close as 20 cm (maximum magnification: 0.26x).

    For creators who enjoy unique and personalized visuals, RX1R III offers twelve built-in Creative Looks. Adjustments to hue, saturation, brightness, contrast, and sharpness can be applied not only to still images but also to videos. Most notable among the Creative Looks6, FL2 allows the capturing of a nostalgic expression with subdued colors, and FL3 allows for a more vibrant image.

    Streamlined Design & Reliable Hardware

    Made of lightweight yet highly rigid magnesium alloy, the RX1R III design balances aesthetics and functionality. While maintaining excellent operability, the dials and Multi-Interface (MI) Shoe are embedded into the camera body and the top surface of the body features a flat design. The grip design and surface texture provide a secure and comfortable hold.

    RX1R III is equipped with an electronic viewfinder featuring an approximately 2.36 million-dot XGA OLED with high resolution and high contrast, offering a magnification of approximately 0.70x.

    RX1R III uses the rechargeable battery pack NP-FW50, allowing the capture of up to 300 still images7. It features a USB Type-C® port that allows rapid charging when connected to USB Power Delivery8-compatible devices, or the addition of external power sources, such as mobile batteries, for extended shooting sessions.

    Social Responsibility

    Aligned with Sony’s ambitious ‘Road to Zero’ initiative, this product supports the company’s vision for achieving a zero environmental footprint by 2050. The Sony Group’s manufacturing facilities for imaging products, including the RX1R III, are operating at 100% renewable energy. The RX1R III packaging uses Sony’s proprietary environmentally friendly Original Blended Material9 instead of plastic10.

    The camera system incorporates comprehensive accessibility options, including a Screen Reader function11 and Display Magnification, to support visually impaired users across an expanded range of menu items.

    Optional Accessories

    TG-2 is a dedicated thumb grip that attaches to the Multi Interface (MI) Shoe to provide stable holding and operability, including when operated with one hand. When attached to the body, the metal material and high-quality paint finish provide exceptional design unity.

    LCS-RXL is a compact body case dedicated to this camera model intended to protect the camera from scratches and dirt and enhance its elegance with its refined texture material. The body case allows access to all ports—USB, HDMI, battery, memory card, and tripod attachment—without removal. The grip design improves the holding experience.

    LHP-1 is a lens hood made specifically for this camera. It features a robust construction using lightweight and high-strength aluminum material, protecting the lens from impact and dirt. The bayonet mount allows for quick and secure attachment.


    Pricing & Availability

    The RX1R III will be available in July 2025 for approximately $5,099.99 USD and $6,299.99 CAD. The TG-2 for approximately $299.99 USD and $349.99 CAD, the LCS-RXL for approximately $249.99 USD and $224.99 CAD, and the LHP-1 for approximately $199.99 USD and $249.99 CAD, in August 2025. They will be sold directly through Sony and at a variety of Sony’s authorized dealers throughout North America.

    1Approximate effective

    2Available subject settings are: Auto, Human, Animal, Bird, Insect, Car/Train, and Airplane. Subject types other than the type specified may be erroneously recognized in some cases.

    3It is number of AF measurement points during still image shooting. The number of points varies depending on the shooting mode.

    4Not available for movies.

    5When shooting JPEG images with a 3:2 aspect ratio, the resolution is as follows: At 35 mm: L size (60 megapixels), at 50 mm: M size (29 megapixels), at 70 mm: S size (15 megapixels)

    6ST (Standard), PT (Portrait), NT (Neutral), VV (Vivid), VV2 (Vivid 2), FL (Film), FL2 (Film 2), FL3 (Film 3), IN (Instant), SH (Soft Highkey), BW (Black & White) and SE (Sepia).

    7When using the viewfinder: 270 shots.

    818W (9V/2A) USB PD power source is recommended.

    9Paper material made from bamboo, sugarcane fibers, and post-consumer recycled paper.

    10Excluding materials used in coatings and adhesives.

    11Supported languages differ according to country and region.


    [ad_2]

    Source link

  • A Few Still Lifes | Beautiful Flower Pictures Blog

    A Few Still Lifes | Beautiful Flower Pictures Blog

    [ad_1]

    A few of the still life photographs I’ve created

    In From the Garden © 2022 Patty Hankins

    In From the Garden © 2022 Patty Hankins


    Biscuits and Jam © 2024 Patty Hankins


    Roses and Books © 2025 Patty Hankins


    White Chrysanthemum and Books © 2025 Patty Hankins


    Teatime with Scones © 2025 Patty Hankins

    In the Victorian language of flowers, marigolds can represent creativity. As I created this photograph, I imagined a woman planning her next embroidery project as she creates the linens and other items for her hope chest.

    For Her Hope Chest Still Life © 2019 Patty Hankins

    For Her Hope Chest Still Life © 2019 Patty Hankins


    [ad_2]

    Source link

  • Sony Electronics Has Announced Its Most Anticipated RX1R III

    Sony Electronics Has Announced Its Most Anticipated RX1R III

    [ad_1]

    Sony electronics has announced the third generation camera in its RX1R series, the RX1R III, which is a full frame compact camera featuring a 61 megapixel sensor and a Zeiss 35mm F2 lens. With the RX1R series being a popular one among select photographers, Sony decided to release a new model.

    Sony has used a back-illuminated CMOS image sensor combined with the BIONZ XR image processing engine, that produces high quality images and low noise. The sensor comes with anti-reflective coating which helps to eliminate the optical low-pass filter, resulting in better image quality.

    Image via Sony

    As with most of Sony’s professional cameras in the Alpha series, the RX1R III comes with an AI processing unit that can recognise movements of most subjects, making tracking subjects easy even when their face is not visible. Even though the camera comes with a fixed 35mm lens, the Step Crop shooting function will allow the user to switch between three equivalent focal lengths – 35 mm, 50 mm and 70 mm through assigned buttons/dials. The camera lens also comes with a macro ring, that enables switching to macro mode instantly.

    Following Sony’s “Road to Zero” initiative, the RX1R III and other of Sony’s imaging products are manufactured at facilities that operate on 100% renewable energy. The packaging also comes in environmental friendly material.

    Here are some of the most important features of the Sony RX1R III:

    • Sensor – 61MP full-frame Exmor R CMOS sensor
    • ZEISS Sonnar T 35mm F2 lens – fixed
    • BIONZ XR processor 
    • Macro ring for instant macro mode switching – 20 cm minimum focus distance
    • Anti-reflection coating on sensor
    • Step Crop Shooting – 35mm, 50mm, 70mm equivalent
    • 693 phase-detection AF points
    • High iso sensitivity
    • Advanced AI for subject recognition and AF tracking
    • 12 creative presets and 3 film style looks
    • Touch LCD screen
    • Compact and lightweight
    • Battery life: 300 still images
    • USB Type-C port

    If you wish to watch the product video, check the YouTube video below:

    https://www.youtube.com/watch?v=8-wwnIp7tLs

    And, the concept video can be watched below:

    https://www.youtube.com/watch?v=erVGQhslgBA

    The RX1R III also has optional accessories that can be purchased separately:

    • TG-2 – thumb grip that can be attached to the multi-interface shoe, to provide stability when handholding the camera
    • LCS-RXL – protective case for the camera with access to all ports
    • LHP-1 – lens hood that can be attached to the bayonet mount, is lightweight and can protect the lens from impact

    The Sony RX1R III is available to pre-order and will be available by the end of July 2025. The camera will cost approximately $5099.99.

    We have more news for you to read if you are interested at this link here.


    [ad_2]

    Source link

  • The Daily Edit – Anne Keller Champions More Women Behind the Lens with Roam Media Core – A Photo Editor

    [ad_1]

    Heidi: As a photographer and former mentor with Roam Media Core, what are your hopes for emerging femme creators working in outdoor photography?
    Anne: I started shooting photos in the bike industry in 2004. At the time, there was literally like one other woman shooting bikes. While I definitely felt supported by some of my male peers, I never had the experience of someone holding my hand and guiding me through the awkward first steps, or second steps, or third, etc. I didn’t even know that might have been a helpful thing to ask for.
    My experience last year as a mentor, and my hope for this year, is that we can create a safe space for that stumbling to happen, and for those hesitant questions to be asked. I think the experience of gaining entry is fairly universal. If this program helps provide any sort of guidance on how one builds a career in the outdoor world and hands over a few tools along the way, that sounds like success to me.
    It’s clear the industry needs more women behind the lens. The statistic I’ve heard is that in the world of action sports photography, participation hovers around 15%. That’s pretty low, so anything that can help reduce those barriers is a good thing.

    Andi Zolton bleeds a set of bike brakes in her garage and is one of only two US based women who wrench professionally on the MTB race circuit, and in her spare time co-operates the Roam women’s bike fest, and fixes stuff on her friend’s bikes

    How do the mentor and mentee relationships work? 
    The program brings on six experienced mentors. This year we have four photo mentors and two video mentors, each paired with a mentee. Applications opened in early May, and we had over 120 people apply, which to me speaks to the need for programming like this.
    The idea behind selecting mentees was to find folks with a solid foundation of skills who were career-focused and genuinely interested in working in the outdoor industry. This isn’t a beginner program, and it’s not meant for someone who just wants to learn how to shoot bikes. We wanted this to feel like a valuable experience for both mentees and mentors, like the mentors could be instrumental in providing guidance that may help further someone’s career objectives.
    The mentor and mentee teams begin virtual work about three months before Roam Fest. They spend that time getting to know each other, talking about goals, career ambitions, and building some trust. Then, each team is paired with two outdoor brands and works virtually with the brand’s marketing team to develop guidelines for a shoot. The program all comes together at Roam Fest, where everyone gathers in person to execute a series of brand product and athlete shoots.

    Have mentees developed brand relationships as well as community support?
    Yes, that’s absolutely the goal. The hope is that mentees can develop relationships with brands that show up at Roam Fest, and that some of those turn into long-term work.
    Community support happens a little more naturally, through time spent with their cohorts and mentors. Each mentee gets paired with one mentor, but much of the festival time is spent as a full group, which gives everyone the chance to learn from each other. Last year, that group dynamic ended up being one of the most impactful parts for both mentees and mentors.

    You’ve been based in Fruita, CO, a trail-centric town, since 2002. How has living there shaped your photography projects and creative aspirations?
    Well, for one thing, it’s forced me to spend a lot of early mornings or late evenings out on the trail, because our lovely desert environment looks flat and shitty in mid-day light… haha.
    Fruita and the greater Grand Valley are unique-looking places, and I think that’s been helpful from a visual standpoint. There’s a whole swath of the country that, while beautiful, starts to look pretty similar from one location to the next. The desert southwest is a far cry from that. Our landscape is distinct, and while it comes with some lighting challenges, it’s also a fun place to shoot. Nothing else really looks like it.
    From a brand and media standpoint, the Grand Valley’s also a great location. It’s a good spot to product test, there’s a range of trails, and it’s gotten a decent amount of media attention. While travel is always possible, it’s nice when your backyard is already on the radar and is a desirable place for brands to visit.

    You helped build Fruita’s sense of community through Hot Tomato Pizza. Now as a photographer, how do you use your photography in building community?
    That’s a great question, and maybe one I haven’t given a ton of thought to. But I think there’s something to be said about how much community already exists in the cycling world. It’s honestly one of my favorite things about the sport. It’s so common for surface connections to turn into friendships, just from time spent on bikes. Most of my favorite people have come into my life that way, and the way those threads weave through other circles is kind of amazing.
    While there might be six degrees of separation between us and Kevin Bacon, I’d argue it’s only one or two degrees between most people in the mountain bike world. So maybe it’s less about building community with a camera, and more about celebrating the community that already exists.

    What do running a crankin’ pizza business, developing a fiercely loyal MTB community, and photography have in common?
    Well, for starters, I no longer smell like garlic every day or fall asleep with dried flour crusties in my eyes, so that’s a plus.
    I don’t know that we were responsible for developing the MTB community. It was on its way. But I can definitely speak to the connection between running a business and being a photographer. The outside view is always the fun stuff. That’s about 10 percent of either job.
    It’s invigorating to be behind the bar pouring beers and laughing with your customer friends, just like it’s fun to be out in the woods behind the camera on a shoot. But that’s such a small percentage of the work. The rest is the grunt stuff. And I think being able to accept and embrace that part might be what separates the romantics from the realists.
    I loved making pizzas. I love shooting photos. But I’m pretty indifferent about staring at my computer editing for hours, entering invoices in QuickBooks, cutting onions, or washing dishes. The behind-the-scenes is rarely glamorous, and also where the majority of the work happens.
    It might sound cooler to talk about the passion behind both things, but I try not to. Both the food and creative industries are passion-driven, and I’ve seen a lot of people dive in because of that. But I’ve also seen a lot of those efforts fail, because the reality of running a business is about a lot more than being passionate. It’s a lot of muck, and I’d rather help people be ready for that than glorify it. So maybe the commonality is to be passionate, but be even better at the mundane.

    The Patagonia film Life of Pie features your story. What was it like seeing your entrepreneurial success translated into film?
    Oh gosh, it was a wild ride. While the film had premiered at a few smaller festivals before the bigger outdoor ones, 5Point in Carbondale was the first one that really felt like a launch.
    We were packed into an auditorium with over a thousand people, all laughing at the same scenes, cheering at others. When the film ended, people stood up clapping, cheering, stomping. It was so loud. That moment was probably the first time I actually felt the gravity of our story being told in that way.
    We never thought much about our success from an outside perspective. We were just in it, running the business. I think that’s true for most small business owners. You’re just doing the thing, not stepping back and thinking about the bigger picture. There was never any meta-level cognition about trying to ‘create something.’ But seeing that response was like holding up a mirror. It made the community impact feel very real.

    You mentioned loving rides “headed toward disaster but not quite tipping over.” How does that sense of edge translate into your photo work?
    Yes, I totally love Type 2 fun.
    How does that show up in photo work? The other day, I was crouched so close into the trail corridor that my friend clipped my helmet with his handlebar as he passed. Thankfully I had the helmet on.
    I’ve been hit by pedals, handlebars, crashed with packs full of camera gear, been caught in hailstorms, had to light fires to stay warm, been stuck out in the dark, destroyed lenses, soaked cameras in rainstorms or at stream crossings, etc
    I really believe that the best action sports photographers actually do the sports themselves, usually at a higher level. I think you kind of have to, in order to access those special places and know what to do once you get there. Mother Nature isn’t always cooperative, and the same sort of experience you’d have on a big adventure ride is often what happens on a remote shoot.
    Give me someone suffering up a rain-soaked, muddy hike-a-bike any day. That’s where the emotion shows up. Even if it’s not pretty.


    [ad_2]

    Source link

  • This Will Improve Your Photographic Creativity In One Hour

    This Will Improve Your Photographic Creativity In One Hour

    [ad_1]

    If you have followed my ramblings for a while here at Light Stalking, you will know there is one technique that I really like as a way to improve creativity.

    That technique is to restrict yourself.

    That can be done in different ways. Using a single prime lens is one that I talked about recently. Restricting the number of shots you take is another, as is revisiting the same location multiple times.

    Today, I would like to talk about another restrictive technique that I think really boosts your creativity. Limiting yourself to just one hour. I tried it out recently for a YouTube video I was creating and found it a very compelling way to get more creative, and the images I have used in this article were taken in that one period. Let me explain a little more.

    https://www.youtube.com/watch?v=SCwy6qGuJE4

    Why Restrict Yourself?

    Restricting yourself in photography, in general, might seem a counterintuitive way of doing things. After all, digital gave us the freedom to shoot as much as we liked for as long as we wanted (given enough batteries).

    That, however, is the problem. That freedom to continue shooting everything can often come at the cost of creativity. We speed up, we shoot everything and anything, our photography becomes less considered, less patient, and in my opinion, less creative. I have a disdain for photographers who boast on social media about how many shots they got on a particular shoot. I would rather have 5 good shots than 500 average shots.

    Adding any of the restrictions I mentioned above, you will tighten up your compositions, take more time, and get better shots.

    So why one hour?

    Woman walks up cobbled street towards Durham Cathedral
    This image is from about 20 minutes in. By Jason Row Photography

    Restricting Yourself To One Hour

    When we go out with no fixed time frame in which to capture images, we can get lazy. We can overthink a single image, or conversely, we can try to capture far too much without thinking creatively. We can get a good shot, but ignore the fact that the light is going to improve in 5 minutes, missing out on a great shot. In short, we lose focus on what’s important.

    Many of us live busy lives, and often that can mean that when we do get the chance to take some photos, we tend to try and shoot as much as we can.

    As I mentioned, restricting yourself in general can be a very good thing in photography. Restricting yourself to one hour has some very specific and perhaps surprising results.

    The first thing that you will notice is that you start to think and compose quicker. You start to notice things faster and, in turn, see more of the details in a shot. You may well start to see the light differently, how it can change minute by minute at a given location.

    Rowing boats lined up on the River Wear in Durham
    Time limiting can actually boost creativity. By Jason Row Photography

    Another thing that you may well notice is that you don’t actually feel rushed. You are not trying to cram in as many shots as you can, rush around from location to location. That lack of haste is actually a creativity boost. You will find yourself slowing down despite the time restriction.

    So, how would you go about a one-hour photo shoot?

    The first thing is to manage your expectations. Not just about what you will capture but the location and the weather as well. The concept works best without too much preplanning.

    Pick a location that you think will be suitable. It could be a district of a city or town, a beach, or perhaps a mountain landscape. Choose a time to go and shoot, and don’t worry too much about the weather.

    In terms of equipment, don’t weigh yourself down with loads of kit. Like having too much time, having too much gear leads to indecision on what lens to use, whether to set up a tripod, etc. I like to restrict myself to one camera, one lens, which can be a prime or zoom. My preference is for zooms when shooting in just one hour.

    Get to the location and take a few minutes just to relax and look around. Then set a timer on your phone for exactly one hour and just wander. Try not to look at the timer; doing so can introduce haste. Instead, take your time to observe, compose and shoot. The key to a one-hour photo shoot is not the quantity, but the quality.

    A pretty, pink doored cafe in the heart of Durham, UK
    Remember to look back on your stroll. By Jason Row Photography

    If a particular shot or location is working, don’t feel the need to rush it and move on; instead, simply enjoy what you are doing. I would also advise not to chimp your photos, trust your instinct and enjoy the fruits of your labour when you get home. Often, chimping can lead us to continually retake the same shot, as well as delete shots that might not have worked. Those poor shots are worth keeping as they show us where we went wrong.

    When the timer alarm goes off, stop shooting, regardless of what you are taking at that moment. Put the camera away, perhaps get a coffee, relax and think back over the shots that you have taken.

    Reflection of a statue in the pub window in Durham, England
    There is always something to shoot. By Jason Row Photography

    What Will You Learn In One Hour?

    In a single one-hour shoot, you will learn not to rush and to take time with individual compositions rather than shooting everything you see. However, if you use the one-hour technique on a regular and frequent basis, you will learn much more.

    The first and perhaps most important thing is that you will become much more instinctive with your camera controls. The simple act of raising the camera, choosing the settings, and shooting will become second nature.

    Prebends Bridge and the River Wear in the heart of Durham, England
    The last shot of the hour. By Jason Rowe Photography

    You will find yourself scanning a scene much more carefully, yet picking out good compositions much quicker. You will also find yourself working on a single composition instead of hunting for many.

    Perhaps most importantly, you will find yourself gaining confidence. Confidence not only in your ability with the camera, but also with the work you are capturing.

    Restricting your photography to just one hour might seem counterintuitive; however, if you try it out regularly, you will soon find your creativity improving and your ability with the camera getting more instinctive. That can only be a good thing considering the limited time you need to put into it.


    [ad_2]

    Source link

  • Introducing Nauticam’s Midrange Focus Optimizer (MFO-3)

    Introducing Nauticam’s Midrange Focus Optimizer (MFO-3)

    [ad_1]

    We got our first look at the Midrange Focus Optimizer (MFO-1) at last year’s DEMA Show. Now, Nauticam has unveiled a new Midrange Focus Optimizer called the MFO-3. (Yeah, we’re intrigued about the mysterious MFO-2 as well!)

    While the MFO-1 is designed to perform various functions when used with your macro lens—extending the focus range, minimizing lens aberration, and boosting magnification—the MFO-3 is designed for a more specific task: close focusing. Nauticam says that the MFO-3’s greatly improved “focus-to-the-glass performance” is especially useful for blackwater photographers. At the same time, according to Nauticam, the optic still offers “ample” working distance when you need it. Thus, Nauticam claims you’ll benefit whether you’re shooting “thumbnail-sized nudibranchs or grapefruit-sized frogfish.”

    Effectively, the MFO-3 converts your 90mm, 100mm or 105mm lens into roughly a 60mm equivalent, and, depending on your lens, provides a working distance of between ~0mm and ~1500mm! Nauticam has provided the results from testing the MFO-3 with a variety of popular longer-focal-length lenses, and the company also shows how the MFO-3 compares with the MFO-1 and SMC-3 (see tables below).

    The Nauticam Midrange Focus Optimizer 3 (MFO-3) costs $730 and is available from retailers such as Backscatter. Keep an eye out: Blackwater master Mike Bartick has been testing the MFO-3 in the field and we’ll be publishing his review on DPG soon.


    When purchasing underwater photography equipment like the products mentioned in this article, please support DPG by supporting our retail partner—Backscatter.com.


    PRODUCT INFORMATION

    Midrange Focus Optimizer 3 (MFO-3)

    Nauticam once again demonstrates its commitment to underwater photographers with the introduction of the Mid-range Focus Optimizer 3 (MFO-3). As full-frame mirrorless cameras become the go-to choice for serious underwater imaging, a key limitation has emerged: the lack of close-focusing, wide-angle macro lens options—especially for blackwater photography. The MFO-3 is designed to solve that problem without requiring new camera lenses or ports.

    Optimized for use with longer focal length full-frame macro lenses (such as 90mm, 100mm, and 105mm), the MFO-3 transforms these lenses into an approximate 60mm equivalent.  It also delivers significantly enhanced “focus-to-the-glass” performance while still offering ample working distance when needed. Whether you’re capturing thumbnail-sized nudibranchs or grapefruit-sized frogfish, this water-contact optic delivers outstanding image quality—without the need to swap out your camera lens or port.

    While it’s an outstanding tool for blackwater, the MFO-3 is just as capable in a wide range of macro environments. And despite its larger physical size, it actually boasts a lower in-water weight than the SMC-3, making it easier to handle and balance in the water.


    Midrange Focus Optimizer 3 (MFO-3) Specifications

    • Dimensions: OD 84mm x H 114.2mm
    • Weight in air: 602g
    • Buoyancy in water: Negative 120g
    • Max Magnification (*1): 0.9x
    • Lens FOV/Converted FOV: 23°/38°
    • Working distance (*1): 0–1500mm
    • Body construction: Hard-anodized aluminum alloy
    • Lens construction: 4 elements in 3 groups
    • Lens coatings: Anti-reflection Coating
    • Mount thread diameter: M67
    • Depth rating: 100m

    *1 Tested with Nikon Nikkor Z MC 105mm f/2.8 VR S Macro Lens

    Comparison with MFO-1 and SMC-3


    81503 MFO-3

    81501 MFO-1

    81203 SMC-3

    Dimensions (OD x H mm)

    Ø 84 x 114.2mm

    Ø 70 x 26mm

    Ø 70 x 32mm

    Weight in air

    602g

    218g

    307g

    Buoyancy in water

    Negative 120g

    Negative 150g

    Negative 215g

    Lens FOV/Converted FOV(*1)

    23°/38°


    Max. Magnification (*1)

    0.9X

    1.2X

    2.3X

    Working distance (*1)

    0–1500mm

    108–1005mm

    46–98mm

    Lens construction

    4 elements in 3 groups

    3 elements in 2 groups

    3 elements in 2 groups

    Lens coatings

    Anti-reflection

    Anti-reflection

    Anti-reflection

    Mount thread

    M67

    M67

    M67

    Depth rating

    100m

    100m

    100m

    *1. Tested with Nikon Nikkor Z MC 105mm f/2.8 VR S Macro lens


    Compatible Lenses with MFO-3


    Lens

    Sensor


    format

    Lens FOV.

    Max.


    Magnification

    Working


    distance

    Converted FOV.

    Canon RF 100mm f/2.8 L Macro IS USM (with Modified Aperture)

    FF

    24°

    0.9X

    0–1490mm

    40º

    Canon EF 100mm f/2.8L Macro IS USM

    FF

    24°

    0.9X

    0–1490mm

    40º

    Nikon NIKKOR Z MC 105mm f/2.8 VR S Macro

    FF

    23°

    0.9X

    0–1500mm

    38°

    Nikon AF-S VR Micro-NIKKOR 105mm f/2.8G IF-ED

    FF

    23°

    0.8X

    5–1490mm

    38°

    Nikon AF-S Micro NIKKOR 60mm f/2.8G ED

    DX

    26.5°

    0.5X

    0–1500mm

    45º

    Sony FE 90mm f/2.8 Macro G OSS

    FF

    27°

    0.8X

    0–1500mm

    45º

    Fujifilm GF 120mm f/4 Macro R LM OIS WR

    Medium 


    Format

    25.7°

    0.9X

    15–1500mm

    43º

    Olympus M. Zuiko Digital ED 60mm f2.8 Macro

    M43

    20°

    0.5X

    0–1500mm

    33º

    OM System M.Zuiko Digital ED 90mm f/3.5 Macro IS PRO(Normal macro mode)

    M43

    14°

    0.7X

    0–1480mm

    23º

    Canon EF-S 60mm f2.8 Macro USM

    APS-C

    24.5°

    TBD

    TBD

    TBD

    Panasonic Lumix S 100mm f2.8 Macro

    FF

    24°

    TBD

    TBD

    TBD


    Included in the box

    • Front and rear rubber caps
    • Neoprene bag
    • M67 Spacer ring for SMC/CMC
    • Cleaning cloth


    SKU # 81503

    $ 730.00


    [ad_2]

    Source link