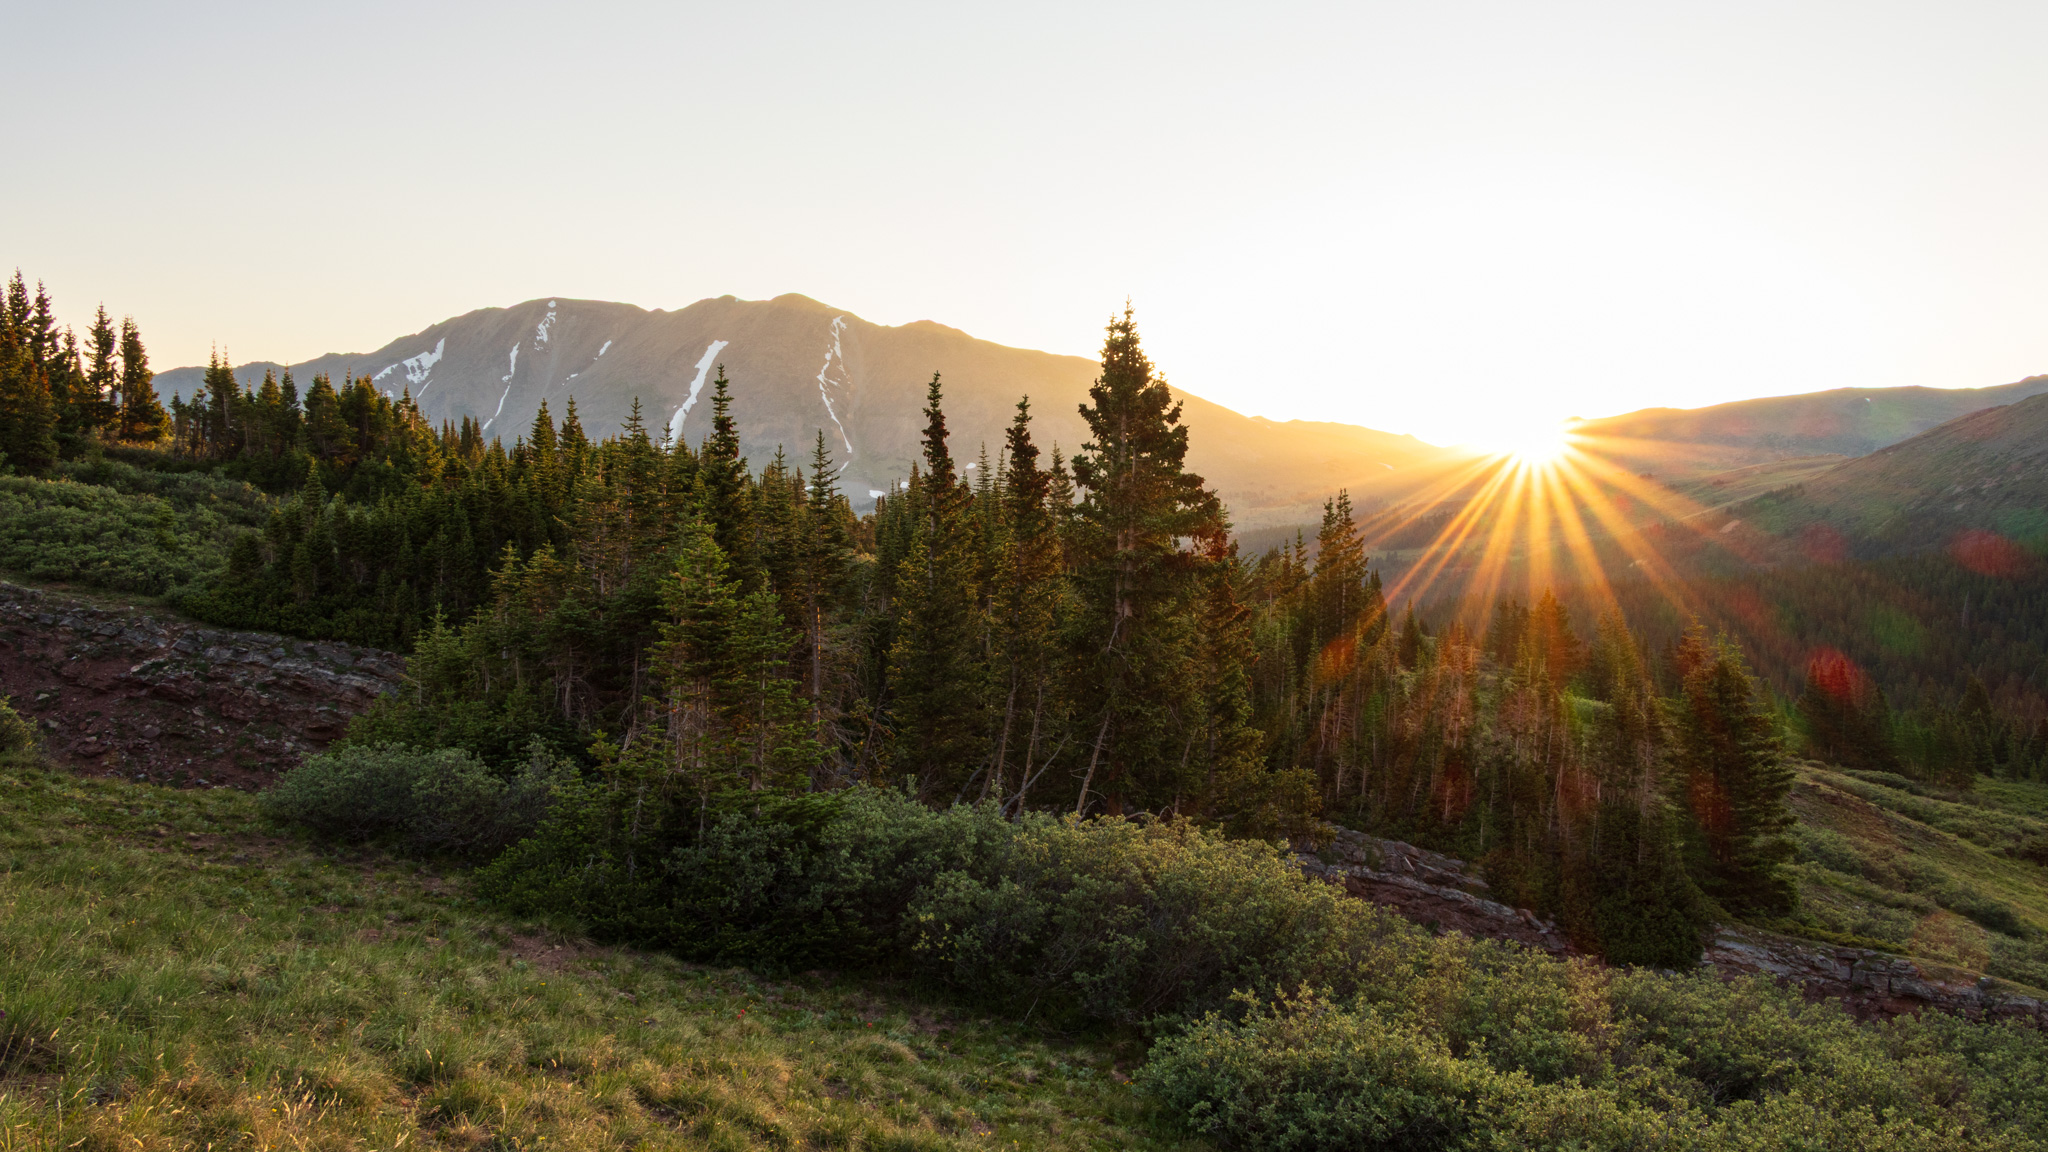
Depending on where you live, you may be experiencing the Summer or monsoons in the Northern Hemisphere and the Southern Hemisphere maybe experiencing Winter weathers slowly transitioning into Spring. This is a time when people spend most of their time outdoors and photographers have a number of opportunities to photograph water features in nature, especially in the Northern Hemisphere.
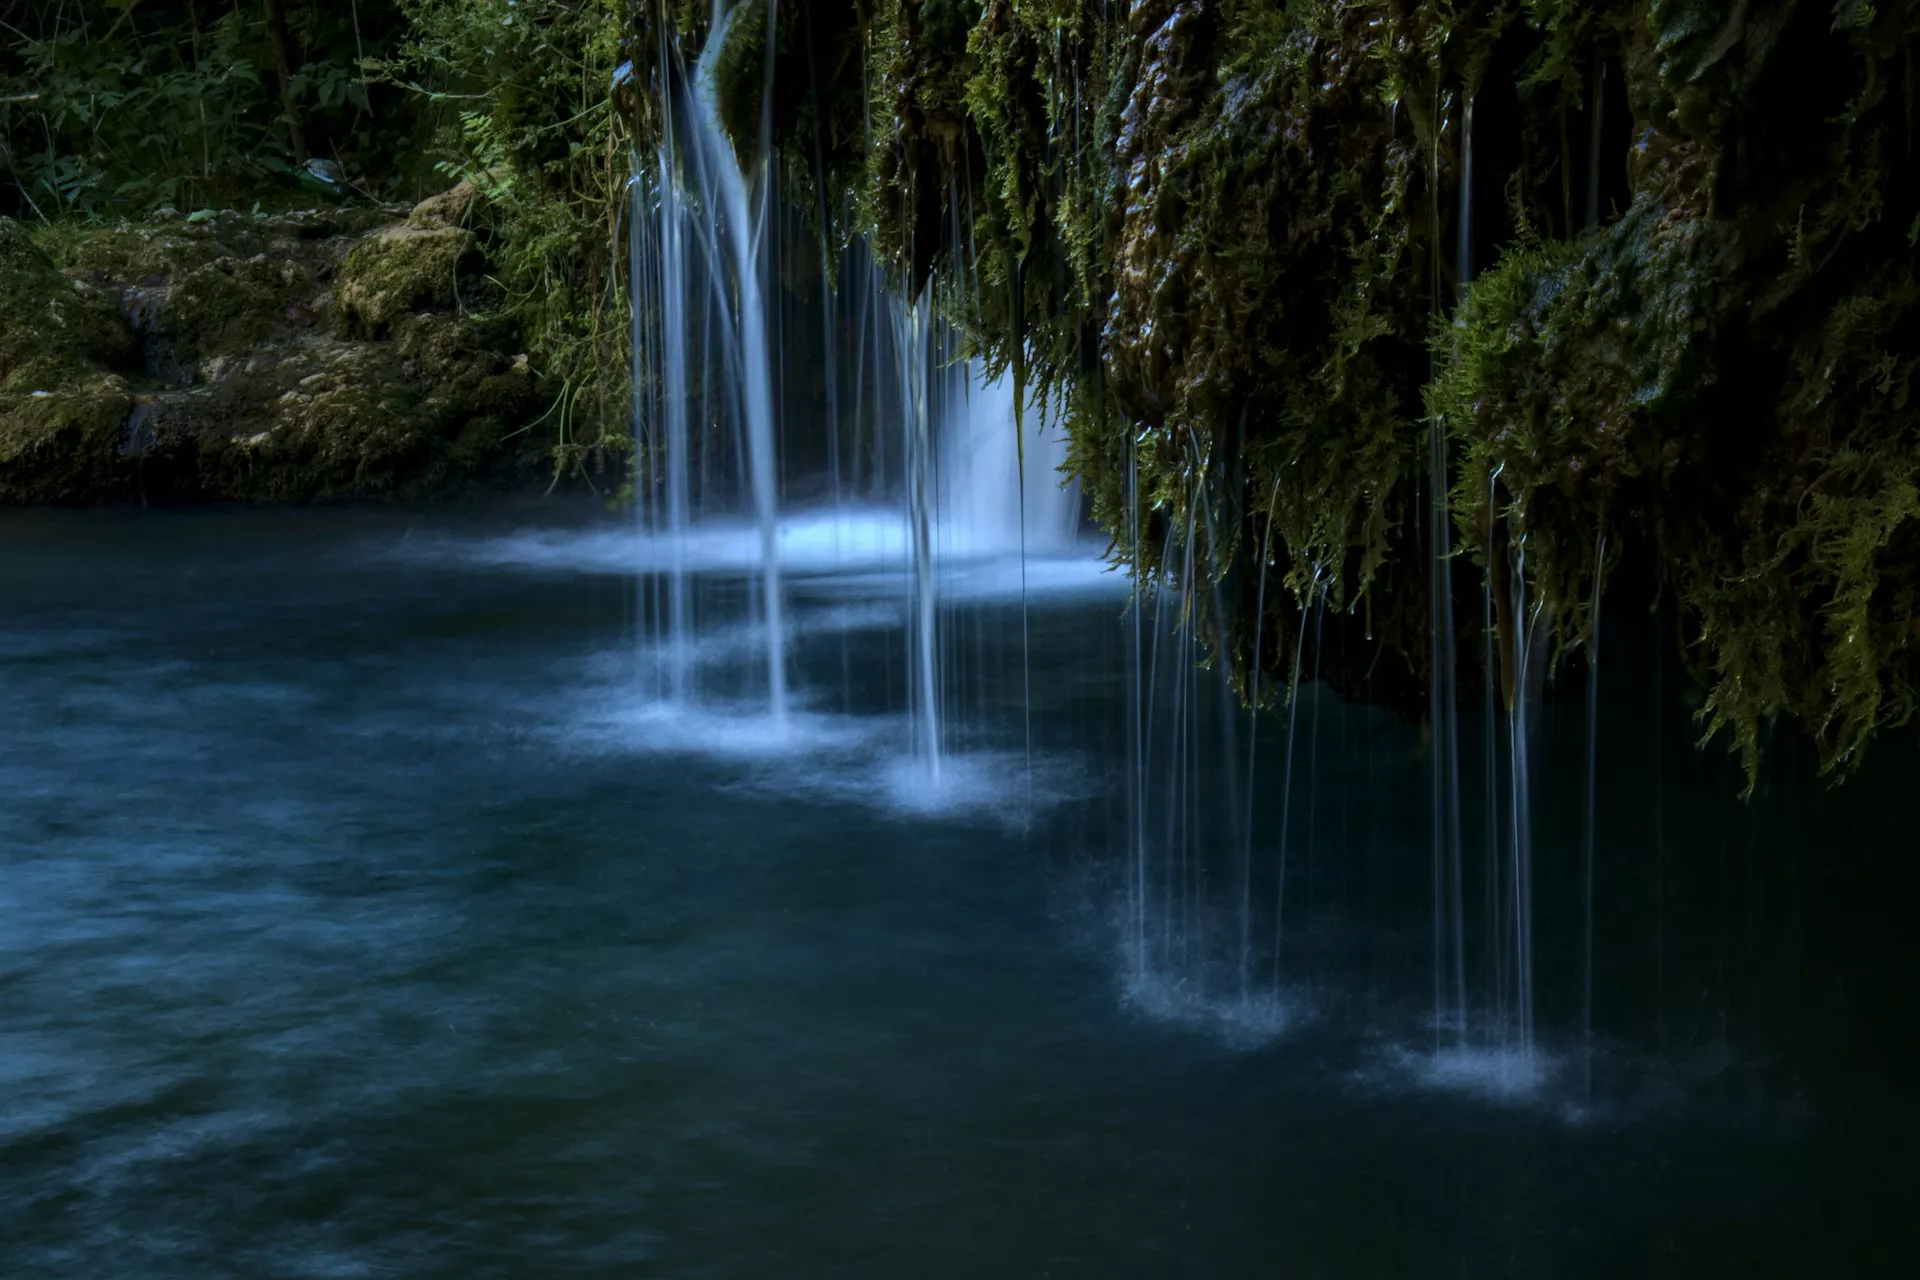
Photo by Adrian Mag
Water features look magical when captured using long exposure techniques during certain times of the day under the right light conditions. In this article we have put together a collection of 25 long exposure photos of water features in nature, that may inspire you to go out and capture some yourself.
Natural water features are found all around us if we move slightly from the most urbanised areas. Streams, rivers, lakes, waterfalls, beaches, oceans, are all great subjects to photograph using the long exposure technique. This technique renders a great mood, atmosphere and some dynamism to an otherwise static image.
Long exposure photography can surprise you with stunning results and if you are looking for a creative surprise in your photography, we recommend you to check out this eBook “The Complete Guide To Long Exposure Photography” by Photzy.
Photo by Landon Arnold
Photo by Intricate Explorer
Photo by James Feaver
Photo by Thomas Le
Photo by David Becker
Photo by Riccardo Cervia
Photo by Fulvio Cassani
Photo by Bruno do Val
Long exposure is not difficult if you get the basics right and an understanding of light and the gear required. You do not need to spend weeks or months practicing the long exposure craft in photography, but just refer to this eBook “The Complete Guide To Long Exposure Photography” by Photzy. This guide comes with 119 easy to follow pages that provide precise training for long exposure photography. It also comes with detailed descriptions and visual references to ensure you get a complete understanding of the craft.
Photo by Richard R
Photo by Hans Isaacson
Photo by Jms
Photo by Anthony Cantin
Photo by William Warby
Photo by Samuele Bertoli
Photo by Tapio Haaja
Photo by Soumya Banerjee
When capturing long exposure images, you also need to make sure that you capture sharp photos under the right conditions using the right gear and setup. Whether you are a beginner or an amateur looking to brush up your knowledge or someone looking to learn more about capturing creative long exposure shots, we recommend you to check out this eBook “The Complete Guide To Long Exposure Photography” by Photzy.
We know of a few 360 degree cameras in the market with Insta360 being the best overall and then the GoPro Max and Ricoh Theta X also in line. DJI which did not have a 360 camera so far, has filled the gap with its recent release of the Osmo 360 that is capable of capturing 8K videos at 50fps.
Image via DJI
The Osmo 360 camera comes with a square 1 inch HDR image sensor, that provides great image quality while consuming low power and also helping with the ultra compact and lightweight design. This is the first of DJI’s cameras that offers 360 videos at up to 8K, 50fps and comes with a good dynamic range to help capture high contrast scenes, for example during sunrise and sunsets.
One of the most interesting features is that the user can switch between front and rear cameras without the need to stop recording. The camera is very compact and weighs only 183g and comes with 105GB storage.
The camera can record in extreme temperatures as low as -20 degree Celsius and can also be used underwater up till a depth of 10 meters without a protective case.
Here are some of the most important features of the Osmo 360:
Square sensor design with dual 1 inch 360° image fields
Large f/1.9 aperture for maximum light intake in even low light situations
SuperNight mode to capture all details in night scenes
105GB of built-in storage
High-frame-rate with 4K 100fps 360° video
Up to 4x slow motion
Ultra-clear 360° photos up to 120 megapixels
Video format supports 10-bit color depth
D-Log M mode to capture all details and for flexibility when postprocessing
Continuous 8K/30fps recording for up to 100 minutes and 190 minutes of continuous recording when capturing 6K 360° video
Pair the camera with invisible selfie stick to make it vanish from the 360° videos without the need for editing, also third person views will make it look like the footage was captured by a cameraman
Switch between front and rear camera without the need to stop recording
Magnetic quick release design to pair with accessories
If you are interested, here is a first impression and a hands-on comparison of the Osmo 360 with a leading 360 degree camera.
The camera is out of stock on DJI’s website, but is available to pre-order from resellers. It is priced at $549.99. More details about this product can be found here. We have more news for you to read if you are interested at this link here.
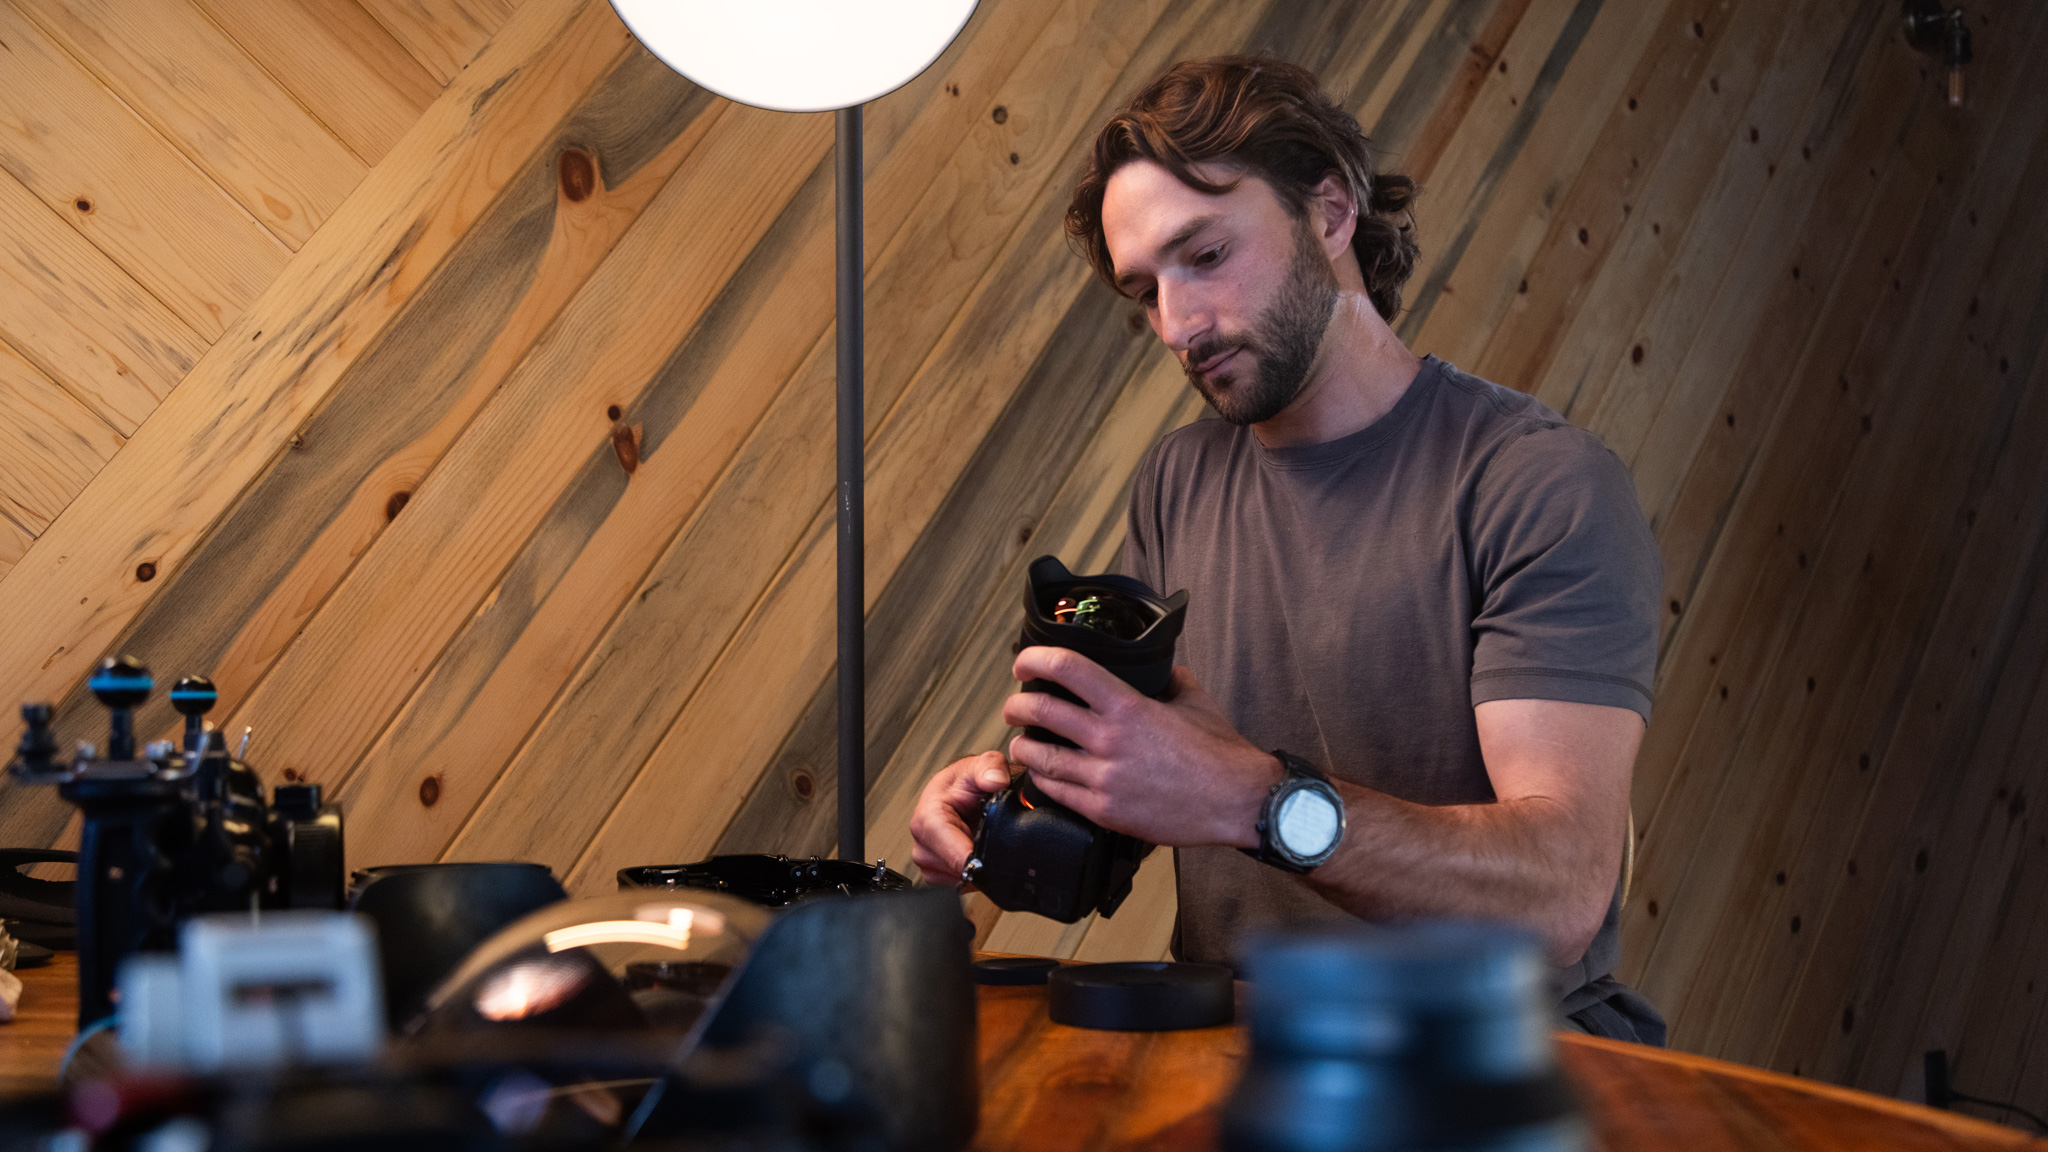
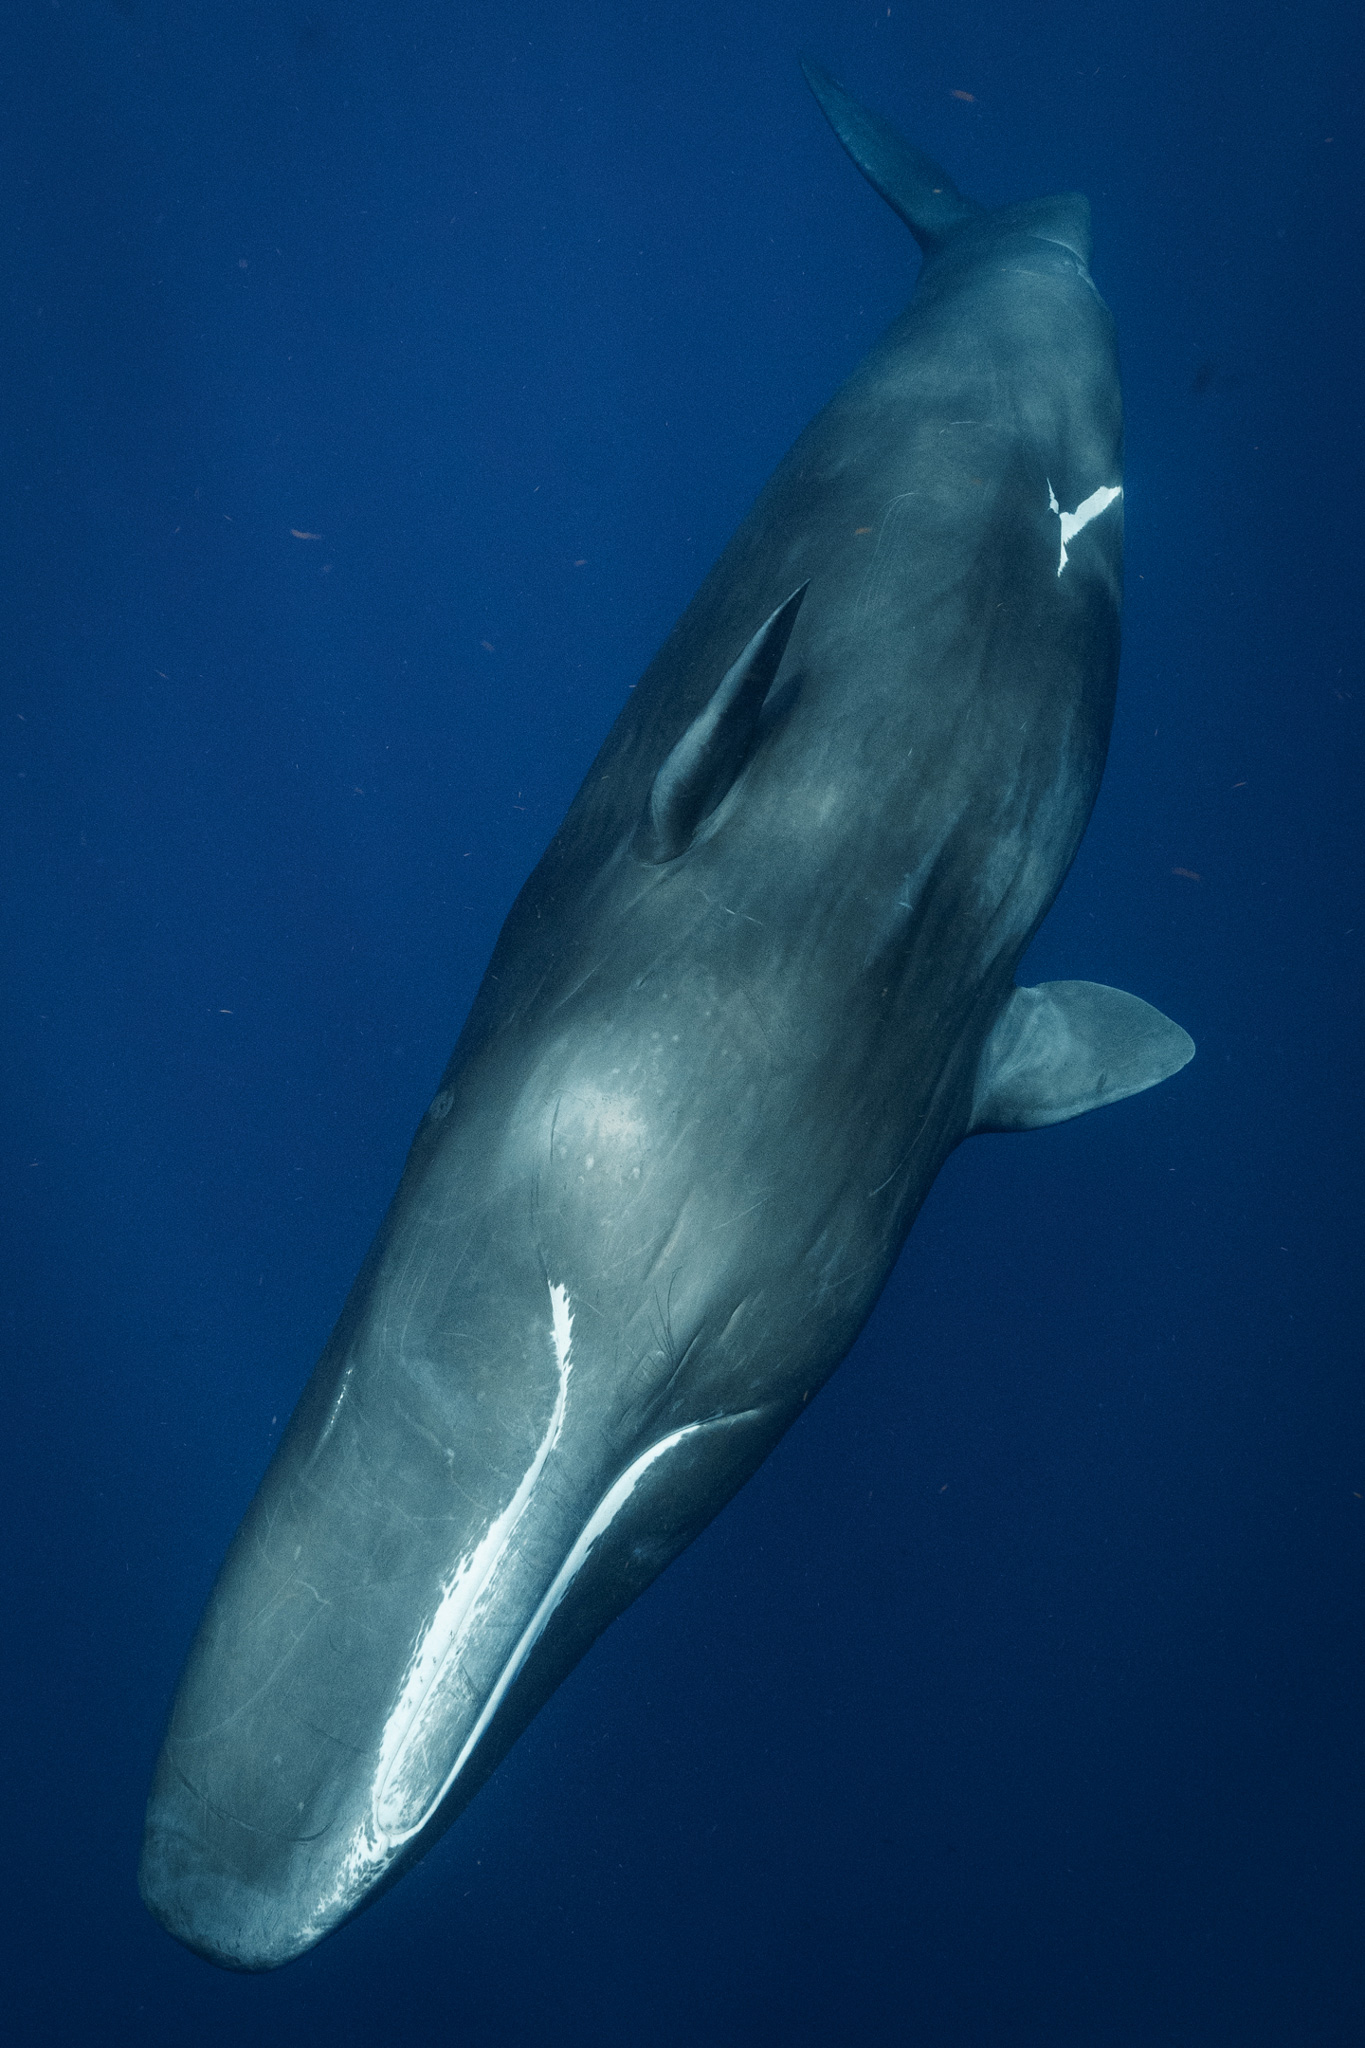
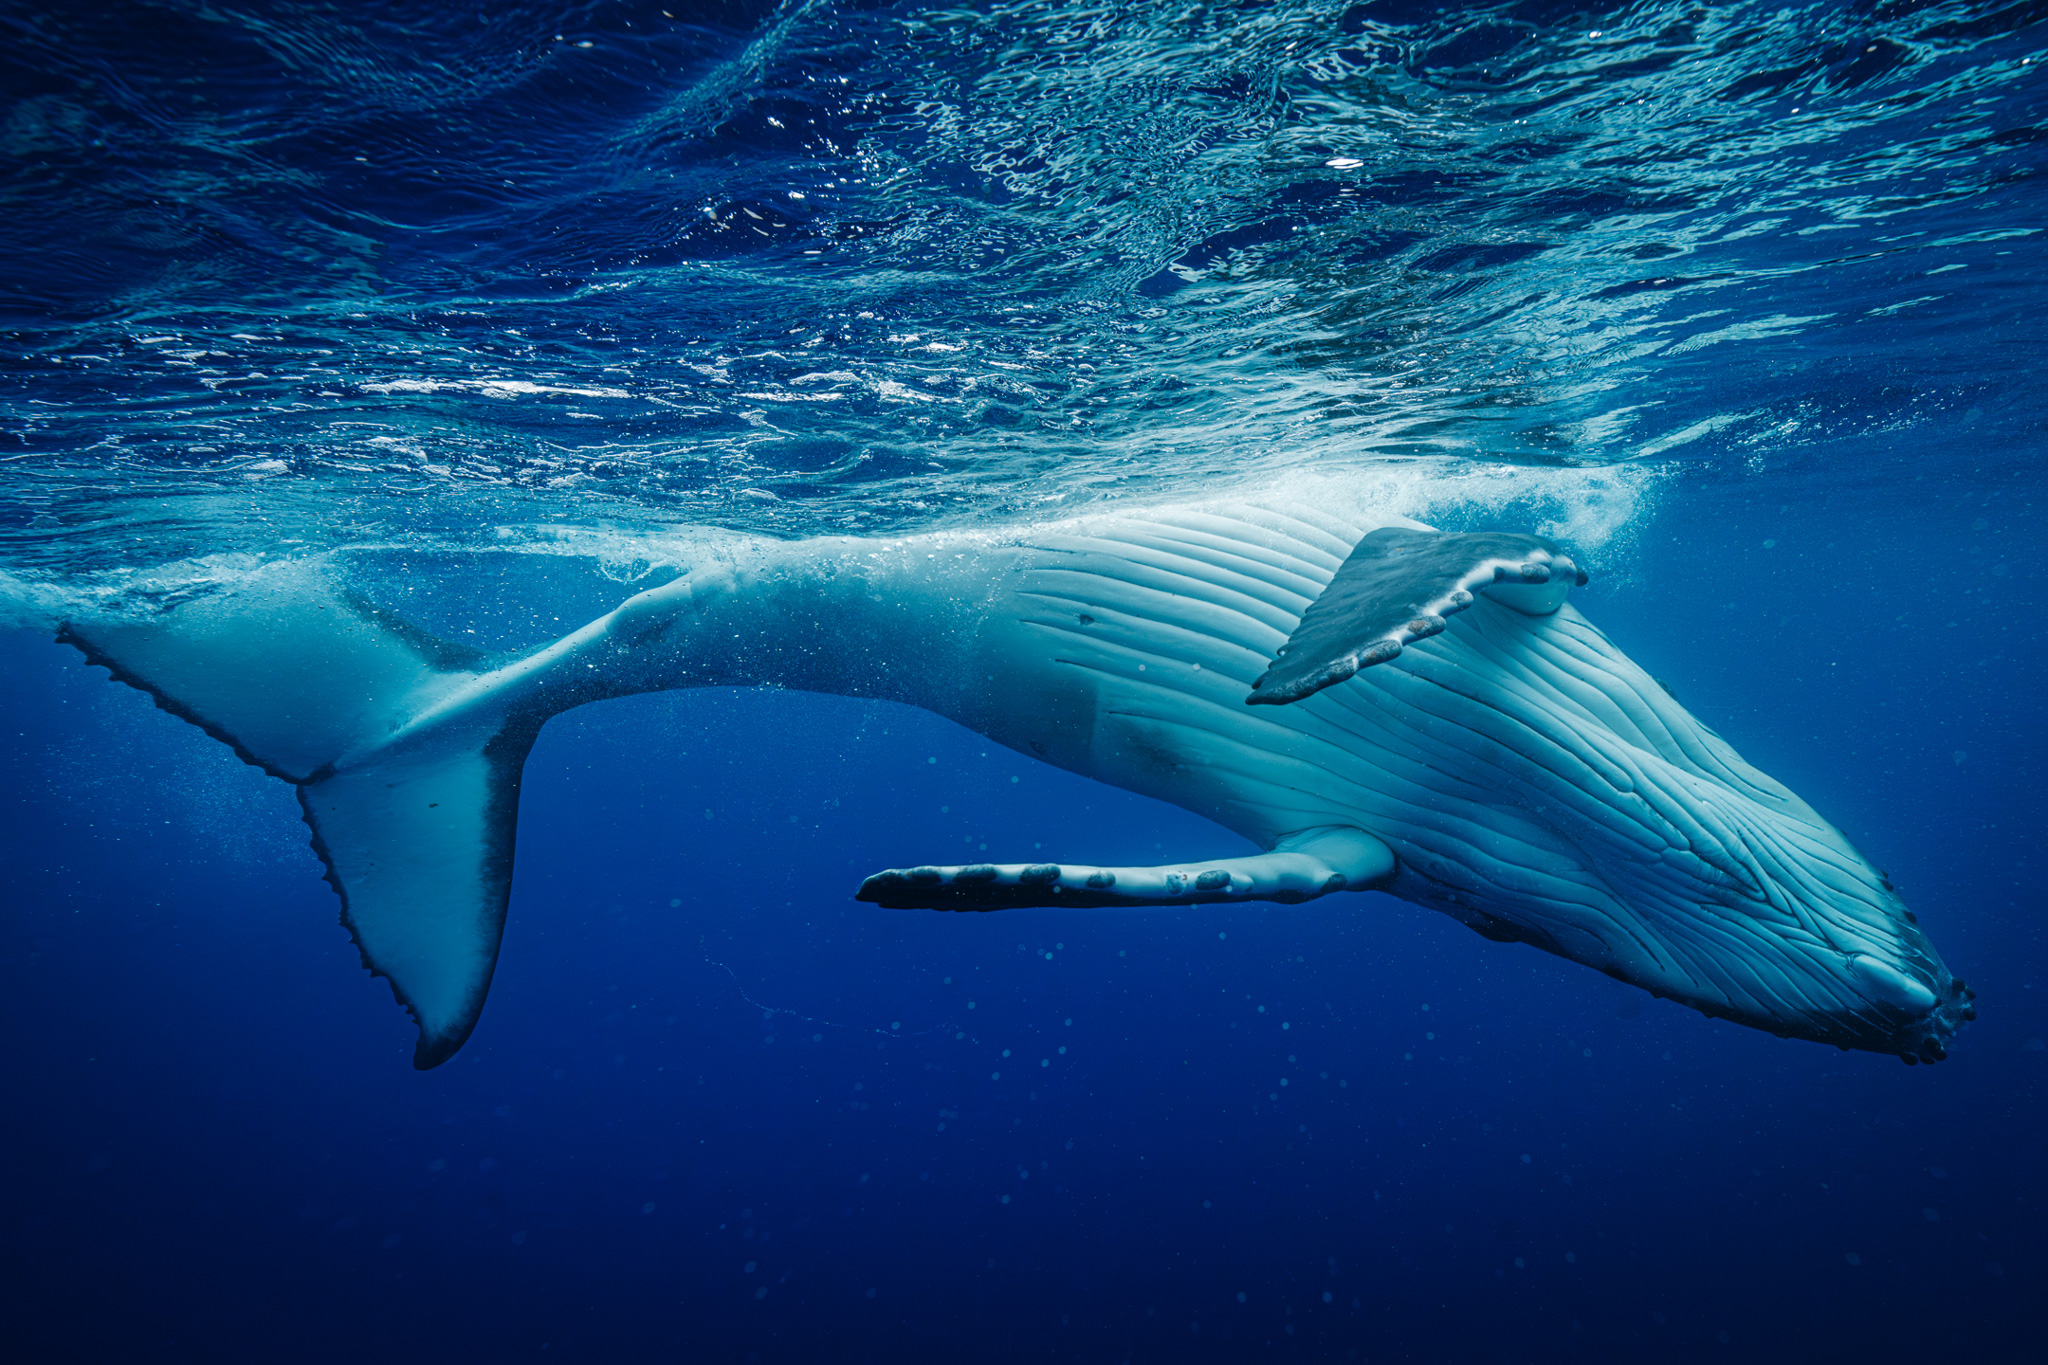
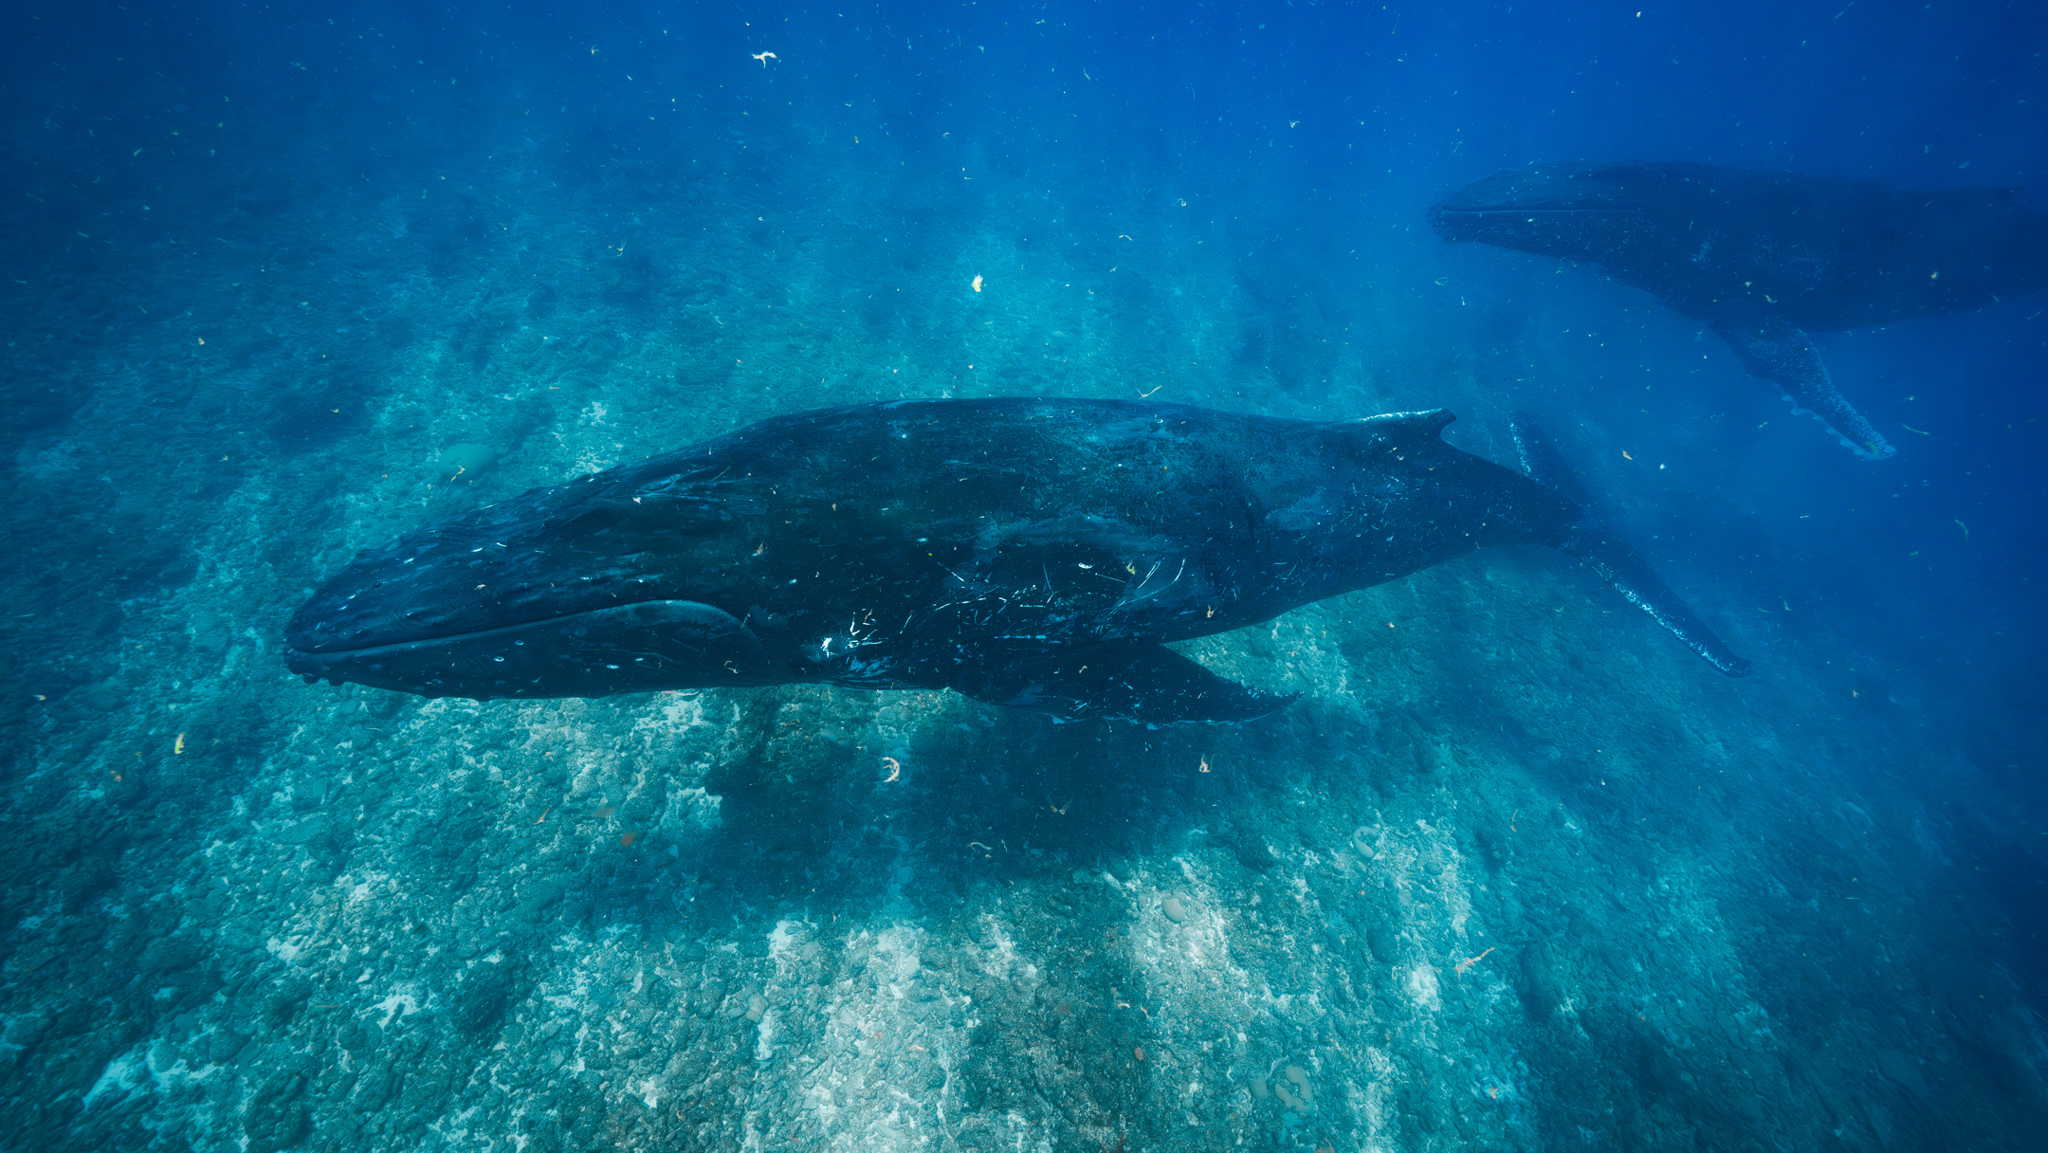
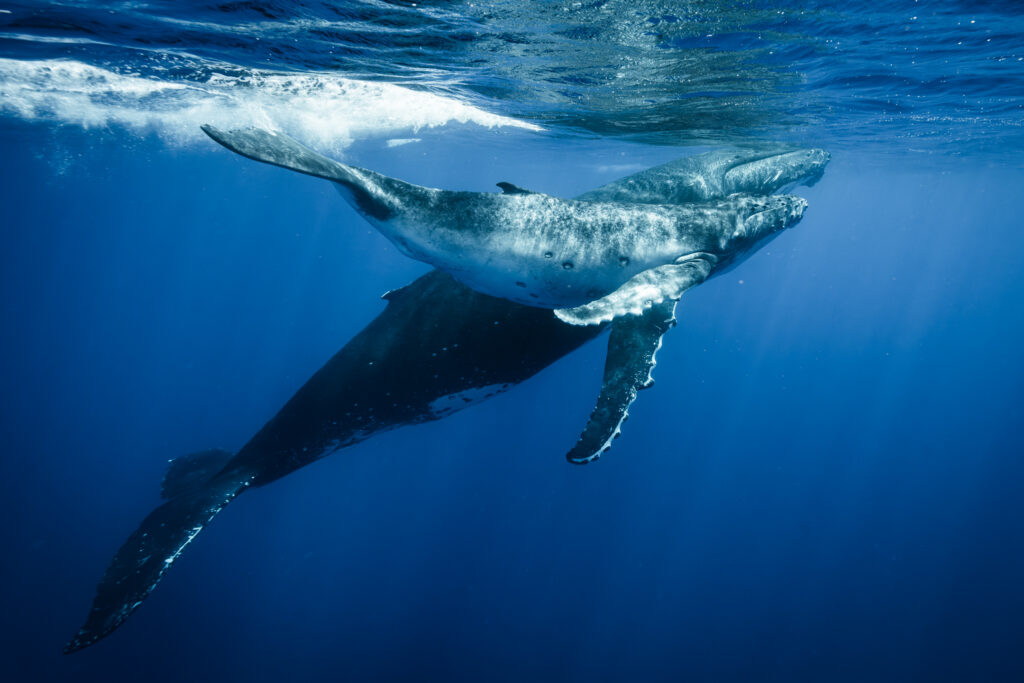
I recently returned from two months of guiding, photographing, and filming ocean safaris in the South Pacific and Caribbean. I work for Just the Wild, a company that specializes in ethical in-water whale and other marine megafauna encounters. Akin to that, I also work as a professional nature and adventure photographer and filmmaker with a specialty in underwater imagery. Before departing, I felt like my underwater images had stagnated in look and aesthetic. Before leaving, I wanted to get my hands on a lens that few underwater shooters have yet to discover. I quickly honed in on the Sigma 14mm F1.4 DG DN | Art.
This lens stood out to me because of its design for astrophotography. The night sky and underwater imagery world overlap a lot. When shooting underwater, you need to be using a lens that’s extremely wide, has fast and accurate autofocus, and, most important to me, satisfies my greed for sharpness.
My underwater setup:
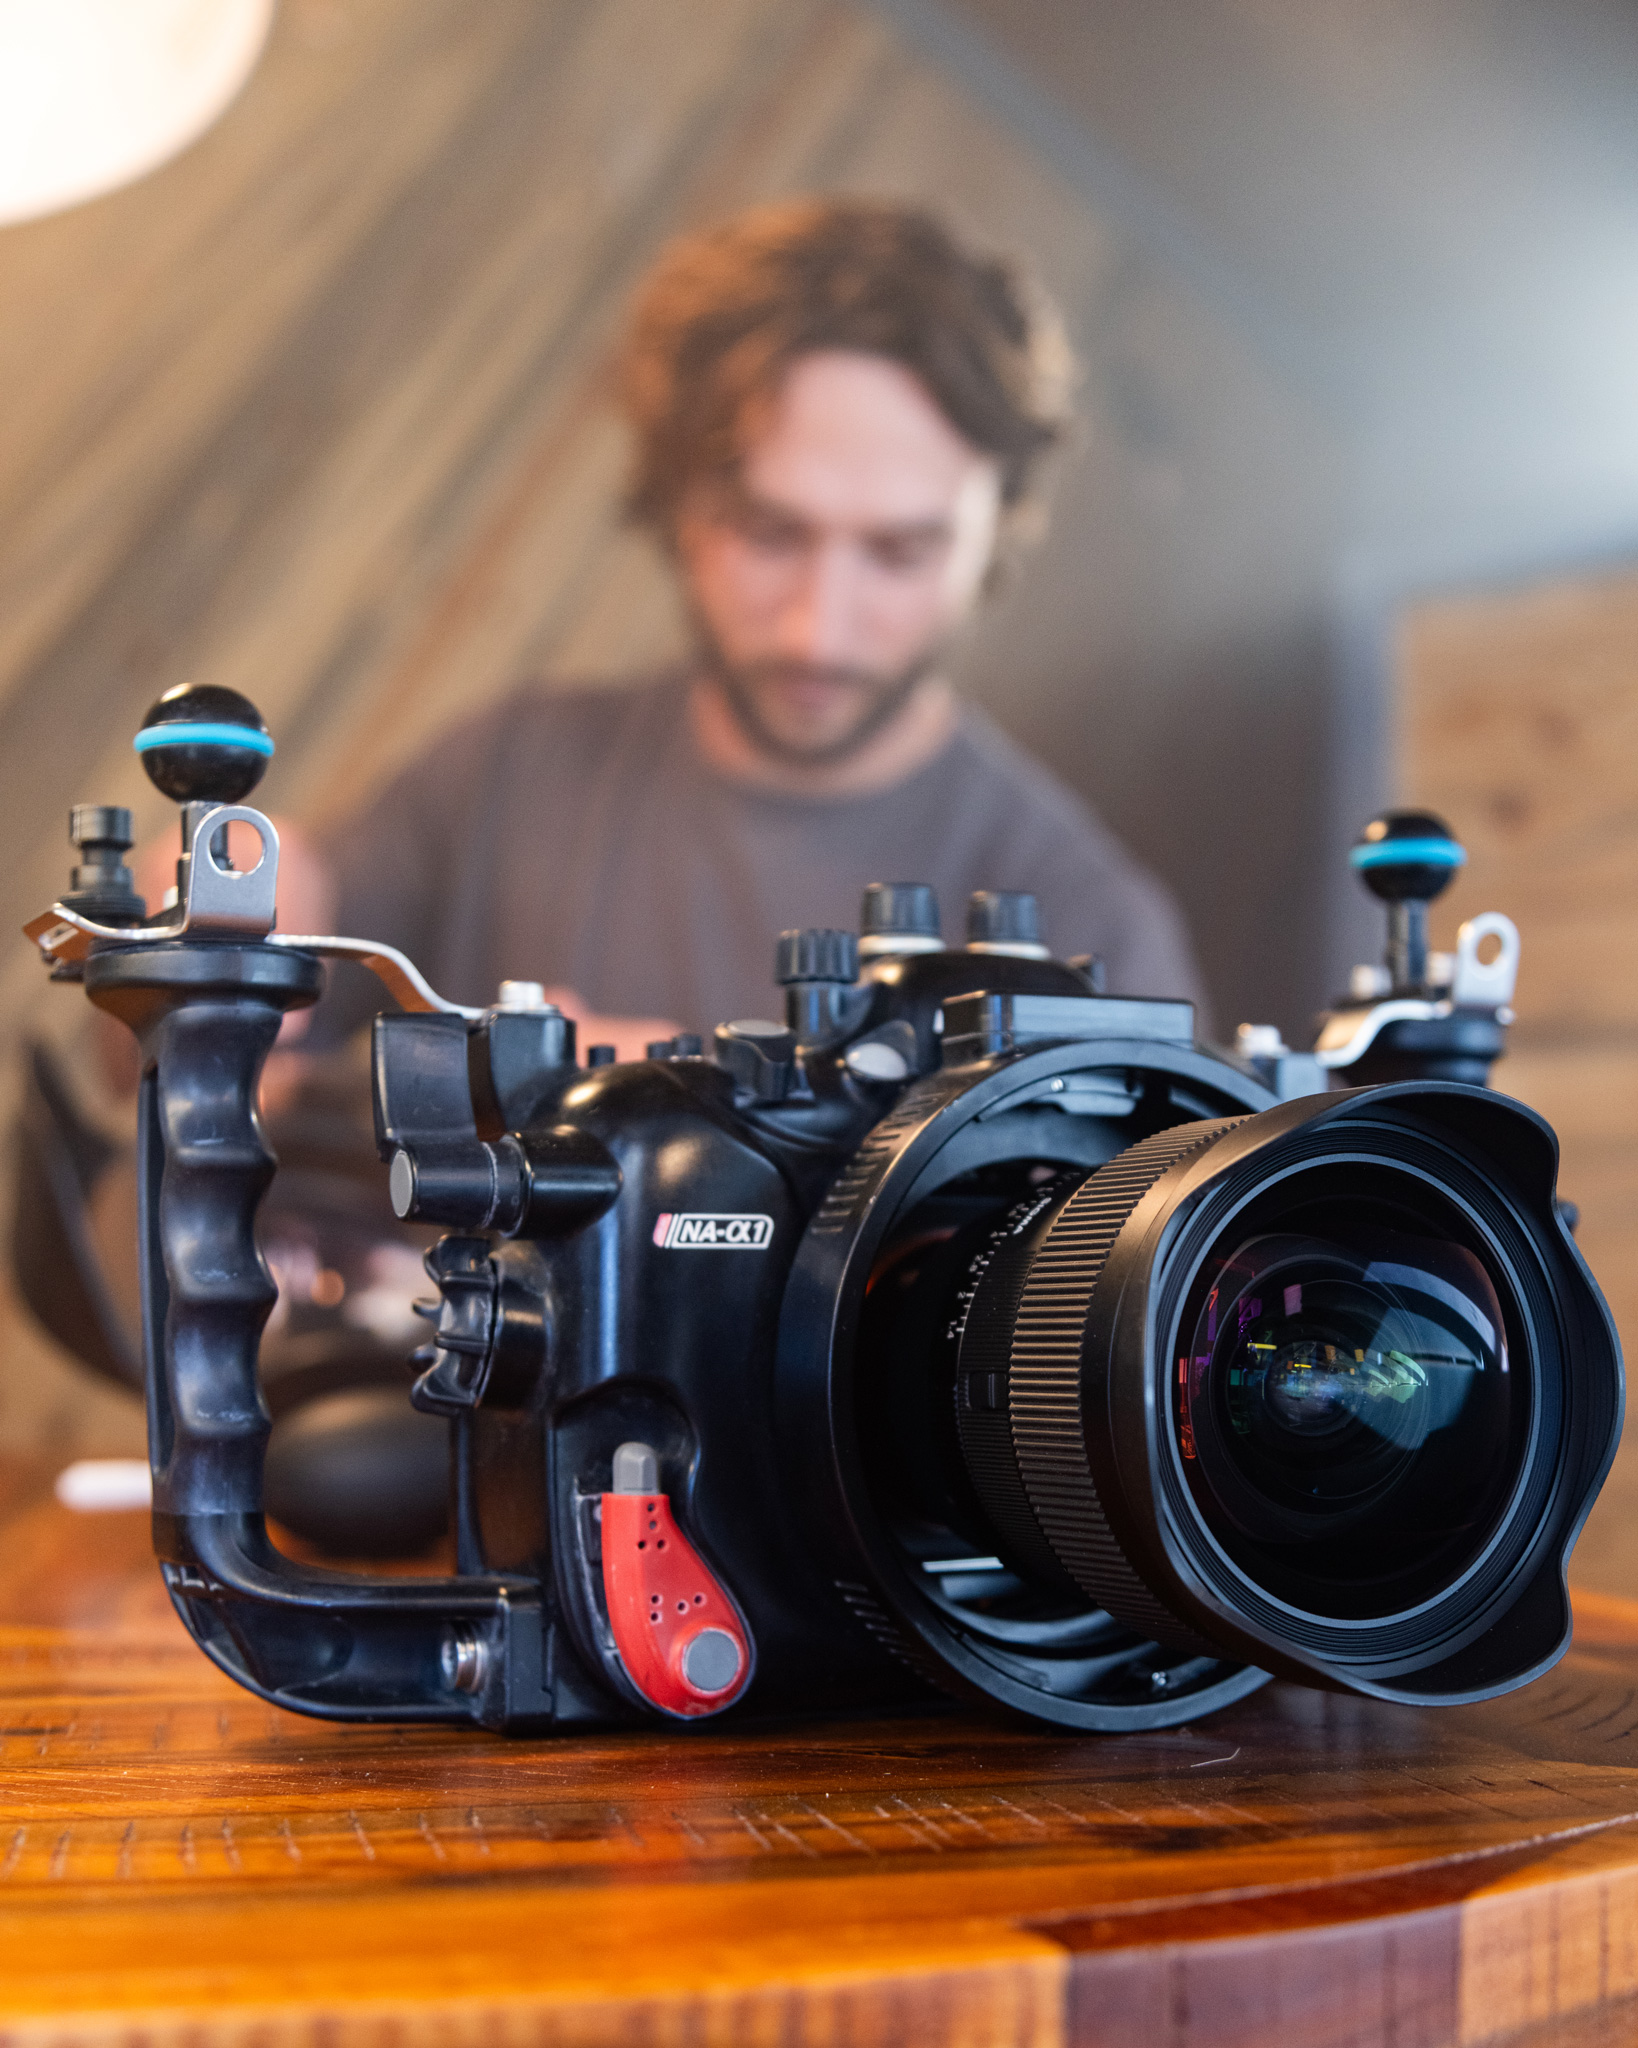
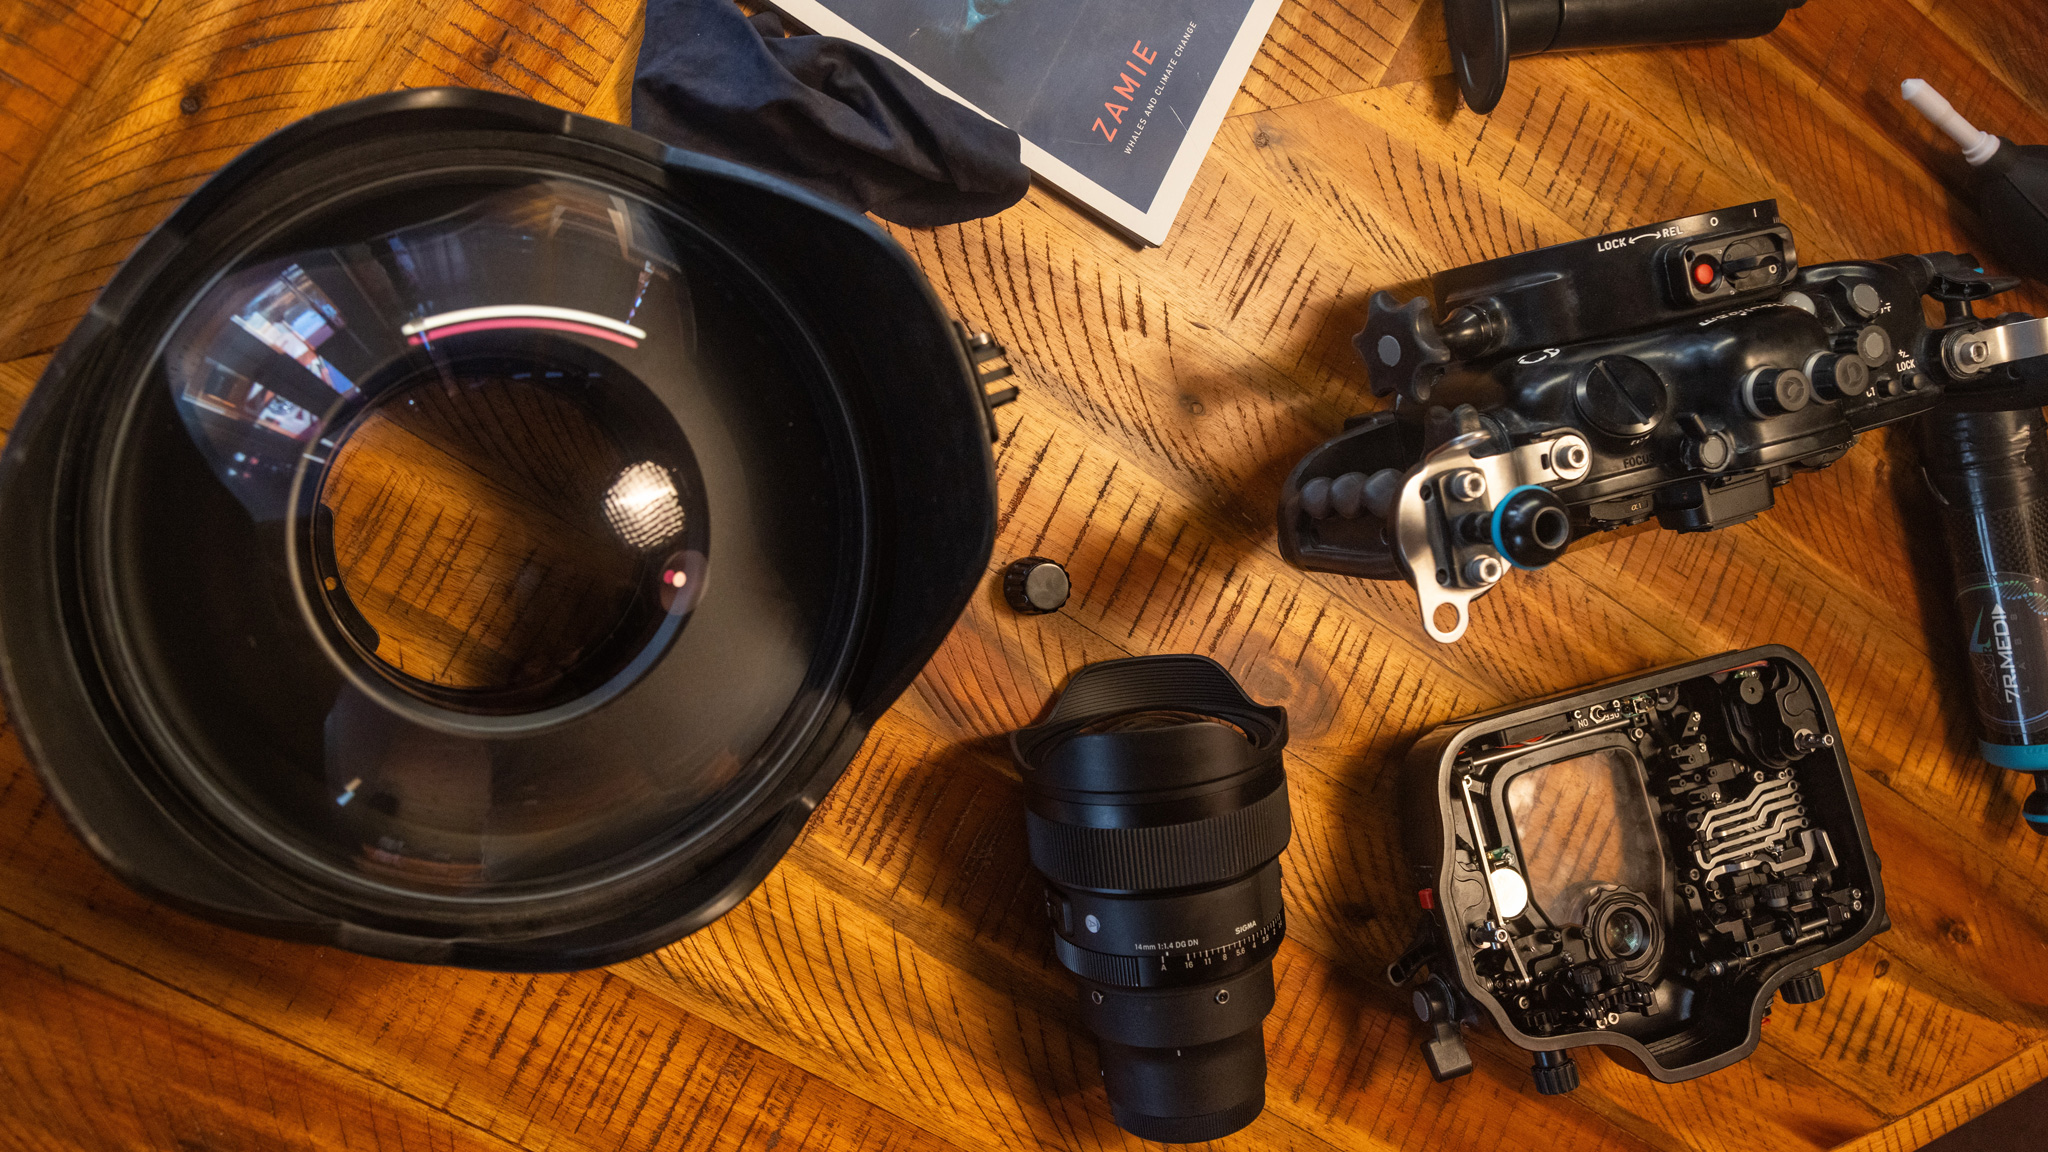
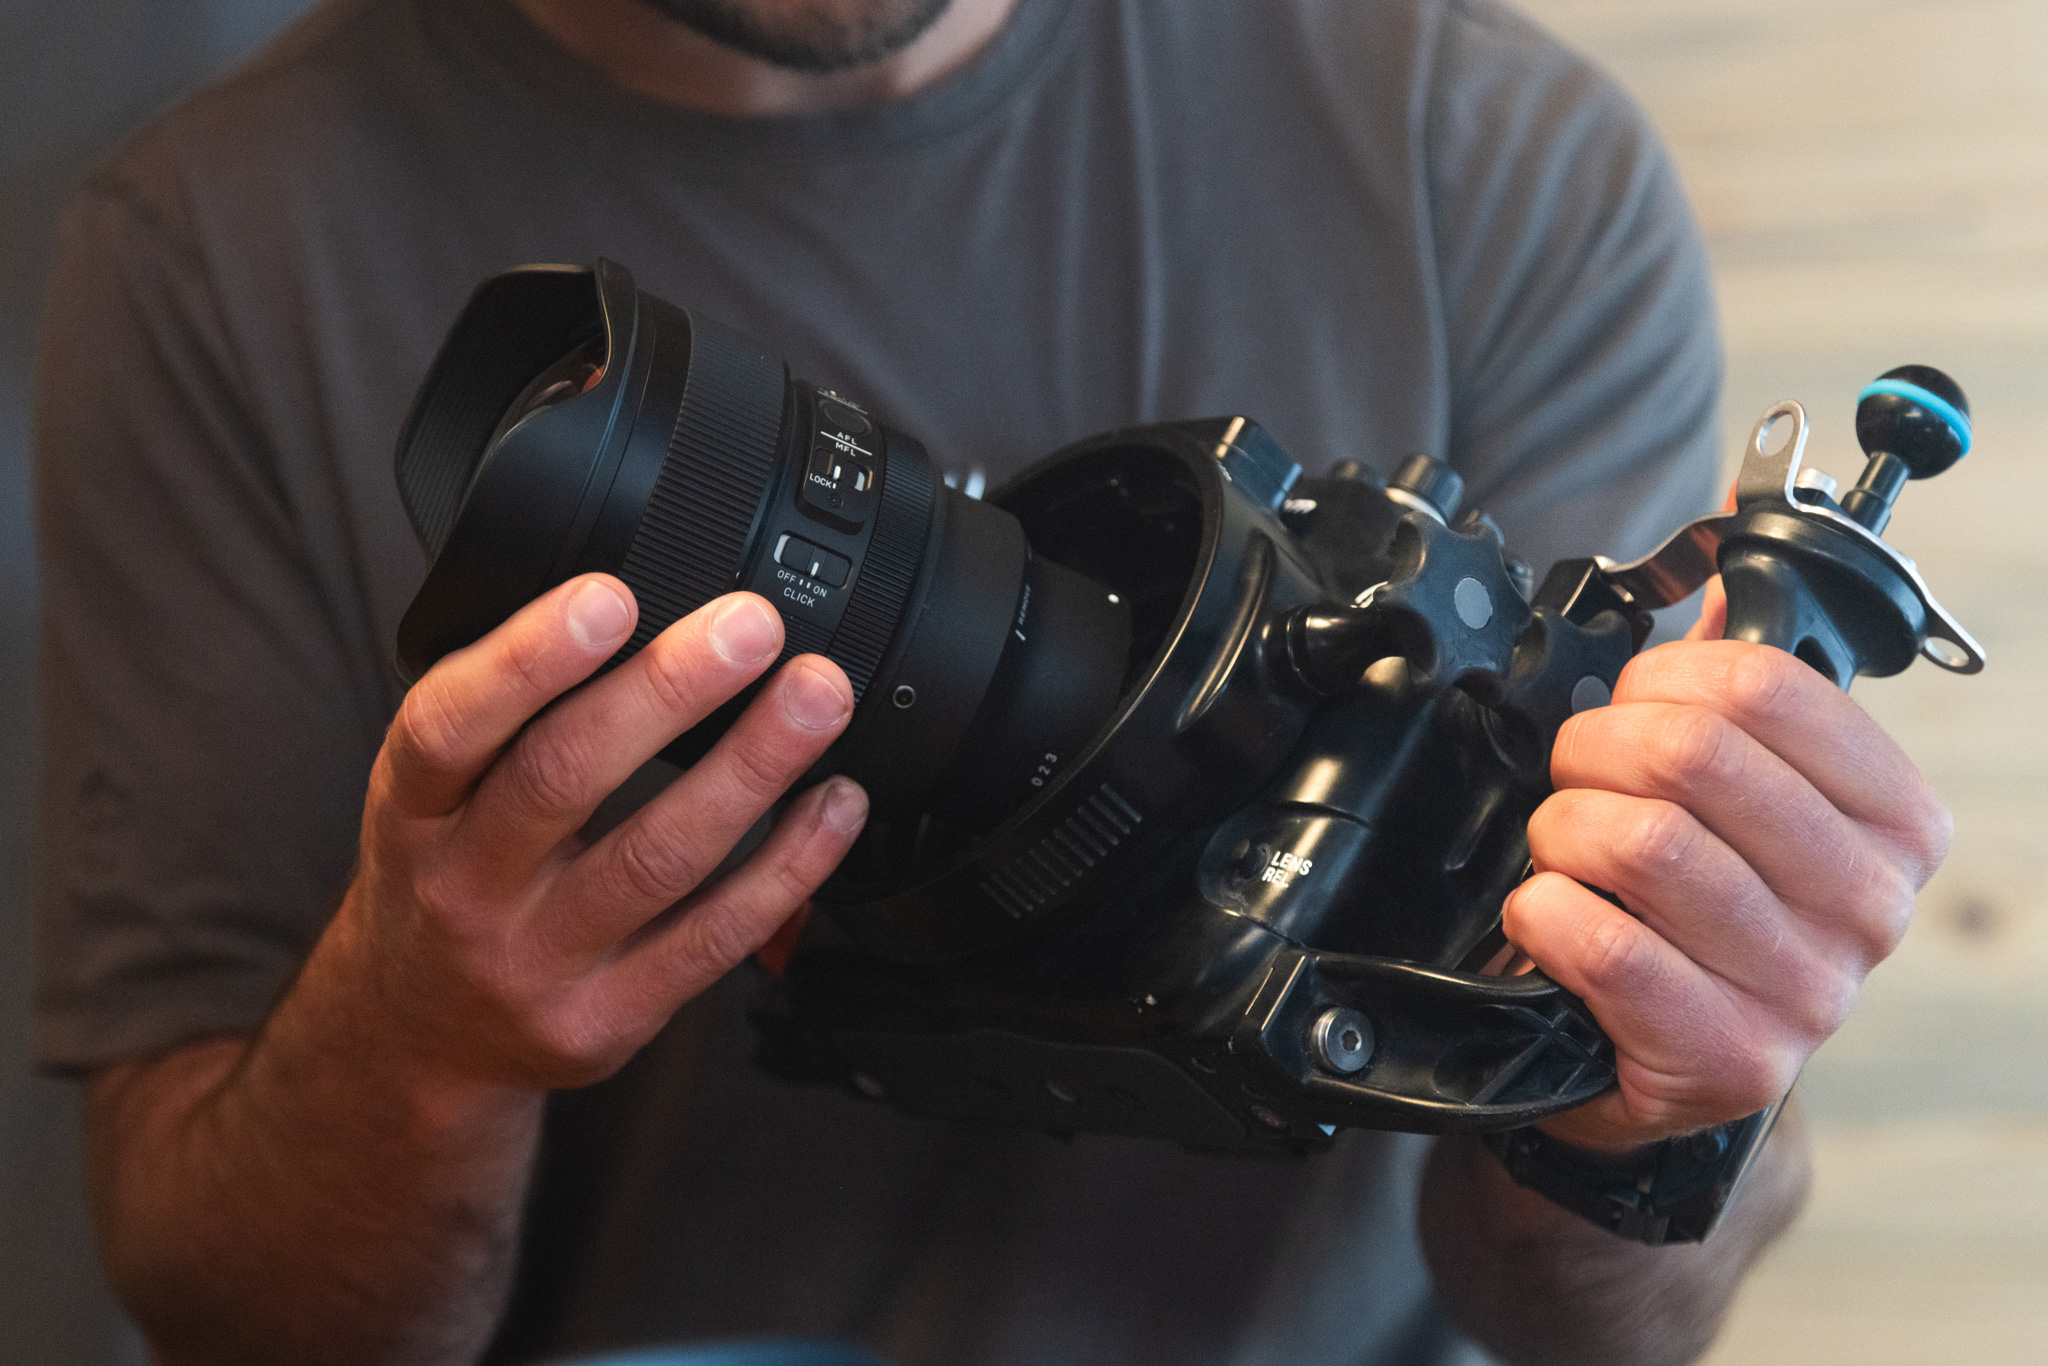
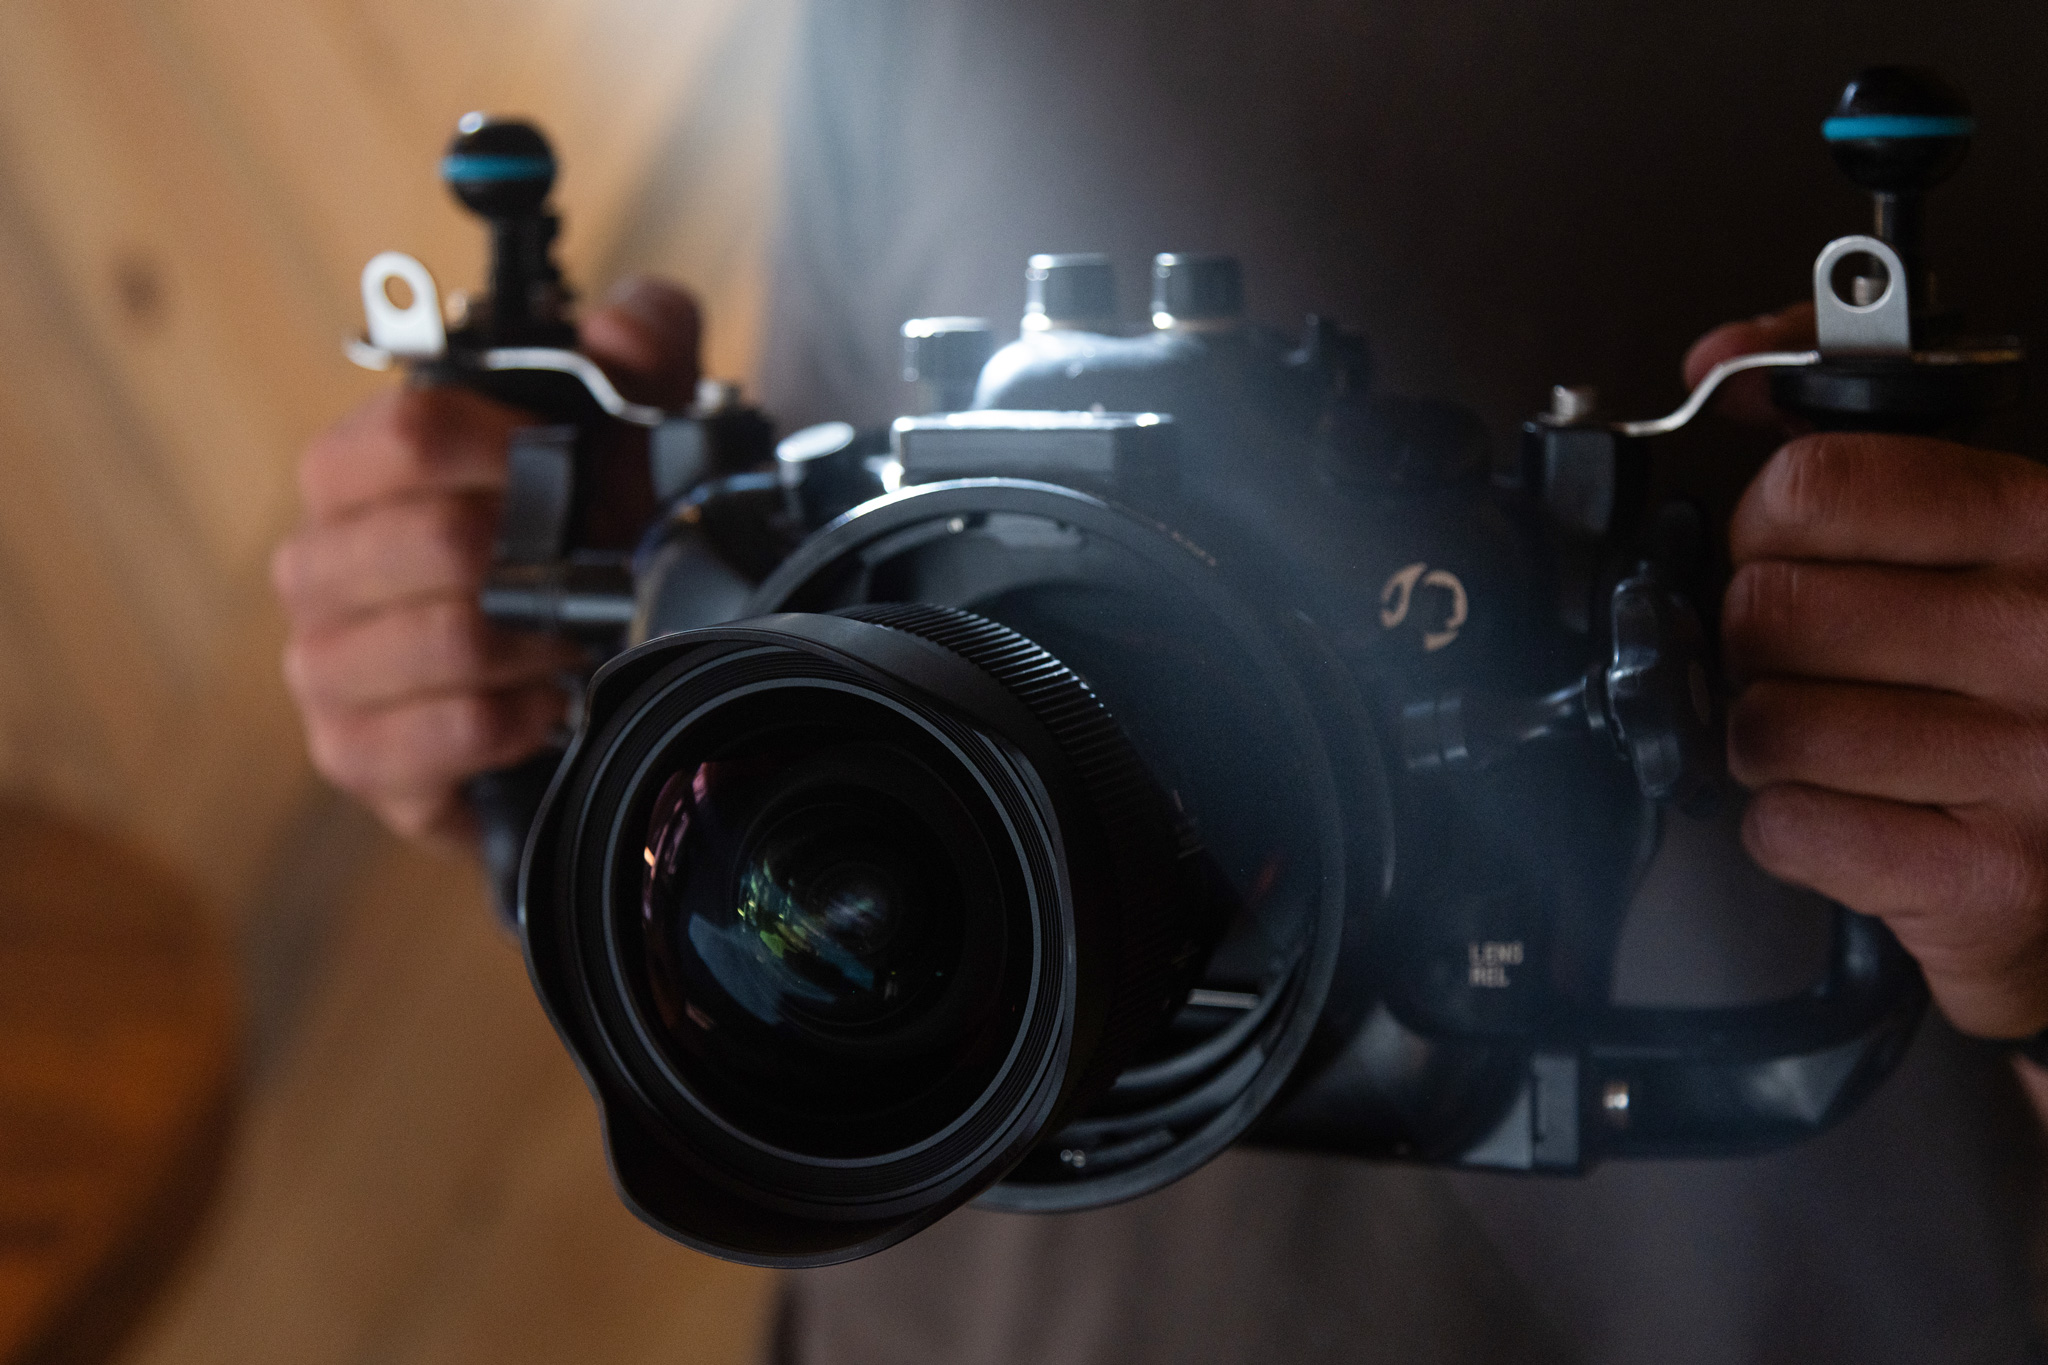
My current go-to underwater setup is the Sony Alpha 1 with a Sigma 14mm F1.4 DG DN | Art contained within a Nauticam housing with a 230mm dome port. While my setup changes depending on what I’m shooting, I rarely make changes when it comes to shooting large animals such as whales.
For anyone looking to get into the underwater world, there are now numerous great housing options. You can’t go wrong with Nauticam, Marelux, Isotta, Aquatica, and for entry-level, I’ve seen great results with Sea Frogs housings. Whatever you go with, make sure you get a housing with a vacuum pump. This will ensure you never flood your housing. I’ve lost a few cameras before I spent the extra money on that safety feature. I’d also recommend consulting distributors like Reef Photo & Video (an authorized Sigma dealer as well) on getting the proper dome and extension ring setup for your lens (I’ll come back to this on maximizing the sharpness for lenses like the 14mm F1.4).
General tips and settings:
Like I said earlier when it comes to underwater, you have to adapt your setup and settings to fit your target subject. That being said, these are the settings for 98% of my whale and other large animal species. The golden ticket to never missing a shot: 1/800 shutter or faster, F8 or above depending on light, and auto ISO.
Now I know you’re scratching your head with the auto ISO. Isn’t it better to manually adjust? New mirrorless cameras give you the ability to set a range for your auto ISO. I limit my camera from being able to shoot above 6400. New mirrorless cameras can easily handle that ISO with very little noise. This allows me to worry more about my composition rather than my settings, which is essential in a dynamic situation like snorkeling with a whale.
14mm F1.4 DG DN | Art Sony A1 F8, 1/800s, ISO 160014mm F1.4 DG DN | Art Sony A1 F10, 1/1000s, ISO 200014mm F1.4 DG DN | Art Sony A1 F10, 1/800s, ISO 1600
Standout features of the Sigma 14mm 1.4:
BUILD QUALITY:
Upon getting the lens, the first thing that stood out to me was the craftsmanship of the build. This lens boasts meticulous and detailed care the engineers put into it. You can’t help but marvel at the beautiful front element and the design of the aperture ring. The other must for me is the weather resistance. This lens is designed to be left outside all night photographing stars, making it tough. Every now and then, I have to open my housing on a boat, a not-so-dry environment, I might add. This lens gives me the peace of mind that my day won’t end in catastrophe if I get water on it.
The Sigma 14mm F1.4 DG DN | Art is built with extreme environments in mind, even without a housing like this.
FOCAL LENGTH:
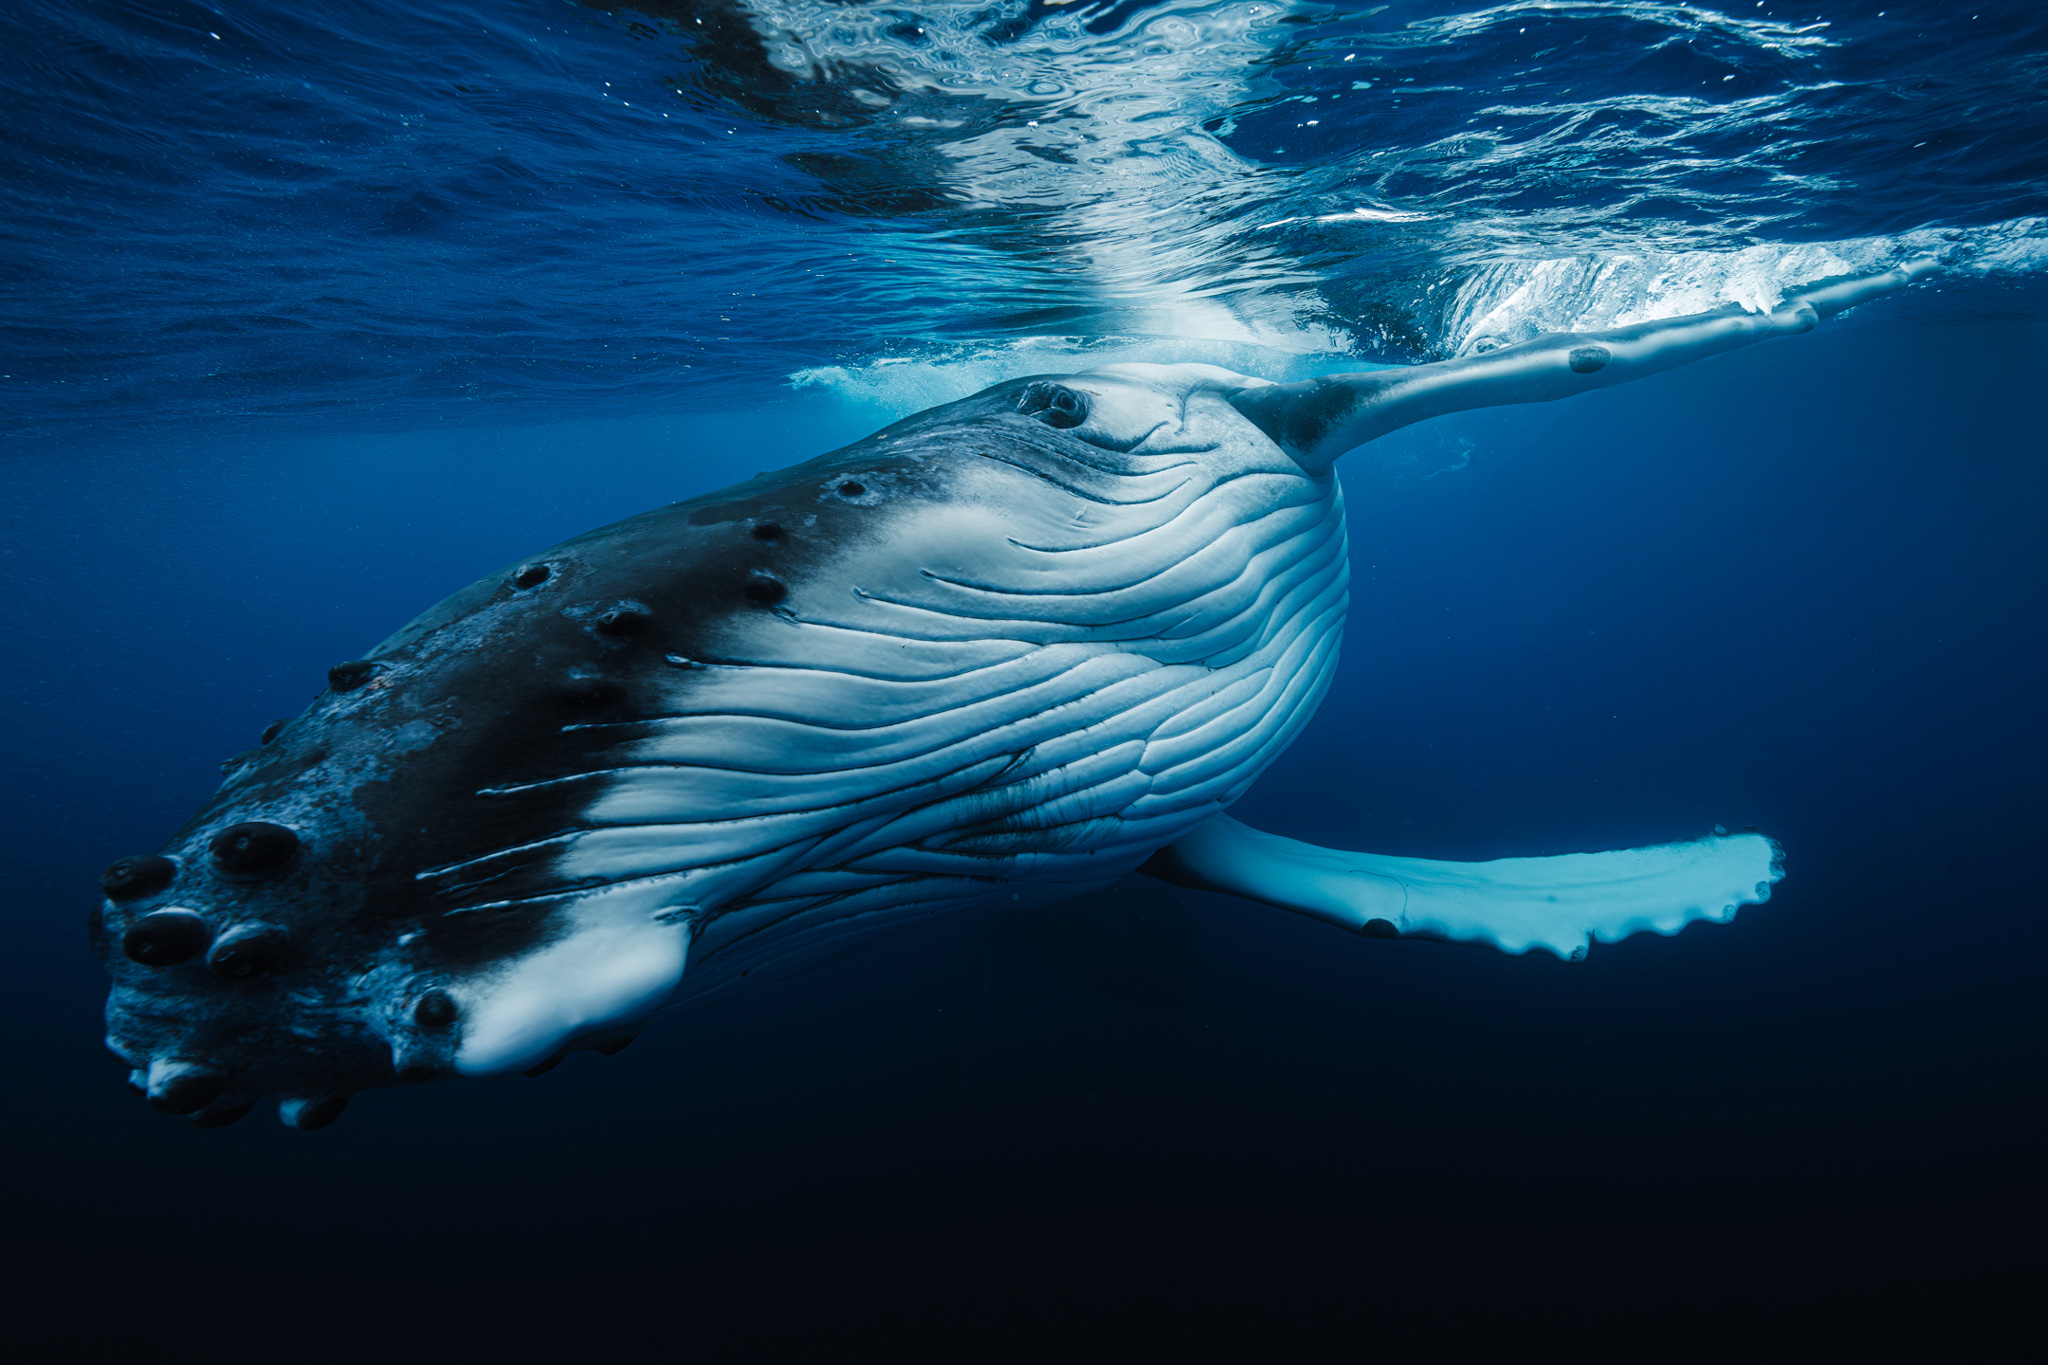
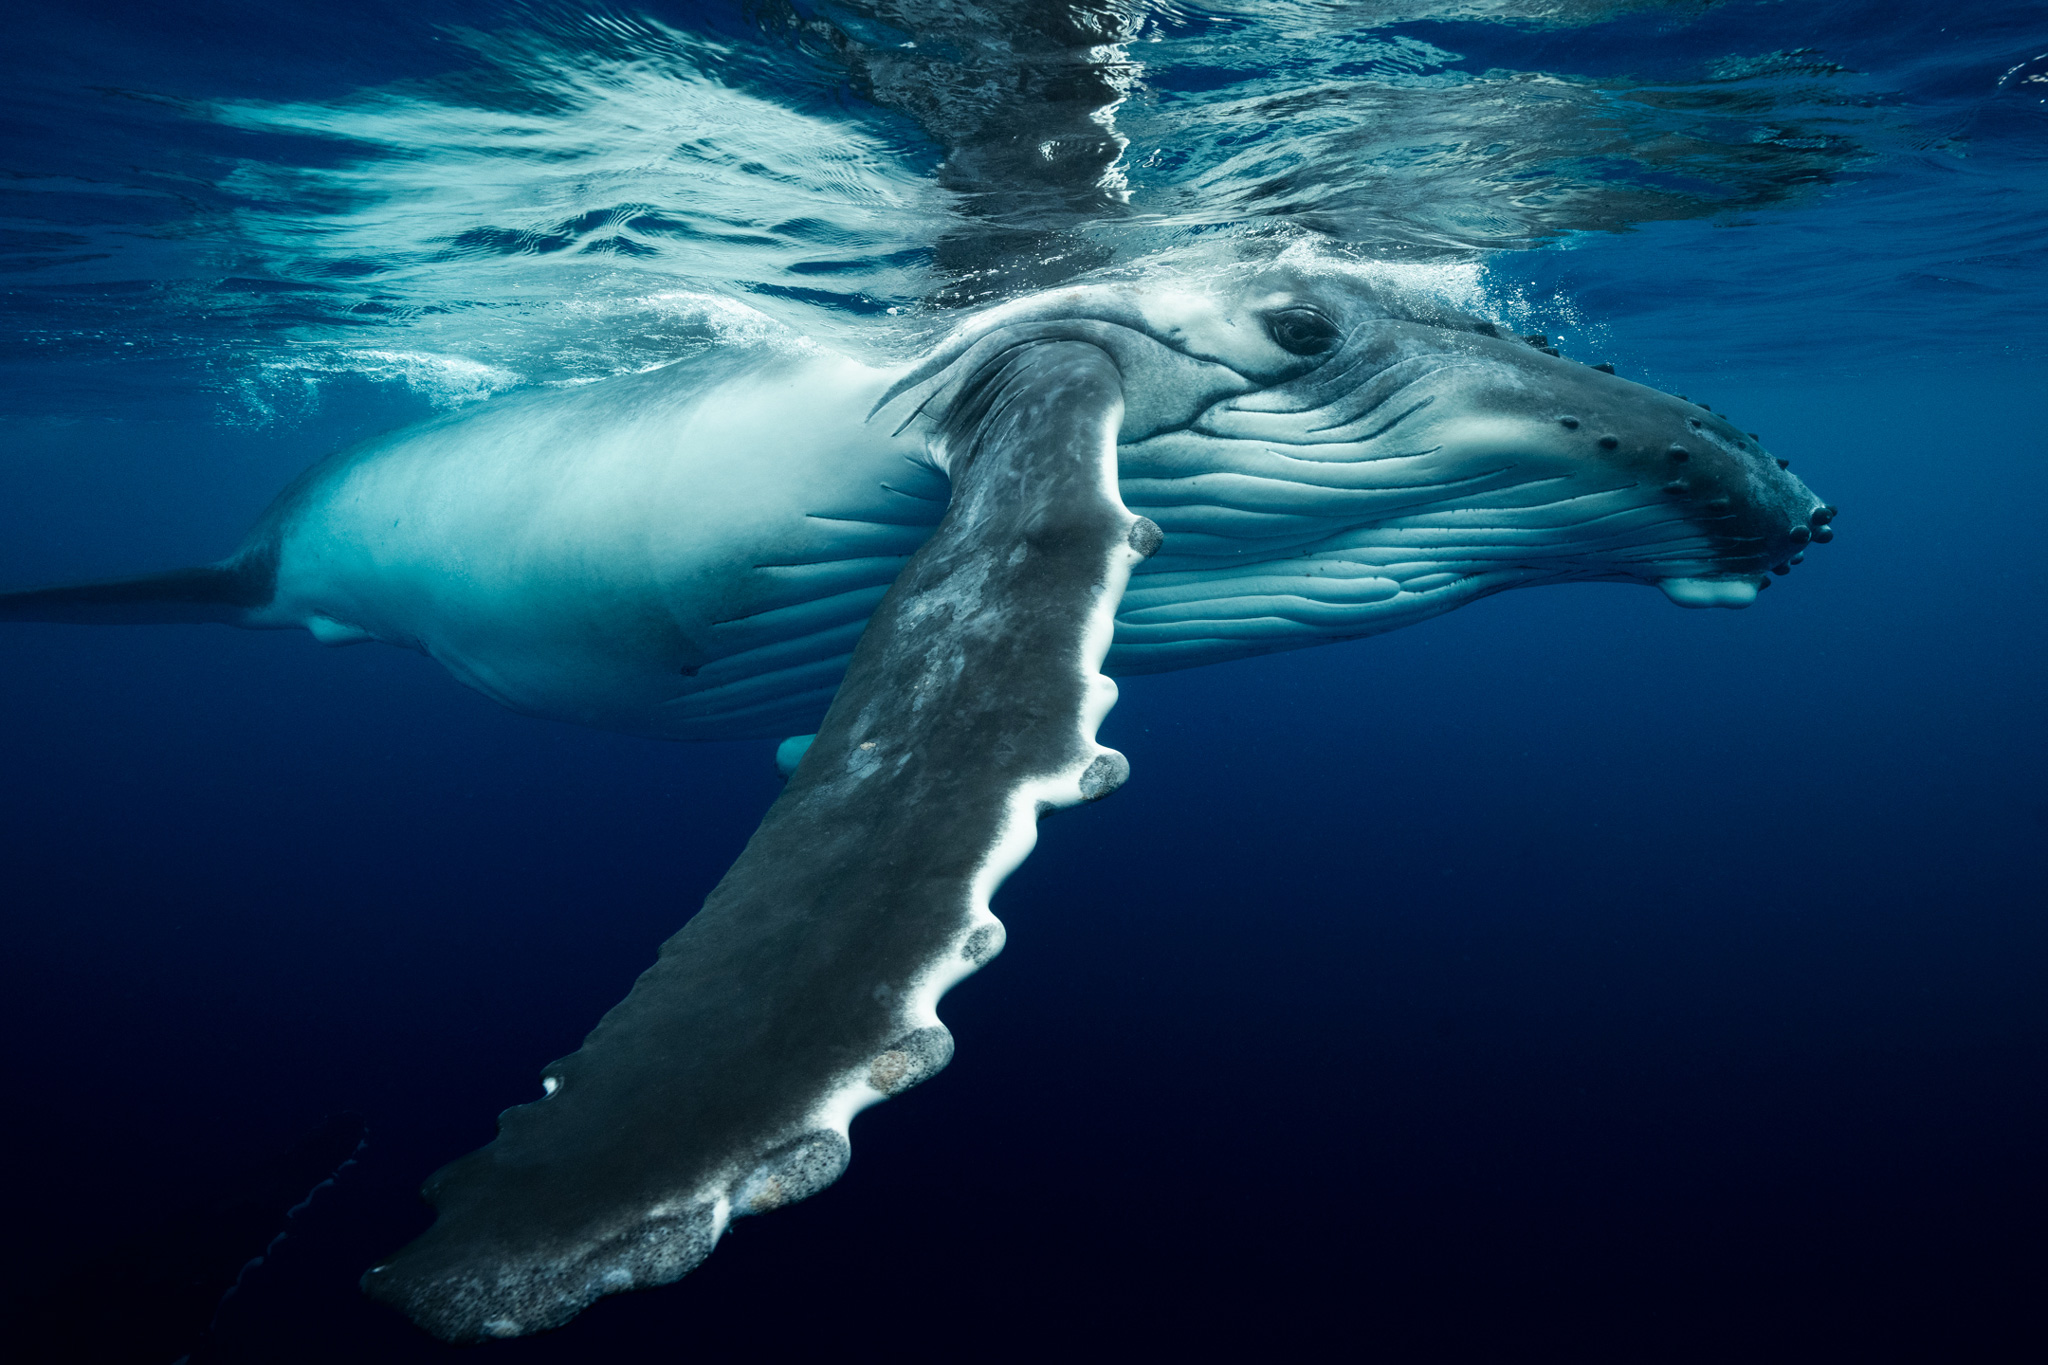
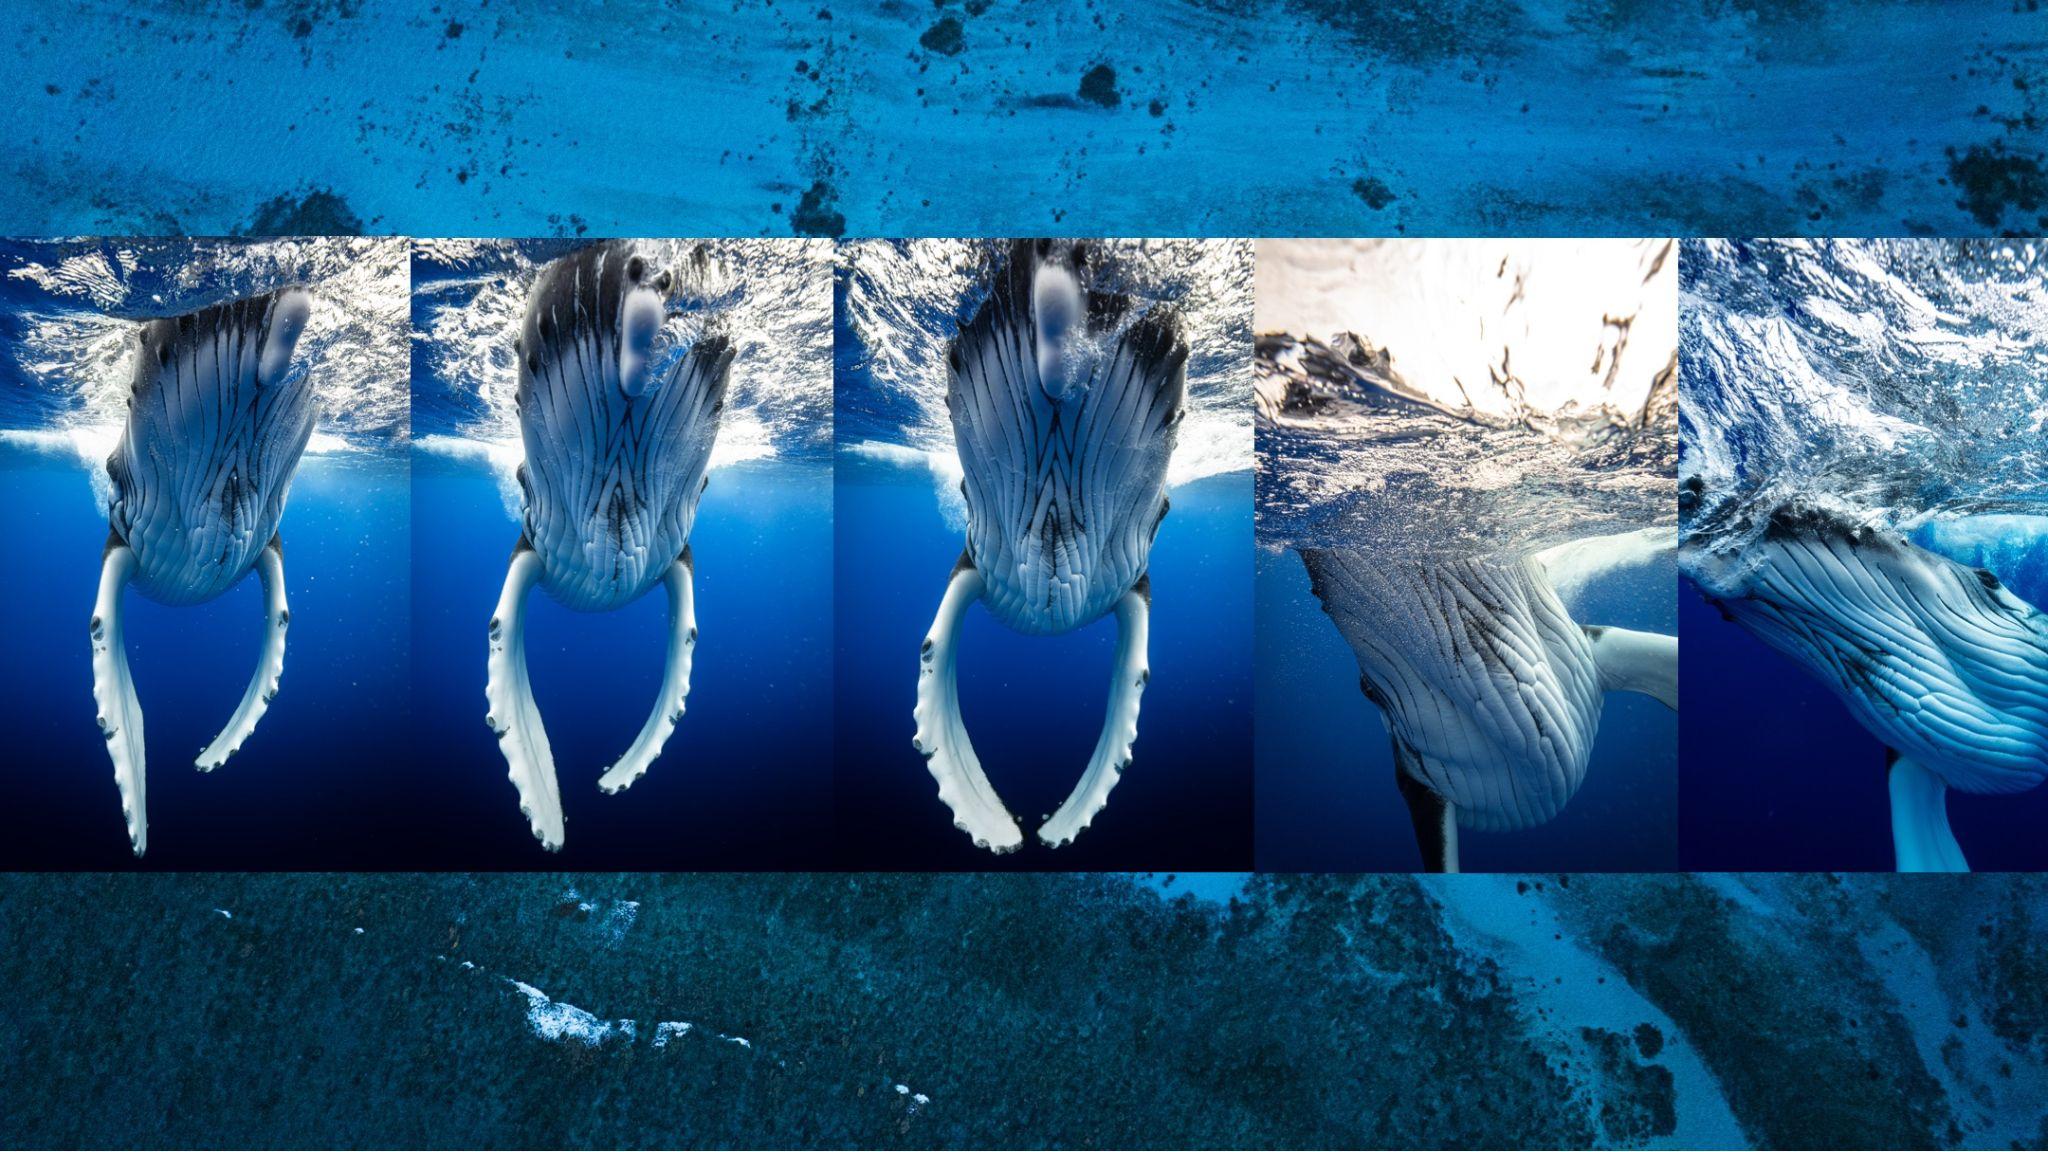
As I mentioned before, the front element of this lens is a work of art. Boasting a 114-degree field of view, this lens is very wide. When shooting underwater, you want as little space between you and your subject as possible. The water and the particulates in it distort your color and detail, so have to be right up in the action. When you’re close to a 35-foot-plus giant, this lens assures that the entire animal will be in view.
14mm F1.4 DG DN | Art Sony A1 F10, 1/800s, ISO 1000
14mm F1.4 DG DN | Art Sony A1 F10, 1/640s, ISO 250014mm F1.4 DG DN | Art Sony A1 F10, 1/640s, ISO 320014mm F1.4 DG DN | Art Sony A1 F11, 1/800s, ISO 2000
F1.4 APERTURE:
For most other underwater shooters, having the ability to shoot at F1.4 isn’t a big sell. When shooting underwater with a dome port, you typically want an aperture of F8 or smaller, otherwise, your edges will become soft. However, I find it extremely useful when filming. When it comes to video, I don’t focus as much on the absolute sharpness I desire with my photos. Especially if I’m shooting a subject I can’t use lighting on, the F1.4 aperture allows me to film later in the day and in darker water. There’s now also the advent of new dome ports by Nauticam called WACP ports. These ports now allow you to shoot much sharper and wider apertures. These ports allow you to use your lenses at a wider aperture without sacrificing corner sharpness. While a port like this doesn’t yet exist for the 14mm, Nauticam has been consistently innovating, and I wouldn’t be surprised if they come out with one soon.
EXAMPLE OF VIDEO SHOT AT F1.4
SHARPNESS:
Have I mentioned I’m a sharpness snob? One of the reasons I wanted to switch from a 16-35mm to a wide prime like the Sigma 14mm F1.4 DG DN | Art is the sharpness. Aside from this lens being insanely sharp on its own accord, the fact that it’s a fixed length makes it that much sharper underwater.
14mm F1.4 DG DN | Art Sony A1 F10, 1/800s, ISO 250014mm F1.4 DG DN | Art Sony A1 F10, 1/640s, ISO 400014mm F1.4 DG DN | Art Sony A1 F9, 1/640s, ISO 2500
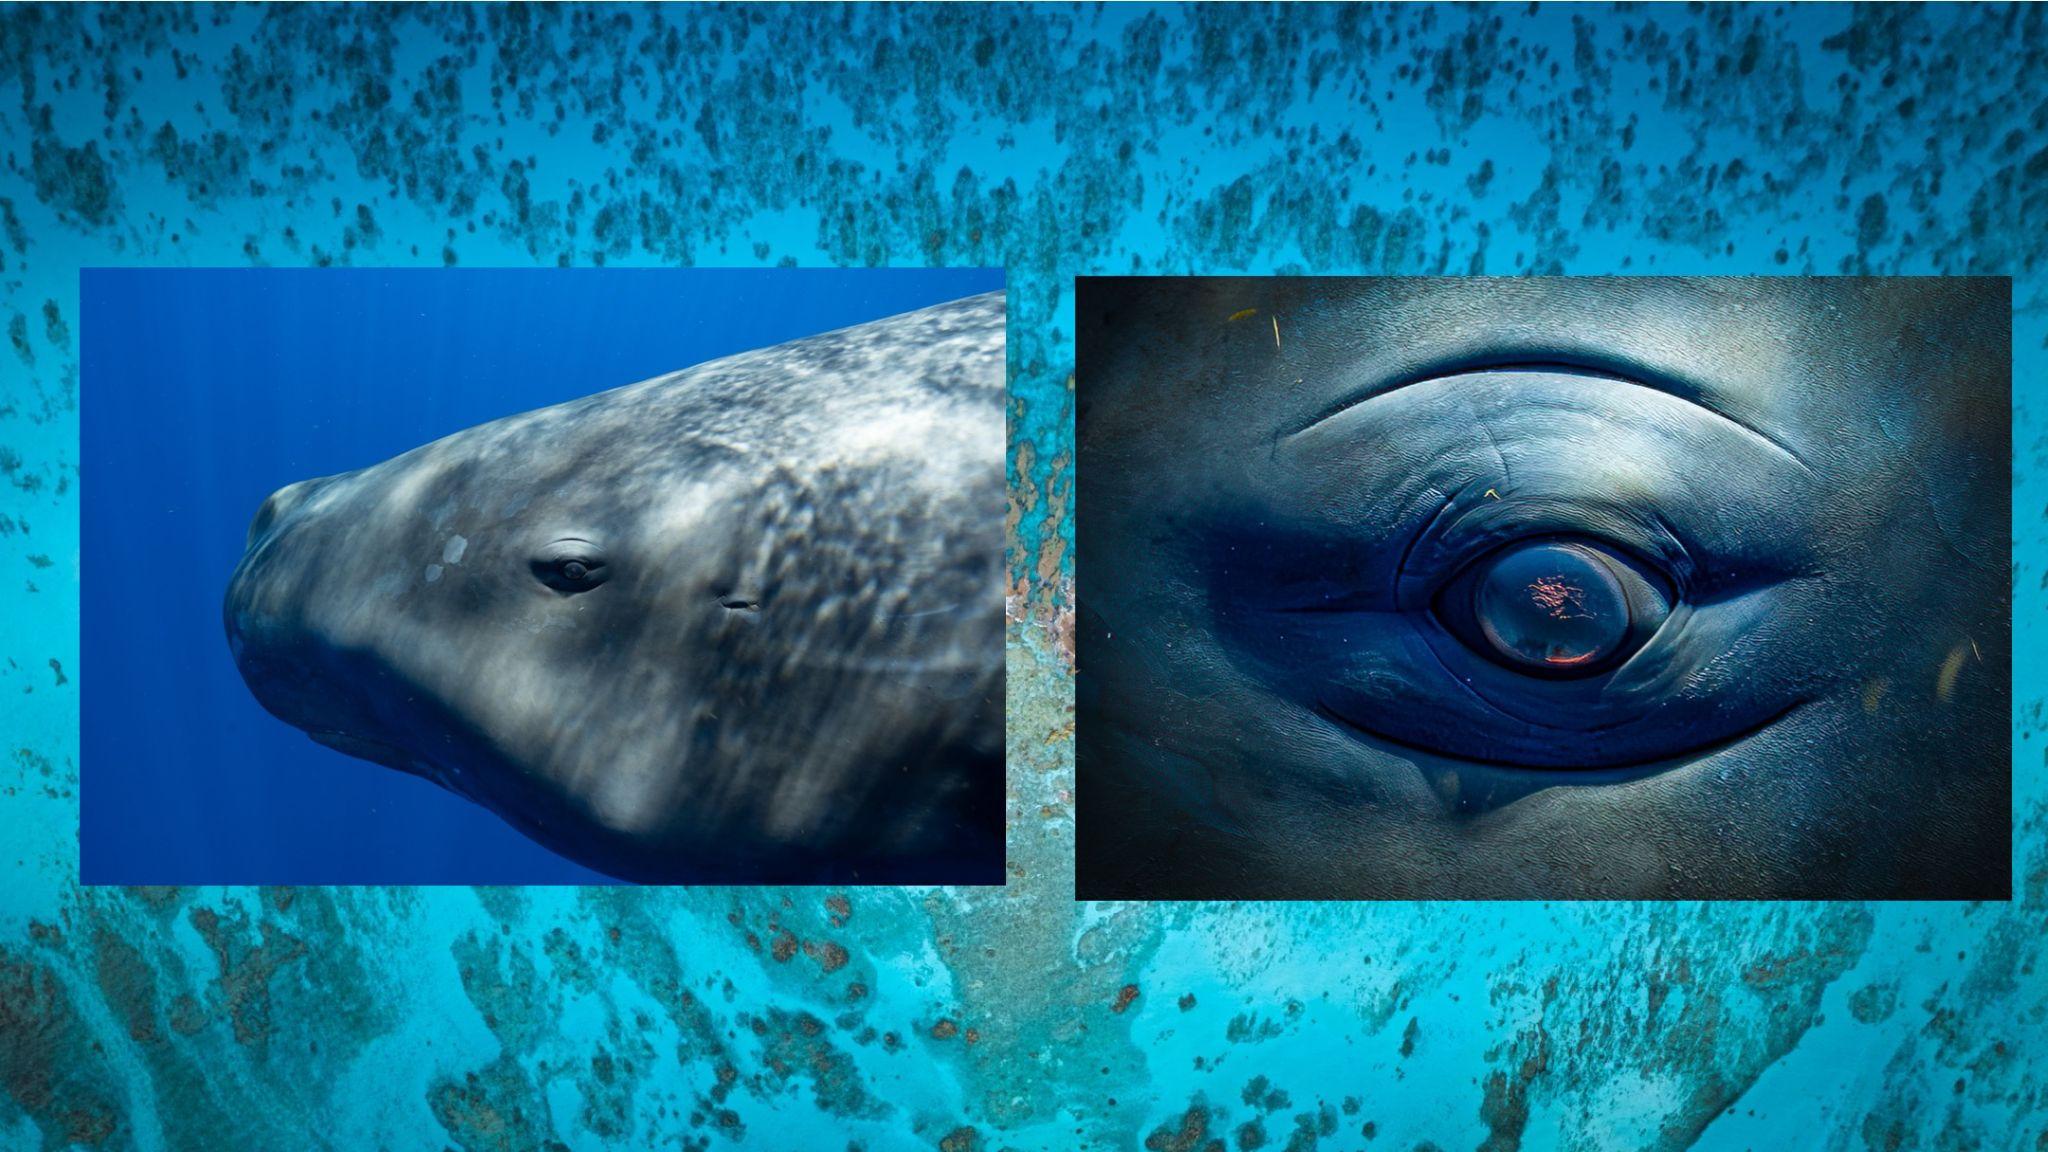
When building your underwater rig, the distance between the front element and the dome port is a huge factor in how sharp your images will be. If you’re changing that distance by zooming in and out, you’ll affect how sharp your images are. By having the 14mm sitting at the perfect distance from the dome port at all time, it maximizes the sharpness of the lens. So much that I can massively crop in on my images and see things like sea lice and other parasites hitching a ride on our giant friends. It’s also extremely valuable for me to crop in on other details of these animals, such as their eye, or pectoral fin, to derive unique compositions. This is only possible with glass this sharp.
Showing the sharpness of the lens when cropping an extreme amount.
EDGE-TO-EDGE QUALITY:
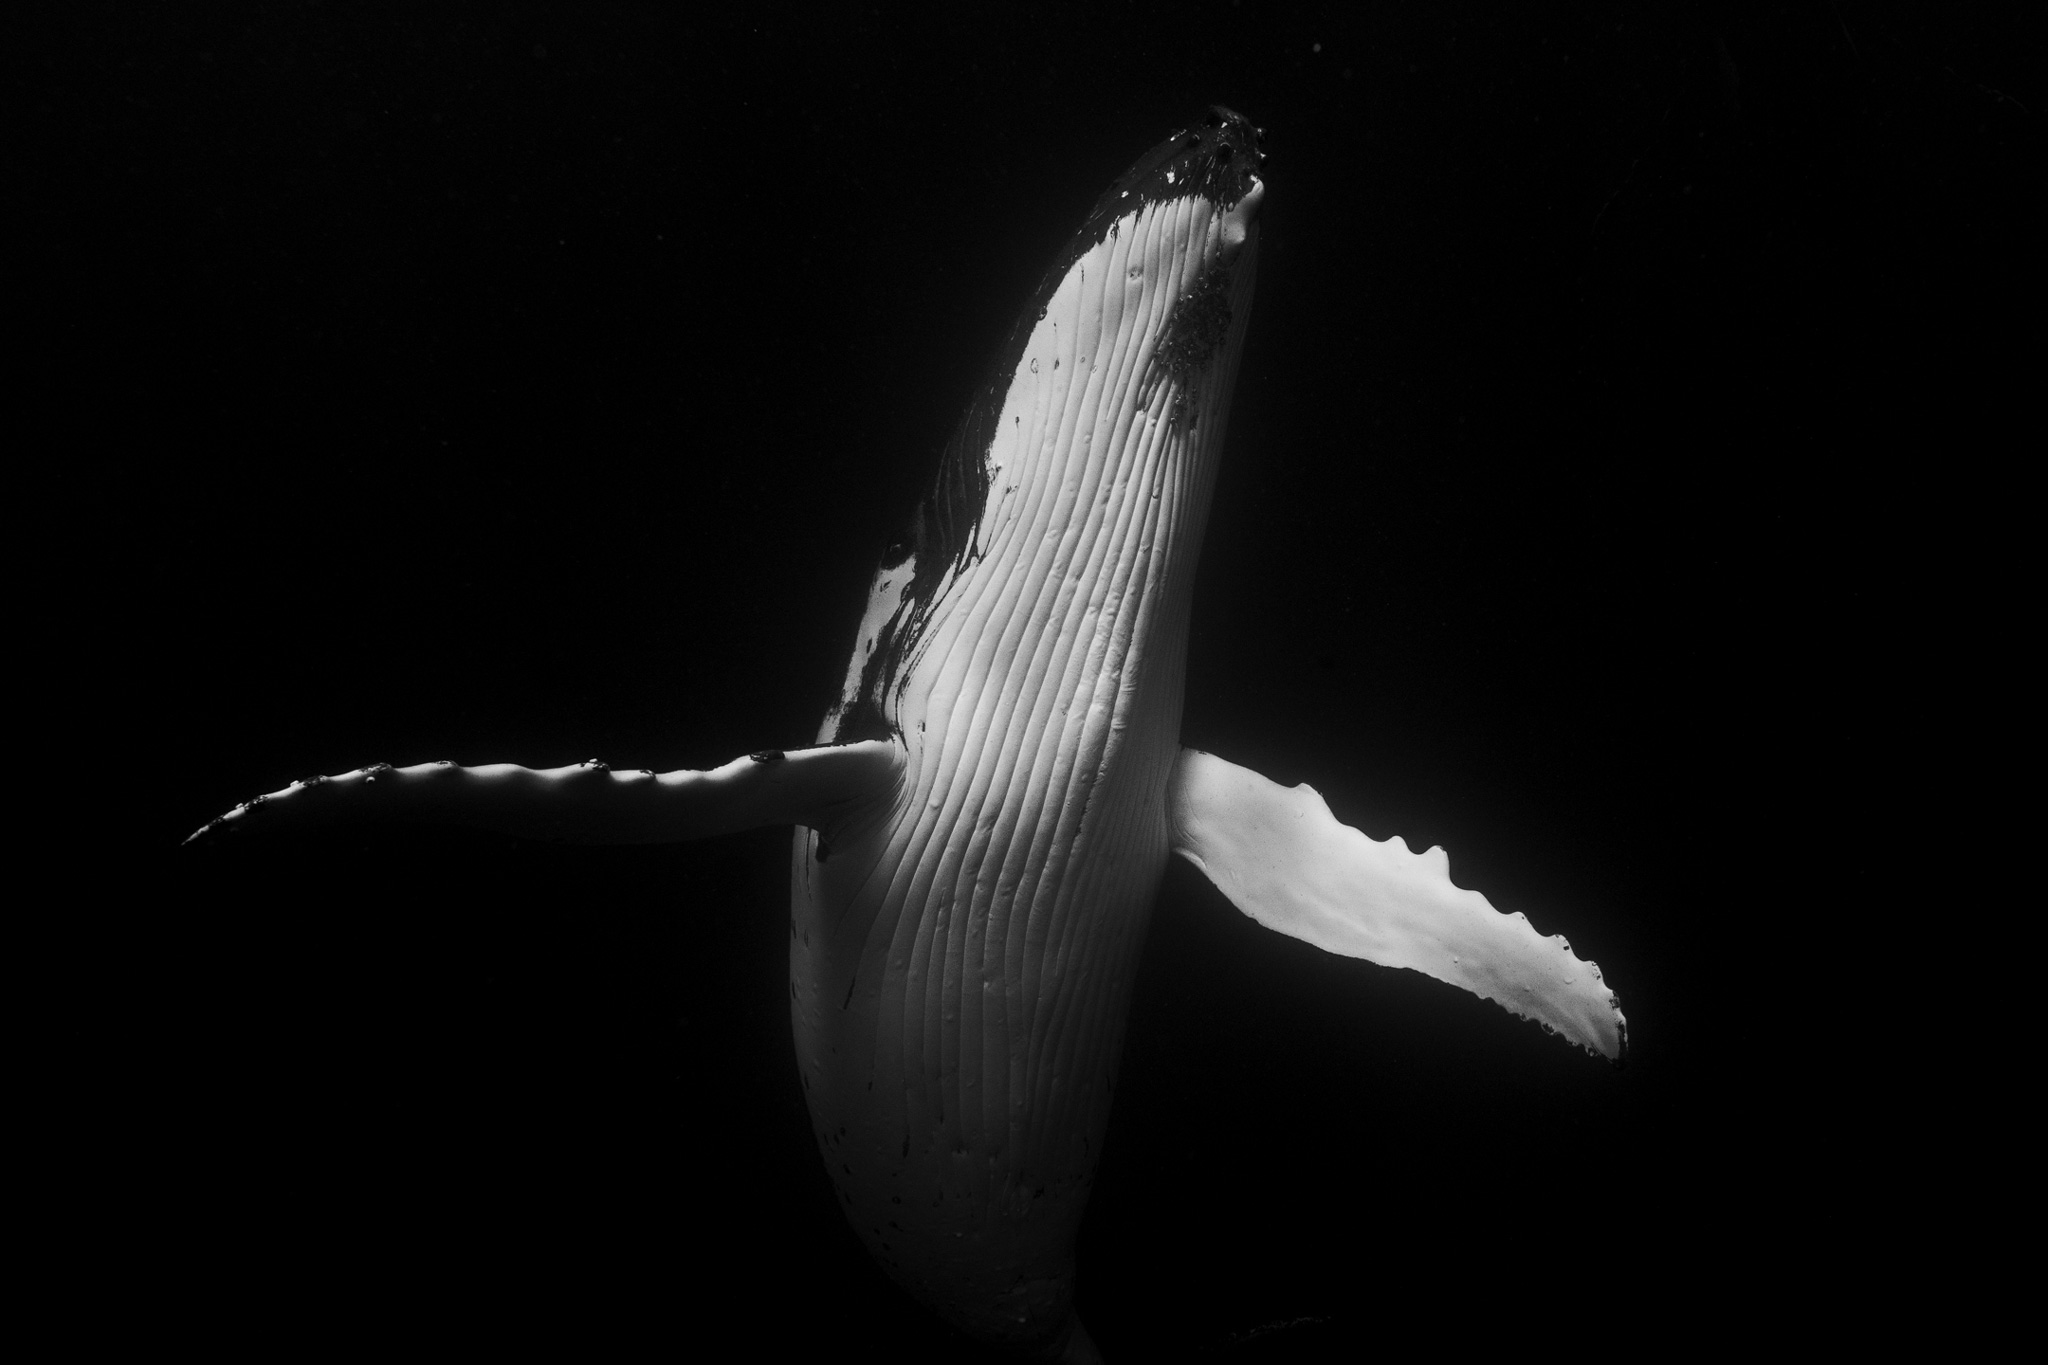
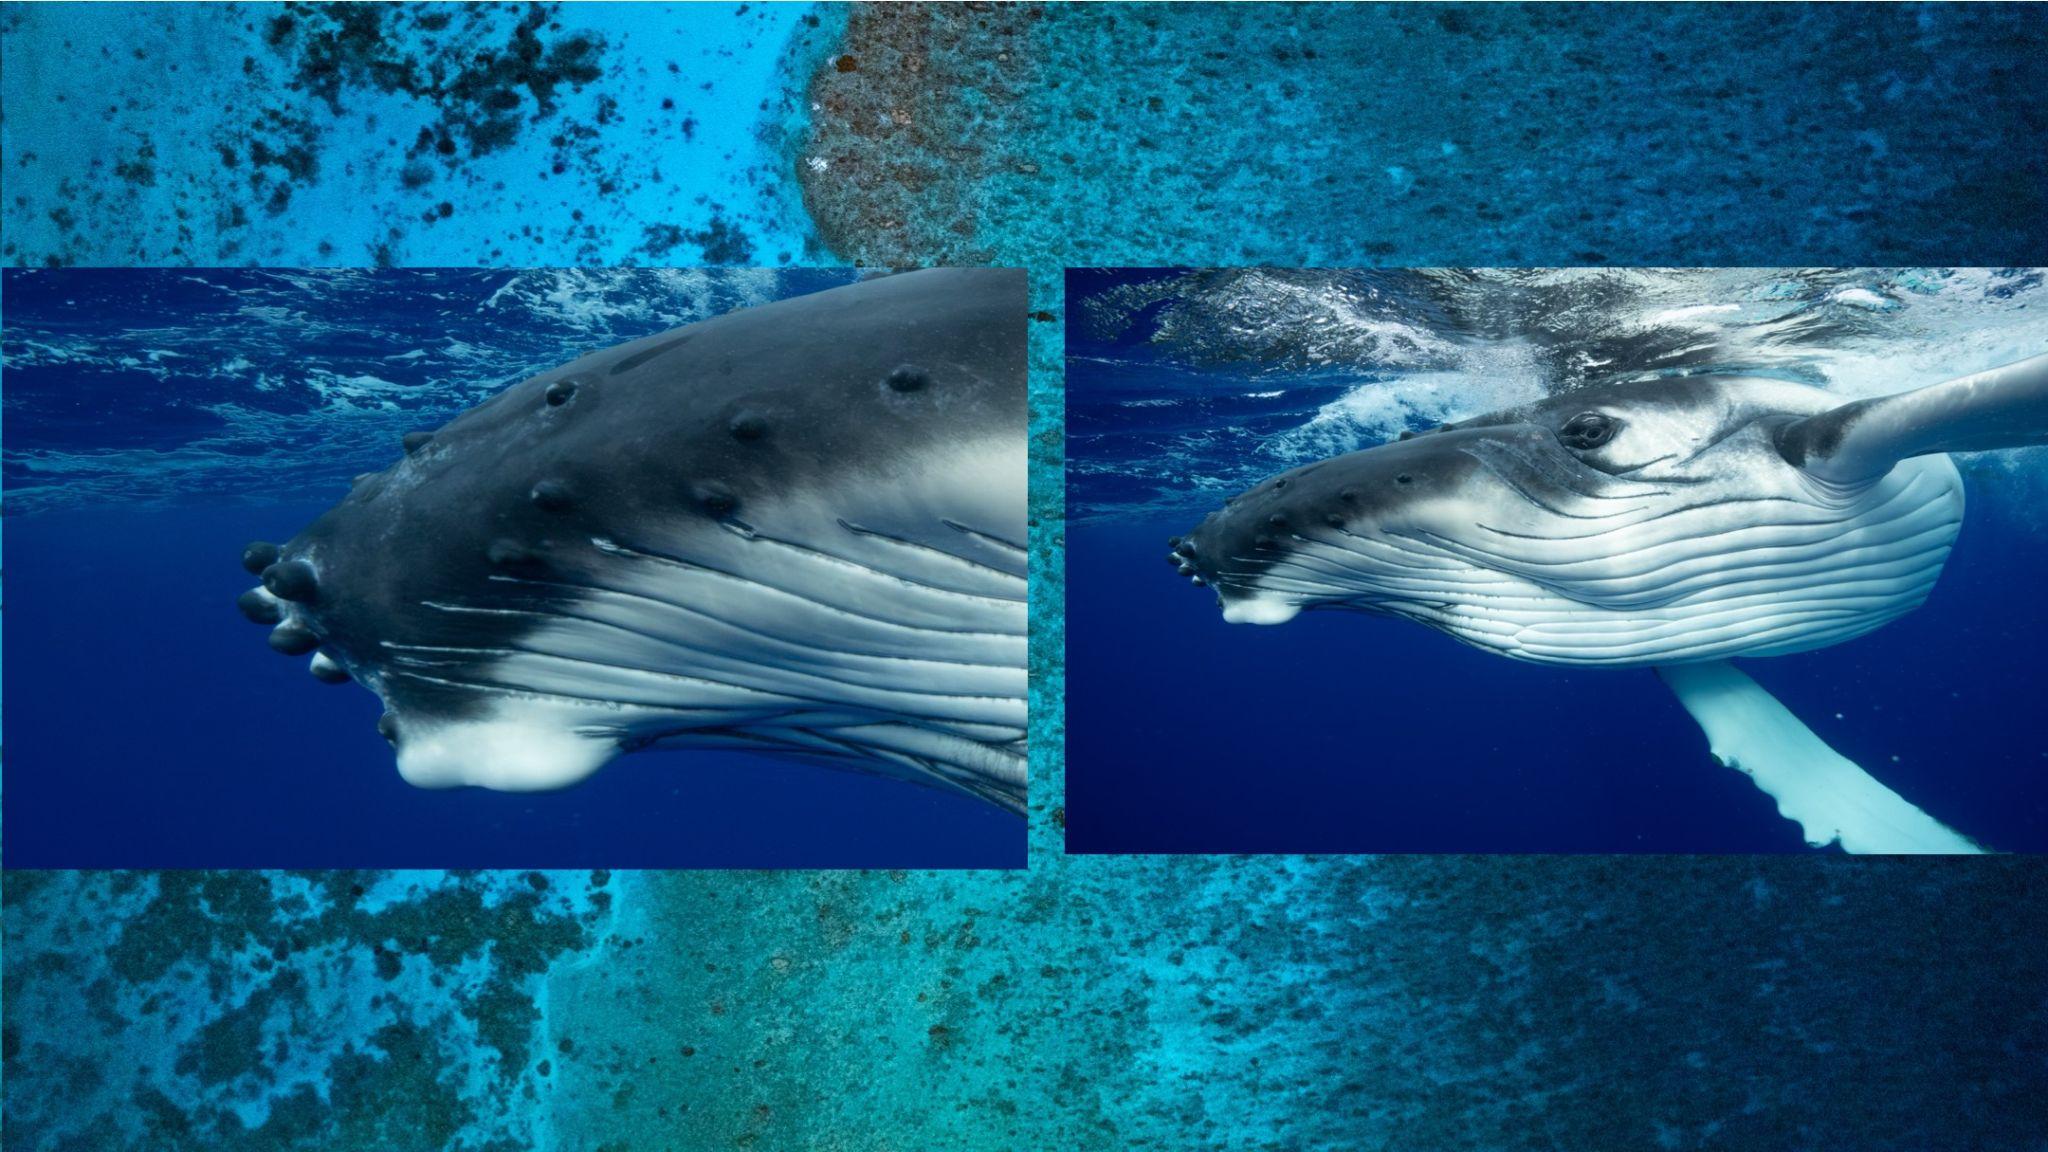
Another huge draw to this lens for underwater shooters is the edge-to-edge quality. As underwater shooters, we’re constantly battling soft and distorted edges in our images. My first day with the lens, I had a humpback calf inches from the front of my lens. After reviewing the images, I quickly noticed the edges preserved almost all their detail, so much so that I could see the hair follicles on the whale. While still a little soft, something that’s inevitable underwater, the effect is leagues better than shooting on a fisheye or a zoom lens.
This crop showcases the detail preservation within the edges of the image.
AUTOFOCUS:
There’s not much to say here besides that the autofocus is flawless. Once I have a whale in frame, I hold down the trigger and let the continuous autofocus go to work. Of the 20,000+ images I took over the two months, I don’t think I had a single miss. While I encounter a lot of animal guiding, every moment is unique and fleeting. Having the ability to capture every unrepeated moment might mean the difference between a good image and an exceptional one.
Autofocus is spot on in virtually any situation.
Conclusions and final thoughts:
My favorite aspect of the images the 14mm F1.4 DG DN | Art produces is the dimensionality of the photo’s aesthetics. After my first day with this lens, I sent a video I filmed with it to a colleague of mine, and his response was, “That whale looks like it’s about to pop out of the screen.” This was the look I’ve been craving in my images, which wasn’t possible with a 16-35mm. I’d recommend this lens to any underwater shooter who’s looking to obtain peak sharpness, flawless autofocus, and wants to add a unique aesthetic to your imagery.
It’s safe to say that this lens will be my go-to workhorse on my future underwater adventures.
For some, poring over Lightroom for hours on end to create the perfect edit, is the only way to go. For others, the mere thought of sitting down at a computer and fashioning raws into something more usable is at best an inspiration for procrastination and at worst something to avoid all together.
Lightroom, particularly if you do not use it much, can be a daunting and overwhelming program. But it doesn’t have to be that way. If you adhere to the 1/99% rule you will soon find yourself getting great shots with minimal effort. The 1/99% rule suggests that you use 1% of the features, 99% of the time. That is something that is perfectly possible with Lightroom. Today we are going to tell you how.
Preselection
One of the biggest mistakes you can make, and one that will definitely put you off editing, is to simply sit with Lightroom and edit each and every photo. This is a time consuming and fruitless pursuit.
It’s much better to use Lightroom’s simple but powerful rating system to find the best images to edit. In the Library module, open the first image of the shoot. You can create your own system but for simplicity, if the image is not worth editing, do not give it a rating. If it’s a maybe, assign it a 3 star rating. If it’s a must edit, give it 5 stars. You can easily assign the star rating using the number keys on your keyboard. Then hit the right arrow to advance to the next image and rate that. In no time at all you will have a selection of 5 star images to edit. Use the filters at the top of the Library module to filter 5 star images only.
Knowing which images you want to edit is half the battle.
Make Use Of Presets
If you really do struggle with editing, then presets are the way to go. Whilst there are a number of photographers that sell presets, there is also a very good selection provided by Adobe.
To apply a preset open the image in the “Develop” Module. On the left side of the screen you will see a plethora of different types. You don’t actually have to click on a preset to see what it will look like on your image. Instead simply roll your cursor over each of them. When you find one that you like, click it and the preset will be applied.
If there is a particular preset that you find yourself gravitating to often, you can choose to apply it on import. To do this, in the import window, to the right click on “Develop Settings.” You will see all the presets that you have installed in a drop down list. Simply select the one you like and all images will have that preset applied as they are imported.
Don’t worry if you are not happy, you can clear any preset by right clicking on it in the “Library” module and selecting “Develop Settings” – “Reset.” This will return the image to its out of camera look. You can do this to multiple images by holding “CMD/CTR” and left clicking all the images you wish to reset. Then with the mouse over one of the selected images, use the same procedure.
Carefully chosen presets can save large amounts of time
If you prefer not to use a preset, Lightroom allows you to make automatic corrections. These can be very useful for very quick edits.
In the “Develop” Module under the “Basic” tools there are two “Auto” options. The first, at the very top is called “Auto.” When you click this, Lightroom will work out what it thinks the image needs based on the histogram. It will apply exposure, contrast and saturation as well as lifting shadows and dropping highlights. It’s not a perfect tool, but for quick edits, it does a decent job.
The other very useful tool is the “White Balance dropper” tool. It is found at the top left of the White Balance section.
To use this tool simply click on it and move the dropper to a section of the image that you know to be a neutral grey. Lightroom will then correct the white balance to make sure that grey area becomes neutral.
Make use of Lightroom’s auto tools
Use The Basic Editing Sliders
If you want to have a little more control over your images, then confining yourself to the basic correction tools is a good way to go. These are Exposure, Contrast, Highlights, Shadows, Blacks and Whites.
For a very simple, fast edit, first move the Exposure slider, to get the bulk of the Histogram to the middle. Then simply move the Black slider until the edge of the histogram hits the left side. Do the same with the White slider until the histogram hits the right side. This will give you optimum contrast and exposure. If you want to edit a touch more, use the Highlight and Shadow tool to get the look you want.
If you like that look you can then apply it easily to the other 5 star images in your shoot. To do this, simply right click on the edited image, select “Settings” – “Copy Setting” then from the window click ‘Check All.”
Now you can scroll through your 5 star images and apply that setting to each one. To do that, bulk select the images in the “Library” Module, right click on one of them and select “Develop Settings” – “Paste Settings.” You might need to go back and tweak one or two, but overall this should give you a fast and consistent edit.
Repetition is a good way to get efficient in Lightroom, so developing your own short workflow will help you breeze through the editing process. It doesn’t have to be complicated, just import, rate, quick edit and export the ones you want to show.
By repeating the same workflow you will soon find yourself being able to edit images in minutes rather than hours.
Editing can be an off putter to some photographers. It can be time consuming and frustrating. However using some or all of the tips above, you will soon find editing in Lightroom doesn’t have to be a chore. The end benefit will be a definite upturn in the quality of your images. That has to be a win-win.
Welcome to our weekly community wrapup. It’s been another cracker on the Light Stalking forums with some wonderful photography. Both discuss produced.
Let’s start with the photo of the week.
This one, judged by Federico, is a dip touch of some art by Patrick. you can read about Federico’s logic for his judgment decisions over here. And well done, Patrick.
Don’t forget to join in this Weekly Photography Challenge with the theme of nighttime reflections. You can join in here. Amazing to think that this is our 759th weekly photography challenge on the forums!
You also don’t want to miss out on the opportunity to submit one of your mobile photography shots to our ongoing Monday Mobile Challenge. The rules are that you must have taken the image and edited, all on a mobile device of any sort. This really stretches your creativity with a bit of restriction. Join in here.
There’s also the opportunity to join in the community photo story challenge, which is an ongoing callout for community members to tell a story with several of their photographs. This is more of a deep dive into a project scenario where you need to take several images at least. It’s great to see what people are coming up with, as it’s sparking a lot of creativity. join here.
And also, here are a few of the photos from this week that I just thought needed to be shared even more because I just thought they were great.
You know when Elin Laxdal starts a thread on Light Stalking, there is going to be some exceptional photography in it. This week was no exception, with Elin sharing some images of livestock that she had taken during the week. You can join in the conversation here.
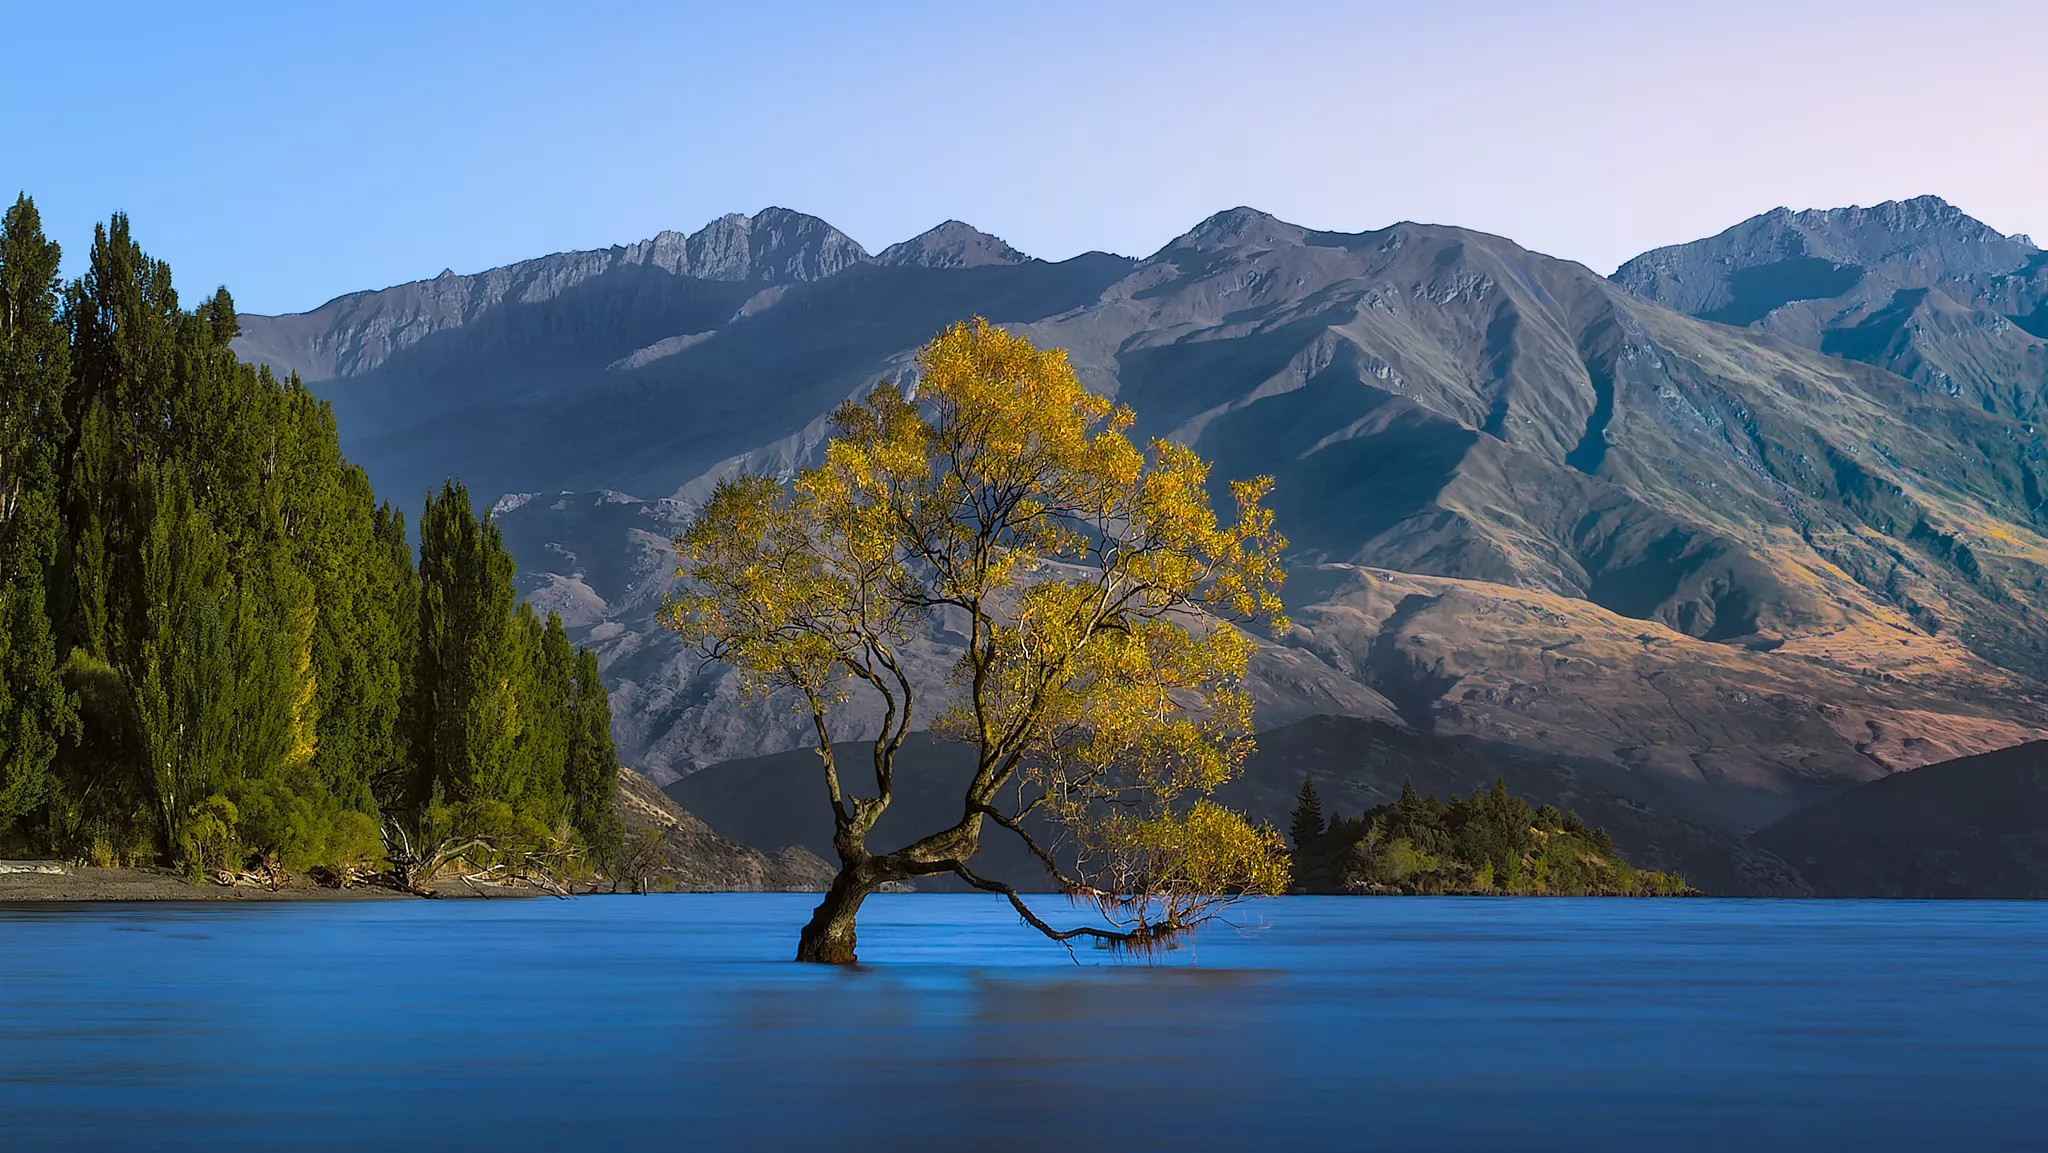
One of the most photographed objects in the world is the famous Wanaka tree in New Zealand. And I think this shot by Rob Eyers is a very solid attempt at a very well-photographed image. Well done, Rob.
If any of you have been around the four of the very long, then you will almost certainly know Patrick and, by extension, Patrick’s puppy. I love seeing this little guy come across my feed, either on Light Stalking or even on Instagram, so I thought I’d include him in the collection here.
Member LightAndShadow has been experimenting with a bit of black-and-white treatment with his images, but I specifically thought this one stood out for the very obvious draw on the eye of those three flowers. I thought this one deserved to be called out. We are discussing it over in this thread. https://lightstalking.us/forums/topic/mallow-wood-and-stone/
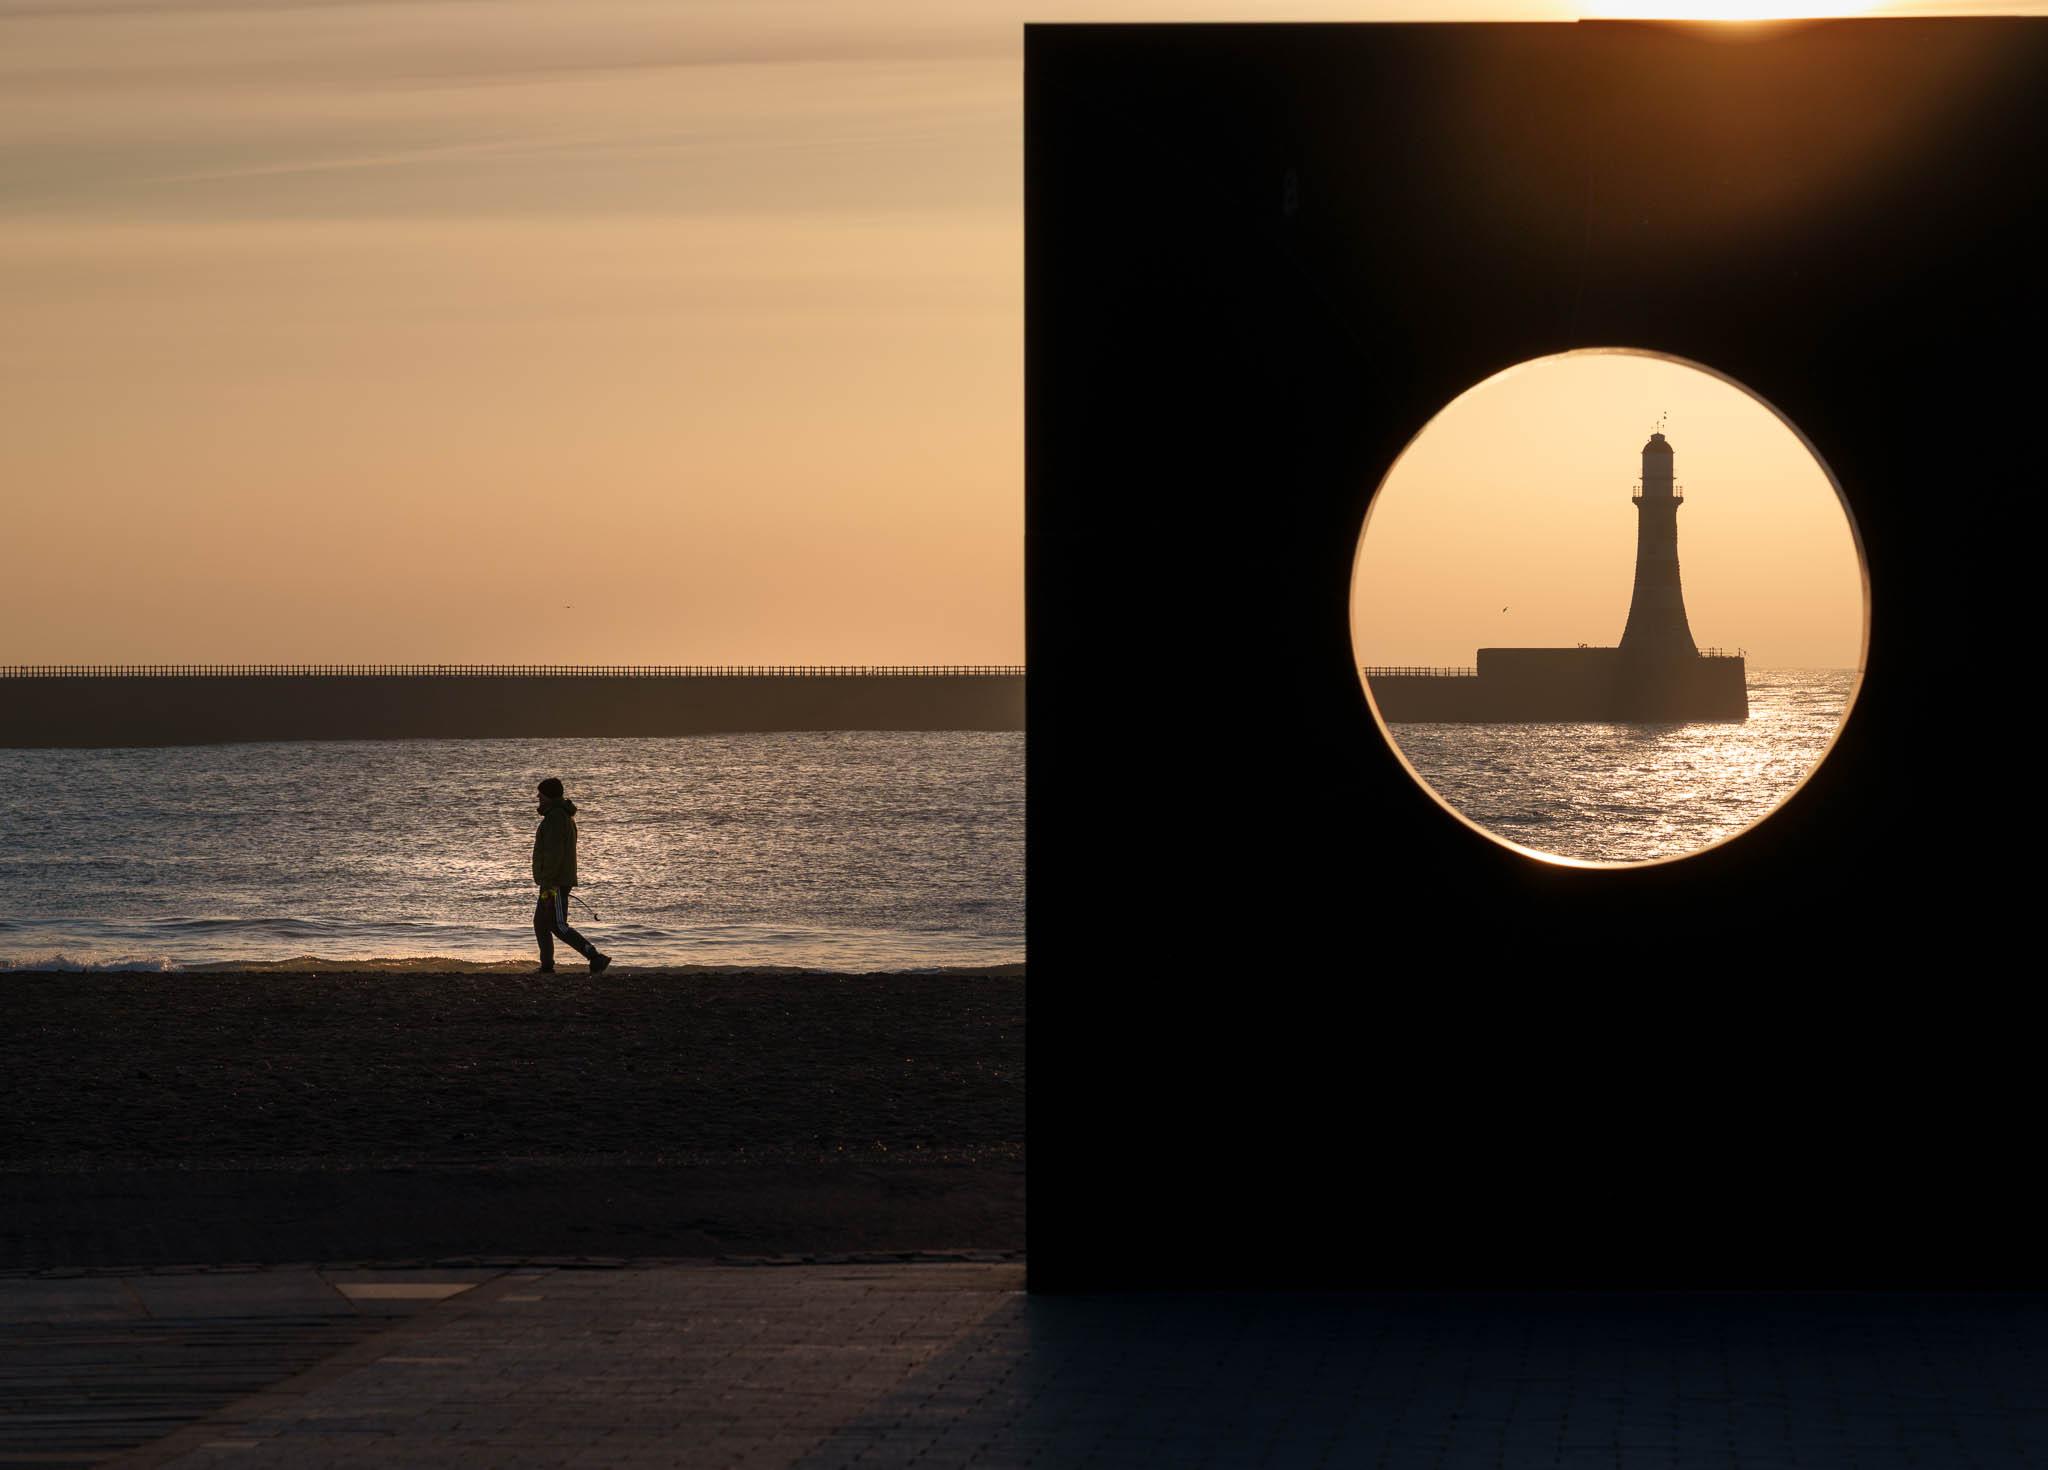
I also thought this was a very interesting image – it looks like a pretty standard shot of a rough day at a Lighthouse until you spot the dark figure in the mid-ground going out into the surf, at which point I feel the image becomes quite terrifying. If emotional response to an image is the measure of a success, as many people say then I think this one achieved that quite well. Well done DavidC.
If you’d like to join in with the shenanigans, our members, feel free to come and join us on the forums. We’d love to see you there, and we are quite a friendly bunch.
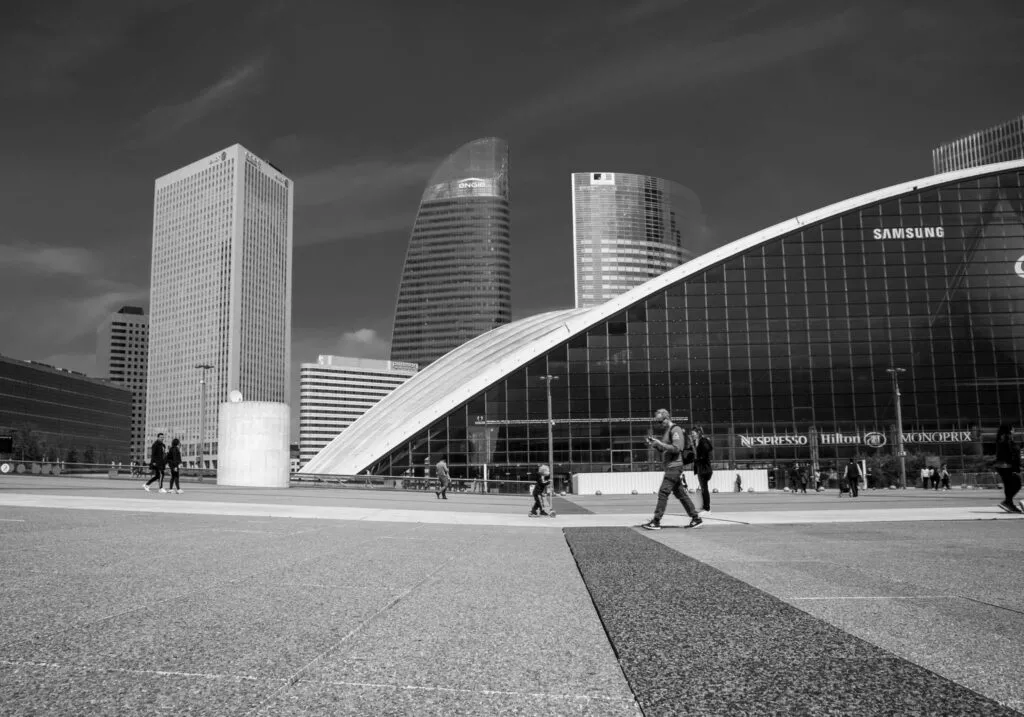
Many photographers consider urban spaces as boring locations to photograph, due to the fact that they may be too busy and/or cluttered. Moreover, these places can be quite crowded most of the time and noisy too, but if you are willing to slow down, and take time to observe and photograph some unique and interesting shots, then urban spaces provide a lot of photographic opportunities.
Urban spaces or cities provide opportunities for several genre of photography like architecture, street, urban wildlife, etc. It is always recommended to scout locations beforehand, get to know the area and study how light falls in a particular area during certain times of the day, etc., so you can come back with very compelling photos.
Here are some tutorials that we have put together, so you can get some ideas and be inspired to photograph in urban spaces.
Here is a tutorial or a walkthrough for an interesting start on how urban spaces can be photographed. This article includes a lot of sample images with details along the way to give you an understanding of how light, perspective, angles, etc., can be used to capture interesting urban photographs.
Photo by Hongmei Zhao
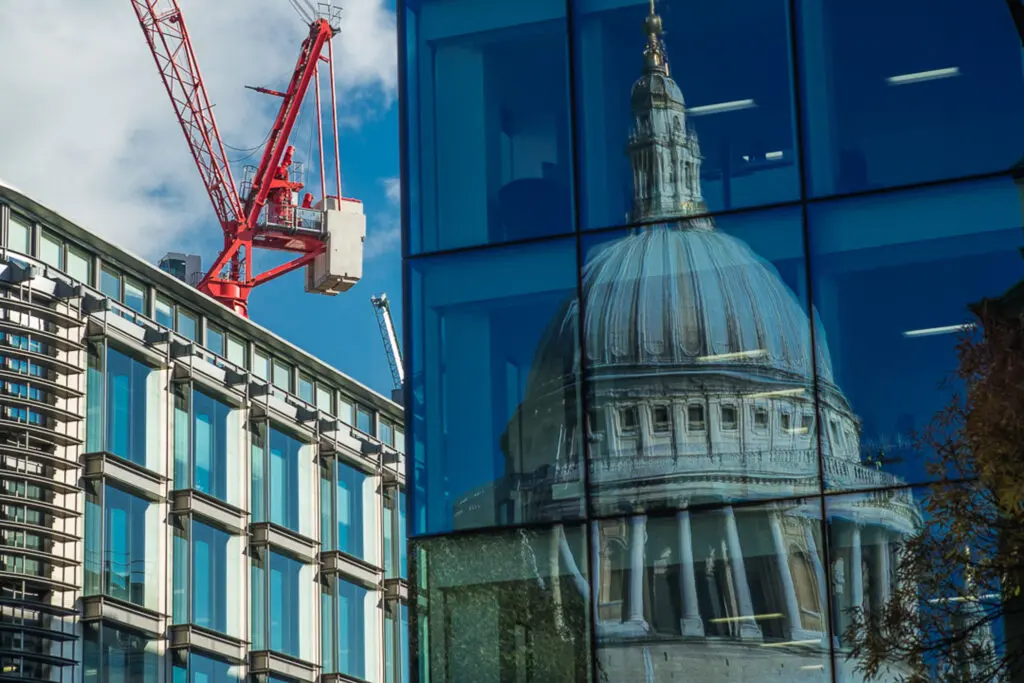
When we hear the word landscapes, we immediately think about natural landscapes in the wilderness like the ones that have meadows, grasslands, hills and mountains, beaches etc. Landscapes can be also extended to urban areas where urban landscapes can be captured as they are quite interesting if you follow some tips.
Photo by Adam Borkowski
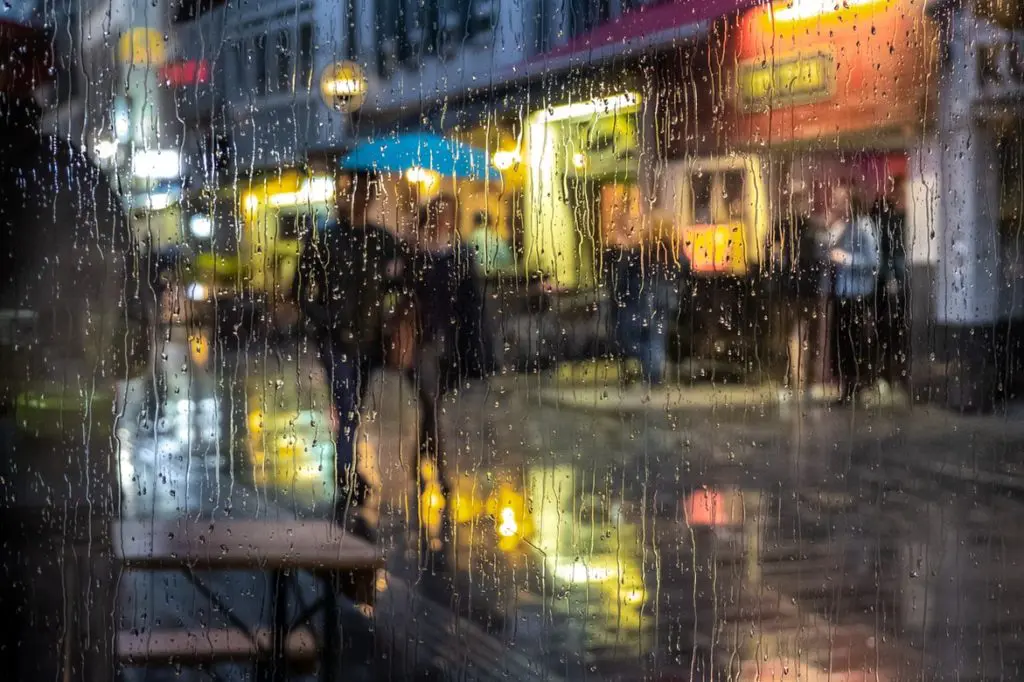
While many photographers choose to stay indoors on rainy days in order to protect their gear and themselves, these days provide great atmosphere for photography and many creative opportunities. Urban landscapes transform into magical spaces during or after a rain and with some precautions and safety measures, one can capture stunning urban photos on a rainy day. Here are some tips for rainy urban photos.
Photo by Gil Ribeiro
Cities are places where something keeps happening all the time – there are a lot of stories, events, cultural activities and so on, that can be photographed. Besides, cities provide great opportunities to capture architecture during various times of the day and seasons, street photography, environmental photos, etc. Here are some ideas to capture stunning city photos.
Photo by Jason Row
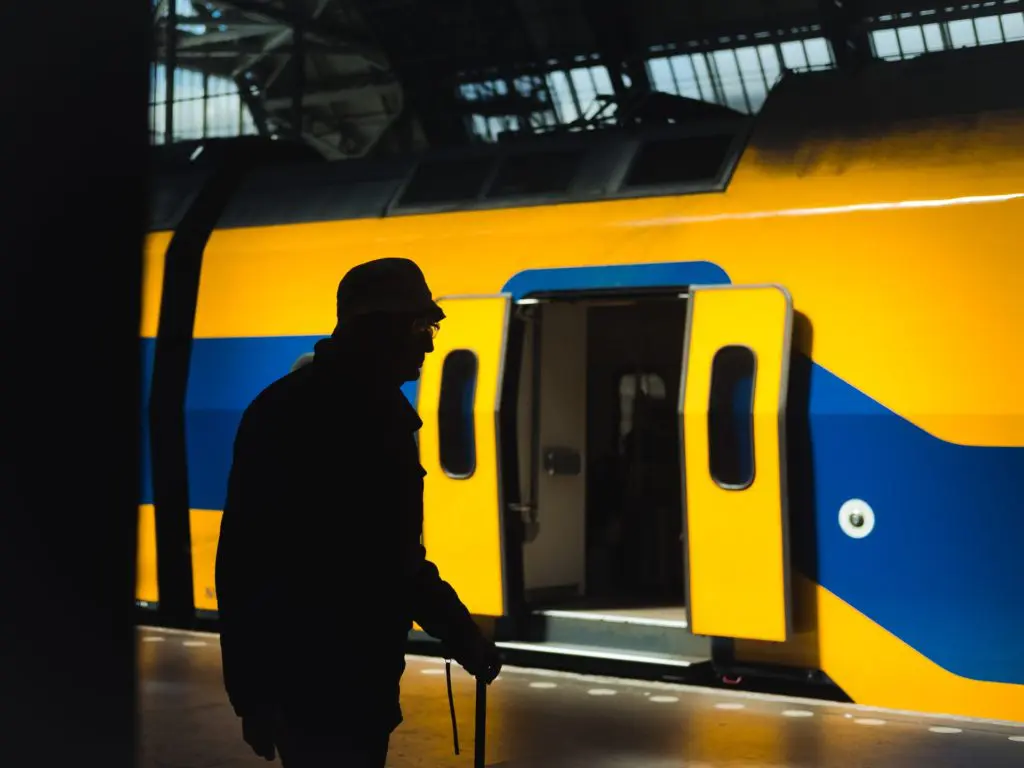
Street photography in a city can offer unique perspectives on what is happening in a city and the light falling through tall buildings and alleyways can offer interesting compositions and stories. Right from train stations to city centres, each space provides different stories and elements that can be used to capture the life in the city. A keen eye for details and a story telling mind is all that you need for capturing great street photos in a city. Here are some tips and ideas.
Photo by Marc Kleen
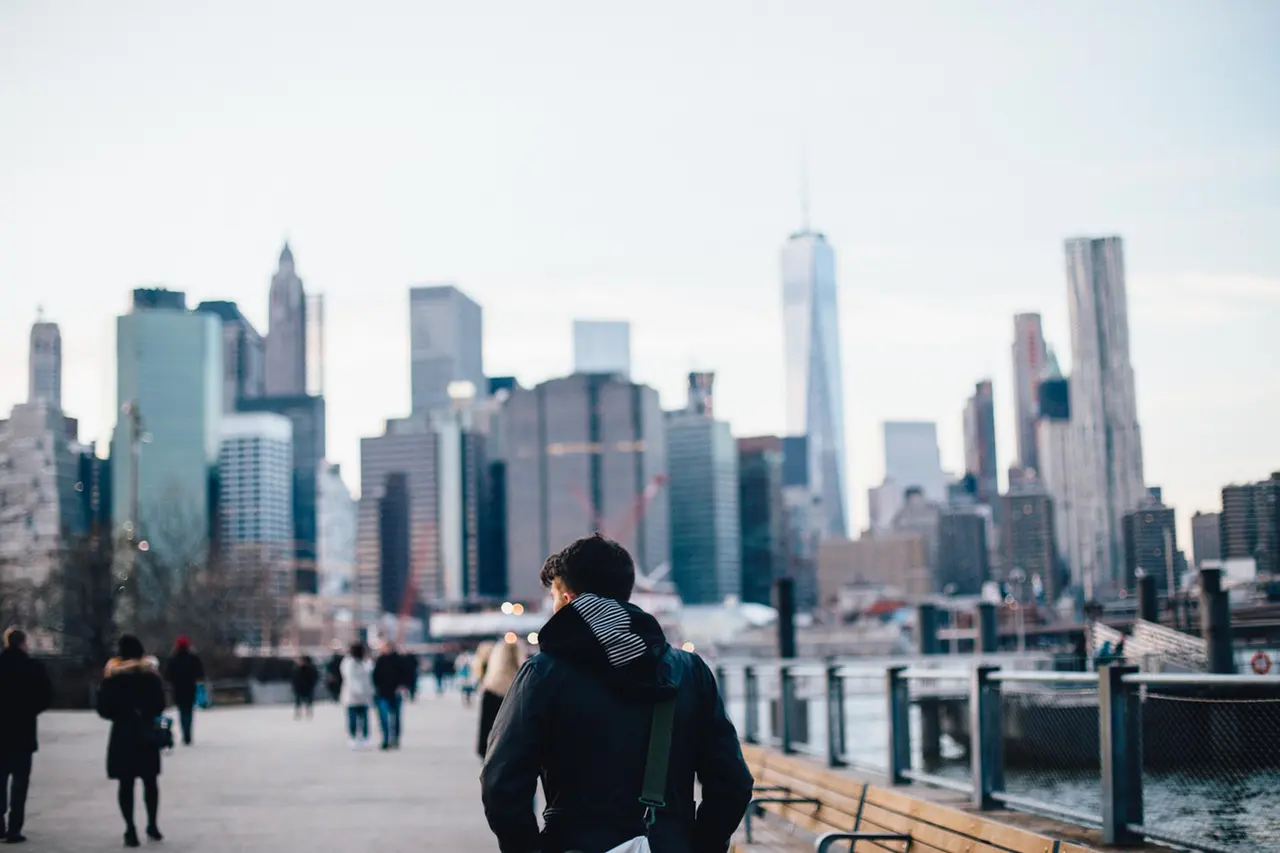
A lot of people choose to live in cities because of the vibe and the other interesting things they can experience there. Cities are also spaces that are filled with architecture and other structures, both new and old. It is not just about capturing the buildings in a city, but also the life there, that makes for epic cityscape photographs. Here are some ideas on how to capture cities in unimaginable ways.
Photo by Abigail Keenan
Do you live in a city? If so, are you bored of photographing the place that you live in? We all have this habit of not photographing the places we live in, because we see it all the time and don’t feel that it has anything new or interesting to contribute. If that is the case, you are wrong. Your city has a load of photographic opportunities and you need to look at it with the eyes of a tourist. Read to find out how!
Photo by Michael Discenza
Have you seen wildlife in urban spaces? Unlike capturing wildlife photographs in the wild by staying very far away from the animals and birds, urban wildlife that are used to humans around them can be captured up close as they mostly stay close to human residents, parks, etc. The wildlife in urban spaces can be interestingly photographed against daily happenings in the cities and towns. This article gives you tips on how to photograph urban wildlife.
Photo by Luna Wang
Besides all the stunning subjects and cityscapes in urban spaces, if you are a photographer interested in capturing portraits, cities offer amazing opportunities to capture interesting portraits. Some very interesting geometrical compositions can be used to capture portraits in urban areas, Here are some tips to start with.
We have all heard of the golden hour as the best time to photograph anything because of the glorious, soft but dramatic light the sun casts during that time. Do not pack your camera bags after sunset, because the blue hour is one of the best times to capture very emotive and soft photos especially in the city when the lights are just turned on. Here is how to shoot cityscapes during the blue hour.
Photo by Mick Haupt
If you are someone interested in urban decay, or wish to shoot something different in urban spaces,, then urban decay is a genre that will be of interest to you. Moreover these spaces will not be crowded, so you can take time to explore and capture them from unique perspectives and angles. Make sure you have permission to enter and photograph these spaces as some areas and buildings may have restrictions or may be private. Here are some tips for you to get started.
Photo by Patrick Tomasso
Finally if you are interested in black and white photography, urban spaces are great because of the light, textures and drama they can lend to great black and white photographs. Make sure that you have a good tonal range in the scene so the resulting black and white image is powerful. You need to learn to see in black and white in order to capture images to convert to black and white.
Photo by Jason Row
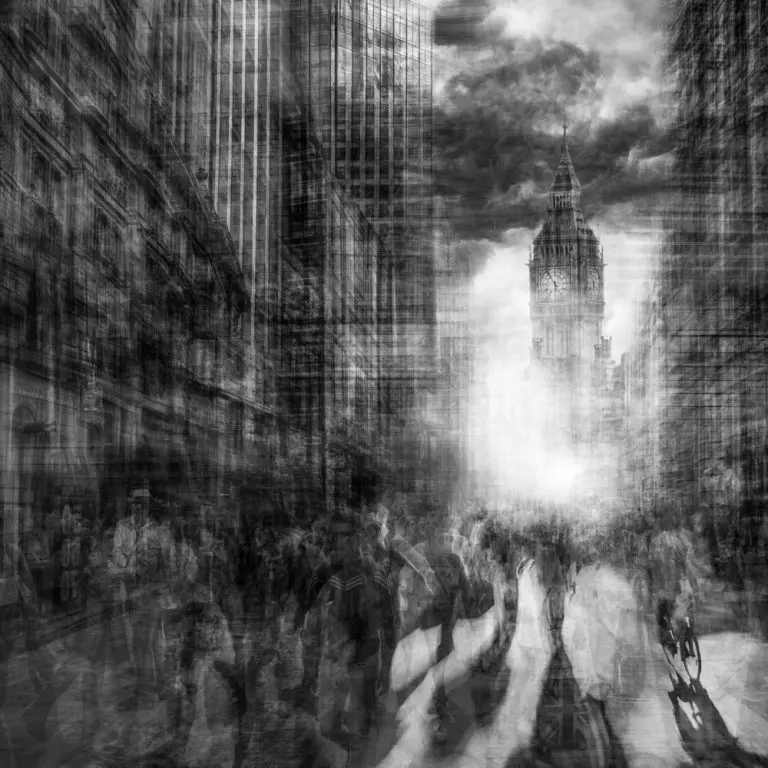
If you want to check out some creative urban photos, check out these “Urban Etchings” by Grant Legassick, which is a definitive study of an urban environment comprising multiple images layered over one another, giving the impression of a fine, delicate pencil drawing or metal etching. These images are mind-blowing and the photographer shares how these were made.
Insta360 which is a global company known for 360 imaging has announced the launch of Antigravity, which is a new independent drone brand developed by Insta360 in collaboration with third parties. Antigravity aims to redefine aerial imaging and is expected to launch with user-friendly controls that will help with creative aerial imaging.
Image via Insta60
Antigravity will allow users to capture images from any angle and perspective and is designed for all kinds of creators. The user will not require technical backgrounds or drone piloting skills beforehand making this drone suitable for both beginners and experienced drone operators.
With the Insta360 being a favorite camera among many creators worldwide, antigravity is built on the same design. It comes with dual-lens 360 camera that helps to record everything in the scene as a high quality 8K 360 video without the need for an external 360 camera attachment. The users can later work on the frames that are required to tell their story.
Antigravity features safety functions to prevent unsafe flights using their drones and shooting parameters can be adjusted when flying the drone. The drone will come with a lot of new features that will be the first in drone designs across the world.
The drone may also weigh less than 249g which is the minimum requirement for drone registration in many countries. Antigravity is also inviting feedback and ideas from the community, so they can implement new ideas and innovations in their future products.
More details about the product can be found here and here. The first product will be unveiled in August 2025. We have more news for you to read if you are interested at this link here.
You press the button, the shutter fires and then you get that sinking feeling, the pit of the stomach realisation that you have royally cocked up the shot. You feel bad, but not because you know the image will not look the way you wished. You feel bad because, in your mind, you failed.
Your knowledge of photography, honed over days, weeks or even years has let you down. You feel like your photography is not moving on. Yet, that very failure can be the trigger for you to improve your photography. Like any subject, photography is not learned just by reading books and watching YouTube videos, it’s learned by learning from your mistakes.
If as a beginner you are making lots of mistakes, then the chances are you are shooting often and learning lots. Today we are going to look at why you should embrace your photography fails.
My Most Common Fail
Let’s start with me. I have been shooting for over 40 years, much of that as a professional. Yet I still make many mistakes and one of those in particular. Take a look at the image below.
There is a recent trend in photography called ICM or Intentional Camera Movement. It’s where a photographer intentionally moves the camera in a predefined direction during exposure to convey a particular emotion. Now I could lie and say that this is one such example. However it’s not. It’s a UCM, Unintentional Camera Movement and I do it all the time.
One of my favorite genres is Blue Hour photography. By its very nature this often necessitates the use of a tripod. Having a somewhat flighty mind, I will often see shots whilst in the middle of a long exposure and drag the tripod away, causing shots like this.
I even do it in daytime shots such as the one below. The first shot is how it should have looked, and the second is using my patented UCM technique. And do you know what? I like both despite the mistake.
Let’s take a look at the more common mistakes that every photographer makes. I say every photographer, because it doesn’t matter if you have been shooting a day or 40 years, these simple mistakes will happen.
Camera Shake: This is probably the most common of all and stems from having a shutter speed that is too low to damp out the movement of the camera in the hand. Image stabilisation has allowed us to reduce shutter speeds to much lower levels but in turn we have normalised this and still go even lower. It’s a mistake that is often hard to notice because it doesn’t show up well on a small LCD screen.
Wrong White Balance: If you shoot RAW, this is a solvable problem, yet there is still that heart dropping moment when your images load into Lightroom and they are all blue.
Over or Underexposing: This is a mistake that happens often when you are new to photography. I think it’s also one of the most important mistakes we should make, more on that soon.
Not Isolating A Subject: This is also a mistake that happens frequently to newcomers. In our desire to capture everything in front of our lens, we fail to isolate what the actual subject matter is.
Lens Flare: This is a common mistake that when fully understood, can be used to great advantage. It’s a mistake that’s very easy to make, particularly with smartphone cameras.
Here’s the thing though, all of the above mistakes plus many more can be made at any time in your photographic journey. They are mistakes that need to be made to improve your understanding of both technique and composition. If you do make such mistakes, don’t see them as a negative, instead, keep the images, load them into Lightroom and look at them. Work out where you went wrong and try to learn from them.
Many of you will be aware of the work of Robert Capa. His images of the D-Day Landings are iconic. There is one in particular of a US soldier swimming ashore on Omaha Beach. It is, perhaps the most famous photograph of that historic day.
Now taking the emotion out of the equation, the technical side of the image is poor. It has motion blur, it has lots of grain and it’s not particularly sharp. Yet, the shot was captured by a photographer that knew all the technical issues he was encountering. He chose to embrace those difficulties in order to get the shot.
That leads us nicely to the point of this section. Those technical hurdles that we might face can be creative opportunities. Let’s look at camera shake as an example. Once we have recognised that a shutter speed that’s too slow can give us blurry images, we can embrace it. That might be by using intentional camera movements or it could be by panning with a moving subject to enhance that sense of motion.
Underexposing might seem a mistake when you first start in photography, but soon you will start to see that an underexposed shot can greatly enhance a dramatic sky.
Virtually every mistake that can be made in photography is a learning tool and can be used in a positive creative way, once you understand what you have done.
The first and most important thing is do not delete. When you get that sinking feeling of having made a mistake, resist the urge to delete the files. Instead load them into Lightroom and assign them a specific star rating or colour tag. This will allow you to quickly find all your “mistakes”
The next thing to do is study those mistakes. If the image has camera shake, look not only at your shutter speed but also your focal length. Check to see if image stabilization was switched on. This will start to fix in your mind the handheld limits for different focal lengths.
Perhaps you had incorrectly set a white balance. Take a look at those images and ask yourself does that colour cast add a particular mood to the image. Perhaps the white balance was too blue, yet it is making that stormy landscape look fantastic.
Analyse every mistake that you make and ask yourself whether that mistake has some creative merit. I think you will find that in many cases the answer will be yes.
Photography fails are something that we have to embrace if we want our photography to progress. When that shutter fires and you get the first realization that you failed, resist the urge to delete and instead use it as an opportunity to learn.
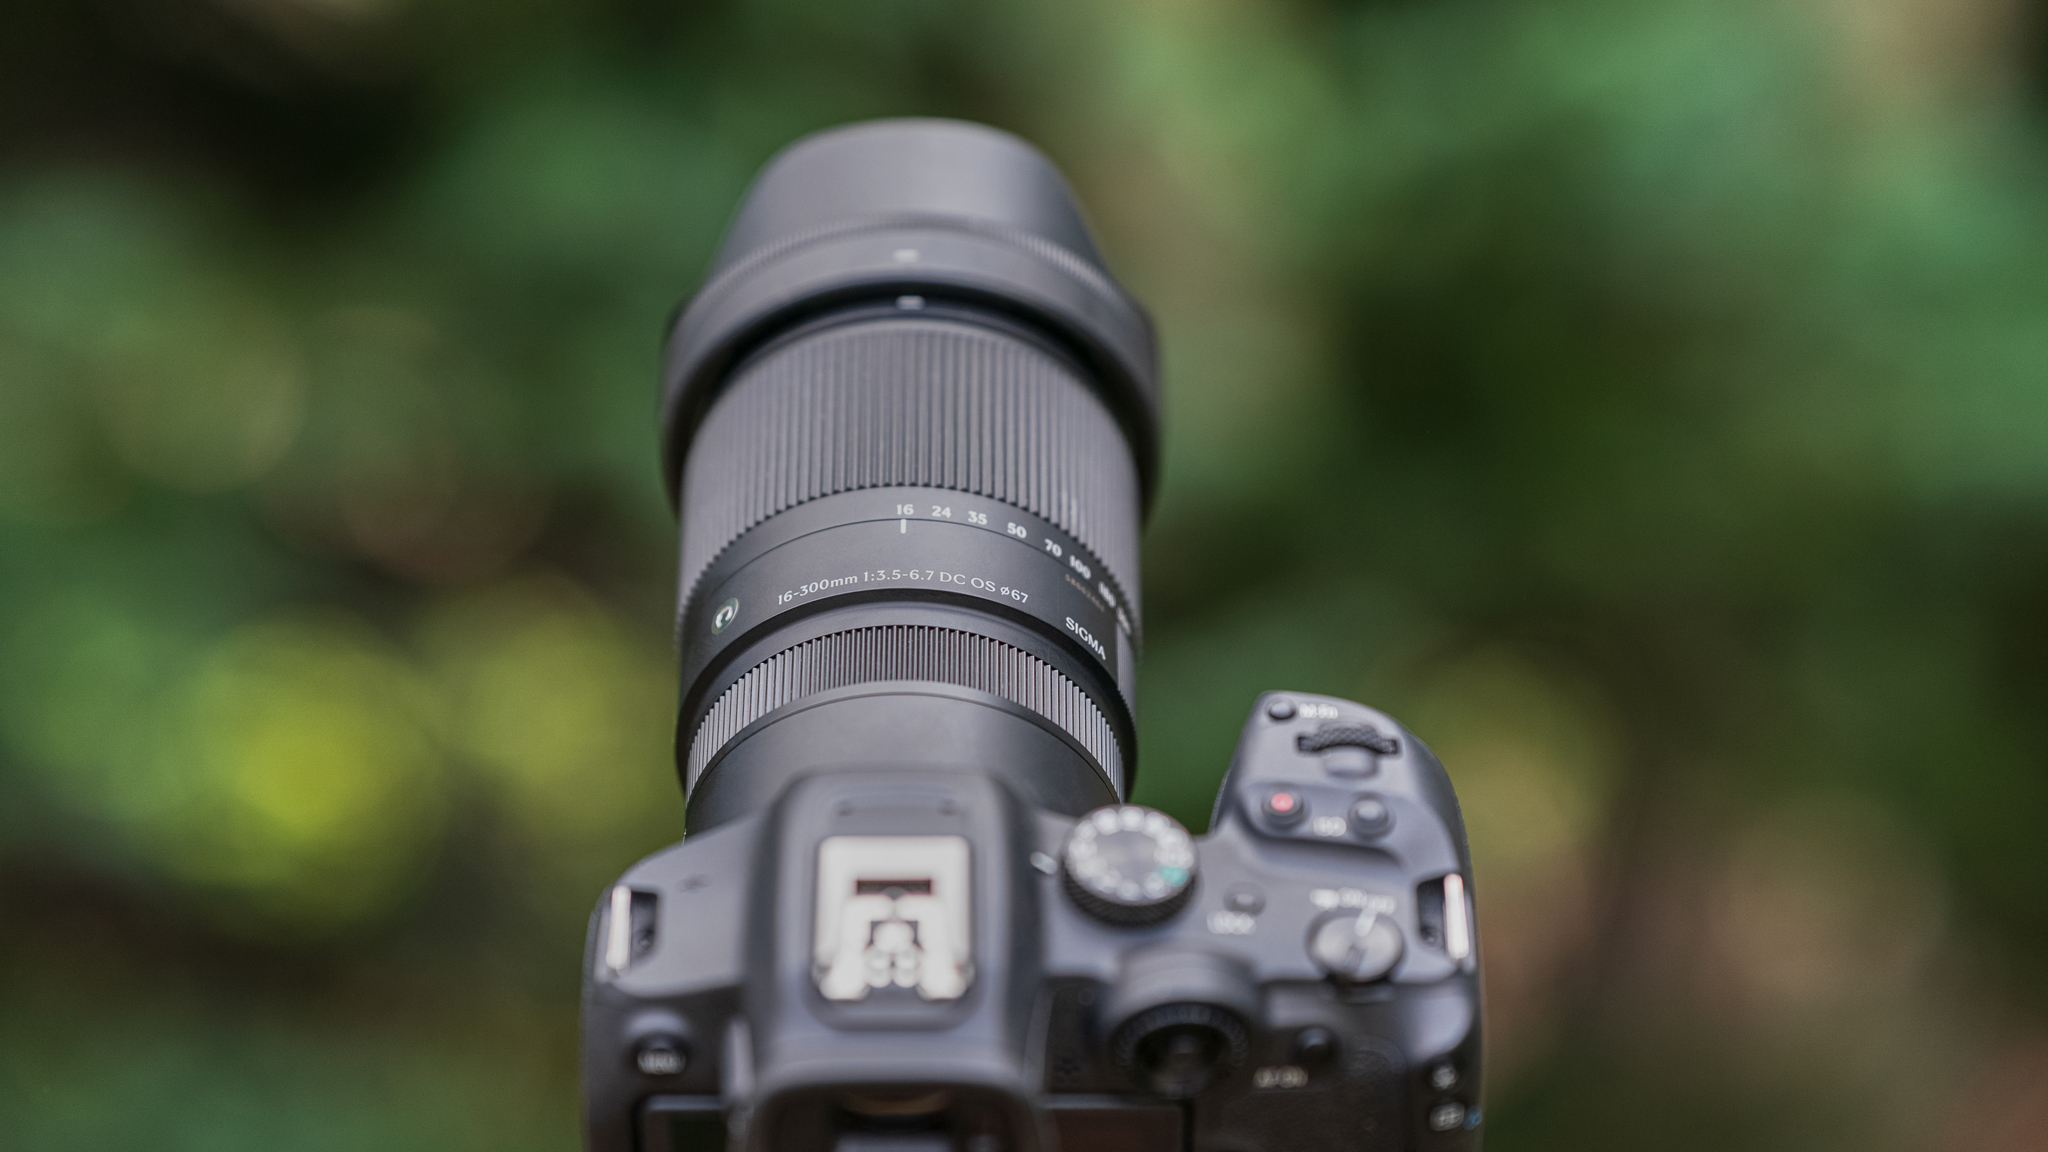
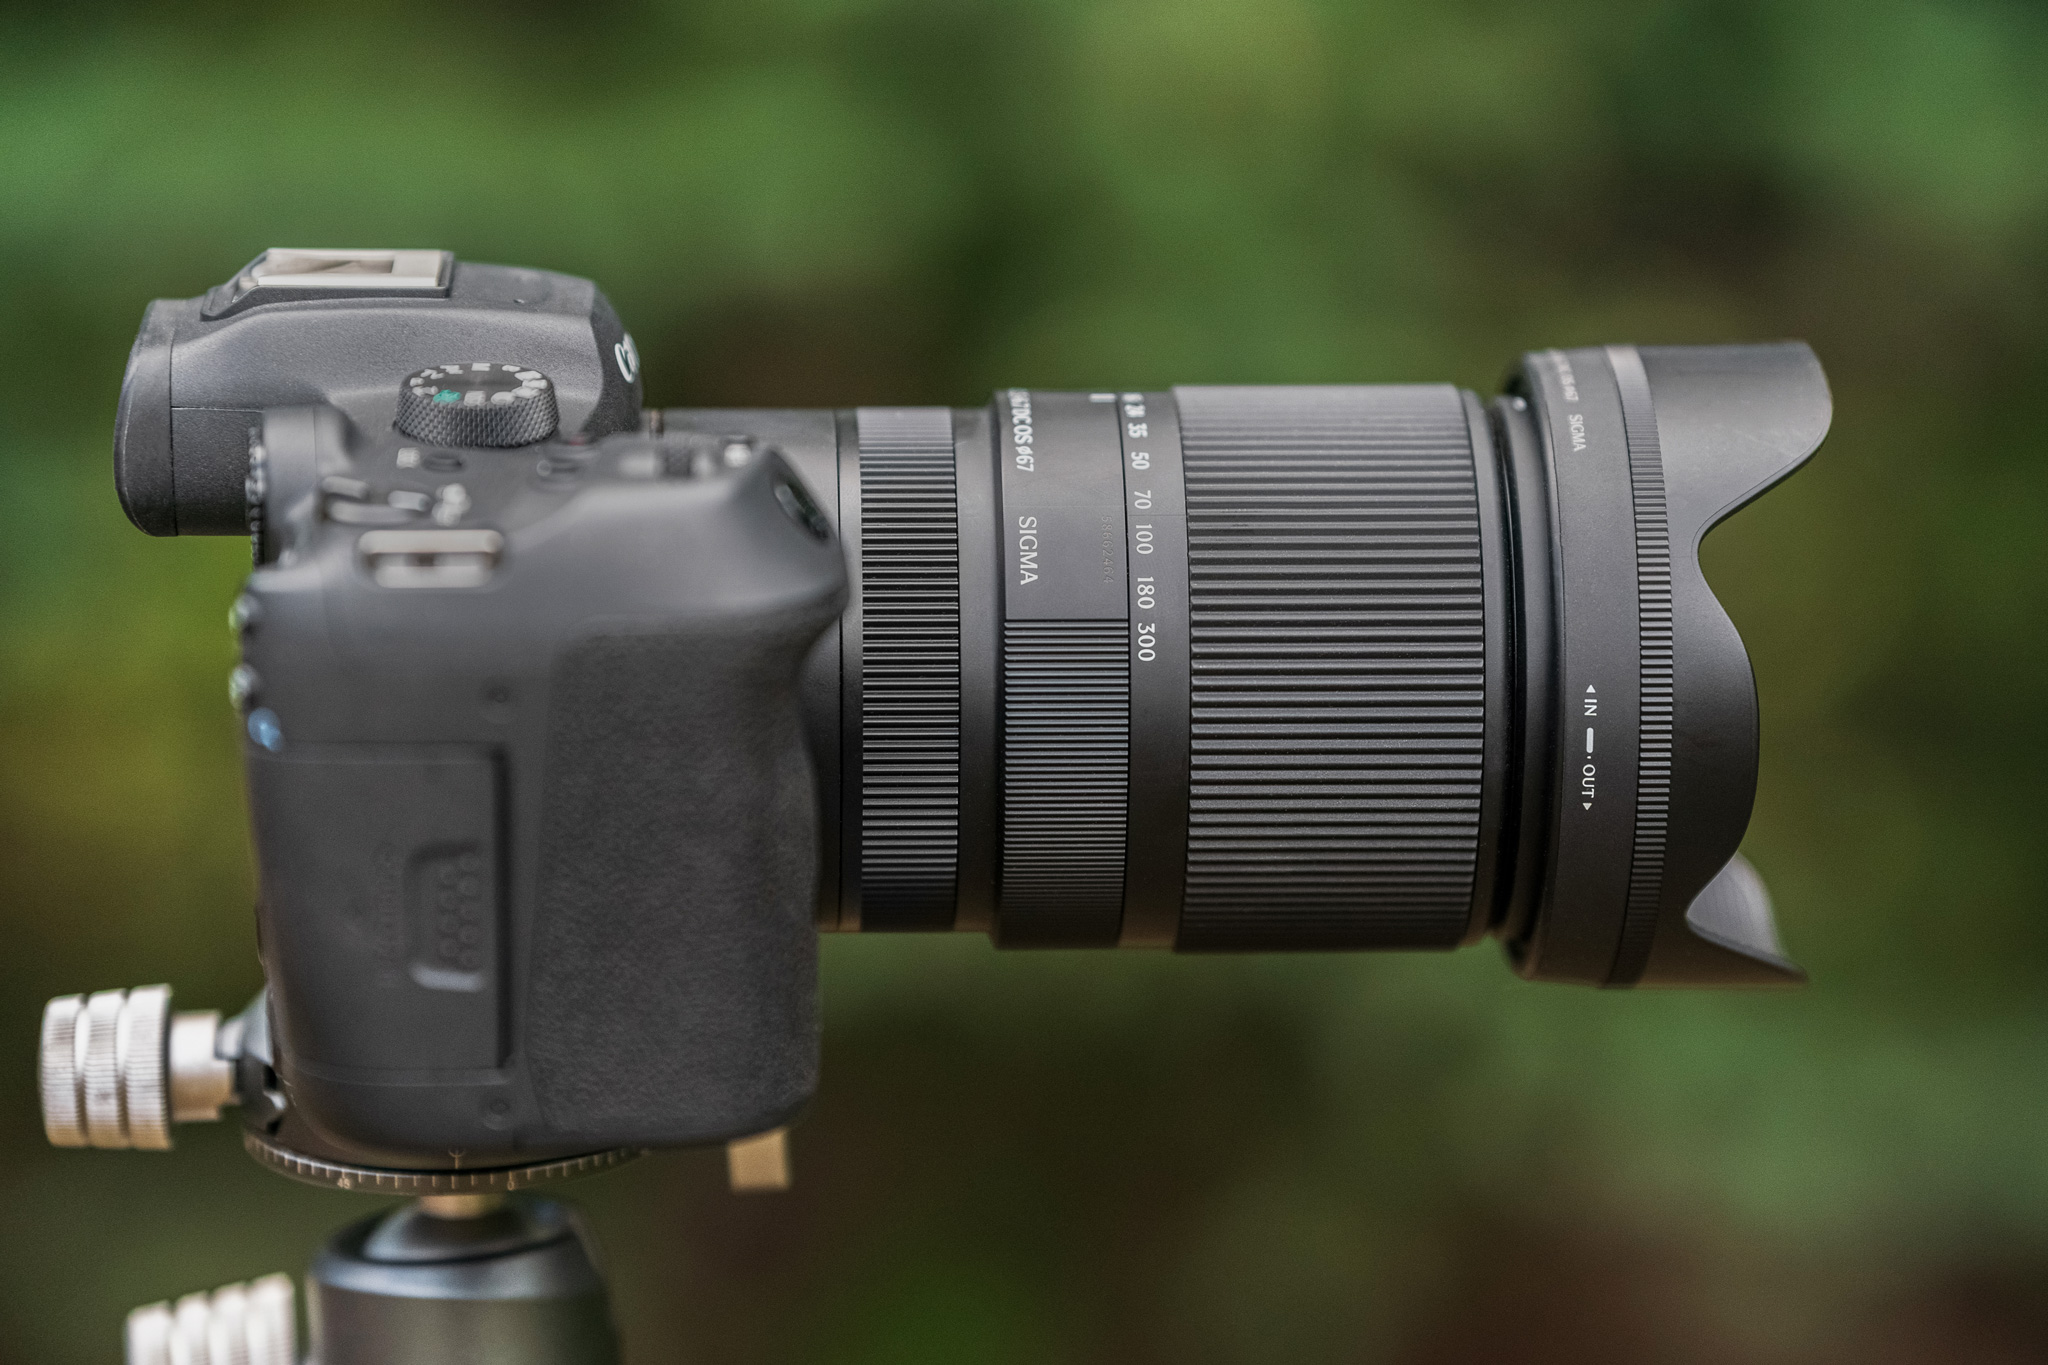
Sigma 16-300mm F3.5-6.7 DC OS | Contemporary lens mounted on a Canon EOS R7.
For every photographic project that we undertake, there is going to be a best “tool for the job”. If you are heading to northern Canada to photograph the aurora borealis, then a fast, wide prime lens like Sigma’s 15mm F1.4 DG DN Diagonal Fisheye | Art would be a great choice. Heading to Yellowstone for wildlife? Then a super-telephoto zoom like the 60-600mm F4.5-6.3 DG DN OS | Sports lens would be ideal. For my latest adventure, the perfect piece of gear was Sigma’s 16-300mm F3.5-6.7 DC OS | Contemporary lens for crop sensor cameras.
Why was this lens the best choice?
Well, I suppose I should start by telling you what I was getting myself into. After almost thirty years exploring the mountains around my hometown of Breckenridge, Colorado, I was looking for a backpacking trip that would sum up the entire area into one big, unifying hike. Going over my maps, I found the perfect route and it would begin and end at my front door. It would be almost forty miles in length and include about 10,500 vertical feet up, and over 11,000 down. I would hike over four mountain passes on the east and south side of town, and then link four remote drainages on the west side of town. Most of my hiking would be done off-trail and require significant effort and route finding skills, and would take me four nights and five days to complete.
Sigma 16-300mm F3.5-6.7 DC OS | Contemporary Canon EOS R7 16mm, 1/400s, F7.1, ISO 400Sigma 16-300mm F3.5-6.7 DC OS | Contemporary Canon EOS R7 96mm, 1/30s, F9, ISO 100
Of course, there’s no way I’m doing an adventure like this without a camera in hand. There would be opportunity for both landscape and wildlife photography during my time in the field. Clearly the best tool for the job would be something lightweight yet powerful. Wide enough for epic landscapes but also with plenty of telephoto power to bring in distant wildlife. Luckily, Sigma had just released a lens that fit the bill perfectly – the 16-300mm F3.5-6.7 DC OS | Contemporary, available for Sony E-mount, L-Mount, Fujifilm X Mount, and Canon RF Mount. I paired it with the relatively small Canon EOS R7 for an easy-to-carry combo.
This lens is less than 5 inches long without the hood attached, making it really easy to pack and carry.
The Canon mount version of this lens weighs just 22 ounces (625g) a with a nice, compact size that fit perfectly in my Think Tank front mount pack. This was great because much of the photography would be a bit more documentary in style and I wanted instant access during the entirety of the hike. The lens also features Sigma’s updated OS2 (optical stabilization) system which meant I could easily handhold many of my shots. The very close focusing distance (minimum is 6.7 inches at the wide end) was awesome for getting close-up images of the many wildflowers that were absolutely peaking on my hike.
Sigma 16-300mm F3.5-6.7 DC OS | Contemporary Canon EOS R7 16mm, 1/250s, F13, ISO 250Sigma 16-300mm F3.5-6.7 DC OS | Contemporary Canon EOS R7 300mm, 1/400s, F8, ISO 800
It was great to have the extensive range of the 16-300mm. On a Canon APS-C camera, this is the equivalent of a 26-480mm lens on a full-frame camera. With that kind of range, I was able to capture everything from epic mountain vistas to simple snapshots documenting my journey.
Sigma 16-300mm F3.5-6.7 DC OS | Contemporary Canon EOS R7 168mm, 1/250s, F7.1, ISO 800Sigma 16-300mm F3.5-6.7 DC OS | Contemporary Canon EOS R7 168mm, 1/640s, F10, ISO 800
The image quality of the Sigma 16-300mm was even better than I had expected. It’s been a long time since I last used a crop sensor super zoom lens. I had decent results back then and was kind of expecting the same, but I was pleasantly surprised to find the results approaching that of the high-end Art and Sport line lenses. Images were nice and sharp, and chromatic aberration was held in check even when shooting in extreme lighting situations, which I often like to shoot. Autofocus was fast and accurate, and seemed to work very well with the Canon AF system.
Sigma 16-300mm F3.5-6.7 DC OS | Contemporary Canon EOS R7 16mm, 1/80s, F8, ISO 100Sigma 16-300mm F3.5-6.7 DC OS | Contemporary Canon EOS R7 16mm, 1/125s, F14, ISO 800Sigma 16-300mm F3.5-6.7 DC OS | Contemporary Canon EOS R7 56mm, 1.6s, F14, ISO 100
One other welcome feature on an excursion like this is the dust and splash-resistant construction – it’s actually the first Sigma Contemporary lens to have weather sealing throughout the entire lens body. There was plenty of adverse weather to deal with including rain, hail and sleet daily, and the 16-300mm handled it all nicely.
Sigma 16-300mm F3.5-6.7 DC OS | Contemporary Canon EOS R7 66mm, 1/5000s, F8, ISO 640Sigma 16-300mm F3.5-6.7 DC OS | Contemporary Canon EOS R7 18mm, 1/13s, F14, ISO 100
Consider the Sigma 16-300mm
A backpacking adventure like this calls for a lens that can handle everything thrown at it, from gorgeous wide vistas to distant wildlife and colorful wildflowers. If you have an upcoming trip where keeping size and weight to a minimum are paramount, take a good look at the Sigma 16-300mm F3.5-6.7 DC OS | Contemporary. It’s sharp, fast, light and portable, making it the perfect one-lens solution for many of your photographic endeavors. Pick one up today, and hope to see you out there!
Get the Sigma 16-300mm lens:
for Sony E-mount, L-Mount, Fujifilm X Mount, Canon RF Mount
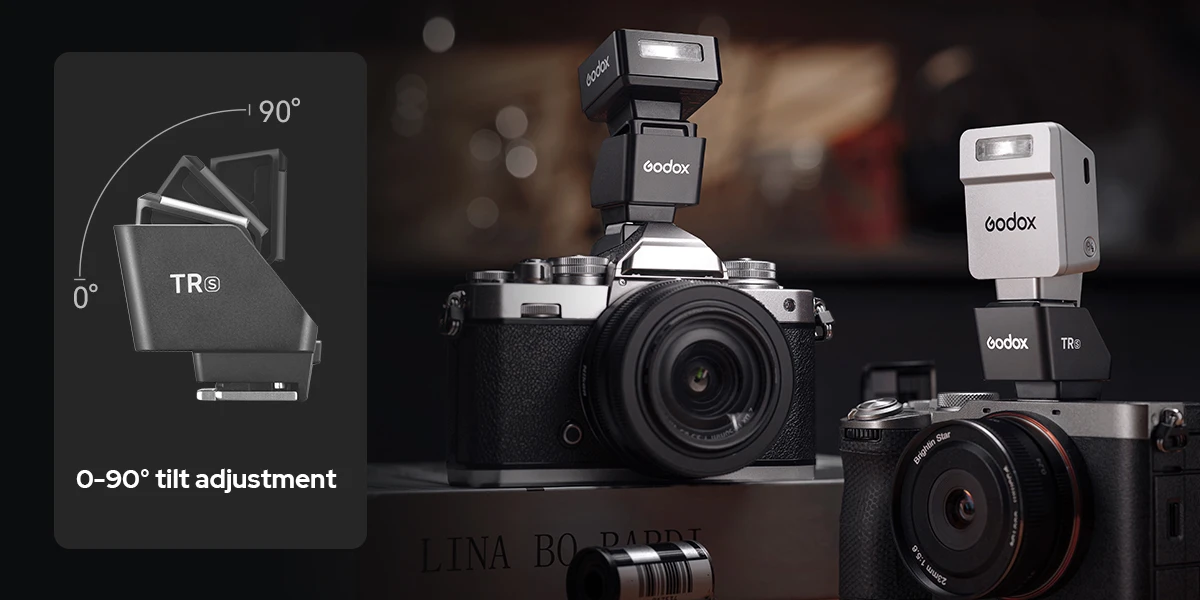
Godox, a company popularly known for photography lighting equipment, has recently released a couple of mini TTL flashes – the Godox iT20 and iT22, that are ultra compact and will easily fit into your pocket. These camera flashes are perfect for both indoor and outdoor photography use, and come with magnetic accessories for quick switching between light effects.
Image via Godox
The mini flashes are almost identical with the iT20 slightly smaller than the iT22 and come in an ultra compact design and weigh only 45g (iT20) and 52g (iT22), which means they can be carried in your pocket, ready to be grabbed and used when needed. There is a dedicated button that allows the user to toggle between manual and TTL modes. Real time settings are displayed, so one can view them for any adjustments required.
Image via Godox
The accessories that come with the flash like the light spreader or diffuser and two color filters, are all magnetic, so they can be easily snapped on to the flash when required. There are also other optional accessories that can be purchased, like diffuser, gels and honeycomb grids which are magnetic. These accessories help with capturing creative and atmospheric effects in your photograph.
Image via Godox
The flash intensity can be adjusted across 6 stops in steps of 1/3. The recycling time for the flashes is 1.5s at full power and a single charge lasts more than 700 flashes. The built-in lithium battery can be charged quickly (approximately 1h 10mins) with a USB-C cable.
Another optional accessory is the “Hot Shoe Riser” that helps to lift the flash by 30mm, so it has clear spread of light without blockage, when using wide angle or long lenses. There is also a 0 – 90 degrees tilt adjustment that helps to bounce light off the flash when required.
The flash is compatible with Canon E-TTL II, Nikon i-TTL, Sony, Fujifilm, OM System and Panasonic TTL systems, supporting both auto flash and High-Speed sync functions. More details about the flash can be found here.
The flash is available to pre-order and costs less than $50.00. We have more news for you to read if you are interested at this link here.