دسته: ویرایش

  • 50 Ecommerce Sites with Stunning Product Photography Ideas

    50 Ecommerce Sites with Stunning Product Photography Ideas

    [ad_1]

    Great product photography doesn’t just make your website look good—it drives clicks, conversions, and customer trust. Whether you’re shooting apparel, jewelry, home goods, or tech, how your products look online directly impacts how well they sell.

    But coming up with fresh photo ideas or perfecting your visual strategy isn’t always easy.

    That’s why we rounded up 50 ecommerce websites with standout product photography—organized by industry. These examples highlight how top brands use composition, lighting, styling, and editing techniques to elevate their imagery and move more product.

    Browse for inspiration. Steal a few ideas. And if you need help turning your own shots into polished product images, we can lend a hand there, too.

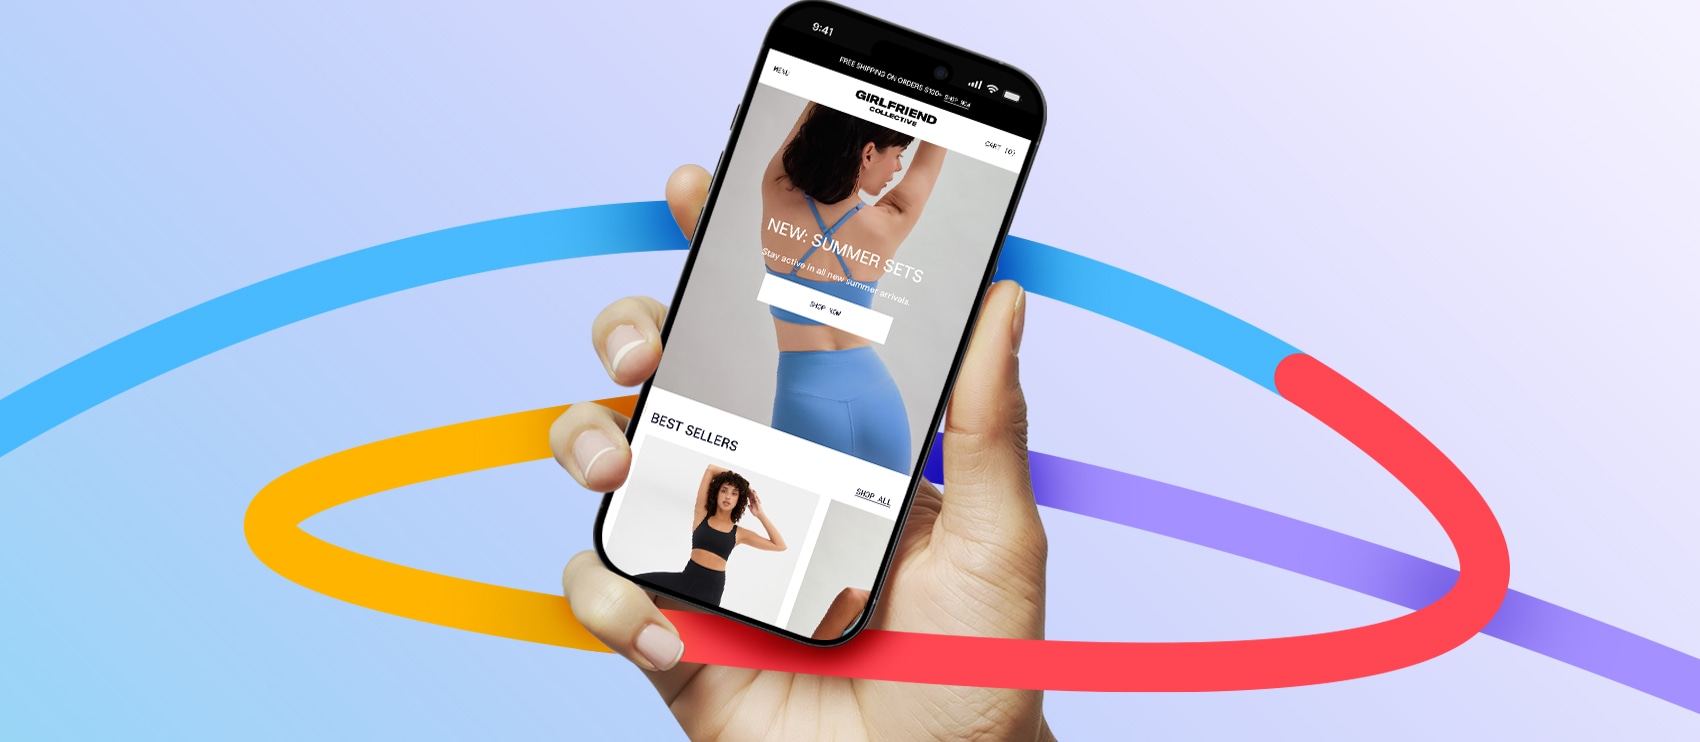
    1. Girlfriend Collective

    Women modeling colorful and fitted activewear sets including sports bras and leggings in black, sky blue, and purple for movement and style.

    Image source

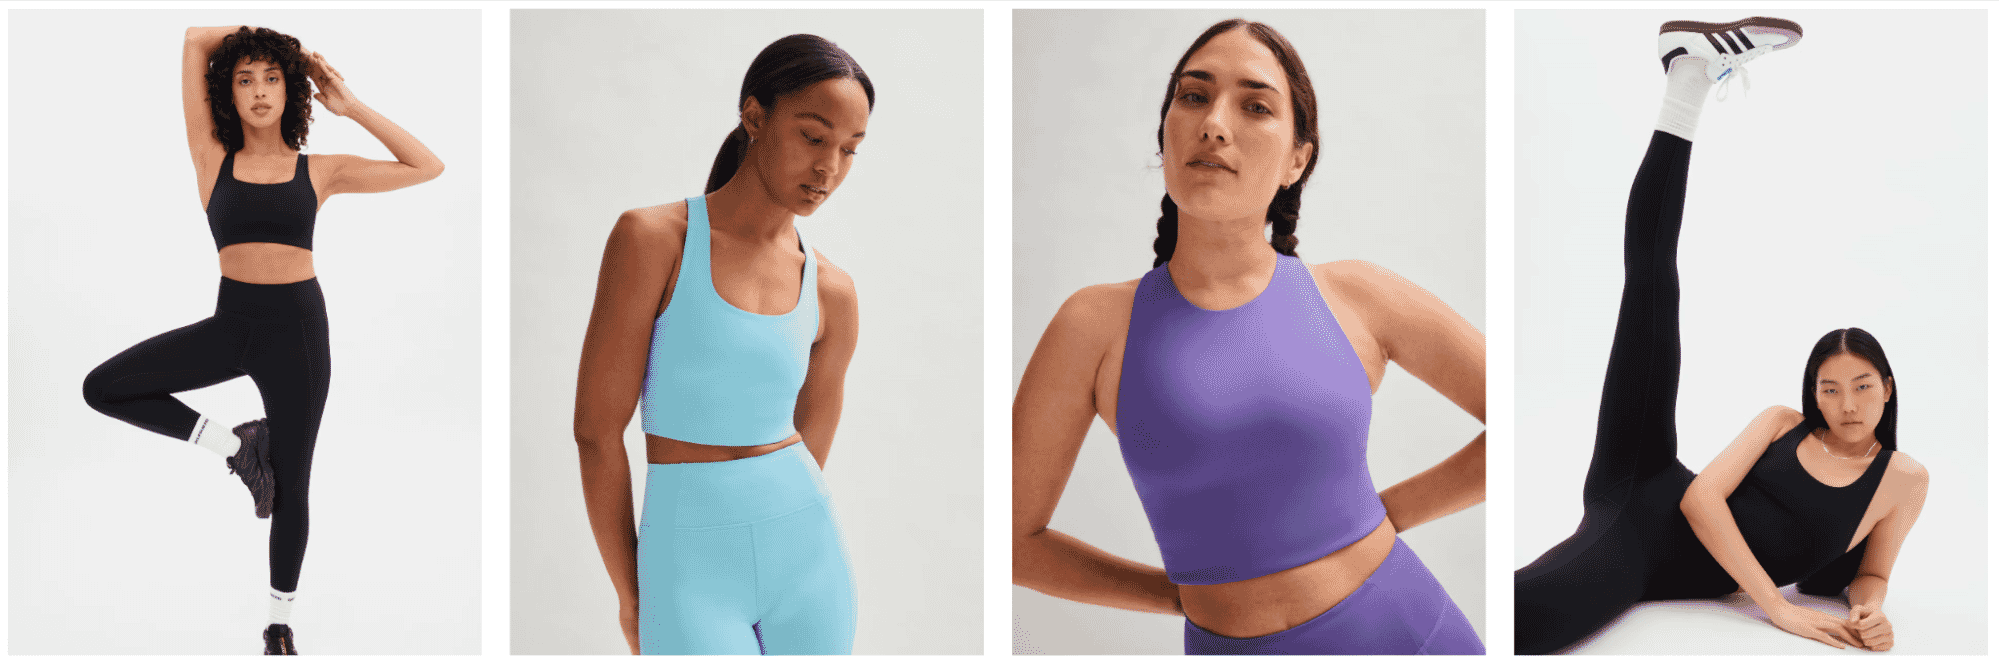
    This set of images features clean, high-resolution portraits of models in active poses, styled against a neutral, seamless background. The garments are front and center, with no distractions from props, textures, or harsh lighting.

    This style of photography strikes the right balance between editorial polish and ecommerce clarity—a smart direction for any brand focused on performance, comfort, or versatility.

    Start a new order

    2. Quince

    Women modeling coordinated red summer outfits and swimwear in a beachside fashion photoshoot, showcasing relaxed resortwear and seasonal style.

    Image source

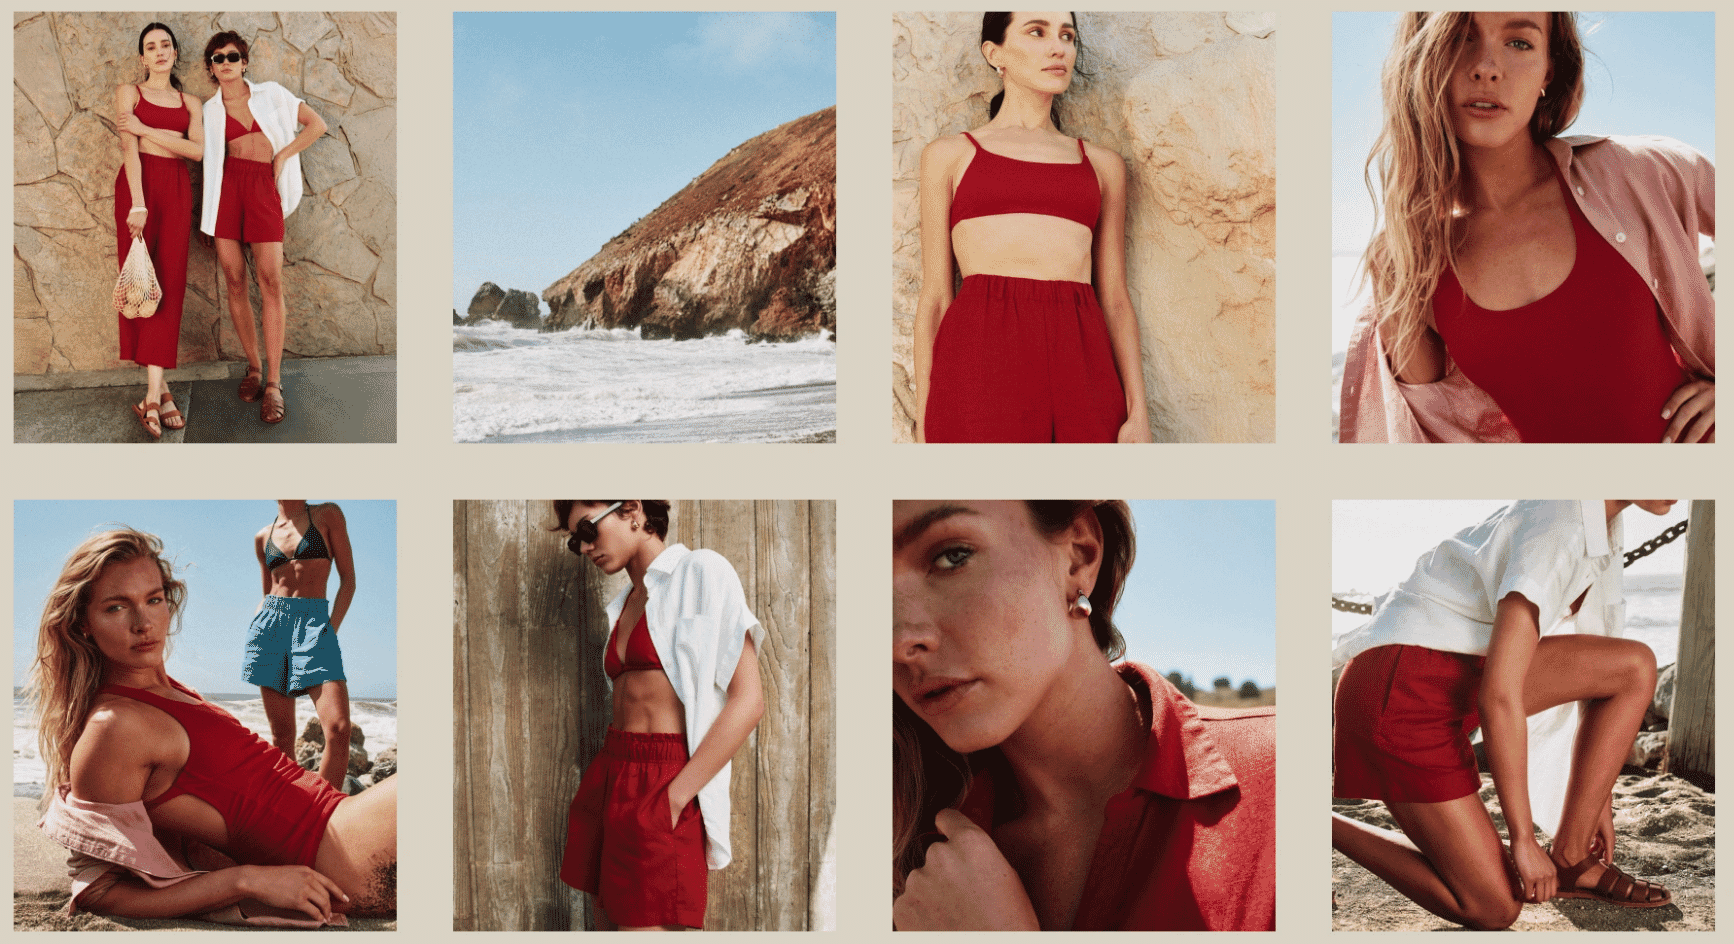
    Quince uses warm, natural light and textured backdrops like stone, sand, and wood) to create a sun-soaked, lifestyle-driven aesthetic. The product photography feels candid and cinematic, blending fashion with storytelling. Clothing is styled casually and captured in movement or relaxed poses, helping customers imagine how pieces feel and function in real life.

    3. Victoria’s Secret

    Victoria’s Secret lingerie campaign featuring models in different bra styles for strapless, low-cut, racerback, and wireless support needs.

    Image source

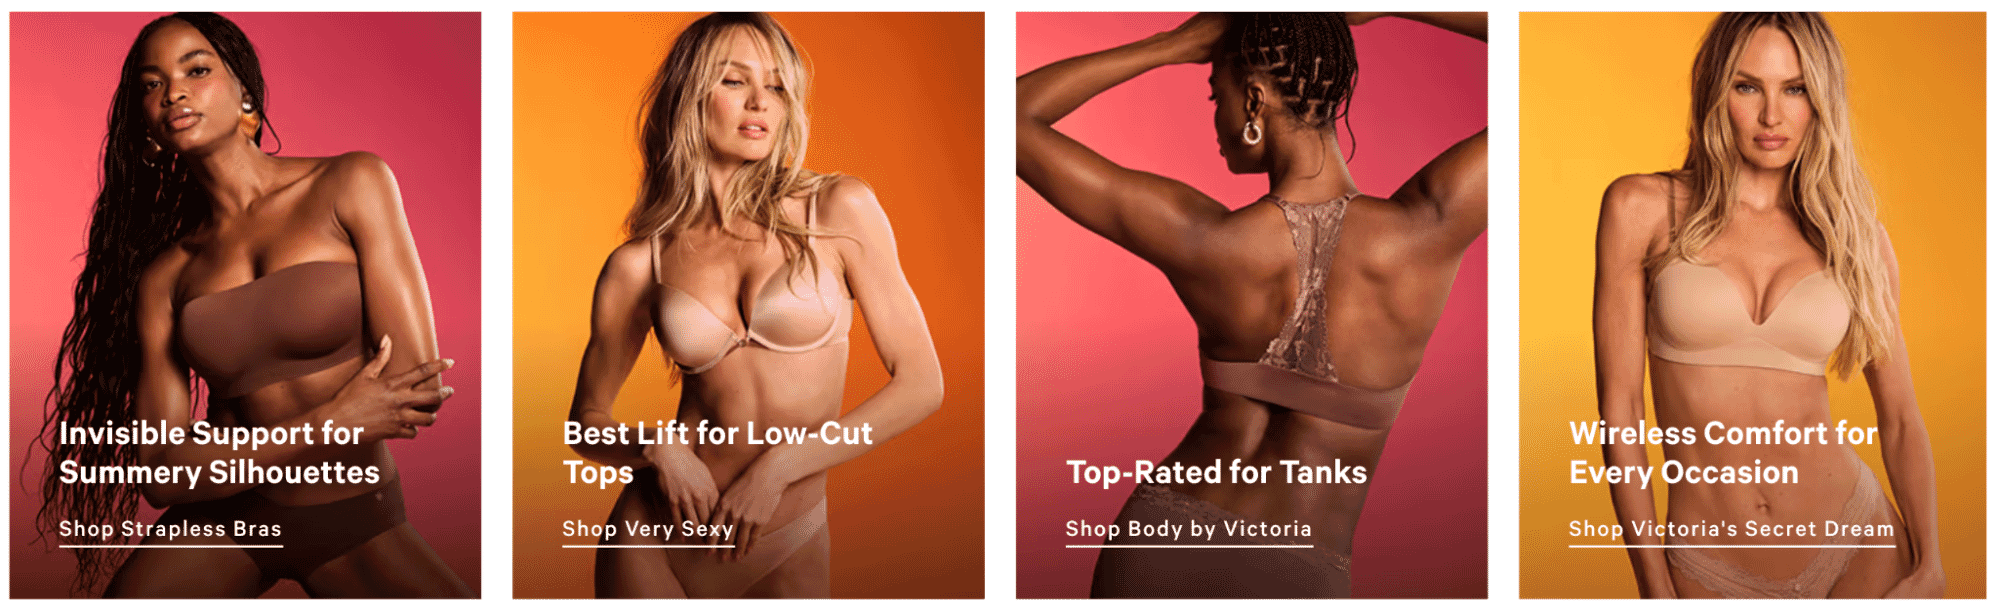
    Victoria’s Secret has secured its spot on the top of the list for product photography for years. It knows how to present their products in a way that speaks to its target audience, and even makes more than 20 million people tune into its annual televised fashion show. 

    4. ModCloth

    Rainbow Bright Pride Collection featuring colorful striped and fruit-print outfits modeled outdoors with bold colors and festive styling.

    Image source

    ModCloth shows its products on models of different shapes and sizes, showing the versatility of various items and allowing its customers to better predict how it would look on them. It does the same with color variations, too.

    5. Thirdlove

    Women modeling soft neutral-toned loungewear including a robe, cropped sweatshirt, and relaxed pants, with seamless black undergarments.

    Image source

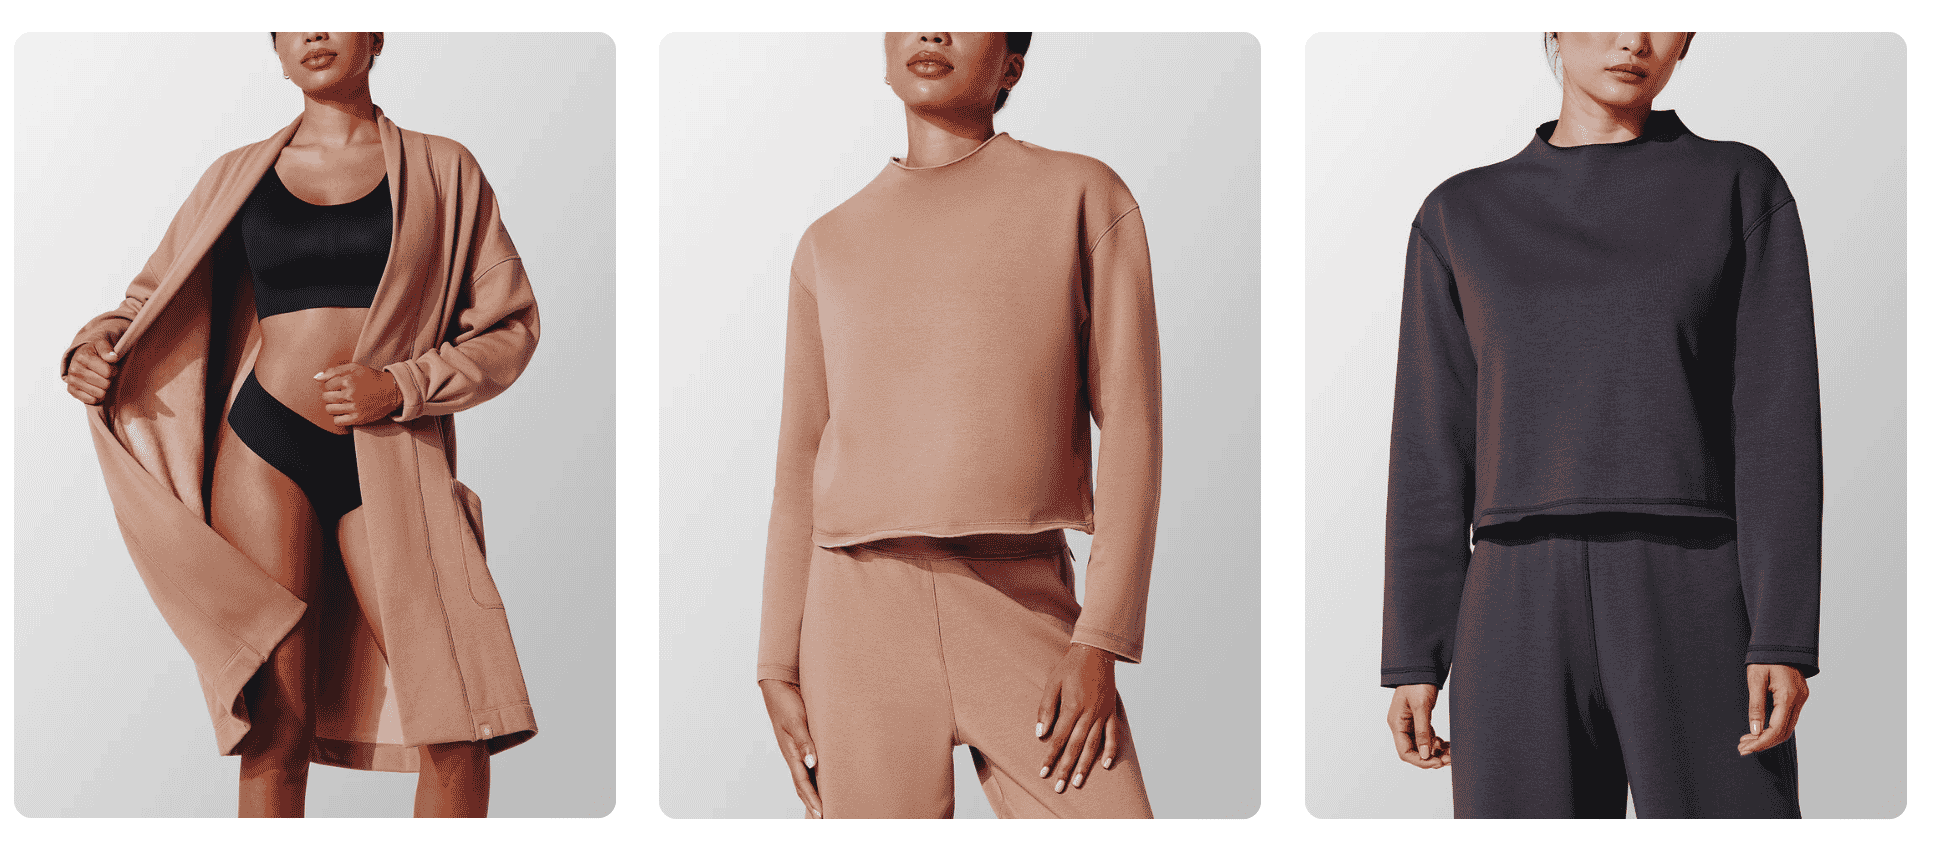
    Instead of using image editing to create color variants for its products, Third Love shoots custom photography for most of the variants. This creates a more lifelike effect that appeals to shoppers.

    6. SSENSE

    Street style black leather bag with pink plush charm and flowing skirt, alongside green satin bikini floating in pool water with ripples.

    Image source

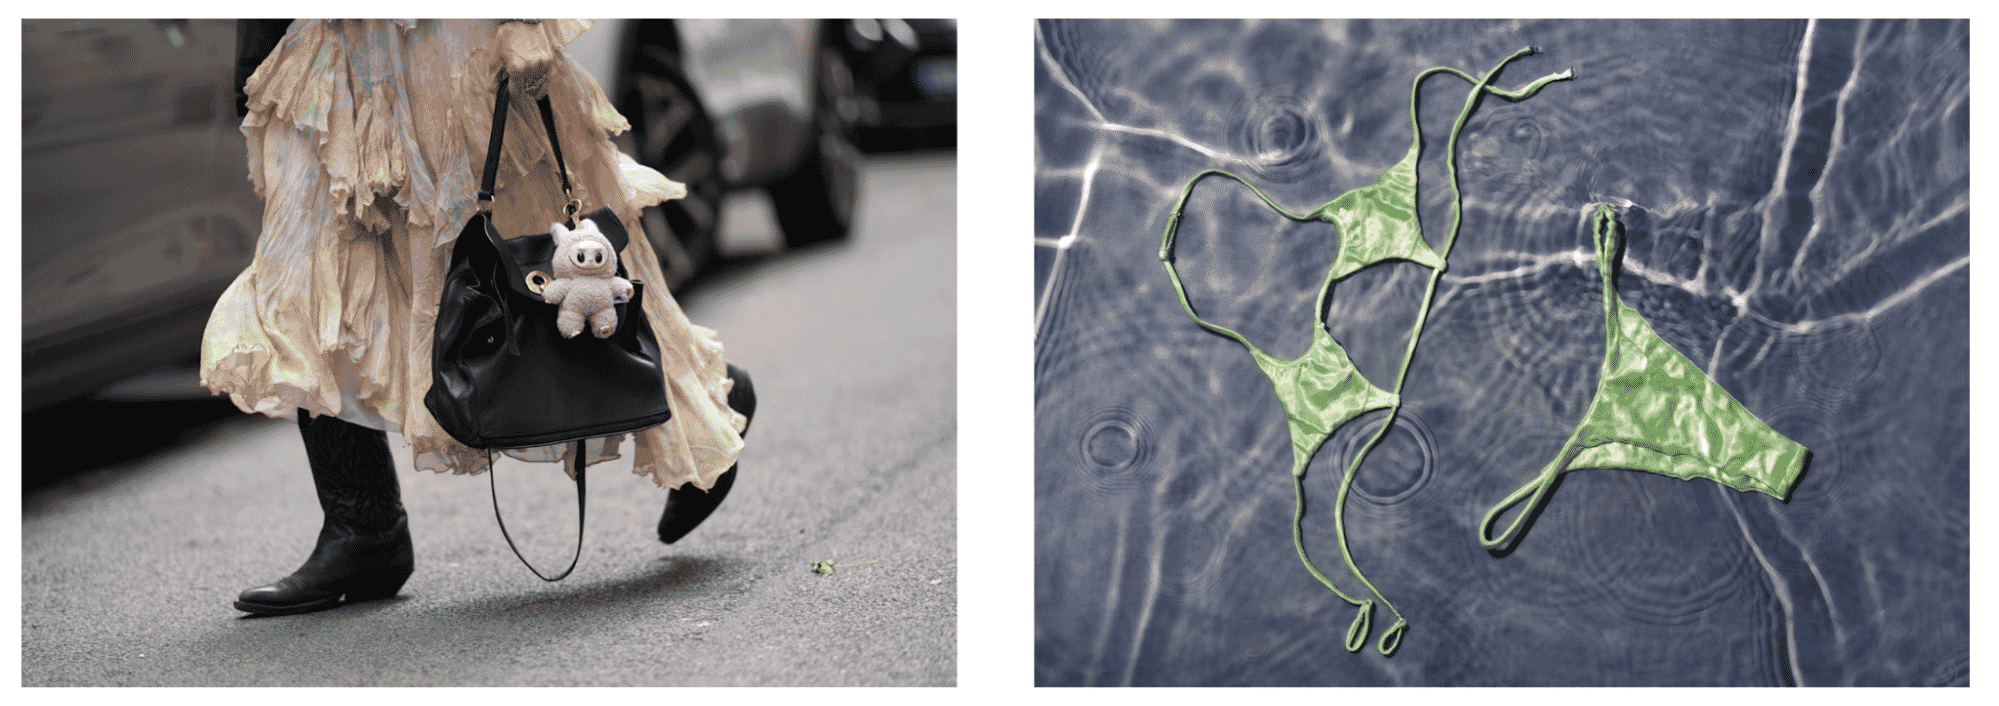
    This split-screen from SSENSE showcases the brand’s signature editorial-meets-ecommerce photography style—bold, artistic, and culturally tuned-in.

    A street-style inspired shot featuring a flowing, pastel-toned skirt, structured black bag, and plush accessory charm. The blurred background and candid motion capture personality, movement, and context—showing the product in the wild.

    The flat lay shows a green bikini submerged just below the surface of a rippling pool. The water distortion and sun reflections turn a simple product shot into an abstract composition. It’s aspirational, seasonal, and emotionally evocative—perfectly suited for a trend-forward audience.

    7. Coterie

    Close-up of Coterie baby diapers shown from front and back angles, highlighting soft texture, absorbent core, and comfort-fit design.

    Image source

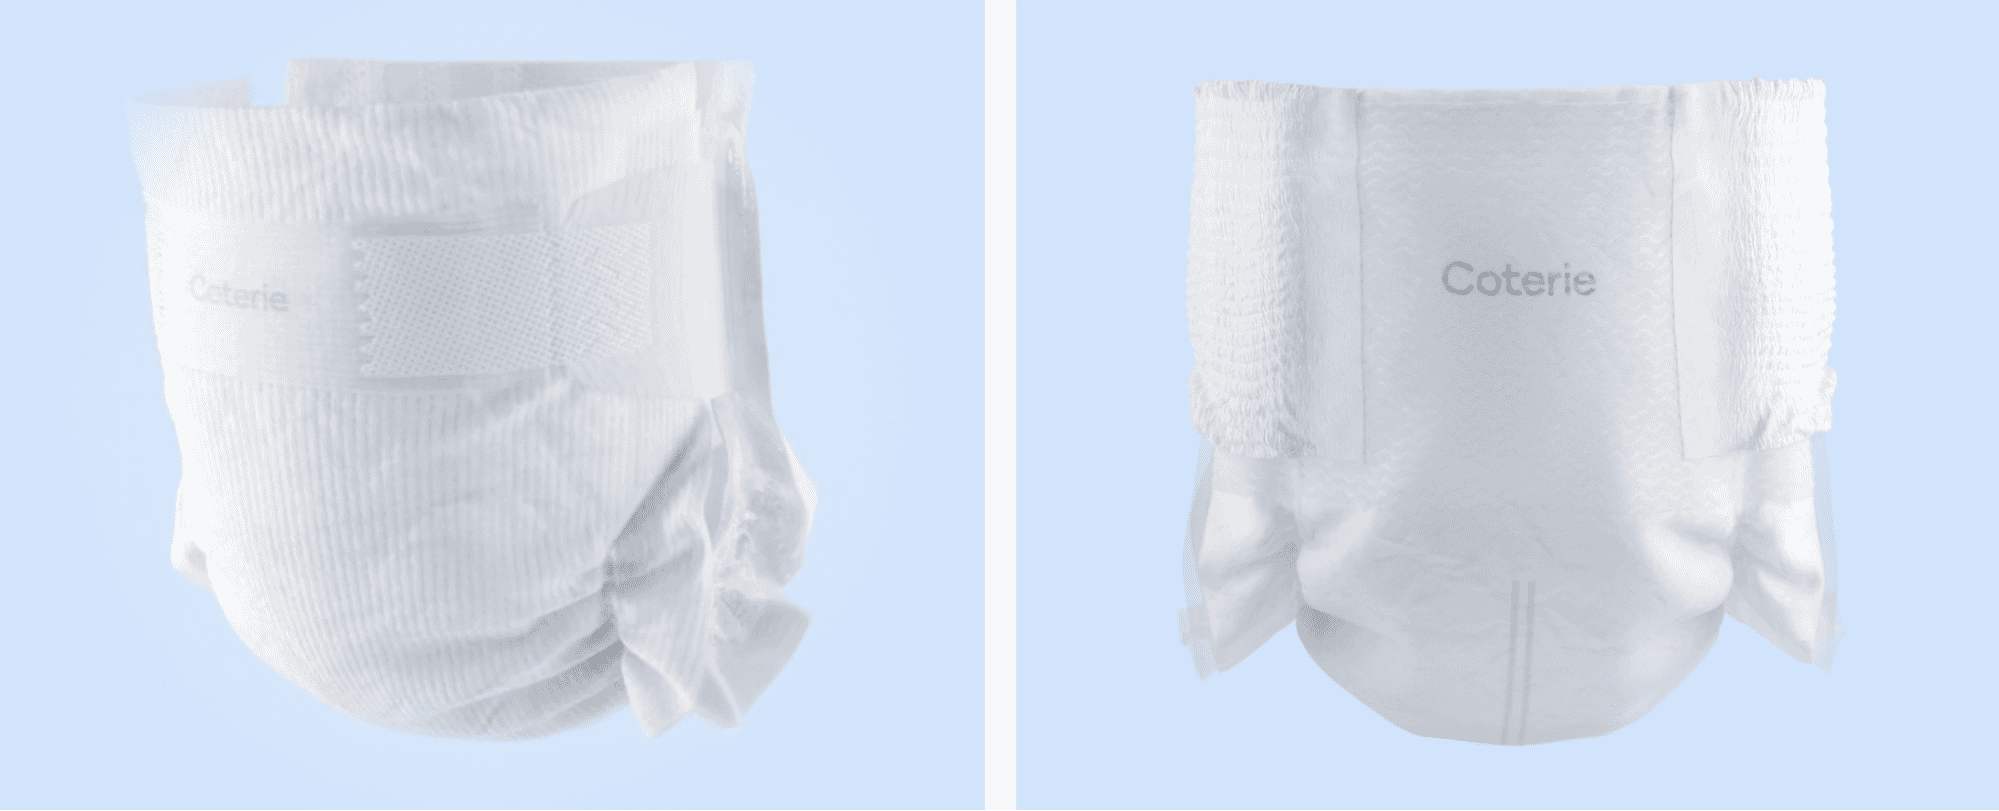
    These product photos from Coterie offer a clean, clinical, and elevated aesthetic that aligns with the brand’s premium baby care positioning. Shot against a soft, gradient blue background, the diapers are perfectly centered and isolated—creating a sterile but comforting environment that enhances product trust.

    What works well:

    • Perfect symmetry and clarity: Both the front and back views are shot with precision and balance, emphasizing shape, texture, and material. This symmetry helps customers understand fit and structure at a glance.
    • Soft, diffused lighting: Gentle lighting minimizes harsh shadows and ensures every detail of the diaper—such as the elastic bands, fabric texture, and wetness indicator—is clearly visible.
    • No distractions: The minimalist backdrop and absence of props keep the focus entirely on the product, reinforcing a sense of hygiene and quality.

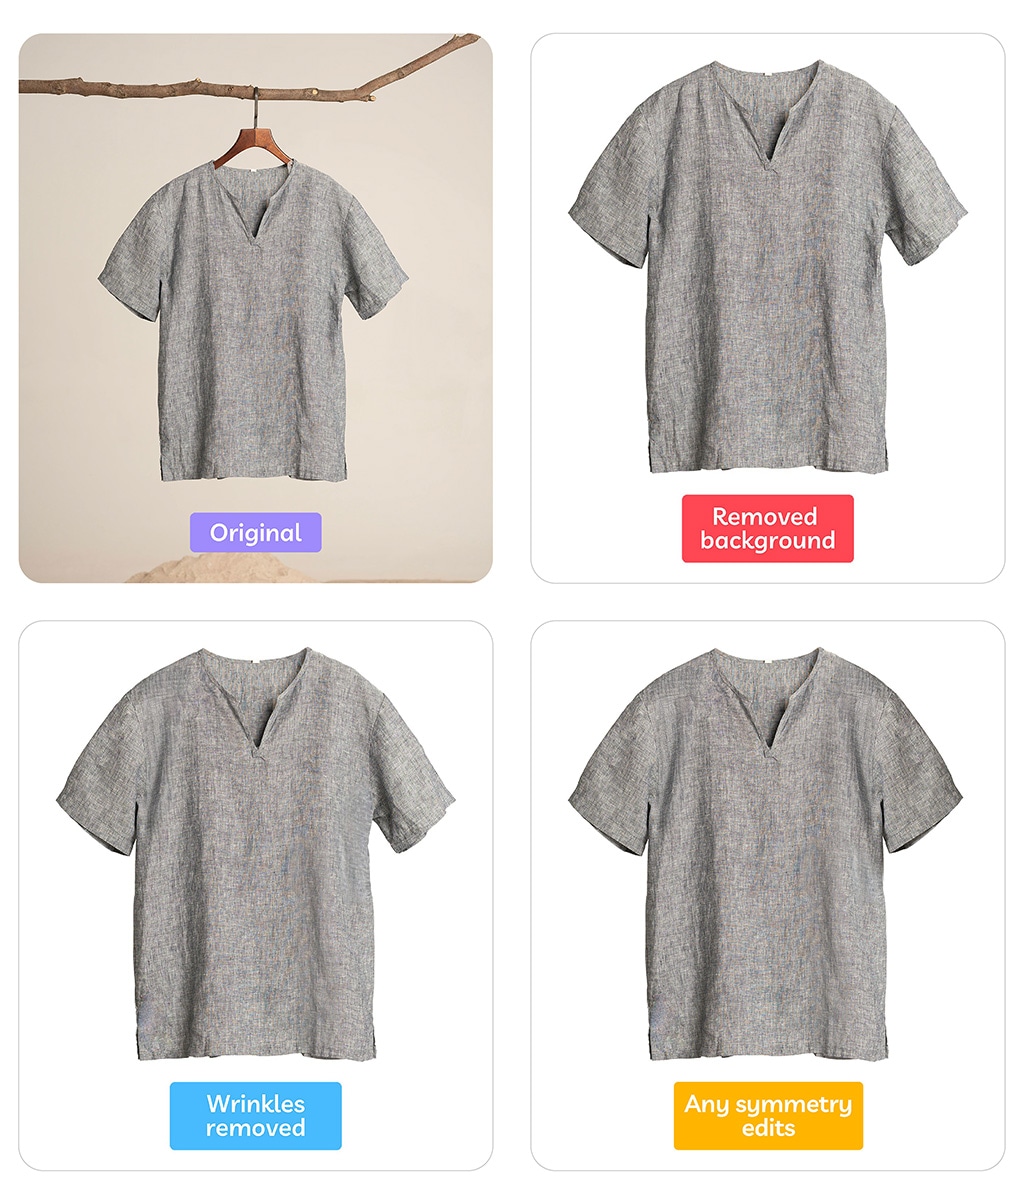
    🪞 Symmetry sells—especially in fashion. Learn how perfectly mirrored product photos boost conversions and trust.

    Jewelry 

    8. Deliqa Gems

    Assorted gemstone rings including pink, blue, and yellow stones with gold settings, featuring halo, solitaire, and multi-stone cluster designs.

    Image source

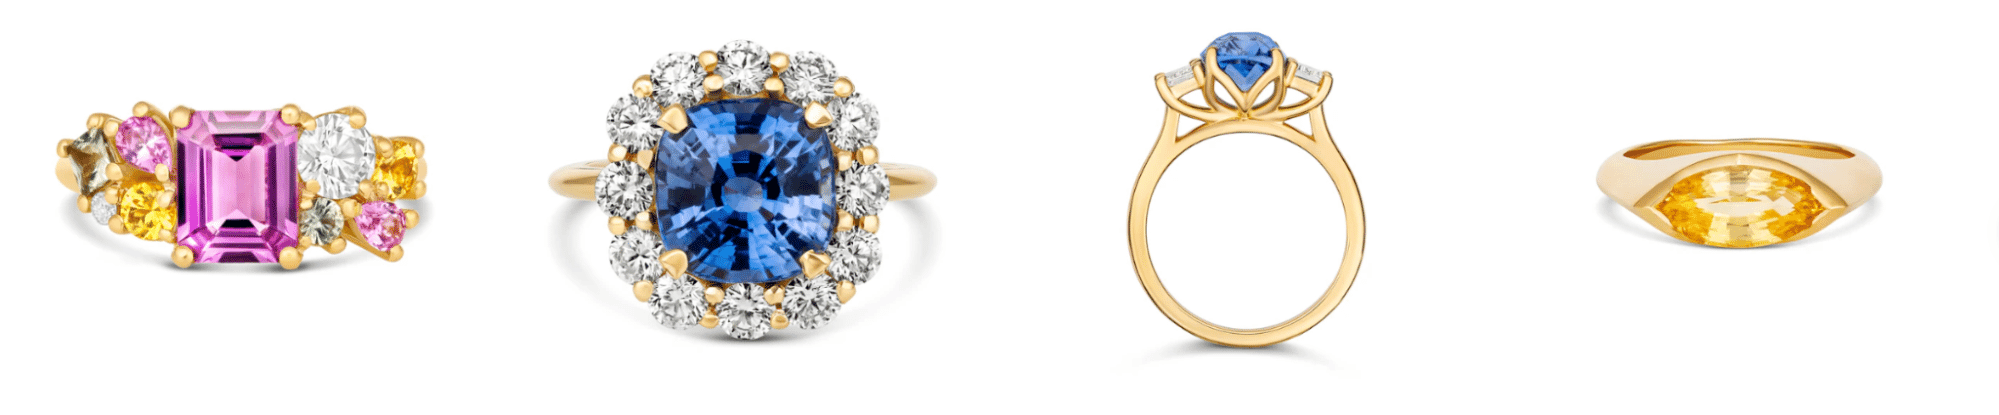
    Each ring is photographed against a seamless white background, allowing the viewer to focus solely on the craftsmanship, color, and cut. This is essential for high-conversion jewelry ecommerce.

    The lighting is soft but directional—eliminating harsh shadows while enhancing gemstone brilliance and gold luster. It’s especially effective for faceted stones, making them pop with fire and depth.

    Deliqa shows different angles—front, top-down, and profile views, giving online shoppers a true-to-life sense of scale and form, mimicking an in-store experience.

    Retouching is used judiciously: reflections are polished, shadows are uniform, and every gem is color-corrected for maximum vibrancy.

    9. Electric Picks

    Delicate and modern gold jewelry featuring a smooth pendant necklace, sculptural earrings, and a minimalist drop necklace with gemstone accents.

    Image source

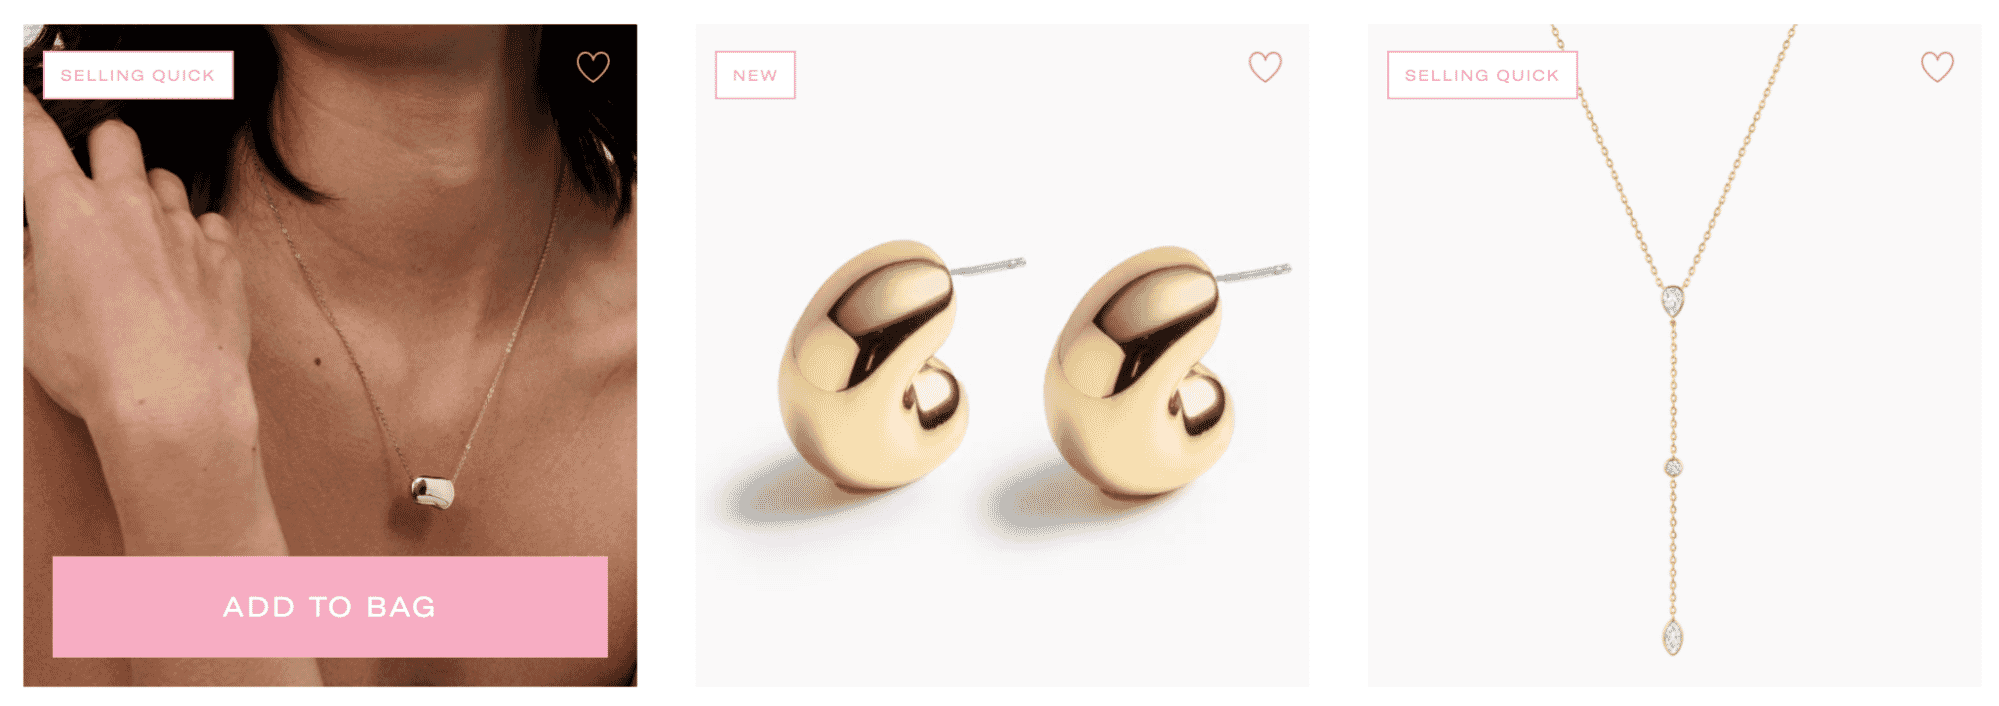
    Electric Picks’s jewelry product photography strikes a perfect balance between lifestyle and studio shots—an ideal approach for modern ecommerce. The left image shows the necklace worn on a model, adding context, warmth, and emotional appeal. The other two are clean studio shots that focus on detail and form. This blend helps shoppers envision the item both in real life and up close.

    All three images use natural-looking, diffused light that avoids harsh reflections (a must for shiny metals like gold). The earrings in particular benefit from soft-edged shadows that give them dimension without distraction.

    10. ROEN

    Elegant gold engagement rings with natural and lab-grown diamonds, including solitaire, pear-cut, and marquise settings, styled and close-up on hand.

    Image source 

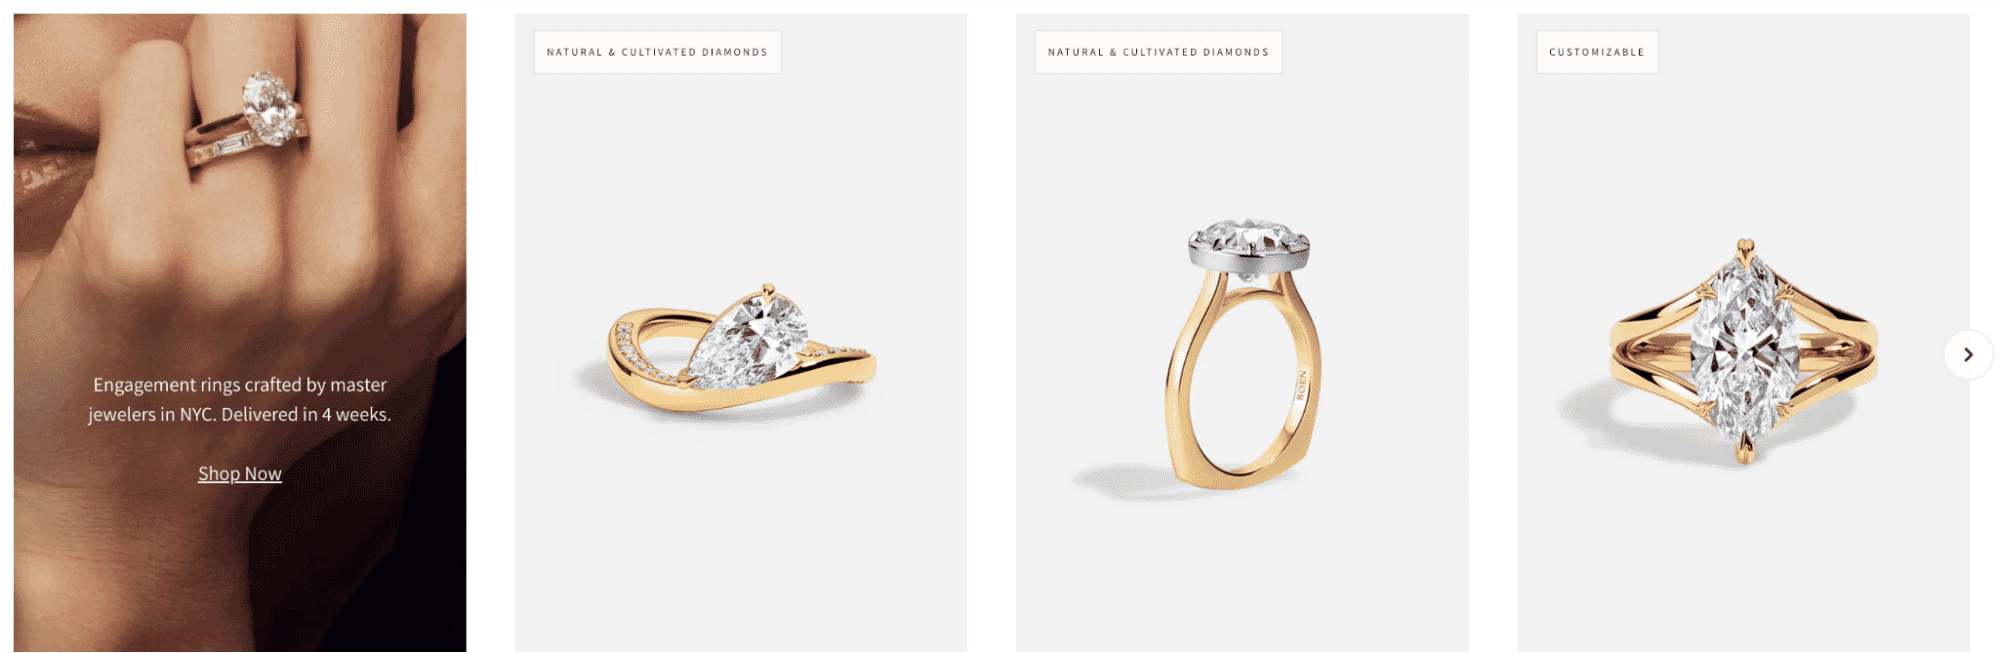
    ROEN’s jewelry photography example delivers a premium, high-end aesthetic that aligns with luxury engagement ring shopping—balancing emotion, clarity, and craftsmanship.

    The leftmost image shows the product on a hand in warm, soft lighting, immediately evoking romance, elegance, and aspiration. It adds emotional weight to the otherwise clinical product lineup.

    The remaining three images showcase the rings against clean, light-gray backdrops with subtle shadows that lift the products off the page. Each shot is expertly lit to maximize sparkle, metal luster, and form—especially in the center stone.

    Side views, angled shots, and direct front views all help customers evaluate details like band thickness, setting style, and stone cut. 

    11. Susan Alexandra

    Small tan dog on a rainbow beaded leash alongside a matching orange beaded dog toy, sitting on a city sidewalk in bright sunlight.

    Image source 

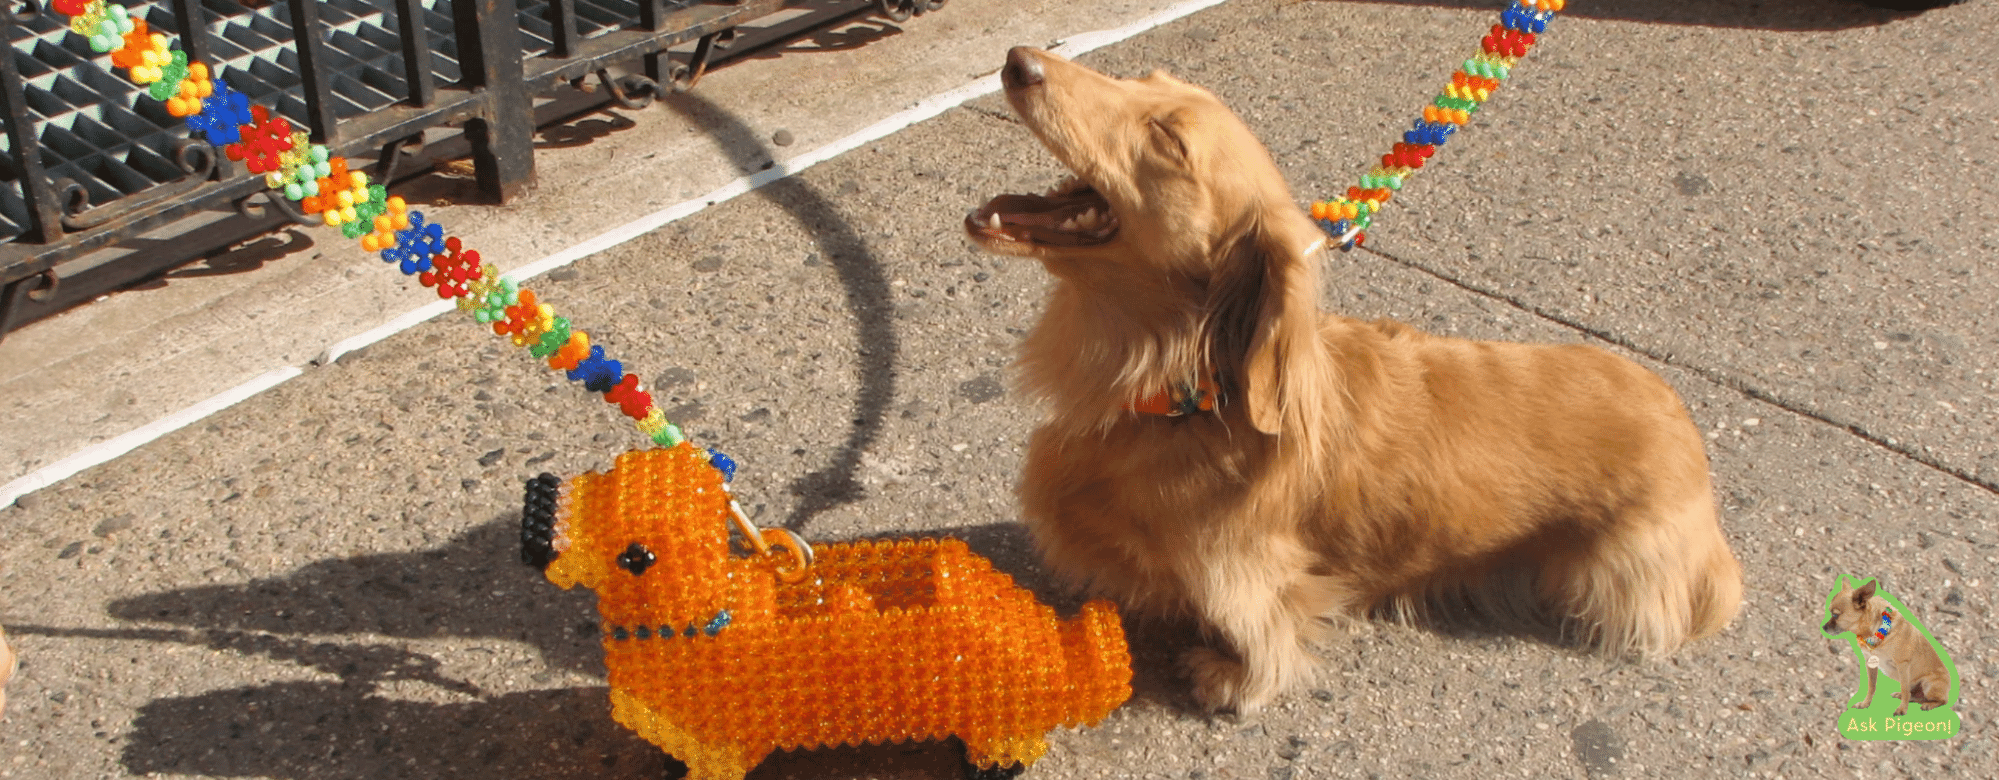
    This playful product photo brilliantly blends creativity and humor to showcase a beaded dog leash set. The real dachshund and its beaded twin—linked by matching rainbow leashes—instantly grab attention and make the image unforgettable.

    This image is a strong example of how injecting personality and playfulness into product photography can make a brand stand out—especially for fun accessories.
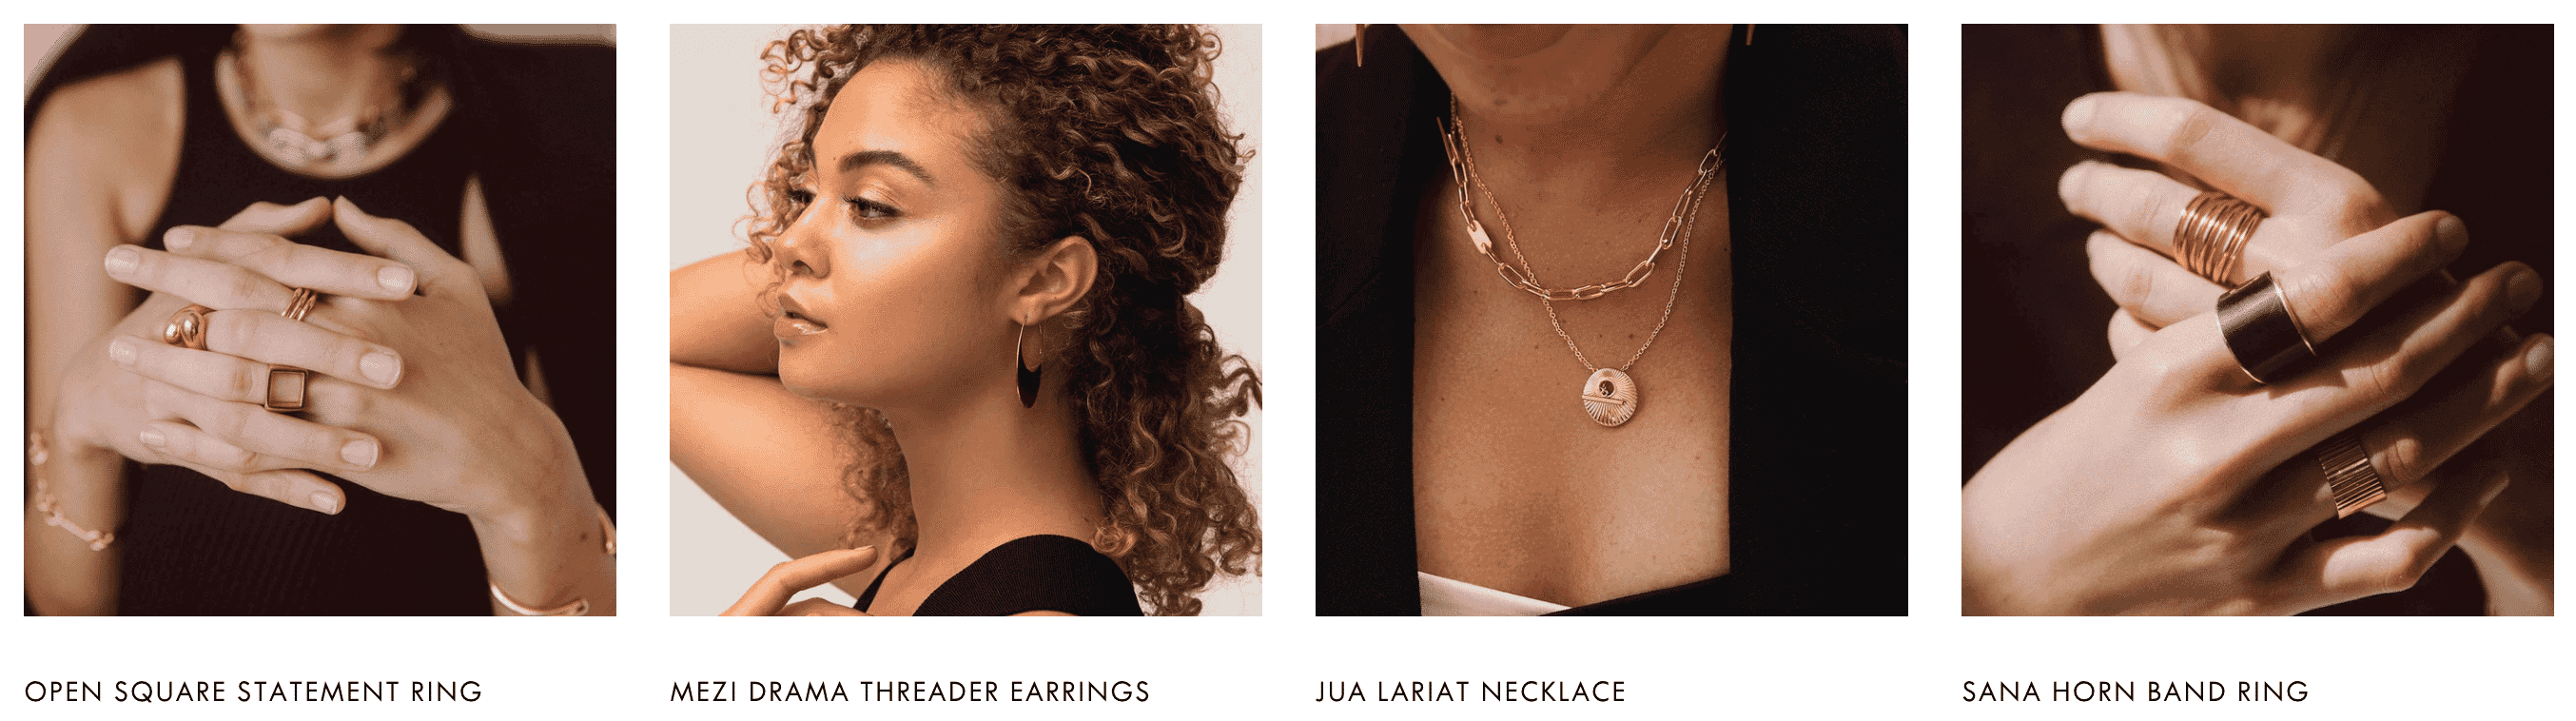
    12. OUTOFOFFICE

    Close-up shots of contemporary gold and silver jewelry including hoop earrings, chunky rings, a statement chain necklace, and multi-stone ear cuffs.

    Image source 

    This set of product photos uses clean styling and close-up detail to showcase modern jewelry in a minimal, elevated way. Each frame focuses on a different piece—earrings, rings, bracelets, and necklaces—while keeping the background simple and distraction-free.

    This style is ideal for luxury, designer, or minimalist brands that want to convey sophistication and clarity in their product presentation.

    13. Jewels & Aces

    Close-up of pierced ears showcasing dainty gold chain earrings and studs with diamonds and baguette-cut stones, styled in minimalist fashion.

    Image source 

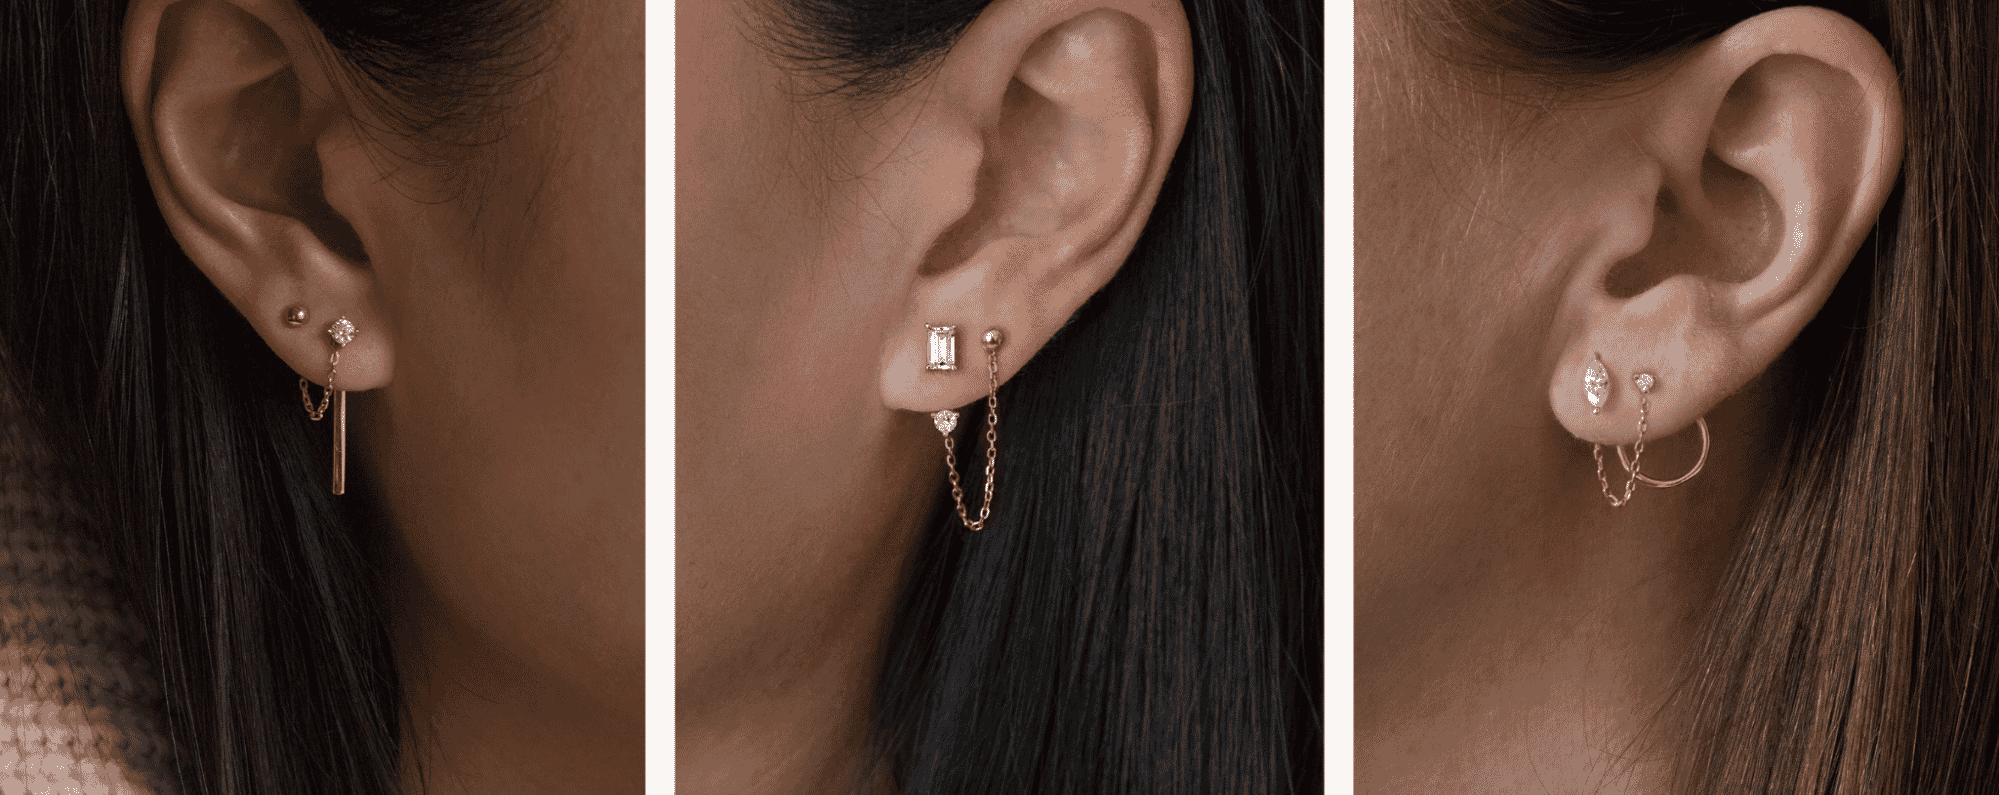
    This series of close-up earring shots exemplifies how subtle styling and soft lighting can elevate small, intricate jewelry. Each image highlights a layered ear stack featuring dainty gold chains and diamonds, worn in unique yet coordinated pairings.

    Here’s what we like: 

    • Warm, natural light: The lighting enhances the gold tones and gemstone sparkle without harsh shadows.
    • Tight framing: Zoomed-in ear shots keep the focus on detail, allowing customers to see how each piece fits and drapes.
    • Consistent tone: The cohesive color palette and similar poses across models create a polished, trustworthy brand image.

    💍 Want your jewelry shots to sparkle like ROEN or Electric Picks? Learn the secret techniques for high-converting images in our expert guide: How to Edit Jewelry Product Photos Like a Pro

    14. Glasses Direct

    Eyeglass size guide showing how to find frame measurements—lens diameter, bridge width, and arm length—on the inner temple of glasses.

    Image source

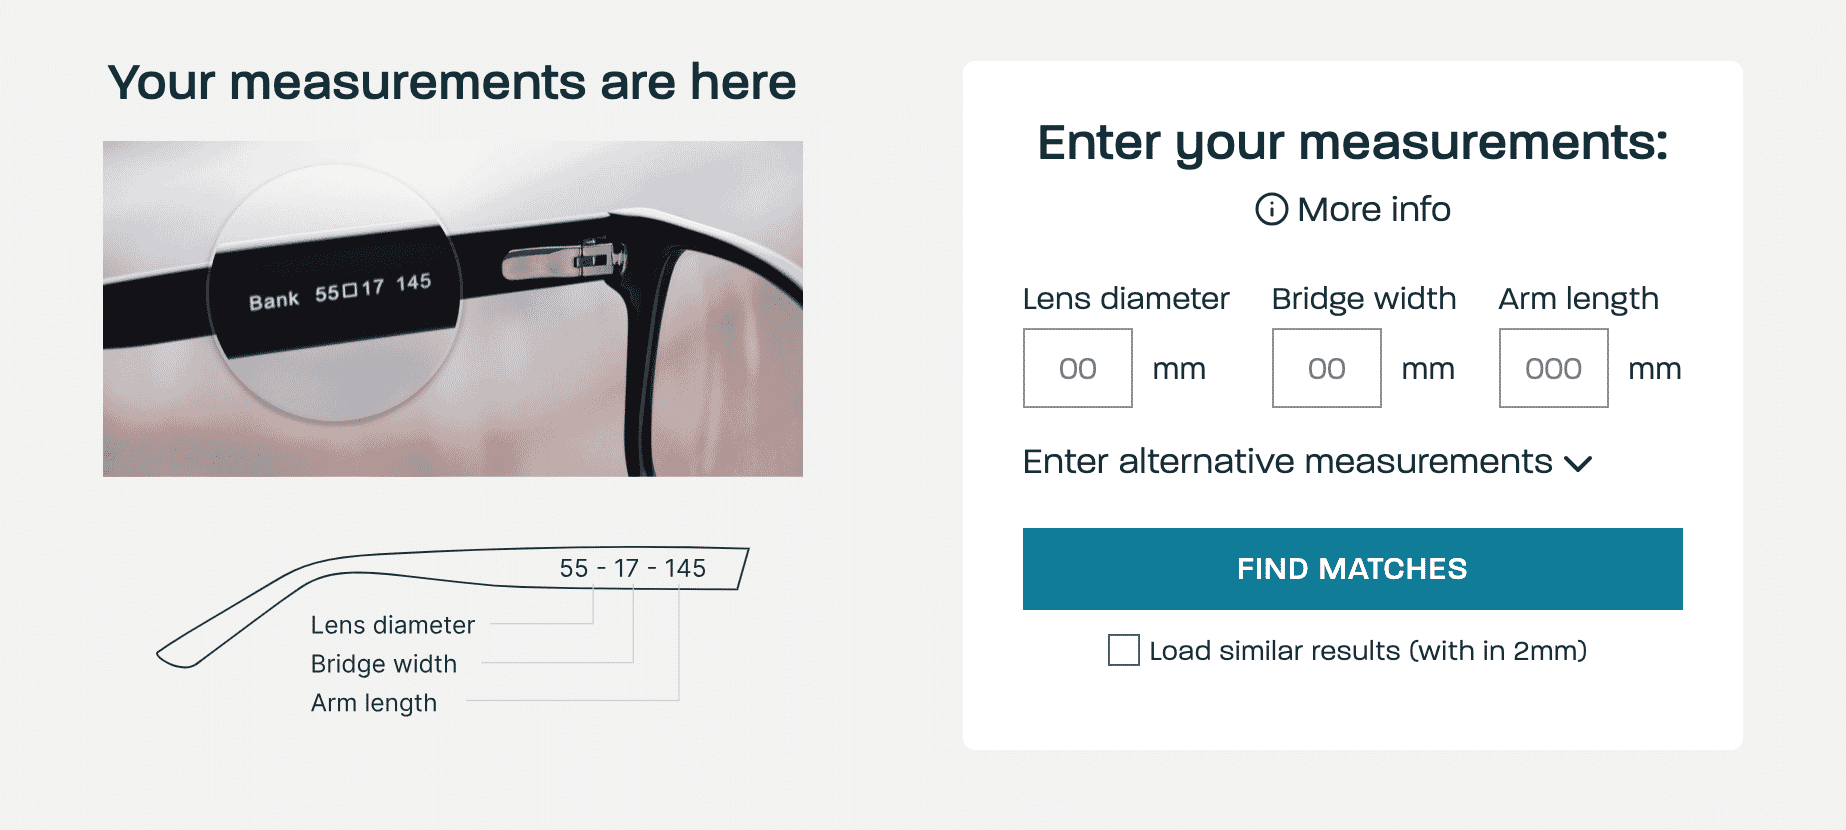
    While Glasses Direct has straightforward yet beautiful white background product photos, supporting visuals round out the impact for potential customers. Illustrations that outline dimensions help shoppers estimate how the frames would fit on their own faces.
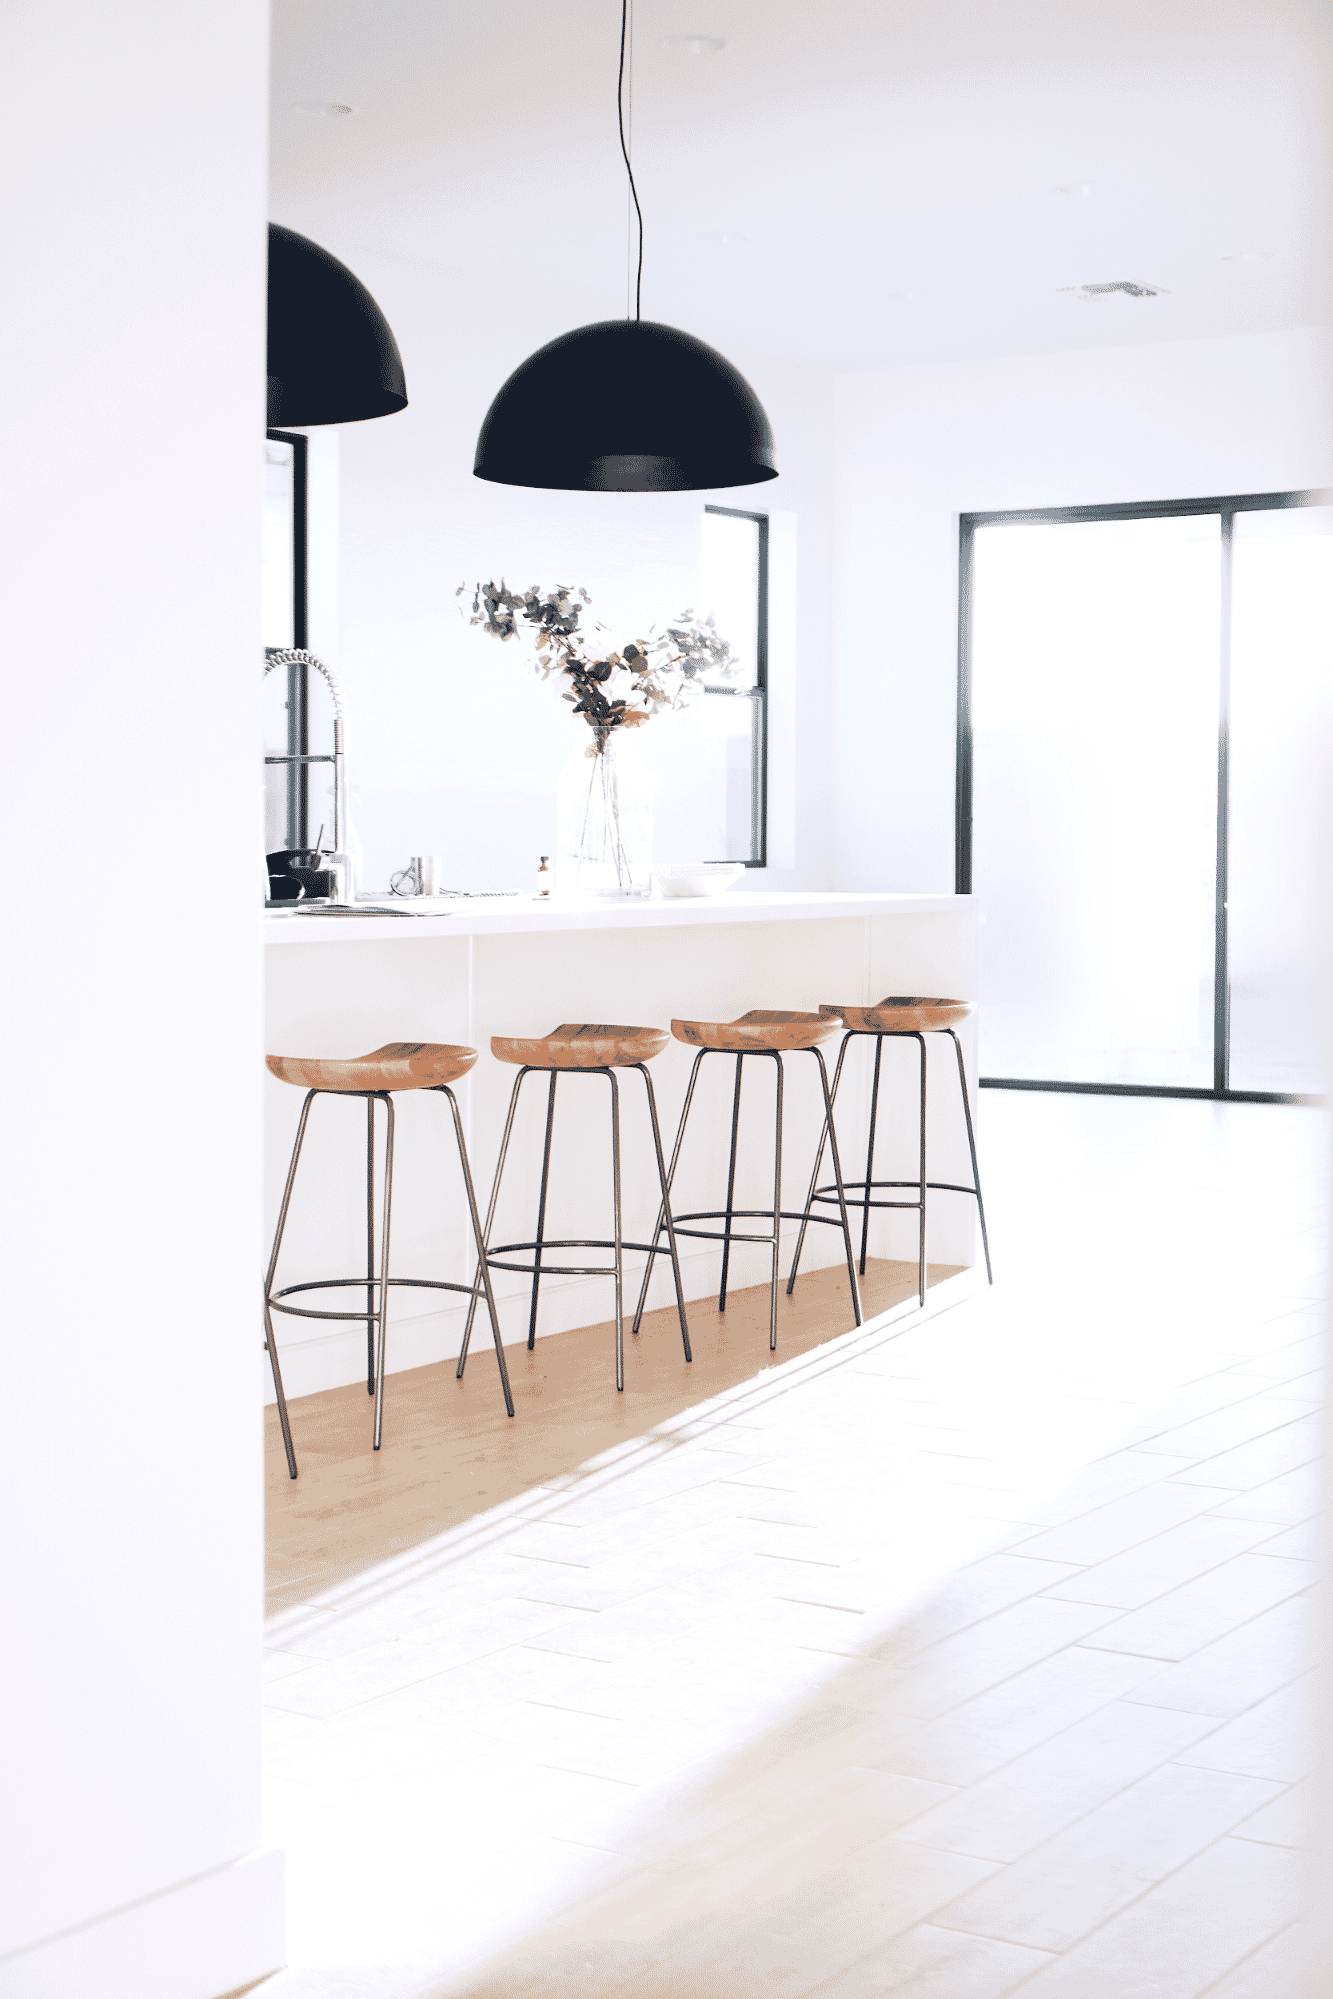
    15. hardgraft

    Premium men’s accessories including a charcoal dopp kit set, black leather holdall, tan suede sneakers, and a cocoa wool pencil wrap.

    Image source

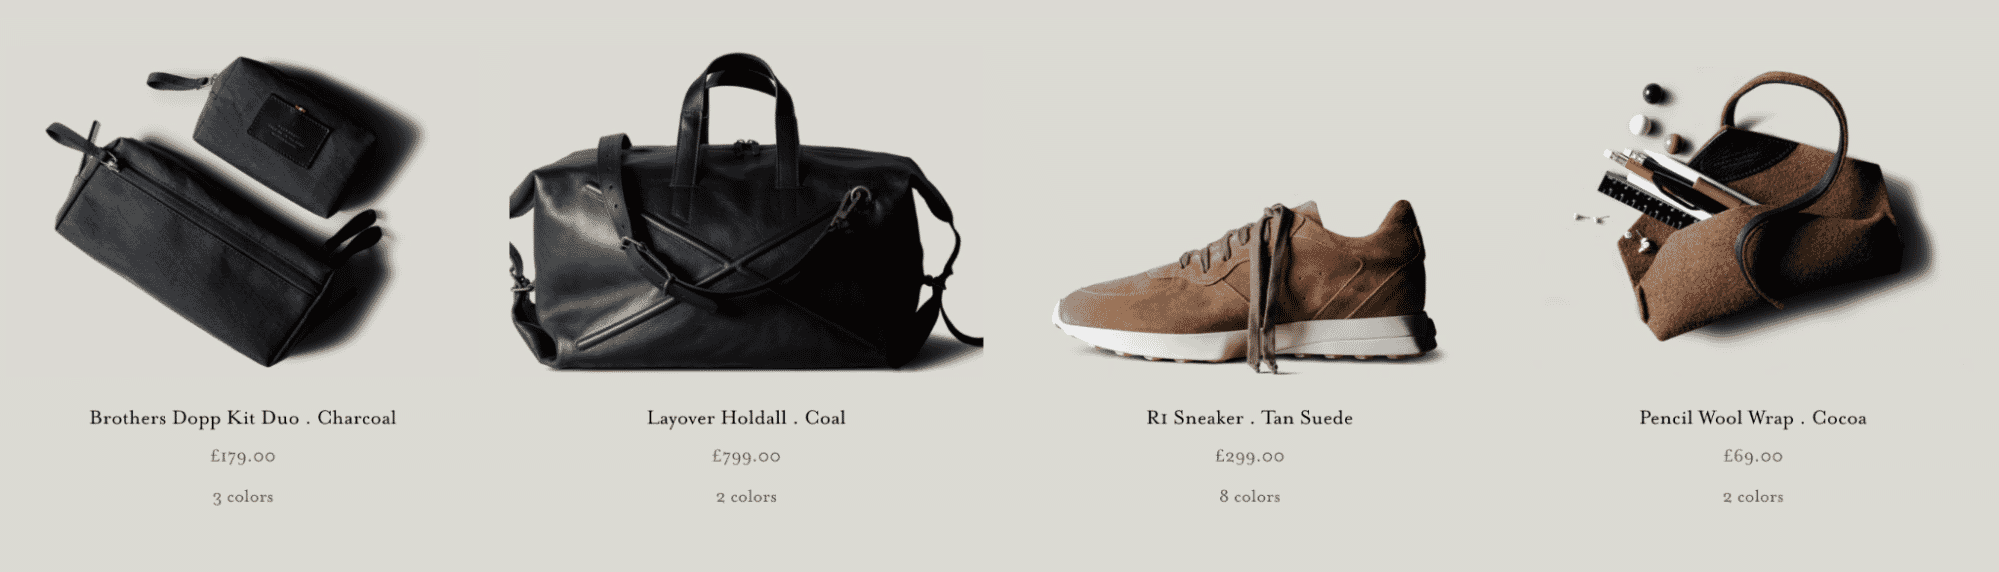
    With a muted, desaturated palette and soft directional lighting, each item is photographed with studio precision against a neutral background. hardgraft’s deliberate use of shadows adds depth and dimension without distraction, allowing the tactile richness of suede, leather, and wool to take center stage. 

    The styling is minimal but intentional—products are cleanly isolated yet carry subtle lifestyle cues, like an unzipped kit or a pencil-stuffed wrap. This clean and cohesive look highlights craftsmanship and quality, appealing to discerning customers who appreciate quiet sophistication.

    16. Mulberry

    Fashion editorial featuring women outdoors wearing colorful knitwear and carrying designer handbags including a tan crossbody and burgundy leather tote.

    Image source

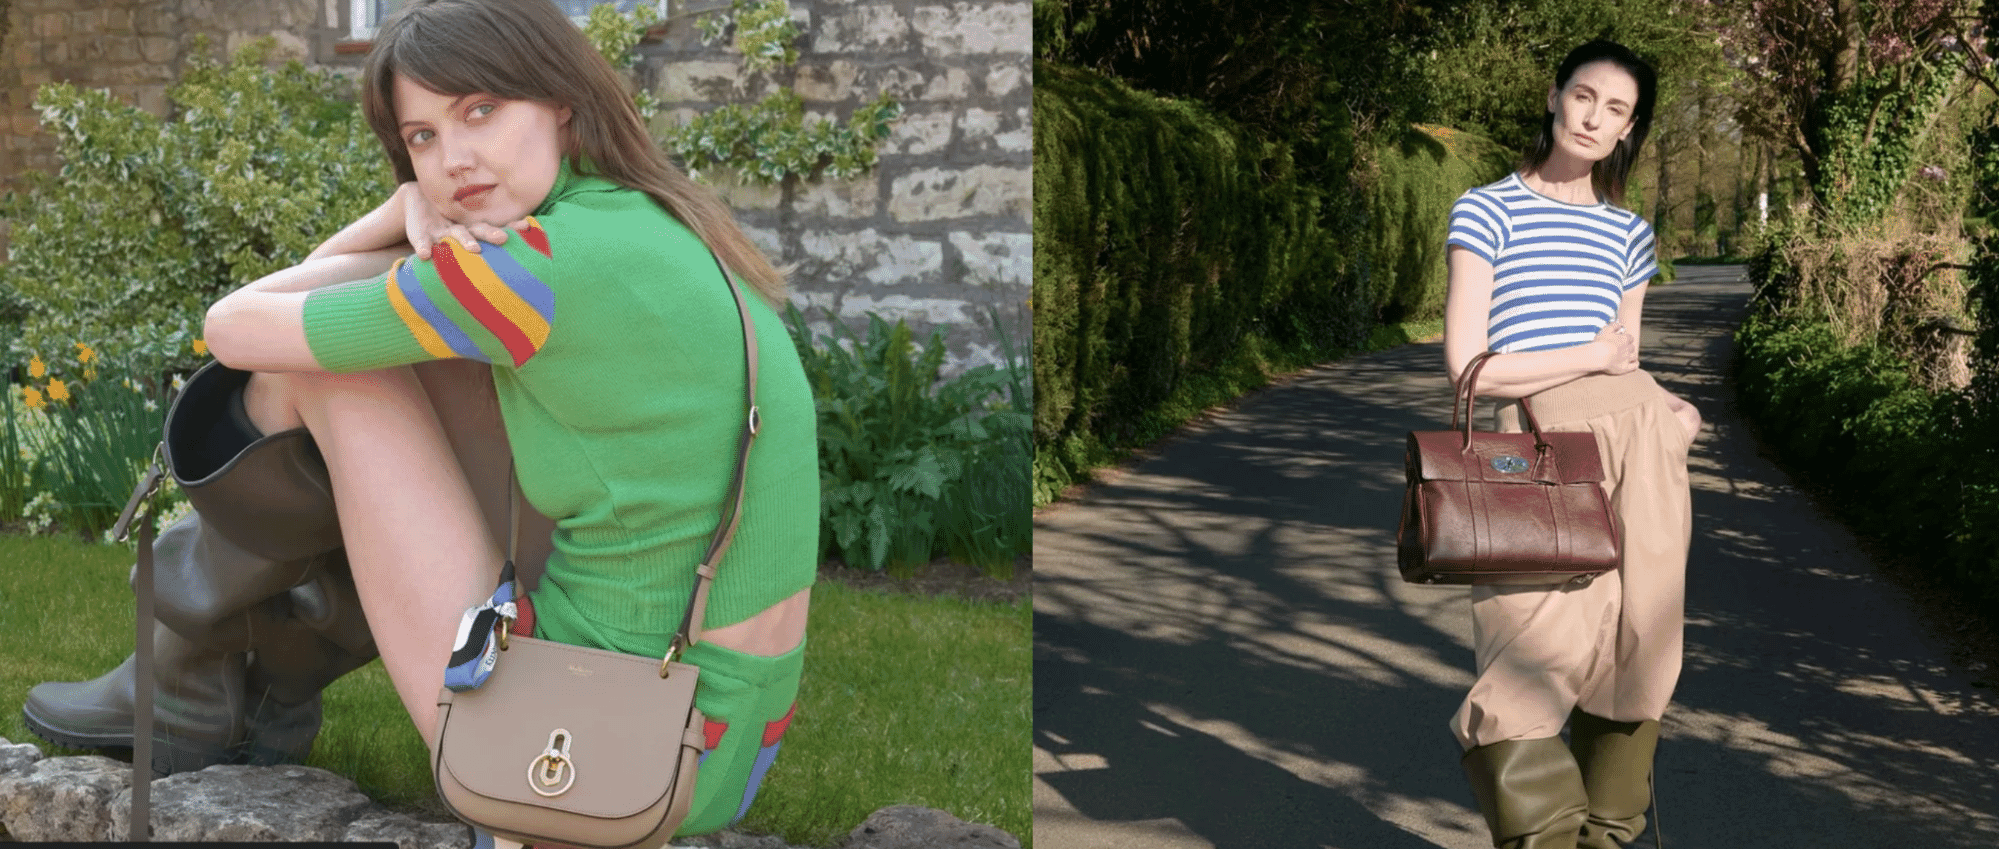
    This campaign showcases handbags in vibrant, outdoor settings that feel both editorial and approachable. Rather than sterile studio shots, these lifestyle images embed the bags into real-world fashion moments—making them feel aspirational yet accessible.

    Each look is styled to suggest a narrative—countryside strolls, spring fashion—adding depth and relatability to the product. Shooting outdoors brings out texture and color in the bags, while the blooming florals and tree-lined road evoke seasonal charm. Bold outfits and confident poses draw attention, but the handbags remain the focal point, always held prominently and clearly lit.
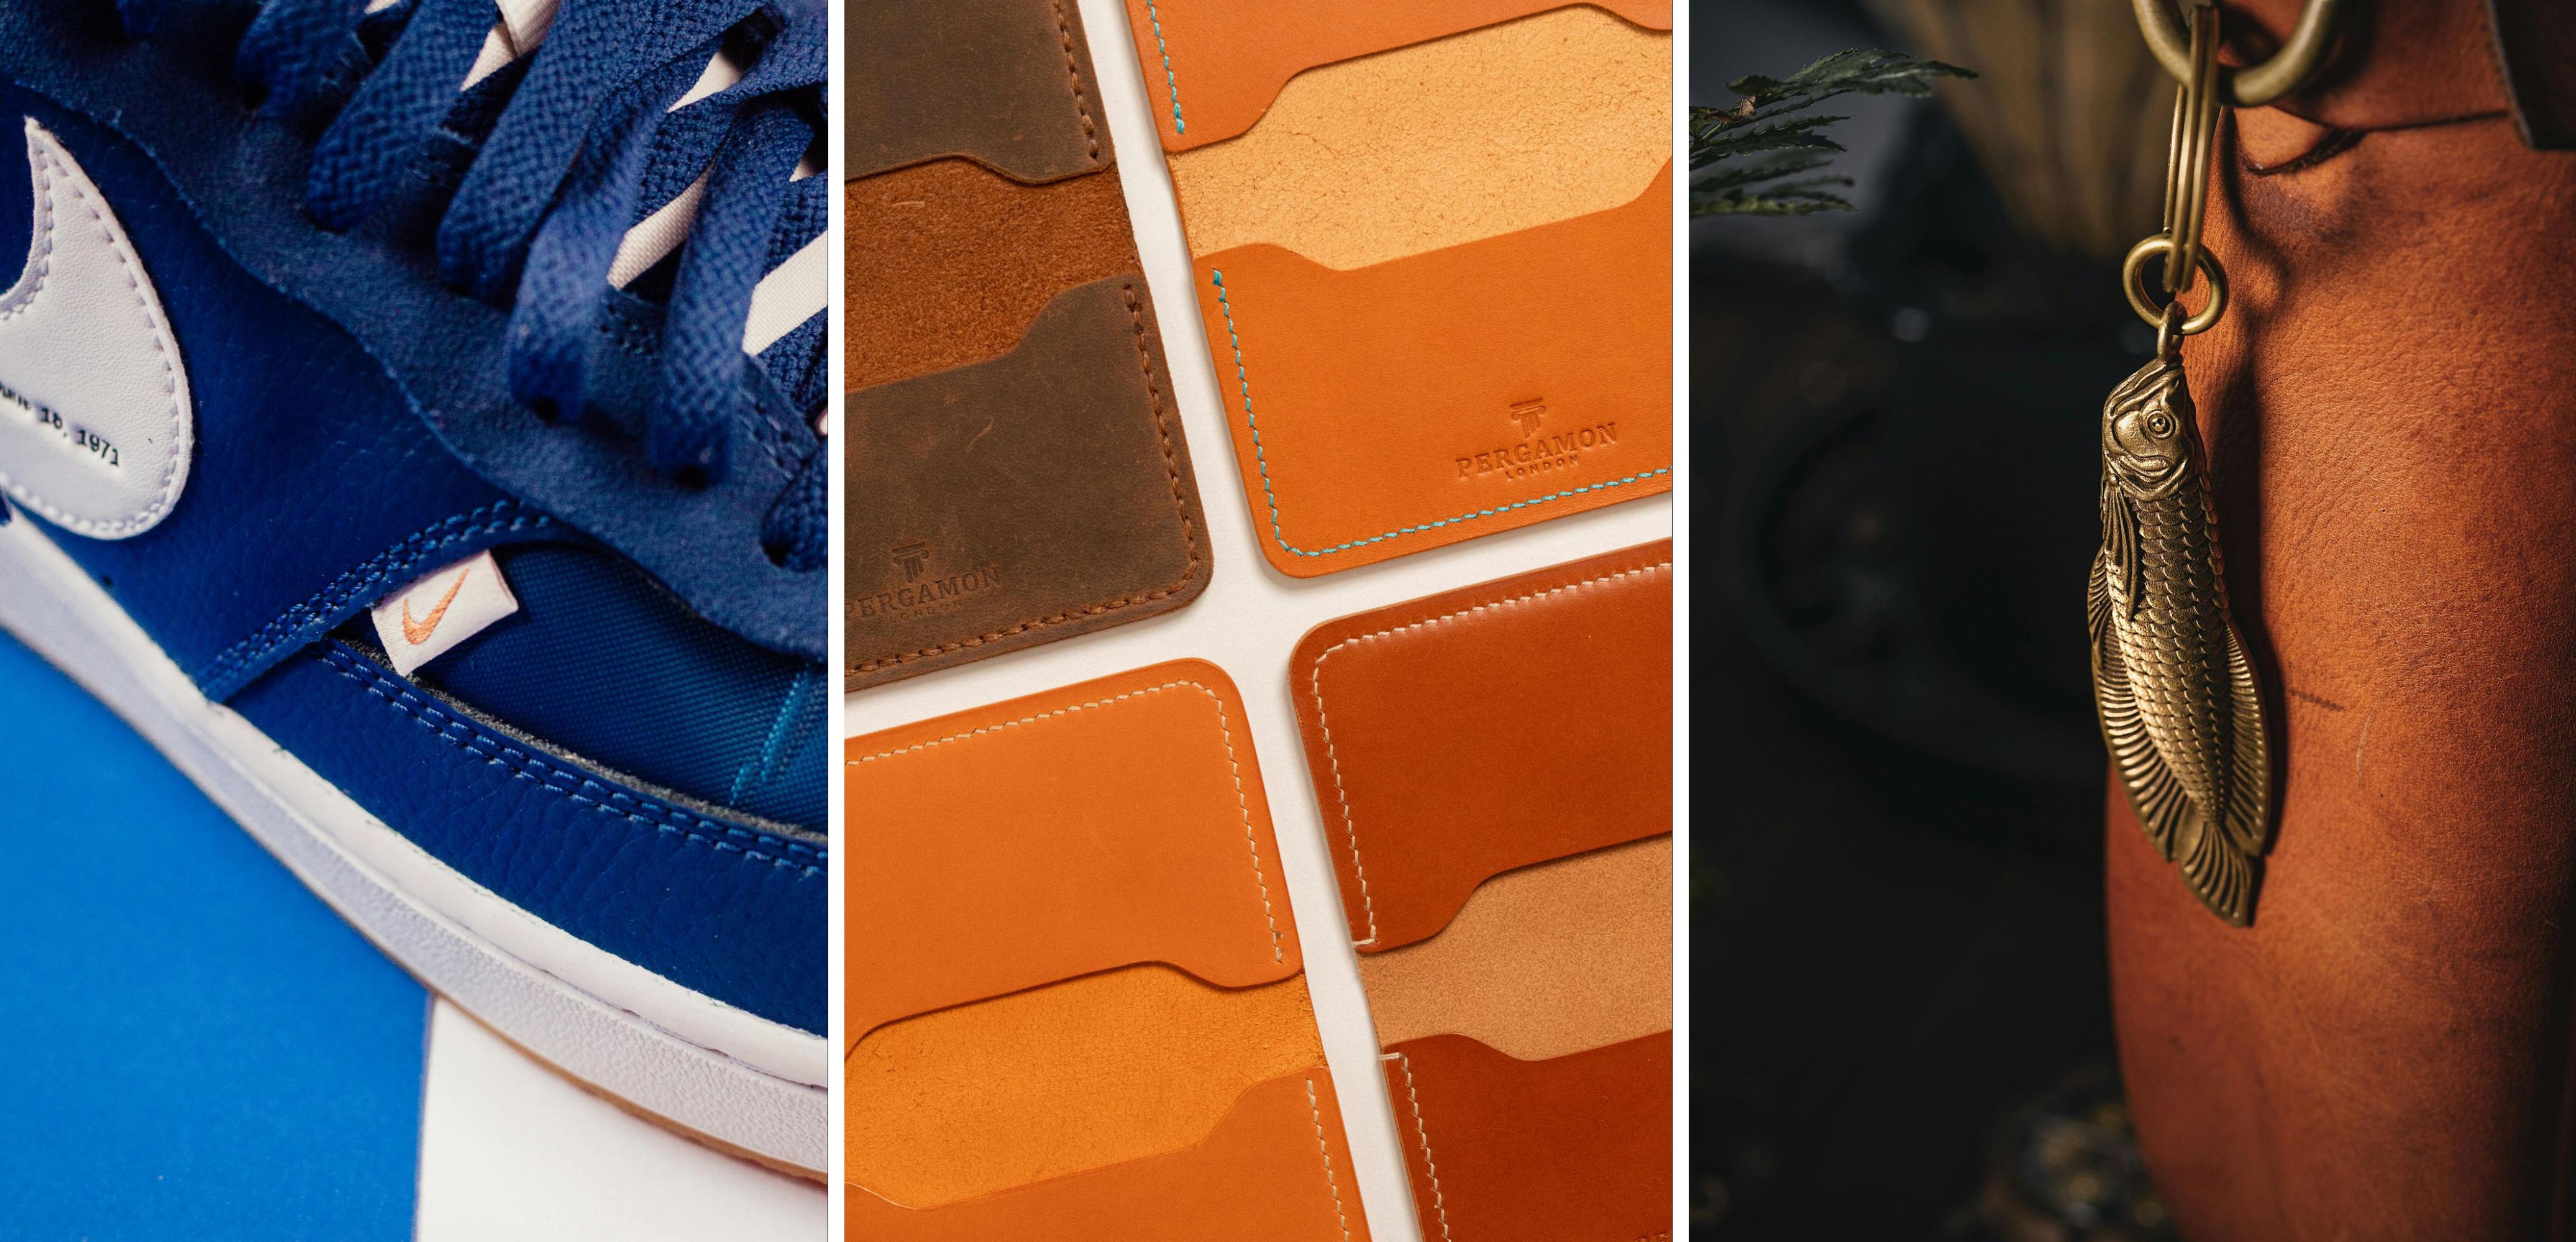
    17. Birkenstock

    Birkenstock summer footwear including slip-on sandals and sneakers in various colors and materials, shown in outdoor lifestyle and studio settings.

    Image source

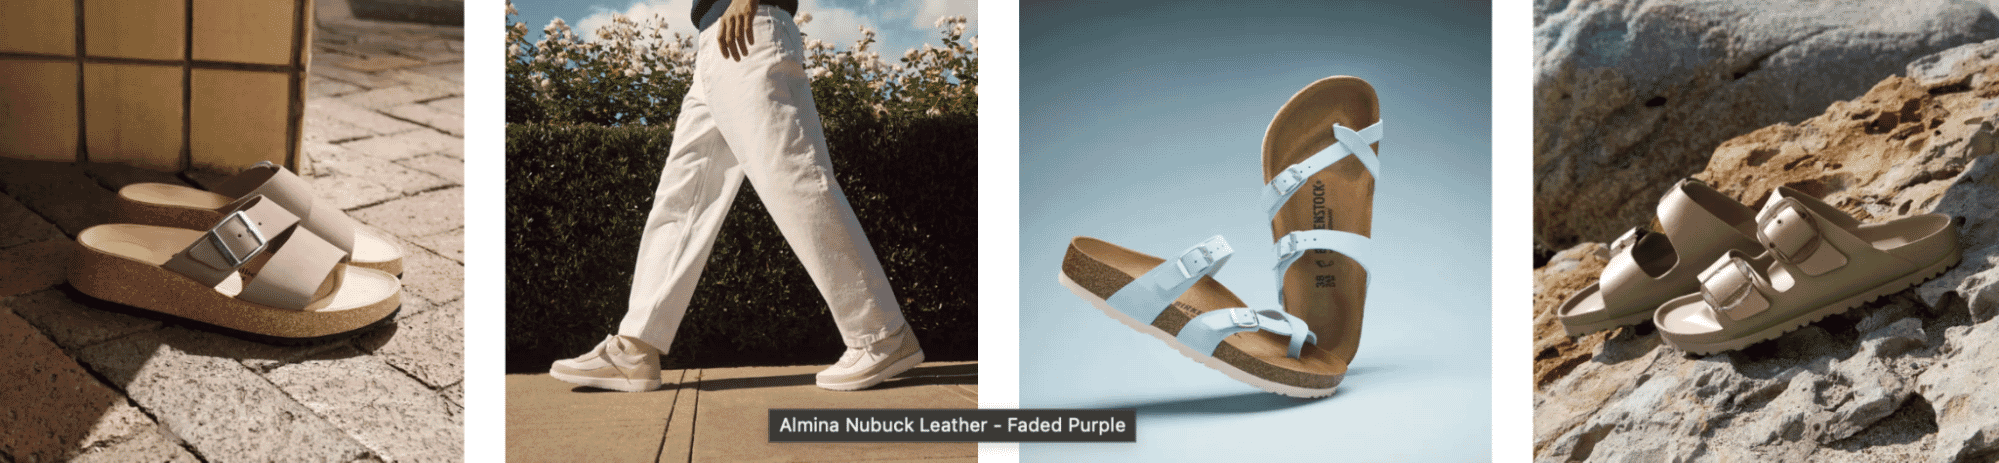
    Birkenstock’s product photography strikes a balance between lifestyle and studio visuals. From sun-drenched sidewalk shots to clean, floating product images, each photo highlights the brand’s signature comfort and craftsmanship. The use of natural textures—brick, stone, and foliage—adds warmth and tactility, making the sandals feel at home in any setting. 

    Meanwhile, crisp lighting and soft shadows emphasize material quality, like nubuck leather and contoured cork soles. Their floating product shot, set against a cool gradient background, draws the eye to every strap and buckle with sculptural clarity. Birkenstock’s visuals are proof that even casual footwear can look iconic with the right photography.
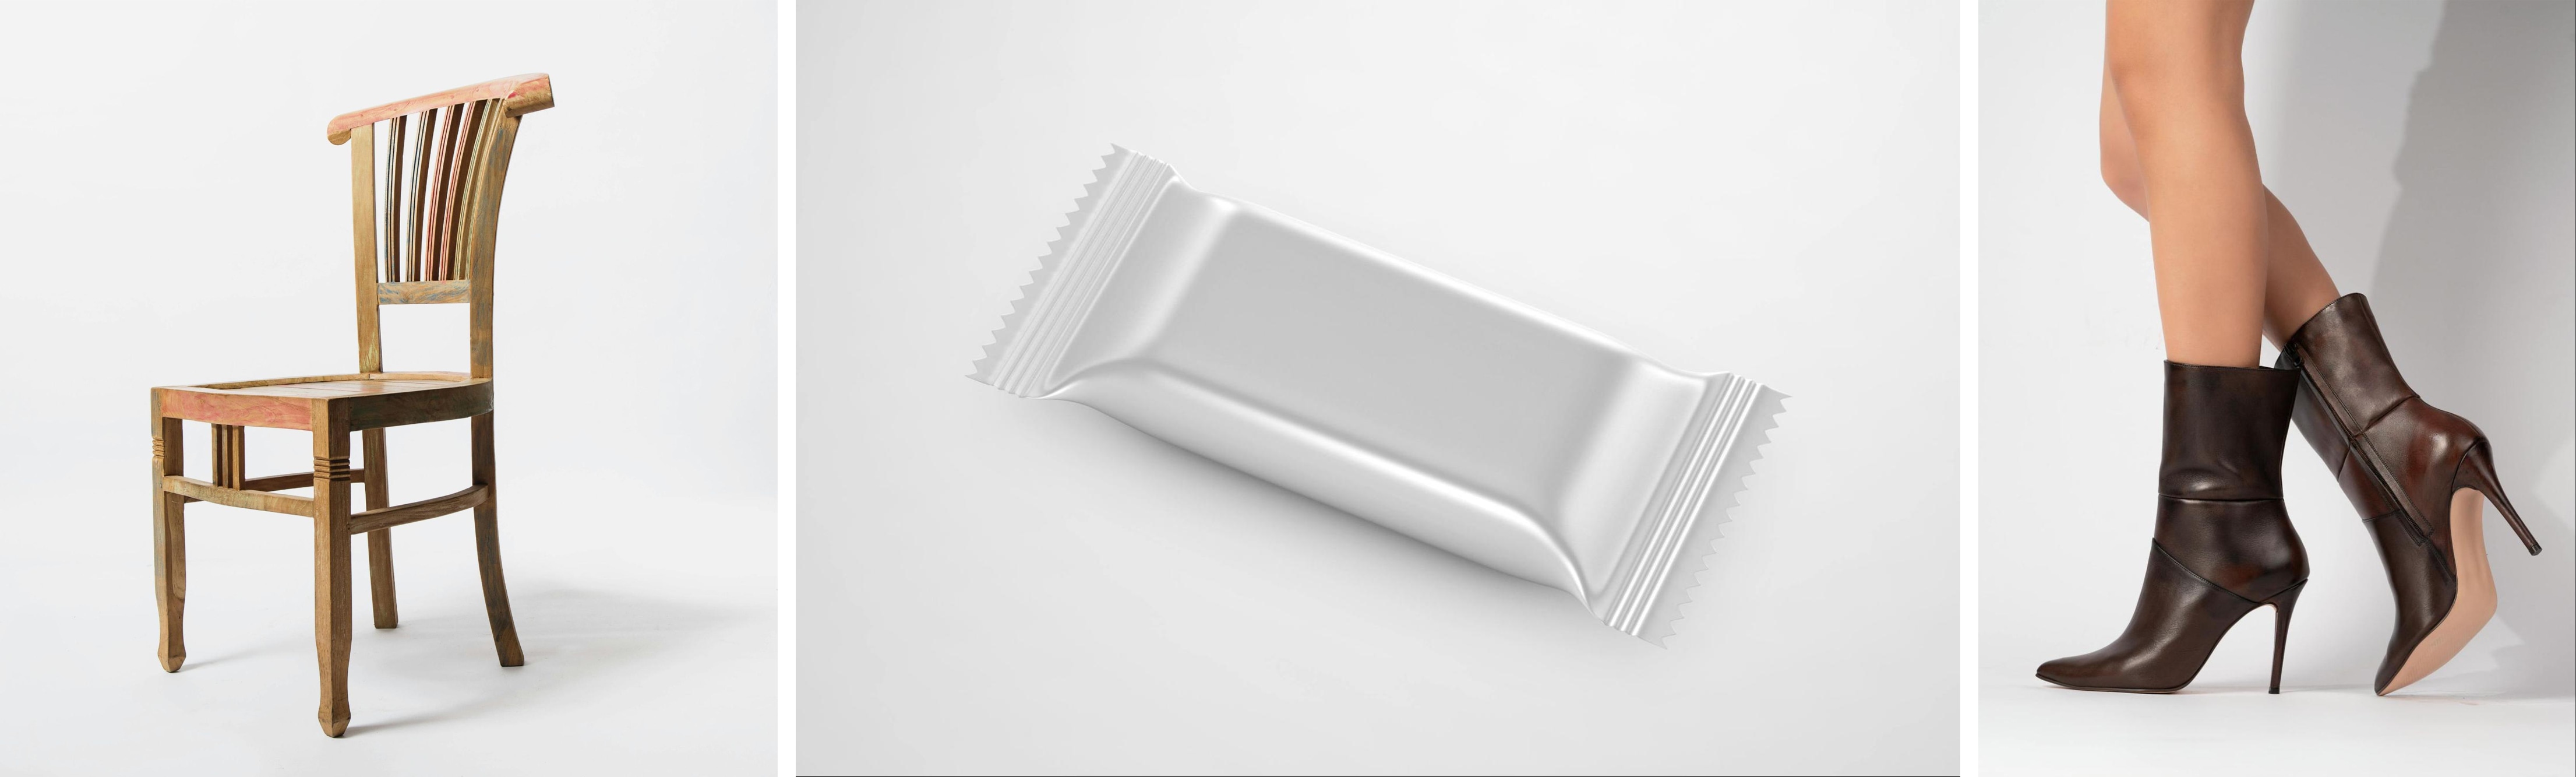
    18. Chalo

    Artisan leather footwear collection including brown and black boots, close-ups of stitching details, and traditional craftsmanship process.

    Image source 

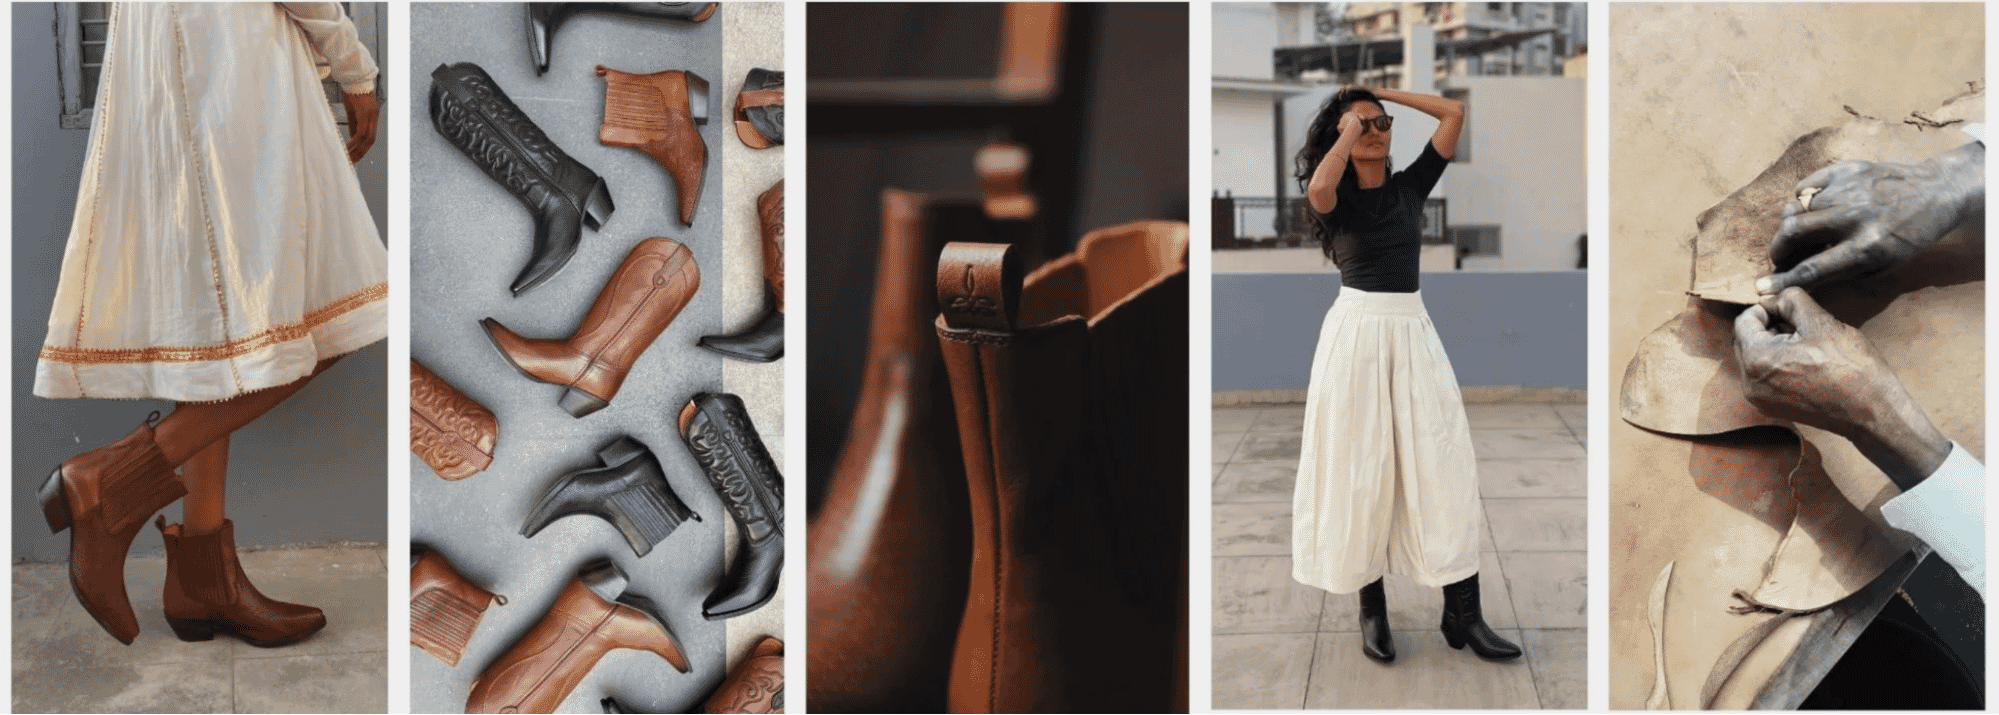
    This image series presents handcrafted leather boots through a rich visual narrative that blends craftsmanship, product detail, and styling. From top-down flat lays to styled shots and macro textures, it balances artistic flair with product clarity.

    Warm, earthy hues echo the natural materials and craftsmanship, making the entire set feel cohesive and tactile. Including the artisan’s hands working on the leather gives authenticity and emphasizes the handmade quality—connecting product to maker.

    Technology

    19. Bang & Olufsen

    Rose gold Bang & Olufsen portable speaker partially buried in sand with leather strap, illustrating durability and beach-friendly audio design.

    Image source

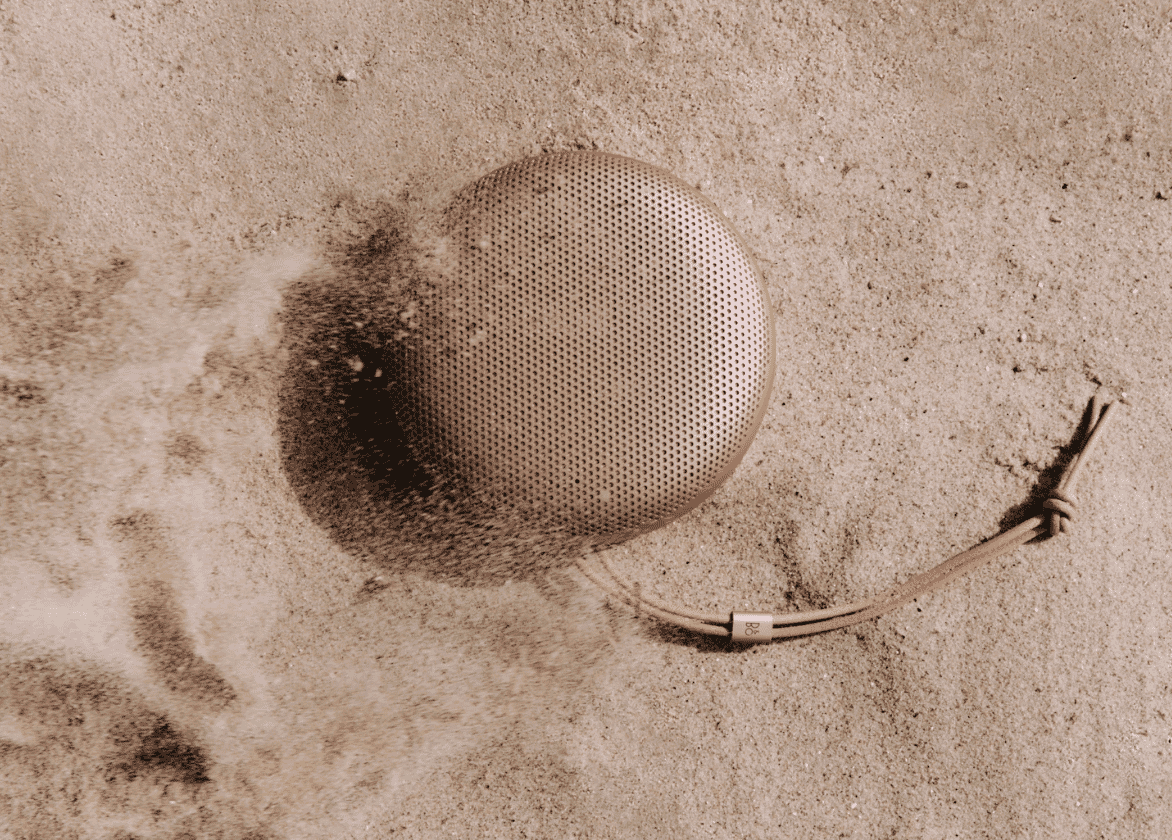
    This photo is a stellar example of minimal, lifestyle-oriented product photography that speaks volumes without clutter—a highly effective way to market portable tech like Bluetooth speakers.

    Shooting the speaker partially buried in sand immediately communicates durability, portability, and outdoor utility—perfect for beach days or travel. Plus, the fine mesh texture of the speaker contrasts beautifully with the rough, grainy sand, drawing the eye directly to the product.

    The subtle motion blur of sand being brushed aside adds energy and realism, reinforcing the “on-the-go” lifestyle. And the soft pinkish-gold tone of the speaker and tan leather strap blend seamlessly with the neutral sandy palette, creating a warm, aspirational tone.

    20. Apple

    Apple Intelligence promotion showing iPhone 16 Pro, MacBook Air, and iPad Air with pricing and product visuals on sleek gradient backgrounds.

    Image source

    The iconic tech brand has made smartphones, computers and other tech devices look sexier than ever. The brand has such a strong visual aesthetic, and all product photos support that image—including photos on its distributors’ sites.

    21. Sonos

    Matte black Sonos Bluetooth portable speaker and over-ear wireless headphones, with modern design and Time Best Inventions 2024 badge.

    Image source

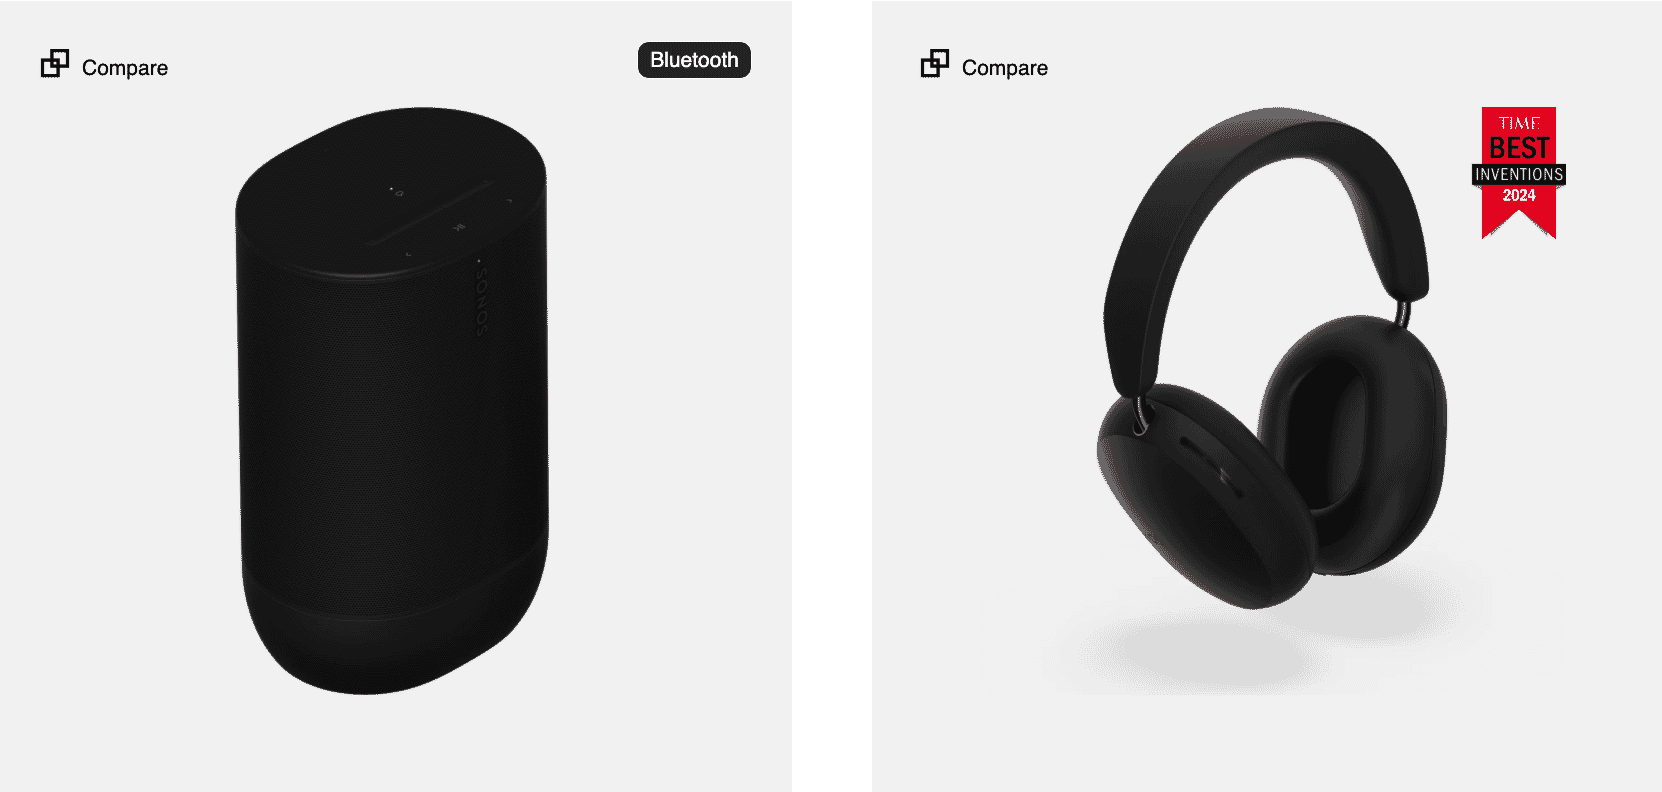
    This image from Sonos showcases a Bluetooth speaker and a pair of over-ear headphones in a highly polished, product-centric style that’s ideal for ecommerce and tech retail. The clean, white background removes all distractions, keeping the focus entirely on the product design—perfect for a high-end tech brand.

    Subtle drop shadows under both products add depth and dimension, helping them stand out while maintaining a crisp, modern aesthetic. The matte black finishes are lit specifically to highlight contours without losing the rich, dark texture—key for showcasing premium materials.

    Plus, including the TIME Best Inventions 2024 badge for the headphones subtly reinforces credibility and innovation without overwhelming the visual.

    Beauty, cosmetics, and skincare

    22. Max Factor

    Max Factor makeup lineup including Facefinity foundation, False Lash Effect mascara, Lipfinity 24HR lip color, and neutral eyeshadow palette.

    Image source

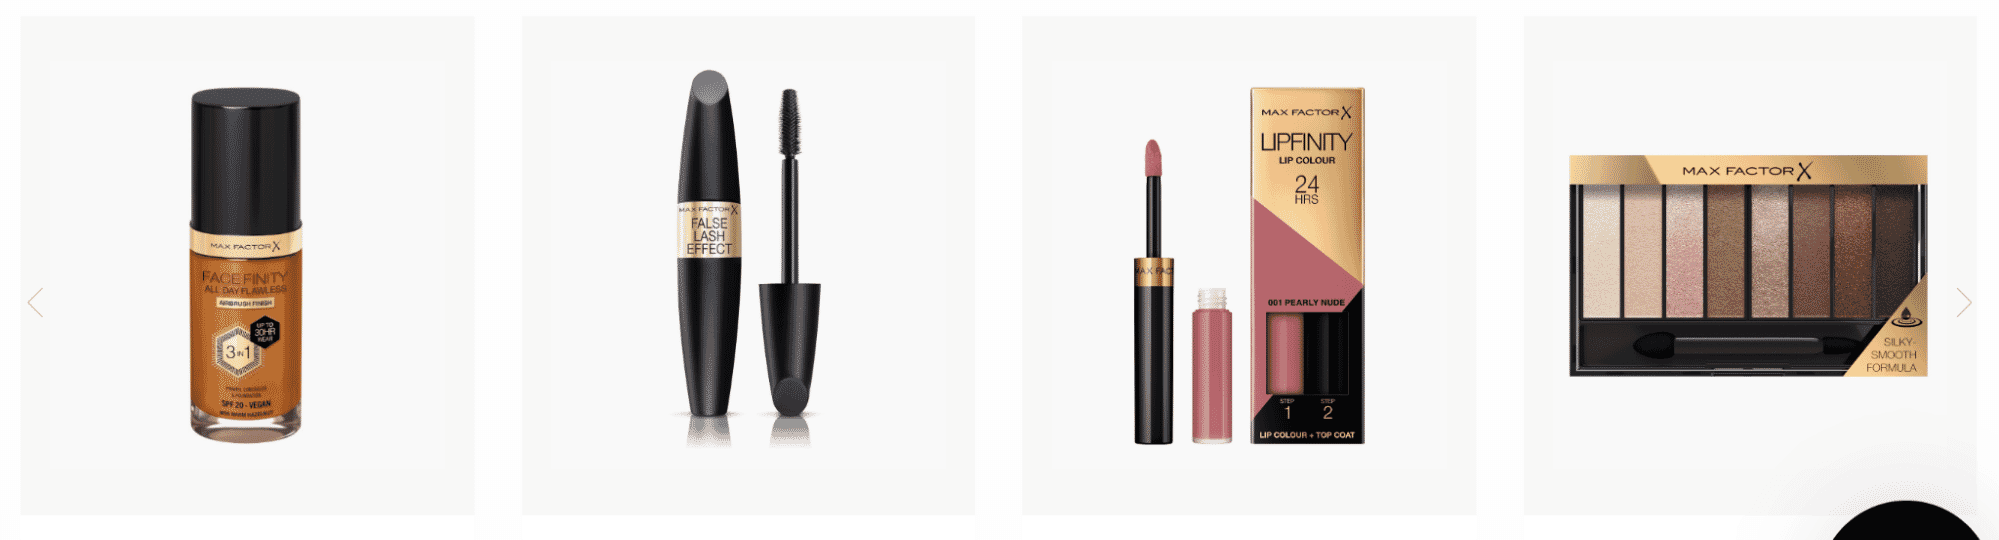
    The bright white backdrop keeps all the focus on the products and makes the colors pop. It’s also super consistent, which is great for brand identity and gives everything a polished, high-end vibe. 

    Each product is facing forward in a clear, easy-to-identify way. No weird tilts or artsy shadows—just straightforward, scroll-stopping clarity. You immediately know what’s what: foundation, mascara, lip color, and an eyeshadow palette.

    Max Factor doesn’t just show product containers:

    • The lip color shows the wand and box.
    • The mascara is open, showing the brush (which is a key selling feature).
    • The eyeshadow palette is open to show the actual shades.

    Basically, the photos answer the unspoken “But what does it look like inside?” question before you even have to ask.

    23. Essie

    Close-up of hand with creative nail art, including smiley face and abstract designs, resting on paint-splattered yellow fabric with paintbrushes nearby.

    Image source

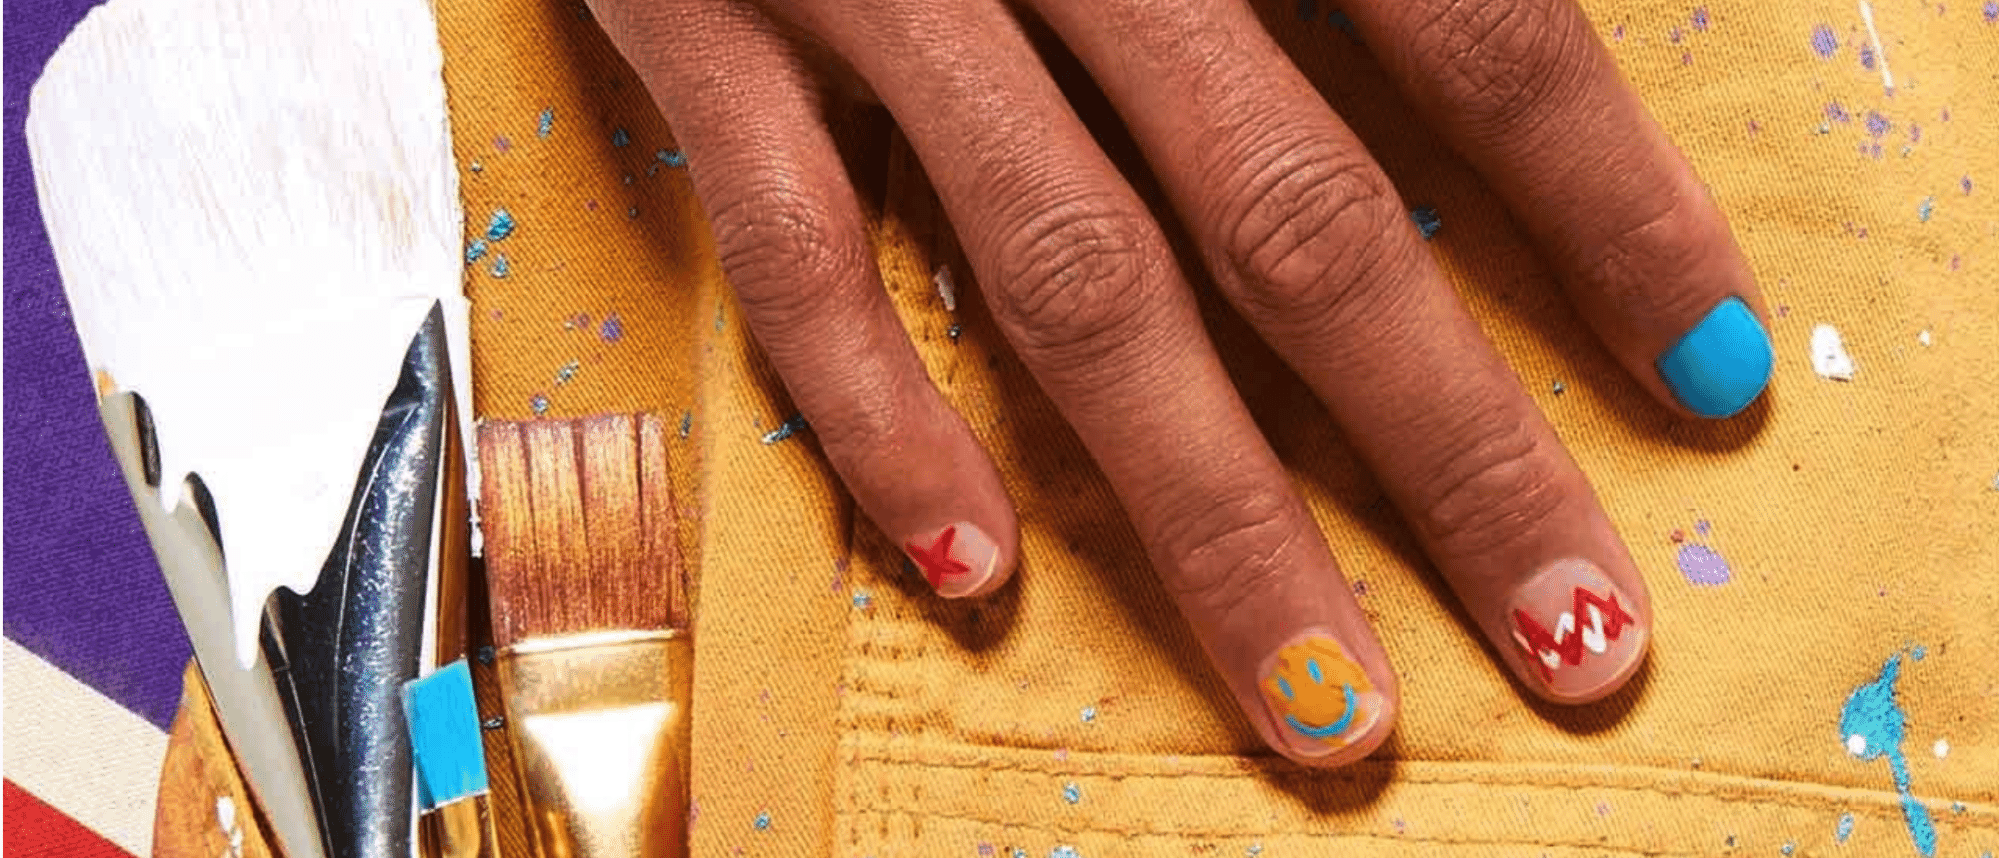
    This photo nails the vibe. The mix of bright turquoise, fiery red, and cheery yellow nail art really pops against the warm-toned background. It draws your eye to the nails without needing a spotlight. Each nail tells a mini story—smiley face, abstract flames, a playful “X”—making it feel custom, not cookie-cutter. This is less “salon menu,” more “expression in progress.”

    And you get more than just the nails. The texture of the fabric, the paintbrushes, the speckles—it adds a sense of realness and movement, like we just walked in on an artist mid-project.
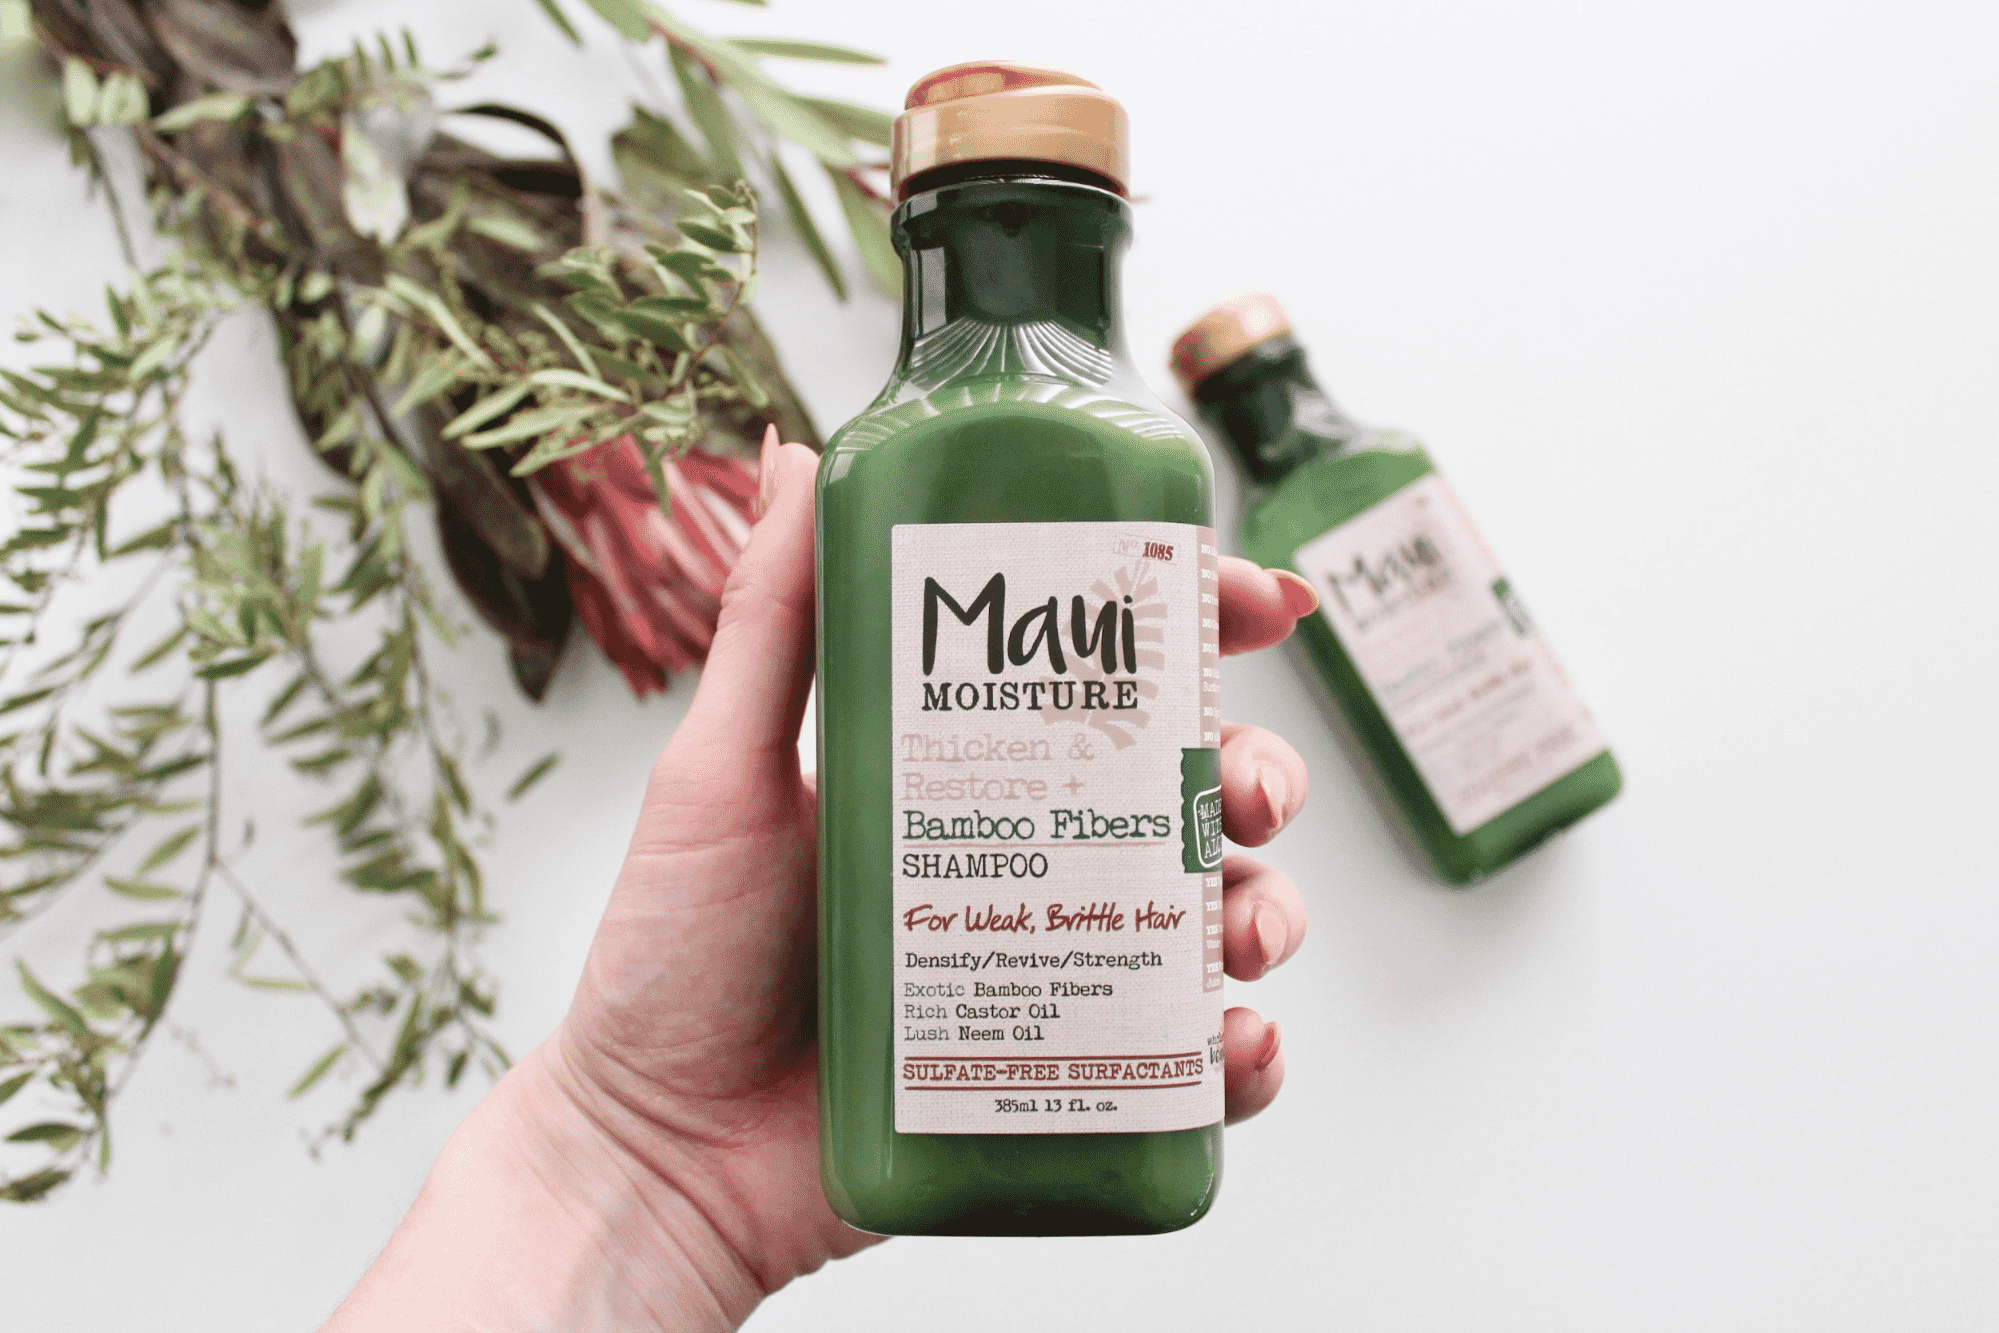
    24. Wiselands

    Wiselands skincare featuring Flax & Chia Concentrated Cream and Daily Rosemary Cleanser with sustainable, vegan, cruelty-free ingredients.

    Image source

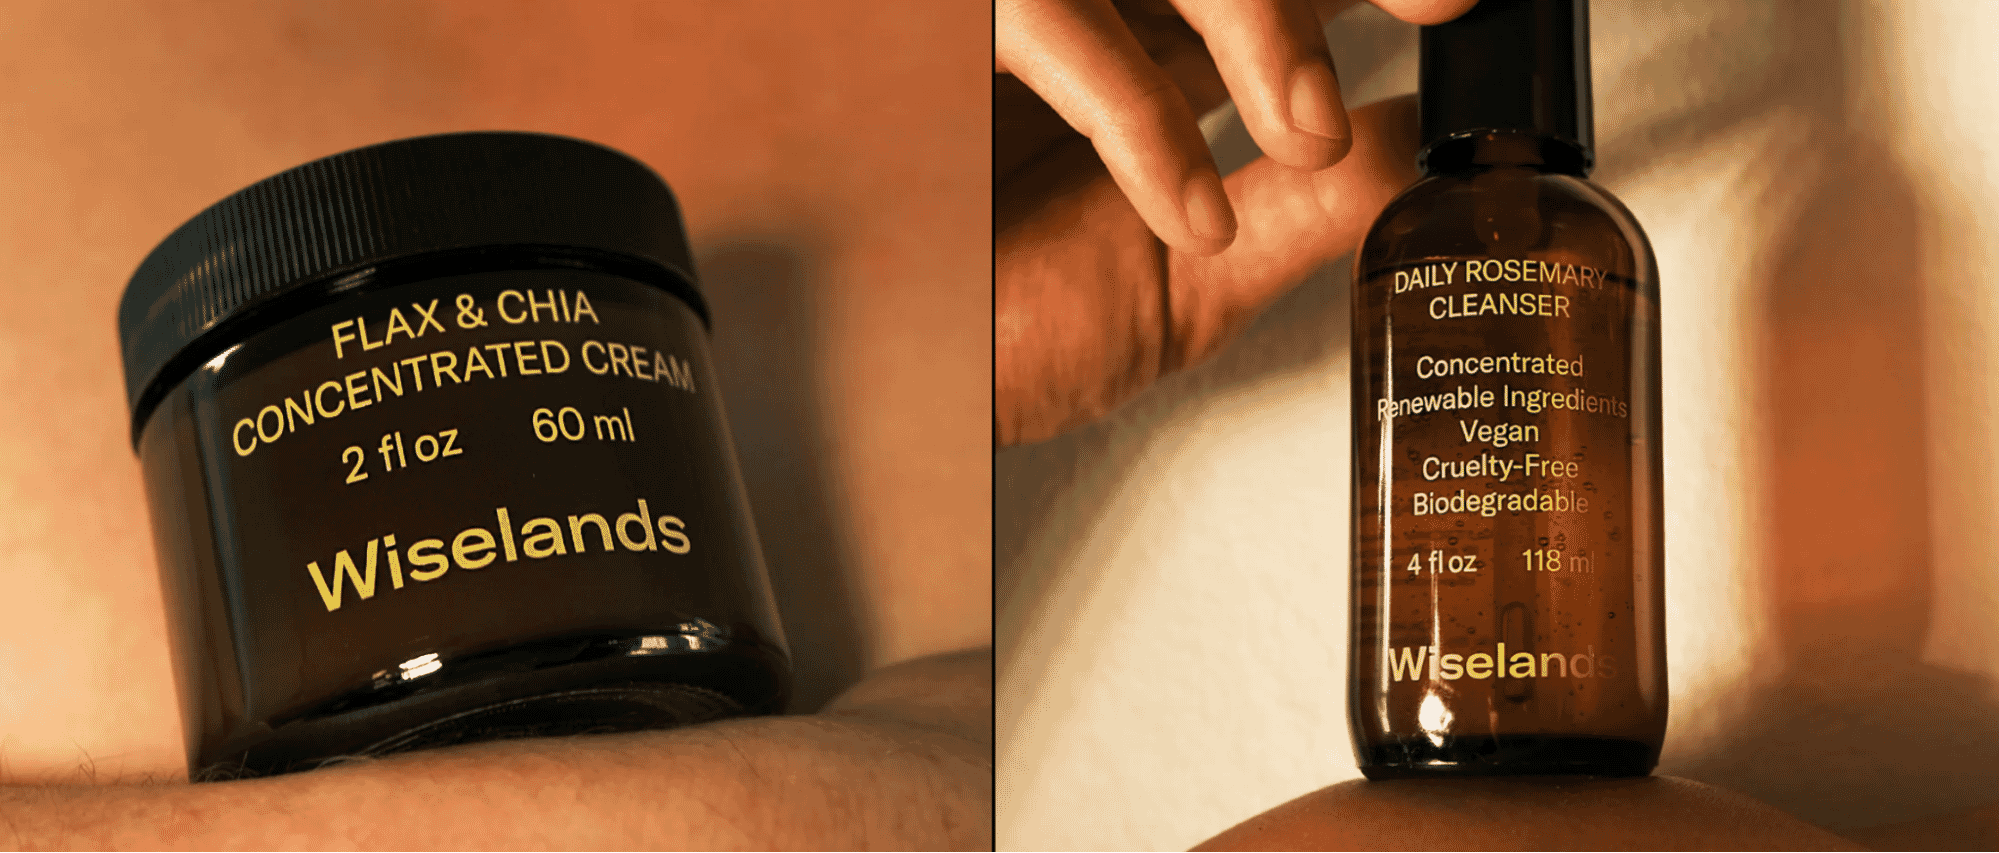
    Wiselands uses rich, moody lighting to elevate its product photography, giving skincare essentials a luxe, tactile presence. The close-up shots highlight the amber glass packaging and gold typography, with warm shadows that enhance the sense of calm and care. Subtle skin contact and soft textures create an intimate, grounded feel—perfectly suited for a brand focused on clean, conscious ingredients. 

    The lighting is deliberately imperfect, mimicking golden-hour warmth that flatters both the product and the skin it’s meant for. It’s a masterclass in using tone and minimalism to communicate trust and quality.
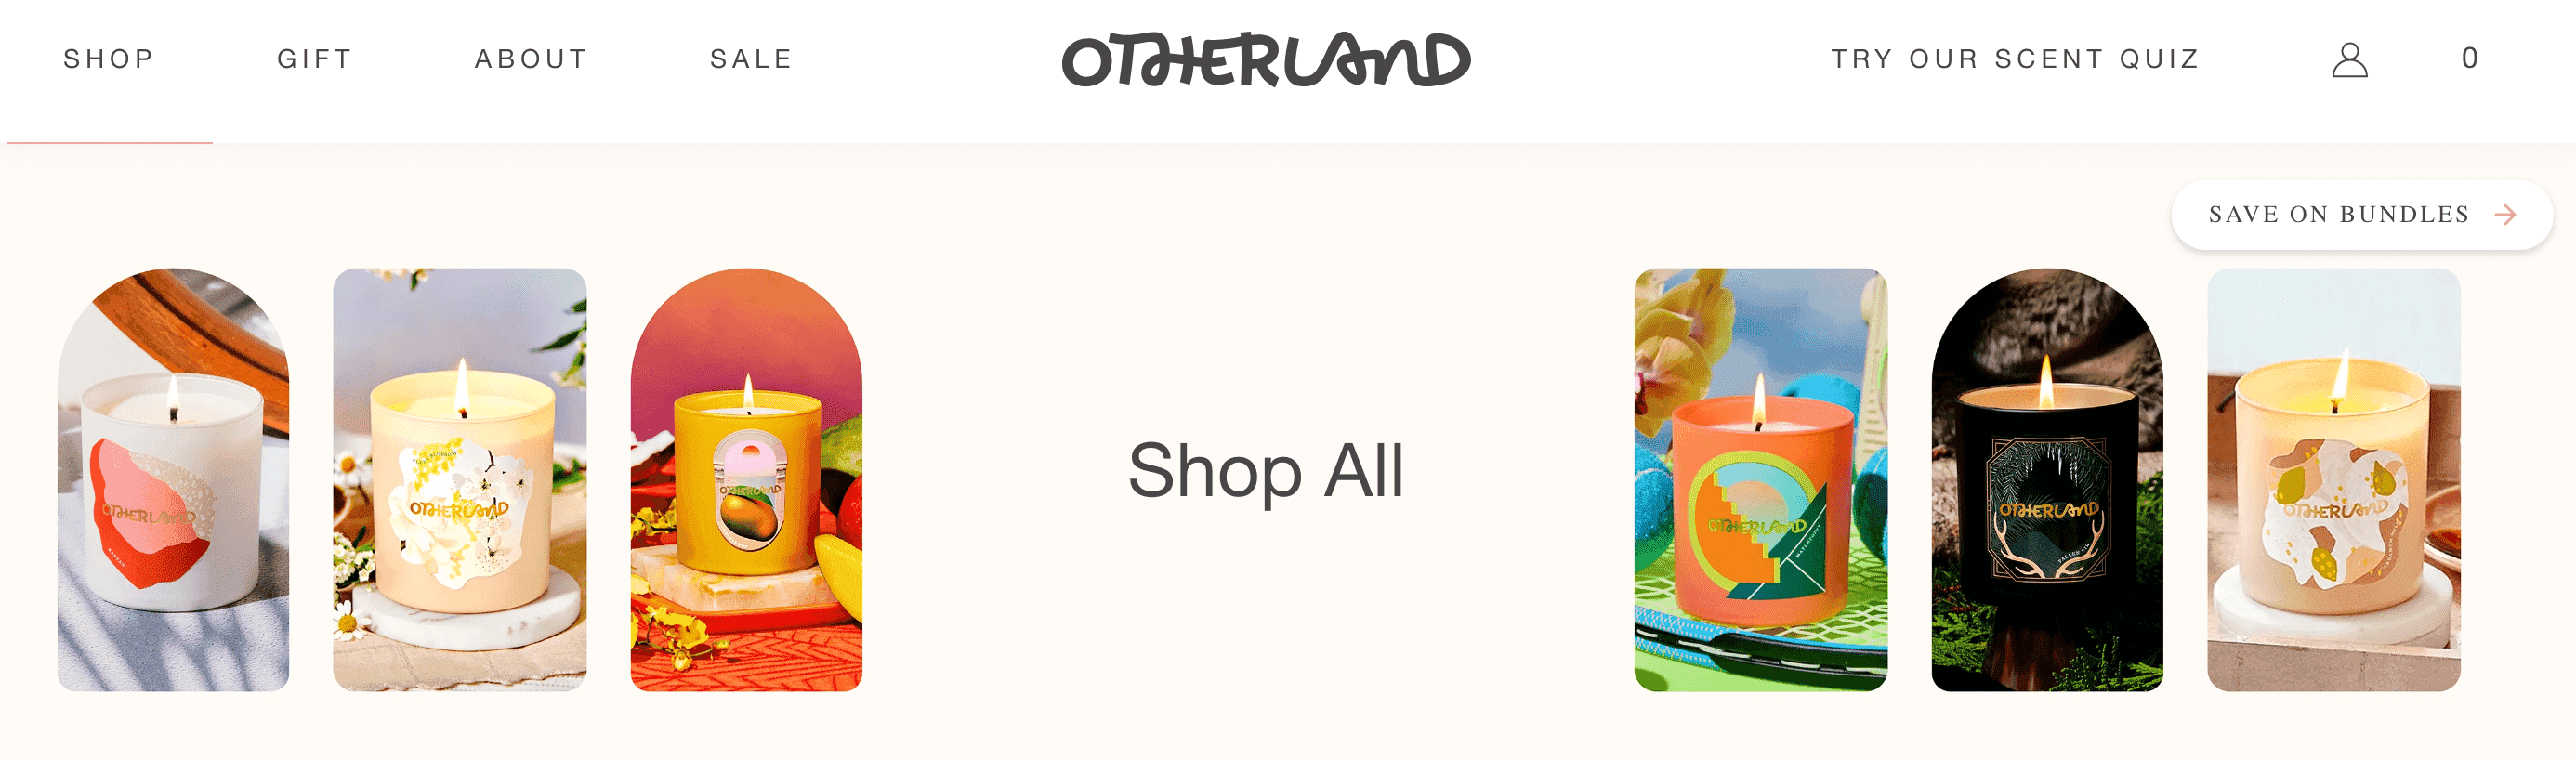
    25. Crown Affair

    Crown Affair haircare trio featuring The Leave-In Conditioner, The Texturizing Air Dry Mousse, and The Dry Shampoo, displayed with minimalist packaging.

    Image source 

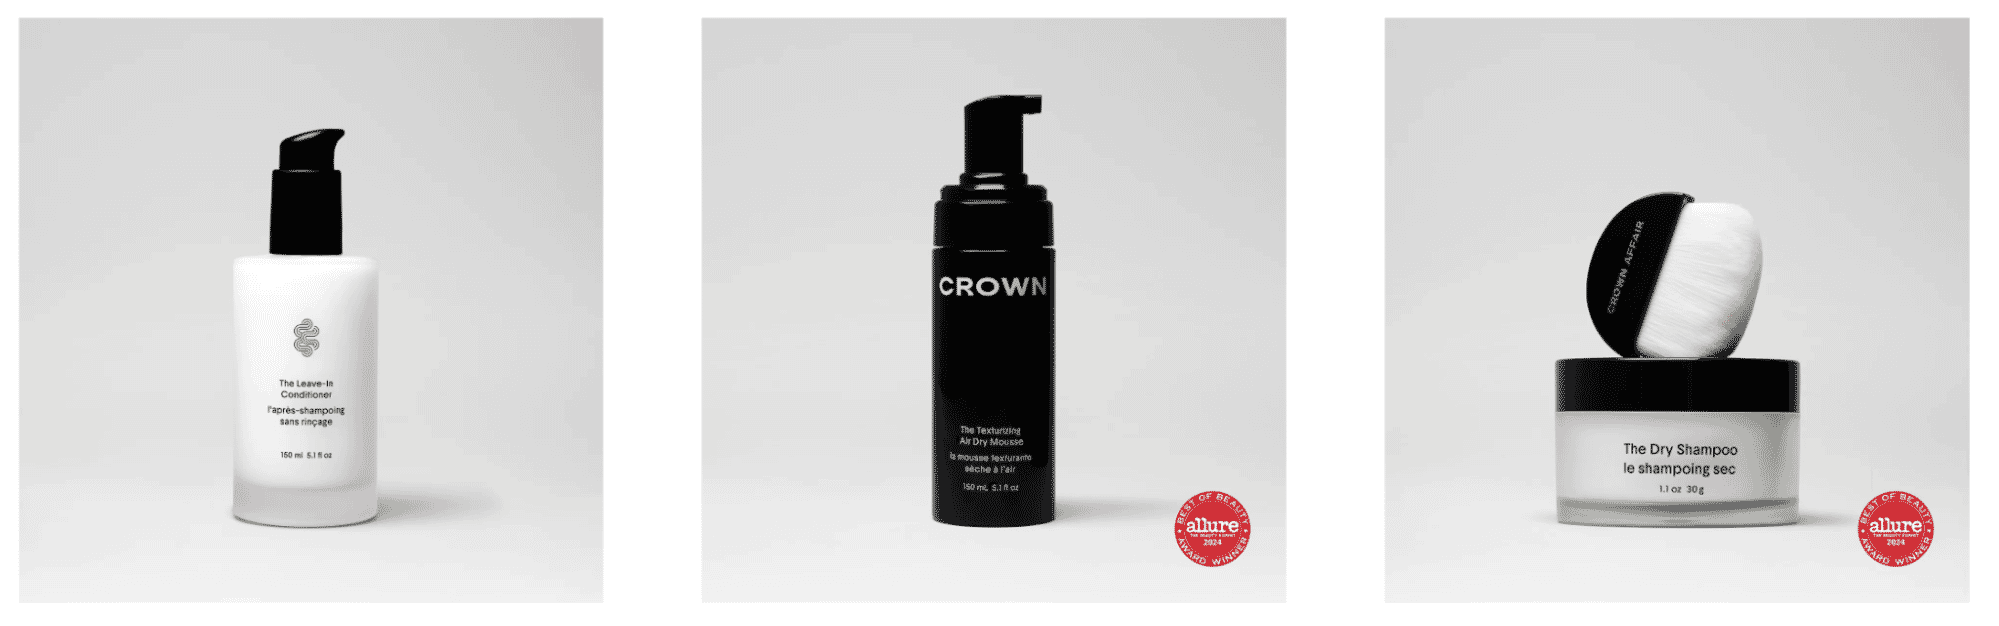
    The minimalist layout and monochrome color palette for Crown Affair’s product photos ooze luxury. It’s giving calm confidence without shouting for attention. 

    Each product is centered, evenly lit, and spaced the same—perfect for a sleek grid or product catalog. Cohesion like this builds brand trust fast. And the soft shadows and contrast between black and white bottles add just enough depth to keep things visually interesting without losing the clean aesthetic.
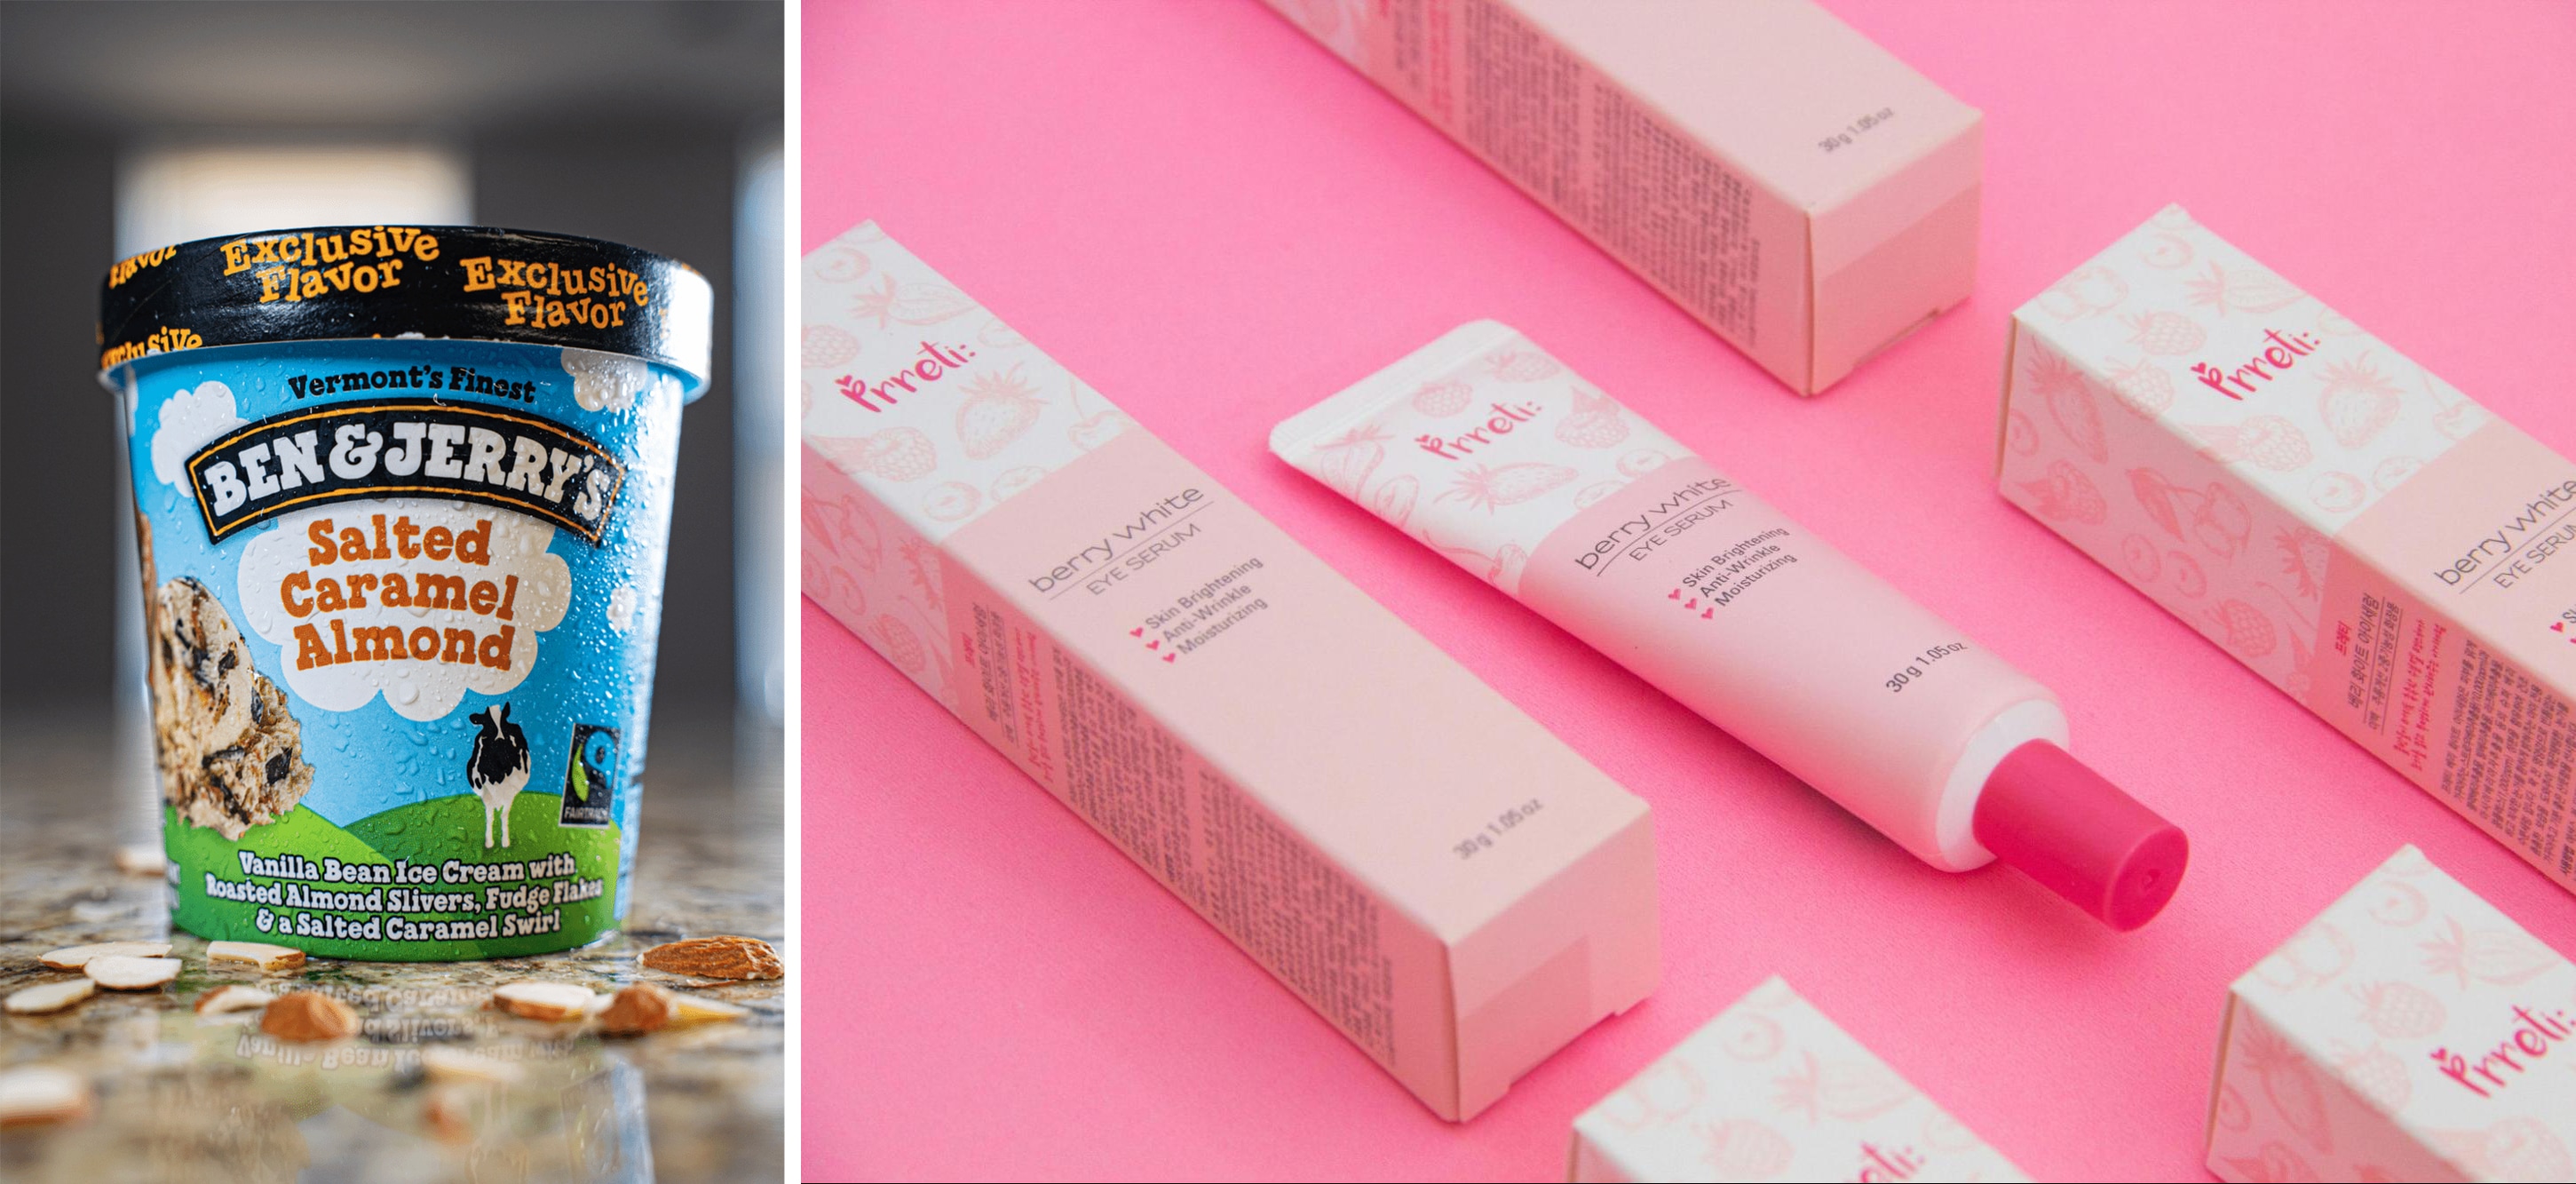
    26. Vacation Inc.

    Vacation skincare and fragrance products, featuring Classic Whip SPF 50 sunscreen mousse and tropical-themed perfume mist bottles labeled “Vacation” and “After Sun.”

    Image source

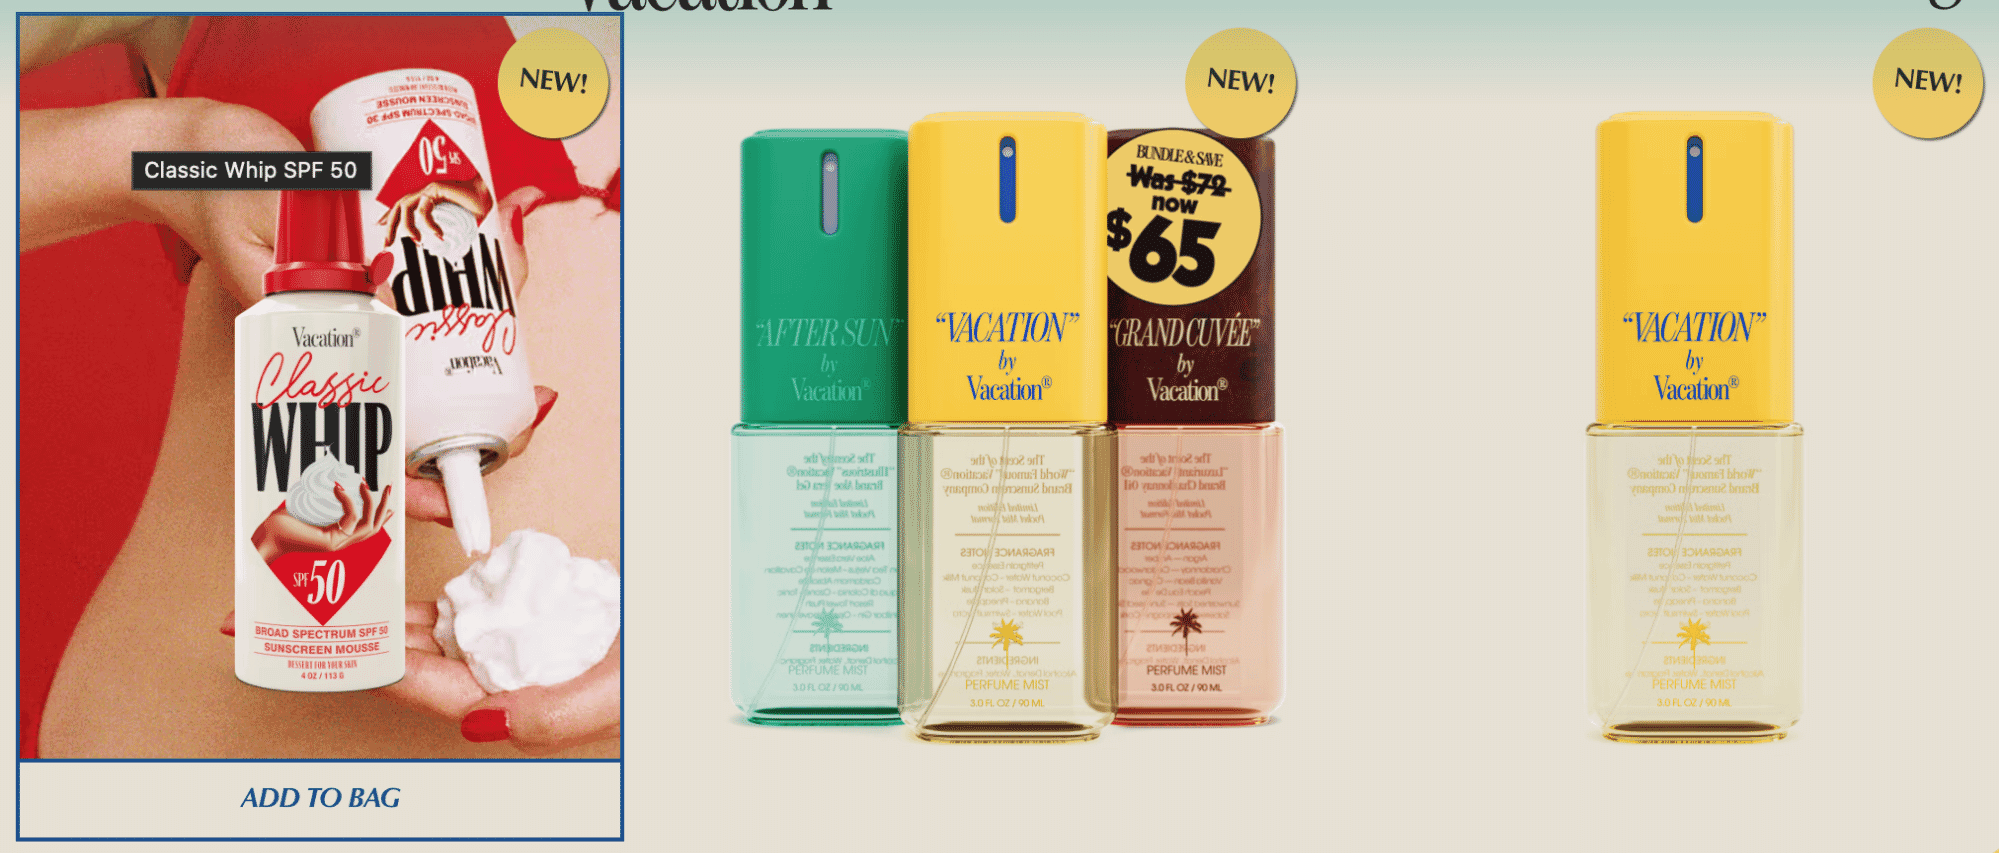
    Sunscreen brand Vacation Inc. uses bold, retro-inspired design. The packaging and photo styling lean heavily into a nostalgic ’80s/’90s vacation aesthetic, reinforcing the brand’s identity. Everything from the fonts to the saturated colors supports this.

    Despite the vibrant branding, the layout is clean. Products are isolated against a pale gradient background, keeping attention on the packaging.

    Outdoors and sporting goods
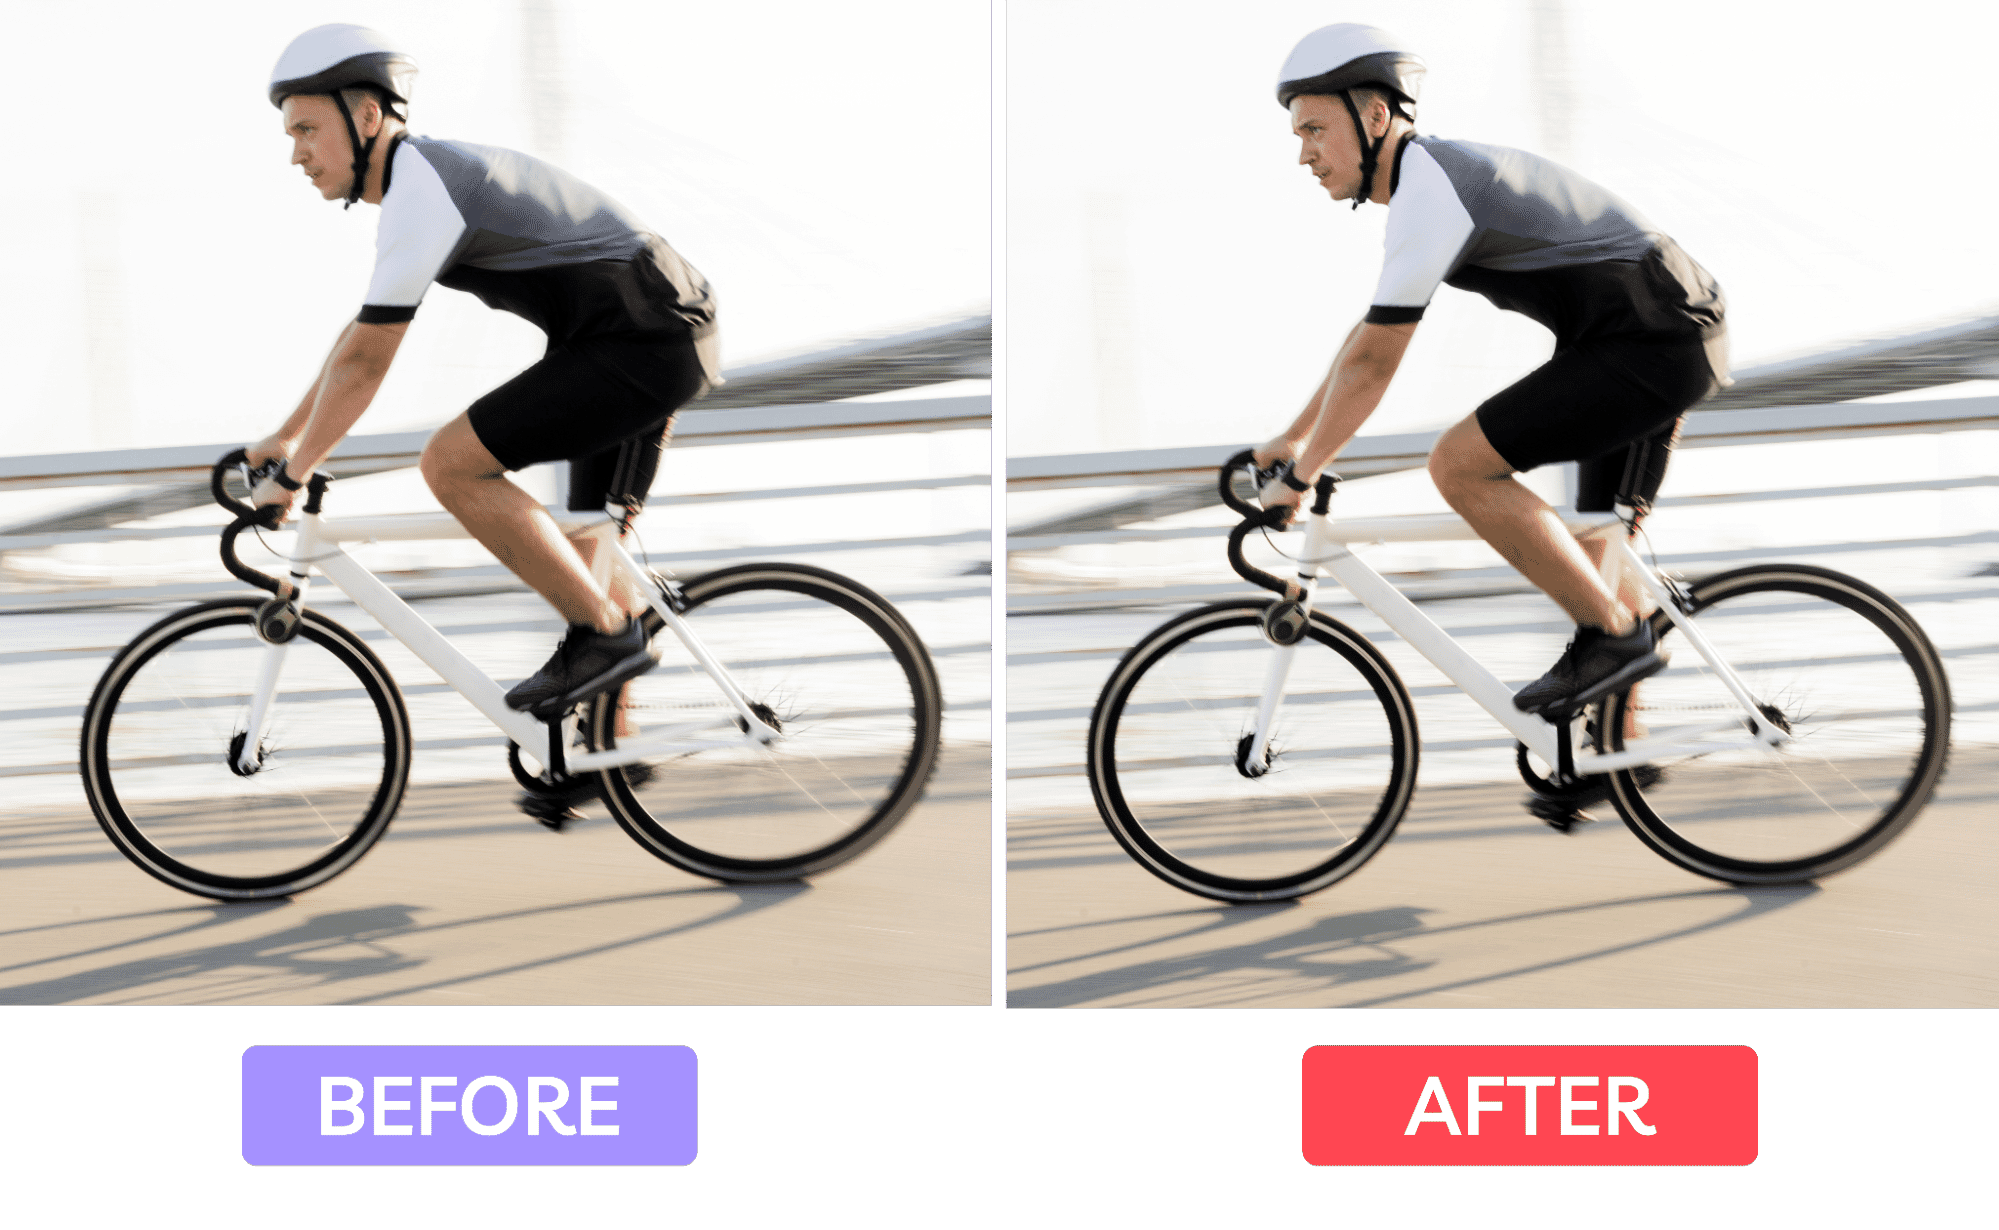
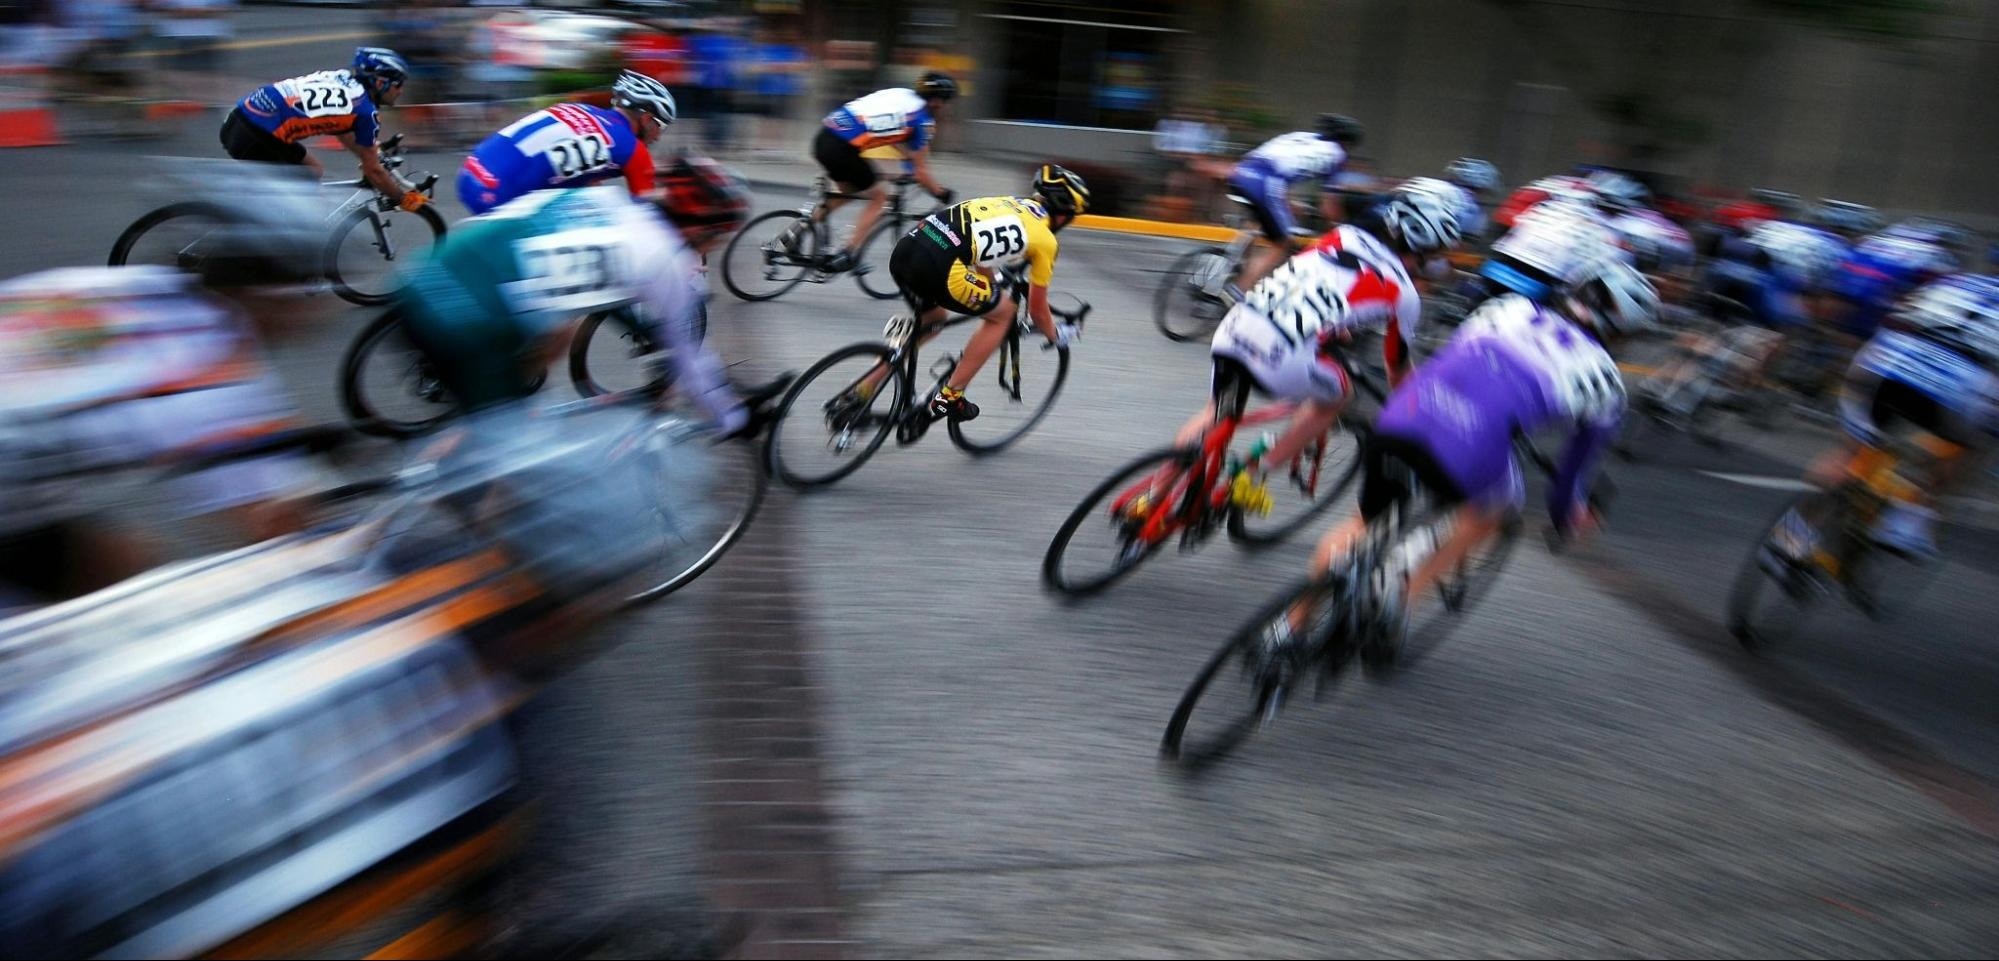
    27. Linus 

    Child riding a blue Linus bike while wearing a helmet, captured mid-action against a concrete urban background with bold shadows.

    Image source

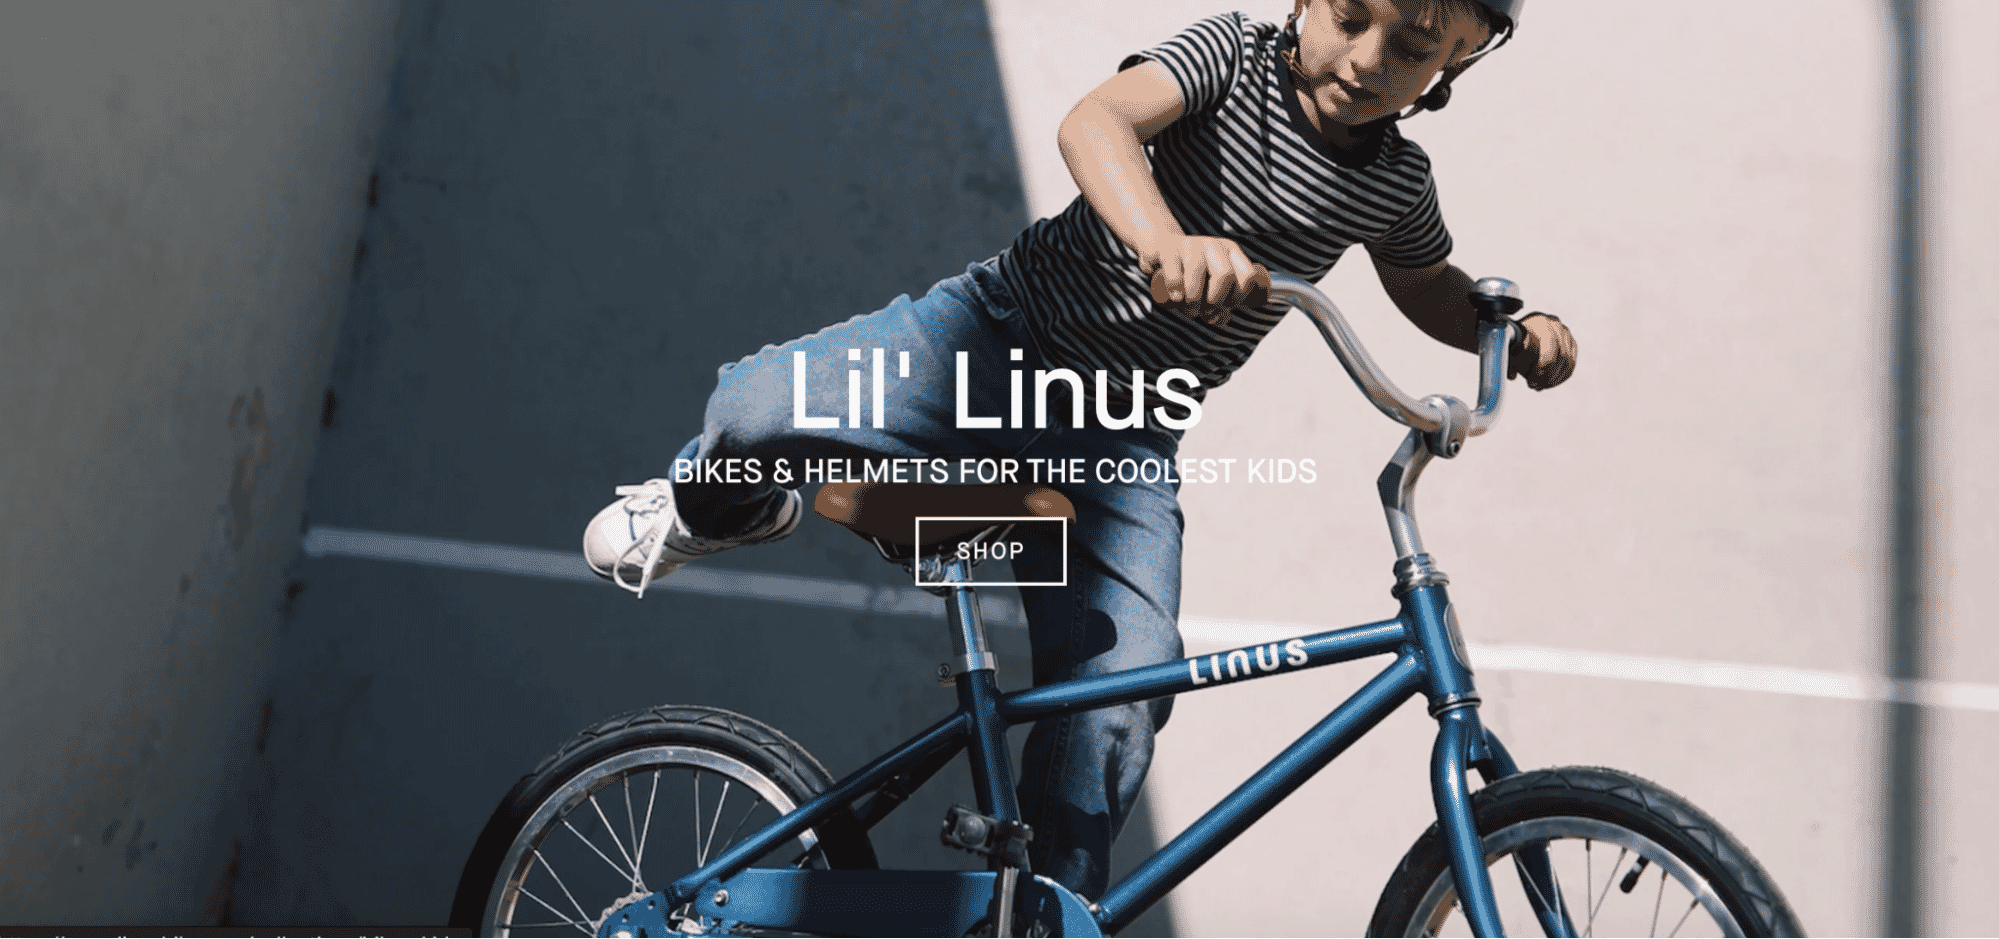
    This example from bike brand Linus takes a lifestyle over product approach. We’re sold on the vibe before the bike. It’s aspirational but also relatable—perfect for parents and cool kids alike.

    The mid-movement shot adds energy and makes the product feel fun and adventurous. The text placement is smart: bold, centered, and readable without overpowering the image.

    28. Pow Gloves

    Winter sports gear including knit headwear with snow goggles and insulated women's gloves, worn by skiers in a snowy outdoor setting.

    Image source

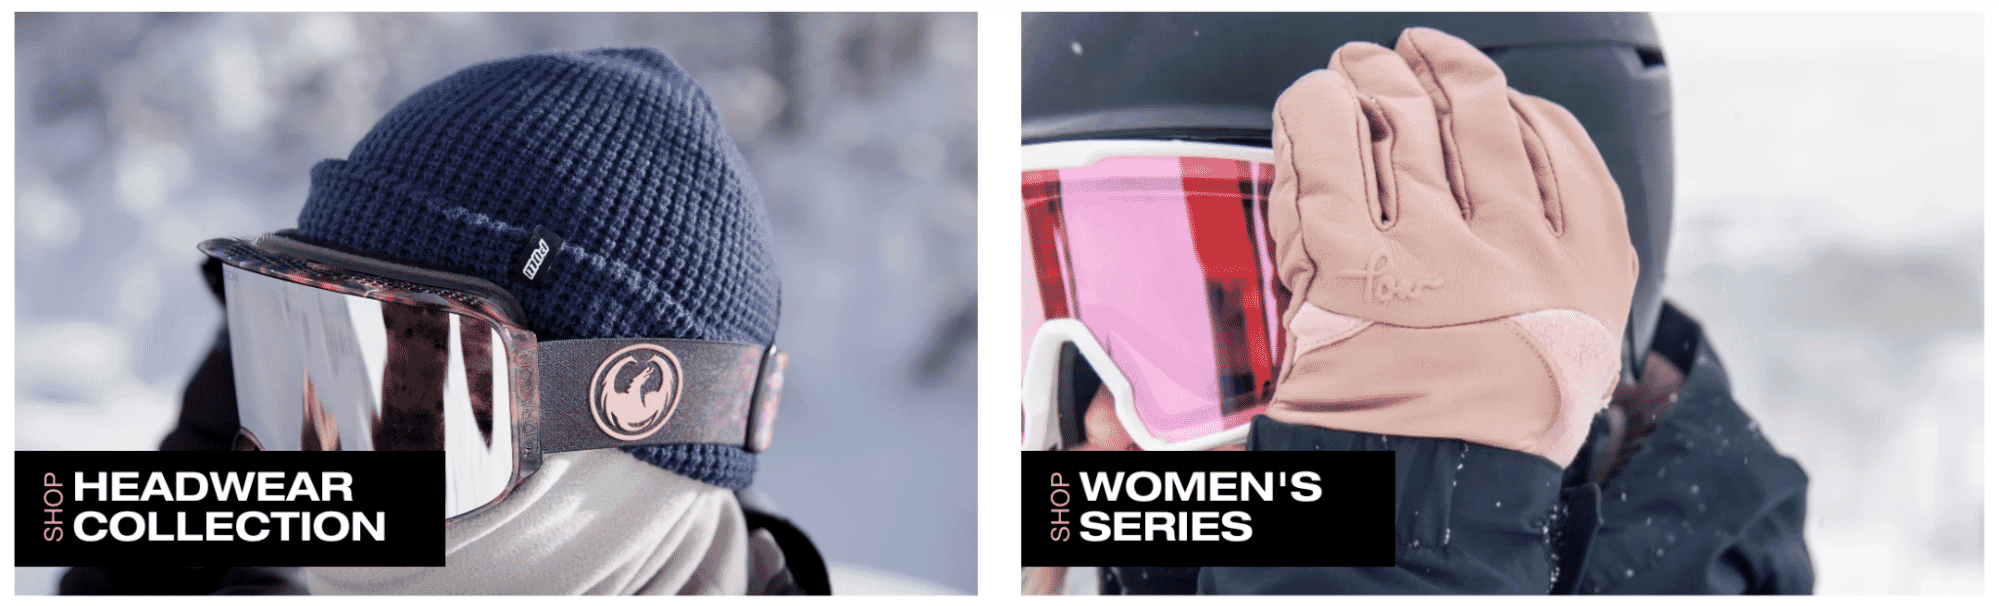
    Pow Gloves delivers high-impact product photography that leans into performance, texture, and environment. Shot in snowy alpine conditions, its imagery captures real-world functionality while keeping the product in crisp focus. 

    Frosted lenses, fleecy knits, and matte leathers pop against blurred white backdrops, highlighting both material quality and cold-weather capability. The models are active but cropped, letting the gloves and headwear shine without distraction.

    29. Beestinger

    Side-by-side visuals of archery stabilizers for target shooting, hunting, and Beestinger components, featuring compound bows in action and close-up gear details.

    Image source

    Beestinger’s product photography balances precision and action, capturing the high-performance world of archery stabilizers. Each image speaks directly to its audience—whether it’s competitive target shooters or camo-clad hunters—by showing the gear in realistic, high-stakes contexts. 

    Sharp detail on textures like carbon fiber, metal finishes, and compound bows communicates quality and durability. Meanwhile, the use of tight crops and dynamic angles keeps the focus on function, not fluff. By pairing lifestyle imagery with close-up product visuals, Beestinger hits the bullseye on authenticity and trust—two essentials in any performance-driven category.

    30. CamelBak

    CamelBak customizable drinkware collection featuring bottles and mugs with engraved graphics and text options for personal designs.

    Image source

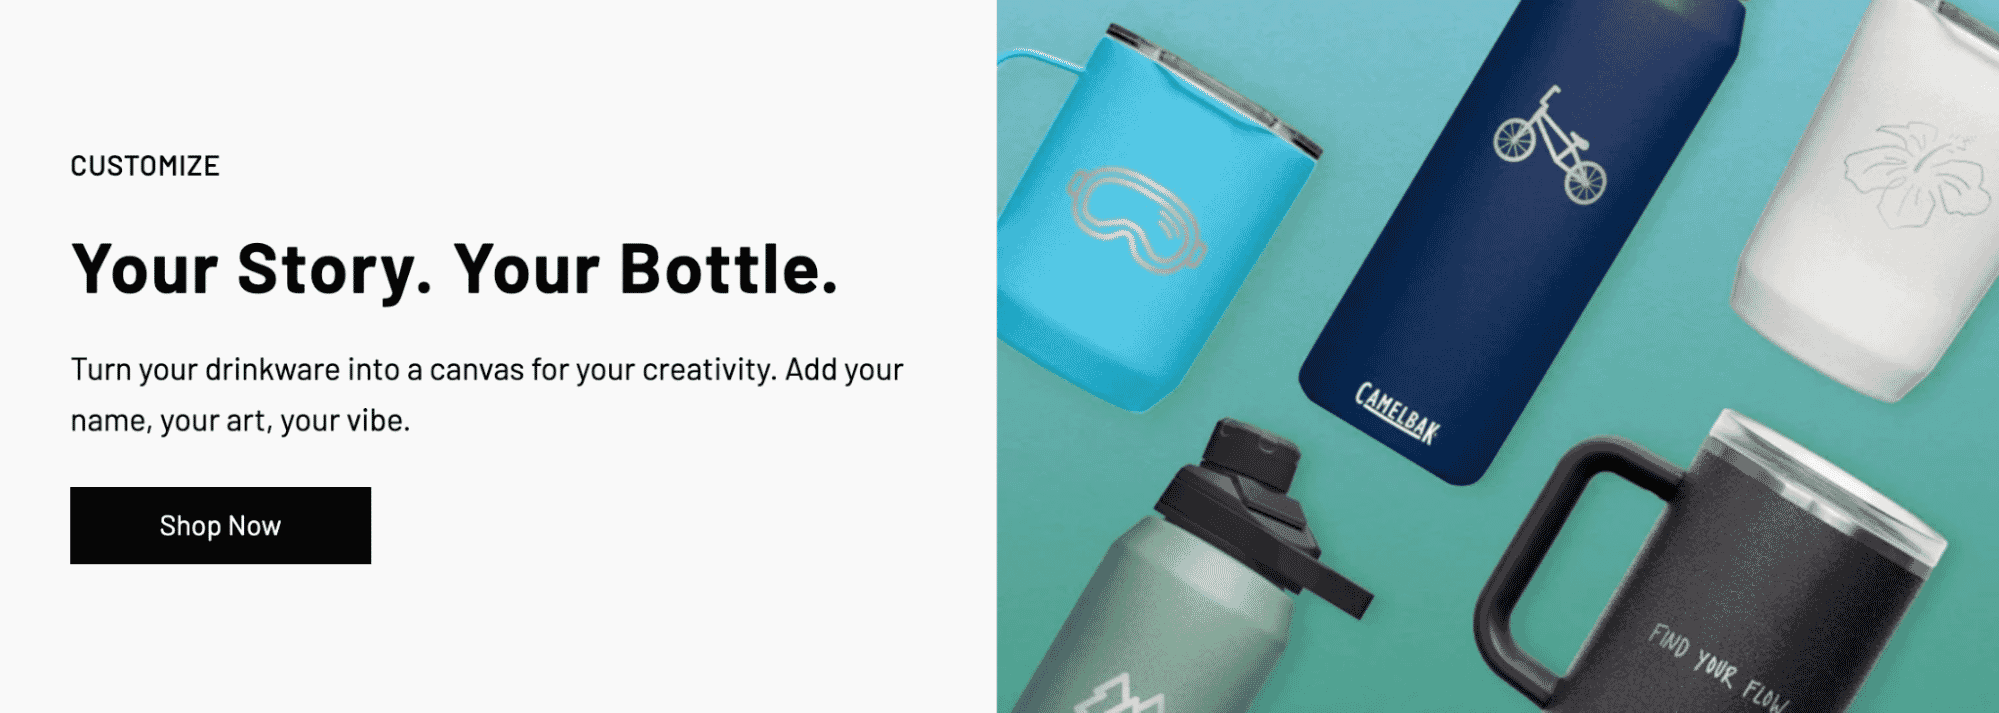
    The top-down flat lay showcases CamelBak’s water bottles in a scattered, playful arrangement. Each bottle is angled differently, giving the scene energy and allowing each product to stand out while still feeling part of a cohesive set.

    The smooth teal gradient adds visual interest without stealing the spotlight. It complements the product colors and adds depth, helping the matte finishes of the bottles pop.

    The lighting is soft but directional enough to highlight the textures—especially the powder-coated surfaces and engraved designs. This gives a tactile sense of quality without relying on close-ups.

    The photo manages to feel unified while showing a range of products: mugs, tumblers, bottles—each in a different color and size. It’s a great way to communicate customization options without crowding the frame.

    31. Lift Foils

    Lifestyle and action shots of people foil surfing in ocean waves, including riders in motion, beach scenes, and a woman carrying a hydrofoil board.

    Image source

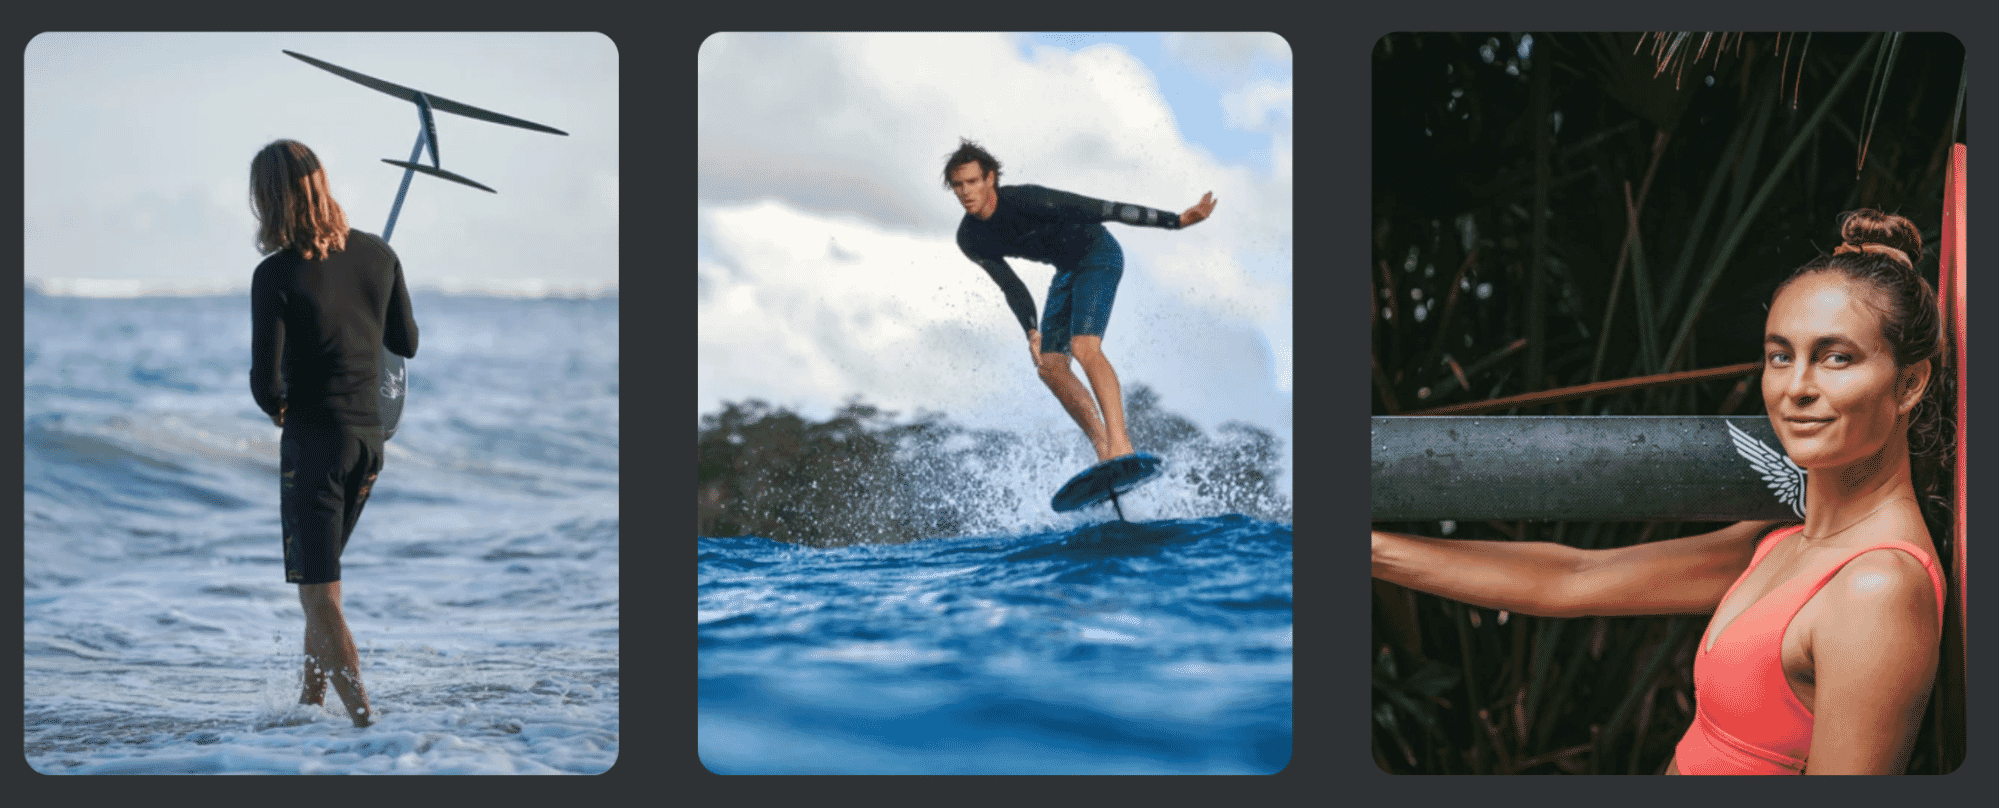
    Lift Foils captures the thrill and elegance of hydrofoil surfing through cinematic, lifestyle-driven photography. Their imagery effortlessly blends action and atmosphere—highlighting both product performance and the aspirational lifestyle that surrounds it. 

    From crisp shots of foil boards slicing through tropical waves to grounded moments of riders gearing up at the shoreline, every frame conveys motion, freedom, and connection to nature. The gear is presented in real use, allowing water, sunlight, and setting to act as natural visual enhancers. This approach not only showcases the quality of the product but also sells the lifestyle it unlocks. It’s adventure marketing at its finest.

    32. Landyachtz

    Artistic skateboard designs from Landyachtz including Dinghy Classic Midnight Dip, Tugboat Atmosphere, and Dinghy Legend with bold prints.

    Image source

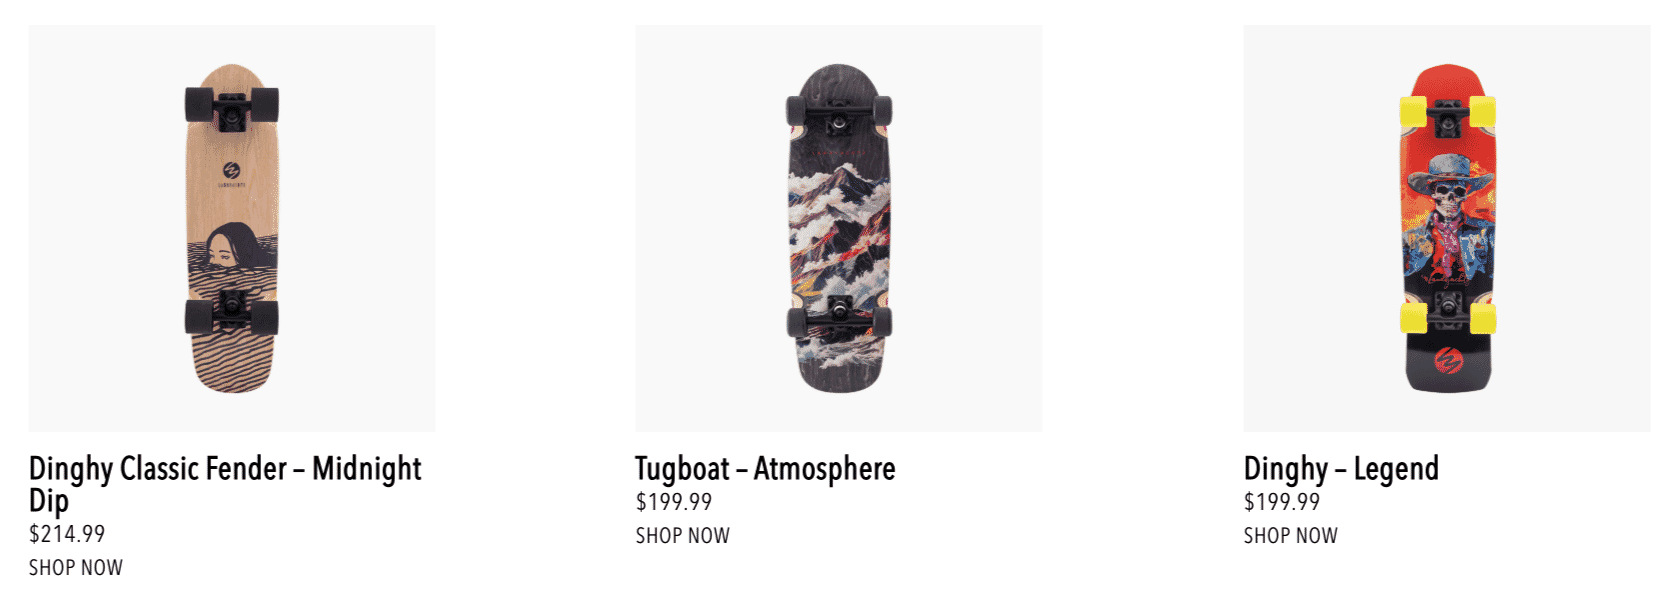
    Landyachtz uses clean, minimal product photography to make bold skateboard designs pop. Set against bright white backgrounds, each board is perfectly centered and evenly lit, allowing the intricate deck artwork—from hand-illustrated mountains to surreal portraits—to shine without distraction. 

    This studio-style approach highlights every detail of shape, texture, and color, making the craftsmanship unmistakable. The consistency across the images also creates a seamless browsing experience, while the sharp, high-resolution shots invite zoom-level inspection. It’s a textbook example of how white-background photography can still feel expressive and brand-forward.

    33. Ethnotek

    Side-by-side view of a colorful roll-top sling bag on a rock and a woman wearing a patterned backpack in a field, showcasing options for daily commutes, hiking, and customizable travel gear.

    Image source

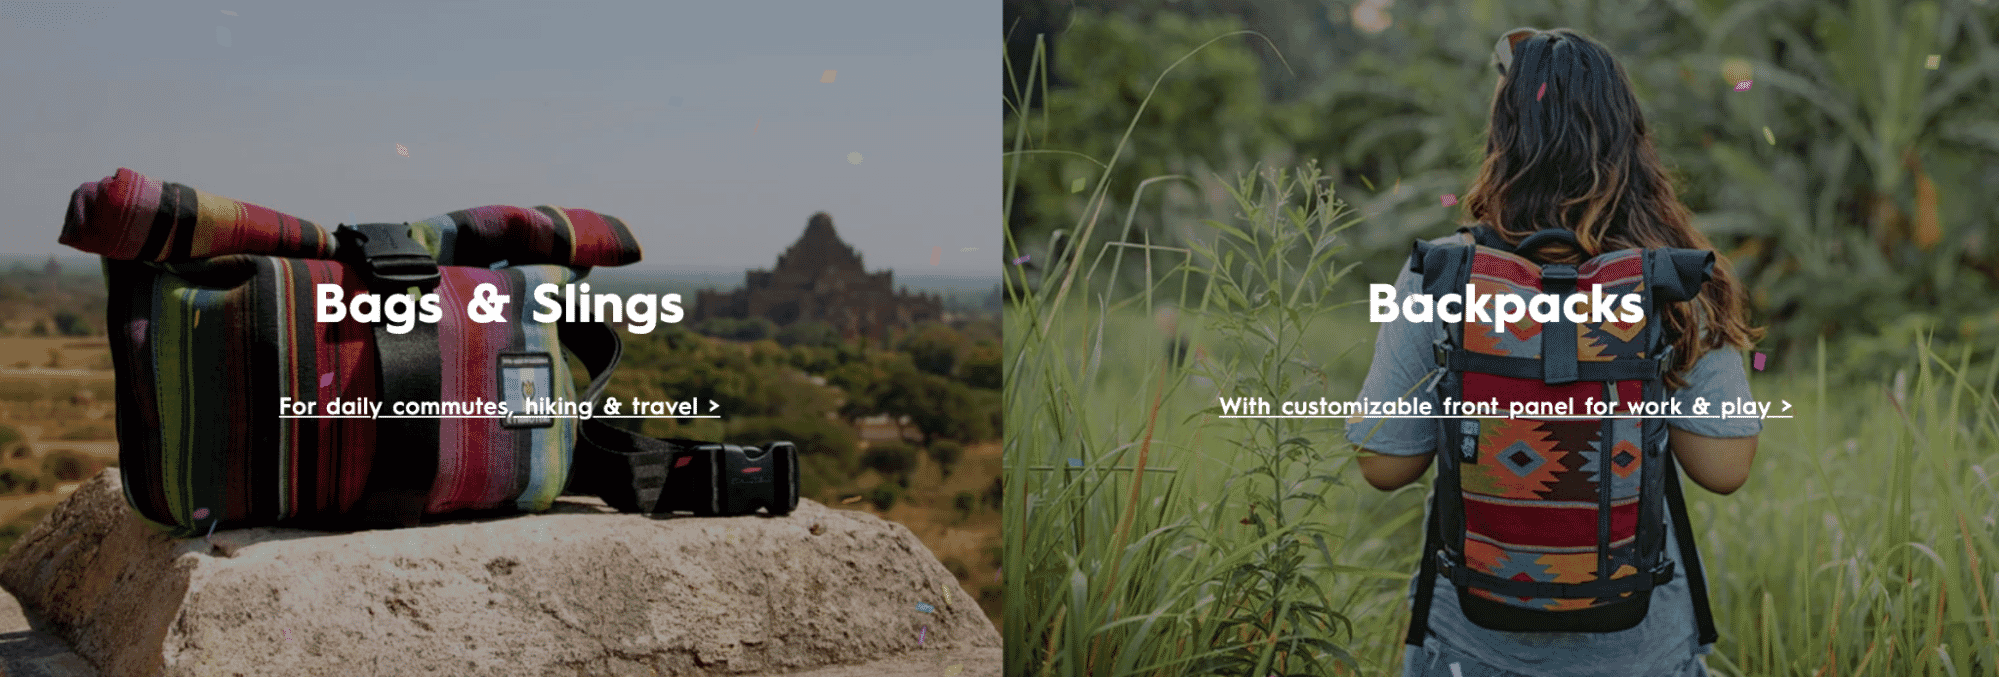
    Ethnotek’s product photography perfectly reflects the brand’s vibrant, adventure-ready identity. Shot in natural, wild settings, their bags are photographed in real-world use—slung over shoulders, perched on rocks, or trekking through fields. 

    This lifestyle-forward approach puts the product in context, emphasizing durability and design for travel and outdoor enthusiasts. The saturated colors of the bags stand out beautifully against the natural backdrops, and each shot is carefully composed to showcase both form and function. The result is photography that feels aspirational, authentic, and deeply connected to the brand’s do-good, go-anywhere ethos.

    Furniture and home goods

    34. MADE

    Outdoor garden lounge setup with striped upholstered sectional sofas, wood coffee table, and potted tropical plants, shown in a sunny patio space. Modern home furniture collection showing a beige sofa, sculptural pendant lighting, and a wooden bed with storage drawers in styled interiors.

    Image source

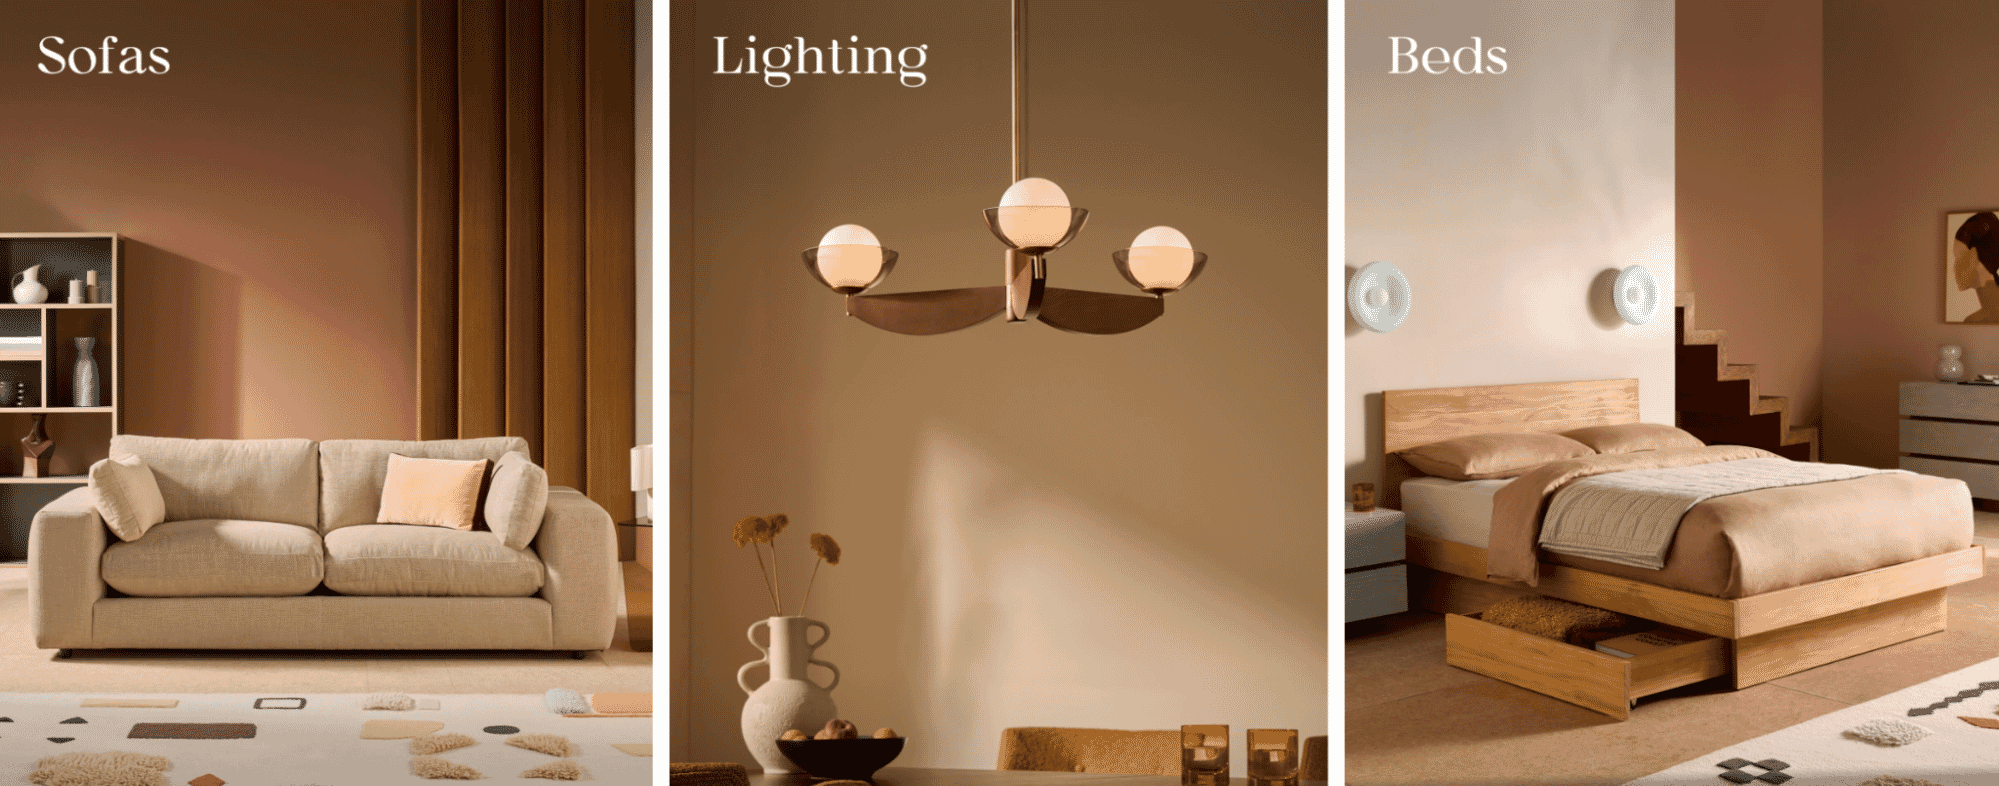
    MADE’s product photography captures the harmony of modern living with a refined, editorial edge. Each image is carefully styled to showcase not just the product—sofas, lighting, or beds—but the ambiance they create. The lighting is soft and consistent, emphasizing texture, shape, and color in a natural way. Warm, muted tones pair with clean architectural lines, drawing the eye through the space and highlighting each design detail without distraction. 

    The result is an inviting, aspirational scene that feels livable yet elevated. MADE’s photography doubles as interior inspiration, turning every product into part of a cohesive lifestyle story.

    35. LOEHR

    Contemporary furniture including a round black table with a yellow cushioned chair, a minimalist open shelf, and a bold orange wood desk.

    Image source

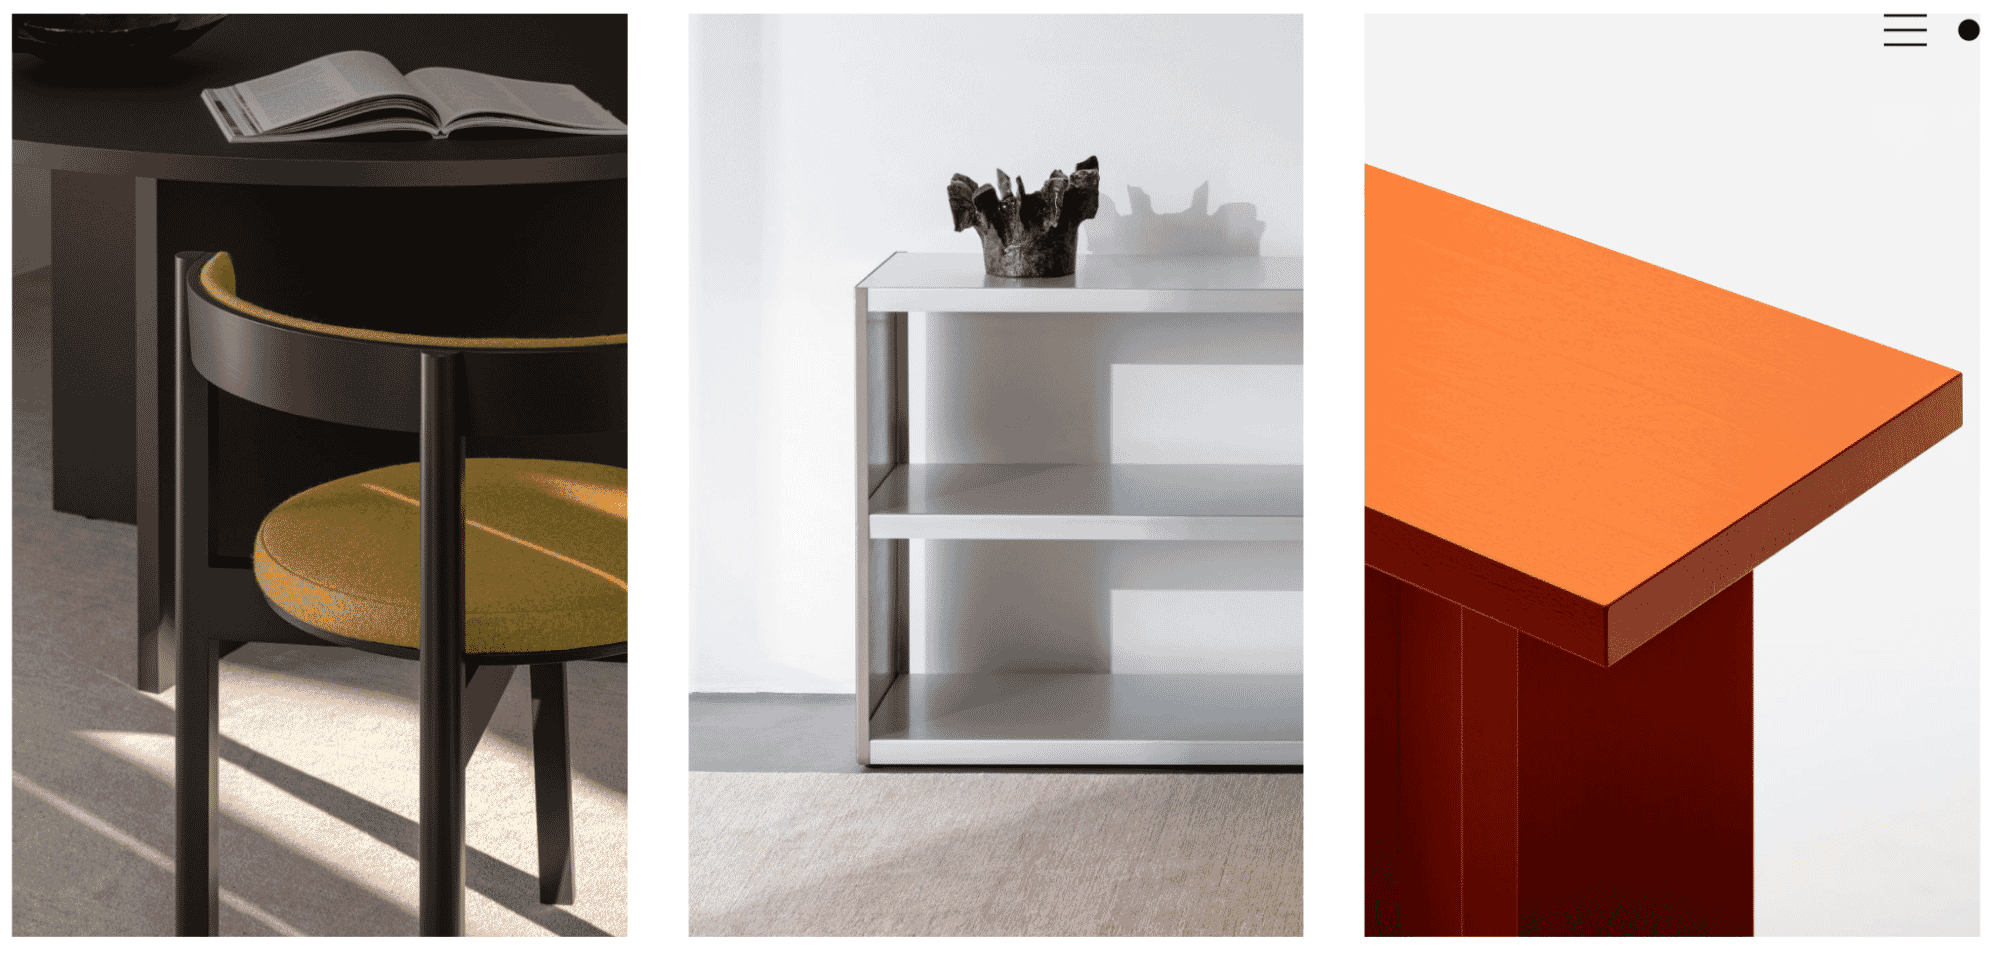
    LOEHR’s product photography is a prime example of modern minimalism. With sharp, architectural compositions and pristine lighting, each image distills furniture design down to its purest form. 

    Materials and textures are foregrounded—brushed metals, matte lacquers, and soft upholstery—without unnecessary staging or visual clutter. The crisp shadows and natural gradients from ambient light add depth while preserving the clarity of shape and line. 

    The result is bold, geometric forms. LOEHR’s photography doesn’t just display a product—it reflects the brand’s design philosophy: functional, thoughtful, and quietly radical.
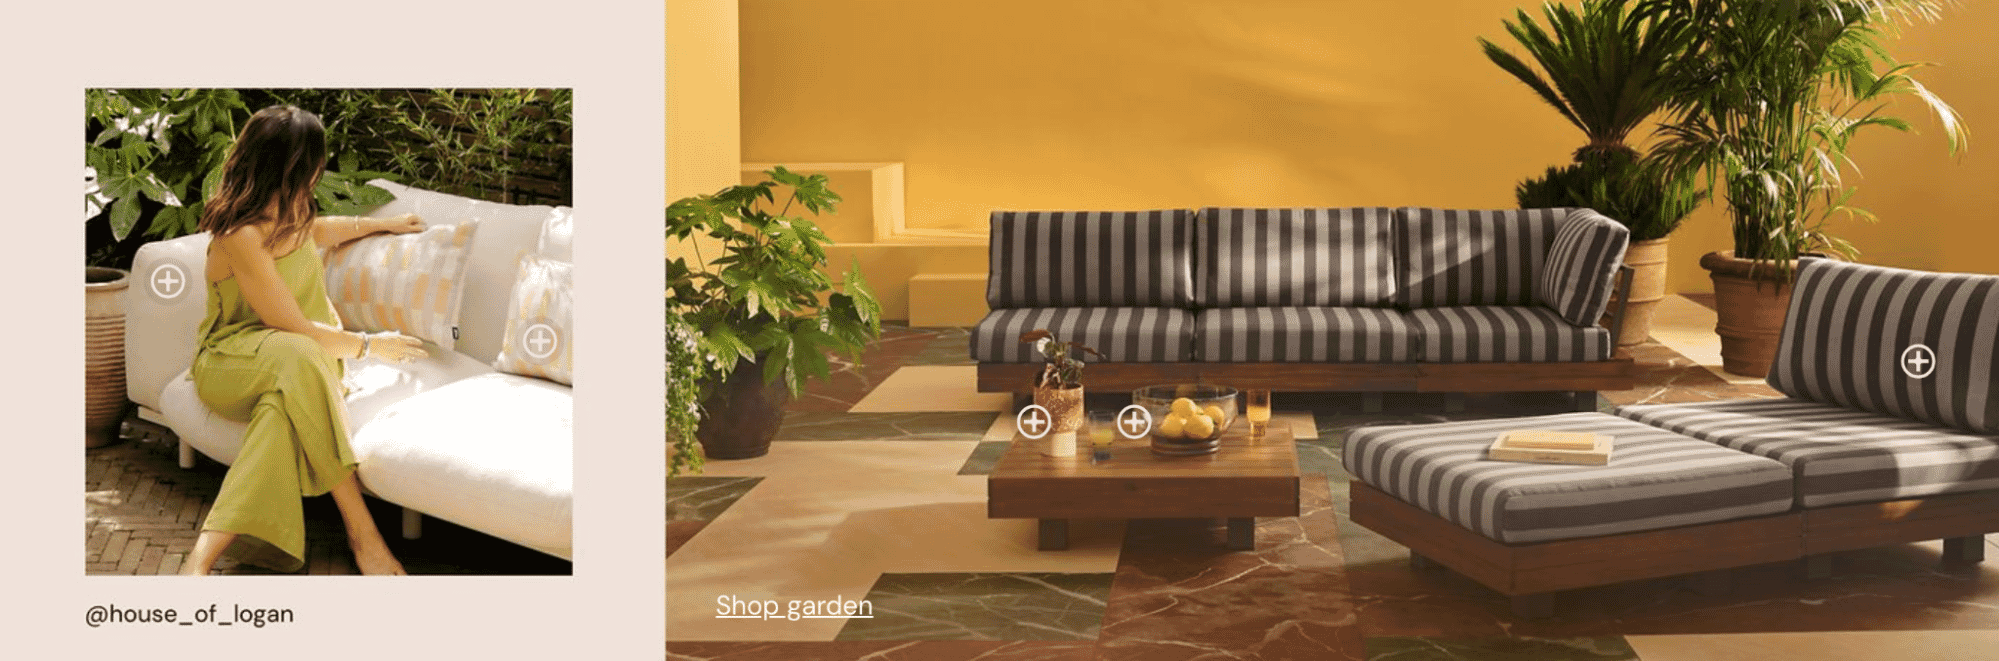
    36. Simon Pearce

    Summer lifestyle scenes with a brunch table set with bagels and juice near a window, and a champagne bottle chilling on an outdoor deck.

    Image source

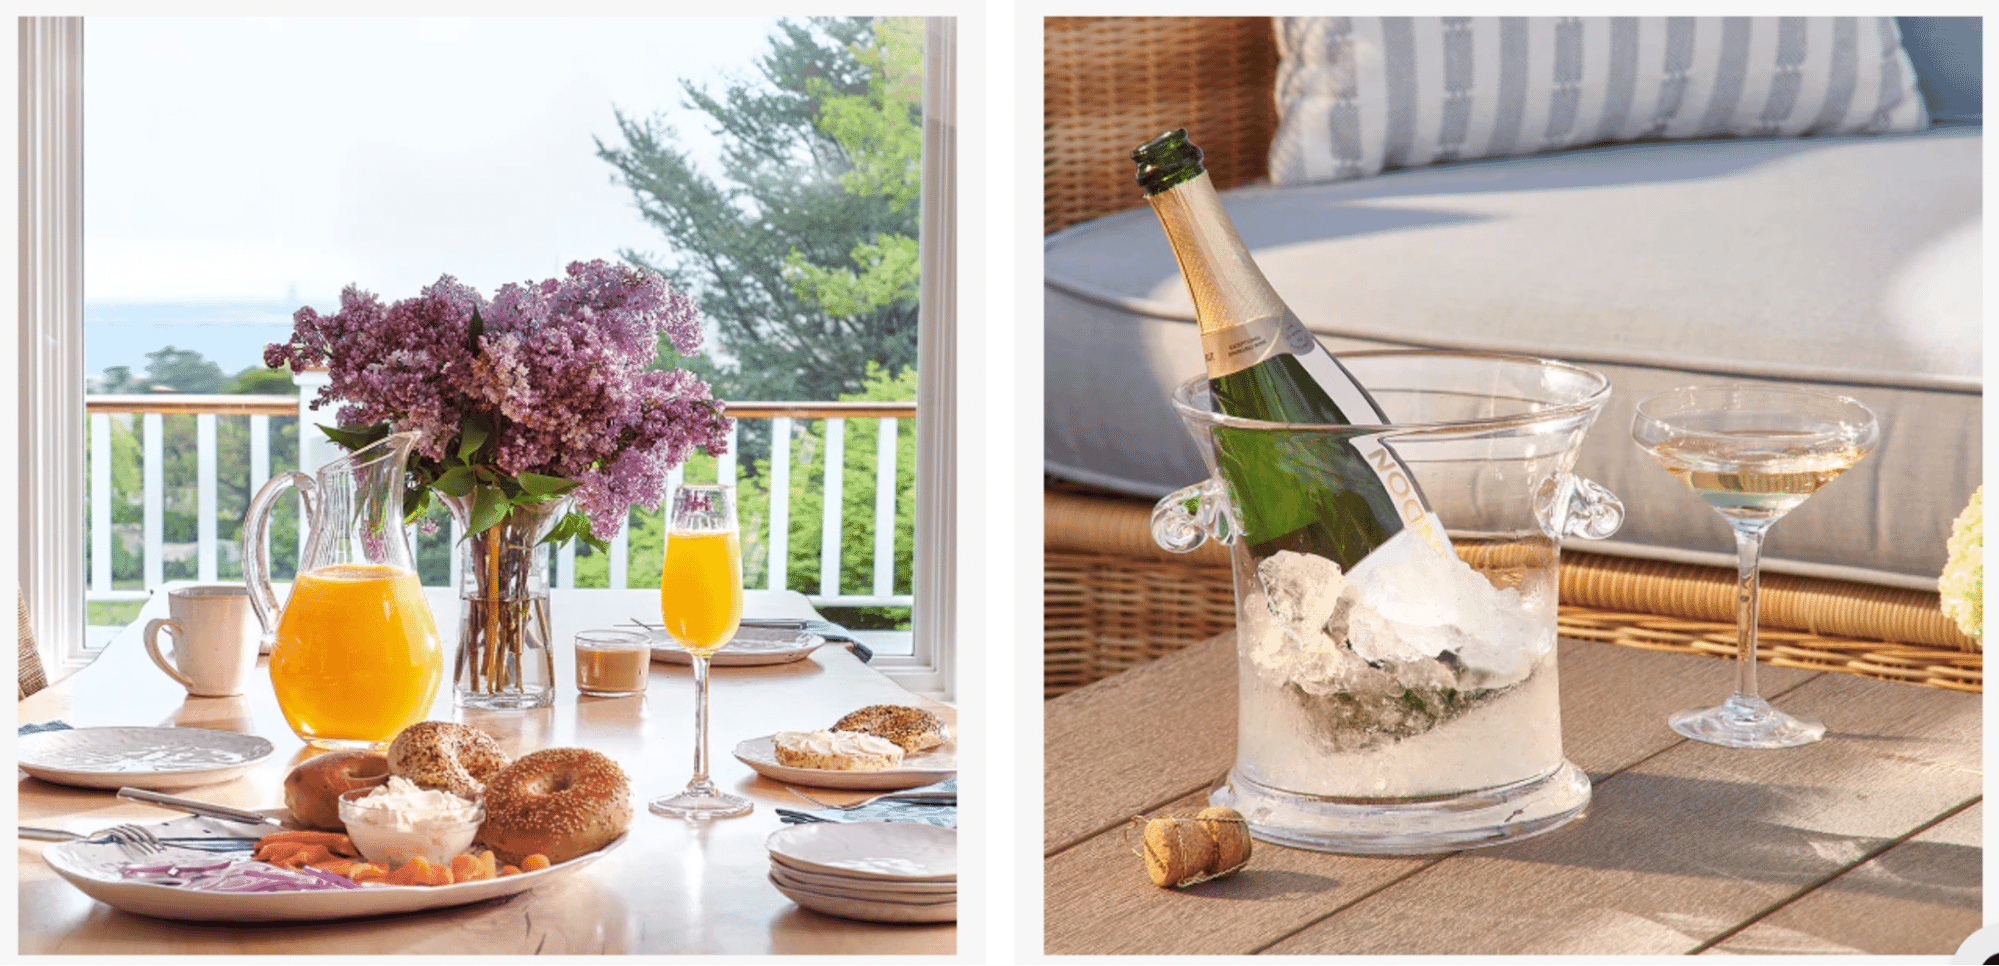
    Set against airy, sun-drenched environments, Simon Pearce’s imagery brings out the artisanal quality of each glass and ceramic piece. The clear sparkle of handblown glassware, the creamy textures of stoneware, and the golden tones of sunlight on surfaces are all captured with refined precision. Lifestyle compositions feel warm and inviting—perfectly styled without feeling staged. 

    Whether it’s a mimosa brunch or champagne on the patio, the photography captures the brand’s essence: craftsmanship, comfort, and understated luxury. This is storytelling through light, texture, and good taste.

    37. Motel a Miio

    Colorful handmade ceramic dish sets, mugs, plates, and bowls with textured glazes on sale with 20–30% discount tags displayed.

    Image source

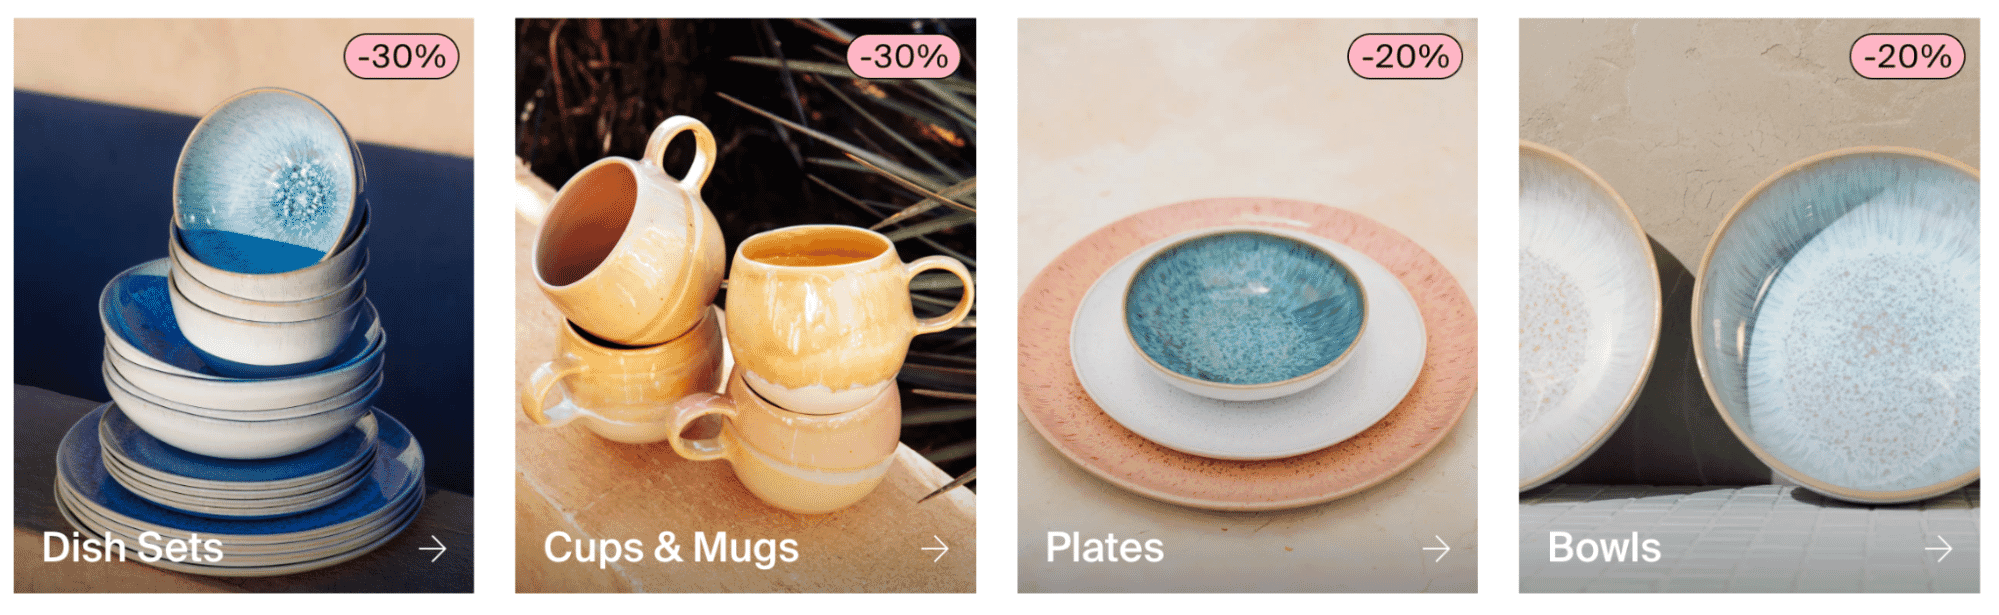
    Motel a Miio’s product photography bursts with color, warmth, and Mediterranean charm. The brand highlights the artisanal quality of its handmade ceramics through rich textures, sunlit surfaces, and thoughtful arrangements. 

    Each image showcases the uniqueness of glazing and form—from the dreamy aqua blues of bowls to the peachy-pink blush of plates. Natural shadows and earthy backdrops give the shots a tactile, sun-kissed feel, inviting viewers to imagine relaxed outdoor dining or cozy kitchen moments. The photography is not just beautiful—it’s transportive, evoking a laid-back, design-forward lifestyle rooted in craftsmanship.

    38. Studio Neat

    Minimalist tool collection featuring the Keen utility knife, Mark One retractable pen, and Mark Two pocket pen in a clean floating product layout.

    Image source

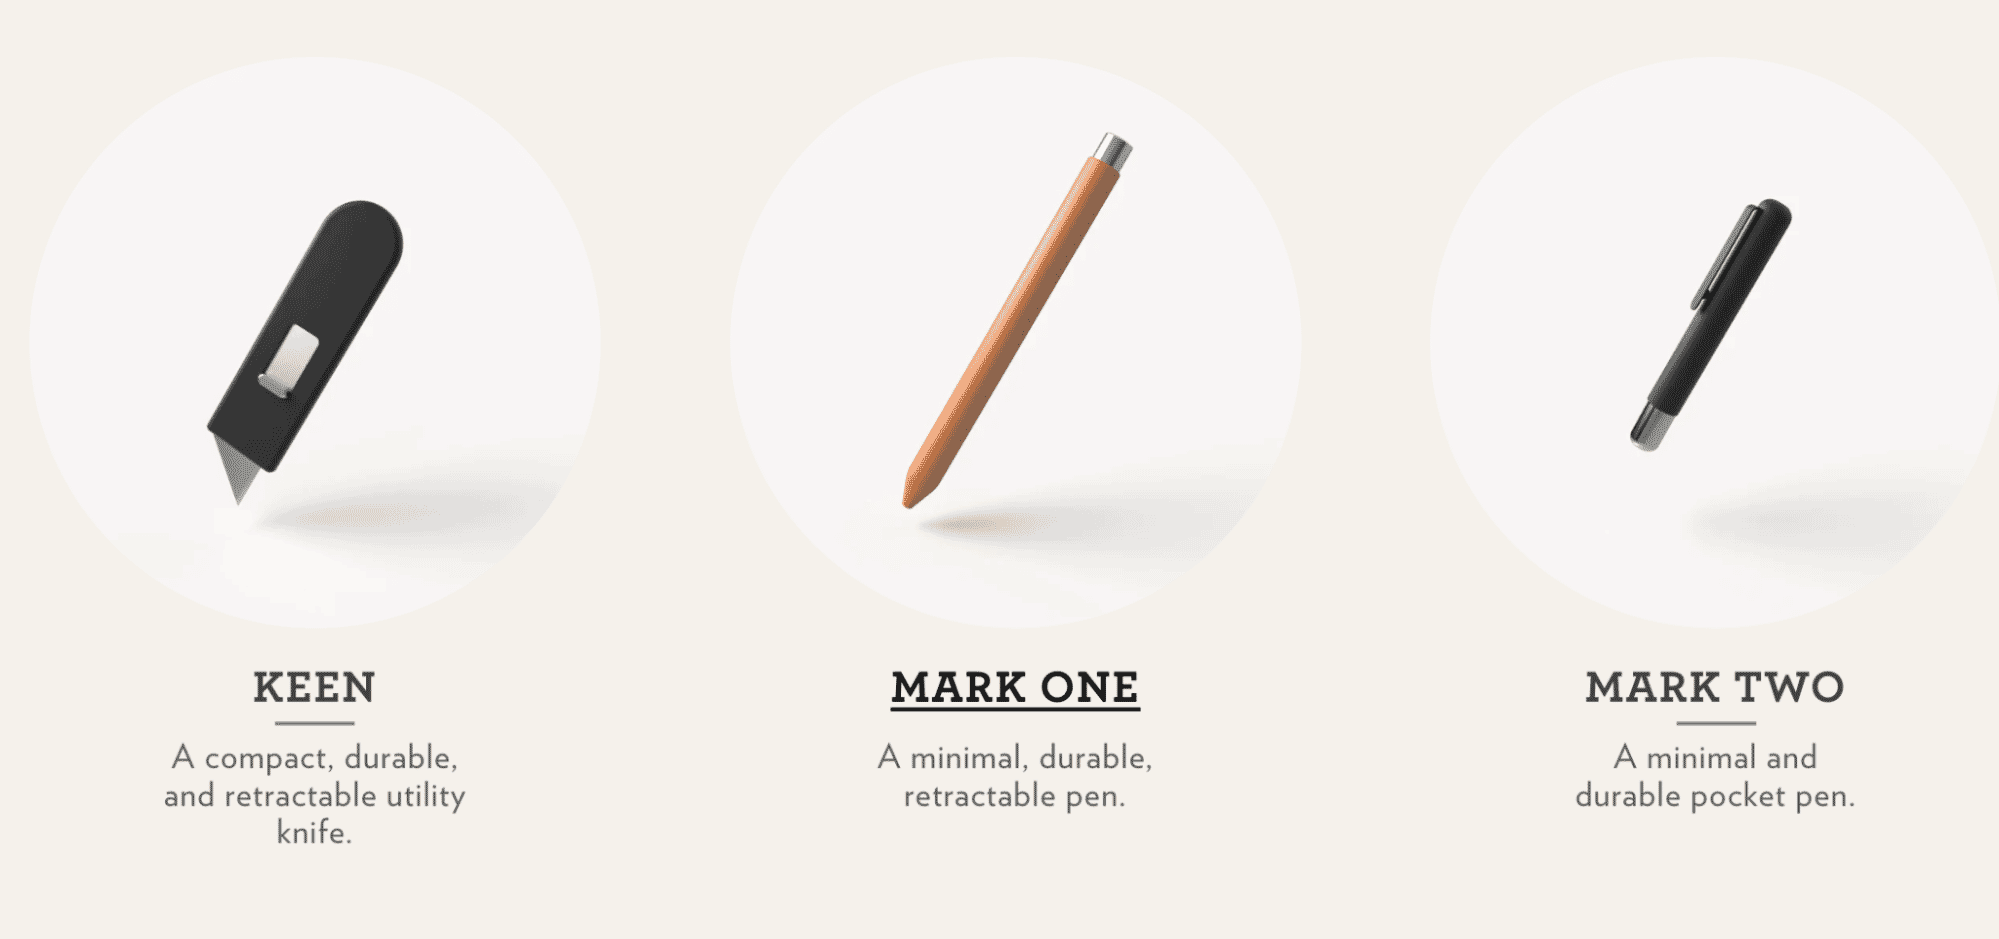
    Studio Neat uses minimalist product photography. In this example, each item is suspended against a clean, white backdrop with gentle shadows, emphasizing their streamlined form and material finish. The floating composition gives the products a modern, weightless feel, aligning with their functional and design-forward ethos. 

    Every visual choice—neutral lighting, soft gradients, centered framing—supports a sleek and utilitarian aesthetic. 

    Cars and automotive

    39. Carvana

    Grid display of different vehicle types including SUVs, sedans, trucks, coupes, minivans, convertibles, wagons, hatchbacks, EVs, hybrids, and plug-in hybrids.

    Image source

    Carvana takes a clean, uniform approach to product photography by displaying each vehicle category in profile against a pure white background. The consistency in angle, lighting, and car color (white) helps customers compare models quickly while reinforcing trust through visual clarity. 

    For ecommerce brands managing large SKUs or configurable product categories, this style benefits from clipping path, retouching, and shadow effects to ensure clean, scalable presentation across all digital platforms.

    40. CarBahn

    Grid of high-performance car parts including ECU tuning, carbon fiber kits, suspension components, intake systems, engines, air filters, and car care products displayed in a workshop setting.

    Image source

    CarBahn’s product photography leans into a high-performance, gearhead aesthetic with bold contrast, sharp lighting, and industrial backdrops. Each category image emphasizes material texture and mechanical precision. There’s a tactile, real-world feel, with shots that oscillate between clean studio setups and gritty workshop environments. 

    This style is ideal for performance auto brands. Related edits might include color correction, reflection and glare removal, and precision shadow work to enhance contrast and depth without over-editing the hardware’s raw appeal.

    41. Mercedes-Benz

    Mercedes-Benz electric concept van with futuristic LED grille and sleek aerodynamic design, showcased under studio lighting.

    Image source

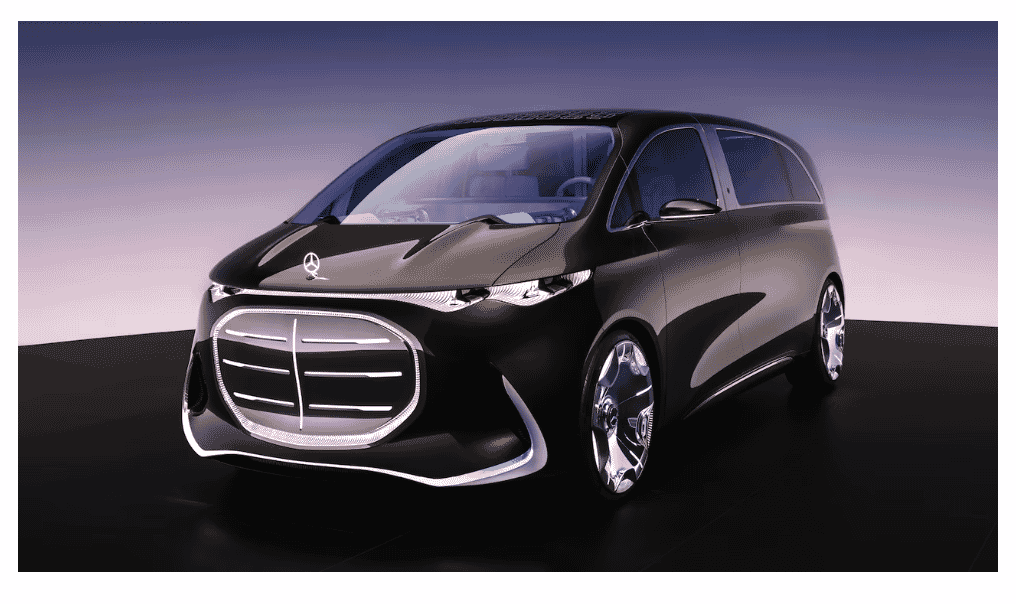
    Mercedes-Benz’s product photography captures futuristic elegance with cinematic precision. This concept vehicle is shot under ambient, gradient lighting that complements the sleek contours and metallic finish, making it feel like a luxury object from the future. The low angle and subtle reflections emphasize design innovation—fluid lines, illuminated details, and aerodynamic form—while keeping the focus on craftsmanship and vision.

    Lifestyle and miscellaneous

    42. StickerBrand

    Bold wall murals including a Japanese wave illustration in a café and a leafy tropical wallpaper behind a green-themed bedroom setup.

    Image source

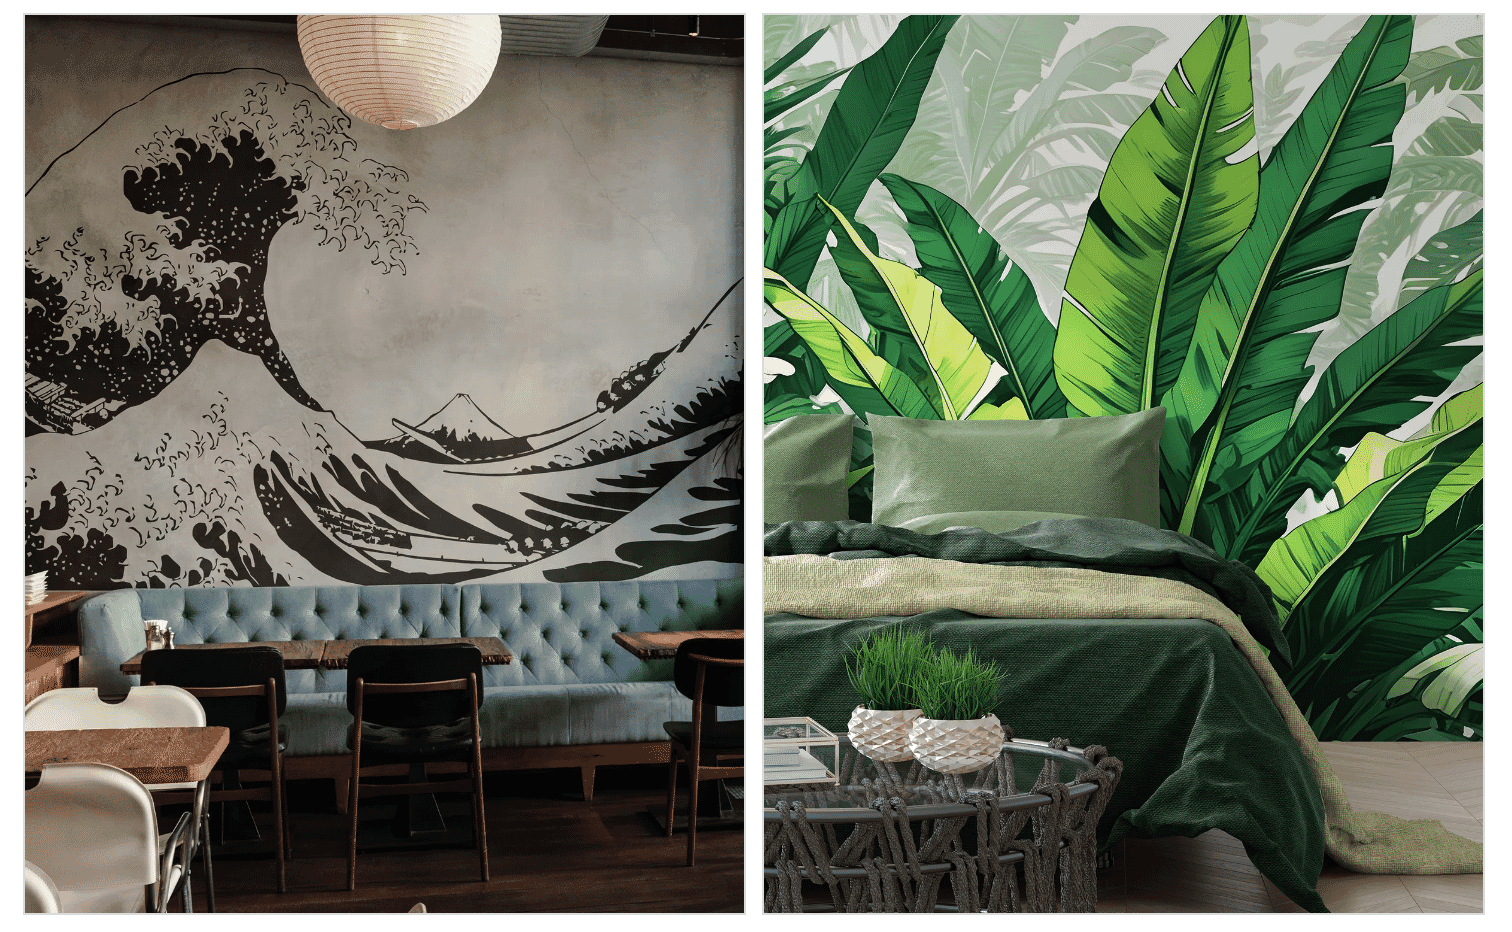
    StickerBrand’s product photography transforms wall decals into immersive, real-life design statements. Each wall is staged in context—whether it’s a moody café corner or a leafy bedroom escape—so shoppers can picture the product in their own space. The lighting is soft and natural, allowing the decals to blend seamlessly with furniture, textiles, and finishes while still standing out with crisp lines and vibrant color.

    43. Bambi Baby

    UPPAbaby family product lineup featuring parents walking with the Vista V3 stroller and close-up images of the V3 bassinet and stroller in various colors.

    Image source

    Bambi Baby’s product photography blends lifestyle and catalog styles to showcase both the function and feeling behind its premium baby gear. 

    The left side of this example shows a warm, everyday moment—a family on a walk at golden hour. This emotional lifestyle shot balances beautifully with the crisp, isolated product shots on the right, which highlight detail, color variations, and pricing. This dual approach supports both storytelling and conversion. 

    44. Bentley

    Tracker hard-shell suitcase collection in a variety of bold colors and finishes, arranged in a line with the tagline “Travel Colourfully.”

    Image source

    Bentley’s luggage line embraces bold, clean, and ultra-modern product photography that celebrates color as a core brand identity. The suitcases are displayed in a tight lineup with seamless lighting and minimal shadows, highlighting each hue without distraction. The gradient floor and backdrop also complement the tones of each suitcase.

    45. Walmart

    Walmart homepage promotions highlighting tech and summer savings, including laptops, PS5, pools, and beauty tools against bright blue backgrounds.

    Image source

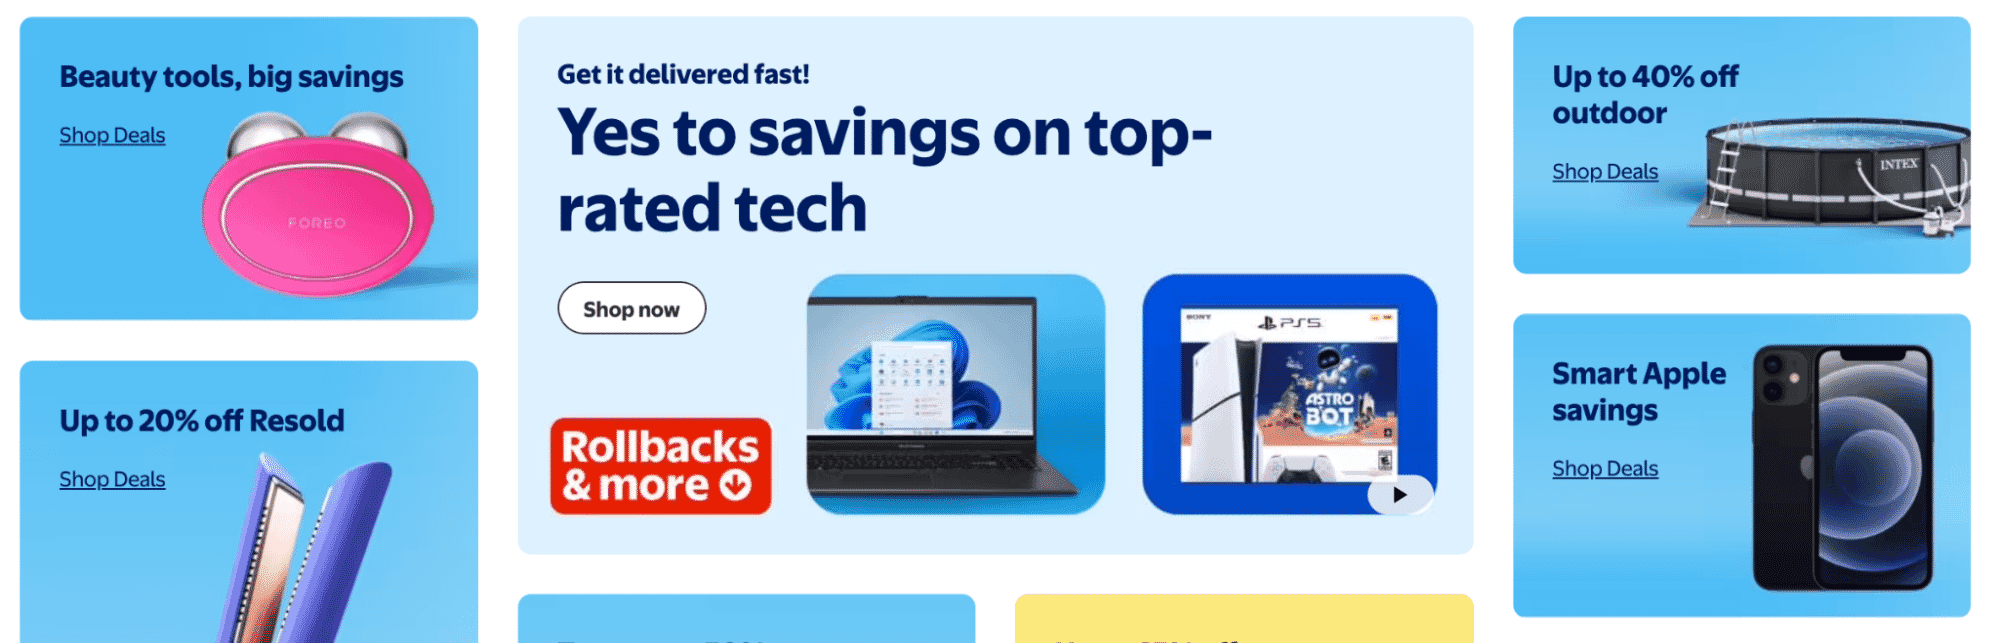
    Walmart uses bright, consistent, and brand-forward product photography to energize its promotional graphics. Each product—from beauty tools and smart tech to outdoor gear—is presented against soft, uniform color backdrops that create an airy and cheerful visual experience. Items are expertly isolated, often enhanced with clipping paths, drop shadows, and vibrant retouching to make them pop while maintaining a cohesive brand aesthetic.

    Food and drink

    46. Candy Club

    Colorful assortment of gummy candy including rainbow strips, chocolate clusters, sour hearts, and sprinkles, spilling out of open Candy Club jars.

    Image source

    Vibrant gummies, chocolates, and sour belts spill playfully from jars across a crisp white background, letting the intense colors and textures take center stage. The overhead layout creates a sense of abundance, while the neatly styled candy piles maintain a polished, crave-worthy aesthetic. Candy Club’s photos are a visual sugar rush that makes every sweet treat look like a party.
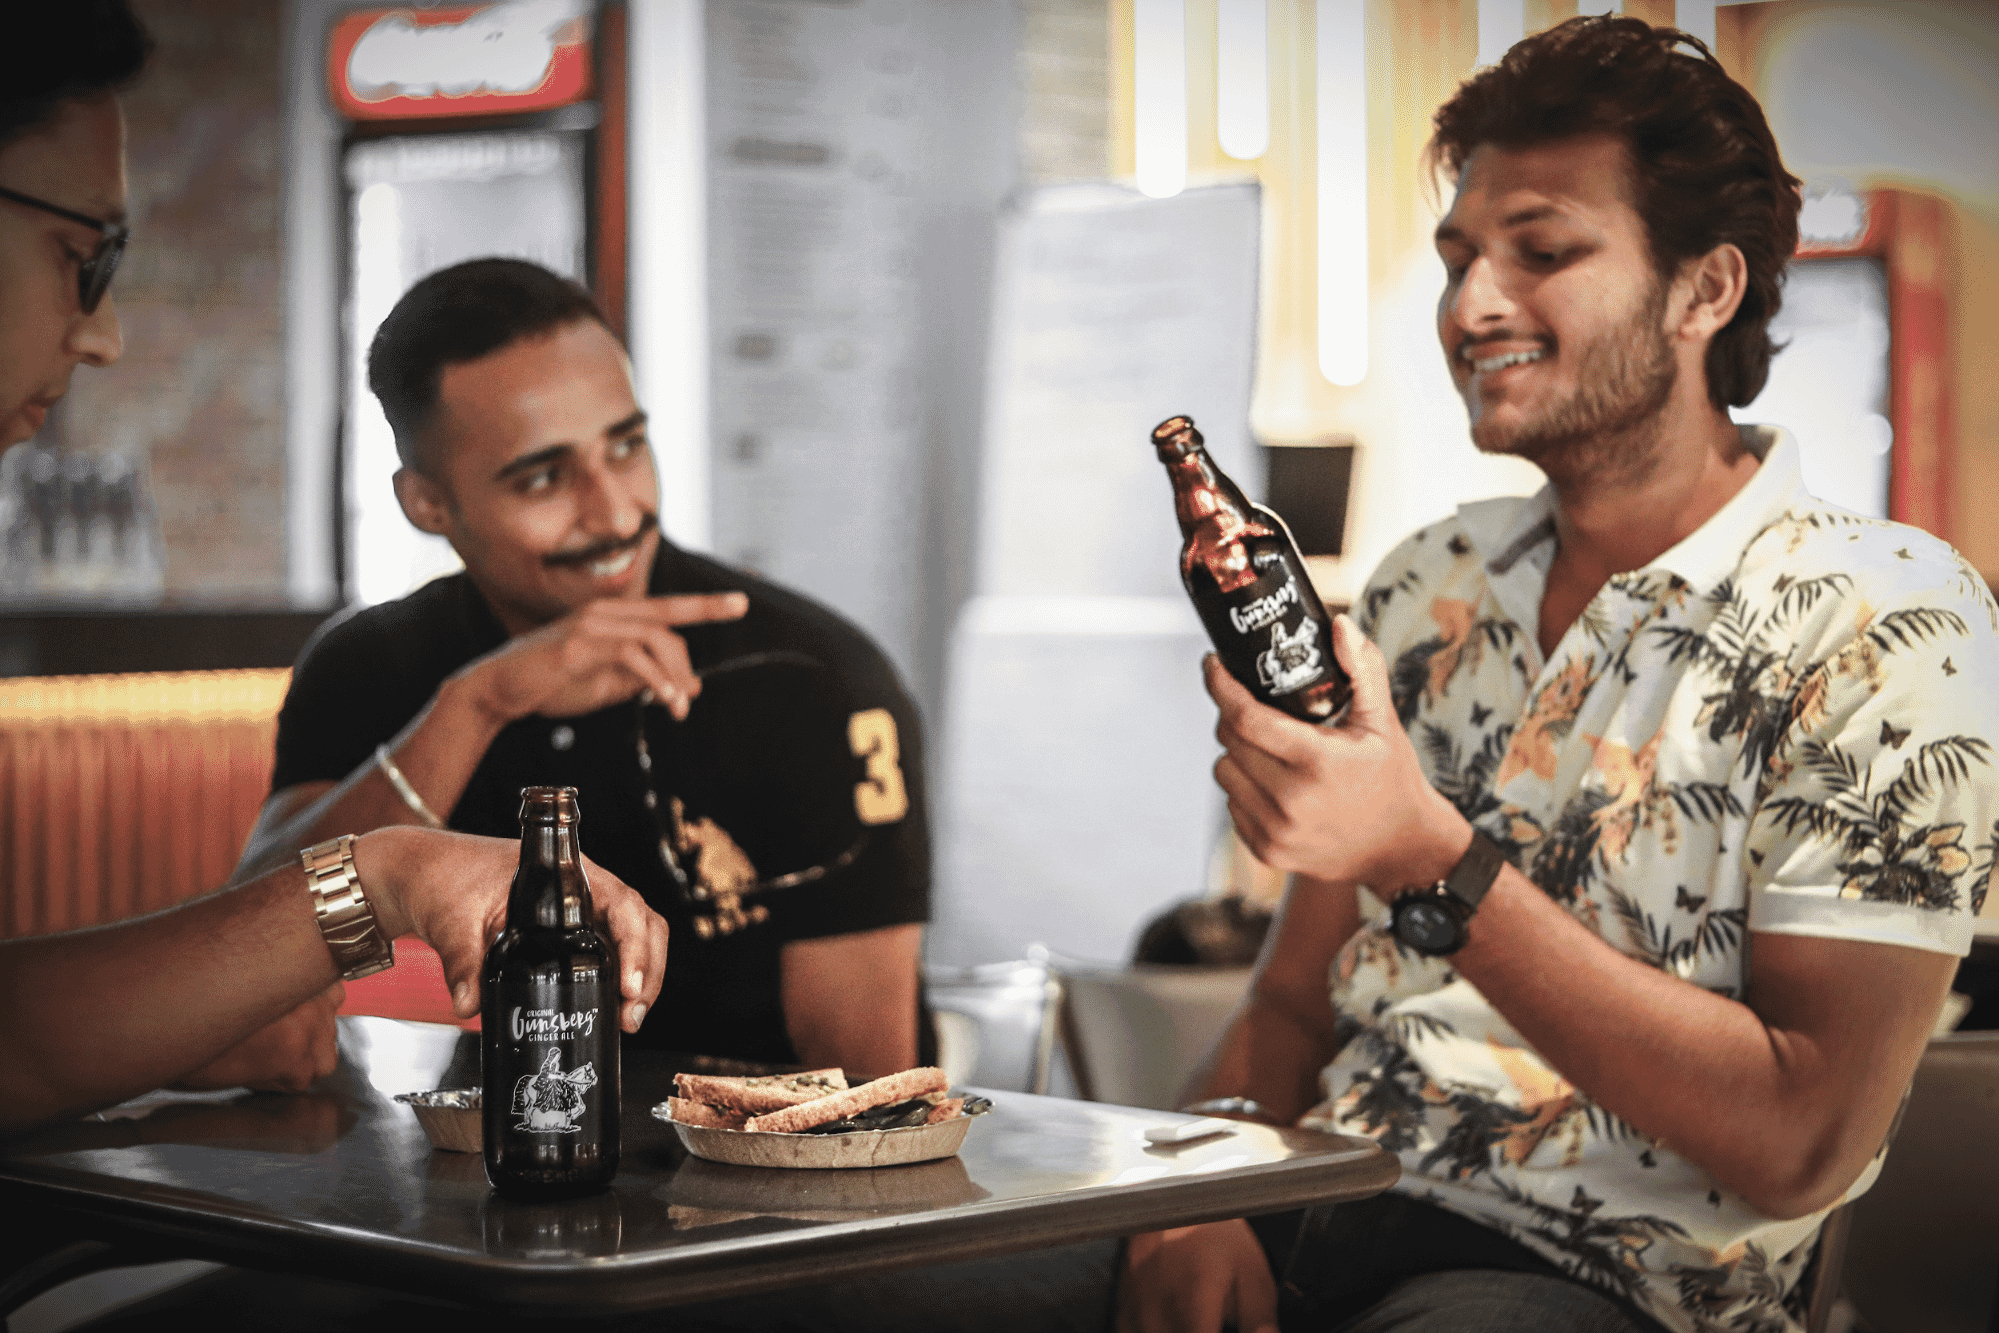
    47. Rauch

    ariety of RAUCH branded beverages including Happy Day orange juice, Bravo multivitamin, MyTea lemon iced tea, Yippy kids drink, and 100% Orange glass bottle on a light background.

    Image source

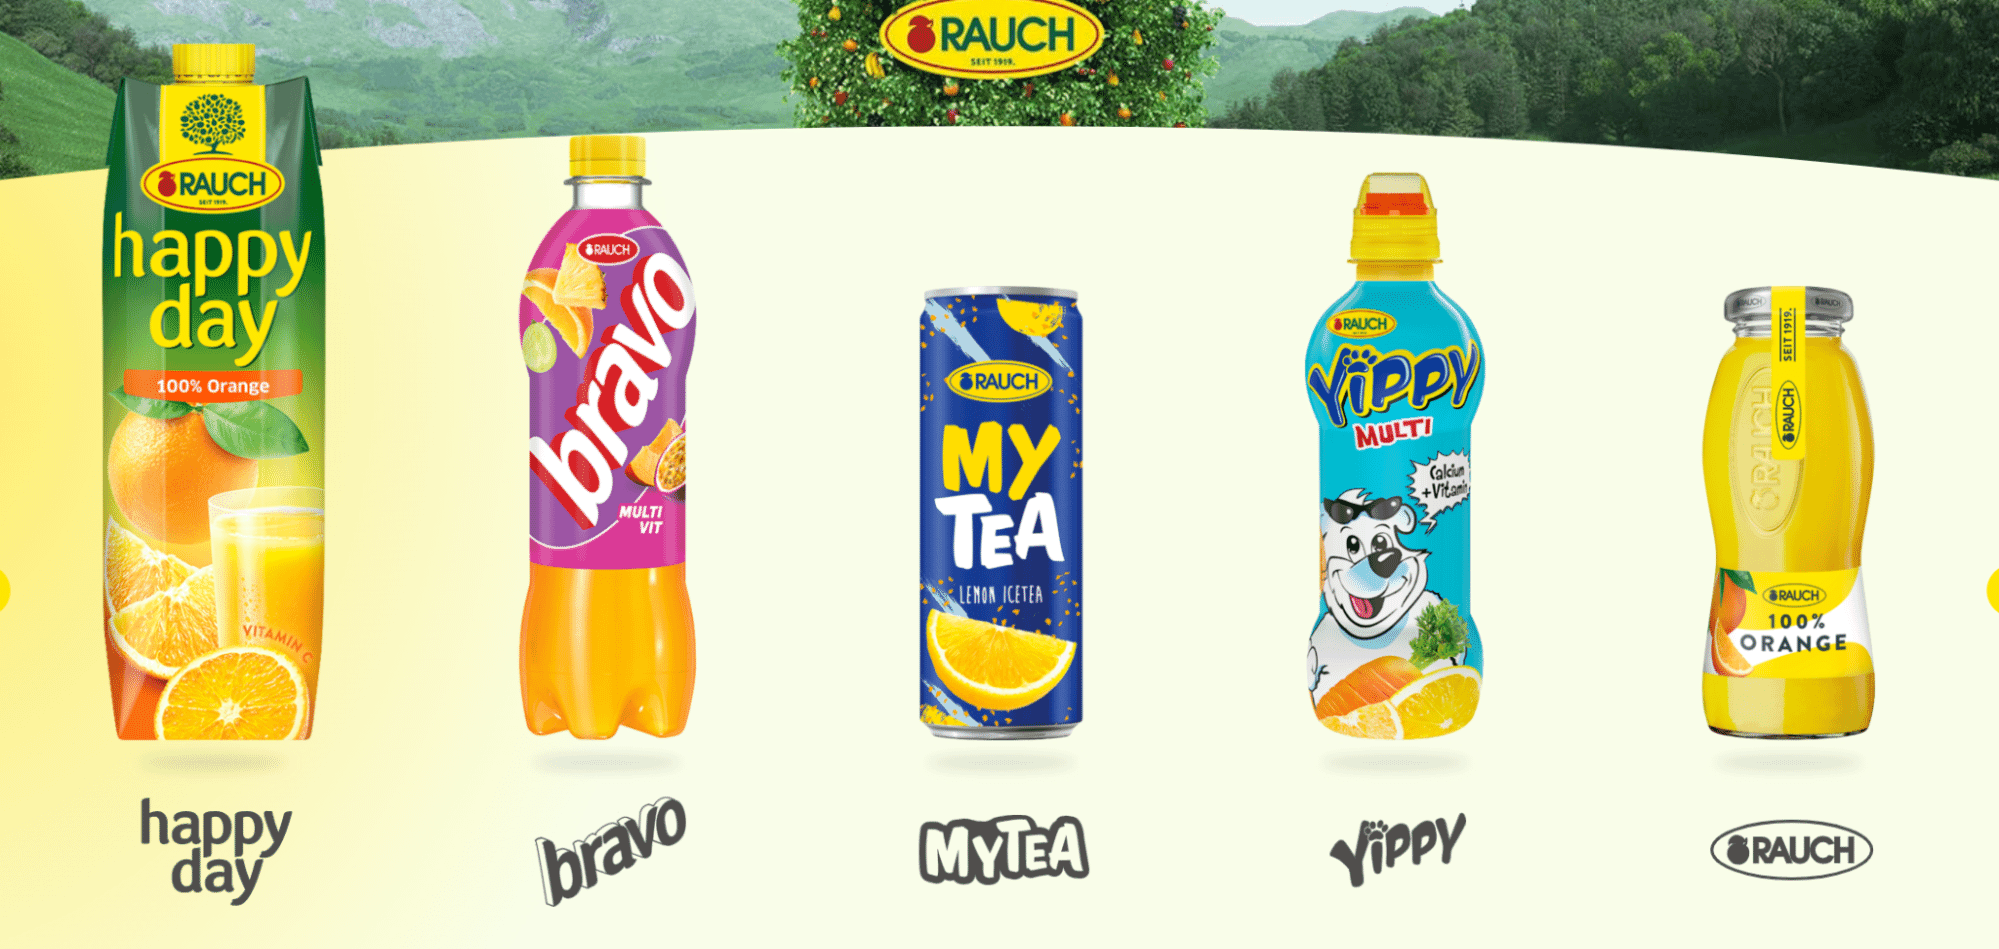
    Rauch brings a playful, shelf-ready polish to its product photography. Against a smooth gradient backdrop that shifts from citrus yellow to cream, each beverage line is given equal spotlight with symmetrical placement and minimal distractions.

    Each product floats with a subtle shadow, allowing vibrant packaging to take center stage. The lighting is soft yet evenly distributed, enhancing the saturated colors and fruity visual cues without harsh glare

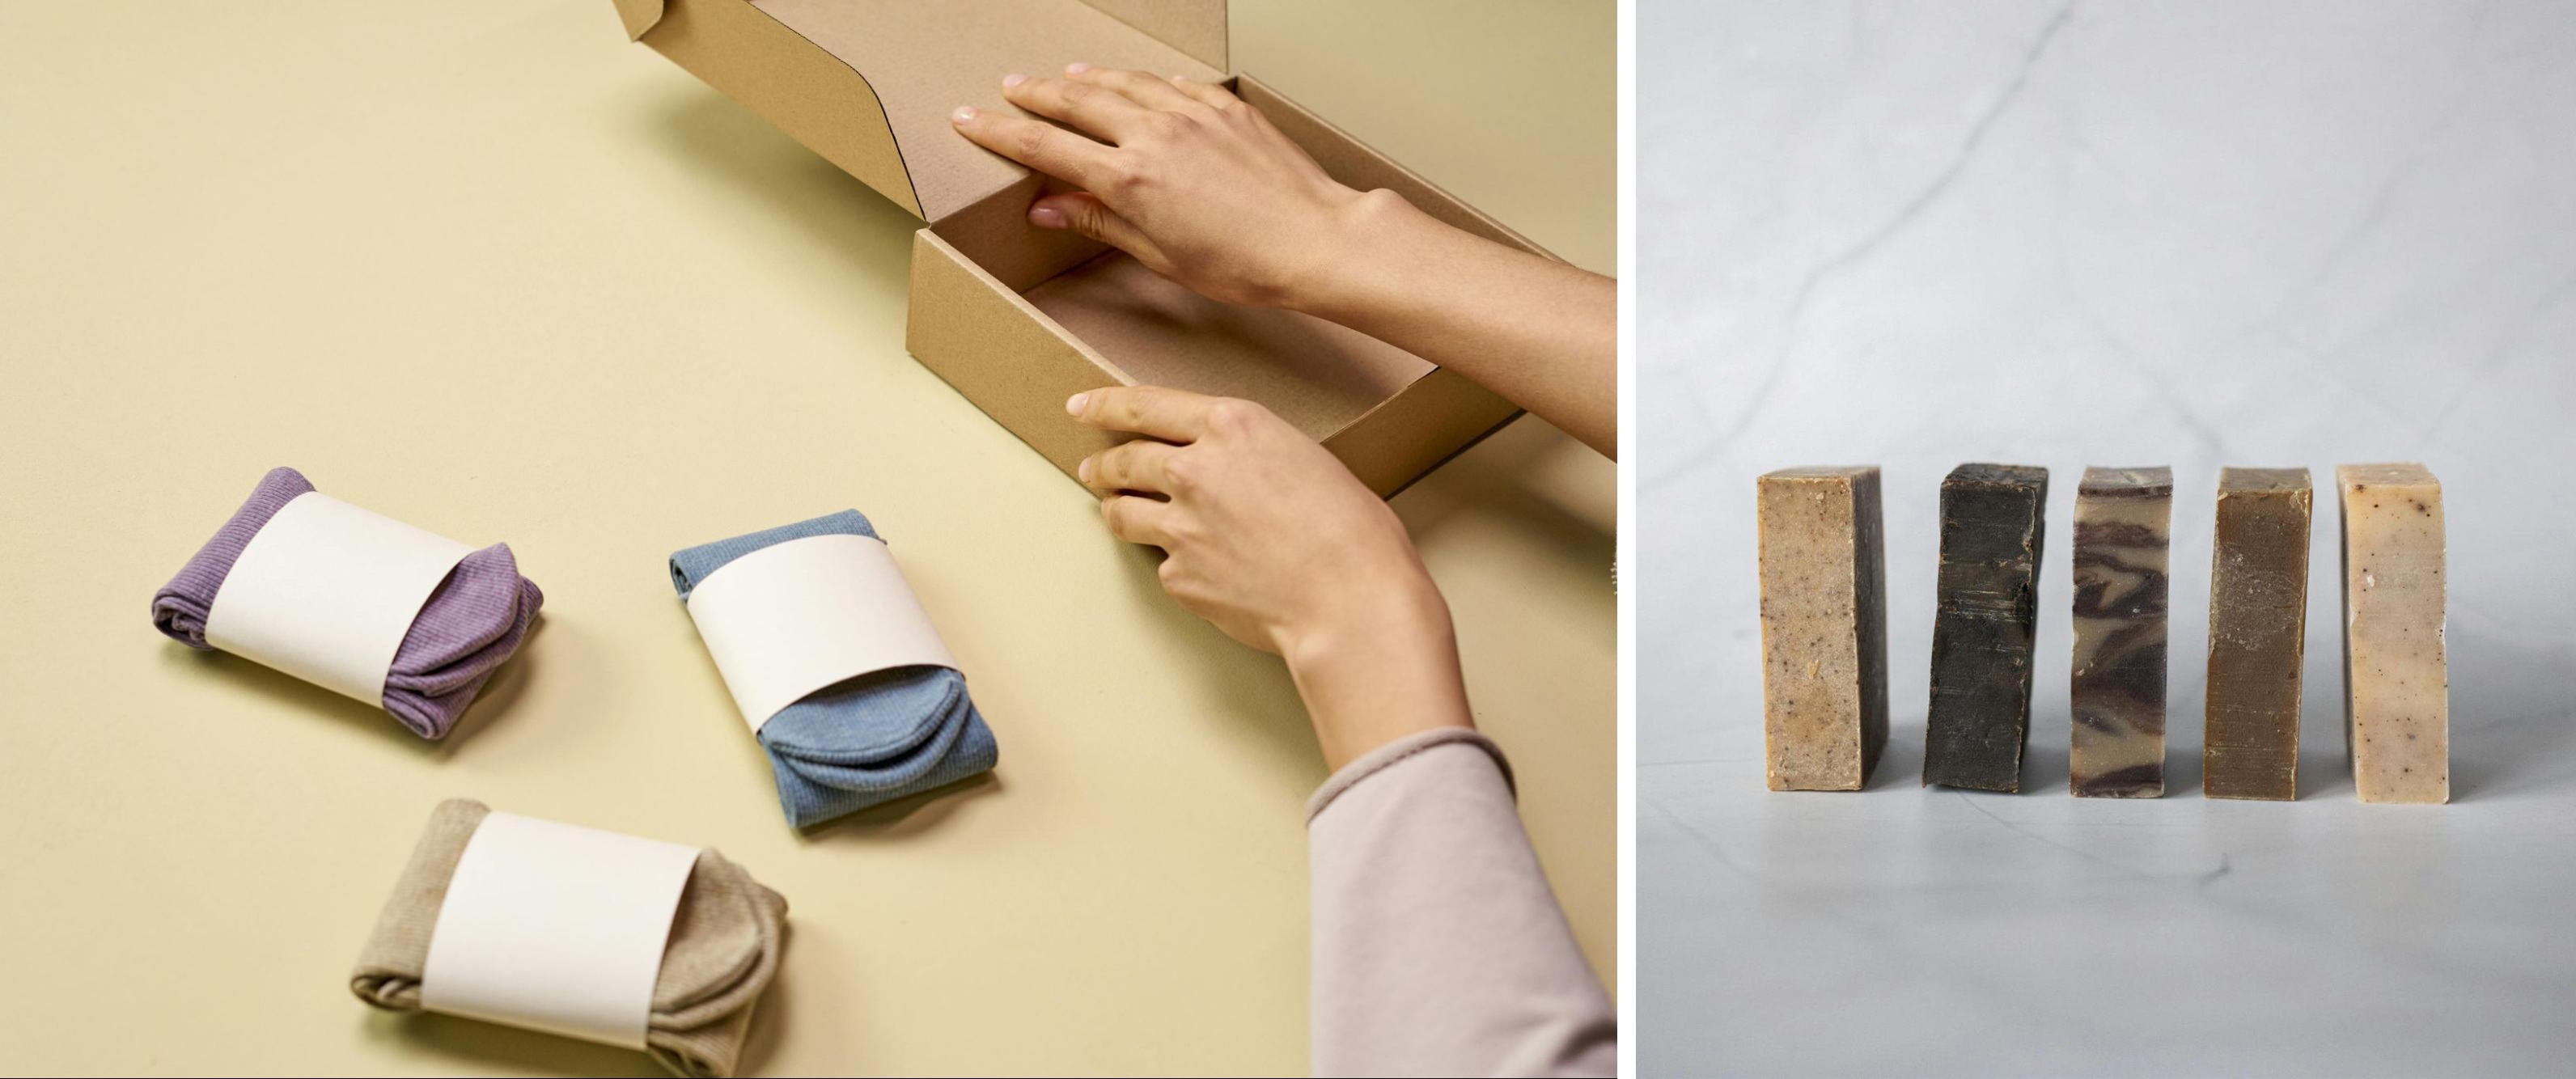
    48. Backyard Butchers

    Premium meat box selections labeled The Steakhouse, The Backyard, and The Farmhouse, featuring vacuum-sealed cuts of USDA choice beef, pork, and chicken.

    Image source

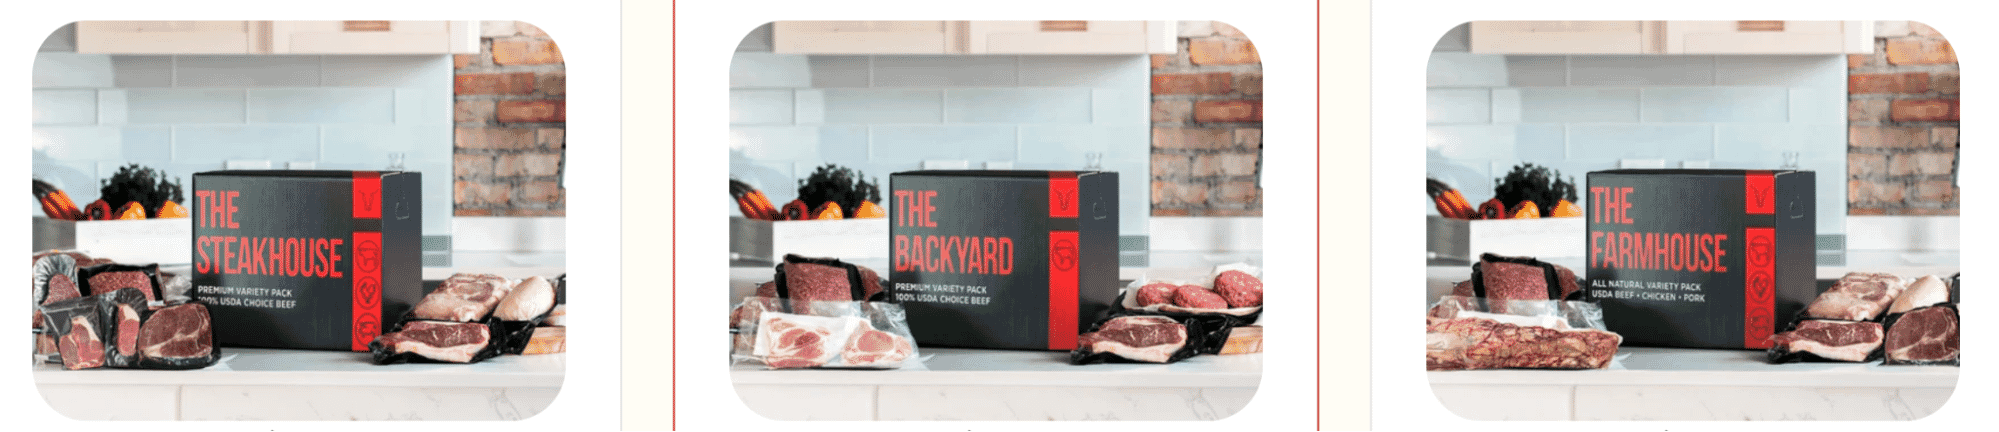
    Backyard Butchers nails a clean, trust-building presentation that’s perfect for high-value food subscriptions. Its product photography highlights premium meat packs in pristine kitchen settings with natural light, fresh produce, and minimal props—immediately reinforcing freshness, quality, and home delivery convenience.

    49. Tony’s Chocolonely

    Tony’s Chocolonely product display with a cream embroidered chocolate hat, colorful chocolate bar gift pack, and milk honey almond nougat bar on vibrant color backgrounds.

    Image source

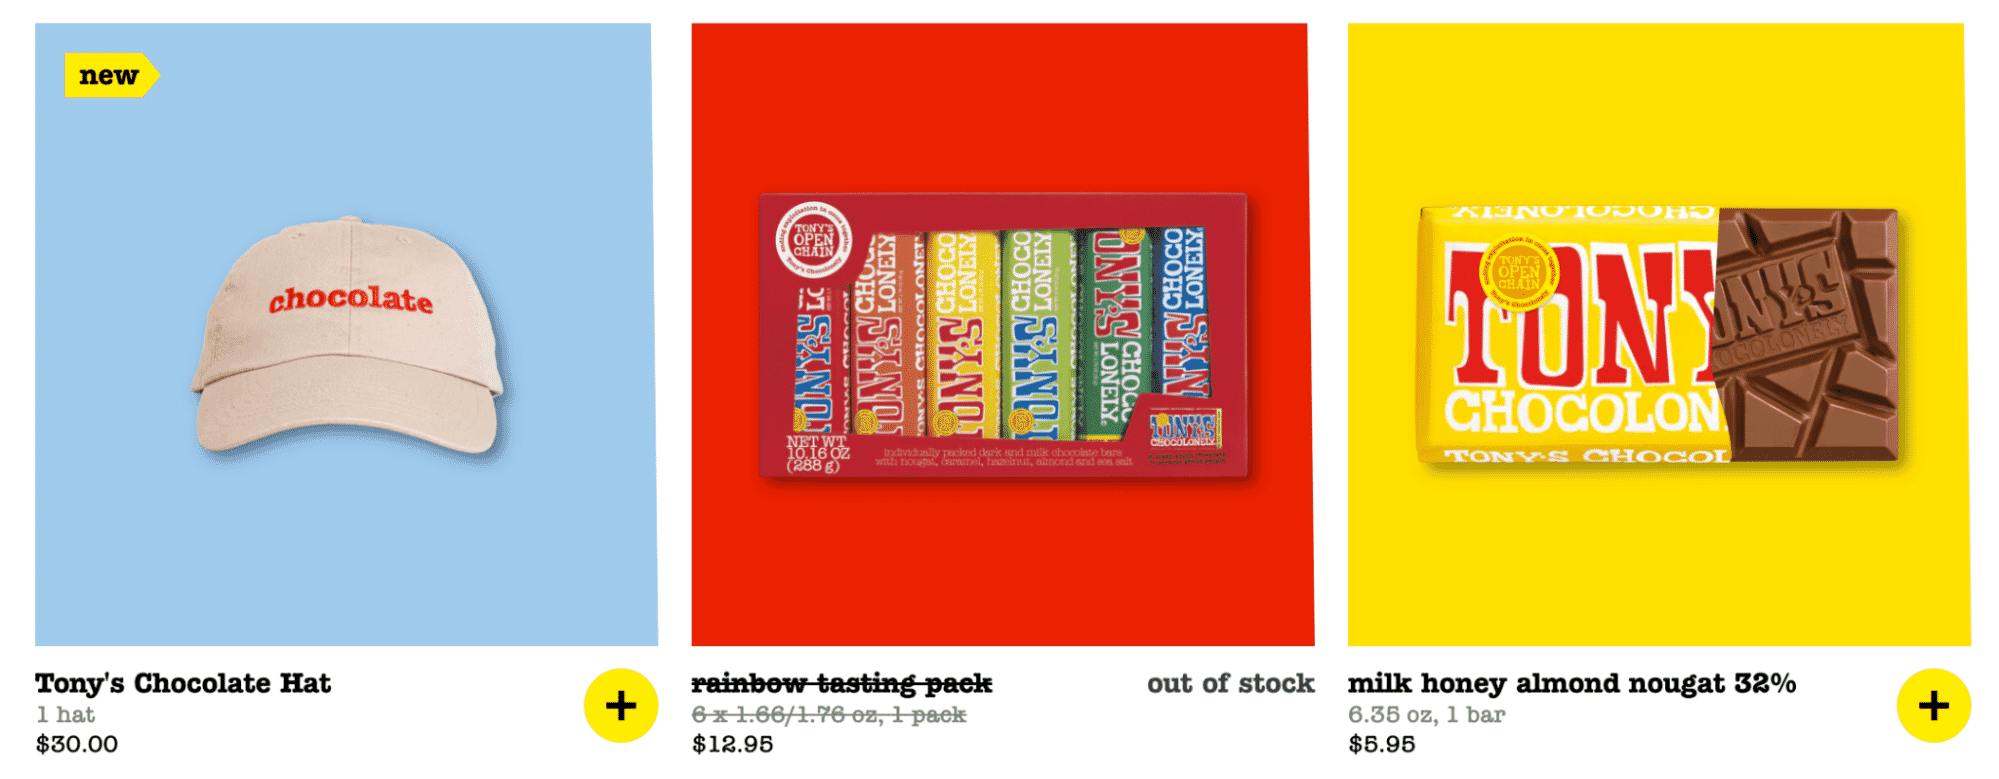
    Tony’s Chocolonely brings the same bold, joyful energy of its packaging into its product photography. Vibrant, solid-color backgrounds create instant visual impact while keeping the focus squarely on the products. Items are shot straight-on with clean clipping paths and slight shadows to create a floating effect, lending a sense of playfulness and modernity. Every shot is bright, color-blocked, and punchy enough to pop in any feed or grid.

    50. Ghia

    Ghia non-alcoholic aperitif and canned drinks styled creatively with the tagline

    Image source 

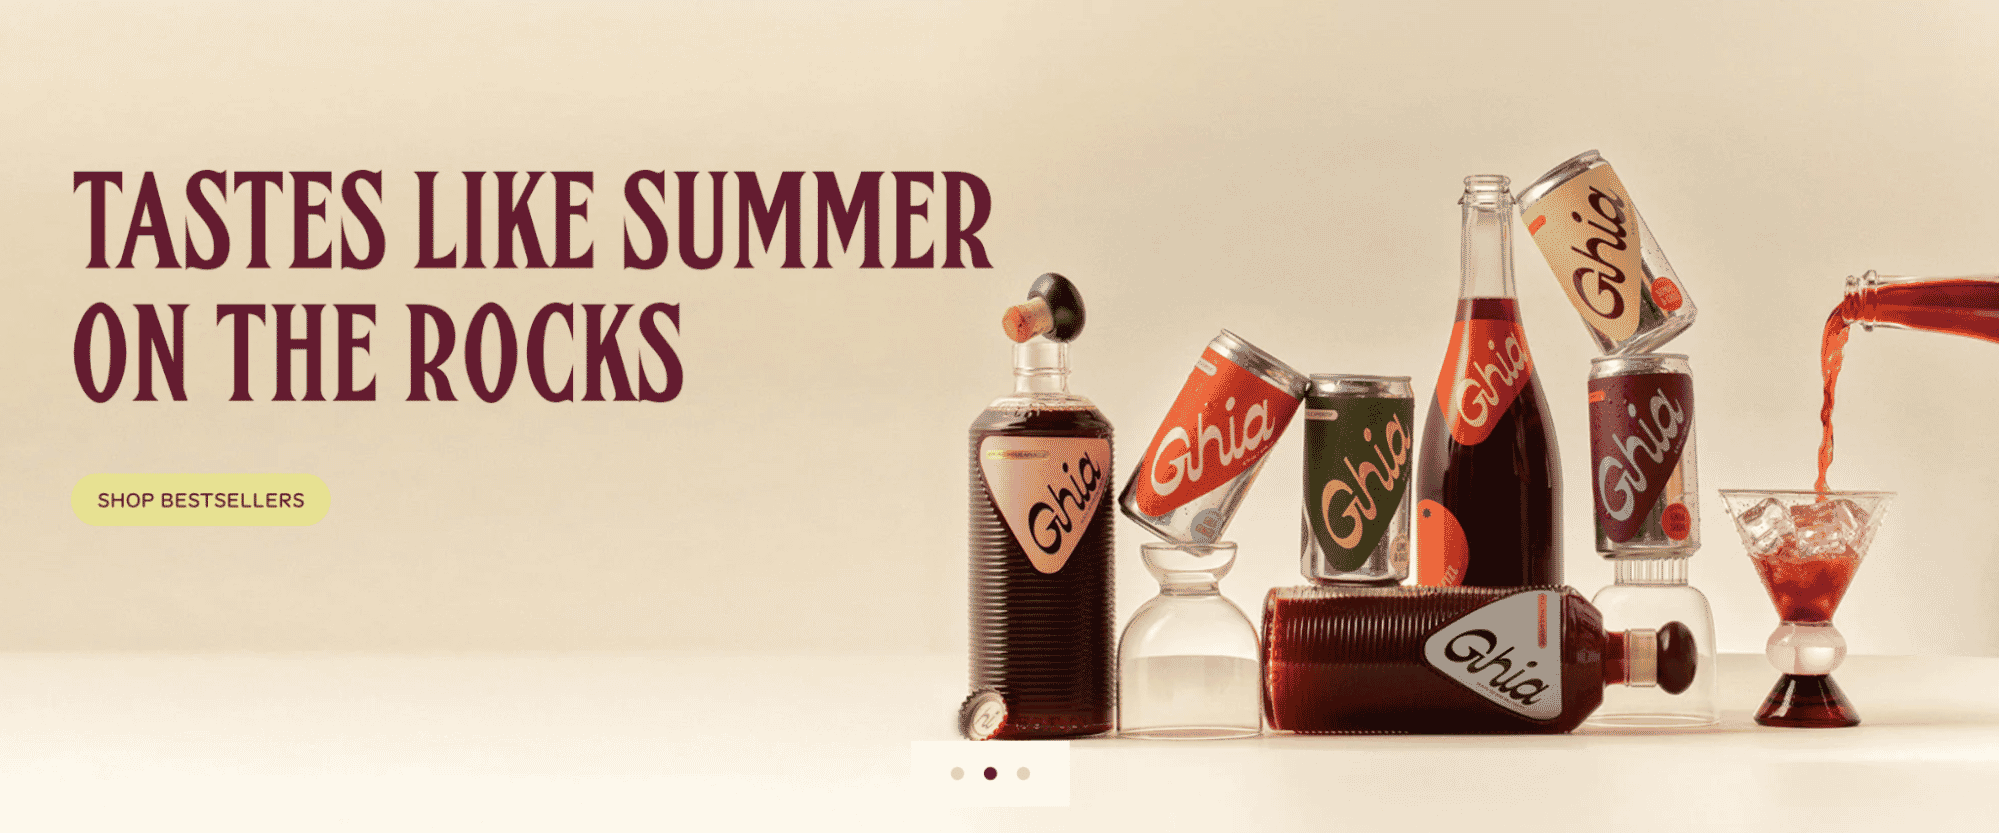
    Set against a creamy, sunlit backdrop, Ghia combines perfect product symmetry with unexpected moments—like a pour shot mid-air or cans balancing precariously on glassware. The lighting is soft yet directional, giving glass and liquid a gentle glow while letting label colors pop with vintage flair.

    Create your perfect product photos

    Great product photography doesn’t just capture what you’re selling—it captures why someone should care. Across industries, from fashion to food to tech, the most successful ecommerce brands use thoughtful visuals to build trust, spark desire, and drive conversions.

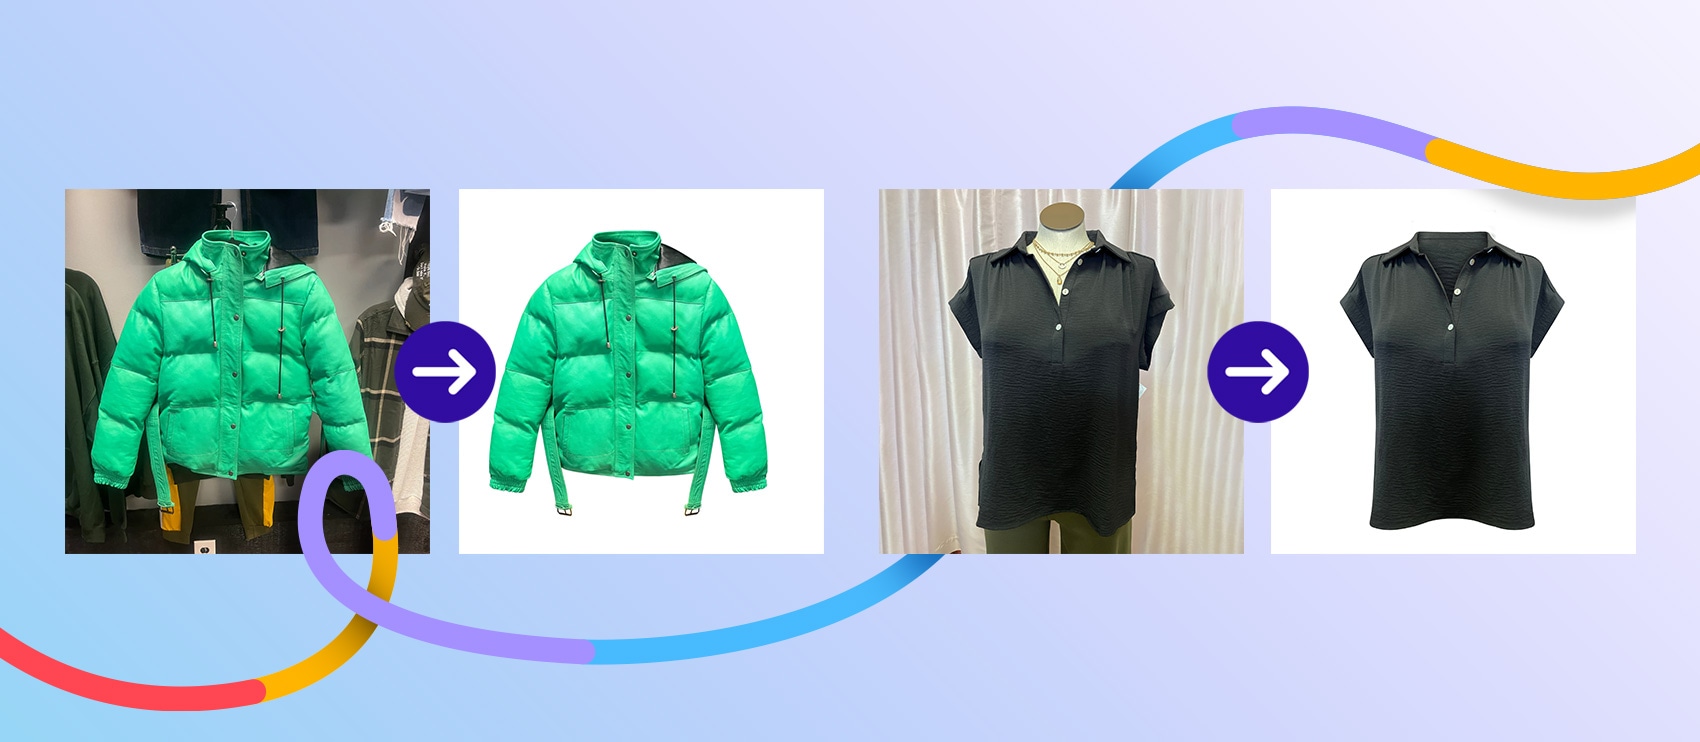
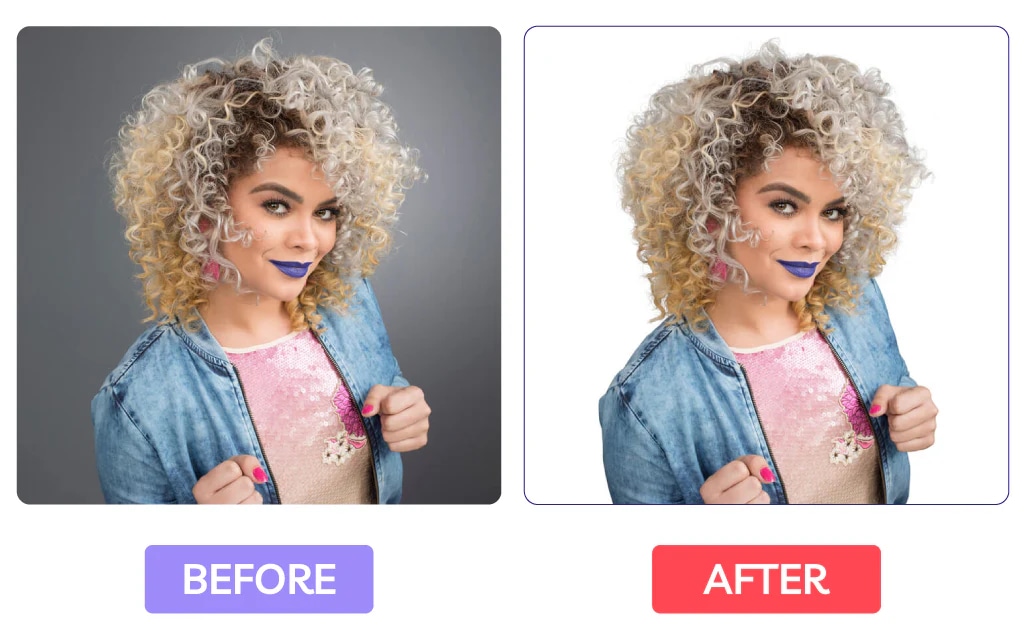
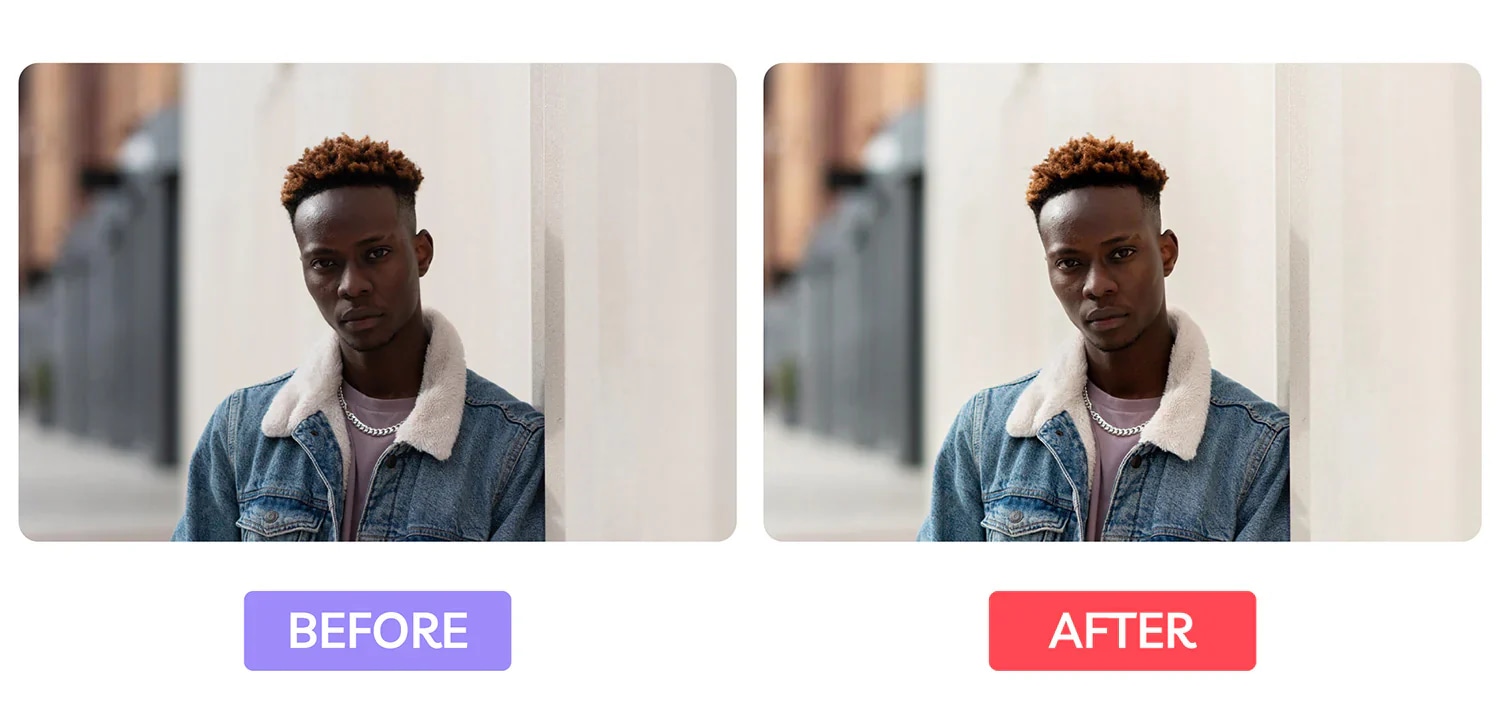
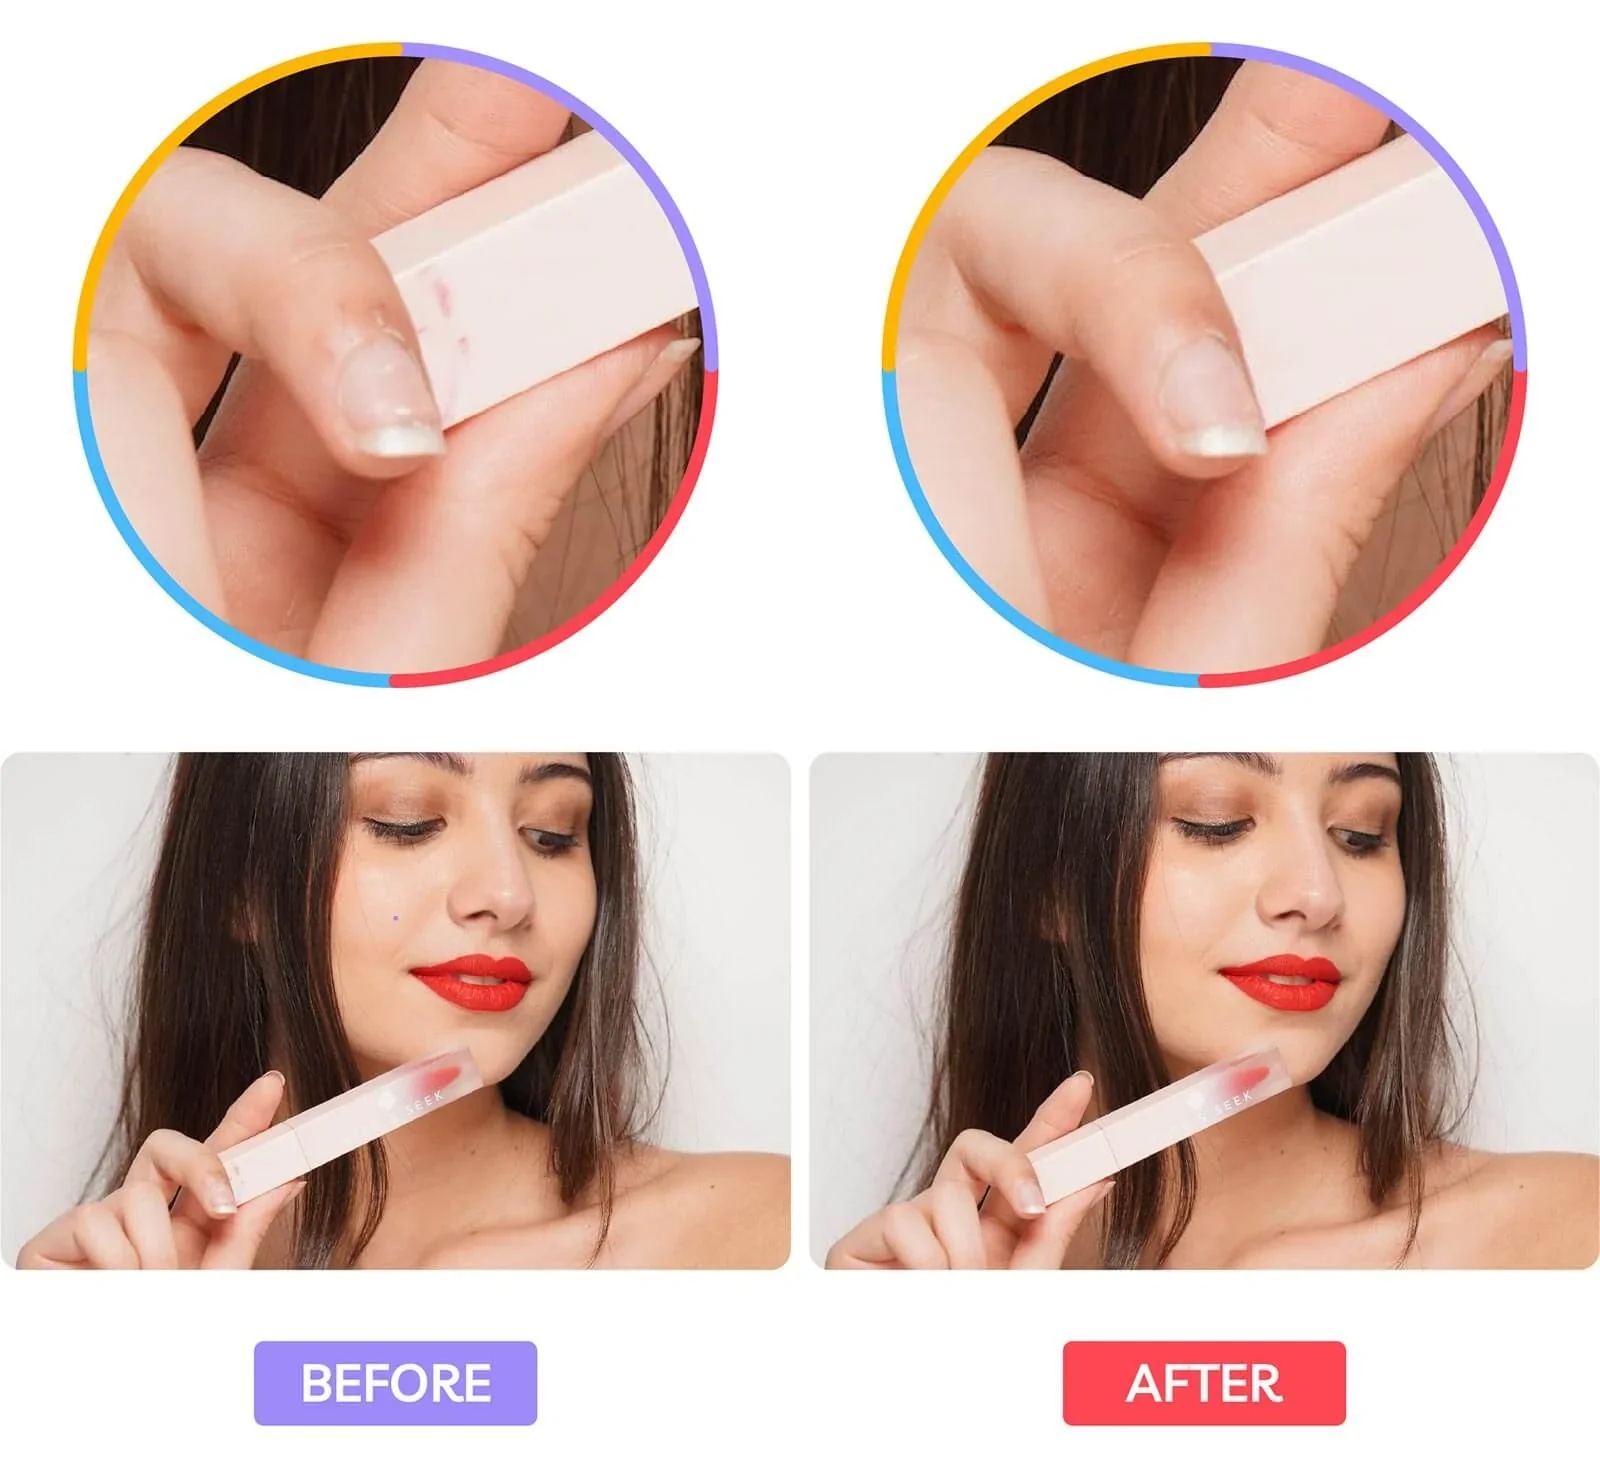
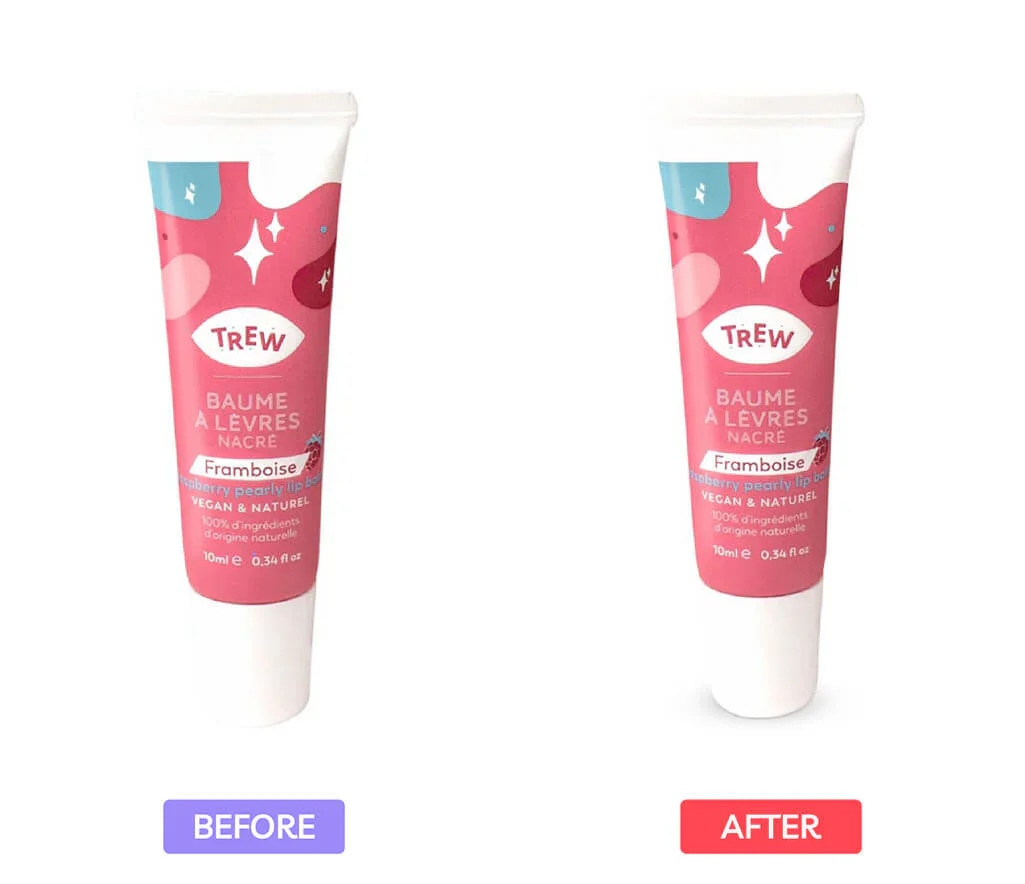
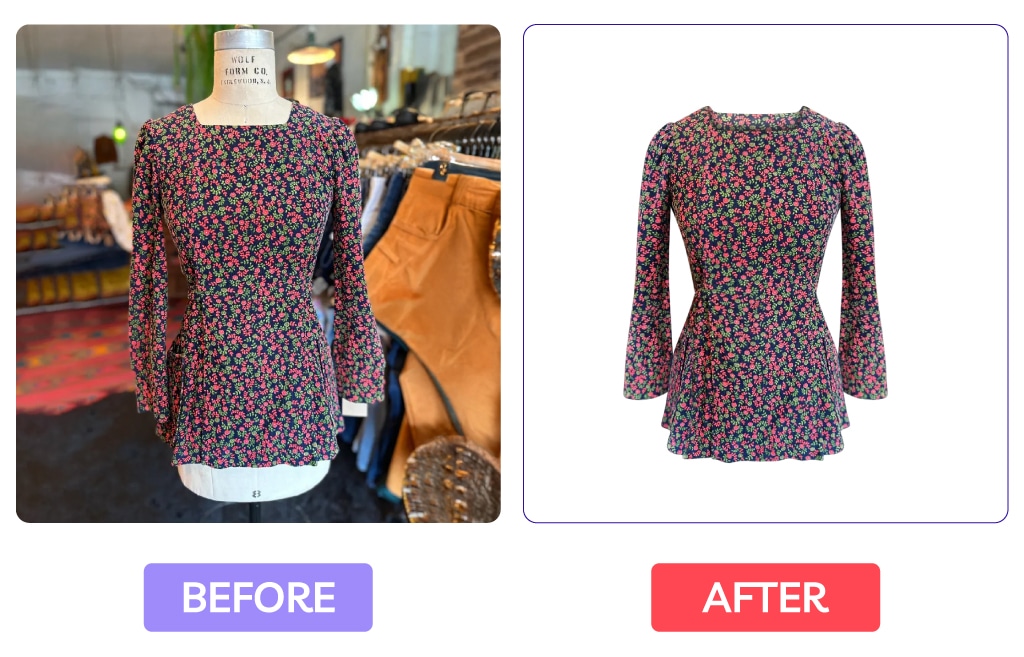
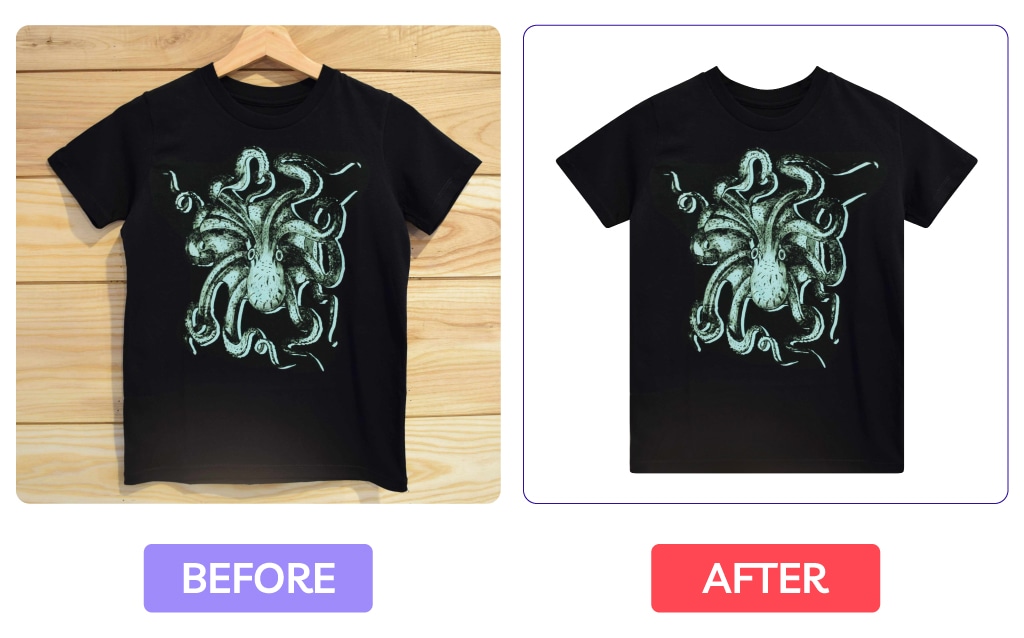
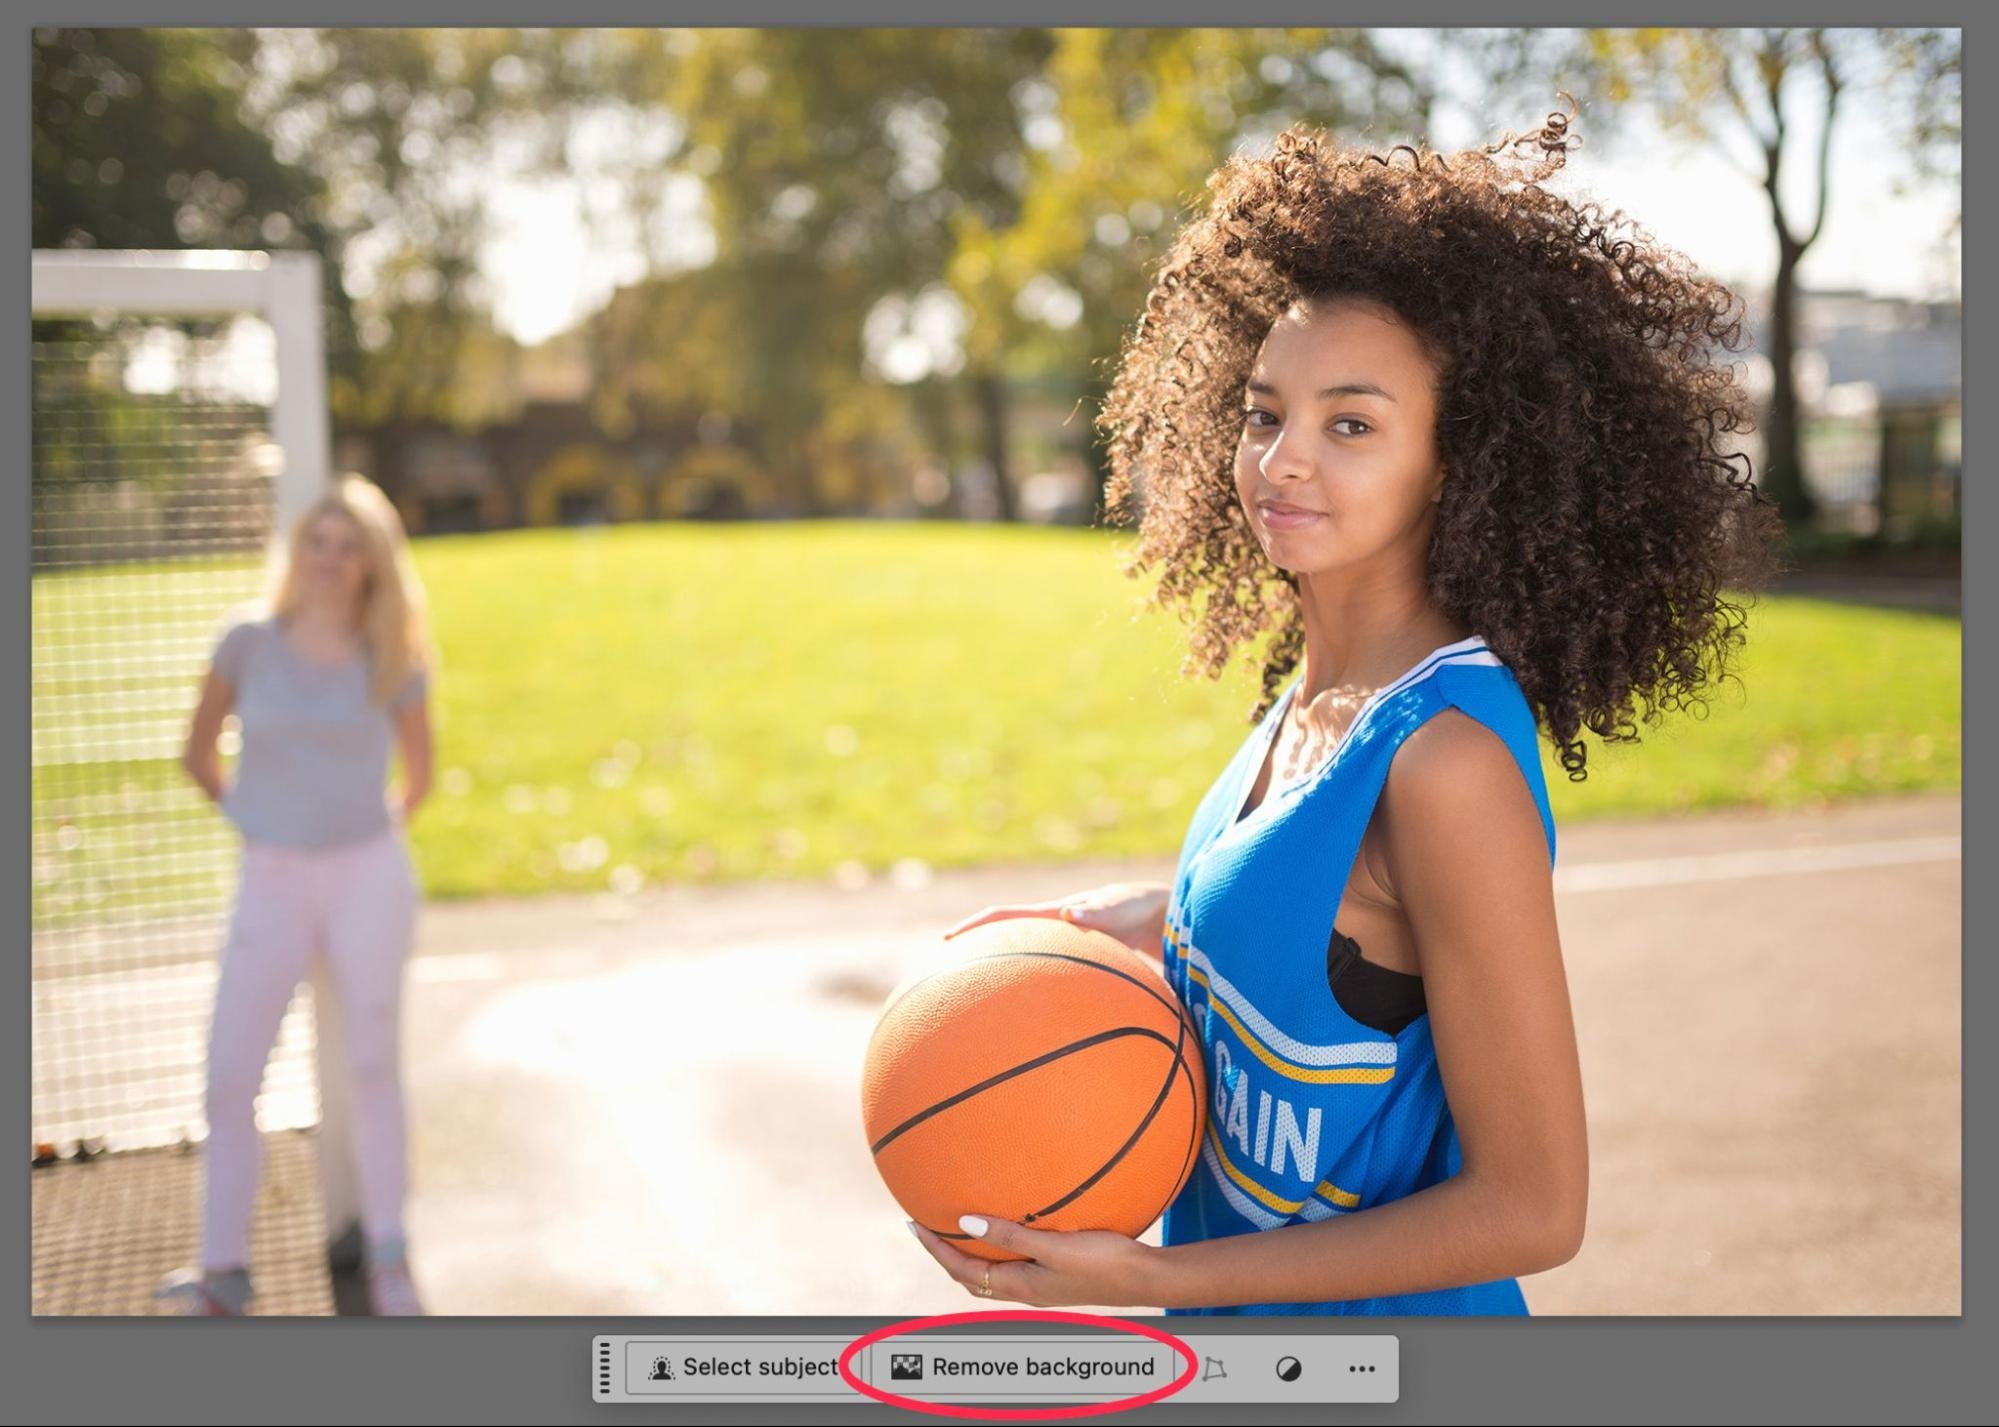
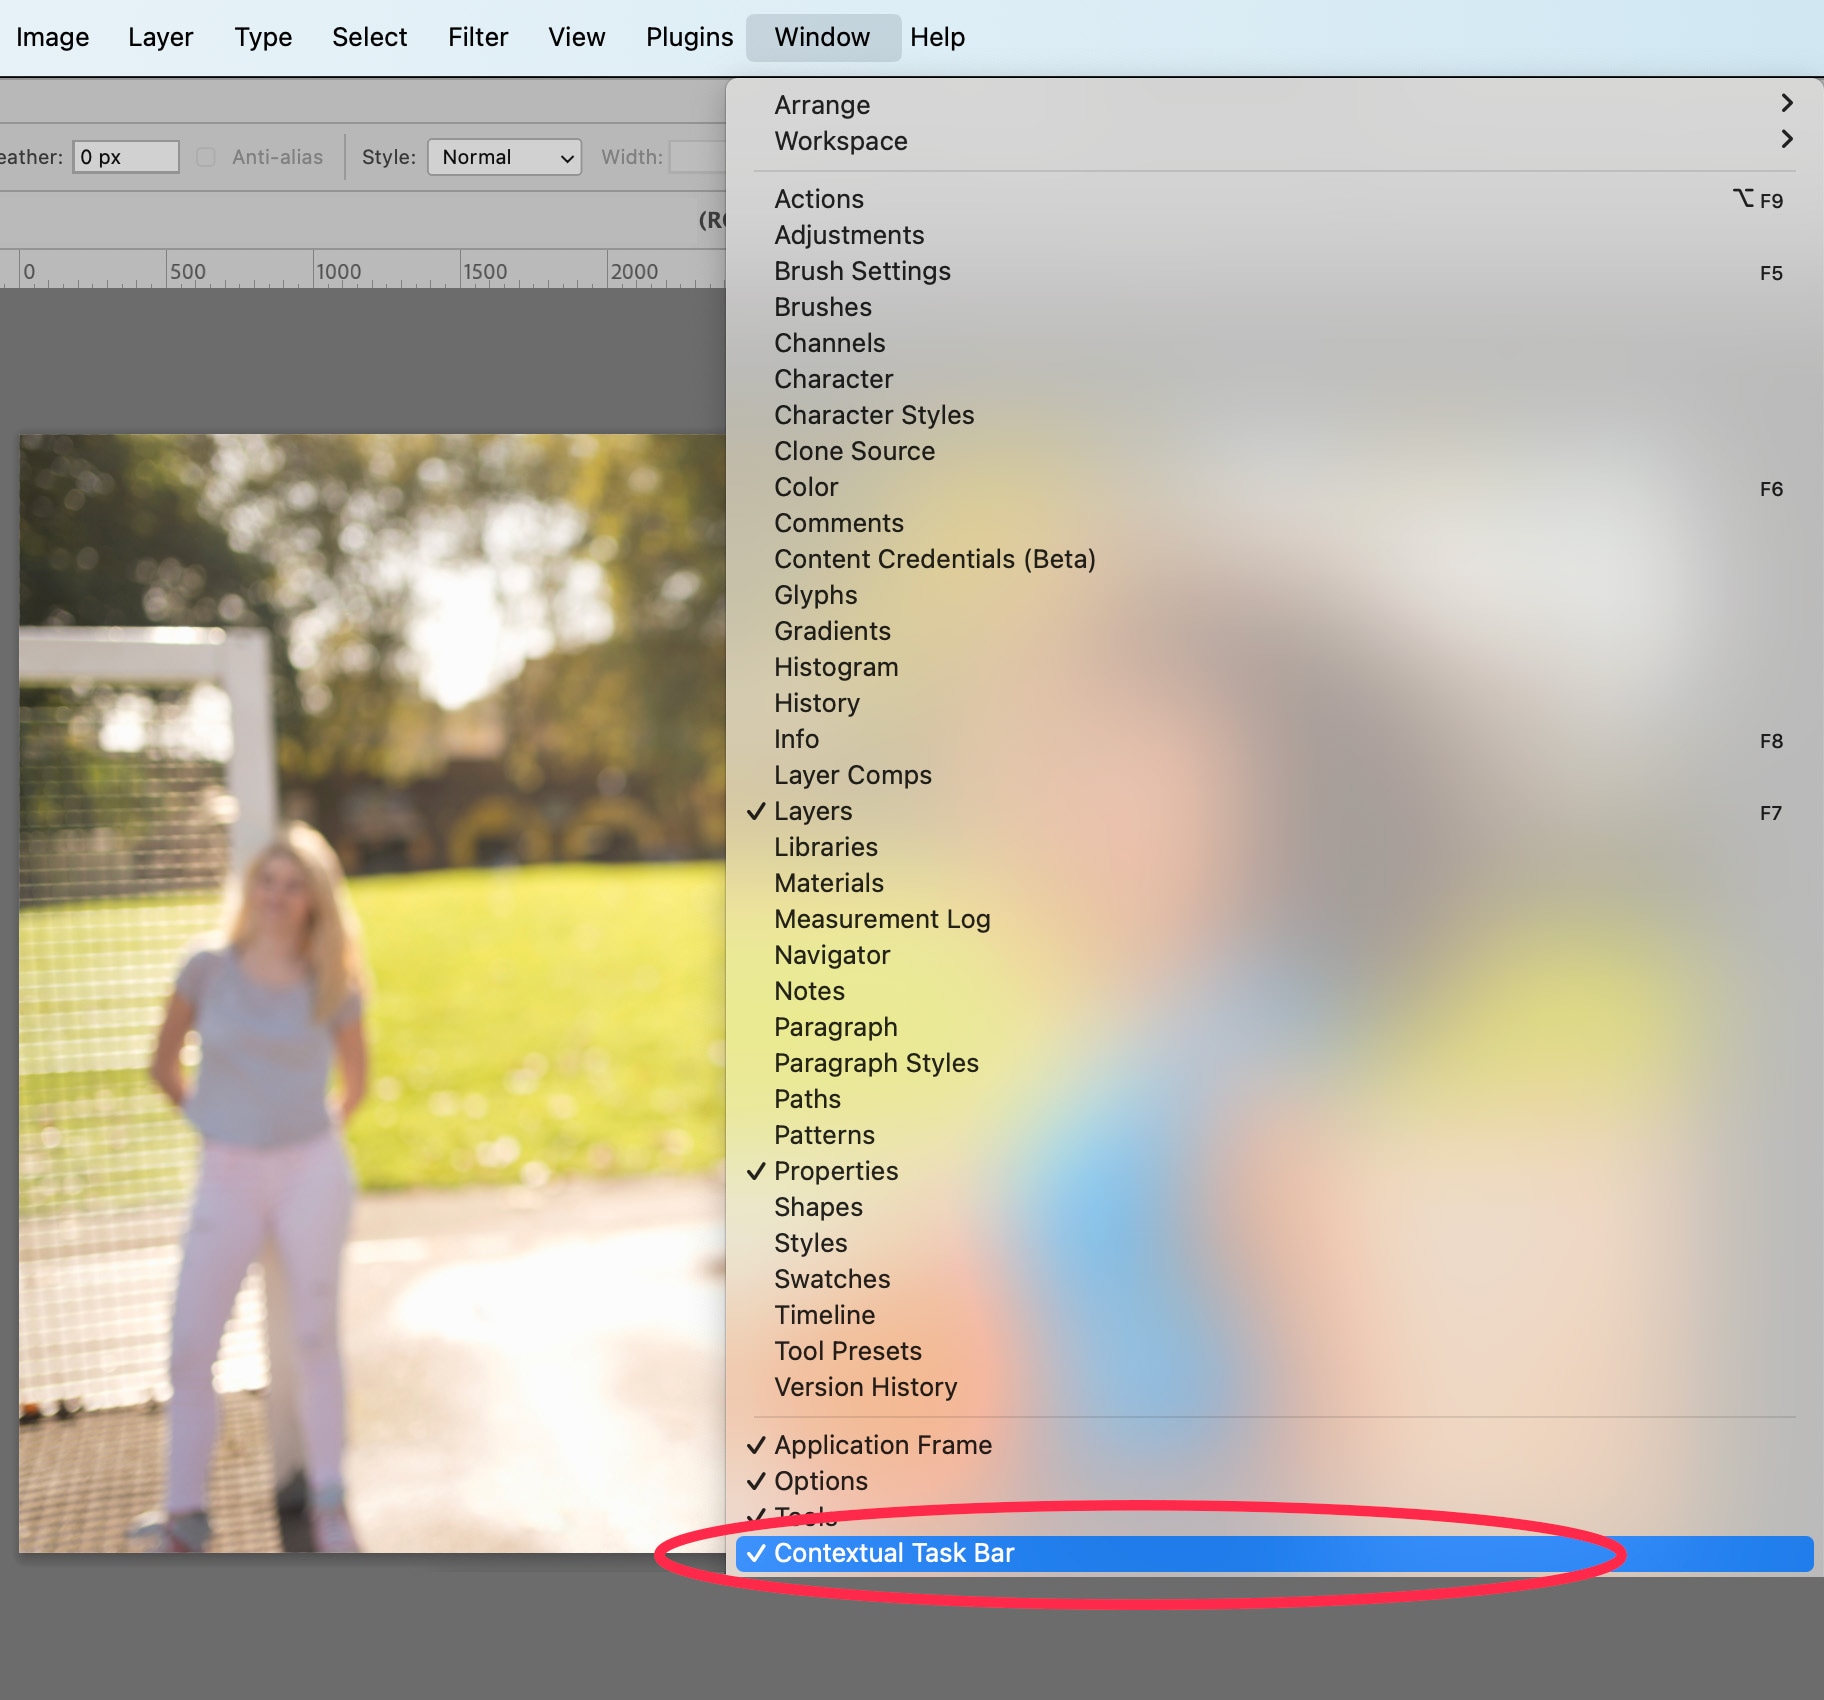
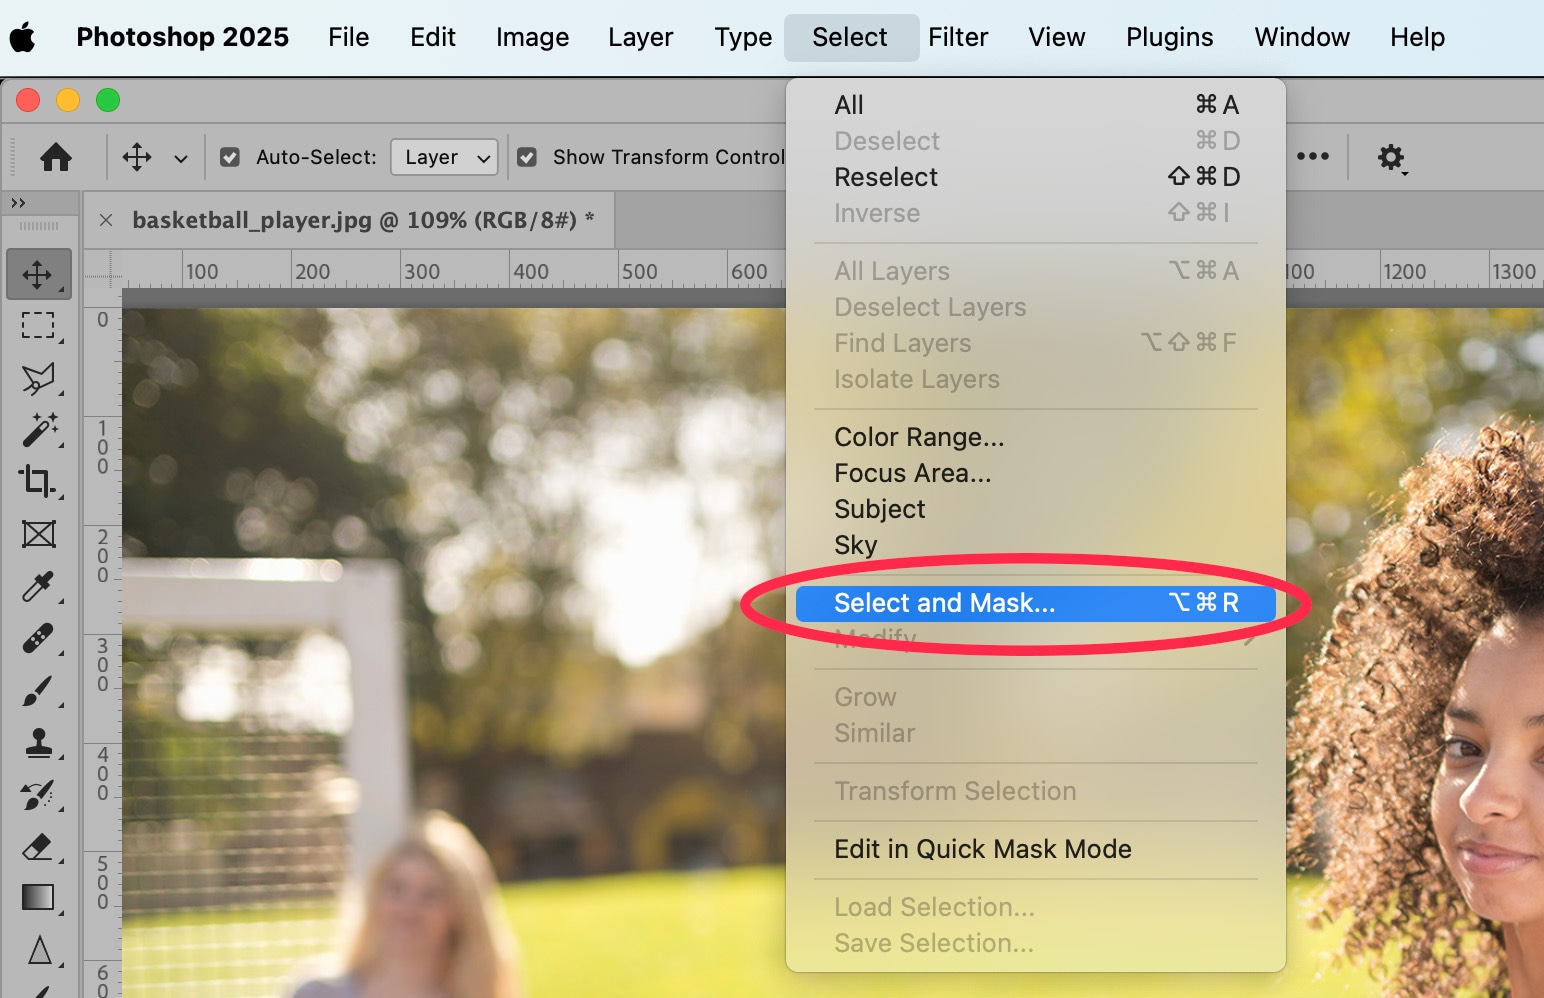
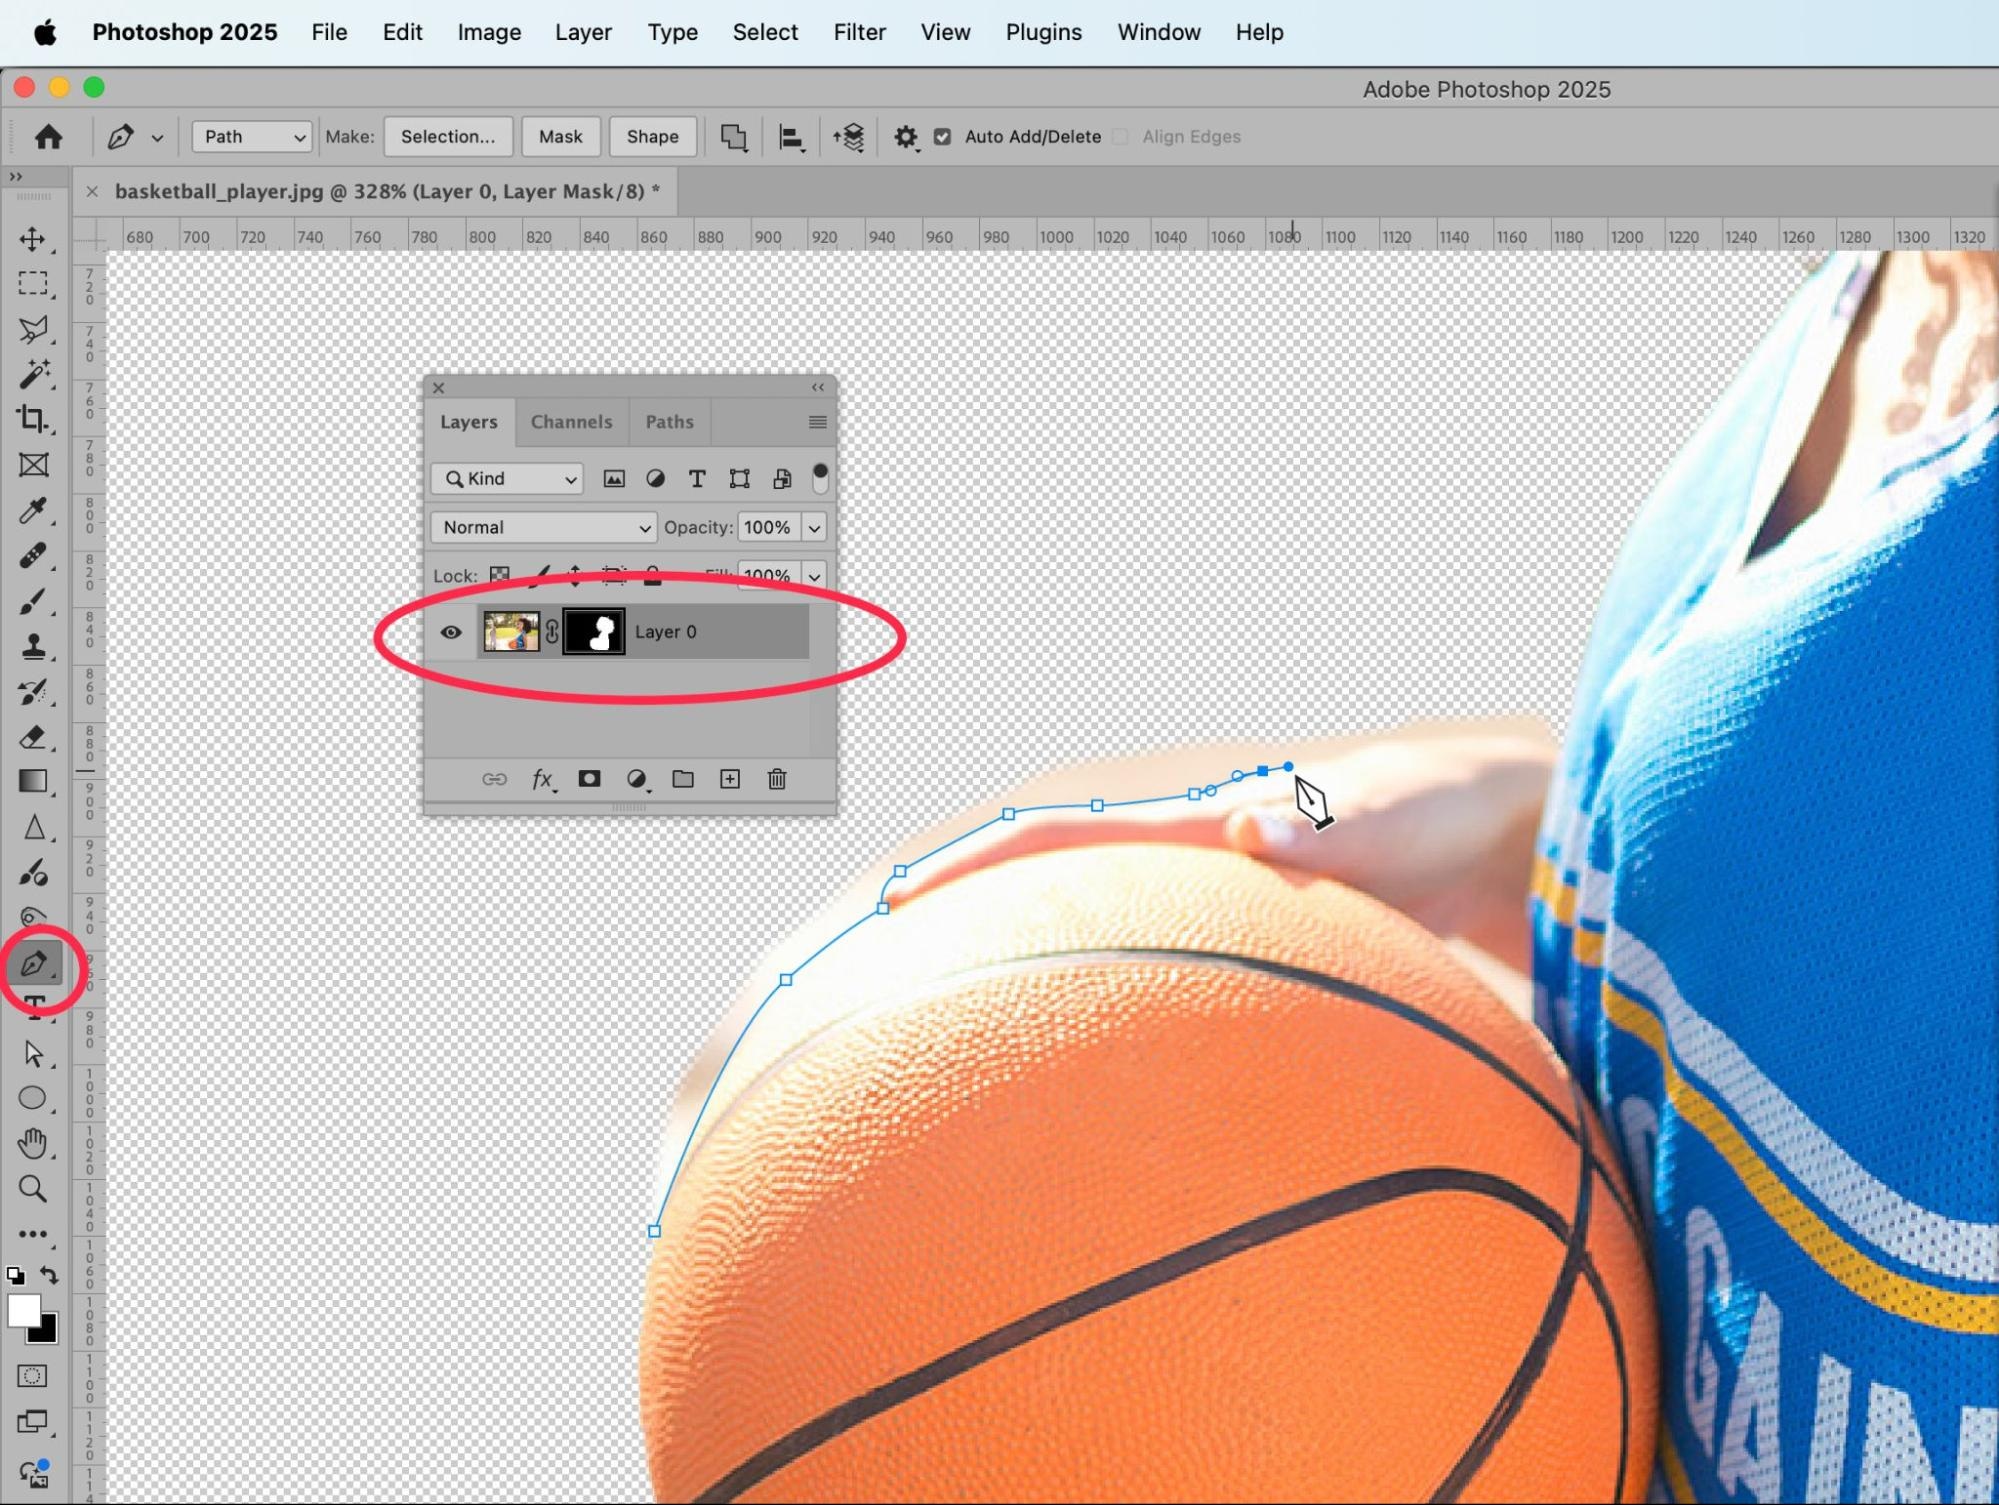
    If you need help making your own photos stand out, we’re here to help. From background removal and retouching to full-on image enhancements, our team can take your product photos from functional to phenomenal.

    Ready to elevate your product visuals? See how our photo editing services work and get started transforming your images today.

    Simple pricing for stress-free, pixel-perfect photo edits tailored to your needs

    [ad_2]

    Source link

  • How to Take Symmetrical Apparel Photos for Ecommerce

    [ad_1]

    Crooked collars, uneven sleeves, lopsided hems—these small details can make even high-quality products look unprofessional. For apparel product shots, getting perfect symmetry is one of those skills that separates amateur shots from photos that serve as sales tools.

    Clothing doesn’t cooperate like rigid products do. But there are plenty of proven tips and tricks to help with the three stages—prep, shooting, and post-production—so you can consistently create balanced, professional photos that convert.

    Why symmetry matters in apparel product photography

    Put simply, symmetry is pleasing to the eye. It represents order that our brain likes. Like a bookshelf with perfectly aligned spines or evenly stacked towels. But if you look at a building that has every window perfectly aligned except one, you’d notice it immediately.

    The same applies to your product photography. If your apparel shots are crooked, unbalanced, or asymmetrical, shoppers notice—and not in a good way. Symmetry triggers trust, which in turn can help boost your sales

    When buyers see balanced, well-aligned product images—like The Wildlife Trusts online storefront—they perceive higher quality and professionalism. It’s a subconscious signal that you care about details, which translates to caring about your products.

    Product grid from The Wildlife Trusts online store featuring illustrated T-shirts, tote bags, caps, and a water bottle, emphasizing nature-themed merchandise.

    Pre-shoot preparation: setting up for symmetry 

    The right prep can save you hours of editing later and help you achieve that balanced, professional look from the start.

    Choosing the right garments and prep

    • Select quality samples: Choose garments in excellent condition without permanent wrinkles, stretched fabric, or damaged seams that can’t be easily fixed.
    • Steam thoroughly: Remove all wrinkles and creases before shooting. Pay extra attention to sleeves, collars, and hems where asymmetry is most noticeable.
    • Know your fabrics: Delicate materials like silk need gentle handling and may require clips to maintain shape (without over stretching). Heavier fabrics like denim hold their form better but need proper steaming.
    • Arrange details evenly: Position buttons, zippers, and accessories symmetrically before shooting.
    • Check seam alignment: Ensure shoulder seams, side seams, and collar edges are properly positioned and won’t create uneven lines.

    Mannequin and display preparation

    • Choose proper sizing: Select mannequins (or models) that fit your garments without stretching or bunching the fabric. You can turn images into ghost mannequins later.
    • Align mannequin straight: Position mannequins facing directly forward. Shoot straight-on or at a slight up/down angle.
    • Support flat lays: Use foam core boards or batting inside garments to add structure and eliminate wrinkles for flat lay shots.
    • Add dimension: Stuff sleeves and body sections with batting to create natural-looking volume and shape.
    • Pin invisible points: Secure fabric from behind using straight pins to keep symmetrical draping.

    Some pieces won’t work symmetrical and that’s fine. Still apply all other prep and shooting tips to get high quality photos. For example, this cape on Project Cece’s online shop is asymmetrical and calls for balanced composition rather than forced symmetry.

    Product page for a red JULAHAS cotton cape on Project Cece, showing eco-labels and ordering options, emphasizing sustainable fashion marketing.

    During the shoot: capturing balanced apparel images

    Photographing and arranging products isn’t quick work—even teams with professional stylists might max out at 10 items per shoot day, though dedicated studios with specialized workflows can typically process more.

    Camera settings for optimal symmetry

    • Choose longer focal lengths: Use 50mm, 85mm or longer to minimize distortion that can make clothing look uneven or warped. If you’ve got limited space, zoom lenses can come in handy.
    • Set consistent aperture: Shoot around f/8-f/11 to keep the entire garment in sharp focus from front to back.
    • Position camera center: Keep your camera dead-center and level. For top-down shots, ensure the camera is truly overhead to avoid skewing.
    • Use a sturdy tripod: Essential for consistent framing, sharp images, and avoiding camera shake.
    • Set up even lighting: Use two lights (ideally), positioned on either side to eliminate uneven shadows. Adjust angles based on fabric thickness.
    • Enable camera gridlines: Use your camera’s grid overlay to align garments perfectly within the frame. You can also shoot tethered and connect to a monitor to catch any issues in real-time.
    • Frame precisely: Frame your shots exactly as needed from the start. If you plan on removing background or doing other edits like drop shadow, you can always adjust canvas size during editing. Just make sure to fully capture your product so you have plenty to work with in editing.

    Styling techniques for balance

    Different garments will benefit from different arm positions—some look better with hands close to the body, others with arms slightly bent away. Whatever you choose, make sure both sides match for symmetrical posing.

    Before and after image of a plaid dress showing improved styling with symmetrical arm positioning and cleaner garment presentation, alongside tips for balance and garment posing in product photography.

    • Use clips, pins, and even tape behind the garment to create perfect draping while keeping them invisible from camera view.
    • Review each shot immediately to catch issues before moving to the next setup. What looks balanced to your eye may appear crooked in the photo.
    • Make small adjustments between shots rather than major repositioning. 
    Dig deeper into why symmetry sells. Read “Symmetry in Product Photography: Why It Matters” to uncover the psychology and strategy behind balanced apparel images.

    Before and after image of a leather jacket showing ghost mannequin effect and symmetry correction in post-production, with tips on natural garment editing for eCommerce apparel photography.

    Post-production: fine-tuning your symmetry  

    Even with perfect shooting, most apparel photos need symmetry adjustments. Good clothing editing fixes natural flaws without making products look artificial and matches both sides, not copy-pastes half a garment.

    Before and after photo of a green puffer jacket showing improved symmetry and background removal, with editing tips on cropping and alignment using Photoshop grid overlays for precise garment presentation.

    Basic symmetry edits anyone can do

    • Crop and straighten: Use your editing app’s grid overlays to align garments perfectly within the frame and correct any camera tilt. In Adobe Photoshop, you can select several grids when cropping, such as Rule of Thirds or Triangle (both great for quickly centering your shots) or Grids (for more precision).

    Photoshop interface showing a leopard print top on a mannequin with the crop tool active and the Rule of Thirds grid overlay dropdown menu expanded for precise image composition.

    Cropped view of a leopard print knotted T-shirt on a mannequin inside Photoshop, with symmetrical framing adjustments applied using grid alignment tools.

    Professional symmetry editing techniques

    Four-stage photo editing process of a linen top including original, background removal, wrinkle removal, and symmetry correction, demonstrating garment photo enhancement.

    Professional symmetry editing involves complex, precise adjustments that require advanced skills:

    • Sleeve alignment: Matching sleeve length, cuff positioning, and draping between left and right sides
    • Side-edge corrections: Ensuring garment edges create perfect parallel lines and consistent silhouettes
    • Curve refinement: Smoothing necklines, armholes, and hemlines for balanced curves
    • Detail alignment: Positioning pockets, buttons, zippers, and decorative elements to mirror exactly

    These edits involve reshaping fabric digitally while keeping realistic texture and natural draping. Our mirror image symmetry service handles these complex fixes so you can focus on shooting and growing your business instead of spending hours on detailed post-production. 

    When to DIY vs. when to outsource

    Not every symmetry issue can be fixed with editing. Major fabric distortions or non-mirrored patterns need to be corrected during shooting—no amount of post-production can create symmetry that wasn’t captured originally.

    Some garments, like the patterned shirt from Omnes, look balanced in shape but have naturally asymmetric designs. For these pieces, focus on getting the overall structure right during shooting, then handle simple fixes like ghost mannequin effects, lighting adjustments, and wrinkle removal.

    OMNES product listing featuring a model wearing a pink floral shirt and pants set, with isolated product image of the top on white background.

    Basic edits like cropping and straightening work fine as DIY projects. But complex symmetry corrections can take hours per image. For busy photographers and ecommerce brands, professional editing usually costs less than your time while delivering better results. 

    And with marketplaces like Amazon requiring high-quality images, professional symmetry editing gives you that polished result that DIY edits can’t always achieve.

    Symmetry checklist 

    Check all these before approving your images and you’re good to go:

    • No obvious wrinkles (natural fabric draping is fine)
    • Sleeves and hems are aligned and match in length
    • Collar and necklines are centered and balanced
    • Buttons, zippers, and pockets are positioned symmetrically
    • Fabric drapes evenly on both sides
    • Lighting is balanced with no uneven shadows

    Consistently balanced shots for every product

    Not only does symmetrical apparel photography help your products look appealing, it also meets the high standards that customers expect in ecommerce. Whether you edit in-house or outsource the tricky stuff, what matters is finding the approach that works for your workflow and quality needs.

    Need help getting perfect symmetry? Path’s editors handle complex apparel fixes, saving you time while delivering professional results for any marketplace.

    The post How to Take Symmetrical Apparel Photos for Ecommerce appeared first on Path Edits.

    [ad_2]

    Source link

  • Symmetry in Product Photography: Why It Matters

    Symmetry in Product Photography: Why It Matters

    [ad_1]

    When you’re selling products online, first impressions happen fast—and they almost always happen visually. If you’re an ecommerce brand or product photographer, you know how important it is to get every detail just right. One of the most overlooked (but critical) details? Symmetry.

    Humans are wired to crave symmetry. It signals beauty, balance, and trust—exactly the feelings you want to trigger when someone lands on your product page.

    When you think about symmetric photos, think ecommerce photography for apparel, shoes, accessories, cosmetics, electronics, and anything presented in a clean, controlled environment. Symmetry matters even more in apparel photography, especially for things like ghost mannequin shots where structure, balance, and form all drive buyer confidence.

    Why you need symmetric product photos

    Studies show that 87% of online shoppers believe enhanced product content is helpful to them during their shopping journey. In today’s competitive landscape, delivering symmetric, polished images isn’t optional—it’s the bare minimum.

    Here’s why:

    • Aesthetic: Symmetry creates a polished, professional look that immediately elevates your brand.
    • Easy browsing: Balanced images are easier to process visually, making it faster for customers to evaluate and compare products.
    • Visual trust: Symmetry builds instant credibility and makes your brand feel more reliable.
    • Emotional appeal: Symmetrical compositions feel satisfying, calm, and complete — all things that lower buying friction.
    • Performance metrics: Symmetrical product photos often convert better, boosting both clicks and sales.

    That’s where Path comes in. Our expert editors apply symmetry with care—enhancing your product’s natural design without making it look artificial or over-edited.

    When and how to use symmetric ecommerce photos

    Highly detailed products

    If you sell jewelry, electronics, watches, or anything intricate, symmetry highlights the craftsmanship and premium quality you’re trying to showcase.

    Highlight centerpiece items

    Hero images, like your main PDP photo or homepage feature, need to feel instantly strong and balanced. Symmetry gives products that commanding presence.

    Premium products and brands

    Luxury brands know: symmetry is a visual shortcut to higher perceived value. It signals attention to detail, care, and sophistication.

    Selling symmetrical products

    When you sell mirrors, tech gadgets, skincare bottles, apparel, shoes, accessories, cosmetics — basically anything designed with balance in mind — your photos should mirror that symmetry. It reinforces design quality and makes browsing intuitive.

    Bonus: Ghost mannequin shots especially benefit from perfect symmetry to create clean, realistic apparel displays.

    Marketplace product photography

    Symmetrical product photos aren’t just nice—they perform better in marketplace search results and listings, helping you stand out in crowded spaces. If you sell on marketplaces like Amazon, eBay, etc., you might even be required to use symmetric product photos. 

    Marketing and advertising campaigns

    Symmetry draws the eye and keeps viewers engaged. Whether you’re designing social media ads, web banners, or print catalogs, symmetric images create irresistible visual flow.

    High-end retouching

    Good symmetry editing polishes natural flaws—like a slightly crooked seam or uneven laces—without making your product look artificial. It’s subtle, invisible craftsmanship that makes a major difference.

    Tips for symmetric product photography

    Here’s the key to mastering symmetry without overdoing it:

    ✅ Keep the product’s natural shape and design intact.

    ✅ Center lines, balance proportions, and adjust visible angles carefully.

    ✅ Use symmetry to enhance authenticity—not to create a fake-looking “clone.”

    🚫 Don’t force symmetry where it doesn’t naturally exist.

    🚫 Avoid warping, pinching, or unnaturally stretching parts of the product.

    🚫 Stay away from edits that make products feel sterile or “too perfect”—buyers can tell.

    Get it perfect, every time

    Symmetry isn’t just about making your photos look good—it’s about building trust and driving sales. In ecommerce, symmetry is a small investment that delivers a big payoff.

    Ready to sharpen your product photos with perfect symmetry? At Path, our expert editors specialize in balancing precision with authenticity. We’ll polish your product images so they feel clean, credible, and irresistible—all with quick turnaround times, industry-leading accuracy, and deep ecommerce expertise.

    Perfect your photos with symmetry

    Simple pricing for stress-free, pixel-perfect photo edits tailored to your needs

    [ad_2]

    Source link

  • Everything You Can Get in 6 Hours

    Everything You Can Get in 6 Hours

    [ad_1]

    Did you know that you can use Path to do a whole lot more than just removing backgrounds and retouching imperfections? You can improve product photos with retouching and ghost mannequins, fix blurry action sports shots, and add shadows to bring images to life. You can virtually iron wrinkles out of clothing and fabric. And you can even totally change the colors in your images—in a realistic way.

    Find out more about all the edits you can order from Path:

    1. Remove the background for versatile photos

    Background removal is probably our most popular request. Whether you’re prepping for a product launch, updating a marketplace listing, or shooting team portraits, clean background removal is essential. We can isolate any subject from your image and remove the rest so you can use that image in different contexts.

    Because we do every edit by hand, there are three ways we remove backgrounds from photos:

    • Clipping path: Carefully hand-drawn clipping paths for crisp, clean photos—best for simpler and more straightforward edges
    • Image masking: How we remove backgrounds from hair, fur, and difficult borders—common for sports photos and headshots

    Multi-clipping path: Involves complex cutouts that require lots of paths, like images with multiple subjects to cut out, bicycles, or items with lots of components.

    Before and after comparison of background removal from an image featuring a woman with curly hair and a denim jacket.

    2. Retouch imperfections for a beautiful image

    Photo retouching is probably the second most common request—we see it across all types of images, including product photos, sports photography, portraits, and car photography.

    Before and after comparison of photo retouching on a man in a denim jacket, highlighting improved lighting and texture.

    We specialize in four types of retouching:

    • Dust, spot and scratch removal: We can remove small dents, smudges, dust, and other imperfections from any type of photo. Our studio offers both basic and advanced dust, spot and scratch removal.
    • Wrinkle on clothing: If the apparel in your shot is wrinkly enough to be distracting, we can smooth it out.
    • Beauty airbrushing: Common for portraits and headshots in particular, we can touch up any distracting imperfections or blemishes while maintaining a natural-looking shot.
    • Camera reflection removal: Get rid of any unwanted reflections from shoot day. Again, we offer basic or advanced reflection removal.

    Before and after close-up of scratch and blemish removal on a product photo and portrait with beauty retouching.

    3. Add or fix shadows to elevate your products

    We can also add, remove, or edit shadows in your images. Shadows are types of ecommerce photo edits that add dimension to boring white background shots. 

    Before and after comparison of shadow adjustments on a tube of lip balm for realistic product presentation.

    You can order one of any five different types of shadow edits at Path:

    • Drop shadow: A drop shadow makes your subject look like it’s hovering above the background. It’s a common technique in white background product photography.
    • Existing shadow: You can also ask us to edit an existing shadow to make it appear more natural or less distracting, depending on the look you’re going for.
    • Floating shadow: A floating shadow gives the impression that your product is hovering above the ground. This is another common technique in white background product photography.
    • Natural shadow: It’s not always possible to get the lighting right, so this shadow edit will help achieve a more natural shot by casting a make-believe shadow on the surface the subject is resting on.
    • Reflection shadow: This type of shadow edit makes your subject appear as though it’s resting on a reflective surface.

    If you want to give it a go yourself, you can follow along in this shadow editing tutorial.

    https://www.youtube.com/watch?v=QdGs3_LuALo

    4. Create a ghost mannequin

    Ghost mannequins are one of the main ways to edit apparel product photos
    Ghost mannequin photography is a style of photography that’s used to showcase clothing and apparel products. It essentially creates an invisible mannequin or model to the item of clothing, making it appear as though it’s being worn even though there’s no one featured in the image.

    Before-and-after image showing ghost mannequin editing on a floral dress, transforming it from a mannequin display to an invisible mannequin effect with a clean white background.

    This photography is effective because it adds dimension to the product, rather than laying it flat on a table in an unengaging way. It allows shoppers to see how the apparel may fit and drape if they were to wear it themselves.

    But capturing this photography requires a lot of editing steps. Many product photographers and brands choose to outsource this tedious, detail-oriented work to our studio—you can get them back by the end of the work day if you send them in the morning!

    5. Add color variants without a reshoot

    You can also order color change edits from Path. This service is especially popular for product photography—if a specific item is available in multiple colors, it’s often more cost-effective to shoot one variant and simply outsource color change edits for the rest. It also comes in handy when an athlete changes teams and needs their headshot to reflect the change.

    6. Create perfectly symmetric apparel shots

    Before-and-after image of a black graphic T-shirt, showcasing symmetry editing with aligned sleeves, centered design, and background cleanup for a professional product presentation.

    Symmetry is one of the fastest ways to elevate the professionalism of your apparel product photography. Perfectly aligned sleeves, balanced hems, and centered internal details (like buttons, zippers, or logos) can make your product look more premium—without needing a reshoot. These are great edits to make to improve product photos.

    Path’s new symmetry service helps you polish your images with clean, realistic edits designed for ecommerce. Whether you’re preparing for a new collection drop or updating existing product listings, symmetric edits ensure every item looks its best on your site, marketplace, or lookbook.

    Here are a few of the most common symmetry fixes we provide:

    • Sleeve alignment: Make sleeves even and consistent across your product images.
    • Side-edge adjustments: Smooth and straighten the outer edges of garments for a neater silhouette.
    • Curve reduction: Eliminate distracting bunching or warping in fabric curves.
    • Detail alignment: Center and balance key details like pockets, drawstrings, zippers, or brand tags.

    Wrinkle retouching is included by default with symmetry edits, so your final images don’t just look aligned—they look polished. This saves time and ensures your edits are cohesive across every SKU.

    Get your edits today

    With the instant pricing tool, you can submit and pay for your edits now and get them back in as little as six hours. That means you can send us your edits, go about your work day, and then receive the edits before the end of the day. It doesn’t get more convenient than that.

    Ready to send your photo edits our way? Get started now—and get your edits back in as little as 6 hours.

    Simple pricing for stress-free, pixel-perfect photo edits tailored to your needs

    [ad_2]

    Source link

  • How to Fix Blurry Sports Photos

    How to Fix Blurry Sports Photos

    [ad_1]

    Taking crisp action shots of sports figures can be challenging, and sometimes an otherwise perfect shot is just a little out of focus. 

    In this tutorial, you’ll learn how to fix blurry sports photos—including methods you can use to sharpen and fix out-of-focus sports photography, as well as tips to ensure your next sports photos are crisp and clear.

    How to fix a completely blurry sports photo

    A completely blurry sports photo is when nothing in the frame is in focus. This often happens in action shots. If this happens to you, there are several filters you can use in Photoshop to sharpen the entire image.

    Using the Unsharp Mask Tool

    Photoshop has a filter specifically designed to sharpen images, known as the Unsharp Mask tool. A blurry image can never truly be “sharpened,” but Unsharp Mask attempts to detect the edges of your photo by looking for side-by-side pixels that are different in color. Then, the tool allows you to adjust the contrast of those pixels and create the illusion of a sharpened image.

    To use this tool, open your blurry sports photo in Photoshop. Make sure you have the layer containing the image you want to sharpen selected (in a JPEG, this would be the Background layer).

    Photoshop 2025 showing the locked background layer selected in the Layers panel, displaying a motion-blurred cyclist on a bridge.

    Next, choose Filter > Sharpen > Unsharp Mask… from the dropdown menu at the top of the application window.

    Photoshop 2025 Filter menu with the Unsharp Mask option highlighted, used for image sharpening and edge refinement.

    A dialog box with Unsharp Mask settings will appear. Within this window you can adjust the Unsharp Mask settings. These settings allow you to finely tune how much contrast Photoshop will apply to the pixels within your image. 

    You’ll see a portion of your image displayed within the dialog box. You can use your cursor to drag until a critical portion of your sports photo appears in that image window. In the example below, we’ve positioned the cyclist’s face in the window.

    Next, you’ll see three sliders: 

    1. Amount: The Amount setting adjusts the increase in contrast between pixels. 
    2. Radius: Radius adjusts the number of pixels along an edge that will be affected by the contrast increase. 
    3. Threshold. Threshold tells Photoshop just how different those pixels must be from each other before they’re considered an “edge.”

    Make sure Preview is checked so you can see how the image will change when you make adjustments within this dialog box.

    Unsharp Mask filter window in Photoshop 2025 previewing sharpening adjustments on a cyclist’s face with fine-tuned radius and threshold settings.

    Each image you adjust will have different settings for these three sliders, because no two images are identical. Play with the sliders until you figure out which combination of settings works best for your image without creating an overly contrasted result.

    Once you’re happy with the final image, click OK.

    Side-by-side comparison of a cyclist image before and after photo retouching, showing improved sharpness and contrast after editing.

    So, it’s not perfect, but it is an improvement

    Sharpen blurry sports images using High Pass Filter

    Another Photoshop tool for sharpening blurry images is the High Pass Filter. In fact, you can use High Pass Filter and Unsharp Mask together to create an even sharper image.

    To use the High Pass Filter, first duplicate the layer that contains the image you want to sharpen (most likely your Background layer). You can do this by clicking on the Layers panel menu (four little horizontal lines in the upper right corner of the panel) and choosing Duplicate Layer….

    Photoshop Layers panel with Duplicate Layer option selected, preparing a new layer for non-destructive image editing on a cycling photo.

    With the new layer selected, choose Filter > Other > High Pass… from the dropdown menu at the top of the application window.

    Photoshop 2025 interface with the Filter menu open, highlighting the High Pass filter option used for edge sharpening and image enhancement.

    Your image will go completely gray. You’ll only see the outlines of your edges in the image. 

    In the High Pass dialog box that appears on the screen, move the Radius slider to the left to reduce detail or to the right to increase the details of the edges. Make sure “Preview” is checked so you can see the effects of moving the slider. In general, keep the radius at 7.0 Pixels or less so your end result will look natural.

    Photoshop High Pass filter preview with layer mask applied to cyclist photo, used for edge sharpening in a non-destructive workflow.

    Click OK.

    Next, go back to your Layers Panel. Change the Blending Mode of the top layer to “Overlay.” (By default, the Blending Mode will be set to Normal.)

    Photoshop Layers panel displaying the Overlay blending mode applied to a duplicated background layer for contrast enhancement.

    Your image will now appear sharper.

    Side-by-side comparison of a motion-blurred cyclist image before and after Photoshop sharpening, highlighting improved focus and clarity.

    For an even sharper image, you could apply Unsharp Mask, and then a High Pass Filter on top of that. 

    You capture the action, we’ll look after the edits. Sports photo editing services start at 25¢ per image.

    How to fix a specific area of a blurry sports photo

    Sometimes, you want to capture motion blur and keep the visual effect, but you also want your subject’s face, or some other portion of the photo to be crisp. There are multiple ways to do this, including using selections, using layer masks, and using Photoshop’s Sharpen Tool.

    How to use a selection and layer mask

    Go back to the image you just sharpened using a High Pass Filter. Now, you’re going to remove the sharpened effects from every part of the image except the cyclist’s face—and then add additional effects to that area to create even more crispness.

    Using the Marquee Tool in Photoshop’s Toolbar, draw an ellipse or a rectangle around the area of the photograph you want to remain crisp.

    Photoshop 2025 showing the Elliptical Marquee Tool in use to select a circular area around a cyclist’s head for localized editing.

    Next, choose Select > Modify > Feather… from the dropdown menu at the top of the application window.

    Photoshop 2025 Select menu showing the path to the Feather option under Modify, used for softening selection edges during image editing.

    In the dialog box that appears, type in a value between 100 and 250. This will give you the smoothest feather of your selection.

    Photoshop feather selection dialog box over a cyclist image, demonstrating how to soften selection edges with a high feather radius.

    Now, go back into your Layers panel and choose the layer that contains your High Pass Filter. Click on the Mask icon at the bottom of the Panel. This icon looks like a black rectangle with a lighter circle inside of it.

    Photoshop 2025 Layers panel showing a duplicated background layer with a layer mask applied and set to Overlay blend mode for localized adjustments.

    Once you click on that icon, you’ll see a mask appear in your layer. It will look all black, except for the area of your selection, which will appear white.

    You’ve now made it so the High Pass Filter will only appear on the area where you originally created your selection, or in the case of this example, on this cyclist’s face.

    How to use the Sharpen Tool

    You can sharpen the cyclist’s face even more by using Photoshop’s Sharpen Tool.

    Select the Sharpen Tool from the Toolbar to the left of the application window. The Sharpen Tool may be sitting behind the Blur Tool or the Smudge Tool.

    Photoshop toolbar showing the Sharpen Tool selected from the Blur Tool group, used for enhancing image clarity and detail.

    In your Layers panel, select your original laye—the layer that does not contain the High Pass Filter. Then, with your Sharpen Tool selected, “paint” over the areas of your image that you want to be a bit crisper. In the below example, we went over the cyclist’s eyes and mouth with the tool.

    Photoshop 2025 interface showing the Sharpen Tool in use on a cyclist’s face, with the background layer selected and tool settings highlighted for precision image enhancement.

    Like all tools in Photoshop, you have the option to adjust the strength and size of the Sharpen Tool in the Options Bar.

    Before and after comparison of cyclist photo sharpening, demonstrating enhanced image clarity and edge definition using Photoshop tools.

    How to remove a blurry background from a sports photo

    Sometimes a photographer will want a clear subject and a blurry background in a sports photo. However, there are times where a crisp background makes more sense. In these instances, it works best to remove the background altogether and replace it with a new image.

    For the following examples, let’s use this image of a young woman holding a basketball.

    Photoshop 2025 interface showing the Remove Background button active beneath a basketball player image during automated background removal.

    Use AI to remove a background in Photoshop

    The easiest way to remove a background is to use the “Remove Background” tool, which is part of Photoshop’s new AI tools. However, while fast, this tool isn’t always the best option, as you’ll see in a minute.

    To use the tool, make sure the Contextual Task Bar is visible. By default, it is—however, if you don’t see it, make sure Contextual Task Bar is checked under the Window dropdown menu.

    Photoshop 2025 interface showing active contextual task bar and layer panel during sports image editing workflow.

    With the Contextual Task Bar visible beneath your image, you’ll see the option to Remove Background. Click on that option.

    Photoshop 2025 interface showing the Remove Background button active beneath a basketball player image during automated background removal.

    The result will be…okay. But not perfect. To really remove the background from an image, you’ll need to add a human touch.

    Young female basketball player isolated on a transparent background after precise clipping path and background removal.

    [cta text=”Save a ton of time with pro background removal from 39¢ per image” button=”Learn more” link=”https://pathedits.com/pages/background-removal”]

    Remove background using Select and Mask

    Another option to quickly remove the background of your image is to use the Select and Mask feature in Photoshop. To do this, go to Select > Select and Mask… from the dropdown menu at the top of the application window.

    Photoshop 2025 Select menu with 'Select and Mask' highlighted, preparing to refine selections for precise cutouts of a sports portrait.

    A new window will appear. In this window, choose Select Subject. You can refine the subject by using the “Refine Hair” button and the tools on the left-hand side of the window, including the Magic Wand Tool.

    Once you have your subject selected to your satisfaction, scroll to the bottom of the Properties tab at the right-hand side of the window. Change “Output to” to “Layer Mask.”

    Photoshop interface showing 'Select Subject' and 'Layer Mask' options in use for isolating and masking a basketball player on a transparent background.

    Click OK.

    Back in your regular image window, you can now refine the subject more. For instance, Select and Mask didn’t do a very nice job of selecting the model’s hair, and parts of her left hand are cut off. You can fix this manually using Photoshop’s Pen Tool and Background Eraser Tool.

    Refine selection using the Pen Tool

    You can use the Pen Tool to refine crisp edges of your subject. 

    First make sure you have the mask portion of your layer selected. Then select the Pen Tool from the Toolbar at the left-hand side of the application window and draw along the edge of your subject. Create a selection from your path, then delete or add portions of your image back in to achieve the desired edge to your subject. 

    Photoshop 2025 interface showing the Pen Tool and active layer mask while creating a clipping path around a basketball in a background removal workflow.

    Use the Background Eraser Tool

    Next, you can use the Background Eraser Tool to refine the hair of our subject. You can get to the Background Eraser Tool by clicking and holding down the Eraser Tool in the Toolbar.

    It’s best to work in stages around the edge of the subject’s hair, so choose one side of the head to start on. Then, set your background color to the color of the background behind that portion of hair. Use the Background Eraser Tool to refine the edge of the hair and continue to change the background color as needed as you work around the entire head.

    Photoshop 2025 close-up view of masking curly hair using the Brush Tool and selection refinement tools on a transparent background.

    Once you’ve sufficiently removed the background from your subject, you can insert a new, crisp background into your image.

    Retouched image of a female basketball player placed on a new outdoor court background after background removal and replacement.

    How to avoid taking blurry sports photos

    While Photoshop offers many options to reduce motion blur, the best way to get a crisp photo is adjusting your camera and equipment settings for the scene you’re shooting. Take plenty of test shots before the event to get your setup close to perfect, based on subject speed and lighting conditions. Shooting in RAW instead of JPEG gives you more flexibility to rescue blurry or underexposed photos later. Even if you don’t have the time to spend on fixing photos, you can outsource photo editing to Path using your captured RAW images. 

    Below are some simple but effective shooting tips to make sure your next sports photos are perfectly in focus.

    Fast shutter speed

    When you’re trying to capture a moving subject, you will need to use a fast shutter speed if you want the subject to appear clear, or “frozen.” How fast a shutter speed you need (and can use) depends on how fast the subject is moving, how much light you have to work with, and how wide or narrow the aperture of your lens is.

    For subjects that are moving at high speed, such as running athletes, cyclists, or racing cars, you will need a shutter speed at least 1/1000 sec, and probably closer to 1/4000 sec. Different cameras offer different shutter speed options, and some new mirrorless options offer shutter speeds up to 1/64,000 sec.

    If you want to create a blurry background with your subject still sharp, use the panning method. Reduce the shutter speed to create a blur and move the camera in the same direction as your subject when they move past you. It takes plenty of experimentation to get your settings and hand movement right, so don’t worry if you don’t get it on the first try.

    High-speed group cycling race with motion blur emphasizing dynamic movement and competition intensity on city streets.

    Adjust light 

    When you reduce your shutter speed (meaning you make it faster, such as going from 1/250 sec to 1/1000 sec), you reduce the amount of light that hits the sensor through the shutter. Therefore, in order to have a bright image, you need to compensate for the high shutter speed by raising the ISO, widening the aperture, or both. 

    Taking photos with plenty of light is important to ensure that the photo comes out at the correct exposure, at the zoom level you need, without the increased film grain that can occur from high ISO values in low-light. Taking photos outdoors during the day will provide a lot of light, as will using a flash. Before you use a flash at an indoor sporting event, however, check the event’s rules for flash photography. Many sporting events don’t allow flash photography from professional photographers, unless they’re the official contracted photographer.

    Reduce camera shake

    Camera shake happens because even when you try to stand perfectly still, your hands naturally make tiny movements that can blur images. Using your camera’s neck strap pulled tight against your neck can add a bit of extra stability when shooting handheld. 

    When you zoom in to your subject, you increase your focal length, and you need to increase your shutter speed to compensate, or else you risk your image blurring from shaking. For a still subject, your shutter speed needs to be at least the inverse of your focal length, so if you zoom in to 400mm, you will need to set your shutter speed to at least 1/400 sec to avoid camera shake. And then you will need to increase your shutter speed from there, depending on how fast your subject is moving and the available lighting conditions.

    Most sports action shots are taken with hand-held cameras or with monopods. You’ll often see sports photographers with large lenses use monopods to support the weight of their kit, which still allows them to quickly move the camera around.

    Many modern cameras and some lenses also have powerful shake reduction capabilities. Look for terms like ‘In-Body Image Stabilization’ (IBIS) in camera bodies or ‘Optical Stabilization’ (OS/IS/VR) in lenses. This technology can help you shoot at slower shutter speeds while still getting sharp images.

    Let us fix your sports photos

    While not every blurry photo can be saved, with the right tools and techniques, you can rescue many of them—and capture crisp, clear shots moving forward. 

    Shooting, organizing, and editing sports photos takes a lot of time and work. Wouldn’t it be great if you could outsource the most tedious, repetitive aspects? With Path, you can! Send us all your background removal, retouching, and image masking needs—so you can get back to the creative work that really matters. 

    Ready to send your photo edits our way? Get started now—and get your edits back in as little as 6 hours.

    Simple pricing for stress-free, pixel-perfect photo edits tailored to your needs

    How to fix blurry sports photos FAQs

    How do you make sports pictures not blurry?

    To make sports photography less blurry, use a fast shutter speed—ideally 1/1000s or faster—to freeze motion. Set your camera to continuous autofocus (AI-Servo or AF-C mode) and track your subject. Good lighting, a higher ISO if needed, and steady panning techniques also help capture sharper images.

    Why are my pictures blurry in sports mode?

    Sports mode usually tries to select faster shutter speeds, but it can still struggle in low light or if the autofocus isn’t keeping up with the action. Your pictures might also be blurry if the camera is focusing on the wrong spot, or if there’s not enough contrast for the autofocus to lock onto the subject properly.

    How do I get my sports pictures sharp?

    Use a fast shutter speed, continuous autofocus, and a wide aperture (like f/2.8 or f/4) to let in more light. Track the subject carefully, and if possible, pre-focus on an area where you expect the action to happen. Shooting in burst mode can also increase your chances of getting a tack-sharp frame.

    How do you take clear sports pictures?

    Clear sports images start with the right camera settings: fast shutter speed, continuous autofocus, and an appropriate ISO. Also, practice good technique—like following your subject smoothly with the camera and anticipating the action. Using higher-quality lenses with image stabilization can make a big difference too.

    [ad_2]

    Source link

  • What Is Product Photography? Types & Meaning

    What Is Product Photography? Types & Meaning

    [ad_1]

    Product photography is always evolving, and it’s getting tougher to keep up with the latest trends. Your product images are doing more than showcasing an item—they’re selling it. High-quality product photography helps shoppers visualize, trust, and ultimately buy your products.

    Below, look at the definition of product photography, as well as best practices and examples to inspire your own.

    What is product photography?

    Product photography is the art of capturing images of goods for sale. These images are used in ecommerce stores, ads, packaging, and catalogs to highlight product features and inspire confidence in buyers.

    Also known as commercial product photography, it includes everything from simple white background shots to stylized lifestyle images. The goal is to help potential buyers understand, desire, and trust your product—visually.

    Hand holding Maui Moisture Bamboo Fibers Shampoo bottle with greenery and a second bottle in the background

    While traditional product photography uses cameras, some brands also use 3D renderings that mimic real photos. These can be effective, though purists argue that only real-camera images count as true product photography.

    Comprehensive Cranium Care, a brand of “hair” products for bald people, outsources its 3D renders.

    Types of product photography

    Product photography is a type of object photography and a type of advertising photography, but you can get even more granular:

    White background

    White background photos are the ones you see on ecommerce marketplaces like Amazon, AliExpress, and eBay. They may have individual product photos or white background shots that feature multiple images. This is arguably the most common product photo type you’ll see.

    Composite image showcasing white background product photography: a rustic wooden chair, a silver candy bar packaging mockup, and brown leather high-heeled boots—demonstrating clean, ecommerce-ready visuals commonly used on marketplaces like Amazon and eBay.

    360-degree

    360-degree photography captures a product from every angle, letting shoppers rotate and view it interactively—almost like holding it in their hands. These image sets are often stitched together with special software to create a seamless, scrollable experience on ecommerce sites.

    This is what professional photographer Eric of CiReC 360° specializes in. He relies heavily on Path for outsourced photo edits because each “image” is actually a series of several images, and the edits must be perfect across all shots. 

    Blue winter jacket with yellow accents shown in 360-degree product photography setup with editing software

    Lifestyle shots

    Lifestyle shots are photos that feature people using the product in a real-world setting. These tell a story and help shoppers imagine themselves with your product.

    Close-up of Youth To The People superfood serum bottle placed on a desk with accessories.

    Contextual

    Contextual photos are similar to lifestyle photography, but they may not feature people. These show the product in its natural environment (e.g., barstools in a kitchen, a yoga mat in a studio).

    Bright and modern kitchen interior with white cabinets and wood accents.

    Scale shots

    Scale shots are product photos that give a frame of reference so people can envision how big the products are. While product specs and dimensions are descriptive, sometimes shoppers need an image to see how big or small it is in comparison to common objects.

    Hands holding a white teacup with Art Deco gold accents on a matching saucer, highlighting product detail.

    Detail

    Detailed product shots are close-ups that highlight materials, textures, or small design elements. They’re crucial for luxury, beauty, apparel, or any product where touch and feel are important.

    Composite image of detailed product photography featuring close-up shots: a blue Nike sneaker highlighting fabric and stitching, a flat lay of handcrafted leather cardholders with visible textures and seams, and a brass fish-shaped keychain on a leather bag—showcasing material quality and intricate design elements for luxury and fashion products.

    Group

    Group product shots feature multiple items. Typically, these products are related in some way. You might bundle them together as a promotion, or feature the same item in different products. 

    Group product shot featuring three folded socks with blank labels beside open cardboard packaging, and a lineup of five artisanal soap bars on a marble surface—illustrating bundle photography for retail, ecommerce, or promotional product listings.

    Flat lay

    Flat lay photos are taken from a bird’s eye view. The bird’s-eye view photos show products arranged on a flat surface. These are perfect for social media and allow for creative storytelling through layout.

    Flat lay image combining beige high-heeled shoes arranged on a white background and a minimalist workspace setup with a white keyboard, notebook, pen, and Apple mouse on a soft pink backdrop—ideal for ecommerce, fashion, and lifestyle branding.

    Packaging

    Packaging product photos are the images that go on the box, bag, label, or whatever packaging holds your merchandise. These photos are important because they appeal to in-person shoppers. It’s especially important to consider this if the packaging hides the product, which you commonly see with food and beauty items. 

    Side-by-side product packaging photo featuring a close-up of Ben & Jerry’s Salted Caramel Almond ice cream container with condensation, and multiple berry-themed boxes of Pireti Berry White eye serum on a pink background—ideal for showcasing food and beauty packaging design for ecommerce.

    User-generated

    User-generated content (UGC) includes product photos taken by anyone other than your brand or employees. These photos are typically shared on social media, so you can repost or feature the content on your own website as a form of social proof. UGC product photography isn’t ideal as your main photo, but it’s a great complement to your product pages.

    Skincare brand Topicals has a carousel of UGC photos at the bottom of its website. It shows authenticity and social proof of its products.

    Before and after images of acne scar reduction using Topicals Faded Serum, showing visible skin improvement.

    How do you take product photos?

    While the art of product photography requires much more than a single article (there are courses listed below!), the high level process is as follows:

    1. Plan the shoot

    Define your shot list, goals, locations, and props. Know what you’re capturing and why.

    2. Set up your space

    Use natural light when possible or invest in lighting kits and reflectors. Use a white backdrop for standard product shots.

    3. Stabilize your camera

    Use a tripod for sharp, consistent angles—especially for ecommerce listings.

    4. Shoot multiple angles

    Show your product from the front, back, side, top, and bottom. Include close-ups and contextual shots where applicable.

    5. Edit your photos

    Adjust lighting, color balance, and crop. Remove backgrounds or retouch imperfections. If you’re not a pro editor, outsource this step.

    What equipment do you need for product photography?

    For product photography, all you really need is a smartphone camera. But for high-quality shots that convert shoppers, you’ll want a dSLR or mirrorless camera and 50 mm lens as the bare minimum. 

    Here’s a general overview: 

    Beginner (DIY at home):

    • Smartphone with high-res camera
    • Natural lighting near a window
    • White poster board or sweep background
    • Free editing tools (Snapseed, Lightroom Mobile)

    Intermediate:

    • DSLR or mirrorless camera (50mm lens recommended)
    • Tripod and remote shutter
    • Lightbox or softbox lighting kit
    • Reflectors and diffusers

    Pro-level / studio setup:

    • Macro or tilt-shift lenses
    • Studio lighting with modifiers
    • Professional backdrops or sweep tables
    • Grip gear (c-stands, clamps)
    • Pro editing software (Photoshop, Capture One)

    Tips and best practices for better ecommerce photos

    While your product photos should reflect your unique brand and appeal to your specific target audience, there are a few universal truths and best practices:

    Get the gear

    While smartphone photos may work for social posts or email, you want high-quality photos for main product pages. Invest in a high-quality camera and lens or hire a professional who has their own equipment to shoot your photos for you.

    Choose your background wisely

    Some ecommerce marketplaces require plain white backgrounds, and if you’re shooting for other channels you have more leeway. Whatever the background, it should reflect the aesthetic you’re after while keeping the focus on the product.

    Think about the context

    Consider the context for your products and for your shoppers. It’s important to show the product in use, using models and contextual backgrounds and props. But it’s also important to consider the context in which your shoppers are viewing the photos. If they’re on mobile (they likely are), offer zoomed-in shots and closeups of important product features.

    Maximize your investment

    Shoot with repurposing in mind. Professional product photos are a significant investment, and you want to make the most of it. Think about using your product photos on more than just ecommerce pages, but also in digital marketing and ad campaigns, on social media, in emails, and for labeling or packaging.

    Leverage symmetry for a premium feel

    Symmetry isn’t just pleasing to the eye—it can instantly elevate the perceived value of your product. For items with naturally balanced design elements (like cosmetics, shoes, tech, or jewelry), a symmetrical composition reinforces order, precision, and quality. Center the product, align key features, and shoot head-on for maximum effect. When used intentionally, symmetry creates a polished, editorial-style aesthetic that feels high-end and trustworthy.

    Remember the details

    It’s always important to edit your photos afterwards, no matter how great the original shot is. You may have to fix imperfections that have the potential to distract potential buyers and negatively impact conversions.

    Outsource the tedious bits

    Lots of photo edits, like background removal and color changes, are so detail-oriented and time-consuming. It can take an entire day just to edit a small batch of photos. If you find your time is bogged down with post-processing, consider outsourcing the edits. Be wary of any providers that use automation and AI, as they run the risk of imperfections the human eye won’t miss.

    Enjoy it

    At the end of the day, it’s important to have fun. Even though you have constraints on what you can do with the images, you can still get creative with it. Use outsourcing and other ways to take some of the stress out of your day to day so you can find your passion and get back to the work you love. 

    Enlist your dedicated virtual photo-editing team of designers who complete every edit by hand

    Enlist your dedicated virtual photo-editing team of designers who complete every edit by hand

    3 product photography examples

    Looking for some inspiration from real-world brands with compelling product photos that can inspire your own visuals? Here are three examples:

    1. Grounded Plants

    Three artificial indoor plants: banana leaf, fiddle leaf fig, and monstera in black pots on a gray background.

    The Grounded Plants brand has such a distinct look and feel, and the product photos are a continuation of that. The backgrounds are plain so not distracting but interesting enough to fit with its overall aesthetic. Plus, variety breaks up the monotony of a single hue.

    2. Otherland

    Assorted Otherland candles in various designs and colors, perfect for creating a cozy ambiance.

    Candle brand Otherland has a creative touch to its product photo backgrounds. It stages shots of its candles with fun props and backgrounds to evoke different moods for each candle.

    3. SOKO

    Close-up of model showcasing statement rings, threader earrings, and layered necklace from a luxury jewelry collection.

    SOKO sells jewelry that was handcrafted with sustainable materials in Nairobi, Kenya, so the magic is in the details. And the details aren’t lost when it comes to its product photos. The perfect mix of white background, detailed, and lifestyle shots, SOKO’s photos are as beautiful as the designs themselves.

    Product photography courses

    There are tons of product photography courses out there—ranging from beginners to advanced, and many specializing in specific niches.

    Here are some product photography courses worth checking out:

    • Product Photography for Ecommerce, Shopify Academy (free): Learn how to take product photos to sell online, including white background shots, home studio setup, and step-by-step process to outsourcing. 
    • Product Photography at Home, Craftsy ($29.99): Professional photographer and small-business owner Jessica Marquez leads the course. You’ll learn how to create tabletop setups for product shoots, including lighting, backgrounds, working with models, and post-production.
    • Shoot Products Like a Pro, Phil Stills (£197): 13 short modules take you through everything from lighting and studio setup to white backgrounds and cut-outs. You can try the first two modules for free.
    • Mobile Product Photography Class, Weebly (free): This product photography course shows you how to capture shots with your smartphone. The course is from 2017, so while some of the tactics may be outdated, a lot of the principles still apply.
    • Still Life Photography, UCLA Extension (?): Learn lighting and camera techniques, food and product photography, and basic Photoshop edits. This course is only available at certain times, so check back for enrollment information and updates.
    • Rachel Kimberley, virtual: This professional photographer has various photography courses on her website, including courses for flat lays, makers, lifestyle, and product styling. 

    13 product photography statistics

    Below are some recent product photography statistics, studies, and surveys to keep your finger on the pulse:

    1. The ecommerce photography market is worth $1 billion

    Globally, the ecommerce product photography market is estimated to be worth $1 billion in 2024. It’s predicted to grow to $2 billion by 2033, with an annual growth rate of about 8%.

    2. People process images in just 13 milliseconds

    One MIT University study found that the human brain can process images after viewing them for just 13 milliseconds. That means they can process a product image just as quickly. Your product photos play a huge role in the first impression, so it’s important they’re high-quality.

    3. People can recall 2,000+ images with 90% accuracy

    One 2013 study showed people 2,560 photographs for a period of just 1 second. After viewing all the images, they tested the participants’ memory recognition. The participants were able to recall more than 2,000 images with at least 90% accuracy, even after a period of three days.

    4. On a scale of 1 to 10 for difficulty, marketers rate producing visual content a 7

    In one survey from Venngage, marketers were given the option to rank the difficulty of consistently producing visual brand content, with 1 being the least difficult and 10 being the most difficult. On average, marketers ranked this task a 7. 

    5. Nearly half of marketers put 20–50% of their budget into visual content creation

    In that same Venngage survey, marketers were asked about their marketing budgets. Nearly half (45.7%) said they put anywhere between 20% and 50% of their budget towards creating visual content. This is likely to increase—there was a 9.5% increase in marketers planning to put at least half of their budget towards visual content production by the end of 2024.

    6. The photo printing market is worth more than $15 billion

    Globally, the photo printing and merchandise market is worth more than $15 billion. It’s forecasted to grow at a CAGR of more than 5%. By 2027, it’s estimated to be worth more than $20 billion.

    The following list shows the most-ordered printed photo products in 2023, from most to least:

    • Prints
    • Frames for wall decor
    • Frames for table/desk
    • Mugs
    • Photo Cards
    • Calendar
    • Clock
    • Albums
    • Puzzle
    • Notebooks
    • Canvas, banners, and signs

    8. 9 camera companies dominate the global market

    The Global Digital Cameras Market Recent Trends, In-depth Analysis, Size and Forecast To 2027 notes nine top camera companies in the world:

    • Canon
    • Nikon
    • Sony
    • Pentax
    • Olympus
    • Fujifilm
    • Casio
    • Panasonic
    • Samsung

    9. 53% of businesses want to try AI image generators

    AI product photography and editing is a trending topic. While the technology is far from perfect, more than half of businesses would like to experiment with using AI image generators, according to a survey from Semrush.

    10. Ice Cream Castles shortened their photo-editing workflow from 7 days to 1 day

    Children’s clothing brand Ice Cream Castles used to take an entire week to edit product photos before they were ready to use them. This took too much time they could’ve spent growing and improving the business—doing the things they love. They started outsourcing their edits and shortened photo edit turnaround time from 7 days to just 1 day

    Comparison chart showing reduced photo editing time and cost, from 37 hours to 6 hours and under $1 per image.

    11. Formkraft took 5 days to shoot photos for their new website

    Photography Prodoto shot product images for Formkraft’s new website that sells a range of merchandise and consumables. The shoot took five days and shot initial concepts for 18 Master Category images and four additional website banner images. It takes time to get high-quality shots!

    12. Medalia paintings convert at 17% when they feature artist photos

    A/B testing tool VWO’s customer Medalia sells Cuban and Haitian art online. They ran an experiment to see if featuring artist photos as well as product photos would boost conversions. It did. Products that featured artists converted 17.2% of the time compared to 8.8% without.

    13. More than half of photographers start out as hobbyists

    According to one survey, slightly more than 50% of photographers get their start with photography as a hobby. 

    Infographic by Aftershoot showing how photographers began their careers, with over 50% starting as a childhood hobby and others citing creative studies, career transitions, or life events.

    Now it’s time to edit your product photography

    You don’t have to do it all yourself. Outsourcing your edits can help you launch faster, stay consistent, and focus on the big picture.

    Path gives you a team of expert retouchers who complete every photo edit by hand—no AI, no cut corners. Just pixel-perfect images that convert.

    Wish you could just hand this over to a pro? Surprise, you can.

    Simple pricing for stress-free, pixel-perfect photo edits tailored to your needs.

    Product photography FAQs

    What is needed for product photography?

    • Camera
    • Lenses
    • Lighting
    • Tripod
    • Background
    • Reflectors and diffusers
    • Editing software
    • Props

    What is the meaning of product photography?

    Product photography is a subcategory of commercial photography that focuses on capturing high-quality images of products for marketing and promotional purposes. The images are used in advertisements, websites, catalogs, and other marketing materials to showcase the product in the best possible light.

    What is the idea of product photography?

    The idea of product photography is to give potential buyers a full impression of a product. In ecommerce, it essentially replaces the in-person product experience a shopper would have in-store.

    What is the role of product photography?

    The role of product photography is to help shoppers better understand the products they intend to purchase. It should showcase the product, build trust, enhance the brand image, boost sales, and ultimately reduce returns.

    What is object photography?

    Object photography is when you take a photo of an inanimate item. As such, product photography is technically a form of object photography—unless the product is living, like a succulent. In object photography, items are typically non-moving, or still.

    [ad_2]

    Source link

  • Want the Secret to Insta-Success? Enrol in the School of Instagram

    Want the Secret to Insta-Success? Enrol in the School of Instagram

    [ad_1]

    Why do some people seem to gain Instagram followers effortlessly, while others struggle to get any traction? Find the answer by enrolling in the School of Instagram. It’s completely free to join, and the lessons you learn will take your Instagram account to the next level.

    Here’s a quick overview of what you can learn from the School of Instagram. (Hint: it’s just a fraction of what’s on the site itself, so you might want to dive right in and get started with your first free lesson right away!)

    1. How to Stand Out on Instagram

    Instagram has over a billion active users, with over 100 million photos and videos uploaded every day. How can you possibly stand out in such a crowded field?

    Start by binge-reading the ten dedicated lessons in the School of Instagram’s first subject area: How to Stand Out on Instagram.

    You’ll learn, among many other things, how to:

    How to write an Instagram captionHow to write an Instagram captionHow to write an Instagram caption

    Successful Instagrammers seem to do all these things naturally, but the truth is that they’ve spent years honing their techniques and learning what works and what doesn’t. The School of Instagram helps you take a massive shortcut and begin using these tried-and-tested tactics right away.

    2. How to Plan Your Instagram Content

    What do you mean, you don’t plan your Instagram content?

    If you’re just using Instagram to connect with friends and family, it’s fine to post off-the-cuff photos of whatever’s happening in your life from moment to moment. But if you want to use Instagram to reach a wider audience, you need to be more strategic. Learn how to do that in Part 2 of the School of Instagram’s curriculum: How to Plan Your Instagram Content.

    Planning your Instagram contentPlanning your Instagram contentPlanning your Instagram content

    You’ll discover time-saving apps you can use to plan your content, create better Instagram Stories, and more. Plus you’ll discover exactly how paid partnerships work and learn how you can grab a slice of the $6.5 billion influencer marketing budget, even if you don’t have a gazillion followers just yet.

    Oh, and have you always wondered how to get one of those beautiful blue “Verified” checkmarks next to your name? See the verification process demystified right here.

    3. Stuff They Don’t Teach You About Instagram

    If you’re an Instagram old-timer, you probably think you know all there is to know about using it.

    Think again.

    Instagram may be a fairly simple app, but with a billion users, and with humans being the creative beings they are, Instagrammers have come up with a ton of useful hacks to do things Mark Zuckerberg never thought of. Learn all about them in Part 3: Stuff They Don’t Teach You About Instagram.

    For example, do you know how to respond more quickly to comments by using the text replacement feature on your phone? How to add animated GIFs to your stories with a few taps? How to offer more poll options with the emoji slider? These are just a few of the Instagram hacks you’ll discover.

    Plus Instagram is always adding new features. Learn how to get the most out of the brand-new Instagram Create Mode, launched just last month.

    Instagram Create Mode TemplatesInstagram Create Mode TemplatesInstagram Create Mode Templates

    There’s so much more there too, from killer video trends to turning your Instagram content into a career. To see all of it, just head over to the site and start taking your free lessons.

    4. Learn From the Insta-Experts

    Let’s face it: there’s a ton of Instagram advice out there. But have you ever noticed that a lot of it is written by people whose own Instagram profiles are… kind of underwhelming?

    If you want to succeed on Instagram, you probably want to learn from people who have tens or hundreds of thousands of followers. You want to know what they’ve done to achieve that success. What have they learned along the way? What can you do to reach the same level?

    That’s where the “Asking for a Friend” interview series comes in. Watch some successful Instagram entrepreneurs talking about their biggest lessons, their best Instagram tips, how they deal with setbacks, and much more.

    You can find these fun and inspiring interviews on the School of Instagram homepage. Here’s one of them, with stylist and digital influencer Kristy Wu.

    https://www.youtube.com/watch?v=o8JAZ0XjPUM


    Create an Insta-Site With Milkshake

    If you follow the lessons from the School of Instagram, you’ll soon be building a healthy and fast-growing Instagram following. But how do you translate that into sales or traffic for your other projects? After all, Instagram only lets you put one link in your profile.

    The best solution is to build an “Insta website”: an eye-catching, mobile-friendly site that quickly states who you are and what you do. Forget complex web design and hosting fees: you can set up a site quickly and easily using the free Milkshake app.

    With Milkshake, you can build a bespoke Insta-site on your phone in minutes, and use it to connect your followers to everything you offer.

    The site is specially designed for Instagram’s mobile web browser, so your followers can swipe through your site just like Instagram Stories. Seamless!

    You can update the site as often as you like. It’s free to create, and the best part is that no software or design skills are needed! What’s not to like? Download the Milkshake iOS app to get started.

    And don’t forget to enrol for the School of Instagram to ensure you’re getting the most out of the platform. They’re adding more lessons and interviews all the time, so sign up to make sure you’re the first to find out about the latest Instagram tips and tricks!

    [ad_2]

    Source link

  • 20 Best Final Cut Pro Movie Trailer Templates Free & Paid (2025)

    20 Best Final Cut Pro Movie Trailer Templates Free & Paid (2025)

    [ad_1]

    Making a film and creating an ad for that film require skill. Let one of the 20 Final Cut Pro movie trailer templates free and premium in this article help you create a great impression for your project. They’re especially helpful if you don’t know how to make a movie trailer.

    Remember that you can subscribe to Envato Elements for a low monthly fee to download thousands of premium digital assets, such as the best movie trailer templates for Final Cut Pro.

    Editorial Note: This article has been completely rewritten to make it more usable for the reader.

    [ad_2]

    Source link

  • 20 Top DaVinci Resolve Slideshow Templates for 2025

    20 Top DaVinci Resolve Slideshow Templates for 2025

    [ad_1]

    A successful DaVinci Resolve picture slideshow should be short, concise, and with a captivating professional design. If you’re unsure how to make a slideshow in DaVinci Resolve, look no further. Here, we went through some of the best premium DaVinci Resolve slideshow templates available on Envato Elements.

    Editorial Note: This article has been completely rewritten to make it more usable for the reader.

    [ad_2]

    Source link

  • 6 Ways to Get Free Photo Edits in 2025 – 6 Ways to Get Free Photo Edits (Updated 2025)

    6 Ways to Get Free Photo Edits in 2025 – 6 Ways to Get Free Photo Edits (Updated 2025)

    [ad_1]

    Looking for ways to elevate your photos without breaking the bank? Whether you’re a seasoned photographer or just starting out, there are plenty of ways to get the edits you need for free—or at a fraction of the cost. 

    At Path, we offer several ways for you to try out our services and save money while enhancing your images, because we believe quality editing should be accessible to everyone. From free trials to bonus credits, we’ve got options tailored to your needs. 

    Let’s explore how you can make the most of your editing workflow without compromising on quality.

    1. Use the Path free trial

    New Path customers can try our services for free. Everyone who creates a new Path account (it’s free to do this, by the way) automatically gets two images edited for free. This is because we believe in the quality of our services and are fully prepared to prove it to you before you invest. 

    You can take advantage of the Path free trial here

    2. Purchase Path credits

    Path credits are our own version of currency which you can use towards any future order. You can buy Path credits in quantities of 25, 50, 100, 250, 500, and 1,000. If you buy 25 credits, you only get 25 credits. But if you buy larger bundles, you’ll receive some bonus credits for free. If you buy 50 Path credits, for example, you’ll get 4 free credits. If you purchase 1,000 credits, you’ll get 200 free credits. 

    So if you know you’ll be needing lots of photo edits, purchasing a bundle of Path credits is a great way to not only save money but also speed up the checkout process each time you place an order. 

    3. Sign up for the Path newsletter

    New Path newsletter subscribers also get rewarded with free Path credits. We give these credits to you as a thanks for signing up to our email list, and a way for you to try our services without a financial commitment. You don’t even need to give us your credit card information! 

    You can sign up for the Path newsletter here

    4. Download a free photo editor

    If you’re keen to learn, you can also download a free photo editing tool or app and learn how to fix your images yourself. While you don’t have to pay any money, you’ll need to make a time and energy investment to learn your chosen tool. 

    You can also fork over some money and subscribe to Photoshop to take advantage of its suite of advanced photo editing tools. You can learn how to use it with these step-by-step Photoshop tutorials

    5. Try AI photo editing

    AI has come a long way when it comes to photo editing. And though it still comes nowhere close to hand-drawn clipping paths and edits, it can handle basic needs for personal or limited professional use. There are many free AI photo editing tools that you can use. If you’re ok with subpar and less-than-perfect results, this can be a great option to get free photo edits. 

    6. Do a work-trade

    Okay, so a work-trade may not be free per se, but you don’t need to pay any money in this arrangement. If you offer a service or product that can be of use to a professional photo editor, consider a trade. Maybe you’re a headshot photographer—you can offer a complimentary portrait session. Or if you sell reusable water bottles, offer a free water bottle in exchange for X number of edits. Get creative! And make sure it’s mutually beneficial. 

    Get your photos edited by your virtual photo editing studio

    Great photography deserves great editing, and Path makes it easy and affordable to bring your images to life. Whether you’re taking advantage of our free trial, earning bonus credits, or exploring other budget-friendly options, we’re here to support your creative journey. 

    When you’re ready to skip the hassle and let the pros handle your edits, your virtual photo editing studio is just a click away—ready to deliver stunning results 24/7. Start saving time and money while taking your photos to the next level today!

    Curious how much it’ll cost to outsource your edits to pro designers? Less than you might think.

    A stylized digital illustration in Pathedits.com branding colors shows a glasses-wearing person on a laptop, linked to product images of headphones and a heart-design sweatshirt, representing e-commerce and digital product creation.

    [ad_2]

    Source link