Creative agencies and teams know the drill—tight deadlines, demanding clients, and the constant pressure to find new revenue streams. Between managing projects and chasing new business, there’s barely time to explore income opportunities that don’t require more billable hours.
Affiliate programs often get dismissed as something only solopreneurs and influencers can benefit from. But your entire team, agency, or department can turn your professional networks into serious passive income through team affiliate marketing.
30,000 sales and marketing pros get our insights, tips, and best practices delivered weekly.
You use your combined professional relationships to refer people who need editing services for different purposes than what you do. Photo editing affiliate programs like ours work particularly well because they offer high-value services, repeat customers, and longer commission windows. Read on for tips on how to make the most of it.
Why choose the Path affiliate program for photo editing
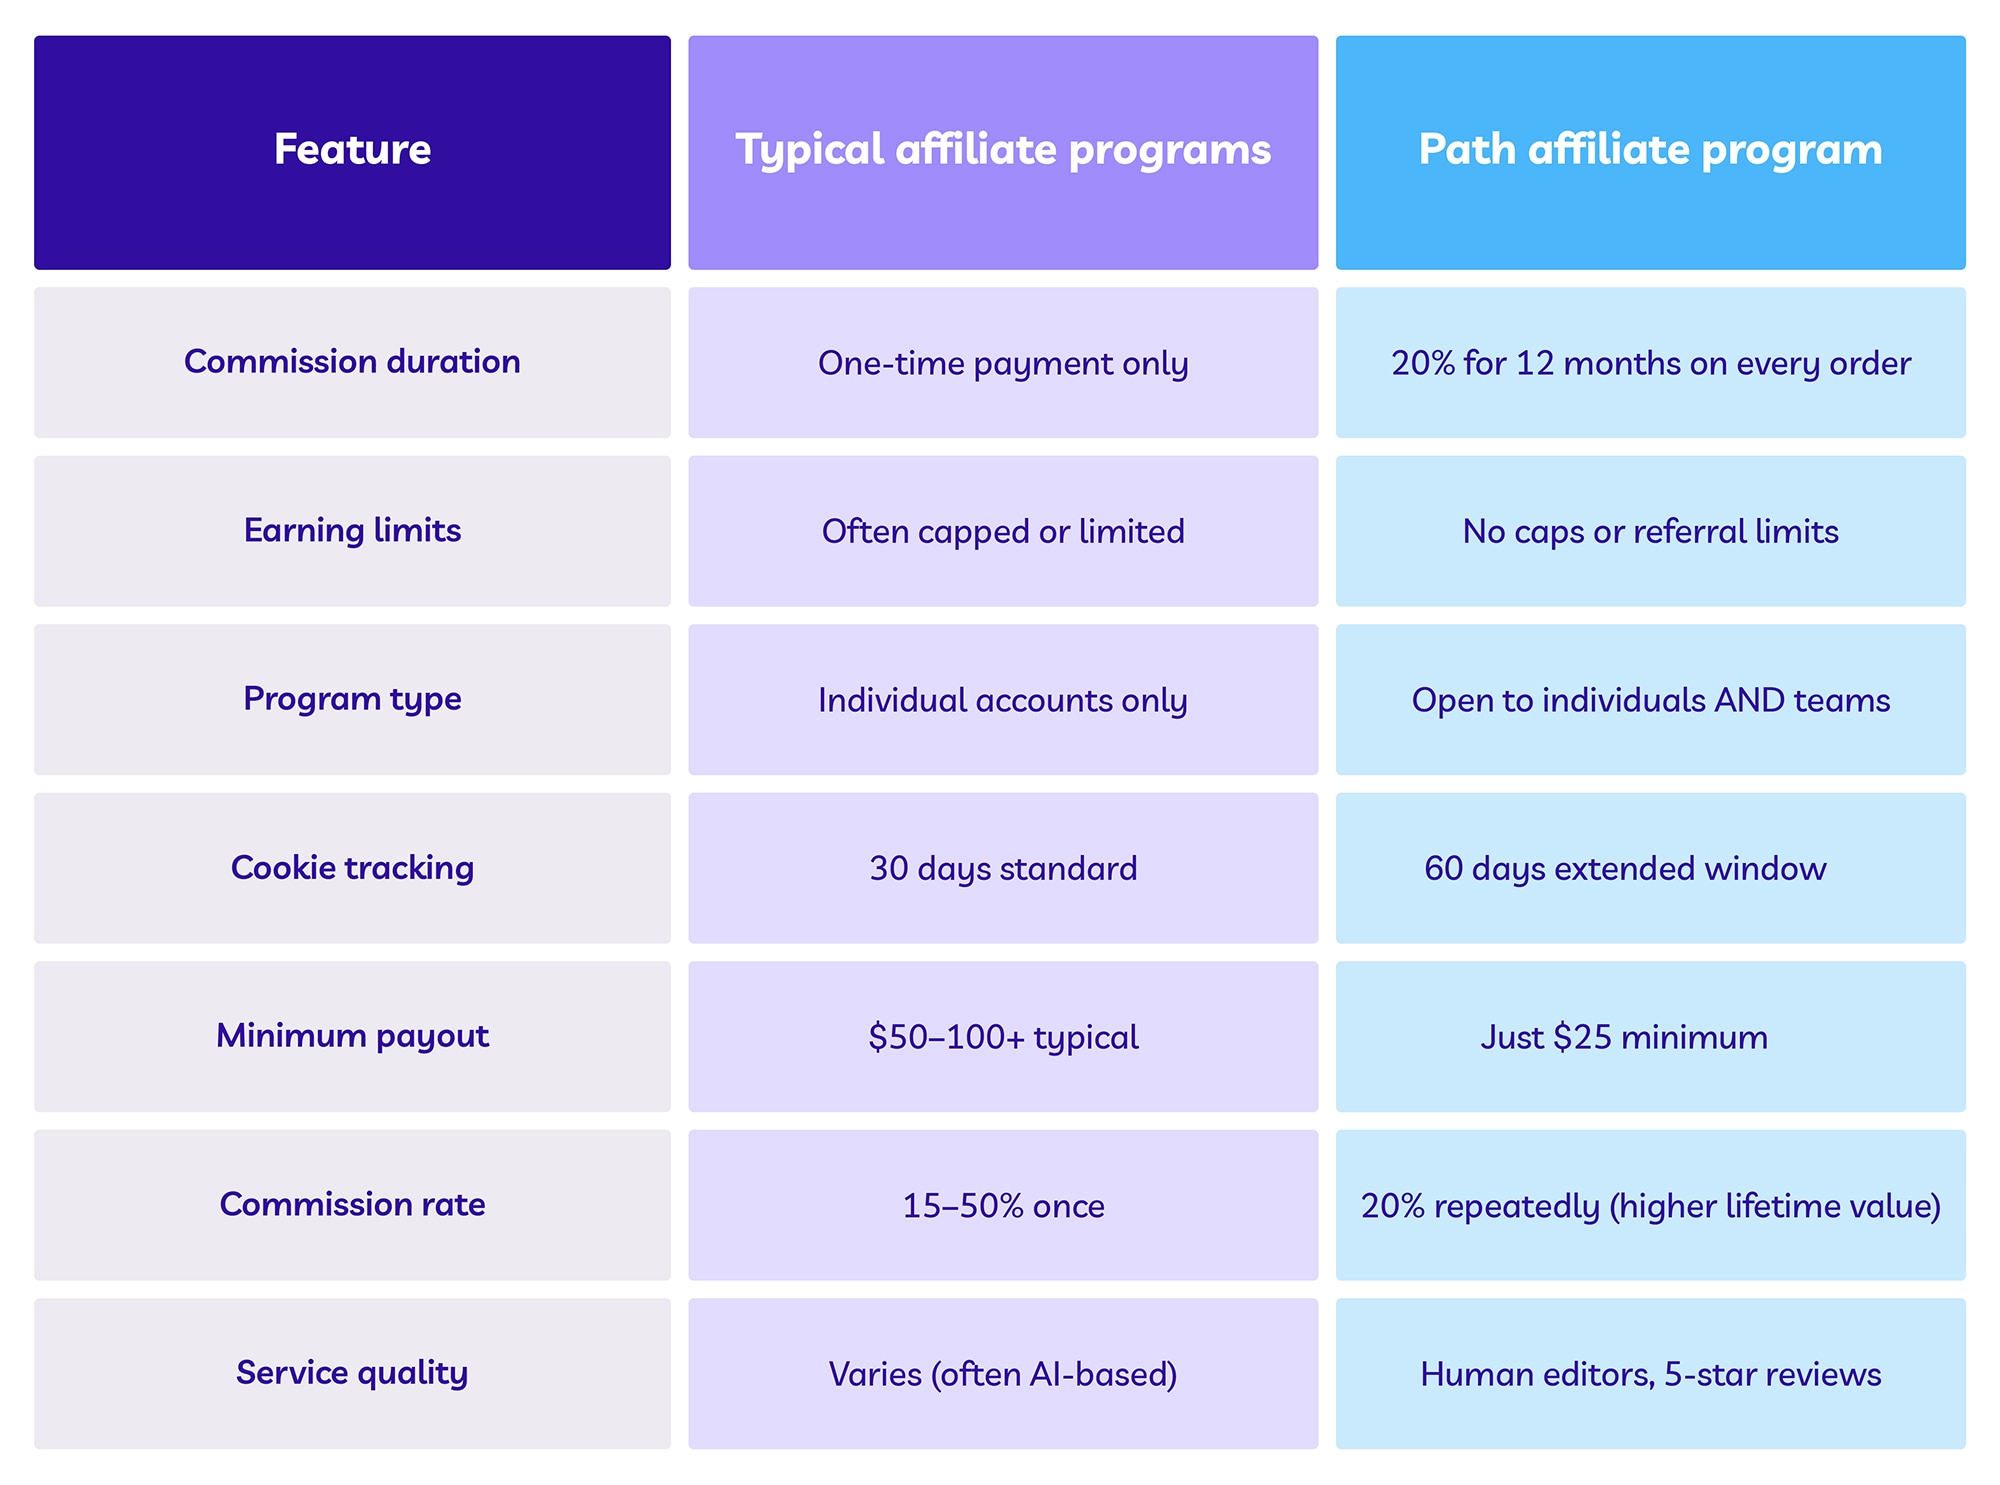
You earn for 12 months, not just once. Most affiliate programs pay you once when someone buys, then you’re done. Path pays you 20% commission on every single order that customer places for their entire first year. One good referral keeps paying you for months.
It doesn’t have income limits. There are no earning caps or referral limits. Refer 5 customers or 50—you get paid for all of them.
Our program works for individuals and businesses. Your agency can participate as a team, pooling referrals and sharing commissions however you want.
You get a longer tracking window. Path tracks your referrals for 60 days using cookies. Most programs only track for 30 days, so you have more time for people to actually place their first order.
The program has a low payout threshold. You get automatic monthly payouts via Wise once you hit just $25.
You receive Industry-competitive rates. Photo editing services typically offer 15–50% commissions, but most pay only on the first purchase. Path’s 20% rate for 12 months means you earn significantly more per referral over time. For example, if a customer spends $500 total on Path editing services in their first year, you earn $100 compared to just $20 from a typical one-time commission program.
You’re recommending quality service. Path uses human editors, not AI. It makes referrals easier because you’re recommending a service that actually works and has a good, established reputation with tons of 5-star reviews.
How the Path affiliate program works
Getting started with our affiliate program takes just 5 minutes:
Apply online: Fill out our application form. We manually review each application, which usually takes 1–3 business days.
Get your link: Once approved, you get access to your affiliate dashboard and unique referral link. The dashboard shows real-time stats on clicks, conversions, and earnings.
Share and earn: When someone signs up with Path through your link, they get 20% off their first order. You earn 20% commission on that order plus every order they place for the next 12 months.
Get paid automatically: We send payments via Wise. Once you earn $25 or more, you get paid automatically in the first two weeks of each month.
We designed this affiliate program for photo editing to be simple enough for you and your team to share your links and get paid without waiting for large withdrawal thresholds.
Who should join the Path affiliate program
Our program works best for teams already working in creative and photography spaces. Remember, your team’s combined network is bigger than any individual’s, and you’re not referring Path to competitors, but people who need editing for different purposes or different scales than your work. Below are some ideas and tips for specific referral opportunities for each type of business.
Creative agencies and studios
You outsource editing work, have clients who need consistent photo editing, and can recommend Path when clients need more support. For example, small business clients who need product photos but can’t afford full agency services, startup clients doing their own photography who need professional editing, freelancers you work with who need editing support, corporate clients’ in-house teams handling basic photography, and marketing teams you work with on different projects.
Ecommerce teams and managers
Product photography is part of your daily routine, and you know how frustrating inconsistent editing can be. You can recommend Path to other ecommerce brands in non-competing industries, suppliers who need better product photos for catalogs, and retailers you sell through, such as ecommerce shops that might need different edits for different marketplaces.
Sports photography businesses
You can refer other photographers in different specialties (real estate, weddings, events), smaller companies who can’t afford your services but need editing, and freelancers you collaborate with or mentor. Even venues you shoot for might benefit from a variety of edits when they advertise competitions or events across social media, websites, and print materials like leaflets or posters.
Corporate photography services
Your ongoing relationships with HR departments and corporate clients can create natural moments where editing recommendations come up in conversation. For example, you might deliver a series of team headshots but their marketing team will need to use them in different formats across websites, LinkedIn, or other platforms.
Solo professionals and freelancers
Content creators, photography educators, consultants, business coaches, and equipment vendors all connect with people who need editing help. And unlike agencies and larger brands, solo professionals and freelancers often share behind the scenes of their workflow and tools with others in the same space.
How to maximize your Path affiliate earnings
Successful referrals generally come from understanding your network and making the conversation feel natural, not forced:
Start with pain points: Your network deals with editing challenges, such as inconsistent quality, slow turnarounds, high costs, no dedicated editing staff. These conversations are where Path fits naturally.
Make it helpful, not salesy: Work Path into existing conversations, emails, and social posts. You’re sharing a useful resource, not pushing affiliate links.
Time it right: Promote during busy seasons when people need more editing help, such as during holiday ecommerce prep, sports championships, school headshot seasons.
Track your progress: Our dashboard shows which referral sources convert best, so you can double down on what’s working and improve campaigns that might not be performing well.
Natural referral touchpoints
If you’re wondering what actual conversations might look like, we have some ideas below. The main idea is to frame your content as helping others, not promoting yourself, because you want your network to trust you, not see you as salesy.
For agencies and studios:
“If you ever need editing support beyond our scope, I have a great resource.”
Include Path in a “resources we recommend” section in project wrap-up emails.
Mention Path in casual conversations about workflow challenges at networking events.
“Hey, found this editing service that might help with your editing backlog.”
For ecommerce teams:
“Your online store photos could really benefit from professional editing.”
Casual chats about business challenges at industry conferences.
LinkedIn posts: “Here’s how we streamline our product photography workflow.”
Include Path in a “Resources that might help your business” section in supplier newsletters.
For photographers:
“If you need future editing support, here’s what I recommend.”
Answer questions or share editing tips in photography Facebook groups, especially during busy wedding seasons.
Recommend Path to photographers you’re helping during mentoring conversations.
General social sharing ideas:
“Great tools for small businesses” roundups.
“Resources we recommend” posts.
Answering industry questions without revealing your own processes.
How to sign up as an affiliate with Path
Ready to get started as our affiliate? Here’s how it works:
Fill out the application. Head to our affiliate page and complete the form. We’ll ask about your business and how you plan to share Path with your network.
Wait for approval. We review each application manually, which usually takes 1–3 business days. Having an established business in creative or photography spaces definitely helps.
Get your dashboard and link. Once approved, you’ll get login details for your affiliate dashboard and your unique referral link. Everything updates in real-time so you can track your progress.
Focus on your existing network first. Spend your first 30 days talking to people you already know rather than trying to find new contacts. Your established relationships are where you’ll see the best results.
Start earning passive income with Path today
If you’re looking to earn passive income from recommending a reputable service to your network, Path’s affiliate program is a great fit. You earn 20% commissions for 12 months, there are no earning caps, and it’s designed for teams and agencies who want to monetize relationships without competing with similar businesses. Apply today and start earning!
Earn 20% commissions while helping others level up their visuals—with a human-powered photo editing partner they trust..
Photo editing is more accessible—and essential—than ever. Whether you’re a business owner, ecommerce seller, or busy creative, knowing what photo editing is (and isn’t) can help you elevate your visuals and reach your goals faster.
In the following guide to photo editing, you’ll learn:
What photo editing means (and why it matters)
Different types of photo editing, from simple to complex
And if you’re ready to level up your own photo edits, check out our free tutorials and professional editing services.
What is photo editing?
Photo editing is the act of image enhancement and manipulation. This process is usually done with a digital photo editing software. Photo editing can involve basic tweaks like when you crop and resize images or adjust saturation. It also includes advanced techniques like swapping faces or photo retouching to get rid of distracting elements or unwanted objects.
Some image editing techniques are done manually, while others are conducted through automated photo editing tools and software. Most edits to digital photography involve some one or a few photo editing programs. Some edits are even done offline on actual photographs, posters, or other printed collateral without any image editing software.
Other terms for photo editing include:
Image editing
Post-processing
Image/photo manipulation
Photoshopping
Image/photo enhancement
Let us look after your image edits, so you can get back to the fun stuff. Try Path free.
The importance of photo editing
Editing helps you fine tune and get the best image possible, as close to what you imagined when you took the photo (or better perhaps). Niche photographers can hone and emphasize their personal style. And for businesses, editing helps cement branding and optimize for business goals.
Photo editing is particularly important for ecommerce companies. Image quality directly affects people’s opinion of the product and sales numbers. If you have ugly photos, it’s going to be tough to convince a shopper to purchase your product.
Types of photo editing
There are many ways to edit a photo—some simple and others more complicated.
Many people can figure out simple photo editing techniques on their own—though this does require time and patience. More complex adjustments may require using dedicated programs with specific photo editing features or hiring a trained professional editor.
Simple photo editing techniques include:
Straighten: adjust the horizon of the photo
Crop: image cropping involves trimming out a portion (usually peripheral) of the image to help draw attention to the subject or otherwise improve the composition
Sharpen: enhance the definition of the edges in an image (won’t make a blurry image in-focus)
Noisereduction: smoothing the picture out, typically accomplished by reducing the pixel size
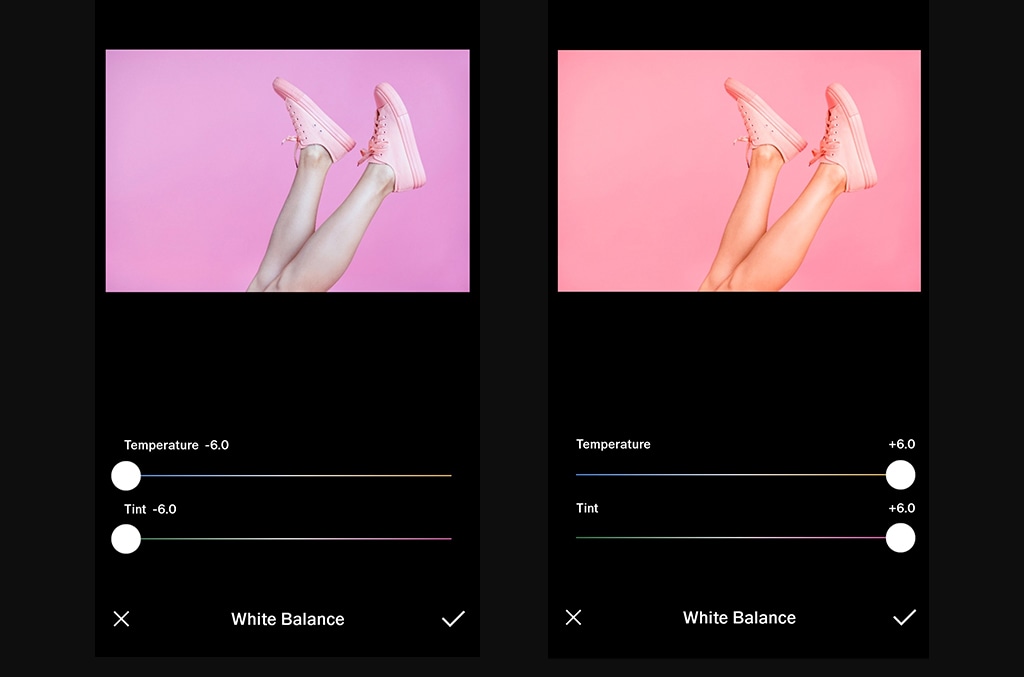
Whitebalance: the color of the light in the image
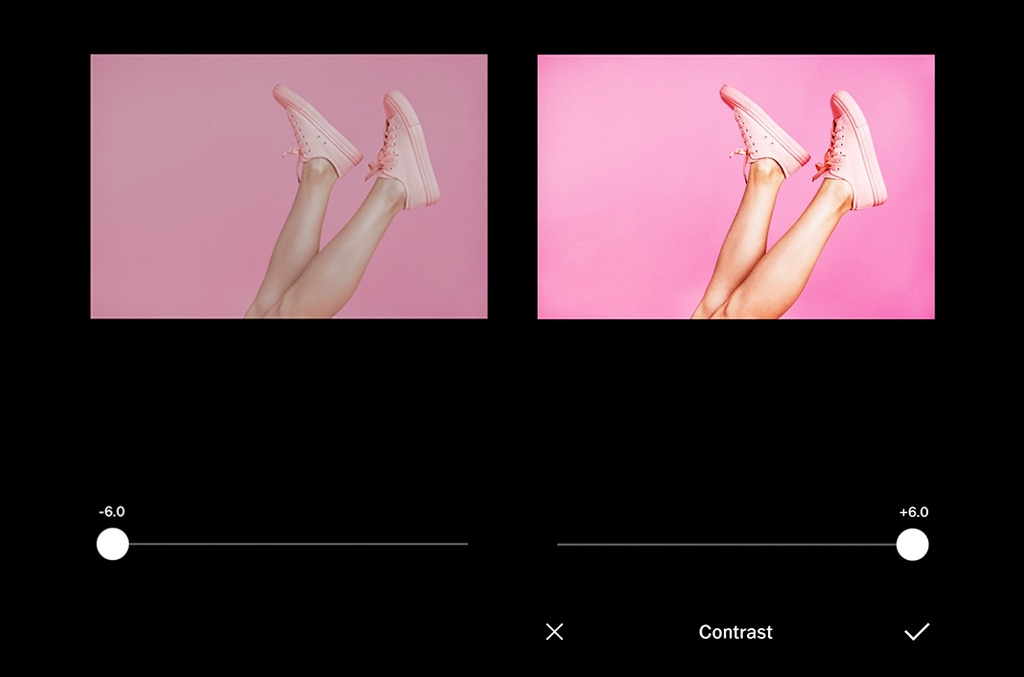
Contrast: higher contrast makes an image more punchy, while lower contrast makes it flatter in color
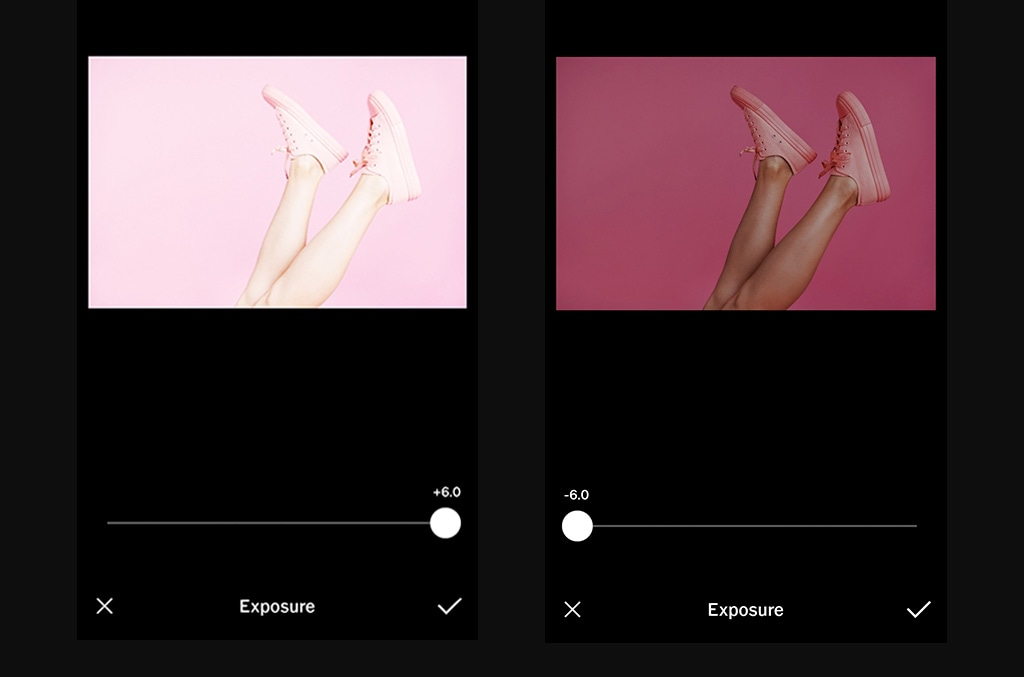
Exposure: the brightness of the photo
Lens correction: lessens the effect(s) of the camera lens
Coloradjustments: change the color of an item or element in the photo
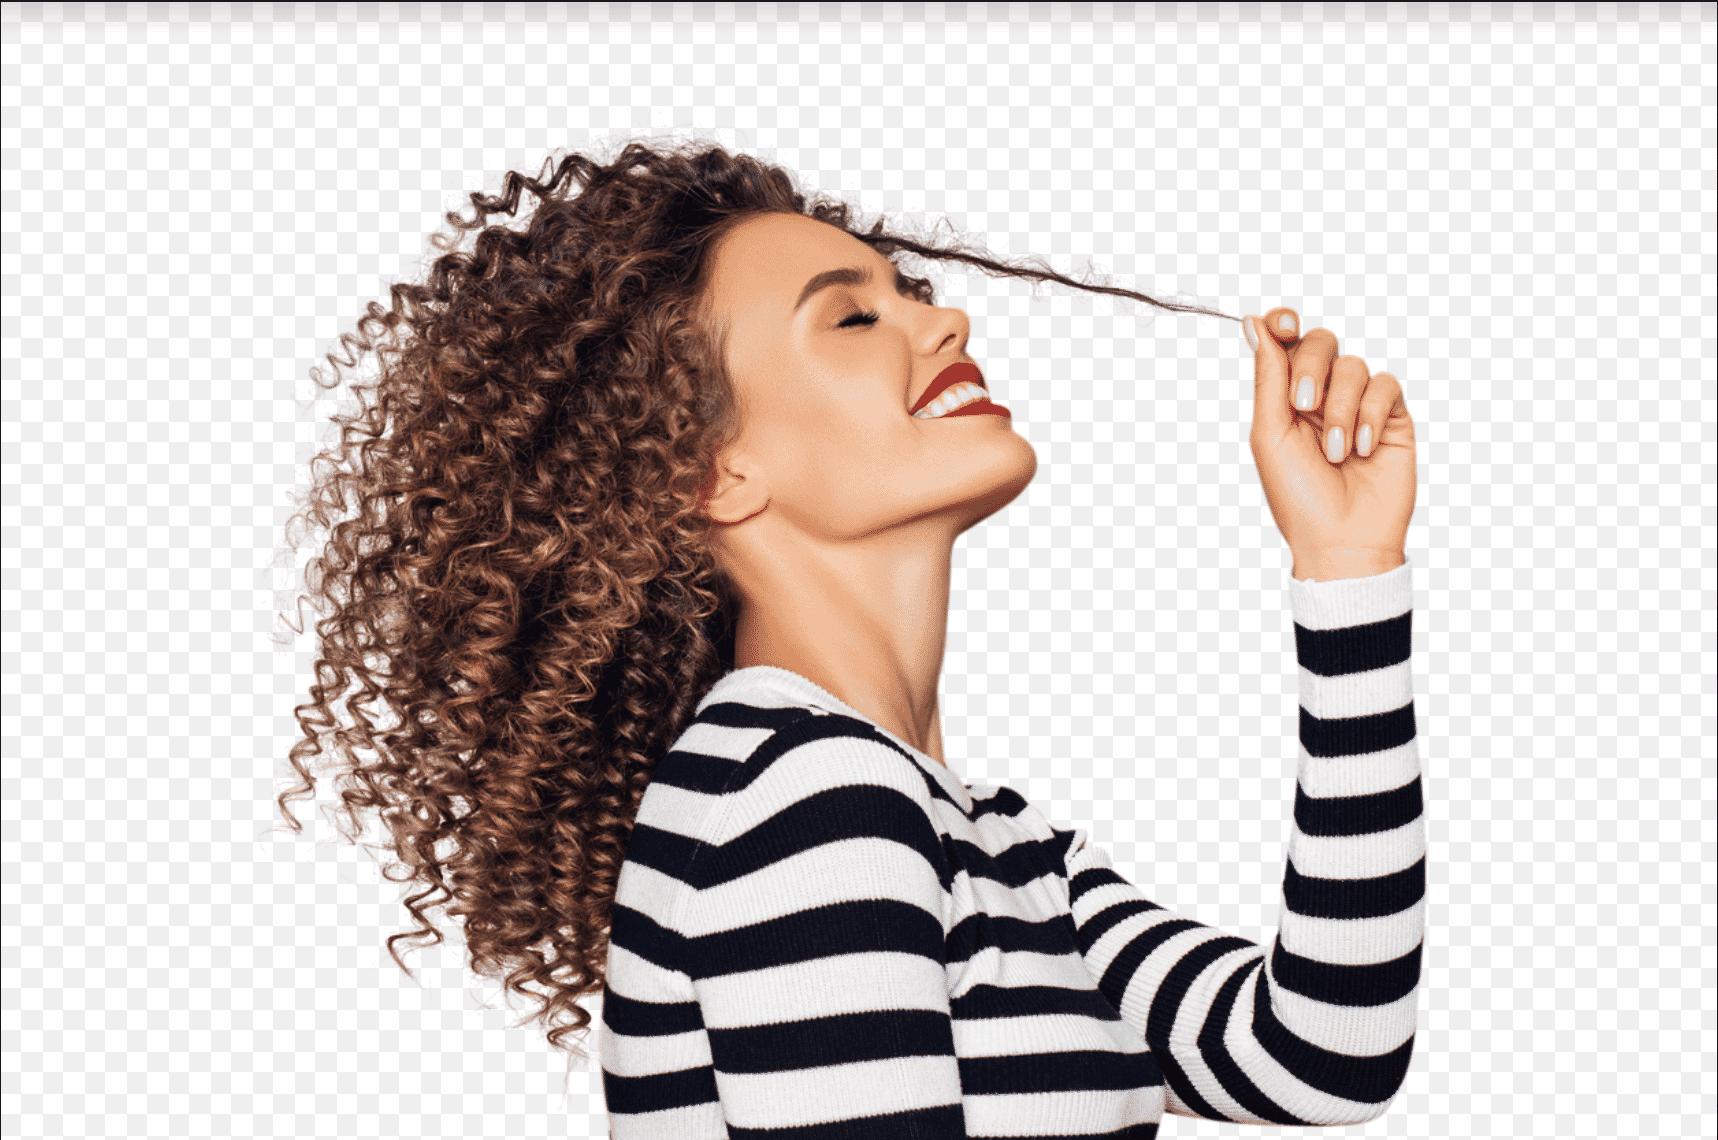
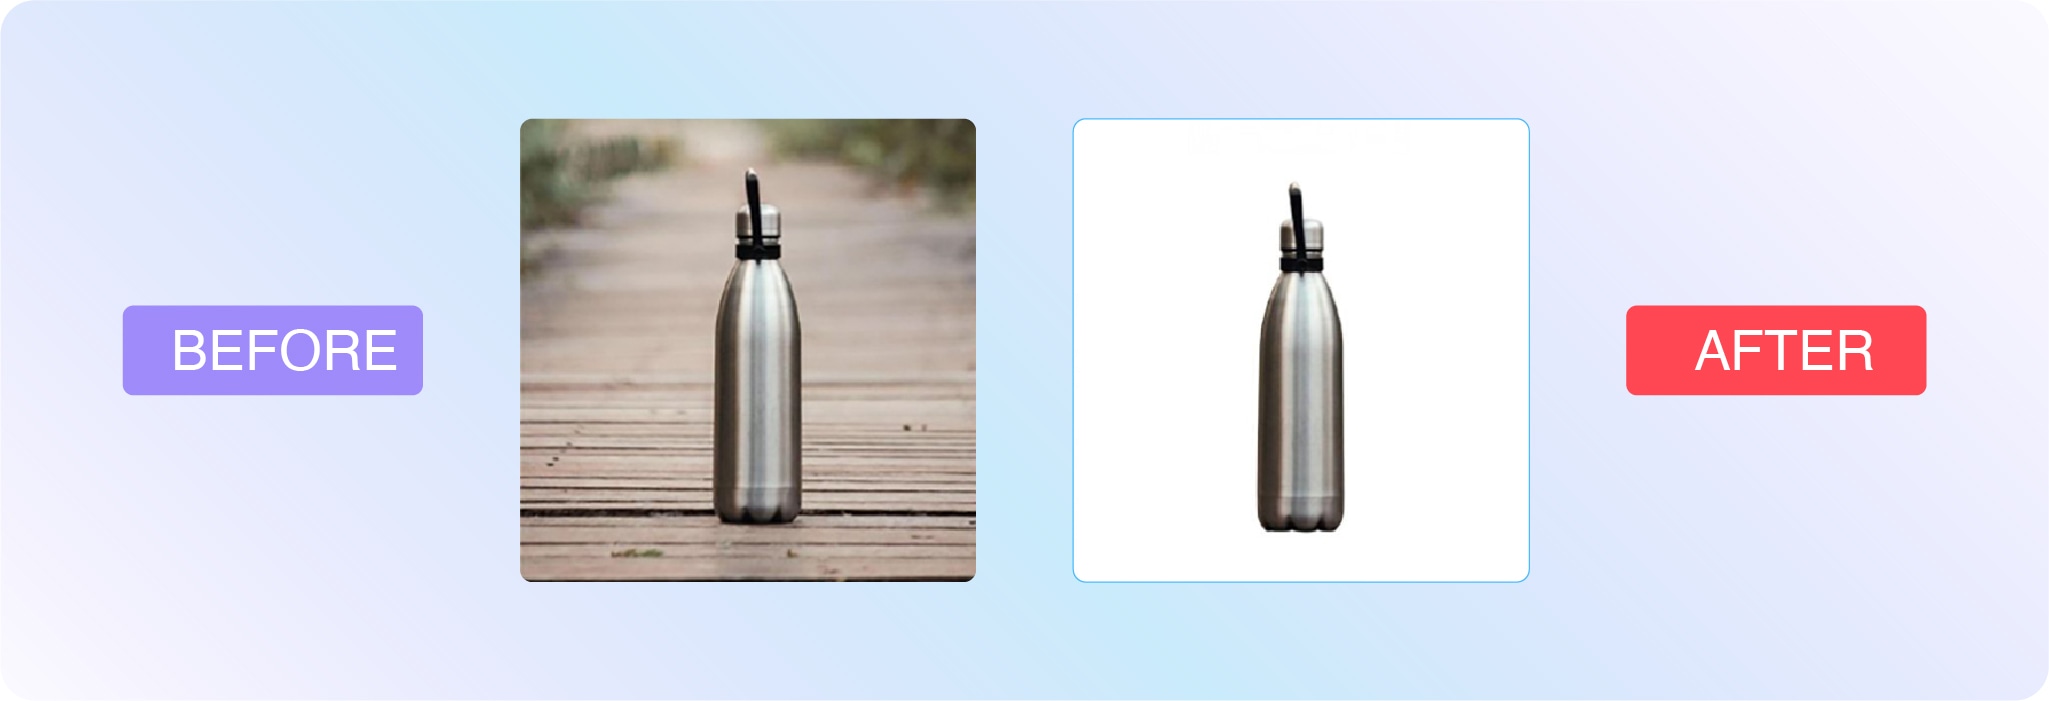
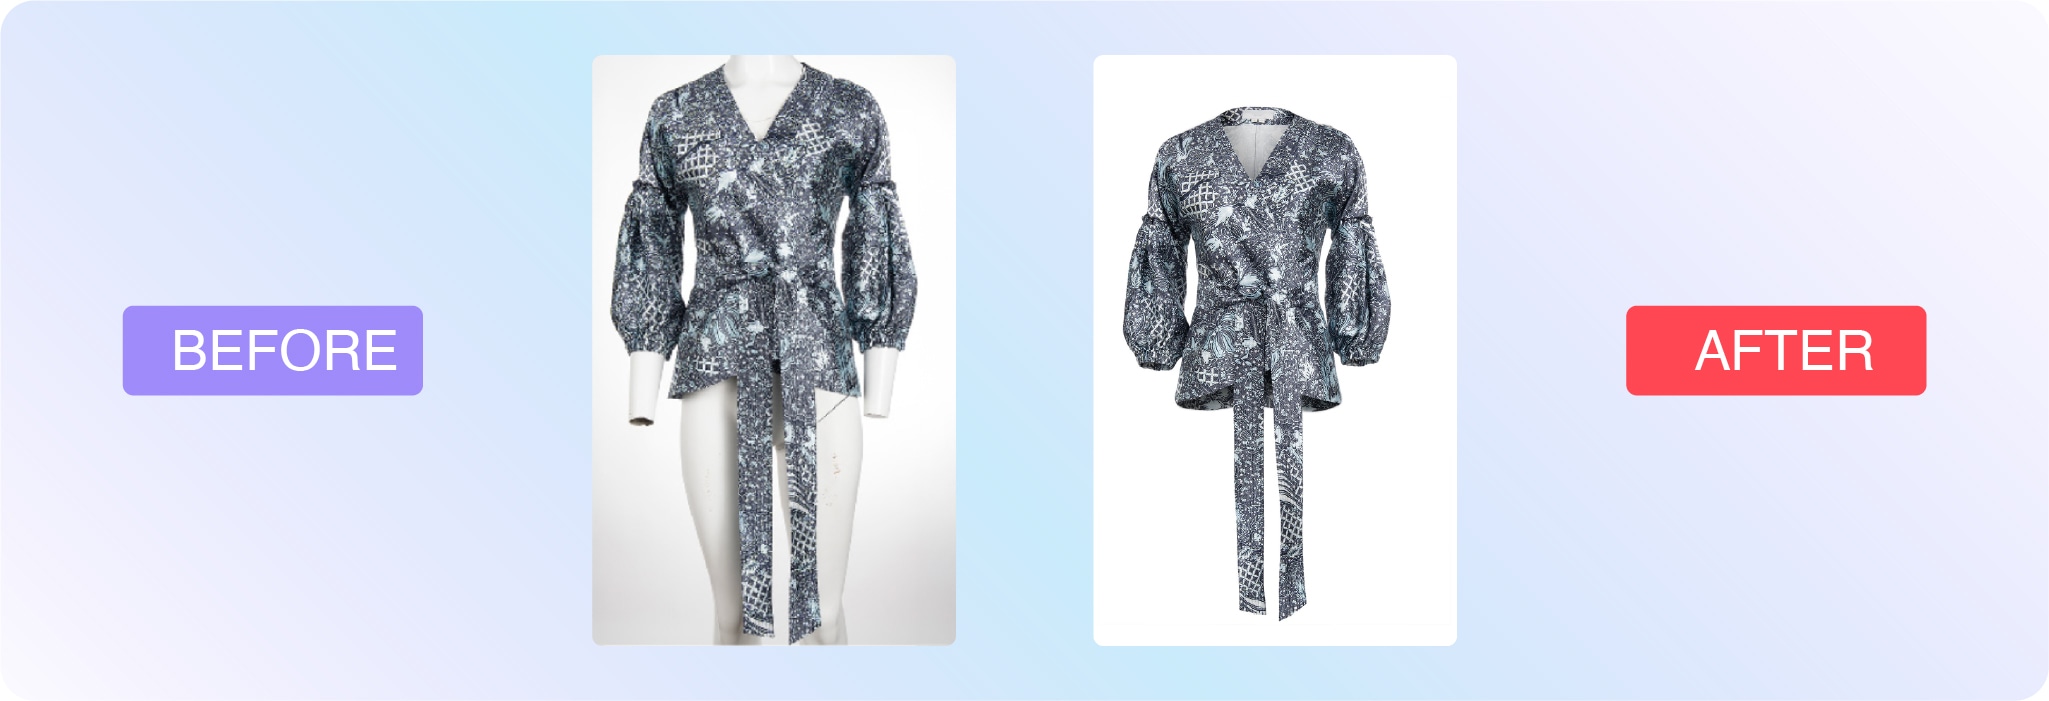
Background removal: delete the background from the image, isolating the subject (this is often used for white background product photography)
More complex techniques include:
Clipping paths: vector path that differentiates the part of the image that’s visible and the part that’s transparent (extracts a subject or element from an image)
Portrait corrections: complexion touch-ups and enhancements
Two methods of digital photo editing are pixel editing and parametric image editing. Let’s look at their definitions:
What is pixel editing?
Pixel editing, or pixel-level editing, is when you alter an image at the pixel level. Because you’re altering the pixels themselves, this also permanently changes the image file. That’s why pixel editing is considered a destructive form of photo editing because it’s not as easy to undo the changes and restore the original file.
Pixel editing allows you to make extremely detailed edits and accomplish certain functions that parametric image editing can’t (like CMYK color modes, for example).
What is parametric image editing?
Parametric image editing (PIE) doesn’t change the pixels of the image. Instead, these edits are recorded as a set of steps to follow to accomplish the final look. Thus, it’s a non-destructive mode of photo editing. However, PIE doesn’t always allow for all types of edits.
Many in the industry recommend starting with PIE, and then using pixel editing to refine the final details.
Examples of photo editing
There are so many ways to edit photos, and everyone has a unique approach. You might see examples of photo editing on social media or YouTube.
Here are some examples of photo edits the team at Path have done for businesses from all around the world:
Background removal
Save a ton of time with pro background removal from 39¢ per image
Photo retouching
Polish up your product shots with pro retouching from 79¢ per image
Ghost mannequin
Let us look after your ghost mannequins, starting at just 99¢ per image
Editing different types of photos
Technique
Skill level
Use case
Cropping
Beginner
Ecommerce, social media, marketing, headshots
Background removal
Intermediate
Amazon product listings, white background product photos
Retouching
Advanced
Portraits, headshots, fashion, jewelry
Product and ecommerce photography
Product images will almost always require or benefit from post-processing. Aim for consistency, especially if you’re working on multiple products for the same company or are providing several types of photos of the same product.
Visuals help market brands and sell products, but you should also think about where the image will be used. Is it for an advertisement, ecommerce page, social media, or a print catalog? A white background shot will call for much different edits than an image for a Facebook ad. Likely, you’ll be able to get more creative with advertising imagery.
Here are some of the most common types of edits for product photography:
Brightness and exposure: If you didn’t nail the lighting, you can make substantial adjustments post-shoot.
Background removal: This is a common edit for product photos, especially if you’re listing the item on Amazon, which has a white background requirement. Regardless, white background maintains consistency.
Color correction: It’s important that product photos portray the item as accurately as possible so it’s a smart idea to color correct all of your product images. As many as 64% of returns happen because the product didn’t match customer expectations based on product images and descriptions.
Color change: For products that come in several colors, it’s important to showcase the variety. Instead of photographing the product in every color, photo editors can make the changes post shoot.
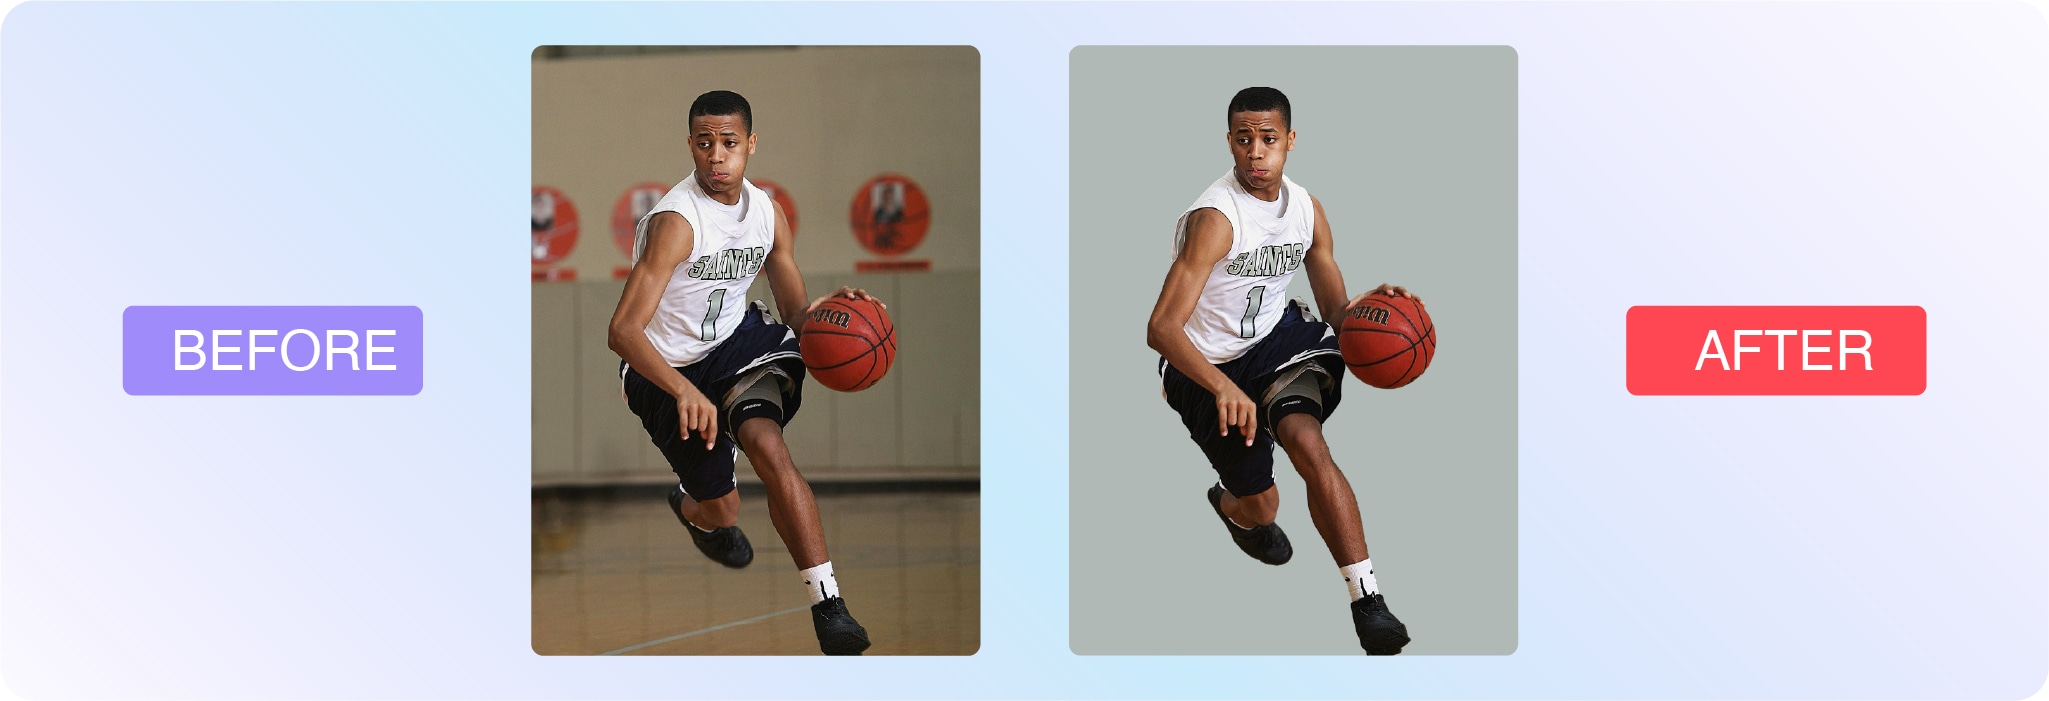
Sports photography
Sports images are often captured in fast-paced, unpredictable environments—making photo editing essential for polishing the final result. Whether you’re working with action shots from the field or editorial images of athletes, editing helps enhance sharpness, fix lighting, and direct attention to the key moment.
Cropping: Reframe the shot to highlight peak action or key players. A tighter crop can add intensity and drama.
Sharpening: Motion blur is common in sports. Sharpening can help make images feel more crisp and in focus.
Colorcorrection: Natural lighting varies across stadiums and gyms. Post-shoot edits bring consistency and accuracy.
Backgroundcleanup: Remove distractions from the crowd or surroundings that pull attention away from the subject.
Spotretouching: Clean up sweat, mud, or jersey wrinkles to create stronger, cleaner visuals for media or brand use.
If you’re editing for a team, school, or sponsor, keep branding consistency in mind—many sports photographers rely on editing templates to maintain uniformity across hundreds or thousands of images.
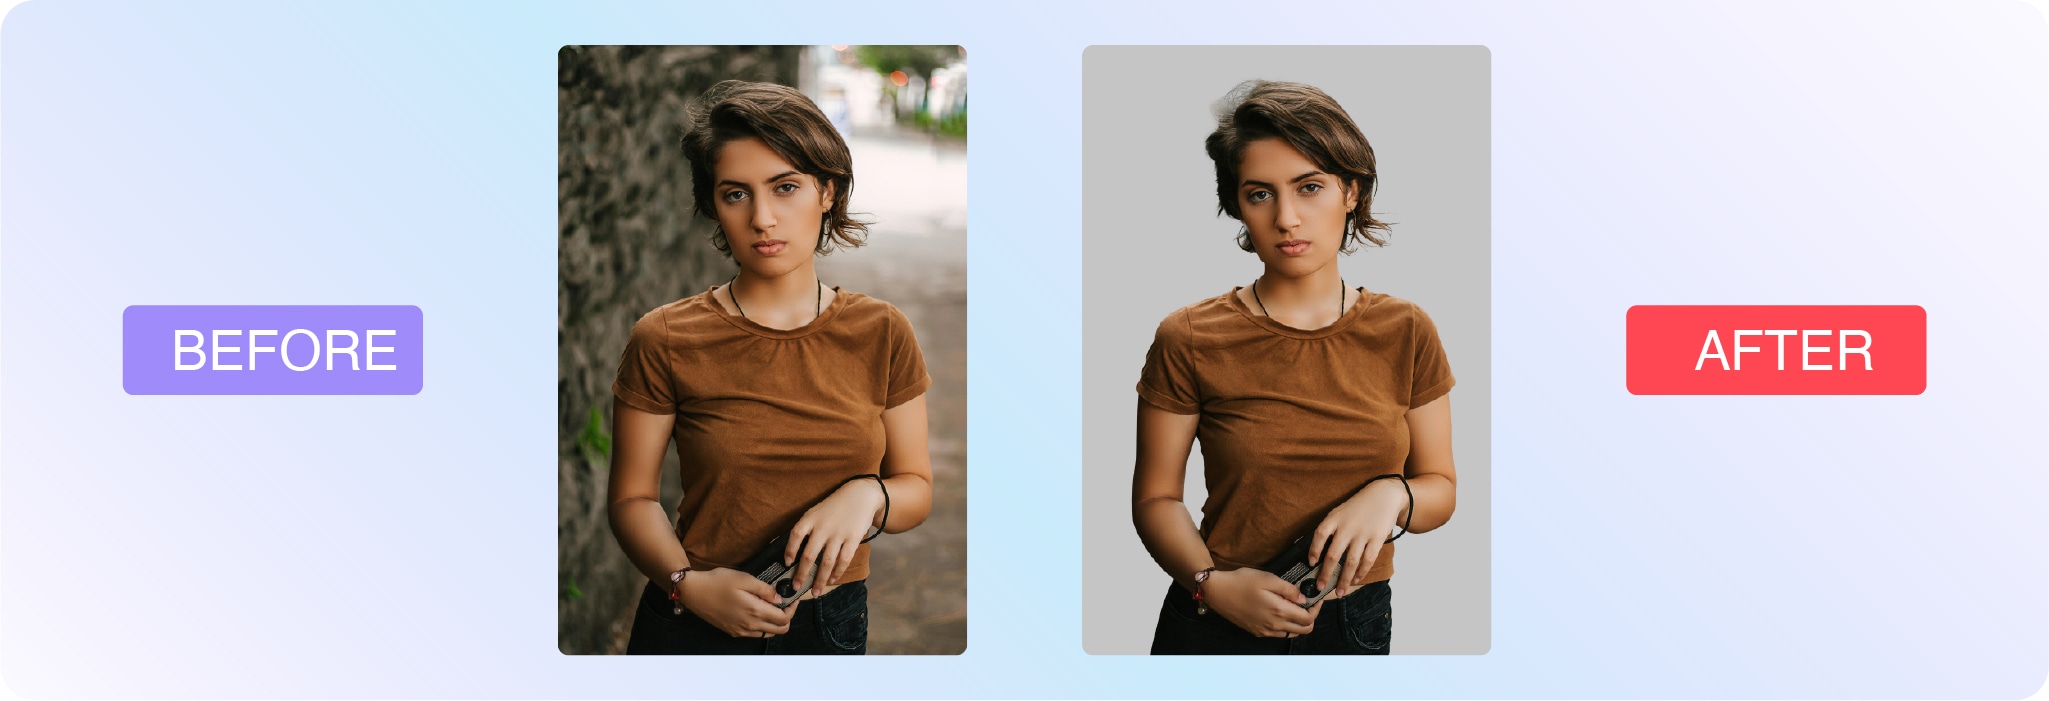
Headshot and portrait photography
Headshots and portraits are often the first impression someone gets of a person—whether it’s for a professional bio, dating profile, modeling portfolio, or graduation announcement. Editing can enhance natural features while preserving authenticity.
Here are common edits for portraits and headshots:
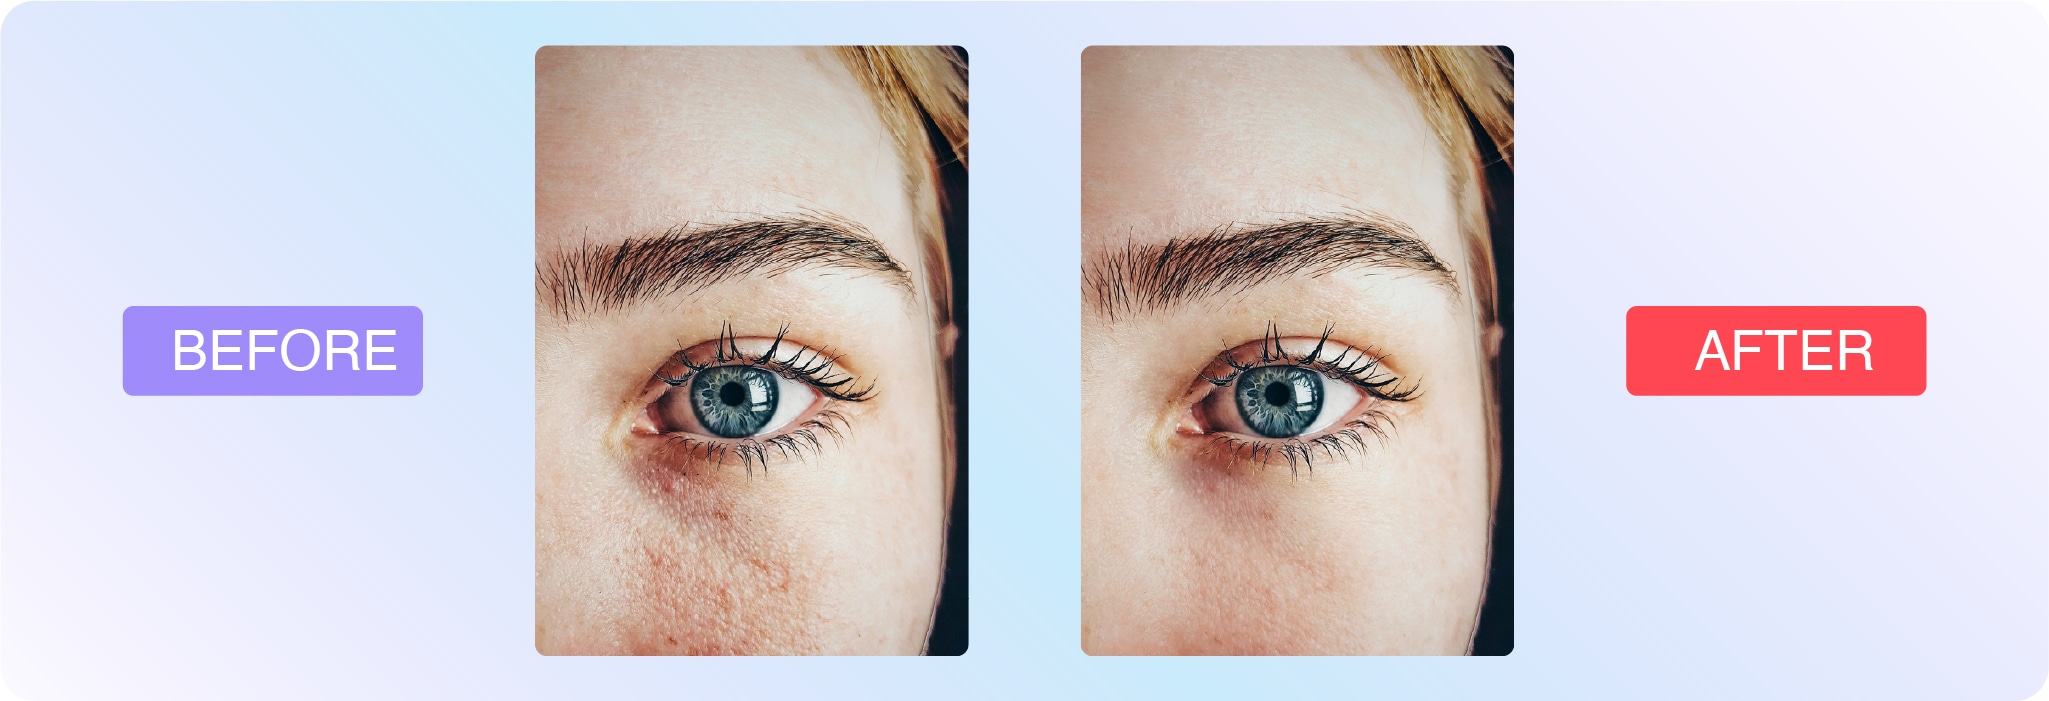
Skinretouching: Reduce blemishes, smooth skin, and even out tone without losing texture.
Whiteningteethandeyes: Brighten smiles and make eyes pop subtly and naturally.
Colorcorrection: Adjust tones to match a flattering, realistic look or a specific brand aesthetic.
Flyawayremoval: Clean up stray hairs or lint that distract from the subject.
Backgroundediting: Simplify or replace backgrounds to match the intended context—e.g., corporate headshot vs. lifestyle portrait.
The key with headshot and portrait editing is to enhance, not transform. The goal is to present someone in their best light while keeping the photo true to who they are.
Learn how to edit your photos
If you’re ready to learn how to edit your own photos, check out this handy collection of Photoshop tutorials. Here are a few to get started with:
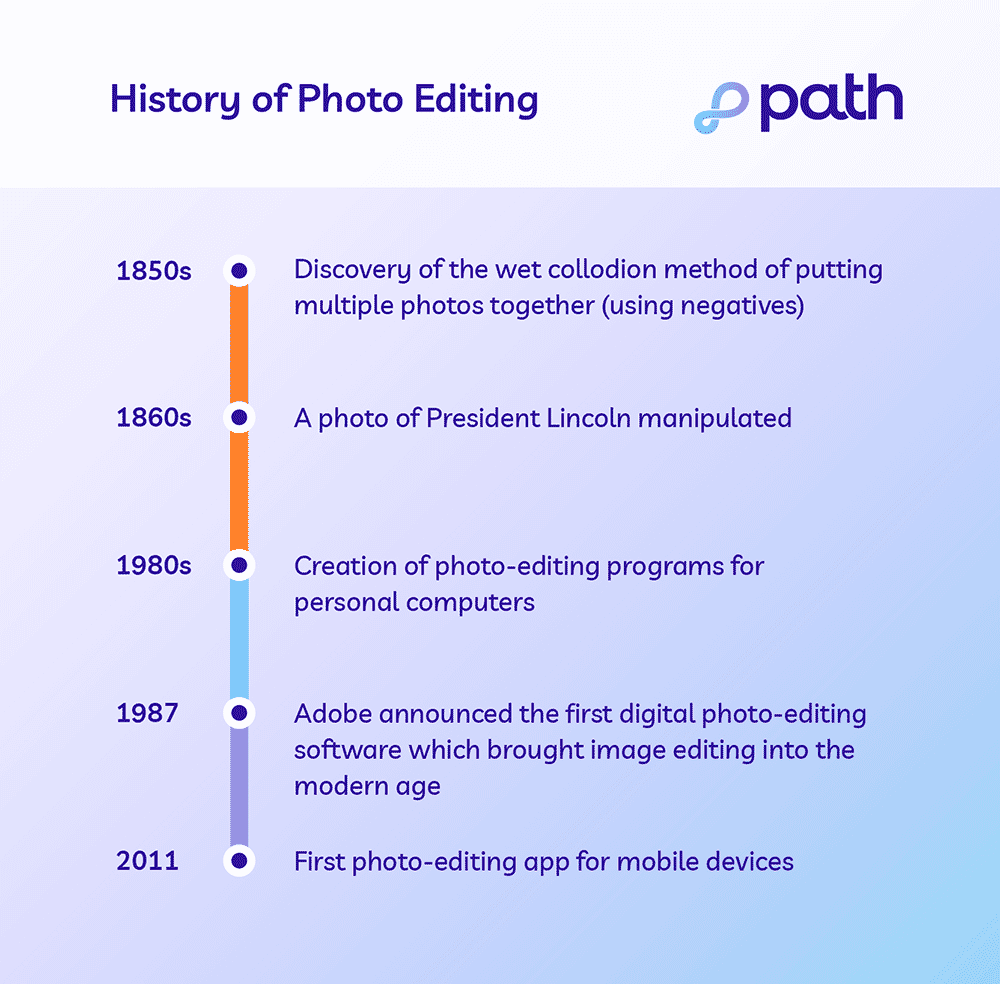
Photo editing history
What is a professional photo editor?
A person who edits images can either be self-employed, contracted by an outsourced company or agency, or someone who works in-house. There are many possible job titles for a photo editor, including digital photo editor, graphic designer or art director, among others.
Typically, photo editors specialize in specific industries, much like photographers. For example, real estate, editorial, and product photography all come with their own set of trends and intricacies. Editors that focus on ecommerce images know how to make products pop.
Our virtual photo editing studio is made of more than 300 trained professional photo editors who specialize in the following:
Ecommerce
Product
Sports
Headshot
Portrait photography
Let us look after your image edits, so you can get back to the fun stuff. Try Path free.
Tackle your photo editing projects with Path
Learning new photo editing techniques can be an enjoyable way to break up your day and add to your industry knowledge, but editing photos can be time-consuming, especially if photography is your specialty. If you need fast, affordable, high-quality photo-editing services, the professionals at Path are here to help.
What is photo editing? FAQs
Can I edit a photo for free?
Yes, you can edit a photo for free. You can use free photo editing tools and do it yourself. You can also use free AI photo editing tools, but these edits require careful quality checks. Or, send your first two photos to Path to get them edited for free.
How can I edit a picture image?
Open your photo editing tool of choice
Upload or open the photo you want to edit
Make your desired edits
Save your work
What is the best app to use for photo editing?
Adobe Photoshop
Adobe Lightroom
GIMP
Pixlr
Snapseed
VSCO
How do I edit my photos like a pro?
Edit photos like a pro by learning basic and advanced Photoshop techniques, outsourcing the tedious edits, and optimizing for the right use and context.
What is the meaning of photo editing?
The meaning of photo editing is the process of manipulating and enhancing a photo. Photo editing can involve basic tweaks like cropping, resizing, and applying artistic filters. It also includes advanced manipulations like retouching and removing unwanted elements and distractions.
What are the 5 basics of photo editing?
Cropping
Resizing
Applying simple clipping paths
Changing colors
Adjusting exposure
What is the purpose of a photo editor?
A photo editor can save you time and stress because they have the skills necessary to accomplish tedious, time-consuming, or complicated editing tasks for you.
Let us look after your image edits, so you can get back to the fun stuff. Try Path free.
Ever wondered what it’s like to work remotely as a Tuts+ Editor? The latest Envato Stories is all about the life of Sharon Milne, Design & Illustration Editor for Tuts+. She lives in Newcastle upon Tyne in the United Kingdom and has been obsessed with vector for over 14 years. Sharon works from her home most of the time, but recently visited the Envato headquarters in Melbourne, Australia.
As the Tuts+ Design & Illustration Editor, Sharon works with a team of instructors from all around the world, and still has time to make art (including this portrait of fellow Envato-er Jordan McNamara) and pass on her considerable vector skills with stunning illustration courses. She also changes her hair colour more than anyone else at Envato!
More Envato Stories
Meet Jordy Vandeput who teaches video production, Tuts+ Editorial Manager David Appleyard, or see all previous Envato Stories episodes. There are more to come, so stay tuned!
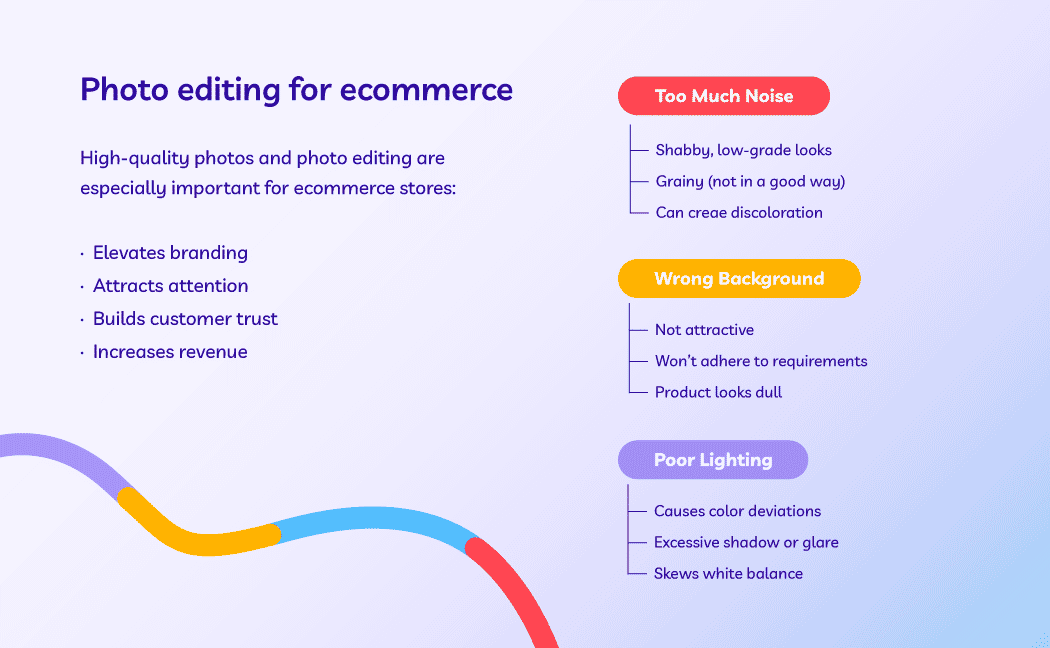
When you need photo edits and see a long list of editing services and techniques, it’s easy to feel a bit overwhelmed. With so many options plus multiple ways to combine them, where do you even start?
It makes perfect sense to go with what feels familiar, like basic retouching or background removal. But we’ve learned from working with thousands of photographers and business owners that your photos often benefit from multiple services working together. Combining services gets you better results with less hassle, since you can handle everything in one order instead of juggling separate projects. Let’s show you how to pick the right edits for your photos.
How to identify what your photos actually need
Before you start combining services, let’s figure out what you’re actually working with—it’ll save you time and help you get better results.
Photo diagnosis checklist
Take a look at your images and ask yourself if you spot any of these:
Background issues: Is the background distracting, the wrong color, or inconsistent across your batch? Does it look messy or unprofessional?
Subject problems: Are there imperfections, poor lighting, or color issues with your main subject? For apparel, does it need to show fit and drape without a model?
Technical fixes: Is anything crooked? Are shadows missing or looking unnatural? Any dust, dirt, or glare issues?
“My apparel needs to show shape without the mannequin” → ghost mannequin + retouching + symmetry
Most photo challenges need two to three services working together, not just one by itself.
How Path services work better together
Here’s why thinking in combinations instead of individual services makes more sense:
Save admin time: Upload everything you need edited in a single order and get it all back together, ready to use. No juggling multiple orders or trying to keep track of which image versions are where.
Speed up your workflow: Everything gets delivered together in the formats you need. Your designer handles all the edits for each image, so there’s consistency across the entire batch.
Keep all photos consistent: When the same designer handles all your edits, you get cohesive results. Colors match, shadows look natural together, and the overall style stays consistent.
Keep costs down: We offer discounts when you bundle multiple editing services together.
You can combine pretty much any of our services together—two, three, four, or more. What matters is understanding which combinations work best for your specific type of photography.
Service combinations by photography type
Every photography project has different needs, and you might even use the same image for different purposes. Here are some proven editing combinations that work well for different situations:
Sports photographers
When you’re dealing with high-volume shoots and tight deadlines, you need services that work fast and handle the most common issues in sports photography.
Your typical service combo:
Image masking for complex backgrounds, hair, equipment details, etc.
Background removal for clean, professional shots and official team photos, etc.
Photo retouching for spot removal, color correction, skin touch-ups, etc.
There may be time-critical events such as championship coverage where you need polished images fast, or you might need to update and create consistent team roster headshots across an entire squad, just like this photographer does. You can choose different services depending on what each batch of images needs, whether that’s processing 200+ action shots or creating headshots with a uniform, professional look.
We offer turnarounds from 6 hours, so you can deliver images to your clients, magazines, or publications fast.
Product and ecommerce brands and photographers
For ecommerce, consistency is everything. Your product photos need to look professional, meet marketplace (like Amazon) standards, and convert browsers into buyers.
A standard combo:
Clipping path for clean cutouts that meet marketplace requirements or create a clean website look.
Shadow services add depth and dimension so products don’t look flat.
Color change shows all available product colors without reshooting every single variant.
Advanced ecommerce stack (add these for even more polished results):
New ecommerce brands often start with the foundation combo (clipping path + shadows + color change) and add ghost mannequin as their apparel inventory grows. Established retailers may go with the full stack approach for complete consistency across their entire product catalog.
Portrait and headshot photographers
Professional portraits and headshots need to look polished but still natural. The goal is enhancing what’s already there, not creating something fake.
Typical professional edits for portraits and headshots include:
Background removal/clipping path gives you versatile backgrounds for different marketing uses.
Photo retouching helps with natural beauty enhancement, color correction, and flyaway hair fixes.
Corporate headshot scenarios may include:
Basic combo of background removal + basic retouching.
Premium package, adding advanced retouching and multiple background options for different brand uses.
Advanced portrait combination (for high-end clients or special projects) may include:
Image masking for complex hair or clothing details.
Color change for different outfit variations or brand color matching.
Multiple background options so clients can use the same headshot across different marketing materials.
Wedding and event portrait combinations may include:
Image masking for intricate dress details and flowing fabric.
Retouching for flawless, natural skin and perfect lighting.
Background removal for ceremony photos that need to work in albums and marketing.
How to choose your perfect edit combination
Use this simple framework to figure out which services make sense for any project:
What’s your end goal? Are these photos for marketplace listings, marketing materials, portfolio work, or client galleries?
What’s your biggest time constraint? Do you have a tight deadline, a high volume of images, or particularly complex edits?
What’s your budget priority? Are you focused on cost per image, or is premium quality and time savings more important?
Consider your photo use case
Sometimes the same photo needs different sets of edits depending on how you plan to use it. For example, a product photo might need:
For marketplace listing: clipping path + white background + basic retouching.
For social media: same photo but with different background + enhanced colors + shadows.
Top up Path credits (optional but recommended—you get bonus credits when you top up)
The ordering process
Click “new order” to start your project
Select all the services you need for this batch—you can choose as many as you want
Upload your images using drag and drop
Get instant quote and you’ll see your total cost immediately
Set preferences like: a) File format for your edited images b) Additional comments or instructions c) Upload any supporting files if needed
Select turnaround time (longer turnaround means cheaper pricing, or choose rush for time-sensitive projects)
Review and approve your quote
Choose payment method and submit your order
If you need 1,000+ images edited a month, we offer bulk pricing with better rates and priority support.
Ordering edits with Path couldn’t be any easier
Now that you know which combinations work for your type of photography, placing an order is straightforward. Try Path free with 2 free edits and see how much better your photos look with the right services working together.
Let us look after your image edits, so you can get back to the fun stuff. Try Path free.
* { box-sizing: border-box; } body {margin: 0;}*{box-sizing:border-box;}body{margin-top:0px;margin-right:0px;margin-bottom:0px;margin-left:0px;}
Do you want to improve your video marketing? Maybe you’ve got a video presentation coming up? Wondering how to animate a logo in After Effects? We’ve got you covered with the best After Effect logo designs.
You need a creative AE logo animation to grab your viewer’s attention. You only have a few seconds in your video to get your brand featured, so you’ve got to make them count. The top-notch Adobe After Effects logo templates you’ll see give you professional results – with almost no knowledge needed.
Use a professional After Effects animated logo file, to set your logo to motion for your business. If you need to animate your logo, then we’ve got a ton of inspiring video logos for After Effects showcased here. Let’s look at over 25 of the best Adobe After Effects logo templates.
Discover More Top After Effects Logo Animations From Envato Elements (In This Video)
See great After Effects logo animations in action. It’s a great way to see animated logos in action. With this piece, you’ll have more ideas than ever for how to animate a logo in After Effects. We also include many more top After Effects logo examples for inspiration.
Check out some of our best animated AE logos from Envato Elements in this quick video:
25 After Effects Logo Animation Project Files (New From Envato Elements – For 2024)
Logo After Effects templates are powerful. But you might be wondering – “how do I animate my logo?“
Fear not – templates still give you totally custom results.
You don’t have to know how to build something from scratch in Adobe After Effects. Instead, here’s what you do. Start with Adobe After Effects logo templates, then add your customizations. That includes your logo image files.
And then? Well, that’s pretty much it. You’re on your way to jaw dropping professional animations. Let’s see many examples of those, all from Envato Elements – an all-you-can-download creative library. Here are the best logo animations After Effects templates trending on Envato Elements:
Stop looking for 3D logo animations with free downloads. Normally, these don’t include premium features that can elevate your projects.
Try the Numbers Particles After Effects logo opener instead. It comes in 4K, 2K or HD resolution. It’s a simple animated logo After Effects. You can use it for any brand or project.
This After Effect logo illustrates your icon with a detective theme. This After Effects logo template can create a bit of suspense and surprise, featuring your brand.
You’ll see this AE logo template animate in a bright light with a silhouetted man nearby. Free logo animations simply don’t have this level of flexibility! Features include:
The Silk Vortex logo AE is a modern animation with included audio. That adds extra value that you just won’t find in free logo animations. Inside the After Effects logo download pack, you’ll see:
full 1080p HD visual graphics
a video tutorial to watch for help
control layers for rapid edits
There is also editable text to add additional details, or a link to your brand.
This Adobe After Effects logo begins in slow motion. Then, your logo explodes into view with a shatter effect. This Adobe After Effects logo design gives you professional results without learning 3D.
Remember: your logo works with flexible After Effects logo templates like this one. You simply open it, add your specifics, and you’re on your way. I’s a clean choice for a logo intro, with fast-paced visuals.
Particle Reveal is a corporate logo After Effects pack with a variety of effects. Included are three unique styles to choose from. Also, this After Effects logo features:
1080p graphics
drag-and-drop After Effects logo placement
video help guides
25fps for smooth visual graphics
It works with any logo in your library. Flex between the three unique styles to create a custom introduction tailored to your brand.
The multilayer setup in this After Effects logo design gives you flexibility. You can tweak the logo AE options to perfectly match your brand vision with the layered approach.
It features a clean design in a modern 2024 After Effects logo pack. It includes 24 unique versions that you can customize, using your own logo designs. Other benefits in this After Effects logo include:
Let’s get scientific! This Adobe After Effects logo animation resembles the twisting helix of DNA. Work in a scientific field? Be ready to say,”animate my logo!“
Here, you’ll see graphics not found with a free logo animation. The Digital DNA AE logo uses futuristic graphics. It’s a great example of how free logo animators just can’t match highly customized designs. Inside this AE logo design, you’ll find:
three After Effects logo themes
three unique animation versions
simple edits
modern particle graphics that use recent logo AE trends
I love the look and feel of hand-drawn logo animations. This After Effects logo template is no exception. Building something from the ground up? A blueprint is a great way to illustrate that idea. And this one has a fiery twist on it! You can use this logo After Effects design to animate the sketch of your logo with added dramatic effects.
Blueprint Burn works with any logo that you are using. It illustrates with a fiery background. These are bright visuals available for your logo design. Remember that free logo animator tools usually are limited in their options, and definitely don’t include hand-drawn effects like this one. No added plugins are needed to complete the edit.
Glitch graphics are reminiscent of old video games or even VHS tapes. It’s a major After Effects logo trend as technology re-shapes everyday life. The glitch effect features in this After Effect logo design. Benefits include:
full HD graphics for all displays
drag-and-drop editing capabilities
an included video tutorial to help you get started
Logo designs are offset against a dark background to add contrast. You simply won’t find an impactful design like this in free logo animators.
The Soft Clean Adobe After Effects logo is a multipurpose design. It places your logo front and center, with a white background. With this style, your AE logo template already has all of the effects you need to burst your brand onto the canvas.
This Adobe After Effects logo design is reminiscent of a video game intro. The 1080p build provides a crisp resolution. No plugins are required, and a tutorial guide is included.
Searching for a sci-fi logo AE design? This template is built with that idea in mind. With After Effects, you can edit all of the colors and graphic layouts. Also, you can add music to build your own AE logo soundtrack.
This logo After Effects uses crystal orbs to roll out your logo onscreen. With three versions to choose from, you’ll find multiple options included. Additionally, this template features:
Here is another logo AE with glitch graphics. It’s fast-paced, making it an option if you need an intro that plays fast. Electronic pixel graphics are suited to any logo that you find yourself using. You can also add background audio or music with After Effects.
Light Blackness is a reverse fade After Effects logo animation. Your logo will fade in from black. But you can also edit the template, so it fades in from a white background.
The Basketball Logo Reveal has a sports theme. You’ll see your logo appear with a basketball background. It’s a 3D design for logos in motion. Think of it as an AE logo intro or even a bumper segment in a video project.
Here’s a logo After Effects template for architects and builders. Your logo will hand-draw on blueprints, with space below for a tagline. This one features:
With this logo AE template, your logo animates using glowing neon lines. It’s both colorful and futuristic. As with our other templates, this supports using your own logos.
This is another choice if you’re looking for a minimalistic logo reveal. It uses graphics that are superior to any free logo animator you might find online. Drag and drop your own logo into place. When you do, you’ll see subtle animations bring it onscreen for your audience.
Sharing your new basketball team with an audience? Here’s an exciting and engaging logo reveal After Effects option. It’s a great way to create excitement for an upcoming game.
Looking for a glossy, high shine effect? This AE logo is going to be the perfect template for you. I love this logo After Effects design for high class brands. Adobe After Effects logos should match your overall brand voice, and this one is ideal for luxurious logos.
Wondering “how do I animate my logo to stand out?” This might be the perfect template for you. It works with your logo, and you won’t need any extra plugins to bring it to life.
Logo reveal After Effects templates should spark excitement. That’s why an After Effects logo reveal like this one fits the bill perfectly. You can use a template like this to pop your logo into view and set the stage for a brand-focused video.
Here’s another high gloss option for an Adobe After Effects logo animation. With no extra plugins required, the simplicity factor for this template helps to set it apart.
The dynamic lighting in this logo intro After Effects design highlights your brand with shine. You won’t need to master AE logo from scratch with this template and its readymade visual effects.
Attention spans are always hard to capture. The best Adobe After Effects logo animation grab and hold that attention without taking too long. The glossy, 3D AE logo effects in this template fit the bill perfectly. You can add your logo and bring it to life with depth with no extra skills needed.
How to Animate a Logo In After Effects – Create a Logo Intro with AE Logo Templates (For 2024 Projects)
We’ve explored 25 of the best logo reveal After Effects templates for 2024. Unlike free After Effects logo templates, these premium options have robust features. Those help you build amazing intros. These logo reveal animation designs are the best way to start your next video project.
Premium logo intro After Effects designs offer unmatched styling and creative control. You can customize them in just five quick steps! Don’t forget that templates are just a starting point. You can learn how to animate a logo in After Effects with quick adjustments.
Logo After Effects designs are easy when you work with templates. Let’s learn how to create an animated logo:
This design is the perfect way to build your own logo reveal animation in After Effects.
To follow along, download the Minimalistic Logo Animation from Envato Elements today. It’s a great example of premium 3D logo animations and their flexibility. Or work in the After Effects logo template of your choice.
Let’s get started on how to animate logo in After Effects templates:
1. Download the Template
First, you’ll need to download the simple logo animation After Effects template. When you download an Adobe After Effects logo template from Envato Elements, it’ll be packaged in a compressed .zip file. To use the logo reveal animation template, go ahead and extract the .zip file.
In the new folder, you’ll find the logo reveal After Effects file. You’re looking for a file or files in the .aep format, which is the default used by Adobe After Effects. If you’ve got the app installed, simply double-click on the file name and it’ll open in After Effects. Now, you’re all set and ready to begin building your own logo reveal animation!
2. Import Your Logo Image
To animate logo After Effects designs, you’ll first need to import your logo image file. When you’re working in After Effects, look in the Project sidebar, on the left side of your screen. You’ll see an array of options here:
Main Composition
Your Logo
Your Title
and more
To continue following our After Effects logo animation tutorials, import your own logo image file into After Effects.
Double-click on Your Logo to open up the logo composition. Then, click on File > Import > File in the upper-left corner of your screen. Browse to the stored logo image file on your computer. Click Open. After Effects will import your logo file.
Finally, drag the image into the Your Logo composition in the lower-left corner of your screen. Place it on top of the AE Logo text placeholder, which you can then hide or delete.
3. Arrange the Logo Reveal After Effects Layout
An After Effects logo animation tutorial like this has to focus on the ability to customize logos once you import them. In this example, you may need to resize or reposition the imported logo. This is easy with an After Effects logo animation tutorial and template. Your animated logo should start looking like this:
To continue following our After Effects logo animation tutorials, import your own logo image file into After Effects.
With your image selected in After Effects, you can change the size and position. To do so, click and drag on one of the corners to resize the image. It sets the stage for proper sizing in your After Effects logo animation.
Similarly, you can drag it around the canvas. This logo intro After Effects template has a round image space that your logo should fit into. Once you’ve got the size adjusted, you’re ready to go with your logo animation tutorial.
4. Customize Text in the AE Logo Template
Don’t forget – after you animate logo After Effects designs, you can add custom text too! This one has pre-built text placeholders built in. You won’t find that in a free logo animation template After Effects.
To add custom text, double-click into the Your Title composition over in the sidebar. Then, select the Horizontal Type tool, found in the menu bar across the top of your After Effects screen.
Custom text helps bring your logo reveal animation to life.
With the tool selected, click into the Your Title placeholder text. From here, you can type in words of your own. Plus, in the Character section of the right sidebar, you can add custom effects. There, you can change the font style, size, and more.
5. Export the Finished AE Logo Reveal Animation
When you finish making edits to your logo reveal animation, it’s time to export the finished product. You can add it to your projects and wow your audiences with your cool logo reveal After Effects design!
On the File menu, hover your cursor over Export. You’ll see a menu appear with an array of options. Click on Add to Render Queue. It’ll appear at the bottom of your screen.
On the menu, choose Lossless, and select the popular QuickTime video format. Choose a file storage location in the Output To section. Finally, click Render, and your simple logo animation After Effects will be exported.
That’s it! You’ve created an animated logo intro with After Effects logo templates from Envato Elements.
5 Quick Tips for Making Great Logo Animation in After Effects 2024
Are you wondering how to animate a logo in After Effects? You need to get the most out of the After Effects templates. We’ll go over five quick tips to create a visually appealing logo animation:
1. Use Your Brand Colors
By using the different colors for your brand, you’ll give your audience a more visually appealing logo reveal. You can present these colors in many different ways. Try using effects such as smoke and lights.
The Magic Logo has different color lighting effects that jump across the screen to help draw in the attention of your audience.
Remember that free logo animations might not include the flexibility you need for your brand colors. The premium templates we saw include easy customizations. While free logo animations might save you money, don’t forget that your brand is a real investment.2. Piece Together the Logo
One of the simplest ways to animate a logo is to put the logo together on the screen. This effect works really well for all types of industries. It provides your viewers with an interesting logo reveal without being over the top.
Corporate Logo features the use of subtle movements to piece together the logo for a visually pleasing effect.
3. Animate the Title
Often your logo reveal will have your company’s name displayed. If you’re going to animate your logo, then you’ll also need to animate your company name. The company name will look lifeless alongside the dynamic logo if it’s not animated, so animate the title as well. Minimal and simple works best here. You can even use a simple fade in and out animation.
This After Effects logo features a stunning animation of the logo and company name.
4. Use a Background
Adding a background to your logo animation will help the animation and logo look more dynamic. White backgrounds work especially well here. Experiment with different color backgrounds to find the one that complements the logo animation the best.
Stylish Logo features a white background that makes the animation pop out on the screen.
5. Use Abstract Effects
Abstract effects create a sense of mystery and intrigue to a logo reveal. This is exactly what you want to do with your logo reveal. Anything from crazy light effects to smoke effects will work well here.
5 Top After Effects AE Video Logo Animation Trends for 2024
If you’re learning how to animate a logo in After Effects, it helps to have trends in mind. As you wonder “how do I animate my logo in 2024?“, trends can serve as a guidepost. Below are the top five logo animation trends today:
1. Minimalism is Timeless
So many companies have moved to “less is more” branding. It only makes sense that your AE logo should match that, too. That’s why logo reveal After Effects templates embrace minimalism more than ever.
Animated logos that embrace minimalism won’t distract from your brand.
If you want your branding to take center stage, consider a minimalist Adobe After Effects logo animation. Logo intro After Effects that use minimalist styles won’t overshadow your brand. You’ll place more emphasis on the brand with simple logo effects.
2. Glitchy After Effects Logos
Interest in science fiction and technology has never been higher. Glitch effects are a perfect overlap of these two exciting fields.
Glitched animations add a quick reveal to your AE logo that makes it more dynamic. Your viewers will immediately be interested in seeing more.
This Glitch Reflection logo has the jittery and exciting style that makes it a perfect logo reveal After Effects option.
Check out a complete round-up of After Effects glitch templates below:
To set yourself apart, it helps to create something that feels custom and artisan. An illustrated style gives this feel. Logo intro After Effects styles that use illustrations are a great way to do that – without animating from scratch!
Logo intro After Effects with illustration are poised to trend in 2024.
Try out an After Effects logo animation template that features illustration. You’ll set the stage that your brand and logo are totally unique, thanks to hand illustrated effects.
4. Embrace Cinematic Styles
A suspenseful and cinematic 3D AE logo reveal has it all. It creates excitement, mystery, and anticipation for your 3D logo animation as well as the rest of the video. These type of suspenseful cinematic logo animations can come in all different styles.
Cinematic styles in AE logo designs borrow big screen effects that you can use for your brand.
You can have a logo reveal with effects such as lightning, moving through outer space, or one that uses smoke. If you’re looking to amp up the drama for your logo reveal, then this trendy logo animation is for you!
5. The Dispersed Logo
The dispersed logo is a classic AE logo reveal animation. Once the logo fades in and displays for a few seconds, bits and pieces of it start to come apart and wash away across your screen.
Dispersion style logo reveal After Effects templates are more popular than ever.
A dispersed logo in After Effects reveal works for many types of businesses and is sure to be a fan favorite.
Discover More After Effects Logo Animation Templates for 2024
You’ve just followed our After Effects logo animation tutorial with tips and trends. These After Effects logo animation templates are some of the best available for 2024! They may be the exact style of animations that you are looking for with your business’s logo.
What if none of these logo After Effects templates work for you, or you want to create even more logo animations? Fortunately, we have countless AE logo animation templates! We’re always searching for and curating the best Adobe After Effects logo animations.
You’re just getting started with the world of logo animation After Effects options! Check out our other Tuts+ articles for stunning Adobe After Effects logo templates:
Modern After Effects Logo Animation Templates on Envato Elements (With Unlimited Use)
Discover thousands of the best logo animations After Effects templates on Envato Elements. Best of all, it comes with a great offer: download as many as you want for one low price. That means you’ll have countless logo reveal After Effects options at no extra cost.
Save yourself the time of searching and scouring for free logo animations. Instead, use a cost that you can’t beat: all you-can-download from Envato Elements.
Choose from thousands of AE logo effects from Envato Elements – with unlimited downloads!
Grab one of these premium Adobe After Effects logo animation files. They help you to create a memorable first impression. AE logos from Elements make design as easy as drag-and-drop. The high-quality designs far outpace free logo animations.
The premium After Effects logo templates have everything you need. They come with ready-to-use designs to showcase your brand in:
Need help finding the perfect logo After Effects templates? With Envato Elements, it’s easier than ever. We’ve launched a powerful new AI search assistant. Simply type in your project needs. And in seconds, you’ll see the perfect logo AE templates (and other digital assets) gathered for you.
Envato Elements is the fastest way to build compelling After Effect logo animations with ease. Join today!
Animate Your Adobe After Effects Logo With AE Logo Templates
Need to add your logo to your demo? Ready to improve your video branding? Logo animation in After Effects is a must-have! Skip free logo animation template After Effects designs. Go with a premium option like the ones you saw above.
Envato Elements has a ton of great After Effects logo animation ideas with trending video designs. Browse through thousands of professional logo animations After Effects files. That includes logo transition After Effects and so much more. Choose one that’s well suited to your next creative project.
After Effects logo templates are your best friend in 2024 and beyond! They’ll save you time and give you an awesome result. Get started today.
Editorial Note: It’s been updated with contributions from Barni Rajah, Daniel Strongin, Maria Villanueva, Andrew Childress, and Gonzalo Angulo. Maria is the Associate Editor of the Tuts+ Design channel. Gonzalo the Associate Editor for the Tuts+ Design channel. Andrew is a freelance instructor for Envato Tuts+.
Do you want to increase engagement and the amount of time visitors spend on your website? That’s where a WordPress video player can help. You can increase engagement by adding a video player plugin to your WordPress website. Not only does this reflect well on your brand, but it also helps your SEO ranking.
WordPress lets you add embedded video out of the box, but you can make the process easier and create a better user experience with a plugin.
Adding a stylish WordPress video player plugin lets visitors engage with the content on your website. Video plugins are full-featured, customizable, and easy to integrate into your website.
The Best WordPress Video Plugins and Players on CodeCanyon
Discover CodeCanyon’s extensive library of the best video WordPress plugins ever created. With a cheap one-time payment, you can purchase one of these high-quality WordPress plugins and give your website viewers a more interactive experience.
With the Essential Grid Gallery WordPress Plugin, you can add both photo galleries and video galleries. Include galleries built with other popular plugins, link to video sites such as YouTube and Vimeo, and create gorgeous grid-based galleries.
With The Grid, you can create endless layouts and grids for your videos. The plugin also includes a touch slider (also known as a carousel) for mobile, and WooCommerce support so you can use powerful, responsive video to help sell your products.
This plugin has over 400,000 sales! This is one of the most complete video gallery plugins on CodeCanyon. The main hero section is where this plugin shines. You can see in the image above just how visually appealing you can make your hero section. You are given full customization with this plugin.
Here are a few notable features for this video gallery plugin:
RoyalSlider will make your videos look great on your website. The plugin is mobile-friendly and will allow you to add custom slideshows and CSS3 banner rotators with images, videos, or HTML content. What sets this plugin apart from the rest are the 12 visually appealing transition effects. This plugin has over 30,000 sales!
Here are a few notable features for RoyalSlider:
touch swipe navigation support for iOS and Android
The Media Grid: WordPress Responsive Portfolio plugin lets you build bespoke, fully customisable grids of images, video, and other media using a simple drag-and-drop interface. It also has a dynamic grid mode, letting you create video grids in moments.
If you are going to be creating a portfolio, showcase, or teaser, then this is the plugin for you. You can create portfolios by creating new custom post types with images, audio, or video thumbnails. This plugin will give you numerous customization options for creating your portfolio.
The Ultimate Layouts plugin will help you create a layout for video and other media if you’re using the WPBakery page builder plugin.
It’s responsive, integrates with YouTube, and lets you build unlimited layouts using the WPBakery page builder, so you don’t have to switch to an unfamiliar interface. Display grids, lists, and carousels with ease.
The Elite Video Player plugin is a fully customisable advertising video player that supports advertising on the most popular video channels such as YouTube and Vimeo.
Import videos, channels, or playlists and play using the default YouTube player or add custom controls. As well as YouTube and Vimeo, you can play self-hosted video or video hosted on Dropbox or Amazon S3.
Features:
advertising pre-roll, mid-roll, or post-roll
Google Analytics: see which of your videos are most popular
If you want to enhance your videos with features such as subtitles in multiple languages, downloads, and adjustable playback speed, the Ultimate Video Player plugin is for you.
It boasts a wide range of features including advertising, cue points, live streaming, and more.
Features:
advertising pre-roll, mid-roll, post-roll, or via popups
Ever thought about including videos in a flipbook? The Diamond Flipbook plugin lets you do that. Create a dynamic flipbook from your content and media, and include video too. Videos will be overlaid on the flipbook in the background.
Features:
PDF support
multiple file upload
JavaScript-based and iOS-compatible
reverse flipbooks for right-to-left languages
insert flipbook via shortcode, template, or lightbox.
If you’re not happy with the default YouTube player, the HTML5 Video Player plugin will provide you with a customisable player that’s designed to display your video in high quality. It supports YouTube, Vimeo, and self-hosted video, and it’s fully responsive.
This HTML5 Video Player is ideal if you want a video player which will support YouTube, Vimeo, and self-hosted videos. The plugin can be used as a full-screen video background for your website. The video will cover the entire screen without any black stripes.
Other features of this player include:
lightweight JSON file of about 256KB
use the plugin as a fixed-width or full-width video player
use the parameters to set the border width and colour
ModuloBox is a beautiful, easy-to-use lightbox plugin that makes it simple to create a fully functional slideshow in a popup. Built with plain JavaScript, it offers the best performance and advanced features to show off your media.
Some features include:
create responsive galleries of HTML5 videos or embed videos from YouTube, Vimeo, Dailymotion, or Wistia
display external websites from a simple URL—for example a Google Map
supports gestures: drag and swipe to navigate through items, pinch to zoom, etc.
Revolution Lightbox is another plugin that lets you add video to a lightbox. It also supports images, Google Maps, and HTML content, giving you maximum flexibility. The lightbox is customizable, so you can adapt it to suit your theme.
Image Map Pro comes with many of the standard map features such as adding text and images to maps. However, this plugin offers so much more. The plugin has its own rich web app! This allows you to easily create a wide selection of custom image maps, pins, and shapes to use on your website.
Here are a few key features for this interactive video WordPress plugin:
Manually embedding videos into your site takes time. The WordPress Video Robot plugin automates this process for you. It’ll take the search terms you give it and automatically add relevant videos to your site. The videos don’t even need to be from your own channel.
If you have an online store and you want to display your products with full 360º animation, this plugin is ideal. Your customers will be able to see your products from all angles, with smooth animation all the way around.
This plugin will easily let you add YouTube videos, Vimeo videos, Dailymotion videos, and self-hosted videos on your WooCommerce site. The videos come with a full range of customization options. Included are even several embedding options such as playback volume, full-screen button, and video controls display.
Here are a few notable features for this plugin:
support for YouTube, Vimeo, Dailymotion, self-hosted, and MP4 videos
videos on single product and category pages
enable and disable video option in the shop or on a single product page
This video gallery plugin is feature-rich. You will be able to create professional-looking galleries within minutes with this plugin. It’s easy to install and even comes with a shortcode generator. If you are looking for a quick solution for your next video automation plugin, this is the right choice for you.
Here is what you can expect from the Video Gallery WordPress Plugin:
five skins + skin generator
iPhone/iPad compatible
extensive admin panel
subtitle support
shortcode generator
Discover Even More High-Quality WordPress Video Plugins
The plugins listed above all do something slightly different, or give a variation on a different functionality such as lightboxes or galleries. The best one for your site will depend on your needs: do you want to pull in videos automatically, for example? Are you hosting videos locally? Do you want enhanced video playback controls?
In this article, we covered many of the best video WordPress video plugins available on CodeCanyon. However, you may have very specific requirements for your video plugins, and the ones mentioned in this article may not be what you are looking for. To help you further with your search, we have even more top video WordPress plugins that you can check out in the articles below:
The various features and styling options allow you to integrate an eye-catching and fully functional player for your media that can fit your website’s theme.
Envato Elements is coming soon, and to celebrate, we’re offering some fantastic freebies. You can grab some handcrafted fonts, a professional brochure template, a coffee branding mockup, a set of elegant logos, and a massive set of watercolor brushes and textures. All you have to do is visit Envato Elements, enter your email address, and download your free files.
Are you in need of a high-quality HTML5 video player plugin for your website? Are you having trouble finding a video player that delivers an exceptional user experience?
CodeCanyon offers a wide range of HTML5 and JavaScript video players that can easily be installed on your website.
Modern Video Player is one of the many high-quality HTML5 and JavaScript plugins available on CodeCanyon.
Much of today’s online content is consumed through video and images. This makes it incredibly important for you to offer your website content in video format through a high-quality video player. By purchasing one of the many affordable plugins available on CodeCanyon, you will get a modern-looking web player that works with many video formats and can even display your images in a slideshow.
The Best HTML5 and JavaScript Video Players on CodeCanyon
Discover the best HTML5 and JavaScript video plugins ever created on CodeCanyon. With a cheap one-time payment, you can purchase any of these high-quality video players.
Here are a few of the best HTML5 and JavaScript video players available on CodeCanyon for 2021:
Don’t miss out on some of the best-selling HTML5 and JavaScript video players on CodeCanyon.
These feature-rich HTML5 and JavaScript video players will give your website visitors the best viewing experience possible. With the premium video players offered on CodeCanyon, you can take advantage of:
advanced video player controls
fully responsive players
song and video statistics
social sharing
Head on over to CodeCanyon and find the right video player plugin for your website!
Top 15 HTML5 and JavaScript Video Players (From CodeCanyon for 2021)
Elite Video Player is a stellar HTML5 video player that can handle just about anything you throw its way:
self-hosted MP4
YouTube
Vimeo
Dropbox
Amazon S3
Google Drive
Show your videos with style—across all browsers and devices—with this fully customizable HTML5 video player.
Features also include:
lightbox, responsive, and fullscreen modes
YouTube channel and playlist support
select player and scrollbar effects
resizable height and width
and many more options
One of the more unique and appealing features the Elite Video Player brings to the screen is the ability to add pre-roll, mid-roll, and post-roll video and popup ads. A WordPress version is also available.
This video player supports a wide variety of embeddable media: from HTML5 video to YouTube playlists, Vimeo videos, and much more. This highly customizable video player has many features that make this a must-have if you need to display videos on your site.
Need a clean and simple JavaScript video background player that you can customize for your website? You can play a single video in a loop, loop multiple videos, or have a mixed playlist of videos and images.
Revolution Multimedia Gallery is a responsive gallery that runs on all major browsers and mobile devices. It uses object-oriented code and the latest CSS3 techniques, making this a very well-built JavaScript video player and gallery.
Here’s what you can expect from Revolution Multimedia Gallery:
responsive layout
responsive, fixed, fluid width, and fullscreen modes
This HTML5 video player includes all the basics you’ll need for a cutting-edge player—without losing those users that are using outdated browsers.
The Ultimate Video Player can play videos on the latest mobile browser or an old desktop computer using IE8 with its Flash fallback feature.
It’s also:
“Packed with a huge amount of features like responsive layout, multiple playlists, external API, optional deeplinking, flexible skin, embed & share, Facebook share etc…”—Ultimate Video Player
Ultimate Video Player is a powerful responsive video player with the right side or bottom gallery that supports most popular video platforms such as YouTube, Vimeo, and more. This player is compatible with all modern browsers.
Ultimate Video Player is the perfect player to build a platform with an intuitive user experience and mobile compatibility.
Fantastic and fast assistance. Problems solved in a short time. Absolutely recommended! — step54
Video Player Lite is a responsive and mobile-friendly player that supports all kinds of media and playback options. You have the ability to show panoramas, virtual reality, YouTube, and Vimeo videos. It also comes with lots of customization options.
Universal Video Player is another HTML5 video player that’s worth your attention.
Not only does it come with many features included in other video players, but it also includes a few extras that set it apart.
Stand-out features include:
Google Analytics tracking
playlist search
categories
shuffle mode
Like some other HTML5 video players, it includes YouTube, Vimeo, and self-hosted video support, a customizable color scheme, and an option to download videos.
The Universal Video Player is a nice solution, and can even automatically retrieve video thumbnails, titles, and descriptions from YouTube servers. A WordPress plugin version is available.
The HTML5 Video Player With Playlist & Multiple Skins (also available as a WordPress plugin) offers side and bottom playlists and six different skins to match your website.
Unlike many other HTML5 video players, this gem also supports .webm video files in addition to the standard .mp4 video format.
You’ll also find:
optional video descriptions with HTML and CSS support
This HTML5 video player has a simple and sleek design. You can place the playlist menu anywhere around the video player, giving you the flexibility to choose how it will look on your website.
Here are a few notable features for this video player:
Stellar Video Player is a premium, multi-purpose video player that supports YouTube videos, Vimeo videos, self-hosted MP4 videos, Google Drive videos, and much more!
Here is what you can expect from this video player:
fully customizable and responsive
lightbox mode
sticky mode
social sharing
Here is what users are saying about the Stellar Video Player
Html5 Video Player With Multiple Skins is a lightweight and responsive player that will only take a small amount of space on the server. This player allows you to embed .mp4 video files and .webm for browsers which don’t have MP4 support.
Revolution Video Player with Bottom Playlist is a powerful and responsive player which you can use to play YouTube, Vimeo, and Self-Hosted video files. You only need the video ID for YouTube and Vimeo. You can also share your video player on Facebook and Twitter.
It is also a highly customizable player that allows users to change appearance as per their own choice.
wide range of parameters for customizing the player
360 Video Player is perfect for responsive web designs, and it also looks good on retina displays. The player allows full-screen view and is compatible with all major browsers, including IE EDGE.
Other notable features include:
iPhone / iPad compatible
CSS powered skins
ads support
video gallery API
5 Free HTML5 & JavaScript Video Player Plugins for Download in 2021
The premium HTML5 and JavaScript video players available on CodeCanyon will certainly give you the most up-to-date and advanced features available, which will greatly improve the user experience.
However, you may be on a budget and still need to add a high-quality video player to your website. To help you with your video player needs, I’ve collected five of the best HTML5 and JavaScript video players you can download for free.
This JavaScript video player is a simple, accessible, and customizable player for video and audio. The player comes with a minimal and responsive design and can work for all types of websites.
jPlayer is an open-source media library written in JavaScript. The plugin is completely customizable and skinnable using HTML and CSS and is very lightweight.
MediaElement.js is a simple and easy-to-install plugin that can display today’s standard video formats. All the basic video player controls come with this JavaScript video player.
This HTML5 video player supports both HTML5 and Flash with the same configuration. The player is fully responsive and can be viewed on tablets and mobile devices.
Discover More Great HTML5 & JavaScript Video Players for 2021
The HTML5 & JavaScript video players mentioned above are some of the best options that you can implement on your website in 2021.
However, these video players may not have the exact functions or design that you are looking for. If none of the premium HTML5 and JavaScript video players mentioned in this article seem to work for your website, then be sure to check out our other articles, which contain many more high-quality HTML5 and JavaScript video players for you to download:
Add a Premium HTML5 and JavaScript Video Player to Your Website Now!
If you are in need of a video player that has a sleek design and is fully functional, then head on over to CodeCanyon.
The video players available will give you complete control over the design and features offered in your web players on your website. Ultimately, this will lead to a better user experience for your particular audience.
In addition to all the high-quality HTML5 and JavaScript video players on CodeCanyon, you can browse through thousands of other high-quality plugins and scripts for your website. You’ll find everything from social media to marketing plugins and scripts in CodeCanyon’s massive premium library.
Do you want to learn how to create photo overlays in Adobe Photoshop? This tutorial will show you how to add a texture overlay in Photoshop and how to use it in a few ways.
Choose Your Favourite Overlay Photo Effects
Now that you know just where to find the best photo overlays when you need them, head to Envato Elements and download your favourites today.
Here are more top resources and tutorials to try from Envato Tuts+: