[ad_1]
16
May 2025 : Friday
May 2025 : Friday
Daily Photo – Along the River
Walking along the river in Milford Sound.


[ad_2]
Source link
[ad_1]
16
May 2025 : Friday
May 2025 : Friday
Walking along the river in Milford Sound.
[ad_2]
Source link
[ad_1]
19
May 2025 : Monday
May 2025 : Monday
More from Milford Sound…

[ad_2]
Source link
[ad_1]
Subscribe now to keep reading and get access to the full archive.
[ad_2]
Source link
[ad_1]
For those who haven’t been following the major rift in the world of photojournalism a quick summary of what is going on: A film called “The Stringer” directed by Bao Nguyen (previously directed The Greatest Night In Pop) and produced/starring Gary Knight (VII Agency co-founder and ED) premiered at The Sundance Film Festival on January 25 claiming and attempting to prove that 53 years ago Nguyễn Thành Nghệ actually took “The Terror of War” (AKA Napalm Girl) image and not Nick Ut. AP photo editor Carl Robinson claims his boss, Horst Fass, told him to switch the credit from Nguyễn, a stringer, to Nick, an AP photographer. The filmmakers find Nguyễn, and he says, yes, he took the picture.
Prior to the film’s premiere, the AP released a preliminary report disputing the claims of the film. At the premiere, the AP watched the film and followed up (May 16) with a 100-page report saying that there’s not enough evidence to remove Nick Ut’s credit.
Then, on May 16, World Press Photo released a statement saying they investigated (David disputes the characterization that they investigated and rather they simply got a private screening of the film and agreed with the conclusion) and are suspending Nick Ut’s credit on his 1973 Photo of the Year award.
This sparked outrage on social media with posts from what appears to me to be the VII camp (Ashley Gilbertson, Ed Kashi, Sara Terry) and the Nick Ut camp (David Burnett, Pete Souza, David Kennerly).
And the real zinger in the whole dust-up is that David Burnett was there! He’s an eyewitness to the events at Trang Bang, where the famous image was made.
Ok, one final note: besides the premiere at Sundance and private screenings, the film cannot be watched until a distributor is lined up. I’m aware of a screening in DC next month, but most people, including David and myself, have not seen the film.
I talked with David over the phone, and here’s a condensed and edited version of our conversation.


Rob Haggart: I want to start by asking if it’s really difficult for you to go back and rehash all this stuff.
David Burnett: No, I mean, I have these moments from not just Vietnam, but the jobs that I worked my whole life, French elections, Ethiopia, Chile, and it’s not really something that causes me great pain. There are so many of these things that I’ve lived through that the memories of them and what I was doing in them as a photographer is very, very clear in my head. And Trang Bang is really no different than almost anything else.
The first time I was under fire and had the crap scared out of me, it’s one of those things where you don’t just think, will I ever get over it? Because you don’t, they become part of what your life is about.
The running joke about Trang Bang and me was that, well, I missed the shot because I was changing film in my old screw mount knob wind Leica which is kind of a slow, kludgy film camera. It was not an easy camera to operate.
And yet, Cartier-Bresson shot with them for something like 20 years before the M2 and the M3 came along and made some pretty great pictures, so I mean, I think part of why I even bothered shooting with that camera instead of getting another M2 for 200 bucks, was kind of a historical thing with the old Contax and Leicas, you felt a little more attached to some kind history if you’re shooting with this kludgy old camera and um you know, and I was trying to reload it and anybody had ever owned one of the cameras knows that if you take a 35-millimeter film where you have the little cut-down tongue that you really need to cut an extra inch or inch and a half away from that one side that’s cut so that when you drop the film in the camera, it will seat itself perfectly.
I never bothered doing that, so I was always stumbling, trying to get the camera reloaded. So I was reloading it when the plane came in to drop the napalm. I was holding the open camera in my left hand and shooting with a 105 in the other hand. When the napalm hit right next to the pagoda, there was this Gigundo fucking fireball, Nick has that picture, and I kind of have it a few seconds later. But it was the in the days when you didn’t shoot with three motor drives, you know, you weren’t going out there to shoot 25 rolls of film. I think I shot maybe three or four rolls that day, and it was a fairly long period of time we were there because we were kind of hanging out waiting to see what was going on.
You could hear firing and shooting coming from the village. Then the planes came in, and there was that fireball, and then like three minutes later, the kids started running out of the field and onto the road toward us, and that is the moment, more than anything in my mind, where Nick was the one guy who was in a position to shoot the picture, and nobody else was. There was this line of journalists, and we were all within a few feet of each other lined up across the road. As soon as we could tell that, there were people on the road racing out toward us, and the kids were running as fast as they could run. Nick and this guy Alex Shimkin, who was killed a few weeks later up north, took off running towards them, and no one else did.
RH: When did you first hear a film was being made about this event and that there were questions about the author of the famous image?
I was sitting at a Walgreens parking lot in Florida 3 years ago going in to go get some stuff, and Gary Knight called me and said tell me everything you know about Trang Bang, so I spent a couple hours on the phone and told him everything I know and then said you know there’s this guy and he’s kind of a horses ass, ex AP guy and he says that Nick didn’t shoot the picture and I kind of think he’s full of crap as does everyone else but along the way you’re gonna run into Carl Robinson.
Carl had this real chip on his shoulder about AP, and he was never afraid to let people know how he felt like he’d been screwed over by the AP.
RH: So you’re telling me this rumor has been around for a while?
Yep, a long time. It’s not new. The last time I saw Horst Faas was in 2008. There was a gathering for a memorial wall at the news museum in Washington, and if you lived near the East Coast and worked as a journalist in Vietnam, you pretty much were there that day. Somebody at that point could have said, hey, Horst, let me talk to you about this thing that Carl’s been telling everybody that you told him to put Nick’s name on the image, and it was really some stringer’s film.
And no one ever, no one ever asked Horst.
No one ever just asked him point blank.
I guess Carl makes a pretty reasonable case for trying to talk about how the guilt of 50 years and being able to unburden his guilt when he finally met this guy. But you know, every crackpot theory that ever was has at least a 2% chance that it happened.
Could Horst have said it? I suppose he could have. But it would have been very out of line with what always happened.
If you talk to Neal Ulevich, who was in the AP bureau as a staff photographer for, I don’t know, six or seven years in Asia and was in the bureau the whole time, he will tell you about the sacrosanct policy of never allowing anyone’s film to have any name on it other than the actual photographer that shot it.
He said, “All the time I was in Asia, never once did I see anybody do anything like that.”
It just didn’t happen.
I was in that group of people who were looking at the first print of Napalm Girl when it came out of the darkroom, and I did what every photographer in the history of photography would have done, which is I look at this picture and I try and think to myself without having seen my own film, hm, I wonder if I have anything better. I’m thinking, yeah, that’s pretty good. That’s probably better than anything I have.
There were 3 or 4 of us looking at this little 5 x 7 print that was still wet, and Horst, without making a big deal out of it, just turned to Nick and said, “You do good work today, Nick Ut.”
I still have the memo I wrote when I went back to my office at the Time-Life Bureau. I said there was this accidental bombing in this village called Trang Bang, and I said, Nick from AP got a pretty good picture, and they tell me they’re shipping the negative to New York on what’ll be the same flight that my negatives are gonna be on, so you’ll be able to get an original print made in the lab rather than rely on a wire service photo.
So that’s what they ended up doing. It was in the front section of the magazine called the Beat of Life; there were always 3 or 4 of these big picture spreads.
Usually one picture, sometimes two or even three, and they ran one of mine of the grandma with the burned baby and Nick’s picture side by side, and when you look in the photo credits, it says page four and five, David Burnett, AP. I mean, it was the wire services in the 70s. They weren’t going to put a photographer’s name on it. It’s kind of funny that way.
RH: What are the chances, if you’re Nick, that you don’t know beforehand you made that picture?
There’s no way that either of those guys would not know they took that picture. It was such an enpassant moment, and I’m sure there was just one frame that was the one.
For sure, there are times when you’re surprised by something you’ve done when you move from wherever you shot it, and now, you know, we’ve kind of shut out the middle man, and you go right to the computer and see if what’s on there is anything like what you remember, but in the film days I would find it really hard to not know that you had something.
I can’t imagine that the camera wasn’t up at the eye; it’s not like a chest-high Hail Mary, although technically, it was never great, but maybe at the same time, some of the imperfections add to the raw reality of that moment.
RH: That leads me to this talking point I see from the film’s defenders saying that this is not a critique of Nick, but that would mean that Nick didn’t know he took the photo. But you think there’s no way he didn’t know he took the photo, so the film is saying he’s been lying for 53 years about this.
He’s a 21-year-old kid with a camera, and I think incapable of that. Yes, it was a good picture, but there were a lot of good pictures out there.
And, you know, some people have said, oh, but Horst knew right away that that was gonna be a great picture, and he wanted AP to have the copyright on it instead of a stringer. But the thing is, you’ve got all these little sub-arguments if you accept a certain premise, and you can walk yourself right off a cliff of trying to figure out what it is you believe or don’t believe.
Gary called me back at one point, and he said, you know, I think there’s really something to Carl’s statement here, but you know, once you get the first bit of the Kool-Aid, you just gotta drink the whole pitcher, and I just don’t see it.
I mean, like I said, it’s possible.
Everything’s possible, you know?
I mean, you know, once you start to believe part of it, you kind of end up believing the whole thing, or you believe none of it.
To me, it looks like Gary’s trying to make himself into a big documentary producer, and this is his launch pad.
Gary said you ought to be in the film, and I just said, Gary, I don’t wanna do a goddam Mike Wallace interview where I have no control over how you cut it or anything else. I’ve watched 60 minutes too many times where Mike managed to hammer somebody, and I had no confidence that it would be a fair representation.
Fox Butterfield was the reporter I was with that day working for The New York Times, and he got a call from Gary’s wife, a producer on the film, he started to tell her his version of what took place, and she told him everything you’ve said is wrong. That’s not a really good way to coax people into a discussion. She said he would have to sign a non-disclosure agreement, and he said, what the hell for? I’m the one telling you stuff; you haven’t told me anything.
Gary said to me last time I talked to him like six weeks ago, he said, well, you know, we’ve done all this forensic stuff, and we’ve proven that he couldn’t be down there to take the picture.
And I said to him, in my mind, because I remember the way he ran out on the road ahead of everybody else when the kids were coming down the road, he’s the only one who could have taken that picture because it was in the very first moments that the kids were coming down toward where the journalists were lined up, and it was after that everybody else started wandering around, but that was another five or ten or 15 minutes later.
And I just don’t see how anybody else was out there in front, and to me, that picture was taken out in front. It wasn’t taken right next to the press people.
It was out there away, maybe, I don’t know, 20 yards, 40 yards. 50 yards.
RH: How do you think the filmmakers should have handled this? What should they have done with the information they got from Carl?
You don’t ever want to get to a place where people are afraid to posit things, but I don’t know what the answer is, but you know, unlike a lot of people who don’t shut up about it, I’m not sure I have an answer to what the most perplexing question is.
And I never said I was right behind him when he shot that.
I saw him, I was changing my film, and it was a minute or two minutes later, and in those moments, that could be a long time. I offer it strictly as a witness to what happened that day and nothing more.
I find one of the most curious things of all, aware of the fact that Nguyễn probably had to leave Saigon with almost nothing, that he left everything behind, and I totally get that.
But apparently, he never sold another picture to anybody, and in the last 50 years, no one has even seen one picture that he’s taken.
Other than the most famous picture of the Vietnam War.
That is a really weird leap of faith.
[ad_2]
Source link
[ad_1]

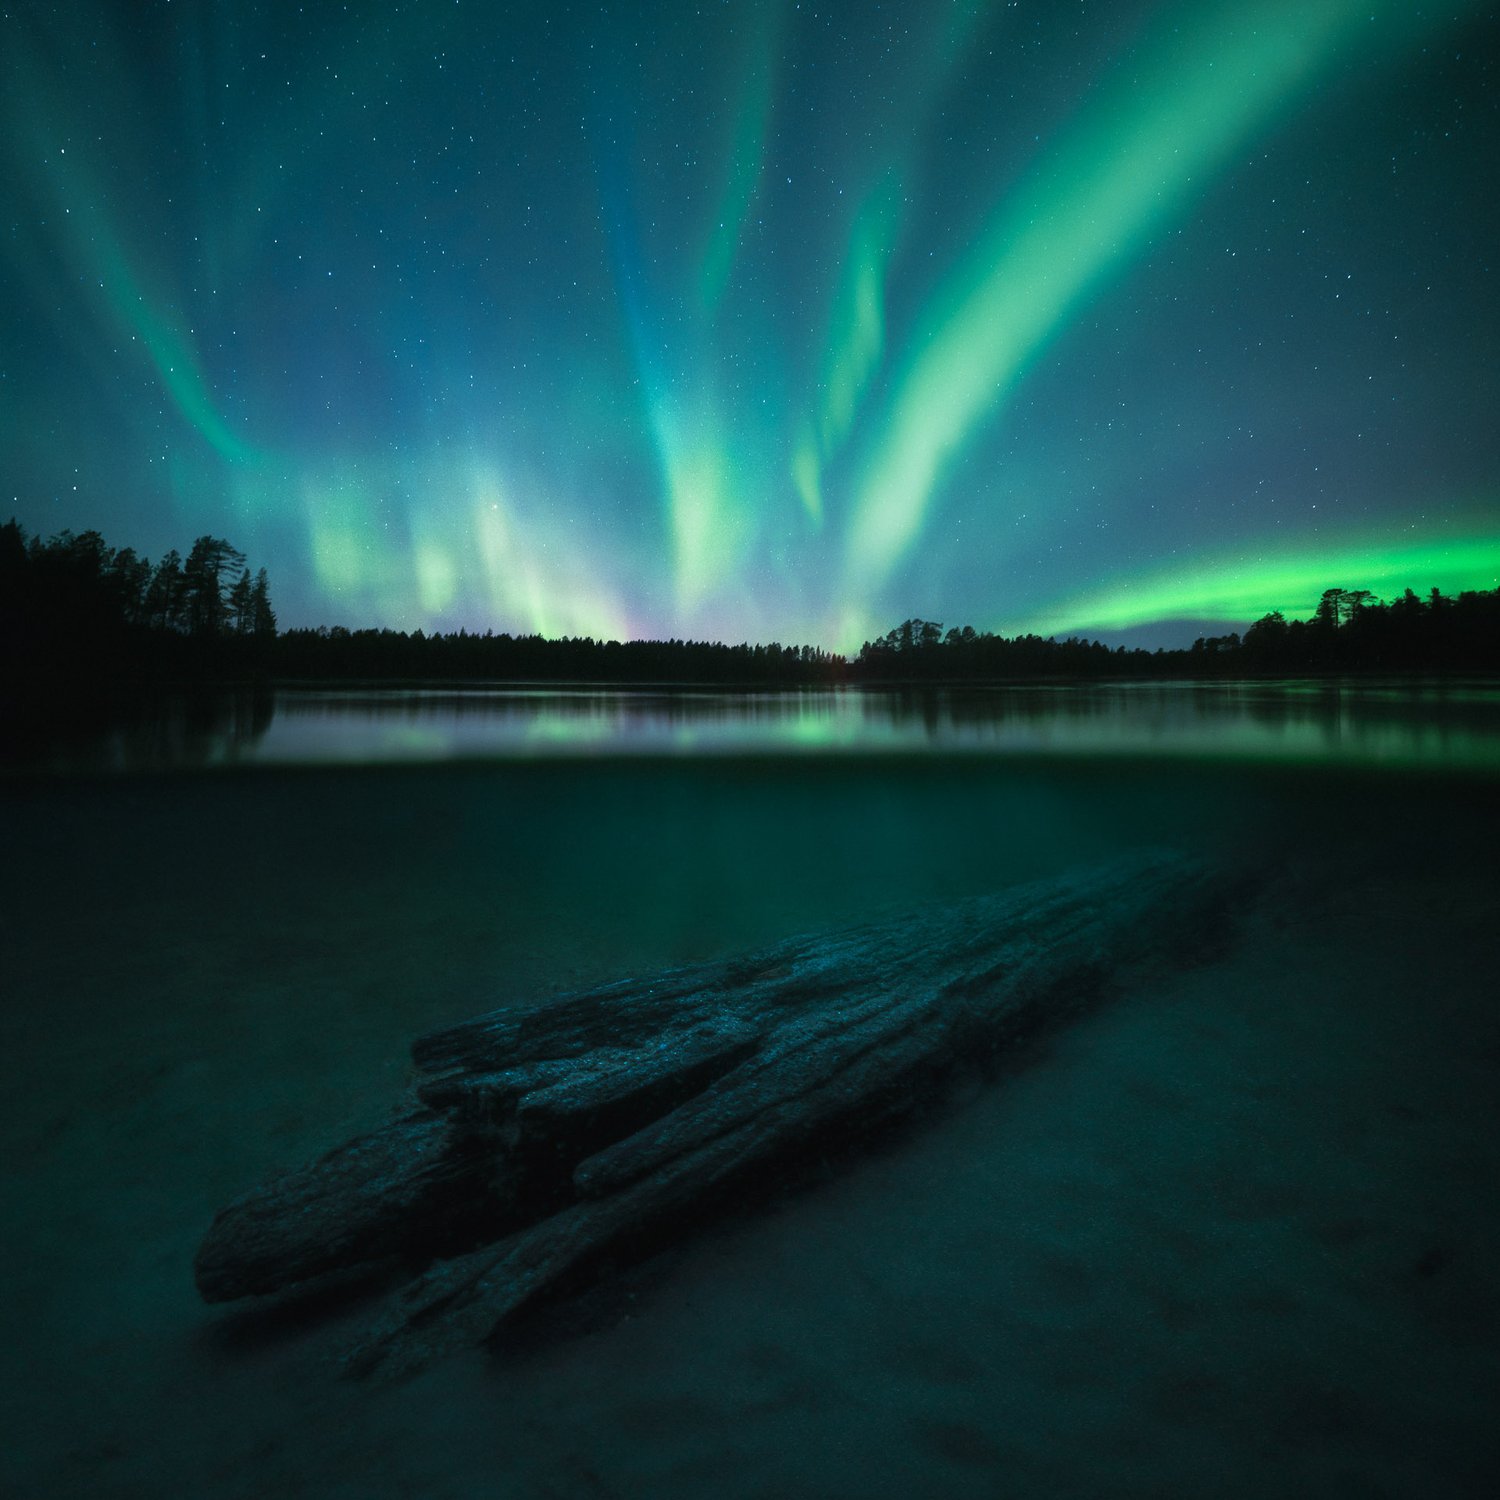
As a creative, I try to push myself to develop new ideas and visions. I had this strong pull to do something different, to push the boundaries of what I could capture with my camera and convey the ever-changing beauty of our planet.
I wanted to push myself out of my comfort zone and express the emotions of transformation. I wanted to connect this piece to my roots, guiding the visuals with Finnish literature, Kalevala, the theme of the mythic transformation of nature, light, and darkness. This was the start of the birth of my new photography piece, Underneath The Surface.
I packed my gear and headed to the stunning landscapes of northern Finland, unsure how I would bring this dream to life. It sure wasn’t easy. The project turned into this intense journey of battling sleeplessness and the brutal cold of Finnish Lapland. Imagine spending hours in freezing water, trying, failing, and then trying again the next day.
But then, there was this moment. After all those attempts, I finally got the shot I was after. Sitting there in the icy water, watching the Northern Lights, I felt this overwhelming sense of connection and change. Time stood still, and I was there, soaking in every second.
It’s funny how we often scratch the surface of things, isn’t it? But we must keep pushing and trying, no matter how often we stumble. And that’s what makes us succeed.
This piece blends the natural world and the mystical stories from the Kalevala. It invites you to step into a scene where these two worlds collide, showing the ever-changing nature of our planet alongside those age-old stories. Through this process, I learned so much about myself and how pushing your limits can lead to some amazing discoveries. Below, you can find a behind-the-scenes video and a chapter on how this photograph was captured.
[ad_2]
Source link
[ad_1]


Photographer: Sacha Stejko
I had the pleasure of serving on the 2025 Communication Arts Photography Competition jury—a fantastic opportunity to step outside my usual discipline and review photography alongside my esteemed peers. One standout moment was discovering Sacha Stej Sacha, an Auckland-based photographer represented by Image Driven Content. Her accolades include being named one of the top 200 advertising photographers globally by Lürzer’s Archive and being recognized as one of the 23 World’s Best Sport Photographers by The Agents Club in 2023. I recently had the pleasure of catching up with Sacha to discuss her award-winning image.
Your photography is known for its cinematic and powerful portrayal of women—what are the key elements you look for when capturing intensity and resilience in your subjects?
When I’m gearing up to capture my subjects, there are a few key elements I always keep in mind. First and foremost, getting to know my subjects is essential. I want to know what shapes who they are. Before the shoot and even during it, I dive into conversations that reveal what makes them tick.
Once I have a sense of them, I try matching their emotional tone; if they’re fiery and passionate, I want that to jump off the frame. I aim to include a piece of who they are in every shot, whether it’s a glimmer in their eye or the way they hold themselves. I strive to create an image they can recognize, one that resonates with their energy. It’s all about connection, and that’s what I love most about photography: being able to freeze a slice of someone’s narrative, a moment of resilience and intensity, in time.
In your “Girls in Sports” campaign for 2 Degrees, you highlighted both strength and vulnerability in your subject. Can you talk about how the casting went and what direction you gave?
This campaign was shot alongside a TVC, and the fantastic Director Taylor Ferguson did the casting. When I met these young women I could see that they radiated talent and spirit. For this brief, I wanted to capture that passion and grit. They don’t just play the game—they own it. I love the dichotomy between their sweet appearances and the fierce determination they display on the field – there is nothing more badass than seeing these girls in their element. Take the rugby girl, for instance. I asked her to sprint full speed towards the camera, like she was dodging the opposing team. In that moment, she transformed into a powerhouse charging at me like a freight train, the fire in her belly blazing as she zoomed closer. It was exactly the energy we were after.
How do you balance storytelling with advocacy in your visual work, particularly around gender representation?
Women in sports face a harsh reality—they often get overshadowed, and it’s disheartening to see that women’s sports internationally don’t get the same spotlight as men’s. That’s why campaigns like this are so crucial; encouraging fans—especially from a young age—to rally behind these amazing athletes.
In my visual work, I find that storytelling and advocacy naturally go hand in hand—probably without me even realizing it. As a woman photographer, I’m drawn to capturing fierce, strong women because I know just how powerful we can be. In a society that often tries to box us in or undermine our strength, it’s crucial to keep that fire alive. That passion burns even brighter as a mother to a spirited young daughter. I want her to see women as capable and unafraid, sensitive and kind, just like the women I photograph.
How do you ensure your images challenge traditional portrayals, particularly of femininity and athleticism, while still maintaining authenticity and emotional depth?
I’m usually guided by how I want the image to feel, especially when it comes to capturing femininity and athleticism. My images become a deep dive into an energy that connects the viewer to the subject. I want to create an atmosphere where the audience feels confronted, pulled into the frame, and unable to look away.
I find authenticity through genuine human connections, digging beyond the surface, whether I’m photographing a seasoned athlete or someone new to the sport. There’s something superhuman about athletes; they possess more than just physical strength; they embody resilience and discipline. There’s a profound sacrifice that comes with striving for excellence, and that narrative fascinates me. Each image I capture is a testament to that journey—an exploration of what it truly means to balance vulnerability and power.
Can you talk about the role visual media plays in shifting public perception and promoting equity, especially in underrepresented communities and activist movements?
Photography holds a unique power in shaping public perception and promoting equity. As a visual person myself, I’ve always felt that a single image can convey emotions and stories far more effectively than words ever could. It’s the raw authenticity of a photograph that can resonate with someone’s heart, breaking down barriers and connecting us all on a fundamental level.
Through the lens of a camera, we can reveal the complexities of human nature and amplify voices that often go unheard. In this visual storytelling landscape, images become tools for change, not just documenting reality but actively reshaping how we view each other. Ultimately, photography fosters a shared humanity that can inspire action and fight against injustice. They remind us that, at our core, we are all just humans with similar desires for love, acceptance, and dignity.
[ad_2]
Source link
[ad_1]
Subscribe now to keep reading and get access to the full archive.
[ad_2]
Source link
[ad_1]
It’s just crazy how fast this stuff is evolving…
The post Google’s New Stuff appeared first on Stuck in Customs.
[ad_2]
Source link
[ad_1]
The Art of the Personal Project is a crucial element to let potential buyers see how you think creatively on your own. I am drawn to personal projects that have an interesting vision or that show something I have never seen before. In this thread, I’ll include a link to each personal project with the artist statement so you can see more of the project. Please note: This thread is not affiliated with any company; I’m just featuring projects that I find. Please DO NOT send me your work. I do not take submissions.
Today’s featured artist: Patrick Fraser
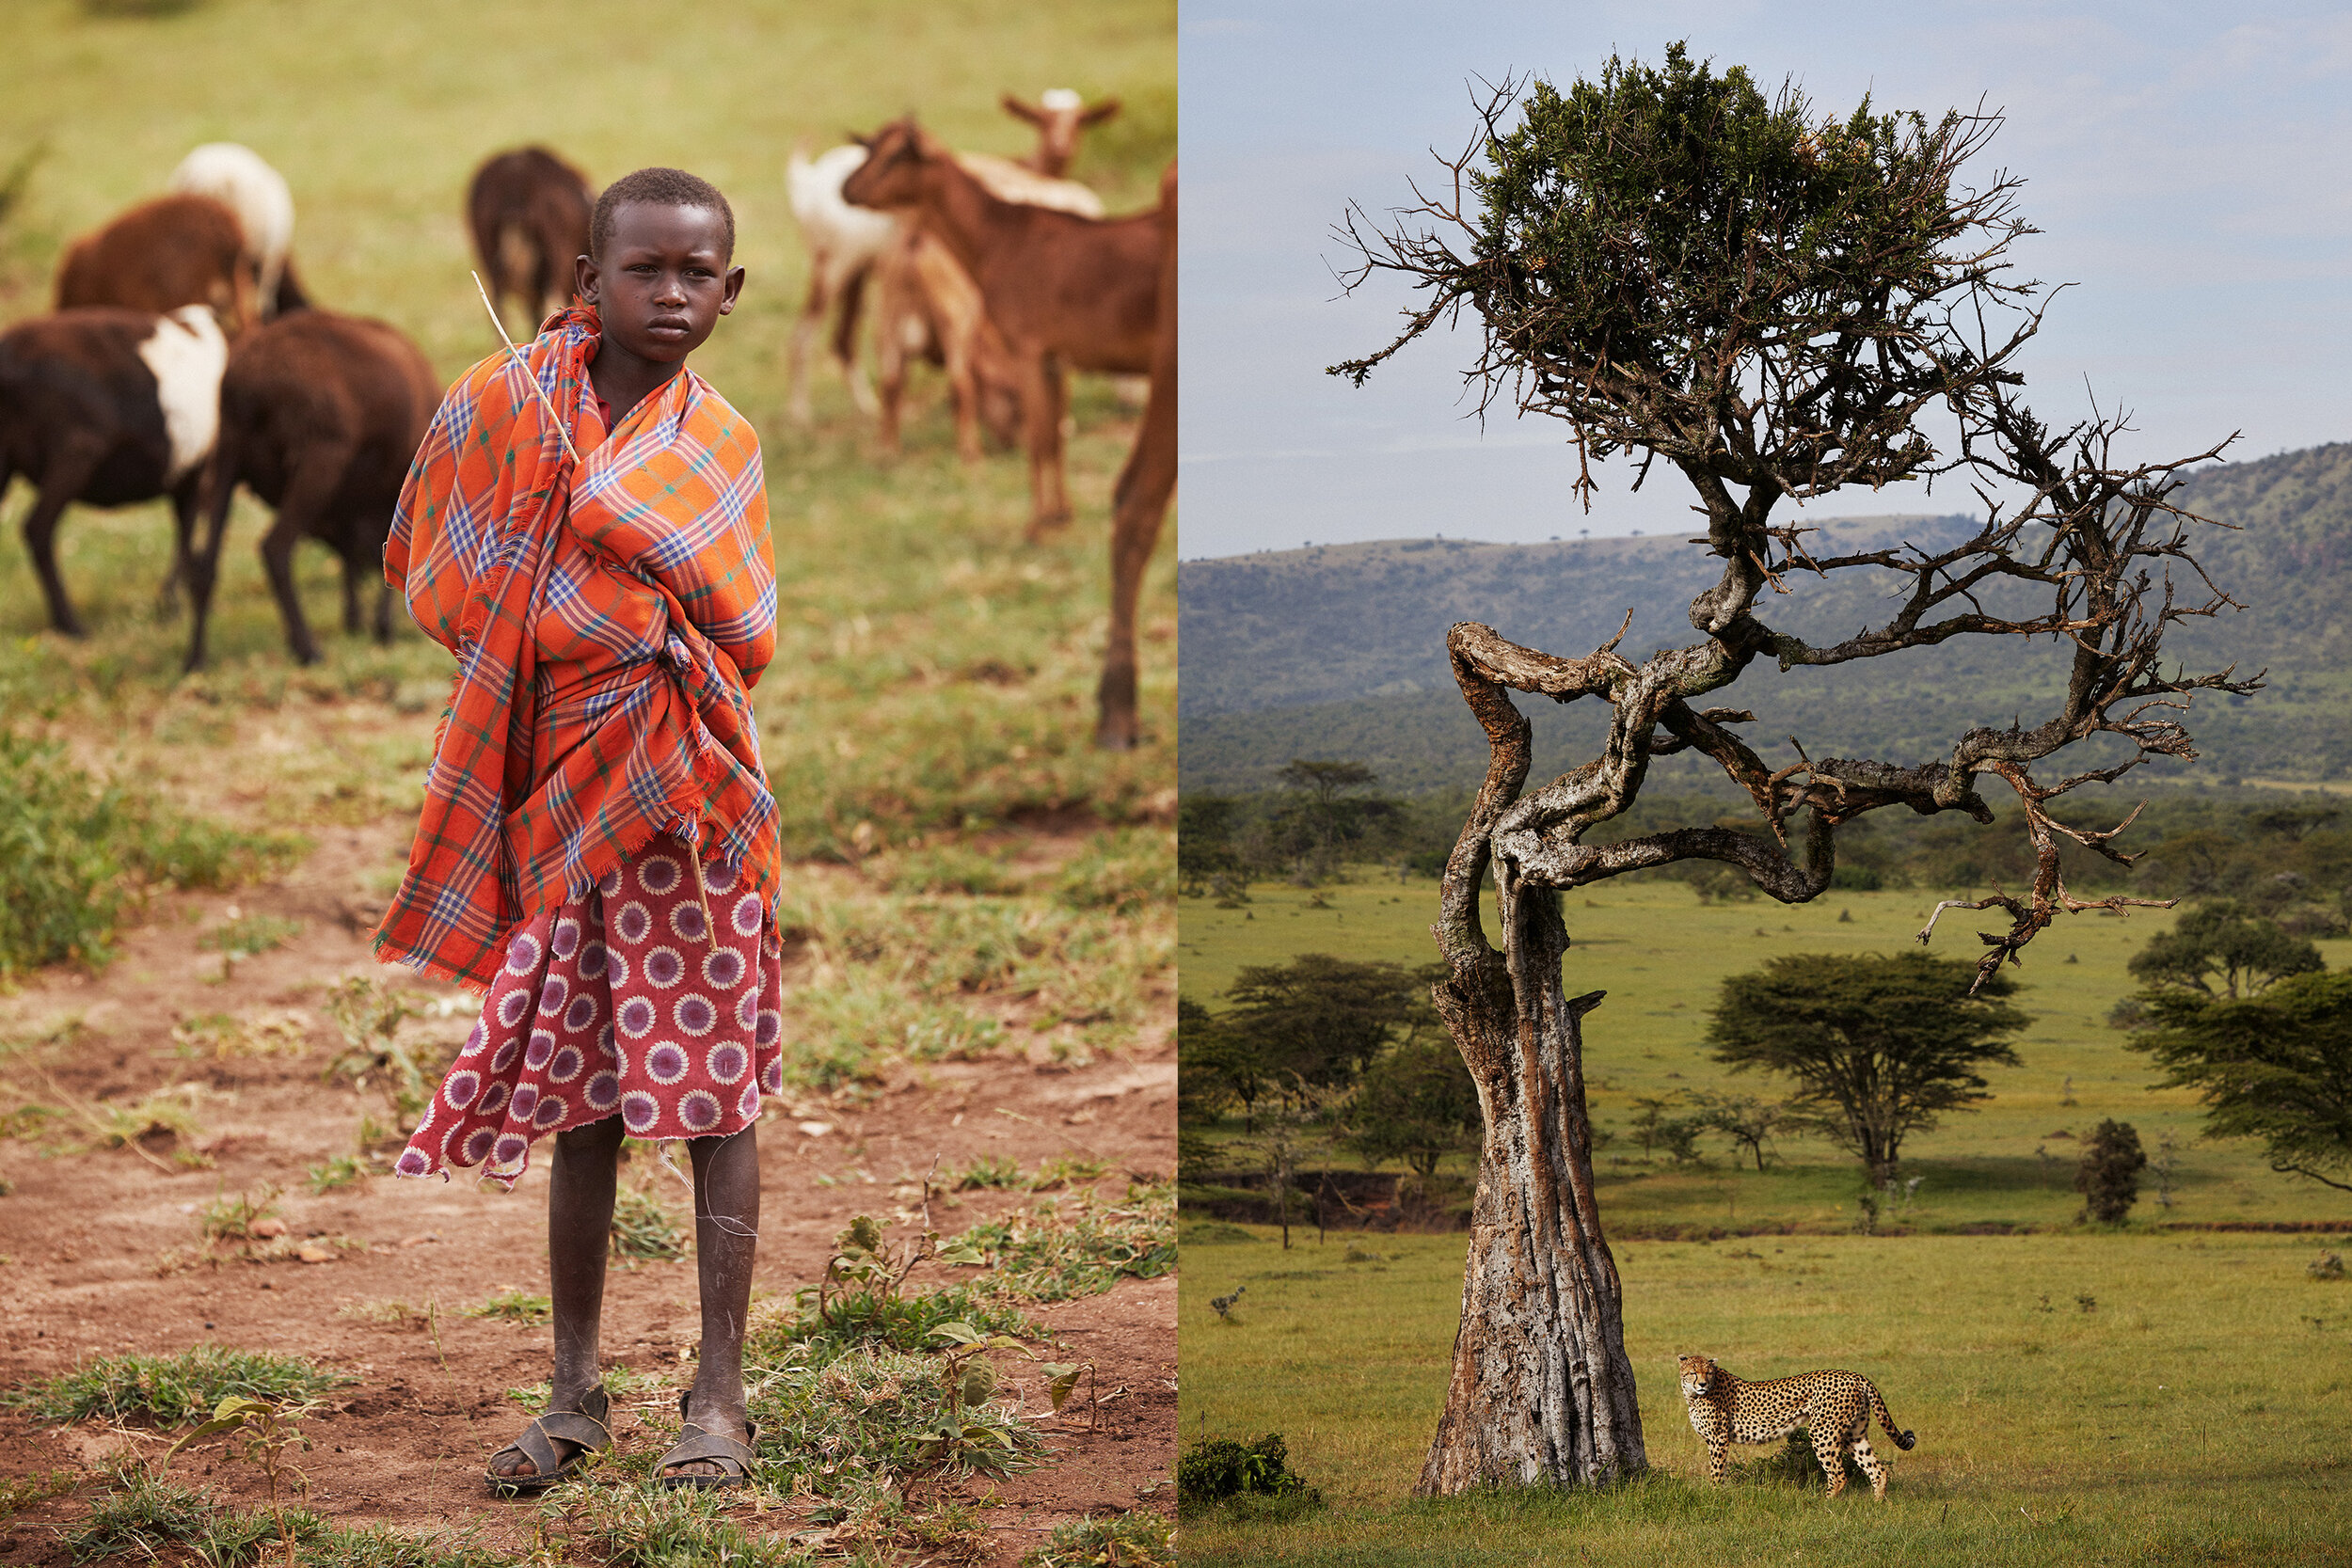
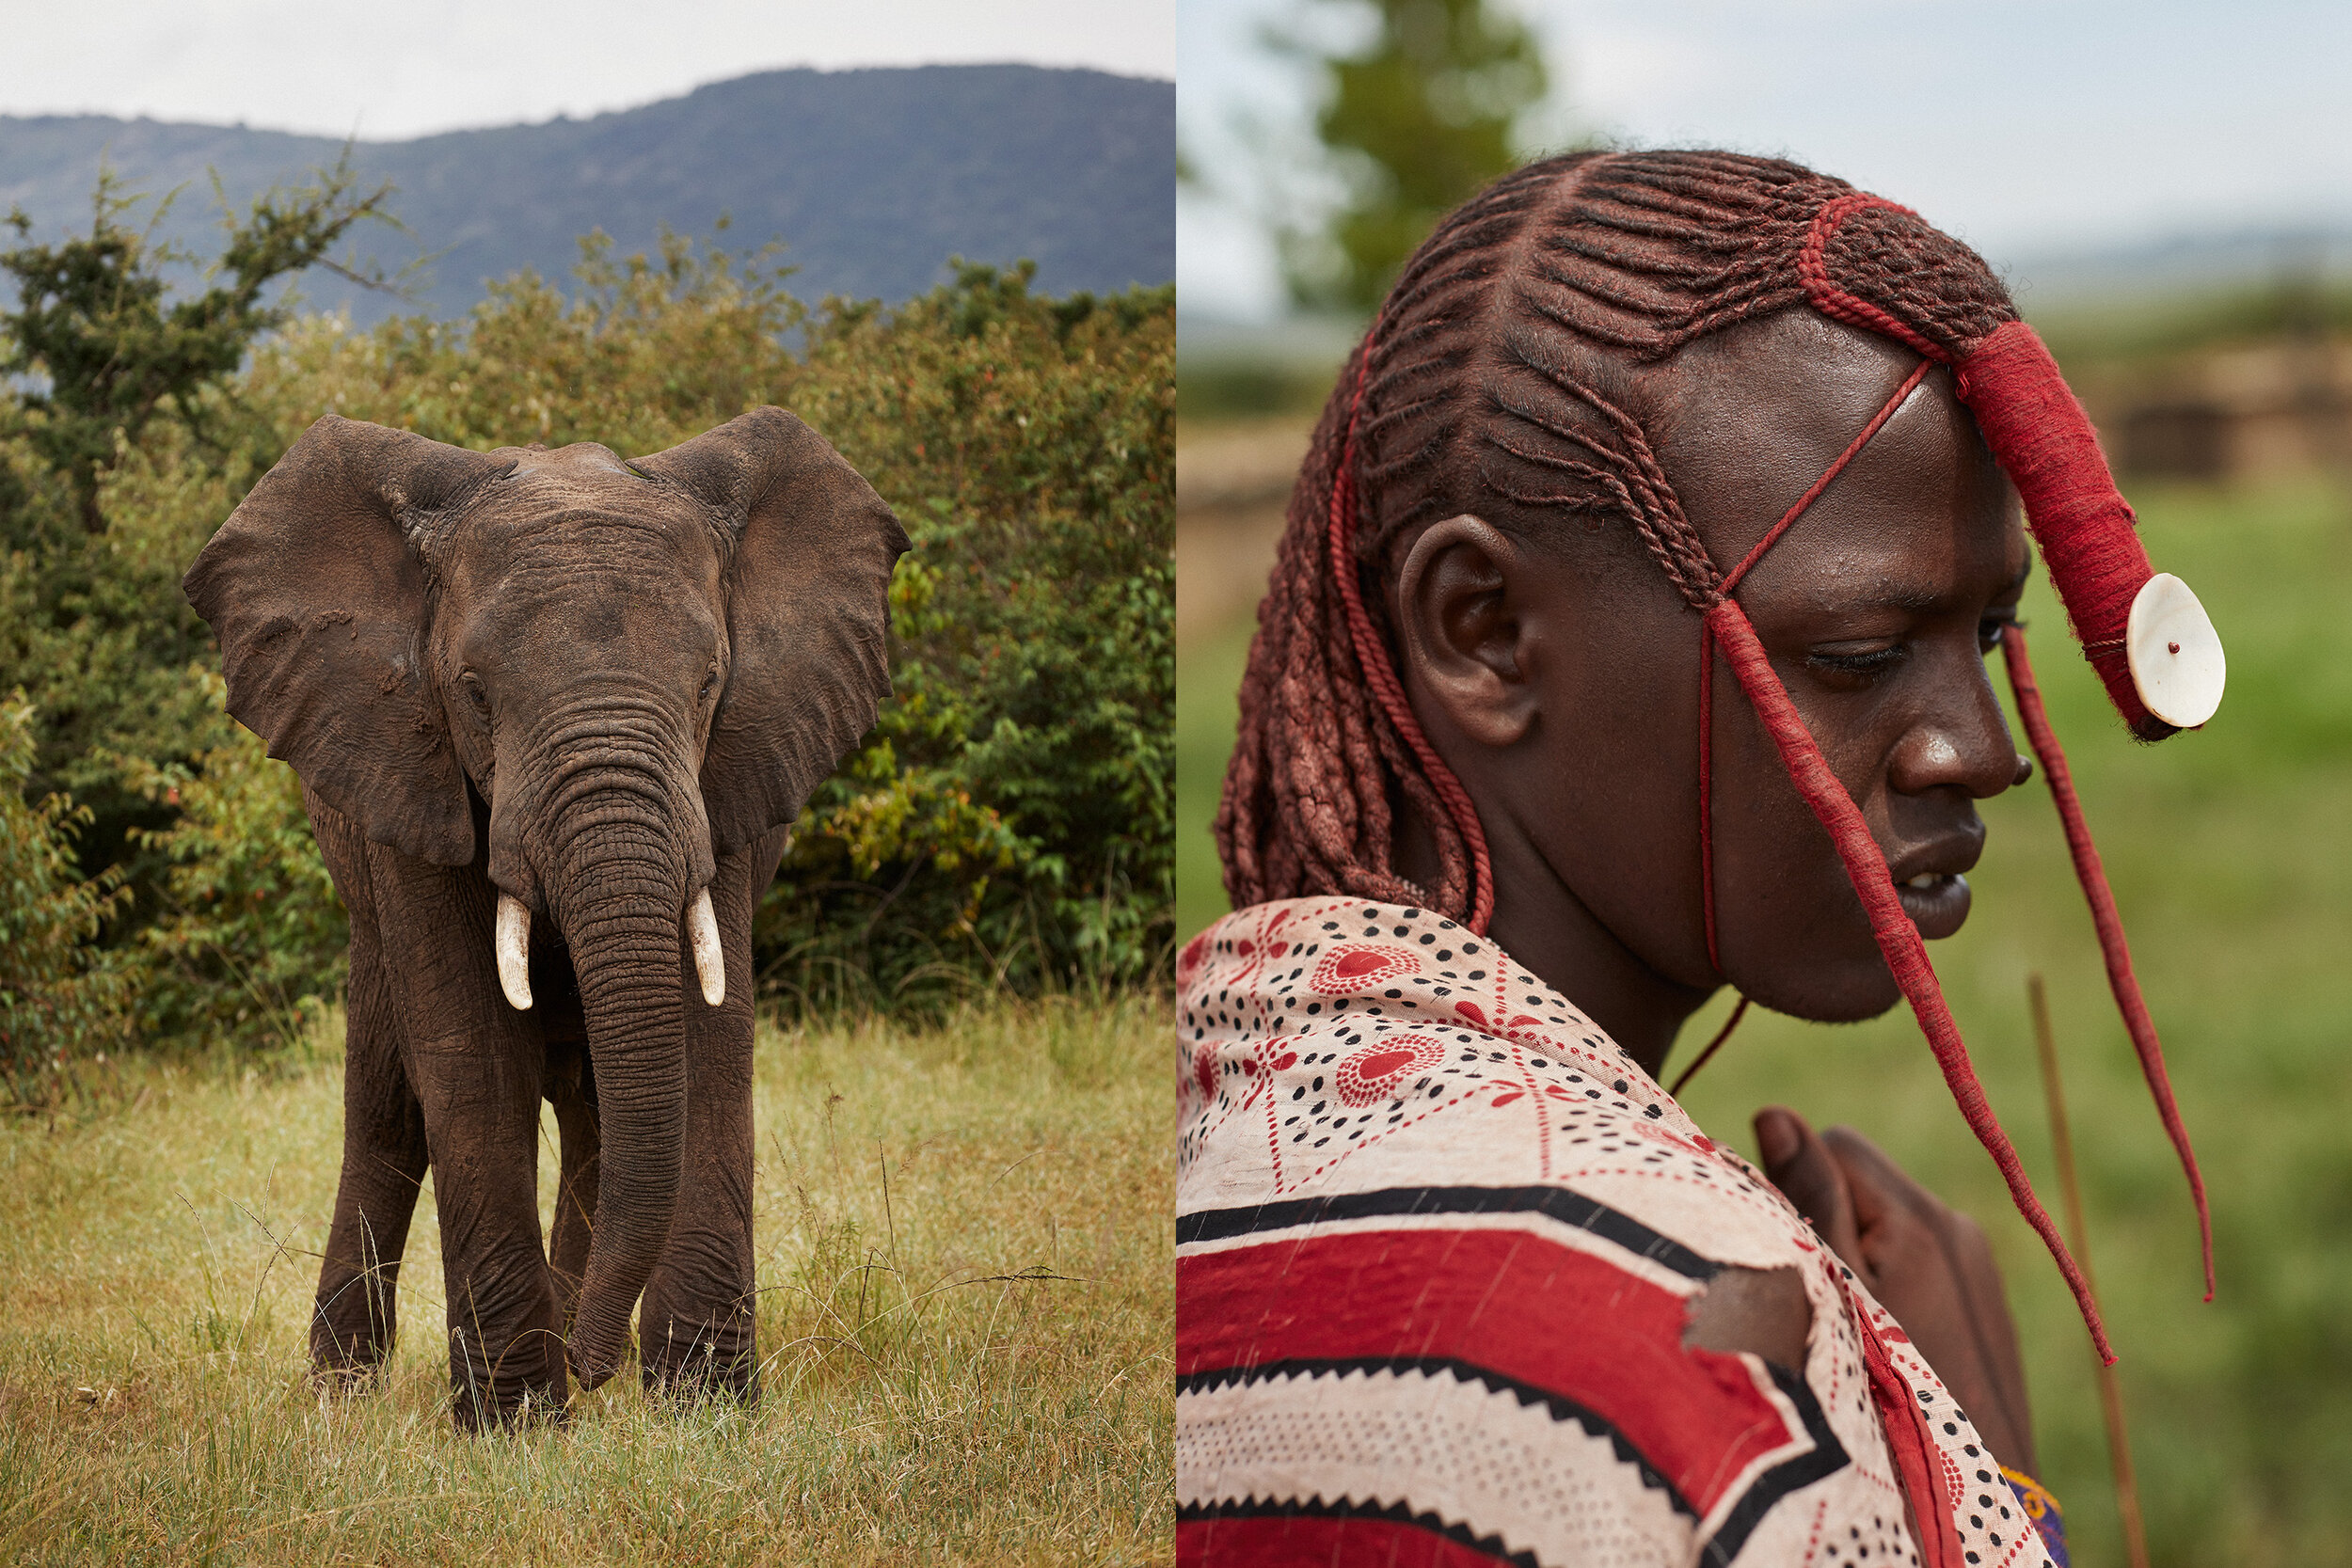
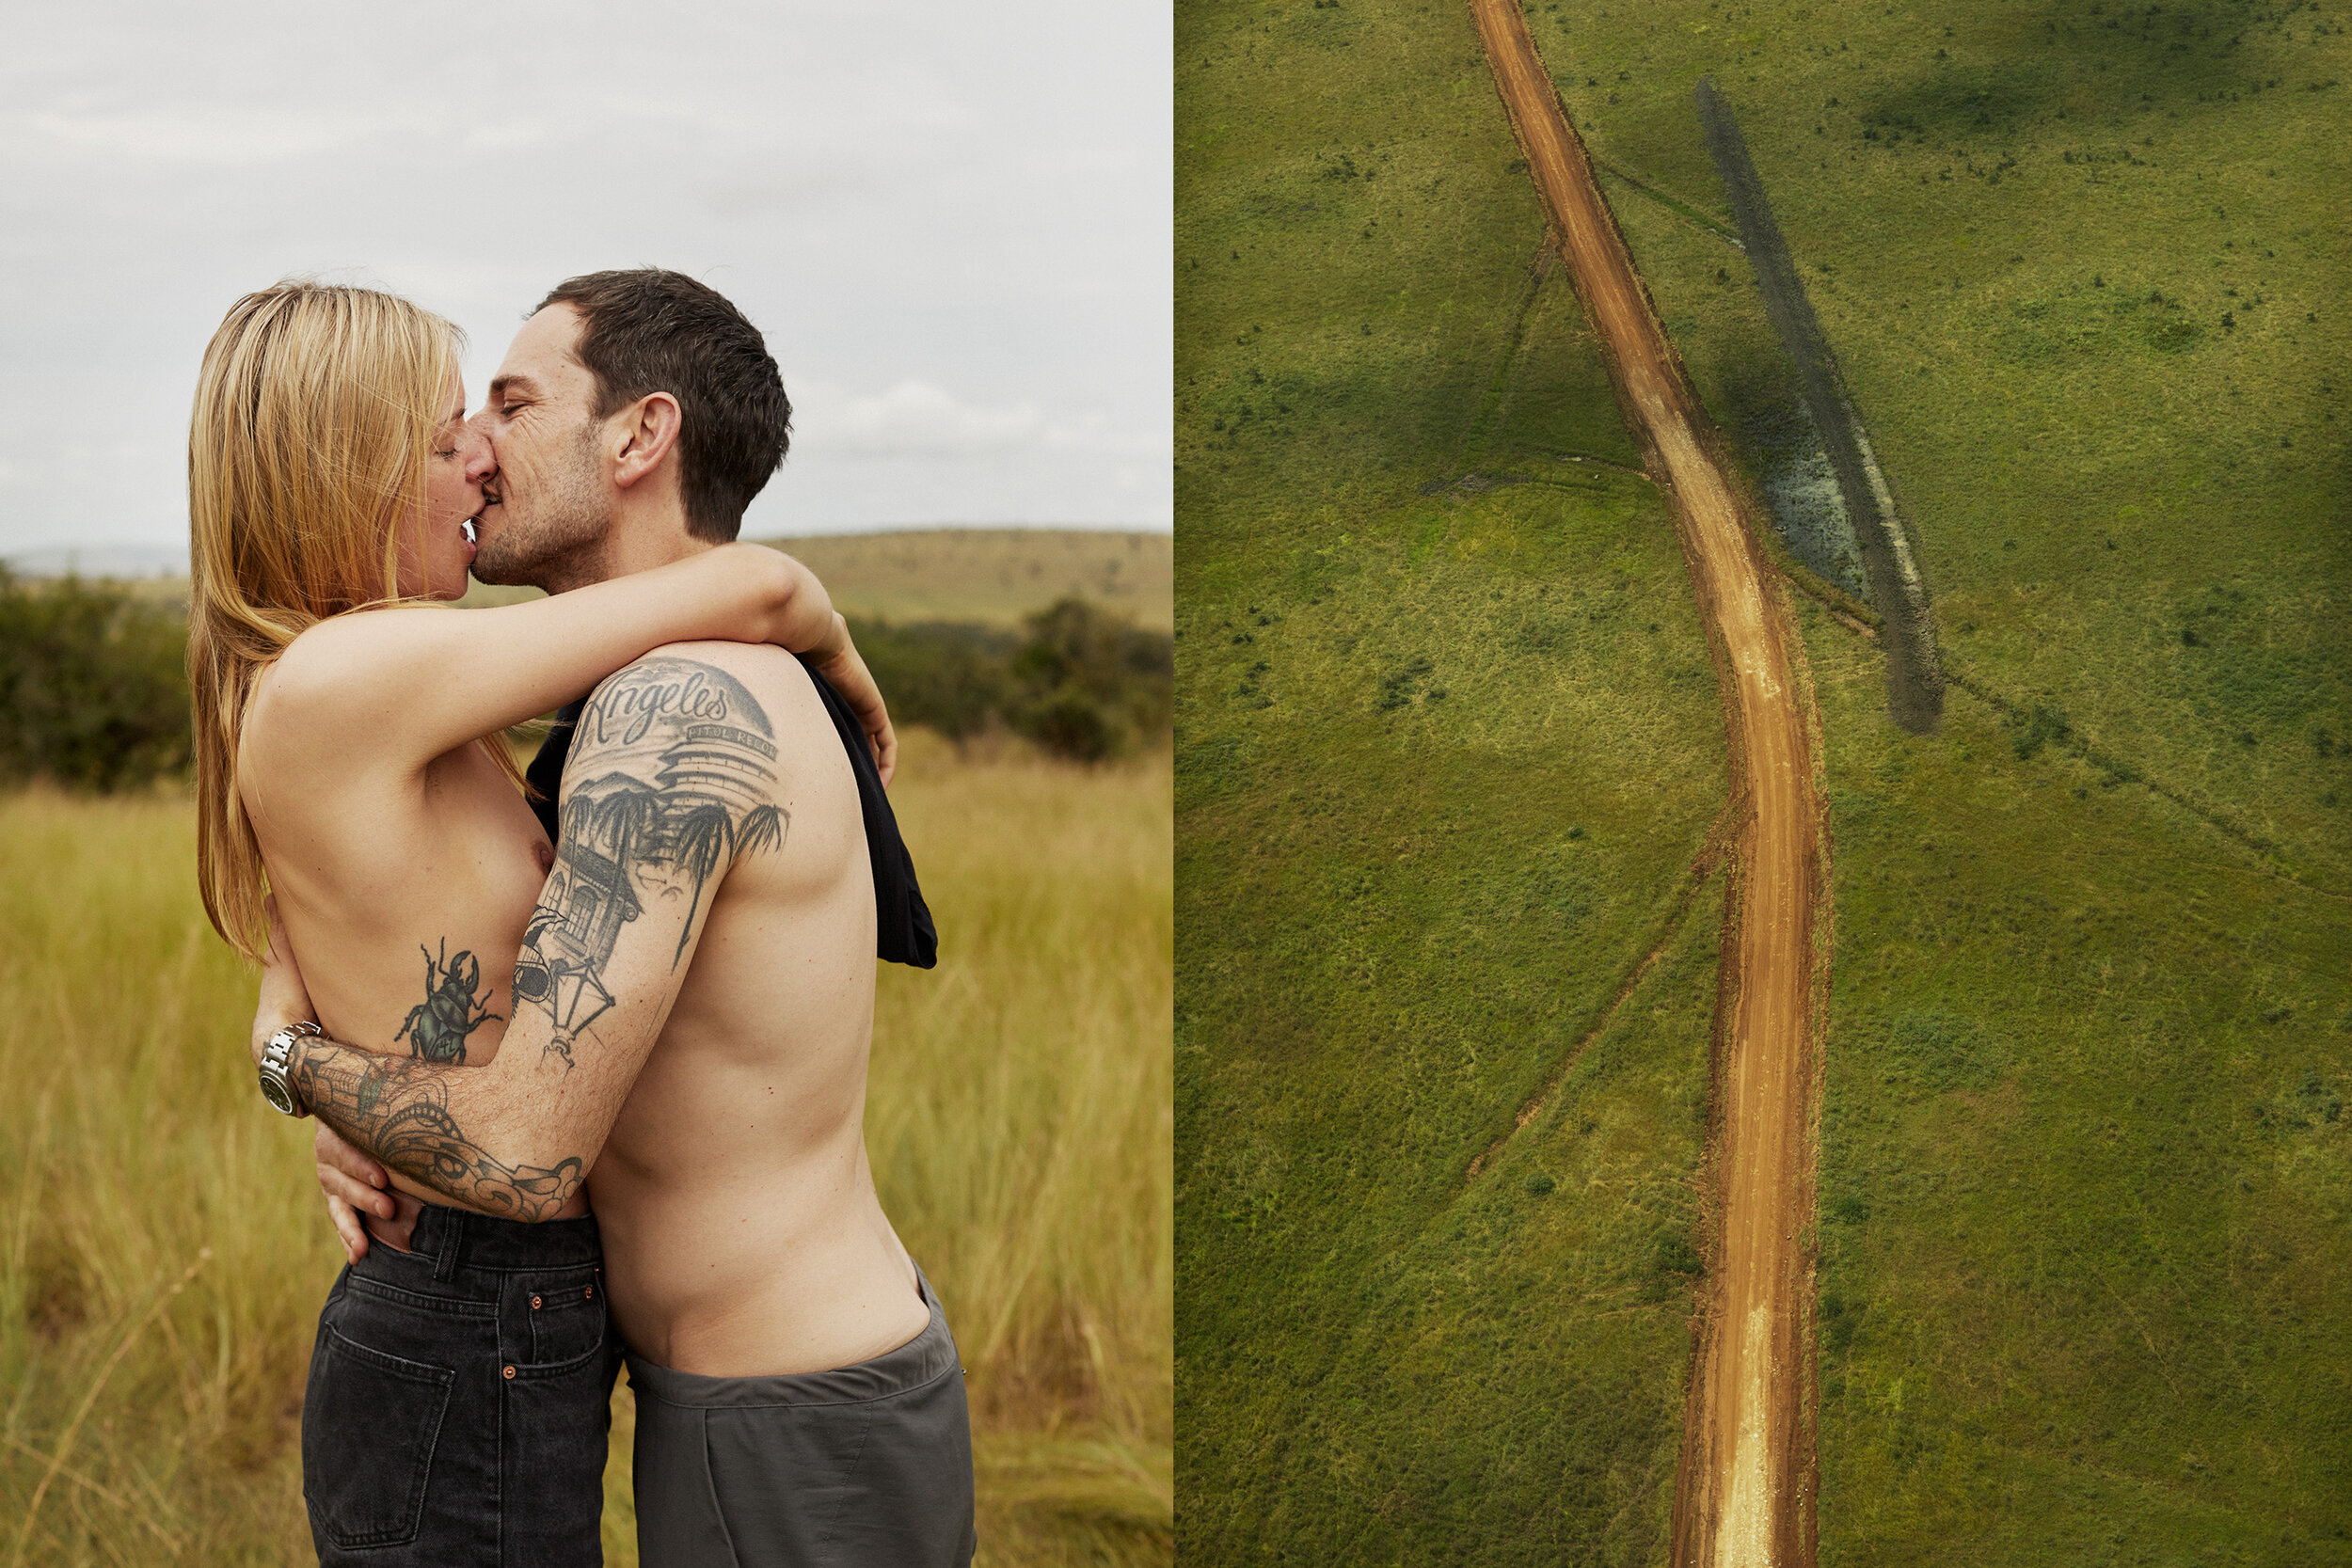
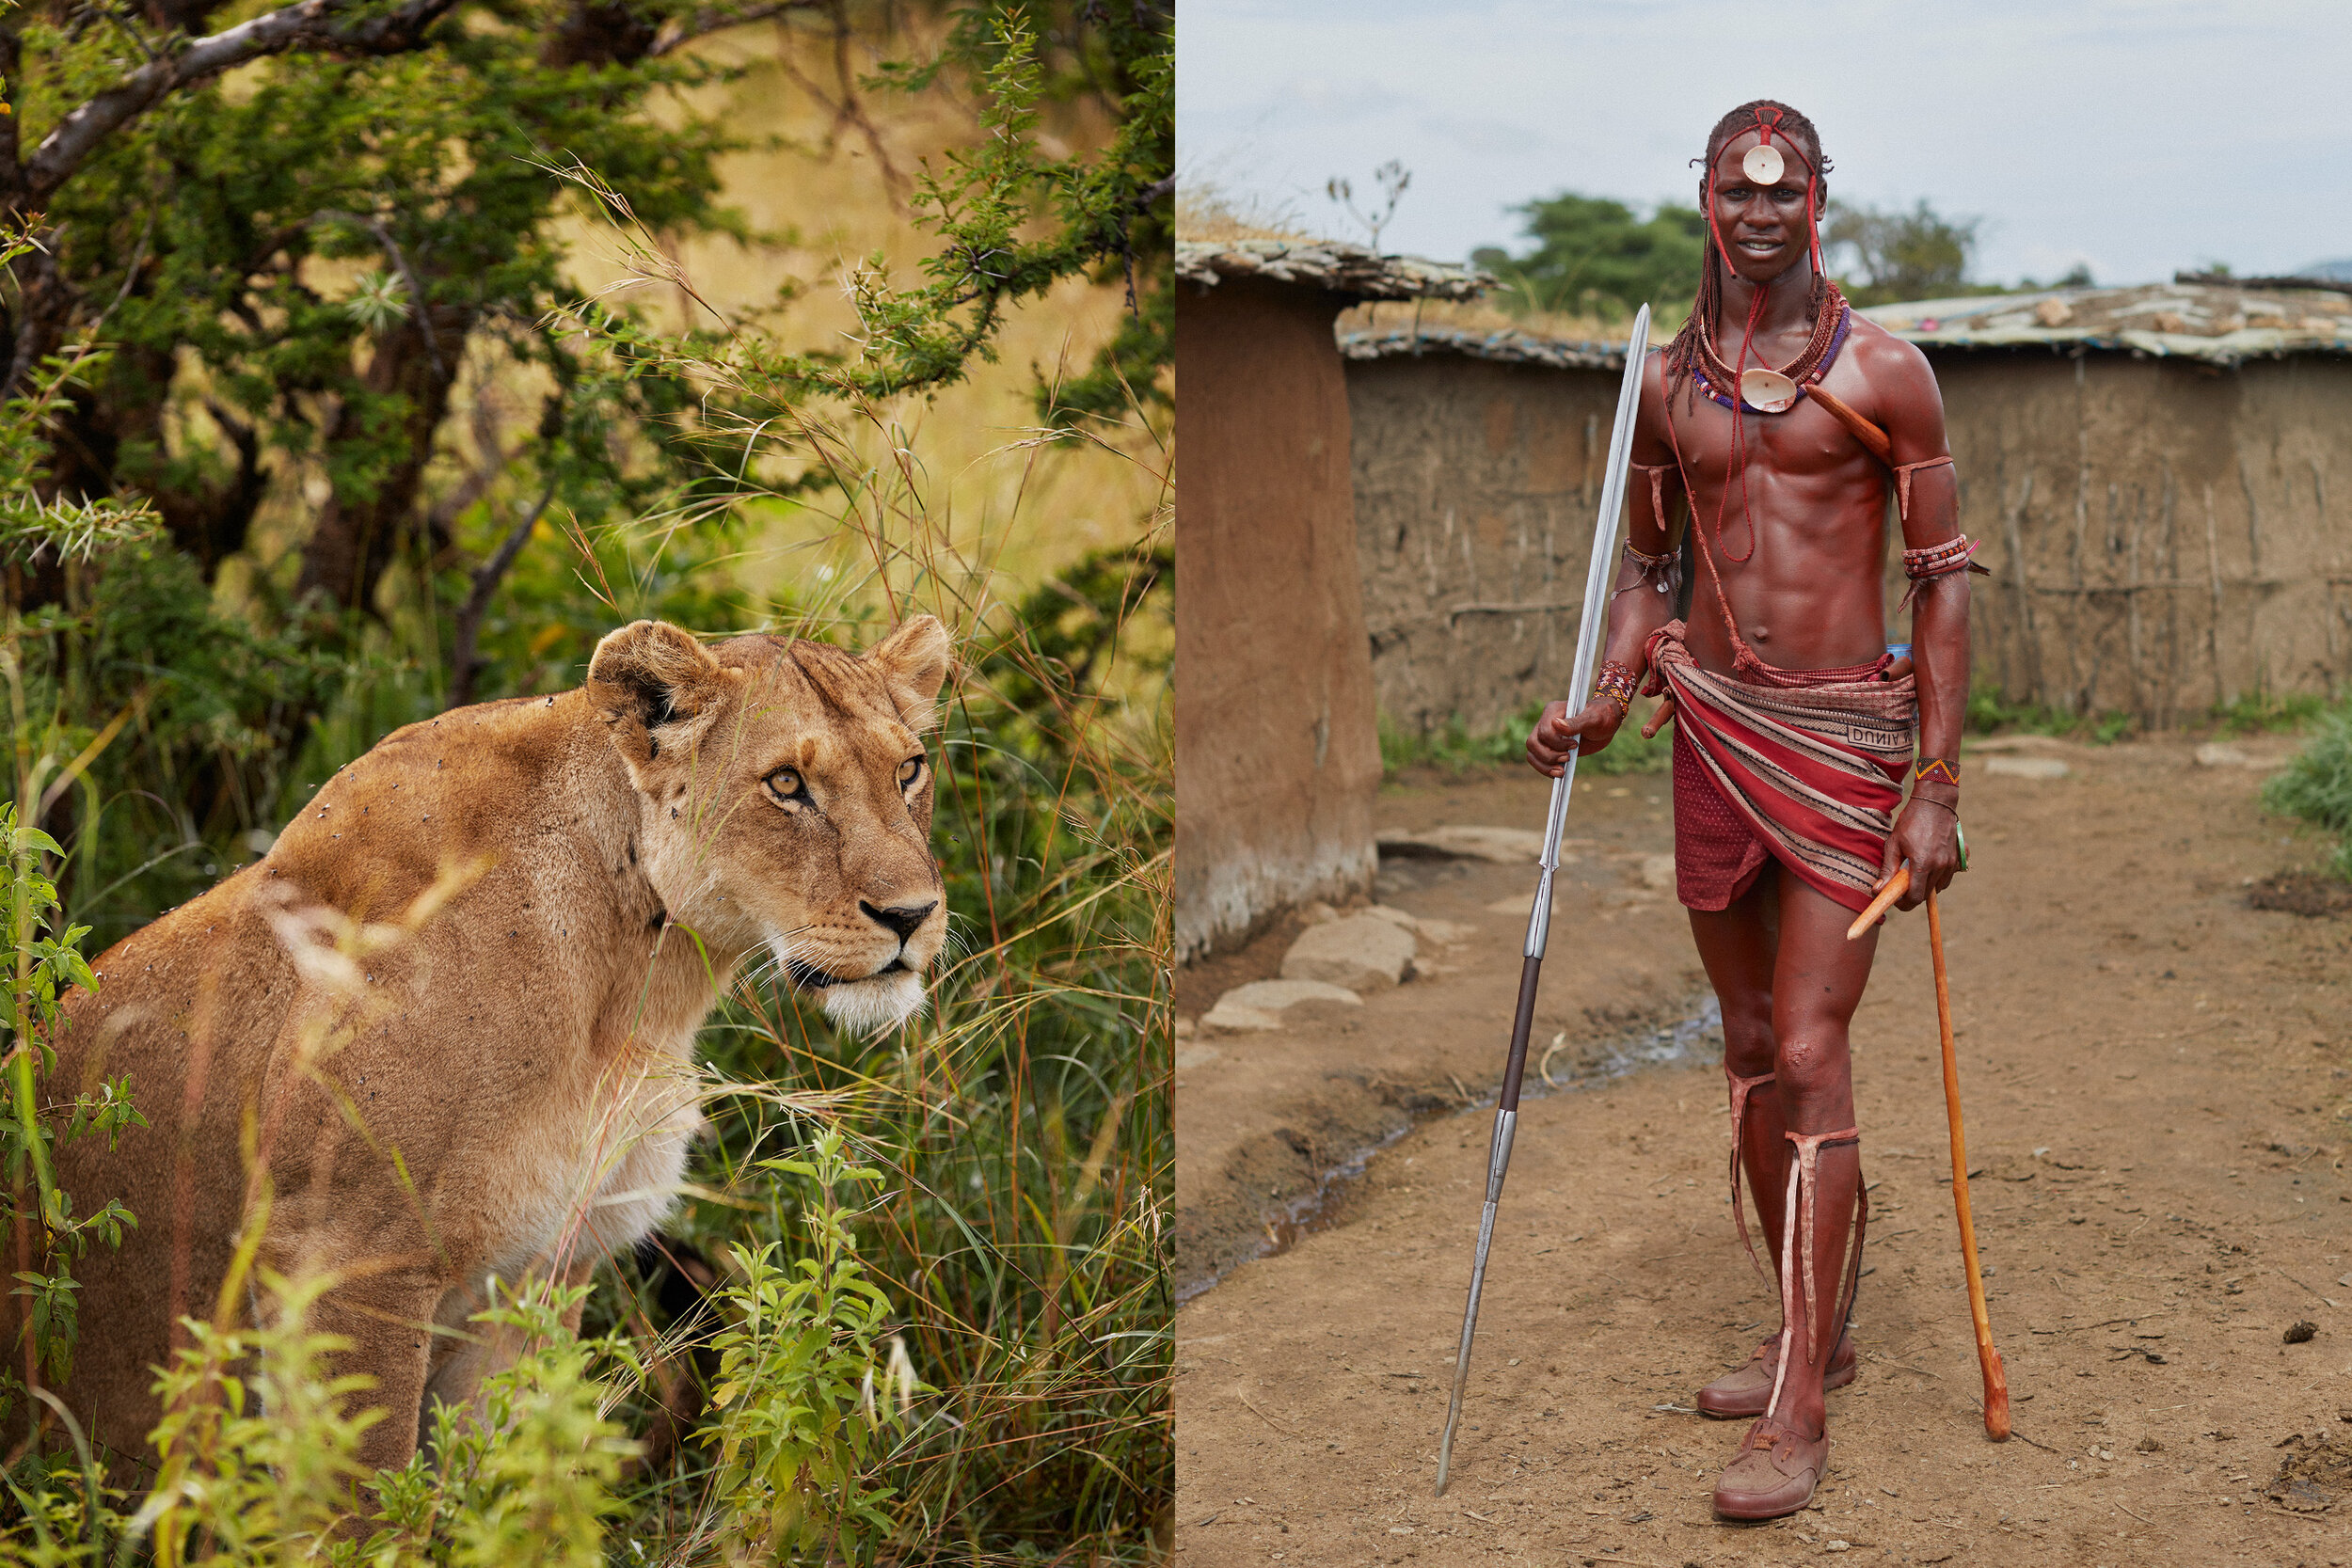
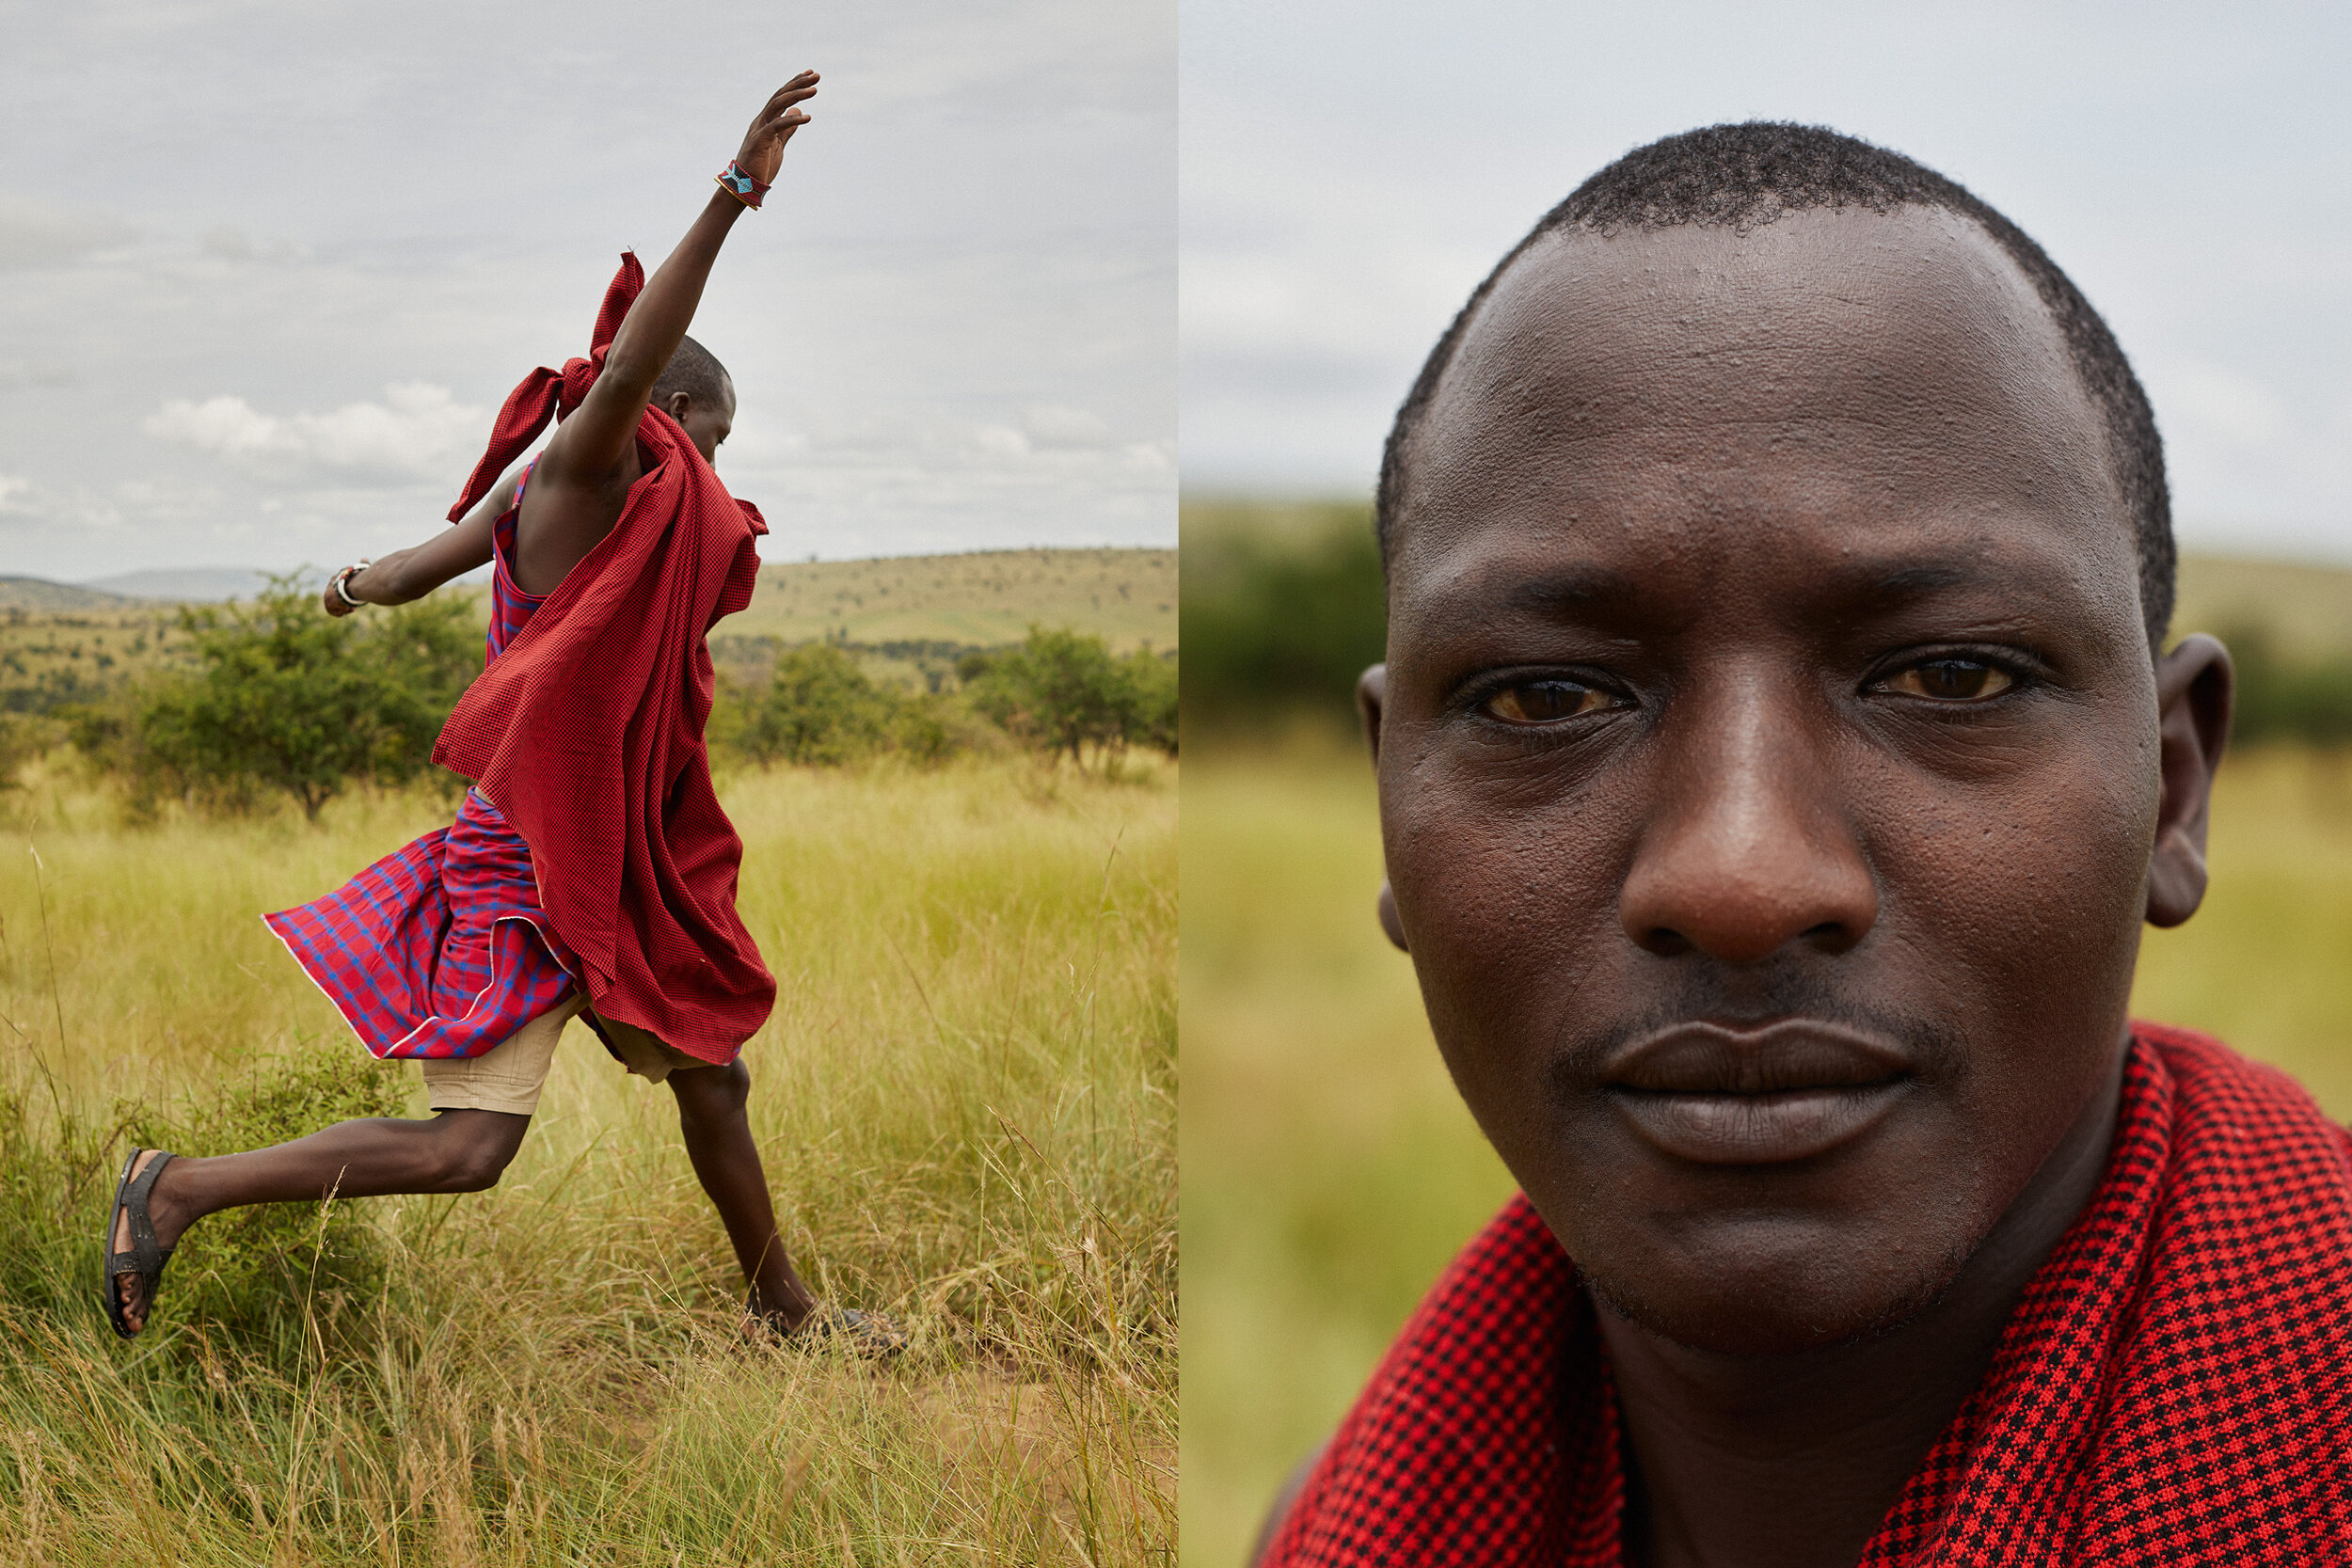
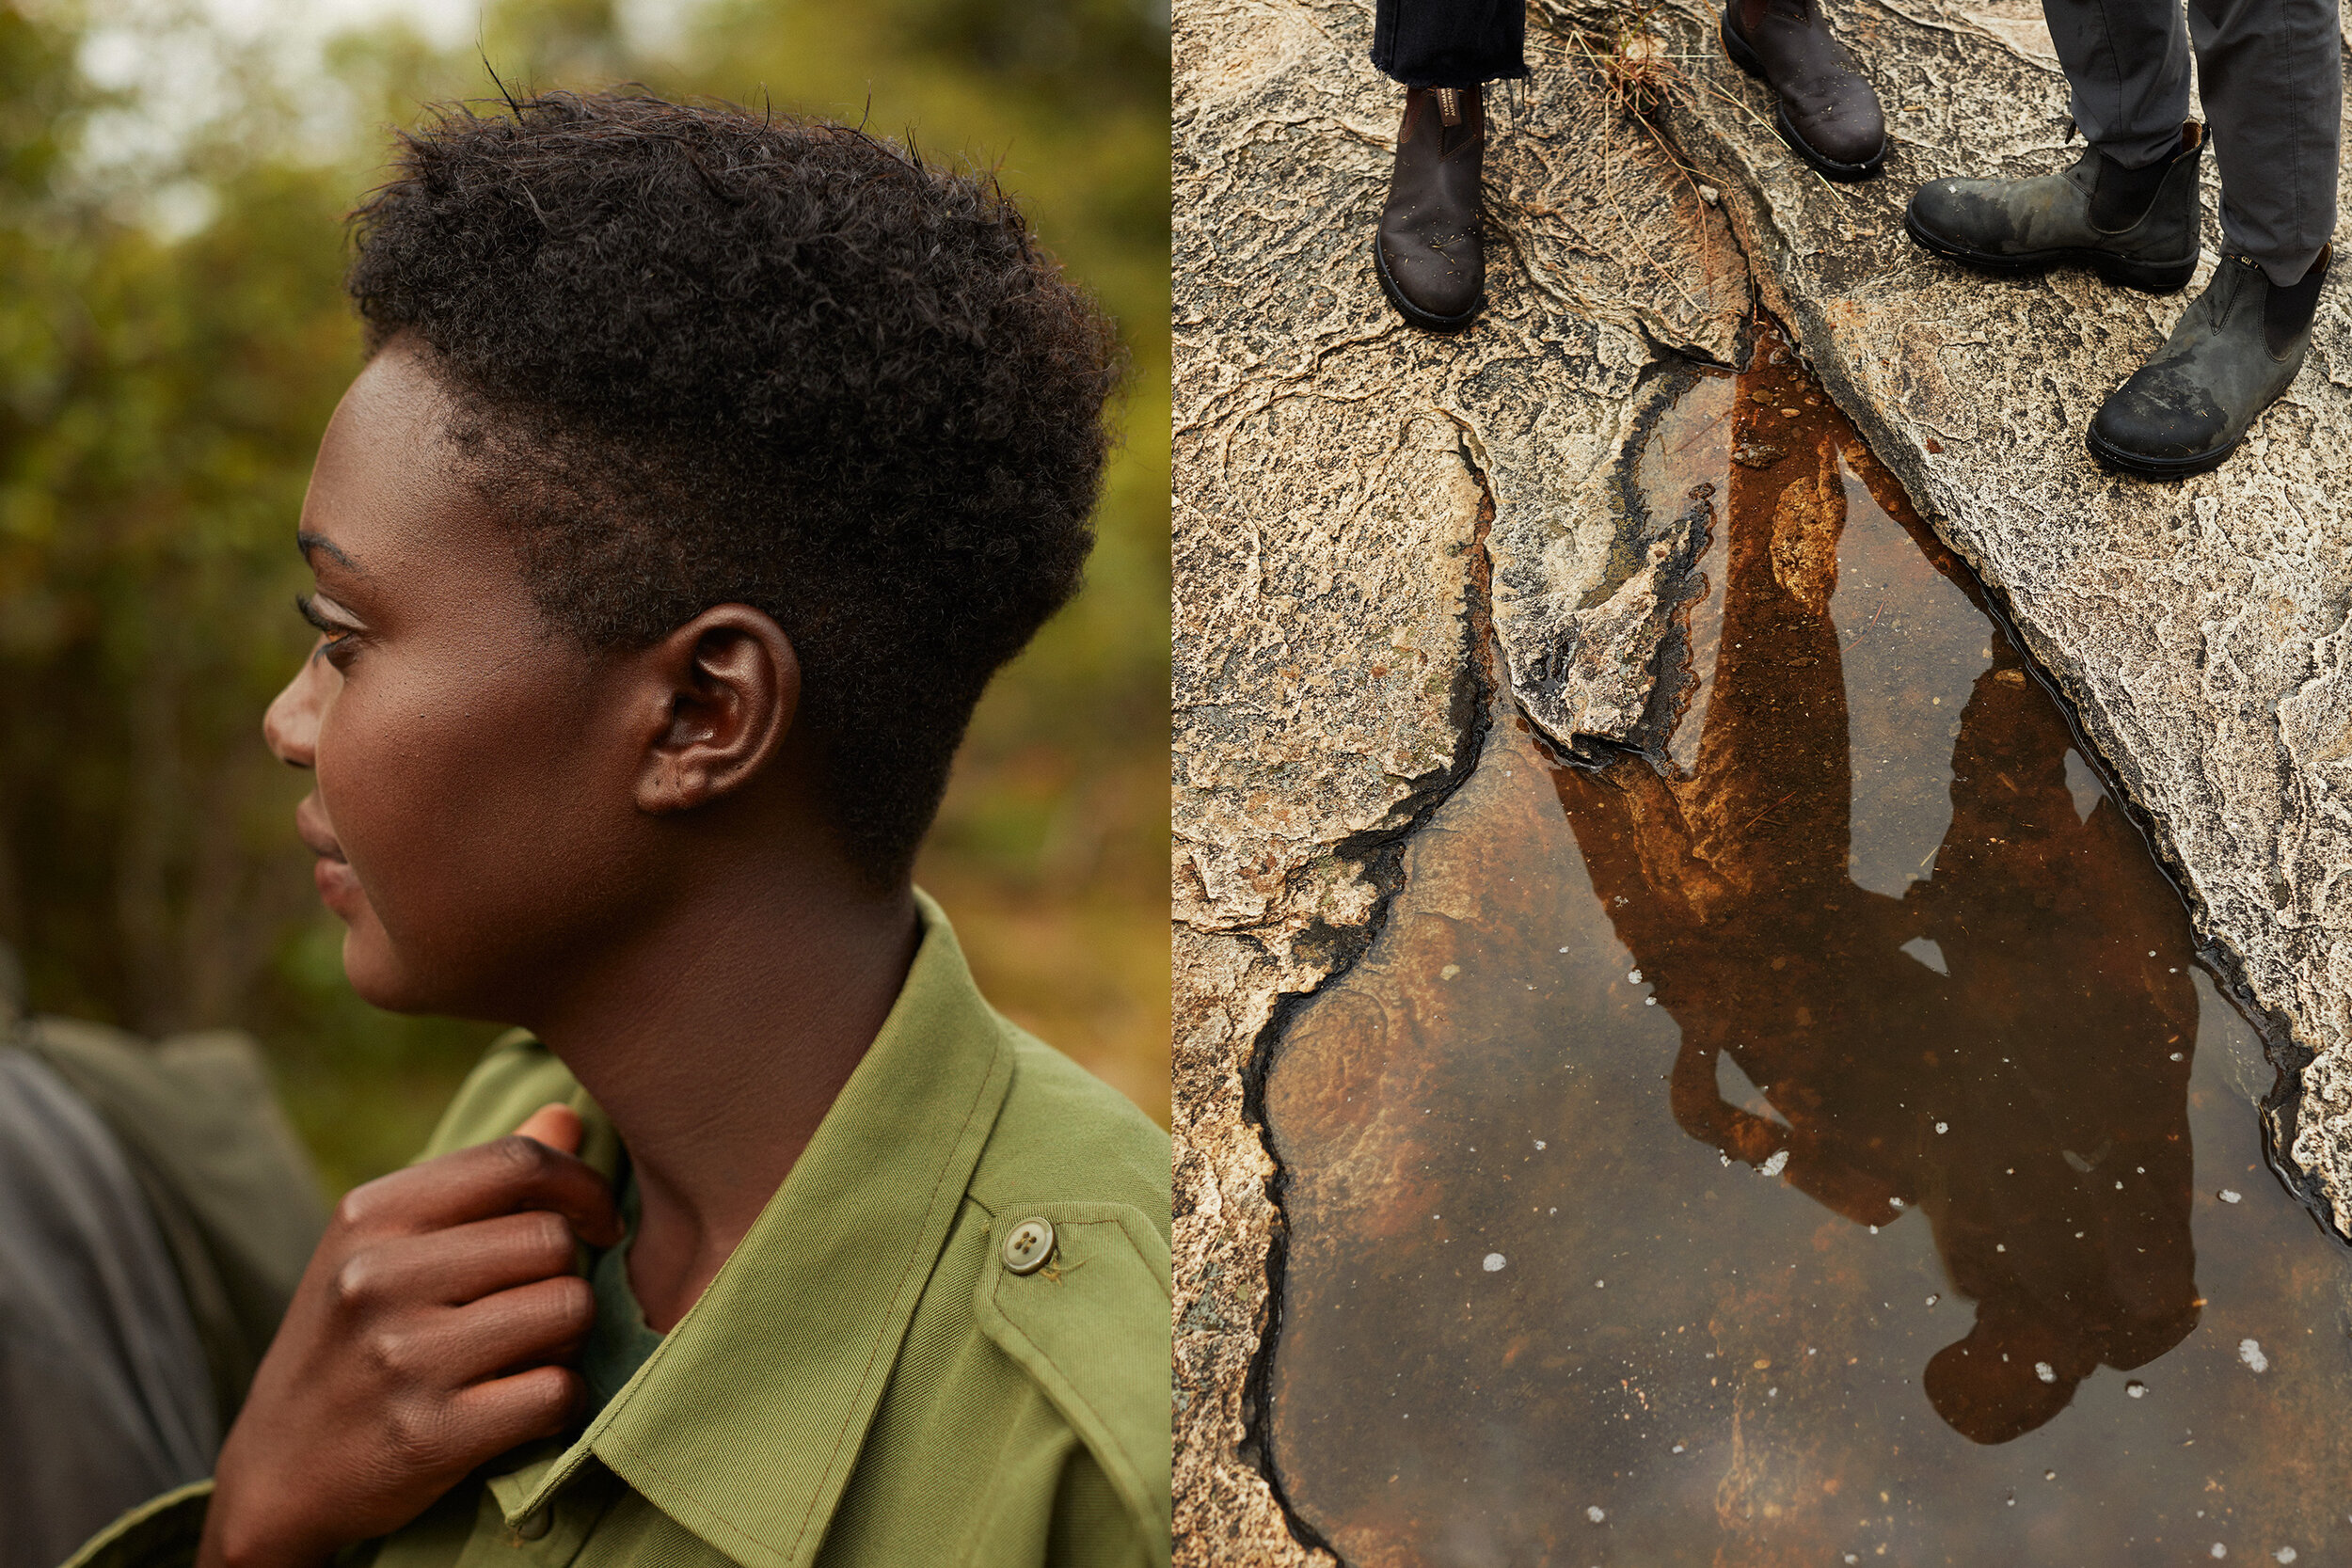
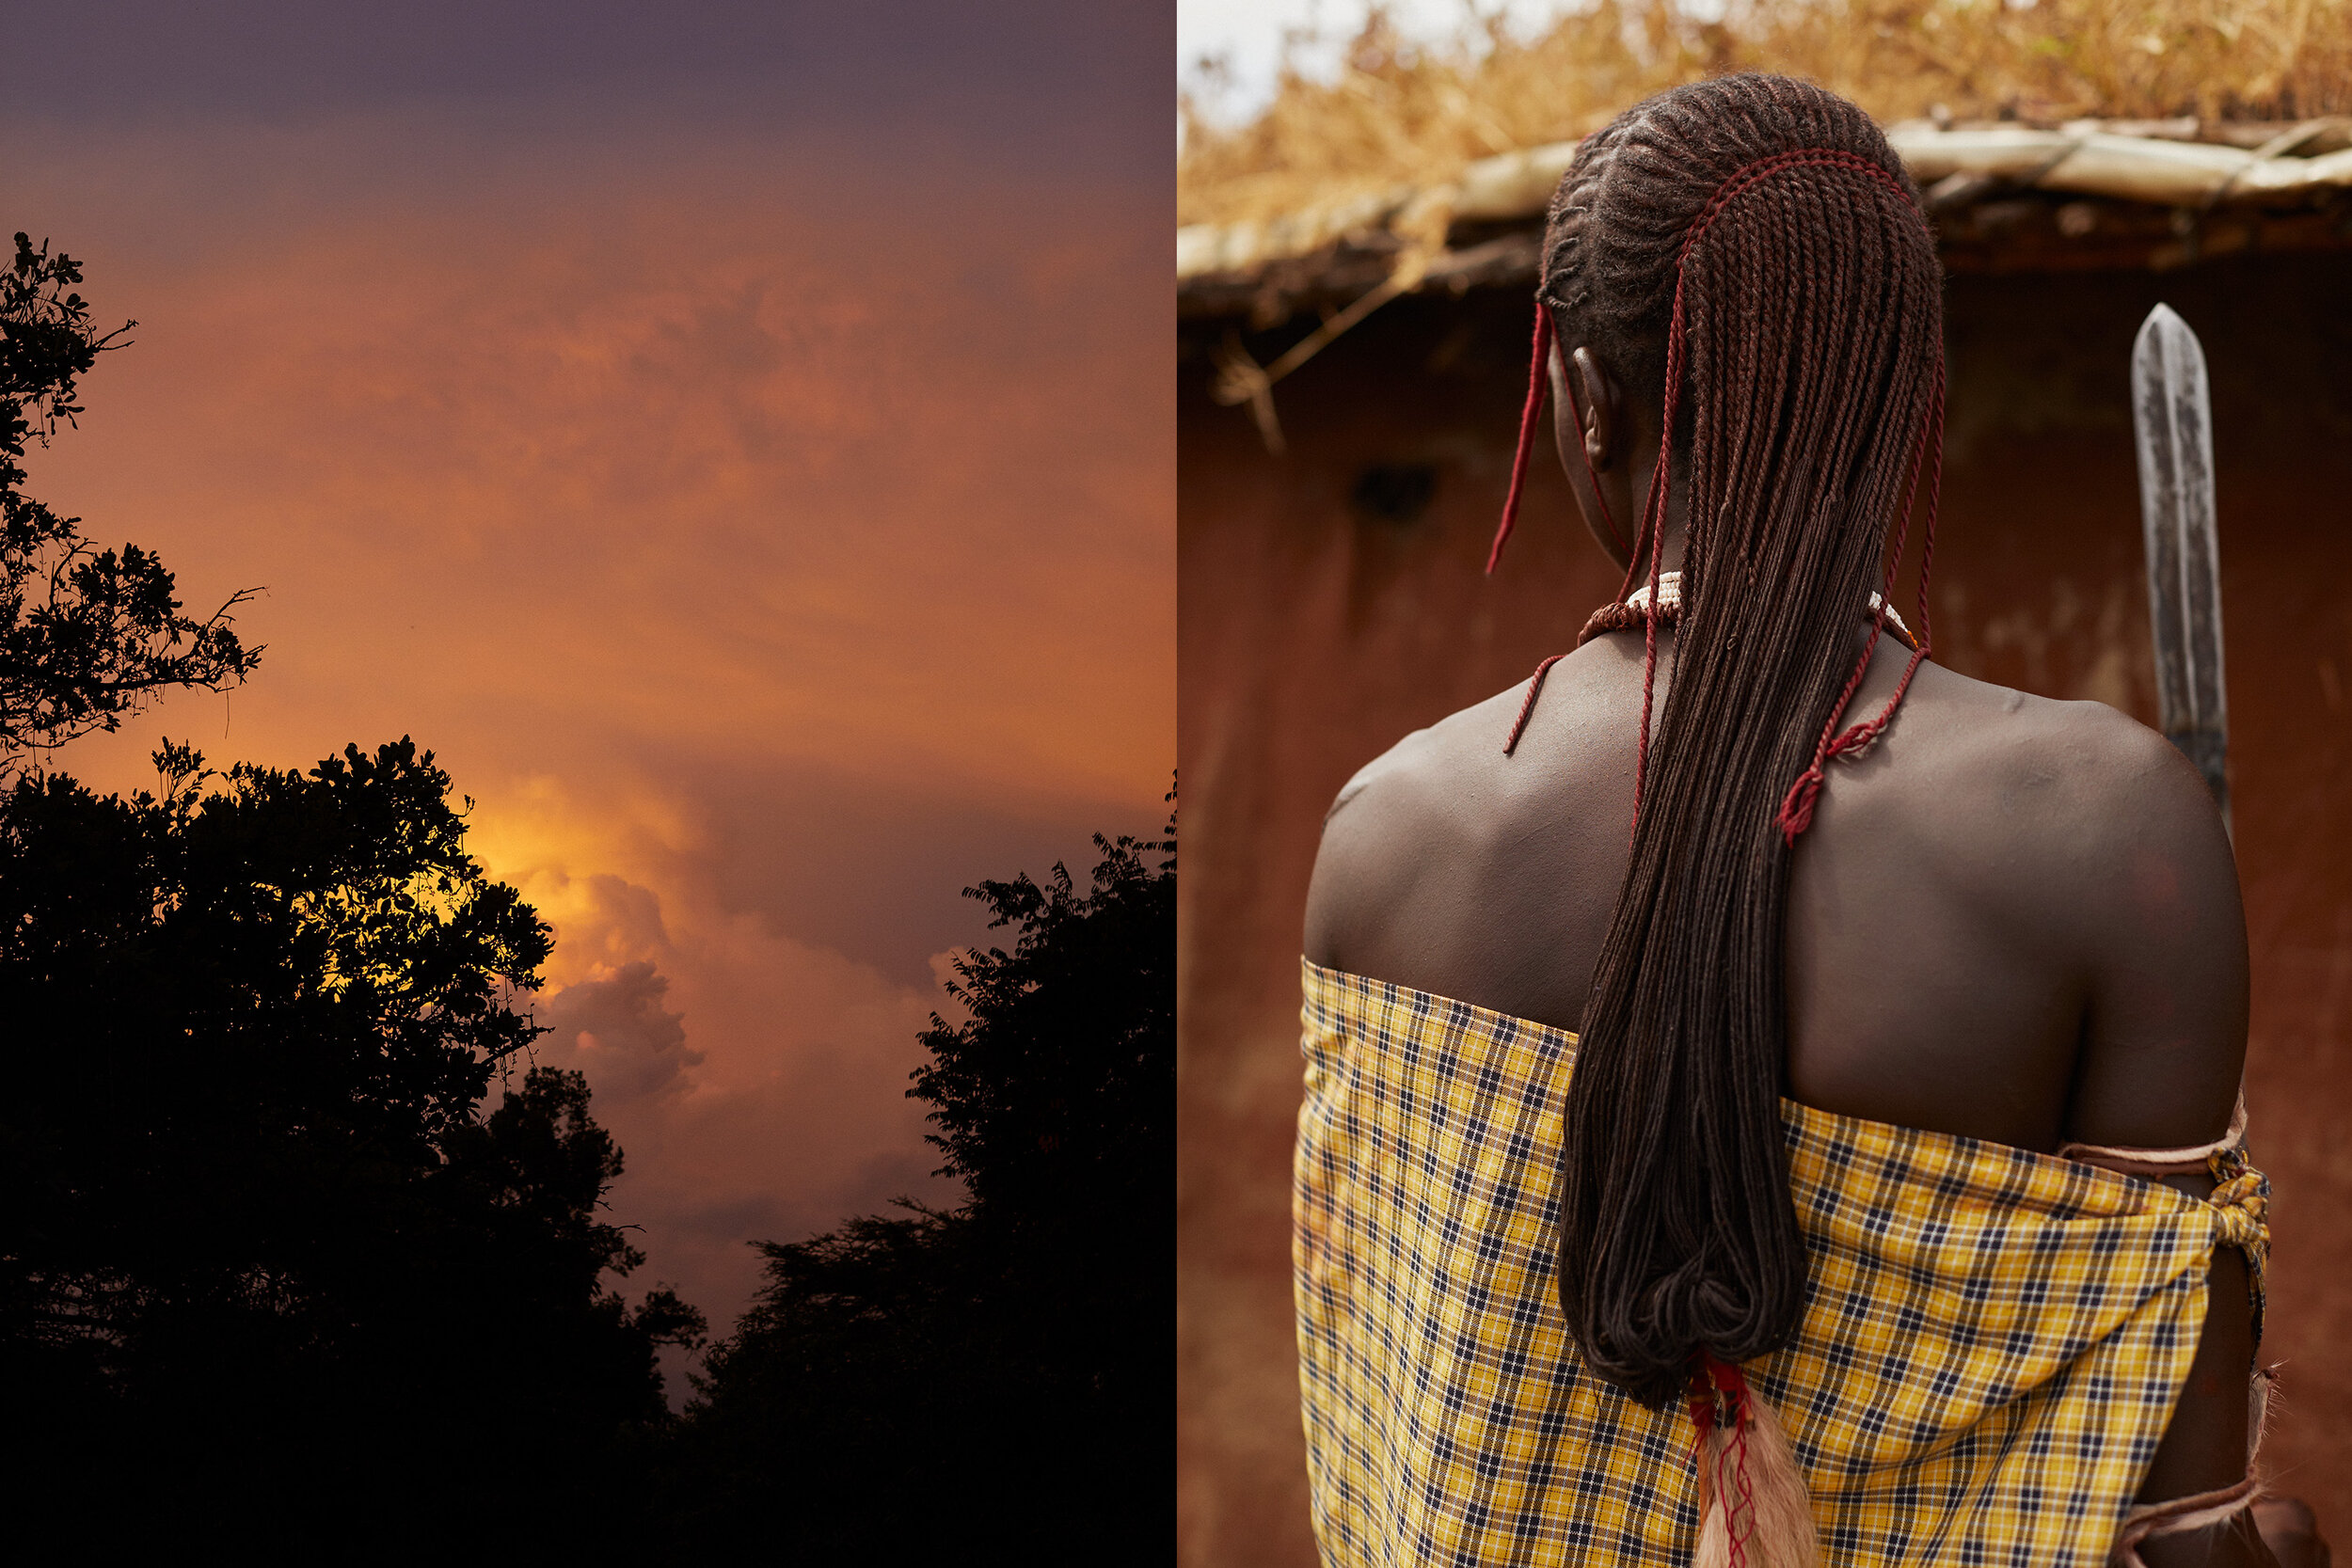
My friend Phoebe called me and said would I like to come and take pictures in Kenya. She was co-guiding a group
that would be exploring biodiversity in a stunning part of East Africa. We would be based on a nature conservancy in the greater Serengeti surrounded by the cultural heritage of the Masai people.
As I had never explored Kenya I jumped on a plane to Nairobi.
While I was there, I took pictures which told the story of the group who were traveling which they could use for their personal use.
I did however manage to capture a personal series of images which I thought would pair together well. We often were with local Masai people and in the village, we would run into nomadic tribes who were passing through.
Once I edited my series I mixed local people, landscape animals and some off the western travelers. I saw similarities with us humans and the wild animals. The costume of the tribal people was particularly vibrant against the greens of the Mara.
Since returning I read the Peter Beard bio “Wild” which laid out his wild life and his love for Kenya. I definitely would like to return there, hopefully with my family sometime as the land and the animals are truly unforgettable.

To see more of this project, click here
APE contributor Suzanne Sease currently works as a consultant for photographers and illustrators around the world. She has been involved in the photography and illustration advertising and in-house corporate industry for decades. After establishing the art-buying department at The Martin Agency, then working for Kaplan-Thaler, Capital One, Best Buy and numerous smaller agencies and companies, she decided to be a consultant in 1999. Follow her on Instagram
[ad_2]
Source link
[ad_1]
By Craig Oppenheimer, Wonderful Machine
Each month, we explain a recent cost estimate, contract, or purchase order in the form of a Pricing & Negotiating article. By redacting the names of the photographer and the client, we can share useful information that would otherwise be confidential. You can read more about our Pricing & Negotiating services on the Consulting Services page of our website.
Concept: Portraits of business owners, and images of them interacting with products at a manufacturing facility
Licensing: Unlimited use of up to 30 images for five years from first use
Photographer: Portraiture specialist
Client: Beverage brand
I recently helped a portrait photographer create an estimate and negotiate a project for a beverage brand. The client was launching a new product within a larger portfolio of beverage companies and wanted to capture portraits of business owners interacting with their products at a manufacturing facility. The images would help tell the story of the product’s origins and the people behind it.
The shoot took place over a single day and focused on five main setups with variations on the same themes. The photographer and crew worked to capture 30 final images. Although the client initially requested unlimited use across all media, based on the creative brief and our discussions, the images were primarily intended for use on their website and social media. While they were not willing to restrict media use, we did convince them to limit the duration of use to five years.
Traditionally, photographers in this market have undervalued usage, and local clients, such as this one, were accustomed to more conservative rates compared to other major markets. I priced each of the five main setups at $1,500, totaling $7,500, and added a creative fee of $2,500, bringing the total fee to $10,000.
We kept the crew lean, including a first assistant for both the scout and shoot days and a Digitech for the shoot day, all at rates appropriate for this market.
After a call with the agency, they asked that we include light prop styling in our bid, with a dictated prop budget of $750. We factored in a prop stylist for both prep and return time, in addition to the shoot day, and detailed the prop budget as instructed, while noting that the final amount would depend on the creative direction. We also added a hair and makeup stylist and noted in the “client provisions” section at the top of the estimate that the client would be handling their own wardrobe.
We allocated $1,000 for the rental of the photographer’s own gear as part of the production.
We allocated $750 to cover mileage, parking, meals, and any other unforeseen expenses on the shoot day.
We allocated a few hundred dollars for the photographer’s time to create a web gallery for the client and set a rate of $100 per image for retouching, allowing up to one hour per image for each of the 30 images they would select.
The estimate was received well, but they asked if we’d be willing to reconsider the time limitation and grant perpetual usage. I suggested that we at least double the photographer’s fee, but we ultimately included an extra $5,000, bringing the total creative/licensing fee to $15,000. While I would have preferred a higher fee, I think the shelf life of these images would likely have been around three years.
The photographer was awarded the project.
Follow our Consultants @wonderful_at_work.
[ad_2]
Source link