Trees – we find them almost everywhere around us, even in the most urban spaces where they are grown to add some life to the lifeless concrete jungles. While trees may be a common subject found easily, and one that is used to frame other subjects or as a supporting element in photography, it is quite difficult to effectively photograph them on their own, especially their grandeur or their importance in a particular space.
Photo by Mel
When photographing trees, importance needs to be given to the gear, especially lenses used, location, angles and perspective, composition, weather, atmospheric conditions and the right light. Although trees are difficult to photograph, the process of slowing down, waiting for the right light and capturing a compelling shot can be very rewarding. Try using interesting compositions like framing, juxtaposition, reflections, centered composition, patterns, etc.
Here are 21 photographs of trees that make use of interesting compositions.
If you are already familiar with basic compositional guidelines like the rule of thirds or the leading lines and wish to take your compositional skills to the next level, we recommend you to check out this eBook “Advanced Composition” by Photzy, that will help you turn your photographs into works of art.
Photo by Henrik Hansen
Photo by iuliu illes
Photo by Adrián Valverde
Photo by Jessica Furtney
Photo by Oli Gibbs
Photo by Ian Wagg
Photo by Jeremy Bishop
If you wish to move beyond the rule of thirds and other simple compositional guidelines to advanced techniques that use curves, repetitions, light and shadows, focal points, etc., then we recommend you to check out this eBook “Advanced Composition” by Photzy which is a 239 pages practical guide, that is packed with training, assignments, lessons and plenty of quizzes to test your knowledge.
Photo by Chad Stembridge
Photo by Intricate Explorer
Photo by Redd Francisco
Photo by Maksim Shutov
Photo by Meg MacDonald
Photo by Mahrshi Bisani
Photo by Daniel Peters
Using basic compositional guidelines all the time can make your photographs look similar and sometimes boring. There are plenty of ways to compose an image other than the basic ways and this eBook “Advanced Composition” by Photzy will show you 47+ ways you can move beyond the basic rule of thirds.
We have heard of many incidents in national parks where wildlife walk away or play with expensive camera gear. Most of the incidents happen during wildlife safaris where a photographer may have accidentally dropped their gear or the gear fell off their bags, etc.
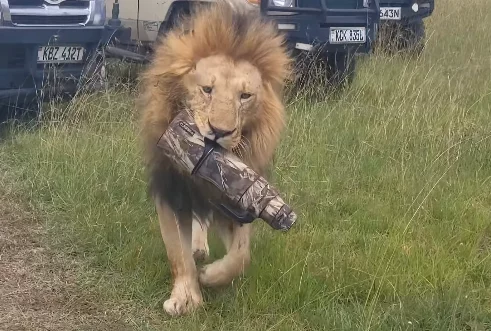
Image via Dansen Raddy
One of the most recent incidents is one where a lion walked away with a photographer’s very expensive lens and looks like this incident happened in Kenya’s Maasai Mara National Park. The incident was captured by another photographer, who posted the footage on his Instagram.
The footage was shared on many social media channels, reposted by other accounts and has gone viral. While a lot of viewers found the footage funny and entertaining, it has raised concerns and a bit of anger among other wildlife photographers.
As photographers, we always need to be ethical and mindful of the wildlife and their surroundings. Incidents like these only show that photographers are more concerned about getting the shot than being more responsible.
A lot of comments on the video shared here talk about how these incidents should not be entertained. Looks like there are also instances where photographers intentionally drop their gear to gain popularity on social media which is really sad, and more so when one claims to be a serious photographer.
While some viewers commented that the scene seem like a planned one, there are comments from witnesses who mention that it was an accident. Other concerns raised were how close the photographers and their vehicles were to the animals, which is not acceptable at all in photography and raises questions about giving animals their space and not disturbing them or their environment when capturing their photographs.
What are your thoughts on incidents like these and the rise in the number of such incidents? Let us know in the comments section below.
We have more news for you to read if you are interested at this link here.
If you’ve really been paying attention to the Instagram profile grid over the last couple of days, you will have spotted that your vertical images that you meticulously cropped to 4:5 aspect ratio are now having the sides trimmed just a little bit. That’s because Instagram has switched to a 3:4 grid ratio on profile pages as it introduces support for images with a 3:4 aspect ratio—i.e., the aspect ratio of the vast majority of smartphone sensors.
The change comes only four months after Instagram did away with their square profile grid, causing many carefully crafted profile pages to no longer look quite so cool. Presumably, the latest move will result in a new wave of similarly incensed users—who spent the last four months perfectly lining up their 4:5 aspect images—but the support for the 3:4 aspect ratio is an eminently sensible decision given that an overwhelming majority of users are trying to make full use of the available screen real estate by posting vertical images shot on their phone.
Of course, users of Micro Four Thirds cameras—underwater shooters included—can also pop the champagne, as their days of cropping vertical images are now officially behind them. Meanwhile, everyone else can at least celebrate the little bit extra in our photos we get to show the world. (Instead of a maximum size of 1080 by 1350 pixels, vertical images can now be 1080 by 1440 pixels.) Before you get too excited, though, keep in mind that there’s a very good chance Instagram will not be switching to a 2:3 grid ratio anytime soon, given the ubiquity of the 3:4 smartphone sensor. Still, one can always dream!
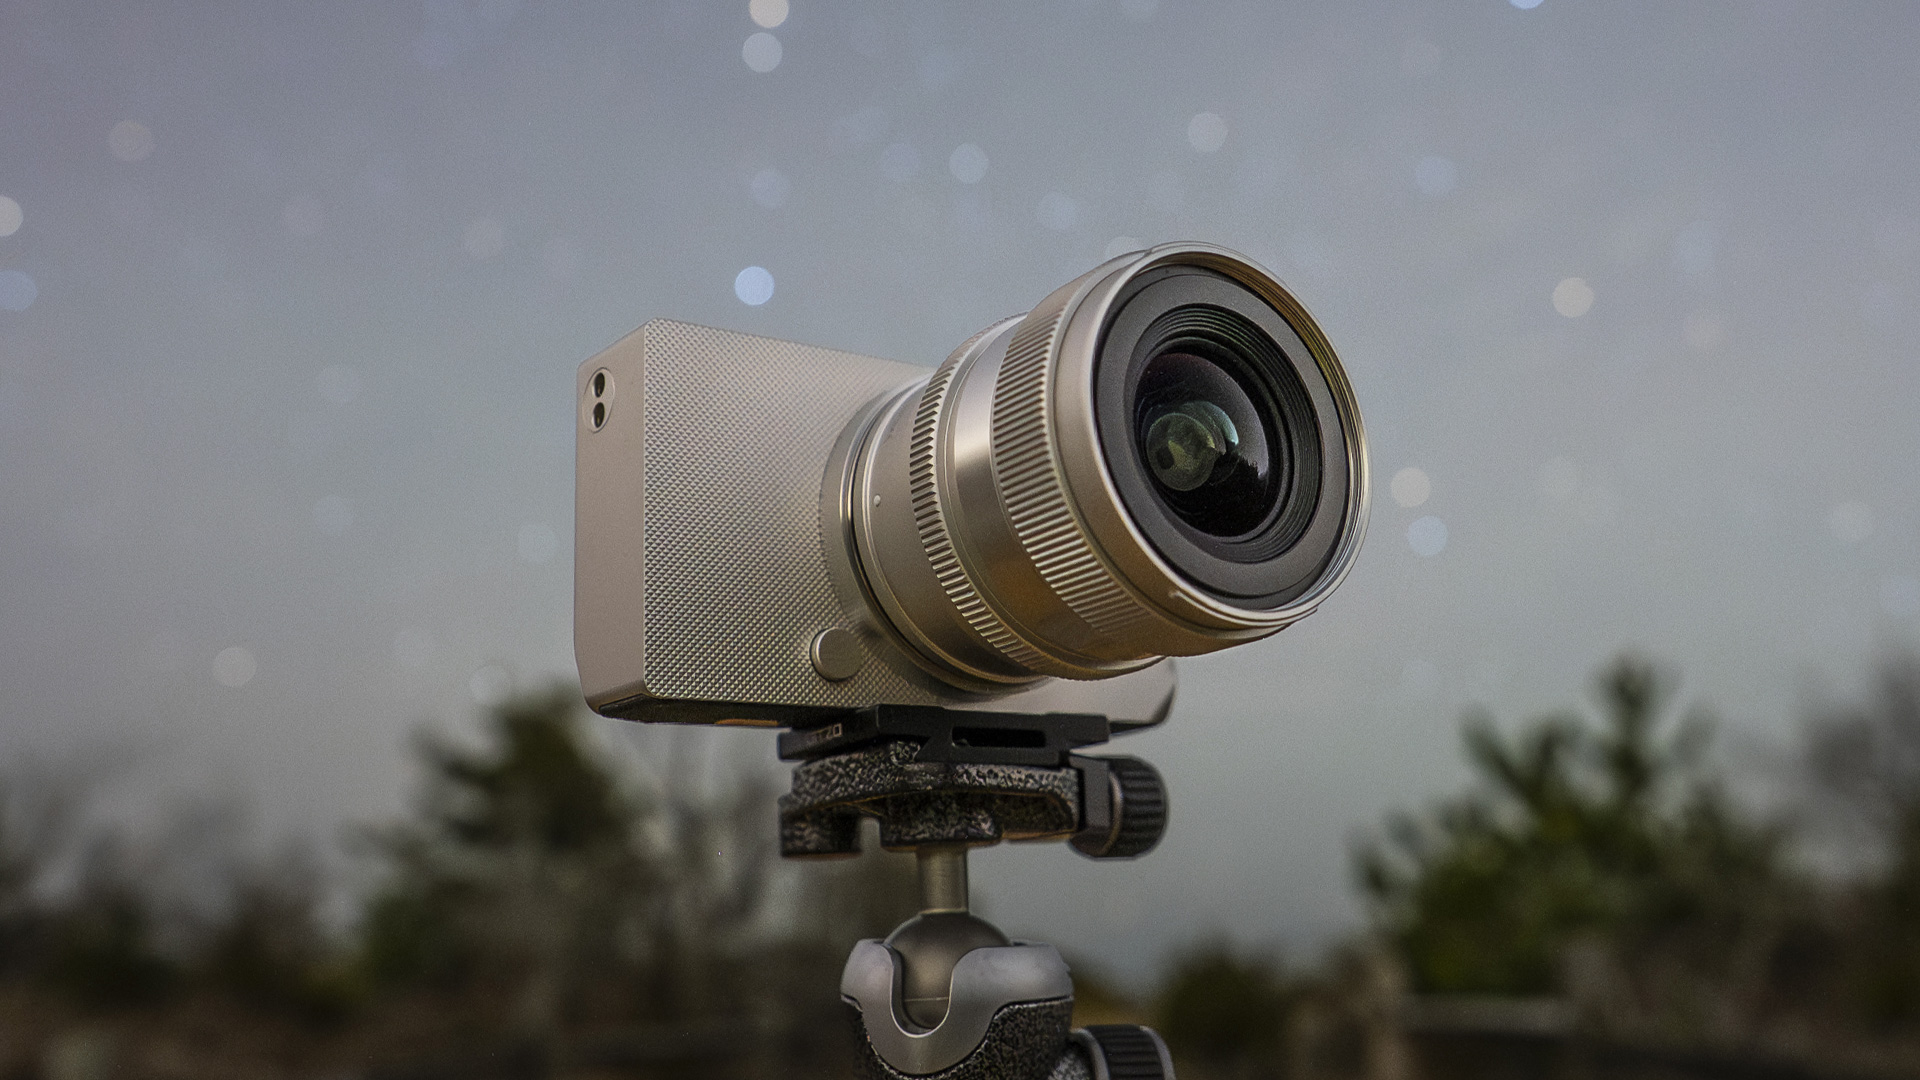
The Sigma BF looks stunning at night. But how are the images?
What does it take to get out of your comfort zone? Over the last 10 years or so, I’ve very rarely shot anything outside of astrophotography. I’ve always had an appreciation for other styles, but very little desire to explore shooting them myself. While I always try to improve my work, my comfort level with astro allows me to fully enjoy being out under the stars and focus on creating.
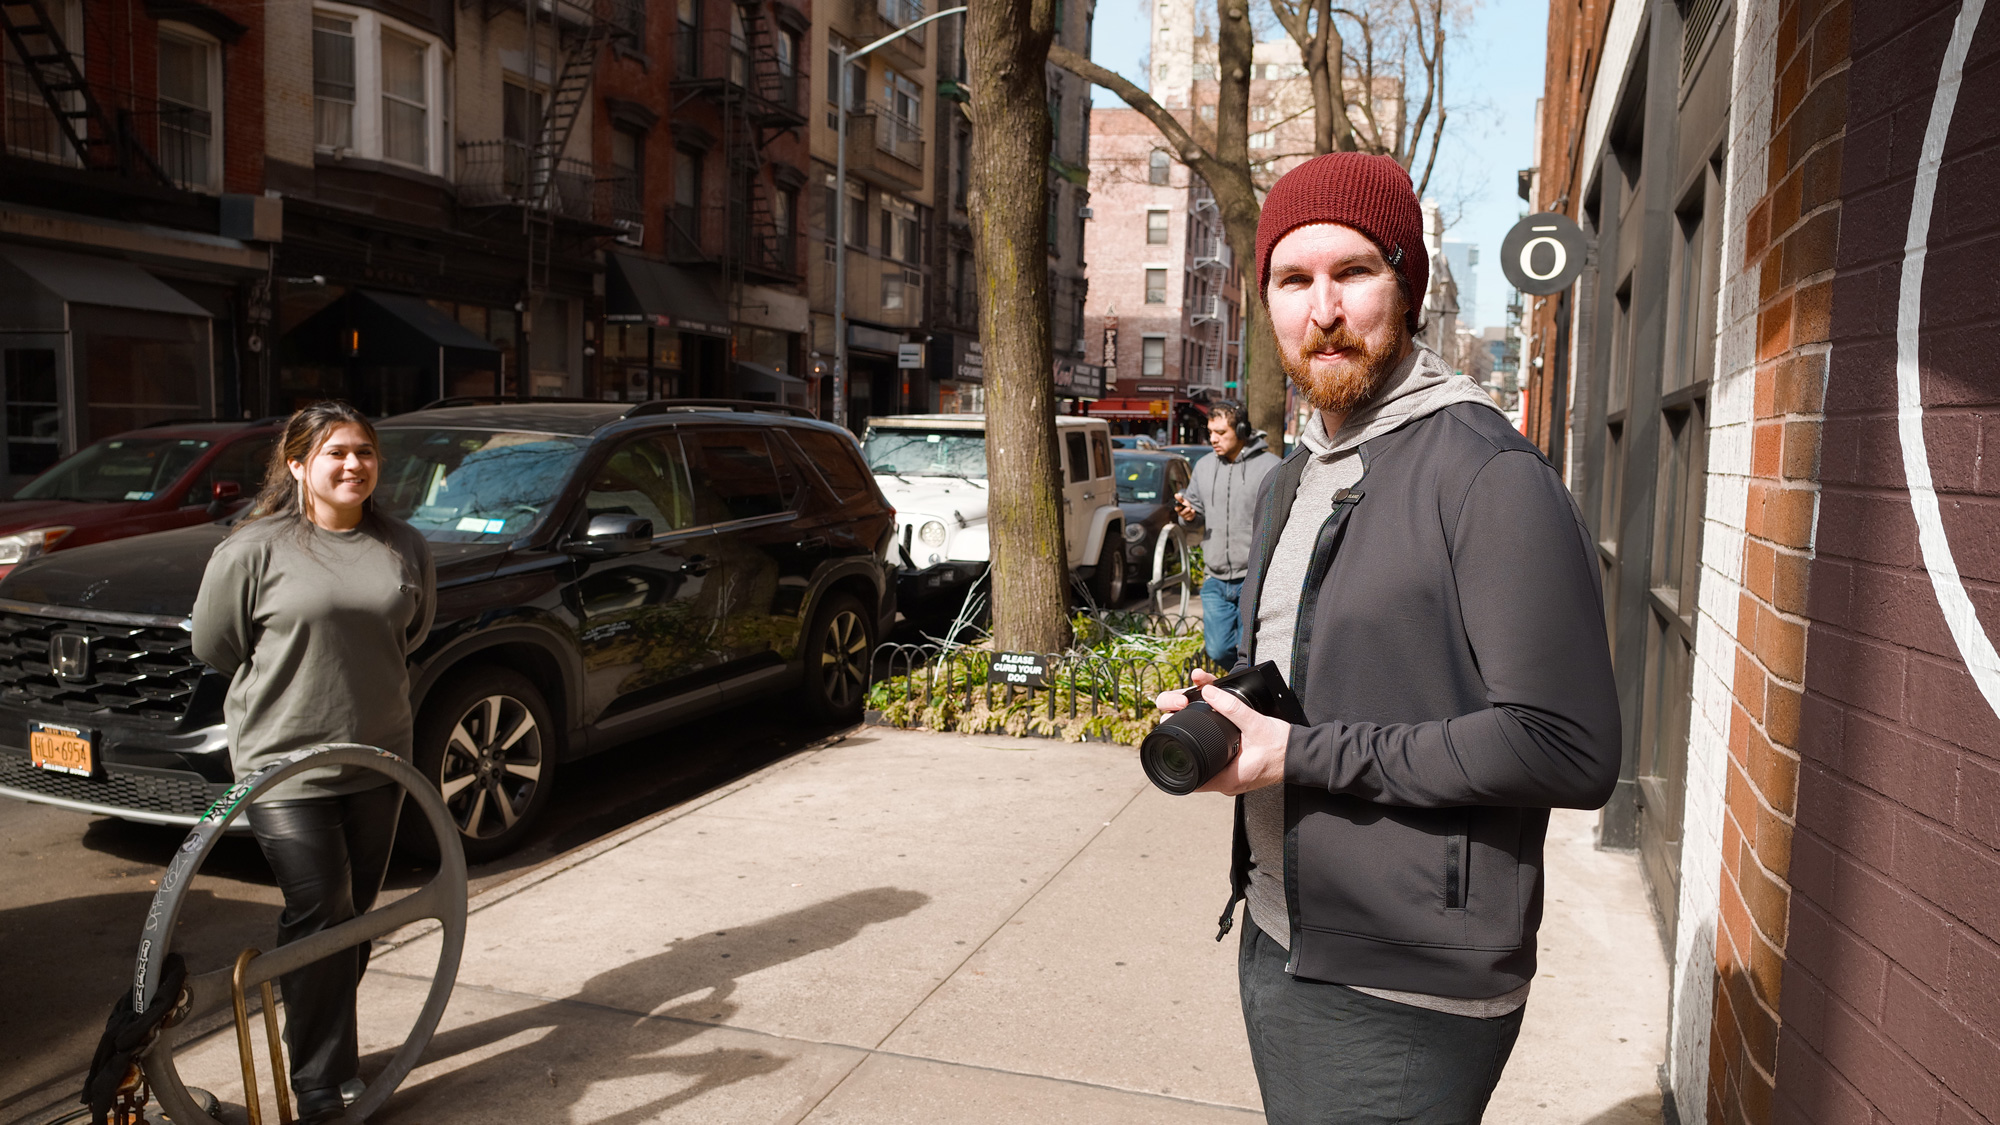
Hearing about some of the details around the new Sigma BF definitely had me intrigued. While it’s hard to deny the design of the camera stands out, it was really the simplified approach that grabbed me. I visited the pop-up in NYC during March 2025 to get my first look at the camera, and then returned two weeks later so I could have the chance to shoot with one.
With the Sigma America crew and my BF camera, ready to hit the streets.
Getting used to the minimal button system on the back of the camera didn’t take much time at all. Using the dial to make quick adjustments and my personal love for the aperture ring on the 20mm F2 DG | Contemporary lens made taking some of my first street photography images feel a lot more fun than like more of a challenge.
The Sigma BF as a walkaround camera
Street photography in particular is a genre I’ve had a special appreciation for when viewing someone’s work. It looks easy, but like so many things, only when it’s done well. I was a bit unsure about what to photograph, or if what I was photographing was any good, but I was having fun. And, at least personally, I was really enjoying the images I was capturing, too.
SIGMA BF CAMERA 20mm F2 DG | CONTEMPORARY F8, 1/1000s, ISO 400
SIGMA BF CAMERA 20mm F2 DG | CONTEMPORARY F8, 1/250s, ISO 400SIGMA BF CAMERA 20mm F2 DG | CONTEMPORARY F8, 1/500s, ISO 400
I didn’t wait long before heading back out with the BF. This time, I made my way to Princeton, NJ, again with the all-metal 20mm F2 DG | Contemporary, hoping to take some black and white architectural images. The built-in monochrome color mode helped me do just that, although other color modes were just a flick of the wheel away. Just walking around with a wrist strap and this new minimalist camera, I found myself looking at everything to try and find the perfect frame. These new (for me) genres of photography felt fresh and exciting.
SIGMA BF CAMERA 20mm F2 DG | CONTEMPORARY F9, 1/80s, ISO 100SIGMA BF CAMERA 20mm F2 DG | CONTEMPORARY F9, 1/400s, ISO 100
I worked my way all the way around buildings, up close and from a distance, watching the back of the camera to find that perfect angle or just waiting until something felt right. That’s such a special feeling when that happens while you’re out photographing. It means you’re completely present in the moment and paying full attention to finding that perfect composition.
SIGMA BF CAMERA 20mm F2 DG | CONTEMPORARY F8, 1/125s, ISO 100SIGMA BF CAMERA 20mm F2 DG | CONTEMPORARY F9, 1/30s, ISO 100
I found myself occasionally using the screen to use the tap to focus feature and other times just getting into that zone of snapping away as everything moved through the frame. Admittedly, autofocus is not a feature I’m often concerned with for astrophotography, but it felt extremely fast and accurate on both of my outings.
Exploring a genre outside of my comfort zone and not having to worry about things like autofocus performance or getting lost in menus, really allowed me to find that zone of being present and immerse myself in shooting.
Trying the Sigma BF for astrophotography
After a few days out in busy streets, I really felt like it was time to head out under the stars. With clear skies in the forecast for the entire night, I arrived a few hours before the Milky Way would be rising. I took a handful of test images as I wandered to find the compositions I would be shooting once the core of the Milky Way was sufficiently visible above the horizon.
One of the first things I noticed was how easy dialing in that very precise infinity focus on the stars was with the LCD screen. Even more importantly, one of the things I didn’t notice were the buttons on the back of the camera. It wasn’t until well after I was shooting the Milky Way that I had even thought about them. After two outings during the day, I think easily navigating a new camera in complete darkness speaks to how thoughtfully it was designed.
The Sigma BF only has a few physical controls and very simple menus that quickly become second nature.
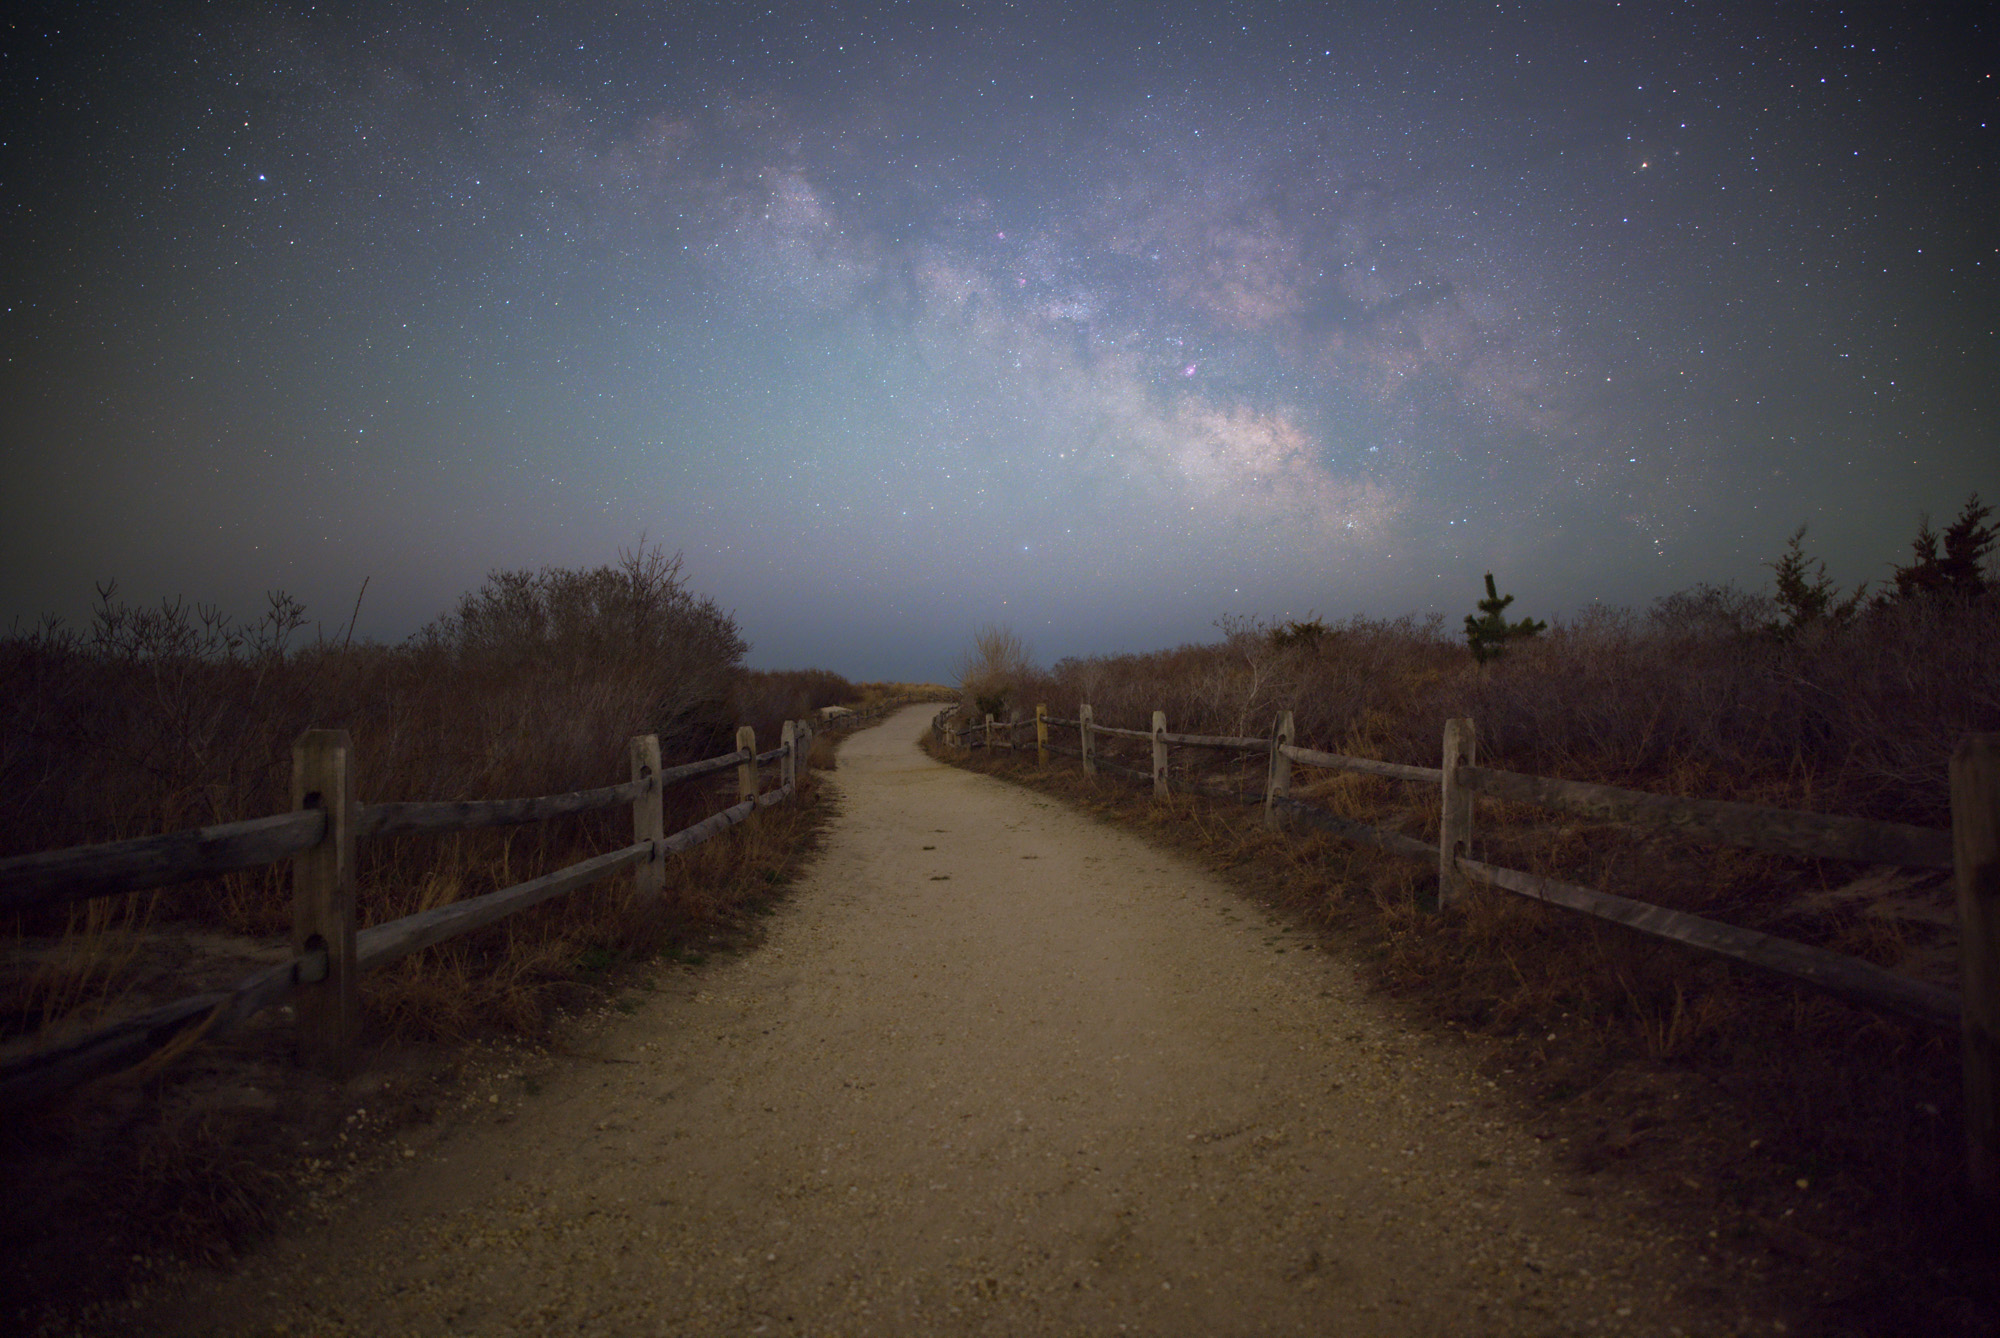
I ended up shooting far longer than I anticipated using a number of different techniques ranging from stacking to separate foreground exposures. While admiring an image of the back of the camera is one thing, the real test for those high ISO captures is viewing on a much larger screen…
NOISE TEST IMAGE – SIGMA BF 20mm, F2, 13s, ISO 3200 (NO NOISE REDUCTION)
Working my way through the images and seeing how far I could push the files was probably the biggest surprise of my experience with the BF. It wasn’t that I didn’t have high expectations, it was a matter of those expectations being surpassed. Pushing astrophotography images while editing, bringing back detail in the shadows and trying to pull out detail in the sky, can often result in a very noisy final image. Shooting at these higher ISOs can also mean that your image lacks a bit of sharpness or just doesn’t have much depth to the color you captured, especially in the foreground. Not only was I able to push the files to bring out an incredible amount of detail through the image, they all felt very sharp and full of rich color.
SIGMA BF CAMERA 20mm F2 DG | CONTEMPORARY F2, 156s, ISO 1600SIGMA BF CAMERA 20mm F2 DG | CONTEMPORARY F2, 156s, ISO 1600
The Sigma BF for wildlife?
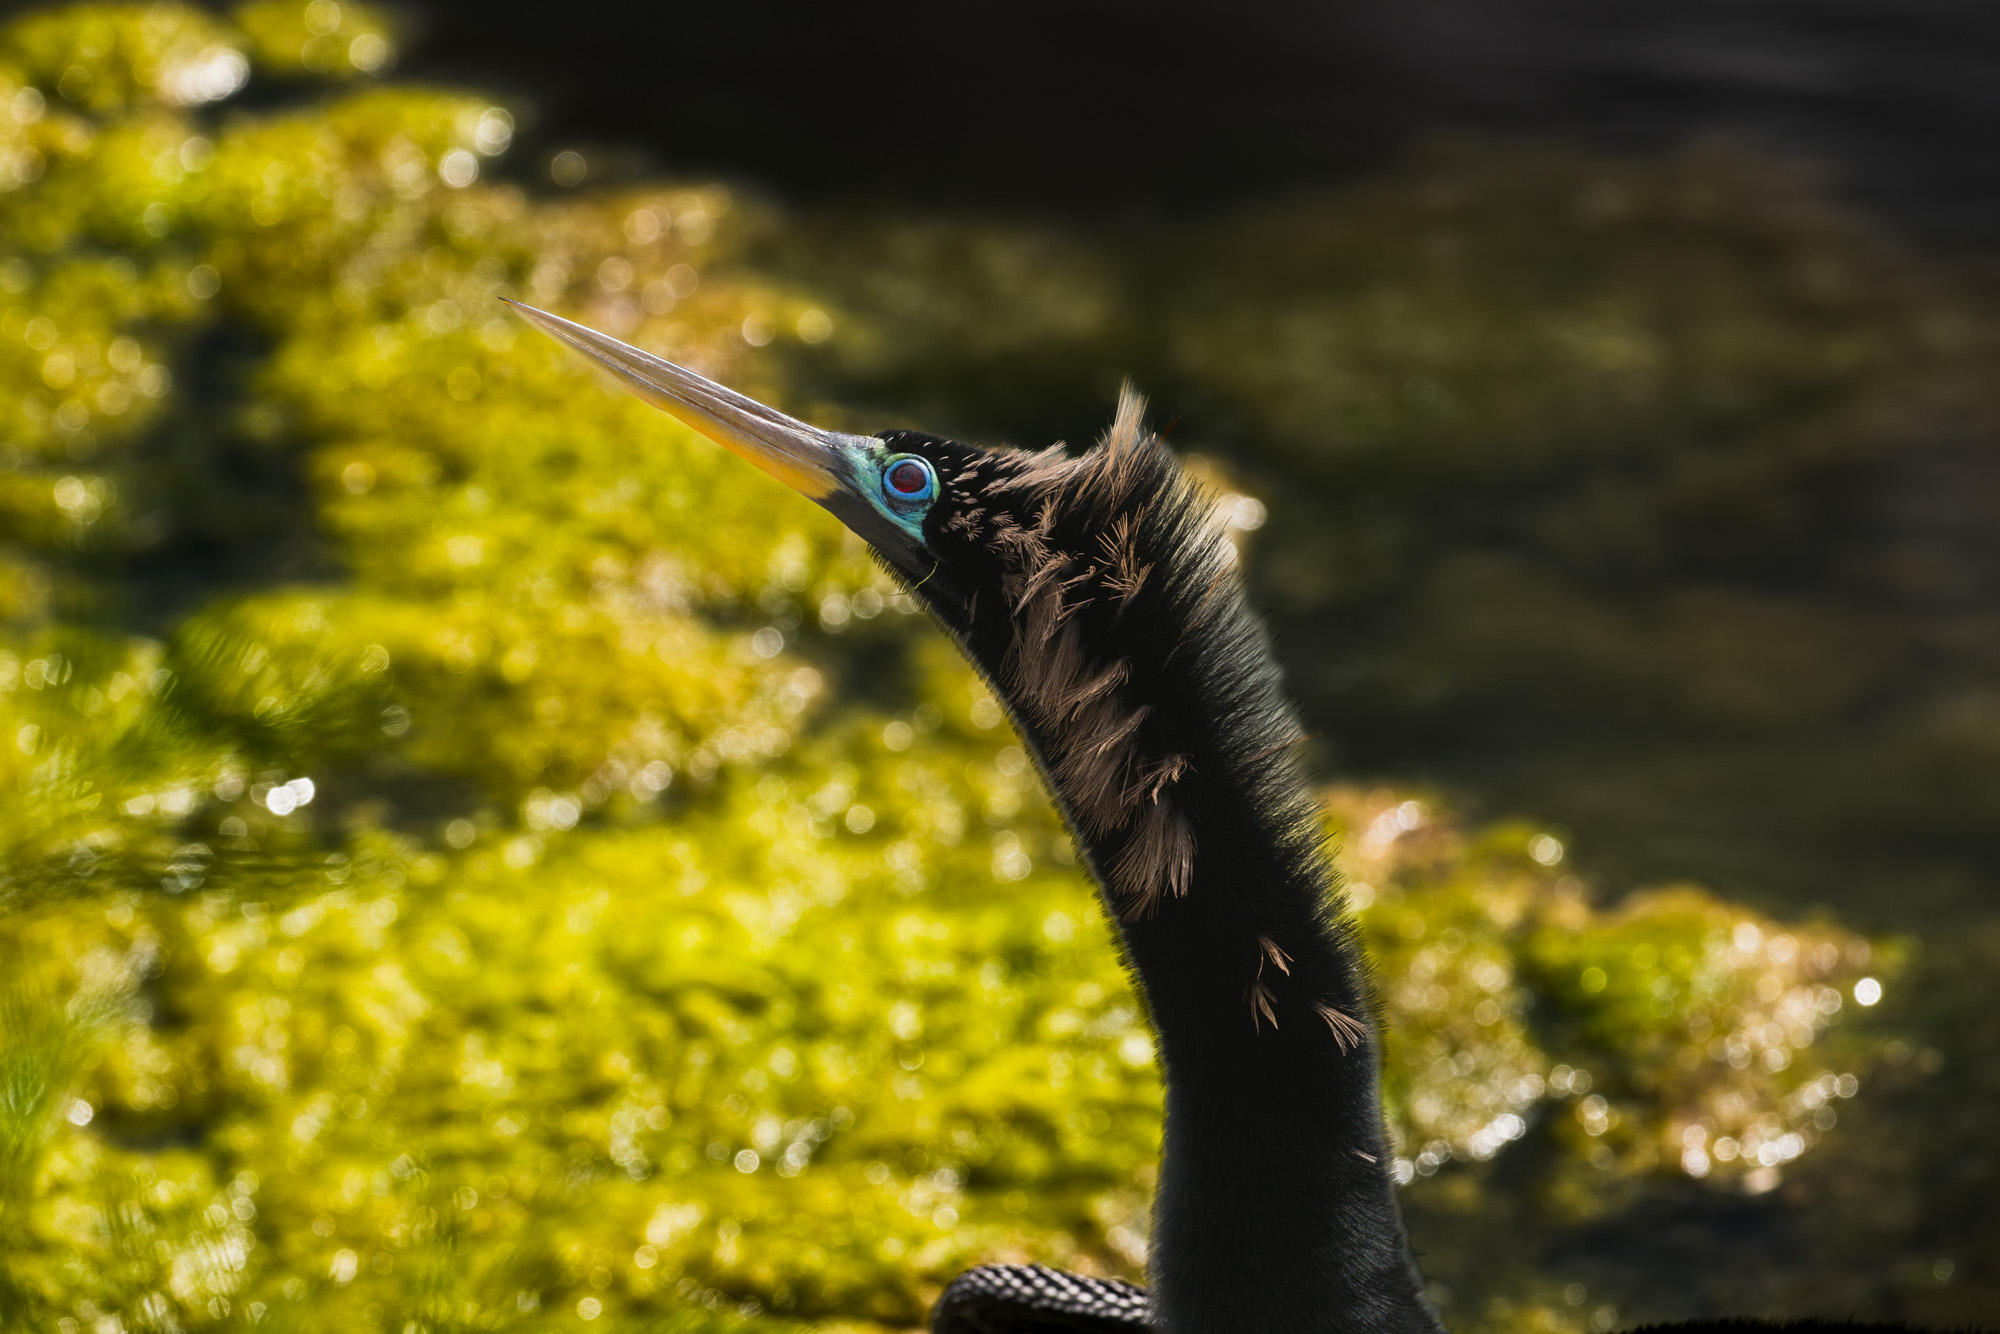
After my night under the stars, I had one more test for the Sigma BF. Wildlife. This was also a test for myself, as aside from a few fox photos about a decade ago, this was not something I had ever given a try. I found myself near Myrtle Beach, South Carolina with the BF and the Sigma 500mm F5.6 DG DN OS | Sports. I wandered Huntington State Beach Park with the hopes of photographing alligators. As I kept my eyes on the water, I saw a variety of different birds that I figured, “why not?” and did my best to take some photos along the way. Again, while this was a new genre of photography for me, I think the simplicity of the BF allowed me to just enjoy being in nature. The autofocus was quick to lock in, and while I didn’t attempt any in-flight shots, I was pretty happy with the results!
SIGMA BF CAMERA 500mm F5.6 DG DN OS | Sports F8, 1/320s, ISO 800SIGMA BF CAMERA 500mm F5.6 DG DN OS | Sports F13, 1/400s, ISO 400SIGMA BF CAMERA 500mm F5.6 DG DN OS | Sports F13, 1/250s, ISO 400
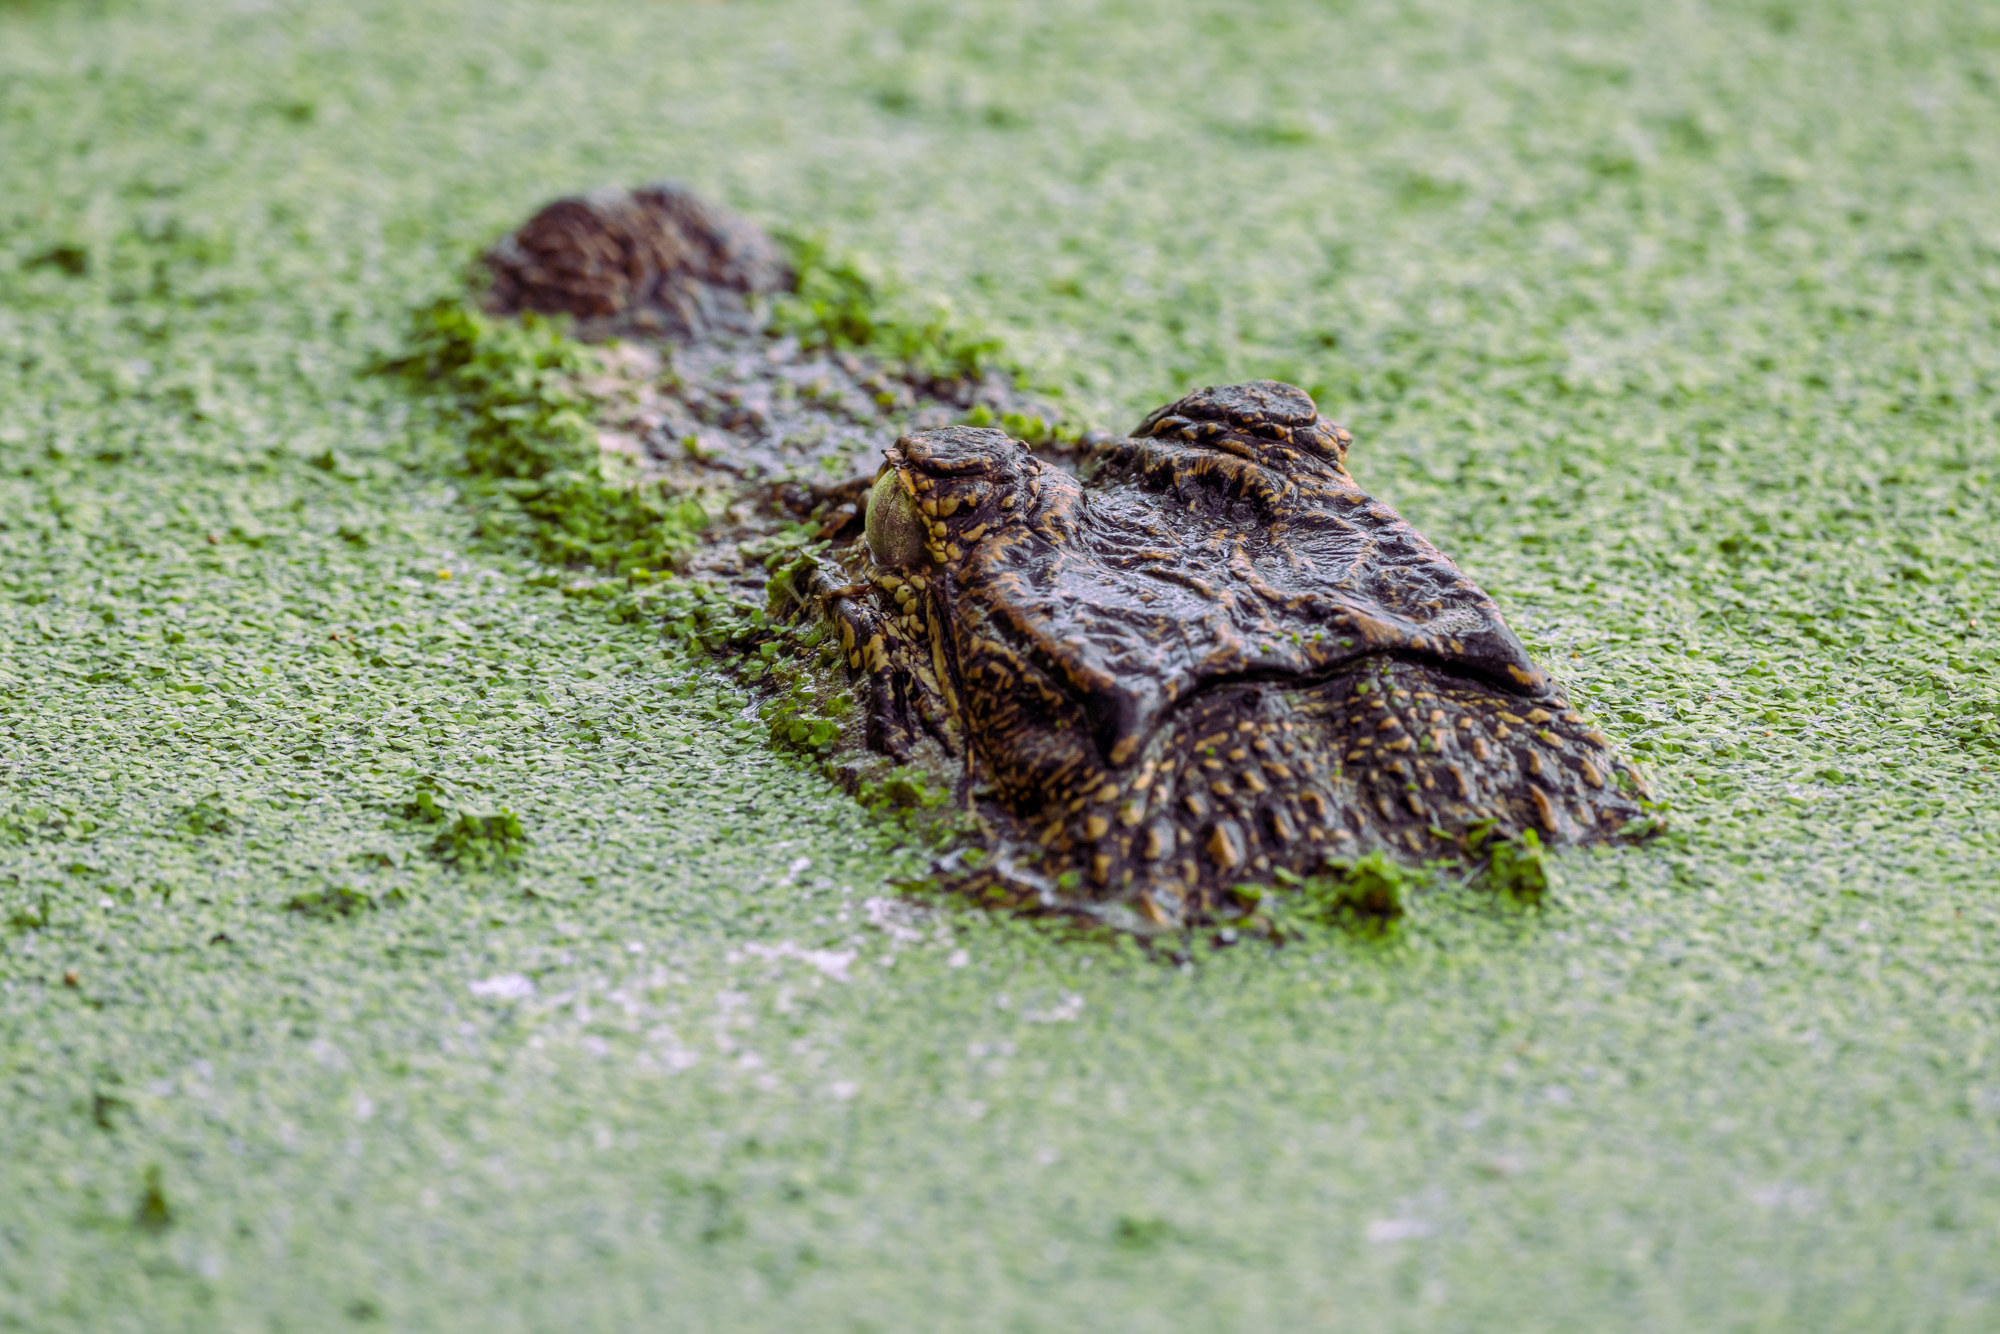
For better or worse, the only gators I saw were just peeking out of the swampy waters. Which at first, felt like a bit of a bummer, but I didn’t end the day feeling like I had checked something off a list. If anything, it felt like I was starting a new list.
SIGMA BF CAMERA 500mm F5.6 DG DN OS | Sports F8, 1/320s, ISO 800
SIGMA BF CAMERA 500mm F5.6 DG DN OS | Sports F13, 1/125s, ISO 800SIGMA BF CAMERA 500mm F5.6 DG DN OS | Sports F8, 1/500s, ISO 800
Maybe after a decade of shooting only astrophotography, a few days with the Sigma BF had inspired me to look at things a bit differently again. I’ve been out shooting more styles of photography in the span of a month than I ever have before. I think sometimes, whether it’s intentional or not, a bit of a reset can be a really helpful process to go through. Just taking a second to look at things differently and use that opportunity to step out of our routine.
I’ve always felt, as a photographer, the best gear is whatever helps me focus on creating first. While the world after a photo is taken demands our constant attention with excessive beeps and notifications, it feels refreshing to have those moments where I’ve connected completely to creating art. I think the BF is a camera that does just that, by encouraging you to look at things different and without distractions.
The Underwater Club Event: Innovating in Underwater Photography with Martin Broen
If you’ve been following DPG Masters over the years (and why wouldn’t you be?), you may know that there was one photographer who bagged the “Best of Show” twice in succession—in 2021 and 2022—for incredible black-and-white photos of Mexican cenotes. But there’s probably a few things you don’t know about Martin Broen. For one thing, he doesn’t only take prize-winning pictures of submerged caves: He’s received 50-plus awards for everything from wrecks and wildlife to macro. For another, he doesn’t just take pictures: He’s the designer of hundreds of innovative products and holds more than 130 innovation patents!
In other words, Martin is a fantastic person to have a chat with, and that’s exactly what Nicolas Remy, host of The Underwater Club (TUC), will be doing for his next Masterclass event. During the two-hour webinar, Martin will—of course—be talking about his amazing panorama, cave, wreck, and wildlife imagery, but he’ll also be discussing how problem-solving skills help to creatively tackle unique challenges in underwater photography. In addition, Nicolas will be finding out what Martin learned from his first foray into publishing, after the success of his cenote-focused coffee-table book Light in the Underworld.
As usual, TUC members join for free, while non-members will need to purchase tickets to the event at AU$49 (approx. US$35). Note that this is also the price of monthly membership, so this is the perfect opportunity to join the club and take advantage of all of the membership benefits.
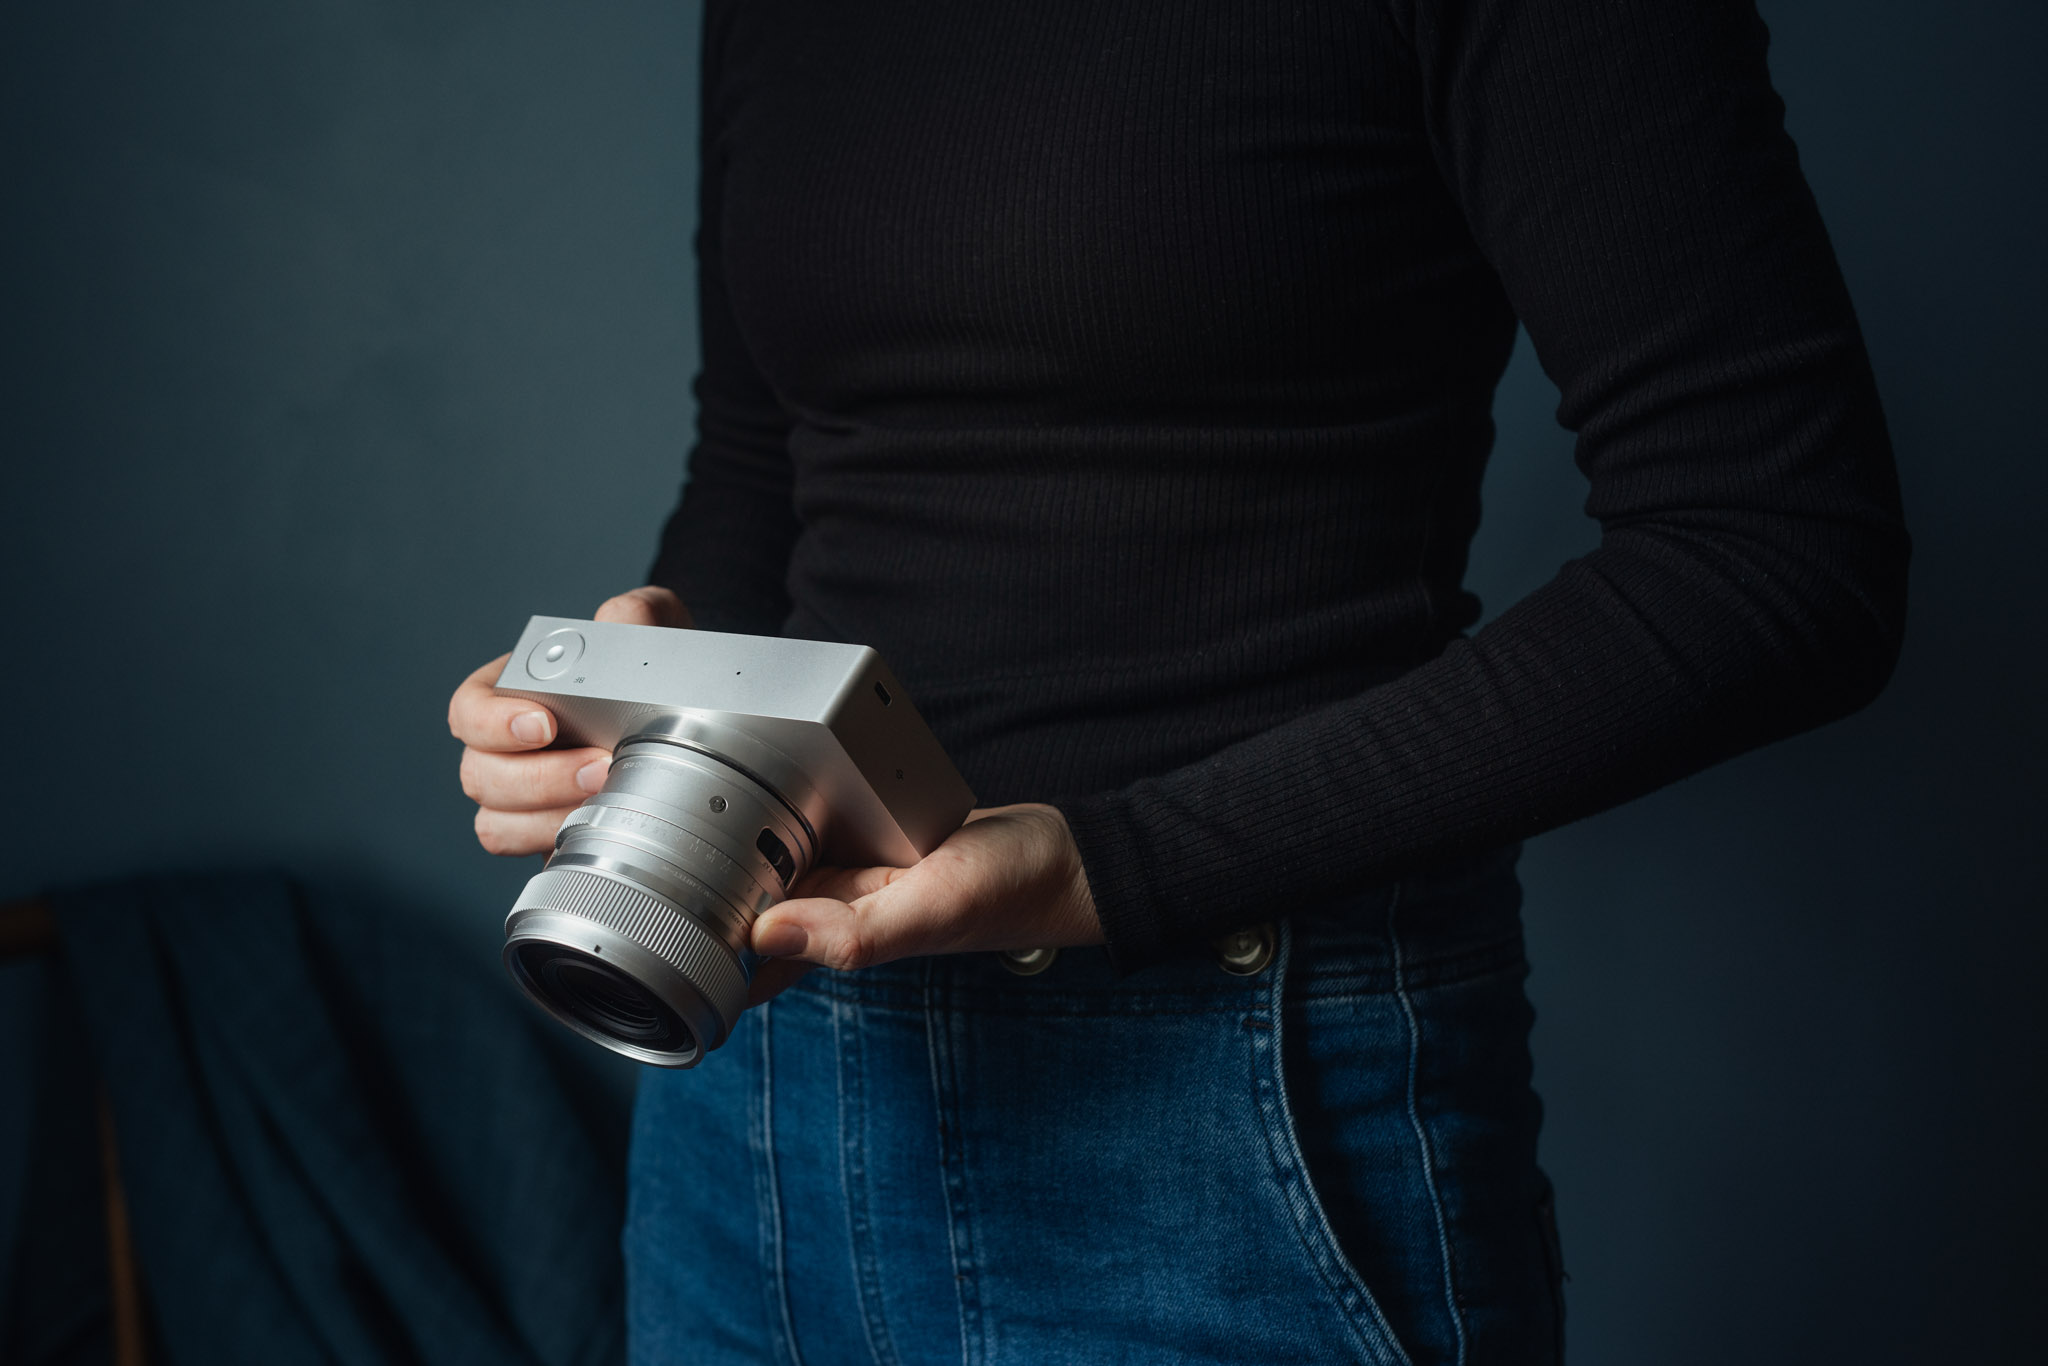
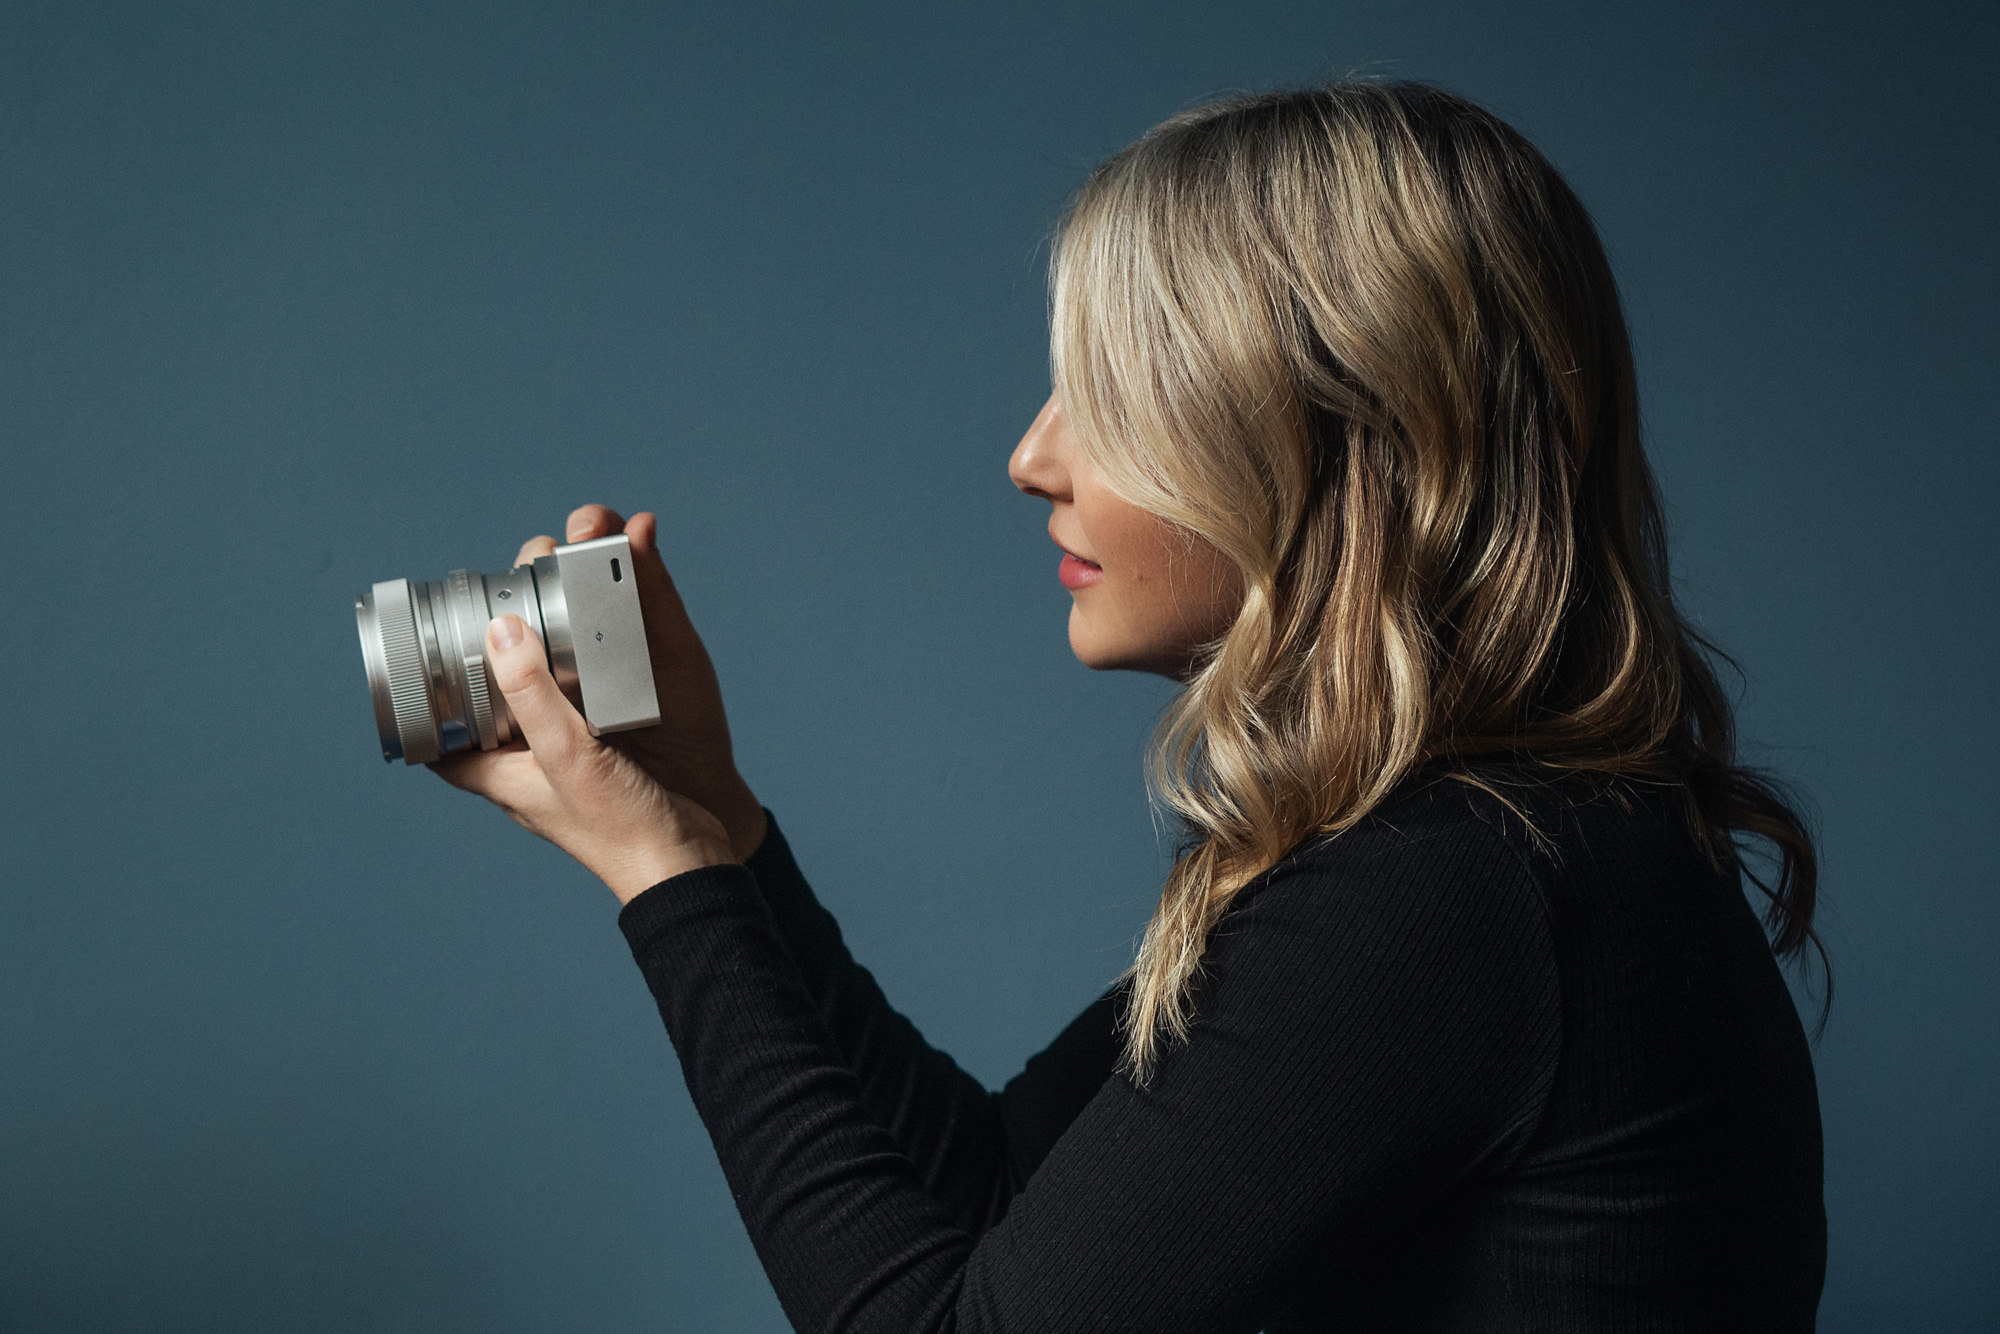
Photographer Meg Loeks with the silver Sigma BF camera and 50mm F2 lens.
What’s not to love about the new BF camera by Sigma? With a strikingly sleek aesthetic, a solid aluminum build, and a minimalist design, it’s as durable as it is intuitive.
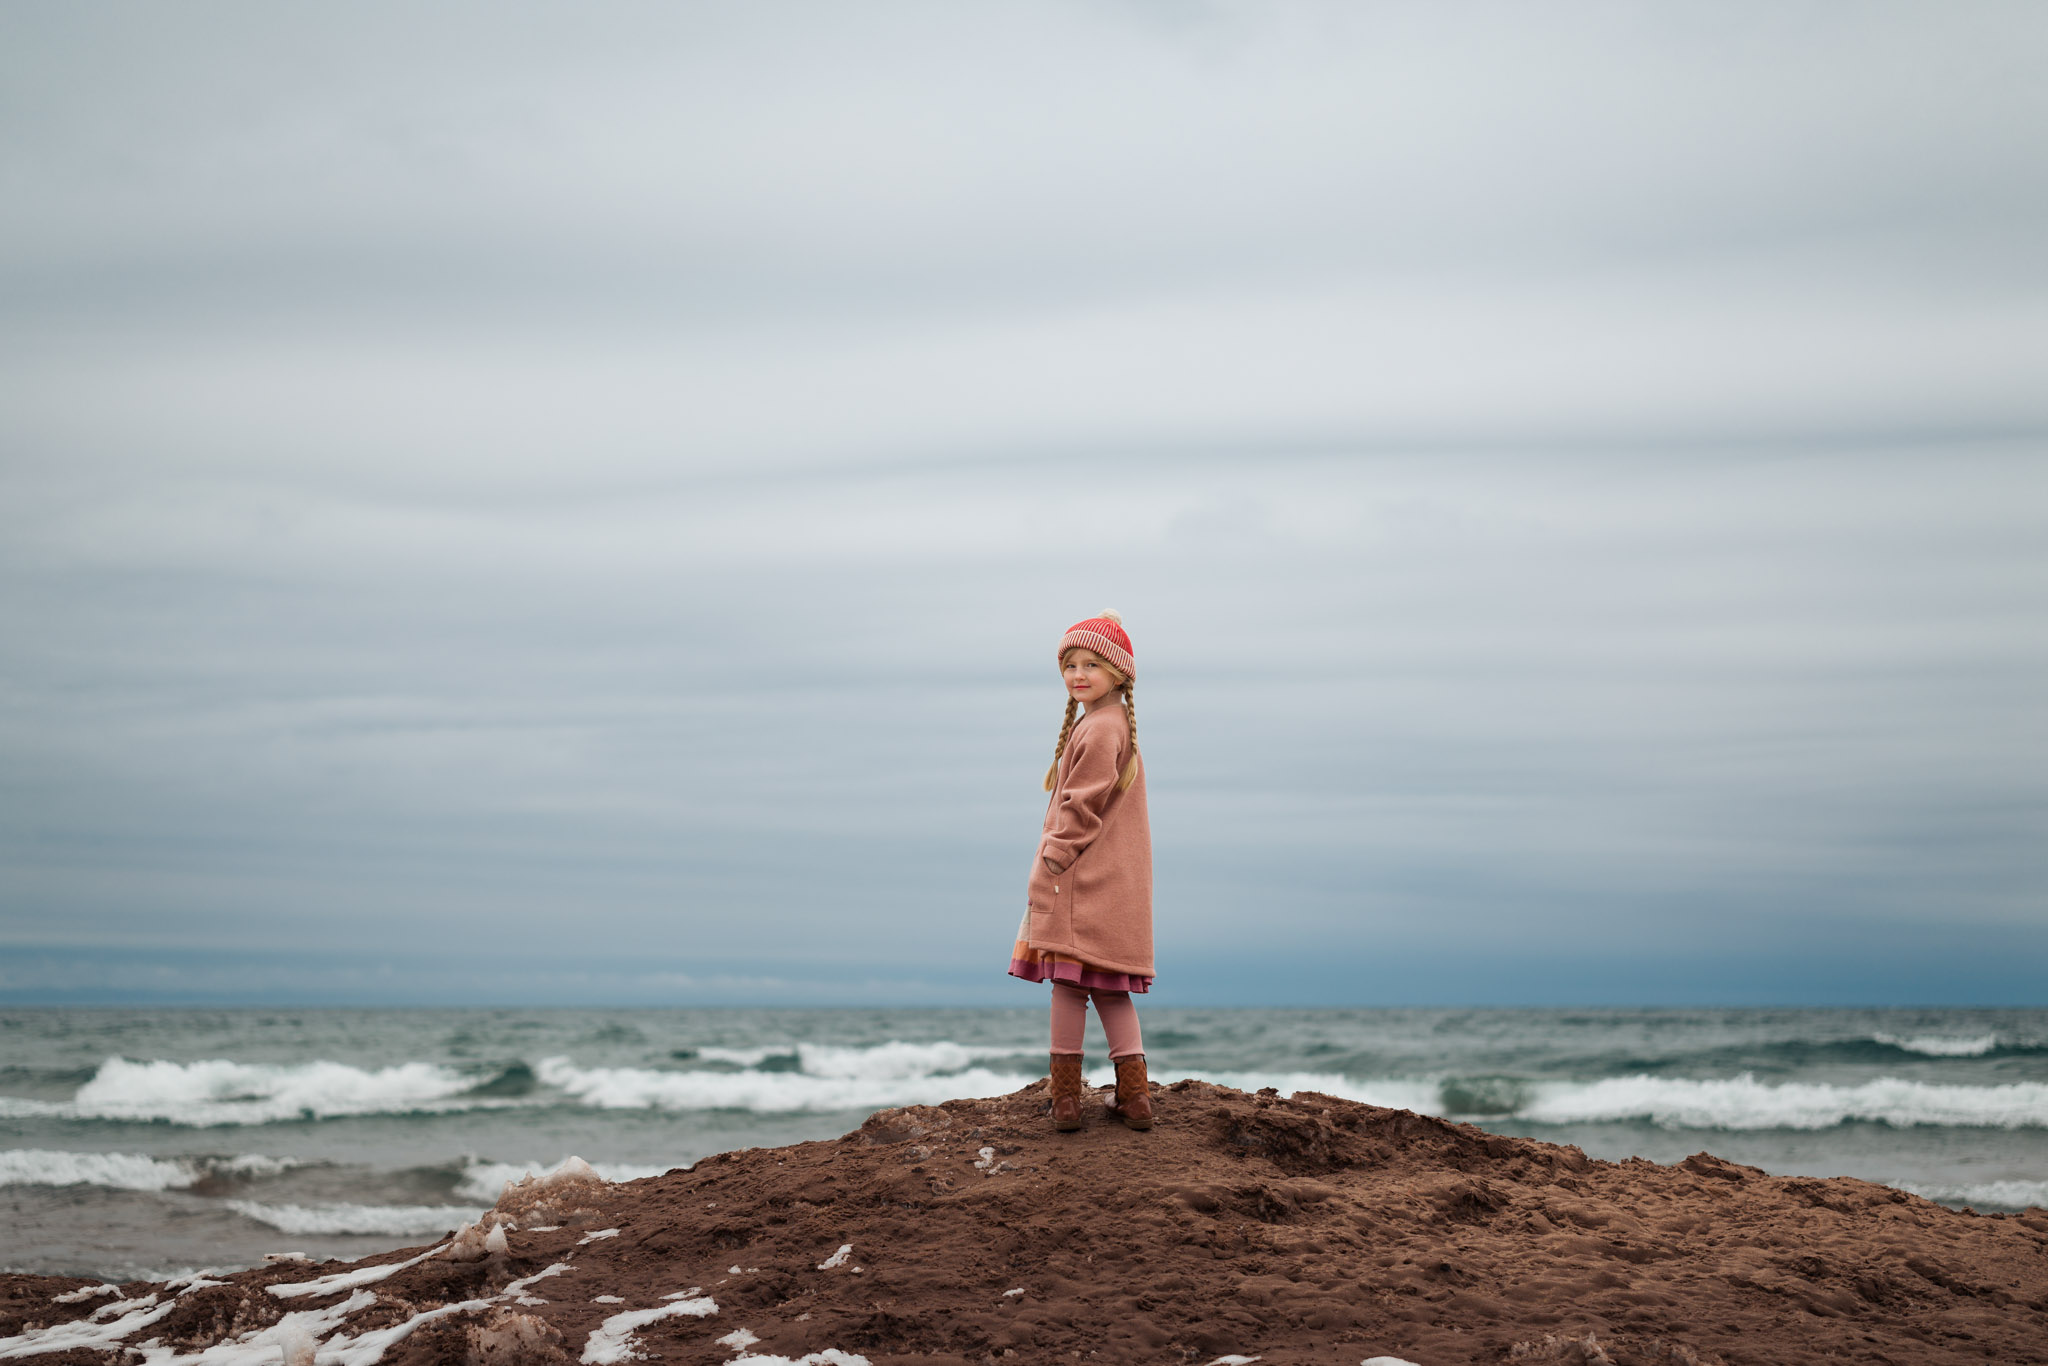
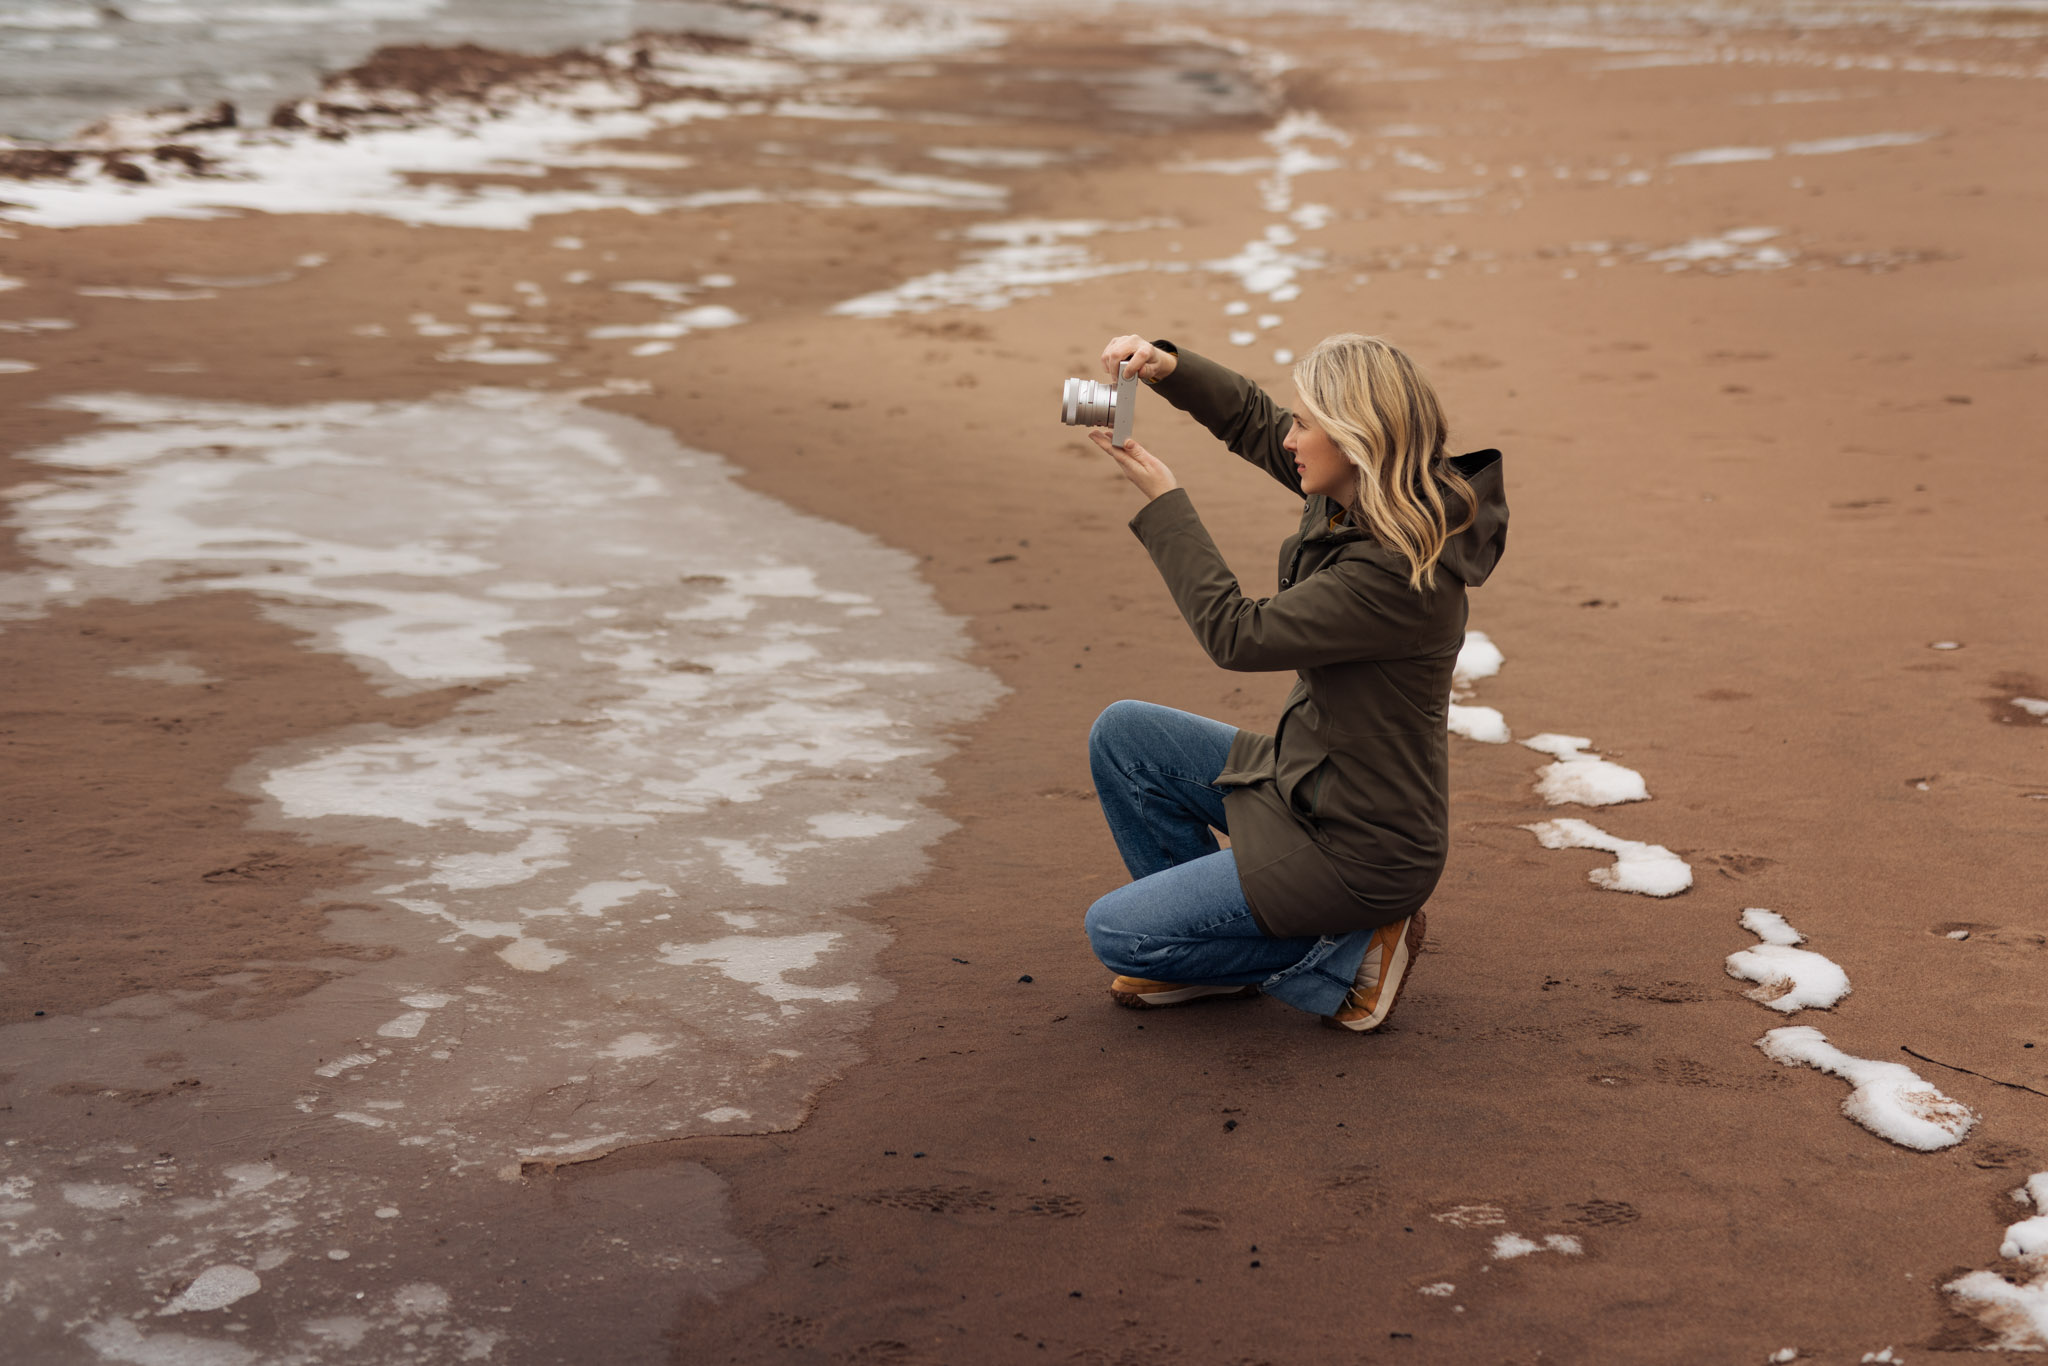
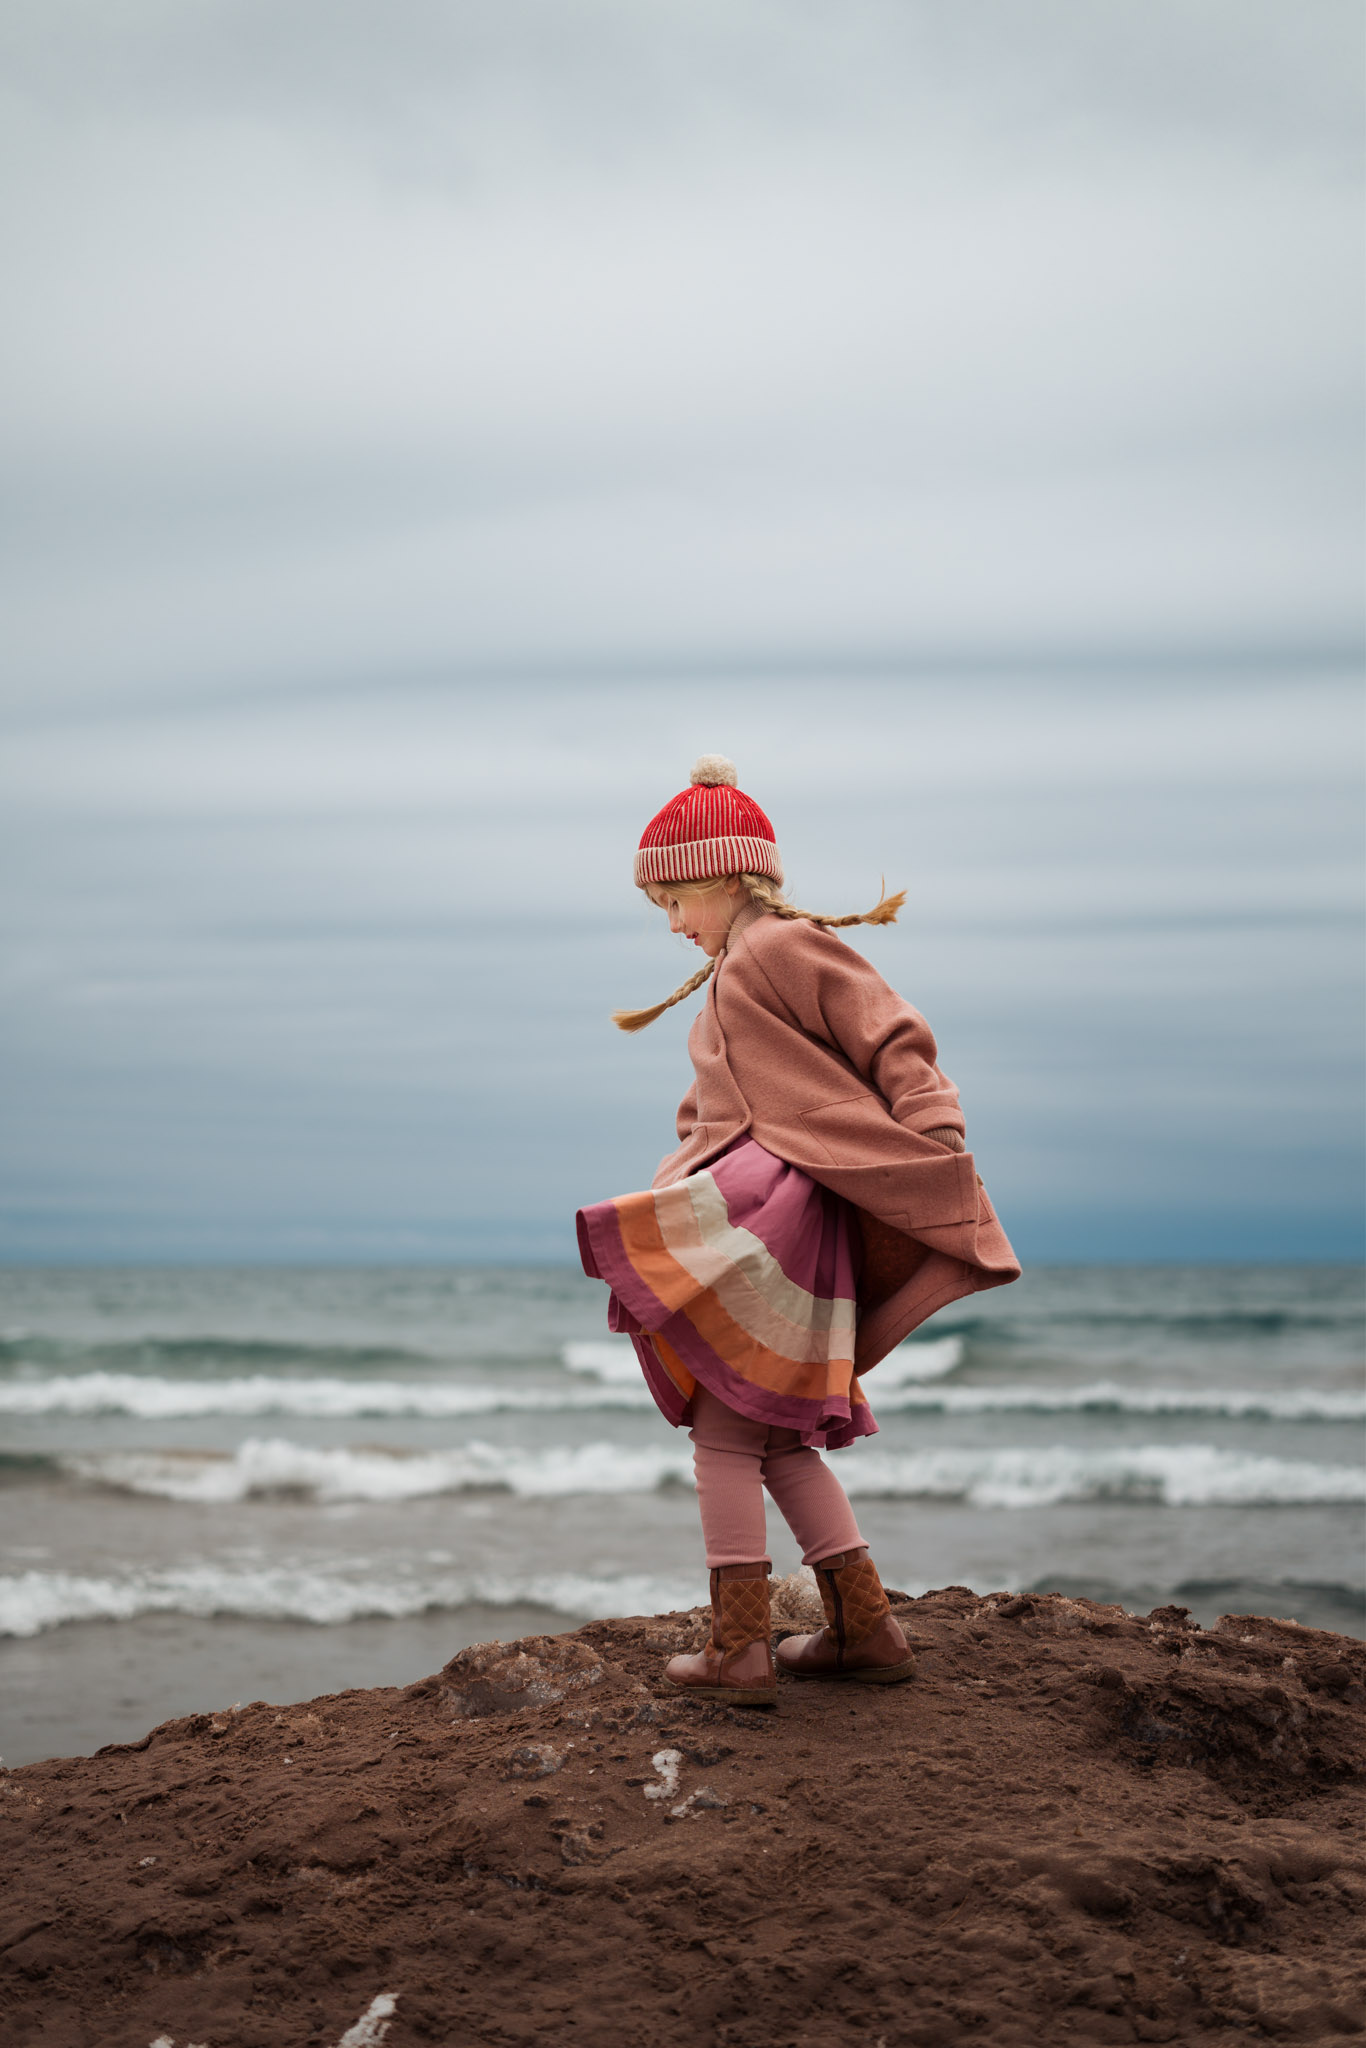
When I’m out with my children, I need a camera that feels like an extension of myself. I want it to feel like second nature, effortlessly there for every moment. The BF camera is just that and more. From playful afternoons at the arcade with my son to breezy moments at the beach with my daughter, this beautiful, stylish camera lets me stay present and focus on what matters most.
SIGMA BF CAMERA 50mm F2 DG | CONTEMPORARY F2, 1/200s, ISO 400SIGMA BF CAMERA 50mm F2 DG | CONTEMPORARY F2, 1/2500s, ISO 100
If I had to pick just two words to describe the BF camera it would be sophisticated and effortless. The sleek, modern design is visually appealing. With looks this good, it could double as modern home decor. This camera’s minimalist design ensures it remains effortlessly user-friendly. A camera doesn’t have to be complicated, and Sigma ensures that with a simple yet stylish aesthetic.
The Sigma BF is as durable as it is intuitive.
Compact and lightweight, the body is suited for life on the go, making it an ideal everyday companion. Though lightweight, the camera boasts a sturdy construction and solid build which is especially favorable for a photographer like me who’s often out chasing adventures with my kids in tow.
I’ve always found that composing through the LCD screen gives me a clearer sense of my frame.
One of my favorite features is that there are no memory card slots. The seamless, internal storage design once again makes everything feel effortless. With no cards to manage, it truly keeps things simple and worry-free.
And as someone who rarely ever uses a viewfinder, I also appreciate its omission allowing for a more compact, sleek camera design and modern LCD screen. As a photographer specifically specializing in children’s portraiture, I’ve always found that composing through the LCD screen gives me a clearer sense of my frame. Not to mention, helping me capture key moments without missing a beat.
SIGMA BF CAMERA 50mm F2 DG | CONTEMPORARY F2, 1/2500s, ISO 100SIGMA BF CAMERA 50mm F2 DG | CONTEMPORARY F2, 1/200s, ISO 250
The camera’s continuous capture rate is swift at 8 frames per second. I occasionally found it too quick, in fact, and switched to single capture for more precise control. When my children were on the move, continuous capture was indispensable for freezing those fast-paced, fleeting moments. The autofocus accuracy in low-light conditions, particularly when my son was darting around the arcade, was nothing short of impressive.
The Sigma BF also camera features automatic face and eye detection for both people and pets, enabling seamless subject tracking. What’s more, the function is active by default, further streamlining the friendly user experience.
SIGMA BF CAMERA 50mm F2 DG | CONTEMPORARY F2, 1/200s, ISO 400SIGMA BF CAMERA 50mm F2 DG | CONTEMPORARY F2, 1/200s, ISO 250
For more precise control, I could switch to single point focus whether in single or continuous autofocus modes. While the autofocusing features of this camera are more curated, they’re ideal and efficient for anyone on the go, allowing for more time to stay immersed in the moment rather than fumbling with countless focus settings.
SIGMA BF CAMERA 50mm F2 DG | CONTEMPORARY F2.5, 1/160s, ISO 125
Another feature I genuinely love is the touch screen focusing. It’s something I’ve frequently used in the past, so I was pleased to see it thoughtfully included in this camera’s design.
The BF feels like the perfect travel companion, equally at home when you’re doing everything or nothing at all.
Last but certainly not least, the image quality is outstanding. Given the Sigma BF camera’s minimalist design, I was thrilled by how sharp and detailed the photos turned out. Even in low light conditions, the clarity and definition held up beautifully. I was also really drawn to the camera’s film-like color rendering. It brings a nostalgic, cinematic feel to images that’s intentional and beautiful.
SIGMA BF CAMERA 50mm F2 DG | CONTEMPORARY F2, 1/2500s, ISO 100SIGMA BF CAMERA 50mm F2 DG | CONTEMPORARY F2, 1/200s, ISO 640
SIGMA BF CAMERA 50mm F2 DG | CONTEMPORARY F2, 1/200s, ISO 320
Sigma unveiled nine updated prime lenses that color-match the sleek BF camera to maintain a cohesive look. My go-to portrait lens is the 50mm F2 DG | Contemporary, and I was consistently impressed by its focusing performance in a range of challenging lighting conditions, from low light to backlight, while my children were constantly on the go. The bokeh was smooth and round, adding to the overall sense of magic I was able to capture. From icy mornings in our yard to playful adventures at the arcade, the bokeh quality enhances the overall mood and atmosphere of my images.
SIGMA BF CAMERA 50mm F2 DG | CONTEMPORARY F2, 1/2500s, ISO 100SIGMA BF CAMERA 50mm F2 DG | CONTEMPORARY F2, 1/200s, ISO 640
Though its minimal design is far from ordinary, this camera is perfectly suited for everyday moments. Its thoughtful design and sleek aesthetic make it ideal for those who value both form and function. It feels like the perfect travel companion, equally at home when you’re doing everything or nothing at all. There’s beauty in keeping things simple, and Sigma makes that possible with the BF camera, letting you stay immersed in the moment rather than gadgets and settings.
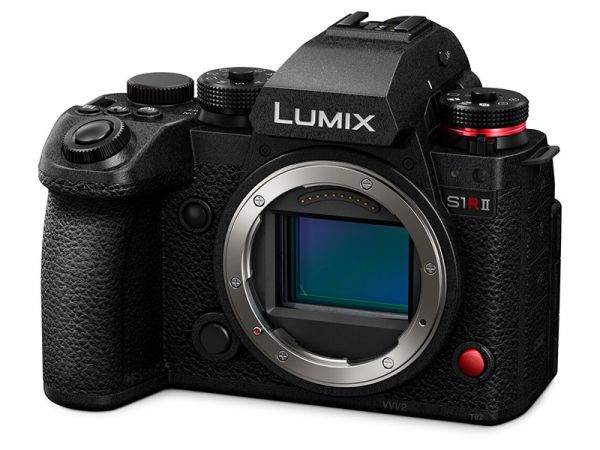
It’s been more than five years since Panasonic launched their Lumix S1R and Lumix S1 full-frame mirrorless cameras with an emphasis on photography and video, respectively. Now the follow-up photo-centric model—the Lumix S1RII—has finally landed, and there are few similarities between the old and new cameras. Built around a new 44.3-megapixel BSI CMOS image sensor and L² image processing engine, the S1RII is significantly smaller and lighter than its predecessor—so we can expect a slew of new underwater housings.
Promising the “best photos” of any Lumix camera, Panasonic says the new sensor offers a stop better noise performance as well as improved color rendering. Like other recent Panasonic cameras, the S1RII boasts Phase Hybrid AF featuring 779 phase-detect AF points as well as AI-powered subject detection and tracking. Using the mechanical shutter, you get an impressive 10fps burst shooting with continuous autofocus, while the electronic shutter offers 40fps. Another significant improvement is the in-body image stabilization, which delivers up to eight stops of shake reduction with shorter lenses or seven stops with compatible telephoto lenses. It’s worth noting that the camera’s maximum flash sync speed is now 1/250s, which is—unfortunately—inferior to its predecessor’s 1/320s.
On the video side, the specs are equally impressive: The S1RII is the first Lumix camera to record 8K/30p 10-bit video with 14 stops of dynamic range. The camera can also record internal Apple ProRes RAW HQ/ProRes RAW 5.8K to a CFexpress Type B card (albeit with an APS-C crop)—another first for the Lumix S series. Other recording options include (oversampled) 6.4K open-gate video for flexible cropping and reframing, and (subsampled) 4K/120p slow-motion capture. Serious videographers will also appreciate the advanced video assist tools, including waveforms and vector scopes for exposure and color monitoring, and real-time LUTs.
To round things off, the S1RII has dual card slots (CFexpress Type B, UHS-II SD), support for external recording to an SSD, a 5.76M-dot OLED EVF (0.78x magnification) and a 1.83M-dot 3-inch vari-angle rear LCD. The camera uses the same battery as the S5II/S5IIX.
Available now from retailers such as Backscatter, the Panasonic Lumix S1RII is priced at $3,300.
When purchasing underwater photography equipment like the products mentioned in this article, please support DPG by supporting our retail partner—Backscatter.com.
PRESS RELEASE
Panasonic Announces New LUMIX S1RII Full-Frame Mirrorless Camera
Newark, N.J. (February 25, 2025) – Panasonic is proud to introduce the new LUMIX S1RII – the latest high- resolution model of the Full-Frame mirrorless LUMIX S Series.
The LUMIX S1RII features a newly developed 44.3MP BSI CMOS sensor and high-performance engine with L2 Technology that work together to deliver impressive stills and videos with LUMIX’s esteemed natural color science. The high-resolution mode, allowing for handheld shooting at approximately 177MP, enables users to enjoy the presence and detail of subjects. With revolutionary video performance, it is the first LUMIX camera to realize 8K video recording at 14 stops1 of dynamic range, broadening the possibilities of video creation. The popular Open Gate feature has been enhanced, allowing to shoot in 6.4K, and even up to 8.1K/7.2K2 with a future firmware update. Furthermore, as a first for the LUMIX S series, it supports internal recording of 5.8K Apple ProRes RAW HQ/ProRes RAW3 to a CFexpress Type B card. This makes it possible to record high- quality video data with minimal setup and without using external devices or cables, providing greater mobility for one-man operations and small-scale shoots.
Evolved real-time recognition Phase Hybrid AF, now with AI tracking, quickly and precisely detects human eyes and faces and follows a subject’s movements smoothly. With high-speed continuous shooting at approximately 40 fps4 and AF tracking, dynamic subjects can be captured accurately and effortlessly. The SH pre-burst mode even starts taking pictures before the shutter is fully pressed, ensuring you never miss a shot.
Our widely acclaimed image stabilization system continues to improve, with the LUMIX S1RII achieving 8.0-stop shutter speed compensation5 with in-body stabilization, and 7.0-stop6 even in the telephoto range with Dual I.S. 2. The advanced video image stabilization features cropless E.I.S. video distortion correction, reducing peripheral distortion while preserving the original angle of view. This allows for greater flexibility in handheld wide-angle shooting. The newly designed compact body and the tilt and free-angle monitor are adaptable to any shooting style, making it an excellent companion for those seeking both mobility and creative flexibility.
The LUMIX S1RII will be compatible with the “LUMIX Lab” smart phone application, enabling you to load LUTs directly into the camera. This streamlines the post-production process, allowing for smoother client deliveries and giving you more time to focus on creativity. A new “LUMIX Flow” app will be launched to enhance production workflows across various scenarios, such as short films, documentaries, music videos, and corporate promotional videos. This app offers a range of features, from storyboard creation and shooting to file organization. The LUMIX S1RII integrates with third party software such as “Frame.io” for more efficient postproduction and collaboration. For the first time in LUMIX history, the LUMIX S1RII supports tethering via “Capture One,” assisting a diverse range of creators across various production scenarios.
Guided by our philosophy of creating technology that fuels creative passion, the LUMIX S1RII is a next-generation mirrorless camera built for creators who want to bring their own unique vision to life.
Main Features
High resolution and high image quality for both stills and videos with a newly developed sensor and next-generation engine
Utilizes a newly developed approximately 44.3MP full-frame BSI CMOS image sensor.
Features a 177MP (approx.) handheld high-resolution mode that captures the immersive presence and details of subjects with precision.
Offers high-resolution recording that captures the texture and fine details of subjects and supports LUMIX’s first 8K 30p video recording (*2) with 14 stops (*1) of dynamic range.
Supports 5.8K Apple ProRes RAW HQ / ProRes RAW internal recording to a CFexpress Type B card.
Enhanced core performance that unlocks new creative possibilities
Redefined real-time recognition Phase Hybrid AF with improved eye and face detection and AI-driven tracking accuracy for people.
Enhanced 8.0-stop (*3) in-body image stabilization (B.I.S.) and newly developed cropless E.I.S. video distortion correction, which stabilizes without cropping the angle of view.
High resolution and high-speed continuous shooting, offering approximately 40 fps (*2) with the electronic shutter “SH” mode, and an extended continuous shooting “H+ (High Speed Plus)” mode of approximately 10 fps (*2) with a mechanical shutter, allowing you to experience post
view blackout-free shooting.
Powerful apps that seamlessly support the production workflow
Compatible with “Capture One,” making it the first LUMIX camera to work seamlessly with the widely used editing software in professional studio photography.
Compatible with “Frame.io,” enabling smooth progression from shooting to editing, as well as cloud sharing and collaboration.
Supports “LUMIX Lab,” simplifying the transfer, editing, and color personalization of photos and videos for seamless smartphone integration and social media sharing.
Supports new “LUMIX Flow,” which assists with storyboard creation, on-site checks during filming, and automatic data organization after shooting to support the video production workflow.
LUMIX mode: Assists with storyboard creation, on-site checks during filming, and automatic data organization after shooting to support the video production workflow.
■ Smartphone mode: Experience the joy of video creation, such as scripting and editing a short drama, documentary video or dance video, with just a smartphone.
■ External monitor: Use a smartphone as an external monitor while shooting, allowing you to swiftly change and adjust the camera settings on the mobile device.
DMW-BG2
Panasonic is pleased to introduce the new DMW-BG2 battery grip, designed to match the feel of the S1RII when holding the camera vertically. The battery in the battery grip can be exchanged while the camera is on, and the grip also supports providing power to the camera for shooting in certain extensive modes.
Price and availability
The new LUMIX S1RII will be available in late March for $3299.99 at valued channel partners.
1 When Dynamic Range Expansion (Log) is enabled.
2 8.1K/7.2K Open Gate recording will be available in the firmware update scheduled for 2025.
3 8.1K / 7.2K RAW HDMI output will be available in the firmware update scheduled for 2025.
4 The continuous burst shooting speed may decrease depending on various conditions such as the lens used, aperture and shutter speed.
5 Center: 8.0-stop; Periphery: 7.0-stop. Based on the CIPA 2024 standard [Yaw/Pitch/Roll direction: focusing distance f=60mm when S-R2060 is used. 5-axis.]
6 Center: 7.0-stop; Periphery: 7.0-stop. Based on the CIPA 2024 standard [Yaw/Pitch/Roll direction: focusing distance f=105mm when S-R24105 is used. 5-axis.]
Tickets for the second Go Diving Show ANZ in Sydney are on sale—and there’s a two-for-one early bird special on now for a limited time. The show happens to coincide with Australia’s Father’s Day weekend—September 6th–7th—so it’s the ideal opportunity to grab dad and show him lots of mesmerizing gadgets—and awesome dive vacation deals! (Bring mom, too, obviously.)
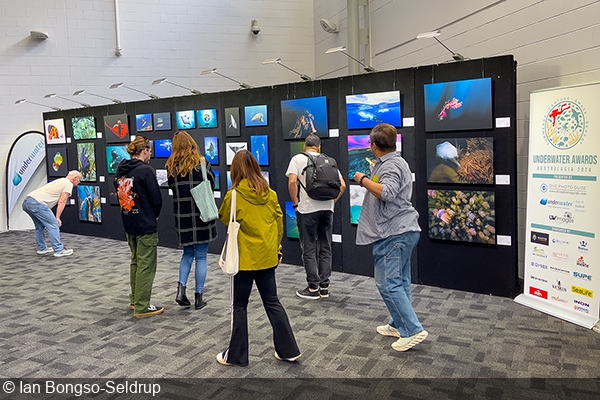
Of course, one of the big highlights is the announcement of the winners of the Underwater Awards Australasia 2025, the Australasia-focused competition organized by DPG, Underwater Australasia and UW Images. Underwater photographer and UW Images owner Brett Lobwein will return to the Photo Stage for the big reveal. Once again, alongside the Photo Stage, we’ll be exhibiting stunning metal prints of the finalist entries in the photo categories. Like last year, the prints, made by the competition’s Printing Partner PhotoMart, will be available for purchase at the show, with the proceeds going to Environmental Partners Australian Marine Conservation Society and Take 3 for the Sea.
Organizers are expecting 100-plus exhibitors and the show will see dozens of speakers giving talks across the four stages (Main Stage, Photo Stage, Tech Stage and ANZ/Inspiration stage) as well as try-dives and in-water skills demonstrations in the on-site dive pool. If you’re in the area, make sure to swing by the DPG booth (#304)—which is shared with The Underwater Club—and say hello!
You might think everyone is on Instagram. It certainly feels that way sometimes and perhaps it is in Meta’s best interest to promote this. Or at least posit the idea as an inevitability.
Blue red and green letters illustration of social media icons. Photo by Alexander Shatov
Well, you’d be wrong because apparently there are enough people not on the platform to warrant paying creators to bring new to Meta’scrown jewel.
That’s not a new business tactic, but it’s sort of novel for social media which is probably why it is just in a beta testing phase at the moment, FStoppers reports.
When you consider some of the recent legislative action in the States, there is some incentive to push forward such a program.
Creators basically have users sign up via a link and are then paid per sign up or after 1000 “qualified taps.” Successful promoters can earn up to $USD 20,000, the website reports. Naturally, it’s going to be hard to reach that level but there are certainly some accounts that could blow past that requirement with ease given their scale and reach.
This new strategy would seem to be in direct competition with TikTok’s and YouTube who have similar programs, highlighting the intense competition in the social media space.
You might recall some time back there was talk of banning TikTok in the United States. While that hasn’t gone anywhere, it did spur a kind of blood-in-the-water approach by rivals to scoop up users left behind if TikTok were banned.
And while that didn’t happen, the race to secure as many users as possible continues, even while it becomes increasingly harder for creators to make money no matter what the platform.
Any thoughts on this strategy are welcome in the comments.
Check out some of our other photography news at this link.
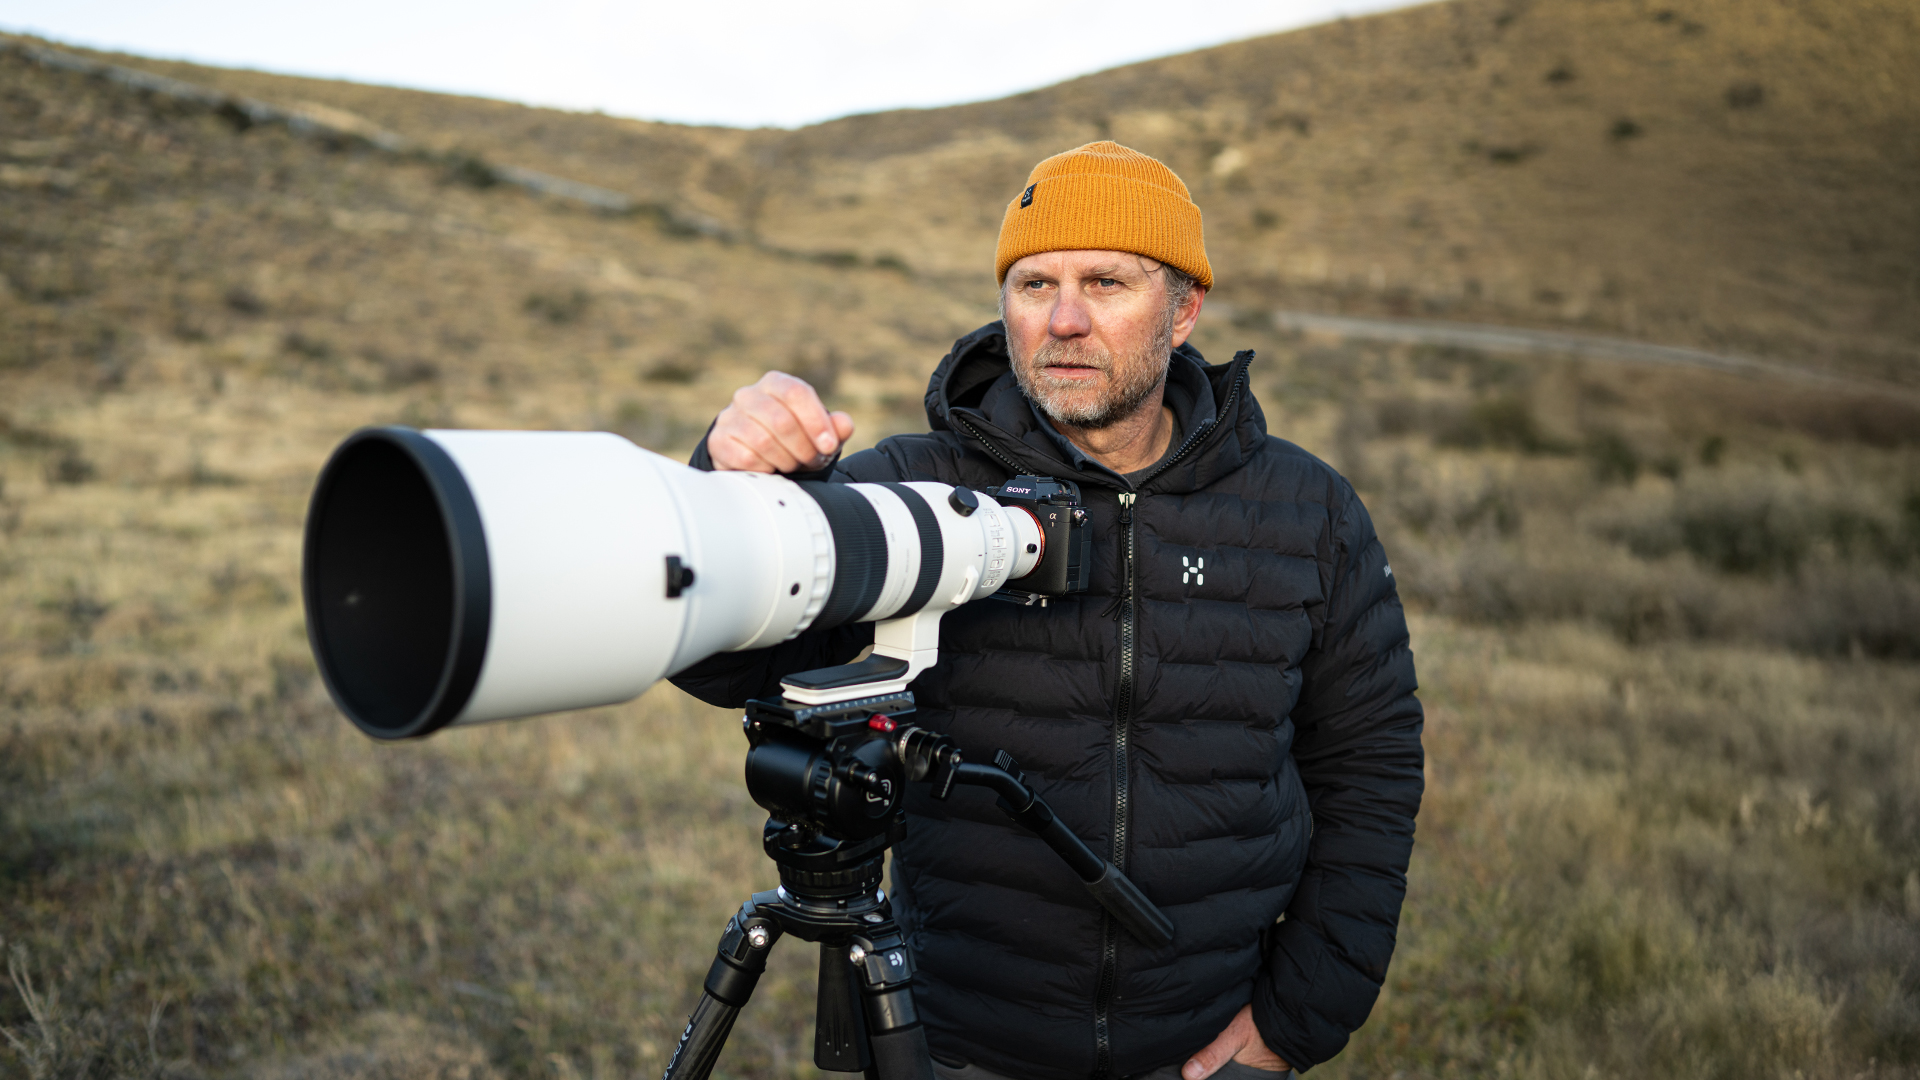
Sigma Ambassador Liam Doran with the 300-600mm F4 DG OS | Sports lens.
As outdoor photographers, there are places in the world that beckon to us to explore their photographic wonders. The pull of exotic landscapes bathed in warm light, and huge swaths of wide open areas packed with an abundance of wildlife, are draws impossible to resist for inquisitive adventurers. One of the places at the top of my to-do list was the incomparable Patagonia region of southern Chile.
A landscape to set the scene, shot with my main travel lens, the Sigma 24-70mm F2.8 DG DN II | Art.
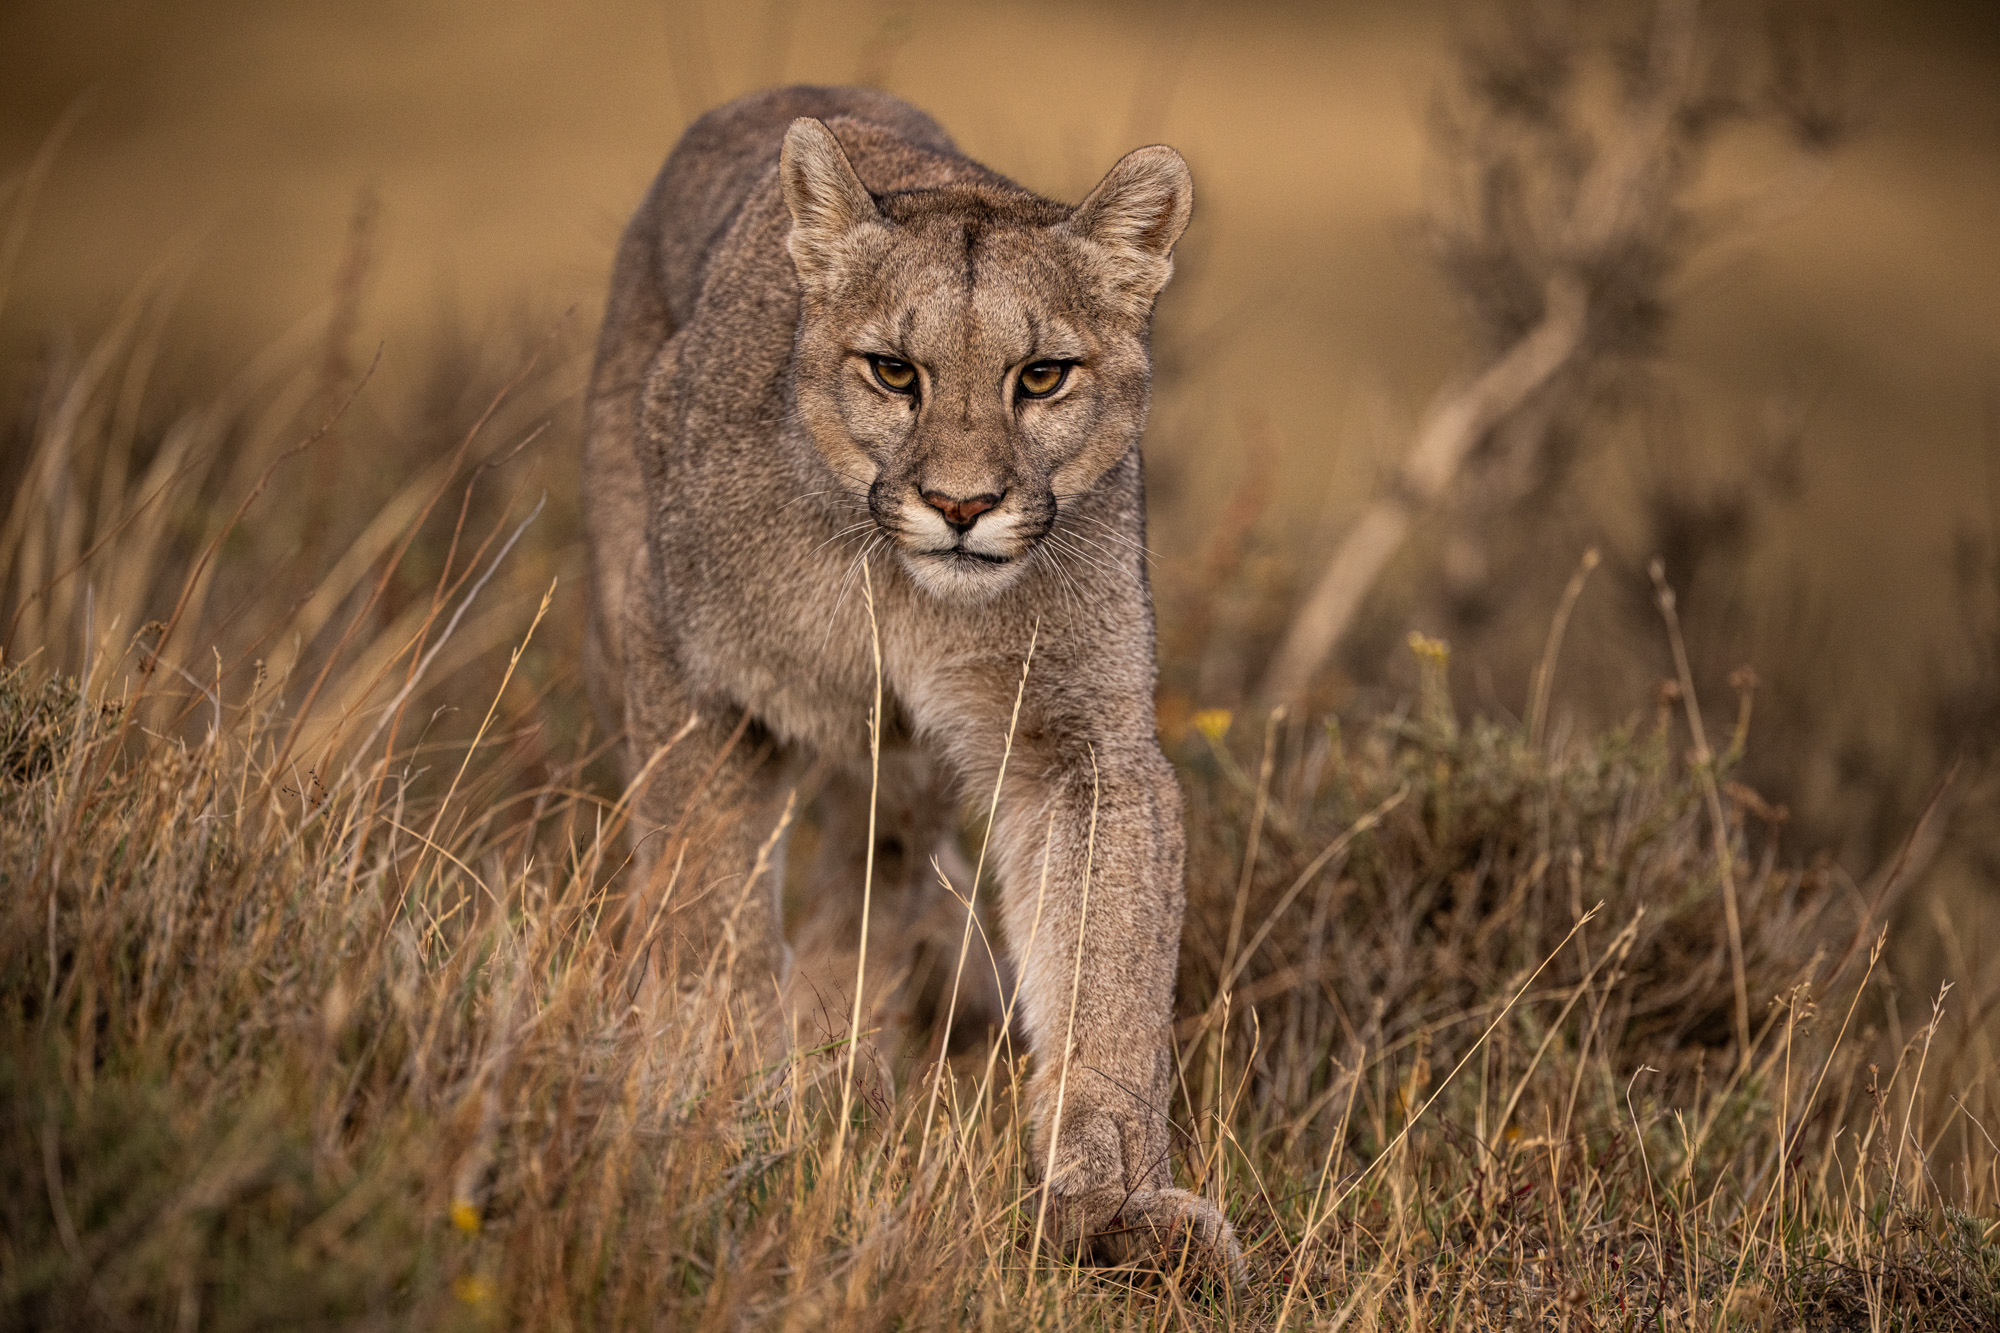
There is so much to photograph and explore in Patagonia, so I decided to narrow my vision to Torres del Paine National Park, and more specifically, the wildlife that calls it home. Most prominent of these animals, and what truly piqued my interest, are the park’s famous pumas. With buy-in from local estancias (ranches) that border the park, the pumas have a massive area where there are free to be wild without persecution from hunting and trapping. Because of this, the puma population in Torres del Paine and the surrounding area is absolutely booming.
SIGMA 300-600mm F4 DG OS | Sports Sony a1 Camera 600mm, F4.5, 1/400s, ISO 1000
The ultimate wildlife photography zoom lens
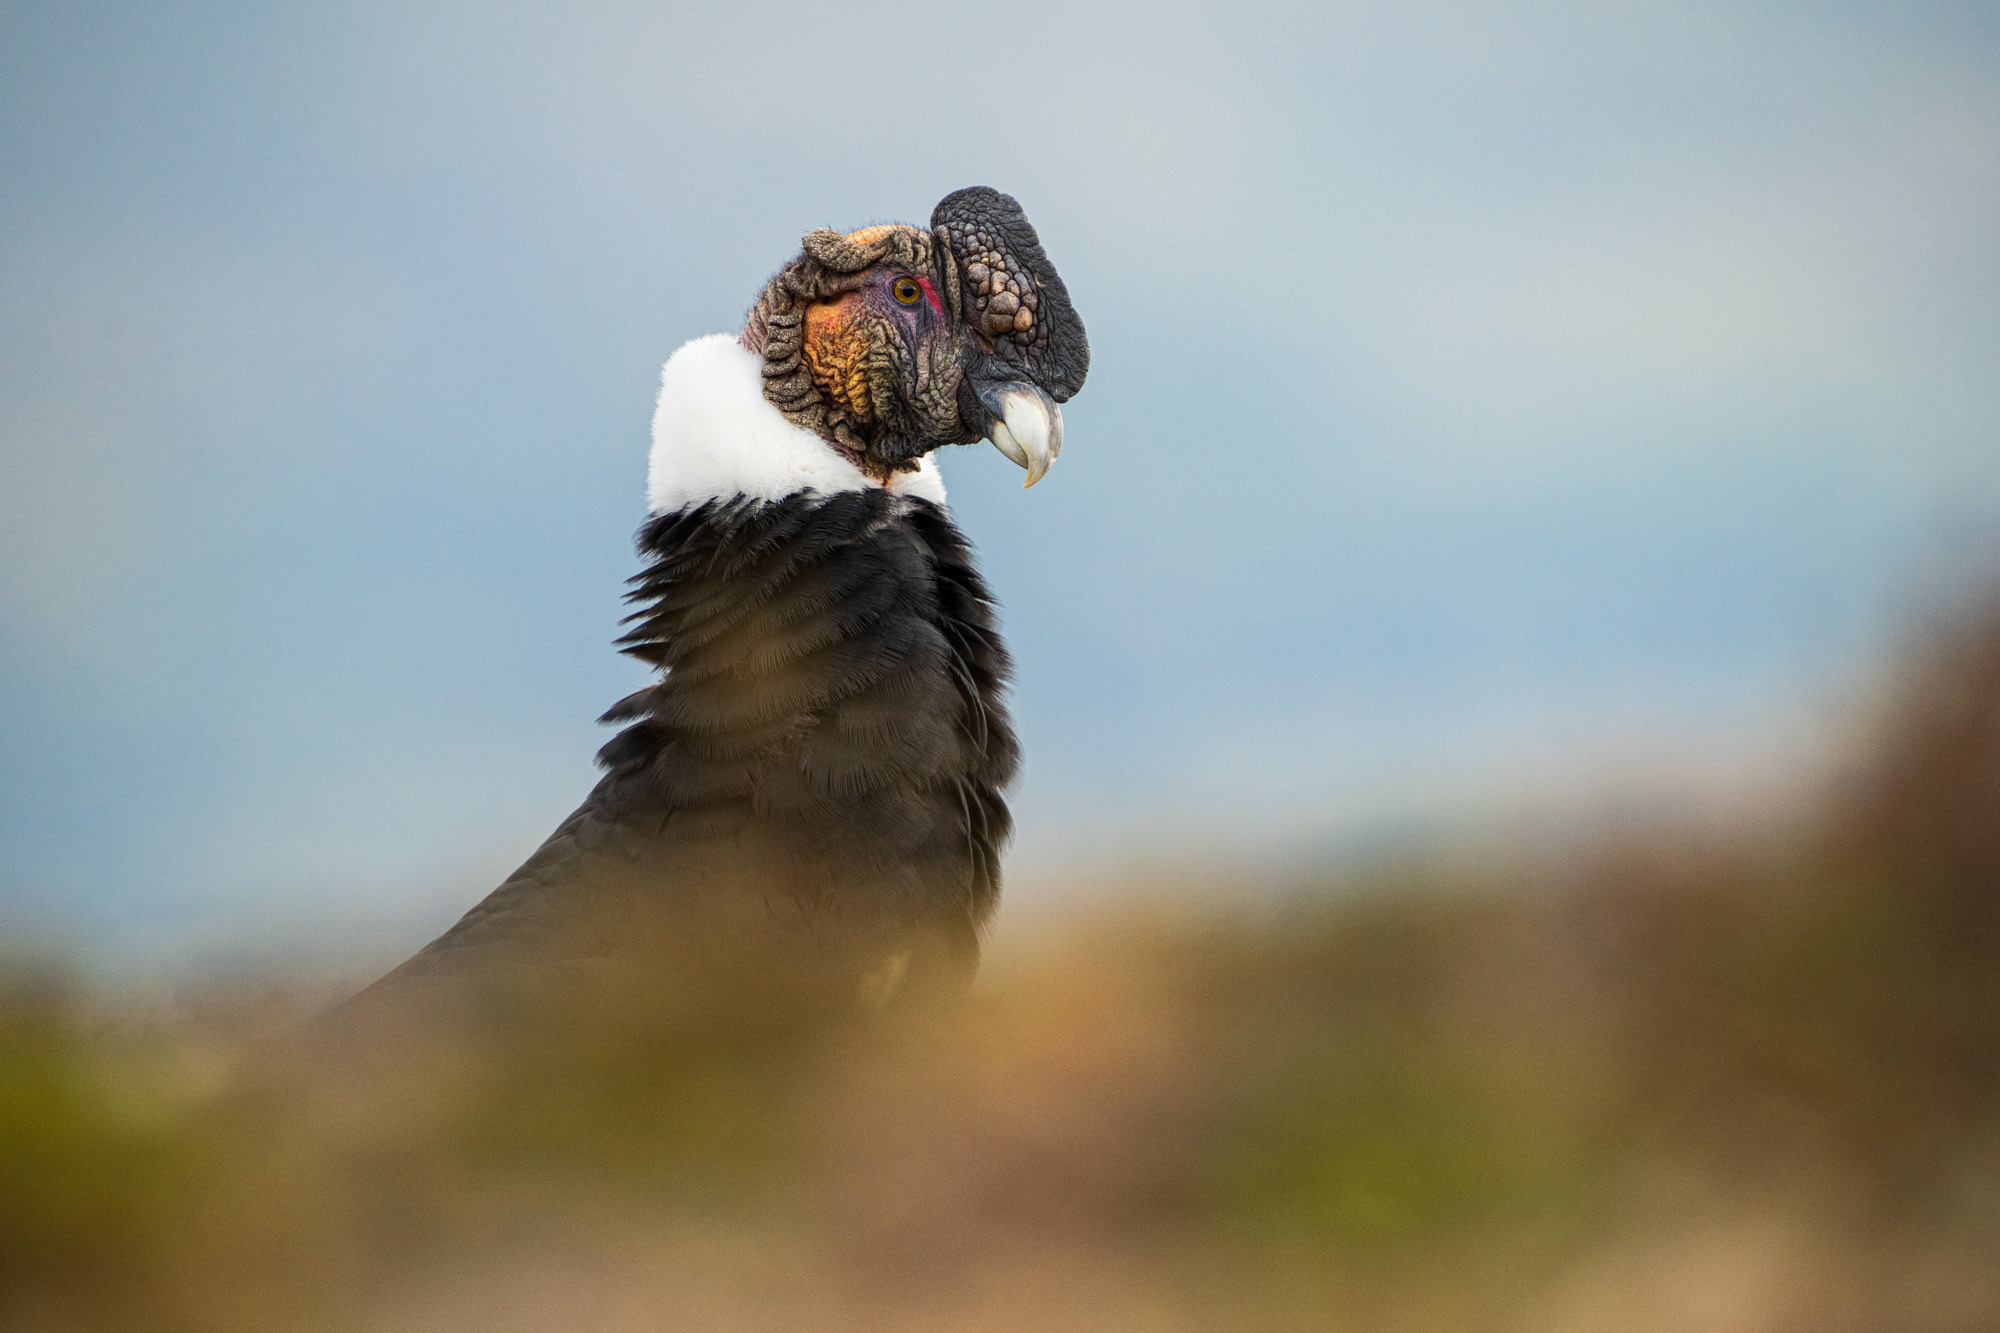
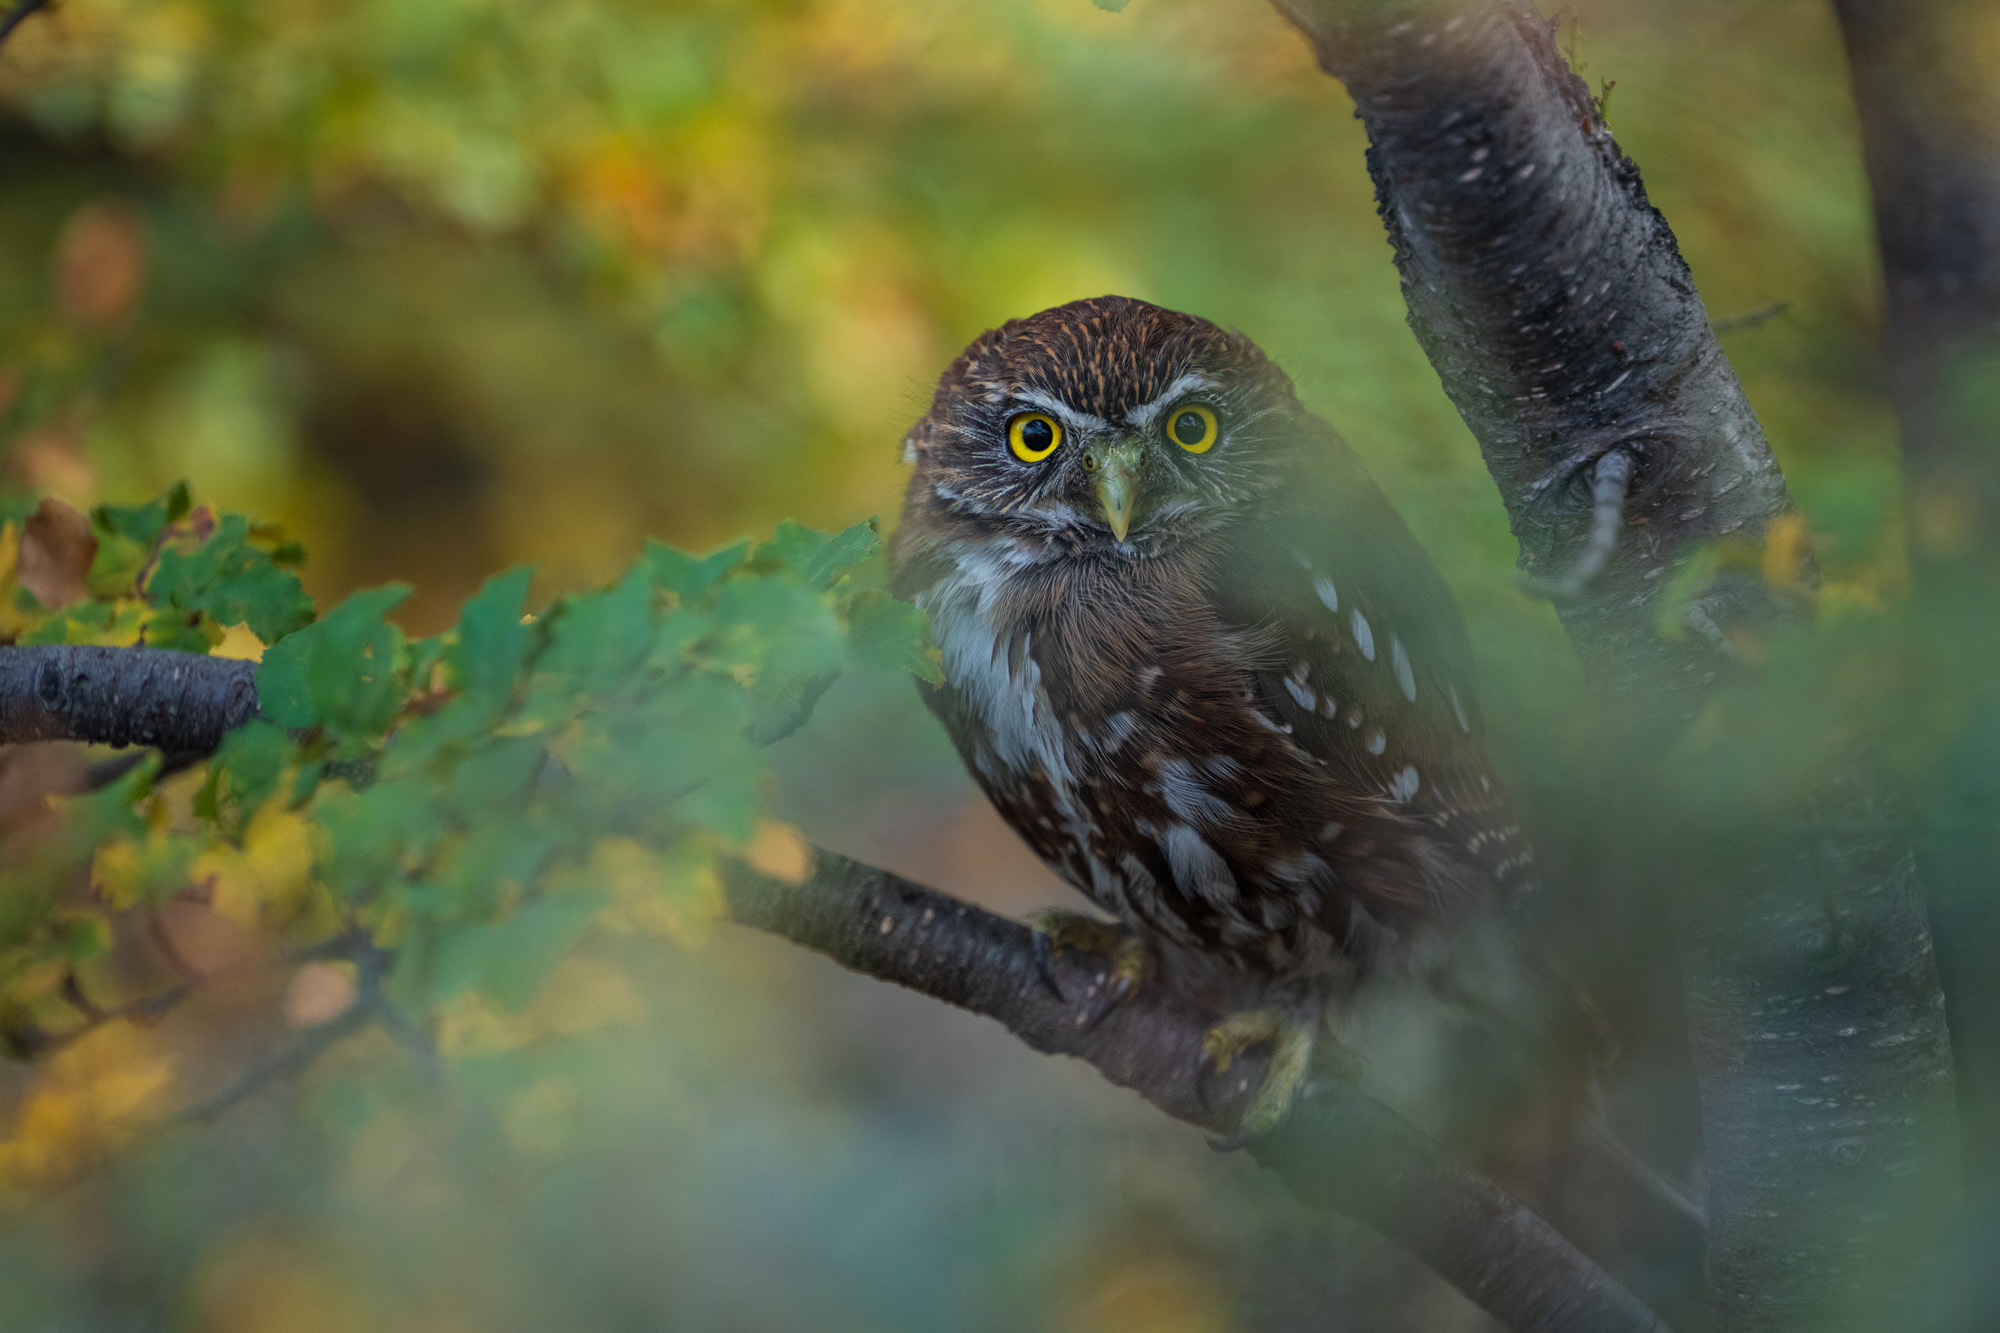
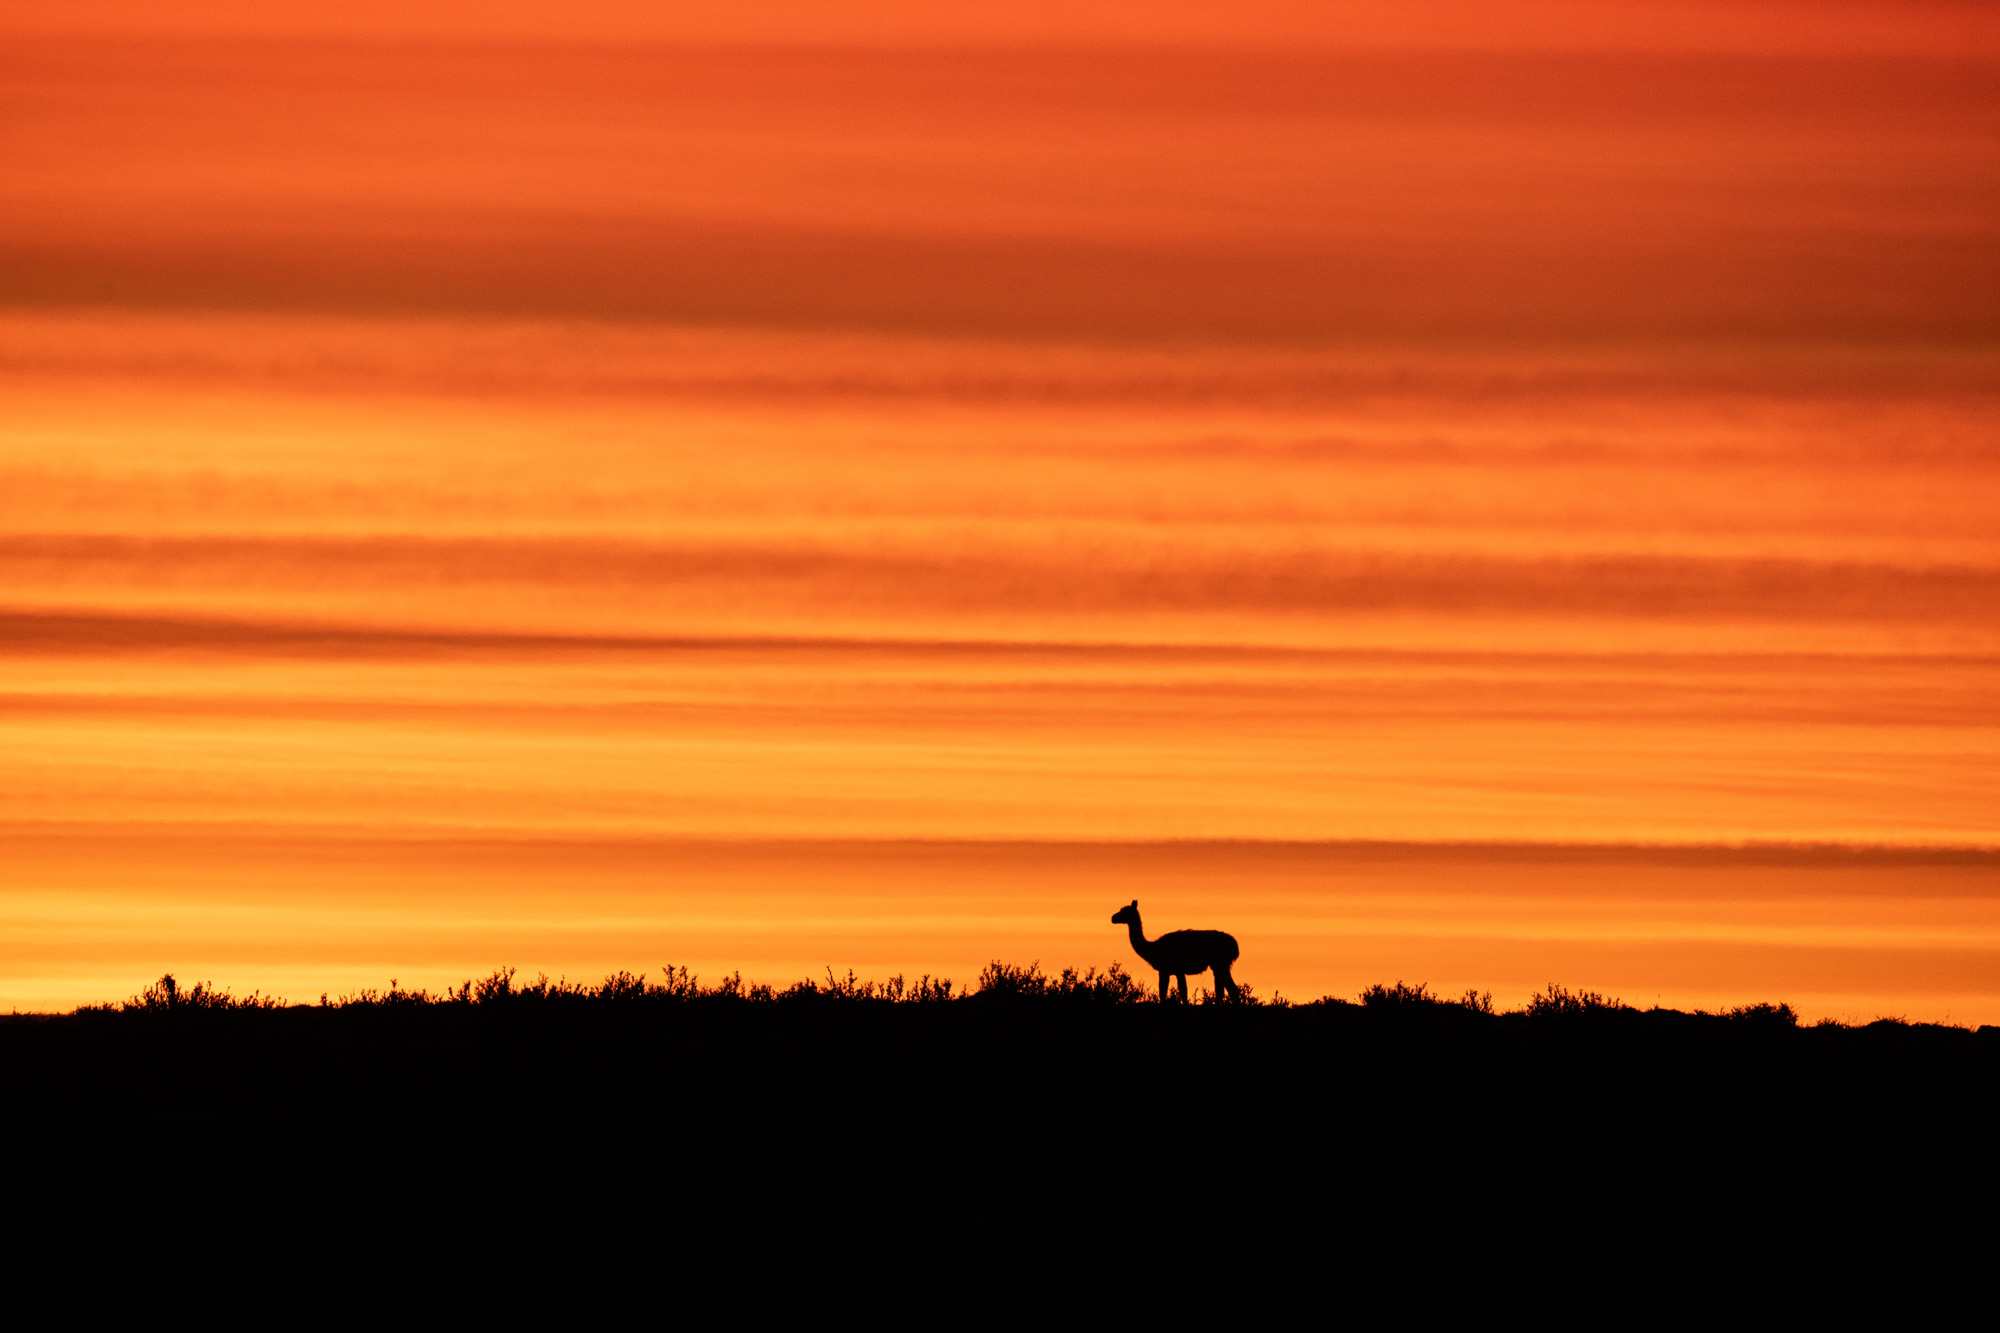
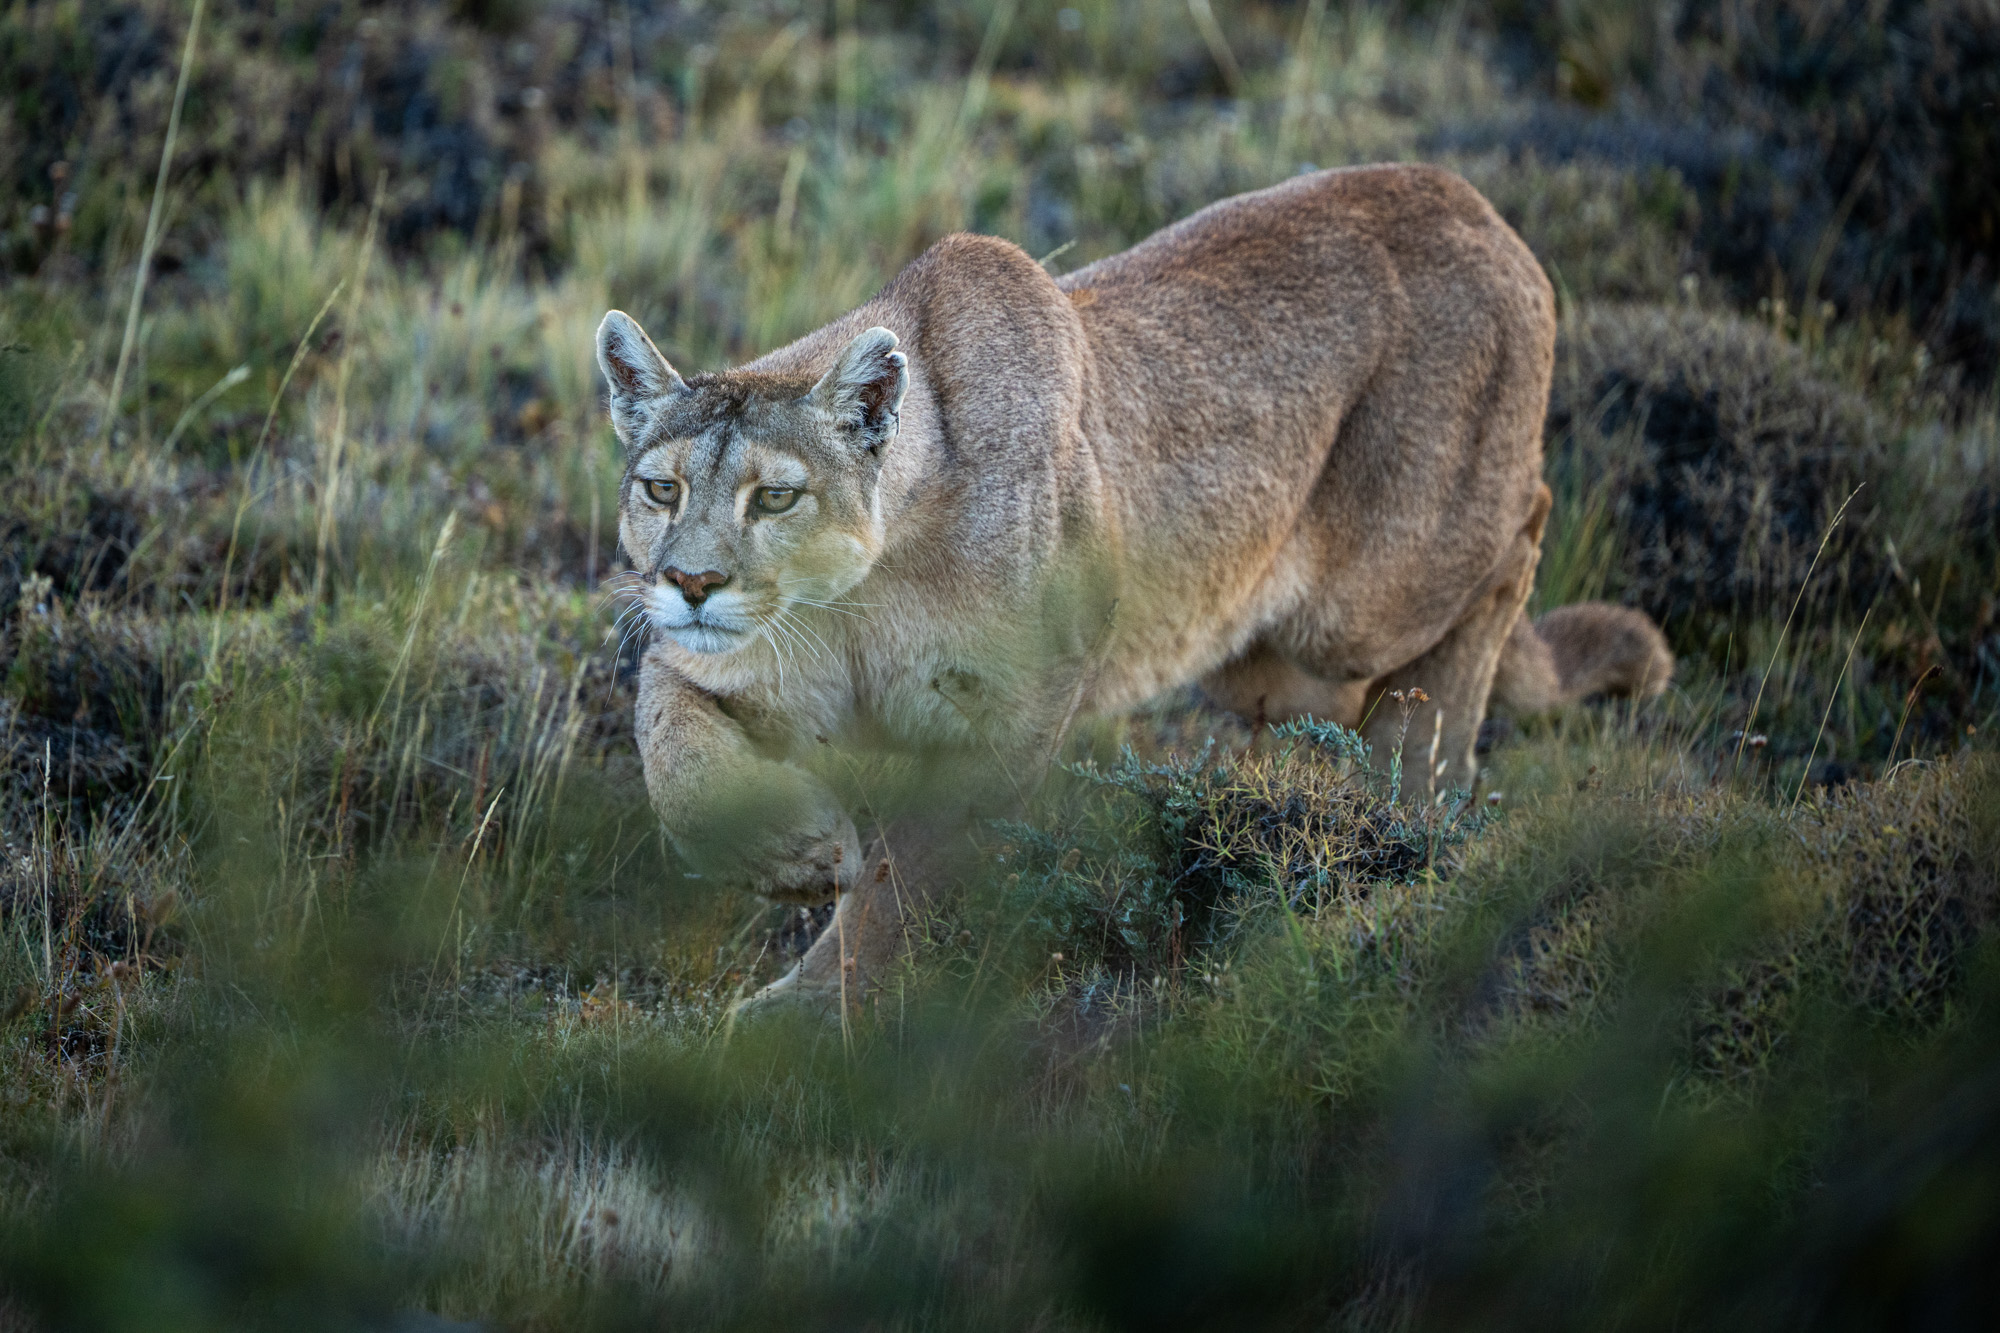
My lens of choice for pumas, and all the wildlife I encountered, was the brand new Sigma 300-600mm F4 DG OS | Sports lens. This is a de-facto professional grade lens the likes of which have never been seen before and I put it to good use. In my time there, I saw 17 individual pumas over the course of about 25 encounters. As far as I know, this is not possible anywhere else in the world. That’s what makes this place so special. Of course not every encounter would result in photos but enough did that I was able to get plenty of great photos. In addition to pumas I was able to photograph Andean condors, grey foxes, rheas, an austral pygmy owl, black chested eagles, and of course plenty of guanacos.
SIGMA 300-600mm F4 DG OS | Sports Sony a1 Camera 600mm, F5, 1/1600s, ISO 1000SIGMA 300-600mm F4 DG OS | Sports Sony a1 Camera 600mm, F4, 1/1000s, ISO 1250SIGMA 300-600mm F4 DG OS | Sports Sony a1 Camera 395mm, F6.3, 1/500s, ISO 1250
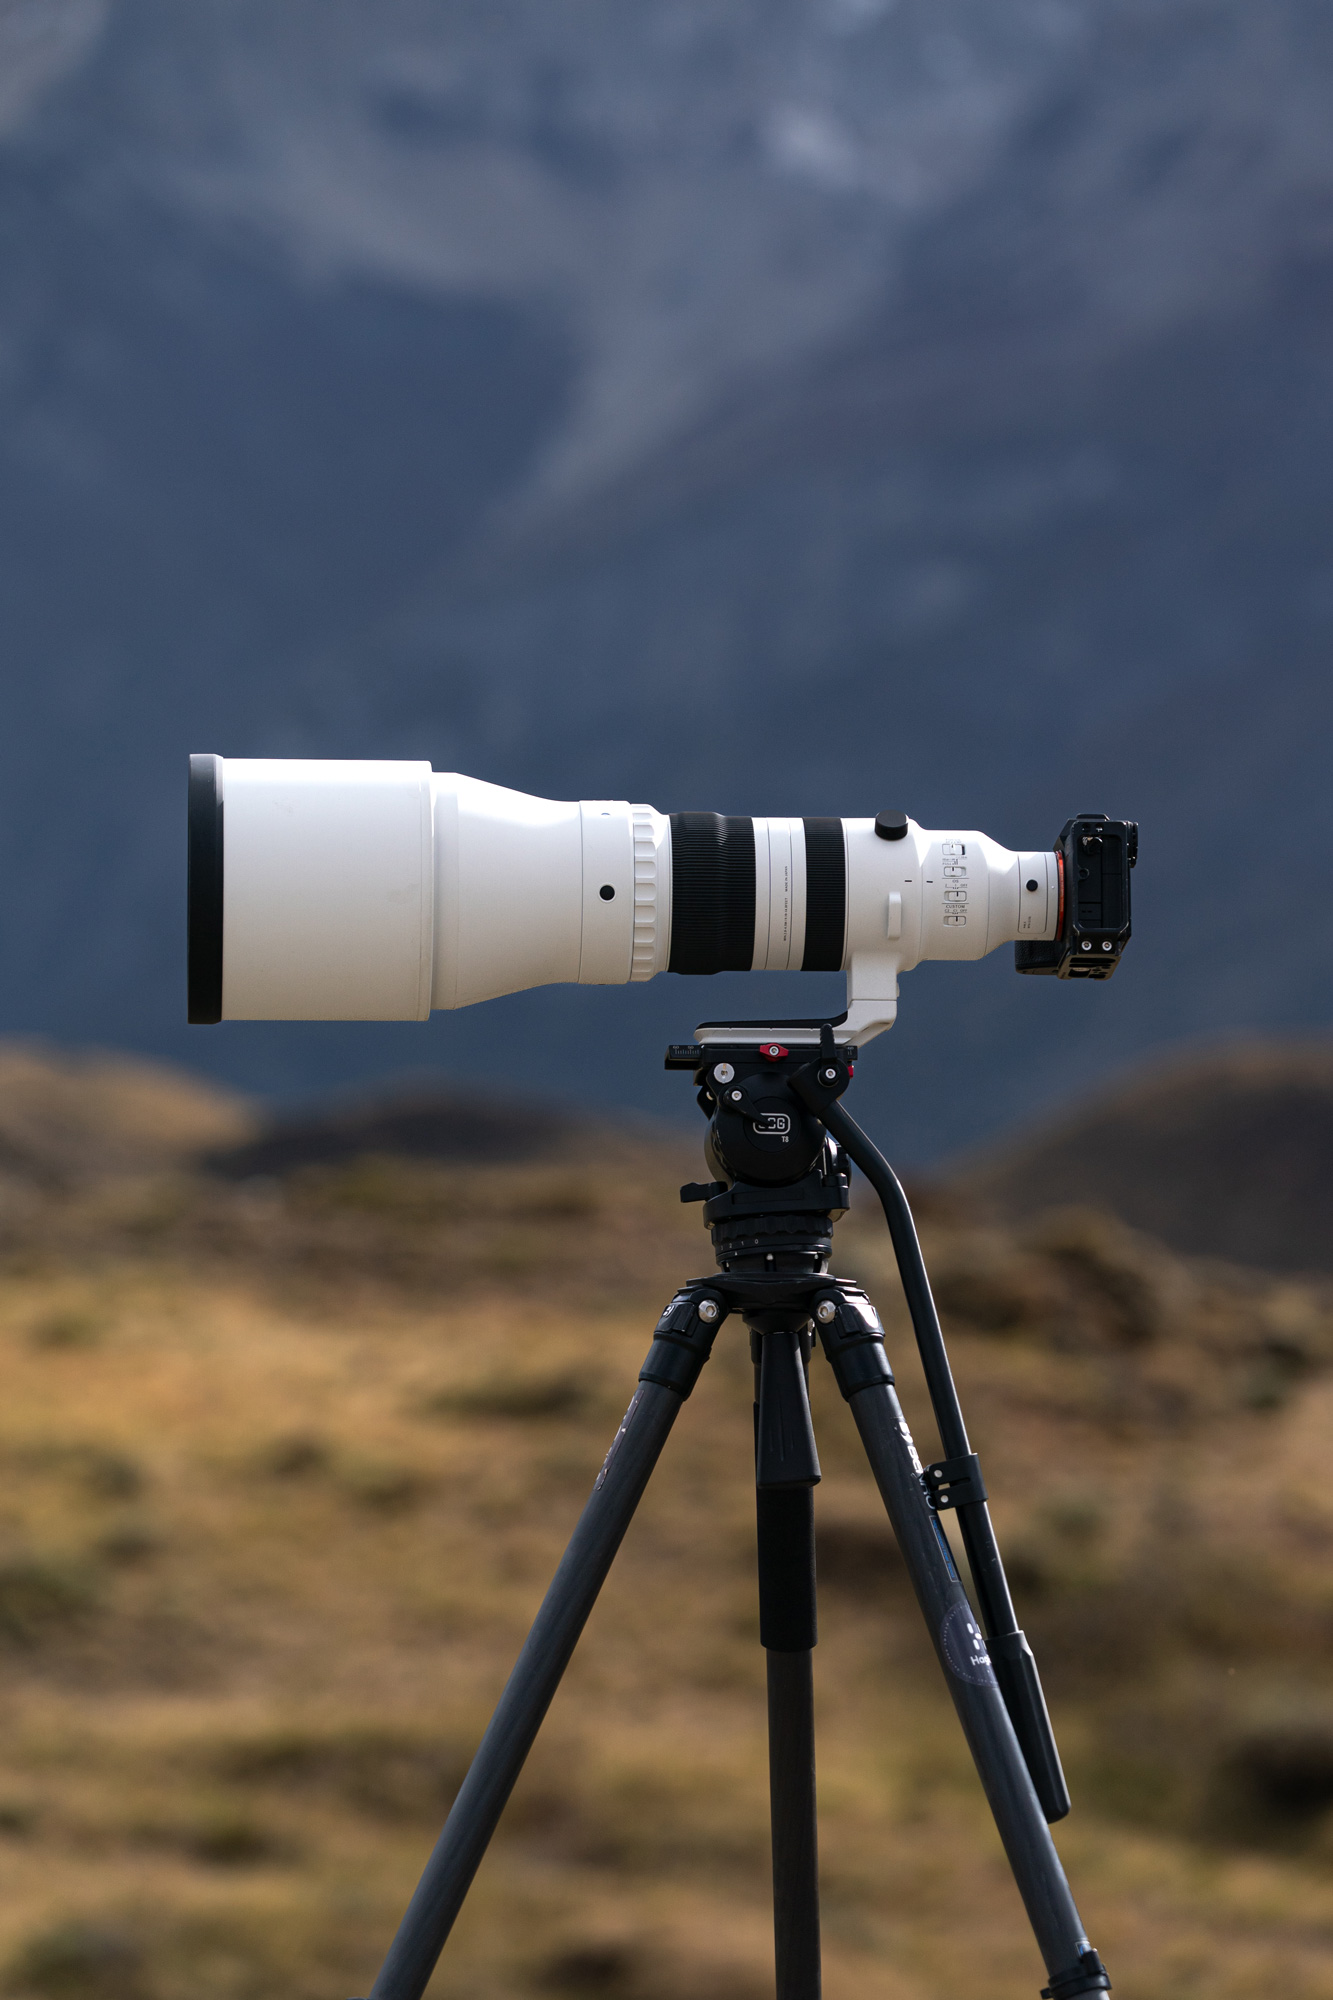
The 300-600mm F4 DG OS | Sports was absolutely perfect for photographing wildlife in the park. The optics are stunningly sharp with nice contrast and great color. The HLA autofocus motor is ultra fast, and when using Animal Eye AF in my camera, it locked on to my subject and consistently yielded professional results. The lens is big and fairly heavy, similar to 500mm and 600mm F4 primes from other lens makers. However, in direct comparisons to other photographers’ setups, mine was usually a bit smaller and lighter. I was able to hand hold the lens for numerous images, but I also had it mounted on a tripod for many of my photos and videos.
This lens can be hand held, but a sturdy tripod makes a day in the field much more practical.
One of my favorite features of the 300-600mm F4 DG OS | Sports is the fact that it’s a zoom that shoots like a prime. There were times when the pumas would come incredibly close, and while other photographers were forced to swap lenses to get the shot, I could simply zoom out! I also love the fast F4 constant aperture. I shot it wide open while recording video clips in pre-dawn light. For still images, the F4 aperture was wonderful for isolating my subjects are rally making them “pop” from their environments. The bottom line here is that you are really getting four ultra-quality F4 prime lenses in a single lens. Oh…and did I mention it’s half the price of one prime lens? Just incredible.
SIGMA 300-600mm F4 DG OS | Sports Sony a1 Camera 395mm, F4.5, 1/1600s, ISO 1000SIGMA 300-600mm F4 DG OS | Sports Sony a1 Camera 561mm, F4.5, 1/2000s, ISO 1000SIGMA 300-600mm F4 DG OS | Sports Sony a1 Camera 600mm, F4, 1/1000s, ISO 1000SIGMA 300-600mm F4 DG OS | Sports Sony a1 Camera 600mm, F4, 1/2000s, ISO 160
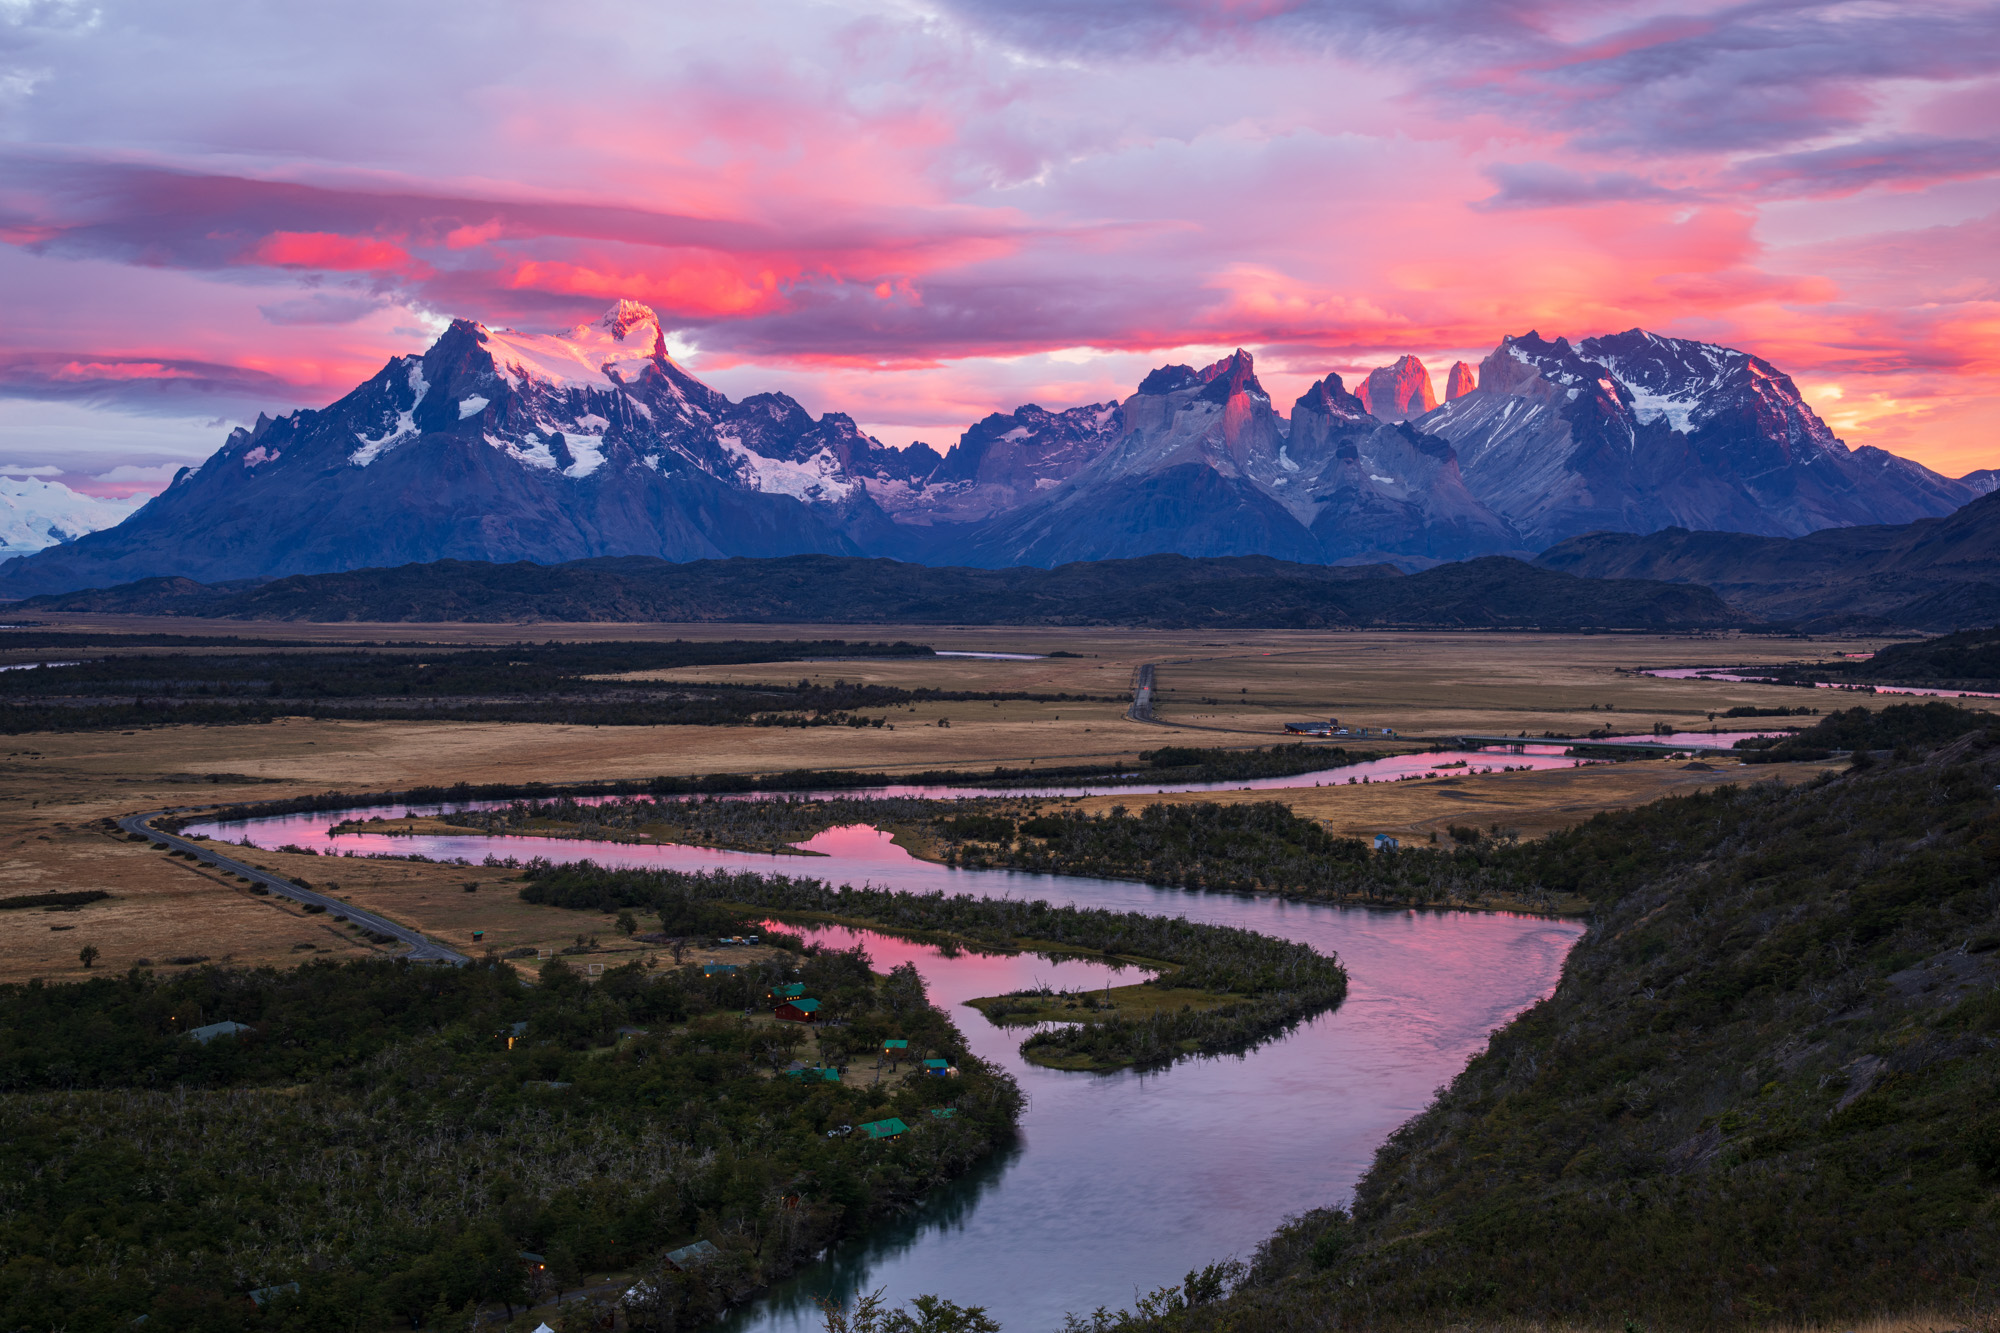
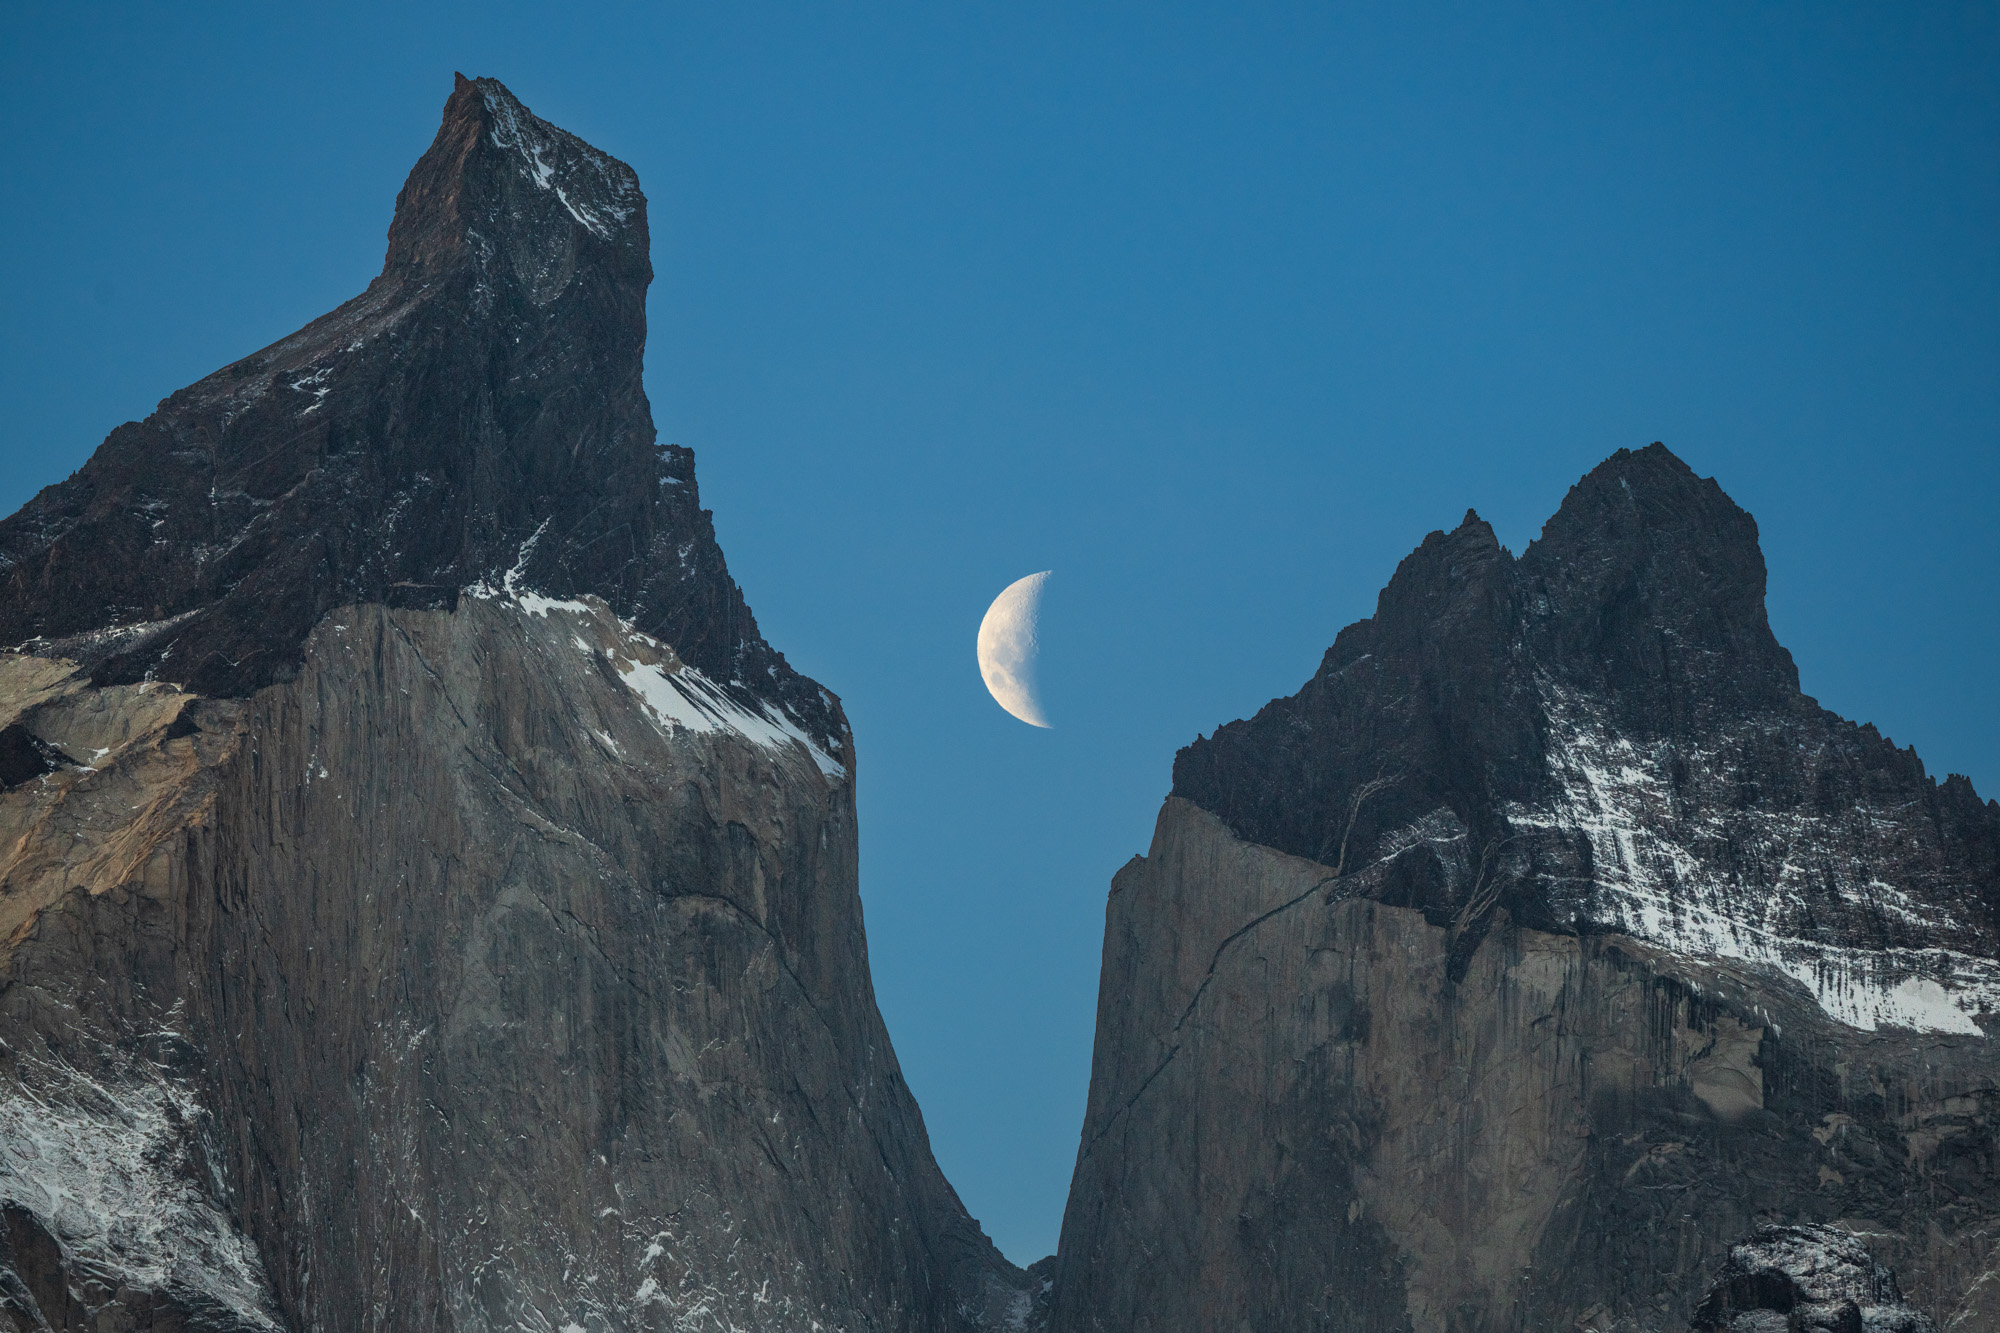
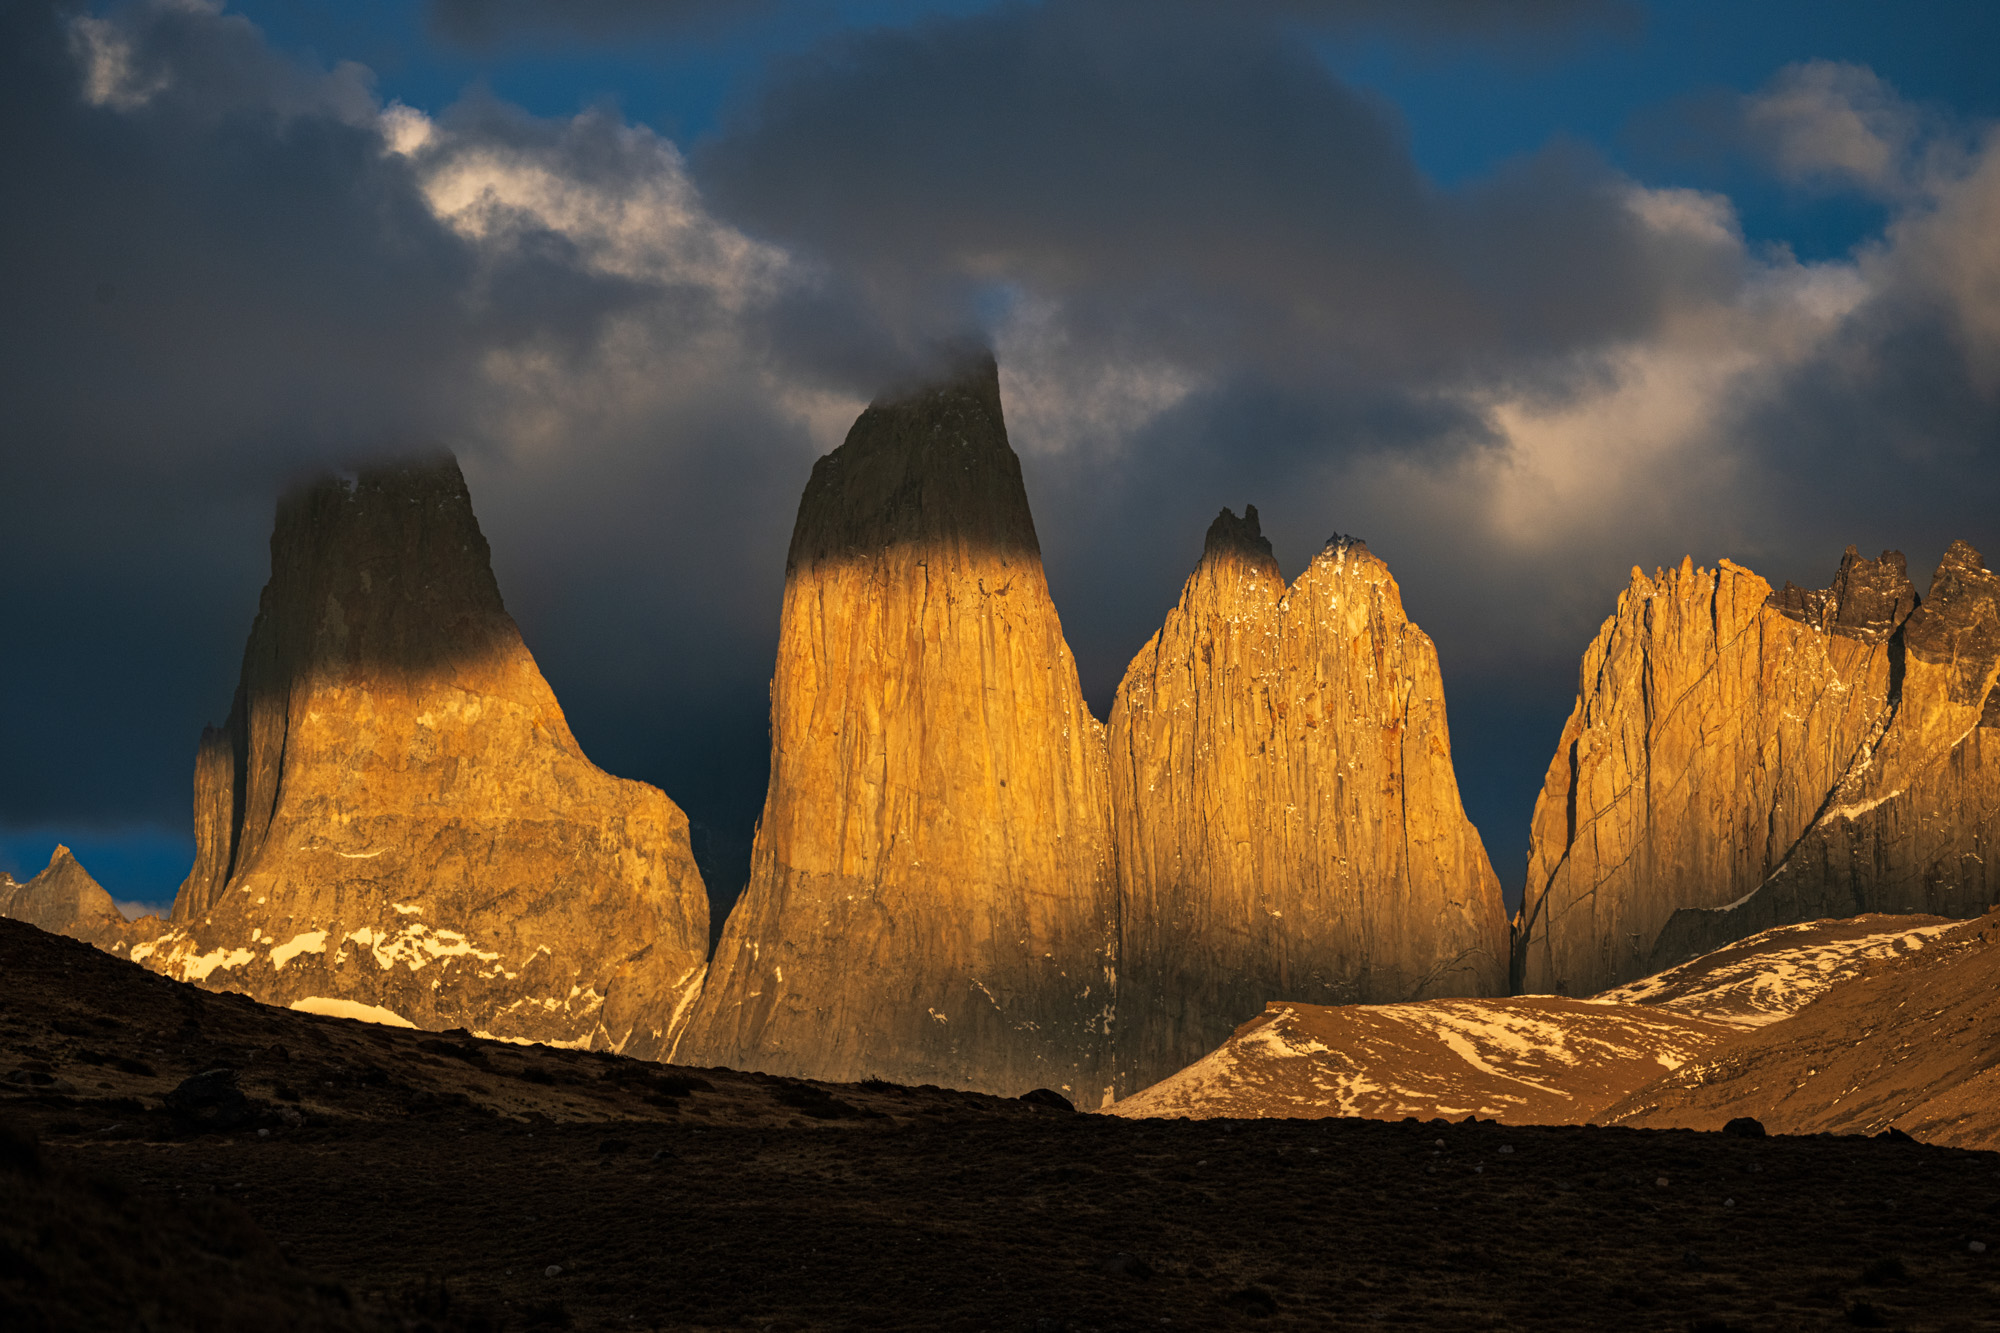
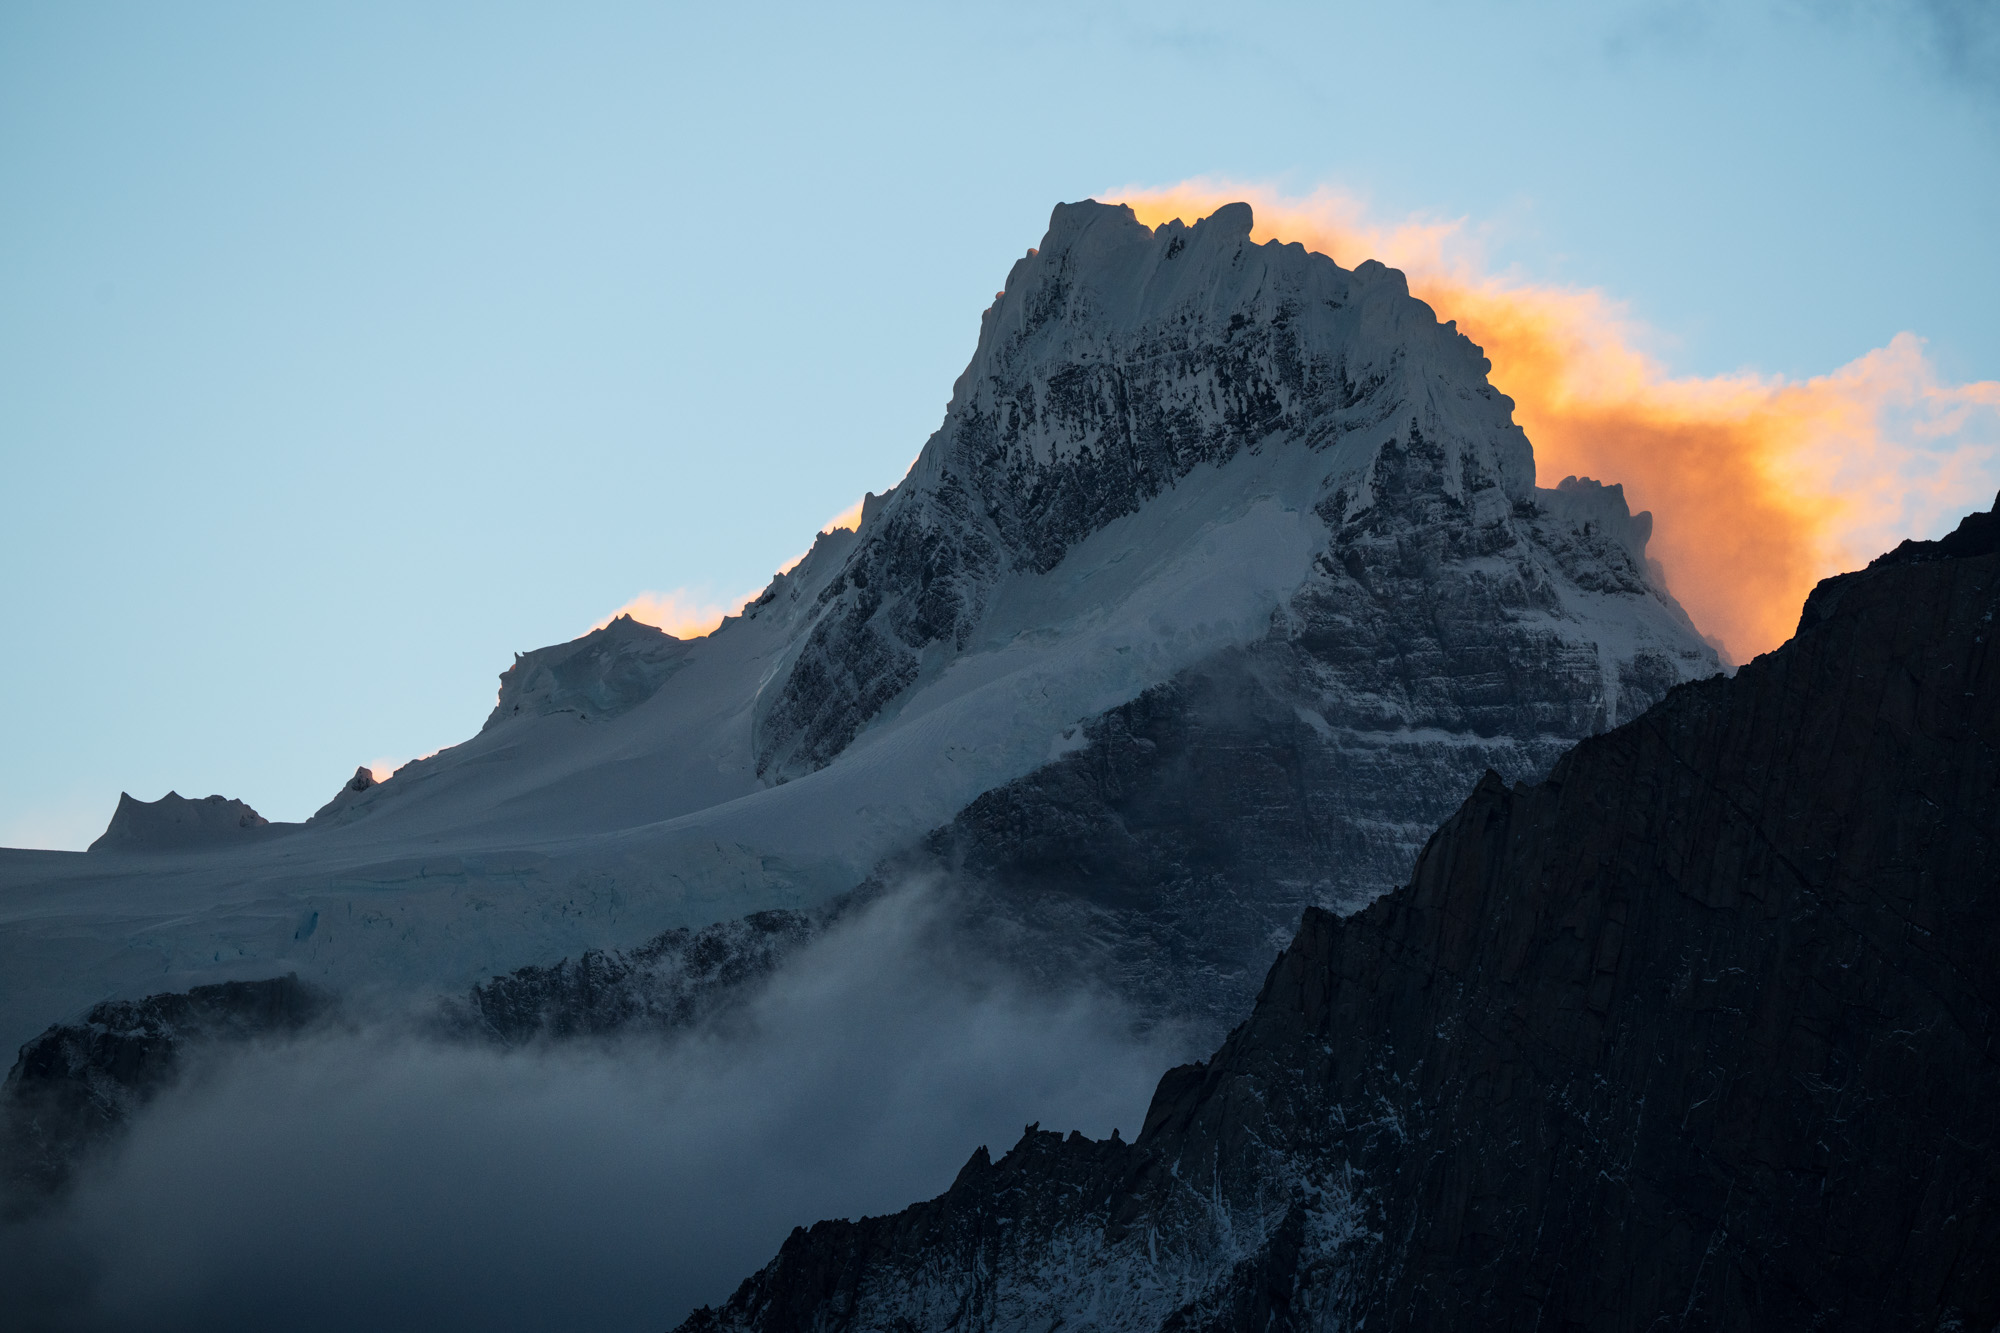
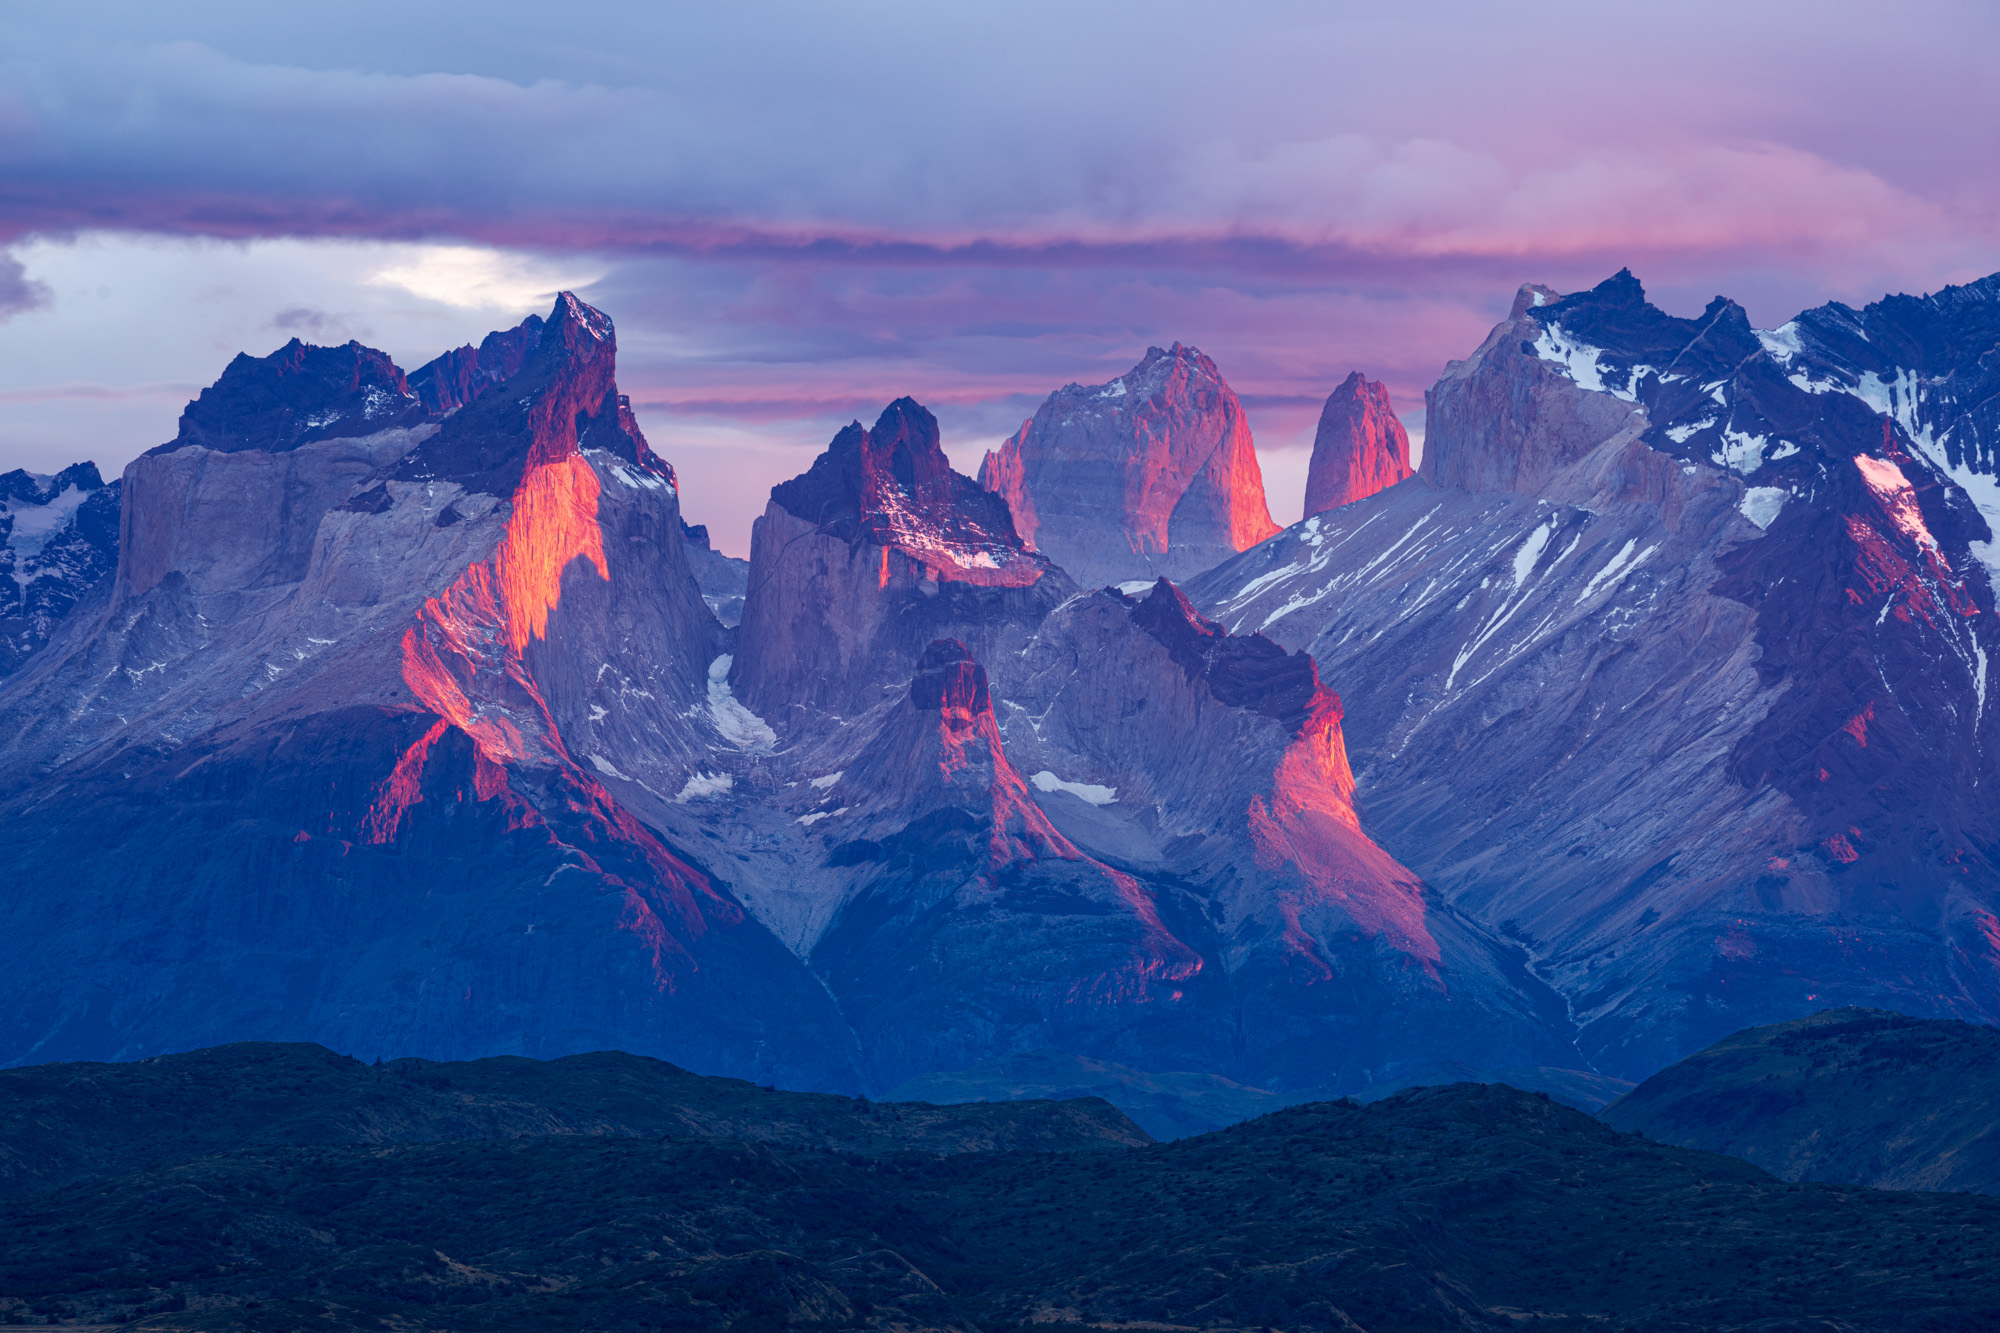
Torres del Paine National Park is well known to landscape photographers for the combination of lustrous low-angle light of the southern latitudes and soaring rock spires of the Cuernos and Towers. While most of my efforts were focused on pumas, I had to get a few images of this iconic place. With the 300-600mm F4 DG OS | Sports, I had the versatility to try different compositions without moving or changing lenses, not to mention gorgeous compression for unique-looking landscape photos.
SIGMA 300-600mm F4 DG OS | Sports Sony a1 Camera 300mm, F5.6, 1/500s, ISO 400SIGMA 300-600mm F4 DG OS | Sports Sony a1 Camera 300mm, F6.3, 1/800s, ISO 400SIGMA 300-600mm F4 DG OS | Sports Sony a1 Camera 451mm, F5.6, 1/800s, ISO 640
My Sigma lens kit for travel and storytelling
Flying halfway around the globe to one of the most photogenic places on earth, I’d be crazy not to also shoot some landscapes and culture. To help me tell those stories I brought a few of my favorite lenses: the Sigma 16-28mm F2.8 DG DN | Contemporary, 24-70mm F2.8 DG DN II | Art, and the 70-200mm F2.8 DG DN OS | Sports. This kit has traveled with me all over the world and images from them have been used for cover shots, features length editorial stories and major commercial ad campaigns. I trust this lens trio to get the job done beautifully and once again they handled everything I threw at them.
SIGMA 16-28mm F2.8 DG DN | Contemporary Sony a1 Camera 16mm, F3.5, 1/320s, ISO 2000SIGMA 24-70mm F2.8 DG DN II | Art Sony a1 Camera 40mm, F16, 30s, ISO 250
SIGMA 70-200mm F2.8 DG DN OS | Sports Sony a1 Camera 192mm, F9, 0.6s, ISO 100
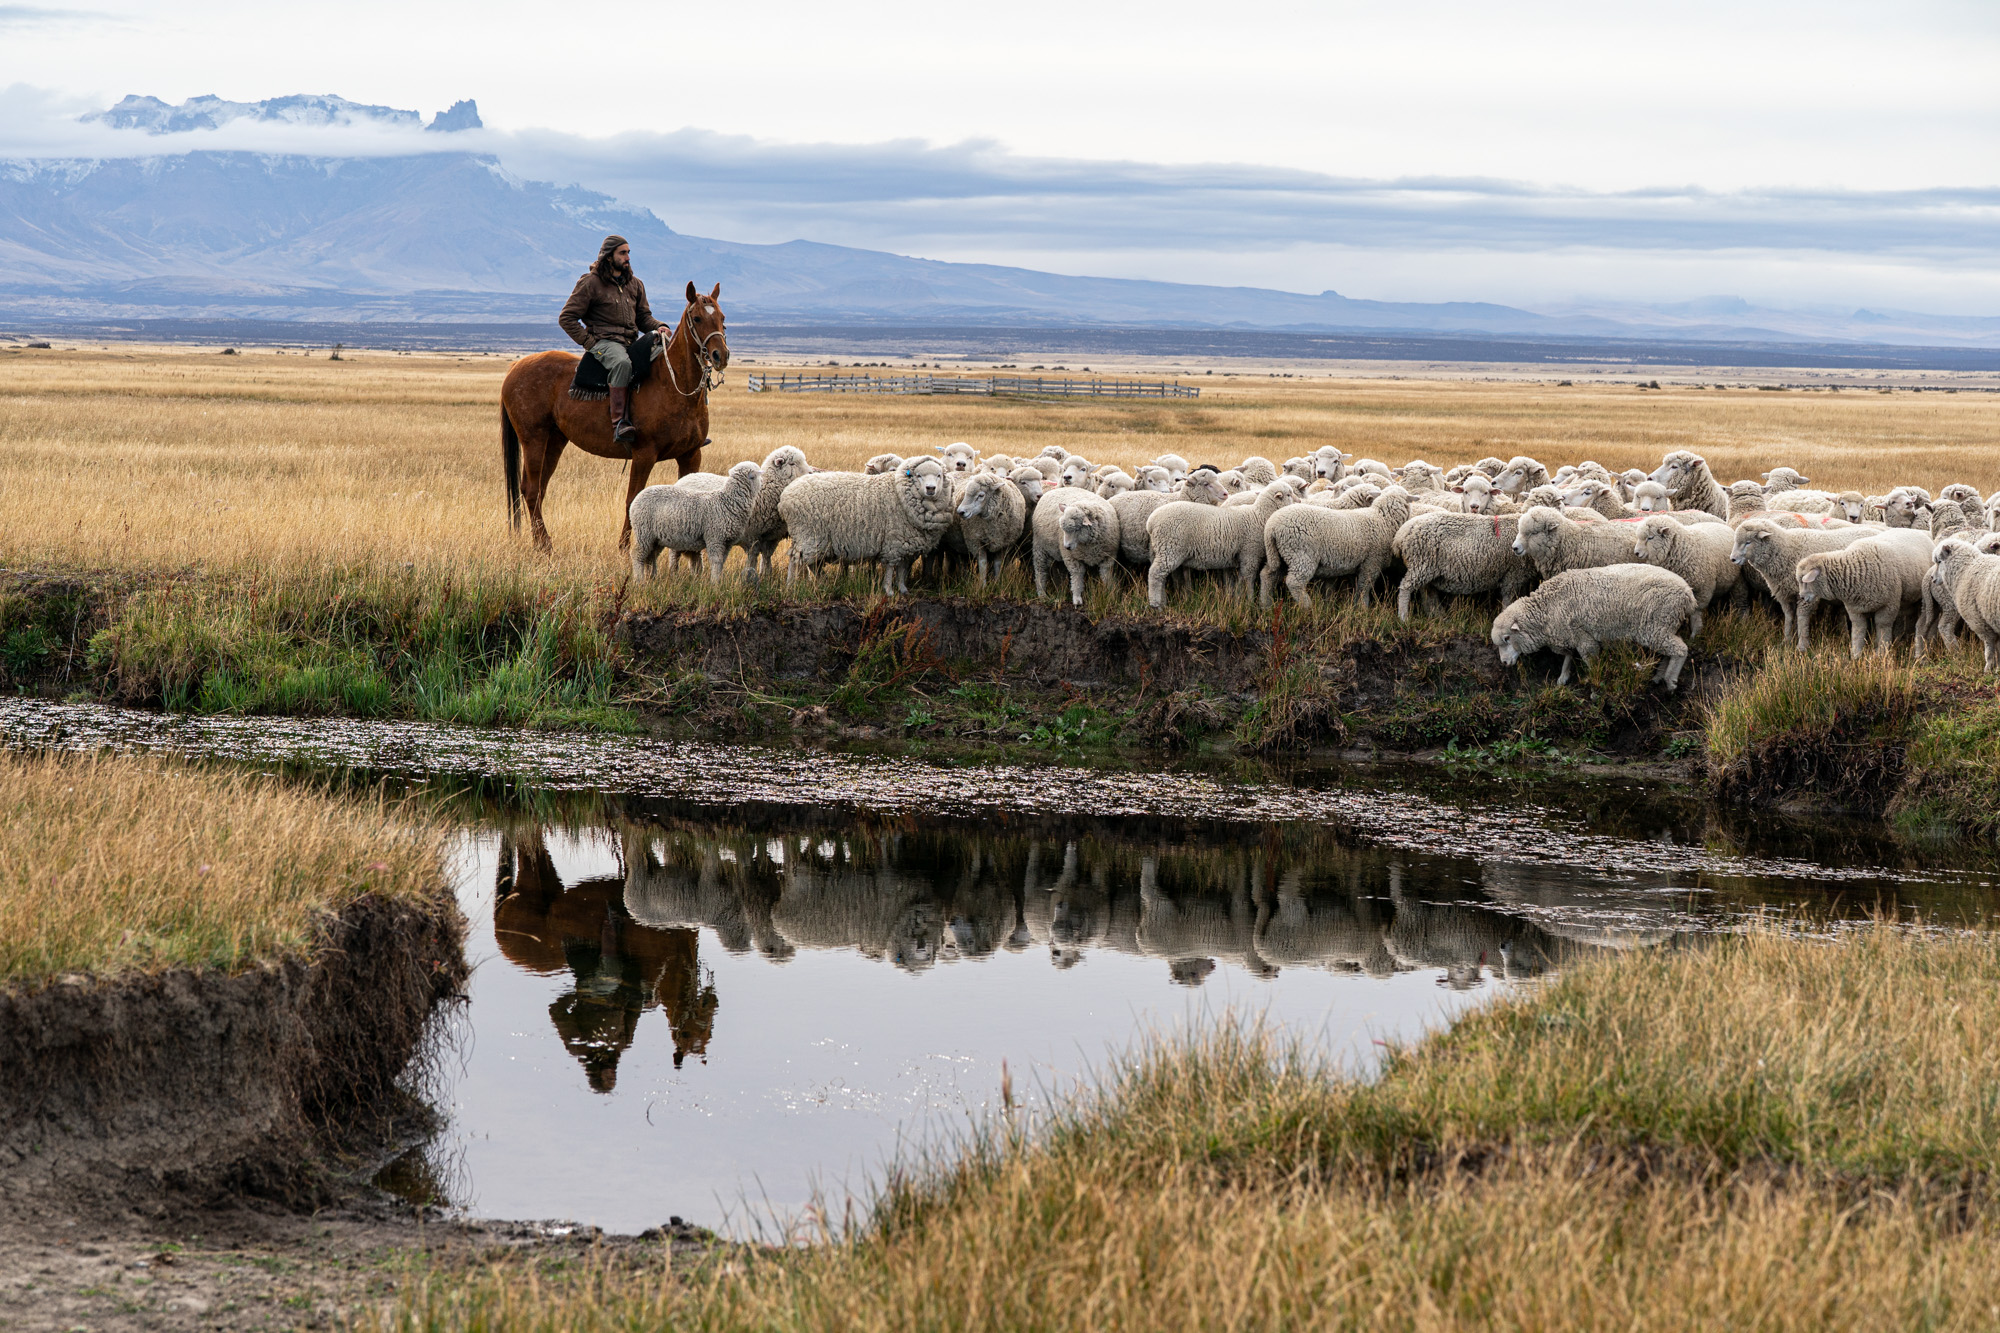
Another highlight was a visit to Estancia San Louis. This is a working sheep ranch long owned by a local family. While there, one of the gauchos was rounding up some sheep and even showed us how he sheared them. The gaucho working his dogs and sheep with the Towers in the background made for some very classic images of Patagonia and was a blast to photograph.
SIGMA 24-70mm F2.8 DG DN II | Art Sony a1 Camera 24mm, F9, 1/800s, ISO 800SIGMA 24-70mm F2.8 DG DN II | Art Sony a1 Camera 70mm, F6.3, 1/800s, ISO 400
I booked my trip to Patagonia though Chile Nativo. Their intimate knowledge of the area was evident, and the glamping (fancy camping) at Riverside Camp was incredibly cool. My guide, Santiago, was super helpful and made finding the pumas and the landscape areas very easy. The team was great to work with, and if you want to go I would highly recommend them. To get there, I flew to Punta Arenas and rented a car. You could also fly into Puerto Natales, which is closer to Torres del Paine, but is quite a bit more expensive.
Final thoughts
Whether you go for wildlife, landscapes or general travel, a trip to Patagonian Chile is something every adventure photographer should put on their list. If your itinerary includes wildlife photography, consider bringing the Sigma 300-600mm F4 DG OS | Sports lens. For me, it was critical to getting my very best images. And bring the rest of your Sigma lenses to photograph the people and the views. You won’t regret it. If you have any questions feel free to reach out. Hope to see you out there!