برچسب: Lightroom

  • Looking For Some Great Lightroom Tutorials – Check These Out!

    Looking For Some Great Lightroom Tutorials – Check These Out!

    [ad_1]

    Lightroom is a versatile program that has evolved over the years and comes with amazing tools that makes it a one stop platform for most beginner and experienced photographers. Most professional photographers rely on Lightroom because of the efficiency in batch processing files, making it a great hit among many wedding and event photographers including others.

    Besides, various features that help photographers organise their photos, sharing them as catalogs, using the creative cloud feature, etc., has made Lightroom a go to program for many photographers. If you are looking to improve your Lightroom skills or wish to learn more about the features that you do not use, here are a number of tutorials that will help you to understand Lightroom better.

    Photography is about spending time capturing images with your camera and spending little amount of time post-processing the images. There are times when photographers may hate editing or maybe need a quick boost to their images without spending much time. Lightroom comes with tools that can make editing a breeze. Read to find more!

    It doesn’t matter what program you use for editing, but it is important to have a specific workflow that can help you work faster and more efficiently to produce great results. Light room comes with rating systems, labels, tags, import settings, etc., that can make your work easier. This article shows how you can streamline your Lightroom workflow and save time.

    Photographers have a huge collection of photos from each session most of the time and sometimes photos are also scattered across several hard drives. It would be great to organise the photos and find the ones we’re looking for easily, without having too much trouble. Here are some ways to organise your images using lightroom.

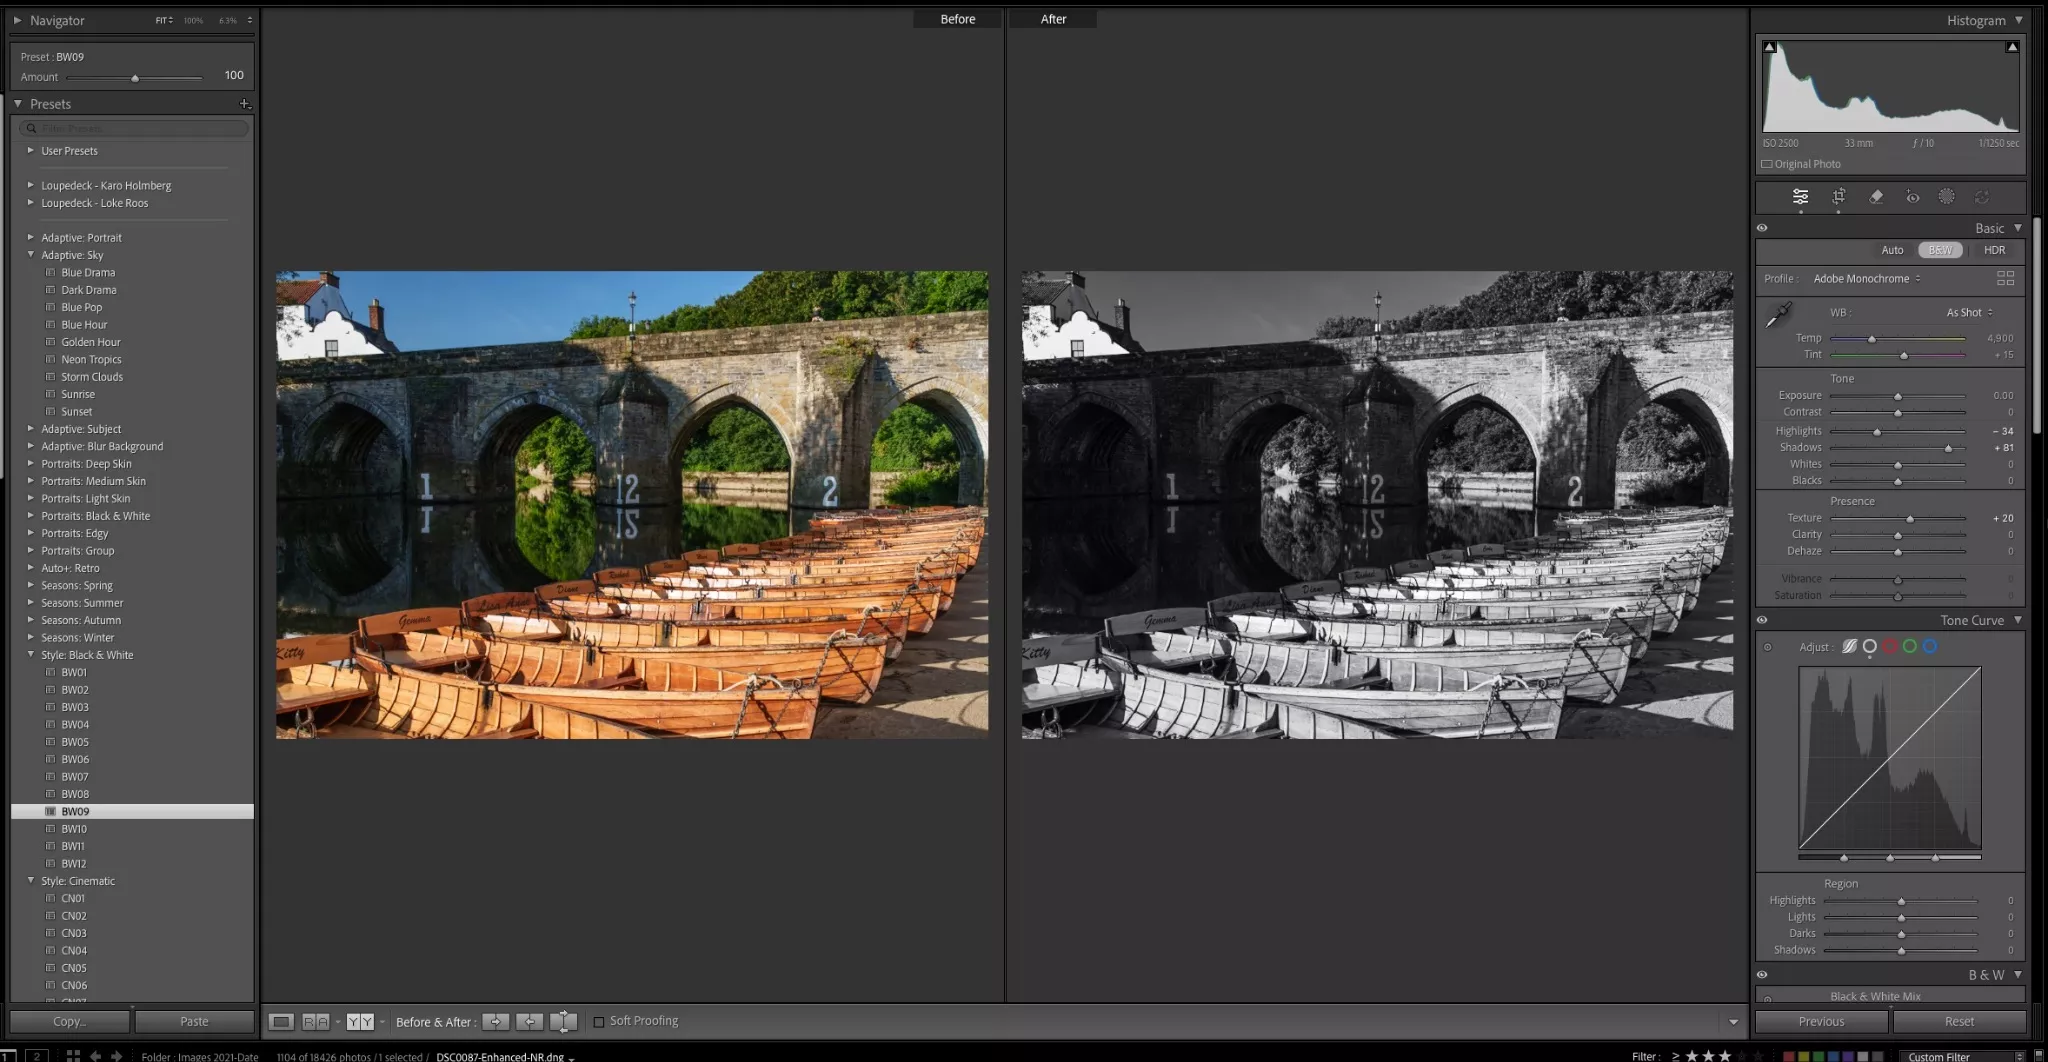
    Lightroom comes with a lot of powerful tools, most of them packed in the “Develop” module and most of the time if the image is captured well in camera, there are only a few subtle edits one needs to do, to make an image presentable. Some tools like the clarity, texture, dehaze and sharpening, if not used well, can make the image look overprocessed or awkward. This article talks about five subtle tools you should learn to use in Lightroom.

    Using the vertical tool manually in Lightroom. By Jason Row Photography.

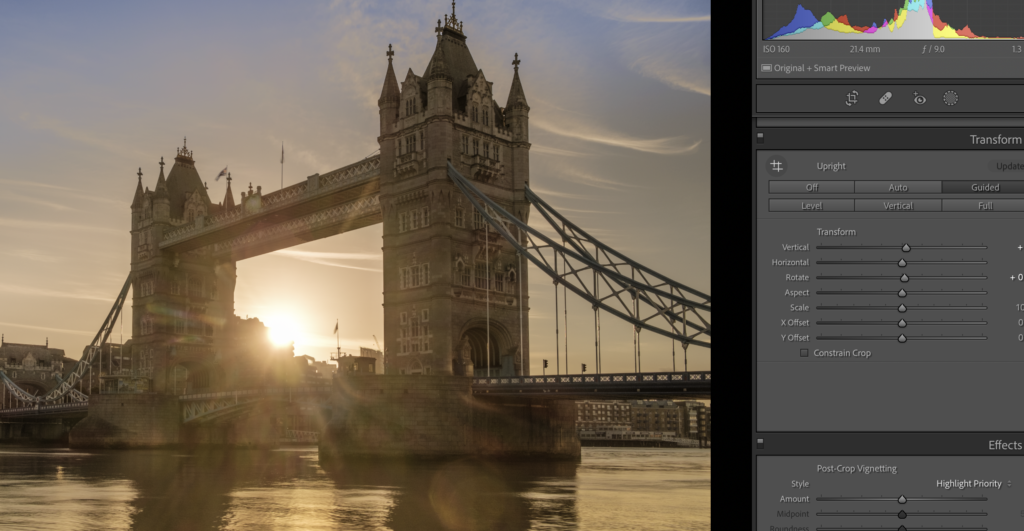
    If you are someone who has interests in architectural photography, chances are that when post-processing, you will need to correct the verticals and remove lens distortions. This may also apply sometimes to other genre in photography. This article talks about the transform and lens correction tools in Lightroom and why you need to use them.

    Lightroom provides a lot of tools to make a photographer’s workflow easier and faster. There are a lot of little things that photographers need to know in order to use this program efficiently. Who doesn’t love hacks in order to get editing jobs done easily? This article provides 10 hacks for Lightroom classic.

    The recent updates over the past year use AI technology to reduce the amount of time required to work on certain tasks within Lightroom. Some of these tools were not available in older versions of Lightroom and they can come in handy if required. Here are some quick but useful Lightroom tools that you should know.

    Lightroom as simple as it may seem, has some really powerful masking tools that make selective editing quite easier for photographers. Depending on what you need to mask, there are various masking options – using just a brush or select objects, subjects, sky, background, etc. Here is a quick guide on how to use the masking tool in Lightroom for the best results.

    Besides the basic colour corrections and other important tools that Lightroom provides, there is a separate section to colour grade photos if you are someone who wishes to bring in a cinematic or another specific look to your images. Lightroom has three colour wheels, one each to control the colours in the shadows, mid-tones and highlights. Check out this article to find out how to use these wheels.

    If you want to work faster in Lightroom, you need to get into your Lightroom settings and makes some changes to improve its performance. Many beginners may not be aware of these settings. Most of the issues arise when working in the develop module or even the simple process of scrolling across to the other images may be slower. Here are some ways to get better performance in Lightroom Classic.

    Some users may not be aware of the fact that Lightroom can also be used to edit videos. Although it does not have any advanced tools for video editing, if you are someone who occasionally captures a couple of videos and wishes to make some basic edits, then Lightroom can be useful if you do not want to invest in other expensive video editing programs. Here are the pros and cons along with how to edit a video using Lightroom.

    Lastly, if you are someone who likes to make edits on the go on your mobile device, Lightroom has a mobile app that can also sync your edits via creative cloud so you can continue from where you left, when working on this app from your computer. Here is a quick guide to using the Lightroom mobile app.

    Further Reading


    [ad_2]

    Source link

  • Hate Editing? Try These Lightroom Tips

    Hate Editing? Try These Lightroom Tips

    [ad_1]

    For some, poring over Lightroom for hours on end to create the perfect edit, is the only way to go. For others, the mere thought of sitting down at a computer and fashioning raws into something more usable is at best an inspiration for procrastination and at worst something to avoid all together.

    Lightroom, particularly if you do not use it much, can be a daunting and overwhelming program. But it doesn’t have to be that way. If you adhere to the 1/99% rule you will soon find yourself getting great shots with minimal effort. The 1/99% rule suggests that you use 1% of the features, 99% of the time. That is something that is perfectly possible with Lightroom. Today we are going to tell you how.

    Preselection

    One of the biggest mistakes you can make, and one that will definitely put you off editing, is to simply sit with Lightroom and edit each and every photo. This is a time consuming and fruitless pursuit.

    It’s much better to use Lightroom’s simple but powerful rating system to find the best images to edit. In the Library module, open the first image of the shoot. You can create your own system but for simplicity, if the image is not worth editing, do not give it a rating. If it’s a maybe, assign it a 3 star rating. If it’s a must edit, give it 5 stars. You can easily assign the star rating using the number keys on your keyboard. Then hit the right arrow to advance to the next image and rate that. In no time at all you will have a selection of 5 star images to edit. Use the filters at the top of the Library module to filter 5 star images only.

    Screenshot of Lightroom Library Moduile with images rated by stars
    Knowing which images you want to edit is half the battle.

    Make Use Of Presets

    If you really do struggle with editing, then presets are the way to go. Whilst there are a number of photographers that sell presets, there is also a very good selection provided by Adobe.

    To apply a preset open the image in the “Develop” Module. On the left side of the screen you will see a plethora of different types. You don’t actually have to click on a preset to see what it will look like on your image. Instead simply roll your cursor over each of them. When you find one that you like, click it and the preset will be applied.

    If there is a particular preset that you find yourself gravitating to often, you can choose to apply it on import. To do this, in the import window, to the right click on “Develop Settings.” You will see all the presets that you have installed in a drop down list. Simply select the one you like and all images will have that preset applied as they are imported.

    Don’t worry if you are not happy, you can clear any preset by right clicking on it in the “Library” module and selecting “Develop Settings” – “Reset.” This will return the image to its out of camera look. You can do this to multiple images by holding “CMD/CTR” and left clicking all the images you wish to reset. Then with the mouse over one of the selected images, use the same procedure.

    Screenshot of before and after images using Lightroom Presets
    Carefully chosen presets can save large amounts of time

    If you prefer not to use a preset, Lightroom allows you to make automatic corrections. These can be very useful for very quick edits.

    In the “Develop” Module under the “Basic” tools there are two “Auto” options. The first, at the very top is called “Auto.” When you click this, Lightroom will work out what it thinks the image needs based on the histogram. It will apply exposure, contrast and saturation as well as lifting shadows and dropping highlights. It’s not a perfect tool, but for quick edits, it does a decent job.

    The other very useful tool is the “White Balance dropper” tool. It is found at the top left of the White Balance section.

    To use this tool simply click on it and move the dropper to a section of the image that you know to be a neutral grey. Lightroom will then correct the white balance to make sure that grey area becomes neutral.

    Screenshot of Auto tools in the Lightroom Develop module
    Make use of Lightroom’s auto tools

    Use The Basic Editing Sliders

    If you want to have a little more control over your images, then confining yourself to the basic correction tools is a good way to go. These are Exposure, Contrast, Highlights, Shadows, Blacks and Whites.

    For a very simple, fast edit, first move the Exposure slider, to get the bulk of the Histogram to the middle. Then simply move the Black slider until the edge of the histogram hits the left side. Do the same with the White slider until the histogram hits the right side. This will give you optimum contrast and exposure. If you want to edit a touch more, use the Highlight and Shadow tool to get the look you want.

    If you like that look you can then apply it easily to the other 5 star images in your shoot. To do this, simply right click on the edited image, select “Settings” – “Copy Setting” then from the window click ‘Check All.”

    Now you can scroll through your 5 star images and apply that setting to each one. To do that, bulk select the images in the “Library” Module, right click on one of them and select “Develop Settings” – “Paste Settings.” You might need to go back and tweak one or two, but overall this should give you a fast and consistent edit.

    Screenshot of a simple, basic edit in Lightroom
    Roker lighthouse in Sunderland showing a minimal edit in Lightroom
    Use just the 6 basic sliders. By Jason Row Photography

    Find A Workflow That Suits You

    Repetition is a good way to get efficient in Lightroom, so developing your own short workflow will help you breeze through the editing process. It doesn’t have to be complicated, just import, rate, quick edit and export the ones you want to show.

    By repeating the same workflow you will soon find yourself being able to edit images in minutes rather than hours.

    Editing can be an off putter to some photographers. It can be time consuming and frustrating. However using some or all of the tips above, you will soon find editing in Lightroom doesn’t have to be a chore. The end benefit will be a definite upturn in the quality of your images. That has to be a win-win.

    Further Reading


    [ad_2]

    Source link

  • Editing Minimalistic Photography in Lightroom — Mikko Lagerstedt

    Editing Minimalistic Photography in Lightroom — Mikko Lagerstedt

    [ad_1]

    You can use multiple masks and make highly complex selections.

    You can also use the following manual masking tools:

    • Select the Graduated Filter tool from the toolbar on the right side of the screen. This tool allows you to apply a gradient effect to your photo, which can help draw the viewer’s attention to a specific area of the image.

    To use the graduated filter, click and drag on the part of the image where you want the effect to start. Then, release the mouse button where you want the effect to end. It will create a gradient effect that gradually changes the photo’s exposure, contrast, saturation, or other settings.

    • Next, you can use the Radial Filter tool to apply a circular gradient effect to your photo. It can help create a vignette effect or draw attention to a particular image area. To use the radial filter, click and drag on the part of the image where you want the center of the effect to be, and then release the mouse button to set the radius of the effect.

    • Finally, you can use the brush tool to apply effects to specific areas of the photo selectively. Select the brush tool from the toolbar on the right side of the screen and then adjust the brush settings to control the brush’s size, hardness, and other properties. Then, brush over the areas of the photo where you want the effect to be applied.

    Using these tools, you can create a more minimalistic photograph by selectively applying adjustments to specific areas of the image. It can help draw the viewer’s attention to the essential parts of the photo and create a more cohesive and balanced composition.

    4. REMOVING DISTRACTIONS

    One of the most helpful ways to make your photograph more minimalistic is to remove distracting elements. In Lightroom, the healing tool is the tool you can use to get rid of unnecessary elements. This tool allows you to selectively remove unwanted objects from your photo, which can help create a more minimalistic and cohesive composition.

    There are three different tools inside the healing panel in the Lightroom CC 2022 version. The Content-Aware Remove, Healing, and Clone tool.

    1. The Content-Aware Remove tool tries to automatically remove selected distractions without suggesting an area to apply with.

    2. The healing tool suggests a replacement for the spot you are trying to remove and uses an algorithm to match the color and light of the applied area.

    3. The clone tool clones an area you want to remove.

    Use the cropping and straightening tools to remove distractions and frame the photograph to emphasize the subject.


    [ad_2]

    Source link