برچسب: Editing

  • What Is Photo Editing: Definition + Tips (2025)

    What Is Photo Editing: Definition + Tips (2025)


    Photo editing is more accessible—and essential—than ever. Whether you’re a business owner, ecommerce seller, or busy creative, knowing what photo editing is (and isn’t) can help you elevate your visuals and reach your goals faster. 

    In the following guide to photo editing, you’ll learn: 

    • What photo editing means (and why it matters)
    • Different types of photo editing, from simple to complex
    • Real-world examples of edits for portrait, sports, and product photography

    And if you’re ready to level up your own photo edits, check out our free tutorials and professional editing services.

    What is photo editing?

    Photo editing is the act of image enhancement and manipulation. This process is usually done with a digital photo editing software. Photo editing can involve basic tweaks like when you crop and resize images or adjust saturation. It also includes advanced techniques like swapping faces or photo retouching to get rid of distracting elements or unwanted objects.

    Some image editing techniques are done manually, while others are conducted through automated photo editing tools and software. Most edits to digital photography involve some one or a few photo editing programs. Some edits are even done offline on actual photographs, posters, or other printed collateral without any image editing software.

    Other terms for photo editing include:

    • Image editing
    • Post-processing
    • Image/photo manipulation
    • Photoshopping
    • Image/photo enhancement

    Let us look after your image edits, so you can get back to the fun stuff. Try Path free.

    The importance of photo editing

    Editing helps you fine tune and get the best image possible, as close to what you imagined when you took the photo (or better perhaps). Niche photographers can hone and emphasize their personal style. And for businesses, editing helps cement branding and optimize for business goals.

    Photo editing is particularly important for ecommerce companies. Image quality directly affects people’s opinion of the product and sales numbers. If you have ugly photos, it’s going to be tough to convince a shopper to purchase your product. 

    Types of photo editing

    There are many ways to edit a photo—some simple and others more complicated.

    Many people can figure out simple photo editing techniques on their own—though this does require time and patience. More complex adjustments may require using dedicated programs with specific photo editing features or hiring a trained professional editor.

    Simple photo editing techniques include:

    • Straighten: adjust the horizon of the photo

    Side-by-side comparison of cropped and straightened pink shoes against a pink background.

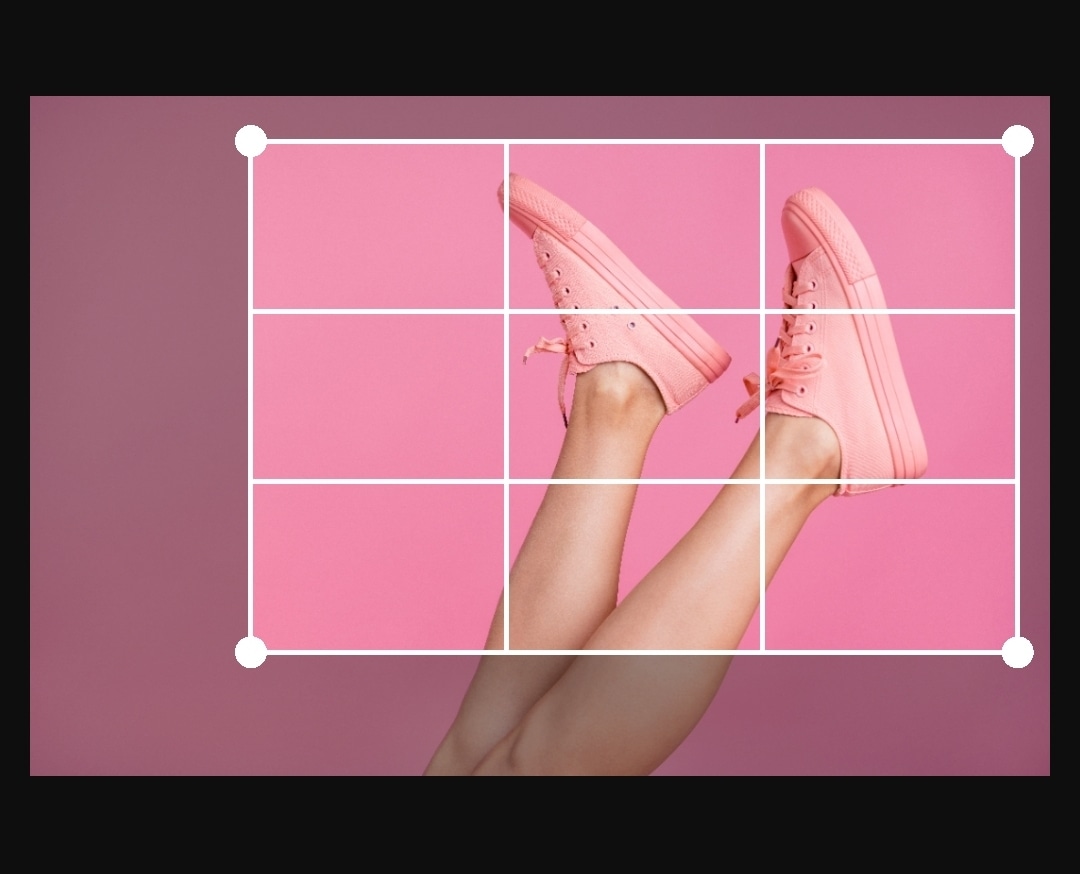
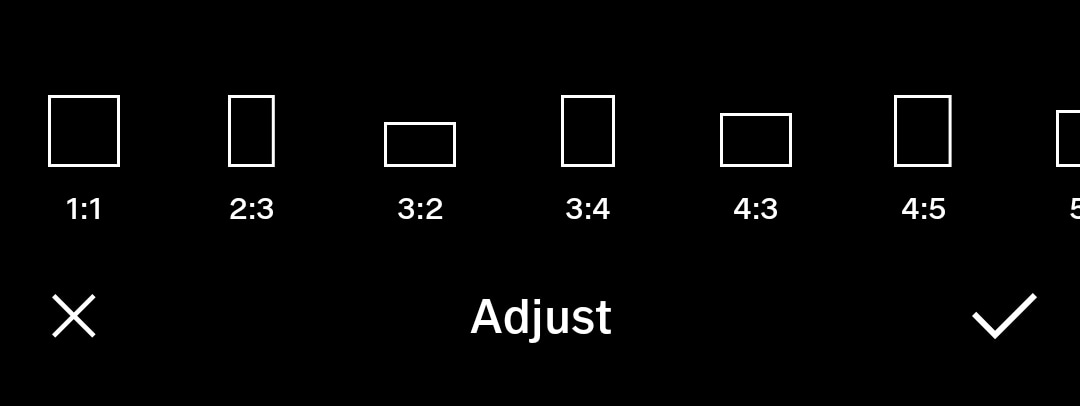
    • Crop: image cropping involves trimming out a portion (usually peripheral) of the image to help draw attention to the subject or otherwise improve the composition

    Pink sneakers on pink background with cropping grid overlay for adjustment.

    • Resize: adjust the dimensions of the image

    Crop ratio selection menu showing various aspect ratios with adjust option.

    • Sharpen: enhance the definition of the edges in an image (won’t make a blurry image in-focus)
    • Noise reduction: smoothing the picture out, typically accomplished by reducing the pixel size
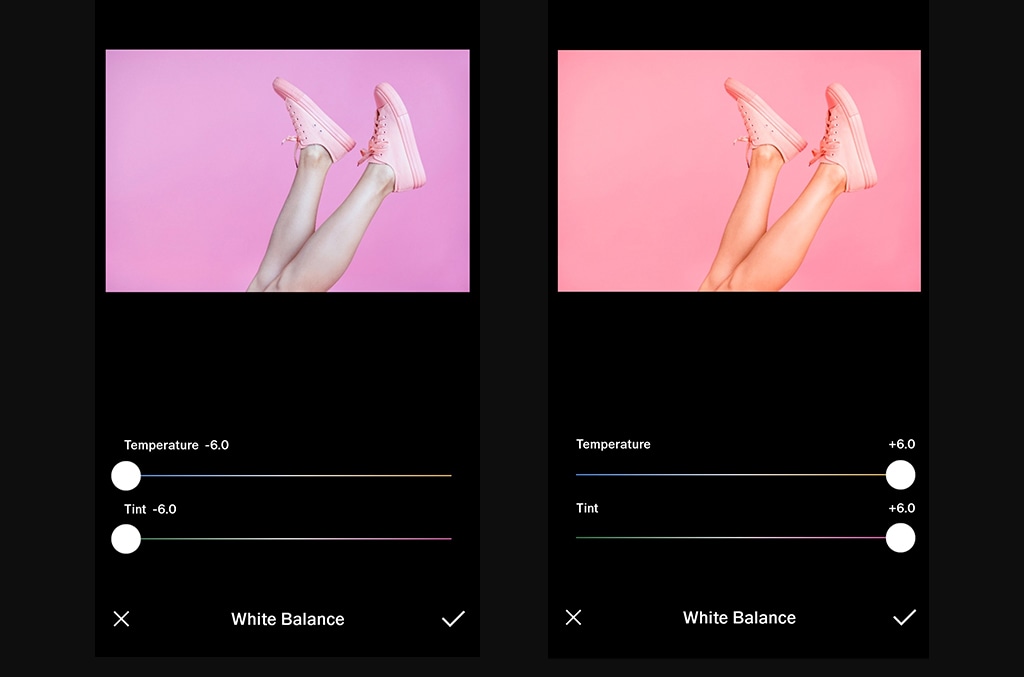
    • White balance: the color of the light in the image

    Comparison of white balance adjustment for pink shoes, showing cooler and warmer temperature and tint settings.

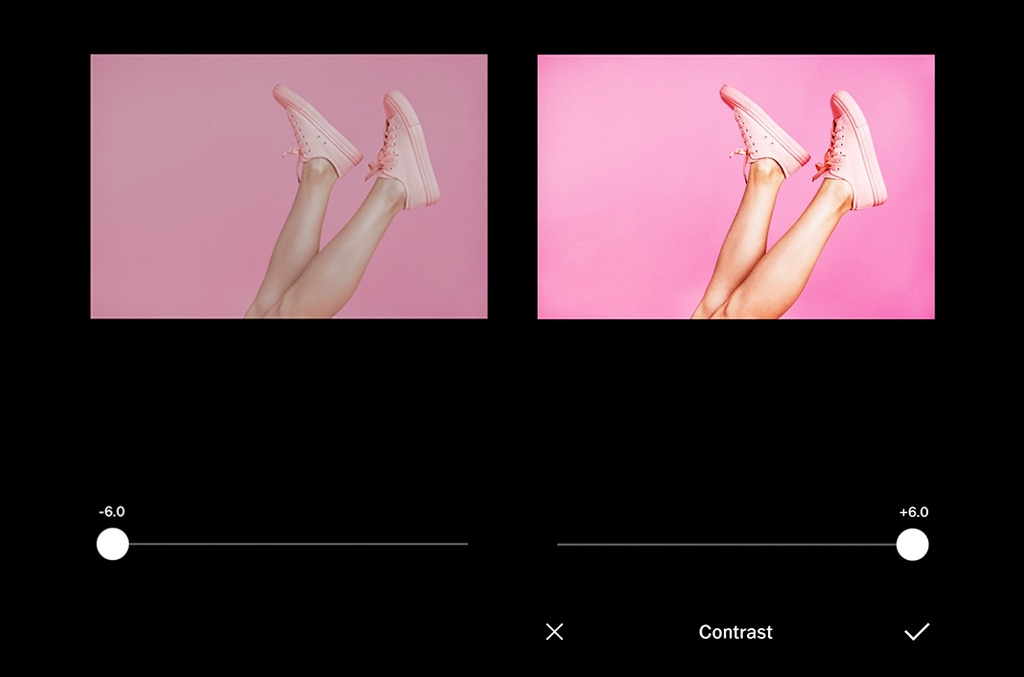
    • Contrast: higher contrast makes an image more punchy, while lower contrast makes it flatter in color

    Side-by-side contrast adjustment of pink shoes on pink background, showing low and high contrast levels.

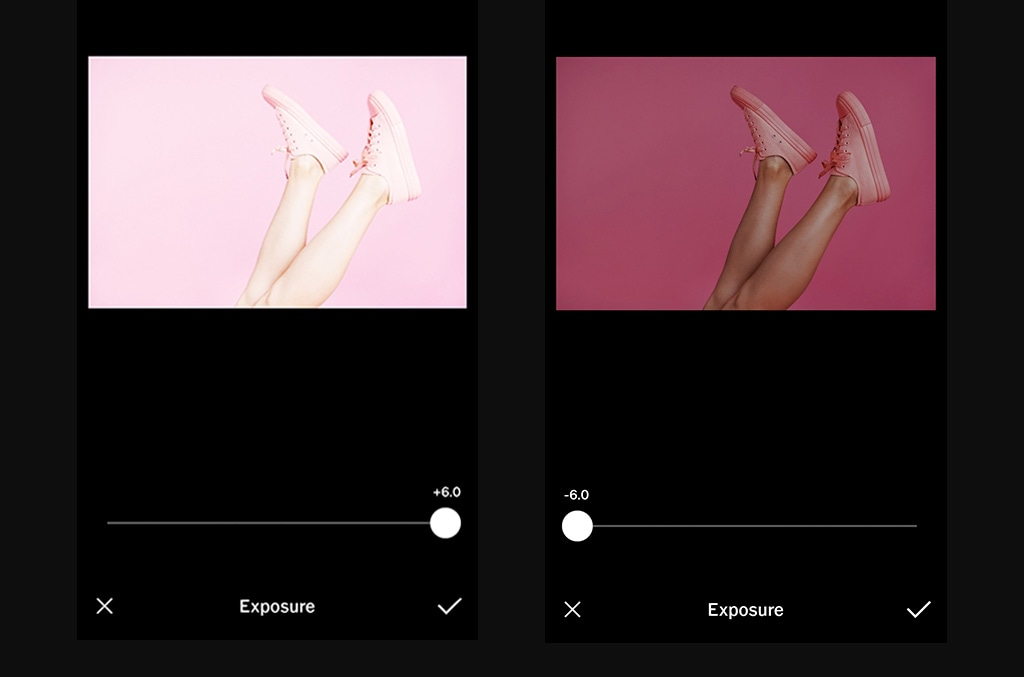
    • Exposure: the brightness of the photo

    Side-by-side exposure adjustment of pink shoes on pink background, showing low and high exposure levels.

    • Lens correction: lessens the effect(s) of the camera lens
    • Color adjustments: change the color of an item or element in the photo
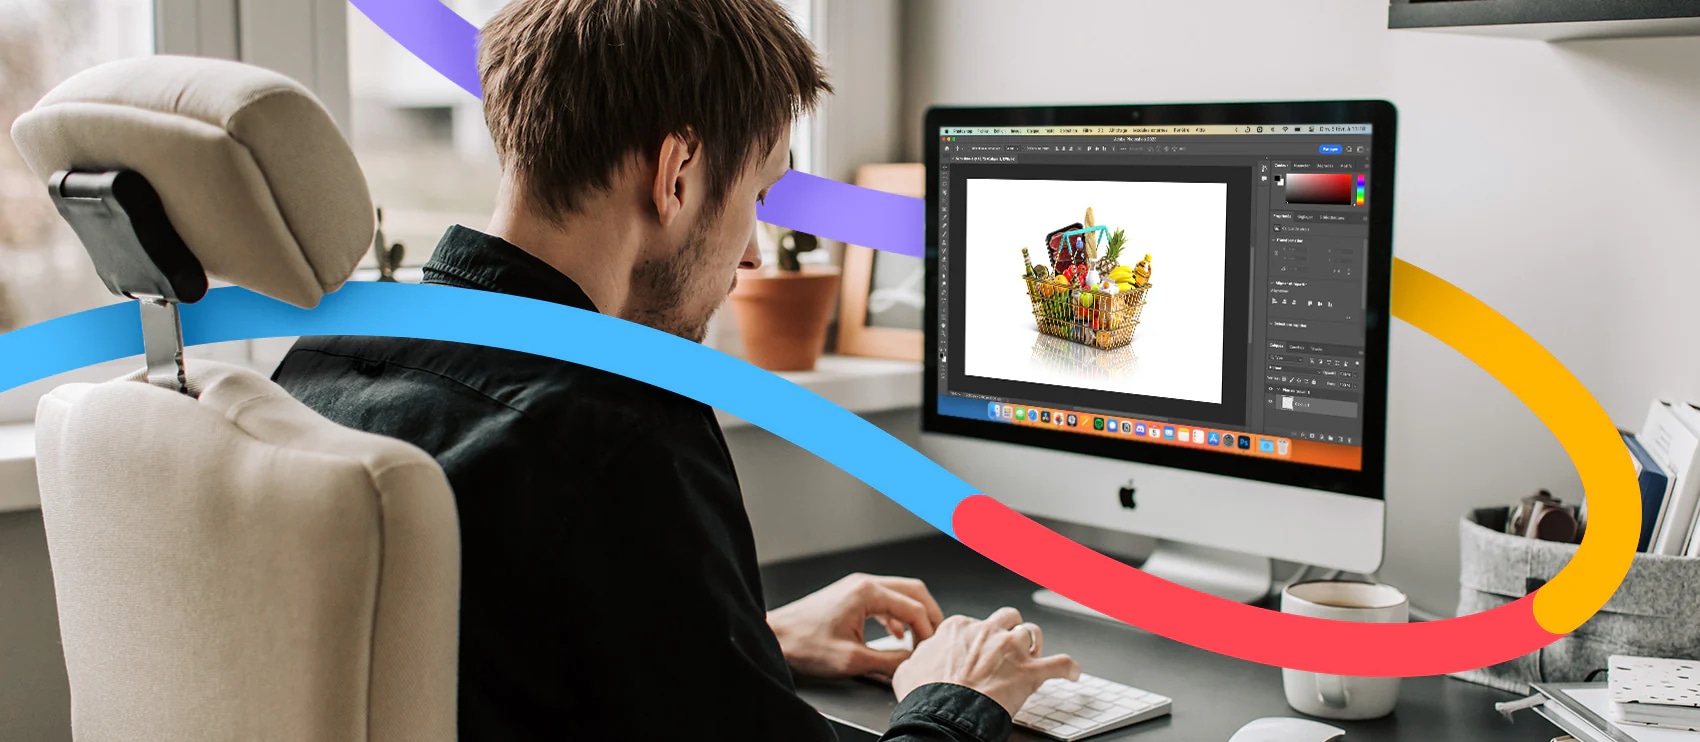
    • Background removal: delete the background from the image, isolating the subject (this is often used for white background product photography)

    Smiling woman with curly hair in a striped top, isolated on a transparent background.

    More complex techniques include:

    • Clipping paths: vector path that differentiates the part of the image that’s visible and the part that’s transparent (extracts a subject or element from an image)
    • Portrait corrections: complexion touch-ups and enhancements
    • Drop and reflection shadow: create and adjust shadows
    • Special effects: this can mean an array of things, from animation to adding weather conditions like fog or snow
    • Adjusting text and visuals: add overlays or manipulate what’s already there
    • Photo stitching: when you seamlessly put two images together to make it look as though they were shot that way
    • Photo masking and Layers: the process of hiding and revealing specified portions of an image
    • Mirror effect: when you create a perfectly symmetrical photo, often used for apparel product shots

    Get pro image editing from just 25¢ per image

    Pixel editing and parametric image editing

    Two methods of digital photo editing are pixel editing and parametric image editing. Let’s look at their definitions:

    Close-up of a pixelated image in Adobe Photoshop, showing toolbar and grid view.

    What is pixel editing?

    Pixel editing, or pixel-level editing, is when you alter an image at the pixel level. Because you’re altering the pixels themselves, this also permanently changes the image file. That’s why pixel editing is considered a destructive form of photo editing because it’s not as easy to undo the changes and restore the original file.

    Pixel editing allows you to make extremely detailed edits and accomplish certain functions that parametric image editing can’t (like CMYK color modes, for example).

    What is parametric image editing?

    Parametric image editing (PIE) doesn’t change the pixels of the image. Instead, these edits are recorded as a set of steps to follow to accomplish the final look. Thus, it’s a non-destructive mode of photo editing. However, PIE doesn’t always allow for all types of edits.

    Many in the industry recommend starting with PIE, and then using pixel editing to refine the final details.

    Examples of photo editing

    There are so many ways to edit photos, and everyone has a unique approach. You might see examples of photo editing on social media or YouTube.

    Here are some examples of photo edits the team at Path have done for businesses from all around the world: 

    Background removal

    Before-and-after product photo editing with background removal for a bottle. Before and after sports action photo editing with background removal of a basketball player dribbling. Before and after portrait editing with background removal of a woman wearing a brown t-shirt.

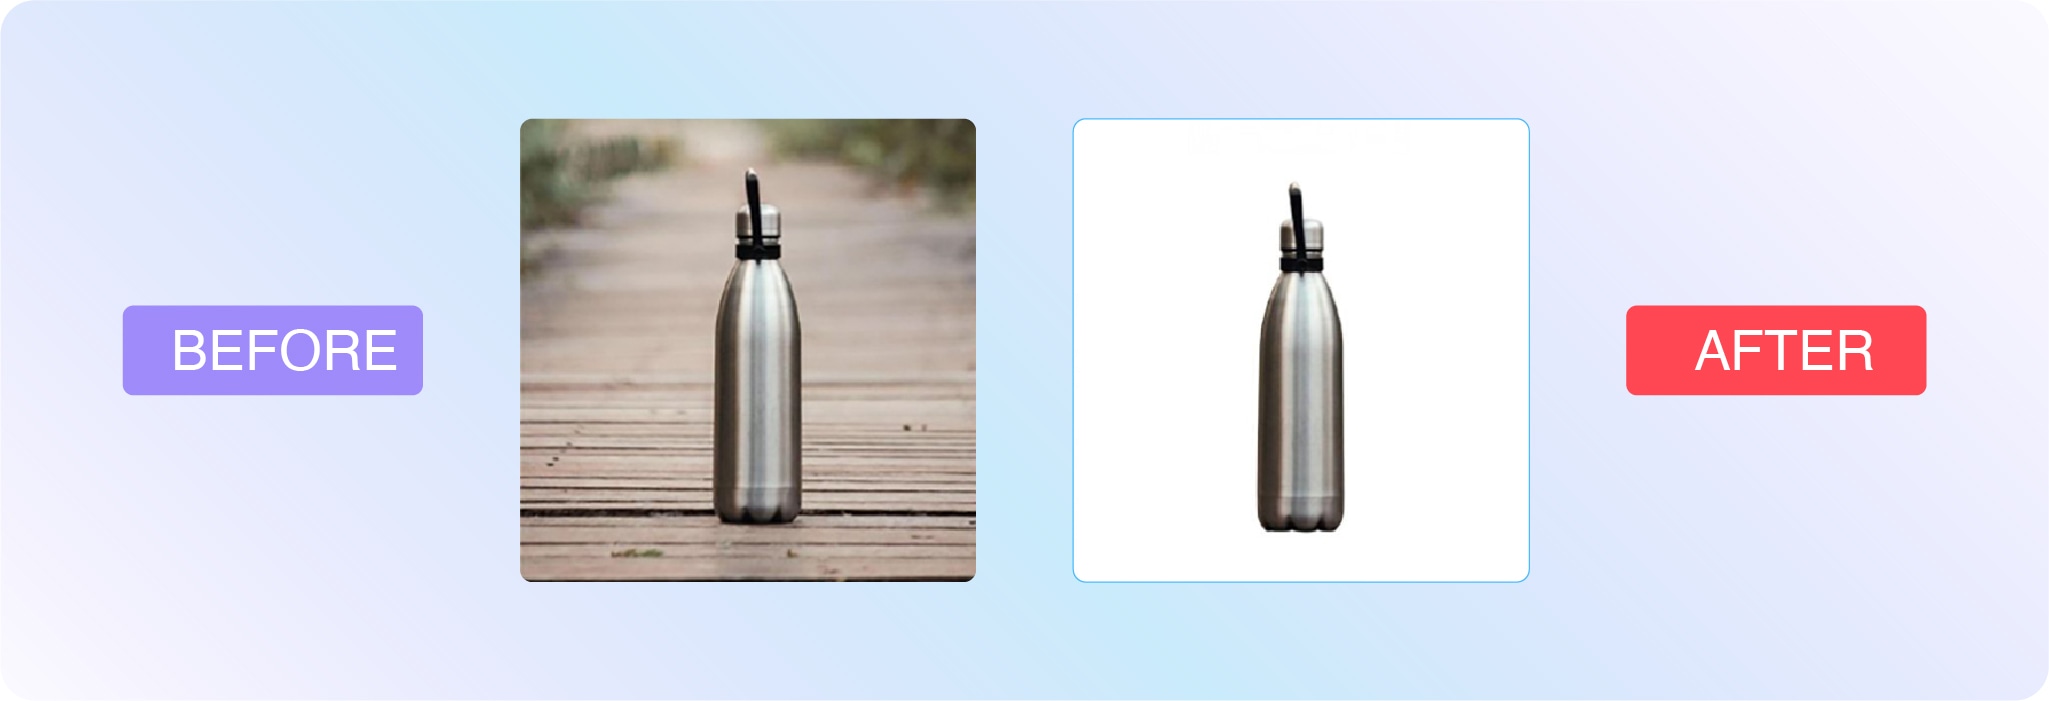
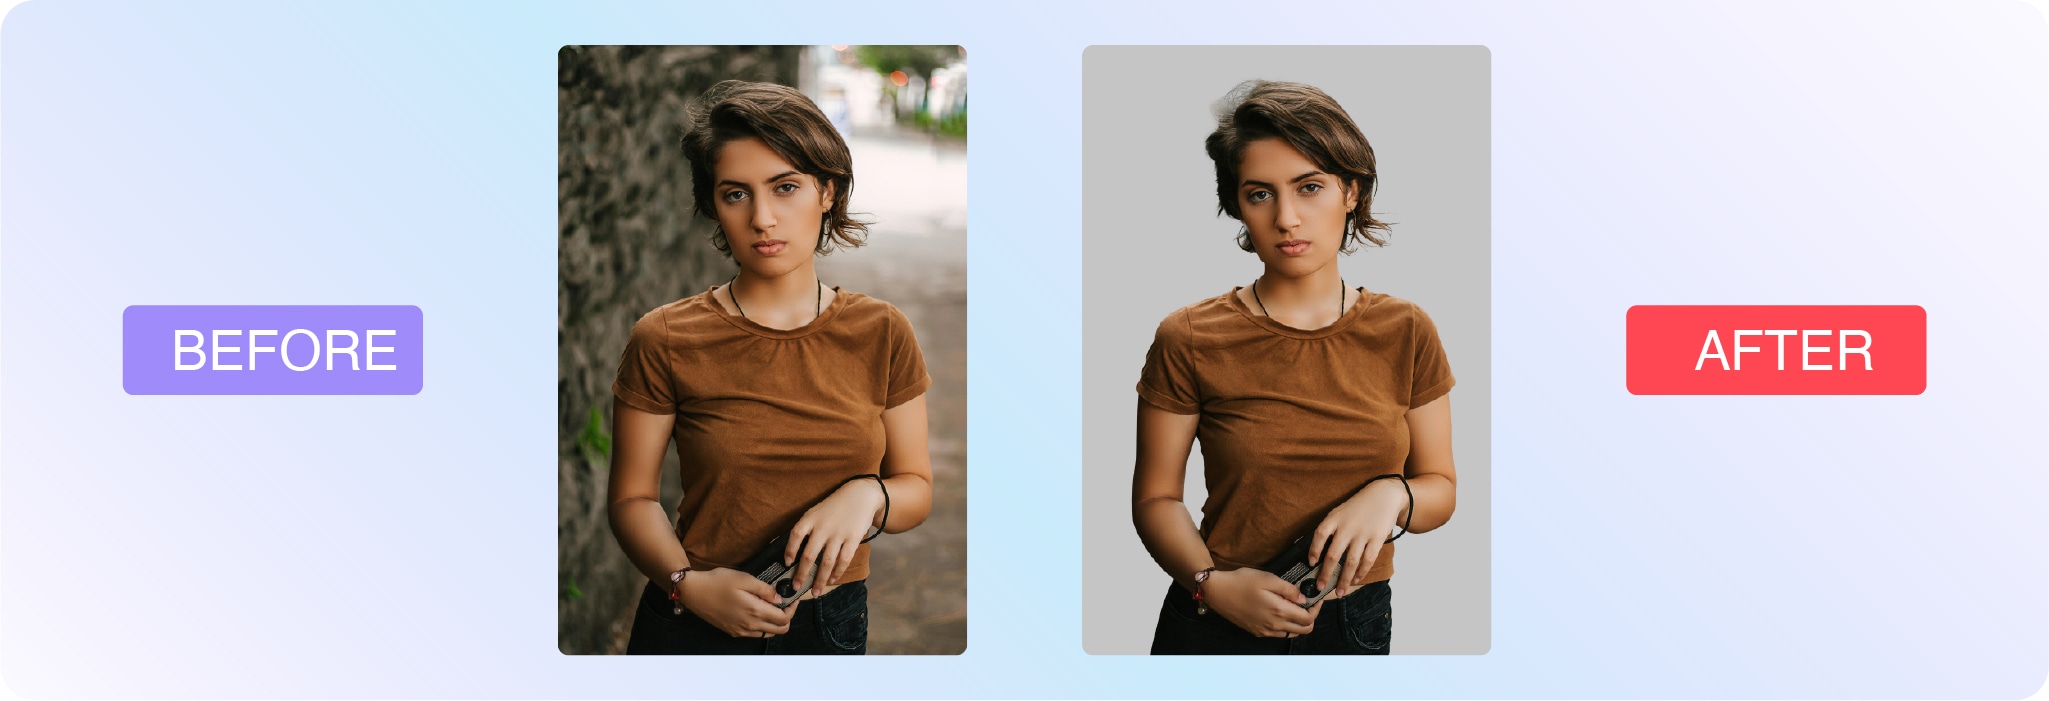
    Save a ton of time with pro background removal from 39¢ per image
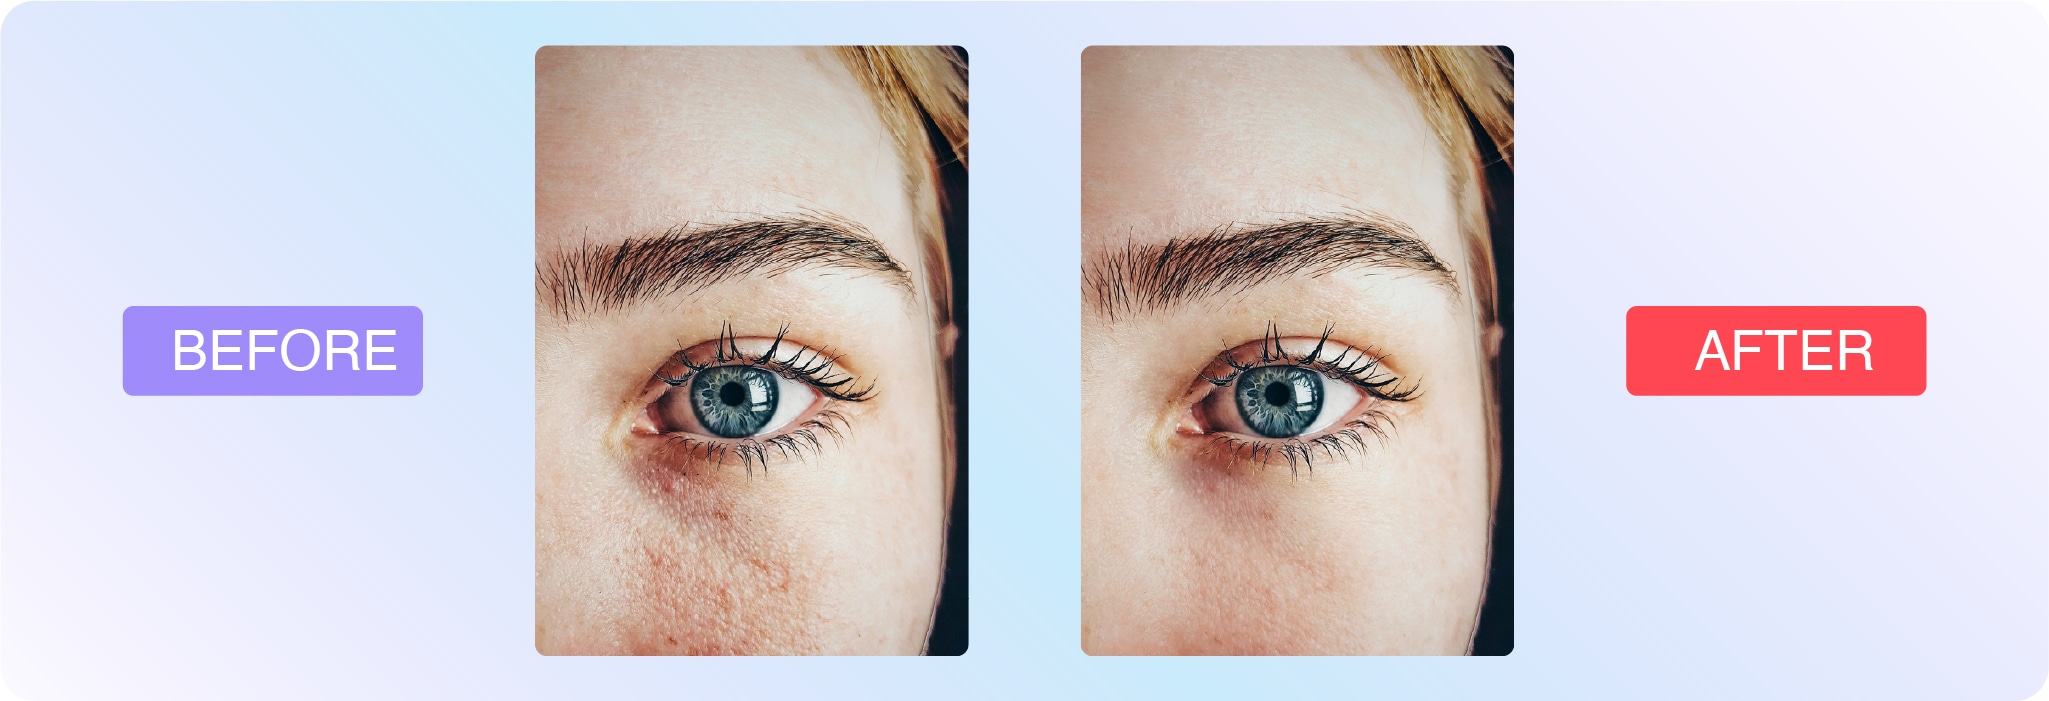
    Photo retouching

    Set of metal straws with cleaning brush on a cloth pouch, labeled before and after.

    Polish up your product shots with pro retouching from 79¢ per image

    Before and after close-up of an eye with photo retouching to smooth facial skin and enhance clarity. Before and after photo retouching showing wrinkle removal from a blue sports shirt worn by a man on a tennis court. Before and after photo retouching showing wrinkle removal from a mustard shirt worn with denim jeans.

    Ghost mannequin

    Patterned blouse displayed on a mannequin, with background removed in the

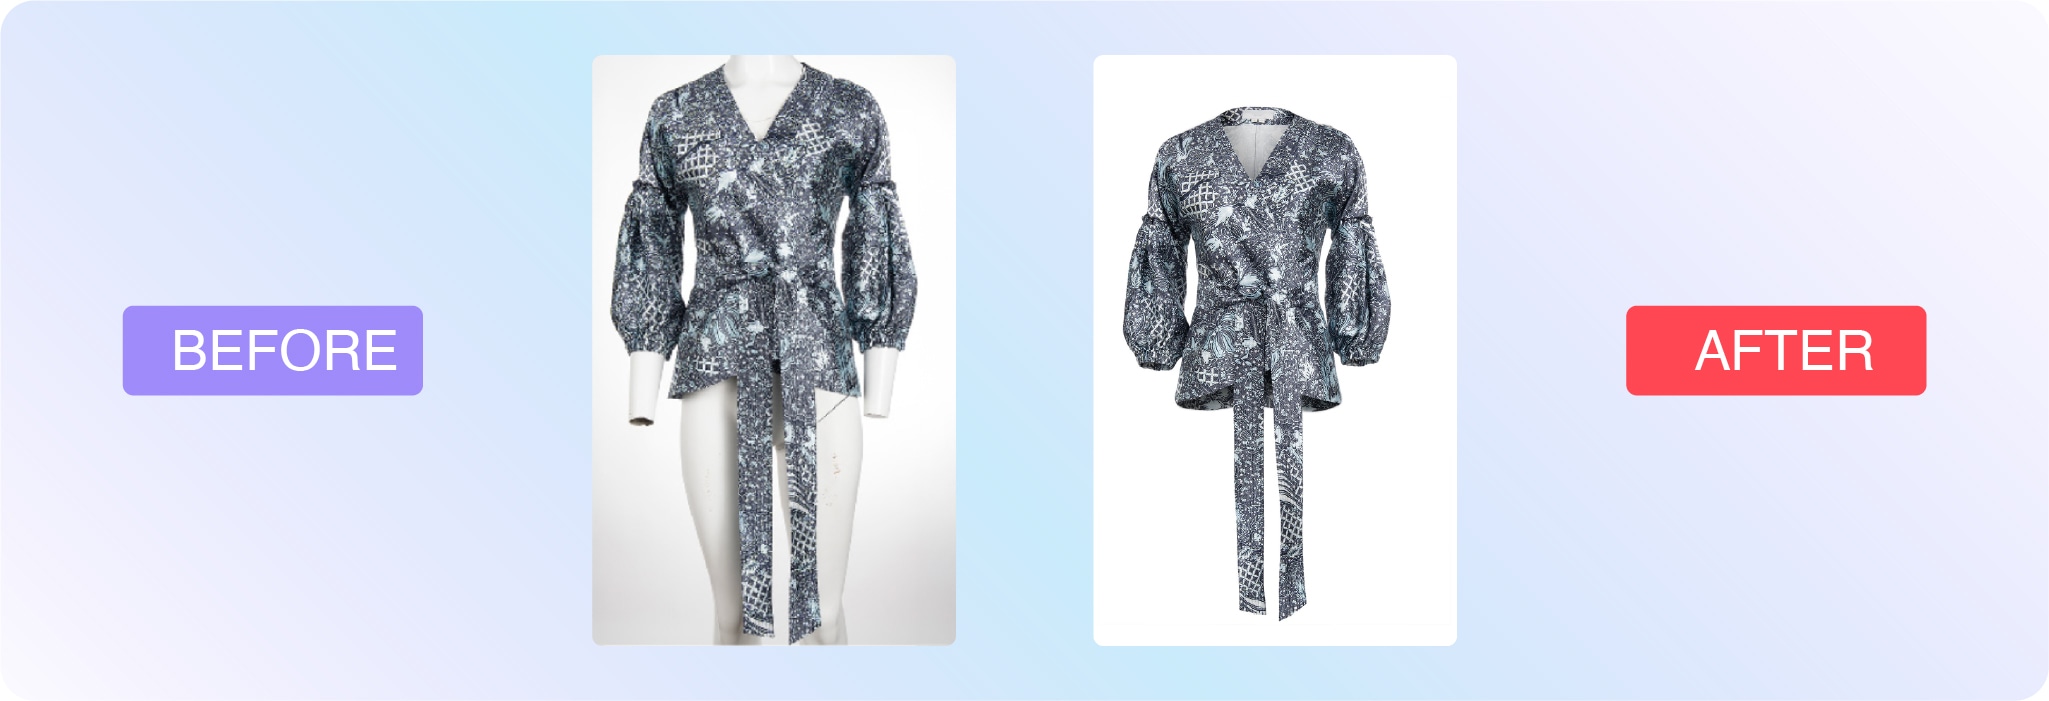
    Let us look after your ghost mannequins, starting at just 99¢ per image

    Editing different types of photos

    Technique Skill level Use case
    Cropping Beginner Ecommerce, social media, marketing, headshots
    Background removal Intermediate Amazon product listings, white background product photos
    Retouching Advanced Portraits, headshots, fashion, jewelry

    Product and ecommerce photography

    Product images will almost always require or benefit from post-processing. Aim for consistency, especially if you’re working on multiple products for the same company or are providing several types of photos of the same product.

    Infographic on photo editing for ecommerce, covering benefits like branding and customer trust, plus issues like noise, background, and lighting.

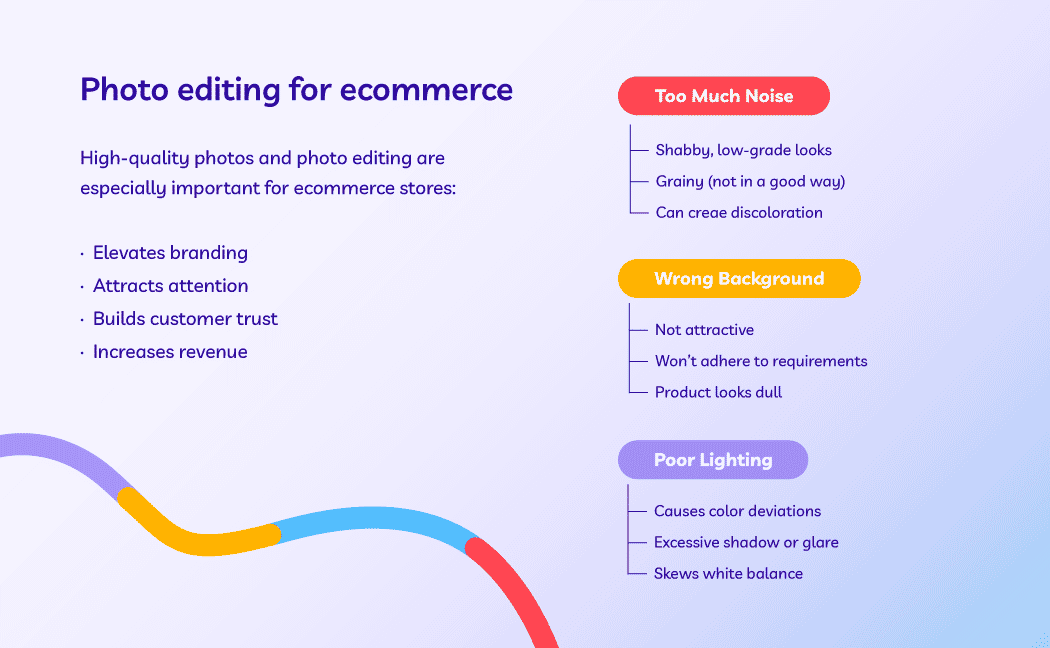
    Visuals help market brands and sell products, but you should also think about where the image will be used. Is it for an advertisement, ecommerce page, social media, or a print catalog? A white background shot will call for much different edits than an image for a Facebook ad. Likely, you’ll be able to get more creative with advertising imagery.

    Here are some of the most common types of edits for product photography:

    Before-and-after product photo of a bottle with editing notes on retouching, background removal, sharpening, resizing, and color treatment.

    Image source

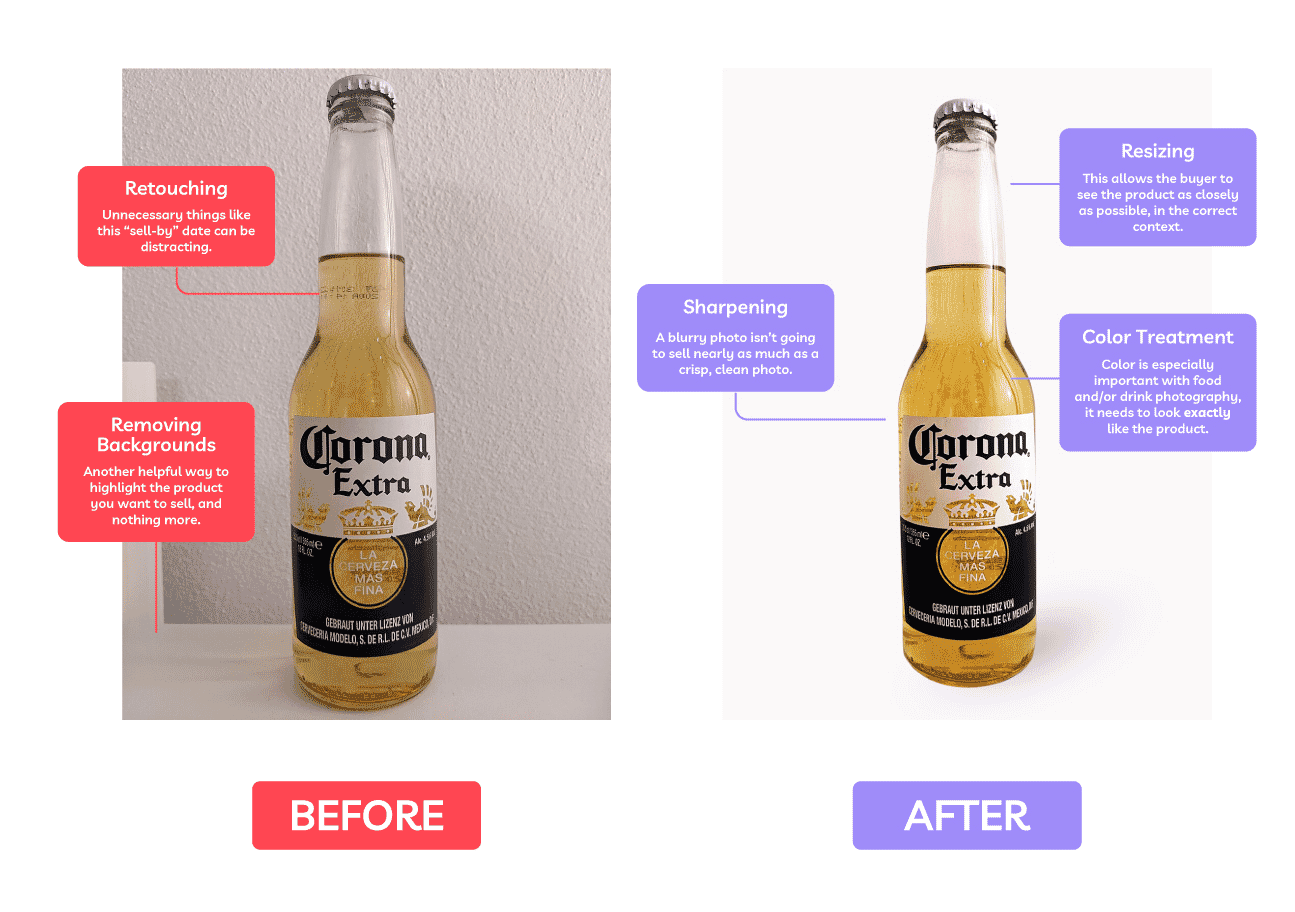
    • Brightness and exposure: If you didn’t nail the lighting, you can make substantial adjustments post-shoot.
    • Background removal: This is a common edit for product photos, especially if you’re listing the item on Amazon, which has a white background requirement. Regardless, white background maintains consistency.
    • Color correction: It’s important that product photos portray the item as accurately as possible so it’s a smart idea to color correct all of your product images. As many as 64% of returns happen because the product didn’t match customer expectations based on product images and descriptions.
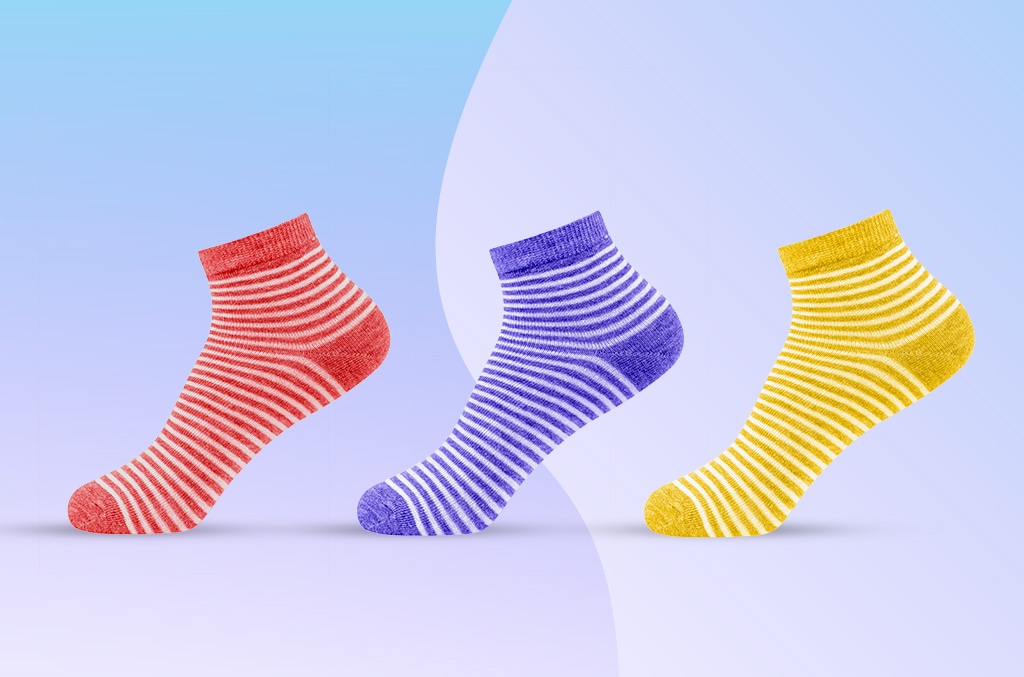
    • Color change: For products that come in several colors, it’s important to showcase the variety. Instead of photographing the product in every color, photo editors can make the changes post shoot.
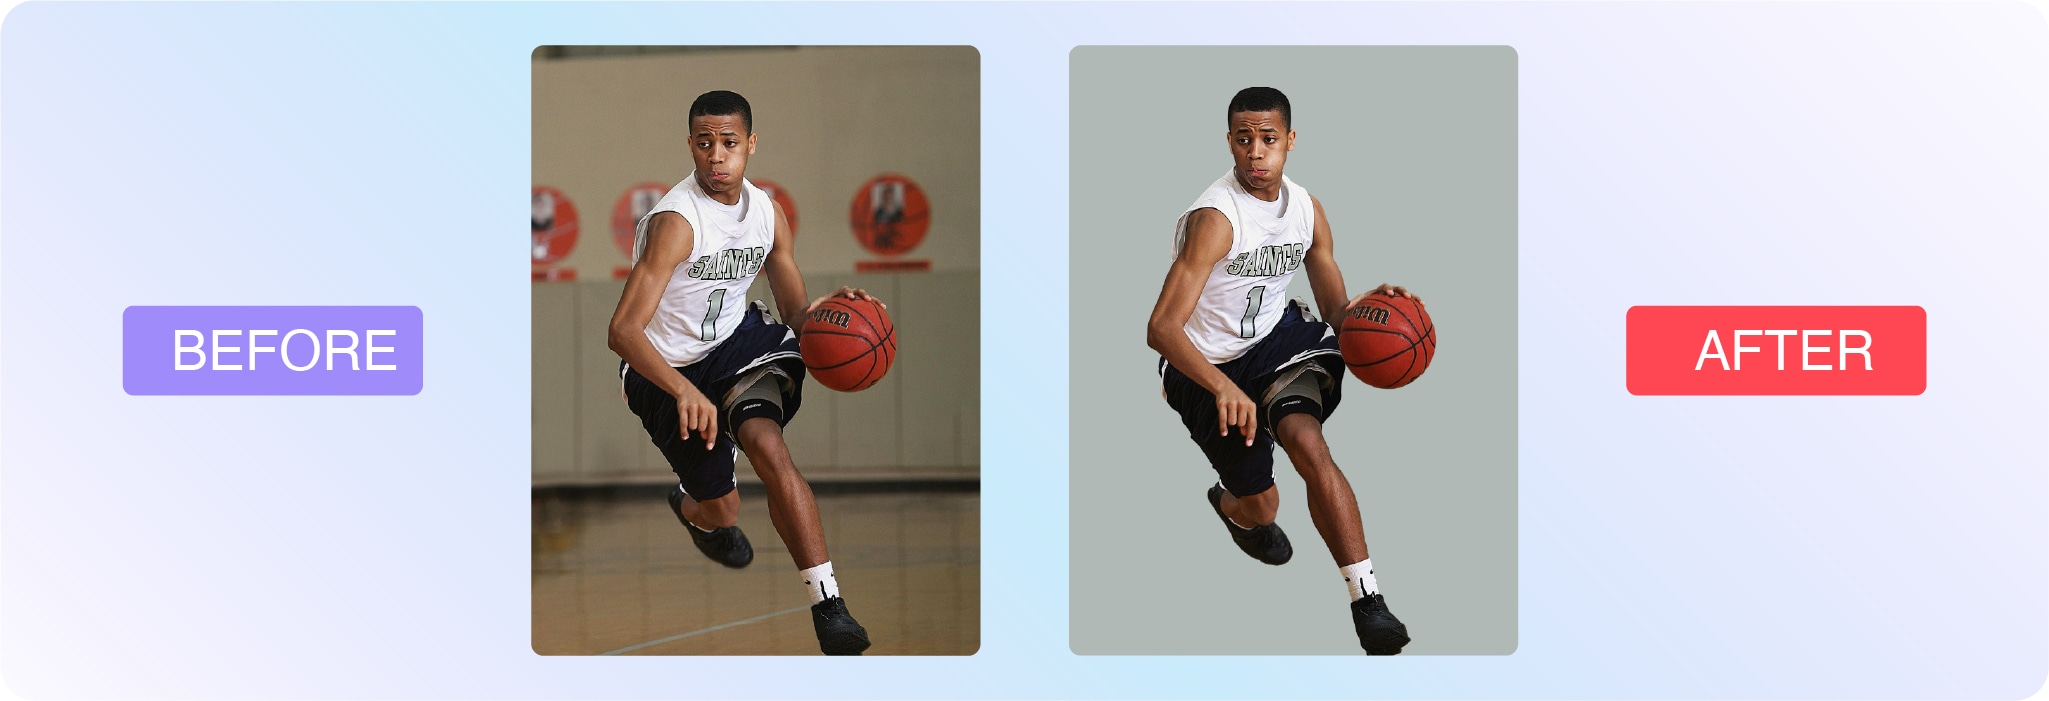
    Three striped socks in red, purple, and yellow colors displayed on a gradient blue background.

    Sports photography

    Sports images are often captured in fast-paced, unpredictable environments—making photo editing essential for polishing the final result. Whether you’re working with action shots from the field or editorial images of athletes, editing helps enhance sharpness, fix lighting, and direct attention to the key moment.

    Common edits for sports photography include:

    • Cropping: Reframe the shot to highlight peak action or key players. A tighter crop can add intensity and drama.
    • Sharpening: Motion blur is common in sports. Sharpening can help make images feel more crisp and in focus.
    • Color correction: Natural lighting varies across stadiums and gyms. Post-shoot edits bring consistency and accuracy.
    • Background cleanup: Remove distractions from the crowd or surroundings that pull attention away from the subject.
    • Spot retouching: Clean up sweat, mud, or jersey wrinkles to create stronger, cleaner visuals for media or brand use.

    If you’re editing for a team, school, or sponsor, keep branding consistency in mind—many sports photographers rely on editing templates to maintain uniformity across hundreds or thousands of images.

    Headshot and portrait photography

    Headshots and portraits are often the first impression someone gets of a person—whether it’s for a professional bio, dating profile, modeling portfolio, or graduation announcement. Editing can enhance natural features while preserving authenticity.

    Here are common edits for portraits and headshots:

    • Skin retouching: Reduce blemishes, smooth skin, and even out tone without losing texture.
    • Whitening teeth and eyes: Brighten smiles and make eyes pop subtly and naturally.
    • Color correction: Adjust tones to match a flattering, realistic look or a specific brand aesthetic.
    • Flyaway removal: Clean up stray hairs or lint that distract from the subject.
    • Background editing: Simplify or replace backgrounds to match the intended context—e.g., corporate headshot vs. lifestyle portrait.

    The key with headshot and portrait editing is to enhance, not transform. The goal is to present someone in their best light while keeping the photo true to who they are.

    Learn how to edit your photos

    If you’re ready to learn how to edit your own photos, check out this handy collection of Photoshop tutorials. Here are a few to get started with:

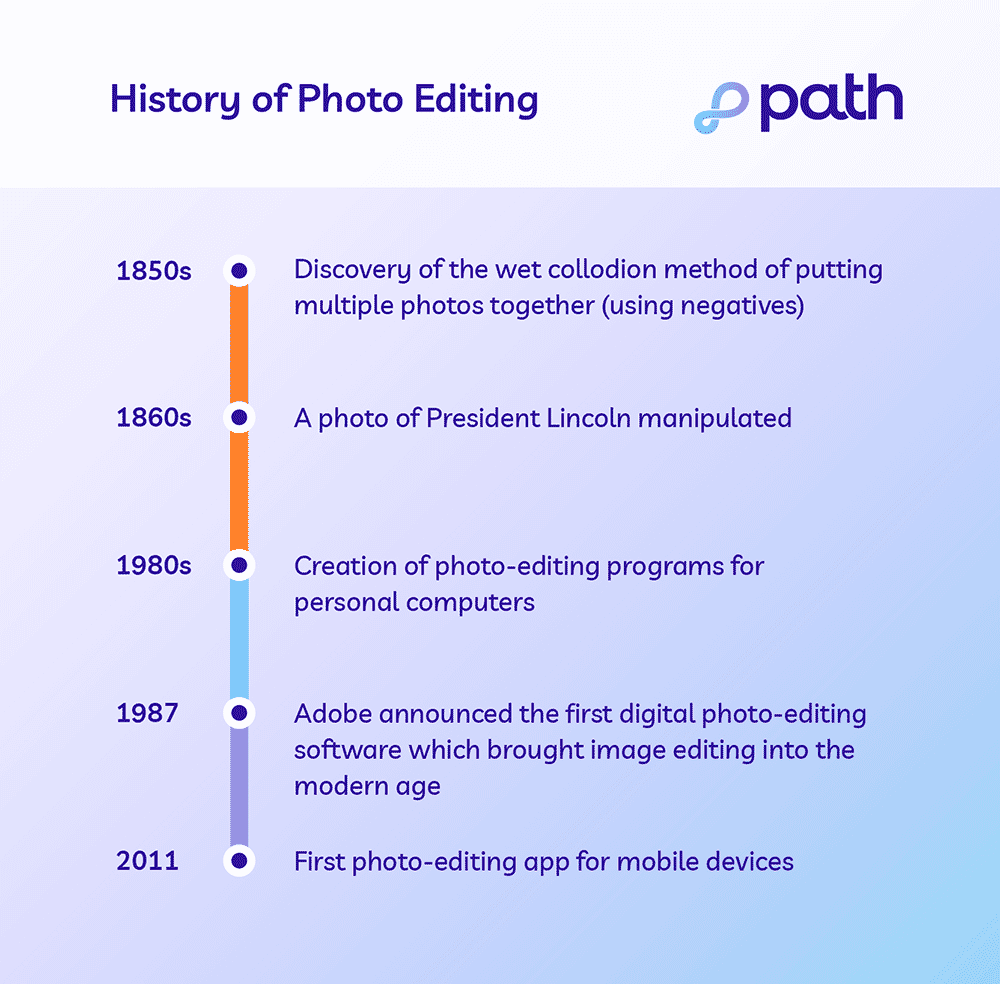
    Photo editing history

    Timeline depicting key photo-editing milestones from the 1850s to 2011 on a gradient background.

    What is a professional photo editor?

    A person who edits images can either be self-employed, contracted by an outsourced company or agency, or someone who works in-house. There are many possible job titles for a photo editor, including digital photo editor, graphic designer or art director, among others.

    Typically, photo editors specialize in specific industries, much like photographers. For example, real estate, editorial, and product photography all come with their own set of trends and intricacies. Editors that focus on ecommerce images know how to make products pop.

    Our virtual photo editing studio is made of more than 300 trained professional photo editors who specialize in the following: 

    • Ecommerce
    • Product
    • Sports
    • Headshot
    • Portrait photography

    Let us look after your image edits, so you can get back to the fun stuff. Try Path free.

    Tackle your photo editing projects with Path

    Learning new photo editing techniques can be an enjoyable way to break up your day and add to your industry knowledge, but editing photos can be time-consuming, especially if photography is your specialty. If you need fast, affordable, high-quality photo-editing services, the professionals at Path are here to help.

    What is photo editing? FAQs

    Can I edit a photo for free?

    Yes, you can edit a photo for free. You can use free photo editing tools and do it yourself. You can also use free AI photo editing tools, but these edits require careful quality checks. Or, send your first two photos to Path to get them edited for free.

    How can I edit a picture image?

    • Open your photo editing tool of choice
    • Upload or open the photo you want to edit
    • Make your desired edits
    • Save your work

    What is the best app to use for photo editing?

    • Adobe Photoshop
    • Adobe Lightroom
    • GIMP
    • Pixlr
    • Snapseed
    • VSCO

    How do I edit my photos like a pro?

    Edit photos like a pro by learning basic and advanced Photoshop techniques, outsourcing the tedious edits, and optimizing for the right use and context.

    What is the meaning of photo editing?

    The meaning of photo editing is the process of manipulating and enhancing a photo. Photo editing can involve basic tweaks like cropping, resizing, and applying artistic filters. It also includes advanced manipulations like retouching and removing unwanted elements and distractions.

    What are the 5 basics of photo editing?

    • Cropping
    • Resizing
    • Applying simple clipping paths
    • Changing colors
    • Adjusting exposure

    What is the purpose of a photo editor?

    A photo editor can save you time and stress because they have the skills necessary to accomplish tedious, time-consuming, or complicated editing tasks for you.

    Let us look after your image edits, so you can get back to the fun stuff. Try Path free.

    Simple pricing for stress-free, pixel-perfect photo edits tailored to your needs.


    Source link

  • Hate Editing? Try These Lightroom Tips

    Hate Editing? Try These Lightroom Tips


    For some, poring over Lightroom for hours on end to create the perfect edit, is the only way to go. For others, the mere thought of sitting down at a computer and fashioning raws into something more usable is at best an inspiration for procrastination and at worst something to avoid all together.

    Lightroom, particularly if you do not use it much, can be a daunting and overwhelming program. But it doesn’t have to be that way. If you adhere to the 1/99% rule you will soon find yourself getting great shots with minimal effort. The 1/99% rule suggests that you use 1% of the features, 99% of the time. That is something that is perfectly possible with Lightroom. Today we are going to tell you how.

    Preselection

    One of the biggest mistakes you can make, and one that will definitely put you off editing, is to simply sit with Lightroom and edit each and every photo. This is a time consuming and fruitless pursuit.

    It’s much better to use Lightroom’s simple but powerful rating system to find the best images to edit. In the Library module, open the first image of the shoot. You can create your own system but for simplicity, if the image is not worth editing, do not give it a rating. If it’s a maybe, assign it a 3 star rating. If it’s a must edit, give it 5 stars. You can easily assign the star rating using the number keys on your keyboard. Then hit the right arrow to advance to the next image and rate that. In no time at all you will have a selection of 5 star images to edit. Use the filters at the top of the Library module to filter 5 star images only.

    Screenshot of Lightroom Library Moduile with images rated by stars
    Knowing which images you want to edit is half the battle.

    Make Use Of Presets

    If you really do struggle with editing, then presets are the way to go. Whilst there are a number of photographers that sell presets, there is also a very good selection provided by Adobe.

    To apply a preset open the image in the “Develop” Module. On the left side of the screen you will see a plethora of different types. You don’t actually have to click on a preset to see what it will look like on your image. Instead simply roll your cursor over each of them. When you find one that you like, click it and the preset will be applied.

    If there is a particular preset that you find yourself gravitating to often, you can choose to apply it on import. To do this, in the import window, to the right click on “Develop Settings.” You will see all the presets that you have installed in a drop down list. Simply select the one you like and all images will have that preset applied as they are imported.

    Don’t worry if you are not happy, you can clear any preset by right clicking on it in the “Library” module and selecting “Develop Settings” – “Reset.” This will return the image to its out of camera look. You can do this to multiple images by holding “CMD/CTR” and left clicking all the images you wish to reset. Then with the mouse over one of the selected images, use the same procedure.

    Screenshot of before and after images using Lightroom Presets
    Carefully chosen presets can save large amounts of time

    If you prefer not to use a preset, Lightroom allows you to make automatic corrections. These can be very useful for very quick edits.

    In the “Develop” Module under the “Basic” tools there are two “Auto” options. The first, at the very top is called “Auto.” When you click this, Lightroom will work out what it thinks the image needs based on the histogram. It will apply exposure, contrast and saturation as well as lifting shadows and dropping highlights. It’s not a perfect tool, but for quick edits, it does a decent job.

    The other very useful tool is the “White Balance dropper” tool. It is found at the top left of the White Balance section.

    To use this tool simply click on it and move the dropper to a section of the image that you know to be a neutral grey. Lightroom will then correct the white balance to make sure that grey area becomes neutral.

    Screenshot of Auto tools in the Lightroom Develop module
    Make use of Lightroom’s auto tools

    Use The Basic Editing Sliders

    If you want to have a little more control over your images, then confining yourself to the basic correction tools is a good way to go. These are Exposure, Contrast, Highlights, Shadows, Blacks and Whites.

    For a very simple, fast edit, first move the Exposure slider, to get the bulk of the Histogram to the middle. Then simply move the Black slider until the edge of the histogram hits the left side. Do the same with the White slider until the histogram hits the right side. This will give you optimum contrast and exposure. If you want to edit a touch more, use the Highlight and Shadow tool to get the look you want.

    If you like that look you can then apply it easily to the other 5 star images in your shoot. To do this, simply right click on the edited image, select “Settings” – “Copy Setting” then from the window click ‘Check All.”

    Now you can scroll through your 5 star images and apply that setting to each one. To do that, bulk select the images in the “Library” Module, right click on one of them and select “Develop Settings” – “Paste Settings.” You might need to go back and tweak one or two, but overall this should give you a fast and consistent edit.

    Screenshot of a simple, basic edit in Lightroom
    Roker lighthouse in Sunderland showing a minimal edit in Lightroom
    Use just the 6 basic sliders. By Jason Row Photography

    Find A Workflow That Suits You

    Repetition is a good way to get efficient in Lightroom, so developing your own short workflow will help you breeze through the editing process. It doesn’t have to be complicated, just import, rate, quick edit and export the ones you want to show.

    By repeating the same workflow you will soon find yourself being able to edit images in minutes rather than hours.

    Editing can be an off putter to some photographers. It can be time consuming and frustrating. However using some or all of the tips above, you will soon find editing in Lightroom doesn’t have to be a chore. The end benefit will be a definite upturn in the quality of your images. That has to be a win-win.

    Further Reading


    Source link

  • How to Choose the Right Photo Editing Services

    How to Choose the Right Photo Editing Services


    When you need photo edits and see a long list of editing services and techniques, it’s easy to feel a bit overwhelmed. With so many options plus multiple ways to combine them, where do you even start?

    It makes perfect sense to go with what feels familiar, like basic retouching or background removal. But we’ve learned from working with thousands of photographers and business owners that your photos often benefit from multiple services working together. Combining services gets you better results with less hassle, since you can handle everything in one order instead of juggling separate projects. Let’s show you how to pick the right edits for your photos.

    How to identify what your photos actually need

    Before you start combining services, let’s figure out what you’re actually working with—it’ll save you time and help you get better results.

    Photo diagnosis checklist

    Take a look at your images and ask yourself if you spot any of these:

    • Background issues: Is the background distracting, the wrong color, or inconsistent across your batch? Does it look messy or unprofessional?
    • Subject problems: Are there imperfections, poor lighting, or color issues with your main subject? For apparel, does it need to show fit and drape without a model?
    • Technical fixes: Is anything crooked? Are shadows missing or looking unnatural? Any dust, dirt, or glare issues?
    • Brand requirements: Do you need multiple product colors? Specific formats? Transparent backgrounds for marketing materials?

    Common photo problems and their solutions

    Here are some scenarios we see all the time:

    • “My product looks flat and boring” → clipping path + shadows
    • “The background is messy and distracting” → background removal + retouching
    • “I need to show this product in 5 different colors” → clipping path + color change
    • “The model’s hair isn’t looking right” → image masking + retouching
    • “My apparel needs to show shape without the mannequin” → ghost mannequin + retouching + symmetry

    Most photo challenges need two to three services working together, not just one by itself.

    How Path services work better together

    Here’s why thinking in combinations instead of individual services makes more sense:

    • Save admin time: Upload everything you need edited in a single order and get it all back together, ready to use. No juggling multiple orders or trying to keep track of which image versions are where.
    • Speed up your workflow: Everything gets delivered together in the formats you need. Your designer handles all the edits for each image, so there’s consistency across the entire batch.
    • Keep all photos consistent: When the same designer handles all your edits, you get cohesive results. Colors match, shadows look natural together, and the overall style stays consistent.
    • Keep costs down: We offer discounts when you bundle multiple editing services together.

    You can combine pretty much any of our services together—two, three, four, or more. What matters is understanding which combinations work best for your specific type of photography.

    Service combinations by photography type

    Every photography project has different needs, and you might even use the same image for different purposes. Here are some proven editing combinations that work well for different situations:

    Sports photographers

    When you’re dealing with high-volume shoots and tight deadlines, you need services that work fast and handle the most common issues in sports photography.

    Your typical service combo:

    • Image masking for complex backgrounds, hair, equipment details, etc.
    • Background removal for clean, professional shots and official team photos, etc.
    • Photo retouching for spot removal, color correction, skin touch-ups, etc.

    There may be time-critical events such as championship coverage where you need polished images fast, or you might need to update and create consistent team roster headshots across an entire squad, just like this photographer does. You can choose different services depending on what each batch of images needs, whether that’s processing 200+ action shots or creating headshots with a uniform, professional look.

    We offer turnarounds from 6 hours, so you can deliver images to your clients, magazines, or publications fast.

    Product and ecommerce brands and photographers

    For ecommerce, consistency is everything. Your product photos need to look professional, meet marketplace (like Amazon) standards, and convert browsers into buyers.

    A standard combo:

    • Clipping path for clean cutouts that meet marketplace requirements or create a clean website look.
    • Shadow services add depth and dimension so products don’t look flat.
    • Color change shows all available product colors without reshooting every single variant.

    Advanced ecommerce stack (add these for even more polished results):

    New ecommerce brands often start with the foundation combo (clipping path + shadows + color change) and add ghost mannequin as their apparel inventory grows. Established retailers may go with the full stack approach for complete consistency across their entire product catalog.

    Portrait and headshot photographers

    Professional portraits and headshots need to look polished but still natural. The goal is enhancing what’s already there, not creating something fake.

    Typical professional edits for portraits and headshots include:

    • Background removal/clipping path gives you versatile backgrounds for different marketing uses.
    • Photo retouching helps with natural beauty enhancement, color correction, and flyaway hair fixes.

    Corporate headshot scenarios may include:

    • Basic combo of background removal + basic retouching.
    • Premium package, adding advanced retouching and multiple background options for different brand uses.

    Advanced portrait combination (for high-end clients or special projects) may include:

    • Image masking for complex hair or clothing details.
    • Color change for different outfit variations or brand color matching.
    • Multiple background options so clients can use the same headshot across different marketing materials.

    Wedding and event portrait combinations may include:

    • Image masking for intricate dress details and flowing fabric.
    • Retouching for flawless, natural skin and perfect lighting.
    • Background removal for ceremony photos that need to work in albums and marketing.

    How to choose your perfect edit combination

    Use this simple framework to figure out which services make sense for any project:

    1. What’s your end goal? Are these photos for marketplace listings, marketing materials, portfolio work, or client galleries?
    2. What’s your biggest time constraint? Do you have a tight deadline, a high volume of images, or particularly complex edits?
    3. What’s your budget priority? Are you focused on cost per image, or is premium quality and time savings more important?

    Consider your photo use case

    Sometimes the same photo needs different sets of edits depending on how you plan to use it. For example, a product photo might need:

    • For marketplace listing: clipping path + white background + basic retouching.
    • For social media: same photo but with different background + enhanced colors + shadows.
    • For print: higher resolution + color matching + vector conversion.

    How to mix and match your edits

    Use this simple approach to figuring out which services work best for your projects:

    • Start simple: Pick two to three core services that address your biggest pain points.
    • Test combinations: Try different combos on smaller image batches to see what works best for your workflow.
    • Scale up when it makes sense: Add more services as you see results and understand how they improve your final images.

    When to add each editing service

    Not sure which services you actually need? Here’s a quick reference for what each one does best.

    Clipping path: When you need hand-drawn, crisp clean cutouts that you can use on any background.

    Background removal: When you want clean white (or any color) backgrounds for product photos.

    Image masking: For intricate shots with hair, fur, or complex borders that need precise, natural-looking cutouts.

    Shadow: When products look flat or unrealistic—shadows add depth and dimension, and they actually help generate more sales.

    Ghost mannequin: For apparel that needs to show natural fit and drape without models or mannequins, essential for consistent ecommerce catalogs.

    Color change: When you have multiple color options and need to show true-to-life colors without reshooting every single shade.

    Photo retouching: When imperfections distract from your subject—this corrects flaws and makes every element shine.

    Multi-clipping path: When you need to select multiple areas within images for separate editing (like changing just the shirt color but not the pants).

    Vector conversion: When you need scalable graphics and logos that maintain quality at any size.

    Symmetry: When product alignment matters for brand consistency and that premium, professional look that converts better.

    Flowchart titled “What does your photo need?” showing how to choose photo editing services like clipping path, image masking, shadow, ghost mannequin, and retouching based on background issues, subject problems, technical fixes, and business needs.

    How to place your Path order

    Ready to try combining services? Here’s exactly how to do it and how it works:

    Getting started

    1. Sign up for your Path account
    2. Top up Path credits (optional but recommended—you get bonus credits when you top up)

    The ordering process

    1. Click “new order” to start your project
    2. Select all the services you need for this batch—you can choose as many as you want
    3. Upload your images using drag and drop
    4. Get instant quote and you’ll see your total cost immediately
    5. Set preferences like:
      a) File format for your edited images
      b) Additional comments or instructions
      c) Upload any supporting files if needed
    6. Select turnaround time (longer turnaround means cheaper pricing, or choose rush for time-sensitive projects)
    7. Review and approve your quote
    8. Choose payment method and submit your order

    If you need 1,000+ images edited a month, we offer bulk pricing with better rates and priority support.

    Ordering edits with Path couldn’t be any easier

    Now that you know which combinations work for your type of photography, placing an order is straightforward. Try Path free with 2 free edits and see how much better your photos look with the right services working together.

    Let us look after your image edits, so you can get back to the fun stuff. Try Path free.


    Source link

  • Free AI Photo Editing Comes to Google Gemini, but is it Still Photography?

    Free AI Photo Editing Comes to Google Gemini, but is it Still Photography?


    AI images have been circulating the internet, more than ever for about a couple of years now and with AI being integrated into most editing programs, google has also been working on several models and one of the most recent is the Gemini 2.0 Flash experimental model. If you are looking to access the features of Google Gemini, you will need to have a google account and be signed in.

    Image via Google

    Google has already been working with many models in the past and their most capable one seems to be the Gemini 2.0. Gemini 2.0 Flash experimental model is built on the success of Gemini 1.5 flash and is available freely to all Gemini users. Gemini 2.0 Flash is faster and comes with new capabilities like natively generated images mixed with text.

    Gemini 2.0 Flash requires the user to type in prompts that ask Gemini to create an image based on the description provided. You can further change elements or subjects in your images through further prompts. You also have the option to choose a desired aspect ratio for the final image through prompts. In the experimental version, you will get a resulting image that has a watermark on it.

    Besides the above process of generating images, you can also upload your own image and make changes to it. For example, if you are using a portrait, you can make changes to the outfit, hair, etc., adding hair or try to get different poses/perspectives of the image. For example a side view, a lower perspective of an image and so on. This is applicable for all genre of photos.

    Besides the above, Gemini 2.0 Flash can also be used to remove unwanted objects or replace objects from a photo, replace backgrounds or even colorise photos. The results achieved using Gemini 2.0 Flash and the capabilities are more similar to the jobs done using photoshop, where some tools in the program were used to perform these actions, whereas in Gemini 2.0 Flash the job is done using prompts.

    With the Gemini 2.0 Flash Experimental already being tried by many users it looks like it could kill programs like Photoshop in the near future, but generating images using prompts, with the help of AI – is this still photography? All these advancements in the field of AI makes us question if we can trust photos anymore, especially when used as evidences. It also makes us check the credibility of the photographer presenting an image.

    We think AI may change photography in some areas, but it can never replace genuine photography. What are your thoughts on this? Let us know in the comments section below. We would love to hear.

    We have more news for you to read if you are interested at this link here.


    Source link

  • The Ethics of Photo Editing: What You Need to Know in 2025

    The Ethics of Photo Editing: What You Need to Know in 2025


    With the recent and rapid advancement of AI technology, the conversation around ethical photo editing has never been more relevant. As tools evolve and photo editing becomes more accessible, it’s crucial to approach image manipulation responsibly. 

    In this post, explore the ethics of photo editing, Path’s stance on the issue, and actionable tips to ensure your edits maintain a moral high ground.

    Why ethical photo editing is important

    Photo editing is more than just enhancing an image—it shapes how people perceive reality. When editing is done unethically, it can:

    • Distort reality: Over-editing or misrepresentation can lead to misleading images, especially in advertising and journalism.
    • Exploit labor: Many affordable editing services outsource work to underpaid workers in poor conditions.
    • Violate rights: Improper handling of copyrighted materials or the unauthorized use of people’s likenesses can breach laws and ethical standards.

    At the end of the day, ethical photo editing means treating images—and the people behind them—with respect. 

    How to get ethical photo edits

    Work with ethical service providers

    When outsourcing photo editing, it’s important to partner with providers who treat their workers with respect and fairness. Look for companies that align with the following to ensure your edits contribute to positive change: 

    • Fair labor practices: Work with companies that treat employees well, providing fair wages and humane working conditions.
    • Transparent practices: Partner with providers that openly share their methods and values.
    • Focus on quality over speed: Avoid services that rely heavily on automation or exploit cheap labor to deliver quick results.

    At Path, we prioritize ethical practices, ensuring our team is supported and valued. We don’t just pay a liveable wage and comfortable working conditions—we proactively invest in our team and look for ways to invest in their learning and development as well as support their families and communities. 

    Maintain the integrity of the image

    Editing should enhance the original photo without compromising its authenticity. Edit the image so it stays true to the subject, rather than misrepresenting it. 

    When it comes to photos of people, this is especially important as we become increasingly aware of image manipulation and authenticity. And in the case of product photos, authenticity can mean the difference between a returned product and a happy customer. 

    When editing your photos, keep the following ethical guidelines in mind: 

    • Limit adjustments: Focus on subtle changes like cropping, adjusting brightness and contrast, fixing unnatural imperfections, or correcting color.
    • Avoid distortion: Refrain from altering key elements that misrepresent the subject. For example, don’t edit a product to appear different from how it looks in real life.
    • Stay honest: Particularly in portraits or headshots, edits should respect the individual’s natural appearance rather than imposing unrealistic beauty standards.

    Ethical editing includes respecting the legal and moral rights of others—so you’ll want to omit certain things from your photos. Using copyrighted material without permission is both unethical and illegal, and editing such material without consent further compounds the issue. Always make sure the images you use are either your own or licensed appropriately. You don’t want to unintentionally steal someone else’s work. 

    Remove identities

    Privacy is another key consideration. If your photos include identifiable individuals, you may want to obtain their written consent before sharing or publishing the images. In some cases, this is even legally required

    In cases where consent isn’t possible, removing or obscuring their identities is the responsible choice. Even if it’s not legally required, prioritizing privacy demonstrates respect for the people captured in your work.

    Be transparent

    Transparency also matters. If an image has been heavily edited, disclosing the extent of the edits is crucial, especially in contexts like journalism or advertising where the audience relies on the authenticity of the visual content.

    Avoid AI edits

    AI tools have made the photo editing process a lot faster and easier in many ways. But they also raise serious ethical concerns. 

    AI lacks the nuance and context of a human editor, often making decisions that compromise the image’s integrity or misrepresent the subject. Plus, relying on AI can lead to the devaluation of skilled human labor and diminish opportunities for professionals in the industry.

    When edits are done by hand, you know they’re executed with a certain level of care, artistry, and accountability that AI can’t replicate. While AI may be tempting for its convenience, ethical editing often requires the thoughtful touch of a skilled human editor to achieve the best results.

    Work with a virtual photo editing studio you can trust

    Our team of 300+ editors have edited more than 8 million images for 40,000+ businesses like yours. We do every edit by hand—no AI automation here. And with prices starting at just 25¢ per edit, it’s tough to beat. 

    Not to mention, working with Path can make you feel good about the work you do. We donate 5% of our profits to our non-profit organization, the Anisa Foundation. The Anisa Foundation helps people in our local community access life-changing—and sometimes life-saving—care and support.

    Find out how you can help us make a difference in the lives of the people in Gaibandha, Bangladesh.

    Ethical photo editing FAQs

    Is Photoshop ethical or unethical?

    Photoshop is a tool—its ethics depend on how you use it. Avoid deceptive edits that mislead viewers or misrepresent subjects.

    What is the code of ethics for photo editing?

    A general code includes respecting subjects, maintaining authenticity, and adhering to copyright laws.

    What is ethical editing?

    Ethical editing involves making truthful, respectful adjustments without misrepresenting the subject or violating laws.


    Source link

  • Editing Minimalistic Photography in Lightroom — Mikko Lagerstedt

    Editing Minimalistic Photography in Lightroom — Mikko Lagerstedt


    You can use multiple masks and make highly complex selections.

    You can also use the following manual masking tools:

    • Select the Graduated Filter tool from the toolbar on the right side of the screen. This tool allows you to apply a gradient effect to your photo, which can help draw the viewer’s attention to a specific area of the image.

    To use the graduated filter, click and drag on the part of the image where you want the effect to start. Then, release the mouse button where you want the effect to end. It will create a gradient effect that gradually changes the photo’s exposure, contrast, saturation, or other settings.

    • Next, you can use the Radial Filter tool to apply a circular gradient effect to your photo. It can help create a vignette effect or draw attention to a particular image area. To use the radial filter, click and drag on the part of the image where you want the center of the effect to be, and then release the mouse button to set the radius of the effect.

    • Finally, you can use the brush tool to apply effects to specific areas of the photo selectively. Select the brush tool from the toolbar on the right side of the screen and then adjust the brush settings to control the brush’s size, hardness, and other properties. Then, brush over the areas of the photo where you want the effect to be applied.

    Using these tools, you can create a more minimalistic photograph by selectively applying adjustments to specific areas of the image. It can help draw the viewer’s attention to the essential parts of the photo and create a more cohesive and balanced composition.

    4. REMOVING DISTRACTIONS

    One of the most helpful ways to make your photograph more minimalistic is to remove distracting elements. In Lightroom, the healing tool is the tool you can use to get rid of unnecessary elements. This tool allows you to selectively remove unwanted objects from your photo, which can help create a more minimalistic and cohesive composition.

    There are three different tools inside the healing panel in the Lightroom CC 2022 version. The Content-Aware Remove, Healing, and Clone tool.

    1. The Content-Aware Remove tool tries to automatically remove selected distractions without suggesting an area to apply with.

    2. The healing tool suggests a replacement for the spot you are trying to remove and uses an algorithm to match the color and light of the applied area.

    3. The clone tool clones an area you want to remove.

    Use the cropping and straightening tools to remove distractions and frame the photograph to emphasize the subject.


    Source link

  • The Best AI Image Editing Tools for Landscape Photographers 2023 — Mikko Lagerstedt

    The Best AI Image Editing Tools for Landscape Photographers 2023 — Mikko Lagerstedt


    My Workflow & AI

    I mostly use Lightroom CC Classic as my daily choice. The AI tools inside Lightroom are powerful, and I often use the masking panel to create selections and fine adjustments. Occasionally, when I need to do some heavy editing, such as removing a difficult part from an image, I turn to Photoshop. The Content-Aware Crop is brilliant for adding more sky to a picture if cropped too tightly. Or, if I need to have more flexibility with layers, Photoshop is an excellent choice.

    For experimenting with a photograph or when I feel too comfortable with editing, I use Luminar Neo. I can easily step into a beginner’s mindset while working with it. And finally, my go-to sharpener at the moment is Topaz Labs Sharpen AI, which does an excellent job when I need to add sharpness to my images. Also, GigaPixel AI is fantastic for ensuring my photographs look brilliant when printed.

    AI image editing tools can significantly improve your landscape photography editing process. By using Lightroom, Photoshop, Luminar Neo, and Topaz Labs, you can achieve beautiful results and bring your creative vision to life. While these tools are powerful, they may have some flaws, so finding the right balance and workflow that suits your needs is essential. I recommend exploring and incorporating these tools into your workflow to enhance landscape photography.

    Unlock Your Creative Potential

    As you delve deeper into the world of AI-powered photo editing tools and unleash their potential, consider exploring some of the resources I’ve created to help photographers at all levels improve their skills and find inspiration.

    • The Complete Photography Collection. This all-inclusive package features all of my tutorials, presets, and eBooks, offering a comprehensive guide to enhancing your landscape photography and achieving the recognition your photos deserve.

    • Epic Preset Collection. Transform your editing process in Lightroom with my presets to help you unlock your creative potential and bring your images to life.

    • 1-on-1 Photography Coaching. Whether you’re a beginner or an experienced photographer, my new online 1-on-1 coaching service is designed to provide personalized guidance and support to your needs and goals.

    • Free Tutorials. For those just starting or looking to expand their skills without breaking the bank, check out my collection of free tutorials covering various aspects of photography and editing.

    Remember that AI is a tool; like any tool, it can’t replace the human element in the creative process. Embrace your intuition, emotions, and experiences as a photographer, and let them guide your editing choices. This will help you create images that not only look interesting but also resonate on an emotional level.

    Your personal style and artistic voice are what makes your photography unique. While AI tools can help you achieve technical perfection, preserving your creative identity and ensuring that your images reflect your personal touch is essential.

    Let me know if you use any of these tools or want to try them out. Thanks for reading!

    Disclaimer: I’m an affiliate of some of these programs. Remember that using the affiliate links in this article helps support my work and enables me to continue sharing my experiences and insights with you.


    Source link

  • Make Photo & Video Editing Faster

    Make Photo & Video Editing Faster


    Programs like Adobe Lightroom, Adobe Photoshop, Adobe Premier, and other video editing programs such as DaVinci Resolve, can all run slow for a variety of reasons. In this post I will discuss some of the possible causes of computer slowness and the solutions to those problems.

    The first possibility is that your computer does not have enough RAM. A good place to start for photo and video editing is at 16GB of memory for your computer. 16GB should allow enough memory to do basic video editing and normal photo editing, as well as most of the other tasks computers are used for such as email, video conferencing, and all that.

    Having more memory never hurts but the law of diminishing returns kicks in very quickly with memory. Many people assume that if you have say 64GB of memory its going to make everything faster. Well, it won’t make everything faster but it will make some things faster. More memory will allow you to do more multi-tasking on your system, and it may also allow you to work with larger files more fluidly, but its not going to get the data off of your hard disk drive or solid state drive any faster.

    SSD’s are the newest storage technology and they’re getting bigger, faster, and more affordable every year. I highly recommend photo editors and video editor buy at least 1 SSD for their computer to put their working files on.

    Working files are the files in your current project. If you have several projects going on at once, well, you might want to consider reducing your workload, but, barring that, you can always buy a larger SSD. SSD’s can now be purchased at up to 8 Terabytes for around $400-$500. I have seen 4 TB drives going for around $200. I know that most photographers aren’t going to fill up a 4TB drive with their working files very quickly unless they are shooting 150 Megapixel images by the thousands.

    If your computer can take a second SSD for your working files, you’re good! Many laptops have a slot in them for an extra SSD which means all you need to do is get that second SSD, install it, and follow the rest of the instructions in this post.

    The Problem with 1 SSD or HDD

    The basic problem, or so I have been led to believe, is that when all these programs and processes are trying to use the same HDD or SSD, they start to incur penalties due to something called latency. Basically, Lightroom is writing data from one place to another on the same drive. And these duplicated writes all have their own latency. Latency is where one process has to wait a fraction of a second for another to finish its use of the HDD before it can then begin using the HDD.

    Over tens of thousands of reads and writes those fractions of a second add up to sitting there and staring at your computer for minutes on end.

    Because the HDD or SSD are a lot slower than main system memory, accessing the page file slows down Lightroom or any other program that has to put working data into the page file.

    The problem with Lightroom specifically goes beyond the page file and revolves around the catalog itself.

    Far be it from me to speculate how it works, but here is what I think the computer is doing. Imagine that your page file and your catalog file are on the same slow HDD. You start up Lightroom and it needs to load data into main memory, but, main memory is full, so, it is writing catalog data to the page file. However, the page file is on the same HDD as the catalog data. This means that the HDD is bottlenecked with itself. It is literally reading and writing the same data to itself into a different folder. Duplicating data like this onto the same HDD is one of the slowest operations a computer can perform.

    So, the solution is to make sure that your page file and your catalog file are on SEPARATE HDDs or SSDs.

    Once you are able to separate out the page file and the catalog files you should see a huge performance increase in loading and working with large Lightroom Catalogs.

    If your computer doesn’t have 2 drives in it for you to use, then you really should install a second drive into your computer just for your Lightroom Catalogs.

    Now, it’s as simple as copying all your catalogs to the new dedicated catalog drive and every time you open a catalog it should load and run a lot faster!

    The really great thing is that now you shouldn’t notice too much of a performance difference even with larger catalogs. Eventually the catalog will get so big that it will slow down again but that limit will be substantially higher because of this system architecture. (Specific numbers will be determined by your system specifications).

    If you are doing video editing, you’ll want to keep your working source videos and/or proxies on their own SSD. Doing this will give the CPU/GPU a direct line of access to those files and no other program is going to interfere with that direct line of access. That means you can easily play back your video at 4k or even 8k as the case may be. The keyword here is WORKING videos, that is, only the videos you’re using for a current project. You’re not going to store video on this drive, it is only for WORKING copies/proxies.

    Good luck and thanks for reading!


    Source link