Many of you who regularly read the pages of DPG may not have gotten this far… but even if you do see yourself as a “proper” shooter—with a “proper” camera—please hear us out. Nobody’s saying your smartphone is going to replace your fancy mirrorless any time soon, OK? This is a different kind of tool, you know? Great for a quick snap or two to send to your mom! Perfect for some sweet clips for Insta! Ideal for keeping the kids out of trouble when you go to Bali for the holidays!
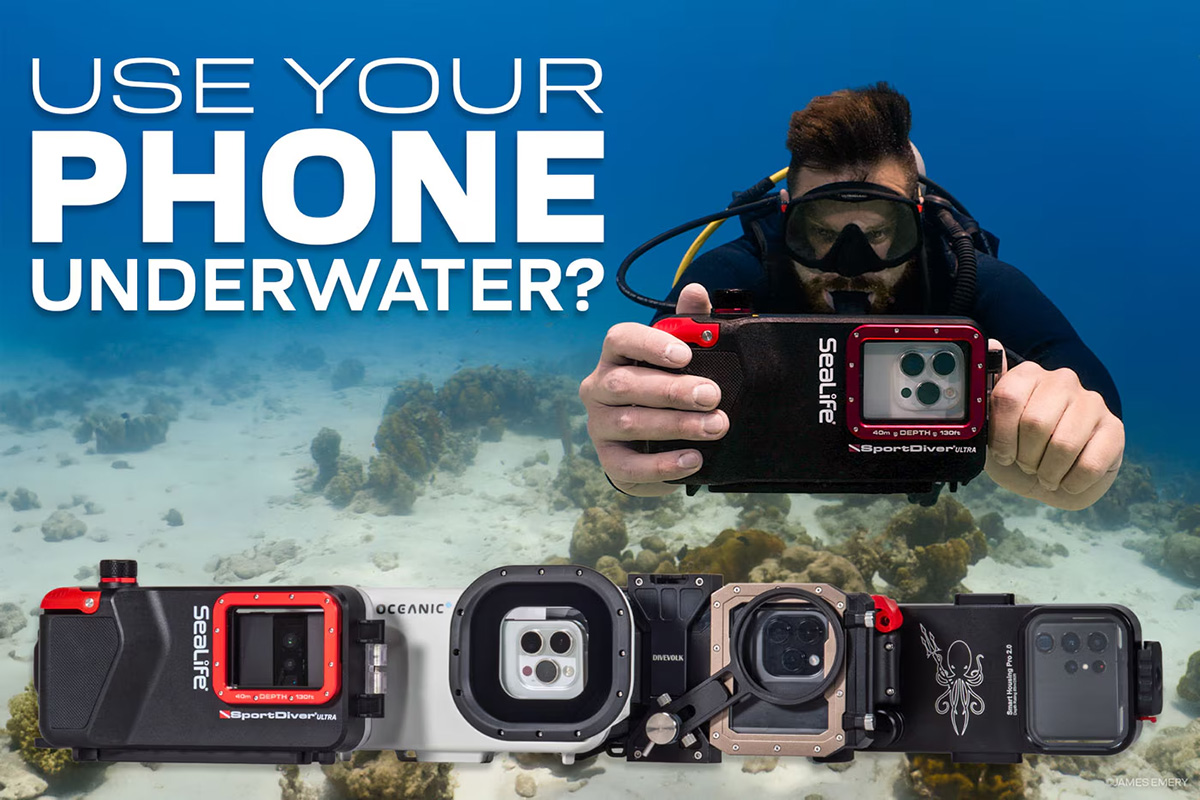
Whatever you have in mind, dear reader, I think we can all agree that your precious smartphone (or perhaps your old model that’s currently at the bottom of the kitchen drawer) deserves the very best housing out there. All of which brings us neatly to Backscatter’s latest, and extremely timely, review, “Best Smartphone & iPhone Underwater Housings of 2025”—a very handy roundup that includes four of the seven smartphone housings currently available from Backscatter—the DIVEVOLK SeaTouch 4 MAX PLUS ($240), the Kraken KRH07 ($450), the Oceanic+ ($350), and the SeaLife SportDiver Ultra ($400).
As you’d expect, the Backscatter boys do an excellent job of comparing these housings side by side—both in their extensive article and the comprehensive accompanying video (starring newly minted Media Producer Thomas Anderson). For each housing, we get Backscatter’s considered opinion across five criteria—phone compatibility, ergonomics, setup, app performance, and accessories—and interestingly, it’s soon apparent that each one has its strengths and weaknesses, making the job of choosing between them considerably easier. As for the thorny question of whether a phone can replace a dedicated underwater camera? Well, Thomas rounds things off by tackling that, too.
To educate yourself on the pros and cons of the latest smartphone housings, watch the video below or check out the article on Backscatter, where you can, of course, also purchase a full range of accessories (including trays and arms, wet lenses, and filters) and video lights. Don’t forget that DIVEVOLK is a sponsor of this year’s DPG Masters Underwater Imaging Competition and there are no fewer than six SeaTouch 4 MAX PLUS housings up for grabs!
When purchasing underwater photography equipment like the products mentioned in this article, please support DPG by supporting our retail partner—Backscatter.com.
Watch the 7-minute video above, or keep reading if you prefer the written word.
Here’s a question that keeps me up at night:
Why do photographers get so intimidated by editing down to their best images and the “now what?” that comes once we put the camera down? And are we missing really important creative opportunities because of this?
For years, I’ve been signing my letters to you with the words “for the love of the photograph,” because I do. And so you do you. Nothing else explains the time and money we spend on making them. No doubt about it, this is a labour of love.
But I wonder if we love the photographs we are going to make—the next ones—way more than the ones we’ve just made. We so often move on to the next thing too quickly. The next project. You know the one: the one for which you need that new lens. Or tripod. Or flash. I’m the same way, and there’s nothing wrong with creative momentum or new gear.
But I think if we loved the photographs we’ve just made as much as the ones we’re about to make, we’d make stronger images and have a richer photographic life.
So, here are three ideas, or three ways, that we can carry the love of the photograph and the making of photographs, a little further and in the process, learn more, make stronger photographs, and find more joy in all of it.
Spend More Time With Them
In my last video, I suggested you consider doing smaller edits when you’re working on a project. I like daily edits when I’m photographing, but whatever “smaller edits” mean to you and your work, I think you’ll benefit from doing it. I also think multiple edits are important, and though I suggest spending more time, this multiple-edit approach is actually more effective and, in the end, takes less time—and is more enjoyable and effective than one big marathon edit session (that you may never get around to).
When it comes to choosing my keepers, I never completely trust my first instincts. We choose our best work by looking through all kinds of different filters. There’s no telling what I might have been looking for when I did my first edits—was I looking for colour images or vertical images or images that tell a certain story?—so it’s always worth giving my images another look, and doing so at least three times over a few months rather than doing one gigantic, mind-numbing edit session to find the best of my work.
One of the best reasons for doing this, especially if you’re doing smaller edits as the work progresses, is that what a project looks like at the end and what it looked like at the very beginning are usually very different. So going back to do another edit, once you’ve seen where the project is leading can be very effective in finding new images that work with that project.
Our work grows and changes, as does how we look at that work. I know we get excited by the next thing, but one of the best ways to make new photographs when you can’t be out there with the camera is to revisit older work. Do another pass. See what comes to the top now that you’re seeing it with fresh eyes months or even years later.
I think not being in such a hurry with finding the best of our photographs, of revisiting them and giving them a second or third chance after we’ve shot them, is a stronger way of editing than the way it’s often done: one big marathon edit session after which we call it done and never give the un-selected images another glance. That’s the first way we can give our photographs a little more love, and the result is stronger final images.
Do More With Them
I used to tell anyone who would listen to “print yer damn work!” Maybe you don’t make the prints yourself, that’s OK; I don’t anymore, either. But I do have it printed by someone who is really good at printing, and getting my work in print makes me a better photographer.
There’s also such joy in holding the work and sharing it in tangible ways. When’s the last time you made a book, a slideshow or a collection of prints to pore over? When’s the last time you submitted them to a magazine or swapped out the prints on your wall? When is the last time you did something with them?
If you want to love your photographs more, consider making something with them. The benefits are huge, and they’re practical. When we output our work, we spend more time with it.
When that output is larger than what we might put on Instagram, or we have to spend money to make it happen, I think we’re more critical of that work. We see the flaws and that keeps us honest and growing in our craft.
I’ve found knowing what I will make with my photographs gives me an end game of sorts. It makes the edits easier when I know what I’m choosing my best images for.
Protect Them
If we love something, we protect it. One way to do that is with an archive of prints, but let’s talk about back-ups for a moment.
It seems like every other week I hear another story of a photographer who lost all their images because a hard drive crashed. I’ve heard stories of theft and fire or water damage as well, and I can’t for the life of me understand why photographers will spend so much money on gear and balk at buying whatever sized hard drives they need to create a simple backup of the work they’ve invested so much in.
If your computer crashed right now or your main hard drive failed, how easy would it be to get back up and running without missing a beat or losing an image?
In case it’s been a while, this is just a reminder to consider giving your backup plan a second look. And if you aren’t current with your backups, maybe to take a moment a do that, you know, for the love of your photographs.
I’d love to hear from you on this. What do you do with your photographs once the camera goes back in the bag? You can be part of the conversation in the comments below.
For some, it’s a simple way to interact with friends and show their images off. For others, it’s a valuable marketing tool. Whether you are just beginning in photography or a seasoned pro, social media is a valuable and useful place for photographers.
Not only is it a place to display and show off your work, but its many different specialist groups can be great places to learn, interact, and solve issues with your gear or photography. However, some social media platforms are much better places to be than others as photographers. There is also the danger that we might use social media as a way of validating our skills.
Today we are going to take a look at some of the top social media platforms for photographers in 2025. We will look at how they can help our photographic journeys rather than as a marketing tool.
We are going to kick off with the granddaddy of photographic social media platforms, Instagram.
Is Instagram Still The Place For Photographers?
The short answer is no, the long answer is, it’s complicated. Instagram has evolved from a platform where all images were displayed at a fixed resolution and image ratio, to a multimedia platform where short form video is king.
As a photographer wishing to show off purely their photography work, Instagram is a busted flush. It’s very hard to build a following and engagement, simply by posting images these days.
There is the argument that Instagram reels are a good place for learning photography, but personally I see a lot of engagement bait and very generic photography “lesson” reels. Instagram’s algorithm seems to favour uniformity and conformity these days so many of the reels are the same advice wrapped up in slightly different ways. Often that advice is also quite poor.
Instagram, the grand daddy, but is it still relevant? By Souvik Banerjee
As a marketing tool, if you have time and/or a team, posting behind the scenes reels as well as images, can build a following and get you noticed; however, unless you are a fairly successful professional, it’s probably not worth investing a huge amount of time in Insta
The Platform Formerly Known As Twitter
Twitter used to be a decent place for showing off your images if you had a decent enough following. These days X, is still a reasonable place so long as you stay within the photography genre. Step outside, just for a moment, and the algorithm will ambush you.
The photography community in X is still pretty friendly. Lots of sharing of images, people willing to give advice, and even the potential to sell a print or two. I have built a decent, engaged following on X by doing a daily showcase. I invite people to post images to my daily theme, then retweet them. I also do an honest critique post once a month, where followers can have an image critiqued by me or other followers. It has proved popular and people enjoy getting real, constructive feedback on their photos.
As a marketing tool, X is pretty limited. Like many platforms these days, external links get heavily demoted, however you can get some engagement by posting a photo to the first comment and a link to the second.
Avoid the politics, and X can be ok. By Daddy Mohlala
What You Should Know About BlueSky And Threads
I have put these two together as they are both new kids on the block, relatively speaking, and both competitors to X. Bluesky is very similar to the Twitter of old, with very good reason; it was created by Jack Dorsey, the original creator of Twitter.
As a photographer’s platform, it falls into the showing category more than the learning. However, the photography community is well-engaged and very friendly. The odd thing I find about Bluesky is that images get lots of likes but very few comments.
The reverse seems true of Threads, which, for photographers, behaves in a similar way. It is again a displaying platform rather than learning, but there does seem to be more commentary, often very useful, compared to Bluesky. The main issue for the photography community on Threads seems to be the infestation of rage bait subjects (this is common across all subjects on Threads). A lot of photographers seem to post “controversial” takes in order to boost engagement. The irony of this approach is that these posts get lots of engagement but don’t pick up many followers.
On both Bluesky and Threads, I have built over 1.2K followers, simply by posting good images, at least once per day. However, I don’t find them particularly useful as photographers’ platforms.
The new kids on the block. Threads and Bluesky
Facebook
This might surprise you, but I think Facebook is probably the best social media platform for photographers in 2025. There are two main reasons for this. The first is that you can create and post as a page, a completely separate entity from your personal timeline. The second is the sheer number of highly specialised photography groups. If you can think of a sub-genre, there will be multiple groups in it.
Creating your own Facebook page is a great way to build a following that is there just for your photography. Many groups allow you to join and post as a page , and if people like your work, you can invite them to join your page.
You don’t need to be a business or professional to have a page. Anyone can create their own photography page and tailor it to their own genre.
Facebook, despite the endless adverts, is actually quite good. By Will Francis
Photography groups on FB can be incredibly helpful, both to new photographers and advanced enthusiasts alike. Whilst the biggest groups can get toxic, the smaller, very specific groups are full of great photographers who are happy to give advice. Local groups are a great way to show off your local photography and build a local following.
Don’t Sleep on YouTube
Whilst there is always an ongoing debate as to whether YouTube is a social media platform, there is absolutely no doubt that it’s a fantastic learning resource for photographers. Whether you are looking to buy some new gear, learn a new photographic genre, or up your editing game, there will be multiple videos available.
As on any social media platform, there can be bad advice, but the bigger photography channels got there by creating engaging and factually useful videos, and in general will be giving out very good advice.
There is a caveat, and that is gear reviews. There are a number of larger channels that predominantly do photography gear reviews. They are often given new equipment before release and put out videos on the day of release. Whilst these videos can be useful in understanding the capabilities of a new piece of photography gear, they can be shills for the manufacturer.
In my opinion, the best gear reviews come from the smaller channels where they have bought it to fit into their own photographic workflows. They are much more likely to give impartial opinions.
For experienced photographers, YouTube can also be a great place to showcase and impart your own knowledge to others. Creating your own photography videos is a good way to give back to the photographic community and gives you an extra creative outlet.
There are a number of other social media platforms. Vero, Glass, and Foto are specifically tailored to the photographer, but none of them really have the pull and power of the bigger platforms. They are good for showing work to your peers but not to a wider demographic.
TikTok and Snapchat both have short-form video photographic tutorials, but like Instagram reels, they tend to be very generic and often misleading.
An often underrated platform for photography is Reddit. There are a number of Reddit photography communities, and they are well-moderated and very useful. One of the great things about Reddit is that it often shows up high on Google searches for specific photography topics, making it a useful go-to for advice.
Social media is not to everyone’s taste. However, as both a learning resource and a place to meet and engage with like-minded photographers, it is invaluable. In my opinion, despite potential toxicity and endless adverts, Facebook is the best place to be for new and enthusiast photographers. The fact that you can create a page dedicated to your own photography is a great way of building up a dedicated following of people who enjoy your work.
Are you in need of a high-quality HTML5 video player plugin for your website? Are you having trouble finding a video player that delivers an exceptional user experience?
CodeCanyon offers a wide range of HTML5 and JavaScript video players that can easily be installed on your website.
Modern Video Player is one of the many high-quality HTML5 and JavaScript plugins available on CodeCanyon.
Much of today’s online content is consumed through video and images. This makes it incredibly important for you to offer your website content in video format through a high-quality video player. By purchasing one of the many affordable plugins available on CodeCanyon, you will get a modern-looking web player that works with many video formats and can even display your images in a slideshow.
The Best HTML5 and JavaScript Video Players on CodeCanyon
Discover the best HTML5 and JavaScript video plugins ever created on CodeCanyon. With a cheap one-time payment, you can purchase any of these high-quality video players.
Here are a few of the best HTML5 and JavaScript video players available on CodeCanyon for 2021:
Don’t miss out on some of the best-selling HTML5 and JavaScript video players on CodeCanyon.
These feature-rich HTML5 and JavaScript video players will give your website visitors the best viewing experience possible. With the premium video players offered on CodeCanyon, you can take advantage of:
advanced video player controls
fully responsive players
song and video statistics
social sharing
Head on over to CodeCanyon and find the right video player plugin for your website!
Top 15 HTML5 and JavaScript Video Players (From CodeCanyon for 2021)
Elite Video Player is a stellar HTML5 video player that can handle just about anything you throw its way:
self-hosted MP4
YouTube
Vimeo
Dropbox
Amazon S3
Google Drive
Show your videos with style—across all browsers and devices—with this fully customizable HTML5 video player.
Features also include:
lightbox, responsive, and fullscreen modes
YouTube channel and playlist support
select player and scrollbar effects
resizable height and width
and many more options
One of the more unique and appealing features the Elite Video Player brings to the screen is the ability to add pre-roll, mid-roll, and post-roll video and popup ads. A WordPress version is also available.
This video player supports a wide variety of embeddable media: from HTML5 video to YouTube playlists, Vimeo videos, and much more. This highly customizable video player has many features that make this a must-have if you need to display videos on your site.
Need a clean and simple JavaScript video background player that you can customize for your website? You can play a single video in a loop, loop multiple videos, or have a mixed playlist of videos and images.
Revolution Multimedia Gallery is a responsive gallery that runs on all major browsers and mobile devices. It uses object-oriented code and the latest CSS3 techniques, making this a very well-built JavaScript video player and gallery.
Here’s what you can expect from Revolution Multimedia Gallery:
responsive layout
responsive, fixed, fluid width, and fullscreen modes
This HTML5 video player includes all the basics you’ll need for a cutting-edge player—without losing those users that are using outdated browsers.
The Ultimate Video Player can play videos on the latest mobile browser or an old desktop computer using IE8 with its Flash fallback feature.
It’s also:
“Packed with a huge amount of features like responsive layout, multiple playlists, external API, optional deeplinking, flexible skin, embed & share, Facebook share etc…”—Ultimate Video Player
Ultimate Video Player is a powerful responsive video player with the right side or bottom gallery that supports most popular video platforms such as YouTube, Vimeo, and more. This player is compatible with all modern browsers.
Ultimate Video Player is the perfect player to build a platform with an intuitive user experience and mobile compatibility.
Fantastic and fast assistance. Problems solved in a short time. Absolutely recommended! — step54
Video Player Lite is a responsive and mobile-friendly player that supports all kinds of media and playback options. You have the ability to show panoramas, virtual reality, YouTube, and Vimeo videos. It also comes with lots of customization options.
Universal Video Player is another HTML5 video player that’s worth your attention.
Not only does it come with many features included in other video players, but it also includes a few extras that set it apart.
Stand-out features include:
Google Analytics tracking
playlist search
categories
shuffle mode
Like some other HTML5 video players, it includes YouTube, Vimeo, and self-hosted video support, a customizable color scheme, and an option to download videos.
The Universal Video Player is a nice solution, and can even automatically retrieve video thumbnails, titles, and descriptions from YouTube servers. A WordPress plugin version is available.
The HTML5 Video Player With Playlist & Multiple Skins (also available as a WordPress plugin) offers side and bottom playlists and six different skins to match your website.
Unlike many other HTML5 video players, this gem also supports .webm video files in addition to the standard .mp4 video format.
You’ll also find:
optional video descriptions with HTML and CSS support
This HTML5 video player has a simple and sleek design. You can place the playlist menu anywhere around the video player, giving you the flexibility to choose how it will look on your website.
Here are a few notable features for this video player:
Stellar Video Player is a premium, multi-purpose video player that supports YouTube videos, Vimeo videos, self-hosted MP4 videos, Google Drive videos, and much more!
Here is what you can expect from this video player:
fully customizable and responsive
lightbox mode
sticky mode
social sharing
Here is what users are saying about the Stellar Video Player
Html5 Video Player With Multiple Skins is a lightweight and responsive player that will only take a small amount of space on the server. This player allows you to embed .mp4 video files and .webm for browsers which don’t have MP4 support.
Revolution Video Player with Bottom Playlist is a powerful and responsive player which you can use to play YouTube, Vimeo, and Self-Hosted video files. You only need the video ID for YouTube and Vimeo. You can also share your video player on Facebook and Twitter.
It is also a highly customizable player that allows users to change appearance as per their own choice.
wide range of parameters for customizing the player
360 Video Player is perfect for responsive web designs, and it also looks good on retina displays. The player allows full-screen view and is compatible with all major browsers, including IE EDGE.
Other notable features include:
iPhone / iPad compatible
CSS powered skins
ads support
video gallery API
5 Free HTML5 & JavaScript Video Player Plugins for Download in 2021
The premium HTML5 and JavaScript video players available on CodeCanyon will certainly give you the most up-to-date and advanced features available, which will greatly improve the user experience.
However, you may be on a budget and still need to add a high-quality video player to your website. To help you with your video player needs, I’ve collected five of the best HTML5 and JavaScript video players you can download for free.
This JavaScript video player is a simple, accessible, and customizable player for video and audio. The player comes with a minimal and responsive design and can work for all types of websites.
jPlayer is an open-source media library written in JavaScript. The plugin is completely customizable and skinnable using HTML and CSS and is very lightweight.
MediaElement.js is a simple and easy-to-install plugin that can display today’s standard video formats. All the basic video player controls come with this JavaScript video player.
This HTML5 video player supports both HTML5 and Flash with the same configuration. The player is fully responsive and can be viewed on tablets and mobile devices.
Discover More Great HTML5 & JavaScript Video Players for 2021
The HTML5 & JavaScript video players mentioned above are some of the best options that you can implement on your website in 2021.
However, these video players may not have the exact functions or design that you are looking for. If none of the premium HTML5 and JavaScript video players mentioned in this article seem to work for your website, then be sure to check out our other articles, which contain many more high-quality HTML5 and JavaScript video players for you to download:
Add a Premium HTML5 and JavaScript Video Player to Your Website Now!
If you are in need of a video player that has a sleek design and is fully functional, then head on over to CodeCanyon.
The video players available will give you complete control over the design and features offered in your web players on your website. Ultimately, this will lead to a better user experience for your particular audience.
In addition to all the high-quality HTML5 and JavaScript video players on CodeCanyon, you can browse through thousands of other high-quality plugins and scripts for your website. You’ll find everything from social media to marketing plugins and scripts in CodeCanyon’s massive premium library.
Do you want to learn how to create photo overlays in Adobe Photoshop? This tutorial will show you how to add a texture overlay in Photoshop and how to use it in a few ways.
Choose Your Favourite Overlay Photo Effects
Now that you know just where to find the best photo overlays when you need them, head to Envato Elements and download your favourites today.
Here are more top resources and tutorials to try from Envato Tuts+:
We all may have seen a rainbow at some point and it may have been in strange places even like a waterfall, due to sea spray or even when watering plants in the garden. The most common occurrence of rainbows is when sunlight hits raindrops or water particles when the air is moist after a rain, but even moonlight can cause rainbows.
A rainbow is actually an optical illusion and seeing a rainbow depends on where you are standing with respect to the sun and at what angle the sunlight is falling on the waterdrops. The same applies for any form of rainbow seen elsewhere.
Now capturing just rainbows can seem quite boring, for example, just a colourful arc in the sky. It is always important to compose the shots to make the final photo look interesting and meaningful. Here are 29 striking rainbow photos that have been shot well.
If you would like to master composition in any genre of photography and create brilliant photographs, then you should check out this eBook “Understanding Composition” by Photzy. This guide is packed with illustrations for visual learning, case studies, and assignments that will help to verify your knowledge.
Photo by Zoltan Tasi
Photo by Austin Schmid
Photo by NOAA
Photo by Karson
Photo by Chris Barbalis
Photo by greg_nunes
Photo by Cosmic Timetraveler
Photo by David Brooke Martin
Photo by Todd Cravens
Photo by Jared Erondu
We all know that composition is the secret to incredible photography and if you want to learn how to determine the flow of a scene so that setting up a perfect shot is effortless, then you should check out “Understanding Composition” by Photzy. This complete hands-on guide with easy to understand case studies covering the “What” and “Why” of photography composition, can make learning a breeze.
Photo by Sorasak
Photo by Dario Mueller
Photo by Zdeněk Macháček
Photo by Lucie Dawson
Photo by Jorge Fernández Salas
Photo by DIEU
Photo by Jesse Gardner
Photo by Dylan Gialanella
Photo by Marcus Woodbridge
Photo by Zoltan Tasi
If you want to learn to spot great composition in a scene quickly, so you don’t miss out on those brilliant shots again, then you should check out “Understanding Composition” by Photzy. You will no longer feel overwhelmed by not being able to get the shots you really want. The 120 pages eBook comes with step-by-step information that contains 25 key lessons, 77 example images, 23 assignments and 1 printable composition checklist, all helpful to get a perfect shot.
Tripods used to be bulkier and heavier once upon a time and photographers had to carry these heavy accessories during their travels and it made the whole process a bit stressful. Travel tripods were made to make this process easier, so they can be carried in a backpack, without spending too much energy. They also do not take up much space since they can be folded into small bags.
Travel tripods are required mostly when you are travelling for landscape and astrophotography. They can also be great accessories when families and friends want to capture group photos and the photographer needs to be in the frame. They are also good for solo travellers who want their self portraits taken in outdoor locations where they travel.
If you are planning to buy a travel tripod, check a few factors before making the decision.
Weight And Portability: You are purchasing a travel tripod because you wish to carry it around when travelling without much hassle. They also need to fit on a backpack or a camera bag that you will be carrying. So check for ones that are lightweight and foldable or collapsible to smaller sizes, so it is easier to carry along during your travels.
Maximum Load Capacity: Some tripods can be too light and flimsy that they can get knocked over easily or blown over by a small wind. Besides, they may not be able to hold the weight of the camera-lens combination that you carry along. You need to check the specifications to see if the tripod can carry the camera and lens combination that you wish to carry along during your travels.
Height: The tripod needs to help the photographer capture a scene from any angle or perspective they wish to. It could be a high one or a very low one. Each tripod comes with specifications or features that may be slightly or a lot different from the other. Check how tall the tripod can be extended or how low it can be collapsed to get the required shots.
Material: Tripods become heavier or lighter based on the material used to manufacture them. Older tripods used to be made of steel or aluminium and they were quite heavy to carry around. Travel tripods and other bigger traditional tripods are now made with carbon fiber and this makes them quite light and easy to carry around.
Stability: A tripod needs to be stable in any terrain and weather conditions. A lot of the remote locations can be quite windy and nights can especially be windier than the days in certain locations. Research about your tripod and purchase one that has features to keep it stable in all conditions.
Budget: If you have a set amount that you are looking to spend on a tripod, check for tripods that have satisfactory features based on the above suggestions and then look for one that suits your budget.
Additional Features: Since mobile photography has become very popular in the recent years, some tripod manufacturers add some accessories along with their tripods like a mobile holder, etc. Some tripods have the feature to use them as a monopod. If you are someone who would be interested in any of these features, check these before making a purchase.
Pro Tip: Even if you use a tripod for stability, there are times when camera shakes can be induced when releasing the shutter button. It is good practice to use a remote or cable release to eliminate camera shake and capture sharp images.
Photo by Joshua Woroniecki
Some of the most popular brands of tripod, known for their quality and reliability are:
Manfrotto
Gitzo
Benro
MeFoto
Joby (known for flexible and compact tripods)
Sirui
Vanguard
Peak Design (known for innovative tripod designs)
K&F Concept
We have included 10 tripods that include a range based on weight, affordability, load, performance, etc., so there is one for every photographer and photography need. Check out this video by pro photographer David Manning to learn more about some of the most popular travel tripods:
This is a lightweight, and affordable tripod made of carbon fiber. It weighs only 1.14kg, which is perfect for travel photographers to carry around. Here are its main features:
The Ball Head can be rotated to any angle you want and this helps to use your camera without any problem for unique perspective shots.
The tripod can be extended to a height of about 162cm and can be folded to about 41cm. This makes it a very compact and portable tripod for travel photographers.
This tripod is well built and can be used with most cameras in the market. However they may be a bit shaky when extended to the longest end.
This tripod is most commonly used by many photographers who travel a lot because of its neat, compact design and portability. The tripod is very easy to set up and has a maximum height of 59 inches, a minimum height of 16 inches and weighing about 1.6 kg.
Pros:
This tripod is travel friendly and popular for its build, portability and stability and can be carried easily in your backpack.
It is made of high quality materials and is available to choose from a few lock models.
Although the tripod is lightweight, it has a central column that has the facility to hang something heavy to keep it stable in windy conditions.
Cons:
This tripod may not be a good choice if you wish to use a large camera and a telephoto lens.
It is quite expensive compared to similar tripods in the market.
I am just getting into photography and I wanted a light tripod to carry with me, I have used other heavier tripods for stargazing, so I have a little experience with tripods. Although light, this tripod is stable, easy to use, and seems sturdy.
This is a budget-friendly tripod that is very lightweight and portable. This tripod can be converted into a monopod when required.
Photo on Amazon
Pros:
It is a very affordable tripod for any photographer on a budget
Since the tripod has a ball head, it helps to move the camera to to any required angles.
Instead of the traditional clips and other lock mechanisms in tripods, this comes with a twist lock feature that makes it easier to setup when out in location.
This tripod has a unique feature of adjusting leg angles and so is a great choice for anyone interested in taking shots from unusual perspective and angles.
Cons:
You cannot use this tripod for very low angle shots because the central column cannot be inverted for this purpose.
It is not very stable in windy situations.
Some reviews found online suggest that the quick release plate may not be compatible with some camera models or may not securely hold the camera.
Replacing my old cheaper Dolica, these are so much more sturdy and stable! They are also as versatile as described. I’m using it to hold up a heavy pastel painting pochade – much more difficult for tripods to handle full pochades for painting than even heavy lens cameras, BTW. If it holds up as I think it will, I’ll consider it a great purchase. However, even with carbon fiber legs I wouldn’t call it light weight, which is probably due to the extra sturdy metal fittings. Still it does fold up small, folds up well, and does the job. UPDATE: It is very sturdy and works like a charm! I wasn’t sure a ball socket would work as well as a pan tilt head, but it works even better.
This tripod is known for its compact nature and design to suit photographers who travel a lot.
Pros:
It can be folded to a very small size, making it highly portable. It can fit easily into a ackpack or a travel bag.
This tripod can hold some amount of heavy gear like DSLRs and telephoto lenses.
Since the legs have multiple columns, the size can be adjusted to the desired value based on the angle, perspective and type of shot.
The center column is can be inverted to capture some low angle shots or to capture subjects at ground level.
Cons:
This brand is quite expensive compared to similar tripods, but the features make it worth the price.
The leg locks in this model seem to be a bit difficult to use compared to traditional flip locks or the twist locks.
The tripod comes with a ball head, which is common in most recent tripods. As a result, there is no panning base which can be a bit difficult for photographers who capture a lot of video footage and panoramas.
The tripod is very lightweight and can be a bt shaky in windy conditions.
5.0 out of 5 starsWell designed Reviewed in the United States on April 2024
Great portable tripod…very well designed with adjustable leg tension makes it solid in spite of it’s size. Watch the video for tips on setting it up fast. Has some extra features that most don’t.
This brand of tripod is quite affordable for anyone who has some hesitation to invest in an expensive tripod. It also can be converted into a monopod whenever necessary and this makes it a very portable accessory for hikers and travellers.
Pros:
Since this tripod is affordable, it is a great choice for anyone who travels a lot for landscape and other photography that require a tripod.
It comes with attachments that allow the user to customise the tripod and use various mounts for devices other than a camera.
These tripods have capacity to hold moderately heavy camera and lens combinations.
Cons:
The tripod is quite basic and is not easily available in the market all the time.
I am using for both taking photos with my iPhone and using my telescope viewer. It has two base attachment so I can swap quickly. One thing to be aware of: I was adjusting it in the dark while taking aurora photos (or attempting to) and it came apart. I tried to put together on the dark but one piece was not able to go back on. Strangely enough, the post had come off during the initial breakdown which I had not noticed in the dark. I had to remove the top, remove the attaching post and put the collar on, then replace the post before screwing the top piece back on. (This will make sense if you are fighting with this problem) Now I am using it with pleasure, easy adjustments, smooth turning.
This is a Carbon Fiber Tripod with a sturdy build and design. They are designed to carry heavy camera and lens and are very portable, even if they cannot be folded to a very small size.
Pros:
The tripod legs allow to adjust the angles to get shots from unique angles and levels.
The flip lock mechanism on the tripod legs allow the users to set and fold the tripod easily when in the field.
The center column comes with a hook to hang something heavy for stability during windy situations.
Cons:
This tripod is slightly more expensive compared to other tripods.
It is heavier compared to similar tripods.
It is not too compact once folded and is not recommended for longer travels.
5.0 out of 5 starsGreat travel tripod Reviewed in the United States on August 2022
I was hiking in Yellowstone and saw several people carrying this tripod. I had to get one once I handled one. It is light, has various positions and very stable. Good price!
This Carbon Fiber Tripod is one of the best in terms of portability and the feature that it can be converted to a monopod. The bubble level helps to keep the horizons straight in the frame and there are additional threads if you wish to mount more accessories besides a camera.
Pros:
The tripod is made of carbon fiber material which makes it lightweight.
The legs are sturdy even in windy conditions.
The heights, angles and perspectives can be adjusted to get interesting shots.
The ball head helps to mount the camera in various angles and orientations.
Cons:
Slightly expensive compared to other lightweight tripods.
The twist lock design may not be practical for some photographers who prefer flip lock mechanism.
5.0 out of 5 starsTop quality Reviewed in the United States on January 2024
One of the best tripods I’ve came across . It’s durable light food up compact and over all fit and finish is impressive !
The JOBY GorillaPod is a popular mini tripod and is known for its flexible legs and compact design. The legs can be twisted and wound around things like poles, tree branches, etc. The gorillapod is not recommended for DSLRs, however a mirrorless camera with a lens that has a combined weight of up to 3 kg is supported. Here are some of its key features:
Pros:
The legs are flexible and can be wrapped around objects and bent into various shapes. This allows the gorillapod to be used anywhere even if the surfaces are not quite right or if you need to put the camera high up or very low on the ground. Otherwise it can be used as a traditional tripod.
It comes with a quick release plate that allows to quickly attach and detach your camera.
The gorillapod material is made of rubber rings and grips which help the gorillapod to be attached to surfaces securely without slipping.
The gorillapod’s legs cannot be extended, but can be bent to achieve different heights.
The gorillapod can easily fit into a camera bag, making it very portable. It is also very lightweight.
Cons:
The weight a gorillapod can hold is quite limited and it is most suitable for smaller cameras with a small lens.
You cannot extend the legs to achieve heights, but the gorillapod can be kept on walls or wrapped around branches and other structures securely if possible to get the desired heights.
It is not very sturdy in windy situations.
Adjusting the legs to get to certain angles may take time and requires some patience.
Limited Load Capacity For Accessories: While the tripod may have attachment points for accessories, the weight limit for these attachments can be relatively low, limiting your options for adding gear.
For years I’ve avoided these tripods because I think they look gangly and stupid, but I finally tried one and wow, I absolutely love it. It holds a lot of weight, in fact, I screwed off the top and discovered the screw set is the same size as a monitor bracket, and I use the tripod as a stand for my Rodecaster Pro podcast board. This tripod is so versatile I ordered a second. My primary use for the second is for a small video projector.
This is an affordable tripod designed with both photography and videography in mind. The tripod legs can be adjusted to different angles in each level and hence can be used efficiently in rugged terrains and sloped surfaces. Since it also can be collapsed to a smaller size, it is perfect for photographers who travel a lot.
Pros:
The tripod can be extended to a maximum height of 77 inches and is a great choice to capture high angle and perspective shots.
The center column can be adjusted or reversed to use the tripod at really low perspectives.
The angles for each section can be adjusted and this makes the tripod a very versatile on to use in tough terrains.
The tripod has one detachable leg that can be used as a monopod.
The price is quite affordable, making it a good choice for photographers on a budget.
Cons:
The weight is slightly more compared to similar lightweight tripods.
The size of the tripod is not too compact when folded completely.
The tripod may be slightly shaky is very windy conditions.
5.0 out of 5 starsLove this!! Reviewed in the United States on May 2024
Works great for filming with your phone Really easy to adjust! I love how tall it goes, short and medium length Come with a case to hold it in
This is a lightweight and compact tripod made of magnesium alloy. This design is quite versatile and makes it a good choice for photographers who travel a lot.
Pros:
The build of the tripod body is good and is made of durable materials that can withstand the wear and tear due to the environmental elements.
It can support all types of cameras including DSLRs with a standard lens.
The tripod legs are detachable and can be converted to a monopod.
Legs can be adjusted to various heights and angles. This helps the photographer to shoot from unique angles and perspectives.
The ball head allows the camera to be used at various angles and perspectives.
Cons:
The maximum height is not good compared to similar tripods and may not be a sufficient height for some photographers who love to photograph from a higher angle.
It can be a struggle to use the tripod in very windy conditions.
Update Feb 17, 2024: Excellent customer support from Neil & the company 3-Legged Thing in England. They are replacing the failed column lock and compression washer no charge plus provided great operational support guides for future. Very impressed how they stand by their product- Thank you! I have updated my rating to 5 stars.
Conclusion
We hope the above list and deciding factors will help you to choose a tripod that suits your photography and style. Look for the weight, load capacity and other features that will make your photography simpler with the tripod.
What tripod do you use when traveling or what would you recommend and why? Let us know in the comments section below.
Making a film and creating an ad for that film require skill. Let one of the 20 Final Cut Pro movie trailer templates free and premium in this article help you create a great impression for your project. They’re especially helpful if you don’t know how to make a movie trailer.
A playground for the wealthiest, Monaco is not just one of the most prosperous countries economically speaking. It’s a photogenic country, from luscious green gardens, clustered hills, and magnificent architectural designs to the infamous Mediterranean Sea. This place is way more abundant than money.
With so many good spots, it’s a nice idea to have a list of the very best areas to take your camera out and click its shutter. Below is a list of places where you can take the best Monaco pictures for your gallery.
[table id=31 /]
Palais du Princes
visitthefrenchriviera
Palais du Princes is the official residence of Prince Albert II. The palace is a quick 5-minute stroll through the Rocher lanes or a 10-minute incline hike through the Major ramp for more fit people. The vistas are pretty stunning, so the walk is well worthwhile.
Even though this place is a private residence, it is still open for visitors occasionally. Please take part in the castle tours to learn more about Monaco and the history of its royal family.
During your visit, you can take your Monaco picture of the Mediterranean Sea’s stunning views. Upon entering the residence, there is an Italian-style gallery. The Blue Room is famous for its blue and gold accent silk tapestry.
The best Instagram-worthy you can capture here is the Changing of the Guard at 11:55 in the morning. You do not want to miss this ceremony!
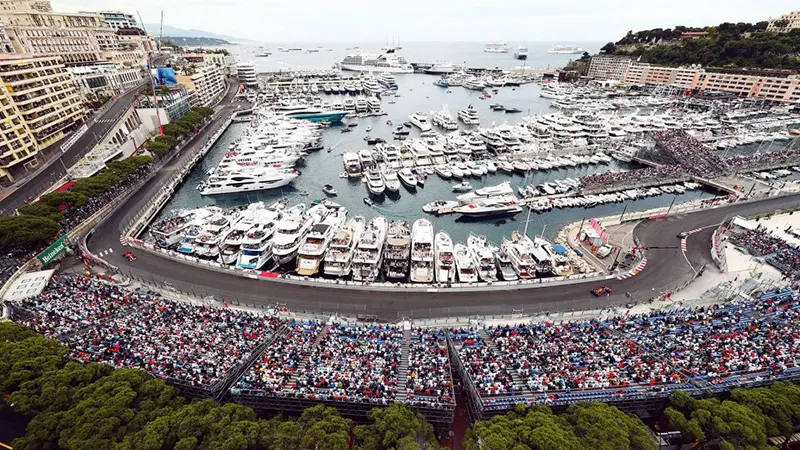
Monaco Grand Prix
speakyourpeace
Nobody wants to miss the infamous Grand Prix in Monaco. The Formula One Grand Prix is unquestionably one of the most thrilling sporting events. Monaco’s circuit is one of those that are used for Formula One racing.
On April 14, 1929, the inaugural Formula One Monaco Grand Prix took place. It’s noteworthy that the Monaco Grand Prix is the shortest of all the races (just 3.337km).
Boulevard Albert 1 is where the race begins, and Place du Casino is where it ends. The Automobile Club of Monaco is organizing this competition. Even though the region is exceptionally congested during races, it is worthwhile to visit.
Keep in mind that the Cannes Film Festival takes place in May. Make sure to bring your motion camera to take a photo of the fast-moving automobiles.
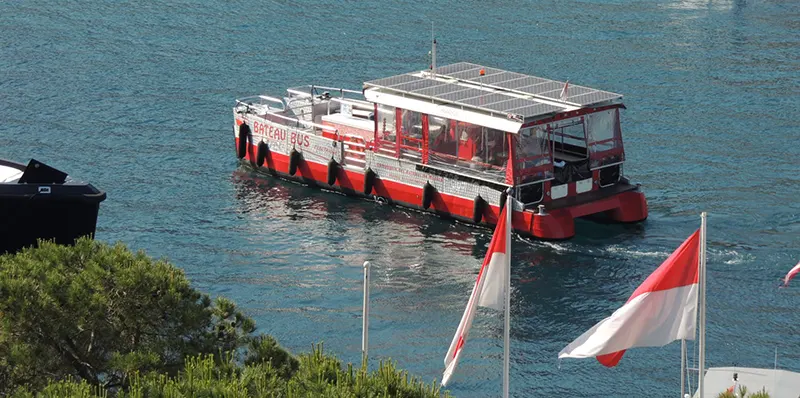
Bateau Bus
Another great spot you might want to take your Monaco pictures in is the Bateau Bus. It is a tiny boat where you can sit outside and carry your outdoor camera for some snaps as you look back to Monte Carlo.
By just paying 2 Euros for a trip to Port Hercule, you can have a chance to get a glimpse of some lovely views from the water.
It will only take 3 to 5 minutes to cross the harbor in a fun and exciting way. A day trip would also be best in the evening as the lights glisten while you float on the water.
Musée Oceanographique de Monaco
frenchriviera-luxury
Who would have thought there would be a guard watching the oceans for over a century? The Oceanographic Museum, built on the side of Monaco’s fabled Rocher, was established by H.S.H. Prince Albert II of Monaco’s great-great-grandfather Prince Albert I.
It has been keeping an eye on the oceans for more than a century. The Museum has more than 6,000 specimens on exhibit and is known for its global expertise. The architecture of the museum is photo-worthy since it elicits the marine world.
On Wednesdays, you can visit the touch tank and feed the animals there. A light and sound show will also be found in the Whale Room. Prepare your camera because this place needs your unlimited snaps.
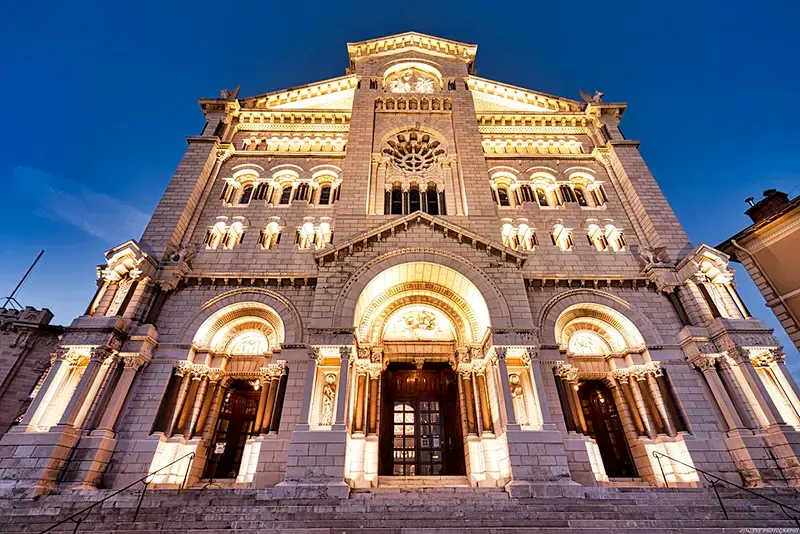
Cathédrale de Monaco
flicker
If you have eyes for architecture, then this Monaco picture spot will definitely. The cathedral is situated at 4 Rue Colonel-Bellando-de-Castro. You will be in awe of the intricate details of its facade.
Aside from the Roman-Byzantine architectural design of the building, many notable persons are buried in the area, making it more historic.
Photo Tip: The cathedral is best photographed when the sun directly hits its exterior. The light and shadow play will create more texture for your snap.
Jardin Exotique
visitthefrenchriviera
Located at 62 Blvd. du Jardin Exotique, modern Monaco is one of the famous places to visit in this country. Jardin Exotique started receiving visitors in 1933.
The garden encapsulated a lot of species of different varieties from across Latin America, Mexico, and Africa. Any spot here would definitely be beautiful.
The large succulents and cacti will make you feel like you are in Eden of some dessert. Ready your camera and enjoy their Observatory Cave and Anthropology Museum. There are tours available every hour after 10 am.
Jardin de Saint-Martin
planetware
Looking over the Port de Fontvieille, Saint-Martin is one of the photogenic spots in Monaco. You will see how the orange-washed houses contrast with the aquamarine waters of the port.
This place is near the Palace of Justice. To get the best Monaco pictures, try to angle your camera at your back as you glance through the terrace. Make sure to cover the houses and the waters too!
Another garden spot is near the statue of Prince Albert I. There are stairs nearby that the photographer can use as a platform to take the photo at a higher angle. The subject should stand the railings as if it is a balcony overlooking the tall, beautiful buildings across.
Pro Tip: Wear some aesthetic or white pieces of clothing to make your Monaco pictures more pleasing.
The Meditteranean
pocruises
Lying from the east and south of Monaco, the Meditteranean Sea is known for its deep blue waters across the globe. Beneath the Museum of Oceanography, you will find a pathway connecting to the marina. I will share with you some not-so-famous spots where you can enjoy the view.
To find this path from Port Hercule, you need to stay by the water. Enjoy the view, and do not forget to take some snaps of the sea! Search for the stone staircase that links you through the rocky beach.
Bridge St Huntsville Movie Theater
simpleviewinc
Bridge Street is located at Huntsville Al 35806. It hosts the number one theater in North Alabama. You can enjoy a nice full bar and scene with plenty of food options, and upgrade your movie with their luxurious loungers.
To choose your movies and reserve tickets beforehand, you can go to Cinemark’s official page or site and have your reserved theater seating. To read more of the previous visitors’ reviews, you can go to their Facebook page or find relevant content in other sites.
Other Things Aside From the Eye-Catching Views
There you go; I hope the list of vantage points will help you on your trip to Monaco. Aside from that, there are also some things worth knowing about the place. You will enjoy the following:
The mild climate is terrific!
It is a great place to shop luxuriously
You can get there by helicopter (if you want an epic experience!)
The place will teach you about marine science
Movie theater in hunstville
October is the perfect month to visit the place especially when you bring your friends with you. Last but not least, even though Monaco is known for the lavish lifestyle it requires, your travel does not have to be expensive.
There are free museums and viewpoints within the country. Some activities will not cost you a fortune.
However, if you worry about your accommodation, you can stay in a city nearby Monaco. In that way, you can find some affordable places to stay in. Manage your bookings beforehand!
King Ludwig II erected his fascinating fortress in the state of Bavaria’s southern frontier in Germany. Due to its astonishing architecture and isolation from the outside world, Neuschwanstein Castle became a haven and has since come to represent the Romantic era worldwide. It has even played a significant role in several biopics about the king, and Disney used it as inspiration in making The Sleeping Beauty movie and Cinderella.
Though its construction never ended after starting in 1868, Neuschwanstein is still visited by around 1.4 million people every year. The shy mad king made this castle to withdraw himself from the public. Yet, today, an immense number of people enter his private abode. Isn’t it a paradox?
[table id=32 /]
Neuschwanstein Castle Photos – A Gallery
Felix
Take a stroll around Neuschwanstein Castle, and you’ll never believe its elegance. It’s incredible when we think that the project had already been canceled when King Ludwig II died. The king lived in the fairytale castle only for 11 days, but each corner of this fairytale castle will speak of Ludwig’s character forever. This picture gallery will contain some exterior pictures of the castle and how and where to take them.
Marienbücke
Luis Fernando Felipe Alves
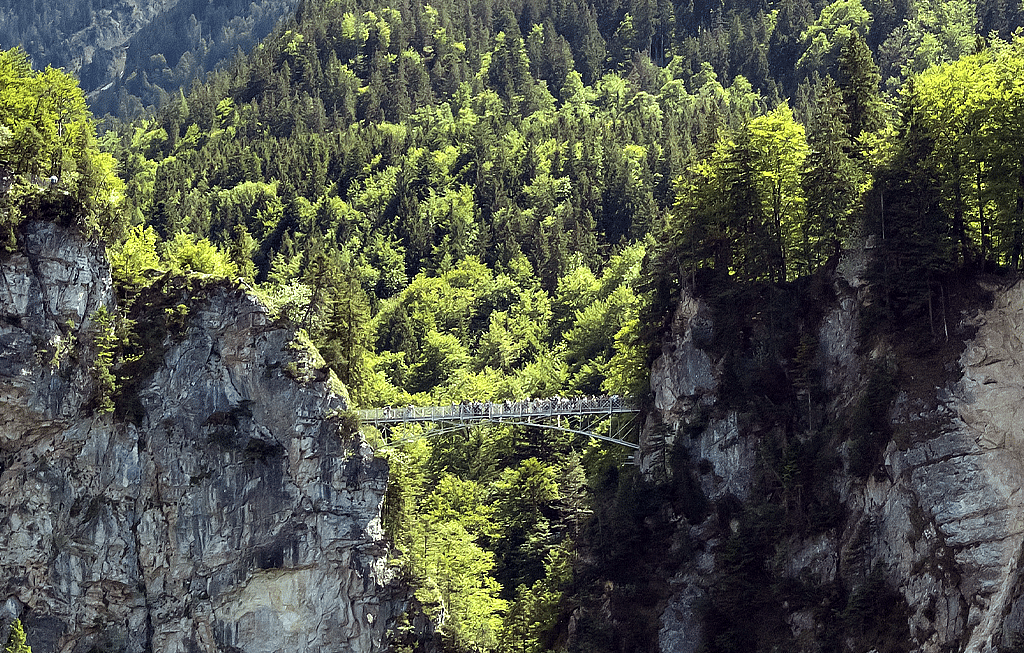
Marienbücke is also called Bridge of Our Lady. In 1866, this bridge was beautifully constructed. It spans the river Pöllat across a rugged canyon. By far, Marienbücke is the most popular vantage point where you can take the best angles of the Neuschwanstein Castle from behind.
The perfect time to capture the castle from there is during the winter. Shades of green from the pine trees pop through the blue and white colors that the Neuschwanstein Castle, snow, and sky exhibit. Given the Marienbrücke’s congestion, you should think carefully about moving up the path after crossing it.
Your starting point should be in front of the fairytale castle to get there. From there, find the path connecting to the bridge. You can arrive there in 10 mins by foot and faster when you decide to take a bus.
Take pictures with caution: On the left side of the Marienbücke, there is a spot where you can include the foreground of the Neuschwanstein Castle into the frame. However, before going there, weigh whether it is worth the risk. This particular side of the bridge is deemed to be dangerous. Years ago, a rockslide happened, and it took the people there five years to remove the boulder.
Hohenschwangau
f9photos
Park your car around three o’clock in the afternoon in Hohenschwangau Castle, and you will get a nice shot of the main tower. Walking further will give you the chance to have a level shot. It would also be best to use a telephoto lens to take a photo from this area.
To get there, find the path leading to Hohenschwangau forks off to the right behind Hotel Müller as you approach the ticket office. The ideal spot is immediately in front of the little gate leading to the courtyard.
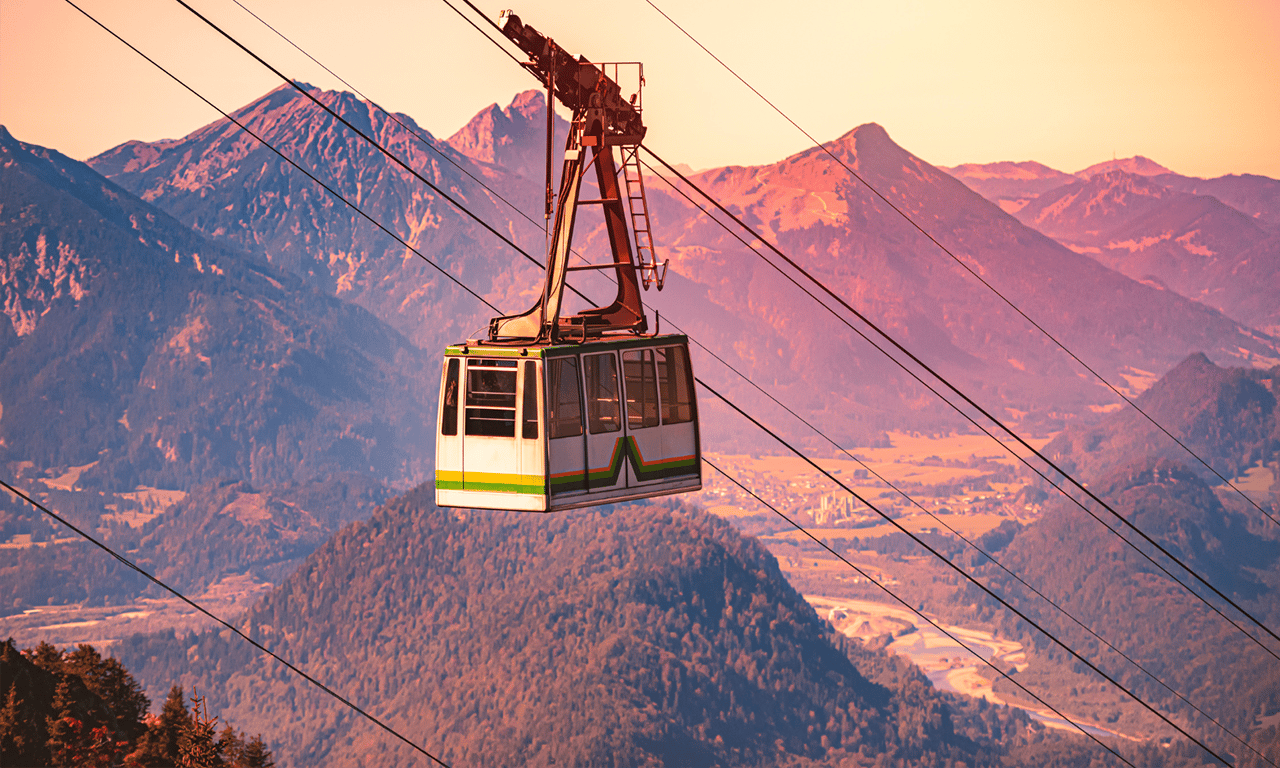
Tegelbergbahn
kyolshin
During your ride, you will get a fantastic view of both Hohenschwangau and Neuschwanstein castles. What is more desirable is the mountains from the background create a fairytale-scenic view. 2 kilometers away from the Neuschwanstein Castle, there you can find Tegelbergbahn— a cable car. You can request the driver to open the window for you to take more explicit photos.
Tips from the locals: There is a downward-sloping hike in Tegelbergbahn where you can witness some beautiful views of the castle. Make sure that you will not do the visit during the winter season as the snow will cover all the pictures up.
Most tourists flock to Antelope Canyon during summertime. Midday is the most crowded time. Tourists prefer to visit during this time so they can get more great stock photos. If you want to avoid the crowd and take your time taking pictures, you can visit earlier or later in the afternoon.
Schwangau
Jaromir Kavan
Schwangau is the closest you can get to take an up-close photo of the castle. You can see the paintings and sculptures that beautify the castle’s facade. Examine the various details created by stage designer Christian Jank and King Ludwig himself as you stroll between the matched gatehouses with the Bavarian coat of arms.
So close yet so far: Did you know that you can only take pictures of the castle’s exterior. Cameras are not allowed the moment you step inside.
When you are on tour with so many tourists, taking great pictures can be challenging. One important piece of advice to get great shots is to look up. The canyons look lovely from that perspective. Also, if you are lucky, you can get gorgeous images of light beams shining down.
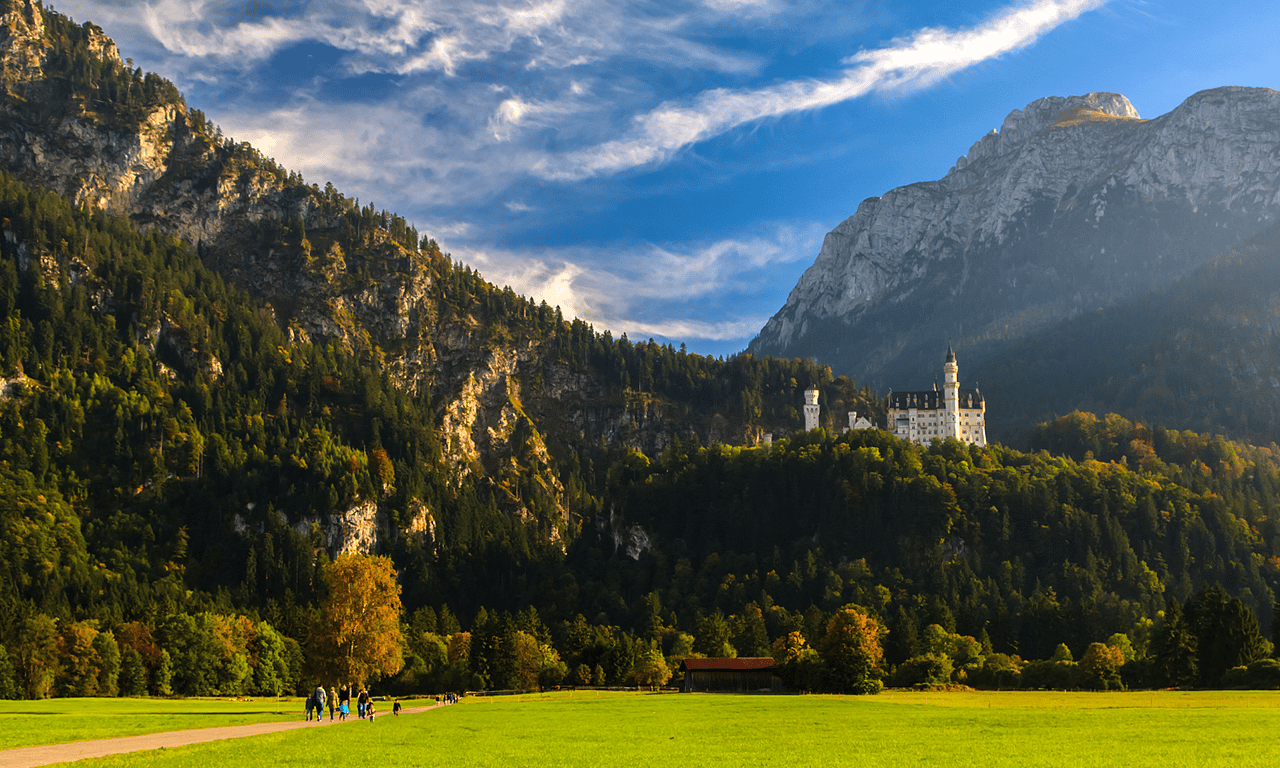
From the Valley
Cadlikai
This viewpoint is far different from the previous ones mentioned. Aside from the Neuschwanstein Castle itself, you will also include in the frame the farmlands and the open field at the foot of the castle. You will notice how Neuschwanstein pops out like a gem amid the bushy Alpine in its surrounding.
Forggensee
Simon Dannhauer
Forggensee is Bavaria’s fifth-largest lake. Every summer, take a two-hour or a short 55-minute tour around the southern end of the dazzling lake to explore it. During the summer, a cruise operates in the area giving you an avenue to take a snap of the tall towers as they erect on top of the mountain.
How to get there: Note that the boat departs from the Füssen Harbor.
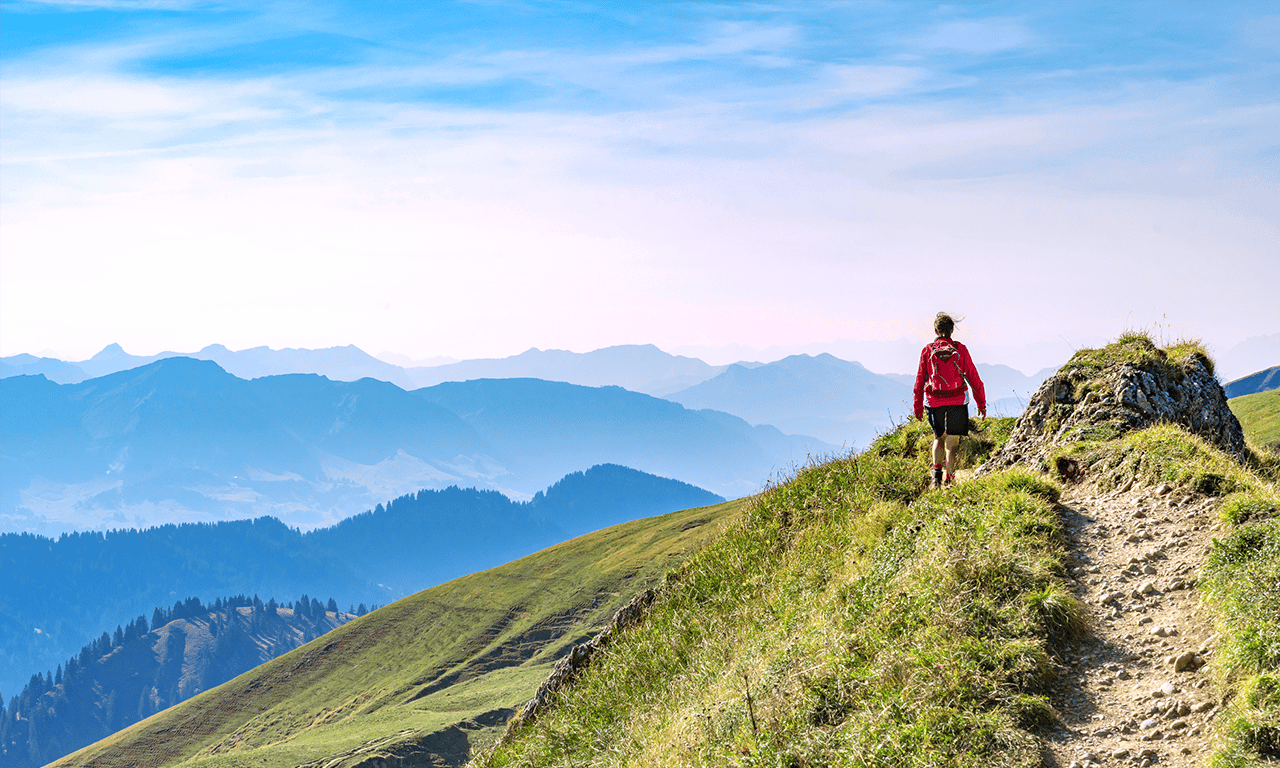
Allgäu Hiking Trails
Uwe Moser
Get another angle of the castle by traversing the Allgäu Hiking Trails right after you visit Marienbücke. The trail is already a must-visit destination, yet it also offers activities from easy mountain hikes to strenuous ones.
For a slightly different perspective of the Neuschwanstein Castle, merely cross the bridge and paw through some well-worn underbrush. Continue on the 120 kilometers of signposted hiking paths that wind through the surrounding hills, leading to nearby cities and destinations.
Watch every step: the hiking paths are not as monitored as you expect them to be. Before proceeding to Allgäu Hiking Trails, check the weather first. Hiking paths together with the bridge are off-limits during lousy weather.
Prepare Your Visits: A Guide To Taking Great Photos
You might want to recreate some of the Neuschwanstein Castle stock photos found on the Internet. However, before doing so, you need to observe the following tips:
On taking pictures
Since many people are visiting in and out of Neuschwanstein, the management needs to post some regulations and rules to maintain the castle. Some of their limitations touch on the dos and don’ts in taking pictures.
Here are the most vital things you should observe:
Marvin samuel Tolentino Pineda
Do not fly drones
It would be best if you had a special permit before flying your drone above the whole property. Note that GPS does not also function around the area. You might lose your drone in the trees in spite of getting a permit.
Lighting is not your friend
Since King Ludwig built the castle to hide from the crowd, even the sunlight hardly penetrates the concrete of the building. Indeed, Neuschwanstein is already in an elevated area as it stands on top of a hill. It is still at the foot of another massive mountain. Thus, the lighting is somehow challenging. But the best time to take images is during the morning.
Do not take photos inside
Lovely scenery, and the outside of the castle is pretty rad. But on the tour thru the inside, you are not allowed to take any images and the guide is very persistent in telling people this.
The outside is where it’s at, and the view from the bridge further up the hill is excellent. If you want to look (and not take photos) at the inside, make sure you go as part of an organized tour cause they sell out crazy fast.
On going to the photo spots
Nick Randle
Aside from knowing the rules for taking photos within the castle, it is also essential to prepare yourself for each spot you visit. Because of this, we have listed some things you need to observe to avoid accidents and other untoward instances.
A lot of hiking is involved
Remember that Neuschwanstein castle is situated on top of a hill, and getting to the photo spots will require you some walking or hiking. Yet, we will not require you to wear hiking boots instead, some pair of mountain trainers will suffice. If you do mountain photography, you probably already have a pair ready. However, you should wear proper boots during the winter.
You will not fit all places into a day
Take it slowly, and enjoy your travel. Do not try to squeeze all spots in just a day because you cannot. You will end up exhausting yourself.
Do not forget to bring some snacks
Although some shops and restaurants in Schwangau and near the castle, it is still best to bring some food. Pack up some drinks and snacks. There is no drive-through restaurants or convenience store halfway through your trip. Do not starve yourself.
Be careful in entering some secret spots
A secret spot around the castle belongs to the descendants of last King in Bavaria. Before entering this place, you need to ensure that you have extreme hiking skills and experience. If you are unsure about yourself, stay on the pathways.
The fairytale castle is waiting for you…
Leonid Andronov
Planning your trip wisely is critical in getting Neuschwanstein’s greatest images. Making hurried excursions to each location is avoided if you have everything planned, especially your lodging. Additionally, remember the following:
Reserve your tickets online for a guided tour beforehand
Arrive at the castle early
Study King Ludwig II’s biography to resonate more with the place
You can take the bus to the castle
The Neuschwanstein castle is open from 9 am to 6 pm daily
You can make the royalty-free photos as an inspo found in the search results
Research for more information about your Europe trip