بلاگ

  • Editing Minimalistic Photography in Lightroom — Mikko Lagerstedt

    Editing Minimalistic Photography in Lightroom — Mikko Lagerstedt

    [ad_1]

    You can use multiple masks and make highly complex selections.

    You can also use the following manual masking tools:

    • Select the Graduated Filter tool from the toolbar on the right side of the screen. This tool allows you to apply a gradient effect to your photo, which can help draw the viewer’s attention to a specific area of the image.

    To use the graduated filter, click and drag on the part of the image where you want the effect to start. Then, release the mouse button where you want the effect to end. It will create a gradient effect that gradually changes the photo’s exposure, contrast, saturation, or other settings.

    • Next, you can use the Radial Filter tool to apply a circular gradient effect to your photo. It can help create a vignette effect or draw attention to a particular image area. To use the radial filter, click and drag on the part of the image where you want the center of the effect to be, and then release the mouse button to set the radius of the effect.

    • Finally, you can use the brush tool to apply effects to specific areas of the photo selectively. Select the brush tool from the toolbar on the right side of the screen and then adjust the brush settings to control the brush’s size, hardness, and other properties. Then, brush over the areas of the photo where you want the effect to be applied.

    Using these tools, you can create a more minimalistic photograph by selectively applying adjustments to specific areas of the image. It can help draw the viewer’s attention to the essential parts of the photo and create a more cohesive and balanced composition.

    4. REMOVING DISTRACTIONS

    One of the most helpful ways to make your photograph more minimalistic is to remove distracting elements. In Lightroom, the healing tool is the tool you can use to get rid of unnecessary elements. This tool allows you to selectively remove unwanted objects from your photo, which can help create a more minimalistic and cohesive composition.

    There are three different tools inside the healing panel in the Lightroom CC 2022 version. The Content-Aware Remove, Healing, and Clone tool.

    1. The Content-Aware Remove tool tries to automatically remove selected distractions without suggesting an area to apply with.

    2. The healing tool suggests a replacement for the spot you are trying to remove and uses an algorithm to match the color and light of the applied area.

    3. The clone tool clones an area you want to remove.

    Use the cropping and straightening tools to remove distractions and frame the photograph to emphasize the subject.


    [ad_2]

    Source link

  • How to Create Team Composite Photo (2025)

    How to Create Team Composite Photo (2025)

    [ad_1]

    There are many types of photography—spotrts being one of them. Likewise, there are many different types of sports photography, too. We work with all kinds of sports photos at Path. 

    One of our favorite types of sports photos is the team photo. Let’s take a look at what a team composite is and how to create one. 

    What is a team composite photo?

    A team composite photo is a single image that combines individual portraits of team members into a unified group display. These photos are often used when it’s not possible to gather the entire team in one location for a traditional group photo. Each person’s portrait is taken separately and then digitally arranged into a cohesive composition, often with a consistent background, layout, and theme.

    How to create a team composite photo

    In our composite, we’ll use these photos that a photographer took of four players on a girls soccer team:

    Notice that, while all the images have similar lighting, the camera was at a different distance from each of the players when the photos were taken. This means the girls aren’t uniform in size throughout all the images. We’ll fix that when we create the composite photo.

    We also need to choose the background photo that the girls will be placed against before we begin. The background photo needs to have similar lighting to the images of the players, but it can be very stylized and dramatic to enhance the intensity of the final photograph. For this example, we’re using a beautiful photograph of a soccer field at night.

    photo of an empty lighted sports field at night

    From these five images, we’ll make a team photo composite.

    Step 1: Remove background from individual portraits

    We need to select just the girls from each photo. The easiest way to achieve this is to use Photoshop’s built in Select Subject tools. If you don’t see the option to Select Subject in the Options Bar at the top of the screen, or the Contextual Task Bar at the bottom of the image, choose the Magic Wand Tool from the Toolbar at the left-hand side of the screen. The option to Select Subject will now appear in both these places.

    screenshot of Photoshop editing, select subject

    When you click on “Select Subject,” Photoshop attempts to determine the subject of your photograph and create a detailed selection of that subject. In the case of our soccer players, the subject would be the girl and the ball she is holding.

    If you want a more refined selection, choose “Select and Mask…” from the Options Bar at the top of the screen to refine the selection further. Check out this article for detailed instructions on how to use Select and Mask….

    photo of girl soccer player being edited in Photoshop and select subject

    How you choose to select the subject depends on the level of detail you require.

    Step 2: Copy and Paste the team players onto the background image

    With your selection still visible, type CTRL+C (COMMAND+C on a Mac) to copy the selection. Then, go to your image of the background you’ll be using. Type CTRL+V (COMMAND+V) to paste the team player selection onto the background.

    screenshot of selected subject, Photoshop editing of a girl soccer player photo

    Don’t worry about the size of the figure in relation to the background just yet. We’ll resize all the players once we have them in the composite.

    Continue steps 1 and 2 for all team players.

    photo of four individual soccer players superimposed onto a background with awkward placement

    Step 3: Resize players within composite photo

    We want the girls to look like they’re standing next to each other in the final photo. Therefore, they all need to be about the same size relative to one another.

    In the final photo, we will have the three standing girls in a row, and the seated girl sitting in front of them.

    screenshot of Photoshop editing, showing layers and selecting Layer 5

    In the Layers panel, select the layer with the first player. If you don’t see the Layers panel, you can make it visible by choosing Window > Layers from the dropdown menu at the top of the application window. 

    Once the layer is selected, go to Edit > Transform > Scale from the dropdown menu at the top of the application window. A blue box will appear around the player in the image.

    screenshot of Photoshop editing, transforming images to scale

    Hover your cursor over one of the corners of the blue rectangle until you see a double-sided arrow appear over the corner. Then, drag it to resize the figure to the size you want. 

    Photoshop editing screenshot showing image of a girl's face and selecting to resize it

    In newer versions of Photoshop (Photoshop 2023 and higher), the image will resize proportionally by default (you do not need to hold down the SHIFT key). 

    If, however, the image looks squished or stretched as you resize it, that means the default settings have been changed. Hold down SHIFT as you drag to resize to adjust the image proportionally.

    If you are unsure if the resizing is proportionate or not, you can look at the Options Bar at the top of the screen. If the values for Width and Height are the same, and the link icon between the Width and Height values is checked, then the image is sizing proportionally.

    Photoshop 2025 toolbar, highlighting scale

    Select the rest of the players’ layers one by one and resize them all. Since the images in this example were taken at different distances from the players, we had to manually resize each photo to get a uniform look across all players.

    However, if all players need to be reduced in size by the same amount (91%, for example), you can type that value into the Width and Height boxes in the Options Bar instead of resizing manually with your cursor.

    Once you have all the players resized, position them onto the background so that it looks like they were there all along.

    team composite photo of four girl soccer players on a lighted field at night

    Step 4: Add depth to the background

    Even though this is a team composite photo doesn’t mean we can’t make it look more realistic! 

    Select the background layer, which in our example holds the image of the stadium.

    Photoshop screenshot of Layer 6, the background layer

    With the Background layer selected, choose the Burn Tool from the Toolbar at the left-hand side of the application window. The Burn Tool may be hiding behind the Sponge Tool or the Dodge Tool.

    Photoshop toolbar, selecting the Burn Tool

    With the Burn Tool selected, “paint” over the area of the background just under the players to create a shadow effect. You don’t need to overdo this–a little goes a long way. You will need to use your judgement to determine exactly how much shadow you need to make the image look more realistic.

    Photoshop screenshot editing shadows

    And you’re done! You can now use your new team photo composite as is, or add your team logo and other elements to it.

    team composite four girl soccer players at night on field

    Photography tips for team composite photos

    Save these tips for when you shoot team players and coaches to improve your team composite sports photos:

    • Shoot all players at the same angle, with the same lighting, in the same place. The easiest way to achieve this is to shoot in a closed studio where you can control the lighting, or at night. Set up a tripod to make sure the camera is in the same place for every photo, and place a marker on the ground for each of the players to stand on during the shoot.
    • Pay attention to the horizon line when you shoot the players. You want the horizon line to be in roughly the same place as the horizon line in the background image you’ll ultimately use. This will make it easier when editing sports photos for the team composite shot.
    • Choose the right equipment for the job. Make sure you have the best sports photography equipment with you for the type of photos you will be taking. This doesn’t just mean having a tripod; you also need to bring adequate lighting for the type of shoot you will be doing (indoor, outdoor, nighttime) and a lens that is best suited for the job. 
    • If possible, photograph the players against a solid, neutral background. This will make removing the players from the background easier when you create your composite. Opt for a background that does not share any colors with the team uniforms, but also try not to use a bright background such as a green screen, as these colors might show up as a reflection on clothing and skin even after the background is removed.
    • Make sure your setup can be taken down and set up again in the exact same way. Keep track of the location of your lights, camera, background, etc. If a player can’t make it to the shoot, you want to be able to schedule a makeup and replicate your studio setup exactly.

    Send your team composite edits to Path

    Making team composite photos can be a tedious and time-consuming process, especially when you’re working with lots of teams with large rosters. Let Path handle some of the work for you—the most challenging cutouts and clippings, and retouching to perfection.

    [ad_2]

    Source link

  • My Story

    My Story

    [ad_1]

    This week, I wanted to share a story about myself and my work. Why I create and what motivates me as a photographer. I hope you enjoy what I wrote. It was straight from my heart.

    I’m a creative landscape photographer from southern Finland. Ever since I was a kid, I have been fascinated by art and paintings and how to create something out of nothing. My photography style is dreamy and minimalistic.

    With my photography, my goal is to transport you to a timeless, peaceful, and beautiful world and connect you back to nature, reminding you of what it feels like to be alive and what it feels like to be human.

    Mikko Lagerstedt – In The Mist – 2022

    My grandma was the biggest inspiration when I grew up – she has made beautiful paintings and drawings throughout her life. She is 94 at the moment I write this. I didn’t understand how she or anyone created such beautiful art. I thought it was a gift you either had or not. Of course, I tried making sketches and paintings as a child. Still, I never spent enough time learning to create something unique until photography found me. I have been photographing for the past 15 years and have always photographed for myself from the early days.

    Playing outside was my favorite thing when I grew up. I often spent my free time outdoors with my friends and siblings, whatever the weather. That’s where my love for the outdoors began.

    How it all started

    My first inspiration for photography came when I was driving to our relative’s cabin. It was a summer evening in 2007, and after a rainy day, the sun came out, and so did the fog. I had to stop taking a couple of photographs with a point-and-shoot camera. As I was going through the images I captured, I was amazed. And thought that these were the moments I wanted to start to capture. This is the view I witnessed and is the only one I still have from those photos.

    My first nature photograph captured with point-and-shoot camera in 2007.

    As a photographer, I am in awe of the beauty of the world around me, from mist to late-night views of stars. There is always something inspiring to capture with my camera.

    When I bought my first DSLR camera in 2008, I learned that photographing is only the first step. The process of creating my work is not linear. I started using Camera Raw to edit the peculiar raw files. From there, I moved to Lightroom, which I use 80% of the time.

    I started sharing my photographs in 2008 on Flickr. Since then, I’ve been fascinated by how my photos can provoke emotions in the viewer. Sometimes how I wanted and sometimes completely differently I envisioned. I also use multiple exposures and photographs of scenes to represent the view and feelings I experience while taking the photographs.

    Capturing a stunning photograph can be challenging. You must be in the right place at the right time to capture the perfect light, weather, and composition. I often capture only a few photographs I’m satisfied with within a year.

    Inspiration

    I have always been drawn to using a single subject in my pictures, which may be related to the passing of my best friend the day before I turned 19. This solitary element serves as a reminder to appreciate the solitude and solitude of the world around us. The events and experiences of our past give our work depth and richness. Your struggles and hardships give your work a unique angle. Embrace it.

    Mikko Lagerstedt – Into the Unknown – 2022

    Mikko Lagerstedt – Alone – 2022

    Nothing lasts forever, and our surrounding world is ever-changing. Through my photography, I aim to inspire others to see the world differently and appreciate its beauty. I want to connect with others and share the moments that inspire me, hoping they will inspire others.

    From the early days of Facebook and Instagram, I gained a significant following of around 1.7 million across social media platforms. In 2009 I entered some of my work in competitions, got mentions, and won second place in the Nikon photo competition, which boosted my confidence to continue photographing.

    Nikon Photo Contest 2nd Place

    Sharing knowledge

    Fast forward to 2014, I left my job in a restaurant and started creating full-time. It has been a challenging route, but one I would never change. I was one of the pioneers of Lightroom presets. I released my first preset collection in 2013, and the sales of the collection helped me take the leap of faith to create full-time.

    I wrote, designed, and published a book, Star Photography Masterclass, and was astounded by how people received it. It’s still one of the most sold items in my catalog. I’ve been balancing teaching others and creating for myself ever since.

    Mikko Lagerstedt – Night Glow from Star Photography Masterclass

    I rarely travel far from where I live. And capturing beautiful photographs does not always require traveling to the far corners of the world. There is beauty to be found all around us if we take the time to look for it.

    Sharing my work online has allowed me to connect with a broad audience and to grow a community of people who appreciate the beauty of the world around us. I constantly strive to improve my craft and create captivating, compelling images.

    Mikko Lagerstedt – Infinite – 2022


    Thank you for reading! This is me.

    We respect your privacy.

    Thank you!

    [ad_2]

    Source link

  • The Art Of Capturing Winter Fog Photography — Mikko Lagerstedt

    The Art Of Capturing Winter Fog Photography — Mikko Lagerstedt

    [ad_1]

    My favorite thing about photography is that you don’t always have to travel far to capture unique photographs. In this week’s tutorial, I talk about capturing fog in winter and how it can add a sense of mystery and atmosphere to your photos. This is the ultimate guide to capturing winter fog photographs.

    Whether a thin layer of mist hovering over a frozen lake or a thick fog enveloping a forest, fog can transform a mundane scene into something magical. In this tutorial, I show you how to capture stunning winter landscapes with mist, from finding the right location to choosing the right time of day and experimenting with compositions.

    Find the right location

    Fog can be elusive, so it’s essential to find a place where it is likely to appear. Look for areas with low-lying valleys, rivers, or lakes. These areas are more prone to fog because the cool air tends to sink and settle in these areas. Look for locations where the fog is likely to accumulate, such as near water, valleys, or low-lying areas.

    1. Look for forecasts of foggy conditions, especially in the early morning or late evening when the air is cooler, and the humidity is higher. You can also check the humidity and dew point, as the fog is more likely to form when the air is saturated with moisture.

    2. Pay attention to the wind direction. Fog is more likely to form in areas with calm winds. Look for locations where the wind is calm or where the wind is blowing away from the area you want to photograph.

    3. Look for locations with interesting features that can add depth and interest to your photos, such as trees, buildings, or other landmarks. Consider using these elements to create leading lines or to add a sense of scale to your photos.

    4. Fog can be unpredictable, so it’s a good idea to visit your location at different times to see if the fog appears. This will also give you the opportunity to experiment with different lighting conditions and compositions.

    5. The seaside can be an excellent place to capture fog in the Winter. The warm seawater and temperature drop can create a massive cloudlike fog.


    [ad_2]

    Source link

  • Unlock Your Photography Potential — Mikko Lagerstedt

    Unlock Your Photography Potential — Mikko Lagerstedt

    [ad_1]

    4. Breaking down goals

    This is how you can achieve goals and track them in your journal. Write down each of these and be as thorough as you can.

    Specific Goal
    What do you want to improve? “I want to improve my Lightroom Color editing.”

    Specific Action
    What are your action steps? “Use the HSL panel in Lightroom and watch tutorials on how to use it.” 

    Timeframe
    How many hours does it take? “I will spend 1 hour per day editing in the HSL panel to improve my color editing.”

    Track your Actions
    How many hours have you spent this week? “I have spent learning 2 hours this week using the HSL Panel?”

    Results
    Write down what you learned. Be specific and acknowledge your improvement. “I understand the HSL panel easily and can identify how to improve the colors in my photography.”

    I believe these steps will help you improve your photography and make you continue to enjoy taking photographs.

    5. Goal ideas for Your Photography

    When you set inspiring goals, it’s easy to feel inspired to start creating and have fun in the process. Let your creativity flow and create what you desire!

    • Practice shooting in different lighting conditions, such as sunrise or sunset, to improve your skills in capturing the golden hour

    • Experiment with using filters, such as polarizers or neutral density filters, to enhance the colors and contrast in your photos

    • Work on composing your shots more effectively by learning about the rule of thirds or practicing leading lines

    • Practice shooting in different weather conditions, such as fog or rain, to capture unique and atmospheric images

    • Learn how to use a tripod effectively to capture sharp, blur-free photos, especially in low light

    • Experiment with different focal lengths and perspectives to create different effects in your photos

    • Practice shooting in manual mode to have more control over your camera settings and to create the desired exposure and depth of field in your photos

    • Experiment with different types of lenses or camera settings to create other effects in your photos

    • Shoot in a new location or visit a new destination specifically to photograph landscapes

    • Work on improving your post-processing skills, such as using software to enhance colors and composition

    • Collaborate with other photographers or participate in a photography workshop or retreat

    • Work on developing a personal style or theme in your landscape photography

    • Explore new local locations. Many beautiful locations are likely near your home, even if you cannot travel far. Aim to explore these new locations and try out different compositions, lighting conditions, and subject matter.

    If you want, you can do daily tasks, such as the one below. You can Download Your Free Photography Planner I made last year.


    [ad_2]

    Source link

  • Insta360 X5 360-degree Camera Announced

    Insta360 X5 360-degree Camera Announced

    [ad_1]


    Insta360 has announced its latest 360-degree camera—the Insta360 X5. While the year-old X4 introduced 8K/30p 360-degree video, the X5 promises to deliver 8K recording at much higher quality due to its larger Type 1/1.28 sensors and Triple AI Chip system. That’s a significant difference in sensor area: The 1/1.28-inch sensors are 144% larger than the 1/2-inch ones used in the X4. The X5’s f/2 lens has an equivalent focal length of 6mm, compared to the 6.7mm equivalent focal length of the X4’s f/1.9 lens. While Insta360 says the X5 is the “toughest 360-degree camera ever”—the X5’s lenses use new ultra-durable glass—the camera features a replaceable lens system, making it possible to swap out damaged lenses on the go.

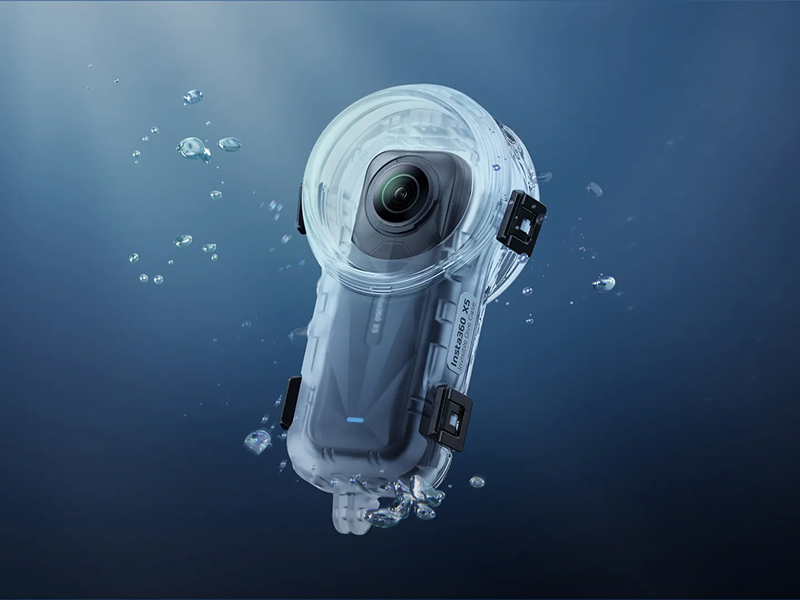
    The fresh sensors and processor have resulted in new recording modes. While the camera captures 8K/30p 360-degree video like its predecessor, 5.7K/60p is now available (vs 30p on the X4), as is 4K/120p (vs 100p on the X4). The X5 tops out at 4K/60p when shooting single-lens video. You can also use the X5 to shoot 72-megapixel stills (9504×4752 pixels), recorded to RAW DNG files. Out of the box, the X5 is waterproof to 15 meters (~50 feet)—a 5-meter (~16-foot) improvement over the X4—but serious underwater shooters will want to put the X5 in the dedicated Invisible Dive Case, which extends the depth rating to 60 meters (~200 feet). Battery life has also been extended: The X5 is good for three hours as opposed to the two-and-a-bit of the X4.

    The Insta360 X5 is available now as the “Standard Bundle” for $550. There are various other bundles available, such as the $700 “Invisible Dive Bundle,” which includes an Invisible Dive Case, Invisible Selfie Stick, Floating Hand Grip and Selfie Stick Wrist Strap.


    PRESS RELEASE

    Insta360 Unveils X5: The Smartest, Toughest 360° Camera Ever Made

    Insta360, the world’s best-selling 360° camera brand, is thrilled to announce Insta360 X5, its latest flagship camera. Combining groundbreaking image quality, rugged durability, and AI-powered ease of use, X5 sets a new benchmark for what 360° cameras can achieve.

    X5’s larger 1/1.28″ sensors and lightning-fast Triple AI Chip system deliver a dramatic leap in image quality across all resolutions, including stunning 8K30fps 360° video. With PureVideo, a new AI-powered low-light mode, X5 achieves crisp, cinematic footage in challenging lighting.

    Built for adventure, this is the toughest 360° camera ever. Its lenses are crafted from a new ultra-durable glass, while a first-of-its-kind replaceable lens system sets a new standard for the industry, allowing you to swap out damaged lenses on the go. Further hardware upgrades like a built-in wind guard, extended 3-hour battery life, and waterproofing to 49ft, make X5 the ultimate companion for active creators.

    From shooting to sharing, X5 makes 360° creation effortless. The all-new InstaFrame Mode simultaneously captures an auto-framed, ready-to-share flat video and a full 360° video to fine-tune later. The Insta360 app has undergone a transformation with more intuitive editing tools, and X5 pairs with the Insta360+ cloud service, where you can instantly share 360º clips, edit on the cloud, and more.

    “X5 redefines 360° cameras by solving creators’ real challenges,” said JK Liu, Insta360’s Founder. “From replaceable lenses to AI-powered low-light shooting, we’ve built our dream camera—rugged enough for adventure, capable enough to produce high-quality footage, and intelligent enough to capture epic moments effortlessly.”

    Insta360 X5 is available to order from April 22, 2025, via the Insta360 Official Store, Amazon, and select retailers, priced at US$549.99.

    Insta360 is also hosting a pop-up event in NYC on April 22 from 9am–5pm, offering attendees the opportunity to experience X5 firsthand through interactive demos, meet special guests, and receive exclusive merch.


    Unmatched Image Quality, Day and Night

    X5’s 8K30fps 360° video looks better than ever, with supersampling from 11K to 8K resulting in minimal loss to image quality for true-to-life shots. But resolution is just part of what determines image quality.

    X5’s 1/1.28″ sensors are 144% larger compared to X4‘s, meaning they capture far more light. The Triple AI Chip system, made up of one 5nm AI Chip and two Pro Imaging Chips, works wonders to reduce noise for clean, uncompressed images in any conditions. With 140% more computing power, every moment—whether on thrilling rides, underwater adventures, or the trip of a lifetime—becomes clearer, brighter, and more vivid.

    Low light capture gets an additional boost with a dedicated mode: PureVideo. Advanced AI noise reduction and dynamic range optimization deliver clear, vibrant footage in low light, perfect for capturing your late-night city explorations, motorcycle rides, and more. Meanwhile, Active HDR has been upgraded to 5.7K60fps for smooth, sharper shots, especially in high-contrast scenes.


    360° Capture – Souped Up & Simplified

    As the fifth generation, X5 has refined every aspect of 360° capture with incredible results. The beauty of shooting with X5 is that you record everything, everywhere, always. No wondering “Did I frame that right?” or fears of missing an epic moment, just shoot first and choose your angles later, with the invisible selfie stick effect enabling otherwise impossible third-person shots. Ideal for solo creators, travelers, and well… everyone.

    But now, there’s a new mode that makes all that 360° goodness simpler to achieve than ever before. Meet InstaFrame. Hit record and X5 produces two files. The first is an instantly shareable flat video, no editing or reframing needed. Here you have the choice of a fixed view that follows a constant direction or a selfie view that keeps you in frame throughout. And the best part? At the same time, you’ll also record a second clip in full 360° so you’ll never miss life’s unexpected moments, from your toddler’s surprise first steps to a dolphin’s sudden appearance beside your kayak.


    The Toughest 360° Camera Ever

    When a lens cracks mid-adventure, most 360° cameras become paperweights—but with X5 you can swap lenses before the ski lift reaches the top of the next run. No worrying about scratches or paying out of pocket for repairs, easily replace damaged lenses on the go with the handy Replacement Lens Kit.

    Designed for the klutzes, the cliff-divers, and the ‘I-just-dropped-it-again’ creators among us, the lenses are also made from a new, high-strength, scratch-resistant glass that makes them far less likely to be damaged in the first place, making X5 a camera you can truly push to the limits.

    Elsewhere, X5 has improved in almost every way that an action camera enthusiast could wish for:

    • Built-in wind guard and improved audio algorithm – a multi-layer steel mesh Wind Guard silences wind noise, while the boosted algorithm offers sharp, immersive sound.
    • Longer lasting, faster-charging battery – A 2400mAh battery supports up to 185 minutes of recording in 5.7K, using the power-saving Endurance Mode. It can also fast charge from 0 to 80% in just 20 minutes, or the time it takes to finish a cup of coffee.
    • IP68 waterproofing to 49ft (15m) – go even deeper without a dive housing.
    • Magnetic mounting system – allows for quick accessory swaps so you’re always prepared for the next shot.
    • FlowState Stabilization + 360° Horizon Lock – still industry-leading for the smoothest shots possible.
    • Convenient ways to “hit record” – the new Twist to Shoot feature enables shooting just by twisting a selfie stick back and forth. Other options include Voice Control 2.0, Gesture Control, or pairing with a wireless remote.


    The Complete Post-Production Package

    The Insta360 app has long been the most sophisticated, user-friendly app for editing 360° content. To coincide with X5’s launch, it has undergone a revamp, with a sleeker user interface and new tools that make editing easier than ever.

    A one-tap Dewarp button removes fisheye distortion for natural-looking footage, a new option to one-tap export with zero editing or reframing, and more. This is in addition to existing features such as Quick Edit and AI Edit for semi-automatic and automatic editing, Shot Lab with 40+ AI templates, as well as a full, manual editing suite.

    Insta360 Studio, the desktop editing software for highest quality exports, is also available completely free, along with the mobile app.

    For the best possible Insta360 experience and a smoother workflow, X5 is compatible with Insta360+, a cloud service offering auto file backup, instant sharing of 360° footage, cloud editing and export, and more, making it easier than ever to share your adventures with the world.


    Availability

    Insta360 X5 is on sale from April 22, 2025, at the Insta360 Official Store, Amazon, and authorized retailers, starting from US$549.99.


    [ad_2]

    Source link

  • Print Collection 2023 — Mikko Lagerstedt

    Print Collection 2023 — Mikko Lagerstedt

    [ad_1]

    As a landscape photographer, I have always been captivated by the beauty and solitude of the natural world. It’s where I can find peace and inspiration and am reminded of our planet’s vastness and complexity.

    I wanted to capture this sense of wonder and connection to the earth in my new  2023 print collection, “In The Solitude.” This collection features a selection of my favorite landscape photographs from the North.

    From the coastline of Finland to the endless snow views of Swedish Lapland, each photograph in this collection is a testament to the majesty and power of the natural world. These prints will transport you to these magical places and inspire you to connect with the earth in your own way.

    But this collection is about more than just pretty pictures. It’s about capturing the emotion and drama of the natural world and the way it makes us feel. Whether the peaceful stillness of a misty morning or the wild energy of the northern lights, each print is meant to evoke a sense of awe and connection.

    I am so proud to present this collection to you, and I hope it brings the natural world into your home. Keep an eye out for the full reveal and details on how to purchase, coming soon!


    [ad_2]

    Source link

  • Have You Lost Your Inspiration For Photography? A Toolkit to Find Your Inspiration Back. — Mikko Lagerstedt

    Have You Lost Your Inspiration For Photography? A Toolkit to Find Your Inspiration Back. — Mikko Lagerstedt

    [ad_1]

    It’s natural for us, as photographers and creatives, to lose our inspiration. While taking a break can initially be a great way to get your inspiration back, it can also harm your inspiration. Procrastination will sometimes sneak in when you are too comfortable.

    It can be easy to fall into a creative rut and feel like you need more ideas. I certainly have been there. However, finding new sources of inspiration is an essential part of any creative process, and there are many ways you can do this. In this article, I share a toolkit of ten tips for finding sources of inspiration.

    If you haven’t read my earlier posts about inspiration, here you can find them below.

    Get Out of Creative Rut
    How To Find Inspiration For Your Photography?
    Stay Inspired – Create a Catalog of Inspiration

    1. Be ready for inspiration

    Take your camera with you wherever you go, and be open to capturing unexpected moments and subjects. Visit new locations and try shooting at different times of day to see how the light and atmosphere changes. Explore new neighborhoods, towns, or even countries – sometimes, the most unexpected locations can yield the most inspiring photographs.

    2. Try new techniques or subjects

    Consider trying new editing techniques or using different lenses or cameras to change the look and feel of your images. Try shooting in black and white, trying long exposures, or experimenting with different compositions. The more you experiment, the more you’ll learn about what works for you and what doesn’t, and the more you’ll be able to develop your own style.

    3. Get out of your comfort zone

    Stepping outside your usual routine and trying something new can be a great source of inspiration, such as taking up a new hobby or visiting a new location. Taking a break from your routine can help you see things in a new light and spark new ideas.

    4. Find new subjects

    Keep your eyes open for inspiring subjects and moments in your everyday life. By staying attuned to your surroundings, you’ll be more likely to spot unexpected moments and topics that can inspire your photography. It could be a beautiful sunset, a stunning landscape, or an interesting street scene.

    5. Journal

    Consider keeping a journal of your photography ideas and inspiration; this can be a great way to keep track of your ideas and revisit them later. Having a place to capture your thoughts can help you stay organized and keep your creativity flowing. You could include sketches, notes, or even photographs that inspire you.

    6. Seek inspiration elsewhere

    Photography is just one art form, and many other art forms can inspire. Consider looking at paintings, sculptures, or even music for inspiration. Pay attention to the colors, compositions, and themes in these art forms, and think about how you could apply these ideas to your photography. For example, you might look at a painting with a strong color palette and try to recreate that same palette in your photographs. Or, you might be inspired by a sculpture’s texture and try incorporating texture into your compositions.

    7. Open your Mind

    Keep your eyes open for inspiration in the world around you. It could be the changing seasons, a city’s architecture, or the natural landscape’s beauty. Look for patterns, textures, and colors that catch your eye, and think about how you could capture these elements in your photographs.

    8. Plan a trip

    Planning a trip specifically for photography can be a great way to step outside your surroundings and find new sources of inspiration. Consider researching locations known for their photographic potentials, such as national parks, historic cities, or natural wonders. Look for places that offer a variety of landscapes and lighting conditions, as this will allow you to experiment with different techniques and subjects. Wander from the beaten path and explore off-the-beaten-track locations – sometimes, the most unexpected places can yield the most inspiring photographs.

    9. Collaborate with others

    Collaborating with other photographers on a project or photo shoot can be a great way to learn from others and find new sources of inspiration. Working with others can help you see things in a new light and inspire you to try new approaches to your photography. Consider reaching out to photographers whose work you admire and see if they would be interested in collaborating on a project. Alternatively, you could join a local photography group or participate in online forums or communities where you can connect with other photographers and discuss ideas and techniques.

    10. Seek new experiences

    One of the best ways to find new sources of inspiration is to seek new experiences. It could be trying new hobbies, traveling to new locations, or simply trying something new in your everyday life. By stepping outside your comfort zone and trying new things, you’ll be more likely to find new subjects and experiences that inspire your photography. For example, if you’re a landscape photographer, consider trying a new type of photography, such as portrait or still-life photography. It can help you see things in a new light and find new ways to approach your landscape photography.

    An additional source for inspiration: Create a theme or a goal.
    Consider setting yourself a personal photography project with a specific theme or goal. This could be a project where you photograph a particular location over the course of a year or a project where you focus on a specific type of landscape or subject. Having a specific project to work on can help you stay motivated and focused and can also provide new sources of inspiration.


    [ad_2]

    Source link

  • It’s Not a Photograph. Yet.

    It’s Not a Photograph. Yet.

    [ad_1]

    My Land Rover pulled up just in time to watch the lions finish their meal. What remained had once been…what? A zebra? It’s sometimes hard to tell. Whatever it was, it’s mostly gone now.

    “We’re too late,” I hear someone say. “Nothing to see here.” Maybe it was the voice in my head.

    But hang on a moment. In the world of wildlife photography (which this article is not about, so keep reading if you’re into other things), I think there is a difference between a sighting and a scene.

    A sighting is, “Look, a leopard!” It might be hidden behind half of the branches in Zambia, but there it is. A leopard. It’s beautiful! But with little else to offer, it’s not really a photograph. The leopard is obscured. The light is harsh. All I can see is the back of the head. A sighting, sure. But not a scene. Yet.

    It is OK not to raise your camera to your eye. It’s OK to look at what’s in front of you and think, “That’s just not a photograph.” When you’re looking for a photograph that tells a story or something that really moves you—something with mood and emotion—it’s more often not a photograph. That’s what makes it so wonderful in the moments when it is. When all the pieces do come together. A good photograph is a rare thing.

    As you read this, I’m on my way to Kenya for the month of February. A group of photographers will join me for the first nine nights, and we’ll all have many opportunities to figure out if something we’re looking at is a sighting or something more: a scene. If we’re not careful, the mistake we’ll make is to forget just how quickly one can become the other.

    Go back to me sitting in the Land Rover with the lions and the erstwhile zebra, and imagine you’re there with me. The moment you think, “Well, nothing to see here,” you should become suspicious. And you should pay attention. Because while this is the time that the lionesses will roll over and sleep (nothing to see here), the cubs will play, and the sighting will become a scene.

    The seasoned response to “nothing to see here” isn’t “let’s go!”—it’s “let’s wait.” A mere sighting can become an astonishing scene very quickly.

    What often transpires in front of our lens never becomes a photograph. We wait and wait, and the pieces never quite align, the composition never materializes, the light fizzles out, and the moment never happens. Fine.

    The dues we pay for the best of our images are often paid in the currency of minutes and hours. And sometimes (often, even), the dues we pay don’t see an immediate return.

    You can wait for hours without seeing a wolf. You can sit on a street corner and never see anyone walk into the perfect light you’ve waited years to find. But it’s more likely that you won’t see a wolf without waiting for hours. It’s more likely you won’t see someone walk into that light if you don’t wait around in hopes they do.

    There is wisdom in looking at something and saying, “There’s not a photograph here,” before moving on. There’s also wisdom in knowing there’s a chance and sticking around to see what happens.

    For me, it comes down to odds. If I’ve got an incredible background, some interesting light (or the promise of it), and know there’s a chance (for example) that the lion cub will swat its sister and then climb on the fallen tree behind them in hopes of some play time, then I’ll wait. It’s harder to find a great background in nice light than it is to find a playful lion cub. 

    If there’s even a chance that waiting can turn the sighting (yawn) into a scene (OMG!), I’ll wait.

    The difference between a sighting and a scene lies in the possibilities, or your ability to recognize them. If there’s truly nothing to work with, move along and find something else. But if what you’re looking at is an “almost” (or it feels like it could be), I’d be inclined to stick it out and wait. Doesn’t matter what you photograph. If you’re at almost, wait it out or shoot through it—because almost is rare.

    A good photograph happens at the intersection of light, space, and time. You need all three: the right light, the right stuff in the right part of the frame, and the right moment. Two out of three is often worth waiting for, especially if giving up and moving on only takes you somewhere that gives you one out of three—or none at all.

    “Nothing to see here.” We’re so quick to say it. Are you sure?

    In a world where photographers can very quickly stand on level ground with each other in their ability to use a camera, what if it’s not upgrading to that better camera or that bigger lens, but the simple ability—or willingness—to wait it out that is the difference between making something astonishing, and making nothing at all?

    The difference between a sighting and a scene is often just the word “yet,” but don’t read that lightly because getting to yet is hard. Getting to yet is a risk. Getting to yet, if it comes at all, often comes only after wrestling with the fear of missing out on whatever is happening elsewhere while you sit here. Waiting.

    One more thing: what if it’s not so much that nothing’s happening yet as it is that you don’t see it yet. When you resist the urge to quickly move on, you give yourself just a moment or two more, not only for something to happen but for you to see what’s already happening. Or to see the possibility that it might. To notice the light in one direction that you didn’t see while looking in another. To see past your expectations of what you hoped was there and see what is there instead. To see something you haven’t seen. Yet.

    So much of photography isn’t about what goes on inside the camera but inside the photographer; it’s how we think, feel, and do.

    I spent last year writing a book that many of my regular readers say is my best yet. Light, Space & Time: Essays on Camera Craft and Creativity is available now in the usual places books are sold, including Amazon, or you can get a signed hardcover edition from my publisher by following this link. below.

    Have you already read Light, Space & Time? I’d love to hear what you think. You can share that with me in the comments below or by leaving a review wherever you purchased the book. Both would make my day.

    For the Love of the Photograph,
    David

    The biggest challenges for most photographers are not technical but creative.  They are not so much what goes on in the camera but what goes on in the mind of the person wielding it.  Light, Space & Time is a book about thinking and feeling your way through making photographs that are not only good, but truly your own. It would make an amazing gift for the photographer in your life, especially if that’s you. Find out more on Amazon. 


    [ad_2]

    Source link

  • Frozen Patterns — Mikko Lagerstedt

    Frozen Patterns — Mikko Lagerstedt

    [ad_1]

    This is a behind-the-scenes story on how I captured the Frozen Patterns photograph. One of the photographs from my upcoming print collection, In the Solitude. It was a cold winter day on the coast of Finland near Inkoo. A place I have visited many times.

    Wandering around the area was mesmerizing. I couldn’t help but feel a sense of awe at the natural beauty surrounding me. Walking along the coast, I saw a frozen sea, a surface covered in unique and intricate patterns. The ice was like a canvas, displaying a masterpiece of nature’s art. I knew I had to capture this moment, to freeze it in time forever. And so, I set up my camera and began to compose the shot.

    As I set up my camera on the tripod, I couldn’t help but feel a sense of familiarity with the place. I had been to this spot many times before, but I had never seen it like this. The sun was setting, casting a warm glow over the snow-covered landscape. The sky was painted with orange light, and the clouds seemed to be on fire.

    I knew I had to capture this moment. I adjusted my aperture and shutter speed, composing the shot to include the beauty of the untouched snow and patterns of the ice with the stunning light behind the trees. As I clicked the shutter, I felt a rush of excitement. I knew that this photograph would be unique.

    As I walked back to my car, I couldn’t help but feel grateful for the opportunity to witness such a stunning sunset. The place may have been familiar, but it had never looked so beautiful. I couldn’t wait to get home and see the final image, but I knew that no matter how well it turned out, it would never fully capture the magic of that moment.

    How to capture a view like this?

    Equipment & Camera Settings
    Nikon Z 7 & Nikon 24-70 f/4 and tripod RRS Tripod
    ISO 64, 1/100 sec. exposure, f/8.0 @ 24 mm

    1. Timing

    The weather is an important part of landscape photography, and forecasts are a great tool to use. The best time to photograph ice patterns at the coast is during the winter months, this was captured in February when the temperatures were low enough for the sea to freeze. The patterns in the ice are most visible and intricate during this time. The best time of day to photograph ice patterns is during golden hour, sunrise, or sunset when the light is low, and the sun is not too high in the sky. This type of light also makes details more visible.

    2. Composition

    Once you have the right light, you must think about how you want to compose your shot. Try to include different elements in the frame to create a sense of scale and depth. A good rule of thumb is to use the “rule of thirds,” which means placing your main subject off-center to create a more exciting photo. Even tho I broke the rule here myself, I wanted to have the beautiful foreground in the lower thirds of the frame and the patterns in the middle with eyes leading to the trees and to that small island on the horizon.

    3. Taking sharp photographs

    Next, you want to ensure you capture the scenery with the correct settings. For this photo, I used f/8 to capture the scene as sharply as possible with epic detail in the image. I used a tripod to get a sharp photograph, even if the shutter speed wasn’t too slow. Also, I tend to use the camera’s self-timer to remove any unnesasery movement.

    4. Post-processing

    You don’t need to edit this type of photograph with multiple layers. You can edit your photo using Lightroom. You can adjust white balance, exposure, and contrast to make your image look how you saw the scenery. There is no right or wrong way to do it. It’s all personal preference. I used only Lightroom in this case to create small changes to the original RAW file. Edited with the help of my EPIC Preset Collection. I wanted to have more balance, so I used the built-in filters to balance the foreground and background light.

    I hope you enjoyed this BTS post about how I have captured one of my favorite seascape images. If you want this photo as a fine art print, the print collection will be out in a couple of weeks, so stay tuned.

    Let me know if you have any questions or suggestions for my next post.
    Until next time my fellow photographers, keep on creating!

    Here is a short video I wanted to share from that day. Nothing special, but to give you more depth to the story. First, we drove to the coast, spent five hours walking on ice, and finally arrived at the place before sunset. The scene was magical.


    [ad_2]

    Source link