I once wrote that “what if?” was the central question for creative people. I also once wrote that our expectations of what we hope for—of a place, a subject matter, even an idea—can blind us to the reality of it.
You show up in Venice to photograph the city in fog and experience agua alta, the high flood waters of winter, only to arrive to a sunny week with nothing but blue skies and sunshine. You go to the pyramids to find them under renovation, flanked by scaffolding.
Most recently, I arrived on the Chilcotin plateau in British Columbia, only to discover I’d come too early. What was “right on time” the past five years (the past 38 years, according to my guide, Brian) was poor timing this year. The aspens hadn’t yet turned, the weather was unusually warm, and the salmon that would be the main attraction for the bears once they had spawned and died had themselves only just arrived and still had work to do before they gave themselves to the bears. It was all out of whack, and with the change in schedule (of which I had not been apprised), all my “what ifs” about my time photographing the bears became “what nows.”
It happens more often than I would like. All the plans, the gear lists, and the packing, the shot lists I dream up all go out the window with some frequency. This year, I built a rig to float on the water and get some split shots with the bear in the top of the frame, the salmon underwater in the bottom third. It was going to be epic! But 2/3 of the frame was empty in the absence of the bears, and without tools and some reimagining (read: fabrication), there was no way to use the rig. It never left my truck.
I had another shot in mind, too. So many sockeye salmon wash up on the shores after spawning that I thought it would be easy to put one aside and do some macro work. I had this idea that the green curve of the cheek against the red scales would be a nice image, not knowing the salmon would mostly be alive, still in the water, and too preoccupied with spawning to get ready for their close-ups. Also? When they turn red, they have lost their scales. Well, there goes that idea.
But “what now?” can be as helpful a creative question as “what if?” The latter is proactive, an act of the imagination, and results in plans and daydreams, shot lists, etc. The former is reactive, an act of response. No less imaginative, but a little more grounded in reality, the biggest hurdle is getting over the disappointment and wiping the mental slate clean to make room for new ideas and perceptions.
Now what? I came home with thousands of images, only a few of them contained a bear after one lone grizzly showed up to check things out. Finding his timing was off, I suspect he went back to his colleagues to report: “Not yet, friends. Almost.” In those eight days of waiting before my own timing ran out and I had to move on, I asked myself many times: What now?
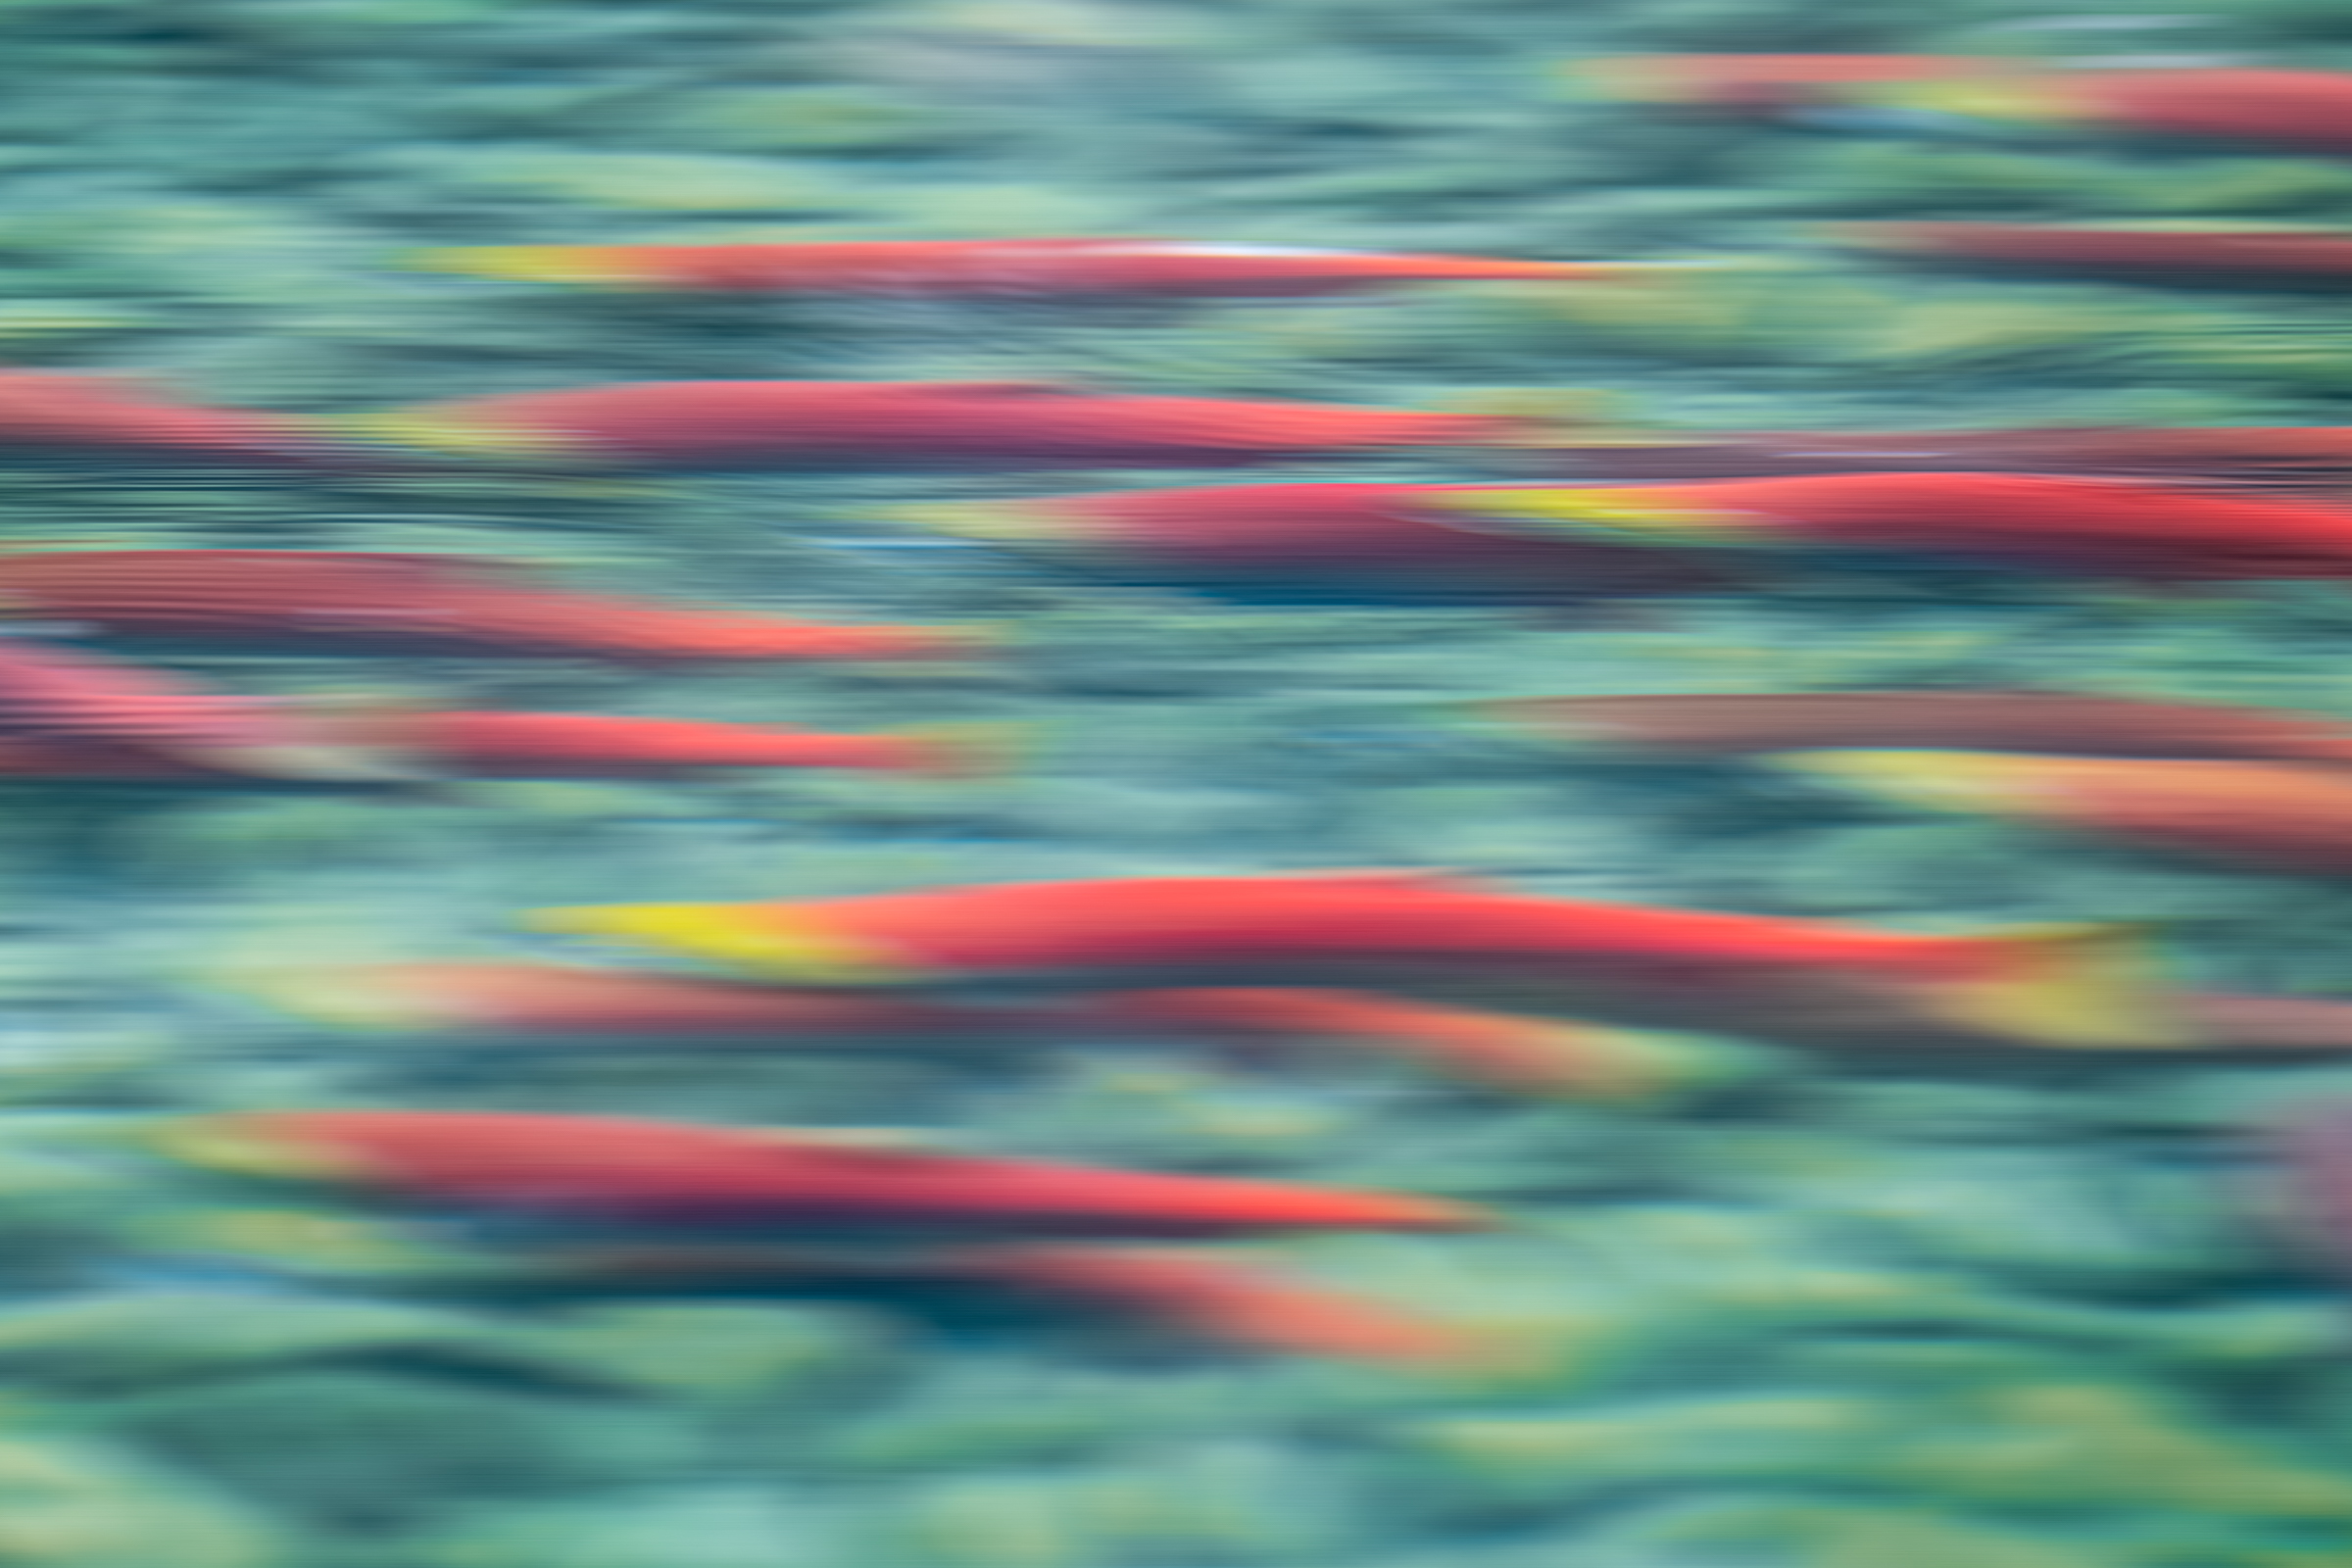
The answer was all around me. The Chilco River, cold and turquoise, was running crimson with the most salmon the river system has seen in something like 15 years. Over 3 million of them, if the guy from the Department of Fisheries and Oceans is to be believed, and all of them making their way upstream to their natal spawning grounds, a riot of reds and greens that seemed as good a subject as any, and would fill a hole in my work that I hadn’t yet explored. Fleshing out the story, if you’ll forgive the pun. After a while, it captured my imagination enough to become its own “what if?”
What if I could capture this extraordinary colour, this dazzling motion? How would I do that? What tools did I have that might help with that? Weirdly, I had a polarizing filter with me. I never have a polarizer. What made me throw that in at the last minute, I wondered. That would make it easier to get through the reflections on the surface of the water. I also had an Insta360 X5, an action camera I bought this summer (highly recommended!), along with a water case and a 12-foot pole.
Every day, twice a day, we went out looking for bears. We never gave up on them. But as we looked, I played with the salmon, both above and below the water. Fast shutters, slow shutters, intentional camera movements sometimes, and more literal efforts at others. I put the video camera in the water and worked through the learning curve of that, giggling away at both the failed attempts and the unexpected successes. I combed through thousands of frames shot from the surface, looking for one or two that felt right.
In the end, I learned a lot. I found myself infatuated, newly fascinated by the salmon, too. And I got a couple of images and some video that I love—neither of which is disconnected from my existing work with the bears.
So important to bears and the forests in which they spend so much of their lives that we call them salmon forests. Bears drag the salmon by the millions into the forests to eat them, leaving much of their bodies to decompose, their nutrients returning to the forest.
To the bears themselves, the salmon provide the calories necessary to survive the winters and, for the females, the body fat needed to allow the embryos of their future cubs to implant, which only happens when they reach 33% body fat. A bear needs to consume over 20,000 calories a day to prepare for denning in the winter, almost all of which comes from the fat-and-calorie-rich salmon. To say the two species are connected is an understatement.
I didn’t get what I hoped for on this trip. But looking back on most of my trips, I often don’t. I get different, for sure. Sometimes I get better. Rarely do I get nothing. The “what if?” prepares me and gets me thinking, but as long as I don’t let it blind me, it’s the “what now?” that’s usually responsible for the work I actually make. I would be surprised if I were the only one.
At the end of 2024, I had a brief but cathartic flirtation with film photography again. There was a very personal reason for this, when my father passed away, he left an old Minolta X300. This was the same camera model that I had used in my early days of photography.
Photo by Tetzemann
I wanted to celebrate his memory by running some film through the camera. It became quite the emotional journey and indeed, I wrote about the experience here on Light Stalking.
However, beyond the emotional journey, I want to share with you what I learnt from a technical and creative viewpoint, in my brief flirtation with film.
I should preface this by saying that I had shot film before, in fact if you have followed my articles here, you will know that much of my early photographic career was film based. However, it has been at least 20 years since I had shot a roll of film, and so this is more about what I had forgotten than new things that I learned.
Every Shot Has A Value
This is something that has always been the case when shooting film. Every single image you make is going to cost you. There is the purchase price of the film, the cost of development and the price of printing to factor in.
That was not an inconsiderable sum in the pre-digital days, but these days, it is a highly significant amount. To get from film to contact sheet you are looking at around $30 per roll of 36. Quite a bit more if you decide to get prints made.
However, this is not necessarily a negative. It teaches you that every single exposure you make has a value. That in turn slows you down. It makes you think both creatively and technically every time you press the shutter. It’s a sobering counter to the digital concept of spray and pray.
Exposure Is Important
Modern digital cameras are incredible. Even if somehow you manage to get the exposure completely wrong, you can pull it back into something decent. This is not so with shooting film.
Most film has a much lower latitude to exposure mistakes than digital. There are one or two black and white films that get close, but in general if you make a significant exposure mistake on film, there is little to no chance of pulling it back either as a print or as a scan.
When I shot Ilford HP4 on my father’s camera, I bracketed, much like I do on digital. However, the images that were 1 or more stops over or under exposed were significantly degraded compared to a digital equivalent.
That also leads to a big increase in something else we don’t worry too much about in digital – grain aka noise.
The upshot of this is that you become keenly aware of how important exposure is to getting the optimum image. This is made even more important by the lack of exposure tools available to you. Speaking of which…
Trusting Your Eyes and Instincts.
The Minolta X300 is a very basic film camera. It has manual and aperture priority exposure modes, and that’s about it. The viewfinder has a +/- scale for exposure and split/Fresnel screen for focusing. Yes, that means manual focusing.
That viewfinder is also really quite dark compared to any modern DSLR or mirrorless. This all combines to make taking photos with the X300 quite challenging.
For focusing, I find the split screen the easiest to use. However, you have to center the camera on your focal point, focus then recompose the shot. There is none of this guiding a focus point using a joystick or d-pad.
Like with exposure however, it slows you down, makes you think clearly about where exactly your subject/focus should be.
There is a complete lack of aids on older film cameras. No histograms, no live views, no focus peaking, none of the tools we are used to. That means you need to visualise in your head exactly how you want the image to look and then use your own experience with that camera and film type to make the vision a reality. Experience is the keyword here, as it trains you to understand so many elements of photography that we often take for granted.
Want to shoot something inside, handheld? You cannot just bump up the ISO and get on with it. You will need to swap out the film for one of a higher ISO.
That’s not necessarily the end of the story. If you are going inside to shoot, you will probably be shooting under artificial light. It’s not as simple as putting a higher ISO film in. You need a film that’s colour balance is tuned to interior lights, in general tungsten film. Without it, your images are going to have a deep orange cast.
It is perfectly possible to remove films mid-roll, however, you will lose a few frames of that film (every frame costs) and you need to be meticulous with labelling. If you remove a film with 20 exposures shot, you need to label that film well. Then when you come to use the film again you need to shoot with the lens cap on and wind on at least 24 frames, before you can start shooting again. Again it’s a game of patience and planning.
Shooting with film brought back a lot of memories, some good, some bad. There is no doubt that we have lost some important skillsets in the move to digital. The most significant is perhaps building up an instinct that when you press the shutter button, you have got it right. In a digital world, that instinct is much diminished because we can review the image before and after we take it.
More importantly, perhaps, is that shooting film teaches you to slow down and think about every shot that you take. You become keenly aware that every image has value.
Would I like to go back to film permanently? That’s a resounding no. The convenience and image quality of digital far outweigh the educational aspect of film. However, as an occasional cathartic exercise in creativity it’s nice to know that I can still take my father’s camera for a run out.
Photo editing is more accessible—and essential—than ever. Whether you’re a business owner, ecommerce seller, or busy creative, knowing what photo editing is (and isn’t) can help you elevate your visuals and reach your goals faster.
In the following guide to photo editing, you’ll learn:
What photo editing means (and why it matters)
Different types of photo editing, from simple to complex
And if you’re ready to level up your own photo edits, check out our free tutorials and professional editing services.
What is photo editing?
Photo editing is the act of image enhancement and manipulation. This process is usually done with a digital photo editing software. Photo editing can involve basic tweaks like when you crop and resize images or adjust saturation. It also includes advanced techniques like swapping faces or photo retouching to get rid of distracting elements or unwanted objects.
Some image editing techniques are done manually, while others are conducted through automated photo editing tools and software. Most edits to digital photography involve some one or a few photo editing programs. Some edits are even done offline on actual photographs, posters, or other printed collateral without any image editing software.
Other terms for photo editing include:
Image editing
Post-processing
Image/photo manipulation
Photoshopping
Image/photo enhancement
Let us look after your image edits, so you can get back to the fun stuff. Try Path free.
The importance of photo editing
Editing helps you fine tune and get the best image possible, as close to what you imagined when you took the photo (or better perhaps). Niche photographers can hone and emphasize their personal style. And for businesses, editing helps cement branding and optimize for business goals.
Photo editing is particularly important for ecommerce companies. Image quality directly affects people’s opinion of the product and sales numbers. If you have ugly photos, it’s going to be tough to convince a shopper to purchase your product.
Types of photo editing
There are many ways to edit a photo—some simple and others more complicated.
Many people can figure out simple photo editing techniques on their own—though this does require time and patience. More complex adjustments may require using dedicated programs with specific photo editing features or hiring a trained professional editor.
Simple photo editing techniques include:
Straighten: adjust the horizon of the photo
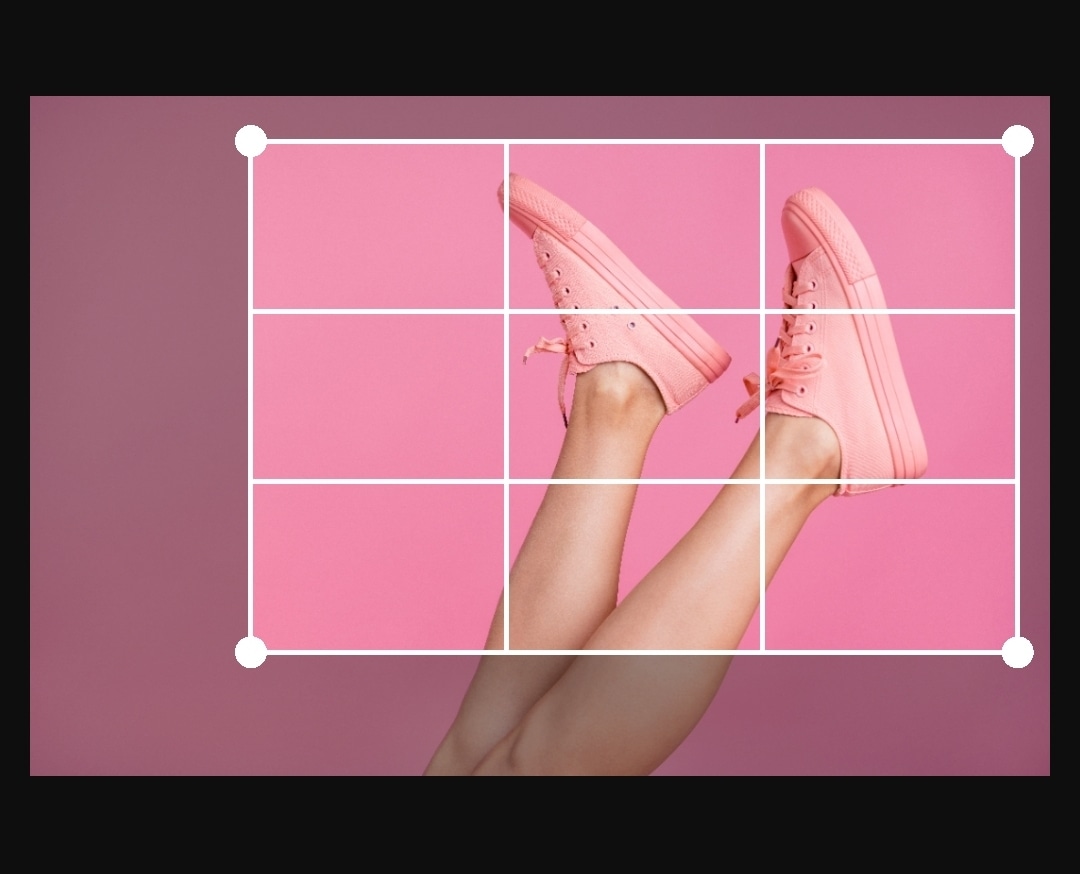
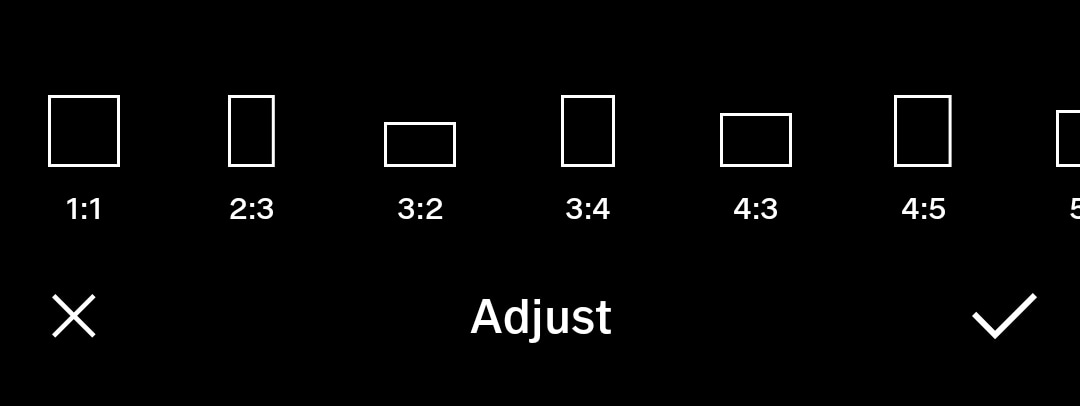
Crop: image cropping involves trimming out a portion (usually peripheral) of the image to help draw attention to the subject or otherwise improve the composition
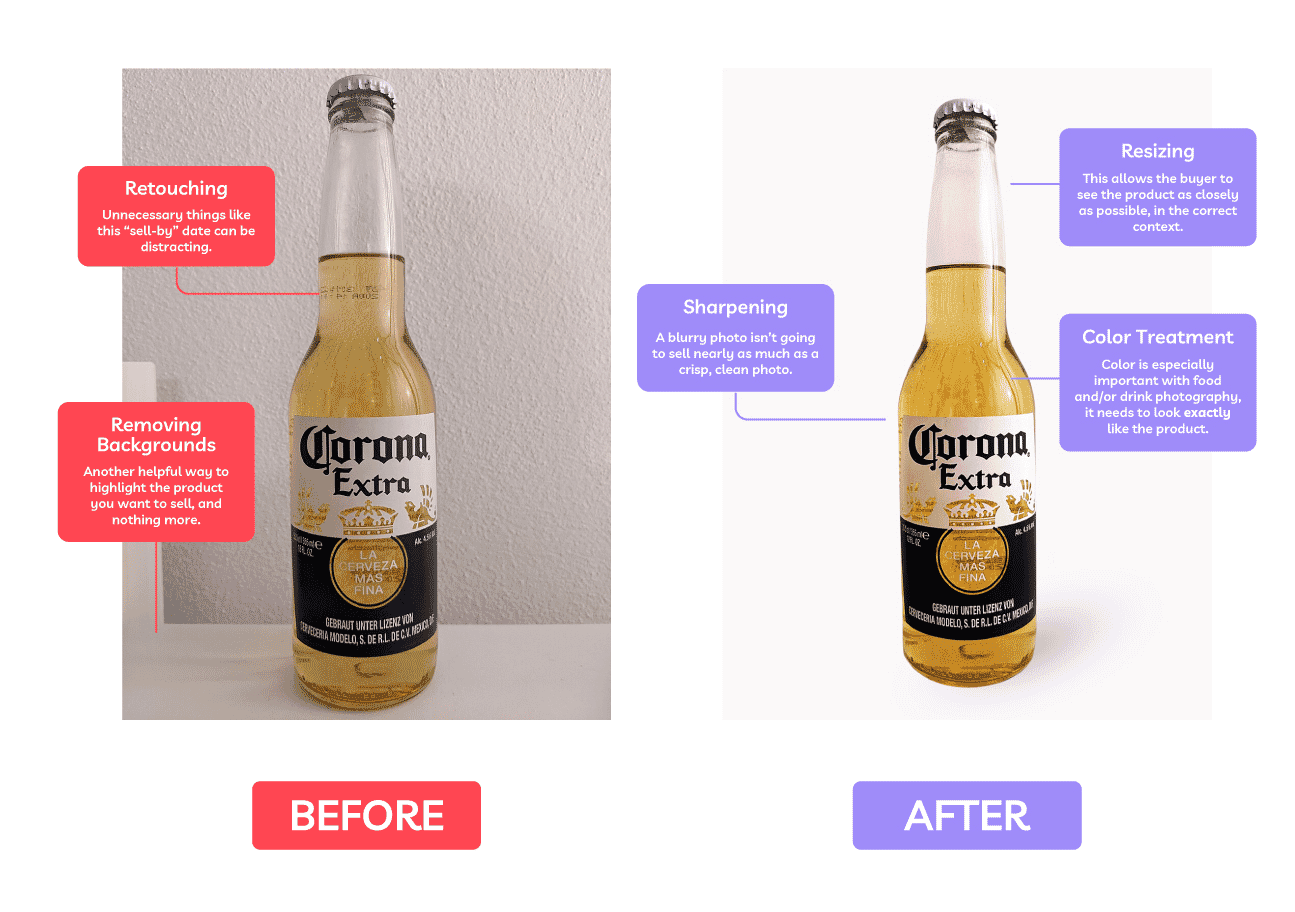
Sharpen: enhance the definition of the edges in an image (won’t make a blurry image in-focus)
Noisereduction: smoothing the picture out, typically accomplished by reducing the pixel size
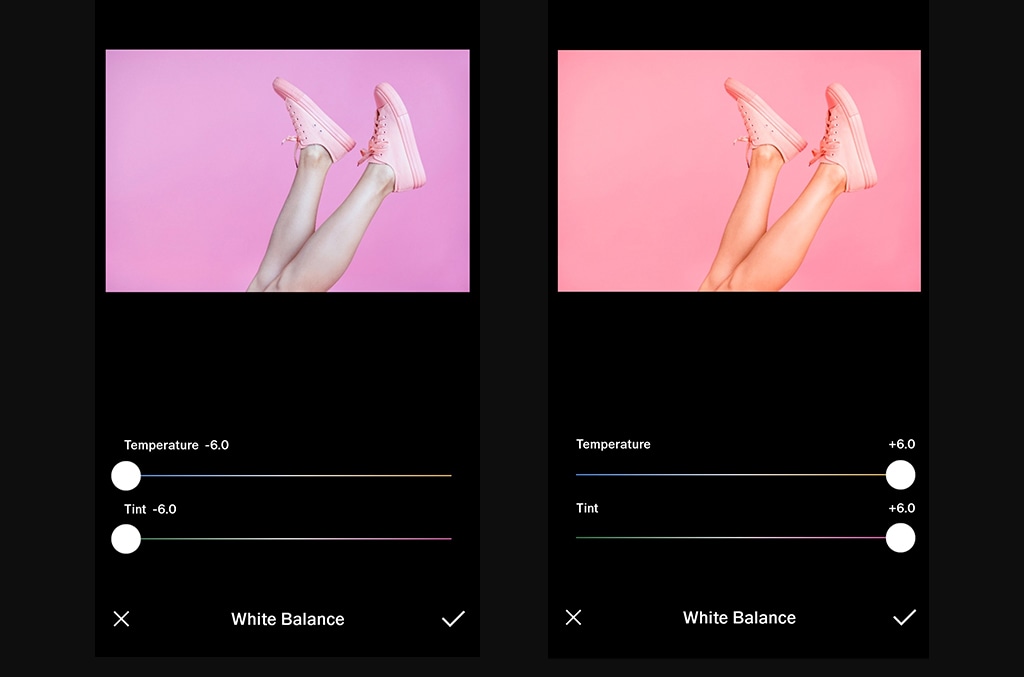
Whitebalance: the color of the light in the image
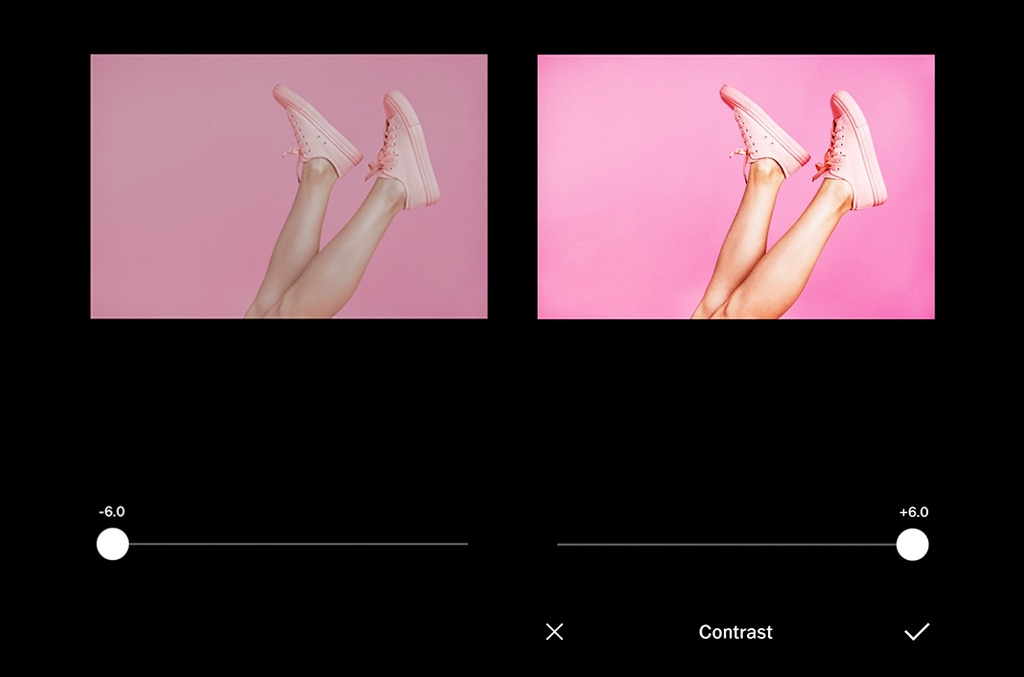
Contrast: higher contrast makes an image more punchy, while lower contrast makes it flatter in color
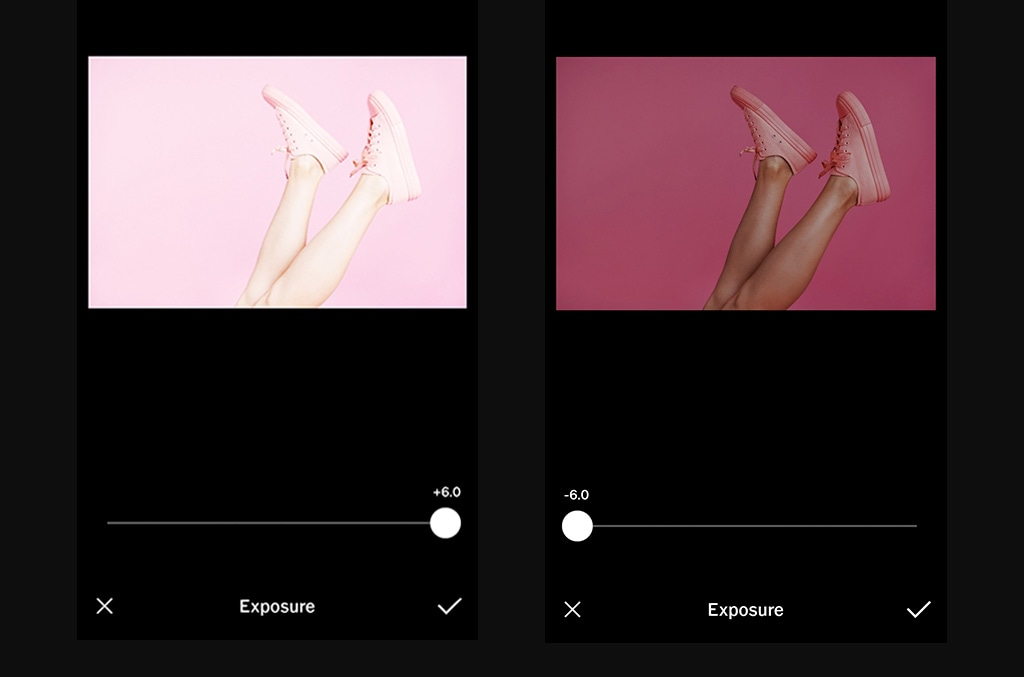
Exposure: the brightness of the photo
Lens correction: lessens the effect(s) of the camera lens
Coloradjustments: change the color of an item or element in the photo
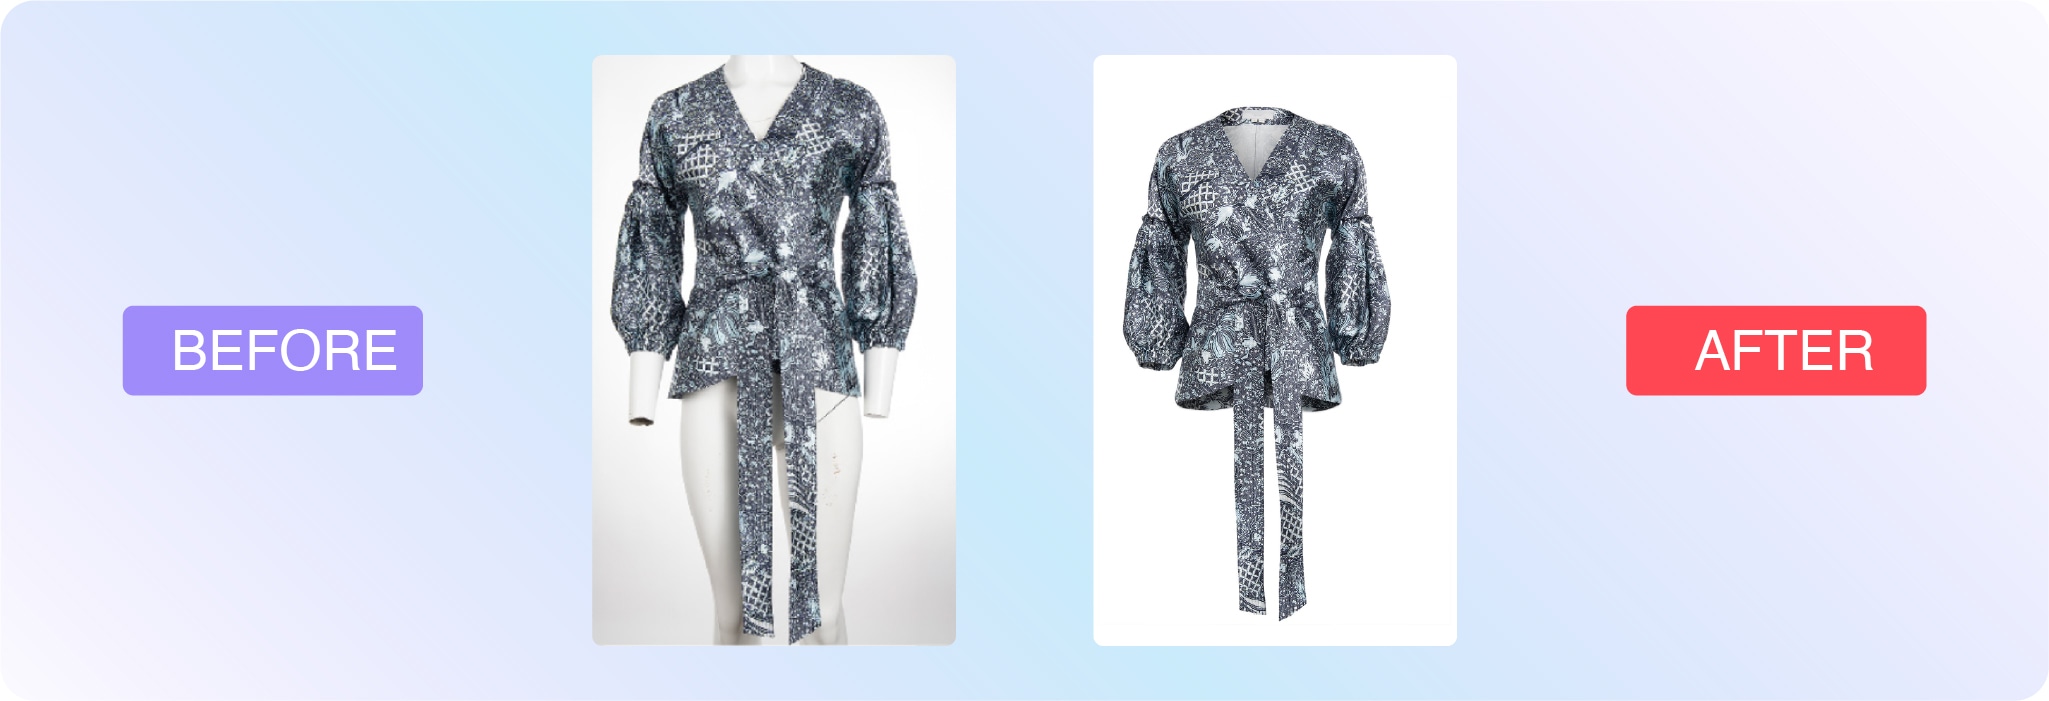
Background removal: delete the background from the image, isolating the subject (this is often used for white background product photography)
More complex techniques include:
Clipping paths: vector path that differentiates the part of the image that’s visible and the part that’s transparent (extracts a subject or element from an image)
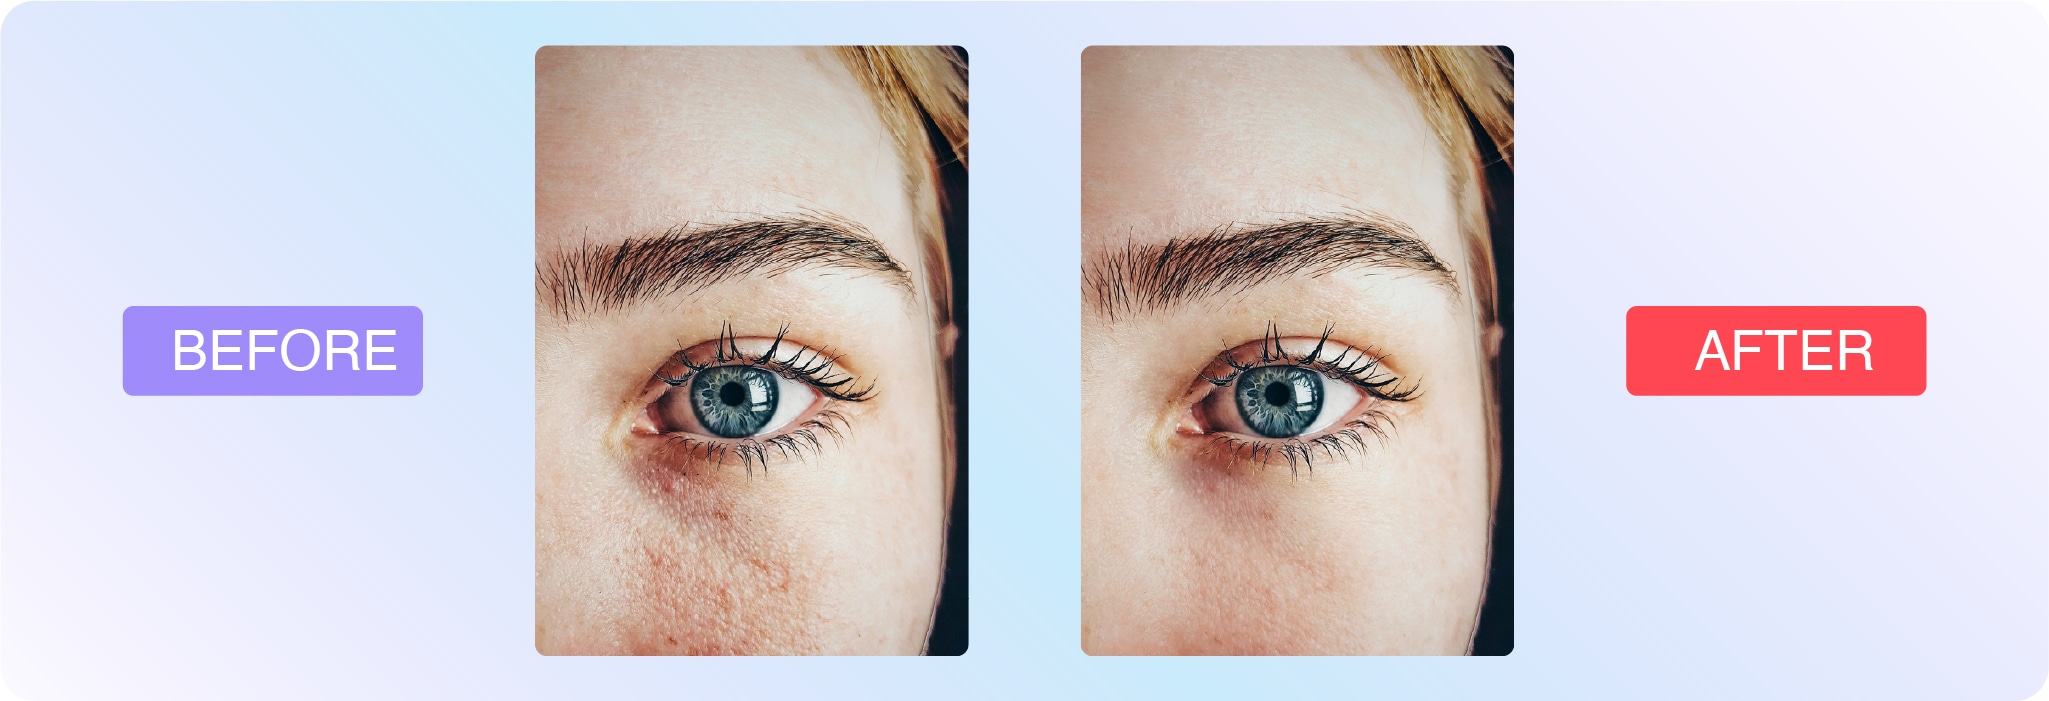
Portrait corrections: complexion touch-ups and enhancements
Two methods of digital photo editing are pixel editing and parametric image editing. Let’s look at their definitions:
What is pixel editing?
Pixel editing, or pixel-level editing, is when you alter an image at the pixel level. Because you’re altering the pixels themselves, this also permanently changes the image file. That’s why pixel editing is considered a destructive form of photo editing because it’s not as easy to undo the changes and restore the original file.
Pixel editing allows you to make extremely detailed edits and accomplish certain functions that parametric image editing can’t (like CMYK color modes, for example).
What is parametric image editing?
Parametric image editing (PIE) doesn’t change the pixels of the image. Instead, these edits are recorded as a set of steps to follow to accomplish the final look. Thus, it’s a non-destructive mode of photo editing. However, PIE doesn’t always allow for all types of edits.
Many in the industry recommend starting with PIE, and then using pixel editing to refine the final details.
Examples of photo editing
There are so many ways to edit photos, and everyone has a unique approach. You might see examples of photo editing on social media or YouTube.
Here are some examples of photo edits the team at Path have done for businesses from all around the world:
Background removal
Save a ton of time with pro background removal from 39¢ per image
Photo retouching
Polish up your product shots with pro retouching from 79¢ per image
Ghost mannequin
Let us look after your ghost mannequins, starting at just 99¢ per image
Editing different types of photos
Technique
Skill level
Use case
Cropping
Beginner
Ecommerce, social media, marketing, headshots
Background removal
Intermediate
Amazon product listings, white background product photos
Retouching
Advanced
Portraits, headshots, fashion, jewelry
Product and ecommerce photography
Product images will almost always require or benefit from post-processing. Aim for consistency, especially if you’re working on multiple products for the same company or are providing several types of photos of the same product.
Visuals help market brands and sell products, but you should also think about where the image will be used. Is it for an advertisement, ecommerce page, social media, or a print catalog? A white background shot will call for much different edits than an image for a Facebook ad. Likely, you’ll be able to get more creative with advertising imagery.
Here are some of the most common types of edits for product photography:
Brightness and exposure: If you didn’t nail the lighting, you can make substantial adjustments post-shoot.
Background removal: This is a common edit for product photos, especially if you’re listing the item on Amazon, which has a white background requirement. Regardless, white background maintains consistency.
Color correction: It’s important that product photos portray the item as accurately as possible so it’s a smart idea to color correct all of your product images. As many as 64% of returns happen because the product didn’t match customer expectations based on product images and descriptions.
Color change: For products that come in several colors, it’s important to showcase the variety. Instead of photographing the product in every color, photo editors can make the changes post shoot.
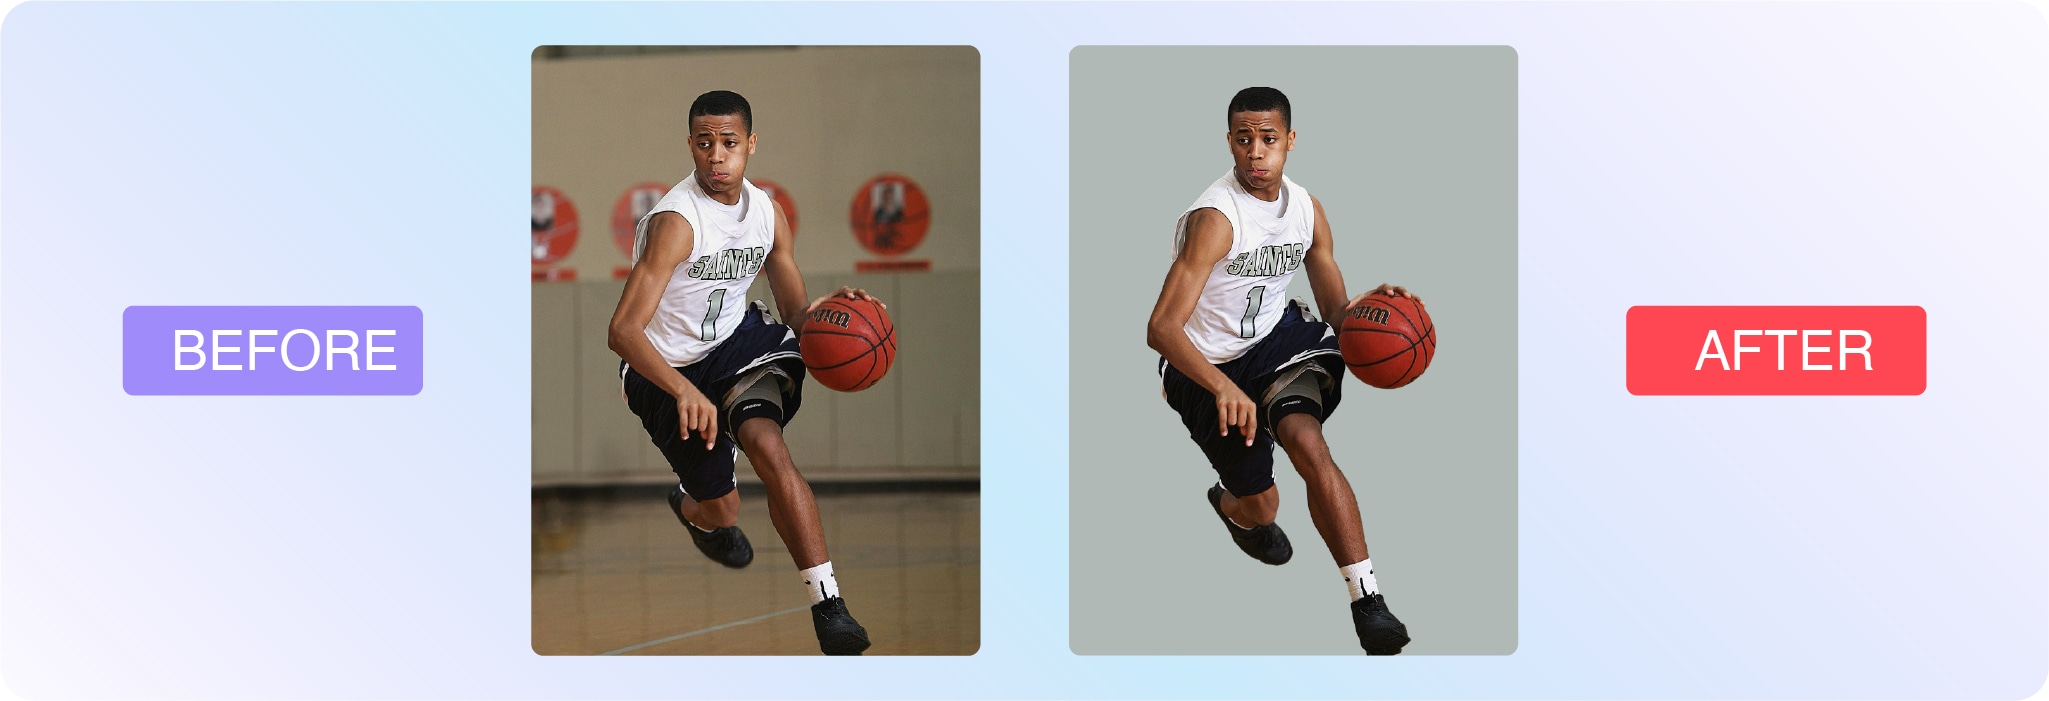
Sports photography
Sports images are often captured in fast-paced, unpredictable environments—making photo editing essential for polishing the final result. Whether you’re working with action shots from the field or editorial images of athletes, editing helps enhance sharpness, fix lighting, and direct attention to the key moment.
Cropping: Reframe the shot to highlight peak action or key players. A tighter crop can add intensity and drama.
Sharpening: Motion blur is common in sports. Sharpening can help make images feel more crisp and in focus.
Colorcorrection: Natural lighting varies across stadiums and gyms. Post-shoot edits bring consistency and accuracy.
Backgroundcleanup: Remove distractions from the crowd or surroundings that pull attention away from the subject.
Spotretouching: Clean up sweat, mud, or jersey wrinkles to create stronger, cleaner visuals for media or brand use.
If you’re editing for a team, school, or sponsor, keep branding consistency in mind—many sports photographers rely on editing templates to maintain uniformity across hundreds or thousands of images.
Headshot and portrait photography
Headshots and portraits are often the first impression someone gets of a person—whether it’s for a professional bio, dating profile, modeling portfolio, or graduation announcement. Editing can enhance natural features while preserving authenticity.
Here are common edits for portraits and headshots:
Skinretouching: Reduce blemishes, smooth skin, and even out tone without losing texture.
Whiteningteethandeyes: Brighten smiles and make eyes pop subtly and naturally.
Colorcorrection: Adjust tones to match a flattering, realistic look or a specific brand aesthetic.
Flyawayremoval: Clean up stray hairs or lint that distract from the subject.
Backgroundediting: Simplify or replace backgrounds to match the intended context—e.g., corporate headshot vs. lifestyle portrait.
The key with headshot and portrait editing is to enhance, not transform. The goal is to present someone in their best light while keeping the photo true to who they are.
Learn how to edit your photos
If you’re ready to learn how to edit your own photos, check out this handy collection of Photoshop tutorials. Here are a few to get started with:
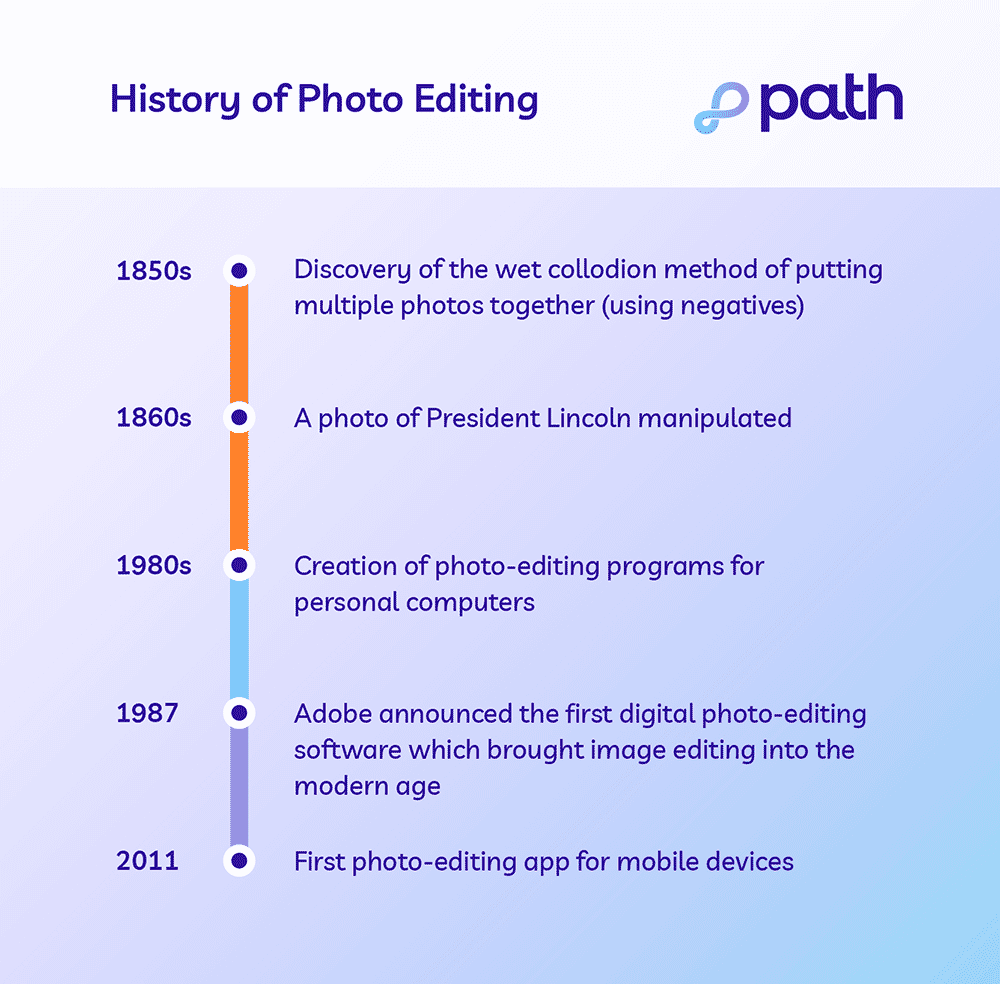
Photo editing history
What is a professional photo editor?
A person who edits images can either be self-employed, contracted by an outsourced company or agency, or someone who works in-house. There are many possible job titles for a photo editor, including digital photo editor, graphic designer or art director, among others.
Typically, photo editors specialize in specific industries, much like photographers. For example, real estate, editorial, and product photography all come with their own set of trends and intricacies. Editors that focus on ecommerce images know how to make products pop.
Our virtual photo editing studio is made of more than 300 trained professional photo editors who specialize in the following:
Ecommerce
Product
Sports
Headshot
Portrait photography
Let us look after your image edits, so you can get back to the fun stuff. Try Path free.
Tackle your photo editing projects with Path
Learning new photo editing techniques can be an enjoyable way to break up your day and add to your industry knowledge, but editing photos can be time-consuming, especially if photography is your specialty. If you need fast, affordable, high-quality photo-editing services, the professionals at Path are here to help.
What is photo editing? FAQs
Can I edit a photo for free?
Yes, you can edit a photo for free. You can use free photo editing tools and do it yourself. You can also use free AI photo editing tools, but these edits require careful quality checks. Or, send your first two photos to Path to get them edited for free.
How can I edit a picture image?
Open your photo editing tool of choice
Upload or open the photo you want to edit
Make your desired edits
Save your work
What is the best app to use for photo editing?
Adobe Photoshop
Adobe Lightroom
GIMP
Pixlr
Snapseed
VSCO
How do I edit my photos like a pro?
Edit photos like a pro by learning basic and advanced Photoshop techniques, outsourcing the tedious edits, and optimizing for the right use and context.
What is the meaning of photo editing?
The meaning of photo editing is the process of manipulating and enhancing a photo. Photo editing can involve basic tweaks like cropping, resizing, and applying artistic filters. It also includes advanced manipulations like retouching and removing unwanted elements and distractions.
What are the 5 basics of photo editing?
Cropping
Resizing
Applying simple clipping paths
Changing colors
Adjusting exposure
What is the purpose of a photo editor?
A photo editor can save you time and stress because they have the skills necessary to accomplish tedious, time-consuming, or complicated editing tasks for you.
Let us look after your image edits, so you can get back to the fun stuff. Try Path free.
For those who haven’t been following the major rift in the world of photojournalism a quick summary of what is going on: A film called “The Stringer” directed by Bao Nguyen (previously directed The Greatest Night In Pop) and produced/starring Gary Knight (VII Agency co-founder and ED) premiered at The Sundance Film Festival on January 25 claiming and attempting to prove that 53 years ago Nguyễn Thành Nghệ actually took “The Terror of War” (AKA Napalm Girl) image and not Nick Ut. AP photo editor Carl Robinson claims his boss, Horst Fass, told him to switch the credit from Nguyễn, a stringer, to Nick, an AP photographer. The filmmakers find Nguyễn, and he says, yes, he took the picture.
Prior to the film’s premiere, the AP released a preliminary report disputing the claims of the film. At the premiere, the AP watched the film and followed up (May 16) with a 100-page report saying that there’s not enough evidence to remove Nick Ut’s credit.
Then, on May 16, World Press Photo released a statement saying they investigated (David disputes the characterization that they investigated and rather they simply got a private screening of the film and agreed with the conclusion) and are suspending Nick Ut’s credit on his 1973 Photo of the Year award.
This sparked outrage on social media with posts from what appears to me to be the VII camp (Ashley Gilbertson, Ed Kashi, Sara Terry) and the Nick Ut camp (David Burnett, Pete Souza, David Kennerly).
And the real zinger in the whole dust-up is that David Burnett was there! He’s an eyewitness to the events at Trang Bang, where the famous image was made.
Ok, one final note: besides the premiere at Sundance and private screenings, the film cannot be watched until a distributor is lined up. I’m aware of a screening in DC next month, but most people, including David and myself, have not seen the film.
I talked with David over the phone, and here’s a condensed and edited version of our conversation.
Screenshot from AP Report: Investigating claims around ‘The Terror of War’ photographScreenshot from AP Report: Investigating claims around ‘The Terror of War’ photographScreenshot from AP Report: Investigating claims around ‘The Terror of War’ photographScreenshot from AP Report: Investigating claims around ‘The Terror of War’ photograph
Rob Haggart: I want to start by asking if it’s really difficult for you to go back and rehash all this stuff.
David Burnett: No, I mean, I have these moments from not just Vietnam, but the jobs that I worked my whole life, French elections, Ethiopia, Chile, and it’s not really something that causes me great pain. There are so many of these things that I’ve lived through that the memories of them and what I was doing in them as a photographer is very, very clear in my head. And Trang Bang is really no different than almost anything else.
The first time I was under fire and had the crap scared out of me, it’s one of those things where you don’t just think, will I ever get over it? Because you don’t, they become part of what your life is about.
The running joke about Trang Bang and me was that, well, I missed the shot because I was changing film in my old screw mount knob wind Leica which is kind of a slow, kludgy film camera. It was not an easy camera to operate.
And yet, Cartier-Bresson shot with them for something like 20 years before the M2 and the M3 came along and made some pretty great pictures, so I mean, I think part of why I even bothered shooting with that camera instead of getting another M2 for 200 bucks, was kind of a historical thing with the old Contax and Leicas, you felt a little more attached to some kind history if you’re shooting with this kludgy old camera and um you know, and I was trying to reload it and anybody had ever owned one of the cameras knows that if you take a 35-millimeter film where you have the little cut-down tongue that you really need to cut an extra inch or inch and a half away from that one side that’s cut so that when you drop the film in the camera, it will seat itself perfectly.
I never bothered doing that, so I was always stumbling, trying to get the camera reloaded. So I was reloading it when the plane came in to drop the napalm. I was holding the open camera in my left hand and shooting with a 105 in the other hand. When the napalm hit right next to the pagoda, there was this Gigundo fucking fireball, Nick has that picture, and I kind of have it a few seconds later. But it was the in the days when you didn’t shoot with three motor drives, you know, you weren’t going out there to shoot 25 rolls of film. I think I shot maybe three or four rolls that day, and it was a fairly long period of time we were there because we were kind of hanging out waiting to see what was going on.
You could hear firing and shooting coming from the village. Then the planes came in, and there was that fireball, and then like three minutes later, the kids started running out of the field and onto the road toward us, and that is the moment, more than anything in my mind, where Nick was the one guy who was in a position to shoot the picture, and nobody else was. There was this line of journalists, and we were all within a few feet of each other lined up across the road. As soon as we could tell that, there were people on the road racing out toward us, and the kids were running as fast as they could run. Nick and this guy Alex Shimkin, who was killed a few weeks later up north, took off running towards them, and no one else did.
RH: When did you first hear a film was being made about this event and that there were questions about the author of the famous image?
I was sitting at a Walgreens parking lot in Florida 3 years ago going in to go get some stuff, and Gary Knight called me and said tell me everything you know about Trang Bang, so I spent a couple hours on the phone and told him everything I know and then said you know there’s this guy and he’s kind of a horses ass, ex AP guy and he says that Nick didn’t shoot the picture and I kind of think he’s full of crap as does everyone else but along the way you’re gonna run into Carl Robinson.
Carl had this real chip on his shoulder about AP, and he was never afraid to let people know how he felt like he’d been screwed over by the AP.
RH: So you’re telling me this rumor has been around for a while?
Yep, a long time. It’s not new. The last time I saw Horst Faas was in 2008. There was a gathering for a memorial wall at the news museum in Washington, and if you lived near the East Coast and worked as a journalist in Vietnam, you pretty much were there that day. Somebody at that point could have said, hey, Horst, let me talk to you about this thing that Carl’s been telling everybody that you told him to put Nick’s name on the image, and it was really some stringer’s film.
And no one ever, no one ever asked Horst.
No one ever just asked him point blank.
I guess Carl makes a pretty reasonable case for trying to talk about how the guilt of 50 years and being able to unburden his guilt when he finally met this guy. But you know, every crackpot theory that ever was has at least a 2% chance that it happened.
Could Horst have said it? I suppose he could have. But it would have been very out of line with what always happened.
If you talk to Neal Ulevich, who was in the AP bureau as a staff photographer for, I don’t know, six or seven years in Asia and was in the bureau the whole time, he will tell you about the sacrosanct policy of never allowing anyone’s film to have any name on it other than the actual photographer that shot it.
He said, “All the time I was in Asia, never once did I see anybody do anything like that.”
It just didn’t happen.
I was in that group of people who were looking at the first print of Napalm Girl when it came out of the darkroom, and I did what every photographer in the history of photography would have done, which is I look at this picture and I try and think to myself without having seen my own film, hm, I wonder if I have anything better. I’m thinking, yeah, that’s pretty good. That’s probably better than anything I have.
There were 3 or 4 of us looking at this little 5 x 7 print that was still wet, and Horst, without making a big deal out of it, just turned to Nick and said, “You do good work today, Nick Ut.”
I still have the memo I wrote when I went back to my office at the Time-Life Bureau. I said there was this accidental bombing in this village called Trang Bang, and I said, Nick from AP got a pretty good picture, and they tell me they’re shipping the negative to New York on what’ll be the same flight that my negatives are gonna be on, so you’ll be able to get an original print made in the lab rather than rely on a wire service photo.
So that’s what they ended up doing. It was in the front section of the magazine called the Beat of Life; there were always 3 or 4 of these big picture spreads.
Usually one picture, sometimes two or even three, and they ran one of mine of the grandma with the burned baby and Nick’s picture side by side, and when you look in the photo credits, it says page four and five, David Burnett, AP. I mean, it was the wire services in the 70s. They weren’t going to put a photographer’s name on it. It’s kind of funny that way.
RH: What are the chances, if you’re Nick, that you don’t know beforehand you made that picture?
There’s no way that either of those guys would not know they took that picture. It was such an enpassant moment, and I’m sure there was just one frame that was the one.
For sure, there are times when you’re surprised by something you’ve done when you move from wherever you shot it, and now, you know, we’ve kind of shut out the middle man, and you go right to the computer and see if what’s on there is anything like what you remember, but in the film days I would find it really hard to not know that you had something.
I can’t imagine that the camera wasn’t up at the eye; it’s not like a chest-high Hail Mary, although technically, it was never great, but maybe at the same time, some of the imperfections add to the raw reality of that moment.
RH: That leads me to this talking point I see from the film’s defenders saying that this is not a critique of Nick, but that would mean that Nick didn’t know he took the photo. But you think there’s no way he didn’t know he took the photo, so the film is saying he’s been lying for 53 years about this.
He’s a 21-year-old kid with a camera, and I think incapable of that. Yes, it was a good picture, but there were a lot of good pictures out there.
And, you know, some people have said, oh, but Horst knew right away that that was gonna be a great picture, and he wanted AP to have the copyright on it instead of a stringer. But the thing is, you’ve got all these little sub-arguments if you accept a certain premise, and you can walk yourself right off a cliff of trying to figure out what it is you believe or don’t believe.
Gary called me back at one point, and he said, you know, I think there’s really something to Carl’s statement here, but you know, once you get the first bit of the Kool-Aid, you just gotta drink the whole pitcher, and I just don’t see it.
I mean, like I said, it’s possible.
Everything’s possible, you know?
I mean, you know, once you start to believe part of it, you kind of end up believing the whole thing, or you believe none of it.
To me, it looks like Gary’s trying to make himself into a big documentary producer, and this is his launch pad.
Gary said you ought to be in the film, and I just said, Gary, I don’t wanna do a goddam Mike Wallace interview where I have no control over how you cut it or anything else. I’ve watched 60 minutes too many times where Mike managed to hammer somebody, and I had no confidence that it would be a fair representation.
Fox Butterfield was the reporter I was with that day working for The New York Times, and he got a call from Gary’s wife, a producer on the film, he started to tell her his version of what took place, and she told him everything you’ve said is wrong. That’s not a really good way to coax people into a discussion. She said he would have to sign a non-disclosure agreement, and he said, what the hell for? I’m the one telling you stuff; you haven’t told me anything.
Gary said to me last time I talked to him like six weeks ago, he said, well, you know, we’ve done all this forensic stuff, and we’ve proven that he couldn’t be down there to take the picture.
And I said to him, in my mind, because I remember the way he ran out on the road ahead of everybody else when the kids were coming down the road, he’s the only one who could have taken that picture because it was in the very first moments that the kids were coming down toward where the journalists were lined up, and it was after that everybody else started wandering around, but that was another five or ten or 15 minutes later.
And I just don’t see how anybody else was out there in front, and to me, that picture was taken out in front. It wasn’t taken right next to the press people.
It was out there away, maybe, I don’t know, 20 yards, 40 yards. 50 yards.
RH: How do you think the filmmakers should have handled this? What should they have done with the information they got from Carl?
You don’t ever want to get to a place where people are afraid to posit things, but I don’t know what the answer is, but you know, unlike a lot of people who don’t shut up about it, I’m not sure I have an answer to what the most perplexing question is.
And I never said I was right behind him when he shot that.
I saw him, I was changing my film, and it was a minute or two minutes later, and in those moments, that could be a long time. I offer it strictly as a witness to what happened that day and nothing more.
I find one of the most curious things of all, aware of the fact that Nguyễn probably had to leave Saigon with almost nothing, that he left everything behind, andI totally get that.
But apparently, he never sold another picture to anybody, and in the last 50 years, no one has even seen one picture that he’s taken.
Other than the most famous picture of the Vietnam War.
Of all the prescriptive nonsense I hear about making photographs, the idea that “real photographers shoot on manual” has to be the most tiresome. As if burdening photographers with an even greater sense of obligation to the shoulds and the should-nots has ever led to greater creative freedom, less rigidity in our work, and more powerful photographs.
I’ve heard similar assertions about shooting in RAW (you must). And not cropping or using burst mode (you must not). And not using Photoshop to ___________. You can fill in the blank yourself because here, the so-called purists give us so many options from which to choose, but no matter what you put there, someone is going to put you on their naughty list without ever pausing to ask why you’re doing it differently.
Let’s set aside the notion that there is such a thing as a “real” photographer; you are a photographer if you make photographs. Full stop.
You might be a new photographer or an experienced photographer. You might be a lousy photographer or an inspired photographer. There are probably a million ways to categorize us, but real? As opposed to what? Imaginary? Fake? Is there a point to this kind of thinking? I need a drink.
Well, there is a point, and it’s that some people can only feel as though they are special by putting others down. They can only feel “in” by forcing others out. After all, if we’re all special, then no one is special (also nonsense, but that’s not what this is about. Focus, David!).
I’m not interested in what kind of photographer you are, though I’m interested in you as a photographer. I hope you’re fulfilled and love what you do, and that your photographs are getting stronger and feel more and more like your own.
I’m not overly concerned with how you make your photographs, so long as you’re happy doing it and it’s truly working for you. I shoot in something like full-manual mode with Auto-ISO and a liberal use of EV compensation, so I’m not sure whether or not I’m a real photographer and allowed to weigh in on whether you are or not. But I do know how to use my camera and make it do what I ask. If “real” photographers do anything, it is that.
Here’s my advice: shoot on Manual all the time. Or shoot in Aperture priority sometimes and Shutter priority sometimes. Hell, be reckless and push the dial to P now and then! Do what works for you.
What matters is that you have control of the camera while also being sensitive to the moment and still having the mental bandwidth to think about composition and what the light is doing. Do that.
If you need the camera to do some of the thinking for you while you tend to the decisions that make for stronger compositions, that’s a good choice. One day, that creative thinking will come a little easier, and you might long for a little more control over the camera’s decisions. Or you’ll figure out how you like to use the tools of your craft in your own way.
I like things simple: manual mode with auto-ISO and EV compensation to dial things in more precisely. This works for me for what I do right now.
And so long as I’m confessing my way out of the real photographer’s club:
I have no idea what my metering mode is and haven’t for over a decade—I just look at the histogram. I could look at my camera and find out, but that knowledge would enrich neither of us.
I don’t know what my focus mode is. It’s continuous and uses tracking—that’s what I know. It’s what I like, and I never change it (though I know how to do so if I had to). It works for what I photograph and how I like to use a camera.
I hate straps and have been told that not using one is reckless. A real photographer would at least use a wrist strap, right? I don’t like them, either. They slow me down. I’ll put one on if I have to—if I can find it.
I’ve been told the same about my indifference to UV filters and lens caps (though you can pry lens hoods from my cold, dead hands).
More often than not, when I bother to use one at all, my tripod is a little wonky.
I clean the front of my lens with my shirt, when (and if) I clean it.
Speaking of cleaning, my sensor often looks like someone spilled kitty litter into my camera while the lens was off, which is not the only reason I tend to shoot wide open, but it’s a reason. I get them cleaned once a year, and that’s enough for me.
My camera bag can be a mess; the dividers are all over the place, and they change all the time, if I even bother using them. Half the time, I just use a Buff, lens cloth, toque, or a pair of gloves to keep bodies and lenses from banging into each other. If my gear gets banged up, it’s because I’m using it for the purpose for which it is made.
I’d hate to have a real photographer weigh in on any of this. But if you’re going to judge me at all (I’d really rather you didn’t; don’t you have photographs you could be making?), then judge me on my photographs.
None of the sins I’ve mentioned gets in the way of creating the photographs I want to make. But fussing would. So would an unexpected lens cap. Or succumbing to the pressure to practice my craft in a way that just isn’t me.
So much of the advice I see aimed at photographers could be gathered up and bound into one volume called Adventures in Missing the Point. There are no real photographers (to the exclusion of others) any more than there is a single right way to do things that qualifies you to be one.
What matters is that you learn to make the kind of photographs you want to make, and to do so with greater creative flow and control. It matters that you be open to new ideas and techniques, but as creative options, not as obligations.
I’m not saying throw your lens caps away or don’t learn to shoot on manual if you think it might give you more control. And, yes, cleaning your lens with your shirt is generally considered less than ideal practice (don’t look at me like that; you do it, too). But I am saying it probably won’t get in the way of you doing the work your soul loves (which I am very much tempted to add is probably the only thing real photographers are universally concerned with).
Think in terms of possibilities, not prescriptions. We’re all trying to create something different, and there can’t possibly be only one path to do so.
For the Love of the Photograph (and those who make them), David
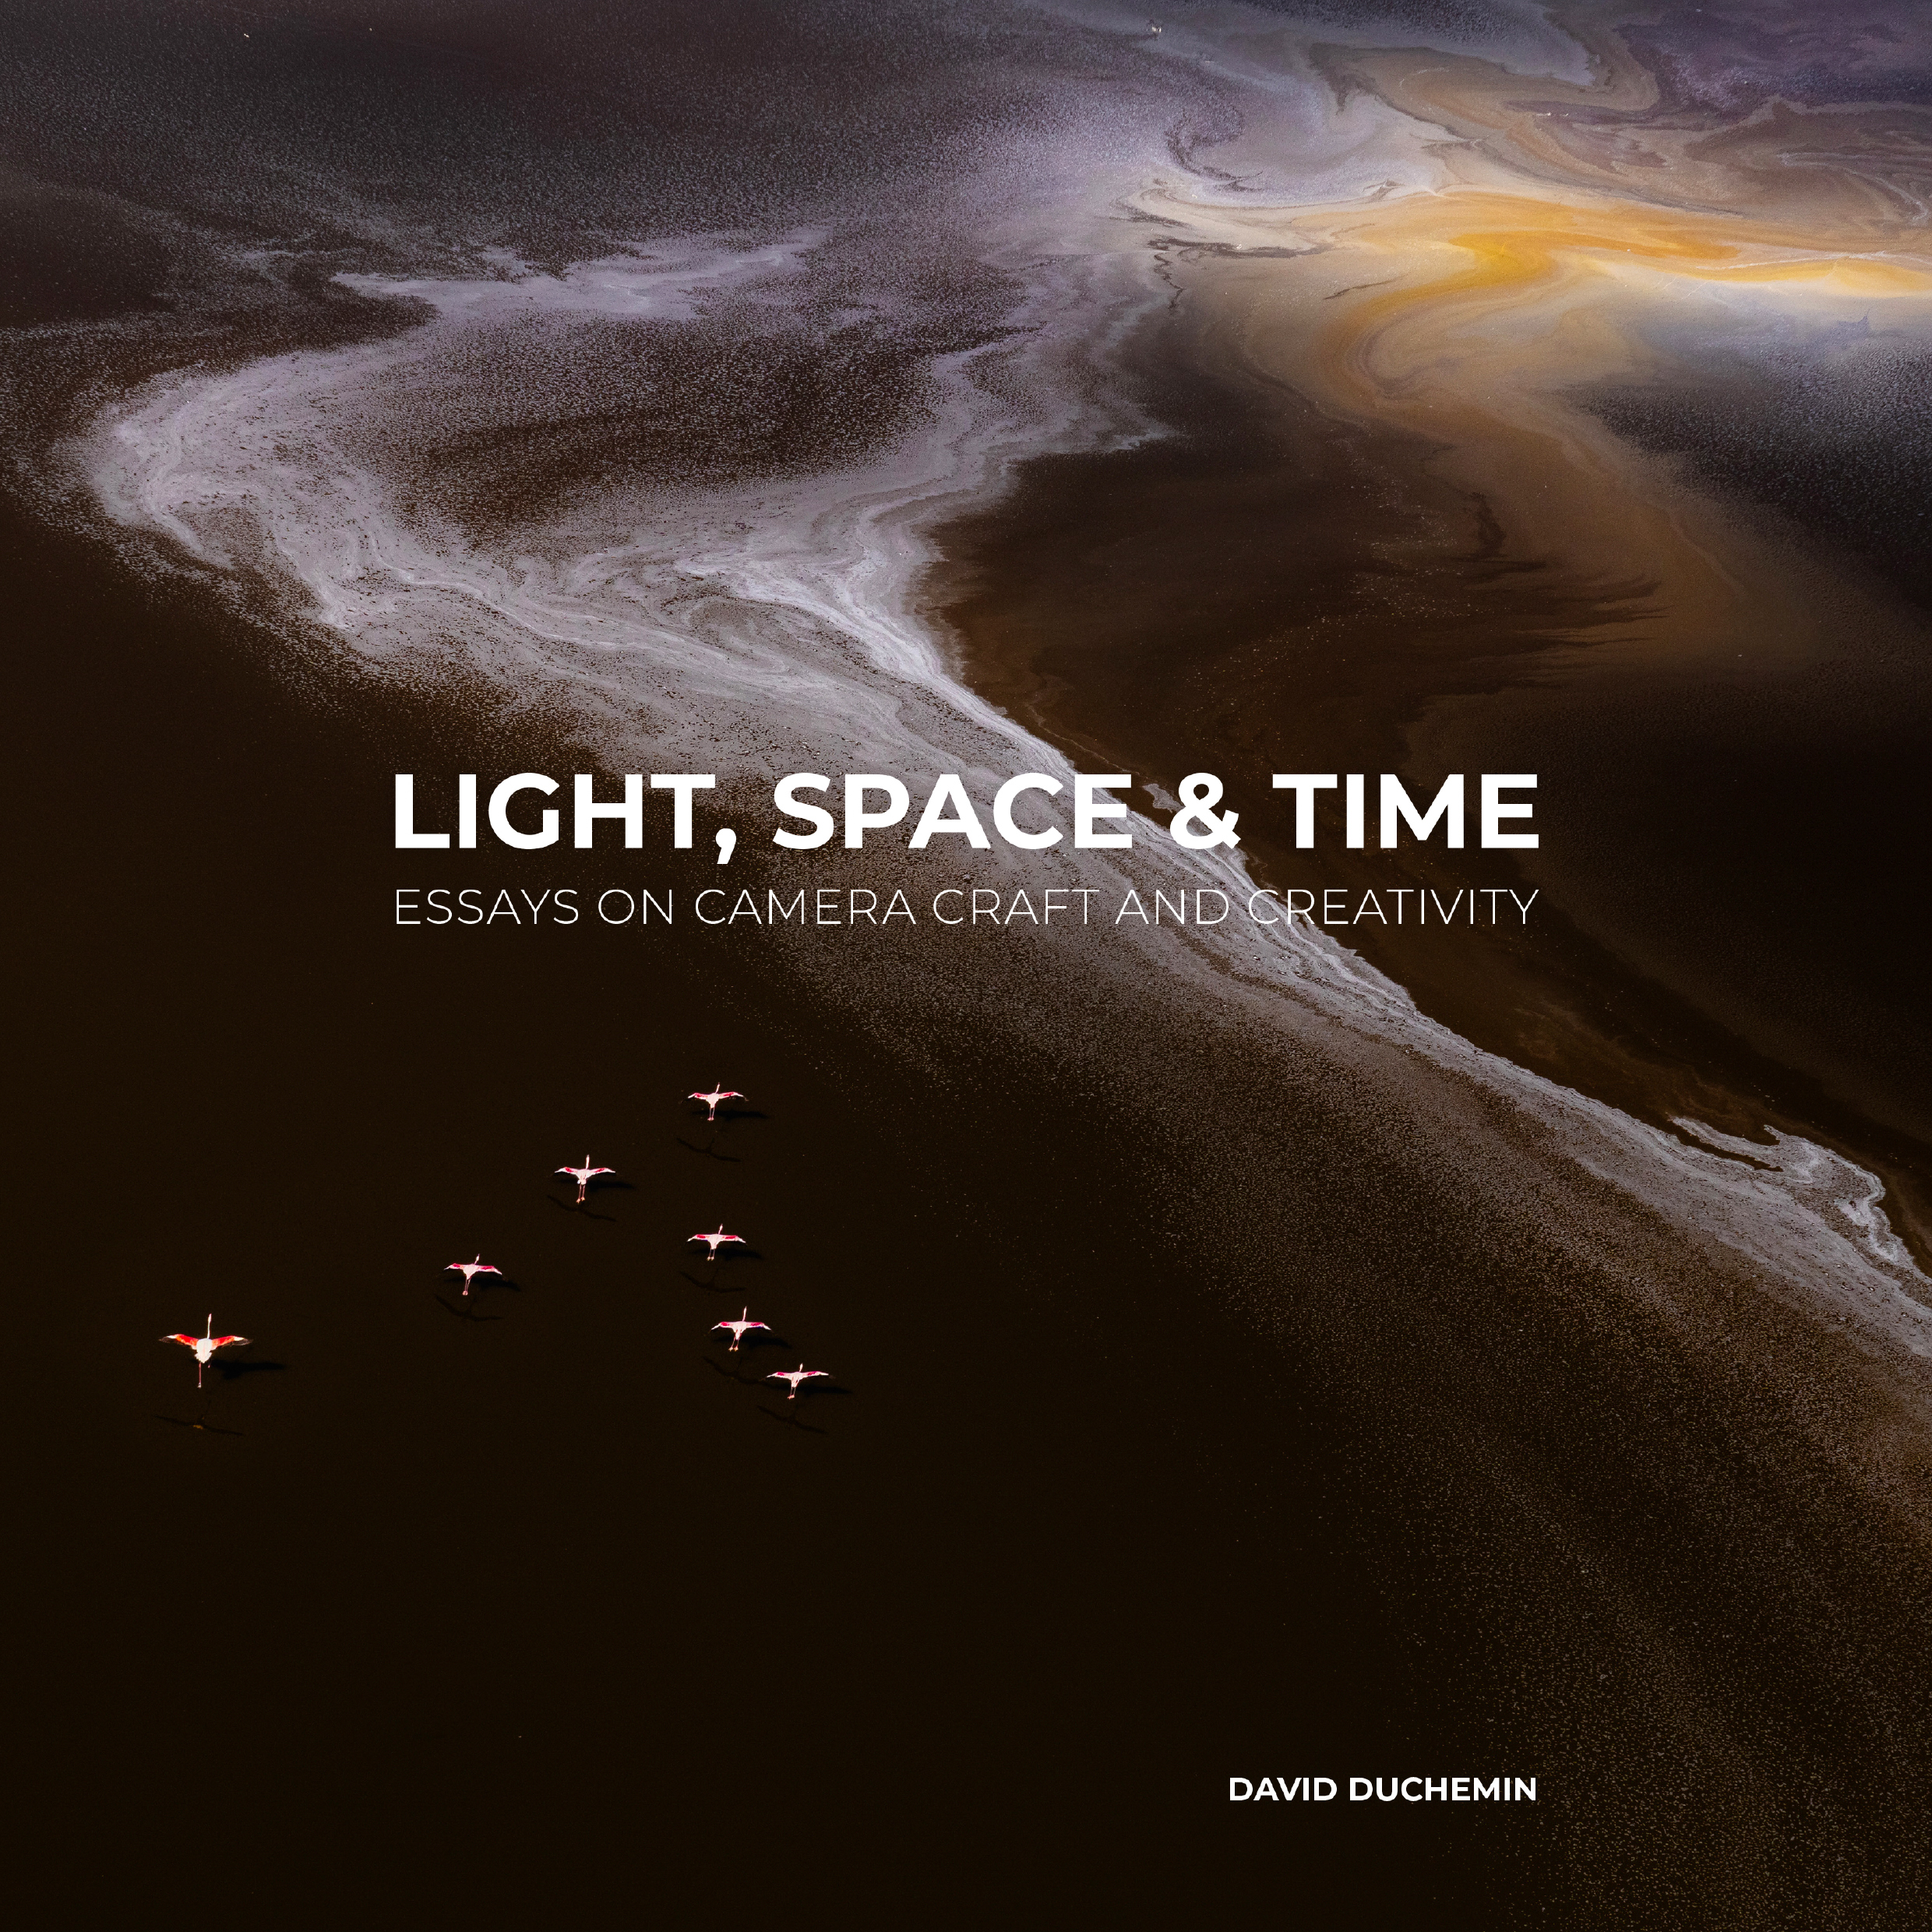
The biggest challenges for most photographers are not technical but creative.They are not so much what goes on in the camera but what goes on in the mind of the person wielding it. Light, Space & Time is a book about thinking and feeling your way through making photographs that are not only good, but truly your own. It would make an amazing gift for the photographer in your life, especially if that’s you. Find out more on Amazon.
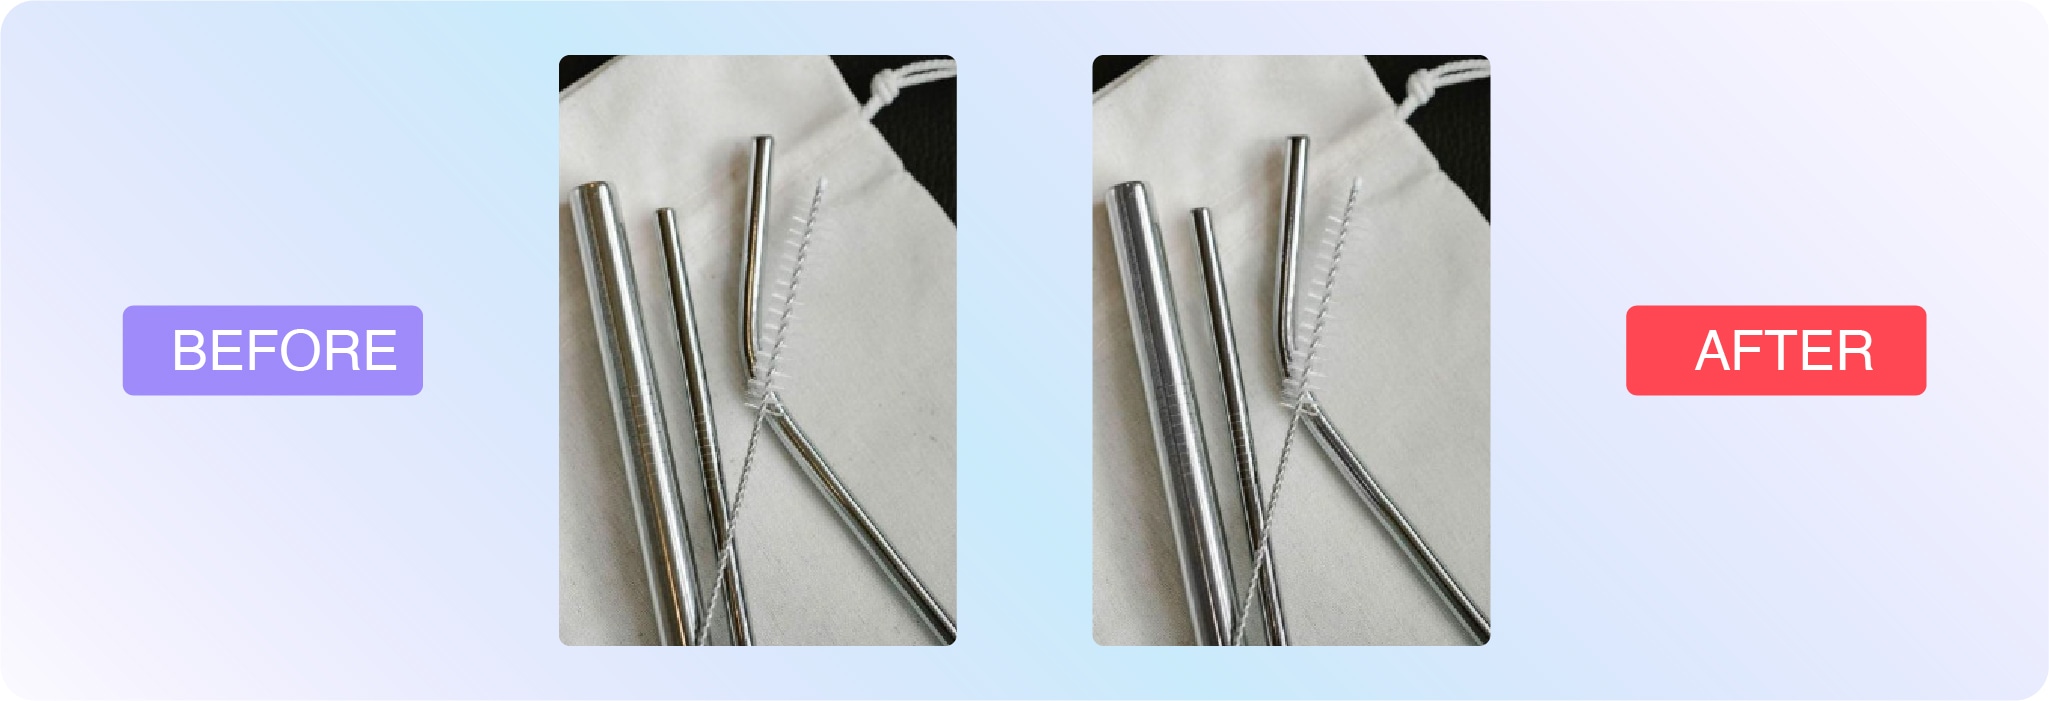
Product photography is always evolving, and it’s getting tougher to keep up with the latest trends. Your product images are doing more than showcasing an item—they’re selling it. High-quality product photography helps shoppers visualize, trust, and ultimately buy your products.
Below, look at the definition of product photography, as well as best practices and examples to inspire your own.
What is product photography?
Product photography is the art of capturing images of goods for sale. These images are used in ecommerce stores, ads, packaging, and catalogs to highlight product features and inspire confidence in buyers.
Also known as commercial product photography, it includes everything from simple white background shots to stylized lifestyle images. The goal is to help potential buyers understand, desire, and trust your product—visually.
While traditional product photography uses cameras, some brands also use 3D renderings that mimic real photos. These can be effective, though purists argue that only real-camera images count as true product photography.
Product photography is a type of object photography and a type of advertising photography, but you can get even more granular:
White background
White background photos are the ones you see on ecommerce marketplaces like Amazon, AliExpress, and eBay. They may have individual product photos or white background shots that feature multiple images. This is arguably the most common product photo type you’ll see.
360-degree
360-degree photography captures a product from every angle, letting shoppers rotate and view it interactively—almost like holding it in their hands. These image sets are often stitched together with special software to create a seamless, scrollable experience on ecommerce sites.
This is what professional photographer Eric of CiReC 360° specializes in. He relies heavily on Path for outsourced photo edits because each “image” is actually a series of several images, and the edits must be perfect across all shots.
Lifestyle shots
Lifestyle shots are photos that feature people using the product in a real-world setting. These tell a story and help shoppers imagine themselves with your product.
Contextual
Contextual photos are similar to lifestyle photography, but they may not feature people. These show the product in its natural environment (e.g., barstools in a kitchen, a yoga mat in a studio).
Scale shots
Scale shots are product photos that give a frame of reference so people can envision how big the products are. While product specs and dimensions are descriptive, sometimes shoppers need an image to see how big or small it is in comparison to common objects.
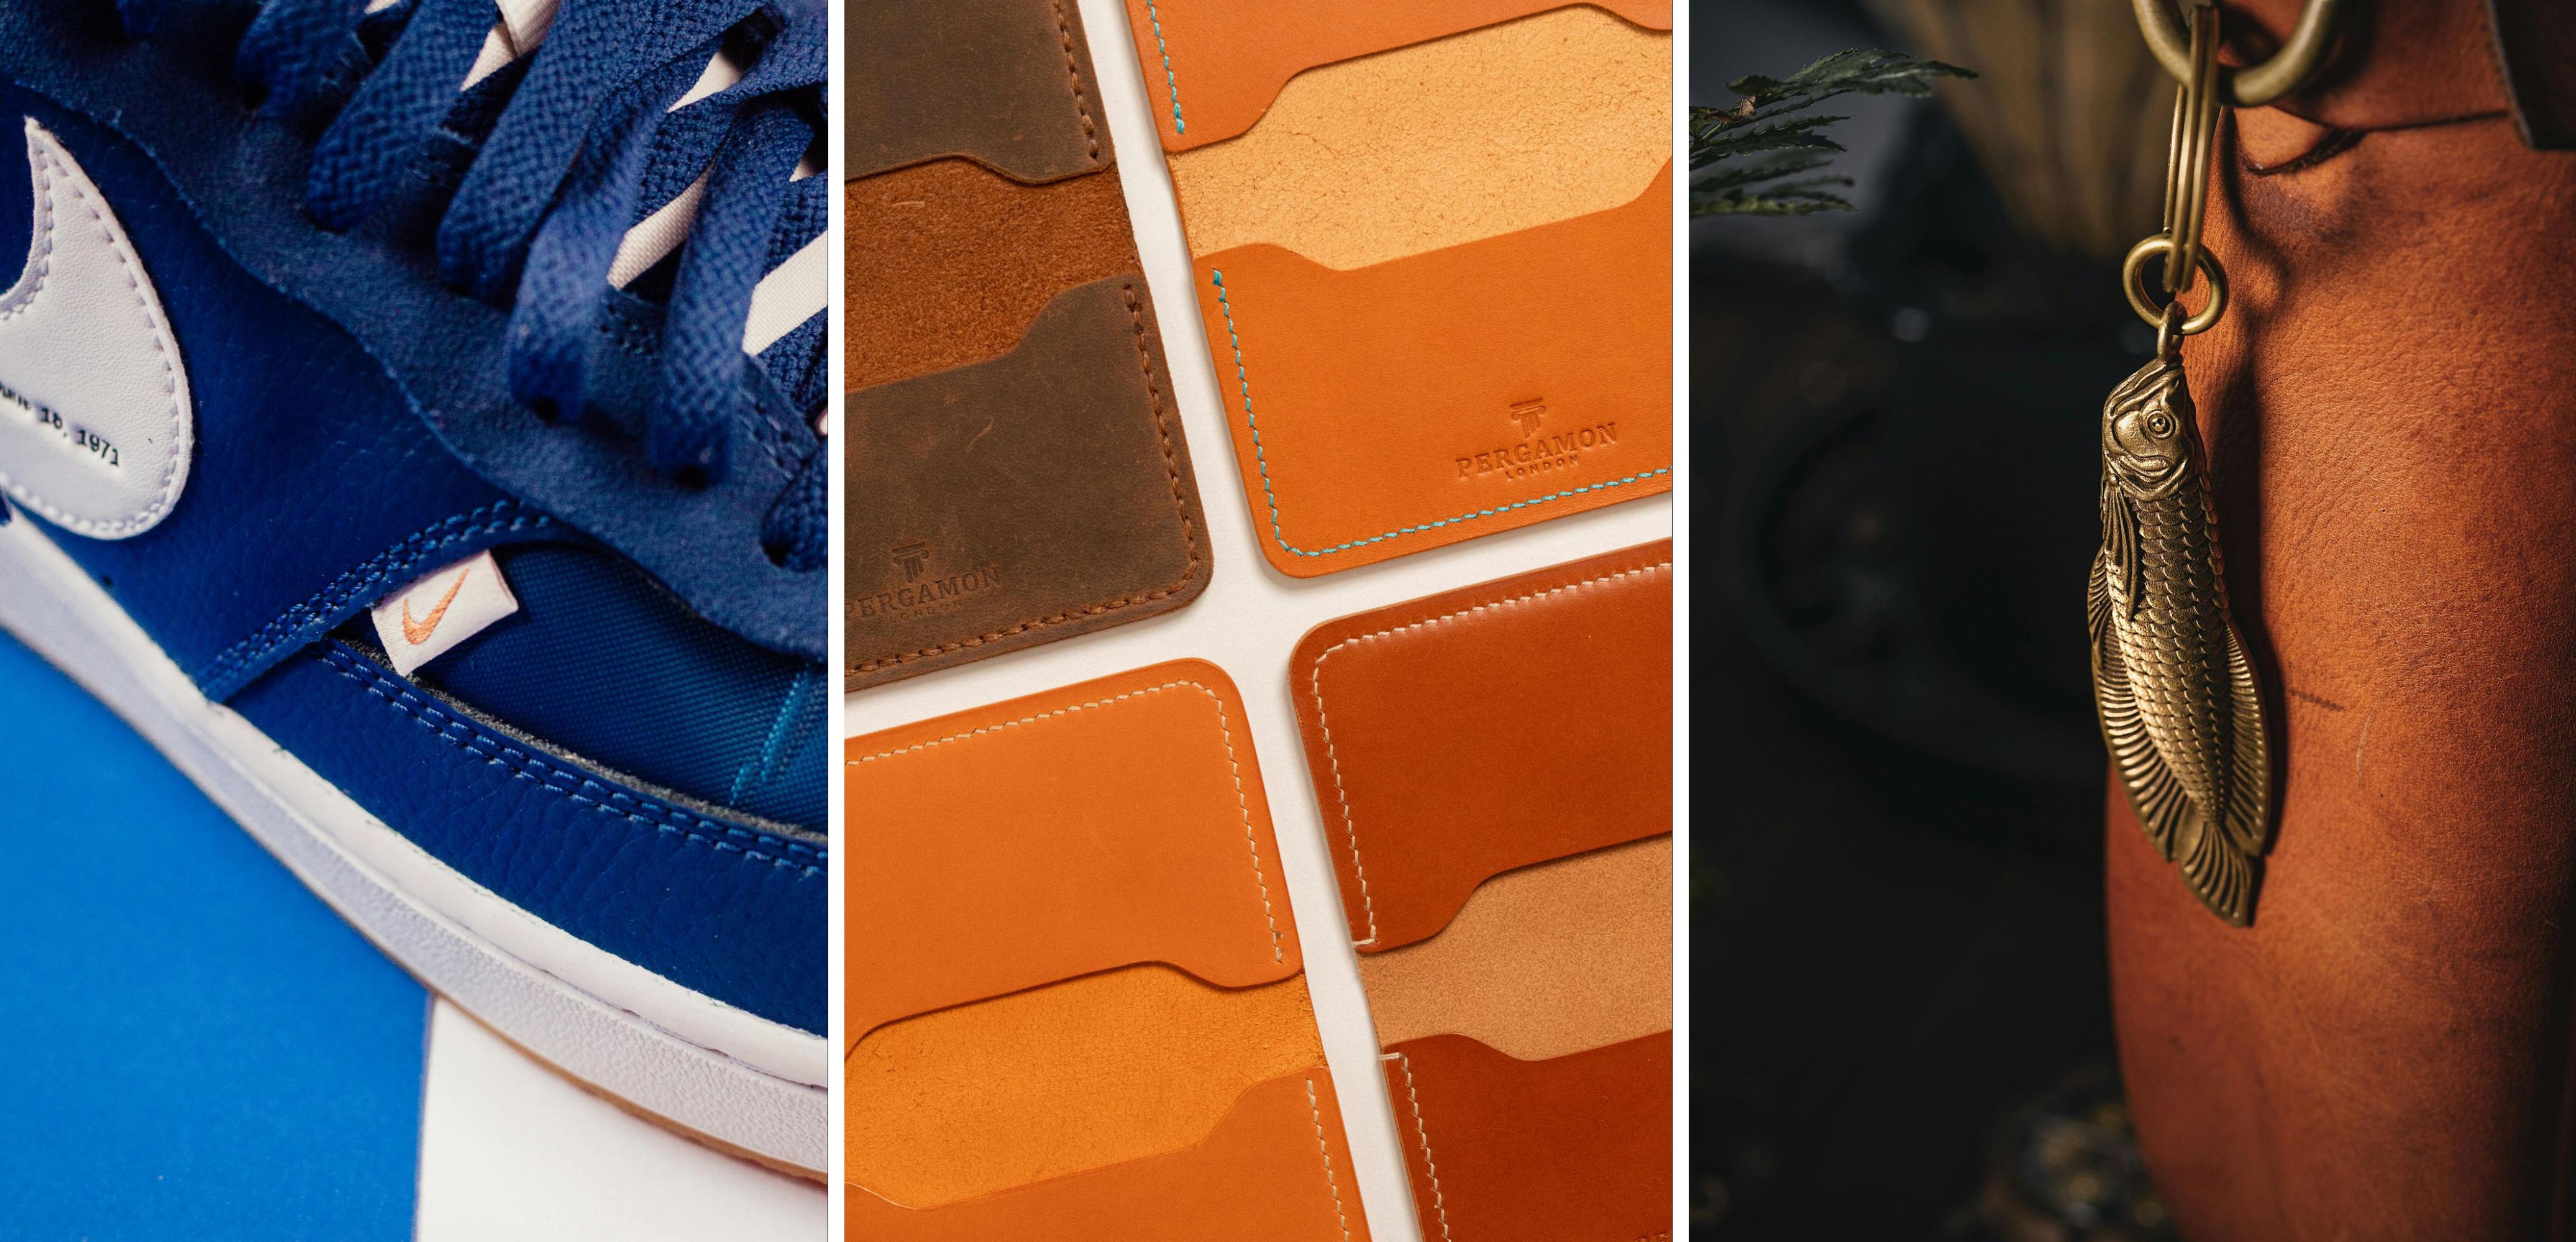
Detail
Detailed product shots are close-ups that highlight materials, textures, or small design elements. They’re crucial for luxury, beauty, apparel, or any product where touch and feel are important.
Group
Group product shots feature multiple items. Typically, these products are related in some way. You might bundle them together as a promotion, or feature the same item in different products.
Flat lay
Flat lay photos are taken from a bird’s eye view. The bird’s-eye view photos show products arranged on a flat surface. These are perfect for social media and allow for creative storytelling through layout.
Packaging
Packaging product photos are the images that go on the box, bag, label, or whatever packaging holds your merchandise. These photos are important because they appeal to in-person shoppers. It’s especially important to consider this if the packaging hides the product, which you commonly see with food and beauty items.
User-generated
User-generated content (UGC) includes product photos taken by anyone other than your brand or employees. These photos are typically shared on social media, so you can repost or feature the content on your own website as a form of social proof. UGC product photography isn’t ideal as your main photo, but it’s a great complement to your product pages.
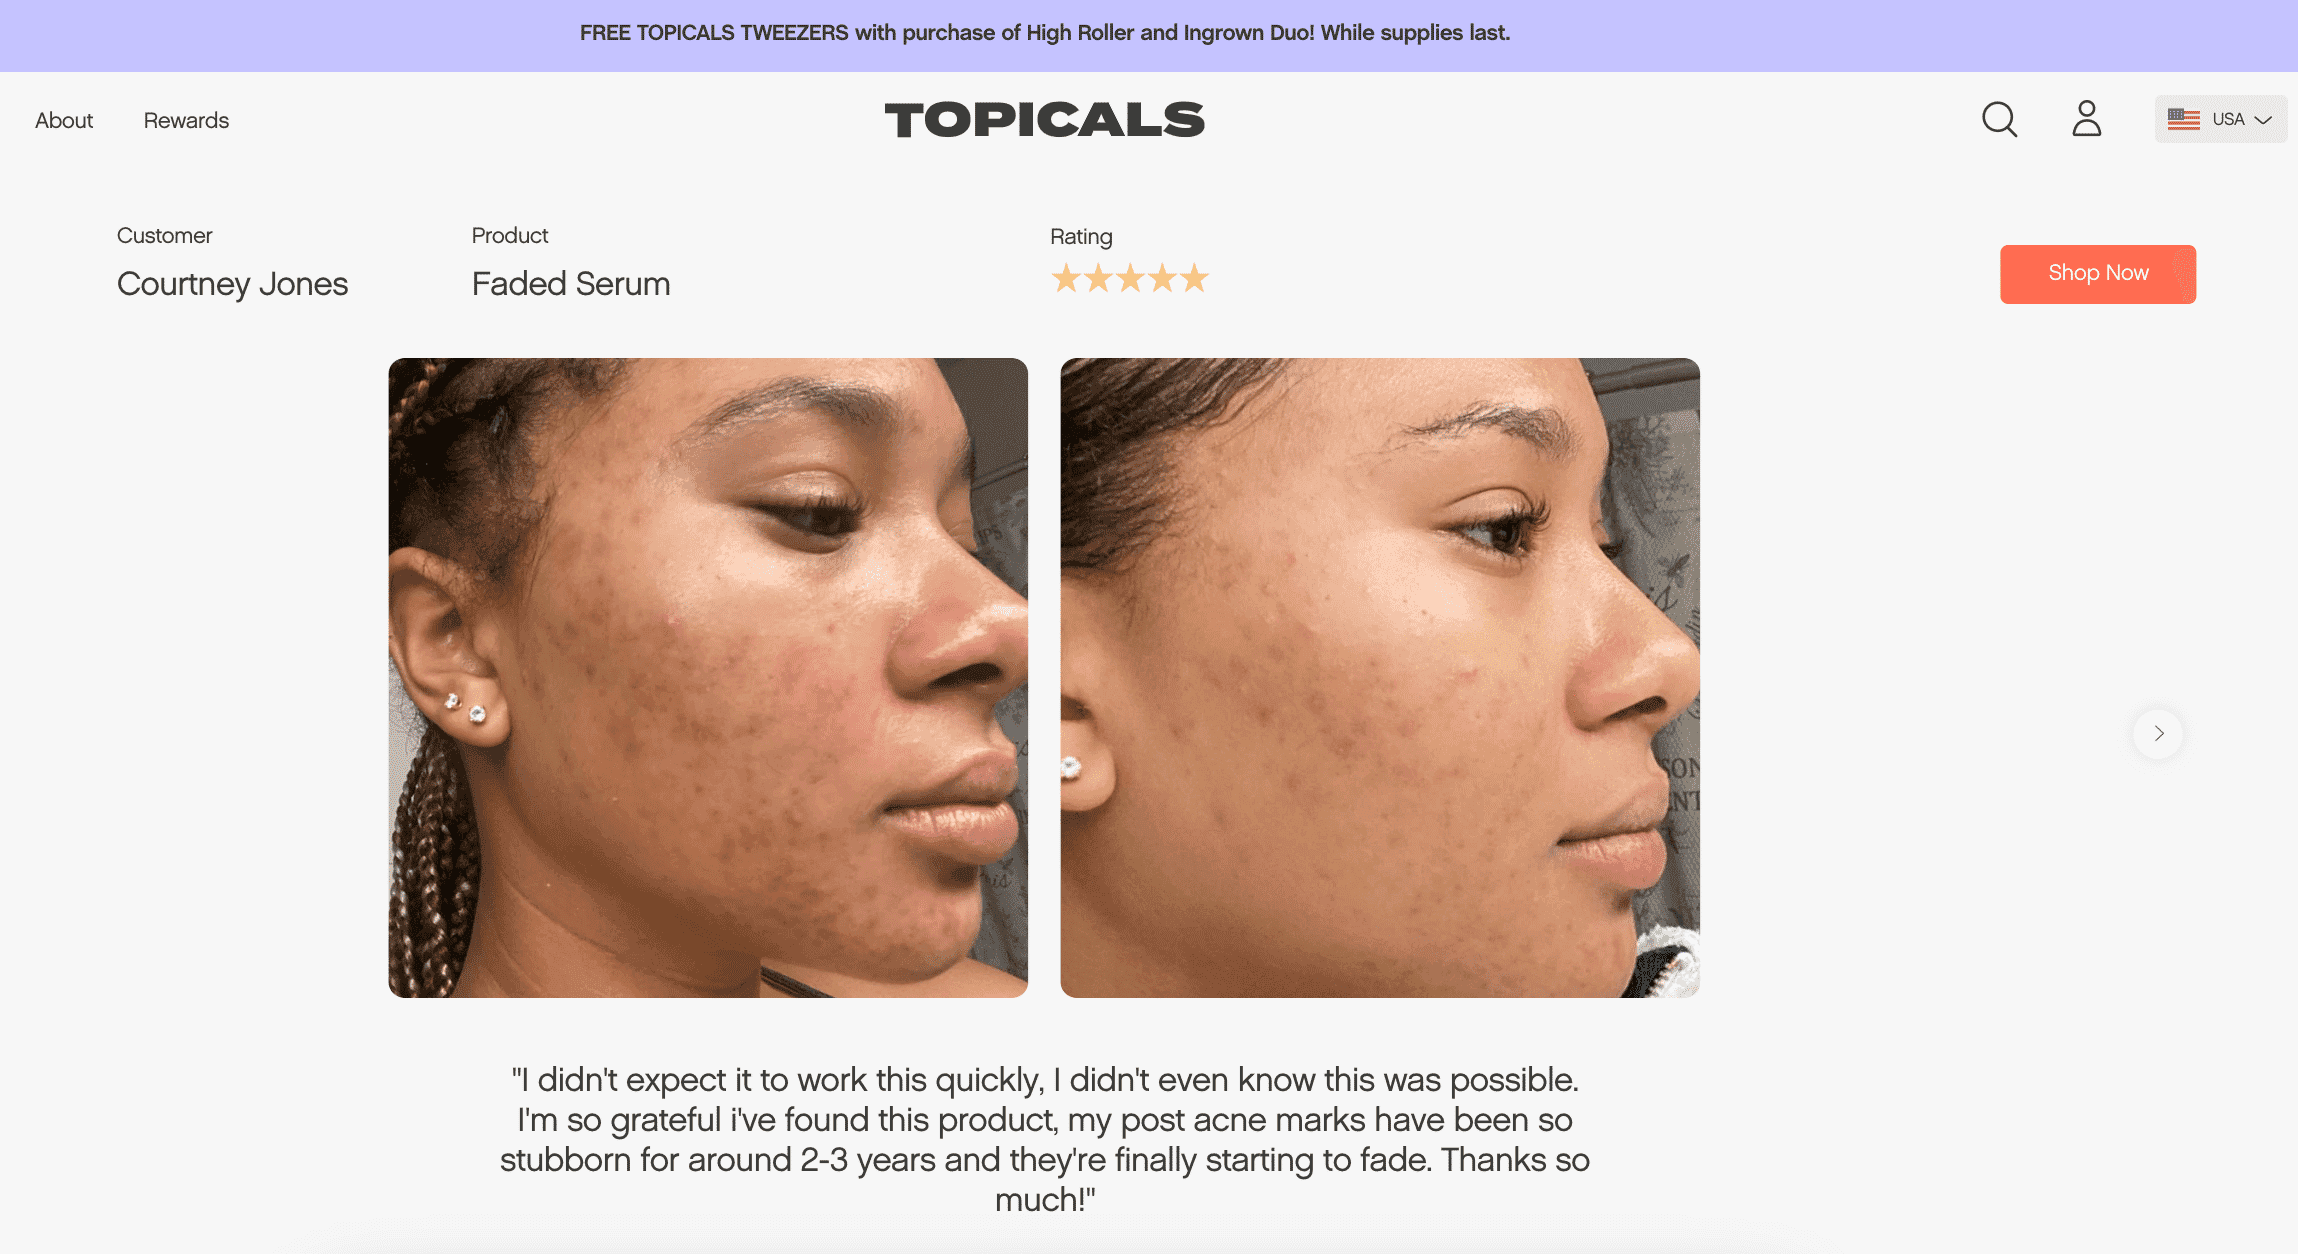
Skincare brand Topicals has a carousel of UGC photos at the bottom of its website. It shows authenticity and social proof of its products.
How do you take product photos?
While the art of product photography requires much more than a single article (there are courses listed below!), the high level process is as follows:
1. Plan the shoot
Define your shot list, goals, locations, and props. Know what you’re capturing and why.
2. Set up your space
Use natural light when possible or invest in lighting kits and reflectors. Use a white backdrop for standard product shots.
3. Stabilize your camera
Use a tripod for sharp, consistent angles—especially for ecommerce listings.
4. Shoot multiple angles
Show your product from the front, back, side, top, and bottom. Include close-ups and contextual shots where applicable.
5. Edit your photos
Adjust lighting, color balance, and crop. Remove backgrounds or retouch imperfections. If you’re not a pro editor, outsource this step.
What equipment do you need for product photography?
For product photography, all you really need is a smartphone camera. But for high-quality shots that convert shoppers, you’ll want a dSLR or mirrorless camera and 50 mm lens as the bare minimum.
Tips and best practices for better ecommerce photos
While your product photos should reflect your unique brand and appeal to your specific target audience, there are a few universal truths and best practices:
Get the gear
While smartphone photos may work for social posts or email, you want high-quality photos for main product pages. Invest in a high-quality camera and lens or hire a professional who has their own equipment to shoot your photos for you.
Choose your background wisely
Some ecommerce marketplaces require plain white backgrounds, and if you’re shooting for other channels you have more leeway. Whatever the background, it should reflect the aesthetic you’re after while keeping the focus on the product.
Think about the context
Consider the context for your products and for your shoppers. It’s important to show the product in use, using models and contextual backgrounds and props. But it’s also important to consider the context in which your shoppers are viewing the photos. If they’re on mobile (they likely are), offer zoomed-in shots and closeups of important product features.
Maximize your investment
Shoot with repurposing in mind. Professional product photos are a significant investment, and you want to make the most of it. Think about using your product photos on more than just ecommerce pages, but also in digital marketing and ad campaigns, on social media, in emails, and for labeling or packaging.
Leverage symmetry for a premium feel
Symmetry isn’t just pleasing to the eye—it can instantly elevate the perceived value of your product. For items with naturally balanced design elements (like cosmetics, shoes, tech, or jewelry), a symmetrical composition reinforces order, precision, and quality. Center the product, align key features, and shoot head-on for maximum effect. When used intentionally, symmetry creates a polished, editorial-style aesthetic that feels high-end and trustworthy.
Remember the details
It’s always important to edit your photos afterwards, no matter how great the original shot is. You may have to fix imperfections that have the potential to distract potential buyers and negatively impact conversions.
Outsource the tedious bits
Lots of photo edits, like background removal and color changes, are so detail-oriented and time-consuming. It can take an entire day just to edit a small batch of photos. If you find your time is bogged down with post-processing, consider outsourcing the edits. Be wary of any providers that use automation and AI, as they run the risk of imperfections the human eye won’t miss.
Enjoy it
At the end of the day, it’s important to have fun. Even though you have constraints on what you can do with the images, you can still get creative with it. Use outsourcing and other ways to take some of the stress out of your day to day so you can find your passion and get back to the work you love.
Enlist your dedicated virtual photo-editing team of designers who complete every edit by hand
Enlist your dedicated virtual photo-editing team of designers who complete every edit by hand
3 product photography examples
Looking for some inspiration from real-world brands with compelling product photos that can inspire your own visuals? Here are three examples:
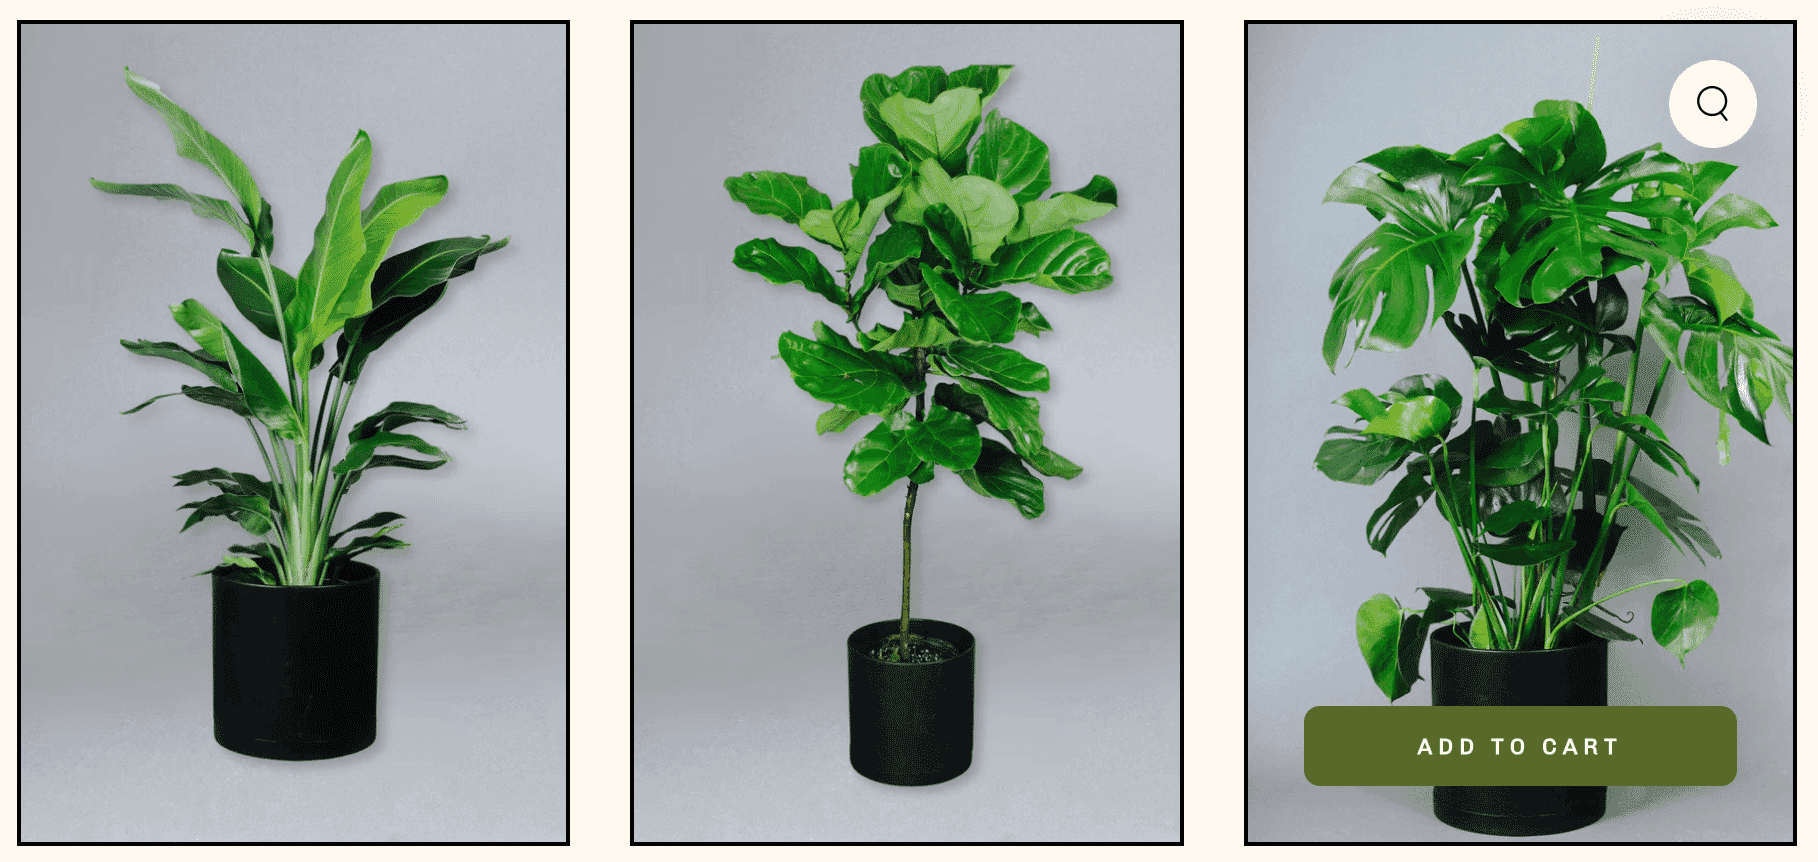
1. Grounded Plants
The Grounded Plants brand has such a distinct look and feel, and the product photos are a continuation of that. The backgrounds are plain so not distracting but interesting enough to fit with its overall aesthetic. Plus, variety breaks up the monotony of a single hue.
2. Otherland
Candle brand Otherland has a creative touch to its product photo backgrounds. It stages shots of its candles with fun props and backgrounds to evoke different moods for each candle.
3. SOKO
SOKO sells jewelry that was handcrafted with sustainable materials in Nairobi, Kenya, so the magic is in the details. And the details aren’t lost when it comes to its product photos. The perfect mix of white background, detailed, and lifestyle shots, SOKO’s photos are as beautiful as the designs themselves.
Product photography courses
There are tons of product photography courses out there—ranging from beginners to advanced, and many specializing in specific niches.
Here are some product photography courses worth checking out:
Product Photography for Ecommerce, Shopify Academy (free): Learn how to take product photos to sell online, including white background shots, home studio setup, and step-by-step process to outsourcing.
Product Photography at Home, Craftsy ($29.99): Professional photographer and small-business owner Jessica Marquez leads the course. You’ll learn how to create tabletop setups for product shoots, including lighting, backgrounds, working with models, and post-production.
Shoot Products Like a Pro, Phil Stills (£197): 13 short modules take you through everything from lighting and studio setup to white backgrounds and cut-outs. You can try the first two modules for free.
Mobile Product Photography Class, Weebly (free): This product photography course shows you how to capture shots with your smartphone. The course is from 2017, so while some of the tactics may be outdated, a lot of the principles still apply.
Still Life Photography, UCLA Extension (?): Learn lighting and camera techniques, food and product photography, and basic Photoshop edits. This course is only available at certain times, so check back for enrollment information and updates.
Rachel Kimberley, virtual: This professional photographer has various photography courses on her website, including courses for flat lays, makers, lifestyle, and product styling.
13 product photography statistics
Below are some recent product photography statistics, studies, and surveys to keep your finger on the pulse:
1. The ecommerce photography market is worth $1 billion
Globally, the ecommerce product photography market is estimated to be worth $1 billion in 2024. It’s predicted to grow to $2 billion by 2033, with an annual growth rate of about 8%.
2. People process images in just 13 milliseconds
One MIT University study found that the human brain can process images after viewing them for just 13 milliseconds. That means they can process a product image just as quickly. Your product photos play a huge role in the first impression, so it’s important they’re high-quality.
3. People can recall 2,000+ images with 90% accuracy
One 2013 study showed people 2,560 photographs for a period of just 1 second. After viewing all the images, they tested the participants’ memory recognition. The participants were able to recall more than 2,000 images with at least 90% accuracy, even after a period of three days.
4. On a scale of 1 to 10 for difficulty, marketers rate producing visual content a 7
In one survey from Venngage, marketers were given the option to rank the difficulty of consistently producing visual brand content, with 1 being the least difficult and 10 being the most difficult. On average, marketers ranked this task a 7.
5. Nearly half of marketers put 20–50% of their budget into visual content creation
In that same Venngage survey, marketers were asked about their marketing budgets. Nearly half (45.7%) said they put anywhere between 20% and 50% of their budget towards creating visual content. This is likely to increase—there was a 9.5% increase in marketers planning to put at least half of their budget towards visual content production by the end of 2024.
6. The photo printing market is worth more than $15 billion
Globally, the photo printing and merchandise market is worth more than $15 billion. It’s forecasted to grow at a CAGR of more than 5%. By 2027, it’s estimated to be worth more than $20 billion.
7. Photo prints and frames are the most popular types of photo products.
The following list shows the most-ordered printed photo products in 2023, from most to least:
9. 53% of businesses want to try AI image generators
AI product photography and editing is a trending topic. While the technology is far from perfect, more than half of businesses would like to experiment with using AI image generators, according to a survey from Semrush.
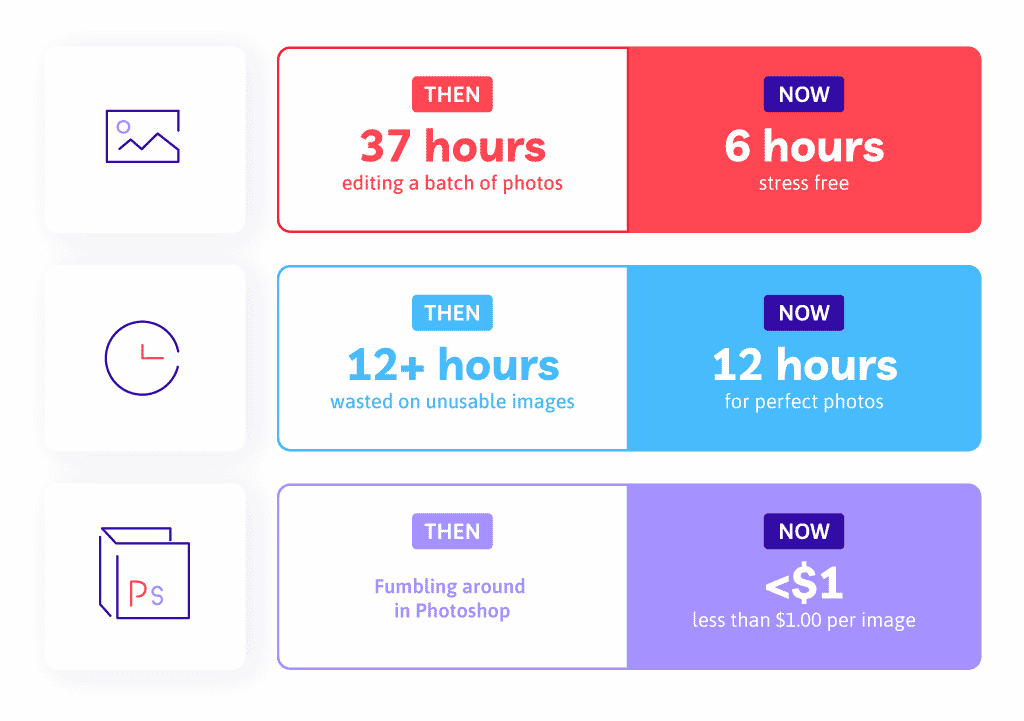
10. Ice Cream Castles shortened their photo-editing workflow from 7 days to 1 day
Children’s clothing brand Ice Cream Castles used to take an entire week to edit product photos before they were ready to use them. This took too much time they could’ve spent growing and improving the business—doing the things they love. They started outsourcing their edits and shortened photo edit turnaround time from 7 days to just 1 day.
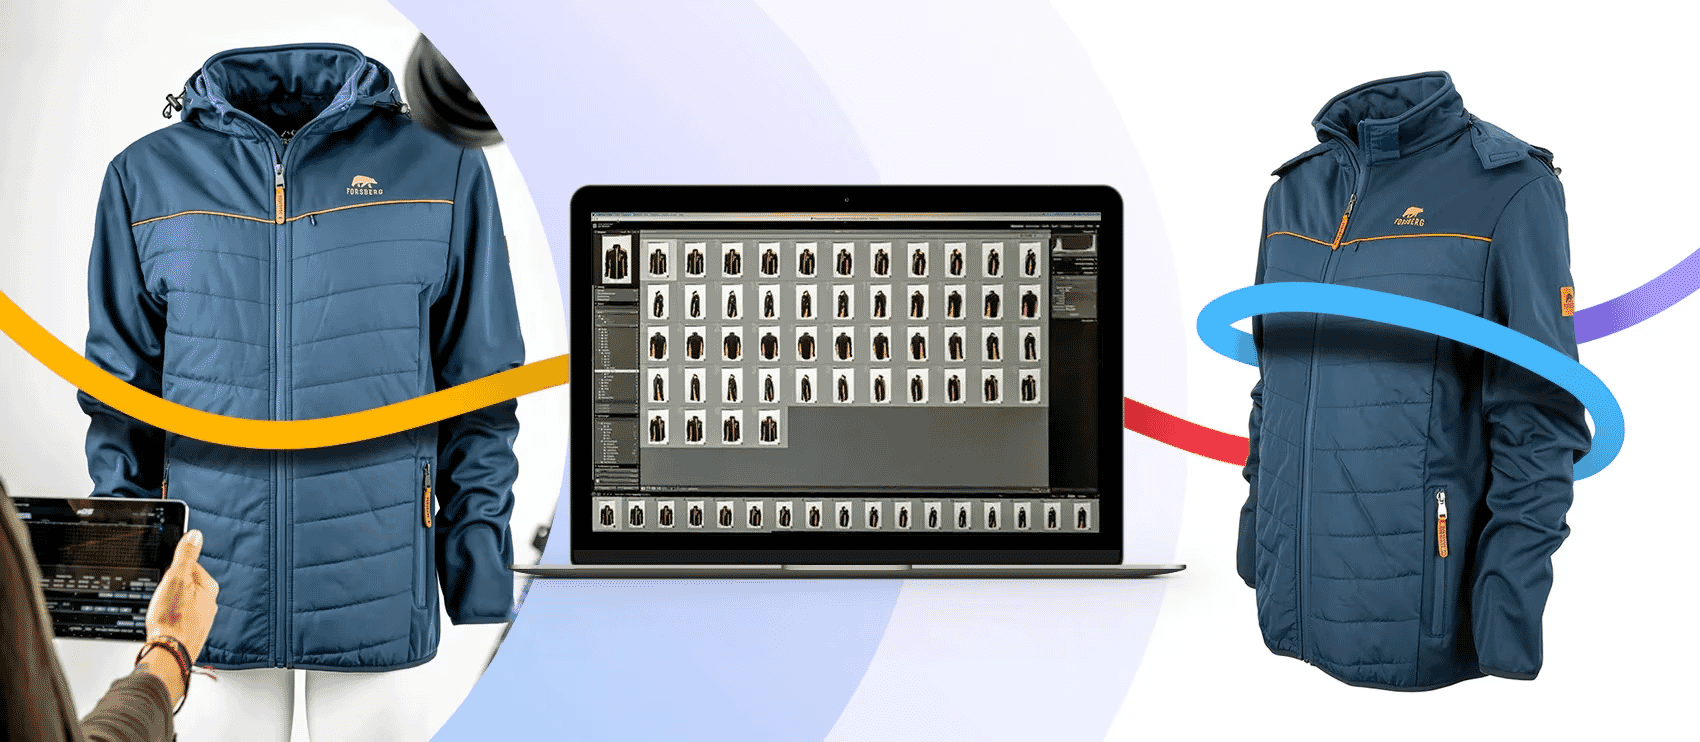
11. Formkraft took 5 days to shoot photos for their new website
Photography Prodoto shot product images for Formkraft’s new website that sells a range of merchandise and consumables. The shoot took five days and shot initial concepts for 18 Master Category images and four additional website banner images. It takes time to get high-quality shots!
12. Medalia paintings convert at 17% when they feature artist photos
A/B testing tool VWO’s customer Medalia sells Cuban and Haitian art online. They ran an experiment to see if featuring artist photos as well as product photos would boost conversions. It did. Products that featured artists converted 17.2% of the time compared to 8.8% without.
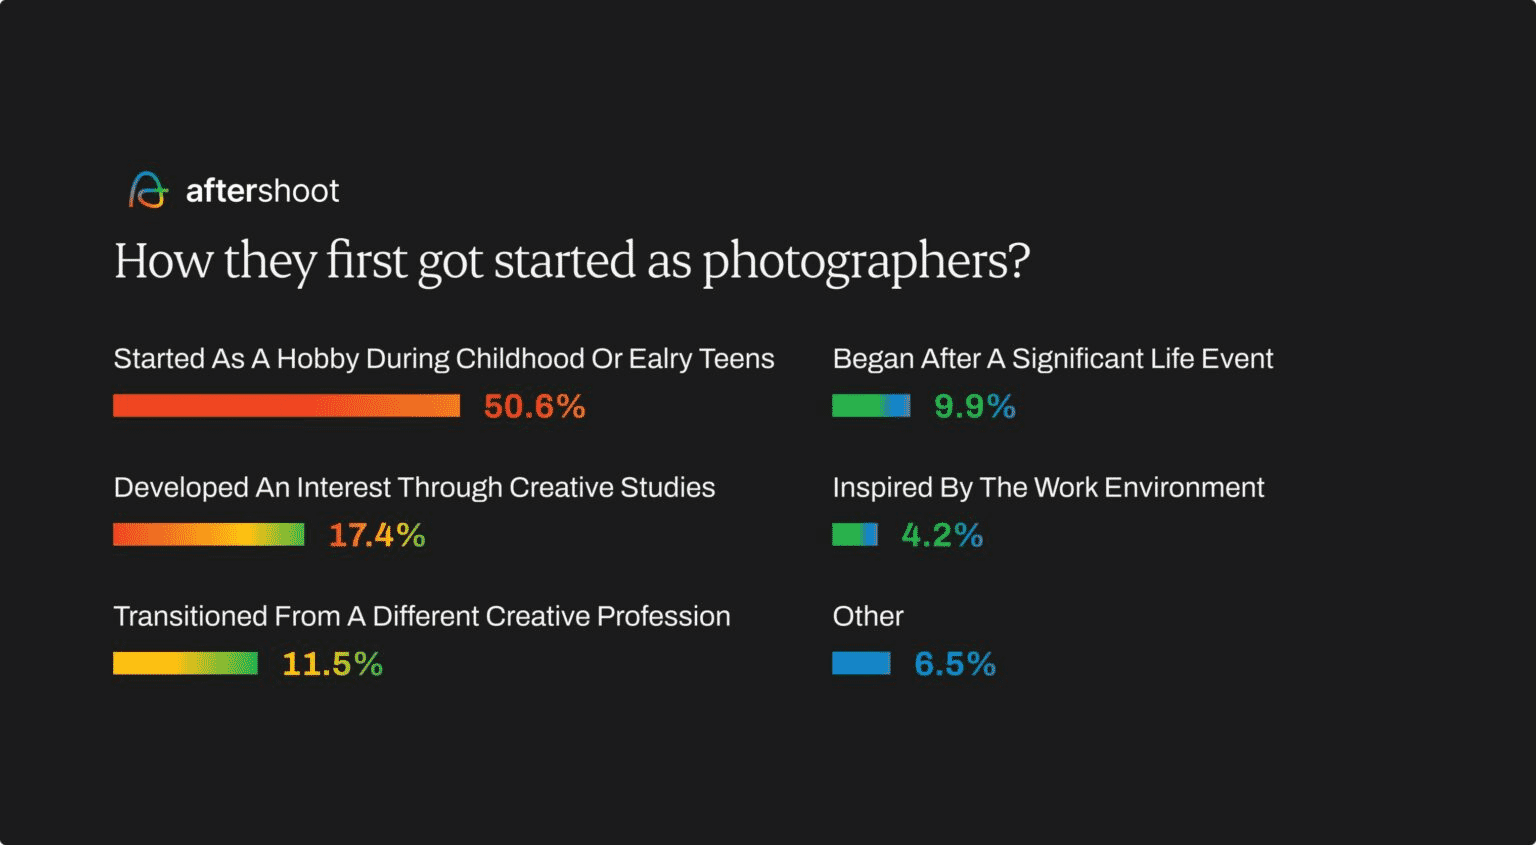
13. More than half of photographers start out as hobbyists
According to one survey, slightly more than 50% of photographers get their start with photography as a hobby.
Now it’s time to edit your product photography
You don’t have to do it all yourself. Outsourcing your edits can help you launch faster, stay consistent, and focus on the big picture.
Path gives you a team of expert retouchers who complete every photo edit by hand—no AI, no cut corners. Just pixel-perfect images that convert.
Wish you could just hand this over to a pro? Surprise, you can.
Product photography FAQs
What is needed for product photography?
Camera
Lenses
Lighting
Tripod
Background
Reflectors and diffusers
Editing software
Props
What is the meaning of product photography?
Product photography is a subcategory of commercial photography that focuses on capturing high-quality images of products for marketing and promotional purposes. The images are used in advertisements, websites, catalogs, and other marketing materials to showcase the product in the best possible light.
What is the idea of product photography?
The idea of product photography is to give potential buyers a full impression of a product. In ecommerce, it essentially replaces the in-person product experience a shopper would have in-store.
What is the role of product photography?
The role of product photography is to help shoppers better understand the products they intend to purchase. It should showcase the product, build trust, enhance the brand image, boost sales, and ultimately reduce returns.
What is object photography?
Object photography is when you take a photo of an inanimate item. As such, product photography is technically a form of object photography—unless the product is living, like a succulent. In object photography, items are typically non-moving, or still.
With the recent and rapid advancement of AI technology, the conversation around ethical photo editing has never been more relevant. As tools evolve and photo editing becomes more accessible, it’s crucial to approach image manipulation responsibly.
In this post, explore the ethics of photo editing, Path’s stance on the issue, and actionable tips to ensure your edits maintain a moral high ground.
Why ethical photo editing is important
Photo editing is more than just enhancing an image—it shapes how people perceive reality. When editing is done unethically, it can:
Distort reality: Over-editing or misrepresentation can lead to misleading images, especially in advertising and journalism.
Exploit labor: Many affordable editing services outsource work to underpaid workers in poor conditions.
Violate rights: Improper handling of copyrighted materials or the unauthorized use of people’s likenesses can breach laws and ethical standards.
At the end of the day, ethical photo editing means treating images—and the people behind them—with respect.
How to get ethical photo edits
Work with ethical service providers
When outsourcing photo editing, it’s important to partner with providers who treat their workers with respect and fairness. Look for companies that align with the following to ensure your edits contribute to positive change:
Fair labor practices: Work with companies that treat employees well, providing fair wages and humane working conditions.
Transparent practices: Partner with providers that openly share their methods and values.
Focus on quality over speed: Avoid services that rely heavily on automation or exploit cheap labor to deliver quick results.
At Path, we prioritize ethical practices, ensuring our team is supported and valued. We don’t just pay a liveable wage and comfortable working conditions—we proactively invest in our team and look for ways to invest in their learning and development as well as support their families and communities.
Maintain the integrity of the image
Editing should enhance the original photo without compromising its authenticity. Edit the image so it stays true to the subject, rather than misrepresenting it.
When it comes to photos of people, this is especially important as we become increasingly aware of image manipulation and authenticity. And in the case of product photos, authenticity can mean the difference between a returned product and a happy customer.
When editing your photos, keep the following ethical guidelines in mind:
Limit adjustments: Focus on subtle changes like cropping, adjusting brightness and contrast, fixing unnatural imperfections, or correcting color.
Avoid distortion: Refrain from altering key elements that misrepresent the subject. For example, don’t edit a product to appear different from how it looks in real life.
Stay honest: Particularly in portraits or headshots, edits should respect the individual’s natural appearance rather than imposing unrealistic beauty standards.
Abide by all copyright and trademark laws
Ethical editing includes respecting the legal and moral rights of others—so you’ll want to omit certain things from your photos. Using copyrighted material without permission is both unethical and illegal, and editing such material without consent further compounds the issue. Always make sure the images you use are either your own or licensed appropriately. You don’t want to unintentionally steal someone else’s work.
Remove identities
Privacy is another key consideration. If your photos include identifiable individuals, you may want to obtain their written consent before sharing or publishing the images. In some cases, this is even legally required.
In cases where consent isn’t possible, removing or obscuring their identities is the responsible choice. Even if it’s not legally required, prioritizing privacy demonstrates respect for the people captured in your work.
Be transparent
Transparency also matters. If an image has been heavily edited, disclosing the extent of the edits is crucial, especially in contexts like journalism or advertising where the audience relies on the authenticity of the visual content.
Avoid AI edits
AI tools have made the photo editing process a lot faster and easier in many ways. But they also raise serious ethical concerns.
AI lacks the nuance and context of a human editor, often making decisions that compromise the image’s integrity or misrepresent the subject. Plus, relying on AI can lead to the devaluation of skilled human labor and diminish opportunities for professionals in the industry.
When edits are done by hand, you know they’re executed with a certain level of care, artistry, and accountability that AI can’t replicate. While AI may be tempting for its convenience, ethical editing often requires the thoughtful touch of a skilled human editor to achieve the best results.
Work with a virtual photo editing studio you can trust
Our team of 300+ editors have edited more than 8 million images for 40,000+ businesses like yours. We do every edit by hand—no AI automation here. And with prices starting at just 25¢ per edit, it’s tough to beat.
Not to mention, working with Path can make you feel good about the work you do. We donate 5% of our profits to our non-profit organization, the Anisa Foundation. The Anisa Foundation helps people in our local community access life-changing—and sometimes life-saving—care and support.
Find out how you can help us make a difference in the lives of the people in Gaibandha, Bangladesh.
Ethical photo editing FAQs
Is Photoshop ethical or unethical?
Photoshop is a tool—its ethics depend on how you use it. Avoid deceptive edits that mislead viewers or misrepresent subjects.
What is the code of ethics for photo editing?
A general code includes respecting subjects, maintaining authenticity, and adhering to copyright laws.
What is ethical editing?
Ethical editing involves making truthful, respectful adjustments without misrepresenting the subject or violating laws.
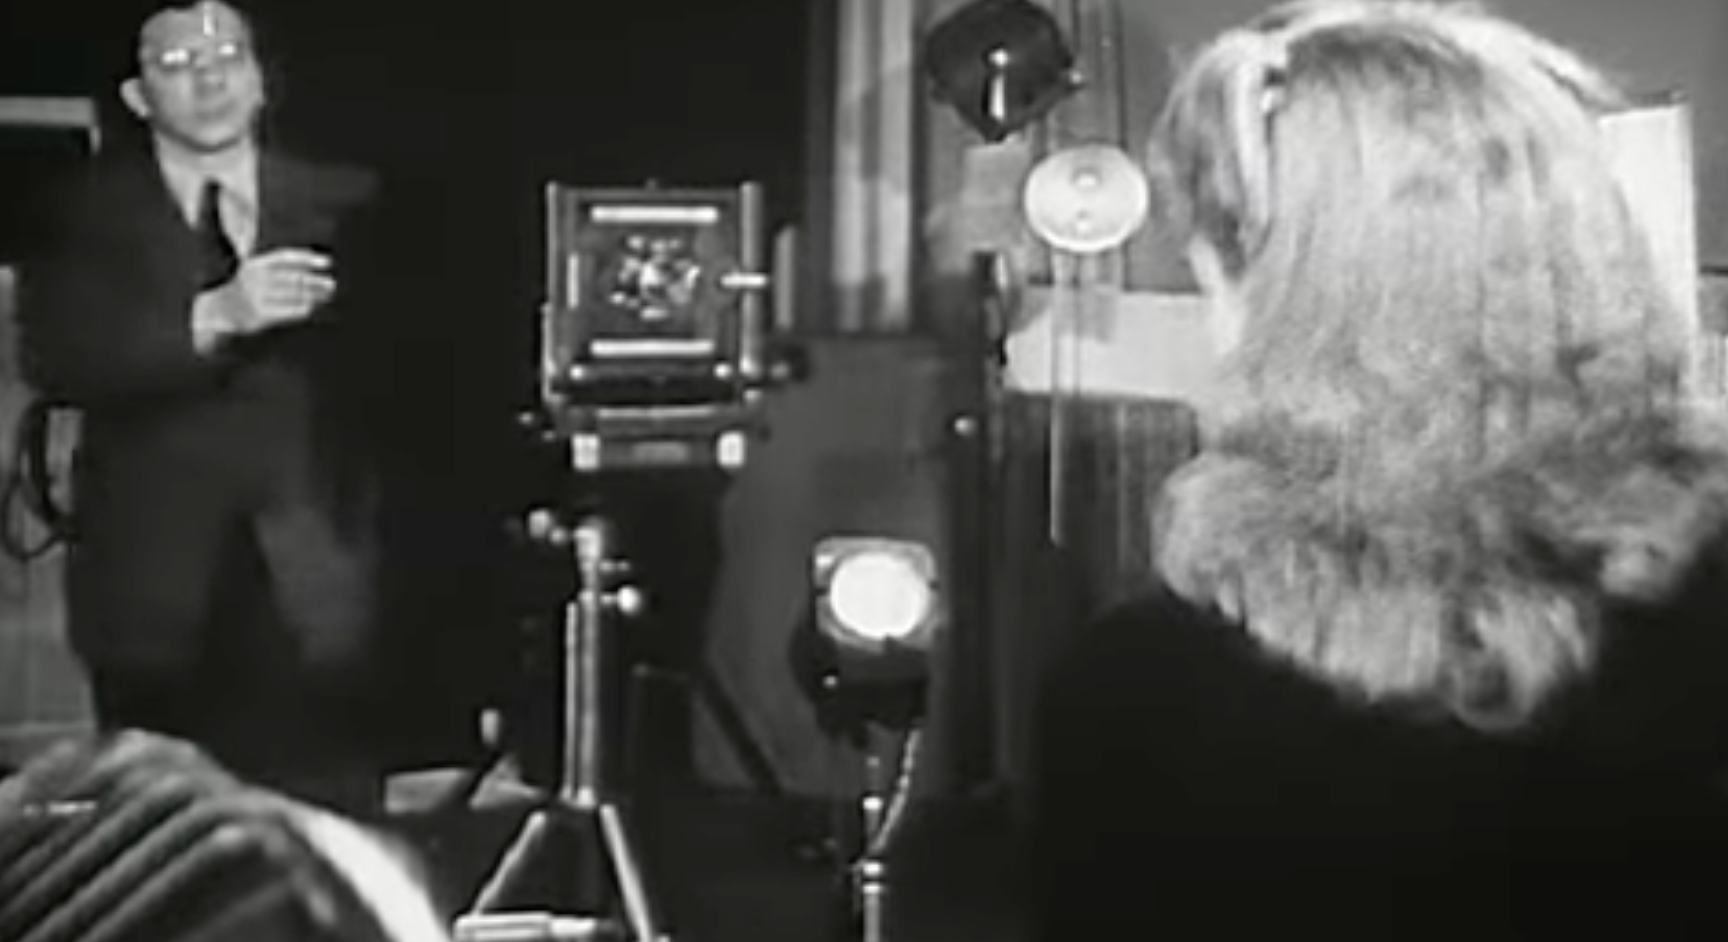
While we spend most of our time here at PopPhoto nerding out about the latest and greatest photography gear, we’re also suckers for truly old-school photo content. This fascinating video outlines what it was like to be a professional photographer in 1946.
Obviously, the industry, technology, and, well, pretty much everything has changed quite a bit back then. But some things do sound familiar. For instance, it’s weird to hear that there was an abundance of people in the profession even back then. The tools were obviously much less accessible than they are now, but even back then, people wanted to get in on the pro photography game.
Videos like this are truly a time capsule, and I have to wonder what it will feel like for people in 2100 to look back on the state of the industry in 2023. Our precious megapixels will likely feel so quaint.
Black and white photography is simply a picture taken that has no colors in it. Black and white only shows light intensity, it does not show the light’s frequency which is what gives light different colors to our eyes.
This type of photography is unique because it is not what is typically shared on Instagram and places like that. If you just bought a new pair of shoes or a new shirt, and you want to share pictures of yourself wearing your new stuff, black and white is a terrible choice because nobody will be able to see the awesome colors you’re wearing.
Even though black and white photos can look totally boring and are probably a bad choice for a lot of things, there are some techniques that are unique to black and white which aren’t as easily accomplished in color photography. One of those things is changing the impression of the scene by changing the intensity of specific colors in the scene. If you do this with a color photo you’ll probably end up with a really horrible image because the color adjustments will not look anything like reality and most people will find it pretty bad.
But, with black and white there is no color, so changes to colors equate to changes in light intensity only. One method for doing this is to use a B&W color filter called a red filter. Red filter’s are specially designed to block out blue. This causes all the blue in a scene to get a lot darker and can be useful for increasing the drama and immediacy of the scene.
In the digital age we don’t have to use an actual Red filter, we can adjust whatever we want digitally. Ain’t that fun? Below is a comparison showing how an image without and with a red filter might look in your photo. No other edits have been added except the red filter.
Another cool thing that black and white can do is show some kinds of visual patterns more obviously than color. I have to be careful when saying that because some patterns are not as easy to see with black and white. It’s mostly patterns of light and shadows that are most apparent with black and white photography.
Black and white photography can be a fun distraction, or it can be a professional pursuit. It’s really up to you.
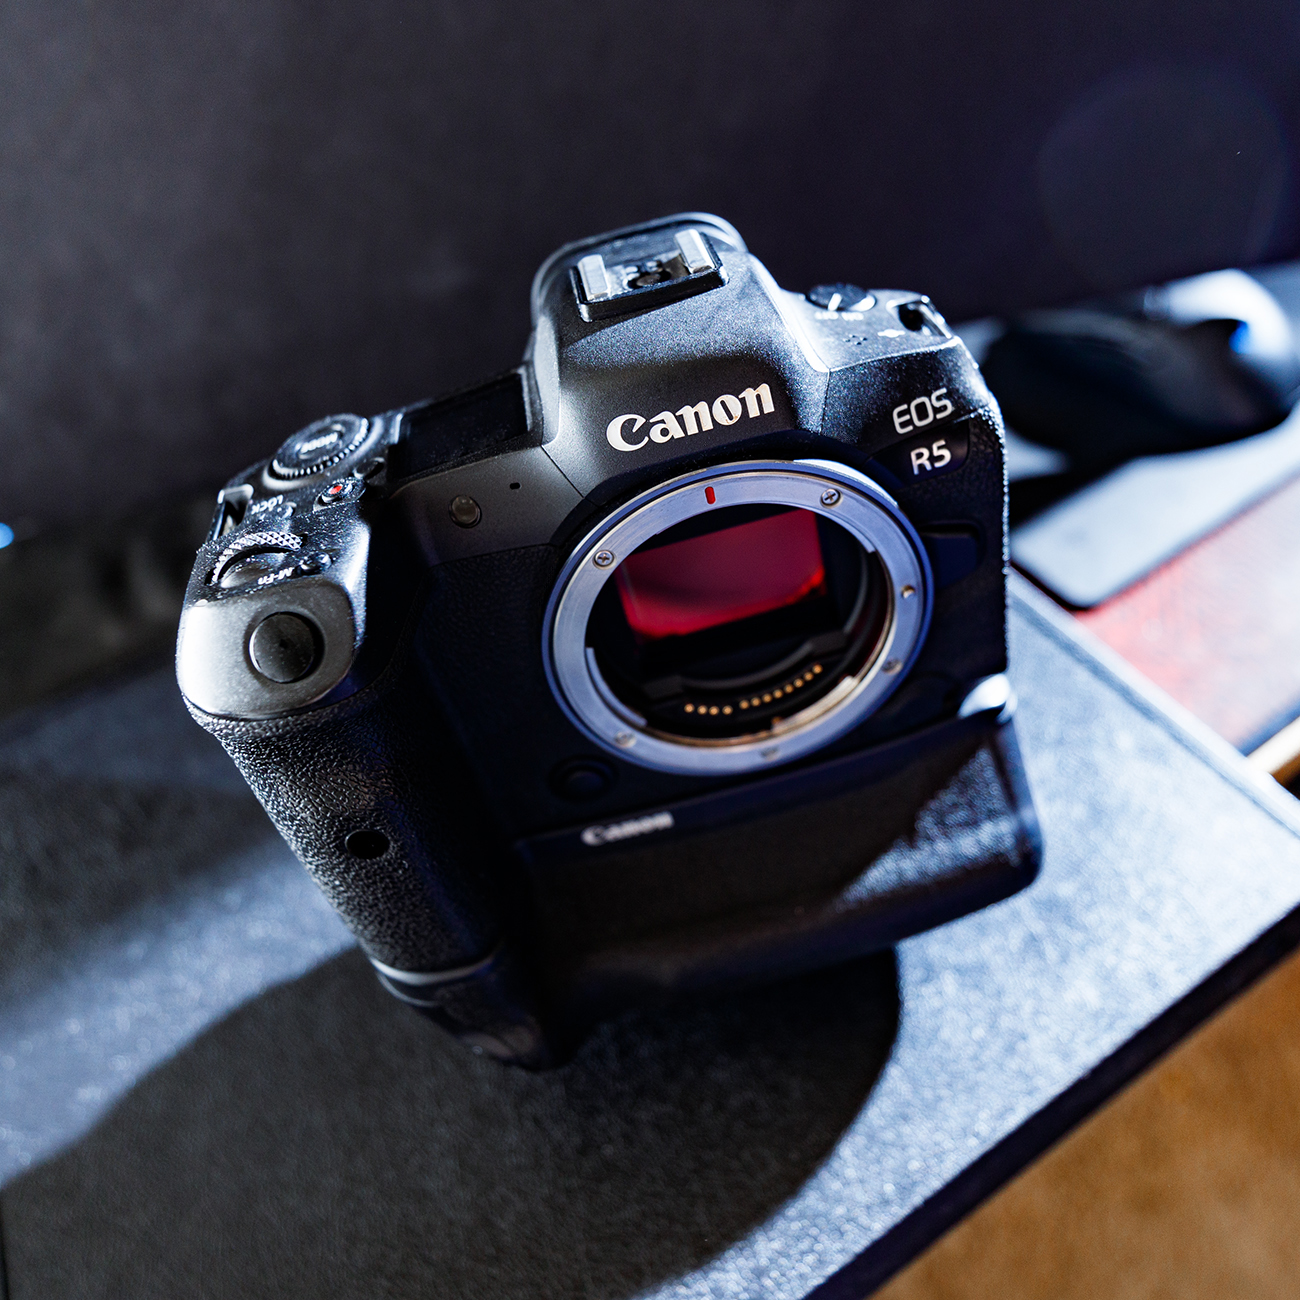
Every camera in the world has a shutter button. The shutter button is the only button that you can press that takes a picture. If you are pressing a button on your camera and the camera is not taking a picture, that button you are pressing is not the shutter button.
If you press a button and the camera does take a picture, then that is the shutter button.
Only still cameras have shutter buttons. Video cameras have “record buttons” not “shutter buttons”.
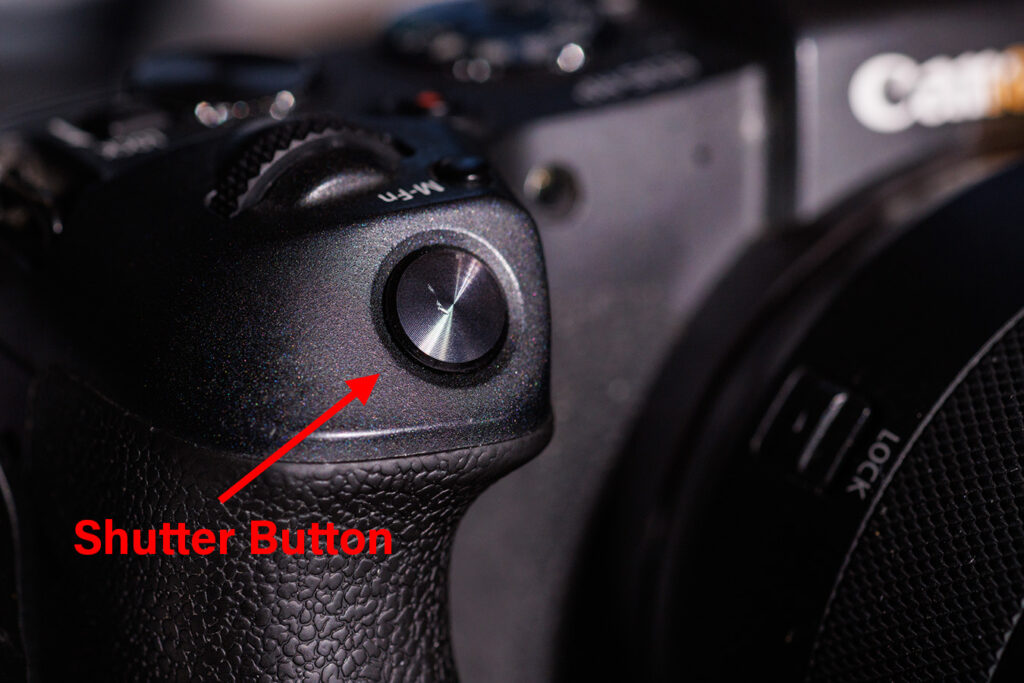
Below is an image of a shutter button on an EOS RP:
The button is located in a place where it is easy to press with your index finger when holding the camera by the grip in your right hand.
Most cameras are setup for right-handed use, this means that holding the camera in your right hand is necessary in order to press the shutter button.
On many cameras the shutter button causes the shutter to open and close which is what allows light to enter the camera and hit the sensor or film.
Many digital cameras also have electronic shutters. And electronic shutter is what is used in a phone.
However, most professional quality cameras use mechanical shutters because a mechanical shutter actually helps the sensor perform better.
Below is a video of a mechanical shutter opening and closing on the EOS RP.
This type of shutter action is called “1st curtain electronic” shutter. That means that the first “curtain” of the shutter is electronically actuated, but the second curtain of the shutter is mechanical. This is still a little bit better than a full electronic shutter for image quality.
Now you know that the shutter button controls the shutter, and the shutter is the thing that opens to let light into the camera which the sensor than captures to produce a picture.
Film cameras work much the same way although they can have different kinds of shutters.
There are some very old-style film cameras that don’t have shutters at all. With those cameras the lens cap is the shutter, and the exposure time is usually very long, typically in the 30 second range.
Despite that, it’s safe to say that pretty much any camera you are likely to use will have a mechanical shutter button on it and pressing that button is how you take a picture.