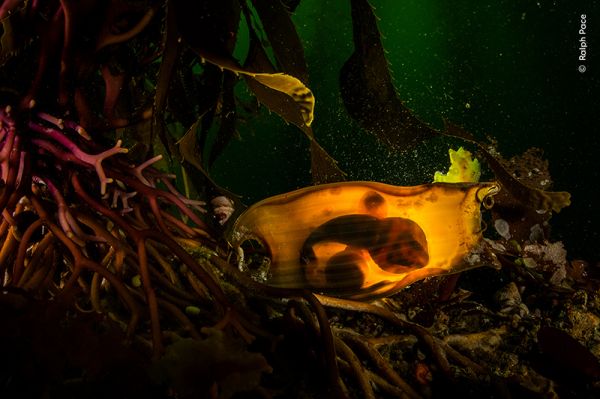
برچسب: the

  • DJI Releases Its First 360 Degree Camera – The Osmo 360

    DJI Releases Its First 360 Degree Camera – The Osmo 360


    We know of a few 360 degree cameras in the market with Insta360 being the best overall and then the GoPro Max and Ricoh Theta X also in line. DJI which did not have a 360 camera so far, has filled the gap with its recent release of the Osmo 360 that is capable of capturing 8K videos at 50fps.

    Image via DJI

    The Osmo 360 camera comes with a square 1 inch HDR image sensor, that provides great image quality while consuming low power and also helping with the ultra compact and lightweight design. This is the first of DJI’s cameras that offers 360 videos at up to 8K, 50fps and comes with a good dynamic range to help capture high contrast scenes, for example during sunrise and sunsets.

    One of the most interesting features is that the user can switch between front and rear cameras without the need to stop recording. The camera is very compact and weighs only 183g and comes with 105GB storage.

    The camera can record in extreme temperatures as low as -20 degree Celsius and can also be used underwater up till a depth of 10 meters without a protective case.

    Here are some of the most important features of the Osmo 360:

    • Square sensor design with dual 1 inch 360° image fields
    • Large f/1.9 aperture for maximum light intake in even low light situations
    •  SuperNight mode to capture all details in night scenes
    • 105GB of built-in storage
    • High-frame-rate with 4K 100fps 360° video
    • Up to 4x slow motion
    • Ultra-clear 360° photos up to 120 megapixels
    • Video format supports 10-bit color depth
    • D-Log M mode to capture all details and for flexibility when postprocessing
    • Continuous 8K/30fps recording for up to 100 minutes and 190 minutes of continuous recording when capturing 6K 360° video
    • Pair the camera with invisible selfie stick to make it vanish from the 360° videos without the need for editing, also third person views will make it look like the footage was captured by a cameraman
    • Switch between front and rear camera without the need to stop recording
    • Magnetic quick release design to pair with accessories

    If you are interested, here is a first impression and a hands-on comparison of the Osmo 360 with a leading 360 degree camera.

    https://www.youtube.com/watch?v=vEDncuegfmQ

    The camera is out of stock on DJI’s website, but is available to pre-order from resellers. It is priced at $549.99. More details about this product can be found here. We have more news for you to read if you are interested at this link here.


    Source link

  • The Life of a Tuts+ Editor: Meet Sharon Milne

    The Life of a Tuts+ Editor: Meet Sharon Milne


    Ever wondered what it’s like to work remotely as a Tuts+ Editor? The latest Envato Stories is all about the life of Sharon Milne, Design & Illustration Editor for Tuts+. She lives in Newcastle upon Tyne in the United Kingdom and has been obsessed with vector for over 14 years. Sharon works from her home most of the time, but recently visited the Envato headquarters in Melbourne, Australia. 

    https://www.youtube.com/watch?v=HCWNXkfyxBA


    As the Tuts+ Design & Illustration Editor, Sharon works with a team of instructors from all around the world, and still has time to make art (including this portrait of fellow Envato-er Jordan McNamara) and pass on her considerable vector skills with stunning illustration courses. She also changes her hair colour more than anyone else at Envato!

    More Envato Stories

    Meet Jordy Vandeput who teaches video production, Tuts+ Editorial Manager David Appleyard, or see all previous Envato Stories episodes. There are more to come, so stay tuned!


    Source link

  • Underwater Whale Photography with the Sigma 14mm F1.4 DG DN Art Lens

    Underwater Whale Photography with the Sigma 14mm F1.4 DG DN Art Lens


    I recently returned from two months of guiding, photographing, and filming ocean safaris in the South Pacific and Caribbean. I work for Just the Wild, a company that specializes in ethical in-water whale and other marine megafauna encounters. Akin to that, I also work as a professional nature and adventure photographer and filmmaker with a specialty in underwater imagery. Before departing, I felt like my underwater images had stagnated in look and aesthetic. Before leaving, I wanted to get my hands on a lens that few underwater shooters have yet to discover. I quickly honed in on the Sigma 14mm F1.4 DG DN | Art.

    This lens stood out to me because of its design for astrophotography. The night sky and underwater imagery world overlap a lot. When shooting underwater, you need to be using a lens that’s extremely wide, has fast and accurate autofocus, and, most important to me, satisfies my greed for sharpness.


    My underwater setup:

    My current go-to underwater setup is the Sony Alpha 1 with a Sigma 14mm F1.4 DG DN | Art contained within a Nauticam housing with a 230mm dome port. While my setup changes depending on what I’m shooting, I rarely make changes when it comes to shooting large animals such as whales.

    For anyone looking to get into the underwater world, there are now numerous great housing options. You can’t go wrong with Nauticam, Marelux, Isotta, Aquatica, and for entry-level, I’ve seen great results with Sea Frogs housings. Whatever you go with, make sure you get a housing with a vacuum pump. This will ensure you never flood your housing. I’ve lost a few cameras before I spent the extra money on that safety feature. I’d also recommend consulting distributors like Reef Photo & Video (an authorized Sigma dealer as well) on getting the proper dome and extension ring setup for your lens (I’ll come back to this on maximizing the sharpness for lenses like the 14mm F1.4).


    General tips and settings:

    Like I said earlier when it comes to underwater, you have to adapt your setup and settings to fit your target subject. That being said, these are the settings for 98% of my whale and other large animal species. The golden ticket to never missing a shot: 1/800 shutter or faster, F8 or above depending on light, and auto ISO.

    Now I know you’re scratching your head with the auto ISO. Isn’t it better to manually adjust? New mirrorless cameras give you the ability to set a range for your auto ISO. I limit my camera from being able to shoot above 6400. New mirrorless cameras can easily handle that ISO with very little noise. This allows me to worry more about my composition rather than my settings, which is essential in a dynamic situation like snorkeling with a whale.


    Standout features of the Sigma 14mm 1.4:

    BUILD QUALITY:

    Upon getting the lens, the first thing that stood out to me was the craftsmanship of the build. This lens boasts meticulous and detailed care the engineers put into it. You can’t help but marvel at the beautiful front element and the design of the aperture ring. The other must for me is the weather resistance. This lens is designed to be left outside all night photographing stars, making it tough. Every now and then, I have to open my housing on a boat, a not-so-dry environment, I might add. This lens gives me the peace of mind that my day won’t end in catastrophe if I get water on it.

    FOCAL LENGTH:

    As I mentioned before, the front element of this lens is a work of art. Boasting a 114-degree field of view, this lens is very wide. When shooting underwater, you want as little space between you and your subject as possible. The water and the particulates in it distort your color and detail, so have to be right up in the action. When you’re close to a 35-foot-plus giant, this lens assures that the entire animal will be in view.

    F1.4 APERTURE:

    For most other underwater shooters, having the ability to shoot at F1.4 isn’t a big sell. When shooting underwater with a dome port, you typically want an aperture of F8 or smaller, otherwise, your edges will become soft. However, I find it extremely useful when filming. When it comes to video, I don’t focus as much on the absolute sharpness I desire with my photos. Especially if I’m shooting a subject I can’t use lighting on, the F1.4 aperture allows me to film later in the day and in darker water. There’s now also the advent of new dome ports by Nauticam called WACP ports. These ports now allow you to shoot much sharper and wider apertures. These ports allow you to use your lenses at a wider aperture without sacrificing corner sharpness. While a port like this doesn’t yet exist for the 14mm, Nauticam has been consistently innovating, and I wouldn’t be surprised if they come out with one soon.

    EXAMPLE OF VIDEO SHOT AT F1.4

    SHARPNESS:

    Have I mentioned I’m a sharpness snob? One of the reasons I wanted to switch from a 16-35mm to a wide prime like the Sigma 14mm F1.4 DG DN | Art is the sharpness. Aside from this lens being insanely sharp on its own accord, the fact that it’s a fixed length makes it that much sharper underwater.

    When building your underwater rig, the distance between the front element and the dome port is a huge factor in how sharp your images will be. If you’re changing that distance by zooming in and out, you’ll affect how sharp your images are. By having the 14mm sitting at the perfect distance from the dome port at all time, it maximizes the sharpness of the lens. So much that I can massively crop in on my images and see things like sea lice and other parasites hitching a ride on our giant friends. It’s also extremely valuable for me to crop in on other details of these animals, such as their eye, or pectoral fin, to derive unique compositions. This is only possible with glass this sharp.

    EDGE-TO-EDGE QUALITY:

    Another huge draw to this lens for underwater shooters is the edge-to-edge quality. As underwater shooters, we’re constantly battling soft and distorted edges in our images. My first day with the lens, I had a humpback calf inches from the front of my lens. After reviewing the images, I quickly noticed the edges preserved almost all their detail, so much so that I could see the hair follicles on the whale. While still a little soft, something that’s inevitable underwater, the effect is leagues better than shooting on a fisheye or a zoom lens.

    AUTOFOCUS:

    There’s not much to say here besides that the autofocus is flawless. Once I have a whale in frame, I hold down the trigger and let the continuous autofocus go to work. Of the 20,000+ images I took over the two months, I don’t think I had a single miss. While I encounter a lot of animal guiding, every moment is unique and fleeting. Having the ability to capture every unrepeated moment might mean the difference between a good image and an exceptional one.


    Conclusions and final thoughts:

    My favorite aspect of the images the 14mm F1.4 DG DN | Art produces is the dimensionality of the photo’s aesthetics. After my first day with this lens, I sent a video I filmed with it to a colleague of mine, and his response was, “That whale looks like it’s about to pop out of the screen.” This was the look I’ve been craving in my images, which wasn’t possible with a 16-35mm. I’d recommend this lens to any underwater shooter who’s looking to obtain peak sharpness, flawless autofocus, and wants to add a unique aesthetic to your imagery.

    It’s safe to say that this lens will be my go-to workhorse on my future underwater adventures.


    Source link

  • How to Choose the Right Photo Editing Services

    How to Choose the Right Photo Editing Services


    When you need photo edits and see a long list of editing services and techniques, it’s easy to feel a bit overwhelmed. With so many options plus multiple ways to combine them, where do you even start?

    It makes perfect sense to go with what feels familiar, like basic retouching or background removal. But we’ve learned from working with thousands of photographers and business owners that your photos often benefit from multiple services working together. Combining services gets you better results with less hassle, since you can handle everything in one order instead of juggling separate projects. Let’s show you how to pick the right edits for your photos.

    How to identify what your photos actually need

    Before you start combining services, let’s figure out what you’re actually working with—it’ll save you time and help you get better results.

    Photo diagnosis checklist

    Take a look at your images and ask yourself if you spot any of these:

    • Background issues: Is the background distracting, the wrong color, or inconsistent across your batch? Does it look messy or unprofessional?
    • Subject problems: Are there imperfections, poor lighting, or color issues with your main subject? For apparel, does it need to show fit and drape without a model?
    • Technical fixes: Is anything crooked? Are shadows missing or looking unnatural? Any dust, dirt, or glare issues?
    • Brand requirements: Do you need multiple product colors? Specific formats? Transparent backgrounds for marketing materials?

    Common photo problems and their solutions

    Here are some scenarios we see all the time:

    • “My product looks flat and boring” → clipping path + shadows
    • “The background is messy and distracting” → background removal + retouching
    • “I need to show this product in 5 different colors” → clipping path + color change
    • “The model’s hair isn’t looking right” → image masking + retouching
    • “My apparel needs to show shape without the mannequin” → ghost mannequin + retouching + symmetry

    Most photo challenges need two to three services working together, not just one by itself.

    How Path services work better together

    Here’s why thinking in combinations instead of individual services makes more sense:

    • Save admin time: Upload everything you need edited in a single order and get it all back together, ready to use. No juggling multiple orders or trying to keep track of which image versions are where.
    • Speed up your workflow: Everything gets delivered together in the formats you need. Your designer handles all the edits for each image, so there’s consistency across the entire batch.
    • Keep all photos consistent: When the same designer handles all your edits, you get cohesive results. Colors match, shadows look natural together, and the overall style stays consistent.
    • Keep costs down: We offer discounts when you bundle multiple editing services together.

    You can combine pretty much any of our services together—two, three, four, or more. What matters is understanding which combinations work best for your specific type of photography.

    Service combinations by photography type

    Every photography project has different needs, and you might even use the same image for different purposes. Here are some proven editing combinations that work well for different situations:

    Sports photographers

    When you’re dealing with high-volume shoots and tight deadlines, you need services that work fast and handle the most common issues in sports photography.

    Your typical service combo:

    • Image masking for complex backgrounds, hair, equipment details, etc.
    • Background removal for clean, professional shots and official team photos, etc.
    • Photo retouching for spot removal, color correction, skin touch-ups, etc.

    There may be time-critical events such as championship coverage where you need polished images fast, or you might need to update and create consistent team roster headshots across an entire squad, just like this photographer does. You can choose different services depending on what each batch of images needs, whether that’s processing 200+ action shots or creating headshots with a uniform, professional look.

    We offer turnarounds from 6 hours, so you can deliver images to your clients, magazines, or publications fast.

    Product and ecommerce brands and photographers

    For ecommerce, consistency is everything. Your product photos need to look professional, meet marketplace (like Amazon) standards, and convert browsers into buyers.

    A standard combo:

    • Clipping path for clean cutouts that meet marketplace requirements or create a clean website look.
    • Shadow services add depth and dimension so products don’t look flat.
    • Color change shows all available product colors without reshooting every single variant.

    Advanced ecommerce stack (add these for even more polished results):

    New ecommerce brands often start with the foundation combo (clipping path + shadows + color change) and add ghost mannequin as their apparel inventory grows. Established retailers may go with the full stack approach for complete consistency across their entire product catalog.

    Portrait and headshot photographers

    Professional portraits and headshots need to look polished but still natural. The goal is enhancing what’s already there, not creating something fake.

    Typical professional edits for portraits and headshots include:

    • Background removal/clipping path gives you versatile backgrounds for different marketing uses.
    • Photo retouching helps with natural beauty enhancement, color correction, and flyaway hair fixes.

    Corporate headshot scenarios may include:

    • Basic combo of background removal + basic retouching.
    • Premium package, adding advanced retouching and multiple background options for different brand uses.

    Advanced portrait combination (for high-end clients or special projects) may include:

    • Image masking for complex hair or clothing details.
    • Color change for different outfit variations or brand color matching.
    • Multiple background options so clients can use the same headshot across different marketing materials.

    Wedding and event portrait combinations may include:

    • Image masking for intricate dress details and flowing fabric.
    • Retouching for flawless, natural skin and perfect lighting.
    • Background removal for ceremony photos that need to work in albums and marketing.

    How to choose your perfect edit combination

    Use this simple framework to figure out which services make sense for any project:

    1. What’s your end goal? Are these photos for marketplace listings, marketing materials, portfolio work, or client galleries?
    2. What’s your biggest time constraint? Do you have a tight deadline, a high volume of images, or particularly complex edits?
    3. What’s your budget priority? Are you focused on cost per image, or is premium quality and time savings more important?

    Consider your photo use case

    Sometimes the same photo needs different sets of edits depending on how you plan to use it. For example, a product photo might need:

    • For marketplace listing: clipping path + white background + basic retouching.
    • For social media: same photo but with different background + enhanced colors + shadows.
    • For print: higher resolution + color matching + vector conversion.

    How to mix and match your edits

    Use this simple approach to figuring out which services work best for your projects:

    • Start simple: Pick two to three core services that address your biggest pain points.
    • Test combinations: Try different combos on smaller image batches to see what works best for your workflow.
    • Scale up when it makes sense: Add more services as you see results and understand how they improve your final images.

    When to add each editing service

    Not sure which services you actually need? Here’s a quick reference for what each one does best.

    Clipping path: When you need hand-drawn, crisp clean cutouts that you can use on any background.

    Background removal: When you want clean white (or any color) backgrounds for product photos.

    Image masking: For intricate shots with hair, fur, or complex borders that need precise, natural-looking cutouts.

    Shadow: When products look flat or unrealistic—shadows add depth and dimension, and they actually help generate more sales.

    Ghost mannequin: For apparel that needs to show natural fit and drape without models or mannequins, essential for consistent ecommerce catalogs.

    Color change: When you have multiple color options and need to show true-to-life colors without reshooting every single shade.

    Photo retouching: When imperfections distract from your subject—this corrects flaws and makes every element shine.

    Multi-clipping path: When you need to select multiple areas within images for separate editing (like changing just the shirt color but not the pants).

    Vector conversion: When you need scalable graphics and logos that maintain quality at any size.

    Symmetry: When product alignment matters for brand consistency and that premium, professional look that converts better.

    Flowchart titled “What does your photo need?” showing how to choose photo editing services like clipping path, image masking, shadow, ghost mannequin, and retouching based on background issues, subject problems, technical fixes, and business needs.

    How to place your Path order

    Ready to try combining services? Here’s exactly how to do it and how it works:

    Getting started

    1. Sign up for your Path account
    2. Top up Path credits (optional but recommended—you get bonus credits when you top up)

    The ordering process

    1. Click “new order” to start your project
    2. Select all the services you need for this batch—you can choose as many as you want
    3. Upload your images using drag and drop
    4. Get instant quote and you’ll see your total cost immediately
    5. Set preferences like:
      a) File format for your edited images
      b) Additional comments or instructions
      c) Upload any supporting files if needed
    6. Select turnaround time (longer turnaround means cheaper pricing, or choose rush for time-sensitive projects)
    7. Review and approve your quote
    8. Choose payment method and submit your order

    If you need 1,000+ images edited a month, we offer bulk pricing with better rates and priority support.

    Ordering edits with Path couldn’t be any easier

    Now that you know which combinations work for your type of photography, placing an order is straightforward. Try Path free with 2 free edits and see how much better your photos look with the right services working together.

    Let us look after your image edits, so you can get back to the fun stuff. Try Path free.


    Source link

  • Announcing the Sixth Think Pink Photo Competition

    Announcing the Sixth Think Pink Photo Competition


    DPG is very proud to announce the opening of the Sixth Think Pink Photo Competition, organized by nonprofit organization Dive into the Pink, and hosted by DPG, with proceeds used to support the fight against breast cancer. This year, the judging panel is made up of pro underwater shooters Shane Gross, Richard Barnden, and Tanya Houppermans.

    We’re once again talking all things PINK! We want to see your most eye-popping images featuring the color pink, from the hue of your foreground subject to the pink polyps in the background reef, from an intense fuchsia to a delicate rosé. Photos may be entered into two categories, Macro and Wide Angle, and may have been taken anywhere, anytime. (For inspiration, see the winners of the First, Second, Third, Fourth, Fifth Think Pink Photo Competition.)

    This year’s awesome prize sponsors include Crystal Blue Resort, Anilao, Philippines, Lissenung Island Resort, Kavieng, Papua New Guinea, Backscatter Underwater Photo & Video, Marelux, Kraken Sports, and Ultralight Camera Solutions.

    ​Entry is via donation to Dive into the Pink ($15 per single entry, $35 for three entries, $50 for five entries). The deadline for submission is August 31st, 11:59pm EST.


    Please read the full Rules and Guidelines (on DiveIntoThePink.org) before entering.


    Thank you for supporting Dive into the Pink! 100% of the proceeds from this effort will be used to support the fight against breast cancer.


    About Dive into the Pink

    Dive into the Pink, Inc. was started in 2015 by Allison Vitsky, a breast cancer survivor, veteran scuba diver, and underwater photographer, who wanted to raise money to fight cancer in an unconventional way—by going scuba diving with friends.

    Most of its funds are split between the Young Survival Coalition (YSC) and the Guise Laboratory at M.D. Anderson Cancer Center. The YSC is an international organization dedicated to the critical issues of young women with breast cancer—specifically, Dive into the Pink supports and promotes the YSC’s incredible patient support network. The Guise Laboratory is part of the Department of Endocrinology at Indiana University; funds are earmarked for a project examining whether characteristics of the bone marrow microenvironment can alter or promote the spread of breast and other cancers to the bones.

    Dive into the Pink is a salary-free, low-administrative cost 501c3 organization.


    Source link

  • Sheep, Trees and Puppies – The Weekly Light Stalking Community Update

    Sheep, Trees and Puppies – The Weekly Light Stalking Community Update


    Welcome to our weekly community wrapup.  It’s been another cracker on the Light Stalking forums with some wonderful photography. Both discuss produced. 

     Let’s start with the photo of the week.

     This one,  judged by Federico,  is a dip touch of some art by Patrick.  you can read about Federico’s logic for his judgment decisions over here.  And well done, Patrick.

     Don’t forget to join in this Weekly Photography Challenge with the theme of nighttime reflections.  You can join in here.  Amazing to think that this is our 759th weekly photography challenge on the forums!

     You also don’t want to miss out on the opportunity to submit one of your mobile photography shots to our ongoing Monday Mobile Challenge.  The rules are that you must have taken the image and edited, all on a mobile device of any sort.  This really stretches your creativity with a bit of restriction.  Join in here.

     There’s also the opportunity to join in the community photo story challenge, which is an ongoing callout for community members to tell a story with several of their photographs.  This is more of a deep dive into a project scenario where you need to take several images at least.  It’s great to see what people are coming up with, as it’s sparking a lot of creativity.  join here.

     And also, here are a few of the photos from this week that I just thought needed to be shared even more because I just thought they were great.

     You know when Elin Laxdal starts a thread on Light Stalking, there is going to be some exceptional photography in it.  This week was no exception, with Elin sharing some images of livestock that she had taken during the week.  You can join in the conversation here.

     One of the most photographed objects in the world is the famous Wanaka tree in New Zealand.  And I think this shot by Rob Eyers is a very solid attempt at a very well-photographed image.  Well done, Rob.

     If any of you have been around the four of the very long, then you will almost certainly know Patrick and, by extension, Patrick’s puppy.  I love seeing this little guy come across my feed, either on Light Stalking or even on Instagram, so I thought I’d include him in the collection here.

    Member LightAndShadow has been experimenting with a bit of black-and-white treatment with his images,  but I specifically thought this one stood out for the very obvious draw on the eye of those three flowers.  I thought this one deserved to be called out.  We are discussing it over in this thread. https://lightstalking.us/forums/topic/mallow-wood-and-stone/

     I also thought this was a very interesting image –  it looks like a pretty standard shot of a rough day at a Lighthouse until you spot the dark figure in the mid-ground going out into the surf, at which point I feel the image becomes quite terrifying.  If emotional response to an image is the measure of a success, as many people say then I think this one achieved that quite well.  Well done DavidC.

     If you’d like to join in with the shenanigans, our members, feel free to come and join us on the forums.  We’d love to see you there, and we are quite a friendly bunch.


    Source link

  • Extremophiles Discovered at Depths Beyond 30,000 Feet for the First Time

    Extremophiles Discovered at Depths Beyond 30,000 Feet for the First Time


    By Ian Bongso-Seldrup, July 31, 2025 @ 10:30 PM (EST)
    Source: BBC

    Macellicephaloides grandicirra, a species of polychaete worm known for its white, spiky appearance


    A Chinese-led research team has captured images of life at depths of more than 30,000 feet—over 9.5 kilometers—for the first time. During an expedition to the Kuril–Kamchatka Trench and the western Aleutian Trench in the bathyscaphe Fendouzhe, the scientists discovered fields of tube worms, beds of mollusks, and mats of bacteria. Previously, the deepest marine vertebrate life captured on film was a snailfish swimming in a trench at 27,350 feet (8,336 meters) off the Japanese coast in 2023.

    “It’s exciting—especially for a deep-sea scientist—to go to a place that human beings have not explored,” one of the lead researchers, Dr Xiaotong Peng, told BBC News. “It’s a great opportunity to discover new things. And what we saw was quite amazing.” The expedition explored trenches at depths of between 19,000 feet (5,800 meters) and 31,276 feet (9,533 meters), covering a distance of around 1,500 miles. Their work has just been published in the journal Nature.

    In the absence of sunlight, the “chemosynthetic” organisms surviving at such depths get their energy from hydrogen sulfide and methane seeping out of cracks in the Earth’s crust. The researchers are aiming to understand how these animals convert these chemicals into energy—and also how they adapt to life under such extreme pressure.


    Beds of mollusks feeding off the chemicals seeping from the seabed


    Dense colonies of tube worms up to a foot long


    Composite image of the Fendouzhe submersible in a deep ocean trench created by the scientific team


    The bathyscaphe Fendouzhe, or Striver, pictured being transported (upside down) aboard its mother ship. The deep-submergence vehicle is designed to reach depths of more than 10,000 meters


    Source link

  • The Big Dune – Stuck in Customs


    Daily Photo – The Big Dune

    I got one of those Google reminders today of an image from the past and it sent me down a little rabbit hole on my Smugmug portfolio. One of the little branches ended up at this image which quite connected with me today for some reason, so I thought I’d share. Maybe it’s because it is the middle of winter where I am… who knows. Whatever the case, I hope it gives you a little bit of joy in your day too. 🙂

    Photo Information

    • Date Taken2014-09-25 20:55:45
    • CameraILCE-7R
    • Camera MakeSony
    • Exposure Time1/2500
    • Aperture4
    • ISO100
    • Focal Length70.0 mm
    • FlashOff, Did not fire
    • Exposure ProgramAperture-priority AE
    • Exposure Bias+0.3


    Source link

  • The Right Tool for the Job: Sigma 16-300mm F3.5-6.7 DC OS Contemporary

    The Right Tool for the Job: Sigma 16-300mm F3.5-6.7 DC OS Contemporary


    For every photographic project that we undertake, there is going to be a best “tool for the job”. If you are heading to northern Canada to photograph the aurora borealis, then a fast, wide prime lens like Sigma’s 15mm F1.4 DG DN Diagonal Fisheye | Art would be a great choice. Heading to Yellowstone for wildlife? Then a super-telephoto zoom like the 60-600mm F4.5-6.3 DG DN OS | Sports lens would be ideal. For my latest adventure, the perfect piece of gear was Sigma’s 16-300mm F3.5-6.7 DC OS | Contemporary lens for crop sensor cameras.


    Why was this lens the best choice?

    Well, I suppose I should start by telling you what I was getting myself into. After almost thirty years exploring the mountains around my hometown of Breckenridge, Colorado, I was looking for a backpacking trip that would sum up the entire area into one big, unifying hike. Going over my maps, I found the perfect route and it would begin and end at my front door. It would be almost forty miles in length and include about 10,500 vertical feet up, and over 11,000 down. I would hike over four mountain passes on the east and south side of town, and then link four remote drainages on the west side of town. Most of my hiking would be done off-trail and require significant effort and route finding skills, and would take me four nights and five days to complete.

    Of course, there’s no way I’m doing an adventure like this without a camera in hand. There would be opportunity for both landscape and wildlife photography during my time in the field. Clearly the best tool for the job would be something lightweight yet powerful. Wide enough for epic landscapes but also with plenty of telephoto power to bring in distant wildlife. Luckily, Sigma had just released a lens that fit the bill perfectly – the 16-300mm F3.5-6.7 DC OS | Contemporary, available for Sony E-mount, L-Mount, Fujifilm X Mount, and Canon RF Mount. I paired it with the relatively small Canon EOS R7 for an easy-to-carry combo.

    The Canon mount version of this lens weighs just 22 ounces (625g) a with a nice, compact size that fit perfectly in my Think Tank front mount pack. This was great because much of the photography would be a bit more documentary in style and I wanted instant access during the entirety of the hike. The lens also features Sigma’s updated OS2 (optical stabilization) system which meant I could easily handhold many of my shots. The very close focusing distance (minimum is 6.7 inches at the wide end) was awesome for getting close-up images of the many wildflowers that were absolutely peaking on my hike.

    It was great to have the extensive range of the 16-300mm. On a Canon APS-C camera, this is the equivalent of a 26-480mm lens on a full-frame camera. With that kind of range, I was able to capture everything from epic mountain vistas to simple snapshots documenting my journey.

    The image quality of the Sigma 16-300mm was even better than I had expected. It’s been a long time since I last used a crop sensor super zoom lens. I had decent results back then and was kind of expecting the same, but I was pleasantly surprised to find the results approaching that of the high-end Art and Sport line lenses. Images were nice and sharp, and chromatic aberration was held in check even when shooting in extreme lighting situations, which I often like to shoot. Autofocus was fast and accurate, and seemed to work very well with the Canon AF system.

    One other welcome feature on an excursion like this is the dust and splash-resistant construction – it’s actually the first Sigma Contemporary lens to have weather sealing throughout the entire lens body. There was plenty of adverse weather to deal with including rain, hail and sleet daily, and the 16-300mm handled it all nicely.


    Consider the Sigma 16-300mm

    A backpacking adventure like this calls for a lens that can handle everything thrown at it, from gorgeous wide vistas to distant wildlife and colorful wildflowers. If you have an upcoming trip where keeping size and weight to a minimum are paramount, take a good look at the Sigma 16-300mm F3.5-6.7 DC OS | Contemporary. It’s sharp, fast, light and portable, making it the perfect one-lens solution for many of your photographic endeavors. Pick one up today, and hope to see you out there!


    Source link

  • Godox Has Announced Ultra Compact Affordable Flash – The New iT20/iT22

    Godox Has Announced Ultra Compact Affordable Flash – The New iT20/iT22


    Godox, a company popularly known for photography lighting equipment, has recently released a couple of mini TTL flashes – the Godox iT20 and iT22, that are ultra compact and will easily fit into your pocket. These camera flashes are perfect for both indoor and outdoor photography use, and come with magnetic accessories for quick switching between light effects.

    Image via Godox

    The mini flashes are almost identical with the iT20 slightly smaller than the iT22 and come in an ultra compact design and weigh only 45g (iT20) and 52g (iT22), which means they can be carried in your pocket, ready to be grabbed and used when needed. There is a dedicated button that allows the user to toggle between manual and TTL modes. Real time settings are displayed, so one can view them for any adjustments required.

    Image via Godox

    The accessories that come with the flash like the light spreader or diffuser and two color filters, are all magnetic, so they can be easily snapped on to the flash when required. There are also other optional accessories that can be purchased, like diffuser, gels and honeycomb grids which are magnetic. These accessories help with capturing creative and atmospheric effects in your photograph.

    Image via Godox

    The flash intensity can be adjusted across 6 stops in steps of 1/3. The recycling time for the flashes is 1.5s at full power and a single charge lasts more than 700 flashes. The built-in lithium battery can be charged quickly (approximately 1h 10mins) with a USB-C cable.

    Another optional accessory is the “Hot Shoe Riser” that helps to lift the flash by 30mm, so it has clear spread of light without blockage, when using wide angle or long lenses. There is also a 0 – 90 degrees tilt adjustment that helps to bounce light off the flash when required.

    The flash is compatible with Canon E-TTL II, Nikon i-TTL, Sony, Fujifilm, OM System and Panasonic TTL systems, supporting both auto flash and High-Speed sync functions. More details about the flash can be found here.

    The flash is available to pre-order and costs less than $50.00. We have more news for you to read if you are interested at this link here.


    Source link