برچسب: Shot

  • Winners of DIVE Magazine’s Big Shot Portraits Photo Competition

    Winners of DIVE Magazine’s Big Shot Portraits Photo Competition


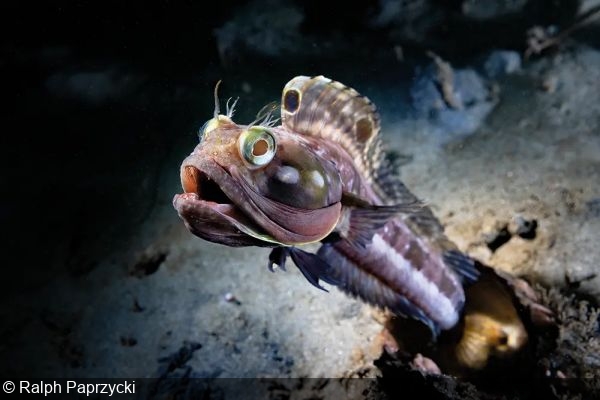
    Winner – ‘Blenny With Attitude’ by Ralph Paprzycki: A sarcastic fringehead (Neoclinus blanchardi) on a night dive at Veterans Park, Redondo Beach, California (Canon EOS R5, Canon RF 14-35mm f/4 lens at 35mm, Ikelite housing, Sea&Sea YS-D3 strobe with snoot; f/8, 1/125s, ISO 500)


    DIVE magazine has unveiled the winners of its latest Big Shot underwater photography competition, which had “portraits” as its theme. Ralph Paprzycki was crowned the overall winner for a fierce-looking sarcastic fringehead captured off Redondo Beach, California. Ralph beat 200 or so other entries to claim the top spot.

    The runners-up were equally compelling: Marcia Riederer’s eye of a dwarf minke whale came in second, Rowan Dear’s arresting leafy seadragon was third, and JillAnne McCarty’s charismatic American saltwater crocodile scored fourth. Moreover, the impressive collection of Highly Commended images demonstrated the high quality of the contest’s entries overall.

    Check out all the winners below and head over to DIVE’s website for more on their Big Shot competition.


    Second Place – ‘Eye to Eye’ by Marcia Riederer: This encounter happened during a trip to the Great Barrier Reef, in Australia. This curious dwarf minke whale came so close that I could only see her eye, even through my wide-angle lens (Sony A7RV, 16-35mm, Isotta housing; f/6.3, 1/250s, ISO 1000)


    Third Place – ‘Portrait of a Dragon’ by Rowan Dear: Having spent several days shooting the leafy sea dragons and their habitat, I decided to switch to the Sony 90mm macro lens for a night dive. While shy at first, this male leafy – who was also carrying eggs – eventually became more comfortable in my presence (Sony A7IV; 90mm macro lens, Red Video Focus Light, INON Z330 strobes; f/18, 1/80s, ISO 320)


    Fourth Place – ‘Toothy Grin’ by JillAnne McCarty: This large American saltwater crocodile, in Cuba’s Jardines de la Reina, swam over to see our boat. I slipped into the water and waited with my eye in the viewfinder. As the crocodile came towards me, he suddenly jerked his head and snapped his jaw. I captured the image with his teeth nearly on my camera’s dome port (Nikon D850, Nikon 16-35 mm lens, 240 mm dome port, Nauticam housing, ambient light; f/20, 1/200s, ISO 800)


    Highly Commended – ‘Playtime’ by Rowan Dear: Taken at Montague Island, Narooma, Australia. This playful sea lion was zipping through the seagrass. It made for a perfect image of contrasting colours showing these playful animals in their environment (Sony A7IV 16-35mm 2.8 lens, INON Z330 strobes; f/8, 1/200s, ISO 320)


    Highly Commended – ‘‘Seacow’ by Romeo Bodolai: This dugong was feeding on seagrass at Marsa Shagra in the Egyptian Red Sea (Sony a7R4, Canon 8-15mm fisheye, Nauticam housing, Ikelite strobes; f/10, 1/250s, ISO 100)


    Highly Commended – ‘Trigger Happy’ by Michael Gallagher: Titan triggerfish are notoriously aggressive around their nests during breeding season, and this one was no exception! I snapped this photograph while hurriedly retreating, and it was not until after the dive that I realised that I had captured the potent beauty of this special fish and its formidable teeth (Canon 5D3, Canon 50mm macro lens, Hugyfot housing, dual Inon Z240 strobes; f/11, 1/125s, ISO 400)


    Highly Commended – ‘Spotted’ by Michael Gallagher: I encountered this magnificent male parrotfish dozing on the reef during a night dive in Lhaviyani Atoll in the Maldives (Canon 20D; Canon 60mm macro lens, Ikelite housing, Ikelite DS-125 strobe x1; f/16, 1/100s, ISO 100)


    Highly Commended – ‘‘Hair Ball’ by Michael Gallagher: Frogfish must be one of my favourite fish of all time, and this hairy frogfish must be one of my personal favourite underwater sightings (Canon 50D, Tokina 35mm macro lens, Hugyfot housing, Inon Z240 strobe with snoot; f/22, 1/200, ISO 200)


    Highly Commended – ‘Nobility’ by Imogen Manins: I regularly visited this individual during freediving sessions at Ricketts Point Marine Sanctuary, Port Philipps Bay, Australia. The rocky reef was covered in a lush carpet of green seaweeds of the Caulerpa genus, providing rich feeding rounds for the bigbelly seahorse (Olympus TG6, Backscatter Air Lens, Olympus housing, video light MW4300; f/3.2, 1/160s, ISO 100)


    Highly Commended – ‘Prince of the Waterfall’ by Romeo Bodelai: Traunfall is a breathtaking waterfall in Austria with excellent visibility (10-15 m) and underwater rock formations, along with plenty of large pike (Sony a7R4, Canon 8-15mm fisheye, Nauticam housing, Ikelite strobes; f/22, 1/2s, ISO 100)


    Highly Commended – ‘Embedded’ by Christian Horras: At the end of a dive around Anilao, I saw this little blenny and decided to try a different take for a picture. I used a slow shutter speed, a snoot and a little camera movement to create the effect in the picture (Nikon Z8, Nikon 60mm macro lens, Seacam housing, Seacam Seaflash 150D strobes; f/16, 1/10s, ISO 64)


    Highly Commended – ‘Playful Calf’ by Vanessa Mignon: Every year, humpback whales travel to Tonga, to mate and give birth. During that time it is possible to swim with them. That day we saw a small fin break the surface, and start swimming in circles, a sign that it was a calf coming up for air while its mother was resting below (Canon 5D Mark IV; Canon 16-35 mm lens, Nauticam housing; f/6.3, 1/160s, ISO 320)


    Highly Commended – ‘‘The Pinch’ by Fabi Fregonesi: An anemonefish with a shrimp delicately perched on its head with the anemone as a frame, Lembeh Strait, Indonesia (Canon 5D Mark IV; 100mm Canon lens, Nauticam housing, 2 Inon Z330 strobes; f/18, 1/250s, ISO 100)


    Highly Commended – ‘‘Orange Beauty’ by Miguel Ramirez: While diving in Wakatobi, Indonesia, I was lucky enough to see this beautiful and rarely spotted spinecheek anemonefish (Premnas biaculeatus) (Nikon D500; Nikon 85mm lens, Hugyfot housing, Inon Z330 x2; f/25, 1/200s, ISO 100)


    Highly Commended – ‘‘Shining Seahorse’ by Stefano Colombo: I had my buddy backlighting while I used a snoot for filling in the front of the seahorse during a muck dive in Tulamen, Bali (Canon EF 5DMKIV; Canon 100mm macro lens, Isotta housing. Inon Z330 strobes, Snooty Snoot; f/13, 1/200s, ISO 320)


    Source link

  • How to Position Your Subject for the Best Shot – Path

    How to Position Your Subject for the Best Shot – Path


    Getting the hang of using a camera and photo editing is one thing, but directing subjects? Now, that’s hard! Even pro photographers can struggle with an awkward or camera-shy person in front of their lens. 

    How can you guide your subjects so your portrait shoots are consistent in quality, there are fewer retakes, and the result looks great? It’s a mix of technical shooting and composition skills, with plenty of soft skills, like getting your subjects to relax and smile.

    Want your next portrait shoot to be a success? Check out some practical tips for how to pose any subject—from corporate execs to creative professionals and family groups.  

    Prepare for a successful portrait shoot

    The secret to great portrait poses actually starts before your subject arrives. Here’s what experienced photographers do to prepare:

    Set clear expectations

    Help your clients arrive confident and prepared by sending them key information ahead of time:

    • Share simple wardrobe guidelines: solid colors work best, avoid busy patterns
    • Explain the location and background setup: indoor/outdoor, how many outfits to bring
    • Give grooming tips: classic styling usually photographs best—and a fresh shave won’t hurt!
    • Outline the session timeline: how long it will take, how many looks you’ll capture
    • Send examples of poses you’ll try: helps them visualize the result

    To speed this up, you can create a standard pre-shoot guide you can quickly customize for each client. Use apps like Canva or Adobe Express and export the guide as a PDF or create a shareable link.

    Build trust and rapport

    Most people aren’t naturally comfortable in front of a camera. Posing for headshots can be stressful even for the most successful business people, so your first job is to make them feel at ease. Try these quick tips:

    • Start with a quick chat about what to expect and what you’ll shoot first
    • Demonstrate poses yourself—it’s easier than explaining and helps break the ice
    • Pay attention to what works for each person—a pose that looks great on one subject might feel awkward for another, so stay flexible
    • The same goes for instructions in general—some people need more guidance than others 
    • Keep the conversation natural while you work, but keep your directions simple
    • Give positive feedback when you capture great shots, and if something’s not working, smoothly guide them into a different pose instead of pointing out problems

    Main posing frameworks for any portrait shoot

    Let’s break down some of the best poses for professional headshots and relaxed portraits that consistently deliver great results and let your subjects shine. 

    Standing poses 

    Standing poses are a great choice for both corporate headshots and casual portraits. They offer plenty of ways to help subjects feel comfortable—from leaning against the wall to interacting with the surroundings. Standing shots also work anywhere—in a studio, office, or outdoors—and you can repurpose them to crop in for tighter headshots or waist-up portraits. 

    Here’s how to pose for standing shots: 

    • Turn feet about 45 degrees from the camera—this creates a naturally slimming angle
    • Have subjects shift weight to one leg—usually the front one—to avoid looking stiff
    • Ask them to lean forward slightly from the hips, with just an inch or two being enough
    • Change arm positions between shots—relaxed at sides, hands in pockets, or arms crossed
    • Remember “if it bends, bend it slightly” for natural-looking poses
    • Keep shoulders relaxed and dropped because tension shows in photos
    • Ask the subject to change the direction of their gaze slowly from one side to the other to get a wide range of angles

    two photos of women, side by side, with gray hair

    For corporate shots:

    • Keep poses clean and professional
    • Arms relaxed at sides or one hand in pocket
    • Subtle lean forward to engage with the camera
    • Maintain a straight posture while avoiding stiffness
    • For tight headshots, still keep the body slightly angled, like on Treeconomy’s team page 

    treeconomy about us page with team individual headshots

    For personal branding:

    • Allow more dynamic movement
    • Try casual leans against walls or furniture
    • Experiment with crossed arms or hands on hips
    • Include interaction with the environment (desk, tools of trade, products), like Liz, owner of Wild Pines, an arts and crafts store

    Wild Pines about page with a photo and text about the founder

    • Allow space for naturally big smiles and laughter, too—it’ll create warm and welcoming portraits, like on Sojo’s company page

    Sojo about us page with the founder photo at a design table and some text about the brand

    Flattering seated poses

    Seated portraits can create a variety of engaging shots. Just because your subject is sitting doesn’t mean options are limited—it’s all about working with posture and leg positioning to create natural, dynamic results.

    Key principles for seated portraits include:

    • Guide subjects to sit at the edge of their chair or sofa instead of slumping back
    • Avoid letting subjects sink into soft furniture (like in the example below of Noura Sakkijha, CEO of Mejuri)
    • Keep the core engaged for good posture 
    • Point toes in the same direction to elongate legs

    Mejuri meet the founder page with text and portriat

    Professional settings:

    • Position at a desk with a slight forward lean
    • Hands clasped or resting naturally—play around with a variety of hand positions to find a flattering pose for your subject
    • Encourage subjects to engage with what’s on their desk, such as their laptop or notebook
    • Cross ankles rather than legs for a polished look
    • Keep shoulders level and relaxed
    • Walk around the subject to capture different angles—from camera-facing to slightly angled to full-on side profile

    man sitting at a desk looking away from the camera with an open laptop in front of him

    Casual settings:

    • Allow more relaxed postures while maintaining good form
    • Create asymmetry by shifting weight to one hip
    • Use arms for support when sitting on floors
    • Avoid both legs pointing directly at the camera—instead, either extend one leg towards the camera or angle them both slightly away from the camera

    portrait on off-white background of  a woman sitting down casually, she has a prosthetic leg

    Creating dynamic duo shots:

    • Use seating to create interesting height variations
    • Try one person seated while the other stands
    • For co-founder shots, have one person sit in a chair while the other perches or leans on the armrest, like in the example below of ettitude’s co-founders
    • Vary the height of chairs or use different seating positions to add visual interest
    • Keep subjects at different heights but maintain connection through body language or eye contact

    Ettitude from the founders page on their webiste

    Relaxed group portraits

    Whether you’re photographing a corporate team or a family, group photos present unique challenges. 

    Basic principles for group shots:

    • Create depth by avoiding straight lines of people—unless you’re shooting a sports team photo that traditionally requires one or two straight lines of players
    • Stagger heights naturally using stairs, chairs, or standing/sitting combinations
    • Keep heads at different levels but close enough to feel connected
    • Position taller people towards the back or center
    • Arrange people in a slight arc to ensure everyone’s visible, like in Ora’s team photo below with the two people on both sides slightly turned inward
    • For large team shots, shooting from an elevated position, such as another floor, can help include everyone, but you could also use a drone
    • Shoot more photos than you think you’ll need—there’ll always be someone blinking so it’s best to have more images to pick from

    Ora about page showing the founders and their story

    For professional teams:

    • Keep poses consistent but not identical
    • Use the rule of thirds to arrange larger groups
    • Break bigger teams into smaller clusters
    • Maintain equal spacing between subjects
    • Ensure everyone’s shoulders are angled slightly rather than square to the camera—or, if facing the camera directly, ask the subject to shift weight from one leg to the other 

    two group shots, side by side, the group shot on the left has three older women standing and the group shot on the right has five diverse adults standing

    For family portrait poses:

    • Create natural connections through gentle touching (hand on shoulder, arms linked)
    • Position children in front or held by parents
    • Use props or furniture to create natural groupings
    • Let small kids move around and play between shots to stay engaged
    • Capture both formal and candid interactions—experiment with both seated and standing poses
    • Switch between some or all subjects looking at the camera to fully candid shots

    family portrait of two adults and two children in a casual home setting

    Common posing challenges and tips to solve them

    Even experienced photographers run into tricky posing situations. Maybe you’ve got a group with significant height differences, someone nervous about being photographed, or the shoot ran late so now you’re rushing to cover all your bases. So, what are some common challenges you might run into?

    Height differences

    If you have subjects with drastically different heights, it can make for an awkward portrait. Position taller people slightly behind or sitting. Seated poses work the best to tackle this, but that doesn’t mean you should avoid standing poses altogether. You can use elements like stairs or slopes to minimize extreme height gaps. 

    portrait photo of a group of students and their teacher in front of a blackboard

    You can also create diagonal arrangements instead of straight lines. Avoid placing the tallest and shortest people next to each other—unless they’re standing behind each other.

    Confidence issues

    If your subjects are camera-shy, start with simple poses to build trust. Give specific compliments about what’s working well, and show them the preview shots when you capture something great. 

    It’s a good idea to have a few go-to safety poses that work for most people. Some might also feel more relaxed if there’s music playing in the background, especially if you’re shooting in a studio.

    Your own confidence and body language as the photographer make a difference too—stay positive or even a little goofy if appropriate. Make sure to edit your portraits and headshots to show your subjects in the most flattering way while keeping their appearance natural

    Photographing glasses and reflections

    If shooting something reflective in the frame, slightly tilt the head down to avoid glare. You can also ask subjects to push their glasses slightly up their nose. Position lights at angles that don’t create reflections. If the reflection doesn’t cover the subject’s eye in full, you can always fix it with retouching.

    Rushing through poses

    Prepare a shot list ready but be flexible—you can have the shot list on your phone or even photograph it so you can flick through your camera during the shoot without stopping the session.

    Start with your most reliable poses first. Give clear, concise directions, and keep subjects engaged by showing progress.

    Are you ready to direct your next portrait shoot?

    Working with people can be unpredictable because everyone’s unique—but that’s exactly what makes portrait photography so rewarding. The trick is to adapt your approach for each subject while keeping your photo quality consistent. With these posing guidelines, you’ll be better equipped to direct any portrait session confidently, from corporate headshots to family gatherings.

    And if you need help getting those portraits polished and ready to share, our team of expert editors at Path can handle the retouching while you focus on capturing more great shots.

    Polish up your portraits with pro retouching from 79¢ per image

    Portrait poses FAQs

    How do you pose for a professional headshot?

    Start by turning your body 45 degrees from the camera, then face back toward it. If you’re standing, shift your weight to your front leg, keep your shoulders relaxed, and lean forward slightly from the hips. Small adjustments make a big difference—change arm positions between shots and keep movements subtle. Allow yourself to smile and laugh, too!

    How do you look professional in a headshot?

    • Maintain good posture without looking stiff
    • Keep shoulders back but relaxed
    • Sit at the edge of your chair for seated shots
    • Cross ankles instead of legs
    • Let hands rest naturally

    What are the best poses for group photos?

    Avoid straight lines of people. Instead, create depth by staggering heights using stairs or chairs, and arrange people in a slight arc. For professional teams, keep poses consistent but not identical. With families, encourage natural connections through gentle touching like hands on shoulders.

    What are common mistakes to avoid when posing subjects?

    Common portrait mistakes include forcing unnatural smiles, rushing through poses without direction, and not adapting poses to fit different subjects. Stay engaged with your subject throughout by having a conversation and provide positive feedback. If something doesn’t work, simply switch to the next pose.

    How to pose different body types?

    Work with your subject’s natural body language instead of forcing uncomfortable poses. The 45-degree angle works well for most people, as does shifting weight to one leg. For seated poses:

    • Focus on good posture
    • Create asymmetry through slight head tilts
    • Adjust your camera position rather than making subjects twist
    • Make sure subjects feel confident in their pose
    • Don’t let the subject sink back into a soft chair or sofa

    How do you pose someone who is camera shy?

    Start with simple poses and build trust gradually. Show them preview shots when you capture something great, keep the conversation going, and guide them into different poses smoothly. Playing background music can help relax in studio settings.


    Source link

  • My First Photos Shot with the FUJIFILM X-T5


    Winter scenics around Anchorage, Alaska

    Eight years ago, I got to test a new camera that hadn’t even been announced yet. It was the Fujifilm X-T1, and with its high performance and small, rugged form factor, it was the world’s first weather-sealed, fast action capable outdoor-ready mirrorless camera.

    Instantly falling in love with the X-T1, my entire photography life was transformed, and with the successive X-T2, X-T3 an X-T4, I had a front row seat as the X Series cameras came of age over the next few years.

    This week, the next chapter began in my X Series life when I snagged the last X-T5 in stock at my local store. As soon as I opened the box and put the camera in my hands, my X Series love was rekindled once again with this new hot-rodded fifth generation model. And with the regular 3-way tilt LCD screen, it felt like home again.

    I won’t delve into the specs here, although you can find them at my X-T5 into post. I’ll just say that with a chassis that’s closer I size to the X-T1 than the X-T4, the new X-T5 felt like a familiar friend. Inside, though, the X-T5 is essentially the bionic version of the X-T1.

    With the radically upgraded 5th gen features and specs that were introduced earlier this fall with the X-H2 and X-H2S, the X-T5 brings almost all of that into the traditional SLR style “X-T” body that so many of us love.

    Winter scenics around Anchorage, Alaska

    Being “magic hoar frost” season here in Anchorage right now, I immediately slapped a lens on it, (the XF70-300mm), bundled up and took it for a short walk around my neighborhood in the clear, cold -10F degree air. Over the next 53 minutes, I shot a collection of photos that I feel perfectly show of what I’ve always loved about the X Series.

    All of these are straight JPEGs, right out of the camera. Most were shot with the Velvia film simulation, although the last photo in this post was made with the new Nostalgic NEG film sim.

    I’ll definitely be posting more images and doing some review posts and videos for the X-T5 after the new year. For now, enjoy these snowy photos and have a great holiday season!

    If you want to grab an X-T5 for yourself and support my site, you can order one at B&H Photo.

    Also, if you do get one, my bestselling Fuji guide, X SERIES UNLIMITED, has been fully updated with all the relevant X-T5 info.

    Winter scenics around Anchorage, Alaska
    Winter scenics around Anchorage, Alaska
    Winter scenics around Anchorage, Alaska
    Winter scenics around Anchorage, Alaska
    Winter scenics around Anchorage, Alaska
    Winter scenics around Anchorage, Alaska
    Winter scenics around Anchorage, Alaska
    Winter scenics around Anchorage, Alaska. Shot with Nostalgic NEG film sim


    Source link