[ad_1]
You may have been told you need to compress and resize image files for websites, social media, and other uses. Why? Oversized images can slow down your site, mess with SEO, and even affect sales. But shrinking an image the wrong way? That can leave you with a blurry, pixelated mess.
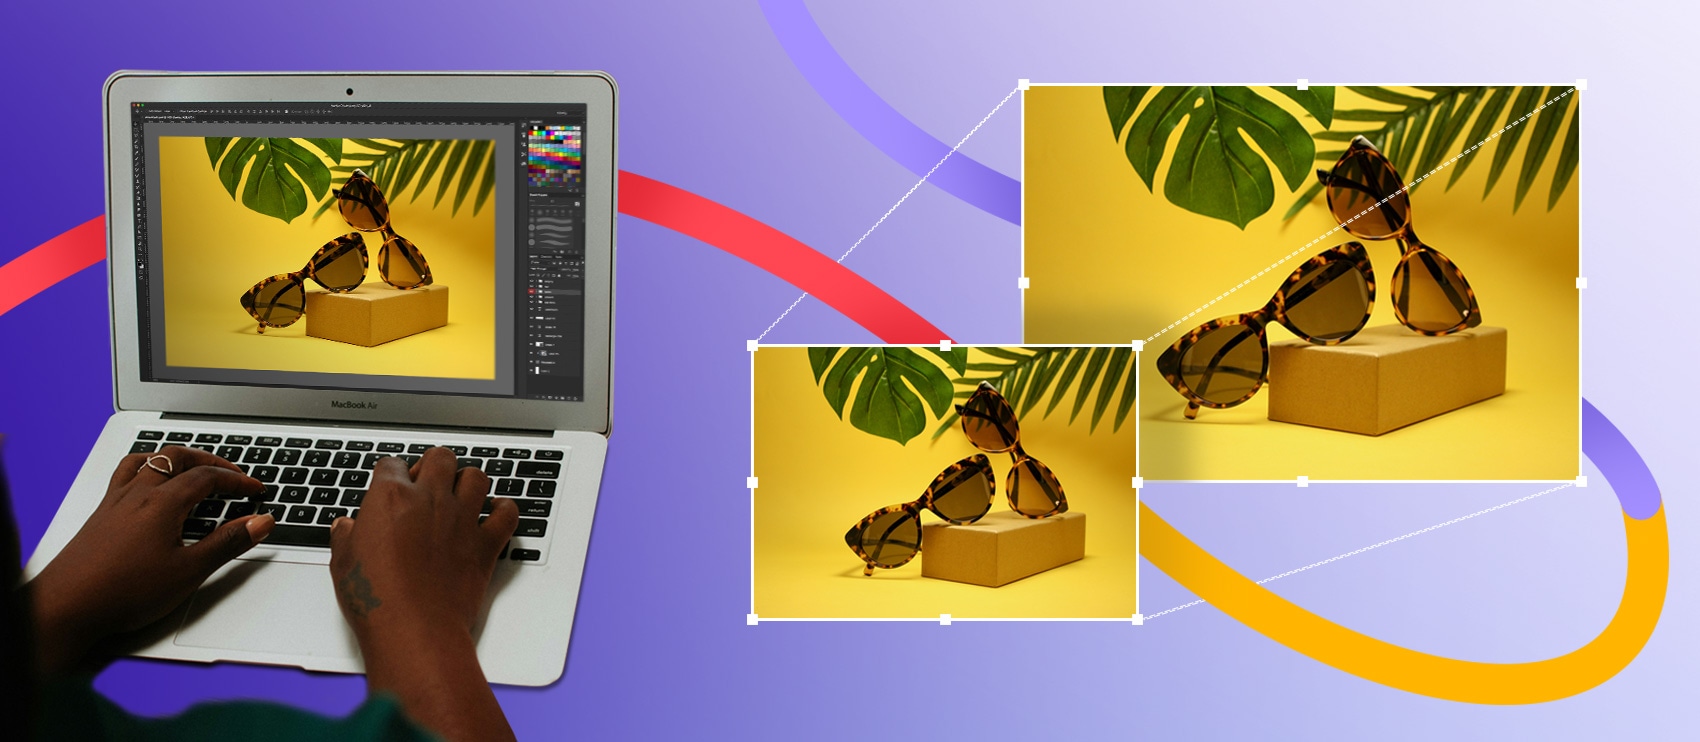
Luckily, resizing images without losing quality is easy once you know how. This guide walks you through how to resize an image in Photoshop without losing quality and all the other best methods—starting with what to consider before you begin.
Preparing for image resizing
Before you resize an image, consider the following:
- Aspect ratio: Make sure the image keeps its proportions so it doesn’t look stretched. Common ratios include 1:1 (square) for profile pics, 16:9 for banners, and 3:2 for product shots.
- Required dimensions: Every platform has its own size recommendations—Instagram Stories need 1080x1920px, while blog images usually fall between 1200px and 1600px wide.
- Resolution: Web images should be 72 DPI for fast loading, while print needs at least 300 DPI for high-quality results.
- Use case: Think about where the photo will be used. This helps avoid distortion and keeps your visuals looking sharp. Websites and online stores need smaller file sizes for speed, while social media platforms have specific size guidelines to keep images looking their best.
It’s also a good idea to make sure you start with a high-quality image. No amount of editing or resizing can make a poor-quality photo look great.
How to reduce image size in Photoshop: shortcut
If you want a quick and easy way to resize images in Photoshop, follow these steps:
If you’re already using Photoshop, open your image by going to File > Open from the menu at the top of the application window. If you have just opened Photoshop, you can still open the image directly from the opening screen. You can also use the shortcut CTRL + O (COMMAND + O on a Mac) to open an image at any time.
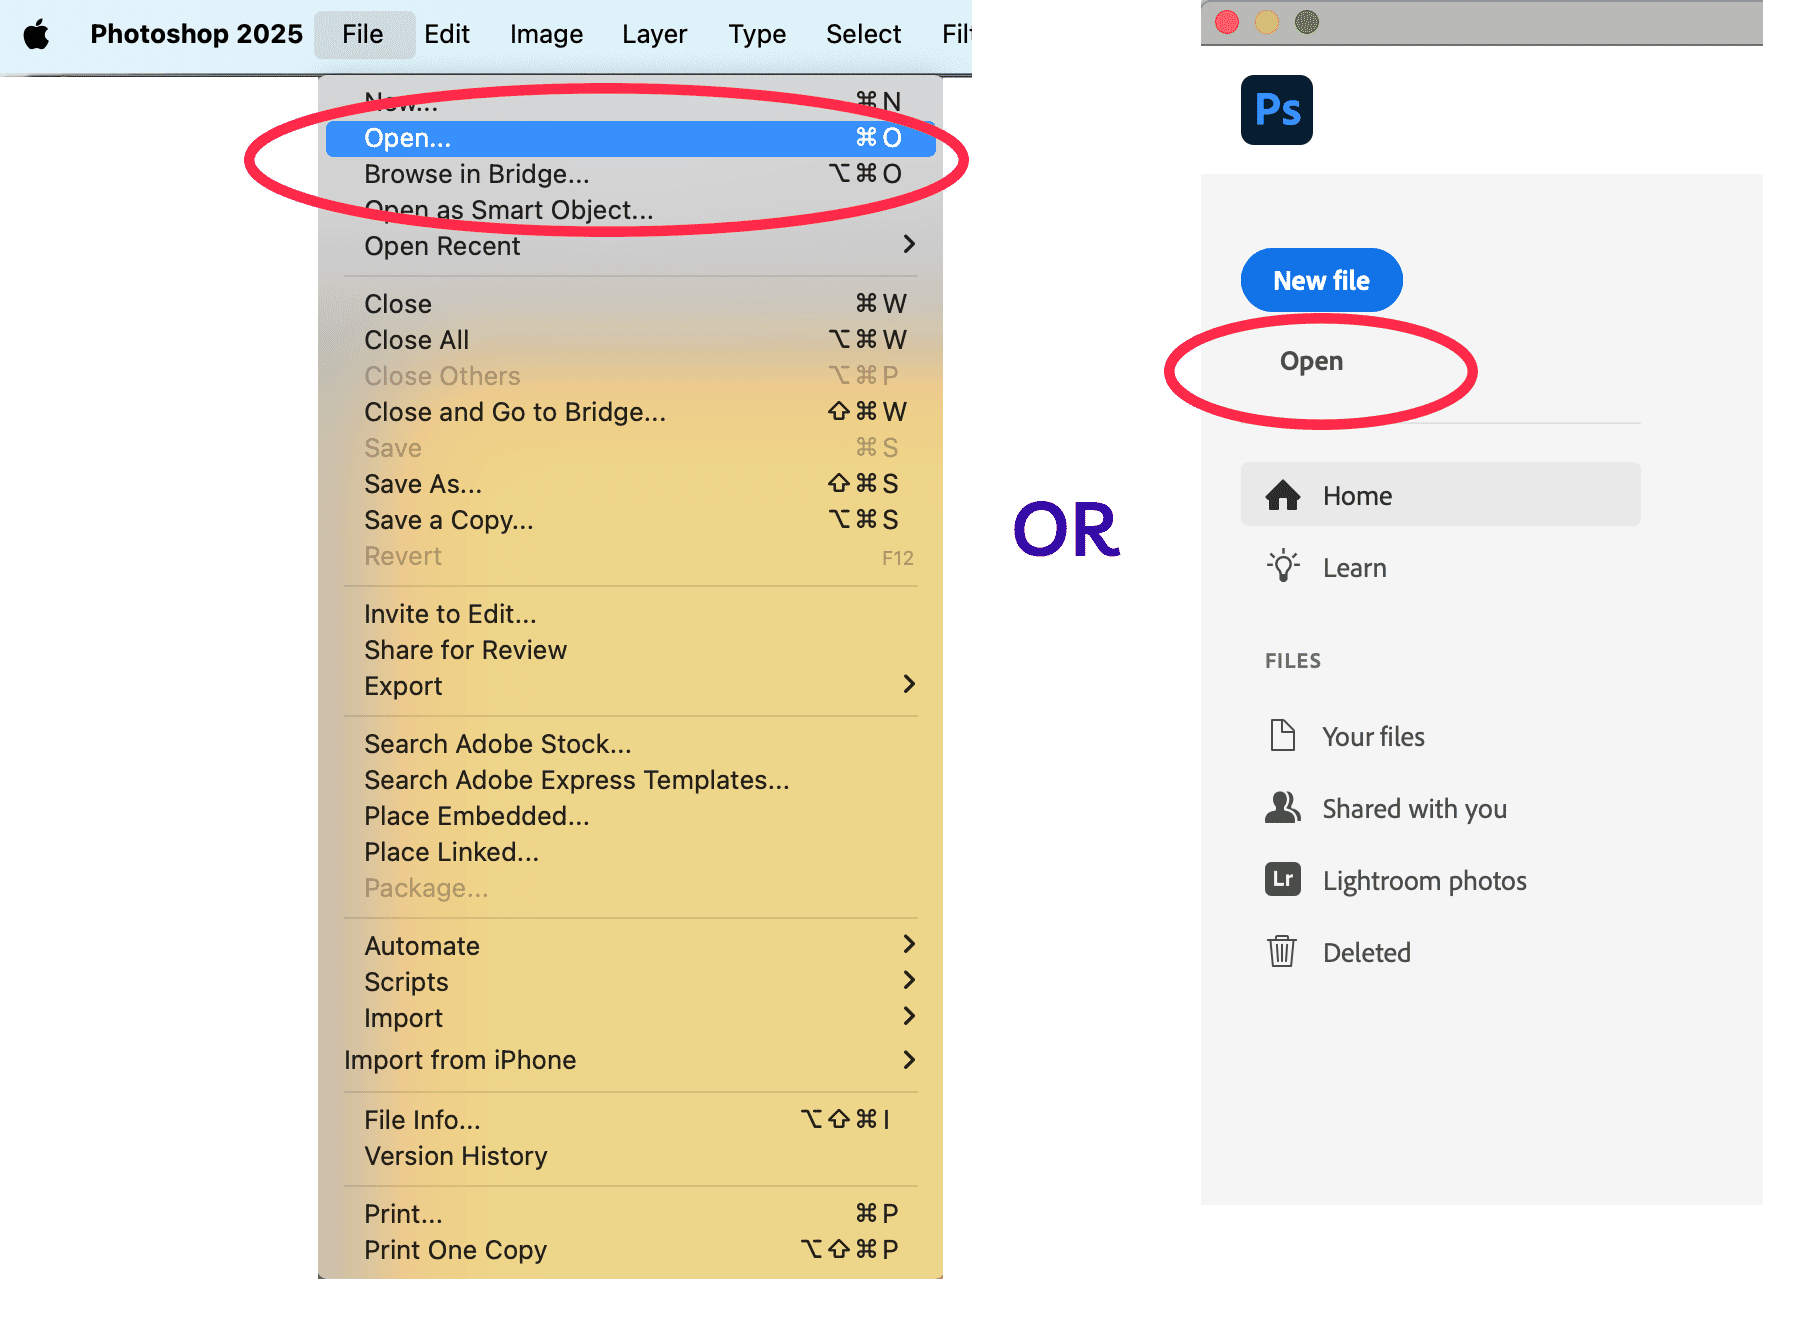
Navigate through your documents until you find your image, and open it. Then, go to Image > Image Size in the top menu. You can quickly access the Image Size window by typing CTRL + ALT + I (COMMAND + ALT + I on a Mac).
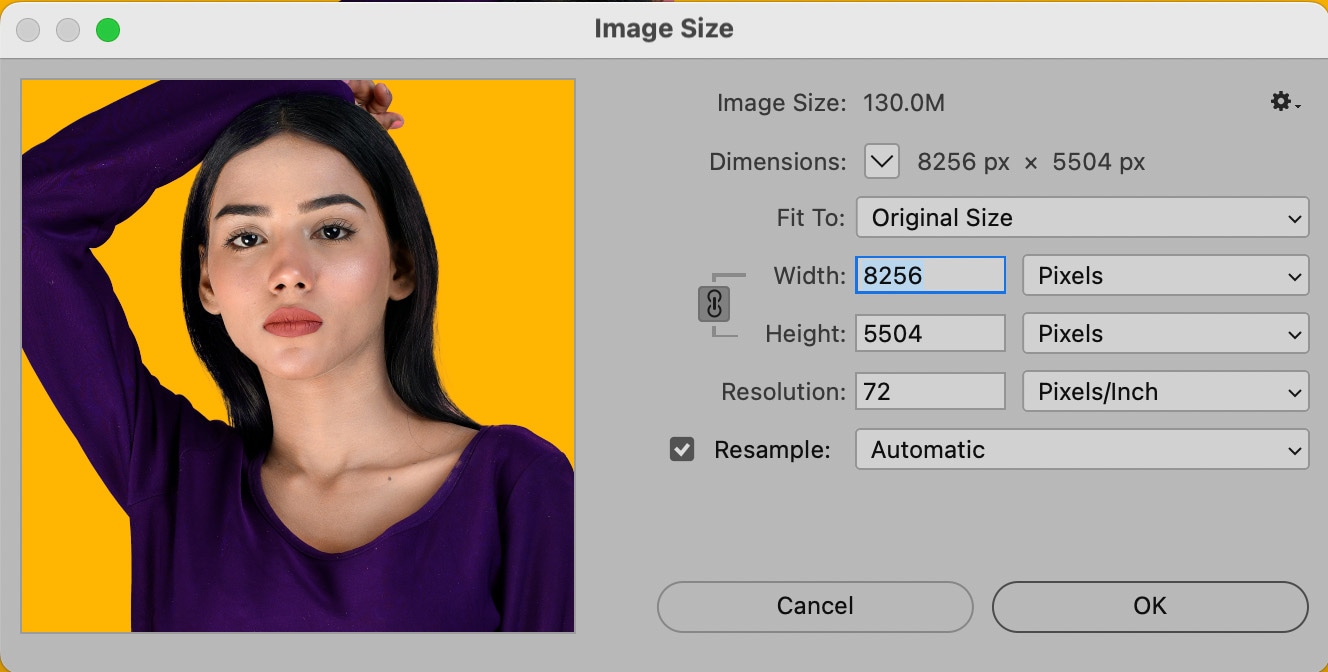
In the Image Size dialog box, enter the new dimensions you want to resize your image to. Make sure the chain link icon (to keep proportions) is enabled.
If you are sizing an image for your ecommerce website, you will want the dimensions to be as small as possible without losing quality. A good rule of thumb? Keep images around 1000px wide (2000px wide if they are to fill the screen from side to side). You can keep an eye on the final file size with the “Image Size:” text at the top of the dialog box. In general, try to keep ecommerce images under 200K to ensure fast load times.
Next to Resampling, choose a method that works best for the type of image you are working with:
- Bicubic Sharper (reduction) is best for reducing the size while still showing a lot of detail
- Bicubic (smooth gradients) will produce the best images for showcasing flawless skin by smoothing edges
- Nearest Neighbor produces very harsh edges and emphasizes artifacts. Only use this if you want a grainy, pixelated look.
All other resampling options are for enlarging images, not reducing them. If you’re not sure which resampling to choose, stick with “Automatic.”
Click OK, then save your resized image (File > Export > Export As…).
For more control over file size and compression, Photoshop’s Export As… tool is a great option—covered in the next section.
How to reduce image size in Photoshop: Export As…
The Export tool in Photoshop is one of the best ways to shrink image file sizes without sacrificing too much quality. Whether you’re optimizing a product image, a thumbnail, or a homepage banner, it can balance image clarity with fast loading speeds.
Using the Export function in Photoshop is often comparable to the compression you’ll get from other tools, without the extra steps (or extra cost) of needing to access additional software.
Before using the Export function, set your ideal image aspect ratio in the top, left hand corner after selecting the Crop tool.
Once your image is cropped (if needed), resize and compress it using the Export function.
Go to: File > Export > Export As…. You can also use the Export As… keyboard shortcut CTRL + SHIFT + ALT + W (ALT + SHIFT + COMMAND + W on a Mac)
This opens the Export As… window, where you can fine-tune file size and quality.
Photoshop image resizing settings
Here are some of the image resize file size and other settings you can choose from:
- Preview section: See what your image will look like after export. Clicking on 2-Up allows you to see different options side-by-side
- File format: On the right-hand side of the screen, you can choose what file type your exported image will be. JPEG is best for compression while keeping quality. PNG is great for transparency but results in larger files. If you have a simple vector-style graphic with no transparency, PNG-8 will give you a great-looking file at a fraction of the size of a PNG-24 (see below). If your graphic is animated, save as an animated GIF.
- Quality (for JPEG): When the JPEG file format is selected, you can use the slider to move between low quality and high quality. A compression level around 5 or 6 is usually adequate.
- Quality (for PNG): When PNG is selected, you have the choice to choose “Transparency” and “Smaller File (8-bit)” If you want a high quality, transparent image (known as a PNG-24), check Transparency and leave Smaller File unchecked. However, if you need to compress an image heavily and transparency isn’t that important, choose Smaller File. This will allow you to export your file as a lower-quality, smaller-sized PNG-8.
- Image size: The dimensions of your image. If you know the exact dimensions you need, you can enter them here. Or, if you want to reduce the size by a percentage, you can use the Percent scaler as well.
- Resample: This is how Photoshop “rebuilds” parts of the image’s data that are altered during compression. Any time you enlarge or reduce an image’s size, you’re going to affect the original proportion that the image had in relation to pixels per inch and dimensions. Bicubic creates smoother gradients, but does not allow for the most compression. Explore other options such as Nearest Neighbor (most basic and worst preservation of detail), Bilinear (usually better for upsampling), Bicubic Smoother (designed for upsampling) or Bicubic Sharper (better for downsampling/preserves detail).
- File size: On the lefthand side of the Export As… window, you can see the file size of the optimized image.
There’s no one-size-fits-all option here. When reducing an image in Photoshop, each image generally takes an individualized amount of tweaking to find the best image quality with the best compression.
Web tools to edit images and reduce file size
- Bulk Web Resizer: This site allows you to upload a batch of images and then resize according to your desired dimensions. You can also adjust the image quality to your needs (choose 100 if you want to preserve the original quality), as well as sharpen images.
- Canva: Canva’s free photo editor allows you to crop and resize images on its site. Additional free editing tools include flipping and rotating images, adjusting the color, and adding filters.
- ImageOptim: ImageOptim can be used in your web browser or via a Mac application. To shrink files, ImageOptim gets rid of EXIF metadata, such as GPS position and the camera’s serial number — however, you can choose to keep specified metadata intact (which is essential to optimizing your product photos for SEO). There’s also a Lossy minification option, which ImageOptim says will result in the smallest file size possible, while preserving image quality. ImageOptim has pricing plans, starting at $9/month for 1,000 image optimizations.
- Kraken: Kraken has a web application and a developer API that can handle bulk image optimization and resizing. The simple web interface is free, and you can drag and drop photos or upload by entering the image URL. There are also different pricing options depending on how many images you work with and how frequently you need to reduce their size. Pricing is based on the total number of GB.
- Pixlr: Resize and also edit photos as needed. The image-editing site also has a free vector-editing tool, as well as free fonts and graphics you can use.
- pngquant: This tool will compress .png files to reduce the file size.
- TinyJPG/TinyPNG: This site allows you to reduce the file size of your images. There are no editing features; instead, TinyJPG/TinyPNG focuses on compressing files to ultimately reduce the file size, stripping unnecessary data from your image.
AI resizing and compression tools
- Let’s Enhance: great for resizing photos for print and digital use.
- Squoosh: web-based, Google-backed compressor with advanced controls.
- Upscale.media: AI-powered upscaler for improving resolution.
Plugins that reduce image size within your CMS
There are tons of plugins on the market that make the image resizing process easier and more automated, all from within your CMS. Here are just a few:
WordPress
Shopify
Tips for resizing ecommerce photos
For ecommerce product photography, maintaining high quality while optimizing file size is key. Here are some best practices:
- Recommended dimensions: Most platforms work well with 1000×1000 px for product images. If zoom functionality is needed, go for 2000×2000 px or higher.
- Aspect ratio: Stick to 1:1 (square) for product photos and 16:9 or 4:3 for banners and hero images.
- Compression: Keep file sizes under 200 KB for fast loading. JPEGs with a “High” setting in Save for Web are a good choice.
- Background: Use a clean white or transparent background to keep the focus on the product.
- Resampling: Use Bicubic Sharper for downsizing to preserve details.
Tips for resizing headshots
Headshots should look sharp and professional across platforms without being too large. Here are some tips to keep in mind:
- Recommended dimensions: For LinkedIn, company websites, or professional use, 400×400 px works well. For print or high-res needs, go for 1200×1200 px or more.
- Aspect ratio: Stick with 1:1 (square) for profile pictures or 4:5 / 2:3 for portraits.
- File type: Use JPEG for web (compressed but sharp) and PNG for transparent backgrounds.
- Compression: Aim for a file size under 100 KB for web use to prevent slow loading.
- Resampling: Use Bicubic Sharper when reducing size to keep facial features crisp.
Outsource your image resizing needs
Resizing images properly takes time, especially if you’re working with a large volume of product photos, headshots, or marketing assets. Instead of spending hours tweaking dimensions and compression settings, consider outsourcing to a professional image-editing service.
At Path, we specialize in high-quality image resizing, background removal, drop shadow, and more—all done by expert editors with precision and speed. Whether you need bulk resizing for an ecommerce store or perfectly optimized headshots, you’re in good hands with Path.
Need bulk image resizing done right? Try Path free—fast, flawless, and optimized for web.

Image resizing and compression FAQs
Does resizing affect SEO?
Yes, large images slow websites, hurting rankings.
What’s the ideal file size for web images?
The ideal file size for web images is under 100KB for optimal performance.
[ad_2]
Source link