برچسب: Photoshop

  • How to Use the Photoshop Magic Wand Tool

    How to Use the Photoshop Magic Wand Tool


    Photoshop’s Magic Wand Tool: You’ve definitely heard of it and, depending on how much you use Photoshop in your day-to-day, you may have even used it.

    Learn what the Magic Wand Tool is and how to select and mask in Photoshop with it. This Photoshop masking tutorial will turn you into a pro in no time.

    The Photoshop Magic Wand Tool is a quick and easy way to select and mask certain portions of an image, giving you the ability to alter one part of your image while leaving other parts intact. One of the most common uses of this tool is to swap out or remove the background of a product photo, leaving the subject of the image in place. 

    Related: Clipping Path vs. Masking: What’s the Difference?

    The Magic Wand Tool works by selecting an area of solid color within an image. Once your selection is made, the Magic Wand Tool gives you multiple options for refining that selection. 

    The Magic Wand Tool is a go-to tool when you want to display a product in various settings by showing it against different backgrounds, or when you want to remove a background altogether so your product stands on its own.

    This is often the case for marketplaces like Amazon or eBay, which have product photo requirements of their own that outline the approved backgrounds your images can have.

    Tutorial: Learn how to create a ghost mannequin in Photoshop

    https://www.youtube.com/watch?v=e_y3vFhp_Bs

    For the following tutorial, we’ll be working with this photo of a soccer player. You’ll learn how to remove the background from the player using the Magic Wand Tool, so that you can later put the player into different scenes. The Magic Wand Tool is a great option for removing backgrounds on photos with a mostly solid background.

    soccer player photo with black background, standing on grass

    Step 1: Unlock the background and select the Magic Wand Tool

    Before you can use the Magic Wand Tool, you’ll need to make sure your layers are set up correctly. Go to your Layers panel, located by default in the lower right-hand corner of Photoshop 2024’s application window. If you don’t see the Layers panel, you can bring it forward by choosing Window > Layers from the dropdown menu at the top of the application window.

    Within the Layers panel, double click on the Layer entitled Background.
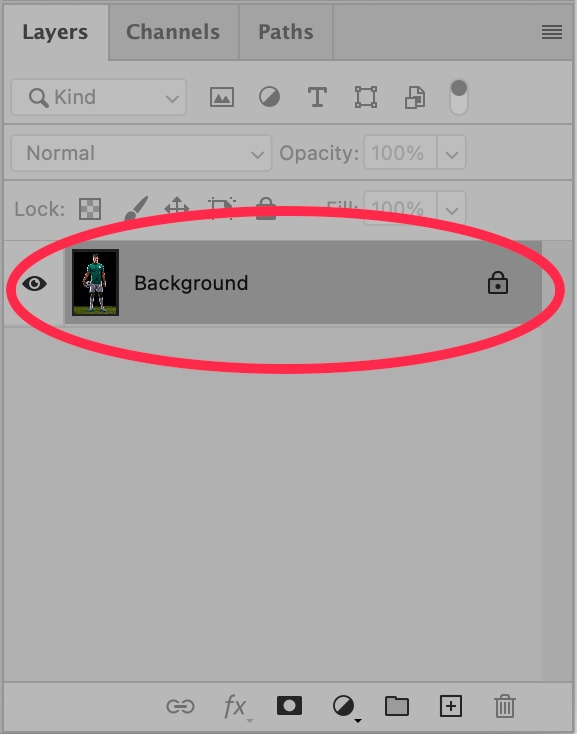
    Layers pop-up menu from Photoshop, showing Background layer

    A pop-up window will appear, prompting you to rename the layer “Layer 0.” Click OK.
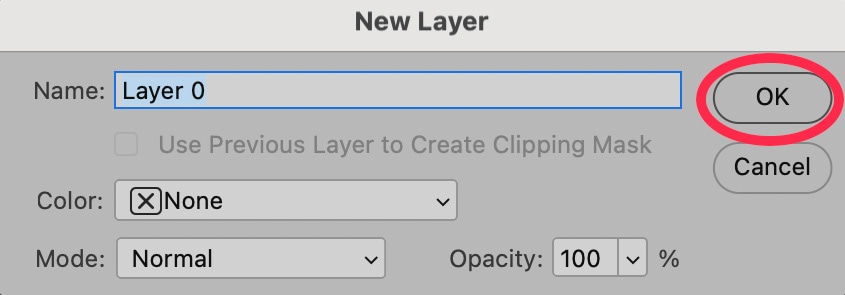
    New Layer pop-up menu from Photoshop, showing Layer 0 with a red circle over the OK button

    Within Adobe Photoshop 2024, choose the Magic Wand Tool from the Toolbar. By default, the Toolbar is placed to the left of the application window. The Magic Wand Tool may be hidden behind the Object Selection Tool or Quick Selection Tool.
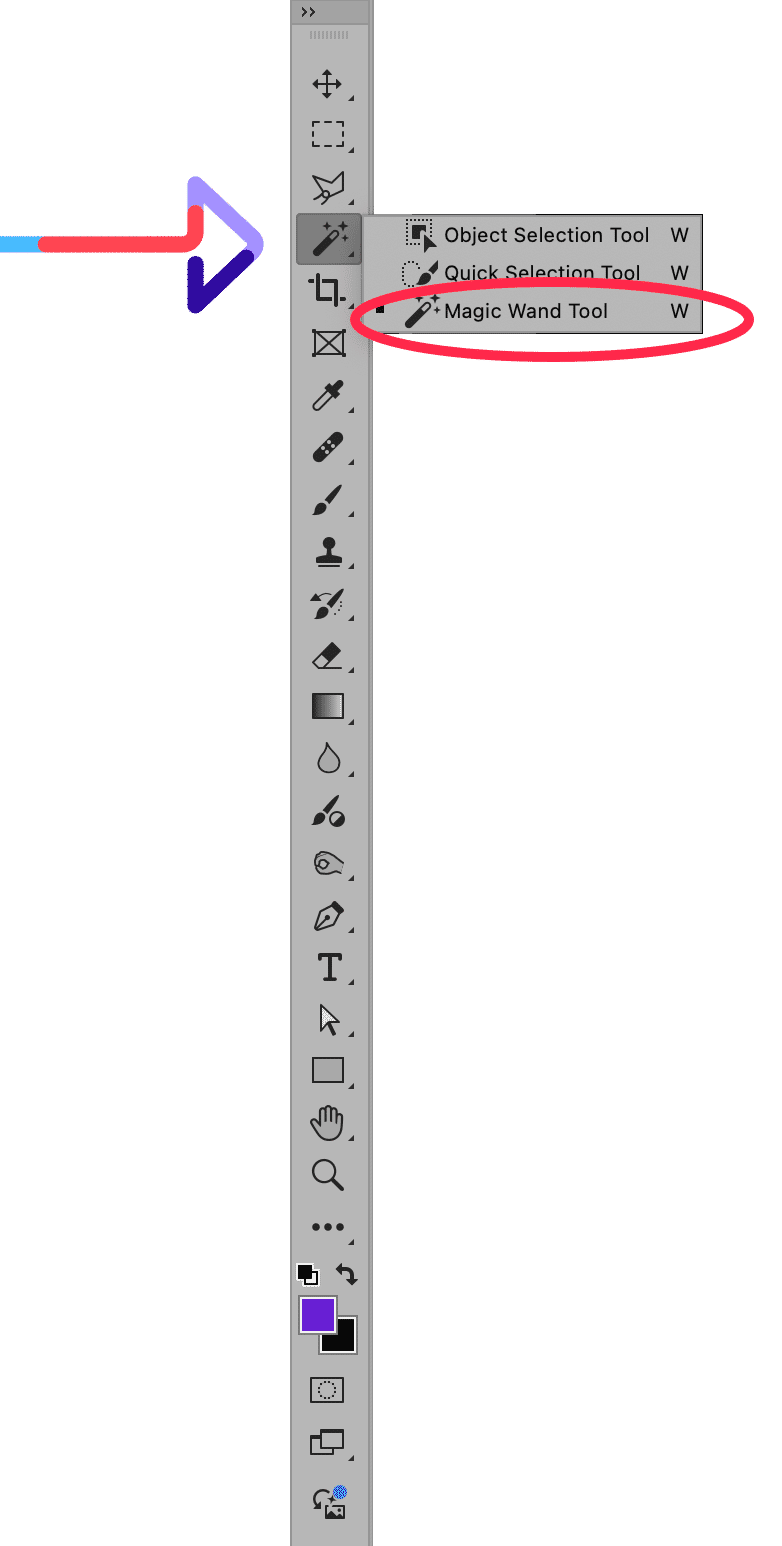
    Photoshop menu showing where the Magic Wand Tool is located

    Note: To select any tool that is hidden “behind” another tool, choose the tool that is in front, and then hold the mouse button until other tools are visible. Then, select the visible tool you need.

    Save time and outsource it: Our background removal services start at $0.49/image

    Step 2: Select the solid areas of the background using the Magic Wand Tool

    There are several different ways to use the Magic Wand Tool to remove a background. We’ll start with the simplest method and work our way to more advanced methods as we refine our selection.

    When you click on a portion of your image using the Magic Wand Tool, the tool selects the pixel you selected along with adjacent pixels of the same (or similar) colors. 

    Once you have the Magic Wand Tool selected, you’ll see several different options in the Options Bar at the top of the screen. You can adjust the Tolerance of the Magic Wand Tool here. The higher the Tolerance, the more similarly colored pixels will be selected alongside the pixel you select with the tool.

    Photoshop main menu showing Tolerance at 0

    For this example, we will keep the Tolerance at 10.

    Click somewhere within the background of the image. The Magic Wand Tool will create a selection of all contiguous portions of your image that are roughly the same color as the background portion you selected.

    soccer player standing on grass with black background and checked lines around the black background border

    The Magic Wand Tool did a relatively decent job, but there are some portions of the background (such as between the player’s legs and under his right arm” that are not selected.

    To select areas of the background that did not get selected, hold down the SHIFT key and click within those areas that need to be selected. Holding SHIFT allows you to add to the existing selection without deselecting anything.

    soccer player with black background standing on grass and the borders of the athlete and the background are outlined

    Step 3: Select other portions of the background and foreground

    The ground in this photo is not a solid color like the background. It is, however, all varying shades of green. In order to select an area that is all about the same color but has a lot of detail, we need to adjust the Tolerance of the Magic Wand tool to a higher value. In this example, we’ve set the Tolerance to 50 and selected the grassy ground area of the photo.

    soccer player standing on grass with black background and everything is outlined and starting to be edited

    The results are less than perfect, but if we were to make the Tolerance much higher, we might accidentally select portions of the player’s legs.

    To smooth out the selection, choose Select > Modify > Smooth… from the dropdown menu at the top of the application window.
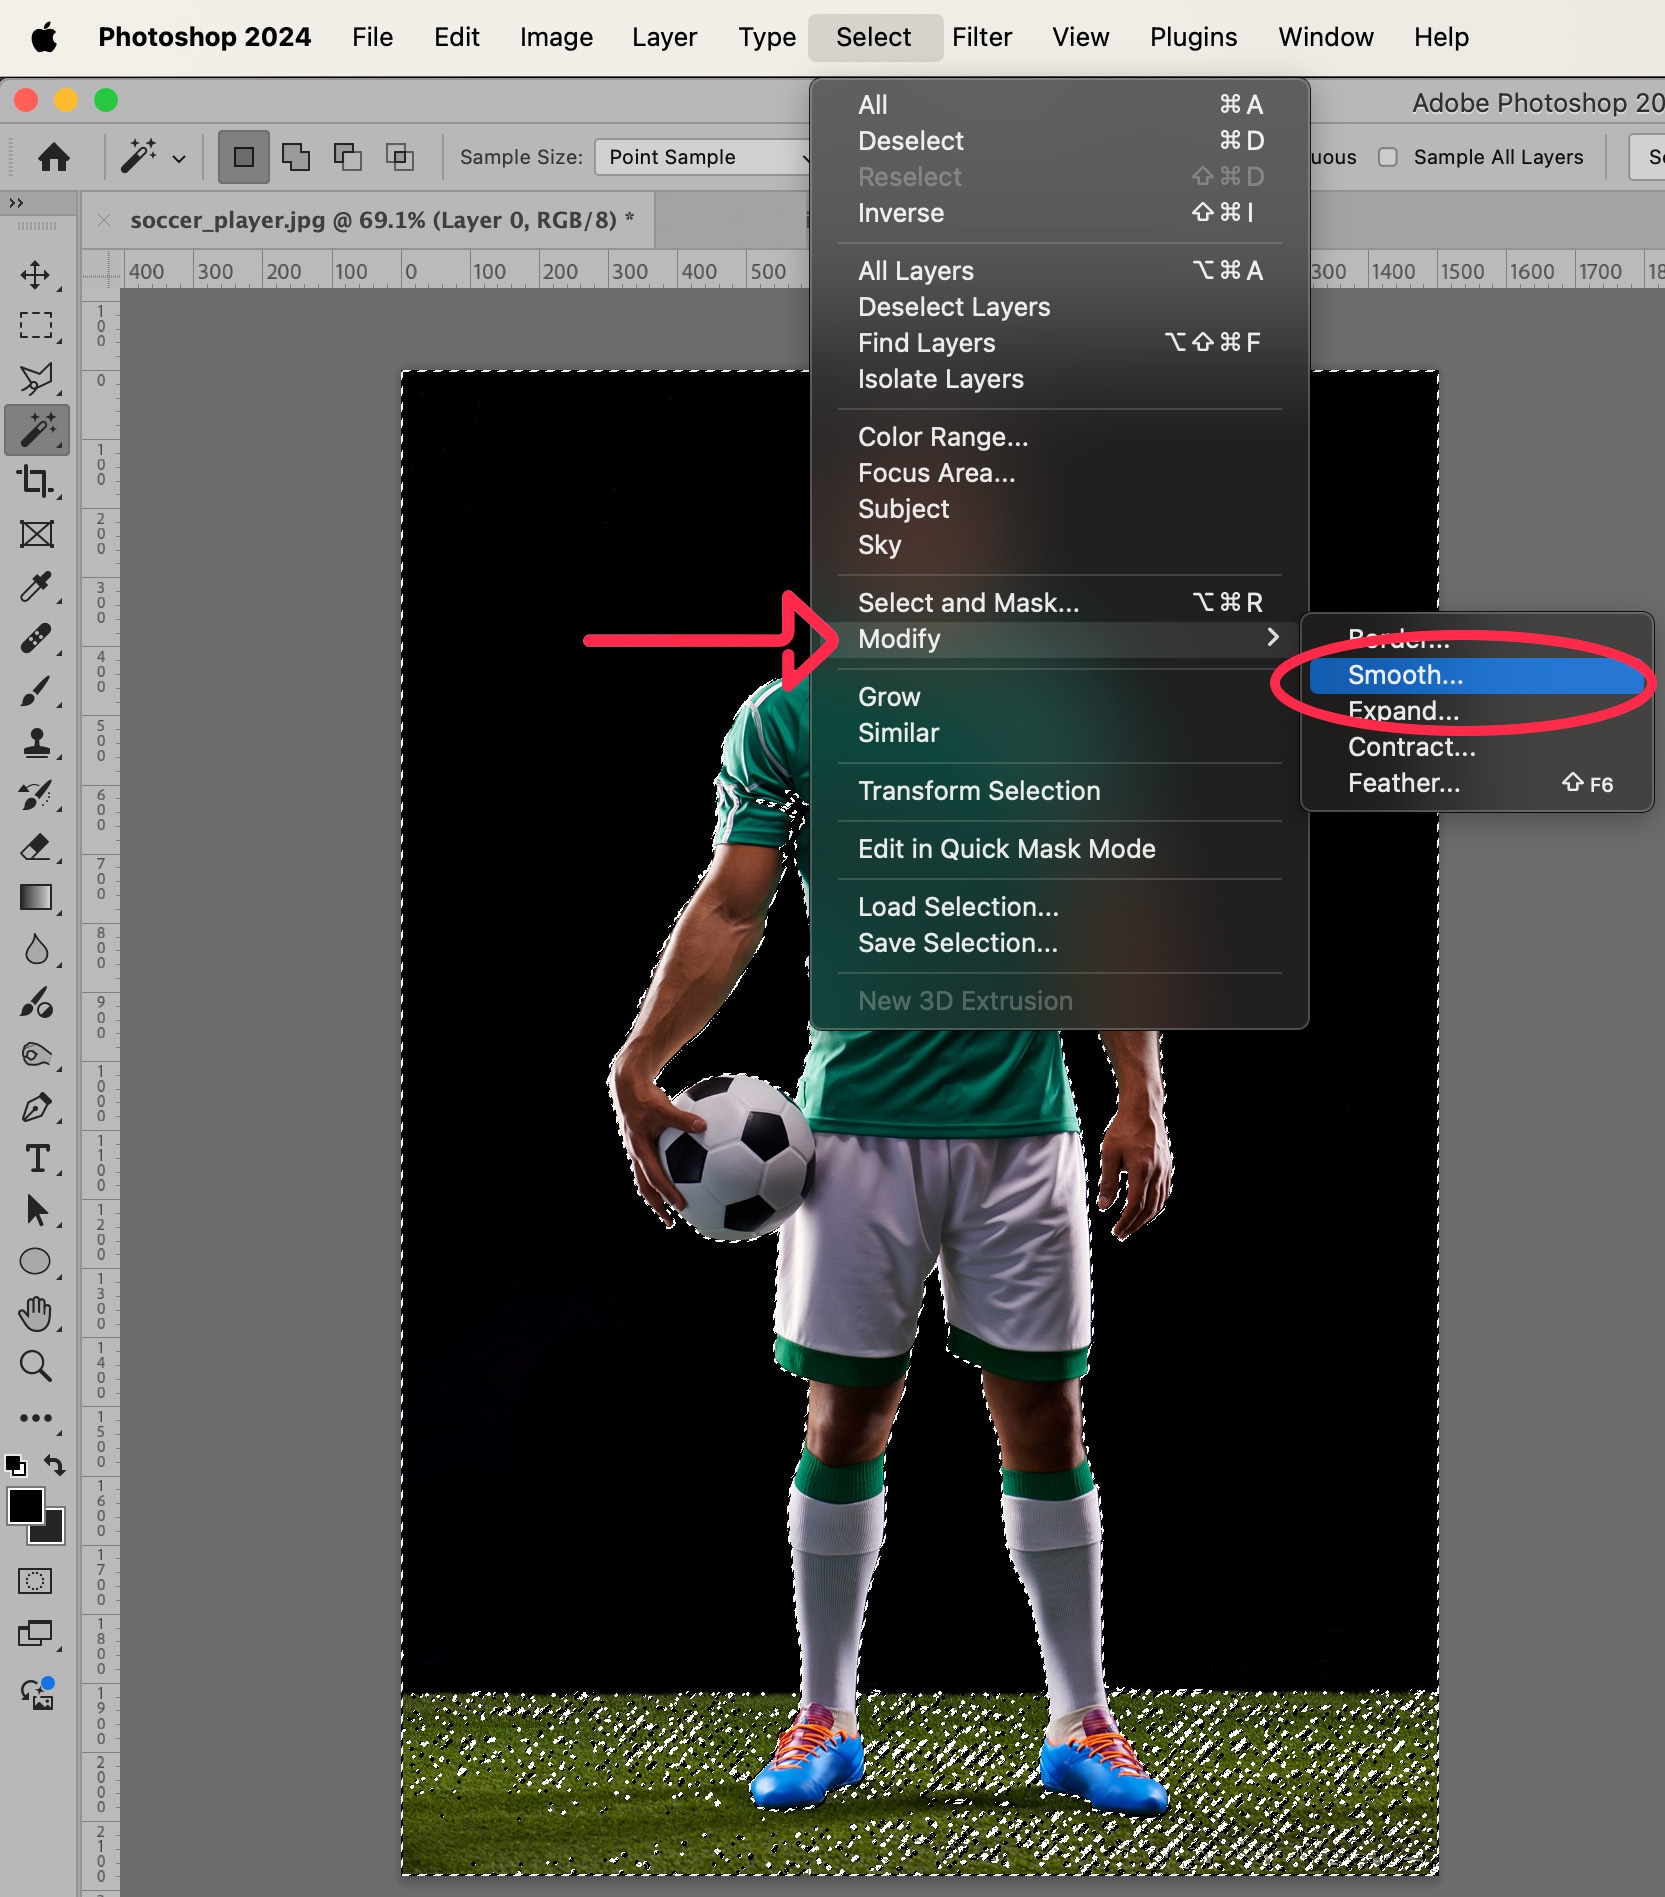
    Photoshop editing window showing how to Modify and Smooth your photo

    In the Dialog Box that appears, set the smooth value to something large enough to smooth out the edges of the selection but small enough to keep the integrity of the selection’s outline. For this example, we’ll set the value to 5.

    Photoshop Smooth Selection pop-up window, with 5 pixels set as the Sample Radius

    Click OK.

    The selection now looks almost close to perfect. Almost.

    soccer player standing on grass with black background and everything is outlined to be edited in Photoshop

    Step 4: Create a mask

    Select the inverse of your current selection by choosing Select > Inverse from the dropdown menu or by typing SHIFT + CTRL + I (SHIFT + COMMAND + I on a Mac).
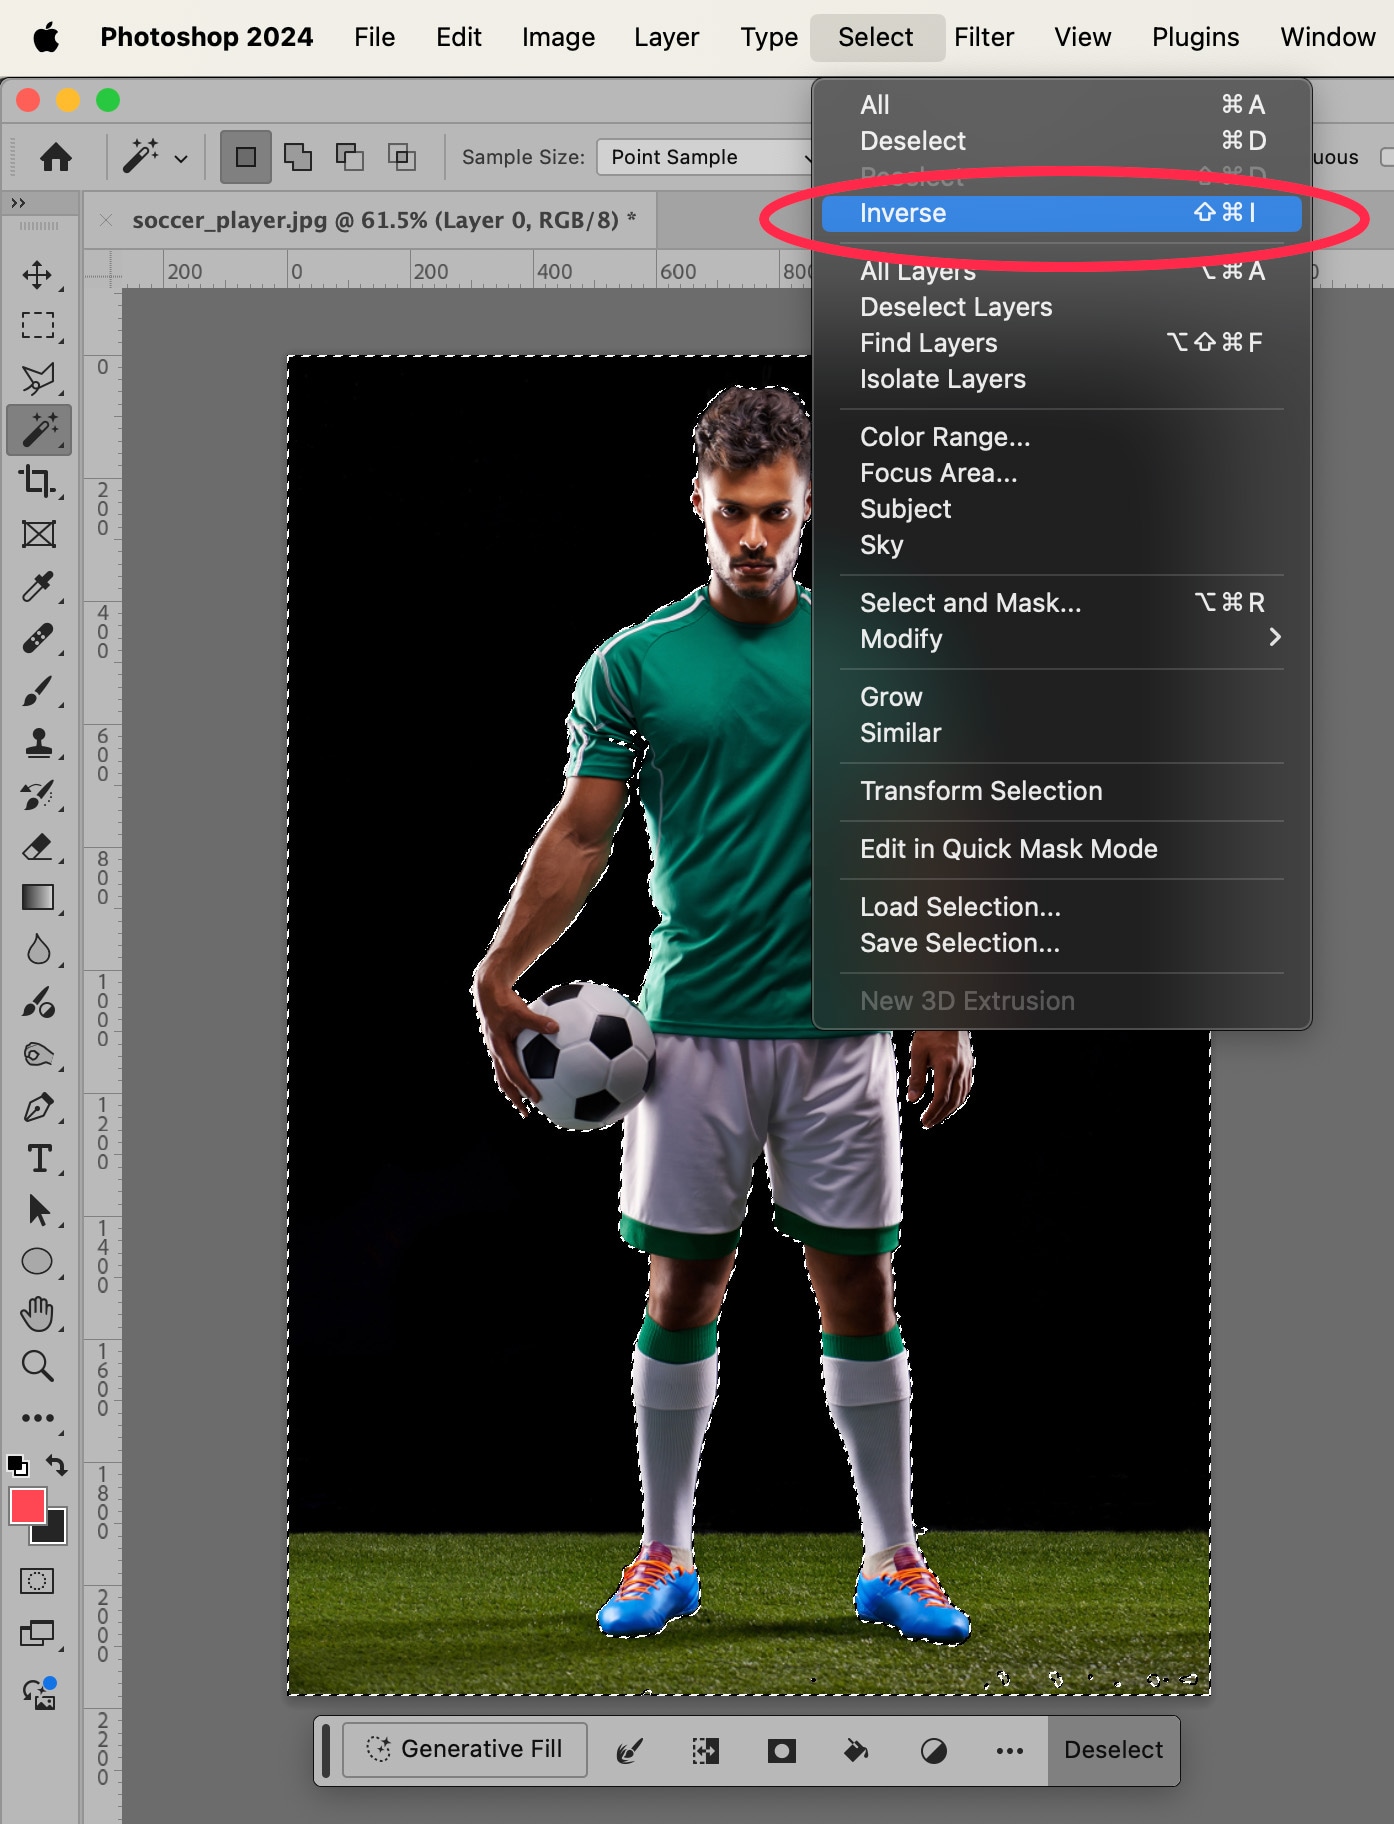
    Photoshop editing, showing the menu that has the Inverse option

    Now, your subject is selected (instead of your background).

    Next, go to Select > Modify > Contract… to tighten the edges of the selection. This is to compensate for any artifacts that may have appeared in the selection when we smoothed it earlier.
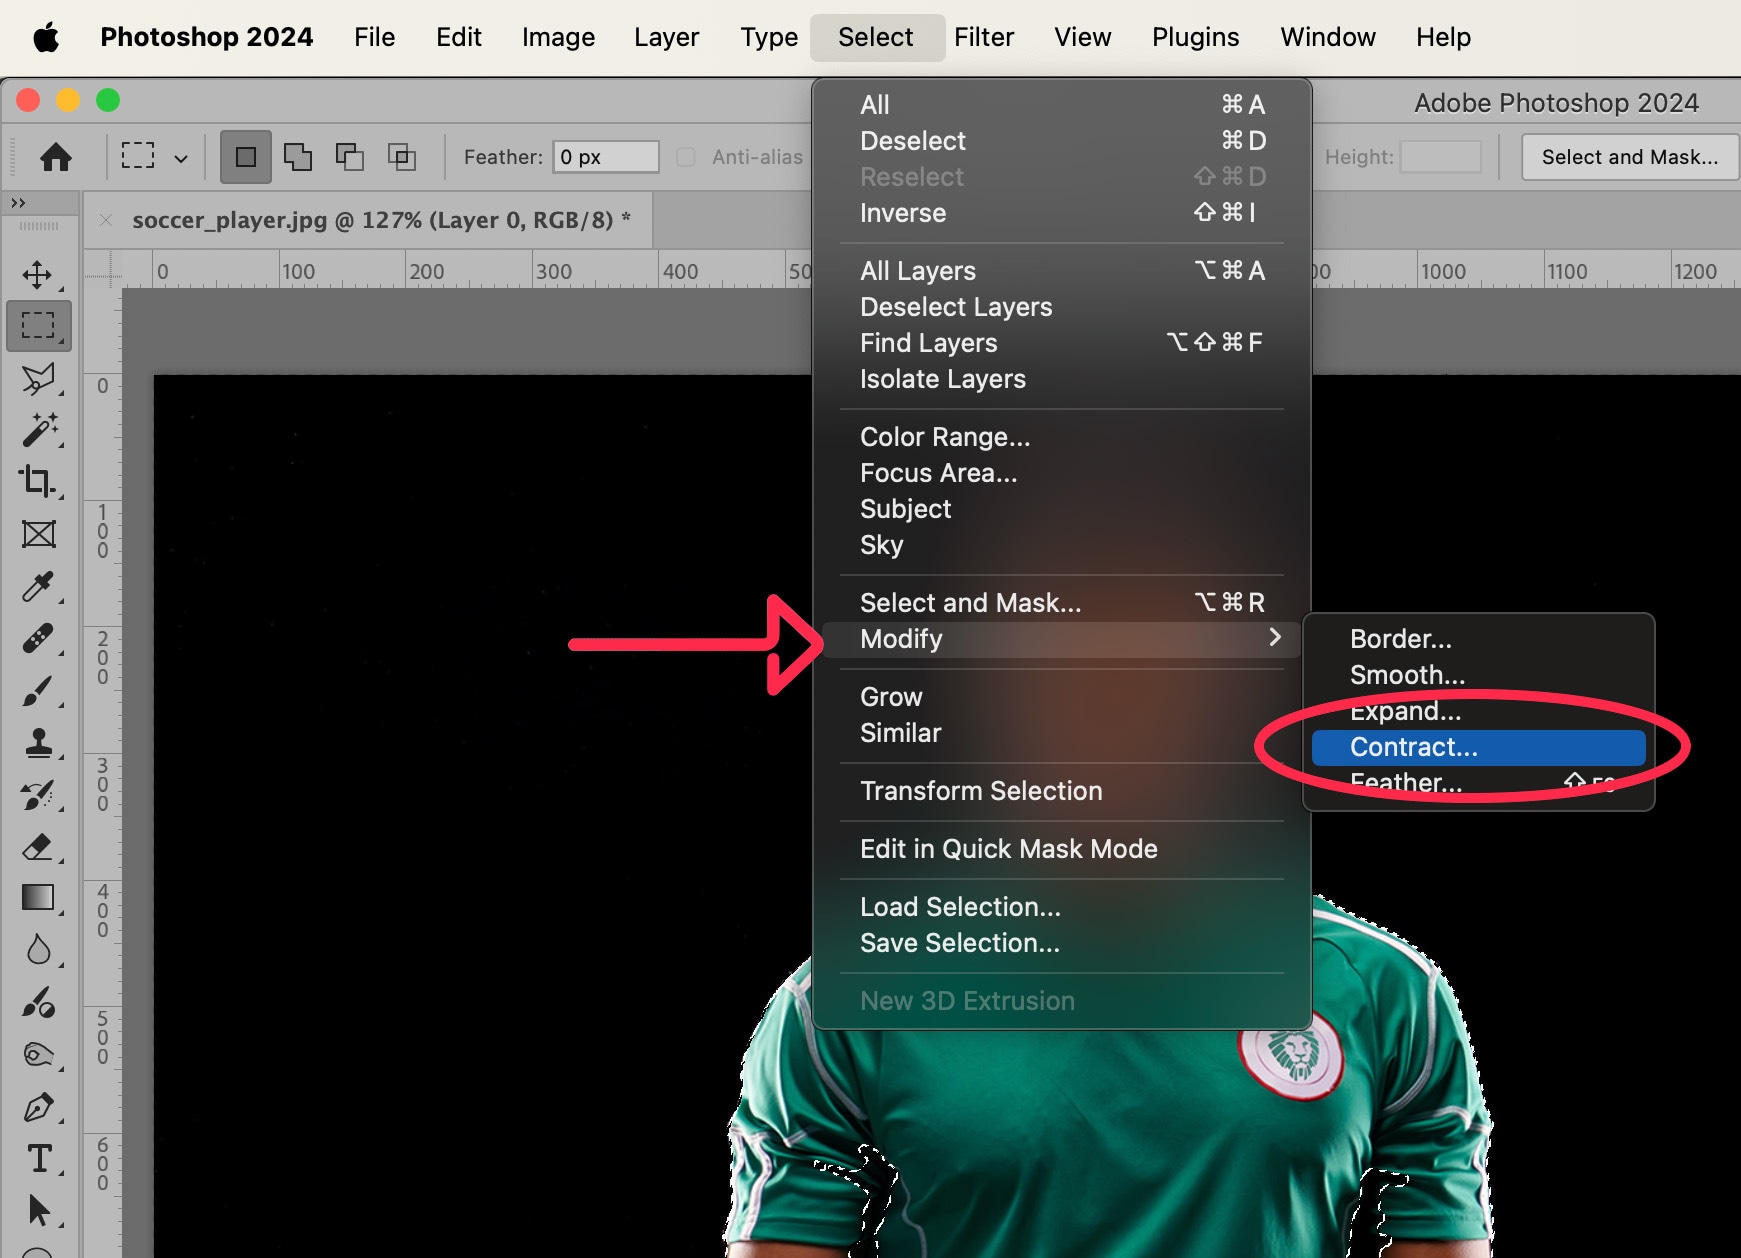
    Photoshop editing options and menus showing Modify > Contract…”> <p>In the dialog box that appears, set a Contract value to something between 1 and 4 pixels. The amount you set it to will vary depending on the image you are working with. In this example, I’ve set the value to 3.</p> <img class=

    Click OK.

    In your Layers panel, look for the Mask icon at the bottom of the panel. It will look like a black rectangle with a white circle inside of it.
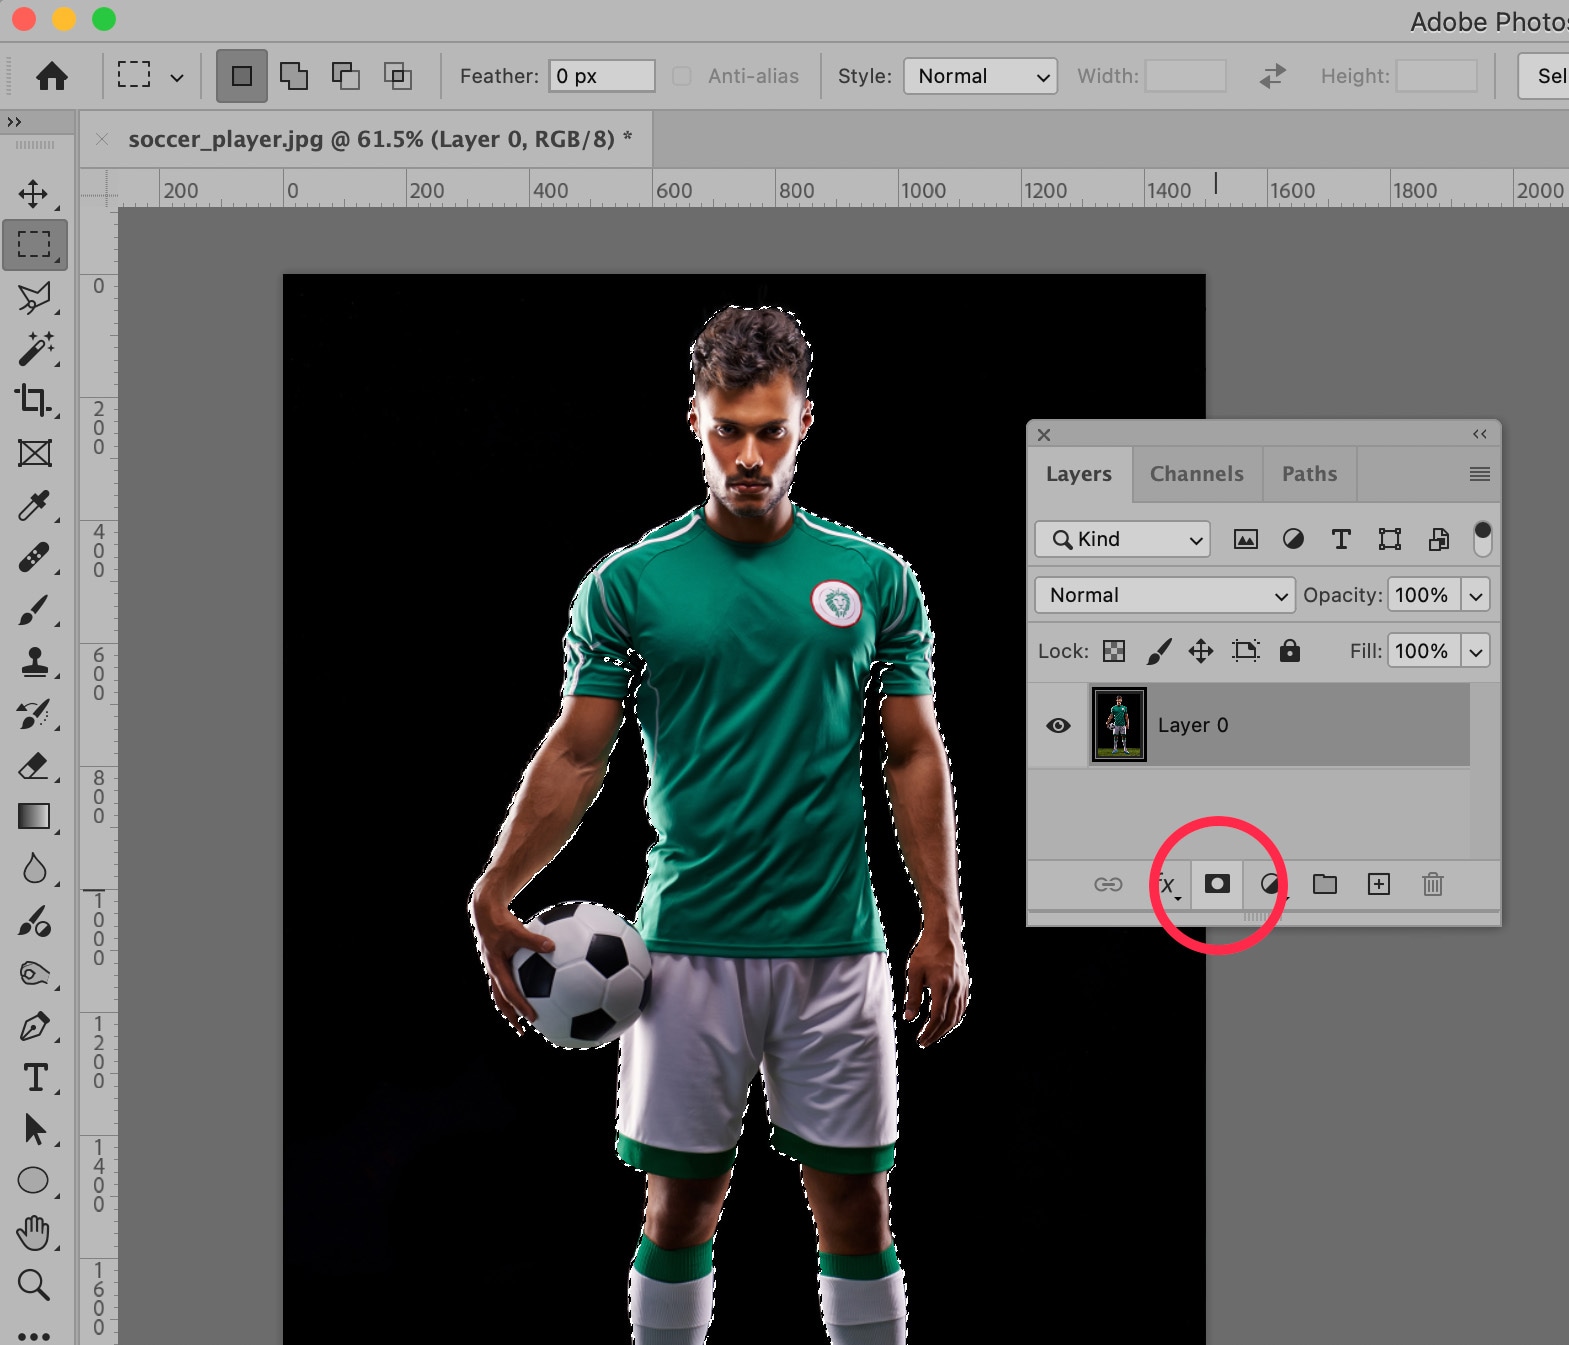
    Photoshop editing showing Layers and Mask options

    With Layer 0 selected, click on the Mask icon. You will now see your subject isolated against a transparent background.
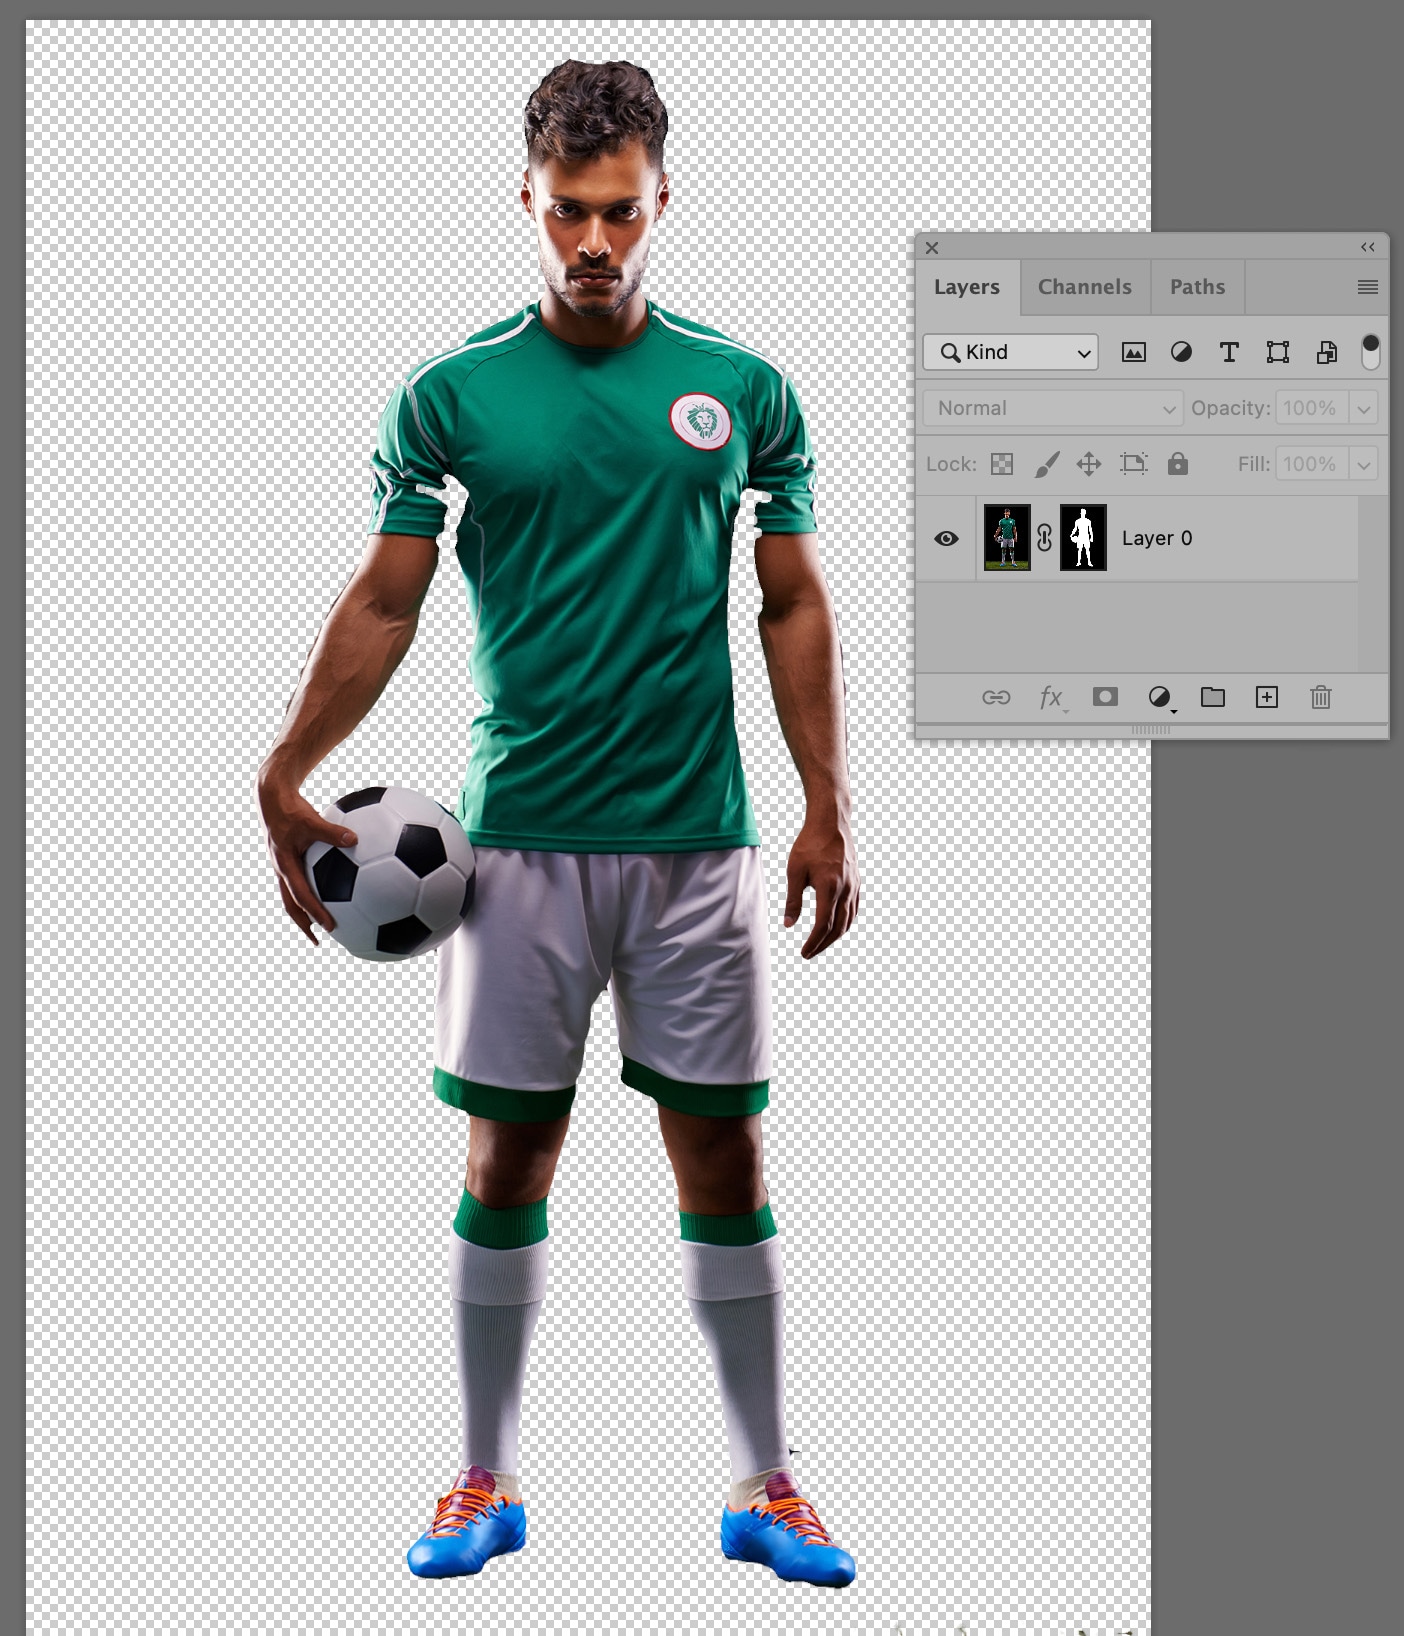
    soccer player image being edited in Photoshop, showing with a transparent background

    We’re almost there, but there are a few things we need to fix before we’re done.

    Step 5: Clean up the selection using the mask

    As advanced as Photoshop 2024 is, nothing can match the human touch for perfecting a selection. In order to finalize your image, you will need to use your Brush Tool, and your judgment, to modify and perfect certain areas of your selection.

    In Layer 0 of your Layers Panel, make sure you have the new layer Mask selected. When the Mask is selected, you’ll see a small, black outline around the Mask. Look closely as it’s a little hard to see.
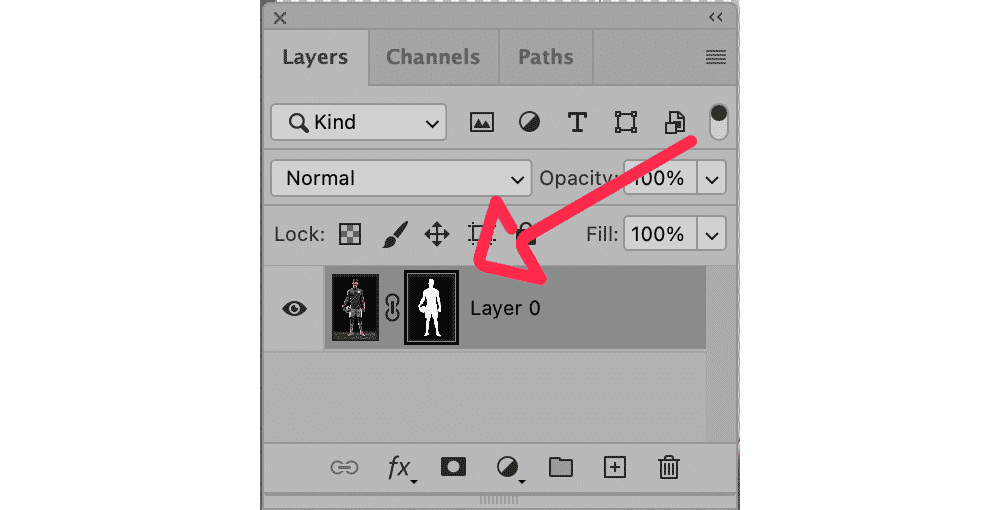
    Photoshop Layers menu showing different layers

    Next, select your Brush Tool from the Toolbar to the left of the application window. In the Options Bar at the top of the application window, you can set the width and hardness of your brush.

    If you have correctly selected the Mask icon in Layer 0, then the Foreground and Background colors in your Toolbar will be black and white. When white is the Foreground color, you can “paint back” portions of your masked image. When black is in the Foreground, you remove areas of your selection and they become masked.
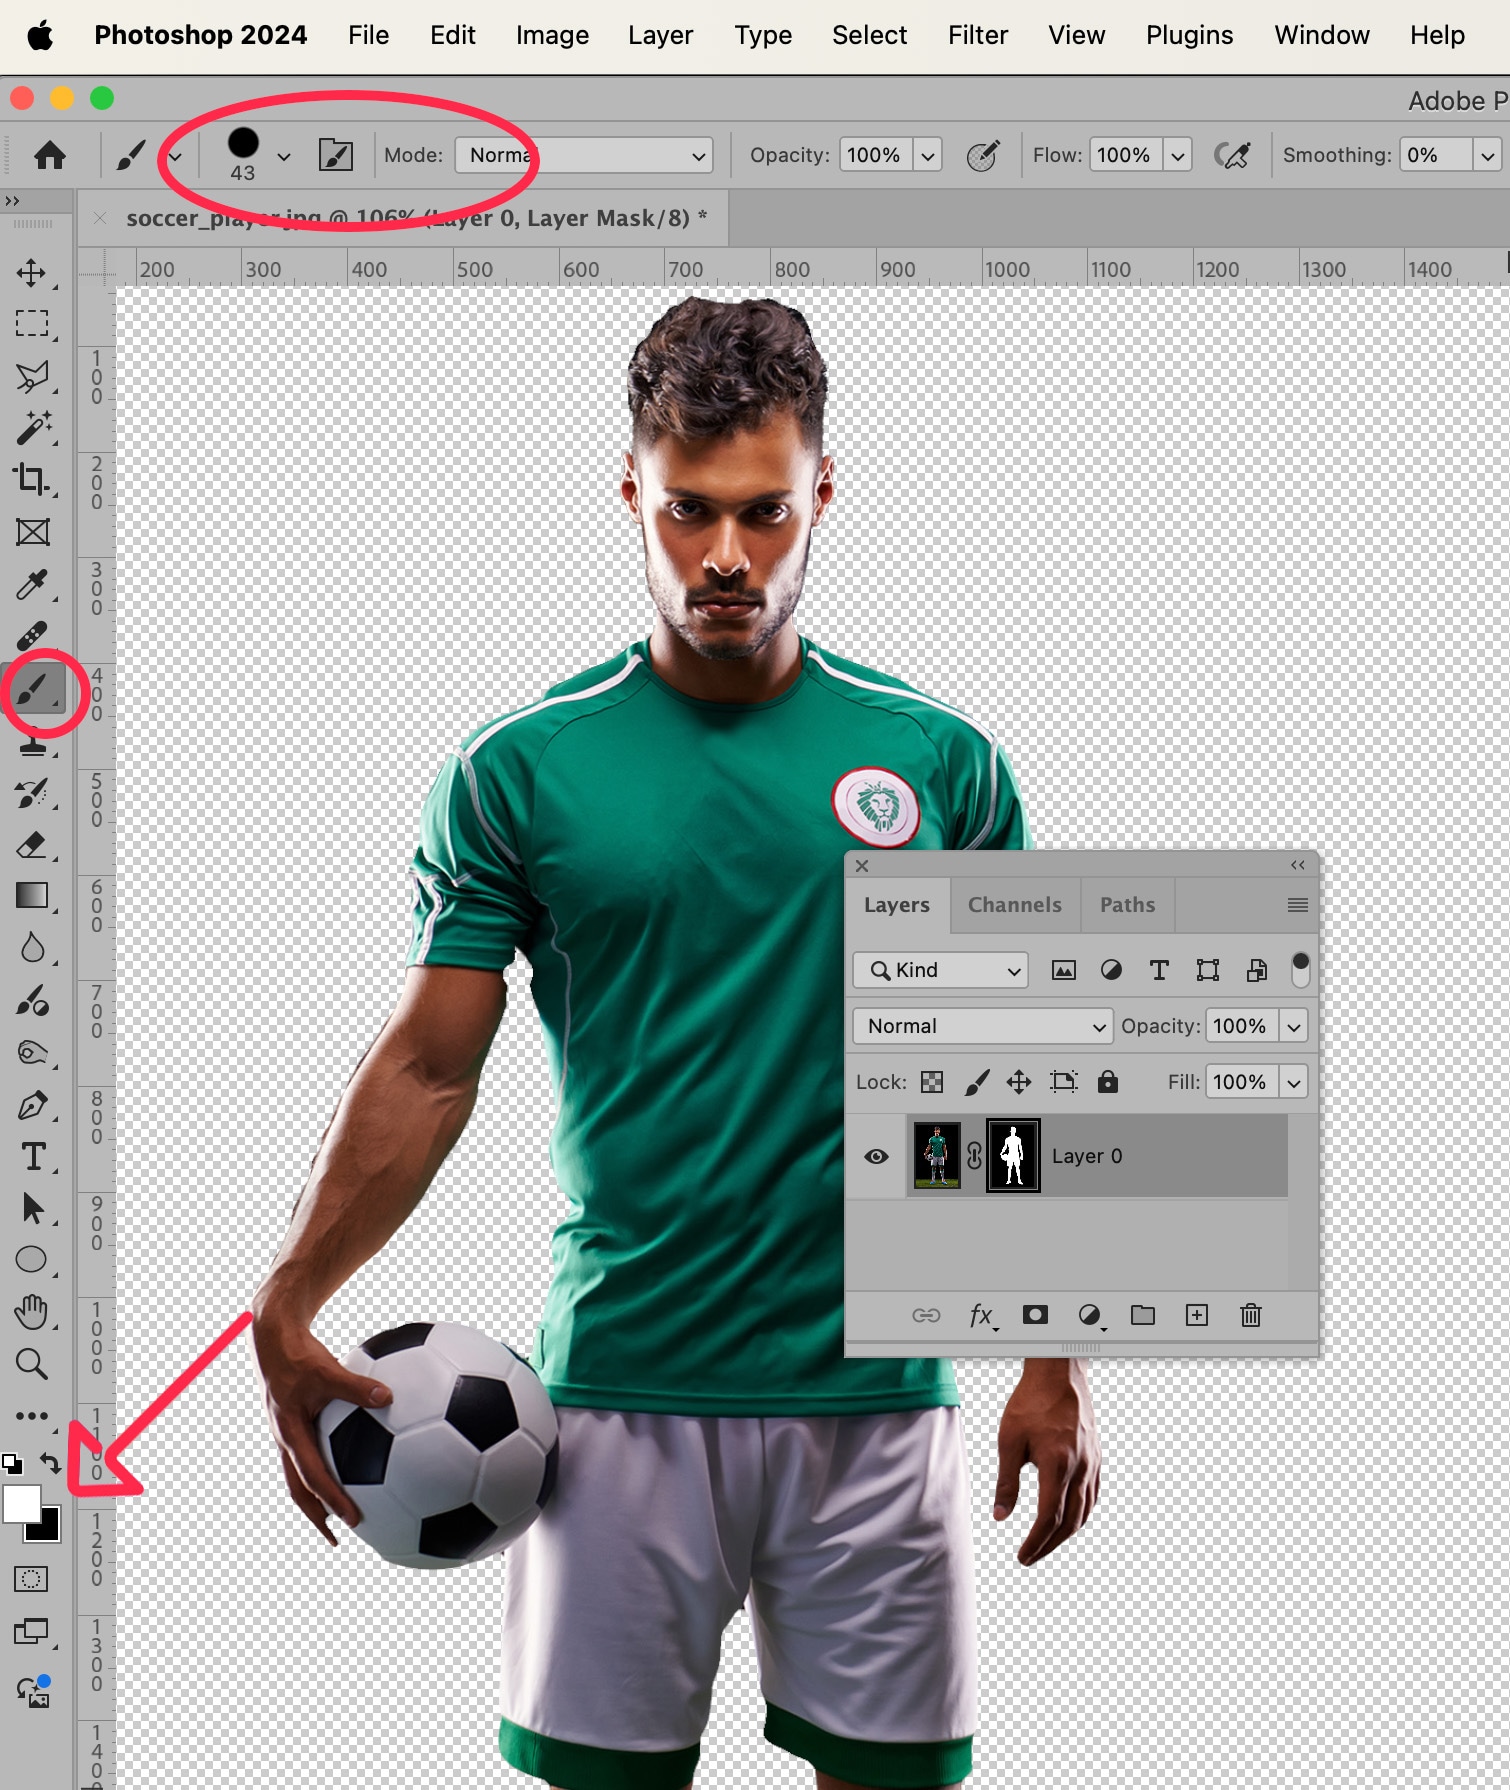
    Photoshop editing screen with mask icon layers features

    For instance, in our example image, certain portions of the player’s sleeves disappeared when we created our initial selection. Therefore, using the Brush Tool, we can “paint back,” or add those portions of the sleeve back in.
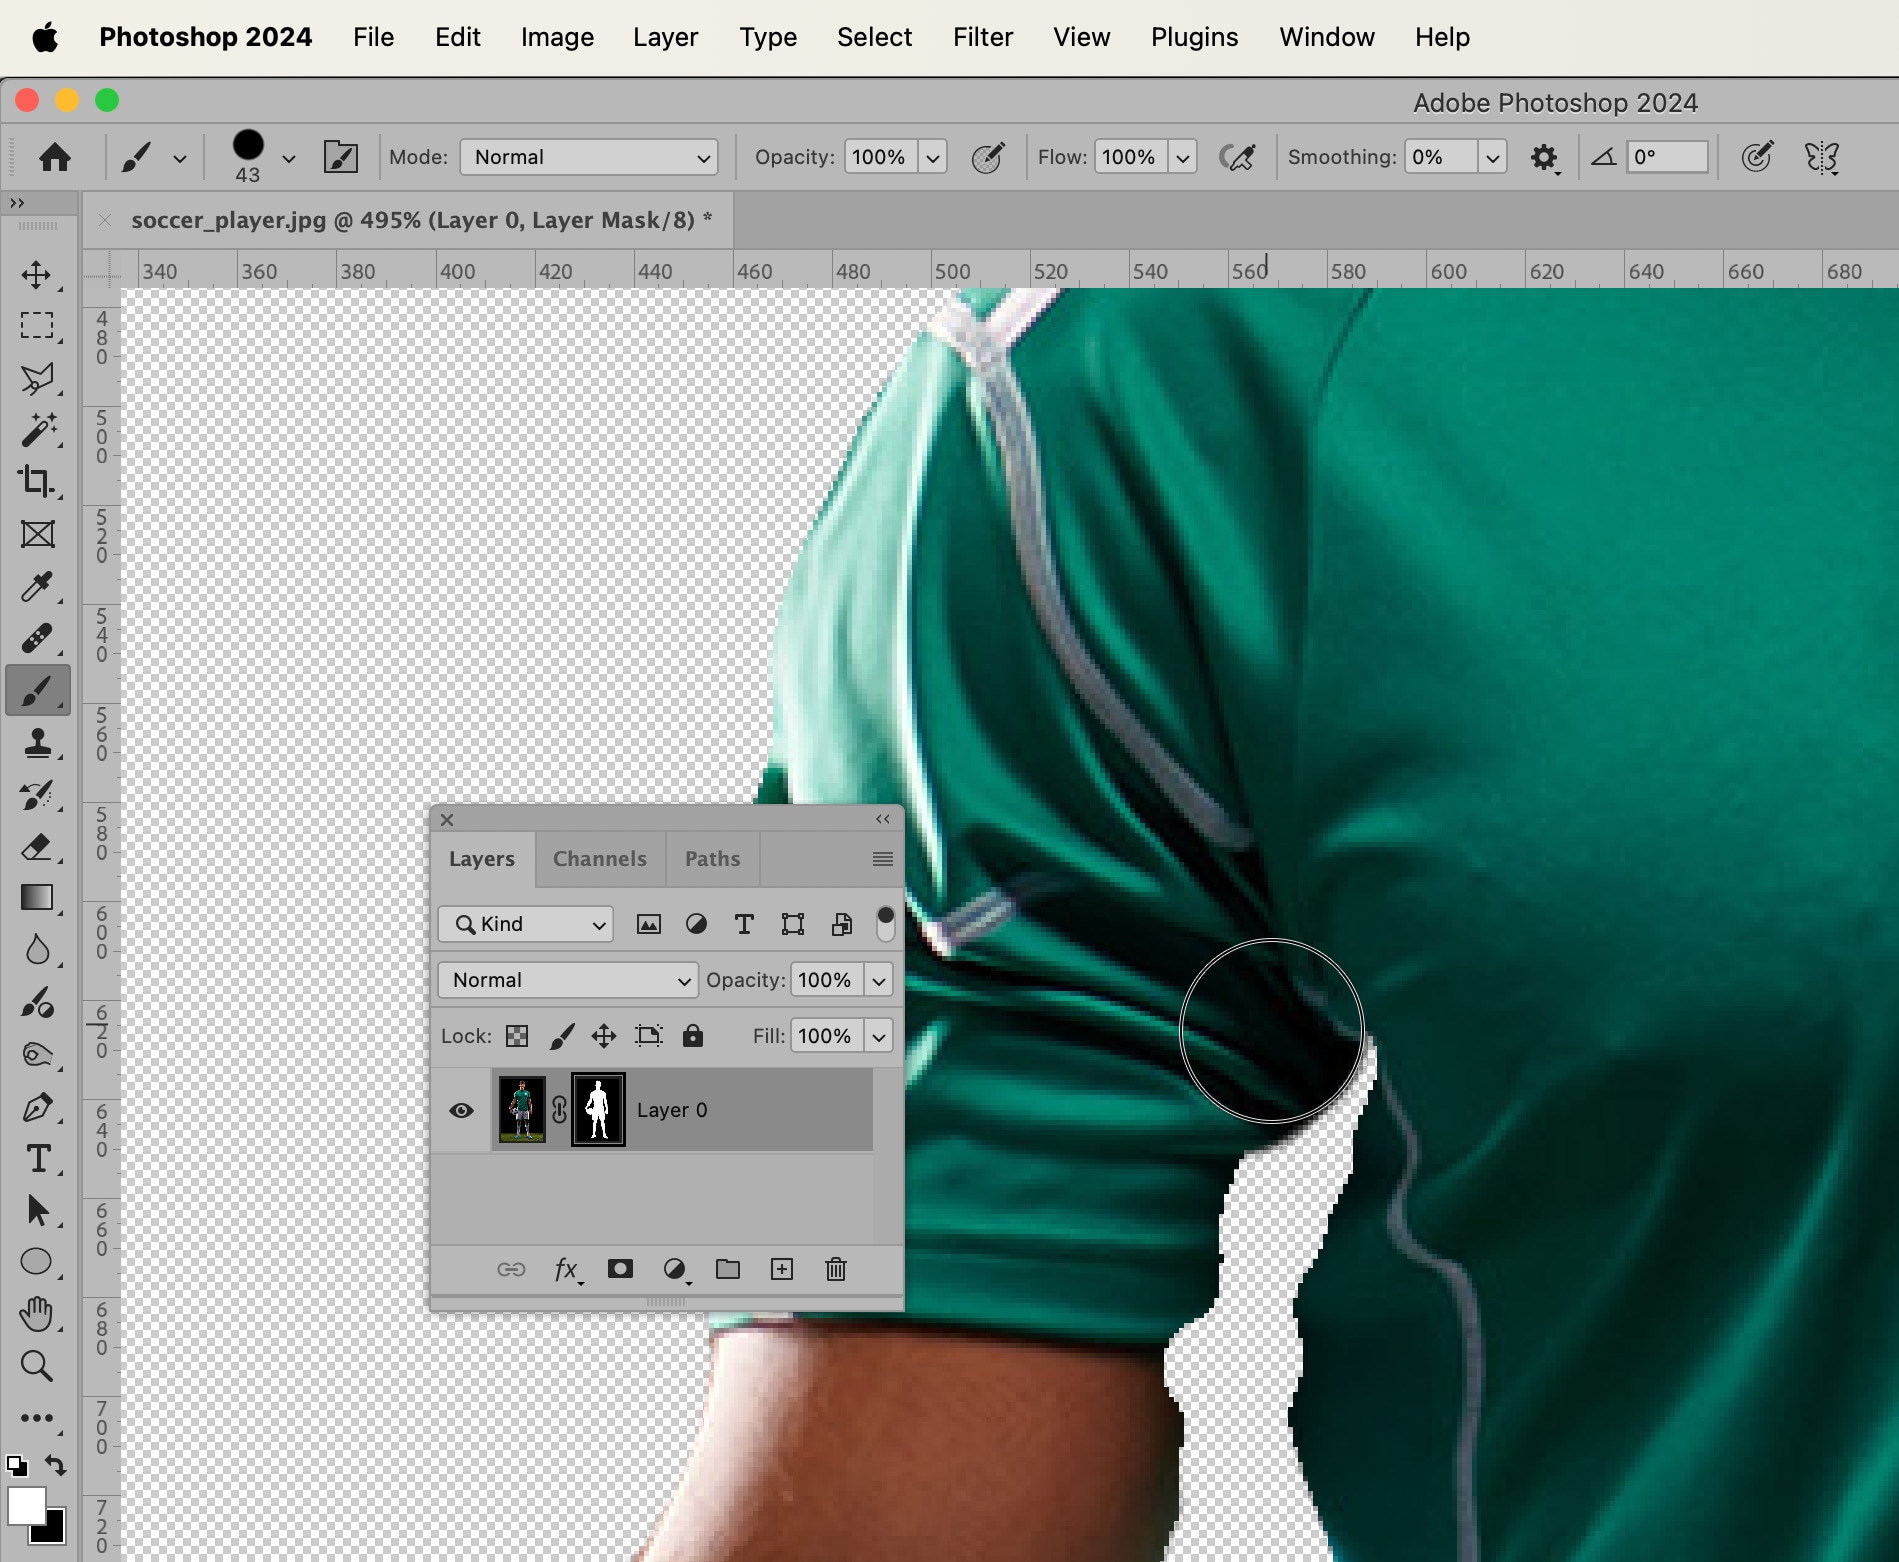
    refining armpit edit details in Photoshop

    Changing the size of the brush and switching between a white foreground and a black foreground, fix any edges of your selection that need finessing.

    Other ways to select and mask in Photoshop 2024

    Photoshop 2024 also offers another option for Selecting and Masking that may or may not be easier for you. Let’s start with the original image again to learn this second method.

    When your Magic Wand Tool is selected, you’ll notice there are some selection options available in the Options Bar at the top of the application window. At the far right of the bar, click Select and Mask….

    select and mask menu from Photoshop

    A new window will open showing most of the image erased. Don’t worry–the image is still there; it’s just been “masked.”

    At the top of the screen, click the button that says Select Subject.

    Photoshop menu showing select subject

    Photoshop will attempt to interpret and select the subject of your image. Though, as you can see in the image below, the results are not always perfect.
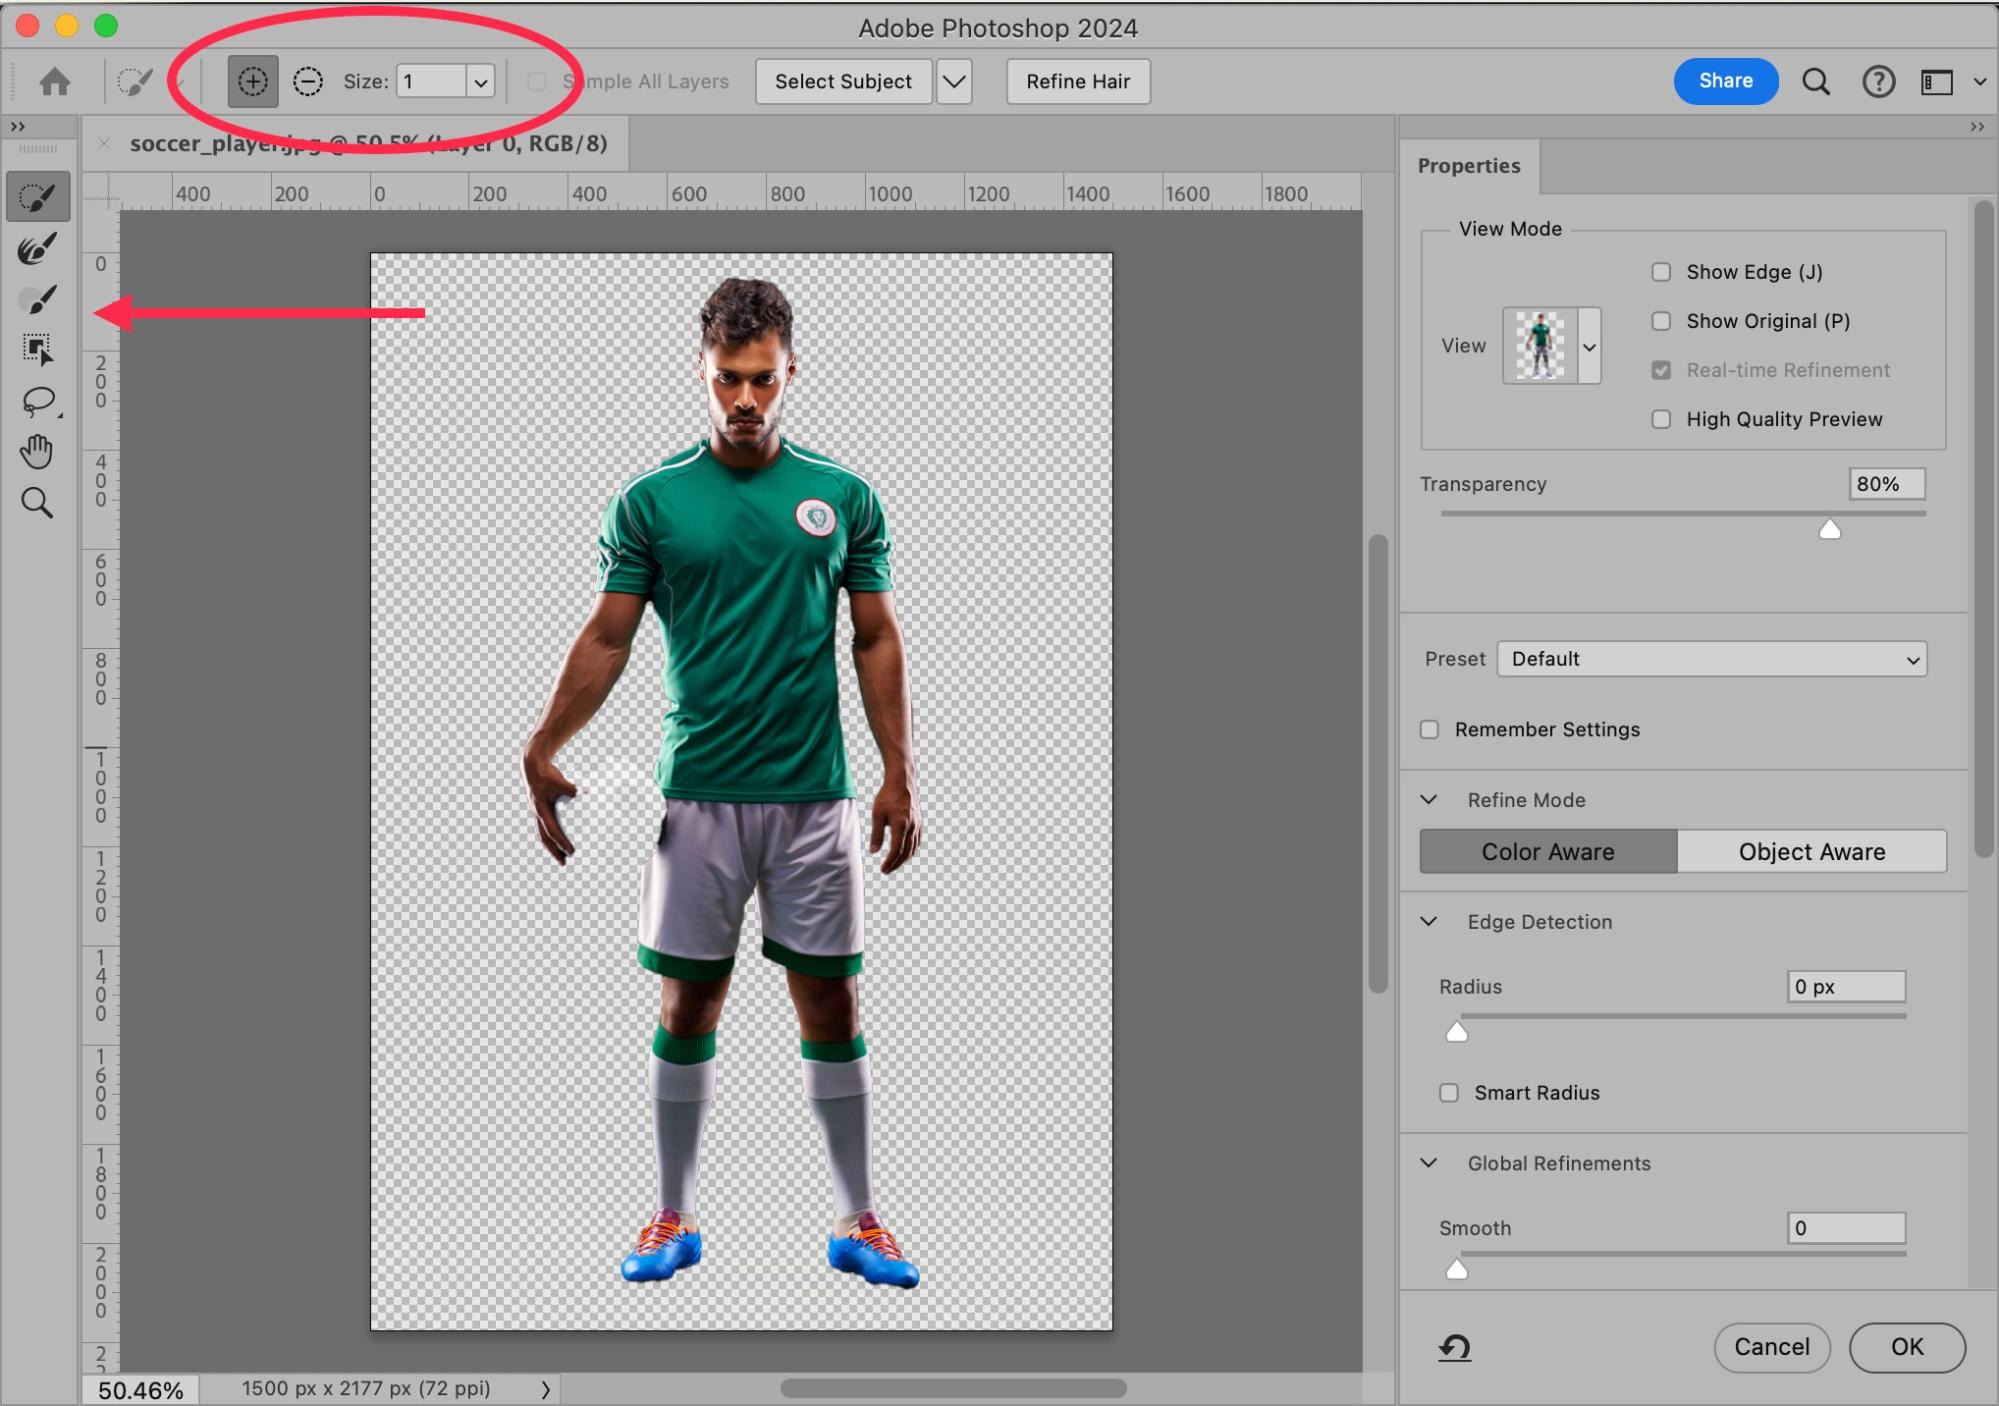
    Photoshop editing screen with different options

    At the top of the window, you will find Add and Subtract buttons. These work to add to your selection or subtract from it using the modification tools on the left-hand side of the window. You can also control the size of the tool.

    list of Photoshop tools and also the menu

    On the left side of the window are tools you can use to modify the selection. These tools are rather intuitive to use. 

    The first tool, the Quick Selection Tool, allows you to grab whole blocks of color at once. This is a good tool to use to “paint back” the ball in the image.
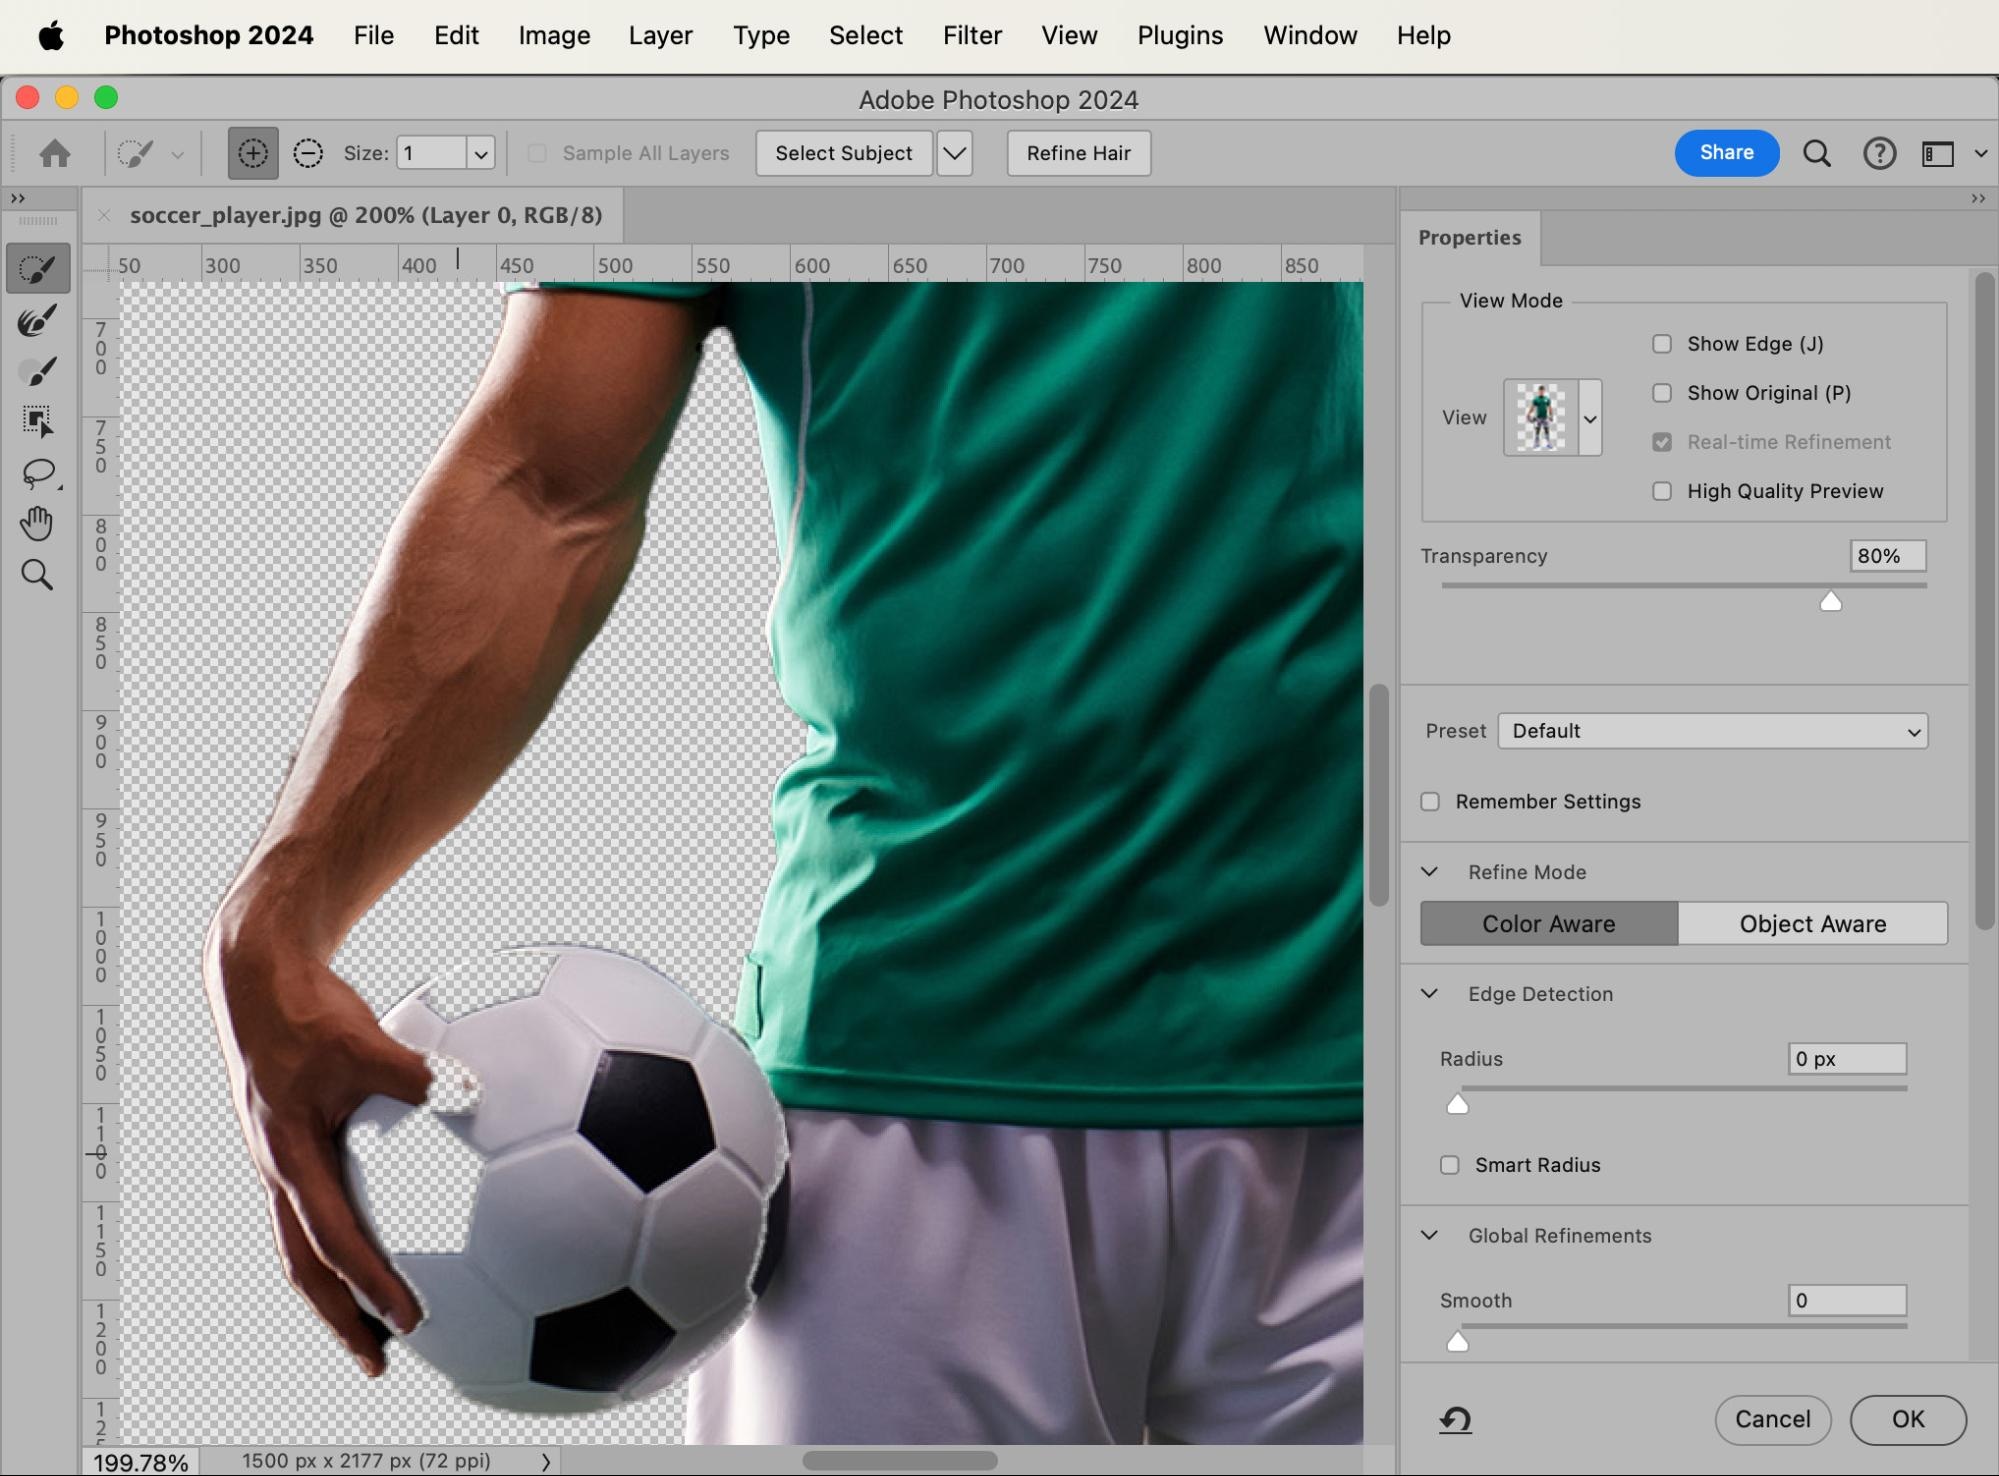
    Photoshop editing of a soccer player holding a ball

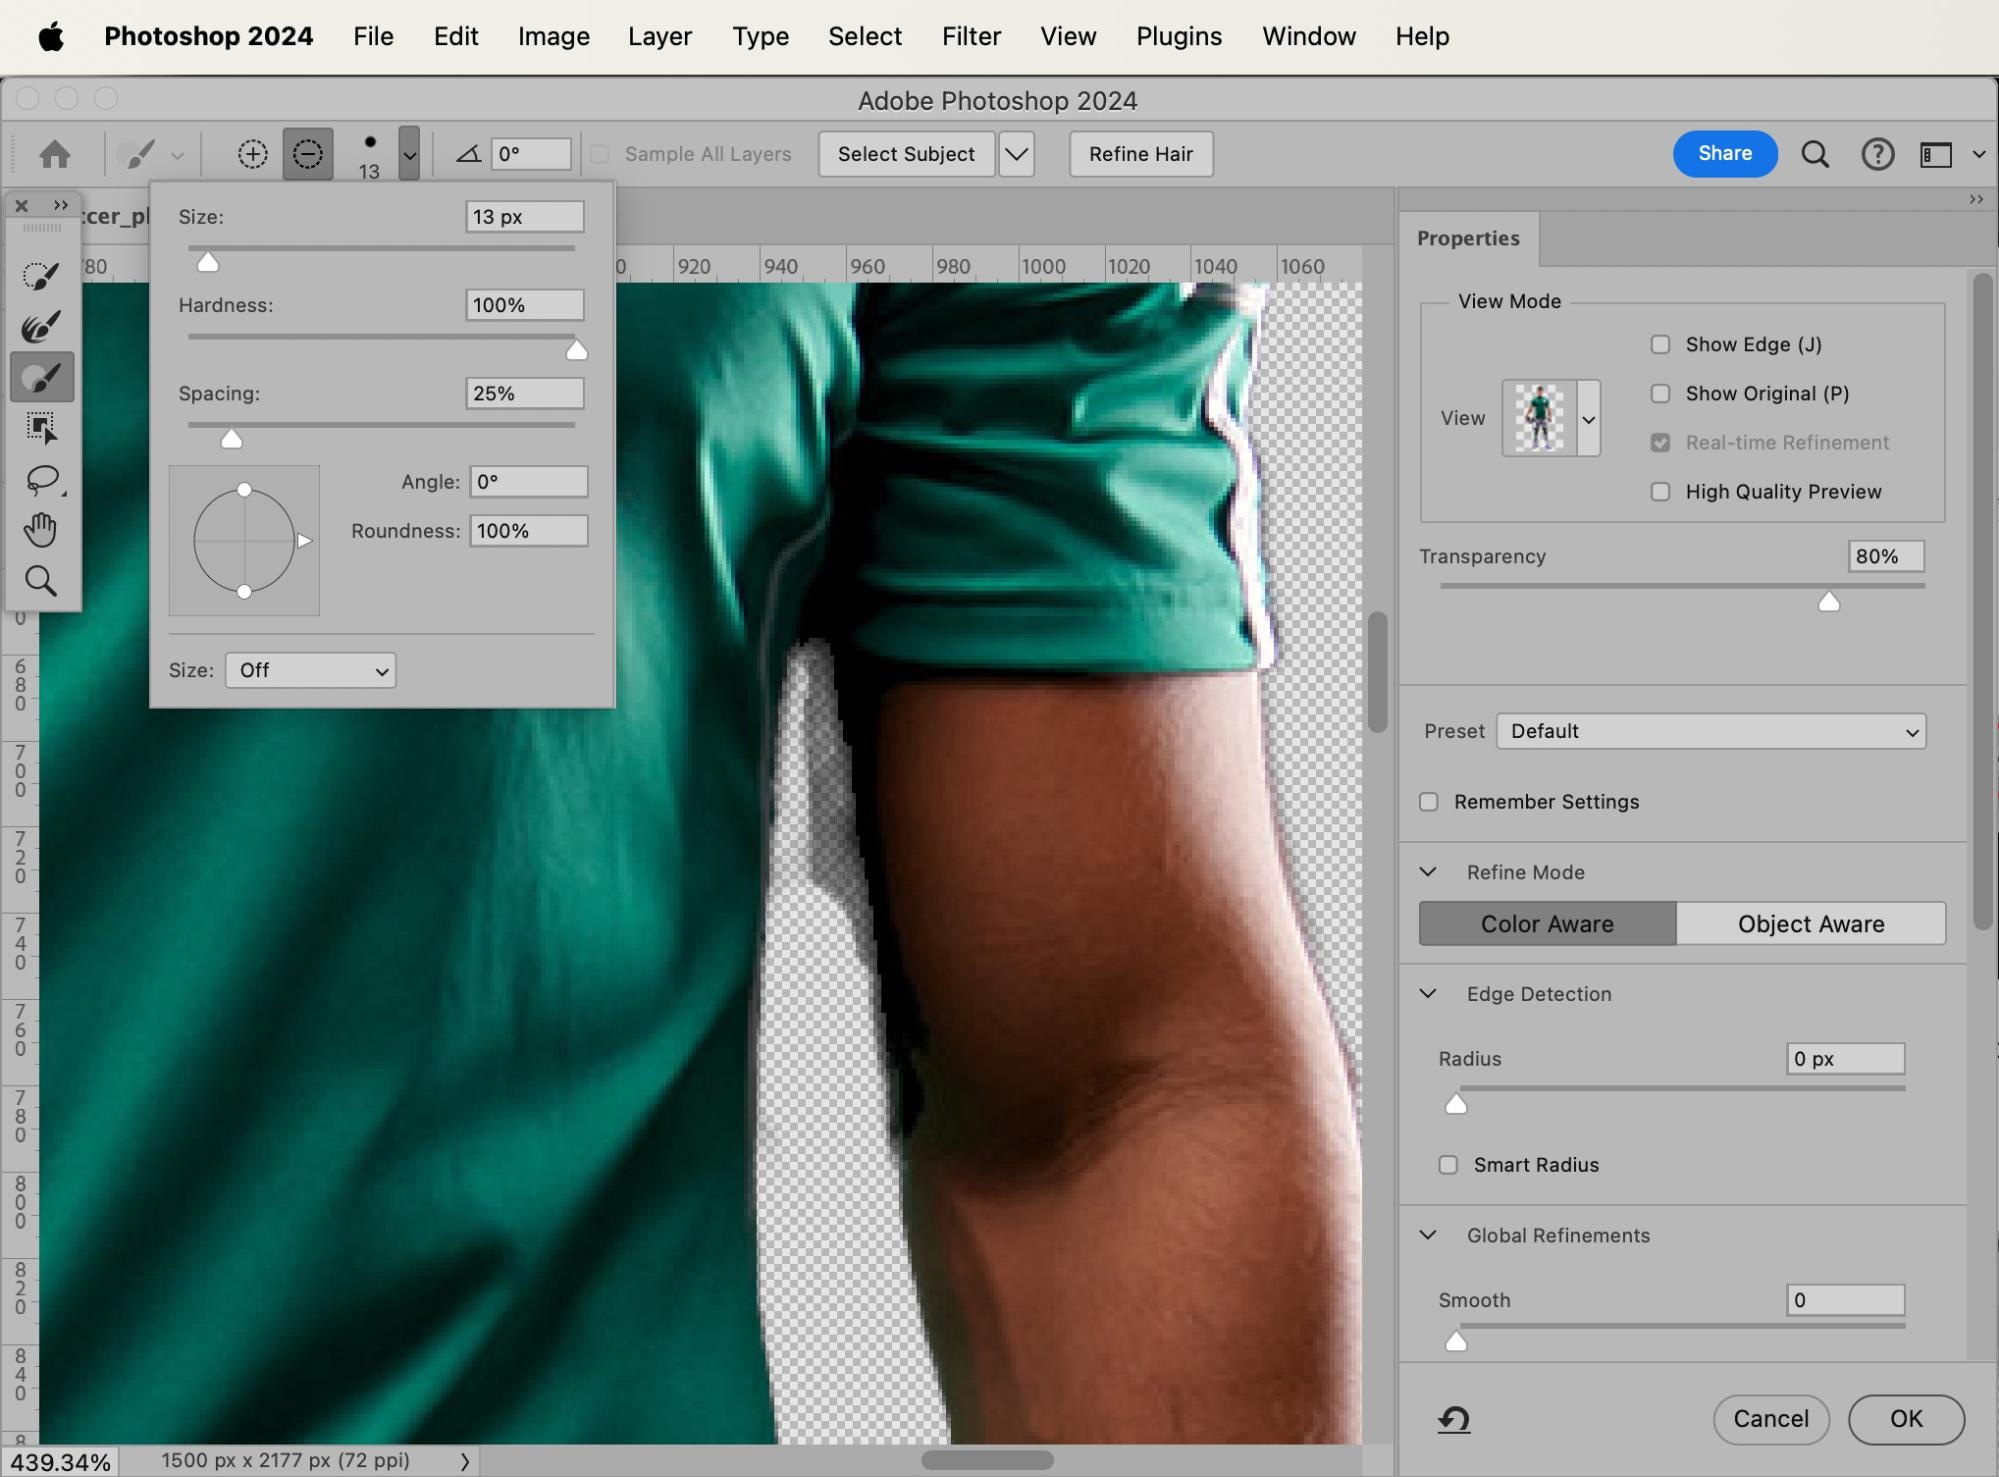
    The next tool, Refine Edge Tool, helps when defining or redefining the edge of your selection. Below that is the Brush Tool, which works just like the regular Brush Tool in Photoshop (and like the Eraser Tool when the Subtract button is activated). 
    Photoshop editing a person's arm

    The Object Selection Tool tries to figure out where certain objects begin and end in your image, the Lasso Tools allow you to freeform select areas of the image, and the Hand Tool and Zoom Tool help you navigate around the image as you work to refine the selection.

    Once you’re satisfied with the selection, click OK. You will see that nothing has changed in your original image, but there’s a “marching ants” selection around your subject.

    soccer player standing on grass with black background and everything is outlined to be edited in Photoshop

    Next, just like in the first method listed above, you’ll need to make your Background Layer into an unlocked Layer 0, and create a Layer Mask.
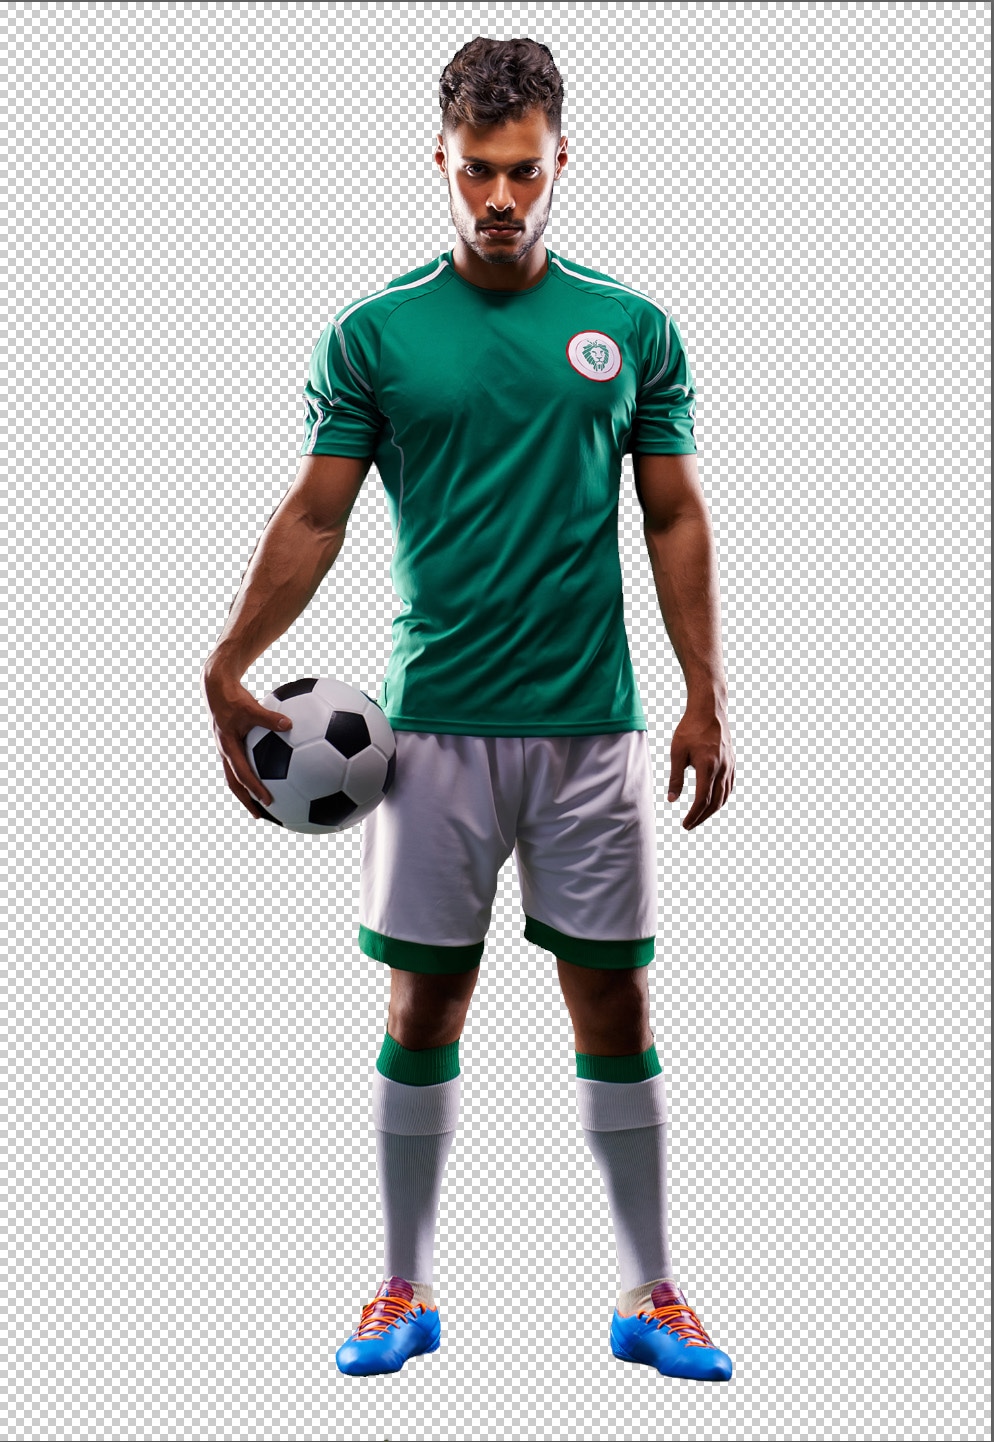
    soccer player holding a ball, cut out on a transparent background

    Whichever way you choose to create your selection, you now have your subject isolated from its background, and you can place your subject into whichever new setting works best for your branding needs.

    Learning how to select and mask in Photoshop with the Magic Wand Tool is helpful because it’s a technique you can apply to a range of photos—sports, product, ecommerce, portraits, headshots, and more. Here are a just a few scenarios where it comes in handy:

    • Show your subject in various environments. Help your audience connect with your subject emotionally by seeing it in a beautiful or familiar setting when changing the background. This can also help you prepare the image for different target segments, so you can swap out backgrounds that make more sense for your audience.
    • Select your subject so you adjust its size or color without altering the setting in which it has been photographed. This means you can show different color variants for your product without having to take multiple photos.
    • Remove the background from a photo so your subject stands out on its own.
    • Create a white background image so you can list products on third-party marketplaces, like Amazon or eBay.

    Not up for the tedious task yourself? Get a quote for your background removal needs


    Source link

  • How to Resize Images Without Losing Quality in Photoshop

    How to Resize Images Without Losing Quality in Photoshop


    You may have been told you need to compress and resize image files for websites, social media, and other uses. Why? Oversized images can slow down your site, mess with SEO, and even affect sales. But shrinking an image the wrong way? That can leave you with a blurry, pixelated mess.

    Luckily, resizing images without losing quality is easy once you know how. This guide walks you through how to resize an image in Photoshop without losing quality and all the other best methods—starting with what to consider before you begin.

    Preparing for image resizing

    Before you resize an image, consider the following: 

    • Aspect ratio: Make sure the image keeps its proportions so it doesn’t look stretched. Common ratios include 1:1 (square) for profile pics, 16:9 for banners, and 3:2 for product shots.
    • Required dimensions: Every platform has its own size recommendations—Instagram Stories need 1080x1920px, while blog images usually fall between 1200px and 1600px wide.
    • Resolution: Web images should be 72 DPI for fast loading, while print needs at least 300 DPI for high-quality results.
    • Use case: Think about where the photo will be used. This helps avoid distortion and keeps your visuals looking sharp. Websites and online stores need smaller file sizes for speed, while social media platforms have specific size guidelines to keep images looking their best.

    It’s also a good idea to make sure you start with a high-quality image. No amount of editing or resizing can make a poor-quality photo look great. 

    How to reduce image size in Photoshop: shortcut

    If you want a quick and easy way to resize images in Photoshop, follow these steps:

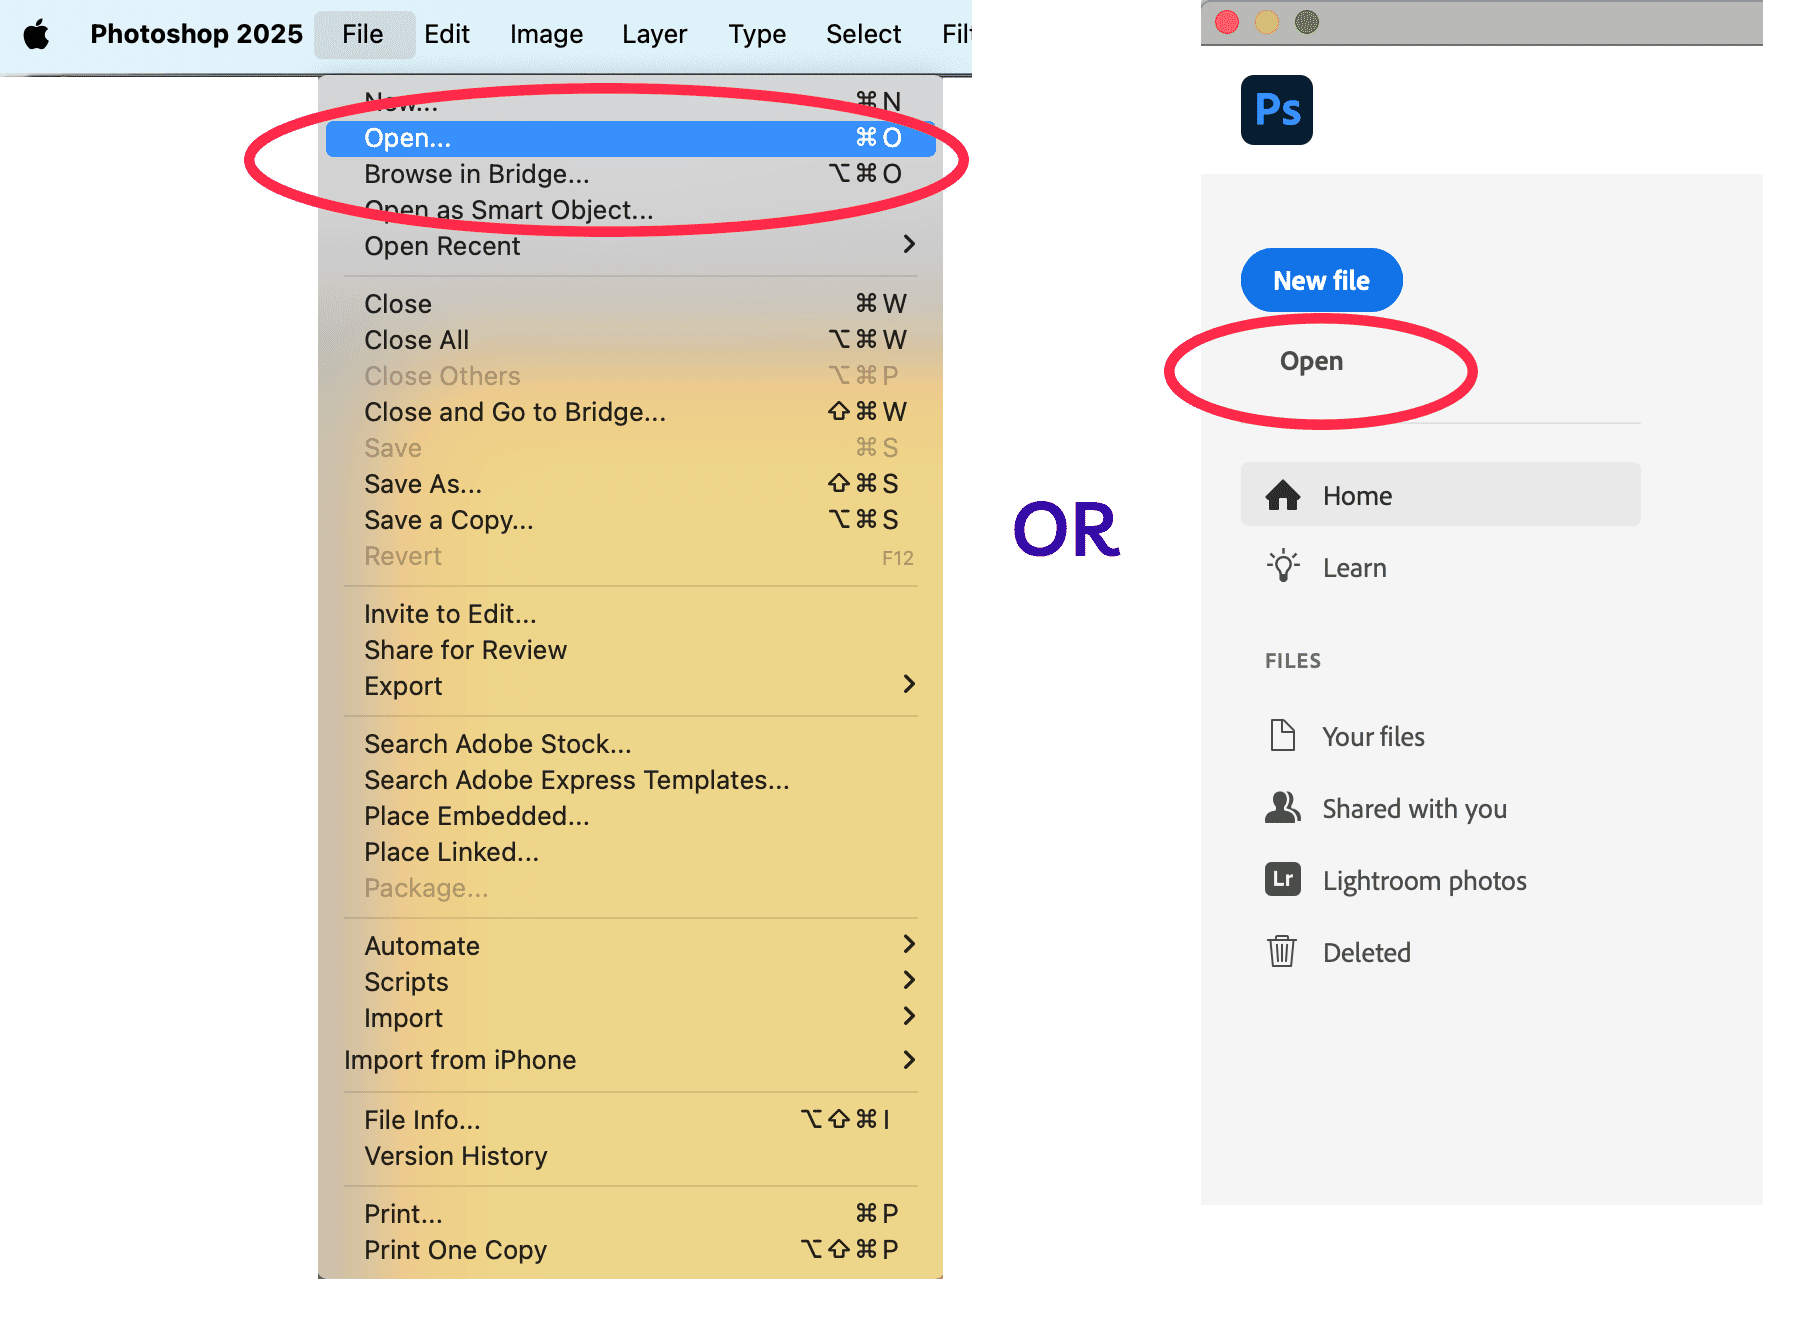
    If you’re already using Photoshop, open your image by going to File > Open from the menu at the top of the application window. If you have just opened Photoshop, you can still open the image directly from the opening screen. You can also use the shortcut CTRL + O (COMMAND + O on a Mac) to open an image at any time.

    Photoshop 2025 interface showing two ways to open files: through the top File menu and the welcome screen sidebar. The image highlights “Open” options with red ovals, ideal for tutorials or onboarding visuals.

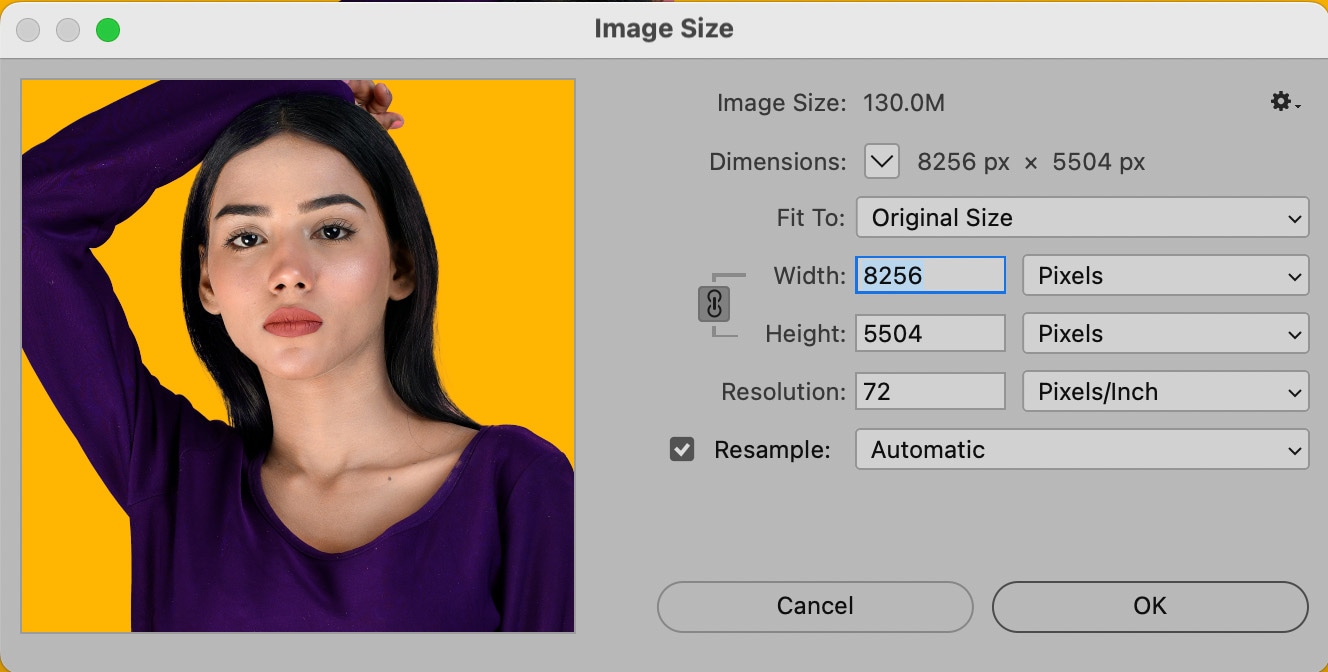
    Navigate through your documents until you find your image, and open it. Then, go to Image > Image Size in the top menu. You can quickly access the Image Size window by typing CTRL + ALT + I (COMMAND + ALT + I on a Mac).

    Close-up of a female model with smooth skin and bold lipstick against a solid yellow background, shown within Photoshop's image resize settings dialog at ultra-high resolution of 8256 by 5504 pixels, suitable for detailed retouching and background removal.

    In the Image Size dialog box, enter the new dimensions you want to resize your image to. Make sure the chain link icon (to keep proportions) is enabled.

    If you are sizing an image for your ecommerce website, you will want the dimensions to be as small as possible without losing quality. A good rule of thumb? Keep images around 1000px wide (2000px wide if they are to fill the screen from side to side). You can keep an eye on the final file size with the “Image Size:” text at the top of the dialog box. In general, try to keep ecommerce images under 200K to ensure fast load times.

    Next to Resampling, choose a method that works best for the type of image you are working with:

    • Bicubic Sharper (reduction) is best for reducing the size while still showing a lot of detail
    • Bicubic (smooth gradients) will produce the best images for showcasing flawless skin by smoothing edges
    • Nearest Neighbor produces very harsh edges and emphasizes artifacts. Only use this if you want a grainy, pixelated look.

    All other resampling options are for enlarging images, not reducing them. If you’re not sure which resampling to choose, stick with “Automatic.”

    Click OK, then save your resized image (File > Export > Export As…).

    For more control over file size and compression, Photoshop’s Export As… tool is a great option—covered in the next section.

    How to reduce image size in Photoshop: Export As…

    The Export tool in Photoshop is one of the best ways to shrink image file sizes without sacrificing too much quality. Whether you’re optimizing a product image, a thumbnail, or a homepage banner, it can balance image clarity with fast loading speeds.

    Using the Export function in Photoshop is often comparable to the compression you’ll get from other tools, without the extra steps (or extra cost) of needing to access additional software.

    Before using the Export function, set your ideal image aspect ratio in the top, left hand corner after selecting the Crop tool.

    Once your image is cropped (if needed), resize and compress it using the Export function.

    Go to: File > Export > Export As…. You can also use the Export As… keyboard shortcut CTRL + SHIFT + ALT + W (ALT + SHIFT + COMMAND + W on a Mac)

    This opens the Export As… window, where you can fine-tune file size and quality.

    Photoshop image resizing settings

    Here are some of the image resize file size and other settings you can choose from:

    • Preview section: See what your image will look like after export. Clicking on 2-Up allows you to see different options side-by-side 
    • File format: On the right-hand side of the screen, you can choose what file type your exported image will be. JPEG is best for compression while keeping quality. PNG is great for transparency but results in larger files. If you have a simple vector-style graphic with no transparency, PNG-8 will give you a great-looking file at a fraction of the size of a PNG-24 (see below). If your graphic is animated, save as an animated GIF.
    • Quality (for JPEG): When the JPEG file format is selected, you can use the slider to move between low quality and high quality. A compression level around 5 or 6 is usually adequate. 
    • Quality (for PNG): When PNG is selected, you have the choice to choose “Transparency” and “Smaller File (8-bit)” If you want a high quality, transparent image (known as a PNG-24), check Transparency and leave Smaller File unchecked. However, if you need to compress an image heavily and transparency isn’t that important, choose Smaller File. This will allow you to export your file as a lower-quality, smaller-sized PNG-8.
    • Image size: The dimensions of your image. If you know the exact dimensions you need, you can enter them here. Or, if you want to reduce the size by a percentage, you can use the Percent scaler as well. 
    • Resample: This is how Photoshop “rebuilds” parts of the image’s data that are altered during compression. Any time you enlarge or reduce an image’s size, you’re going to affect the original proportion that the image had in relation to pixels per inch and dimensions. Bicubic creates smoother gradients, but does not allow for the most compression. Explore other options such as Nearest Neighbor (most basic and worst preservation of detail), Bilinear (usually better for upsampling), Bicubic Smoother (designed for upsampling) or Bicubic Sharper (better for downsampling/preserves detail).
    • File size: On the lefthand side of the Export As… window, you can see the file size of the optimized image.

    There’s no one-size-fits-all option here. When reducing an image in Photoshop, each image generally takes an individualized amount of tweaking to find the best image quality with the best compression.

    Web tools to edit images and reduce file size

    • Bulk Web Resizer: This site allows you to upload a batch of images and then resize according to your desired dimensions. You can also adjust the image quality to your needs (choose 100 if you want to preserve the original quality), as well as sharpen images.
    • Canva: Canva’s free photo editor allows you to crop and resize images on its site. Additional free editing tools include flipping and rotating images, adjusting the color, and adding filters.
    • ImageOptim: ImageOptim can be used in your web browser or via a Mac application. To shrink files, ImageOptim gets rid of EXIF meta­data, such as GPS position and the camera’s serial number — however, you can choose to keep specified metadata intact (which is essential to optimizing your product photos for SEO). There’s also a Lossy minification option, which ImageOptim says will result in the smallest file size possible, while preserving image quality. ImageOptim has pricing plans, starting at $9/month for 1,000 image optimizations.
    • Kraken: Kraken has a web application and a developer API that can handle bulk image optimization and resizing. The simple web interface is free, and you can drag and drop photos or upload by entering the image URL. There are also different pricing options depending on how many images you work with and how frequently you need to reduce their size. Pricing is based on the total number of GB.
    • Pixlr: Resize and also edit photos as needed. The image-editing site also has a free vector-editing tool, as well as free fonts and graphics you can use.
    • pngquant: This tool will compress .png files to reduce the file size. 
    • TinyJPG/TinyPNG: This site allows you to reduce the file size of your images. There are no editing features; instead, TinyJPG/TinyPNG focuses on compressing files to ultimately reduce the file size, stripping unnecessary data from your image.

    AI resizing and compression tools

    • Let’s Enhance: great for resizing photos for print and digital use.
    • Squoosh: web-based, Google-backed compressor with advanced controls.
    • Upscale.media: AI-powered upscaler for improving resolution.

    Plugins that reduce image size within your CMS

    There are tons of plugins on the market that make the image resizing process easier and more automated, all from within your CMS. Here are just a few:

    WordPress

    Shopify

    Tips for resizing ecommerce photos

    For ecommerce product photography, maintaining high quality while optimizing file size is key. Here are some best practices:

    • Recommended dimensions: Most platforms work well with 1000×1000 px for product images. If zoom functionality is needed, go for 2000×2000 px or higher.
    • Aspect ratio: Stick to 1:1 (square) for product photos and 16:9 or 4:3 for banners and hero images.
    • Compression: Keep file sizes under 200 KB for fast loading. JPEGs with a “High” setting in Save for Web are a good choice.
    • Background: Use a clean white or transparent background to keep the focus on the product.
    • Resampling: Use Bicubic Sharper for downsizing to preserve details.

    Tips for resizing headshots

    Headshots should look sharp and professional across platforms without being too large. Here are some tips to keep in mind: 

    • Recommended dimensions: For LinkedIn, company websites, or professional use, 400×400 px works well. For print or high-res needs, go for 1200×1200 px or more.
    • Aspect ratio: Stick with 1:1 (square) for profile pictures or 4:5 / 2:3 for portraits.
    • File type: Use JPEG for web (compressed but sharp) and PNG for transparent backgrounds.
    • Compression: Aim for a file size under 100 KB for web use to prevent slow loading.
    • Resampling: Use Bicubic Sharper when reducing size to keep facial features crisp.

    Outsource your image resizing needs

    Resizing images properly takes time, especially if you’re working with a large volume of product photos, headshots, or marketing assets. Instead of spending hours tweaking dimensions and compression settings, consider outsourcing to a professional image-editing service.

    At Path, we specialize in high-quality image resizing, background removal, drop shadow, and more—all done by expert editors with precision and speed. Whether you need bulk resizing for an ecommerce store or perfectly optimized headshots, you’re in good hands with Path.

    Need bulk image resizing done right? Try Path free—fast, flawless, and optimized for web.

    Simple pricing for stress-free, pixel-perfect photo edits tailored to your needs.

    Image resizing and compression FAQs

    Does resizing affect SEO?

    Yes, large images slow websites, hurting rankings.

    What’s the ideal file size for web images?

    The ideal file size for web images is under 100KB for optimal performance.


    Source link