برچسب: Path

  • Earn Passive Income With the Path Affiliate Program

    Earn Passive Income With the Path Affiliate Program

    [ad_1]

    Creative agencies and teams know the drill—tight deadlines, demanding clients, and the constant pressure to find new revenue streams. Between managing projects and chasing new business, there’s barely time to explore income opportunities that don’t require more billable hours.

    Affiliate programs often get dismissed as something only solopreneurs and influencers can benefit from. But your entire team, agency, or department can turn your professional networks into serious passive income through team affiliate marketing.

    Send us an email to quickly connect with our support team.

    30,000 sales and marketing pros get our insights, tips, and best practices delivered weekly.

    You use your combined professional relationships to refer people who need editing services for different purposes than what you do. Photo editing affiliate programs like ours work particularly well because they offer high-value services, repeat customers, and longer commission windows. Read on for tips on how to make the most of it.

    Why choose the Path affiliate program for photo editing

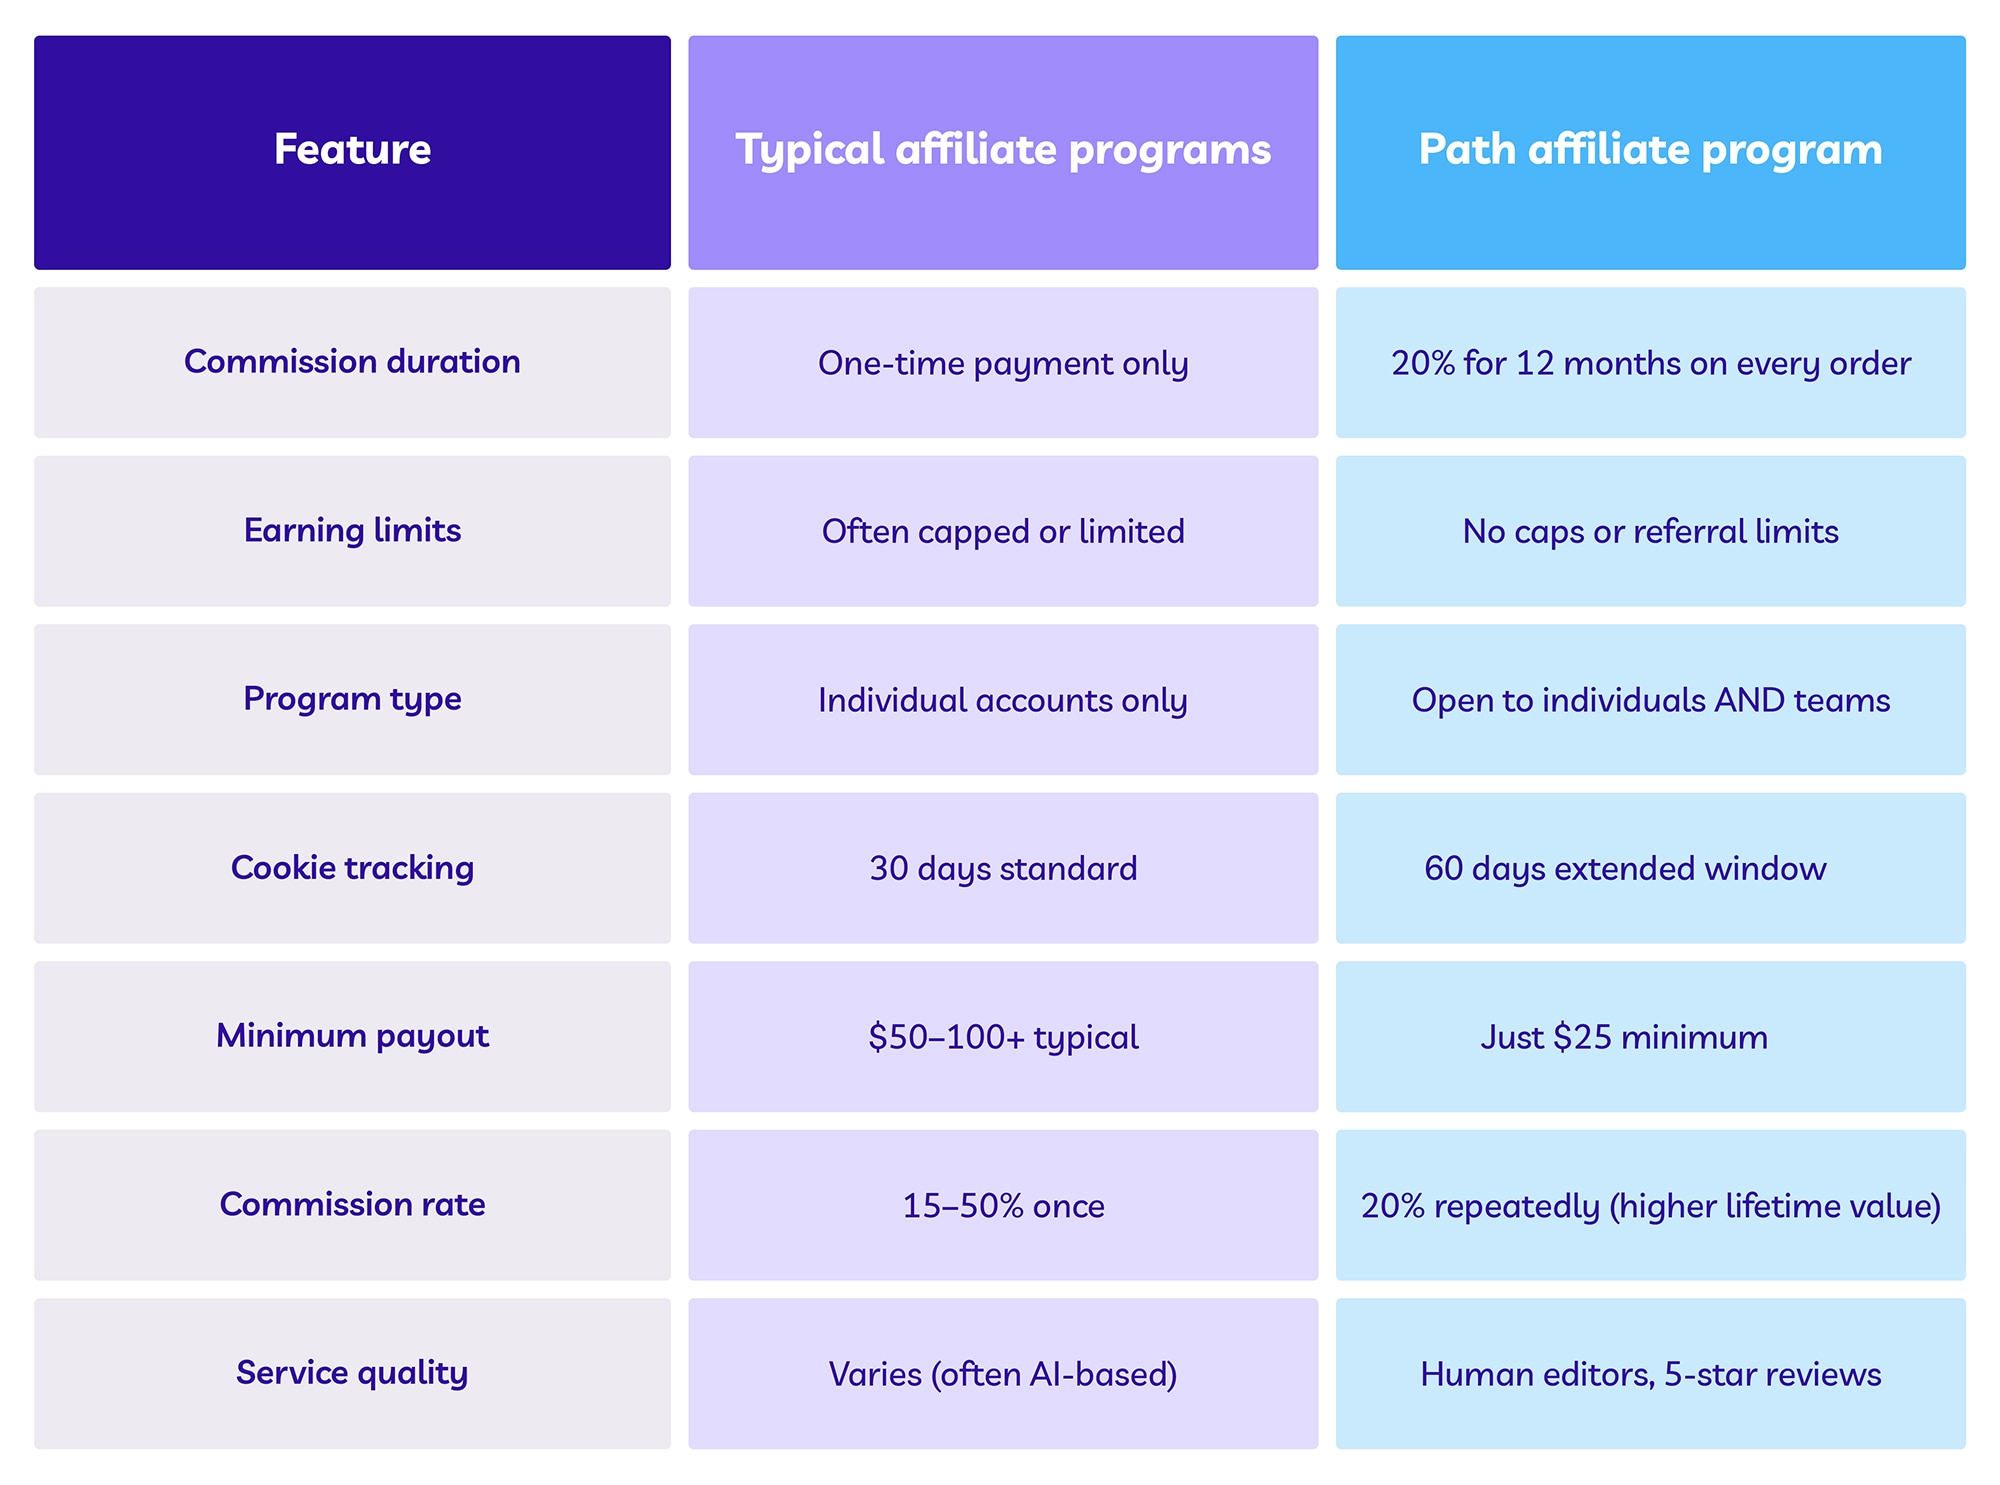
    Here’s how Path’s affiliate program stands out compared to typical industry affiliate programs:

    You earn for 12 months, not just once. Most affiliate programs pay you once when someone buys, then you’re done. Path pays you 20% commission on every single order that customer places for their entire first year. One good referral keeps paying you for months.

    It doesn’t have income limits. There are no earning caps or referral limits. Refer 5 customers or 50—you get paid for all of them.

    Our program works for individuals and businesses. Your agency can participate as a team, pooling referrals and sharing commissions however you want.

    You get a longer tracking window. Path tracks your referrals for 60 days using cookies. Most programs only track for 30 days, so you have more time for people to actually place their first order.

    The program has a low payout threshold. You get automatic monthly payouts via Wise once you hit just $25. 

    You receive Industry-competitive rates. Photo editing services typically offer 15–50% commissions, but most pay only on the first purchase. Path’s 20% rate for 12 months means you earn significantly more per referral over time. For example, if a customer spends $500 total on Path editing services in their first year, you earn $100 compared to just $20 from a typical one-time commission program.

    You’re recommending quality service. Path uses human editors, not AI. It makes referrals easier because you’re recommending a service that actually works and has a good, established reputation with tons of 5-star reviews.

    Comparison chart highlighting benefits of Path’s affiliate program versus typical programs, showing higher commission duration, no earning limits, extended cookie tracking, and lower payout minimum.

    How the Path affiliate program works 

    Getting started with our affiliate program takes just 5 minutes:

    1. Apply online: Fill out our application form. We manually review each application, which usually takes 1–3 business days.
    2. Get your link: Once approved, you get access to your affiliate dashboard and unique referral link. The dashboard shows real-time stats on clicks, conversions, and earnings.
    3. Share and earn: When someone signs up with Path through your link, they get 20% off their first order. You earn 20% commission on that order plus every order they place for the next 12 months.
    4. Get paid automatically: We send payments via Wise. Once you earn $25 or more, you get paid automatically in the first two weeks of each month.

    We designed this affiliate program for photo editing to be simple enough for you and your team to share your links and get paid without waiting for large withdrawal thresholds.

    Who should join the Path affiliate program 

    Our program works best for teams already working in creative and photography spaces. Remember, your team’s combined network is bigger than any individual’s, and you’re not referring Path to competitors, but people who need editing for different purposes or different scales than your work. Below are some ideas and tips for specific referral opportunities for each type of business.

    Creative agencies and studios

    You outsource editing work, have clients who need consistent photo editing, and can recommend Path when clients need more support. For example, small business clients who need product photos but can’t afford full agency services, startup clients doing their own photography who need professional editing, freelancers you work with who need editing support, corporate clients’ in-house teams handling basic photography, and marketing teams  you work with on different projects.

    Ecommerce teams and managers

    Product photography is part of your daily routine, and you know how frustrating inconsistent editing can be. You can recommend Path to other ecommerce brands in non-competing industries, suppliers who need better product photos for catalogs, and retailers you sell through, such as ecommerce shops that might need different edits for different marketplaces.

    Sports photography businesses

    You can refer other photographers in different specialties (real estate, weddings, events), smaller companies who can’t afford your services but need editing, and freelancers you collaborate with or mentor. Even venues you shoot for might benefit from a variety of edits when they advertise competitions or events across social media, websites, and print materials like leaflets or posters.

    Corporate photography services

    Your ongoing relationships with HR departments and corporate clients can create natural moments where editing recommendations come up in conversation. For example, you might deliver a series of team headshots but their marketing team will need to use them in different formats across websites, LinkedIn, or  other platforms.

    Solo professionals and freelancers

    Content creators, photography educators, consultants, business coaches, and equipment vendors all connect with people who need editing help. And unlike agencies and larger brands, solo professionals and freelancers often share behind the scenes of their workflow and tools with others in the same space.

    How to maximize your Path affiliate earnings 

    Successful referrals generally come from understanding your network and making the conversation feel natural, not forced:

    • Start with pain points: Your network deals with editing challenges, such as inconsistent quality, slow turnarounds, high costs, no dedicated editing staff. These conversations are where Path fits naturally.
    • Make it helpful, not salesy: Work Path into existing conversations, emails, and social posts. You’re sharing a useful resource, not pushing affiliate links.
    • Time it right: Promote during busy seasons when people need more editing help, such as during holiday ecommerce prep, sports championships, school headshot seasons.
    • Track your progress: Our dashboard shows which referral sources convert best, so you can double down on what’s working and improve campaigns that might not be performing well.

    Natural referral touchpoints

    If you’re wondering what actual conversations might look like, we have some ideas below. The main idea is to frame your content as helping others, not promoting yourself, because you want your network to trust you, not see you as salesy.

    For agencies and studios:

    • “If you ever need editing support beyond our scope, I have a great resource.”
    • Include Path in a “resources we recommend” section in project wrap-up emails.
    • Mention Path in casual conversations about workflow challenges at networking events.
    • “Hey, found this editing service that might help with your editing backlog.”

    For ecommerce teams:

    • “Your online store photos could really benefit from professional editing.”
    • Casual chats about business challenges at industry conferences.
    • LinkedIn posts: “Here’s how we streamline our product photography workflow.”
    • Include Path in a “Resources that might help your business” section in supplier newsletters.

    For photographers:

    • “If you need future editing support, here’s what I recommend.”
    • Answer questions or share editing tips in photography Facebook groups, especially during busy wedding seasons.
    • Recommend Path to photographers you’re helping during mentoring conversations.

    General social sharing ideas:

    • “Great tools for small businesses” roundups.
    • “Resources we recommend” posts.
    • Answering industry questions without revealing your own processes.

    How to sign up as an affiliate with Path

    Ready to get started as our affiliate? Here’s how it works:

    1. Fill out the application. Head to our affiliate page and complete the form. We’ll ask about your business and how you plan to share Path with your network.
    2. Wait for approval. We review each application manually, which usually takes 1–3 business days. Having an established business in creative or photography spaces definitely helps.
    3. Get your dashboard and link. Once approved, you’ll get login details for your affiliate dashboard and your unique referral link. Everything updates in real-time so you can track your progress.
    4. Focus on your existing network first. Spend your first 30 days talking to people you already know rather than trying to find new contacts. Your established relationships are where you’ll see the best results.

    Start earning passive income with Path today

    If you’re looking to earn passive income from recommending a reputable service to your network, Path’s affiliate program is a great fit. You earn 20% commissions for 12 months, there are no earning caps, and it’s designed for teams and agencies who want to monetize relationships without competing with similar businesses. Apply today and start earning!

    Earn 20% commissions while helping others level up their visuals—with a human-powered photo editing partner they trust..

    Simple pricing for stress-free, pixel-perfect photo edits tailored to your needs

    [ad_2]

    Source link

  • How to Position Your Subject for the Best Shot – Path

    How to Position Your Subject for the Best Shot – Path

    [ad_1]

    Getting the hang of using a camera and photo editing is one thing, but directing subjects? Now, that’s hard! Even pro photographers can struggle with an awkward or camera-shy person in front of their lens. 

    How can you guide your subjects so your portrait shoots are consistent in quality, there are fewer retakes, and the result looks great? It’s a mix of technical shooting and composition skills, with plenty of soft skills, like getting your subjects to relax and smile.

    Want your next portrait shoot to be a success? Check out some practical tips for how to pose any subject—from corporate execs to creative professionals and family groups.  

    Prepare for a successful portrait shoot

    The secret to great portrait poses actually starts before your subject arrives. Here’s what experienced photographers do to prepare:

    Set clear expectations

    Help your clients arrive confident and prepared by sending them key information ahead of time:

    • Share simple wardrobe guidelines: solid colors work best, avoid busy patterns
    • Explain the location and background setup: indoor/outdoor, how many outfits to bring
    • Give grooming tips: classic styling usually photographs best—and a fresh shave won’t hurt!
    • Outline the session timeline: how long it will take, how many looks you’ll capture
    • Send examples of poses you’ll try: helps them visualize the result

    To speed this up, you can create a standard pre-shoot guide you can quickly customize for each client. Use apps like Canva or Adobe Express and export the guide as a PDF or create a shareable link.

    Build trust and rapport

    Most people aren’t naturally comfortable in front of a camera. Posing for headshots can be stressful even for the most successful business people, so your first job is to make them feel at ease. Try these quick tips:

    • Start with a quick chat about what to expect and what you’ll shoot first
    • Demonstrate poses yourself—it’s easier than explaining and helps break the ice
    • Pay attention to what works for each person—a pose that looks great on one subject might feel awkward for another, so stay flexible
    • The same goes for instructions in general—some people need more guidance than others 
    • Keep the conversation natural while you work, but keep your directions simple
    • Give positive feedback when you capture great shots, and if something’s not working, smoothly guide them into a different pose instead of pointing out problems

    Main posing frameworks for any portrait shoot

    Let’s break down some of the best poses for professional headshots and relaxed portraits that consistently deliver great results and let your subjects shine. 

    Standing poses 

    Standing poses are a great choice for both corporate headshots and casual portraits. They offer plenty of ways to help subjects feel comfortable—from leaning against the wall to interacting with the surroundings. Standing shots also work anywhere—in a studio, office, or outdoors—and you can repurpose them to crop in for tighter headshots or waist-up portraits. 

    Here’s how to pose for standing shots: 

    • Turn feet about 45 degrees from the camera—this creates a naturally slimming angle
    • Have subjects shift weight to one leg—usually the front one—to avoid looking stiff
    • Ask them to lean forward slightly from the hips, with just an inch or two being enough
    • Change arm positions between shots—relaxed at sides, hands in pockets, or arms crossed
    • Remember “if it bends, bend it slightly” for natural-looking poses
    • Keep shoulders relaxed and dropped because tension shows in photos
    • Ask the subject to change the direction of their gaze slowly from one side to the other to get a wide range of angles

    two photos of women, side by side, with gray hair

    For corporate shots:

    • Keep poses clean and professional
    • Arms relaxed at sides or one hand in pocket
    • Subtle lean forward to engage with the camera
    • Maintain a straight posture while avoiding stiffness
    • For tight headshots, still keep the body slightly angled, like on Treeconomy’s team page 

    treeconomy about us page with team individual headshots

    For personal branding:

    • Allow more dynamic movement
    • Try casual leans against walls or furniture
    • Experiment with crossed arms or hands on hips
    • Include interaction with the environment (desk, tools of trade, products), like Liz, owner of Wild Pines, an arts and crafts store

    Wild Pines about page with a photo and text about the founder

    • Allow space for naturally big smiles and laughter, too—it’ll create warm and welcoming portraits, like on Sojo’s company page

    Sojo about us page with the founder photo at a design table and some text about the brand

    Flattering seated poses

    Seated portraits can create a variety of engaging shots. Just because your subject is sitting doesn’t mean options are limited—it’s all about working with posture and leg positioning to create natural, dynamic results.

    Key principles for seated portraits include:

    • Guide subjects to sit at the edge of their chair or sofa instead of slumping back
    • Avoid letting subjects sink into soft furniture (like in the example below of Noura Sakkijha, CEO of Mejuri)
    • Keep the core engaged for good posture 
    • Point toes in the same direction to elongate legs

    Mejuri meet the founder page with text and portriat

    Professional settings:

    • Position at a desk with a slight forward lean
    • Hands clasped or resting naturally—play around with a variety of hand positions to find a flattering pose for your subject
    • Encourage subjects to engage with what’s on their desk, such as their laptop or notebook
    • Cross ankles rather than legs for a polished look
    • Keep shoulders level and relaxed
    • Walk around the subject to capture different angles—from camera-facing to slightly angled to full-on side profile

    man sitting at a desk looking away from the camera with an open laptop in front of him

    Casual settings:

    • Allow more relaxed postures while maintaining good form
    • Create asymmetry by shifting weight to one hip
    • Use arms for support when sitting on floors
    • Avoid both legs pointing directly at the camera—instead, either extend one leg towards the camera or angle them both slightly away from the camera

    portrait on off-white background of  a woman sitting down casually, she has a prosthetic leg

    Creating dynamic duo shots:

    • Use seating to create interesting height variations
    • Try one person seated while the other stands
    • For co-founder shots, have one person sit in a chair while the other perches or leans on the armrest, like in the example below of ettitude’s co-founders
    • Vary the height of chairs or use different seating positions to add visual interest
    • Keep subjects at different heights but maintain connection through body language or eye contact

    Ettitude from the founders page on their webiste

    Relaxed group portraits

    Whether you’re photographing a corporate team or a family, group photos present unique challenges. 

    Basic principles for group shots:

    • Create depth by avoiding straight lines of people—unless you’re shooting a sports team photo that traditionally requires one or two straight lines of players
    • Stagger heights naturally using stairs, chairs, or standing/sitting combinations
    • Keep heads at different levels but close enough to feel connected
    • Position taller people towards the back or center
    • Arrange people in a slight arc to ensure everyone’s visible, like in Ora’s team photo below with the two people on both sides slightly turned inward
    • For large team shots, shooting from an elevated position, such as another floor, can help include everyone, but you could also use a drone
    • Shoot more photos than you think you’ll need—there’ll always be someone blinking so it’s best to have more images to pick from

    Ora about page showing the founders and their story

    For professional teams:

    • Keep poses consistent but not identical
    • Use the rule of thirds to arrange larger groups
    • Break bigger teams into smaller clusters
    • Maintain equal spacing between subjects
    • Ensure everyone’s shoulders are angled slightly rather than square to the camera—or, if facing the camera directly, ask the subject to shift weight from one leg to the other 

    two group shots, side by side, the group shot on the left has three older women standing and the group shot on the right has five diverse adults standing

    For family portrait poses:

    • Create natural connections through gentle touching (hand on shoulder, arms linked)
    • Position children in front or held by parents
    • Use props or furniture to create natural groupings
    • Let small kids move around and play between shots to stay engaged
    • Capture both formal and candid interactions—experiment with both seated and standing poses
    • Switch between some or all subjects looking at the camera to fully candid shots

    family portrait of two adults and two children in a casual home setting

    Common posing challenges and tips to solve them

    Even experienced photographers run into tricky posing situations. Maybe you’ve got a group with significant height differences, someone nervous about being photographed, or the shoot ran late so now you’re rushing to cover all your bases. So, what are some common challenges you might run into?

    Height differences

    If you have subjects with drastically different heights, it can make for an awkward portrait. Position taller people slightly behind or sitting. Seated poses work the best to tackle this, but that doesn’t mean you should avoid standing poses altogether. You can use elements like stairs or slopes to minimize extreme height gaps. 

    portrait photo of a group of students and their teacher in front of a blackboard

    You can also create diagonal arrangements instead of straight lines. Avoid placing the tallest and shortest people next to each other—unless they’re standing behind each other.

    Confidence issues

    If your subjects are camera-shy, start with simple poses to build trust. Give specific compliments about what’s working well, and show them the preview shots when you capture something great. 

    It’s a good idea to have a few go-to safety poses that work for most people. Some might also feel more relaxed if there’s music playing in the background, especially if you’re shooting in a studio.

    Your own confidence and body language as the photographer make a difference too—stay positive or even a little goofy if appropriate. Make sure to edit your portraits and headshots to show your subjects in the most flattering way while keeping their appearance natural

    Photographing glasses and reflections

    If shooting something reflective in the frame, slightly tilt the head down to avoid glare. You can also ask subjects to push their glasses slightly up their nose. Position lights at angles that don’t create reflections. If the reflection doesn’t cover the subject’s eye in full, you can always fix it with retouching.

    Rushing through poses

    Prepare a shot list ready but be flexible—you can have the shot list on your phone or even photograph it so you can flick through your camera during the shoot without stopping the session.

    Start with your most reliable poses first. Give clear, concise directions, and keep subjects engaged by showing progress.

    Are you ready to direct your next portrait shoot?

    Working with people can be unpredictable because everyone’s unique—but that’s exactly what makes portrait photography so rewarding. The trick is to adapt your approach for each subject while keeping your photo quality consistent. With these posing guidelines, you’ll be better equipped to direct any portrait session confidently, from corporate headshots to family gatherings.

    And if you need help getting those portraits polished and ready to share, our team of expert editors at Path can handle the retouching while you focus on capturing more great shots.

    Polish up your portraits with pro retouching from 79¢ per image

    Portrait poses FAQs

    How do you pose for a professional headshot?

    Start by turning your body 45 degrees from the camera, then face back toward it. If you’re standing, shift your weight to your front leg, keep your shoulders relaxed, and lean forward slightly from the hips. Small adjustments make a big difference—change arm positions between shots and keep movements subtle. Allow yourself to smile and laugh, too!

    How do you look professional in a headshot?

    • Maintain good posture without looking stiff
    • Keep shoulders back but relaxed
    • Sit at the edge of your chair for seated shots
    • Cross ankles instead of legs
    • Let hands rest naturally

    What are the best poses for group photos?

    Avoid straight lines of people. Instead, create depth by staggering heights using stairs or chairs, and arrange people in a slight arc. For professional teams, keep poses consistent but not identical. With families, encourage natural connections through gentle touching like hands on shoulders.

    What are common mistakes to avoid when posing subjects?

    Common portrait mistakes include forcing unnatural smiles, rushing through poses without direction, and not adapting poses to fit different subjects. Stay engaged with your subject throughout by having a conversation and provide positive feedback. If something doesn’t work, simply switch to the next pose.

    How to pose different body types?

    Work with your subject’s natural body language instead of forcing uncomfortable poses. The 45-degree angle works well for most people, as does shifting weight to one leg. For seated poses:

    • Focus on good posture
    • Create asymmetry through slight head tilts
    • Adjust your camera position rather than making subjects twist
    • Make sure subjects feel confident in their pose
    • Don’t let the subject sink back into a soft chair or sofa

    How do you pose someone who is camera shy?

    Start with simple poses and build trust gradually. Show them preview shots when you capture something great, keep the conversation going, and guide them into different poses smoothly. Playing background music can help relax in studio settings.

    [ad_2]

    Source link

  • 2024 Path Talent Hunt Winners

    2024 Path Talent Hunt Winners

    [ad_1]

    Path would be nothing without our people. To recognize our team’s unrelenting dedication to honing their craft and providing quality service to customers like you, we decided to host our first Talent Hunt at the end of 2023. After much success, we did it again in 2024!

    The contest

    The Talent Hunt was created with a few goals in mind: 

    • to identify exemplary photo editing techniques an
    • to recognize the editors behind the edits—we do everything by hand here, no sloppy AI shortcuts
    • to foster innovation and future leaders in the industry

    We let everyone get in on the fun—our in-house folks, temp workers, and even our subcontracting team—to see who can make the best, the fastest, and the most accurate photo edits. And not only that, but how the rest of our organization can learn from them. It’s just another way we’ve found to continuously innovate and push ourselves to always do better.

    We had three categories for winners:

    1. Speedstar Editor: the person who can edit images in the least amount of time while maintaining quality standards
    2. Quality Wizard: the editor who can edit images with extraordinary quality by using different techniques outside of their traditional quality within the defined timeframe
    3. Technique Mastermind: for the most creative editing techniques that still deliver quality and speed

    We also had a judging panel, made of:

    Creative review

    • Md. Ataur Rahman, Senior Manager, Production
    • MD. Shahadat Hossain, Senior Manager, Customer Support
    • Md Shaharia Kabir, Assistant Manager, Audit
    • Rayhanul Islam, Senior Executive, R&D
    • Abdullah Al Jasim, Executive, R&D

    Overall organization and coordination

    • Rifat Rahmatullah, Manager, Human Resources
    • Shams Al Mujahid, Senior Executive, HR and Admin

    Final decision

    • Md. Atiqur Rahman Molla, CEO
    • Rokaiya Yesmin, COO

    The winners

    Seven participants competed in the Talent Hunt, with two emerging as the top contestants. These editors displayed exceptional proficiency in all types of edits. Their techniques not only streamlined editing processes but also elevated the overall quality.

    Get to know the winners—some of the very people who edit your photos:

    Bishojit Sarker, 1st place

    • Category: Quality Wizard
    • Technique: image masking and photo retouching
    • Prize: mobile phone

    Mohammad Ripon, 2nd place

    What’s next?

    Sure, the Talent Hunt was a lot of fun! But there’s also a business goal behind it. Our top editors have innovated to bring new editing techniques and workflows to their work.

    By having this Talent Hunt, we can bring our larger team of editors together, identify top talent, and learn from them. The Talent Hunt winners can share their expertise, learnings, and techniques with the rest of the Path editing team to help continue to propel the quality of our services higher and higher.

    Thanks for being a part of our family

    We wouldn’t be able to edit images, innovate, and give back to our people without our customers. To us, Path is more than just a photo editing studio. It’s a family. And we’re happy to have you a part of that big, extended Path family. 

    Ready to send your photo edits our way? Get started now—and get your edits back in as little as 6 hours.

    [ad_2]

    Source link