برچسب: Magic

  • The Photo Hustle – There Is No Magic Formula – A Photo Editor


    This is an excerpt from The Photo Hustle by Karen Williams Buy your copy here: https://store.mangopublishinggroup.com/products/the-photo-hustle-1

    Screenshot

    If you picked up this book, I’m betting you love photography enough to pursue a career in it, but you have no idea where to start. That’s where I come in. I want to be the resource and mentor I never had, so you don’t have to learn the hard way. I’ll be sharing the insider secrets of the photography industry that they don’t teach you in school. Because combining your passion for photography with a career can get a little messy. Being a great photographer is only half the battle. To thrive in this industry, you need to be a savvy entrepreneur, too. And that’s why I took it upon myself to fill in this much-needed gap. Instead of hoping things will change, it’s time we take control of our careers—and I’m here to help you do just that. This book will equip you with everything you need to know for a successful photography career. But you have to show up and put in the work.

    The photo hustle is real. These days, it’s not enough to have talent. You have to know the industry—and it’s a tough one to break into. Most photography schools and workshops don’t teach you how to run a successful business. Rather, they focus on the latest gear and techniques. They’ll teach you about posing, directing clients, composition, and lighting. They’ll show you all the pretty editing tricks and how to set up a shot.

    But actual business skills? That stuff rarely gets taught in the photography world. Marketing and branding? Not in most curricula. Sales and pricing strategies? I don’t think so. Client experience and retention? Doubtful. Financial planning and management? I’m not seeing it. Most photographers are expected to figure it out on their own, often through trial and error. But in reality, most photographers were never prepared for the “photo hustle” that exists on the flip side of their passion… I know I wasn’t.

    Listen, I know you have the passion. I know you’ve dedicated your time to your craft. And I know you’re ready to get out there and share it with the world. Yes, photography is a tough road. But if you stick it out, get up when you get knocked down, and keep going, you can succeed. Keep pushing, keep creating, and keep capturing life through your lens. The world is waiting to see your visual eye.

    There is no magic formula for making it in photography. If you’re hoping for a perfect path to success from Point A to Point B, I’m sorry to be the one to break it to you—it just doesn’t exist. No two photographers fall into success in the same way.

    “I’ve done everything right, but nothing is working. How do I get in?”

    It’s a question I get almost daily, but this time it came from a friend—let’s call her Michelle—over coffee. Michelle, an incredibly gifted photographer, had been struggling. Two years out of photography school, and she hadn’t landed her dream gigs…or anything close to them. Instead, she was building a business photographing families and pets. She was good—damn good—but it wasn’t her dream. Like so many photographers I talk to every day, Michelle had talent and drive, but couldn’t break into the industry. So, what gives?

    I told Michelle what I tell all photographers: the industry has secrets they don’t want you to know. No matter how good you are or how many boxes you check, breaking in is tough. And if you don’t know what I’m going to share with you on these pages, then your chances of getting in are just as slim. Some photographers make it by luck, some hustle, and some are “discovered.” But believe me, there’s no perfect path, no magic formula—just straight talent and lots (and lots) of hustle.

    When I was studying for my BFA, my dream was to shoot the cover of Rolling Stone magazine. That dream was shaken when, in September 2023, the president and founder Jan Wenner dismissed Black and female artists as not “articulate enough” for his book The Masters, a collection of interviews with rock’s greatest.2 His words hit hard, sparking the same frustration I felt following the George Floyd tragedy and the hollow promises made in light of his death. After fifteen years in the industry, I had become accustomed to being one of the few Black people on set, and I began to question why so many talented, hard-working photographers of all kinds were being sidelined. The answer is simple: the industry keeps a lot of information locked away. And I had become a part of the industry-wide gatekeeping that I hated so much. This book is the product of my determination to change that.

    Spoiler alert: I’m not a professional photographer—I’m the person behind the scenes, hiring photographers, shaping art direction, and building brand stories big and small. I’m living my dream as a photo editor. Over the last fifteen years, I’ve had the opportunity to work for WIRED, Southern Living, Netflix, AARP, MasterClass, Square, and San Francisco Magazine. But the journey wasn’t easy—I faced a ton of job rejections that nearly shattered my confidence. But I refused to let them break me down—I chose not to let others dictate my worth or my future in the field. So, I took matters into my own hands and hustled hard for years. I even changed jobs fourteen times in sixteen years, transforming each of my setbacks into an opportunity to learn, grow, and improve my craft. My journey of hustle and hard work led me to where I am today. I even founded my company, Black Visual Queen, to change the industry and help photographers like you find their path to success in this highly gate-kept arena, where opportunities are often so elusive.

    First, a word of warning: this is a tough industry, and brand photography isn’t for everyone. The road to that dream is a long one, paved with hustle, hard work, and lots (and lots) of rejection. But since you’re reading this book, I’m willing to bet that knowing this doesn’t deter you. You’re one of the photographers who have the determination to work with prestigious, big-name clients, and you’re not ready to throw in the towel on your dream just yet. If this is you, then listen up, because I’m going to teach you everything you need to know about the photo hustle—and how to get in. The photo industry is not just reserved for the elite; it’s for anyone willing to do the work. All you need is a little tenacity, talent (which you have), and the tips and tricks I’m going to spill in this book.

    Through the years, I’ve seen top photographers ready to quit, exhausted by fierce competition and overwhelmed by technology. Many don’t know how to market themselves. So, if you’re frustrated by rejections, ghosting, or “we’ll keep your name on file” responses, just keep going. Keep hustling, keep honing your craft. The challenges are real, but don’t let them extinguish your passion. Embrace your uniqueness, stay motivated, and don’t fall into the comparison trap. Photography is rewarding, and the world is waiting to see your unique perspective.

    In the following pages, you’ll learn everything photography school didn’t teach you and all the industry secrets the insiders don’t share. This is the book I wish I’d had back when I was starting out in photography: the tell-all (well, maybe not all—I’ve signed a lot of non-disclosure agreements!) about the photography biz, especially for editorial and brand work.

    The book is split into two parts. Part 1 covers how to get in the room—in other words, how to break into the industry, how to pitch, how to market yourself, handle finances, and land the gig. We’ll be diving into your “why” as a photographer because knowing that helps you make the next right decision.

    Part 2 explains what to do once you’re hired—how to navigate estimates, contracts, agents, photoshoot etiquette, avoid the dreaded blacklist (yes, it’s real), and how to redeem yourself if you find yourself on it.

    Consider this book your trusted mentor. I want this to be the book you reach for when you land the gig and have no idea what an estimate looks like or what to watch out for in a contract. I want you to take this everywhere with you. Carry it in your purse. Stow it in your camera bag. Use it as a resource to help you navigate the tough business side of photography. By the end, I want you to feel encouraged, equipped, and confident to build the successful photography career you’ve always dreamed of.

    Ready to find your “magic formula?” Let’s dive in.


    Source link

  • How to Use the Photoshop Magic Wand Tool

    How to Use the Photoshop Magic Wand Tool


    Photoshop’s Magic Wand Tool: You’ve definitely heard of it and, depending on how much you use Photoshop in your day-to-day, you may have even used it.

    Learn what the Magic Wand Tool is and how to select and mask in Photoshop with it. This Photoshop masking tutorial will turn you into a pro in no time.

    The Photoshop Magic Wand Tool is a quick and easy way to select and mask certain portions of an image, giving you the ability to alter one part of your image while leaving other parts intact. One of the most common uses of this tool is to swap out or remove the background of a product photo, leaving the subject of the image in place. 

    Related: Clipping Path vs. Masking: What’s the Difference?

    The Magic Wand Tool works by selecting an area of solid color within an image. Once your selection is made, the Magic Wand Tool gives you multiple options for refining that selection. 

    The Magic Wand Tool is a go-to tool when you want to display a product in various settings by showing it against different backgrounds, or when you want to remove a background altogether so your product stands on its own.

    This is often the case for marketplaces like Amazon or eBay, which have product photo requirements of their own that outline the approved backgrounds your images can have.

    Tutorial: Learn how to create a ghost mannequin in Photoshop

    https://www.youtube.com/watch?v=e_y3vFhp_Bs

    For the following tutorial, we’ll be working with this photo of a soccer player. You’ll learn how to remove the background from the player using the Magic Wand Tool, so that you can later put the player into different scenes. The Magic Wand Tool is a great option for removing backgrounds on photos with a mostly solid background.

    soccer player photo with black background, standing on grass

    Step 1: Unlock the background and select the Magic Wand Tool

    Before you can use the Magic Wand Tool, you’ll need to make sure your layers are set up correctly. Go to your Layers panel, located by default in the lower right-hand corner of Photoshop 2024’s application window. If you don’t see the Layers panel, you can bring it forward by choosing Window > Layers from the dropdown menu at the top of the application window.

    Within the Layers panel, double click on the Layer entitled Background.
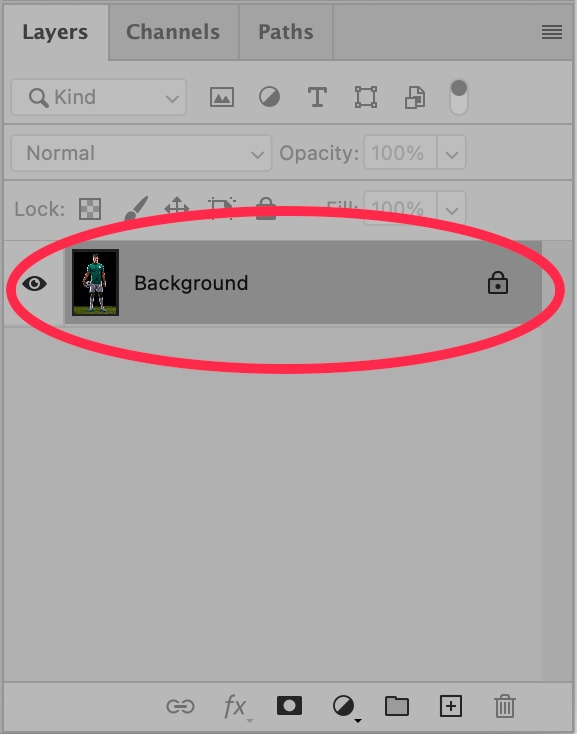
    Layers pop-up menu from Photoshop, showing Background layer

    A pop-up window will appear, prompting you to rename the layer “Layer 0.” Click OK.
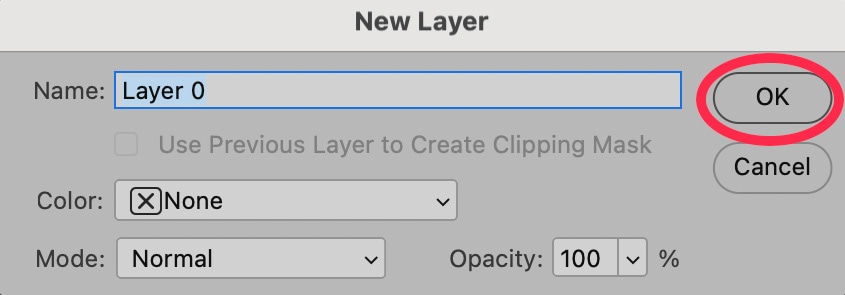
    New Layer pop-up menu from Photoshop, showing Layer 0 with a red circle over the OK button

    Within Adobe Photoshop 2024, choose the Magic Wand Tool from the Toolbar. By default, the Toolbar is placed to the left of the application window. The Magic Wand Tool may be hidden behind the Object Selection Tool or Quick Selection Tool.

    Photoshop menu showing where the Magic Wand Tool is located

    Note: To select any tool that is hidden “behind” another tool, choose the tool that is in front, and then hold the mouse button until other tools are visible. Then, select the visible tool you need.

    Save time and outsource it: Our background removal services start at $0.49/image

    Step 2: Select the solid areas of the background using the Magic Wand Tool

    There are several different ways to use the Magic Wand Tool to remove a background. We’ll start with the simplest method and work our way to more advanced methods as we refine our selection.

    When you click on a portion of your image using the Magic Wand Tool, the tool selects the pixel you selected along with adjacent pixels of the same (or similar) colors. 

    Once you have the Magic Wand Tool selected, you’ll see several different options in the Options Bar at the top of the screen. You can adjust the Tolerance of the Magic Wand Tool here. The higher the Tolerance, the more similarly colored pixels will be selected alongside the pixel you select with the tool.

    Photoshop main menu showing Tolerance at 0

    For this example, we will keep the Tolerance at 10.

    Click somewhere within the background of the image. The Magic Wand Tool will create a selection of all contiguous portions of your image that are roughly the same color as the background portion you selected.

    soccer player standing on grass with black background and checked lines around the black background border

    The Magic Wand Tool did a relatively decent job, but there are some portions of the background (such as between the player’s legs and under his right arm” that are not selected.

    To select areas of the background that did not get selected, hold down the SHIFT key and click within those areas that need to be selected. Holding SHIFT allows you to add to the existing selection without deselecting anything.

    soccer player with black background standing on grass and the borders of the athlete and the background are outlined

    Step 3: Select other portions of the background and foreground

    The ground in this photo is not a solid color like the background. It is, however, all varying shades of green. In order to select an area that is all about the same color but has a lot of detail, we need to adjust the Tolerance of the Magic Wand tool to a higher value. In this example, we’ve set the Tolerance to 50 and selected the grassy ground area of the photo.

    soccer player standing on grass with black background and everything is outlined and starting to be edited

    The results are less than perfect, but if we were to make the Tolerance much higher, we might accidentally select portions of the player’s legs.

    To smooth out the selection, choose Select > Modify > Smooth… from the dropdown menu at the top of the application window.
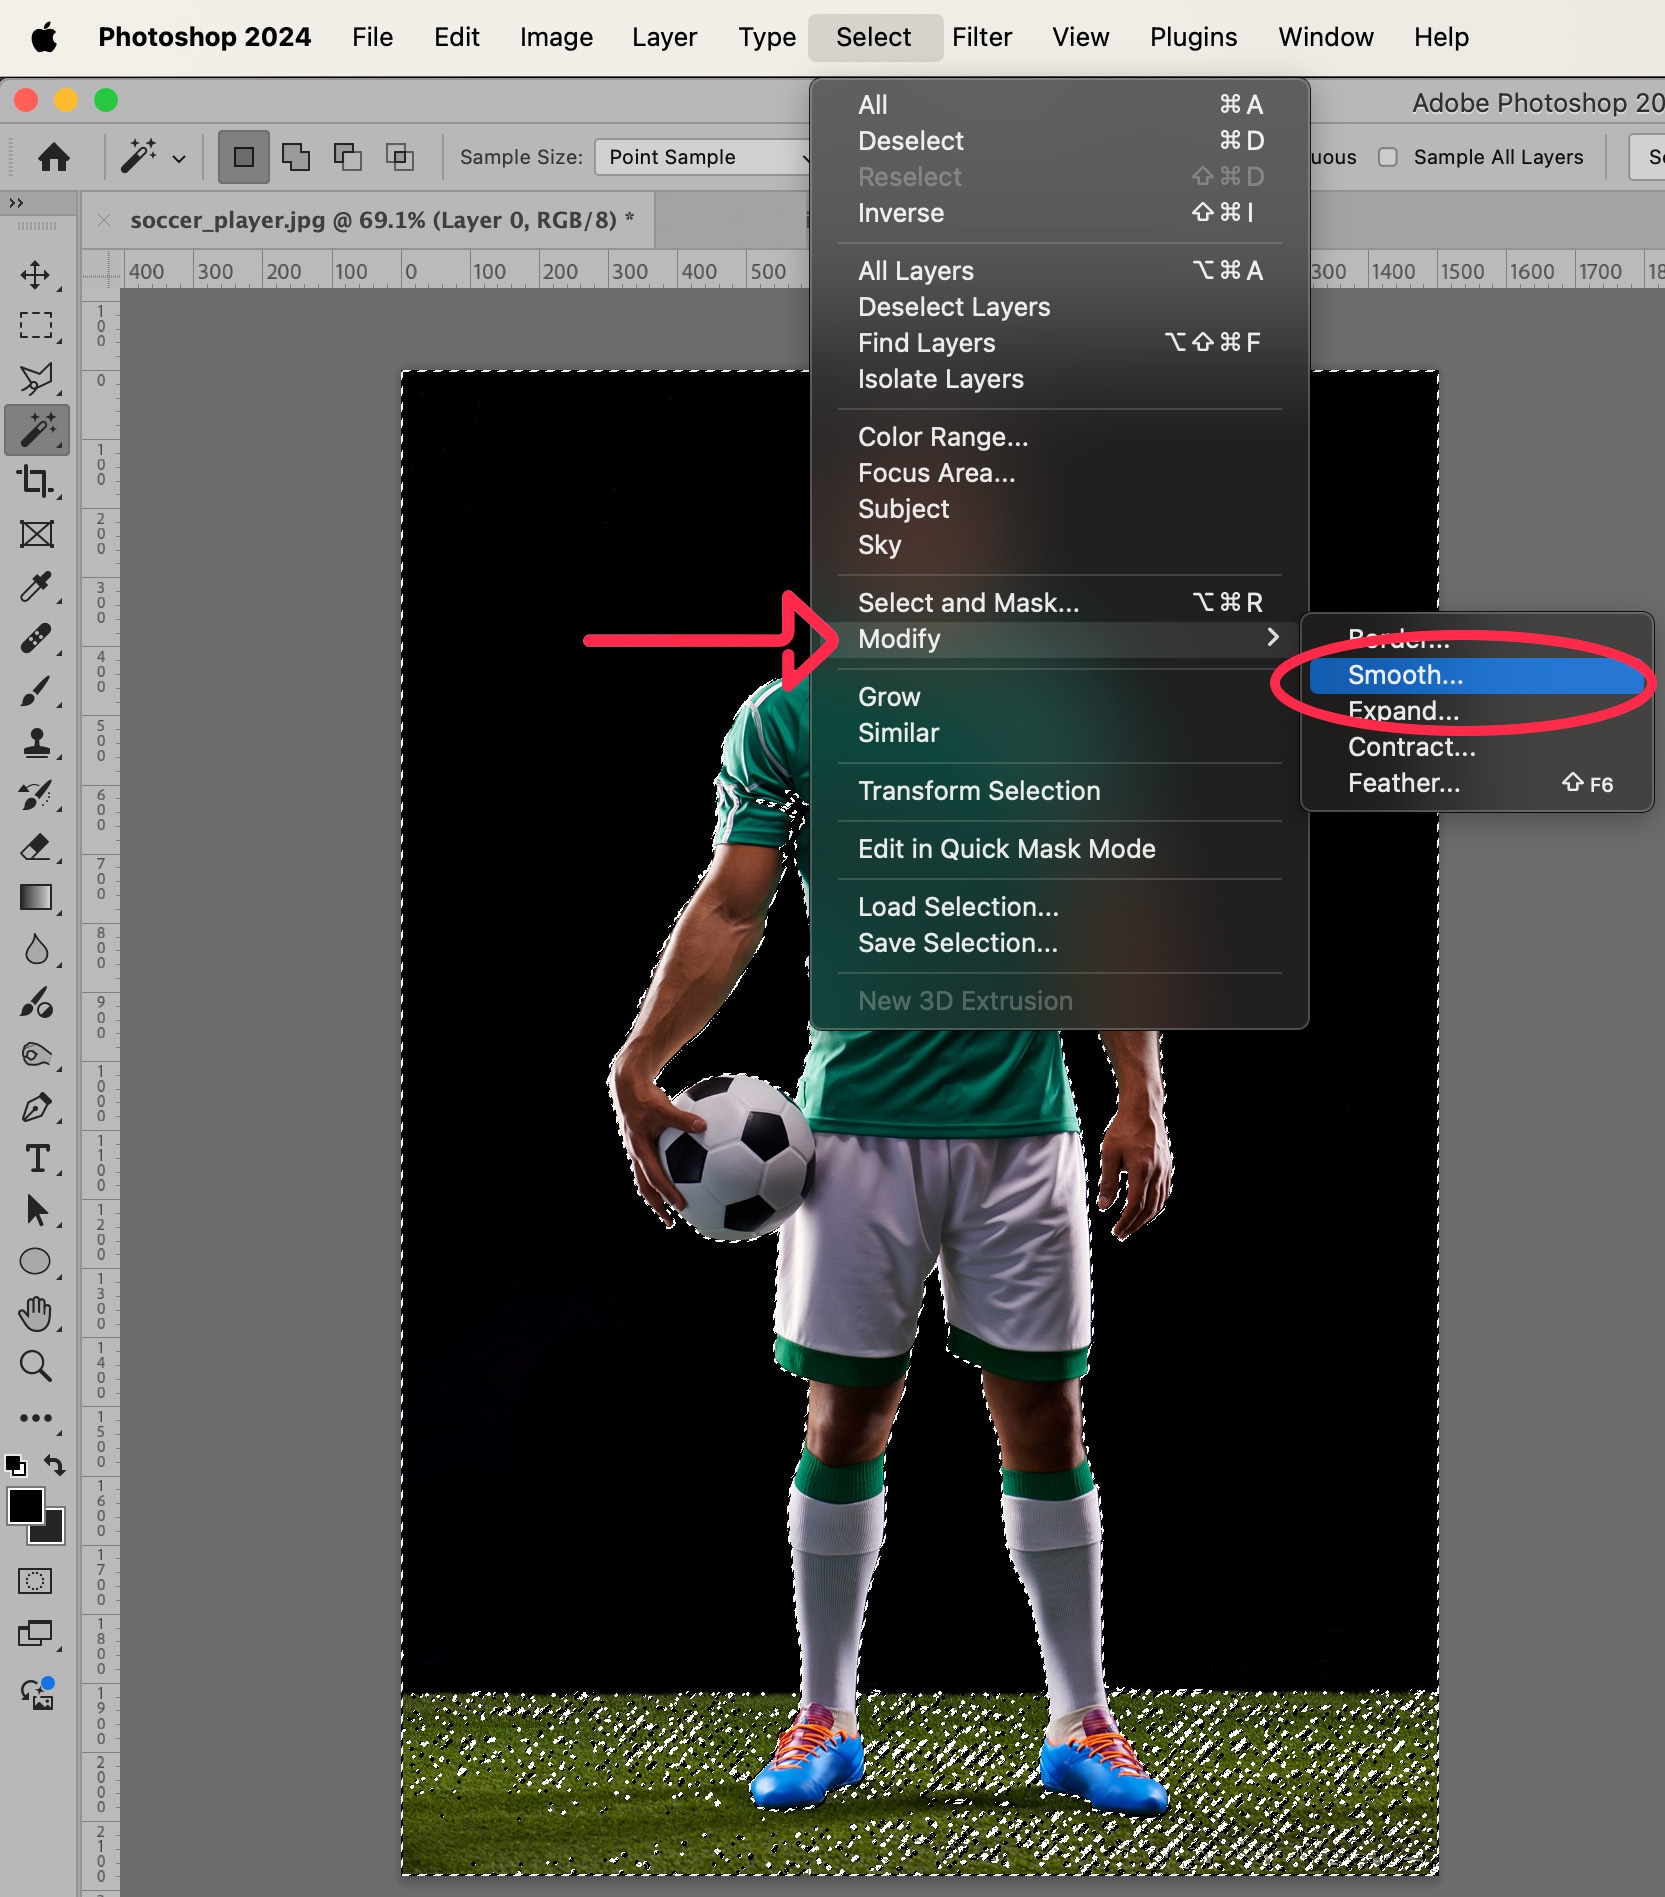
    Photoshop editing window showing how to Modify and Smooth your photo

    In the Dialog Box that appears, set the smooth value to something large enough to smooth out the edges of the selection but small enough to keep the integrity of the selection’s outline. For this example, we’ll set the value to 5.

    Photoshop Smooth Selection pop-up window, with 5 pixels set as the Sample Radius

    Click OK.

    The selection now looks almost close to perfect. Almost.

    soccer player standing on grass with black background and everything is outlined to be edited in Photoshop

    Step 4: Create a mask

    Select the inverse of your current selection by choosing Select > Inverse from the dropdown menu or by typing SHIFT + CTRL + I (SHIFT + COMMAND + I on a Mac).
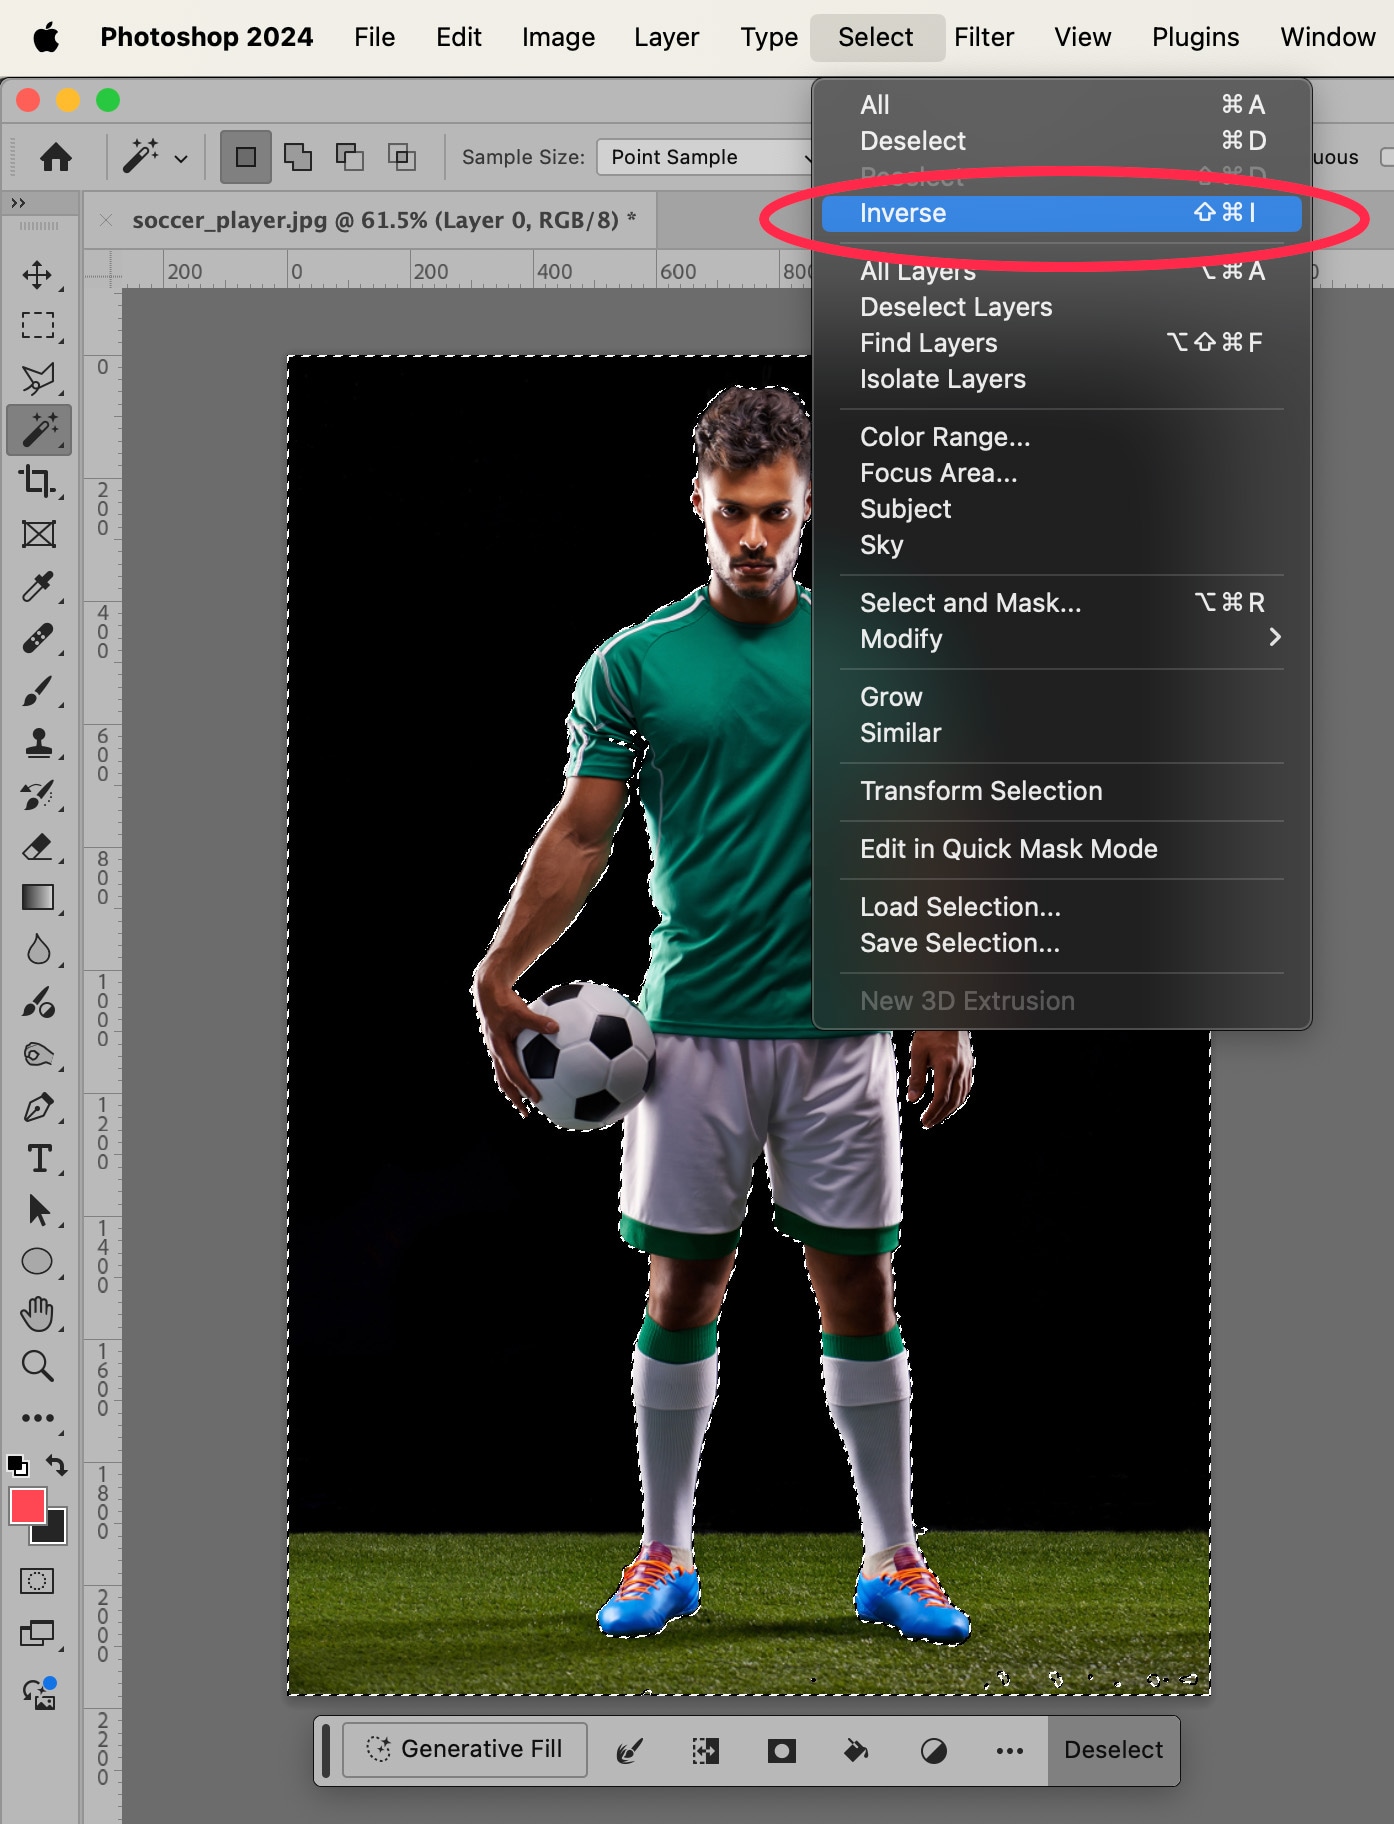
    Photoshop editing, showing the menu that has the Inverse option

    Now, your subject is selected (instead of your background).

    Next, go to Select > Modify > Contract… to tighten the edges of the selection. This is to compensate for any artifacts that may have appeared in the selection when we smoothed it earlier.
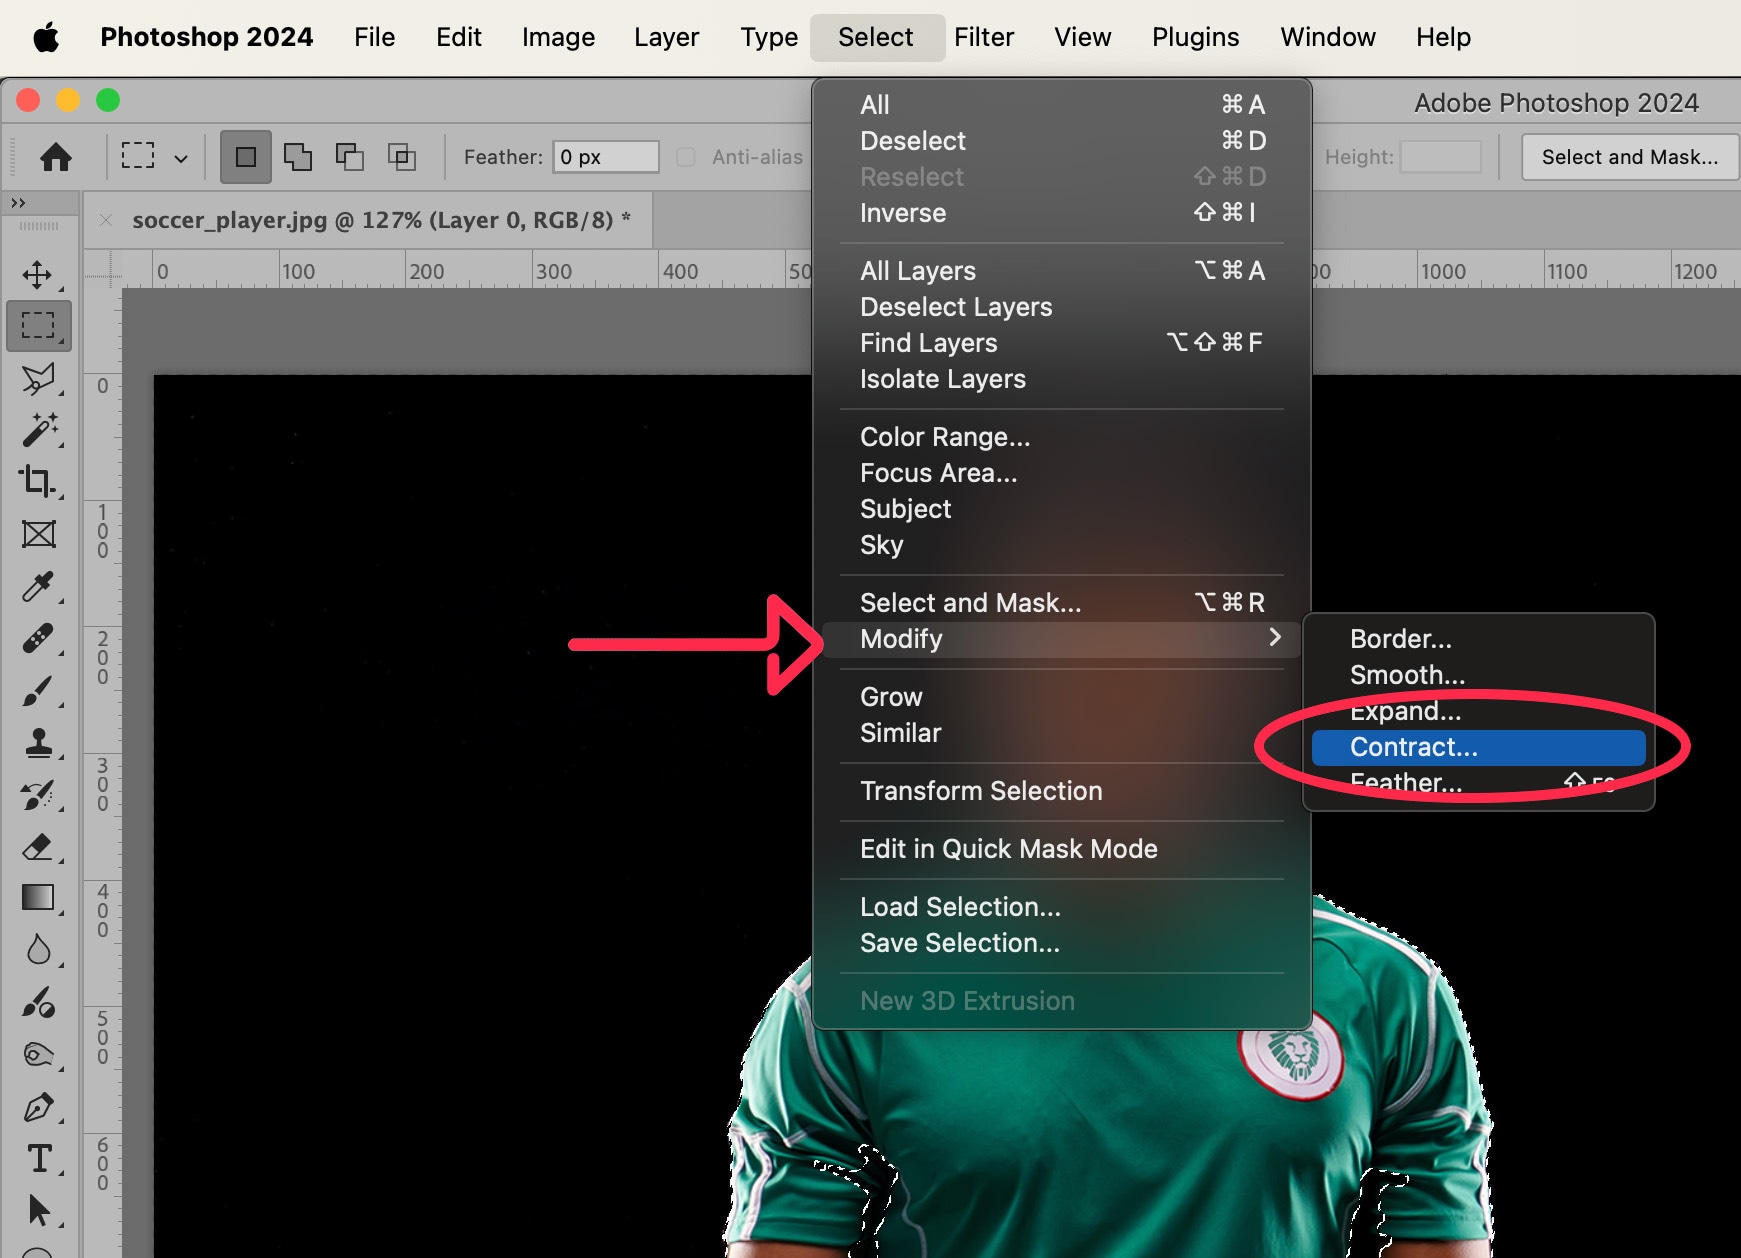
    Photoshop editing options and menus showing Modify > Contract…”> <p>In the dialog box that appears, set a Contract value to something between 1 and 4 pixels. The amount you set it to will vary depending on the image you are working with. In this example, I’ve set the value to 3.</p> <img class=

    Click OK.

    In your Layers panel, look for the Mask icon at the bottom of the panel. It will look like a black rectangle with a white circle inside of it.
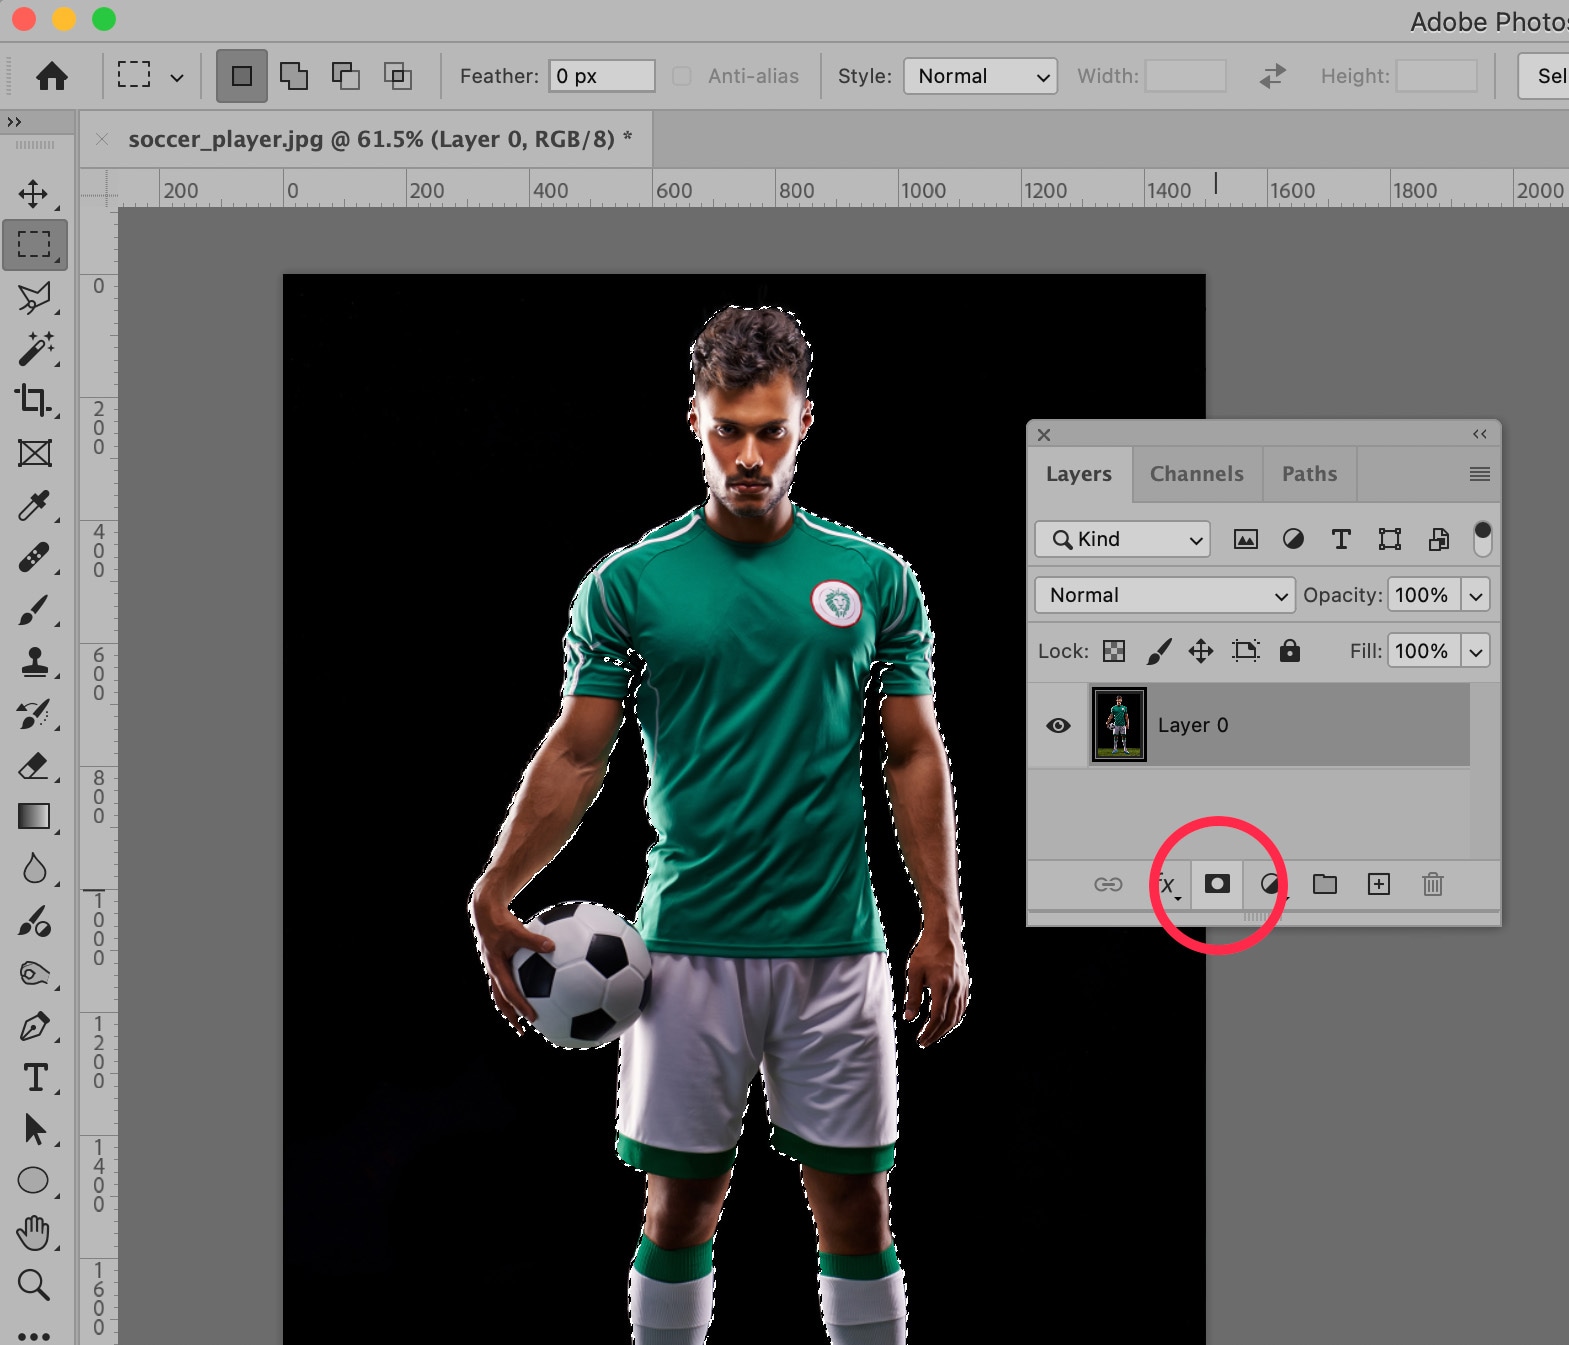
    Photoshop editing showing Layers and Mask options

    With Layer 0 selected, click on the Mask icon. You will now see your subject isolated against a transparent background.
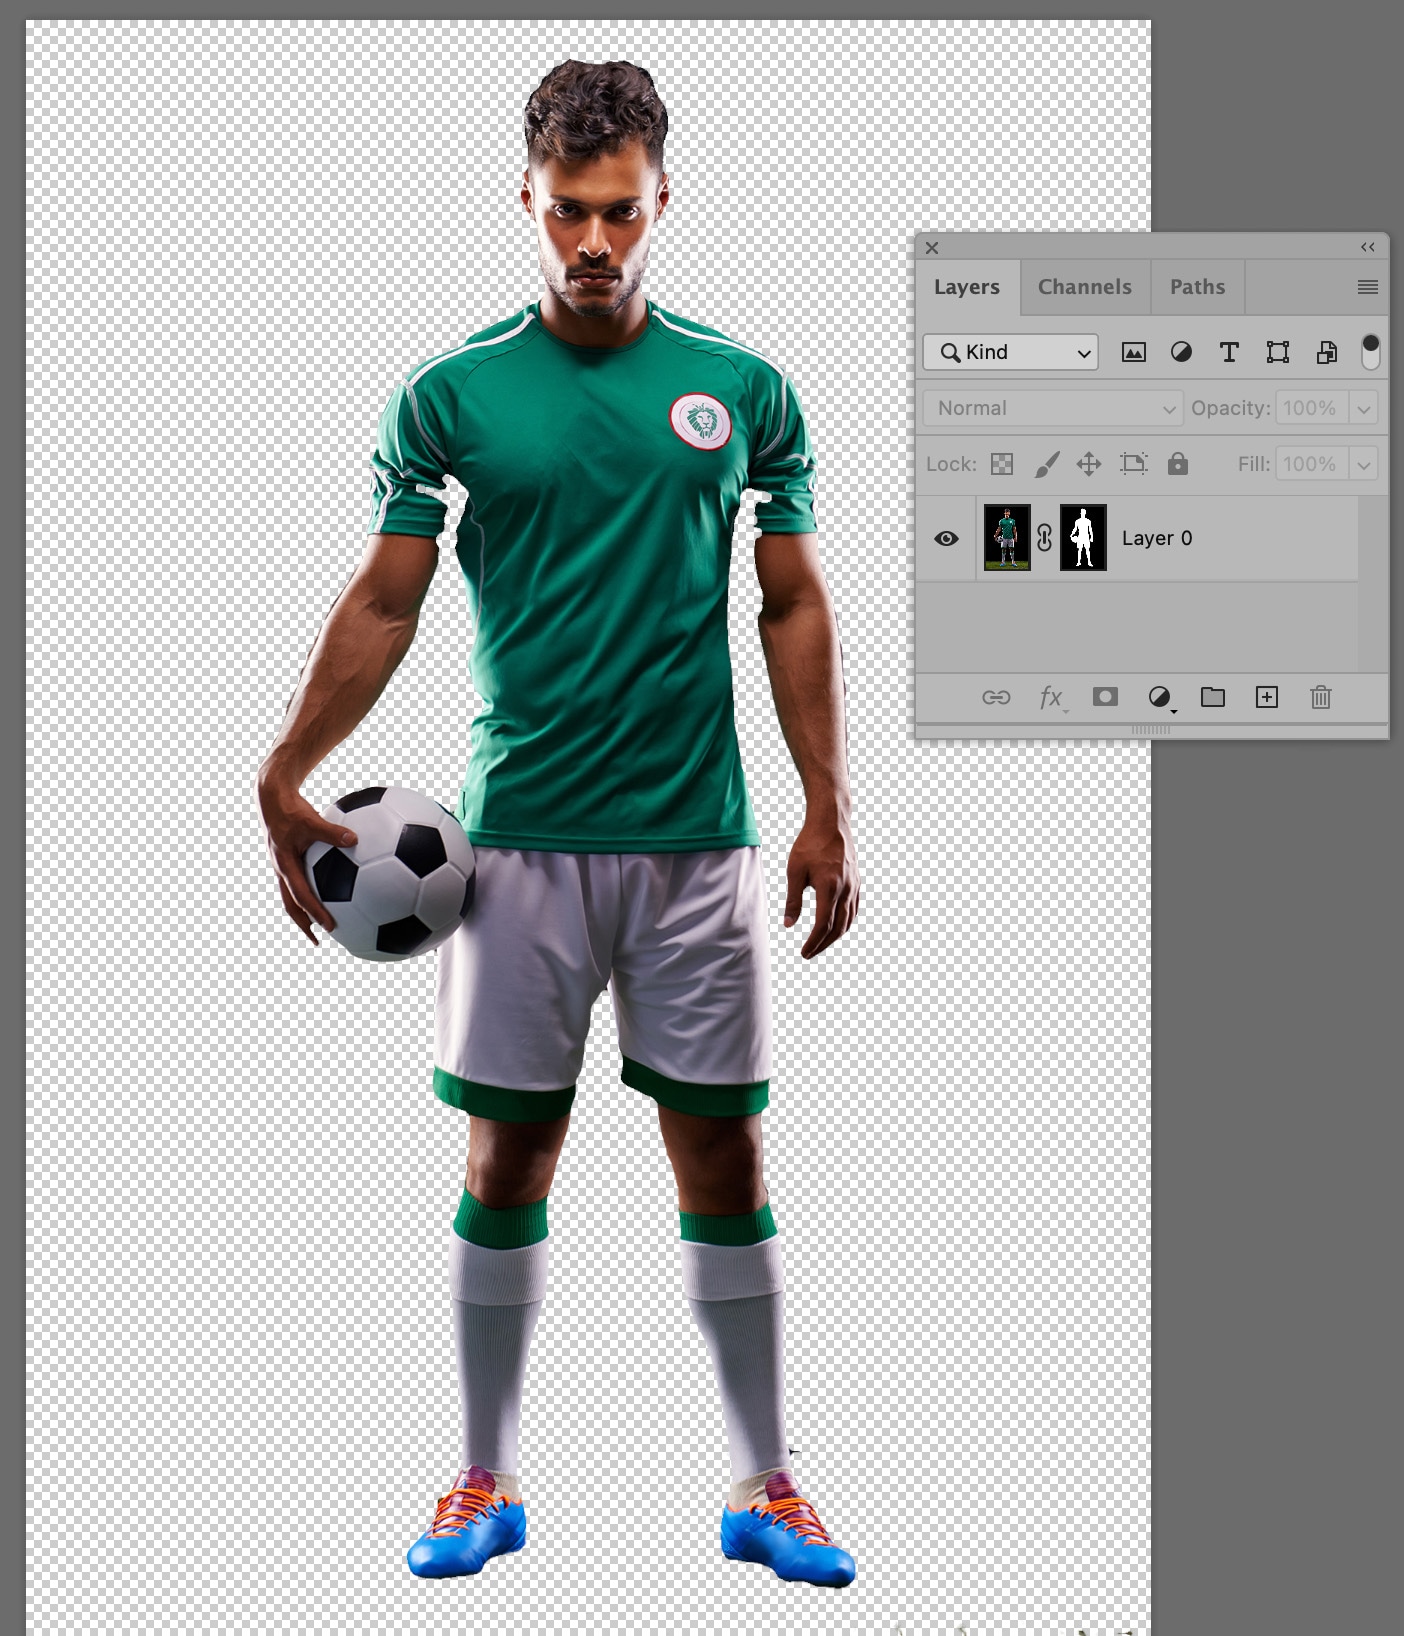
    soccer player image being edited in Photoshop, showing with a transparent background

    We’re almost there, but there are a few things we need to fix before we’re done.

    Step 5: Clean up the selection using the mask

    As advanced as Photoshop 2024 is, nothing can match the human touch for perfecting a selection. In order to finalize your image, you will need to use your Brush Tool, and your judgment, to modify and perfect certain areas of your selection.

    In Layer 0 of your Layers Panel, make sure you have the new layer Mask selected. When the Mask is selected, you’ll see a small, black outline around the Mask. Look closely as it’s a little hard to see.
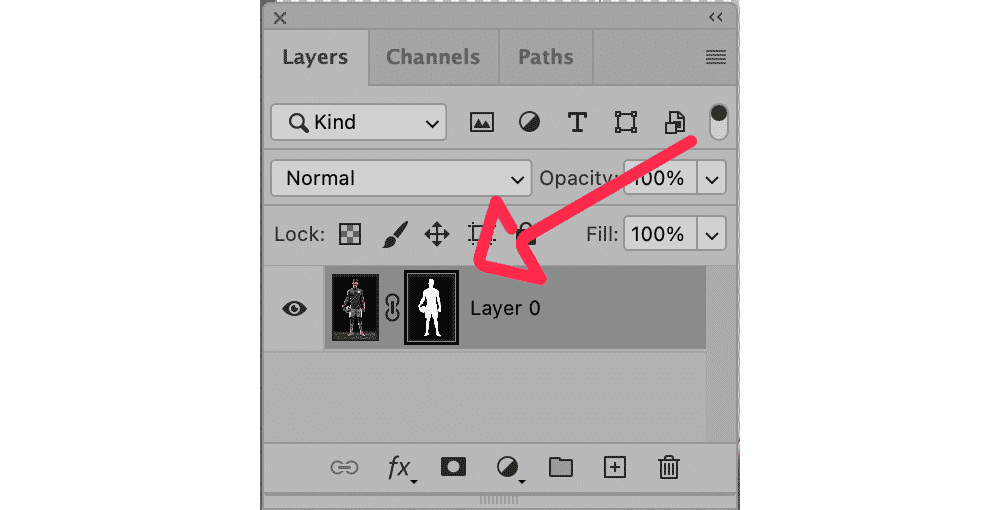
    Photoshop Layers menu showing different layers

    Next, select your Brush Tool from the Toolbar to the left of the application window. In the Options Bar at the top of the application window, you can set the width and hardness of your brush.

    If you have correctly selected the Mask icon in Layer 0, then the Foreground and Background colors in your Toolbar will be black and white. When white is the Foreground color, you can “paint back” portions of your masked image. When black is in the Foreground, you remove areas of your selection and they become masked.
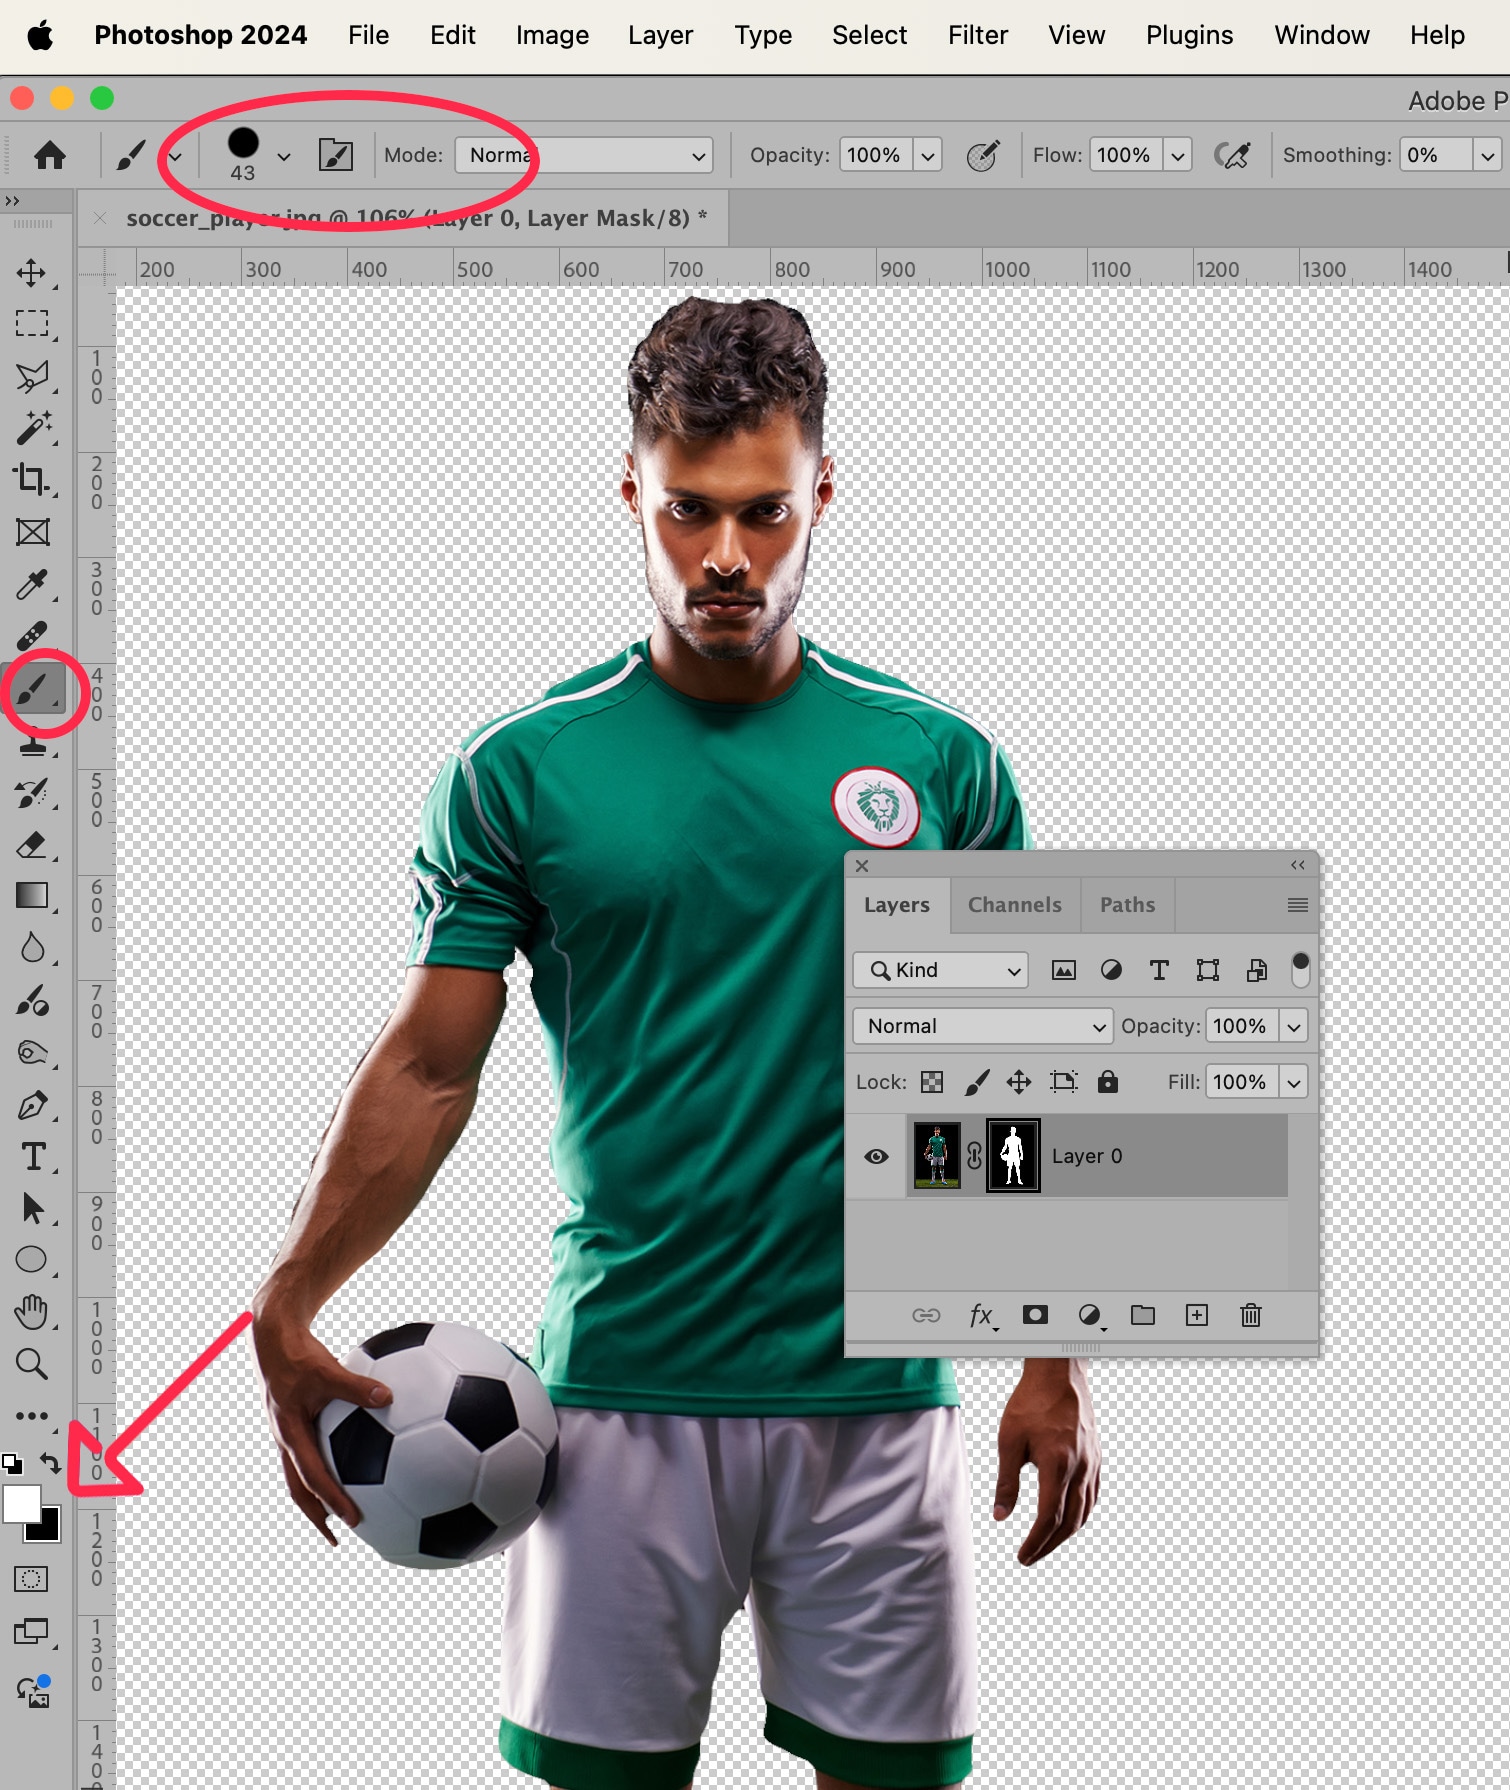
    Photoshop editing screen with mask icon layers features

    For instance, in our example image, certain portions of the player’s sleeves disappeared when we created our initial selection. Therefore, using the Brush Tool, we can “paint back,” or add those portions of the sleeve back in.
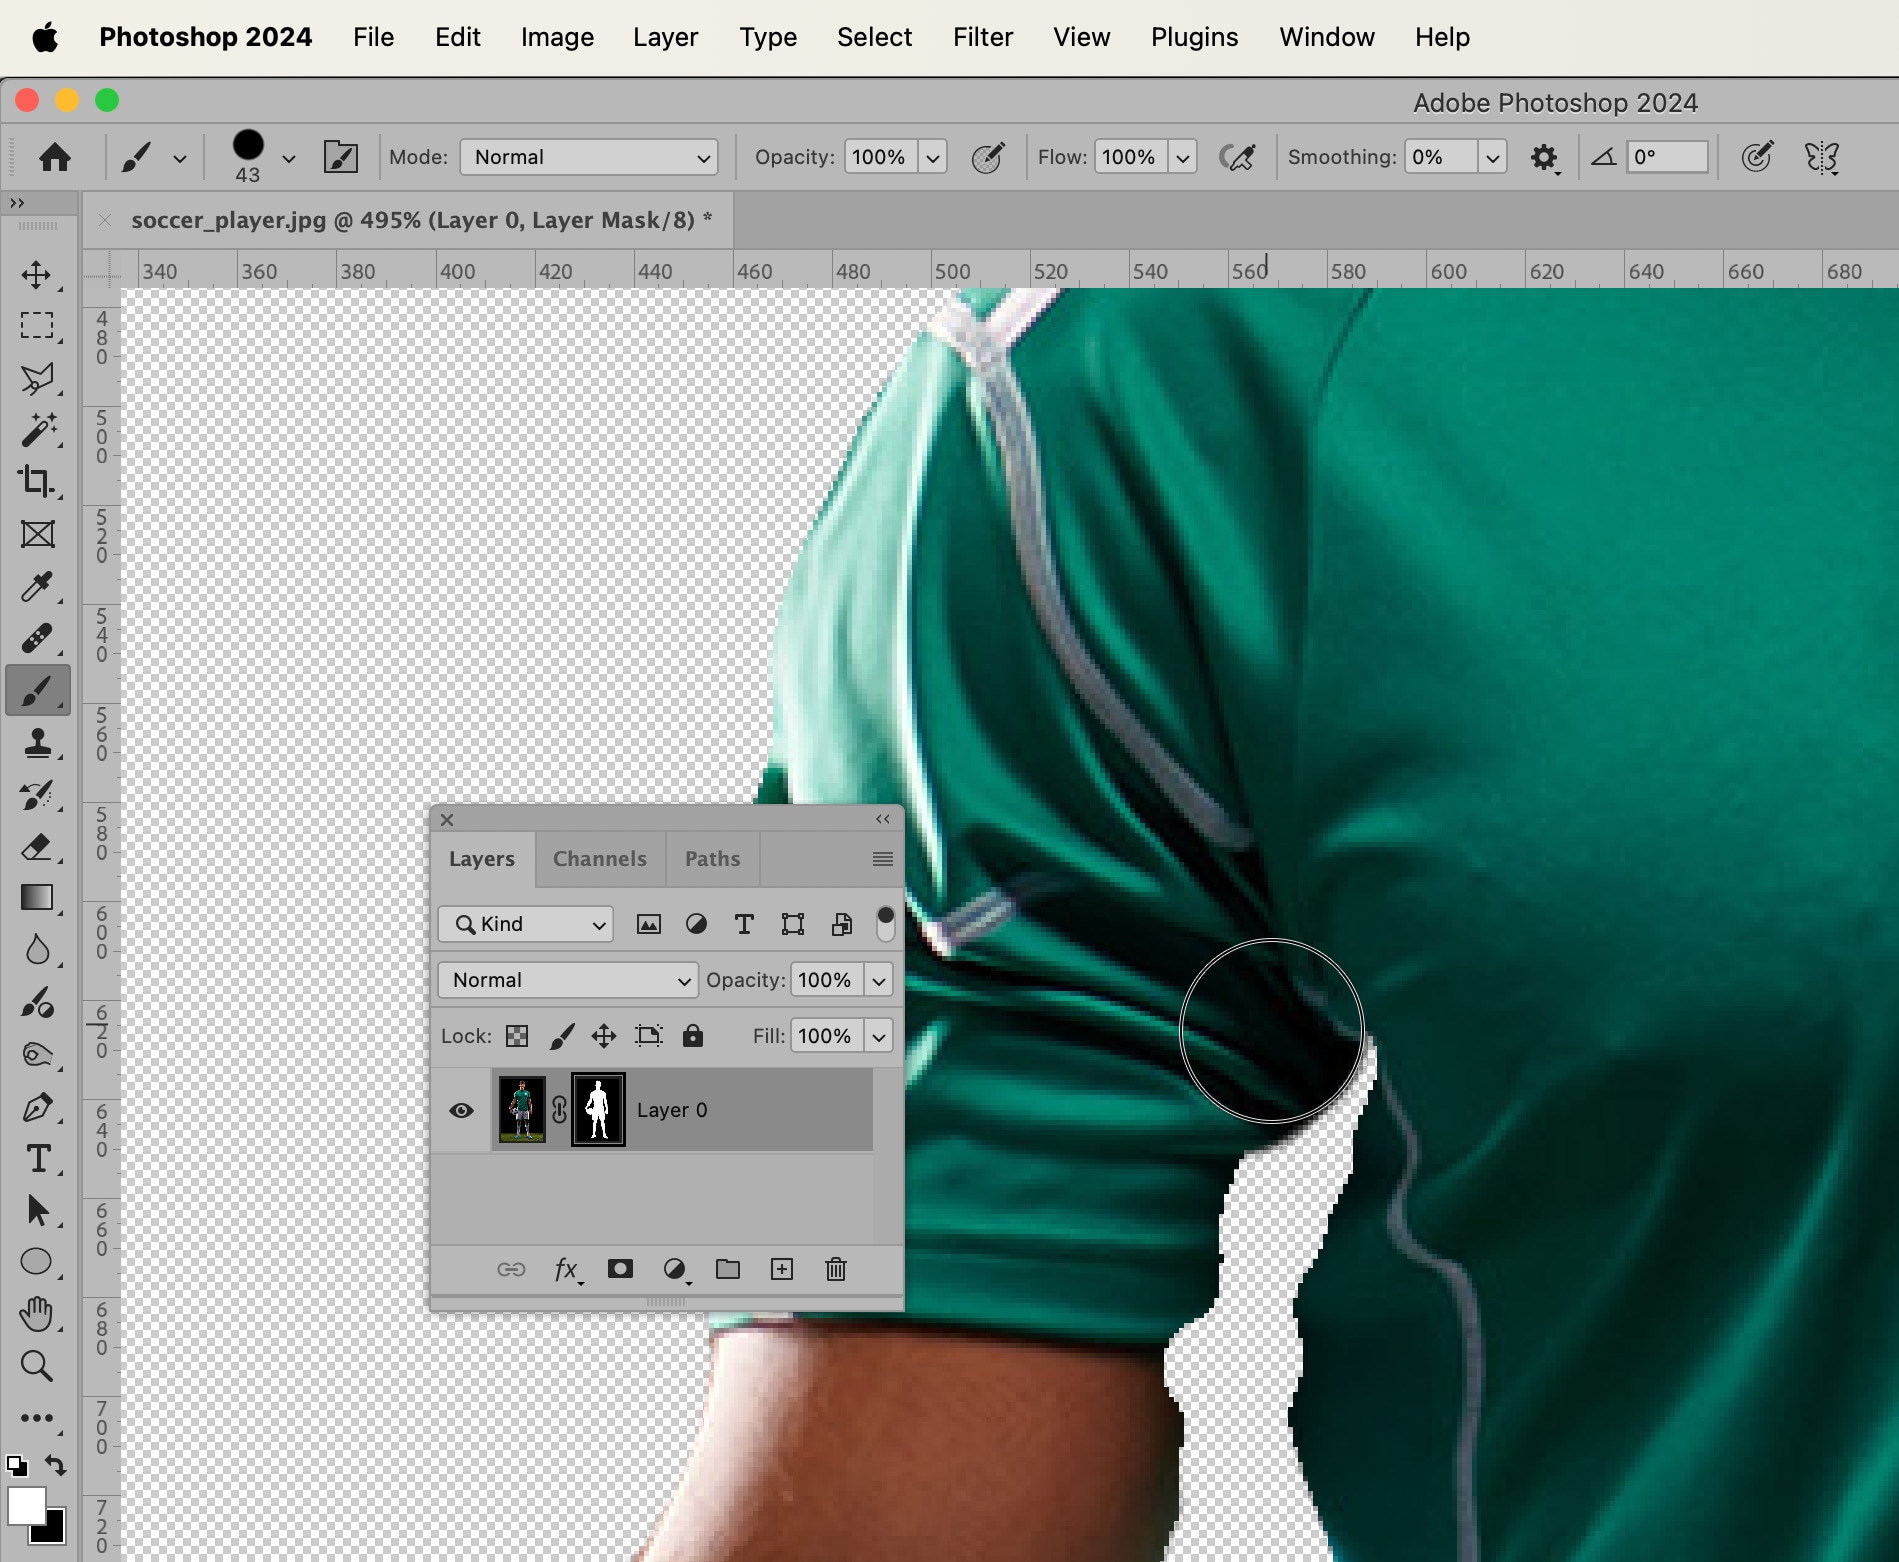
    refining armpit edit details in Photoshop

    Changing the size of the brush and switching between a white foreground and a black foreground, fix any edges of your selection that need finessing.

    Other ways to select and mask in Photoshop 2024

    Photoshop 2024 also offers another option for Selecting and Masking that may or may not be easier for you. Let’s start with the original image again to learn this second method.

    When your Magic Wand Tool is selected, you’ll notice there are some selection options available in the Options Bar at the top of the application window. At the far right of the bar, click Select and Mask….

    select and mask menu from Photoshop

    A new window will open showing most of the image erased. Don’t worry–the image is still there; it’s just been “masked.”

    At the top of the screen, click the button that says Select Subject.

    Photoshop menu showing select subject

    Photoshop will attempt to interpret and select the subject of your image. Though, as you can see in the image below, the results are not always perfect.
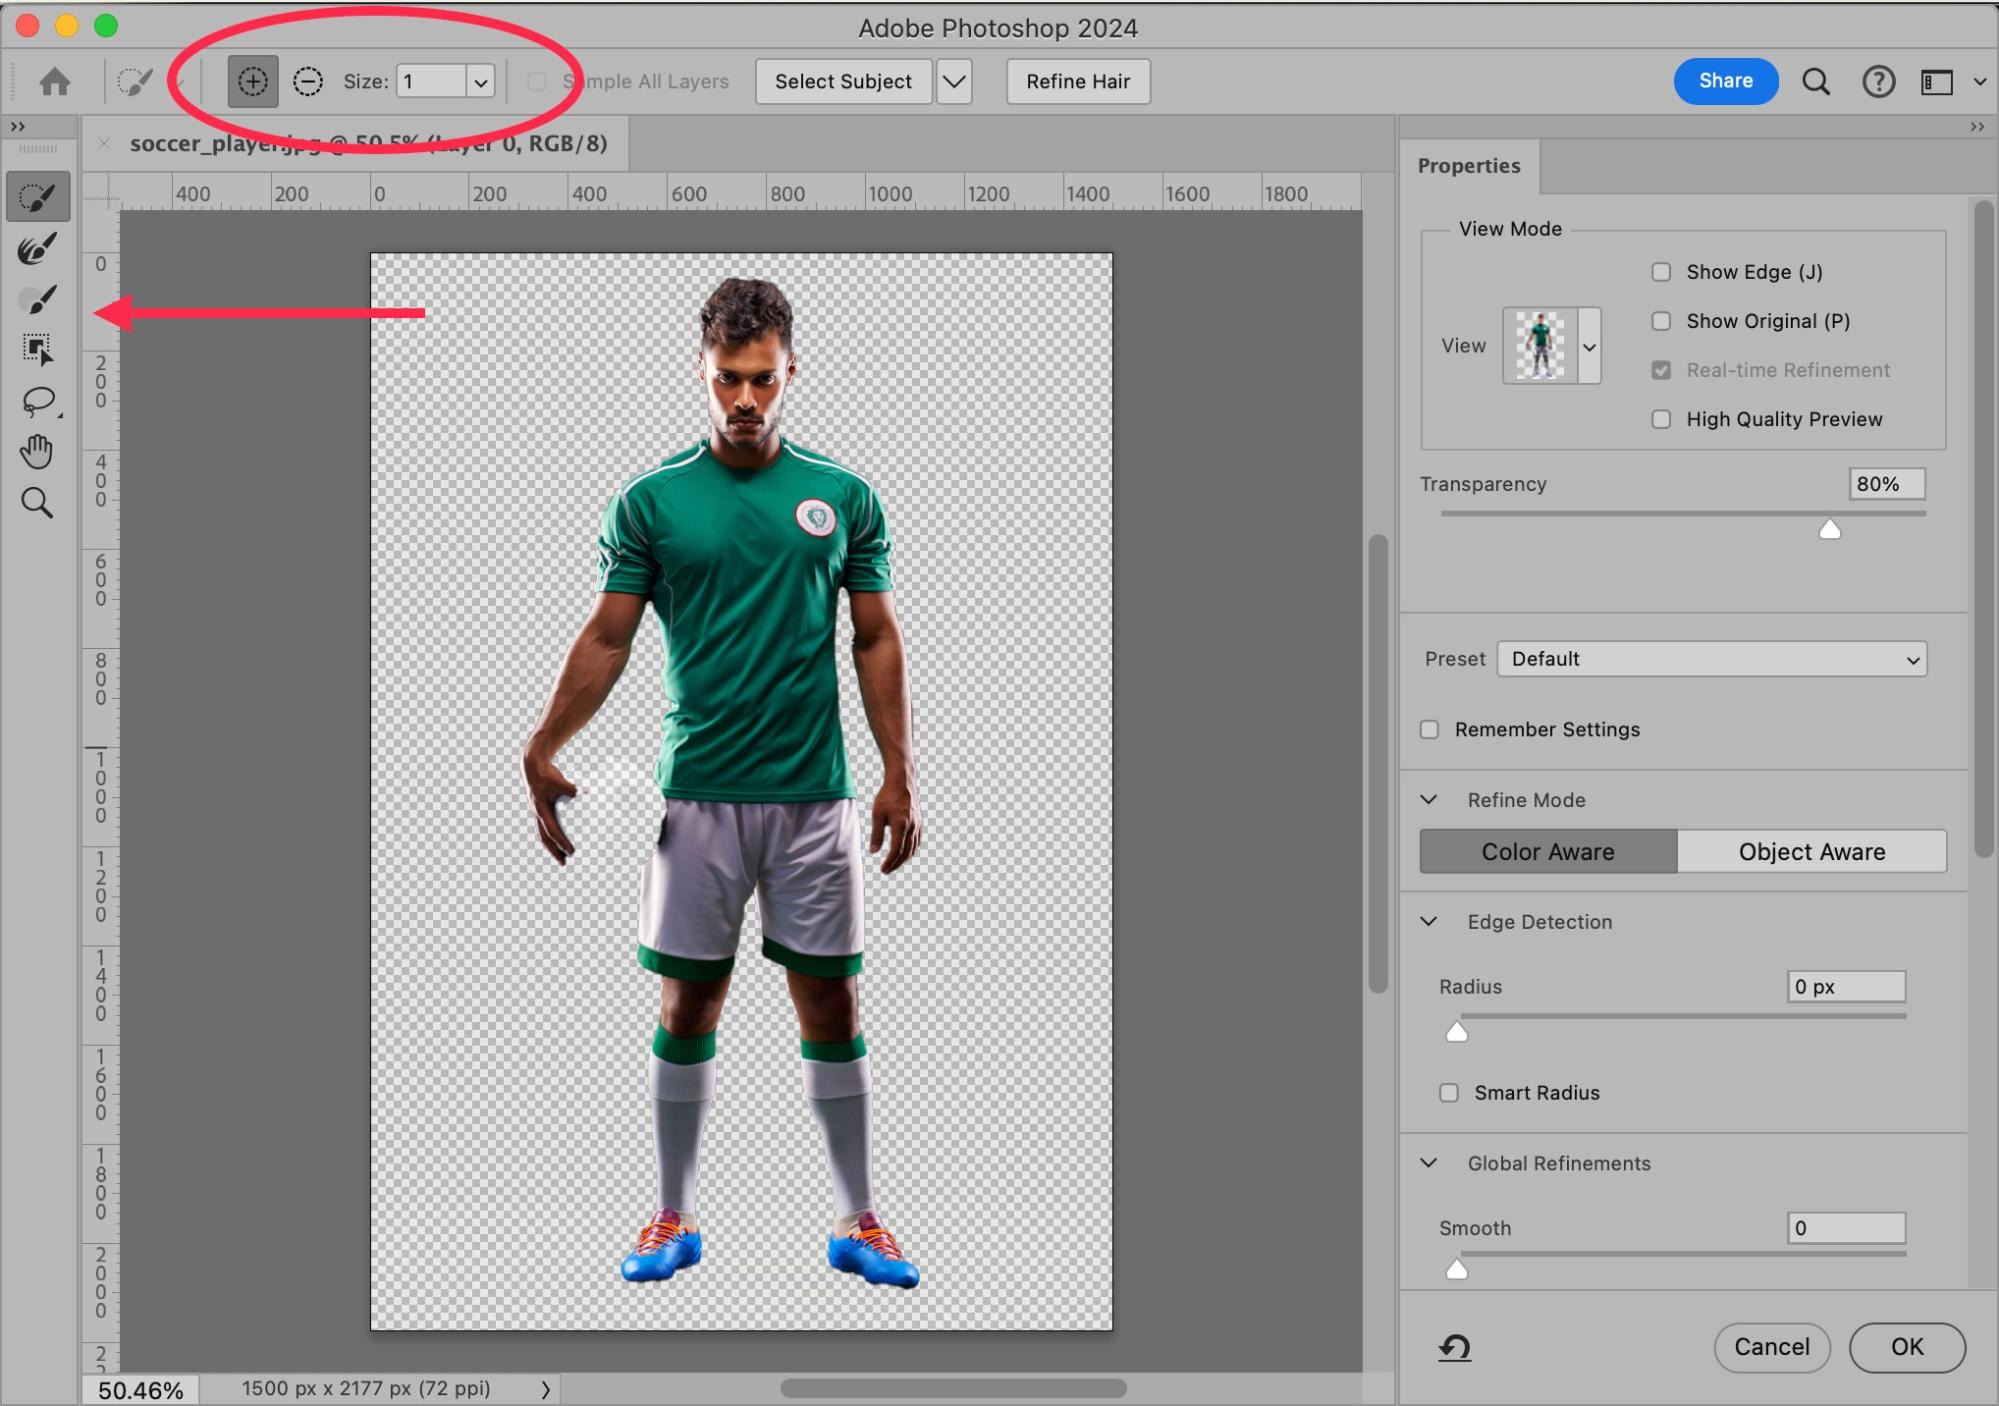
    Photoshop editing screen with different options

    At the top of the window, you will find Add and Subtract buttons. These work to add to your selection or subtract from it using the modification tools on the left-hand side of the window. You can also control the size of the tool.

    list of Photoshop tools and also the menu

    On the left side of the window are tools you can use to modify the selection. These tools are rather intuitive to use. 

    The first tool, the Quick Selection Tool, allows you to grab whole blocks of color at once. This is a good tool to use to “paint back” the ball in the image.

    Photoshop editing of a soccer player holding a ball

    The next tool, Refine Edge Tool, helps when defining or redefining the edge of your selection. Below that is the Brush Tool, which works just like the regular Brush Tool in Photoshop (and like the Eraser Tool when the Subtract button is activated). 
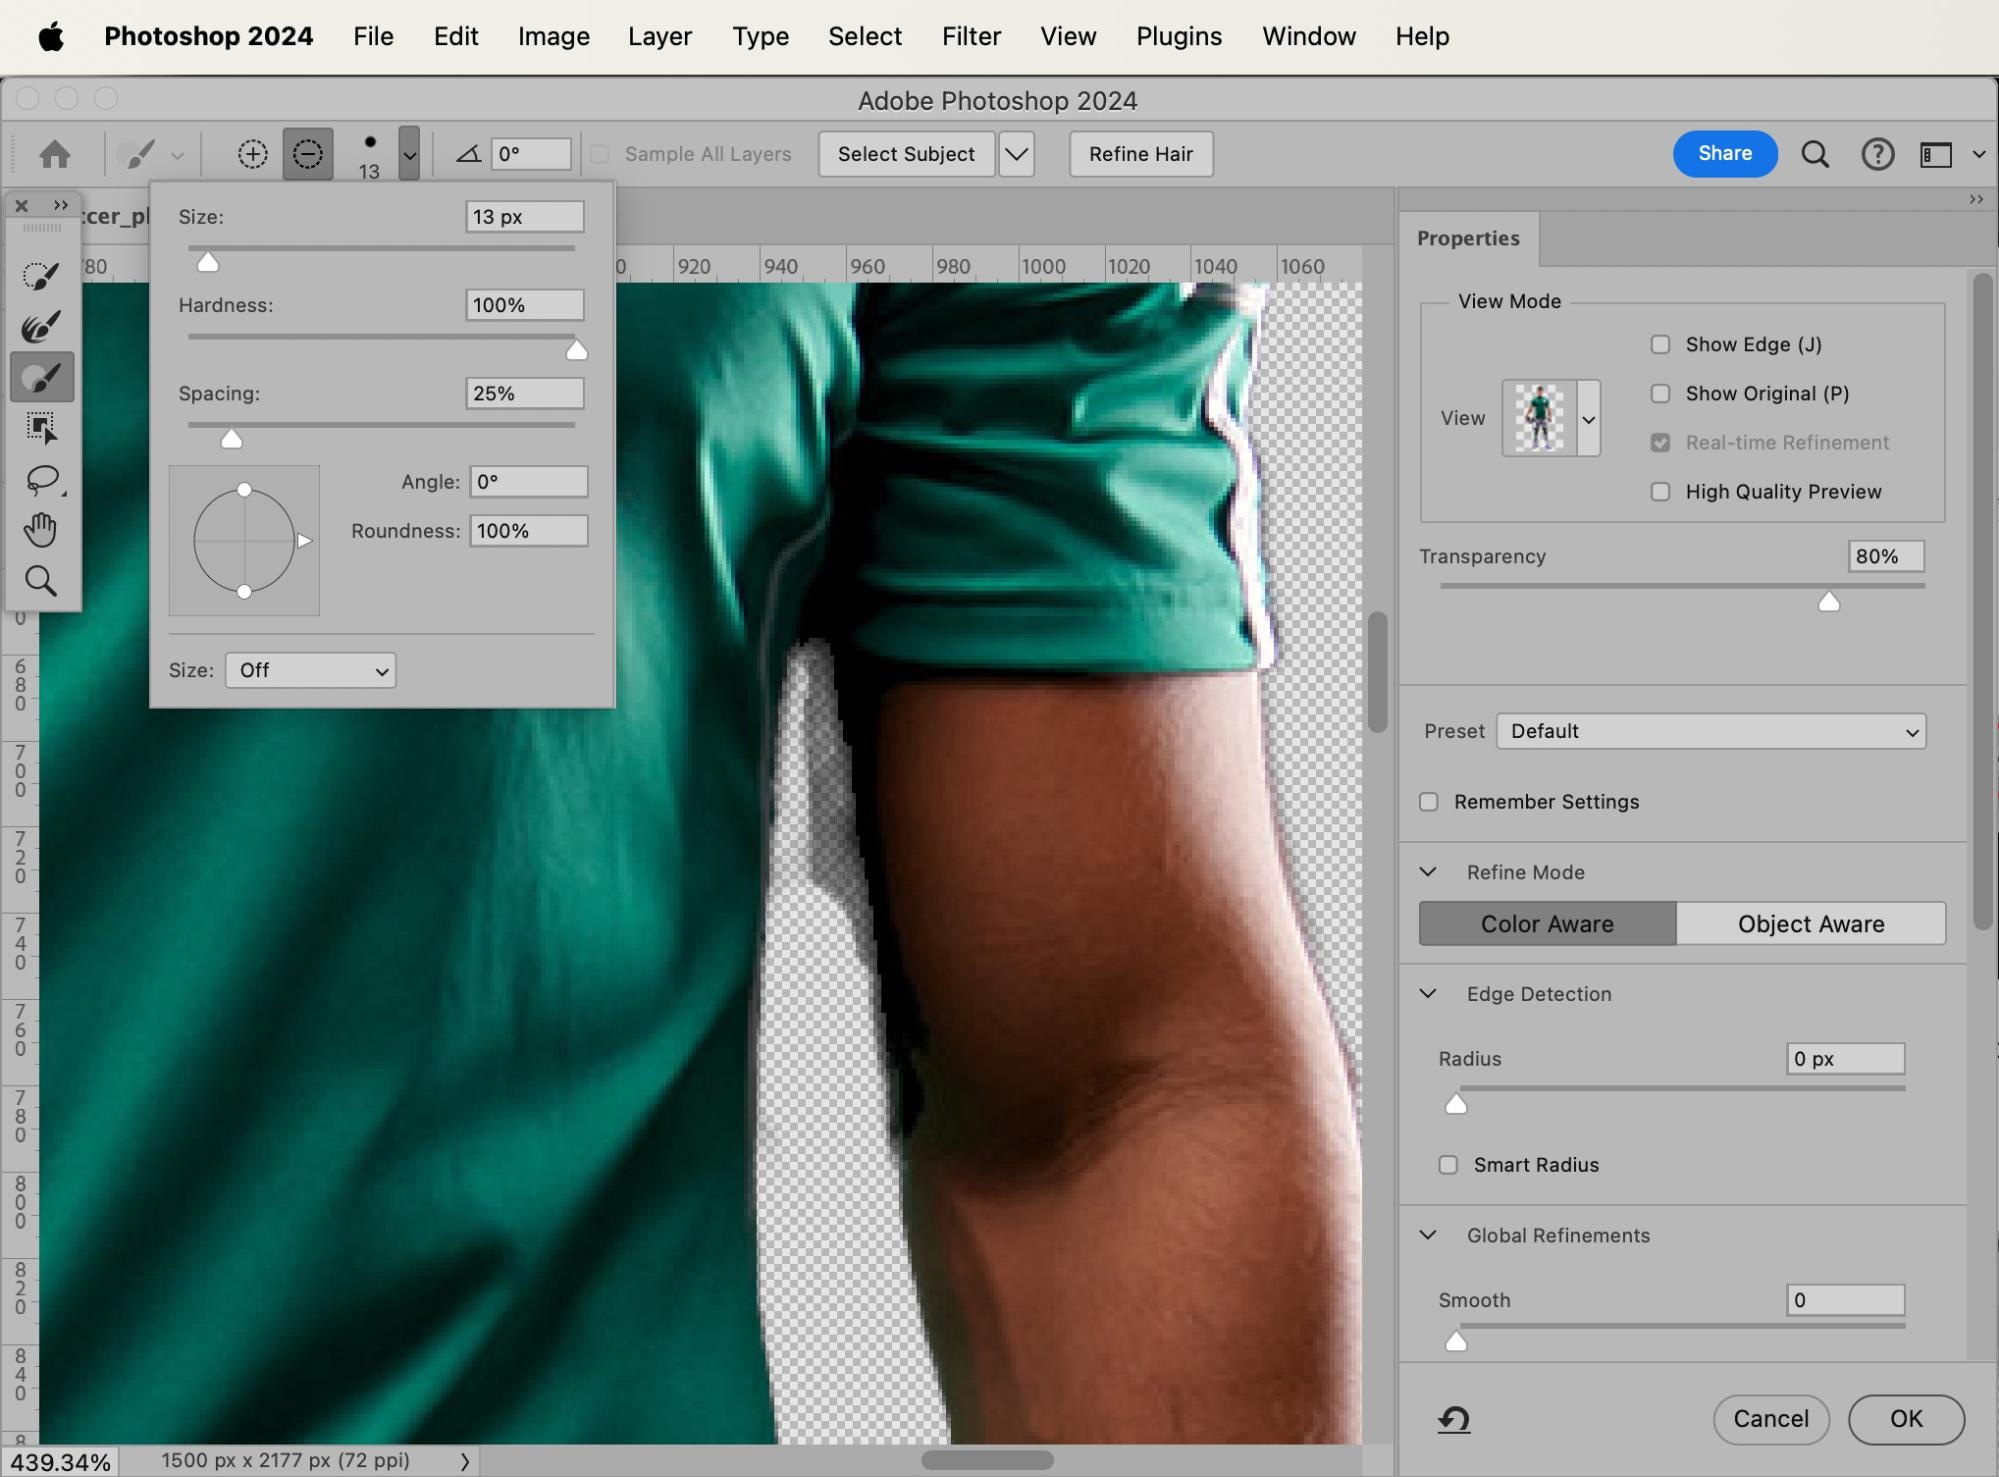
    Photoshop editing a person's arm

    The Object Selection Tool tries to figure out where certain objects begin and end in your image, the Lasso Tools allow you to freeform select areas of the image, and the Hand Tool and Zoom Tool help you navigate around the image as you work to refine the selection.

    Once you’re satisfied with the selection, click OK. You will see that nothing has changed in your original image, but there’s a “marching ants” selection around your subject.

    soccer player standing on grass with black background and everything is outlined to be edited in Photoshop

    Next, just like in the first method listed above, you’ll need to make your Background Layer into an unlocked Layer 0, and create a Layer Mask.

    soccer player holding a ball, cut out on a transparent background

    Whichever way you choose to create your selection, you now have your subject isolated from its background, and you can place your subject into whichever new setting works best for your branding needs.

    Learning how to select and mask in Photoshop with the Magic Wand Tool is helpful because it’s a technique you can apply to a range of photos—sports, product, ecommerce, portraits, headshots, and more. Here are a just a few scenarios where it comes in handy:

    • Show your subject in various environments. Help your audience connect with your subject emotionally by seeing it in a beautiful or familiar setting when changing the background. This can also help you prepare the image for different target segments, so you can swap out backgrounds that make more sense for your audience.
    • Select your subject so you adjust its size or color without altering the setting in which it has been photographed. This means you can show different color variants for your product without having to take multiple photos.
    • Remove the background from a photo so your subject stands out on its own.
    • Create a white background image so you can list products on third-party marketplaces, like Amazon or eBay.

    Not up for the tedious task yourself? Get a quote for your background removal needs


    Source link