برچسب: Guide

  • An Absolute Beginner’s Guide To Film Photography

    An Absolute Beginner’s Guide To Film Photography


    Film photography has never really gone away. Sure, it’s declined massively since the arrival of digital, however these days increasing numbers of newer photographers are trying their hand at film photography.

    I have written several articles about shooting film here at Light Stalking, yet I have realized that there may well be an entire section of you that know little to nothing about it.

    Many of you will have developed your photographic skills through the digital age, and whilst understanding the existence of film photography may be daunted by trying it out for yourselves. So today I am going to look at the absolute basics. Cameras, films, processing and shooting on film. Let’s get into it by looking at film.

    Beautiful black Olympus OM40 film camera with Zuiko lens
    There are a plethera of film cameras available for all budgets. By Mali Maeder on Pexels

    Photographic Films

    Photographic films can be broken down into three main types. Black and white negative film, colour negative film and colour transparency film also known as slide film.

    Negative films do exactly as the name suggests, they record a negative image to the film. Blacks and whites are reversed, primaries become secondaries on colour negative film. Some of you might have seen processed colour negatives and wondered why they are orange. This is simply to mask the imperfections of the dyes in the film.

    Hand holding a colour negative strip against a white background
    Colour negative film has an orange base. By Luriko Yamaguchi on Pexels

    Negative films are made so because they are designed for printing. When you expose a negative onto photographic paper, you get a normal, positive image.

    Transparency film is designed to be projected rather than printed, much like you would have watched a film in the cinema before the advent of digital projectors. It is much less tolerant to incorrect exposure than negative films. It used to be able to be printed via an Ilford process called Cibachrome, however that has been discontinued. As far as I am aware, the only way to print transparency films these days is to digitise them.

    What’s also important to note, especially for digital photographers is that the ISO, also known as ASA, is fixed. A film will have a speed rating such as 100, 200 or 400 ISO and the camera must be set to that ISO to shoot. There are ways to change the ISO through the film processing, however that’s not for this basic guide.

    I should note that photographic films and processing are relatively expensive these days compared to the film era. This is a simple supply and demand issue, whilst film is seeing a resurgence, it’s nowhere near large enough to bring prices down. Typically you will pay $8-10 for a roll of 35mm black and white film plus $15-20 for processing and scanning.

    Strips of black and white film on a lightbox with loupe
    Black and white is the easiest to home process. By Annushka Ahuja on Pexels

    Film Sizes

    As digital photographers you will be aware of different sensor sizes, from the very small ones on our phones to the medium format sensors of Hasselblad and Fuji. Film cameras are very much the same. At the peak of film photography in the 1990s, the smallest commercial film was Disk Film, this was really tiny and as the name suggests, each frame was placed around a disk rather than a roll.

    Next came 110 and 126, before we got to the ubiquitous 35mm. From there we stepped up to 120/220, both the same width of film but 220 being able to take twice the number of exposure. These are commonly known as medium format. Above that we had 5×4 and 8×10 sheet film used in plate/field style cameras.

    Returning to the modern day, 35mm, 120 and sheet films are still made and available, the smaller films are now obsolete.

    POV image of person holding a Bronica medium format film camera
    Medium format is within reach of many. By Amar Preciado on Pexels

    The Cameras

    Apart from a few speciality companies, film cameras are not mass produced anymore. However there is a massive secondhand market for these cameras. The recent resurgence of film photography has pushed up the price of these significantly, however they are still bargains compared to modern mirrorless cameras.

    As you might guess, the camera you buy determines the film that it requires. By far the most commonly used format is 35mm and there are two main camera types you will find. The SLR is the direct predecessor to the modern DSLR and shares a lot of the same ergonomics. Secondly there are the compact, rangefinder cameras. These can be as simple as the excellent Olympus Trip all the way through to Leica Ms with their interchangeable lenses.

    Person loading a 35mm film into a camera
    Loading film takes some practice. By Vinh Vo on Pexels

    Medium format, 120 film gets a little more complicated and a lot more expensive, even used. The smallest medium format cameras are 645. These take 15 images on a roll of 120 and as the name suggests the frame size is 6 cm by 4.5 cm. Next we step up to 6×6, the most common medium format, then 6×7 and 6×9. Generally all these formats use different cameras. For example Mamiya did a compact 645 camera and a 6×9 Press camera whilst Hasselbald were famous for their 6×6 cameras.

    As a newcomer to film photography, I would strongly recommend a 35mm SLR camera. These are the cheapest and most available. Buy from a reputable used dealer rather than eBay or marketplace. This will ensure that the camera is in good working order. Things to look out for are light leaks, slow running shutters and electrical issues.

    You can also break down SLRs into two main eras. Pre 1990s, cameras were mainly manual focus, manual film wind and with fairly rudimentary exposure meters and modes. The 1990s saw the introduction of many of the features we see in modern cameras such as matrix metering and autofocus. They also often had motorized film advance built in.

    Shooting With A Film Camera

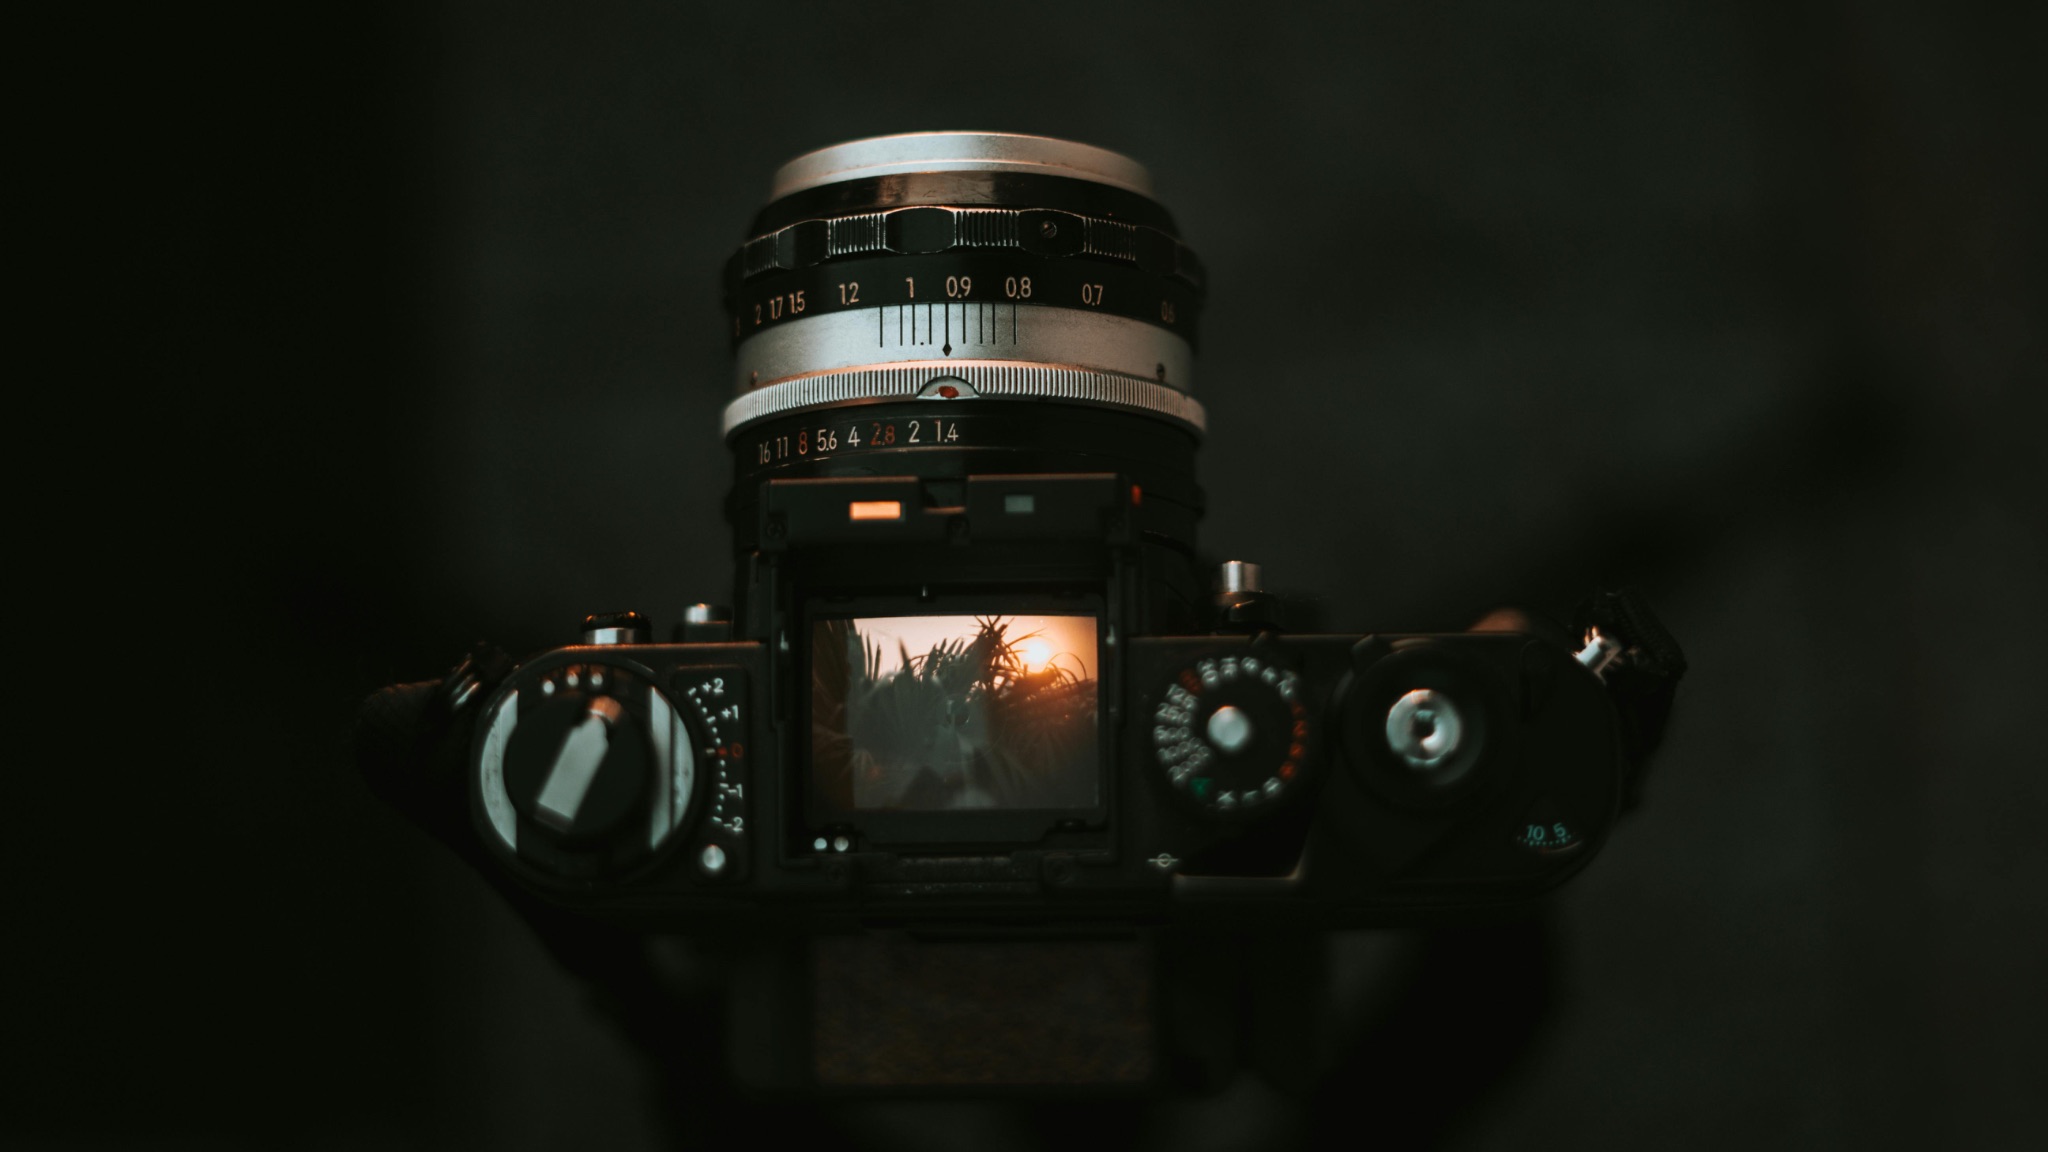
    Those used to modern digital cameras will be in for quite a culture shock. The first thing you will notice is how bright the viewfinders are, before realizing that the information in that viewfinder is severely lacking, often just an exposure scale.

    There will be a dial on the exterior of the body for setting ISO and this is very important to set as the wrong ISO will give you incorrectly exposed images. Plus of course, you cannot see that the images are incorrectly exposed.

    top down view of film camera with pentaprism removed
    Shooting on a film camera is a culture shock. By Pratik Gupta on Pexels

    On older cameras, focussing can be quite a challenge. Even more modern autofocus film cameras were slow and unreliable. Focusing manually, you would have the viewfinder’s fresnel screen or split screen. If you have less than stellar eyesight, this can be quite a challenge.

    Loading film requires dexterity and practice. Getting the end of the film into the slots on the spool can be hard and often different cameras have slightly different ways to achieve this. One tip for manually wound cameras, is to watch the film rewind lever after loading the film. If this turns as you wind the film on, it is loaded correctly.

    You are going to need to get used to shooting either 24 or 36 frames before needing to change the film but more importantly not 100% knowing whether you have nailed the shot until you get the films processed. Speaking of which.

    Film Processing and Printing

    At the top I mentioned the three main types of photographic film, colour and black and white negative film and transparency. Each of these has a different way of being processed. Standard black and white film is actually pretty easy to process yourself, however you need to have a dust free environment to do it. You don’t actually need a darkroom as you can load the film into a processing tank inside a dark bag. This can be a bit fiddly at first but becomes second nature with practice. Once the film is in the drum you can do the actual processing in light.

    Both colour negative and slide films require much more complicated processing that are really best suited to a professional lab. Slide/transparency film, in particular, is very prone to colour variations when processed.

    Man in darkroom preparing to print black and white film under red light
    Black and white processing and printing is not hard. By Tima Miroshnichenko on. Pexels

    If you do not want to go down the home processing route, most labs will also offer black and white processing. These days there are plenty of processing labs available although they are unlikely to be local. You usually have to post your film in, and wait a week or two. The lab will probably offer processing and printing or processing with scans only.

    Printing colour or black and white negative films has two options. You can print directly from the negative onto photographic paper, or you can scan the negative and print on a home printer. Most modern labs will actually be scanning your negative although that scan will be output to real photographic paper.

    The more ambitious amongst you might want to try printing black and white at home. Although you can print under a red light, your darkroom must be completely sealed from any external white light.

    Enlargers and processing trays are readily available, and most decent camera stores stock the processing chemicals. It’s not a difficult task to print black and white yet, immensely satisfying.

    So that’s my brief beginners guide to film photography. Film photography is a wonderful medium that can teach you patience, the value of an image and a deep understanding of exposure. It can be relatively expensive compared to digital but can give great satisfaction.


    Source link

  • A Pro Guide to Taking The Best Monaco Pictures

    A Pro Guide to Taking The Best Monaco Pictures


    A playground for the wealthiest, Monaco is not just one of the most prosperous countries economically speaking. It’s a photogenic country, from luscious green gardens, clustered hills, and magnificent architectural designs to the infamous Mediterranean Sea. This place is way more abundant than money. 

    With so many good spots, it’s a nice idea to have a list of the very best areas to take your camera out and click its shutter. Below is a list of places where you can take the best Monaco pictures for your gallery. 

    [table id=31 /]

    Palais du Princes

    Palais du Princes
    visitthefrenchriviera

    Palais du Princes is the official residence of Prince Albert II. The palace is a quick 5-minute stroll through the Rocher lanes or a 10-minute incline hike through the Major ramp for more fit people. The vistas are pretty stunning, so the walk is well worthwhile.

    Even though this place is a private residence, it is still open for visitors occasionally. Please take part in the castle tours to learn more about Monaco and the history of its royal family. 

    During your visit, you can take your Monaco picture of the Mediterranean Sea’s stunning views. Upon entering the residence, there is an Italian-style gallery. The Blue Room is famous for its blue and gold accent silk tapestry. 

    The best Instagram-worthy you can capture here is the Changing of the Guard at 11:55 in the morning. You do not want to miss this ceremony!

    Monaco Grand Prix

    Monaco Grand Prix
    speakyourpeace

    Nobody wants to miss the infamous Grand Prix in Monaco. The Formula One Grand Prix is unquestionably one of the most thrilling sporting events. Monaco’s circuit is one of those that are used for Formula One racing.

    On April 14, 1929, the inaugural Formula One Monaco Grand Prix took place. It’s noteworthy that the Monaco Grand Prix is the shortest of all the races (just 3.337km). 

    Boulevard Albert 1 is where the race begins, and Place du Casino is where it ends. The Automobile Club of Monaco is organizing this competition. Even though the region is exceptionally congested during races, it is worthwhile to visit.

    Keep in mind that the Cannes Film Festival takes place in May. Make sure to bring your motion camera to take a photo of the fast-moving automobiles. 

    Bateau Bus

    Bateau Bus

    Another great spot you might want to take your Monaco pictures in is the Bateau Bus. It is a tiny boat where you can sit outside and carry your outdoor camera for some snaps as you look back to Monte Carlo.

    By just paying 2 Euros for a trip to Port Hercule, you can have a chance to get a glimpse of some lovely views from the water. 

    It will only take 3 to 5 minutes to cross the harbor in a fun and exciting way. A day trip would also be best in the evening as the lights glisten while you float on the water.

    Musée Oceanographique de Monaco

    Musée Oceanographique de Monaco
    frenchriviera-luxury

    Who would have thought there would be a guard watching the oceans for over a century? The Oceanographic Museum, built on the side of Monaco’s fabled Rocher, was established by H.S.H. Prince Albert II of Monaco’s great-great-grandfather Prince Albert I. 

    It has been keeping an eye on the oceans for more than a century. The Museum has more than 6,000 specimens on exhibit and is known for its global expertise. The architecture of the museum is photo-worthy since it elicits the marine world. 

    On Wednesdays, you can visit the touch tank and feed the animals there. A light and sound show will also be found in the Whale Room. Prepare your camera because this place needs your unlimited snaps.

    Cathédrale de Monaco

    Cathédrale de Monaco
    flicker

    If you have eyes for architecture, then this Monaco picture spot will definitely. The cathedral is situated at 4 Rue Colonel-Bellando-de-Castro. You will be in awe of the intricate details of its facade.

    Aside from the Roman-Byzantine architectural design of the building, many notable persons are buried in the area, making it more historic. 

    Photo Tip: The cathedral is best photographed when the sun directly hits its exterior. The light and shadow play will create more texture for your snap.

    Jardin Exotique

    Jardin Exotique
    visitthefrenchriviera

    Located at 62 Blvd. du Jardin Exotique, modern Monaco is one of the famous places to visit in this country. Jardin Exotique started receiving visitors in 1933.

    The garden encapsulated a lot of species of different varieties from across Latin America, Mexico, and Africa. Any spot here would definitely be beautiful.

    The large succulents and cacti will make you feel like you are in Eden of some dessert. Ready your camera and enjoy their Observatory Cave and Anthropology Museum. There are tours available every hour after 10 am. 

    Jardin de Saint-Martin

    Jardin de Saint-Martin
    planetware

    Looking over the Port de Fontvieille, Saint-Martin is one of the photogenic spots in Monaco. You will see how the orange-washed houses contrast with the aquamarine waters of the port.

    This place is near the Palace of Justice. To get the best Monaco pictures, try to angle your camera at your back as you glance through the terrace. Make sure to cover the houses and the waters too! 

    Another garden spot is near the statue of Prince Albert I. There are stairs nearby that the photographer can use as a platform to take the photo at a higher angle. The subject should stand the railings as if it is a balcony overlooking the tall, beautiful buildings across. 

    Pro Tip: Wear some aesthetic or white pieces of clothing to make your Monaco pictures more pleasing. 

    The Meditteranean

    The Meditteranean Sea
    pocruises

    Lying from the east and south of Monaco, the Meditteranean Sea is known for its deep blue waters across the globe. Beneath the Museum of Oceanography, you will find a pathway connecting to the marina. I will share with you some not-so-famous spots where you can enjoy the view. 

    To find this path from Port Hercule, you need to stay by the water. Enjoy the view, and do not forget to take some snaps of the sea! Search for the stone staircase that links you through the rocky beach.

    Bridge St Huntsville Movie Theater

    Bridge St Huntsville Movie Theater
    simpleviewinc

    Bridge Street is located at Huntsville Al 35806. It hosts the number one theater in North Alabama. You can enjoy a nice full bar and scene with plenty of food options, and upgrade your movie with their luxurious loungers.

    To choose your movies and reserve tickets beforehand, you can go to Cinemark’s official page or site and have your reserved theater seating. To read more of the previous visitors’ reviews, you can go to their Facebook page or find relevant content in other sites.

    Other Things Aside From the Eye-Catching Views

    There you go; I hope the list of vantage points will help you on your trip to Monaco. Aside from that, there are also some things worth knowing about the place. You will enjoy the following:

    • The mild climate is terrific!
    • It is a great place to shop luxuriously
    • You can get there by helicopter (if you want an epic experience!)
    • The place will teach you about marine science
    • Movie theater in hunstville

    October is the perfect month to visit the place especially when you bring your friends with you. Last but not least, even though Monaco is known for the lavish lifestyle it requires, your travel does not have to be expensive.

    There are free museums and viewpoints within the country. Some activities will not cost you a fortune.

    However, if you worry about your accommodation, you can stay in a city nearby Monaco. In that way, you can find some affordable places to stay in. Manage your bookings beforehand!

    Lightroom Bundle Presets


    Source link

  • My Bestselling Fujifilm Guide Now Covers the X-H2 and X-H2S

    My Bestselling Fujifilm Guide Now Covers the X-H2 and X-H2S


    I’m excited to announce that my bestselling Fujifilm guide, X SERIES UNLIMITED has just been updated will full coverage of the new 5th generation X-H2 and X-H2S cameras. You can grab the latest 2022 Edition here.

    The latest comprehensive revision includes all of the new features found in the X-H2X-H2S, and revised/expanded information about all of the other current X Series models, including the X-T4, X-T3, X-Pro 3, X-E4, X-S10, X-T30/30 II, X100V and the X-T100. 

    If you’re a Fujifilm shooter, then this is the most definitive guide to the X Series cameras you can get. It explains every single feature and every single function, and it does so with clear descriptions, real world examples and a very easy-to-follow format.

    X SERIES UNLIMITED – October 2022 Edition

    It teaches you everything you need to know in order to become a better, more proficient, more creative photographer with your Fuji camera.

    It has full coverage of all current and past models, all the way back to the 1st generation X Series cameras, and if you purchase the book, you’ll be entitled to free updates in the future when Fujifilm releases new models and firmware updates. 

    Click here to see what other people have said about the guide, and then let me help you get the most from your Fuji camera. Join thousands of other Fuji users around the world who have downloaded the guide and benefitted from the vast amount of knowledge and expertise I’ve put into it. 

    If you’re on the fence. rest assured; it comes with a 100% money back guarantee. If you don’t like the book for any reason, I’ll refund your purchase.


    Source link